

Page 1
F
Notice d’utilisation et d’installation
Four à micro-ondes
Operating and installing instructions
Microwave Oven
D Gebrauchs-und Installationsanweisungen
Mikrowellenherde
Page 2

Page 3

3
Sommaire
Installation . . . . . . . . . . . . . . . . . . . . . . . . . . . . . . . . . . . . . .4
Mises en garde . . . . . . . . . . . . . . . . . . . . . . . . . . . . . . . . . . .10
Présentation . . . . . . . . . . . . . . . . . . . . . . . . . . . . . . . . . . . . .11
Bandeau de Commande . . . . . . . . . . . . . . . . . . . . . . . . . . . . .12
Mise à l’heure / Equivalence des puissances micro-ondes . . . . . . . . . . .13
L’afficheur & le sélecteur . . . . . . . . . . . . . . . . . . . . . . . . . . . .14
Programmation . . . . . . . . . . . . . . . . . . . . . . . . . . . . . . . . . . .15
Programmation / Programmation AUTO . . . . . . . . . . . . . . . . . . .16
"Speed DEFROST" . . . . . . . . . . . . . . . . . . . . . . . . . . . . . . . . .17
La fonction gril / la fonction micro-ondes & gril . . . . . . . . . . . . .18
Programmation du gril . . . . . . . . . . . . . . . . . . . . . . . . . . . . . .19
La fonction Craquine . . . . . . . . . . . . . . . . . . . . . . . . . . . . . . .20
Le plat Craquine . . . . . . . . . . . . . . . . . . . . . . . . . . . . . . . . . .22
Recommandations . . . . . . . . . . . . . . . . . . . . . . . . . . . . . . . . .23
Entretien / Nettoyage . . . . . . . . . . . . . . . . . . . . . . . . . . . . . .24
Un petit problème ! Que faire ? . . . . . . . . . . . . . . . . . . . . . . . .25
Service Après-Vente . . . . . . . . . . . . . . . . . . . . . . . . . . . . . . . .26
Relations consommateurs . . . . . . . . . . . . . . . . . . . . . . . . . . . .26
Instructions de sécurité importantes.
Lire avec attention et garder pour les futures utilisations
Chère Cliente, Cher Client,
Vous venez d'acquérir un four à micro-ondes BRANDT et nous vous en remercions.
Nos équipes de recherche ont conçu pour vous une nouvelle génération d'appareils pour
cuisiner chaque jour avec plaisir.
Avec des lignes pures et une esthétique moderne, votre nouveau four à micro-ondes Brandt
s'intègre harmonieusement dans votre cuisine et allie parfaitement facilité d'utilisation et
performances de cuisson.
Vous trouverez également dans la gamme des produits Brandt, un vaste choix de tables de
cuisson, de fours, de hottes aspirantes, de lave-vaisselle et de réfrigérateurs intégrables.
Bien entendu, dans un souci permanent de satisfaire au mieux vos exigences vis à vis de
nos produits, notre service consommateurs est à votre disposition et à votre écoute pour
répondre à toutes vos questions ou suggestions (coordonnées à la fin de ce livret).
A la pointe de l'innovation, Brandt contribue ainsi à l'amélioration de la qualité de la vie
quotidienne en vous apportant des produits toujours plus performants, simples d'utilisation, respectueux de l'environnement, esthétiques et fiables.
La Marque BRANDT.
Page 4
4
Installation
•
Vérifiez que votre appareil n’ait subi aucune avarie lors du transport (porte ou joint
déformé, etc...). Si vous constatez un dommage quelconque, avant toute utilisation,
contactez votre revendeur.
•
Vérifiez la tension du secteur. Dans le cas d’une sous-tension PERMANENTE (200-210 volts),
consultez votre installateur électricien.
•
Veillez à ne pas obstruer les orifices de ventilation situés en dessous et à l’arrière du four.
•
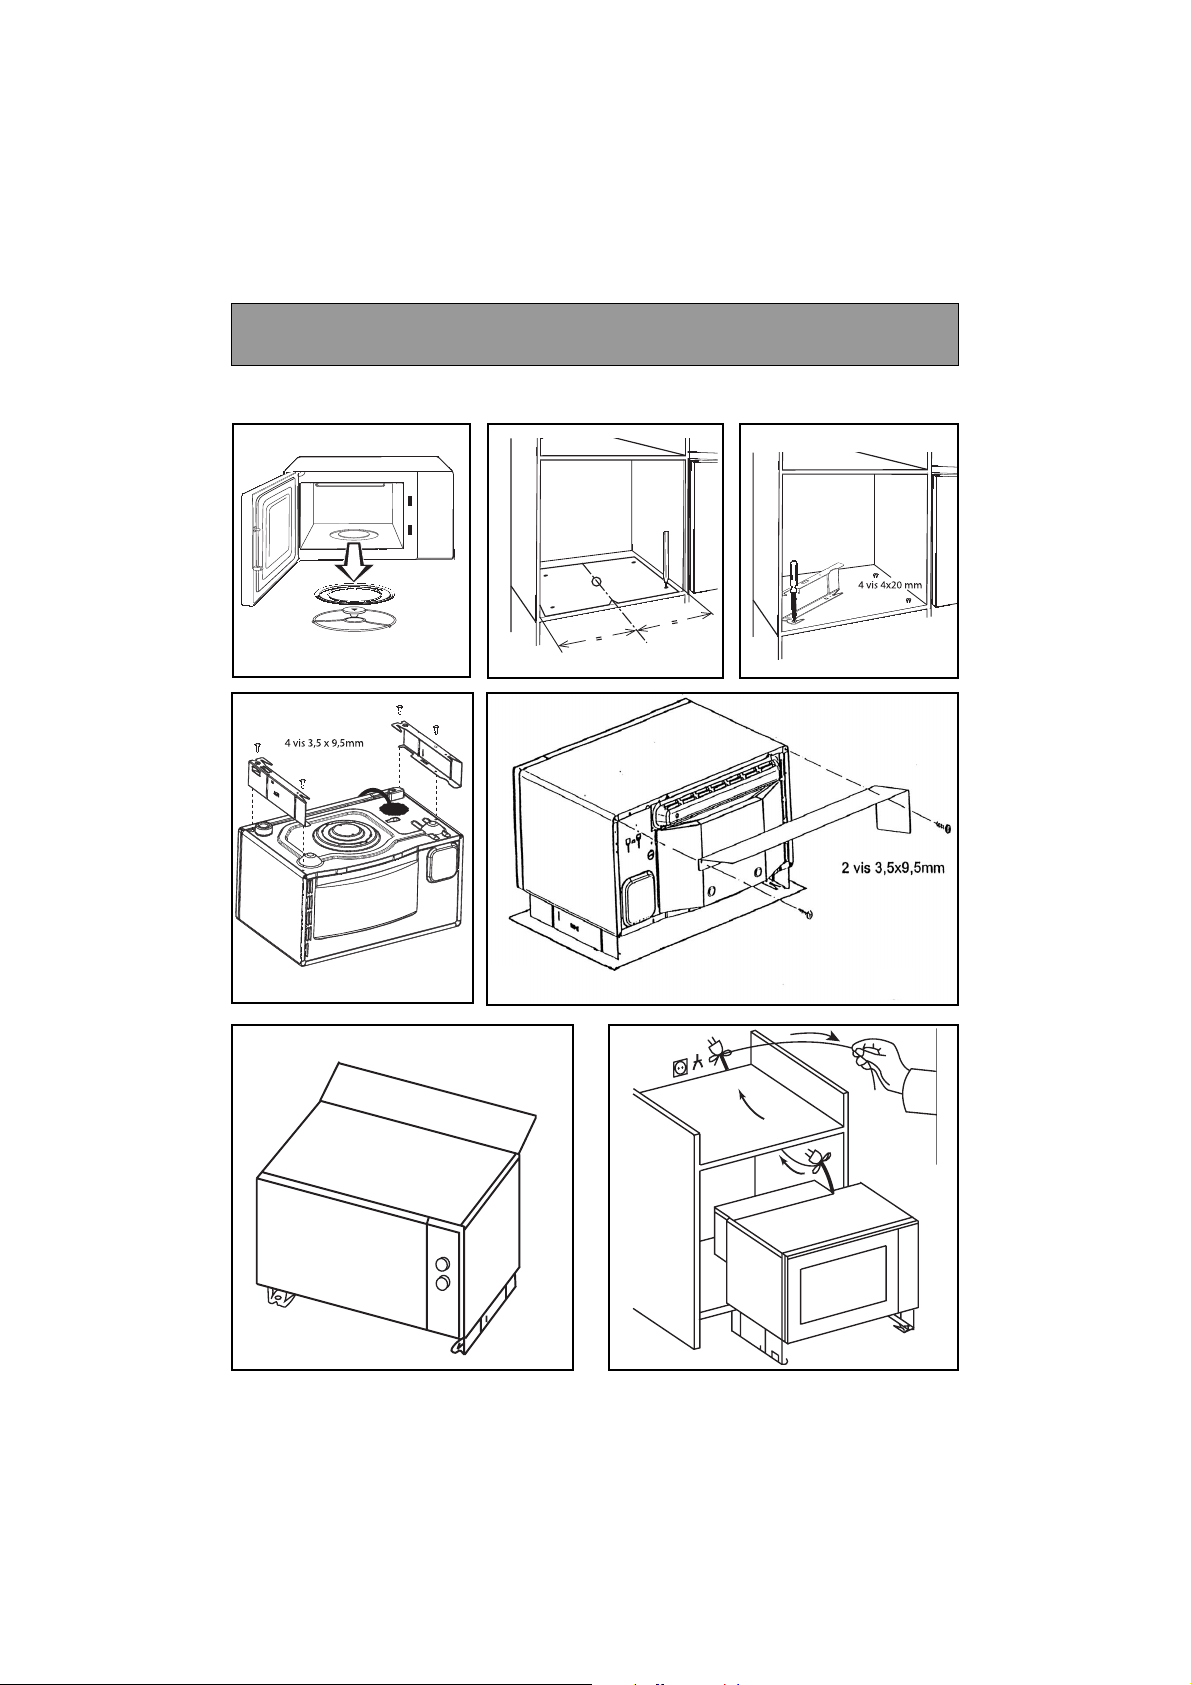
Certains appareils sont encastrables. Pour obtenir le kit d’encastrement correspondant,
veuillez consulter votre revendeur.
•
Veillez à ce que la fiche de prise de courant soit accessible après installation.
•
N’utilisez pas immédiatement votre appareil (attendez environ 1-2 heures après l’avoir
tranféré d’un endroit froid vers un endoit chaud, car la condensation peut provoquer un dys
fonctionnement.
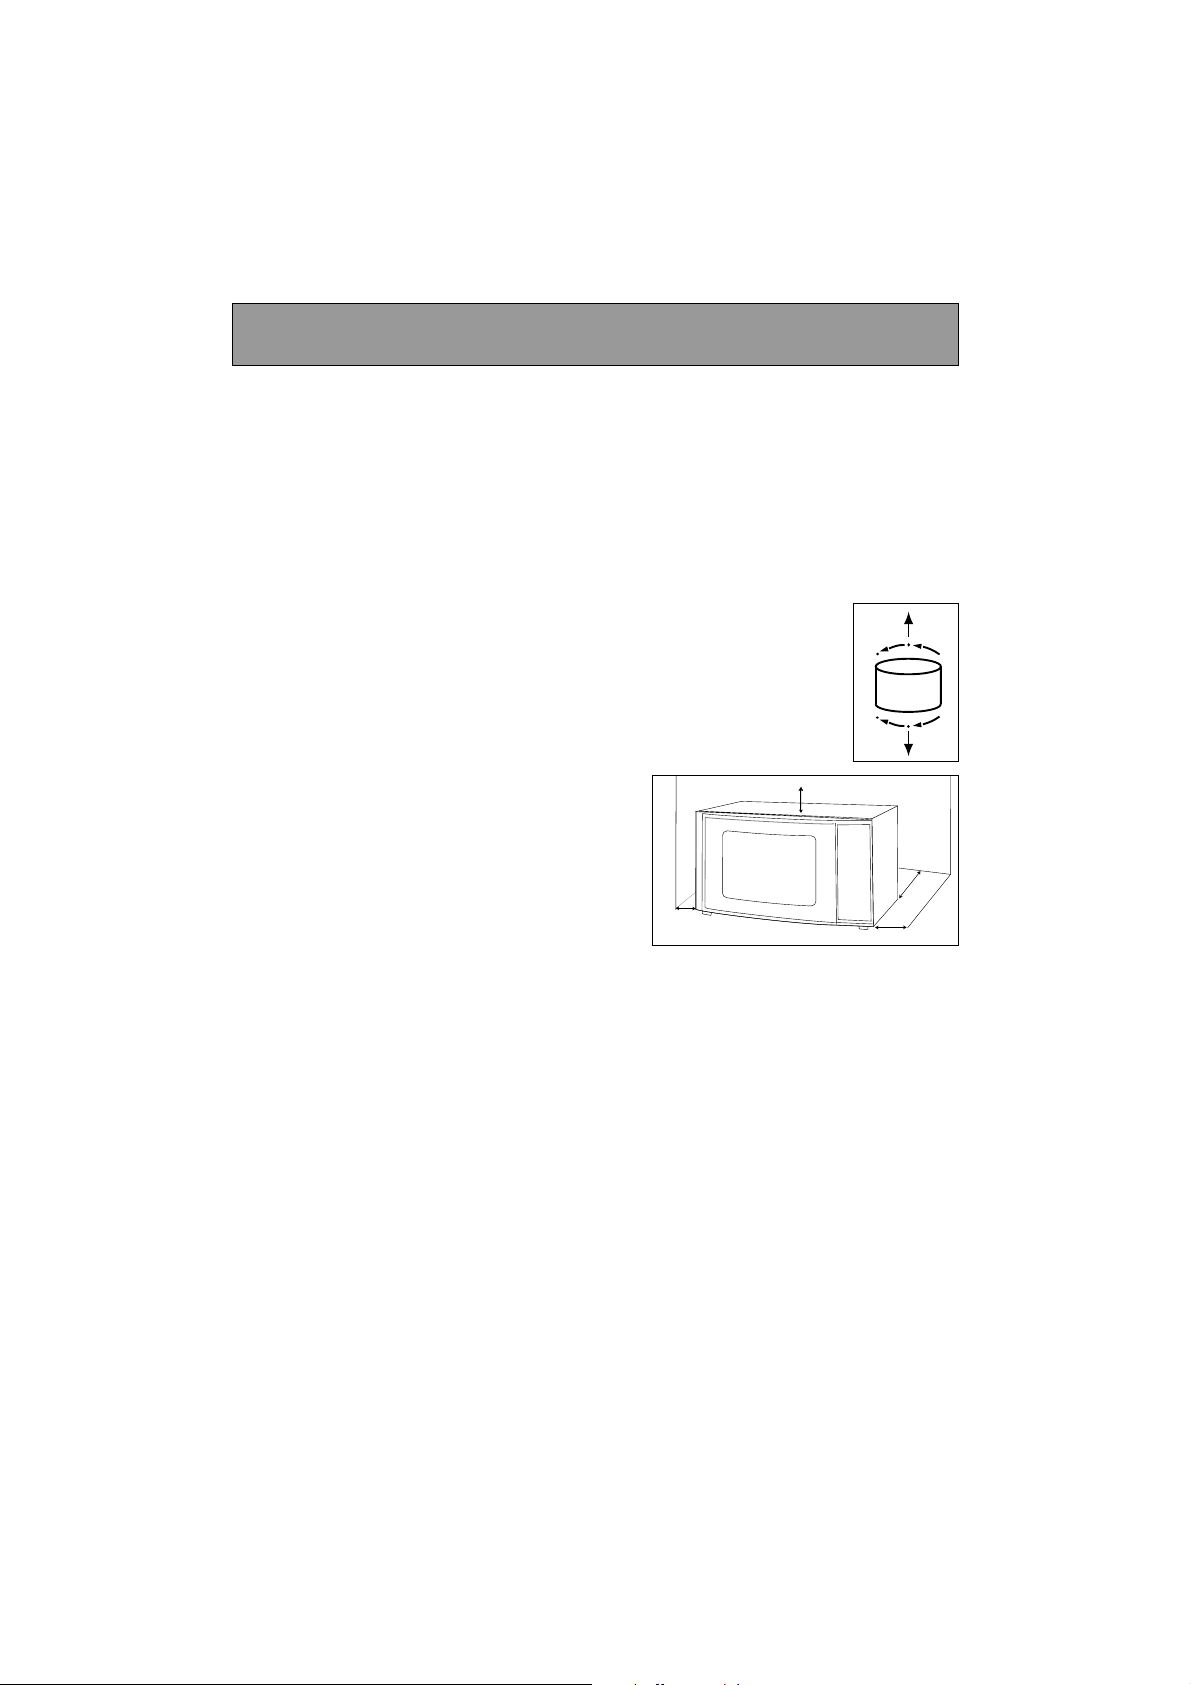
Pour les appareils posés sur un plan
de travail, choisissez un emplacement
qui laisse un espace libre minimum de :
- 5 cm entre les faces latérales de
l’appareil et les murs
- 14 cm au-dessus de votre appareil
- 10 cm pour la face arrière.
Emplacement
•
Votre installation doit être équipée d’une protection thermique de 16 Ampères.
•
Utilisez impérativement une prise de courant comportant une borne de mise à la terre et
raccordée conformément aux normes de sécurité en vigueur.
•
Prévoyez dans votre installation électrique un dispositif accessible par l’utilisateur qui doit être
en mesure de séparer l’appareil du secteur et dont l’ouverture de contact est d’au moins 3 mm
au niveau de tous les pôles.
•
Si le câble d’alimentation est endommagé, il doit être remplacé par le fabricant, son service après
vente, ou une personne de qualification similaire afin d’éviter un danger.
Raccordement électrique
Avant branchement
•
Cet appareil est destiné à être posé (ou encastré selon les cas) sur un plan de travail situé
à au moins 85 cm du sol.
•
Posez l’appareil sur une surface plane et horizontale, éloigné de toute source
de chaleur ou de vapeur.
Pour assurer la bonne stabilité de l’appareil, le pied avant gauche est
réglable (5 positions). Tournez-le pour rehausser ou descendre le four.
•
Assurez-vous de la libre circulation de l’air en dessous et autour du four.
5 cm
14 cm
10 cm
5 cm
Page 5
5
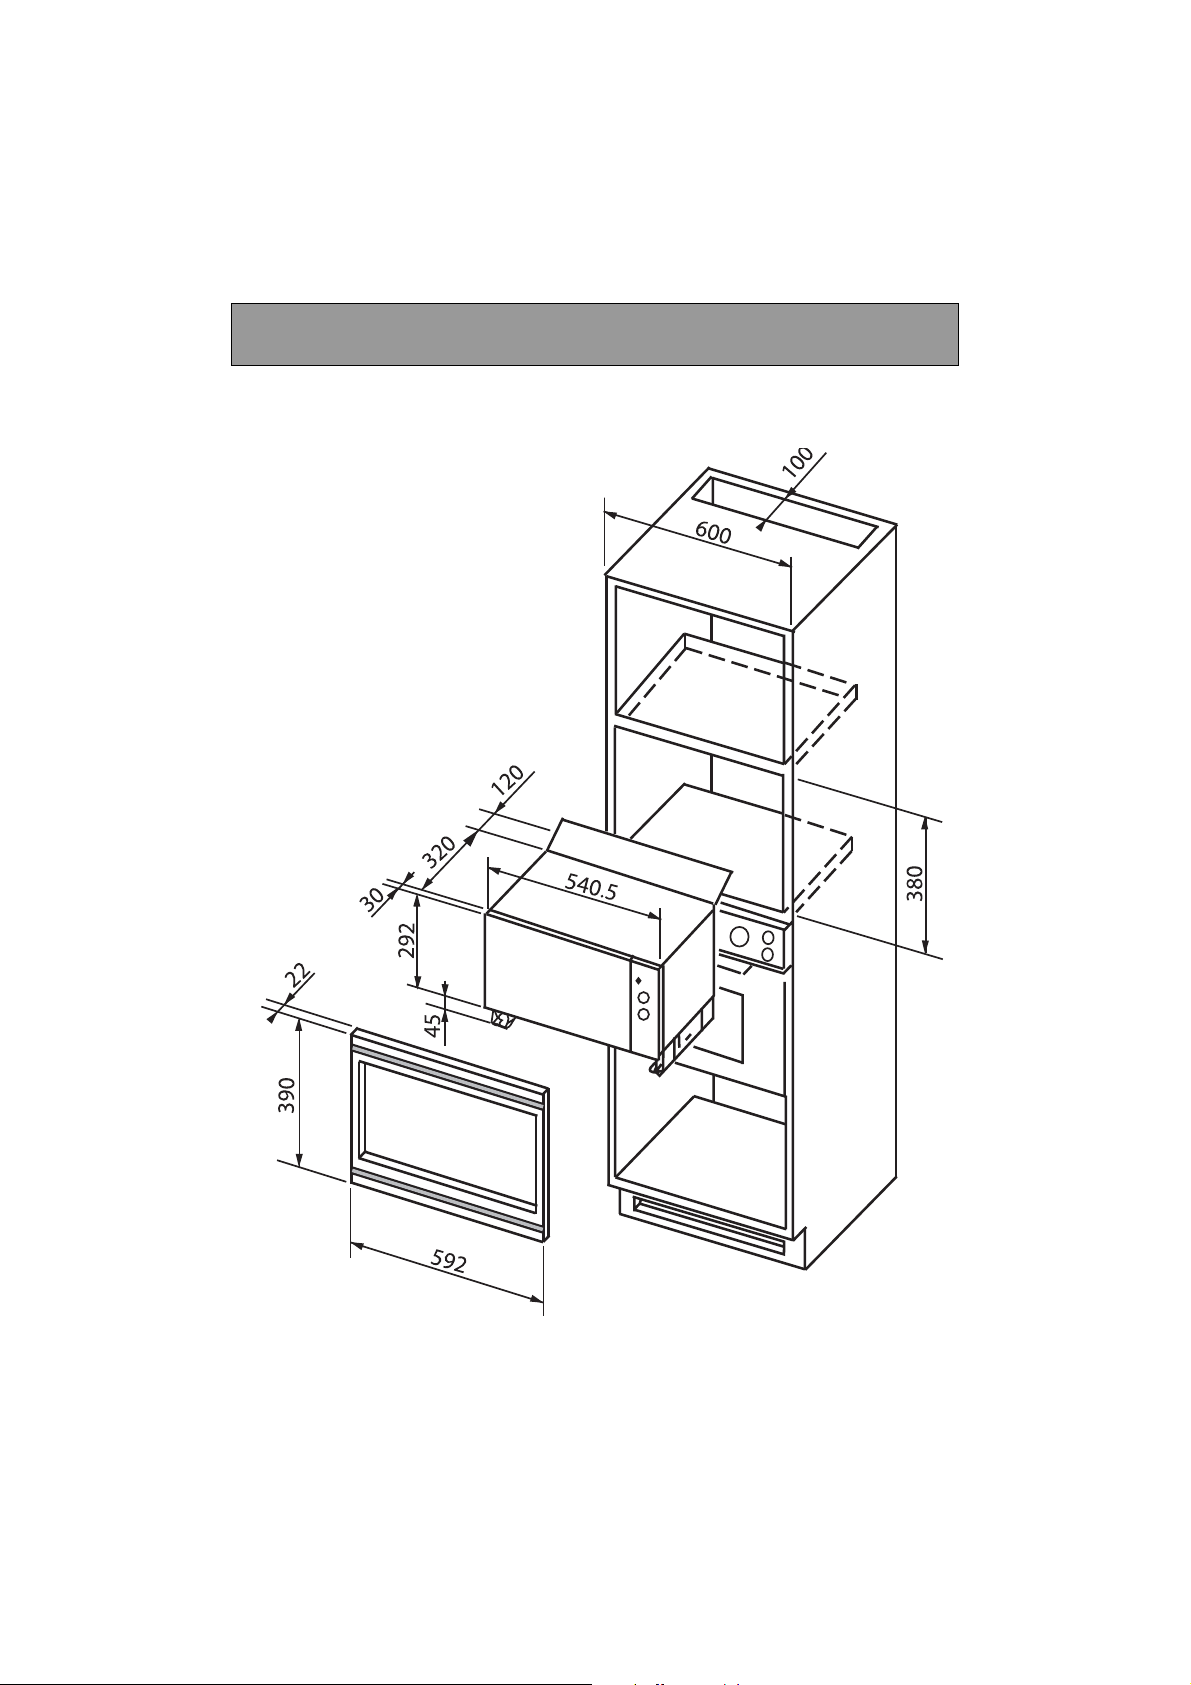
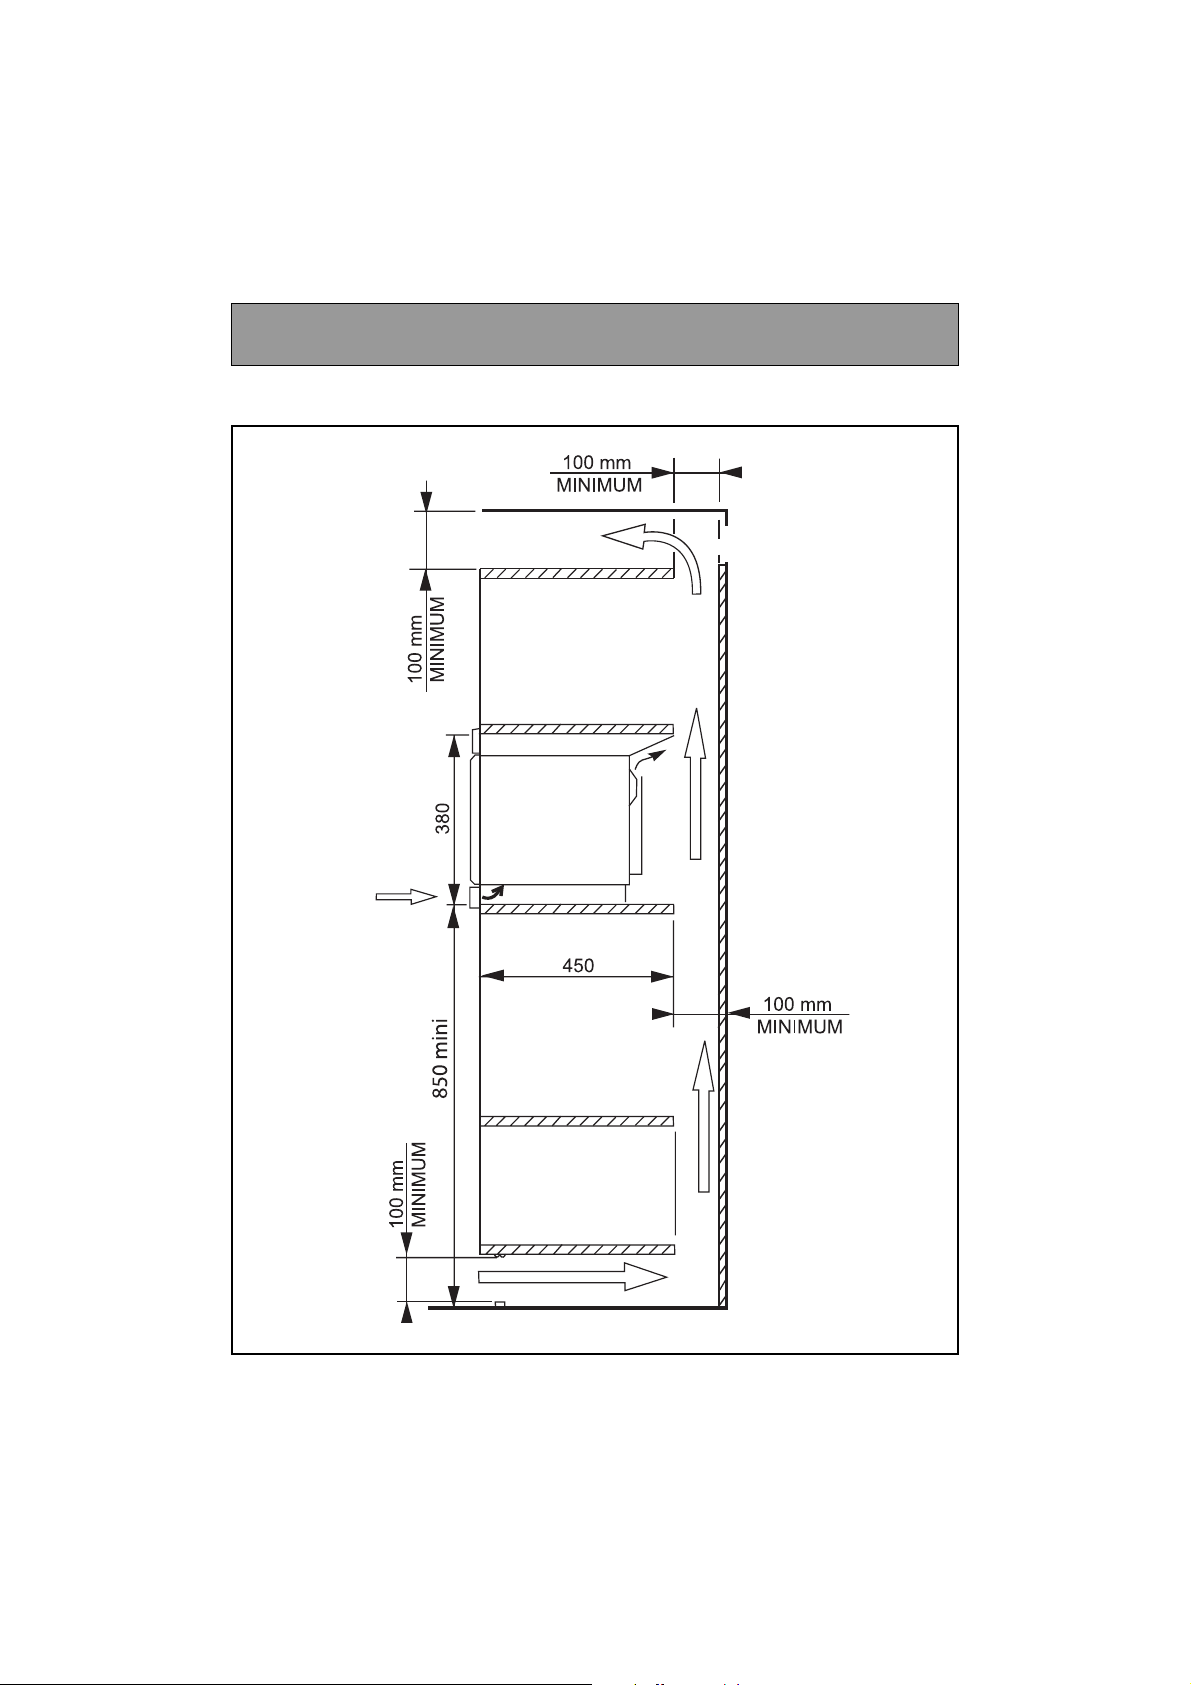
KIT D’ENCASTREMENT
Installation
Page 6
6
KIT D’ENCASTREMENT
Installation
Page 7
7
76
5
4
1
2
3
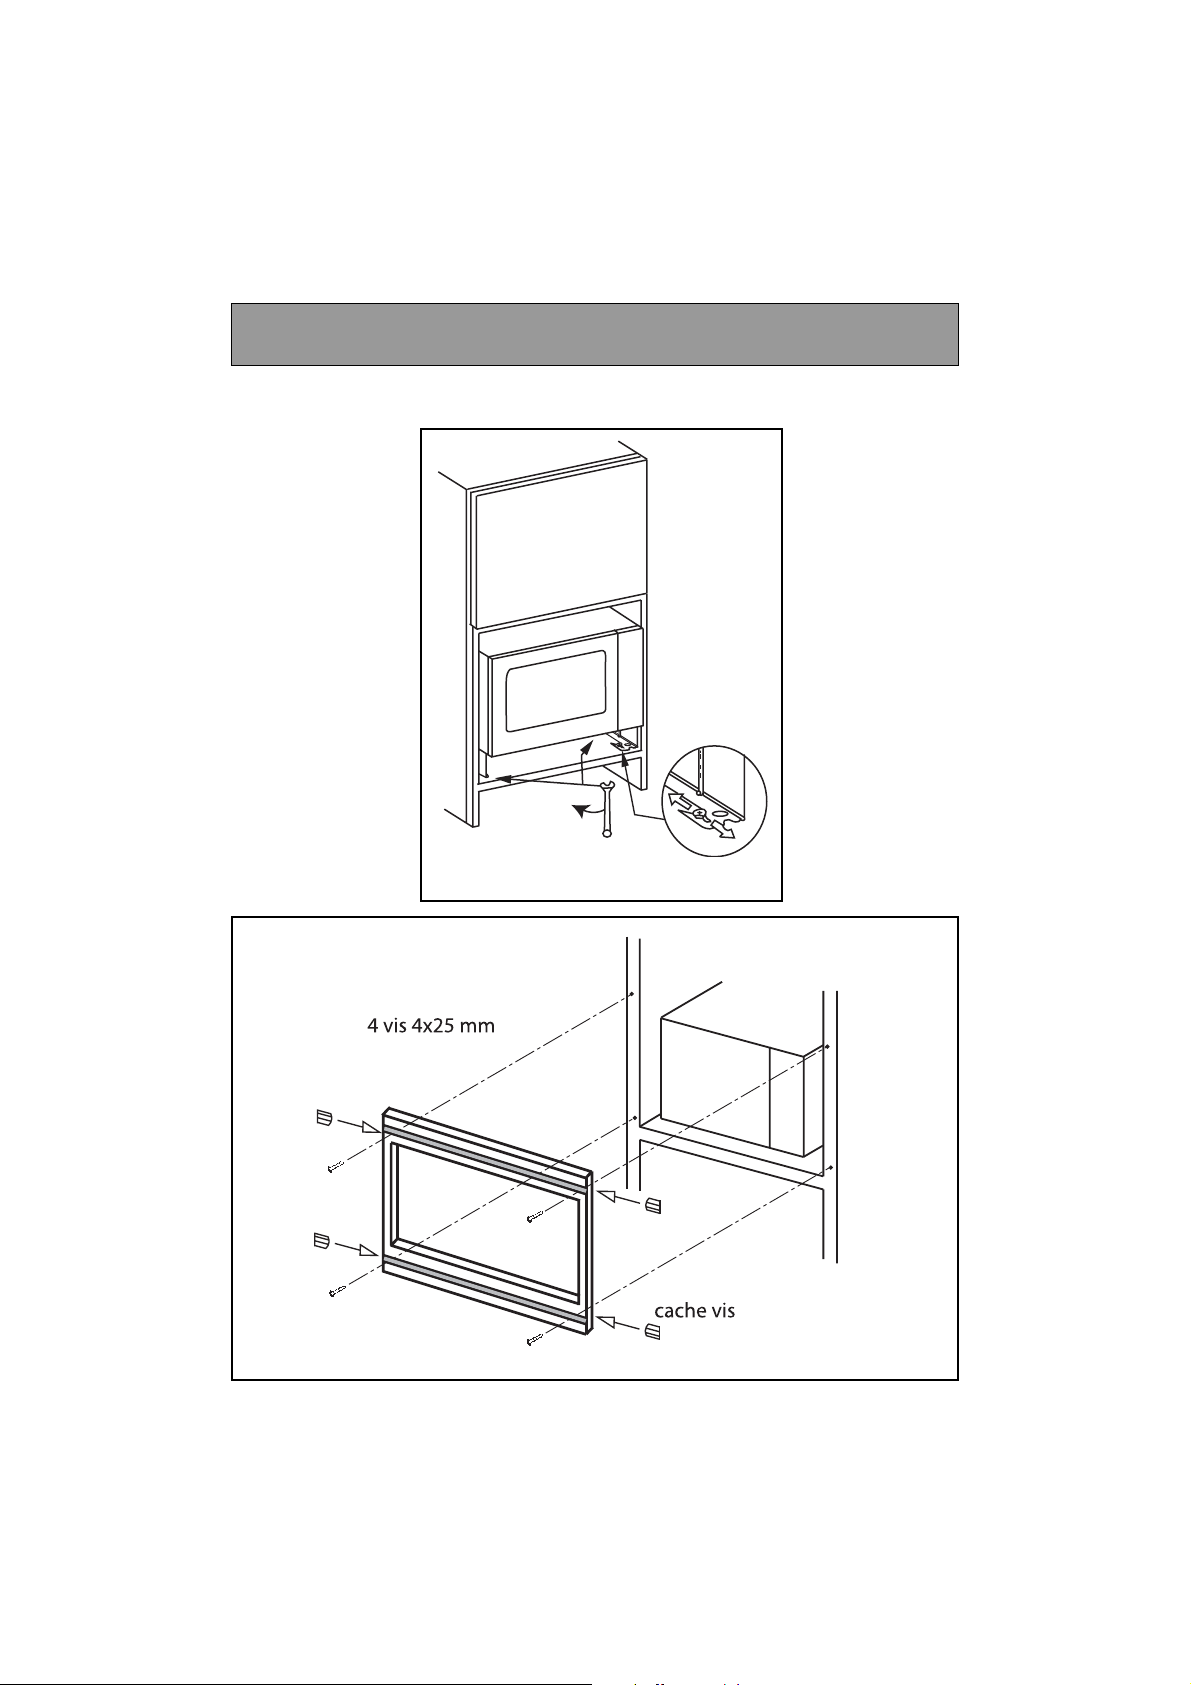
KIT D’ENCASTREMENT
Installation
Page 8
8
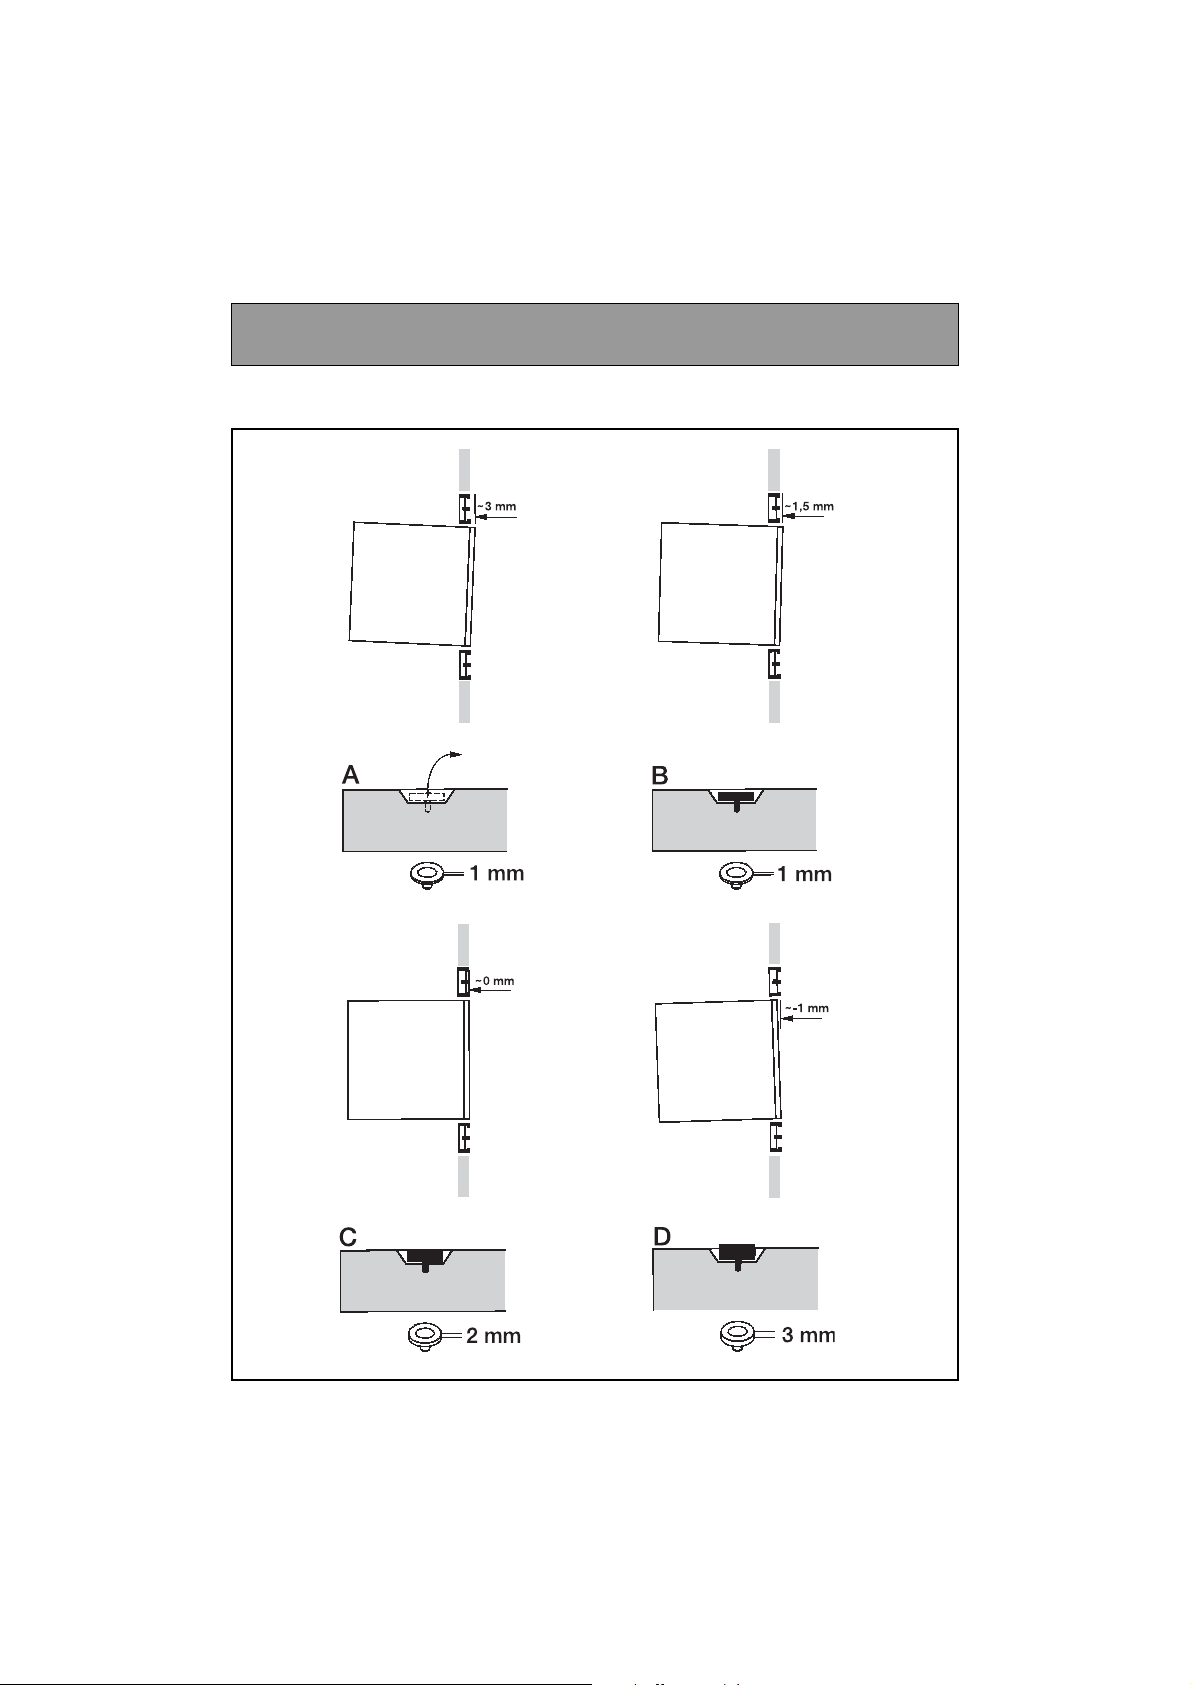
KIT D’ENCASTREMENT
8
9
Installation
Page 9
9
KIT D’ENCASTREMENT
Installation
Page 10

10
Mises en garde
• Votre appareil est exclusivement destiné à un usage domestique pour la cuisson, le
réchauffage ou la décongélation des aliments. Le fabricant se dégage de toute responsabilité en cas d’utilisations non conformes.
• Vérifier que les ustensiles sont appropriés à l’usage dans un four à micro-ondes.
• Pour ne pas détériorer votre appareil, ne jamais le faire fonctionner à vide ou sans plateau.
• N’intervenez pas dans les orifices de la serrure en face avant; vous pourriez créer des
dommages sur votre appareil qui nécessiteraient une intervention.
• Pendant le chauffage de denrées alimentaires dans des contenants en plastiques ou en
papier, garder un oeil sur le four en raison de la possibilité d’inflammation.
• Il est déconseillé d’utiliser des récipients métalliques, des fourchettes, des cuillères, des
couteaux ainsi que des liens et agrafes en métal pour sachets de congélation.
• Le contenu des biberons et des pots d’aliments pour bébés doit être remué ou agité et la température doit être vérifiée avant consommation, afin d’éviter les brûlures.
• Ne laissez les enfants utiliser le four sans surveillance que si des instructions appropriées ont été données afin que l’enfant puisse utiliser le four de façon sûre et comprenne les dangers d’un usage incorrect.
• Les liquides ou autres aliments ne doivent pas être chauffés dans des récipients hermétiques
car ils risquent d’exploser.
• Il est recommandé de ne pas chauffer les oeufs dans leur coquille et les oeufs durs entiers
dans un four micro-ondes car ils risquent d’exploser, même après la fin de la cuisson.
• Le chauffage de boissons par micro-ondes peut provoquer un jaillissement brusque et
différé de liquide en ébullition, aussi des précautions doivent être prises lorsqu’on manipule le récipient.
• Dans le cas de petites quantités (une saucisse, un croissant, etc...) posez un verre d’eau
à côté de l’aliment.
• Des temps trop longs peuvent dessécher l’aliment et le carboniser. Pour éviter de tels incidents, n’utilisez jamais les mêmes temps préconisés pour une cuisson au four traditionnel.
• Si de la fumée apparaît, arrêter ou débrancher le four et garder la porte fermée pour étouffer
les flammes éventuelles.
• Afin d’évacuer la vapeur d’eau résiduelle, votre appareil est pourvu d’une fonction de ventilation retardée. Selon le mode de cuisson choisi (solo/gril/combiné) la ventilation pourra continuer de fonctionner après la fin de cuisson.
Page 11
11
Présentation
•
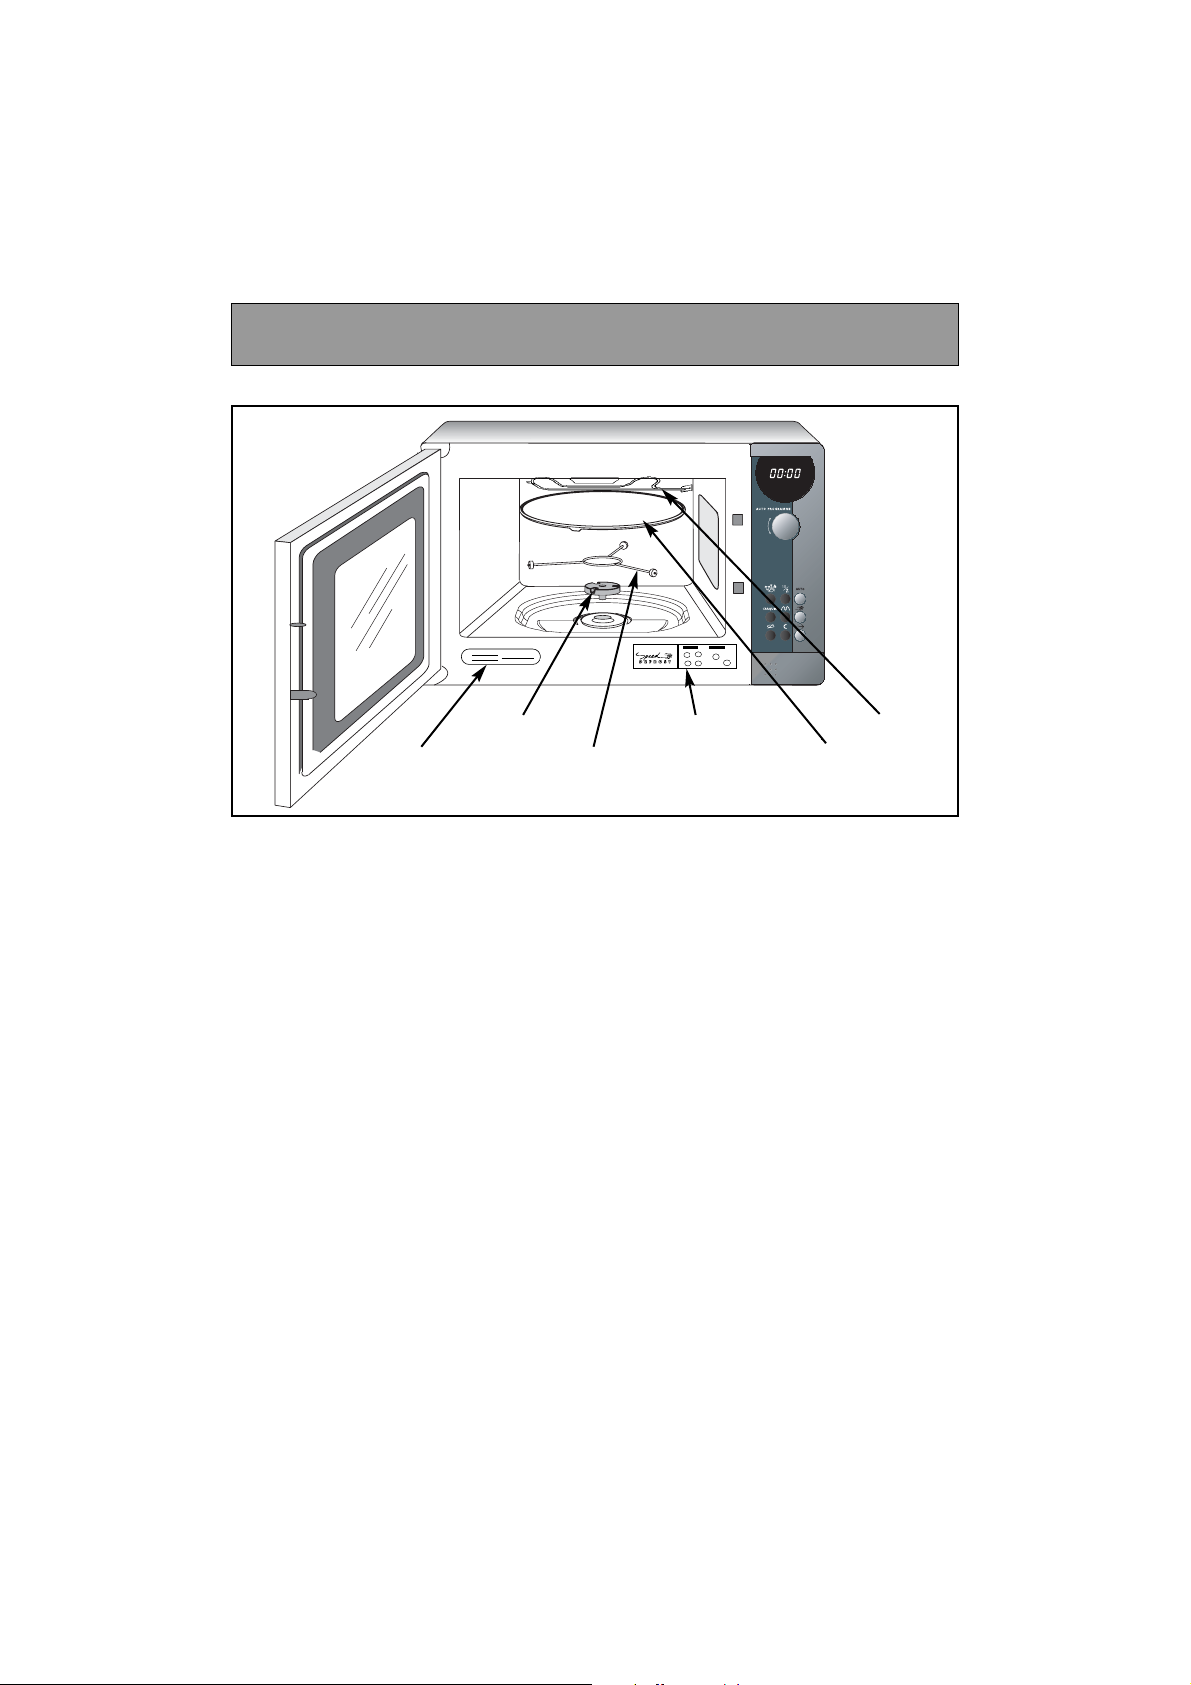
Le PLATEAU TOURNANT :
permet une cuisson homogène de l’aliment sans manipulation.
- Il est guidé dans sa rotation par l’entraîneur et le support à roulettes.
- Il tourne indifféremment dans les 2 sens.
- S’il ne tourne pas, vérifiez que tous les éléments soient bien positionnés.
- Il peut être utilisé comme plat de cuisson.
- Pour le retirer, prenez-le en utilisant les zones d’accès prévues à cet effet.
•
Le PLATEAU EN POSITION ARRÊT :
permet l’utilisation de grands plats sur toute la surface du four. Dans ce cas, il est nécessaire de tourner le récipient ou de mélanger son contenu à mi-programme.
•
Le SUPPORT A ROULETTES :
Ne cherchez pas à faire tourner manuellement le support à roulettes, vous risqueriez
de détériorer le système d’entraînement. En cas de mauvaise rotation, assurez-vous
de l’absence de corps étrangers sous le plateau.
•
L’ÉTIQUETTE Speed DEFROST : collez l'étiquette autocollante en bas du four
à l’endroit indiqué ci-dessus.
Plateau
tournant
Entraîneur
Support
à roulettes
Etiquette
d’identification
Etiquette
Speed DEFROST
Gril
Page 12
12
B
G
F
A
D
E
C
I
H
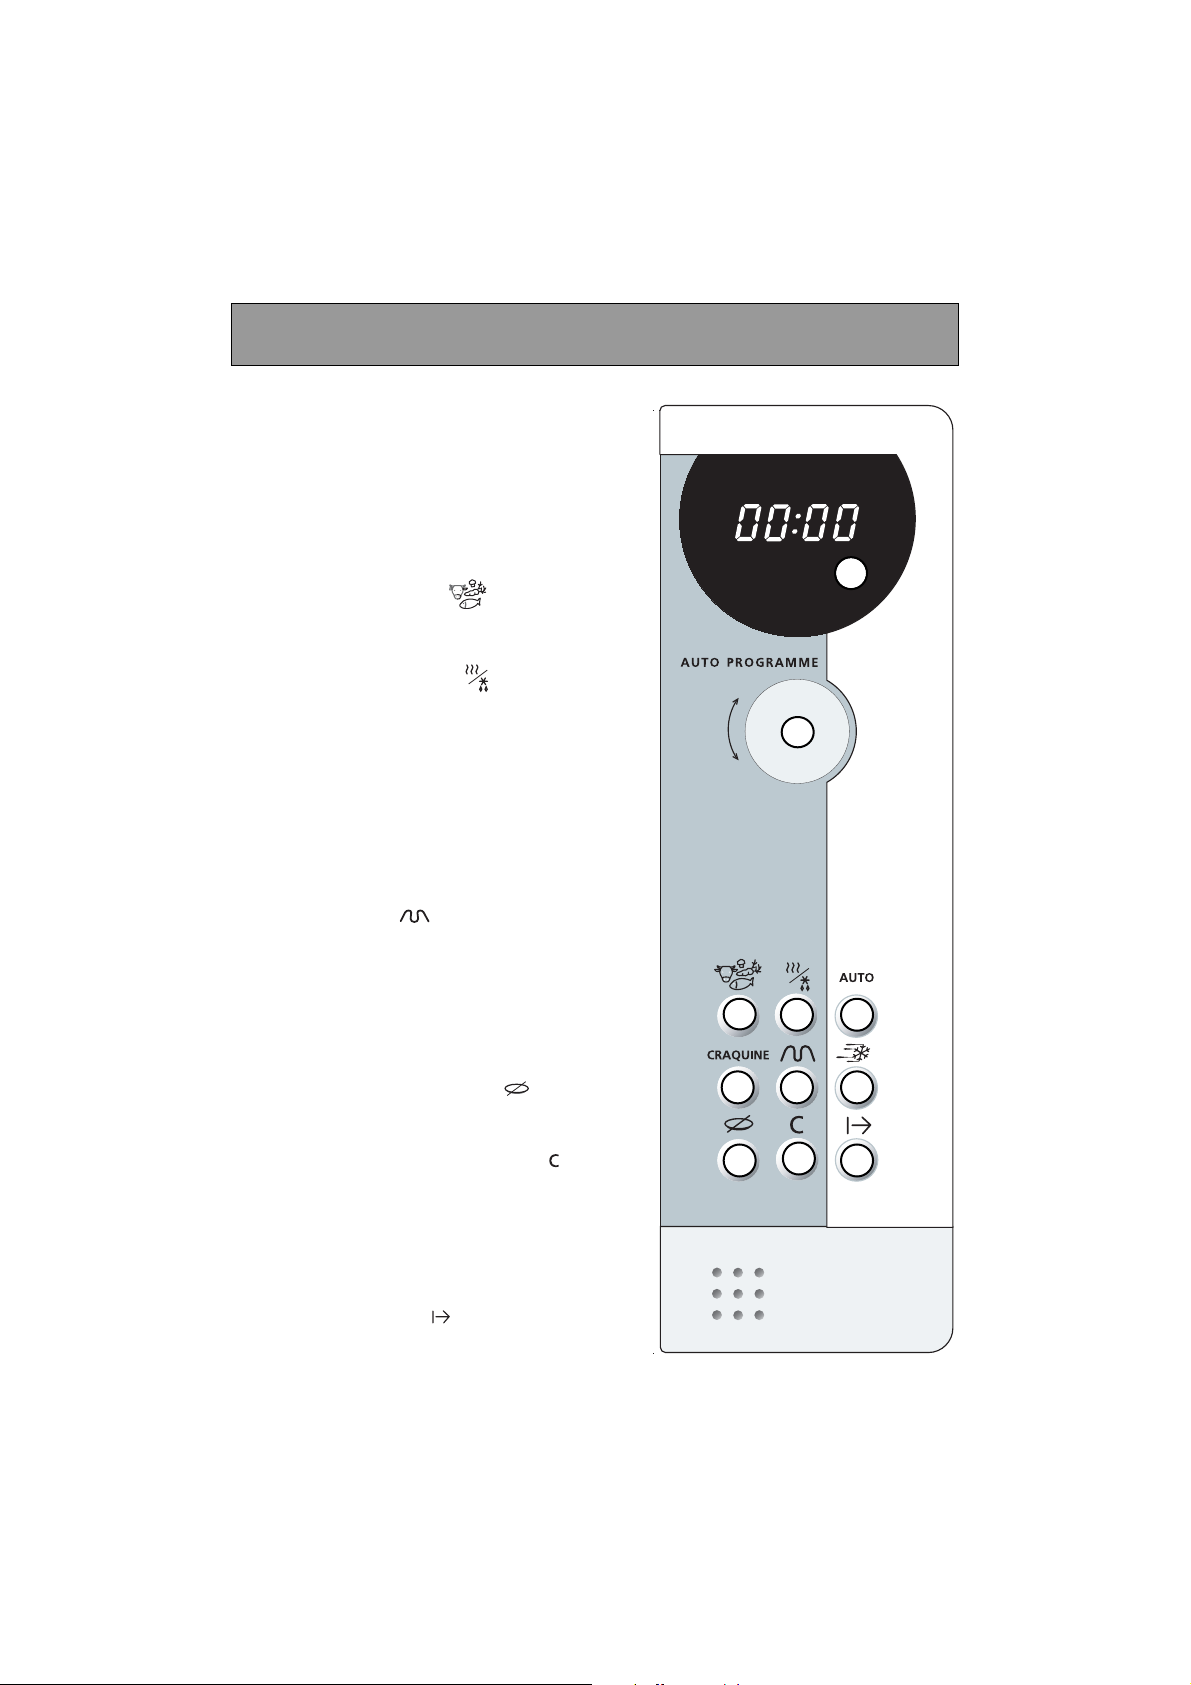
Bandeau de Commande
A L'afficheur :
vous facilite la programmation en affichant :
les catégories d’aliments et de fonctions,
le temps ou le poids programmé, et l’heure.
B Le sélecteur :
permet de choisir l’aliment, la fonction, le
temps ou le poids.
C La touche ALIMENTS :
permet de choisir la catégorie d’aliment, à
l’aide du sélecteur.
D La touche FONCTIONS :
permet de choisir la fonction appropriée, à
l’aide du sélecteur.
E La touche AUTO :
permet une programmation automatique
en fonction du poids de l’aliment.
F La touche "CRAQUINE" :
à utiliser avec le plat Craquine.
G La touche GRIL :
permet de sélectionner l’un des 2 niveaux
de puissances du gril.
H La touche "Speed DEFROST" :
permet une décongélation rapide des aliments.
I La touche ARRÊT PLATEAU :
permet l’arrêt du plateau tournant.
J La touche PAUSE/ANNULATION :
permet d’interrompre ou d’effacer un programme en cours (un appui pour PAUSE,
deux appuis pour ANNULATION).
Elle permet également de mettre l’horloge à
l’heure.
K La touche DÉPART :
permet de débuter votre programme.
J
K
Page 13
13
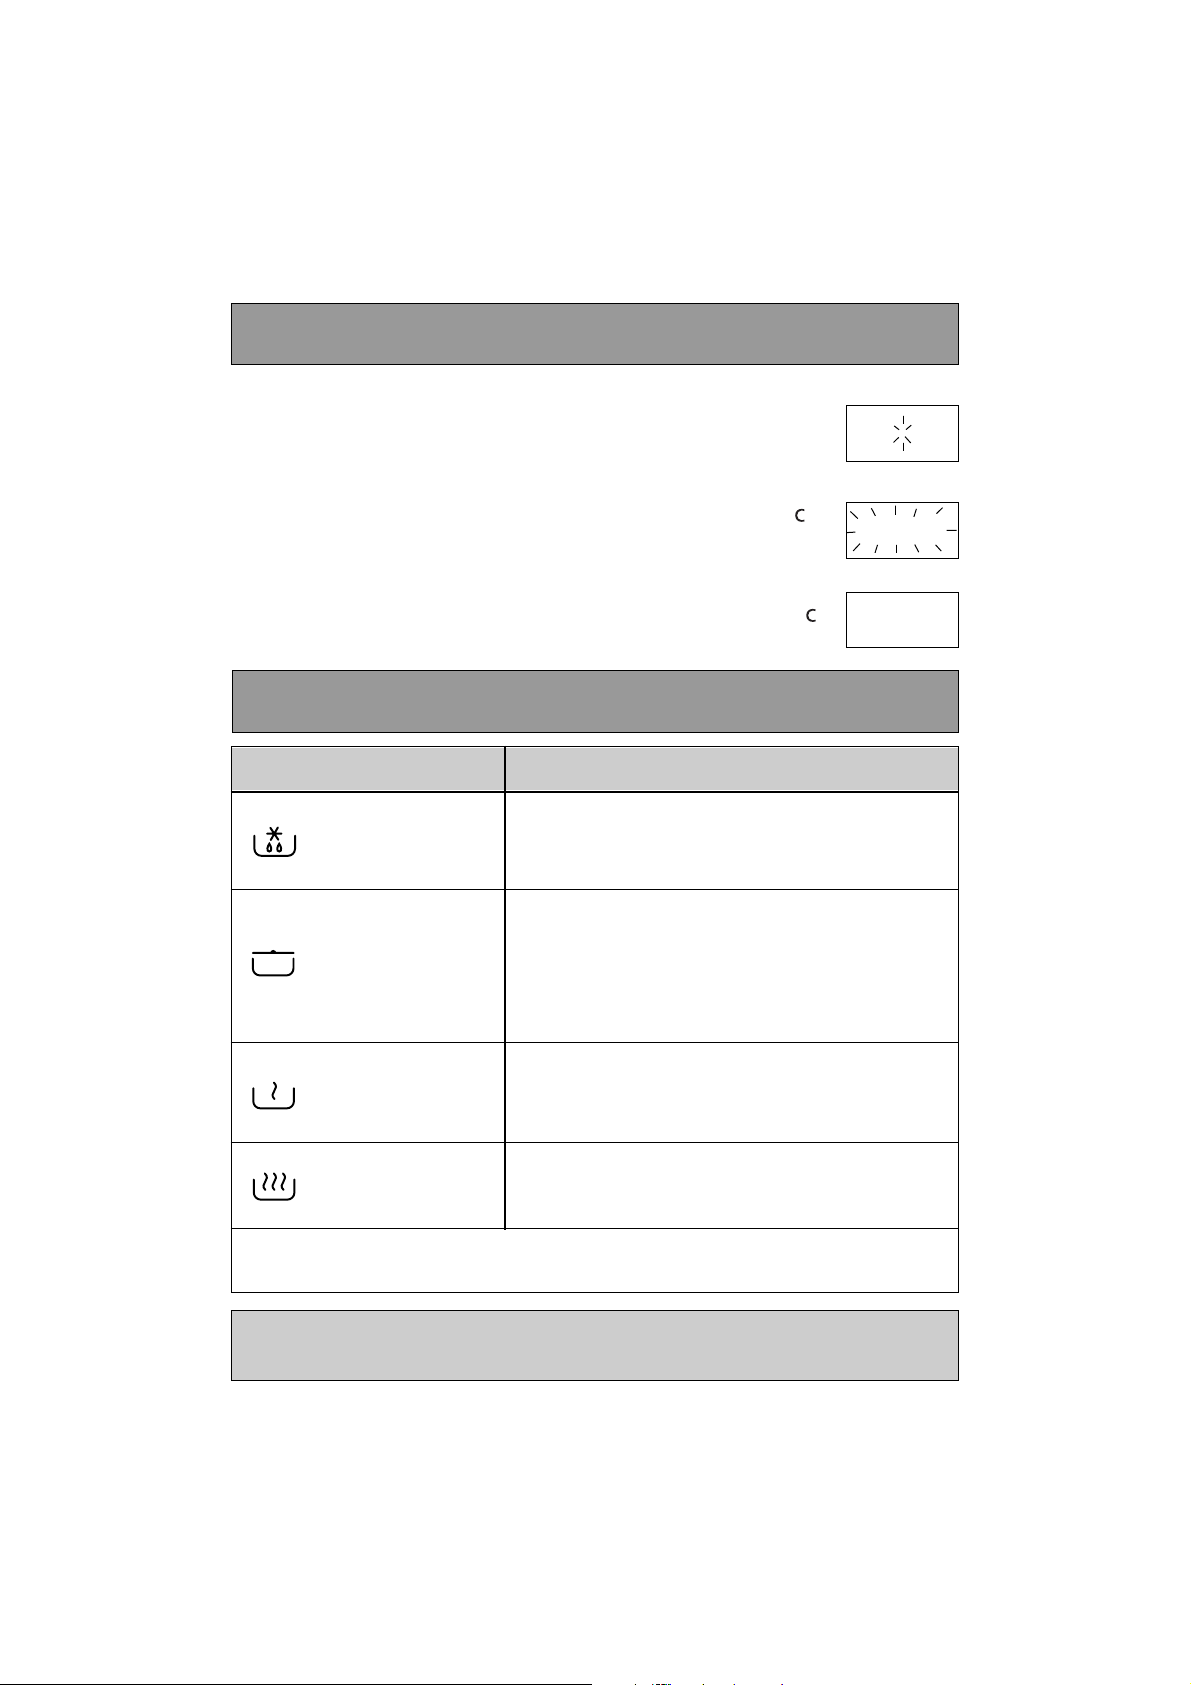
Equivalence des puissances micro-ondes
Lorsque vous sélectionnez un aliment, la puissance
nécessaire est programmée automatiquement.
Après le branchement de votre appareil ou une coupure de courant,
l’horloge indique 00:00, les deux points : clignotent.
Pour mettre l’horloge à l’heure :
- Appuyez pendant 5 secondes sur la touche PAUSE / ANNULATION .
Les 4 chiffres clignotent
, et un bip sonore vous invite à régler l’heure.
- Programmez l’horloge en tournant le sélecteur.
- Validez d’une simple pression sur la touche PAUSE / ANNULATION .
Votre horloge est à l’heure.
0 0 : 0 0
1 2 : 0 0
0 0 : 0 0
Mise à l’heure
DÉCONGÉLATION
150W
Pour décongeler tous les aliments. Pour terminer
des cuissons délicates ou pour cuire très lentement.
MIJOTAGE
500W
Pour cuire les poissons et volailles.
Pour terminer les préparations commencées en
CUISSON, telles que haricots, lentilles, laitages.
Cette fonction est disponible lorsqu’on commence la
programmation en sélectionnant la fonction).
RÉCHAUFFAGE
700W
Pour réchauffer tous les aliments liquides ou solides,
ainsi que les plats préparés frais ou surgelés.
CUISSON FORTE
900W
Pour cuire les légumes et potages.
Puissance restituée : 900 W
FONCTION UTILISATION
Page 14
14
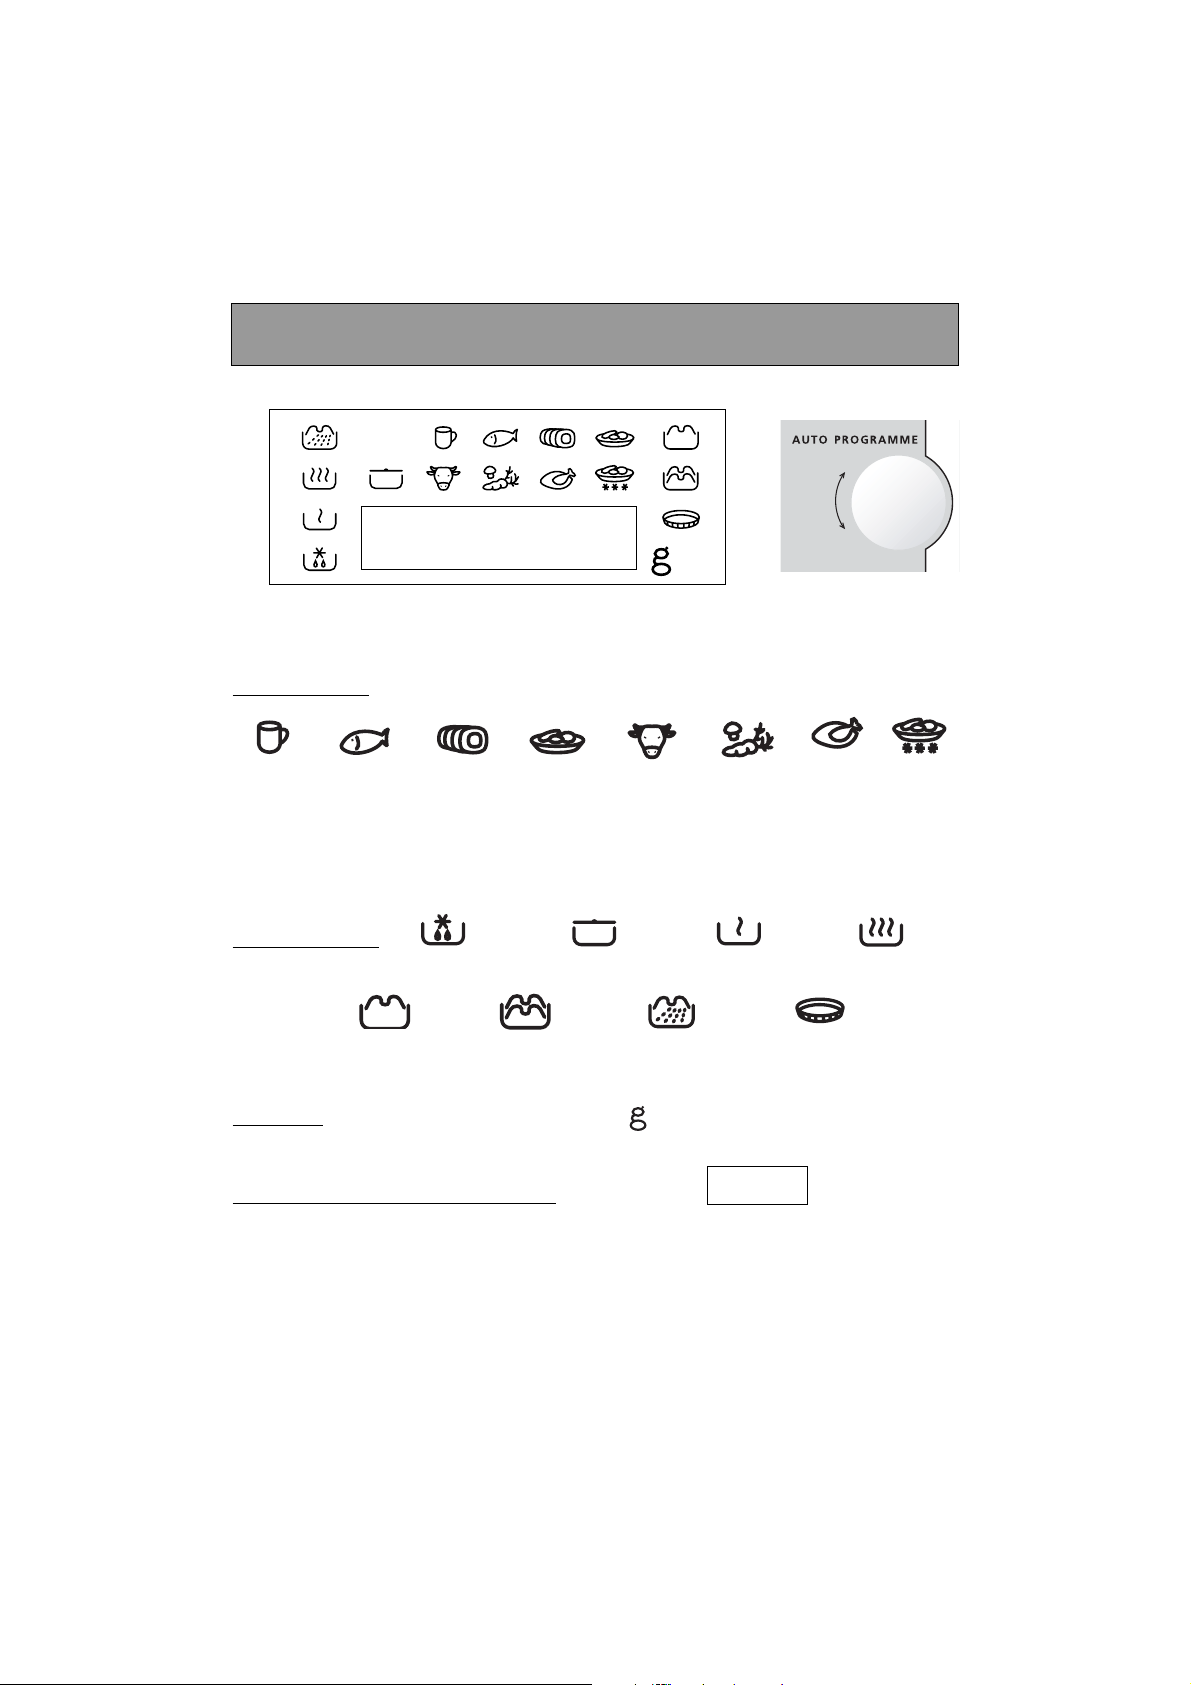
L’afficheur et le sélecteur vous guident pour choisir :
les aliments
les fonctions
DÉCONGÉL. MIJOTAGE RÉCHAUFFAGE CUISSON
GRIL DOUX GRIL FORT MICRO
-ONDES+GRIL CRAQUINE
le poids pour une programmation AUTO
le temps de programmation (ou l’horloge)
L’aliment ou la fonction en cours de sélection clignote.
12:00
12:00
liquides
bœuf,
agneau
légumes
volaille
plats
préparés
surgelés
plats
préparés
frais
porc,
veau,
poissons
dindonneau
L’afficheur & le sélecteur
Page 15
15
Les programmations à votre disposition :
Programmation express
▼▼
programmez le temps désiré (ex. 2 minutes) à l’aide du
sélecteur. Les fonctions et clignotent alternativement pour indiquer la puissance express 900 W.
▼▼
Appuyez sur la touche DÉPART .
Programmation
2 : 0 0
Votre appareil est maintenant branché et à l’heure.
Ouvrez la porte, placez l’aliment dans l’appareil, fermez la porte.
Si la porte n’est pas bien fermée, l’appareil ne fonctionnera pas.
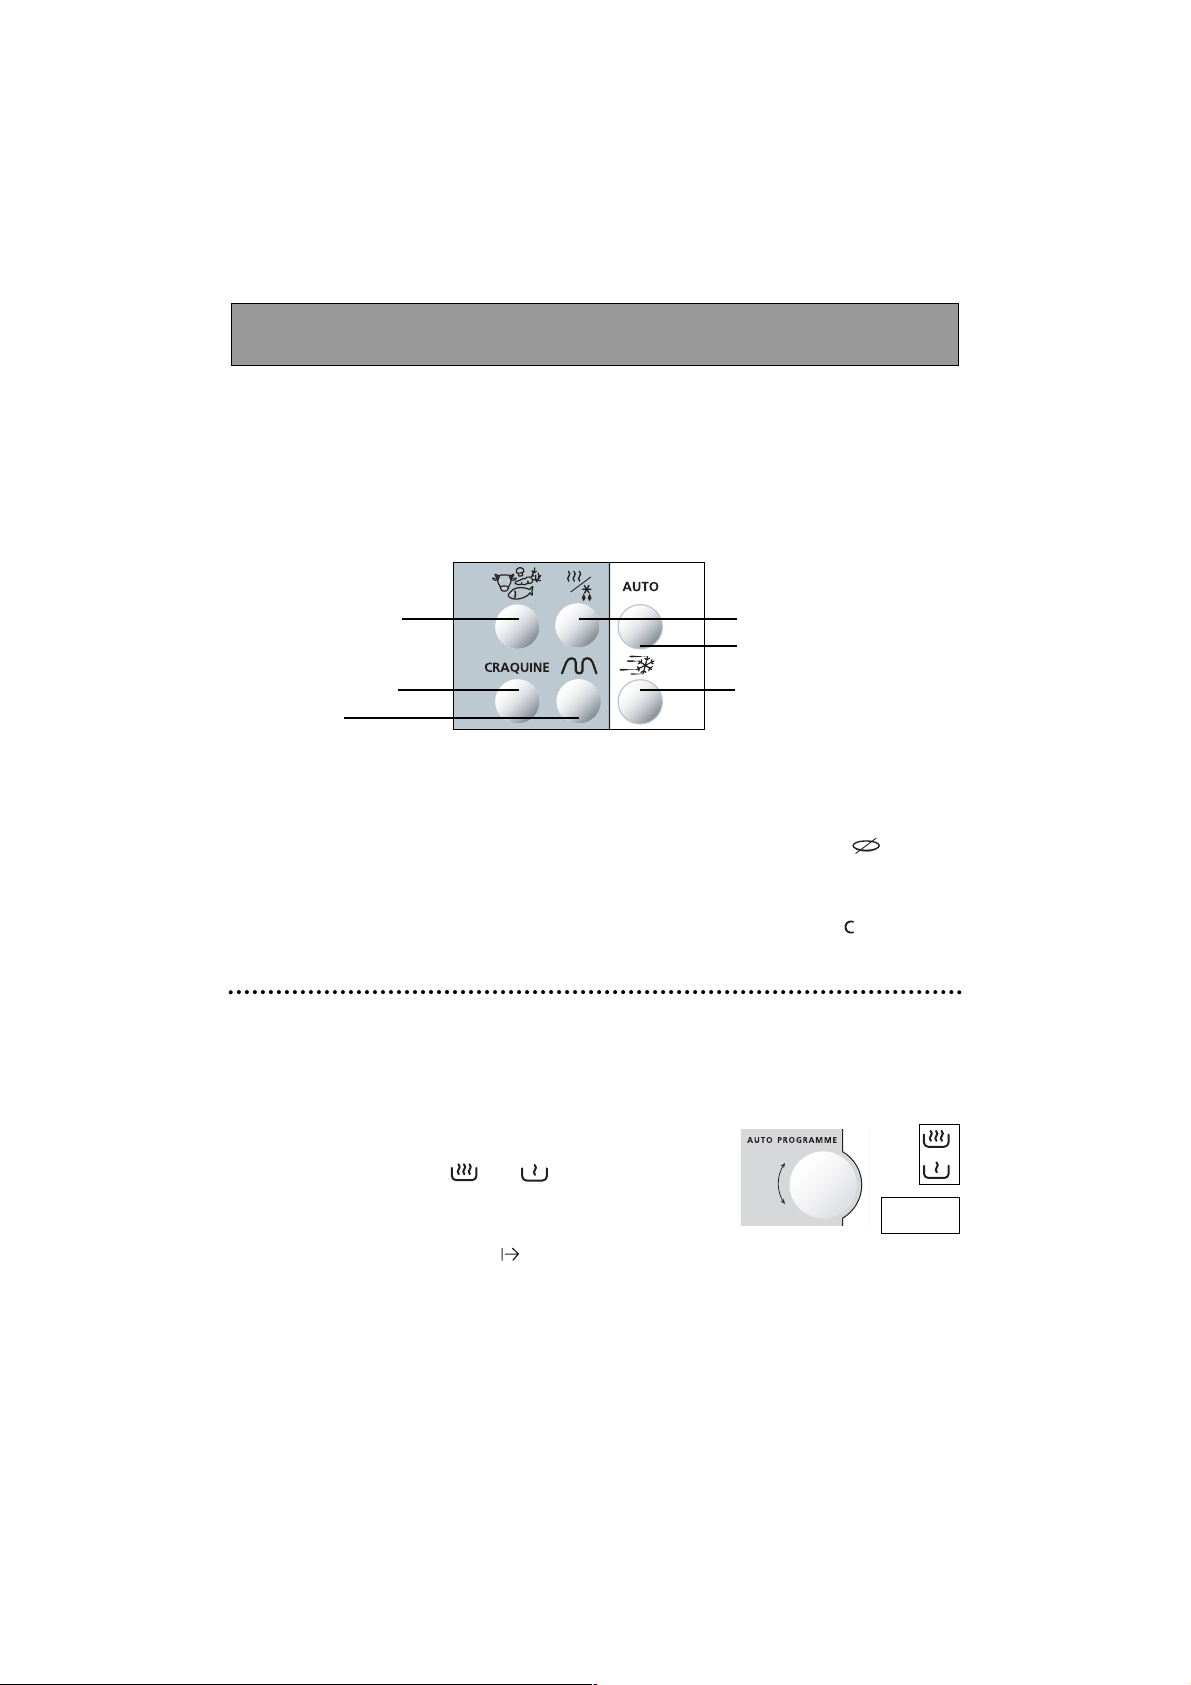
Faites votre programmation avec les touches :
•
Lorsque l’appareil s’arrête, un triple signal sonore indique la fin du programme. Ce signal est
répété toutes les minutes pendant dix minutes jusqu’à ouverture de la porte.
•
Si vous estimez que le plat ne peut pas tourner, utilisez la touche ARRÊT PLATEAU avant ou
en cours de programme.
•
En cas d’erreur de programmation, appuyez deux fois sur la touche ANNULATION .
SPEED DEFROST
AUTOMATIQUE
CRAQUINE
ALIMENTS
FONCTIONS
GRIL
Page 16
16
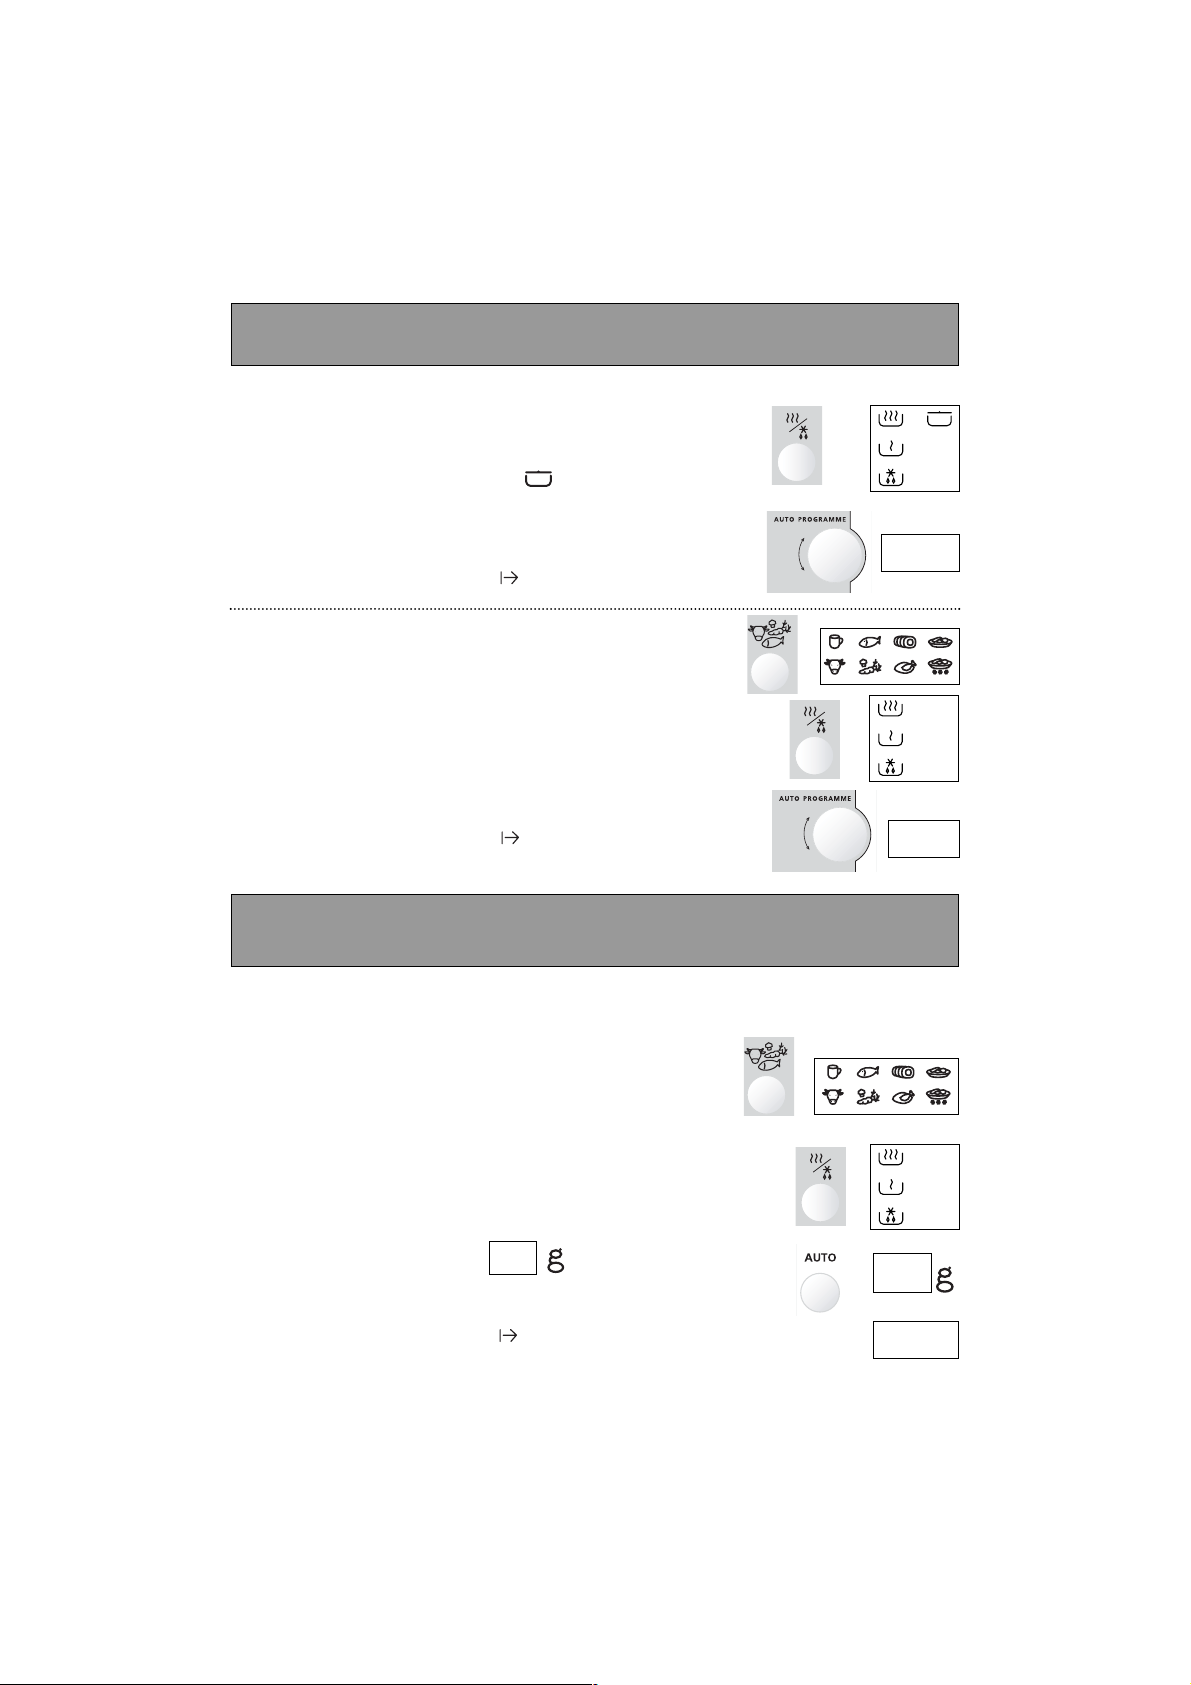
Programmation automatique
Avec la touche AUTO, le temps est calculé automatiquement
en fonction du poids de l’aliment.
▼▼
Appuyez sur la touche ALIMENTS, faites votre choix.
▼▼
Appuyez sur la touche FONCTIONS, faites votre choix.
▼▼
Appuyez sur la touche AUTO
, clignote,
vous demandant d’indiquer le poids à l’aide du sélecteur.
▼▼
Appuyez sur la touche DÉPART .
Le temps adéquat s’affiche automatiquement
.
5 0
Programmation
Programmation par la fonction
▼▼
Appuyez sur la touche FONCTIONS, faites votre choix.
Dans ce mode, la fonction
MIJOTAGE est disponible.
▼▼
Attendez que “00:00” clignote,
programmez le temps désiré à l’aide du sélecteur.
▼▼
Appuyez sur la touche DÉPART .
Programmation par l’aliment
▼▼
Appuyez sur la touche ALIMENTS, faites votre choix.
▼▼
Appuyez sur la touche FONCTIONS, faites votre choix;
la puissance micro-ondes sera adaptée à l’aliment choisi.
▼▼
Attendez que “00:00” clignote,
programmez le temps désiré à l’aide du sélecteur.
▼▼
Appuyez sur la touche DÉPART .
5 : 0 0
7 : 0 0
Programmation Auto
5 0 0
9 : 0 0
Page 17
17
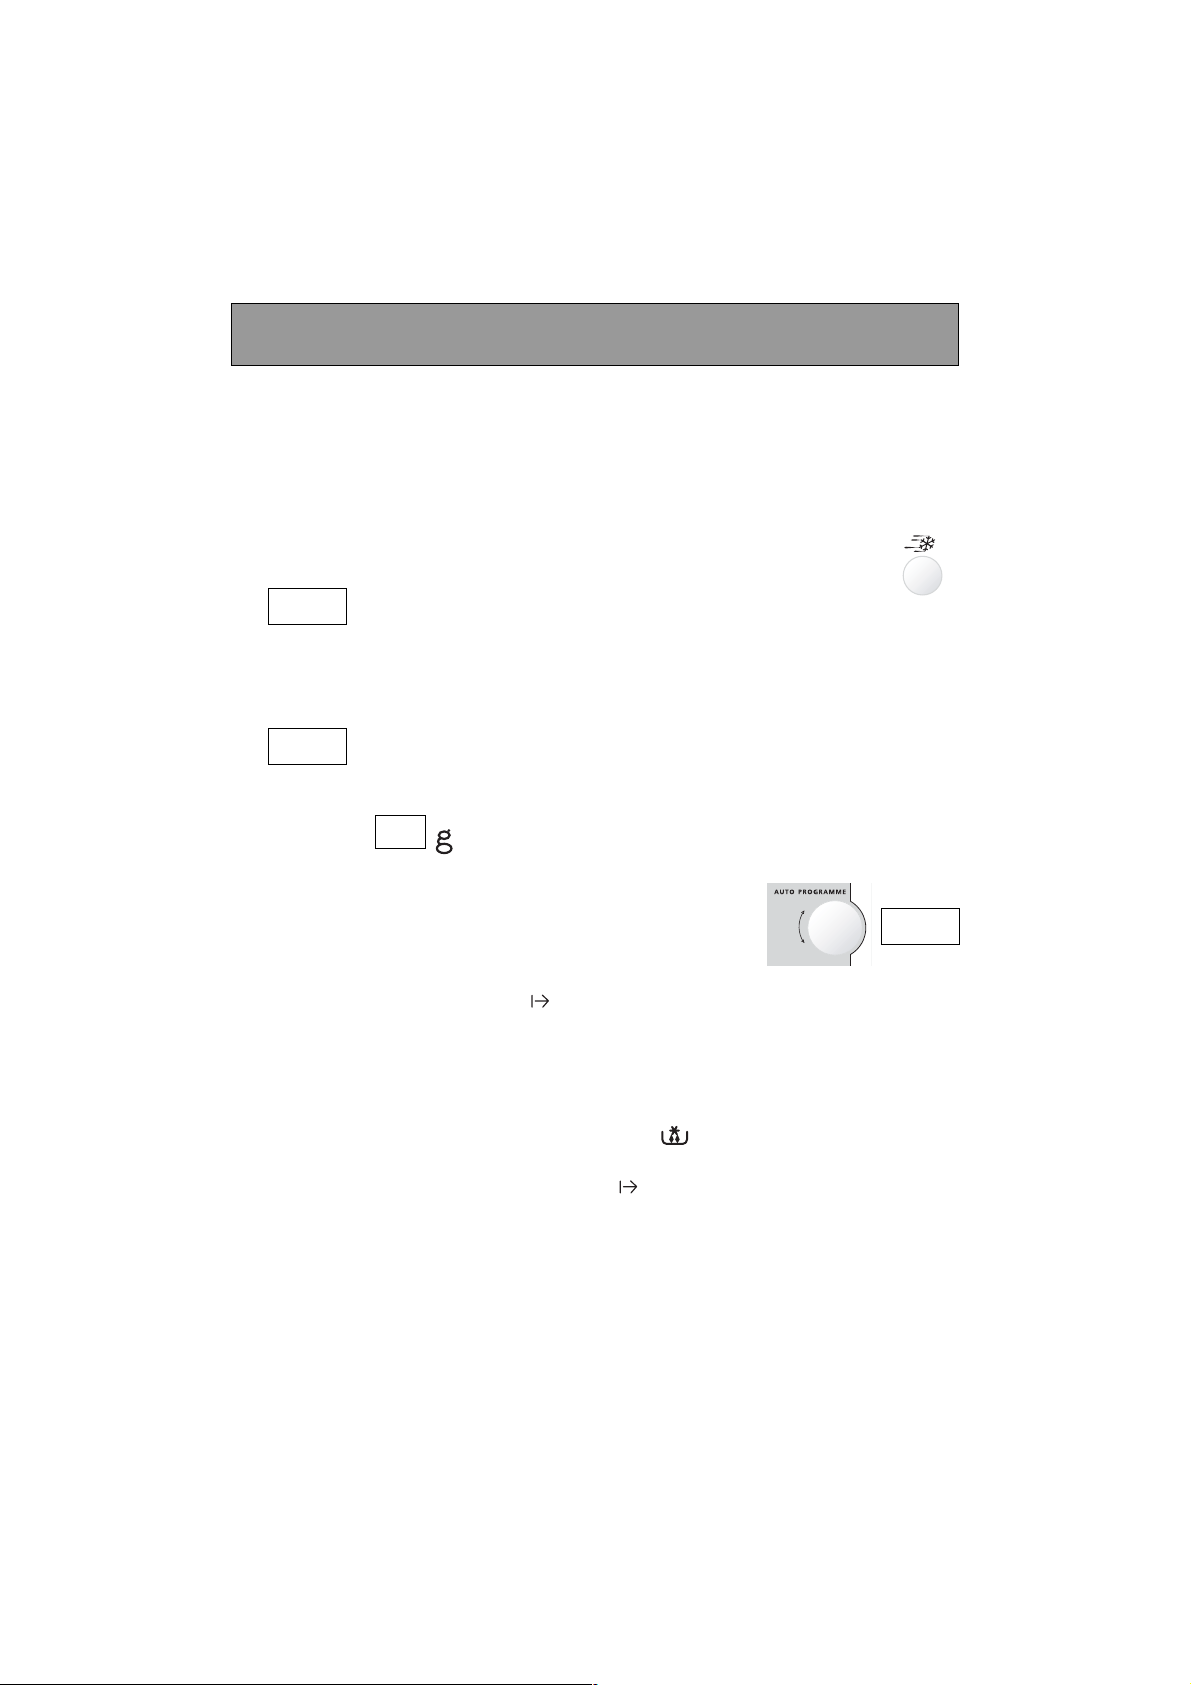
Speed DEFROST
La touche Speed DEFROST permet une décongélation rapide des aliments
d'un poids maximum de 500 grammes, ceci afin de garantir de bons résultats. Au delà de ce poids, utilisez la touche FONCTIONS pour les décongeler
(voir page précédente).
▼▼
Pour la décongélation rapide des viandes, volailles, poissons, légumes
et liquides, appuyez une fois sur la touche Speed DEFROST :
s'affiche.
▼▼
Pour la décongélation rapide des pains, brioches et viennoiseries,
appuyez deux fois sur la touche Speed DEFROST :
s'affiche.
▼▼
Attendez que s'affiche.
▼▼
Rentrez le poids de votre aliment avec le sélecteur
(dans la limite de 500 grammes).
▼▼
Appuyez sur la touche
DÉPART
.
Le temps de décongélation est calculé automatiquement en fonction du poids de l'aliment.
Ce temps peut varier selon la température initiale de l'aliment. (Les temps indiqués correspondent à des produits surgelés à -18°C).
Le temps s'affiche et le four démarre.
En fonctions Speed DEFROST et décongélation une sonnerie à mi-programme
vous rappelle qu’il faut retourner l’aliment pour un meilleur résultat. Refermez la
porte et appuyez sur la touche DÉPART pour redémarrer le four.
▼▼
1 0 0
S 2
S 1
4 0 0
Page 18
18
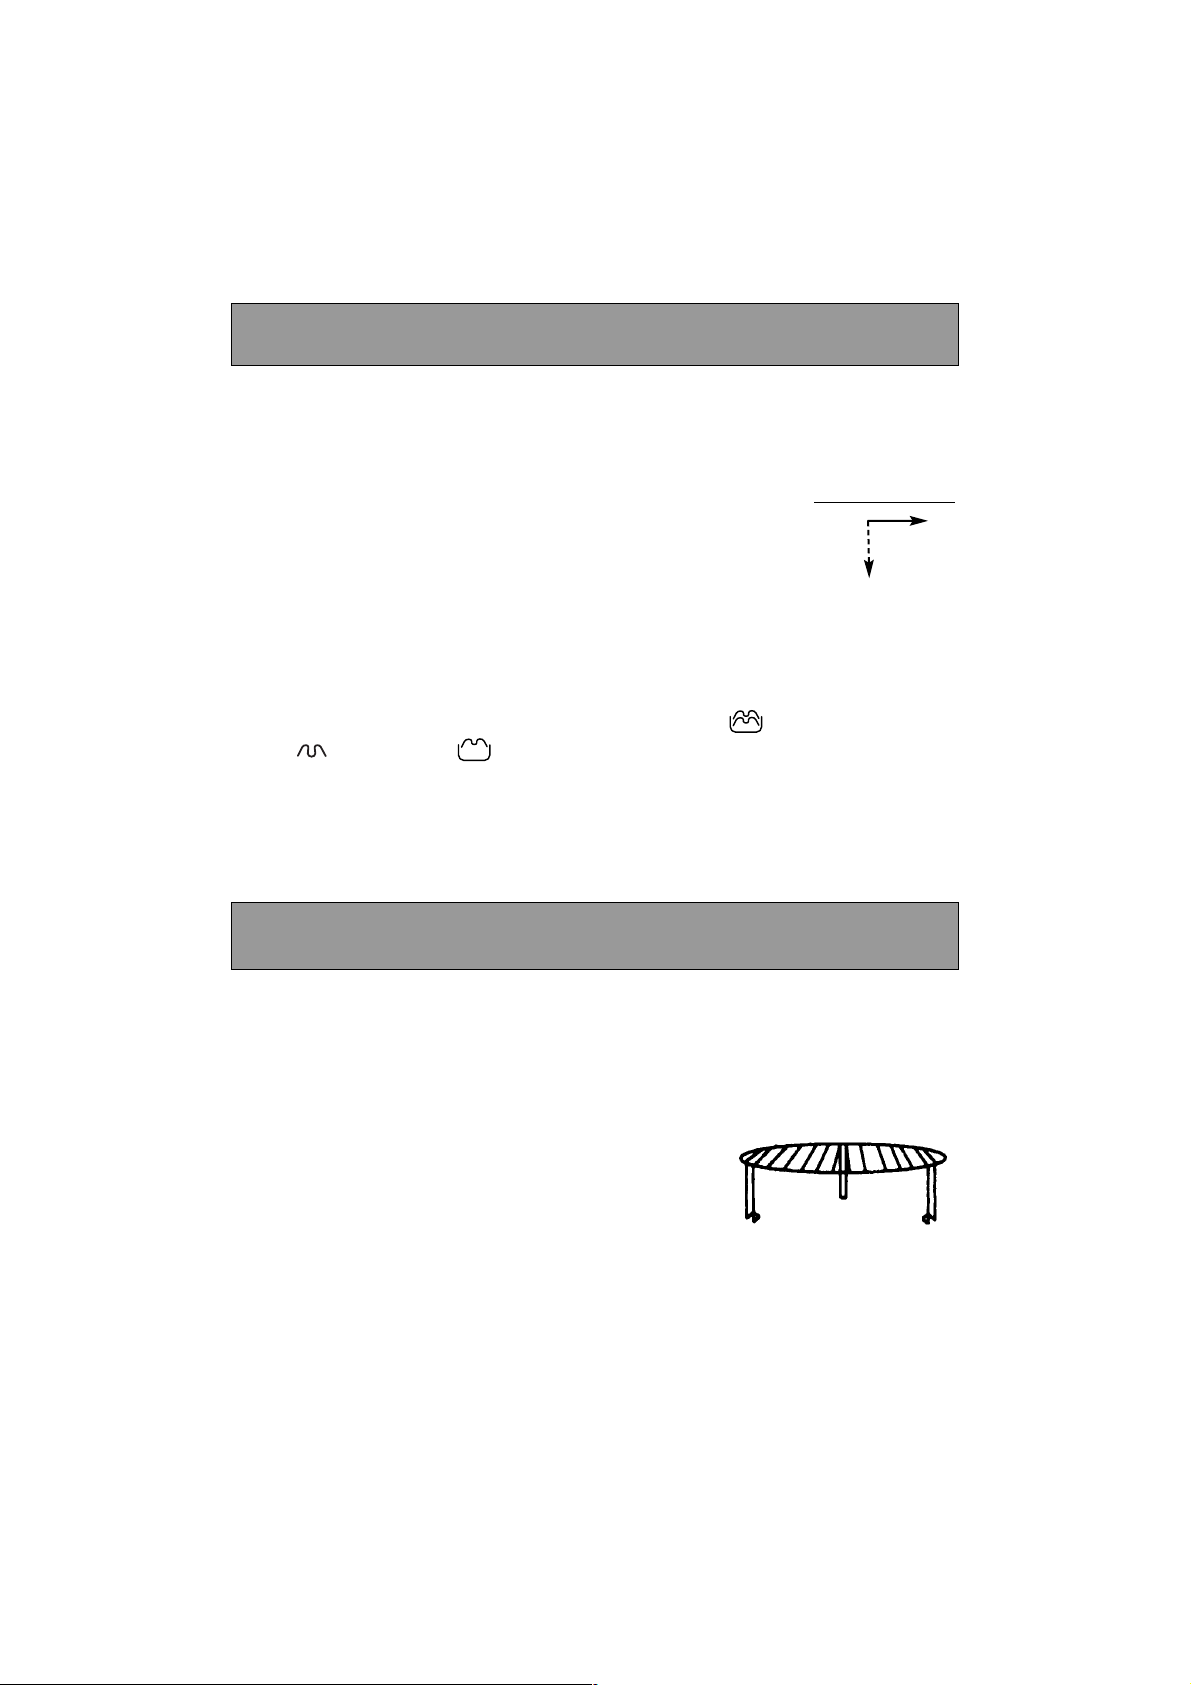
Cette fonction donne la possibilité d’utiliser simultanément les micro-ondes et le gril,
ce qui permet une cuisson rapide.
LA CLAYETTE
en fonction GRIL, permet de dorer les aliments de faible
hauteur.
Lors de son utilisation en fonction micro-ondes + gril,
elle doit obligatoirement être bien centrée sur le plateau
tournant. L’utilisation de la clayette avec des récipients
métalliques est exclusivement réservée à la fonction GRIL
seul. Toutefois, vous pouvez réchauffer un aliment dans
une barquette en aluminium en l’isolant de la clayette à
l’aide d’une assiette.
la clayette
La fonction micro-ondes + gril
Cette fonction permet de dorer les aliments tels que gratins et viandes.
Elle peut être utilisée avant ou après la cuisson, selon les recettes.
•
Le gril est rabattable; afin de faciliter le nettoyage :
1. horizontal pour les gratins, grillades à plat
2. vertical pour l’entretien de la voûte
Laisser refroidir le gril 25 minutes après utilisation avant de le toucher.
•
Lors de l’utilisation du gril, il est nécessaire de se protéger les mains pour sortir les plats
et d’utiliser des récipients qui supportent des températures élevées, tels que le verre à
feu ou la céramique.
•
Vous avez à votre disposition 2 niveaux de gril :
GRIL
FORT (un appui sur la touche
GRIL ) et GRIL
DOUX (deux appuis).
En règle générale, utilisez le niveau GRIL
FORT pour griller viandes et poissons, et utilisez
le niveau GRIL
DOUX en fonction micro-ondes + gril pour gratiner, ainsi que pour dorer
les aliments les plus délicats.
La fonction gril
Positions du gril
1
2
Page 19
19
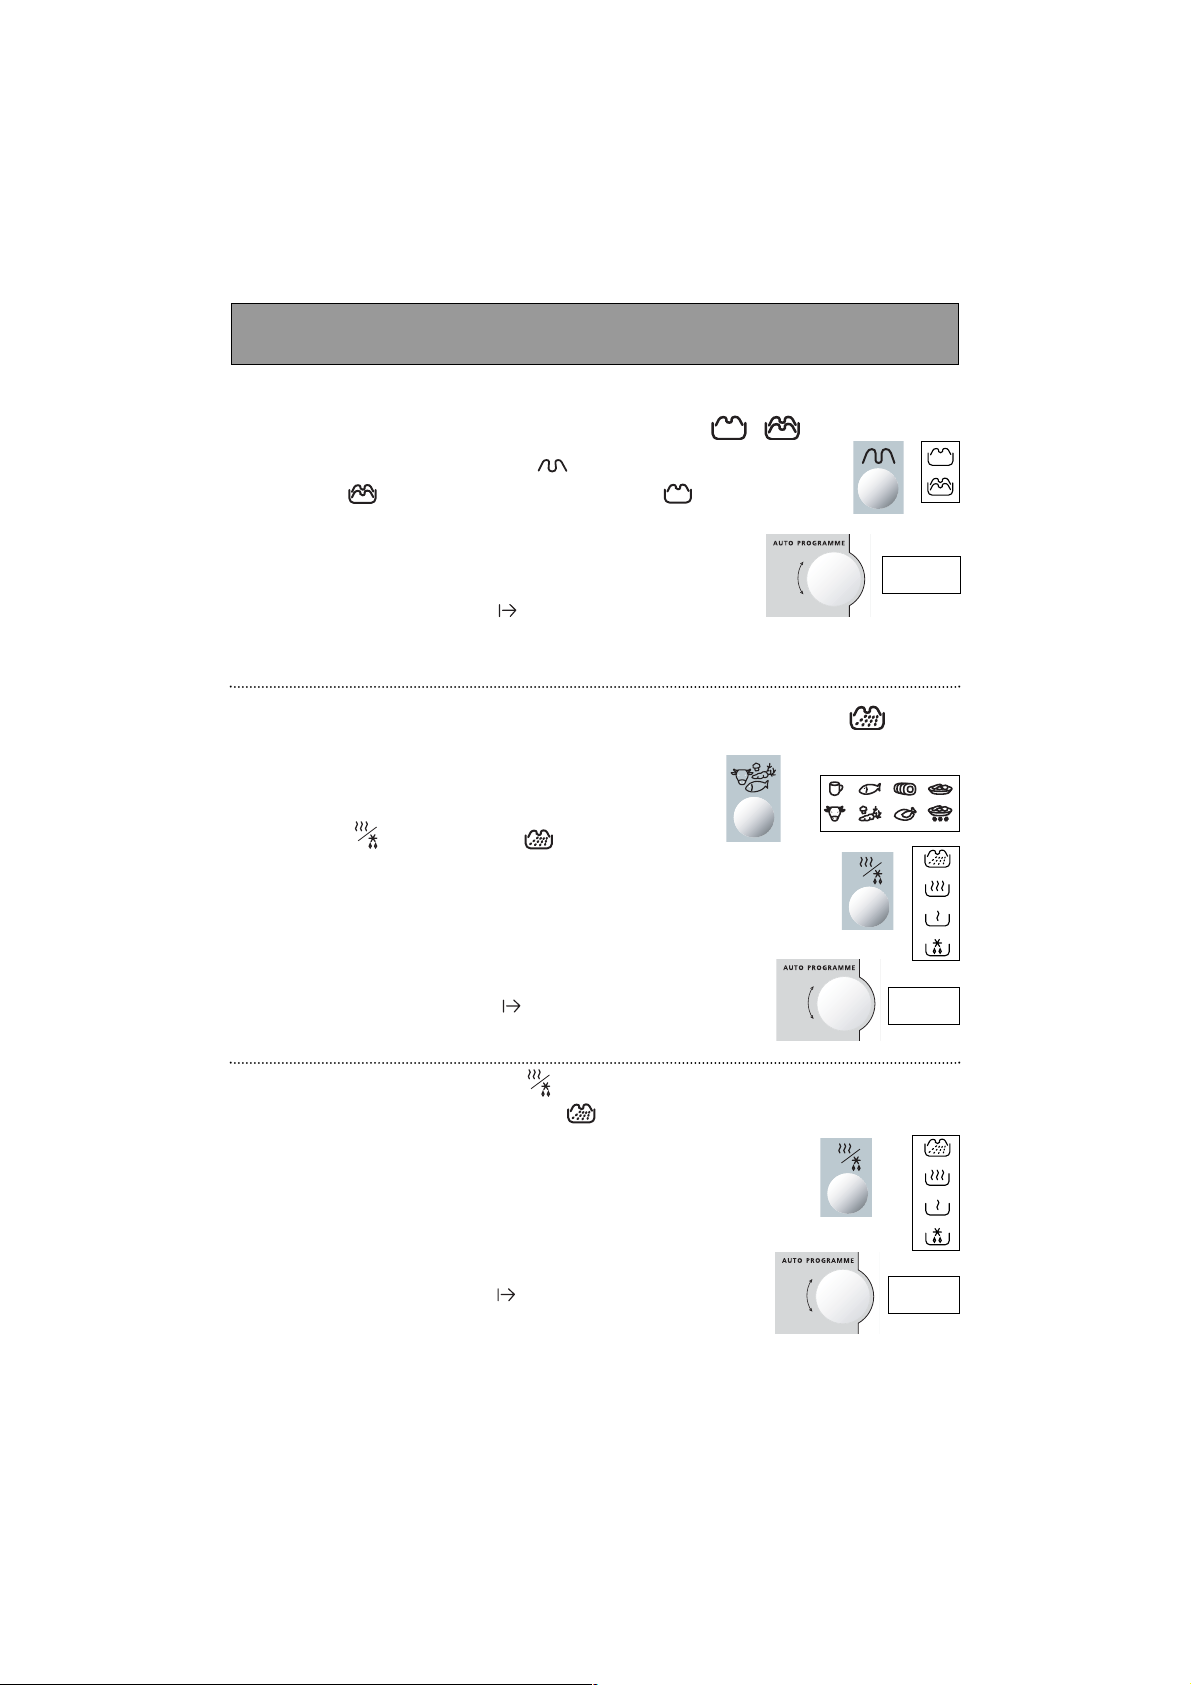
Programmation du gril
Programmation du gril 2 niveaux de puissance
▼▼
Appuyez une fois sur la touche GRIL pour sélectionner
GRIL FORT , 2 fois pour sélectionner GRIL DOUX .
▼▼
Attendez que “00:00” clignote,
programmez le temps désiré à l’aide du sélecteur.
▼▼
Appuyez sur la touche DÉPART .
Un troisième appui sur la touche GRIL arrête le gril.
Programmation de la fonction micro-ondes + gril simultané :
▼▼
Appuyez sur la touche ALIMENTS, faites votre choix.
▼▼
Appuyez sur la touche FONCTIONS, sélectionnez ensuite
la
FONCTION
micro-ondes + gril .
La puissance micro-ondes ainsi que le niveau de gril
seront automatiquement adaptés à l’aliment choisi.
▼▼
Attendez que “00:00” clignote,
programmez le temps désiré à l’aide du sélecteur.
▼▼
Appuyez sur la touche DÉPART .
Si votre aliment ne correspond à aucune catégorie proposée :
▼▼
Appuyez sur la touche FONCTIONS ,sélectionnez
ensuite la
FONCTION
micro-ondes + gril .
Dans ce cas, une puissance micro-ondes moyenne et
le gril fort sont préprogrammés.
▼▼
Attendez que “00:00” clignote,
programmez le temps désiré à l’aide du sélecteur.
▼▼
Appuyez sur la touche DÉPART .
4 : 0 0
6 : 0 0
6 : 0 0
▼▼
Page 20

20
La fonction CRAQUINE
Avec la fonction CRAQUINE vous obtiendrez un gain de temps et d’énergie tout en
conservant le plaisir des recettes traditionnelles (goût, coloration et croustillant).
• La fonction CRAQUINE, associée à son plat, permet le fonctionnement simultané
du gril et des micro-ondes.
• Le plat CRAQUINE, pourvu d’un revêtement particulier, absorbe les micro-ondes par
le dessous.
• Il diffuse cette chaleur sous l’aliment pour le cuire ou le réchauffer et lui donner ainsi
la coloration et le croustillant souhaités, tandis que le gril dore le dessus.
2 possibilités d’utilisation :
• Sans préchauffage, la fonction CRAQUINE permet de cuire et dorer la plupart des
préparations surgelées et fraîches à base de pâte, tout en leur apportant le croustillant comme dans un four traditionnel.
• Avec préchauffage - le plat CRAQUINE peut être préchauffé à vide à l’aide de la touche CRAQUINE 2 minutes maximum. Cela permettra de saisir et cuire les petites
pièces de viandes ou de réchauffer et dorer les plats préparés portions, surgelés ou
traiteurs à base de pâte.
Conseils
• Retirer les aliments de leur emballage d’origine (métallique, plastique) avant de les
cuire ou de les réchauffer en fonction CRAQUINE.
• Il est préférable de programmer un temps minimal et d’en rajouter si nécessaire.
• Tous les aliments avec enveloppe ou peau, tels que pommes de terre ou saucisses,
doivent être piqués avant cuisson.
• Après leur parfaite décongélation, bien essuyer les pièces de viandes avant de les
saisir en fonction CRAQUINE.
• Comme en cuisson traditionnelle, surveiller la coloration des aliments.
• Bien se protéger les mains pour sortir le plat car celui-ci atteint des températures élevées.
• Les aliments fourrés ou farcis ne doivent pas être dégustés trop rapidement (ex. :
friands), car ils peuvent être tièdes à l’extérieur et très chauds à l’intérieur.
• La cuisson ou le réchauffage des œufs en fonction CRAQUINE est à proscrire.
• Si vous désirez enchaîner des cuissons en fonction CRAQUINE, nous vous recom-
mandons de respecter un temps de refroidissement d’environ dix minutes entre
chaque cuisson afin d’obtenir une meilleure coloration.
Page 21
21
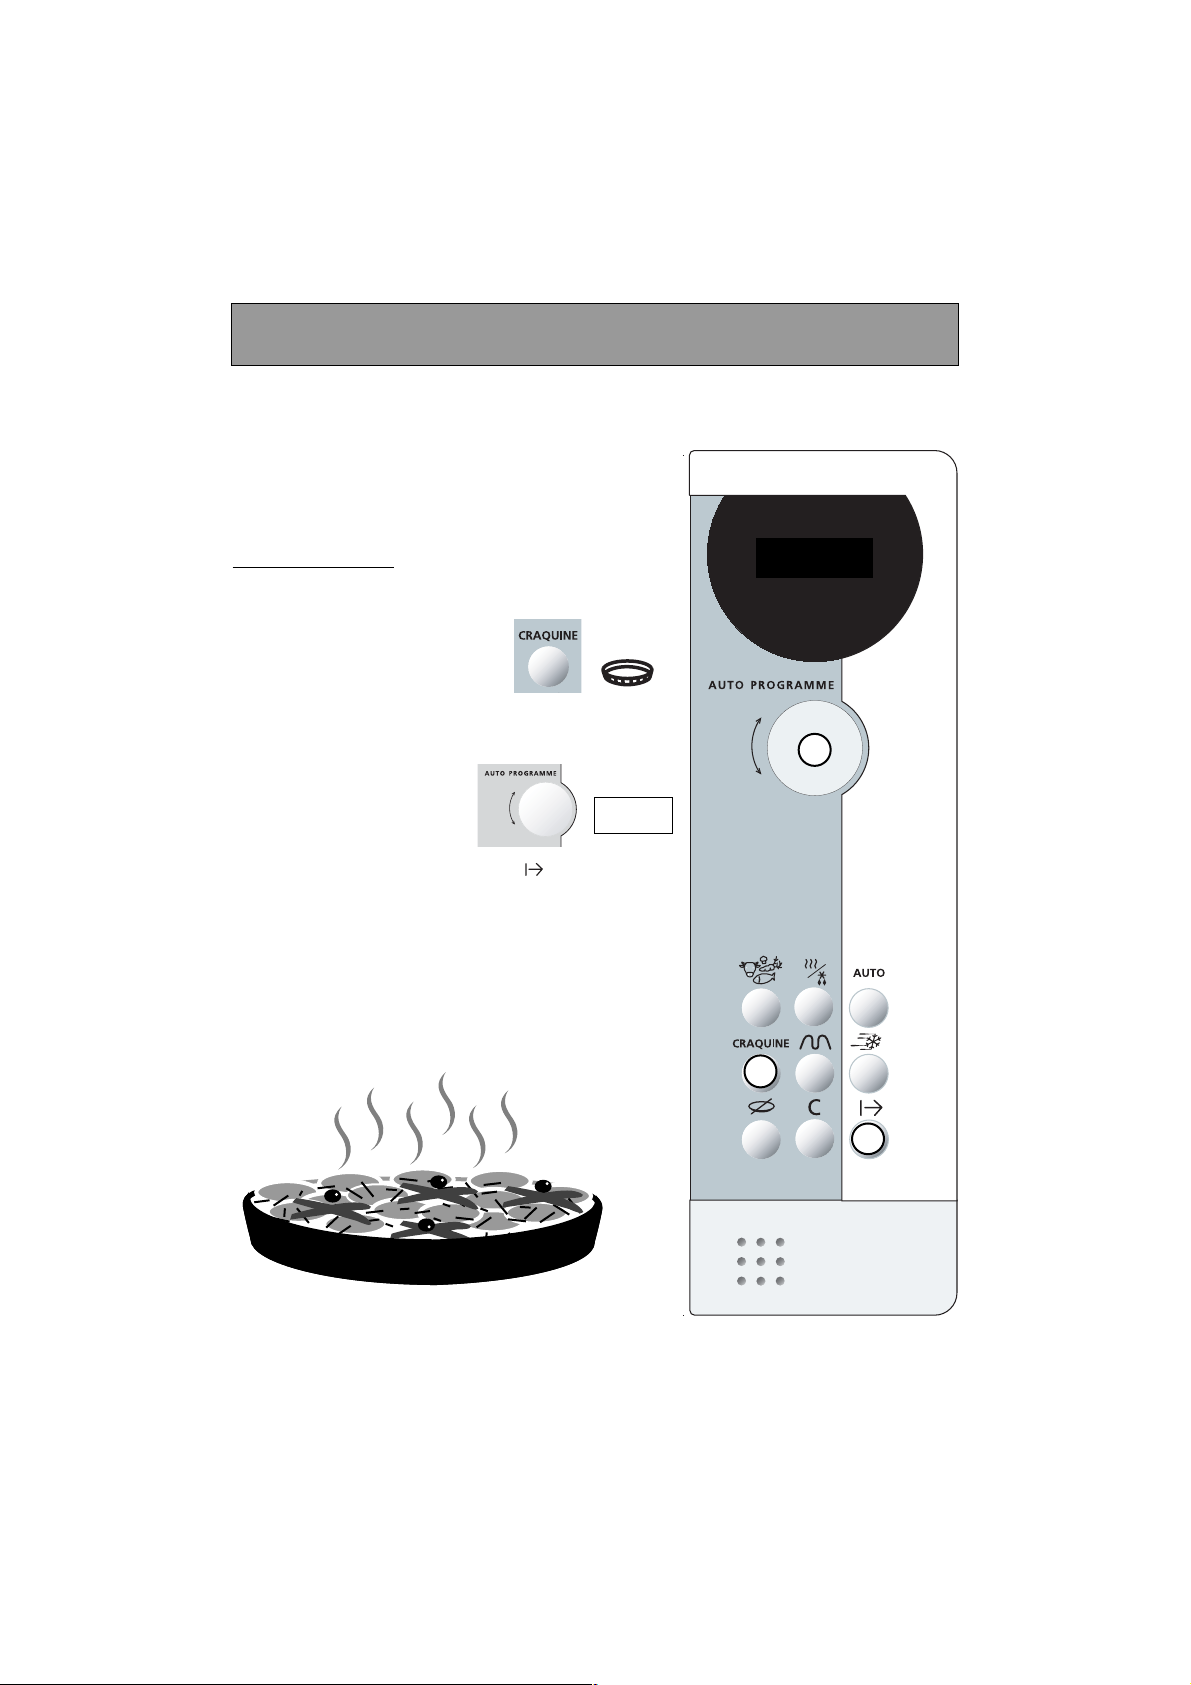
Placer la pizza surgelée directement dans le plat
CRA-
QUINE,
posez le plat
CRAQUINE
au centre du plateau
tournant.
Programmation
Appuyez s
ur la
touche
CRAQUINE
:
le symbole Craquine s’affiche
Attendez que
“00:00”
clignote, programmez le
temps désiré à l’aide du
sélecteur, ex. 6 minutes.
Appuyez sur la touche DÉPART .
le plateau tourne, l’éclairage intérieur s’allume.
➤ En fin de cuisson, sortez le plat à l’aide d’un
gant de protection.
1
2
3
Exemple : pour cuire 1 pizza surgelée de 350 g
La fonction CRAQUINE
6:00
6 : 0 0
Page 22

22
Entretien du plat
CRAQUINE
• L’intérieur est recouvert d’un revêtement
anti-adhésif; il n’est donc pas nécessaire
de huiler le plat avant utilisation.
• Ne pas découper les aliments directement
dans le plat afin de préserver ce revêtement.
• Pour nettoyer ce plat, une éponge, de l’eau
chaude et un détergent liquide suffisent;
ne pas utiliser d’éponge métallique ni de
poudre à récurer.
Le plat peut être lavé au lave-vaisselle.
Remarques
• Ne pas poser le plat CRAQUINE sur la clayette ;
cette manipulation pourrait entraîner la dégradation irrémédiable de votre appareil.
• Ne pas utiliser le plat CRAQUINE dans un four traditionnel ni sur des surfaces
de cuisson (gaz, électrique ou autres), ni sur une quelconque surface dégageant
une forte chaleur.
• Ne laisser aucun ustensile dans le plat CRAQUINE chaud; la température atteinte
pourrait l’endommager.
Le Plat CRAQUINE
Le Plat CRAQUINE
Page 23

23
Recommandations
EN COURS DE CUISSON :
• Si vous avez fait une programmation par le TEMPS ou avec la touche AUTO :
➤ vous pouvez modifier la durée à tout moment.
• Vous pouvez arrêter ou démarrer le plateau tournant en cours de cuisson en appuyant
sur la touche
ARRÊT PLATEAU .
• Pour modifier le choix de la
FONCTION ou de l’ALIMENT, il faut appuyer deux fois sur la touche
PAUSE/ANNULATION et recommencer la programmation.
• Si vous ouvrez la porte avant la fin du programme, refermez la porte et appuyez sur la
touche
DÉPART pour remettre votre appareil en fonctionnement.
• Si vous retirez l’aliment avant la fin de la programmation, annulez les données qui restent
affichées en appuyant deux fois sur la touche
ANNULATION .
REMARQUES :
•
Si, après avoir commencé une programmation, vous n’appuyez pas sur la touche DÉPART
au bout de trois minutes, le programme sera annulé (l’heure s’affichera de nouveau).
Page 24

24
Entretien / Nettoyage
•
MISE EN GARDE : Il est recommandé de nettoyer le four régulièrement et
d’enlever tout dépot alimentaire à l’intérieur et à l’extérieur de l’appareil.
Utiliser une éponge humide et savonneuse. Si l’appareil n’est pas maintenu
dans un état de propreté, sa surface pourrait se dégrader et affecter de façon
inexorable sa durée de vie et conduire à une situation dangereuse. Si la porte
ou le joint de porte est endommagé, le four ne doit pas être utilisé avant d’avoir
été remis en état par une personne compétente.
•
Ne pas nettoyer l’appareil avec un nettoyeur vapeur.
•
L'emploi de produits abrasifs, d'alcool ou de diluant est
déconseillé; ils sont susceptibles de détériorer l'appareil.
•
En cas d'odeur ou de four encrassé, faites bouillir de l'eau additionnée de jus de citron ou de vinai-
gre dans une tasse pendant 2 min et nettoyez les parois avec un peu de liquide vaisselle.
•
Pour les appareils munis d’une fonction gril ou chaleur pulsée, le dessus et les sorties d'air arrières
sont très chauds. Veillez à ne pas toucher ces parties après utilisation. Procédez au nettoyage de
l’intérieur du four lorsque celui-ci est tiède. Utilisez un tampon au savon en fine laine d'acier.
•
Le plateau peut être retiré pour faciliter le nettoyage.
Pour ce faire, prenez-le par les zones d’accès prévues
à cet effet. Si vous enlevez l'entraîneur, évitez de faire
pénétrer de l'eau dans le trou de l'axe moteur.
N'oubliez pas de remettre l’entraîneur, le support à roulettes et le plateau tournant.
EAU
+
SAVON
Page 25

25
Un petit problème ! Que faire ?
Problèmes
▼ Le temps se décompte mais l’appareil ne
fonctionne pas (le plateau ne tourne pas,
l’éclairage ne s’allume pas et l’aliment
n’est pas chauffé)
▼ Le four est bruyant
▼ Vous constatez de la buée sur la vitre
▼ La fumée se dégage du gril en début de
programme
▼ Le plateau ne tourne pas correctement
▼ L’aliment n’est pas chauffé en programme
micro-ondes
▼ L’appareil produit des étincelles
Conseils
▲ Appuyer sur la touche
ARRÊT PLATEAU
pendant 5 secondes.
▲ Ajuster le pied réglable.
Nettoyer les roulettes et la zone de
roulement sous le plateau tournant.
▲ Essuyer l’eau de condensation à l’aide
d’un chiffon, afin d’éviter toute corrosion.
▲ Enlever tous dépôts de résidus de
cuisson sur l’élément chauffant.
▲ Nettoyer les roulettes et la zone de
roulement sous le plateau tournant.
▲ Nettoyer la grille d’aspiration sous
l’appareil.
Vérifier que les ustensiles conviennent
aux fours à micro-ondes.
▲ Vérifier que l'entraîneur et le support
à roulettes soient bien positionnés.
Bien nettoyer l‘appareil : retirer
graisses, particules de cuisson ...
Eloigner tout élément métallique
des parois du four.
Ne jamais utiliser d’éléments métalliques avec la clayette.
Page 26

26
• Si l’appareil a subi une avarie quelconque :
- Vérifiez que la porte n’est pas déformée.
• Si l’appareil ne fonctionne pas,
avant
d’appeler le réparateur :
- Vérifiez l’alimentation électrique.
- Vérifiez la bonne fermeture de la porte.
- Vérifiez votre programmation.
ATTENTION : ne cherchez jamais à intervenir vous-même.
MISE EN GARDE : il est dangereux pour quiconque autre qu’une personne formée,
d’effectuer une opération de maintenance ou une réparation qui nécessite le retrait
du couvercle protégeant contre l’exposition à l’énergie des micro-ondes.
Les éventuelles interventions sur votre appareil doivent être
effectuées par un professionnel qualifié dépositaire de la marque.
Service Après-Vente
Page 27

27
Pour en savoir plus sur tous les produits de la marque :
informations, conseils, les points de ventes, les spécialistes après-vente.
Pour communiquer :
nous sommes à l’écoute de toutes vos remarques, suggestions, propositions
auxquelles nous vous répondrons personnellement.
Vous pouvez nous écrire : Service Consommateurs BRANDT
BP 9526
95069 CERGY-PONTOISE CEDEX
ou nous téléphoner au :
⇒
tarif en vigueur à la date d’impression du document.
* Service fourni par Brantd Customer Services, sociètè par actions simplifiée au capital de 2.500.000
euros - 5/7 avenue des Béthunes, 95310 Saint Ouen l’Aumône - RCS Pontoise 440 303 303.
Attention ! conservez soigneusement cette notice après avoir recopié les informations de la plaque signalétique située à l’arrière de
votre appareil.
N° de série
BRANDT APPLIANCES SAS
7 RUE HENRI BECQUEREL
92500 RUEIL MALMAISON
TYPE
Relations consommateurs
0892 02 88 01*
0,34 TTC / min à partir d'un poste fixe
Page 28

28
Table of contents
Installation . . . . . . . . . . . . . . . . . . . . . . . . . . . . . . . . .29
Warning . . . . . . . . . . . . . . . . . . . . . . . . . . . . . . . . . . .35
General description . . . . . . . . . . . . . . . . . . . . . . . . . . .36
The control panel . . . . . . . . . . . . . . . . . . . . . . . . . . . . .37
Setting the clock / Microwave power settings . . . . . . . . . . . . .38
The display & the selector knob . . . . . . . . . . . . . . . . . . .39
Programming . . . . . . . . . . . . . . . . . . . . . . . . . . . . . . . .40
AUTO programming . . . . . . . . . . . . . . . . . . . . . . . . . . .41
“Speed DEFROST” . . . . . . . . . . . . . . . . . . . . . . . . . . . . .42
The grill function / the microwave + grill function . . . . . .43
Programming the grill function . . . . . . . . . . . . . . . . . . . .44
The Craquine function . . . . . . . . . . . . . . . . . . . . . . . . . .45
The Craquine dish . . . . . . . . . . . . . . . . . . . . . . . . . . . .47
Recommendations . . . . . . . . . . . . . . . . . . . . . . . . . . . . .48
Care & cleaning . . . . . . . . . . . . . . . . . . . . . . . . . . . . . .49
Troubleshooting guide . . . . . . . . . . . . . . . . . . . . . . . . .50
After-sales service . . . . . . . . . . . . . . . . . . . . . . . . . . . . .51
Important safety instructions. Read careffully
and keep for future reference
Page 29

29
Installation
Leave sufficient space around the oven :
- 5 cm between the sides of the oven
and any walls or objects
- 14 cm above the oven
- 10 cm behind the oven.
LOCATION
BEFORE CONNECTION
•
Check whether your oven has suffered any damage during transport (deformed door or
door seal, etc.). If you see any signs of damage, contact your dealer before use.
•
Verify the power voltage. If there is a PERMANENT undervoltage (200-210 volts), consult your
electrical installer.
ELECTRICAL CONNECTION
•
The appliance should be installed at a distance of 85 cm above floor.
•
Place the oven on a flat and horizontal surface, away from any source of heat or
steam. To ensure the stability of the microwave oven, the front left foot is
adjustable (5 positions). Turn it to raise or lower the appliance.
•
Make sure that air may circulate freely around the oven.
•
Make sure that nothing obstructs the ventilation louvers at the back of the appliance.
•
Some ovens are designed for flush-fitting. To obtain the corresponding kit, consult your dealer
•
Make sure the electrical plug will be accessible after installation.
•
Do not use your appliance immediatly (wait approx. 1-2 hours) after transfer from a cold
place to a warm place as condensation may cause a malfunction.
•
Your installation must be protected by a 16 Amp thermal fuse.
•
It is mandatory to use a power point with a ground terminal, connected in accordance with
current safety regulations.
•
In your electrical installation, provide a device that is accessible to the installer, capable of
separating the appliance from the mains power and whose contact opening is at least 3 mm
at all of the poles.
•
If the supply cord is damaged, it must be replaced by the manufacturer, its service agent or
similarly qualified persons in order to avoid a hazard.
5 cm
14 cm
10 cm
5 cm
Page 30

30
BUILT-IN KIT
Installation
Page 31

31
BUILT-IN KIT
Installation
Page 32

32
76
5
4
1
2
3
BUILT-IN KIT
Installation
Page 33

33
BUILT-IN KIT
8
9
Installation
Page 34

34
BUILT-IN KIT
Installation
Page 35

35
Warning
• Your appliance is designed exclusively for the domestic purposes of defrosting, heating or
cooking foods. The manufacturer bears no responsibility in the case of improper usage.
• Only use ustensils that are suitable for use in microwave ovens.
• To avoid deterioration of your microwave oven, never operate it empty or without the
turntable.
• Never tamper with the lock mechanism of your microwave oven; you could cause damage
requiring repair by an authorised technician.
• When heating food in plastic or paper containers, keep an eye on the oven due to the
possibility of ignition.
• It is not advisable to use metal recipients, forks, spoons, knives, metal ties or staples for
deep-freeze bags.
• The contents of feeding bottles are baby food jars shall be stirred or shaken and the
temperature checked before consumption in order to avoid burns.
• Only allow children to use the oven without supervision when adequate instructions
have been given so that the child is able to use the oven in a safe way and understands
the hazards of improper use.
• Liquids and other foods must not be heated in sealed containers they are liable to explode.
• Eggs in their shell and whole hard-boiled eggs should not be heated in microwave ovens
since they may explode, even after microwave heating has ended.
• Microwave heating of beverages can result in delayed eruptive boiling, therefore care
must be taken when handling the container.
• For small amounts (one sausage, a single croissant, etc.), place a glass of water alongside the food item.
• Time settings that are too long may dry out and burn the food. To avoid such incidents,
never use the same cooking times as those recommended for traditional ovens.
• If smoke is observed, switch off or unplug the appliance and keep the door closed in
order to stifle any flames.
• In order to evacuate moisture, your appliance is fitted with a delayed ventilation function. Depending on the applied cooking mode (solo/grill/combination), the oven ventilation will continue to operate after the cooking end.
Page 36

36
General description
•
THE TURNTABLE :
ensures equal cooking of food throughout with no need to intervene.
- It may be used as a cooking dish.
- Rotation is controlled by the drive shaft and the wheel support.
- The turntable rotates in both directions.
- If it does not turn, verify that all components are properly positioned.
- For easy removal, wells are provided on either side.
•
TURNTABLE OFF :
stops the turntable from revolving in order to use platters which require the entire oven
space. When off, remember to turn the recipient or stir the contents.
•
THE WHEEL SUPPORT :
Do not try to rotate the roller ring manually, as you could damage the drive system. If it
does not turn smoothly, make sure that there is nothing in the well beneath the turntable.
•
Speed DEFROST STICKER : position the sticker as shown above.
TurntableDrive shaft Wheel
support
Identification
label
Speed DEFROST
sticker
Grill
Page 37

37
The control panel
A Display window :
to simplify programming, the display
indicates : the time of day, the types of
food and functions, the minutes /
seconds or weight programmed.
B The selector knob :
to choose the food type, function, programme time or weight.
C FOOD TYPE key :
to choose the food type, with the selector knob.
D FUNCTION key :
to choose the appropriate function, with
the selector knob.
E “AUTO” key :
automatically sets the correct programme
time according to a specified food type
and weight.
F ”CRAQUINE” key :
for use with the Craquine dish.
G GRILL key :
to select low or high grill.
H ”Speed DEFROST” key :
to quickly defrost all types of frozen food.
I STOP-TURNTABLE key :
to stop the turntable from revolving.
J PAUSE/CANCEL key :
to interrupt (press once) or cancel a programme (press twice). Also used to set
the clock.
K START key :
to start all programmes.
B
G
F
A
D
E
C
I
H
J
K
Page 38

38
Microwave power settings
When you select the type of food, the appropriate
power setting is automatically programmed.
After first plugging in your microwave oven or after a power outage,
the clock reads 00:00 and the two dots flash.
To set the clock :
- Press the PAUSE / CANCEL key for 5 seconds.
The 4 numbers flash
,
and a tone sounds indicating the hour must be set.
- Turn the selector knob to display the correct time.
- Validate by pressing the PAUSE / CANCEL key .
Your clock is set.
0 0 : 0 0
1 2 : 0 0
0 0 : 0 0
Setting the clock
POWER SETTING APPLICATION
DEFROST 150W
To defrost all frozen food or to top off cooking
of delicate dishes or to cook very slowly.
SIMMER 500W
HEAT 700W
To heat up all liquids and all fresh or frozen
pre-cooked dishes.
HIGH COOK 900W
To cook vegetables and soup.
Microwave output power : 900 W
To cook fish and poultry.
To finish programmes begun with the HIGH COOK
power setting, for instance beans, lentils, or
dairy products. (This power setting is available
when you programme with the function key.)
Page 39

39
The display and the selector knob guide you in your choice of :
food types
functions
DEFROST SIMMER HEAT COOK
LOW GRILL HIGH GRILL MICROWAVE + GRILL CRAQUINE
the weight for Automatic programming
the programme time (or clock)
The food type or function being selected will blink in the display.
12:00
beverages
beef,
lamb
vegetables
poultry
frozen
ready-
made
dishes
fresh
ready-
made
dishes
pork,
veal
fish
turkey
The display & the selector knob
12:00
Page 40

40
You may choose amongst the following programmes :
Express programme
▼▼
Set the programme time (ex. 2 minutes) with the selector knob.
The functions & blink alternatively to indicate
that the express programme (900 W) is set.
▼▼
Press START .
Programming
2 : 0 0
Your microwave oven is now plugged in and the clock is set.
Open the door, set the dish inside, close the door.
If the door is not properly shut, the appliance will not operate.
The following keys are used for the various programmes :
•
3 beeps announce the end of a programme. The beeps are repeated every minute for 10 minutes
until you open the door.
•
If you think there is insufficient space for the dish to turn freely inside the oven, press the STOP
TURNTABLE key before or during the programme.
•
If there is an error in the programming, press the CANCEL key twice.
SPEED DEFROST
AUTOMATIC
CRAQUINE
FOOD TYPE
FUNCTION
GRILL
Page 41

41
Programming with the function key
▼▼
Press the FUNCTION key, make your selection.
With this key, the
SIMMER setting is available.
▼▼
Wait until
00:00
flashes, set the programme time
with the selector knob.
▼▼
Press START .
Programming with the food type key
▼▼
Press the FOOD TYPE key, make your selection.
▼▼
Press the FUNCTION key, make your selection;
the correct microwave power setting will be programmed
according to the food type selected.
▼▼
Wait until
00:00
flashes, set the programme time
with the selector knob.
▼▼
Press START .
Automatic programming
With the AUTO key, the programme time is set automatically
according to the weight of your food item.
▼▼
Press the FOOD TYPE key, make your selection.
▼▼
Press the FUNCTION key, make your selection.
▼▼
Press the AUTO key; flashes,
use the selector knob to indicate the weight of your food item.
▼▼
Press START .
The appropriate time is programmed automatically
.
5 0
Programming
5 : 0 0
7 : 0 0
Auto Programming
5 0 0
9 : 0 0
Page 42

42
Speed DEFROST
With the Speed DEFROST key you can quickly defrost all types of frozen
food. To guarantee quality results, use Speed DEFROST for dishes weighing
up to 500g. To defrost food items over 500g, use the FUNCTION key (as
described on the preceding page).
▼▼
For quick defrosting of meat, poultry, fish,vegetables and beverages,
press the Speed DEFROST key once :
is displayed.
▼▼
For quick defrosting of bread, rolls and pastry, press the Speed DEFROST key twice :
is displayed.
▼▼
Wait until flashes.
▼▼
Use the selector knob to enter the weight of your food item
(up to 500g).
▼▼
Press START .
The defrost time corresponding to the given weight is automatically calculated.
Necessary time may vary according to the initial temperature of the food (the defrost
times were calculated for food frozen at -18°C).
The defrost time is displayed and the programme begins.
When using Speed DEFROST or the defrost function a beep indicates the midpoint of the programme (the oven continues to operate). To obtain the best results,
turn the food at this time, close the door and press the
START key to continue
the second half of the programme.
▼▼
10 0
S 2
S 1
4 0 0
Page 43

43
This function enables you to use the microwaves and grill simultaneously, for rapid
cooking.
The Rack
for use with the GRILL function, to brown shallow
dishes.
When used with the simple or combined microwave
functions, it must be positioned on the center of the
turntable. Metal dishes may be used on the rack
only with the simple GRILL function. However, you
can heat a dish in an aluminum tray if it is isolated from
the rack atop a plate.
the Rack
The microwave + grill function
This function enables you to brown dishes such as gratins or meat. It may be used
before or after cooking, as called for in the recipe.
•
The grill folds down for easy cleaning :
1. Horizontal position: for cooking au gratin, grilled food laid flat.
2. Vertical position : for cleaning the oven.
Always allow the grill to cool off 25 minutes before touching it.
•
After grilling make sure to use an oven mitt to handle dishes, and remember to use only
oven proof cookware such as ceramic dishes or heat resistant glass.
•
The dual level grill offers you a choice between :
HIGH GRILL (press the GRILL
key once) and LOW GRILL (press twice).
As a rule, use the HIGH GRILL level to grill meat and fish and the LOW GRILL level
with the simultaneous microwave + grill function for gratins and to brown delicate dishes.
The grill function
Grill
Positions
1
2
Page 44

44
Programming the grill
Programming the dual-level grill
▼▼
Press the GRILL key once to select HIGH GRILL ,
press twice to select LOW GRILL .
▼▼
Wait until
00:00
flashes, set the programme time
with the selector knob.
▼▼
Press START .
Press the GRILL key a third time to turn the grill off.
Programming the microwave + grill functions simultaneously :
▼▼
Press the FOOD TYPE key, make your selection.
▼▼
Press the FUNCTION key , select the microwave +
grill function.
The appropriate microwave power setting and the grill
level will be automatically adjusted according to your food type.
▼▼
Wait until
00:00
flashes, set the programme time with the
selector knob.
▼▼
Press START .
In the event the food item you wish to cook does not correspond
to any of the proposed food categories :
▼▼
Press the FUNCTION key , select the microwave
+ grill function.
A medium microwave power setting and the high grill
level will be programmed.
▼▼
Wait until
00:00
flashes, set the programme time
with the selector knob.
▼▼
Press START .
▼▼
4 : 0 0
6 : 0 0
6 : 0 0
Page 45

45
The CRAQUINE function
With the CRAQUINE function you can save time and energy cooking your favorite dishes
and have them turn out as crispy, tasty and golden brown as if cooked in a traditional oven.
• Use of the CRAQUINE key together with the CRAQUINE dish, allows you to use the
grill and microwave functions simultaneously.
• The CRAQUINE dish features a special coating that absorbs microwaves through its
bottom.
• It radiates heat from below the food to cook or reheat it, giving it the required color
and crispness while the grill browns the top.
2 cooking methods :
• Without preheating - by using the CRAQUINE function you can cook and brown
most frozen meals and fresh, dough-based dishes without preheating the
CRAQUINE dish. They turn out as crispy as if cooked in a traditional oven.
• With preheating - the CRAQUINE dish can be preheated using the CRAQUINE key
for a maximum of 2 minutes. Preheating is recommended to cook or brown small
pieces of meat or fish and some dough-based, frozen and take-out dishes.
Recommendations :
• Take foods out of their metallic or plastic packaging before cooking or reheating
them with the CRAQUINE function.
• It is advisable to program shorter cooking times and extend if necessary.
• All foods with a skin or wrapping, such as potatoes and sausages, must be pierced
before cooking.
• Make sure pieces of meat are completely thawed out and dried off before searing
with the CRAQUINE function.
• Keep an eye on the food’s colouring, just as you would with a traditional oven.
• Protect your hands when taking out the dish because it can be extremely hot.
• Do not serve stuffed foods (apple pastry for example) too quickly because they can
be warm on the surface whereas the filling is extremely hot.
• Cooking or reheating of eggs with the CRAQUINE function is prohibited.
• If you wish to cook several dishes consecutively with the CRAQUINE function, allow
the oven to cool 10 minutes between dishes for better browning.
Page 46

46
Example : to cook a frozen pizza (350 g)
The CRAQUINE function
Place the frozen pizza directly on the CRAQUINE dish,
place the CRAQUINE dish on the middle of the turntable.
Programming
Press the CRAQUINE key :
the Craquine symbol is
displayed.
Wait until “00:00” flashes,
set the programme time
with the selector knob.
ex. 6 minutes.
Press START .
the turntable revolves, the oven light comes on.
➤ Be sure and use an oven mitt to remove the
pizza dish.
6 : 0 0
1
2
3
6:00
Page 47

47
Care of the CRAQUINE dish
• The inside of the dish is covered with a non-stick coating,
so it is not necessary to grease it before use.
• Do not cut foods directly in the CRAQUINE dish as this
damages the non-stick coating.
• The CRAQUINE dish is dishwasher-safe.
• Use a sponge, hot water and dishwashing liquid
to wash the dish. Do not use a metallic sponge
or scouring powder.
Recommendations
• Do not place the CRAQUINE dish on the rack; this could
cause irremediable damage to your oven.
• Do not place the CRAQUINE dish in a traditional oven, on
gas, electric or other stoves or on any very hot surface.
➤ The CRAQUINE dish may be preheated for certain purposes but never pre-
heat for longer than 2 minutes.
• Do not leave any utensils in a hot CRAQUINE dish as the high temperature may
damage them.
The CRAQUINE dish
The CRAQUINE dish
Page 48

48
Recommendations
WHILE THE OVEN IS OPERATING :
• If you used the time or AUTO key,
➤ you may change the programme length at any time.
• You may stop or start the turntable revolving during a programme by pressing the
TURNTABLE STOP key .
• To change the food type or FUNCTION selection, press the CANCEL key twice and
programme again.
• If you open the door before the end of the programme, shut the door and press the
START key to continue the programme.
• If you remove a dish before the end of the programme, press the CANCEL key twice
to erase the programme.
REMARKS :
• If you wait longer than 3 minutes to press the START key after having entered
a programme, it will be cancelled (the clocktime will be displayed).
Page 49

49
Care & cleaning
• WARNING : It is recomended to clear the oven regularly and to take
any food deposit inside and outside the appliance.Use a soapy and
wet cloth. If the appliance is not kept clean, its surface could deteriorat
and adversely affect its life and possibly result in a hazardous situation.
If the door or door seals are damaged, the oven must not be operated
until it has been repaired by a competent person.
• A steam cleaner is not to be used.
• Do not use abrasives, alcohol or solvents as
they are liable to damage the oven.
• In the event of unsavory odors or caked-on dirt, boil water containing lemon juice or
vinegar in a cup for 2 minutes and clean the walls with a little dishwashing liquid.
• For those ovens with grill or convection heat functions, the top and rear air vents beco-
me very hot. Do not touch these parts after use; wait till the appliance has cooled down
in order to clean it. Use a fine steel wool pad on the metal parts.
• The turntable can be removed for cleaning. Wells are
provided on both sides for easy access.
If you remove the drive shaft, do not allow water
to enter the motor shaft hole.
Be sure to put the turntable, the drive shaft and the wheel support back in their proper place.
SOAP
+
WATER
Page 50

50
Troubleshooting guide
Problem
▼ The time counts down, but the appliance
does not function (the turntable does not
rotate, the light does not come on and
the food is not heated)
▼ The microwave oven is noisy when
operating.
▼ Condensation forms on the door glass
▼ The grill element smokes when it heats up.
▼ The turntable does not revolve correctly
▼ The microwave programs do not produce
the desired results.
▼ The appliance produces sparks.
Suggestion
▲ Press the
TURNTABLE OFF
key for
5 seconds.
▲ Adjust the front left foot.Clean the
wheels and the well area beneath the
turntable.
▲ Wipe the water off with the help of a
cloth in order to avoid.
▲ Clean all cooking residue from the grill
element.
▲ Clean the wheels and the well beneath
the turntable.
▲ Clean the vents under the appliance.
Make sure that you use only containers
which are suitable for microwave cooking.
▲ Check whether the wheel support is cor-
rectly positioned.
Thoroughly clean the appliance :
remove any greasy deposits, cooking
residue, etc...
Move any metal objects away from the
oven walls.
Never use metallic containers with the
rack.
Page 51

51
After-sales service
•
If the equipment has sustained any damage :
- Check that the door is not deformed.
•
If the oven does not operate, before calling the repairman :
- Check the electrical supply.
- Check that the door is properly closed.
- Check your programming.
CAUTION : never attempt to repair your oven yourself.
WARNING : it is dangerous for anyone other than qualified personnel to make any repairs
requiring removal of the cover providing protection from exposure to microwave energy.
Only a specially trained technician is qualified
to repair your microwave oven
Page 52

52
Inhalt
Installation . . . . . . . . . . . . . . . . . . . . . . . . . . . . . . . . . . . . .53
Warnung . . . . . . . . . . . . . . . . . . . . . . . . . . . . . . . . . . . . . . .59
Präsentierung . . . . . . . . . . . . . . . . . . . . . . . . . . . . . . . . . . . .60
Schalterblende . . . . . . . . . . . . . . . . . . . . . . . . . . . . . . . . . . .61
Einstellen der uhrzeit / Leistungsangaben . . . . . . . . . . . . . . . . . . . .62
Anseige und Drehwähler . . . . . . . . . . . . . . . . . . . . . . . . . . . . .63
Programmierung . . . . . . . . . . . . . . . . . . . . . . . . . . . . . . . . . .64
Programmierung / AUTO Programmierung . . . . . . . . . . . . . . . . .65
"Speed DEFROST" . . . . . . . . . . . . . . . . . . . . . . . . . . . . . . . . .66
Grillbetrieb / Kombibetrieb (Mikrowelle + Grill) . . . . . . . . . . . . .67
Grillprogrammierung . . . . . . . . . . . . . . . . . . . . . . . . . . . . . . .68
CRAQUINE-Betrieb . . . . . . . . . . . . . . . . . . . . . . . . . . . . . . . . .69
CRAQUINE-Fonktion . . . . . . . . . . . . . . . . . . . . . . . . . . . . . . . .70
CRAQUINE-Teller . . . . . . . . . . . . . . . . . . . . . . . . . . . . . . . . . .71
Hinweise . . . . . . . . . . . . . . . . . . . . . . . . . . . . . . . . . . . . . . .72
Reinigung und Pflege . . . . . . . . . . . . . . . . . . . . . . . . . . . . . . .73
Ein kleines Problem ! Was können sie tun ? . . . . . . . . . . . . . . . .74
Kundendienst . . . . . . . . . . . . . . . . . . . . . . . . . . . . . . . . . . . .75
Wichtige Sicherheitshinweise. Bitte aufmerksam lesen und für
zukünftige Benutzungen aufbewahren.
Page 53

53
Installation
•
Vergewissern Sie sich, dass das Gerät während des Transports nicht beschädigt
wurde (verformte Tür oder Dichtung, usw. ...). Sollten Sie irgendeine
Beschädigung feststellen, bitte vor der Benutzung des Gerätes mit Ihrem
Händler Kontakt aufne hmen.
•
Überprüfen Sie die Netzspannung. Im Falle einer PERMANENTEN Unterspannung (200-210 Volt)
müssen Sie Ihren Elektriker konsultieren.
Für Geräte, die auf eine Arbeitsplatte
gestellt werden, einen Platz wählen,
der mindestens:
- 5 cmRaum zwischen den Seitenwänden
des Gerätes und den Wänden,
- 14 cm über dem Gerät
- und 10 cm hinter der Rückwand des
Gerätes frei lässt.
Aufstellungsort
Vor Dem Stromanschluss
•
Dieses Gerät muss mindestens 85 cm vom Fußboden entfernt aufgestellt
(oder eingebaut) werden.
•
Stellen Sie das Gerät auf eine ebene, waagerechte, von Wärme- oder
Dampfquellen entfernte Fläche. Um die Stabilität des Gerätes sicherzustellen, ist der vordere linke Fuß einstellbar (5 Positionen). Diesen drehen,
um den Mikrowellenherd höher oder tiefer zu stellen.
•
Vergewissern Sie sich, dass die Luftzirkulation unter und um den Herd nicht
behindert ist.
•
Darauf achten, dass die unter dem Mikrowellenherd und an seiner Rückwand vorhandenen
Belüftungsöffnungen nicht verstopft werden.
•
Bestimmte Geräte können eingebaut werden. Um den entsprechenden Einbausatz zu
erhalten, wenden Sie sich bitte an Ihren Händler.
•
Achten Sie darauf, dass die Steckdose nach der Installation erreichbar bleibt.
•
Benutzen Sie Ihr Gerät nicht sofort, wenn Sie es von einem kalten an einen warmen
Ort transportiert haben (warten Sie 1 bis 2 Stunden), da die Kondensierung eine
Funktionsstörung hervorrufen könnte.
•
Ihre Installation muss mit einem thermischen Schutz von 16 Amperen versehen sein.
•
Unbedingt eine den geltenden Sicherheitsnormen entsprechend angeschlossene und mit
einer Erdungsklemme versehene Steckdose benutzen.
•
Sorgen Sie dafür, dass Ihre elektrische Installation eine für den Benutzer erreichbare
Vorrichtung enthält, damit er das Gerät vom Stromnetz trennen kann. Die Kontaktöffnung
dieser Vorrichtung muss im Bereich aller Pole mindestens 3 mm betragen.
•
Wenn das Versorgungskabel beschädigt ist, muss es durch den Hersteller, seinen Kundendienst
oder eine Person mit einer gleichwertigen Qualifikation ersetzt werden, um Gefahren zu
unterbinden.
Stromanschluss
5 cm
14 cm
10 cm
5 cm
Page 54

54
Einbaurahmen
Installation
Page 55

55
Einbaurahmen
Installation
Page 56

56
76
5
4
1
2
3
Einbaurahmen
Installation
Page 57

57
Einbaurahmen
8
9
Installation
Page 58

58
Einbaurahmen
Installation
Page 59

59
Warnung
• Dieses Gerät ist ausschließlich zum Zubereiten, Aufwärmen und Auftauen von
Lebensmitteln im Hausgebrauch bestimmt. Für Schäden durch unsachgemäßen
Umgang kann der Hersteller nicht haftbar gemacht werden.
• Sich vergewissern, dass die benutzten Utensilien für den Gebrauch in einem
Mikrowellenherd geeignet sind.
• Um Beschädigungen am Gerät zu vermeiden, dieses nicht leer und ohne Einsatz
einschalten.
• Nehmen Sie keine Veränderungen an den Öffnungen auf der Verriegelung auf der
Vorderseite des Geräts vor, da dieses sonst beschädigt werden kann.
• Während des Erhitzens von Nahrungsmitteln in Kunststoffbehältern oder Papier, die
Mikrowelle aufgrund einer möglichen Entzündungsgefahr beobachten.
• Es wird abgeraten, Metallgegenstände - Besteck, Verschlüsse, Klammern usw. aus
Metall bei Gefrierbeuteln - in den Mikrowellenherd zu bringen.
• Der Inhalt von Babyflaschen und Nahrungsmittelgläsern für Babys muss geschüttelt oder
umgerührt und die Temperatur vor dem Verzehr überprüft werden, um Verbrennungen zu
vermeiden.
• Kinder den Mikrowellenherd nicht unbeaufsichtigt und ohne die
entsprechenden Erläuterungen bedienen lassen, um sicherzustellen, dass sie die damit
verbundenen Gefahren eindeutig verstanden haben.
• Flüssigkeiten oder sonstige Nahrungsmittel dürfen nicht in hermetisch verschlossenen
Behältern erhitzt werden, sie könnten explodieren.
• Wir empfehlen Ihnen, in einem Mikrowellenherd Eier nicht in ihrer Schale zu erhitzen,
dasselbe gilt für ganze, hart gekochte Eier, da sie sogar nach dem Ende des Garvorgangs
explodieren können.
• Das Erhitzen von Getränken in der Mikrowelle kann ein plötzliches und verzögertes
Übersprudeln hervorrufen, deshalb beim Herausnehmen des Gefäßes vorsichtig sein.
• Stellen Sie beim Erwärmen kleiner Mengen (Würstchen, Brötchen usw.) ein Glas Wasser
daneben.
• Bei zu langem Aufwärmen können die Speisen austrocknen bzw. verkohlen. Beachten Sie
deshalb, dass die Zeit zum Erwärmen bei einem Mikrowellenherd wesentlich niedriger ist als
bei einem normalen Backofen.
• Bei Rauchbildung, die Mikrowelle abschalten oder vom Stromnetz trennen und die Tür
geschlossen lassen, um eventuelle Flammen zu ersticken.
• Ihr Gerät ist für das Ausführen des Wasserdampfes mit einer verzögerten Lüftung ausgestattet. Je nach gewählter Garart (Solo/Grill/Kombination) kann die Lüftung nach Beendigung
des Kochvorgangs noch weiter funktionieren.
Page 60

60
Präsentierung
Drehteller
Mitnehmer
RollenträgerIdentifikationschild
Aufkleber
Speed DEFROST
Grill
• Der DREHTELLER:
Ermöglicht ein gleichmäßiges Garen des Nahrungsmittels ohne Handhabungen.
- Er kann als Kochbehälter benutzt werden.
- Er wird anhand des Mitnehmers und des Rollenträgers gedreht.
- Er dreht sich ohne Unterschied in beide Richtungen.
- Wenn er sich nicht dreht nachsehen, ob alle Elemente korrekt positioniert sind.
•
Der Teller in blockierter Position:
Ermöglicht die Benutzung großer Platten auf der ganzen Innenfläche des Herdes. In
diesem Fall muss der Kochbehälter nach Ablauf des halben Programms gedreht, oder
sein Inhalt umgerührt werden.
• Der ROLLENTRÄGER:
- Versuchen Sie nicht, den Rollenträger von Hand zu drehen, Sie könnten das
Mitnehmsystem beschädigen. Wenn der Teller sich nicht korrekt dreht nachsehen, ob an
seiner Unterseite Fremdkörper haften.
•
Speed DEFROST- Aufkleber
Bringen Sie den selbstklebenden Aufkleber unten an der Garraumfront an (s. Abb.).
Die Einbaurichtung des Mitnehmers und des Rollenträgers nach der obigen
Zeichnung muss beachtet werden (zentrale Verformung des Trägers nach oben).
Page 61

61
Schalterblende
A
Das Anzeigefeld :
erleichtert Ihnen die Programmierung durch die
Anzeige: der Lebensmittelund Funktionsgruppen,
der programmierten Ziet bzw. des programmierten
Gewichts, und der Tageszeit.
B
Der Wählschalter:
ermöglicht die Auswahl des Lebensmittels, der
Funktion, der Zeit oder des Gewichts.
C
Taste Lebensmittel
:
ermôglicht die Auswahl der Lebensmittelgruppe
mit Hilfe des Drehwählers.
D
Taste Funktionen
:
ermöglicht die Auswahl der passenden
Funktion mit Hilfe des Drehwählers.
E
Taste
AUTO :
programmiert automatisch die notwendige
Zeit entsprechend dem Gewicht des
gewählten Lebensmittels.
F Taste "CRAQUINE" :
zum Betrieb mit dem Craquine-Teller.
G Taste GRILL :
ermöglicht die Auswahl einer der zwei
Leistungsstufen des Grills.
H Taste "Speed DEFROST" :
ermöglicht das schnelle Auftauen von
Nahrungsmitteln.
I Taste Drehteller-Stop :
zum Abschalten des Drehtellers.
J
Taste Pause/Korrektur :
ermöglicht das Unterbrechen bzw. Löschen
eines laufenden Programms (einmal Drücken
für PAUSE, zweimal Drücken für Korrektur).
Ermöglicht ebenfalls das Einstellen der Uhr.
K Starttaste :
zum Starten der angewählten Funktion.
B
G
F
A
D
E
C
I
H
J
K
Page 62

62
Nach dem Anschließen des Gerätes am Stromnetz oder einem
Stromausfall zeigt das Anzeigefeld 00:00, die beiden Punkte
zwischen den Zahlenblocks blinken.
Einstellen der Tageszeit:
- 5 Sekunden lang die Taste Pause/Korrektur gedrückt halten. Die vier Ziffern
blinken und ein Piepton signalisiert, daß die Zeit eingegeben werden kann.
- Tageszeit durch Drehen des Drehwählers einstellen.
- Ein einfacher Druck auf die Taste Pause/Korrektur bestätigt die Eingabe.
Die Uhr ist nun eingestellt.
Leistungsangaben
0 0 : 0 0
1 2 : 0 0
0 0 : 0 0
Einstellen der uhrzeit
Bei Auswahl eines Lebensmittels wird
die notwendige Leistung automatisch programmiert.
AUFTAUEN
150W
Auftauen von Fleisch, Fisch, Obst, Brot und anderen
empfindlichen Speisen.
(Fertig) garen empfindlicher Lebensmittel
SCHONENDES
WEITERKOCHEN
500W
Garen von Fish und Geflügel.
Fertiggaren von Lebensmitteln wie Linsen, weiße
Bohnen, Milchspeisen
(Diese Funktion steht zur Verfügung wenn Sie die
Programmation mit der Funktionsauswahl beginnen.)
ERHITZEN
700W
Erhitzen von Flüssigkeiten
Erhitzen von Tellergerichten (frisch oder tiefgekühlt)
GAREN
900W
Garen von frischem Gemüse und Suppen.
Ausgangsleistung : 900 W
FONCTION UTILISATION
Page 63

63
Die Anzeige und der Drehwähler leiten Sie bei der Wahl :
der Lebensmittel
der Funktionen
AUFTAUEN SCHONENDES ERHITZEN GAREN
WEITERKOCHEN
MEDIUM GRIL STARKER GRIL MIKROWELLE
+GRIL CRAQUINE
des Gewichts für die Automatikprogrammierung
der Programmdauer (oder der Tageszeit)
Das gewählte Lebensmittel bzw. die gewählte Funktion blinkt.
12:00
12:00
Flüssig-
keiten
Rind,
Lamm
Gemüse
Geflüdel
tief-
gekühlte
Fertig-
gerichte
frische
Fertig-
gerichte
Schwein,
Kalb,
Pute
Fisch
Anzeige und Drehwähler
Page 64

64
Programmierung
Das Gerät ist nun angeschlossen und die Uhr eingestellt.
Öffnen Sie die Tür. Stellen Sie das Nahrungsmittel in das Gerät und schließen Sie die Tür.
Sollte die Tür nicht richtig zu sein, funktioniert das Gerät nicht.
Die Programmierung erfolgt mit den Tasten Lebensmittel, Funktionen, Speed
DEFROST und AUTO.
•
Wenn sich das Gerät abschaltet, zeigt ein dreifaches, akustisches Signal das Programmende an.
Dieses Signal wird 10 Minuten lang jede Minute wiederholt, bis die Tür geöffnet wird.
•
Wenn Sie möchten daß das Gefäß sich nicht dreht, die Taste Drehteller-Stop vor oder
während dem Programm betätigen.
•
Bei einem Programmierfehler zweimal auf die Taste Korrektur drücken.
SPEED DEFROST
AUTOMATIK
CRAQUINE
LEBENSMITTEL
FUNKTIONEN
GRILL
Folgende Programme stehen zur Verfügung:
Expreßprogrammierung
▼▼
Gewünschte Zeit (z. B. 2 Minuten) mit Hilfe des Drehwählers
programmieren. Die funktionen und blinken
und zeigen die Expreßleistung 900 W an.
▼▼
Starttaste drüken.
2 : 0 0
Page 65

65
Programmierung
Automatikprogrammierung
Mit der Taste
AUTO, wird die Zeit
automatisch
entsprechend dem Lebensmittelgewicht errechnet.
▼▼
Auf die Taste Lebensmittel drücken, Wahl treffen.
▼▼
Auf die Taste Funktionen drücken, Wahl treffen
▼▼
Auf die Taste AUTO drÜcken: blinkt; nun das
Gewicht (500 g) mit Hilfe des Drehwählers eingeben.
▼▼
Starttaste drücken .
Die entsprechende Zeit wird automatisch angezeigt
.
5 0
Programmierung über die Funktion
▼▼
Auf die Taste Funktionen drücken, Wahl treffen.
In diesem Modus steht die Funktion
SCHONENDES
WEITERKOCHEN
zur Verfügung.
▼▼
Warten, bis “ 00 : 00” blinkt, gewünschte Zeit
mit Hilfe des Drehwählers programmieren.
▼▼
Starttaste drücken.
Programmierung über das Lebensmittel
▼▼
Auf die Taste Lebensmittel drücken, Wahl treffen.
▼▼
Auf die Taste Funktionen drücken, Wahl treffen.
Die Leistung der Mikrowelle wird an das gewählte
Lebensmittel angepaßt.
▼▼
Warten, bis “00:00” blinkt, gewünschte
mit Hilfe des Drehwählers programmieren.
▼▼
Starttaste . drücken.
5 : 0 0
7 : 0 0
AUTO Programmierung
5 0 0
9 : 0 0
Page 66

66
Speed DEFROST
Die Taste Speed DEFROST ermöglicht das schnelle Auftauen von
Nahrungsmitteln mit einem Höchstgewicht von 500 g, um gute Ergebnisse
zu garantieren. Über dieses Gewicht hinaus die Taste FUNKTIONEN verwenden, um die Nahrungsmittel aufzutauen (siehe vorstehende Seite).
▼▼
Für das schnelle Auftauen von Fleisch, Geflügel, Fisch, Gemüse
und Flüssigkeiten, einmal auf die Taste Speed DEFROST drücken:
wird angezeigt.
▼▼
Für das schnelle Auftauen von Brot, Kuchen und Gebäck, zweimal auf die Taste
Speed DEFROST drücken:
wird angezeigt.
▼▼
Abwarten, bis angezeigt wird.
▼▼
Mit dem Wahlschalter das Gewicht des Nahrungsmittels eingeben (höchstens 500 g).
▼▼
Auf die Starttaste drücken .
Die Auftauzeit wird automatisch im Verhältnis zum Nahrungsmittelgewicht ausgerechnet.
Diese Zeit kann von der Anfangstemperatur des Nahrungsmittel abhängen. (Die angegebenen Zeiten entsprechen bei – 18°C tiefgekühlte Produkte).
Die Zeit wird angezeigt und der Ofen startet.
Während des Auftauens (Speed DEFROST oder Funktion ) erinnert ein anhaltendes
Signal in der Programmitte daran, daß das Lebensmittel umgedreht werden muß, um ein
besseres Ergebnis zu erzielen. Tür wieder schließen und auf die Starttaste drücken, um
den Betrieb wieder aufzunehmen.
1 0 0
S 2
S 1
Page 67

67
Bei dieser Funktion werden gleichzeitig Mikrowellen und der Grill eingesetzt,
wodurch eine kurze Garzeit erzielt wird.
GRILLROST
ermöglicht beim Grillen das Bräunen von dünnen
Lebensmitteln.
Beim Einsatz im Kombibetrieb (Mikrowelle + Grill) muß es
unbedingt mittig auf dem Drehteller stehen. Der Einsatz des
Grillrost mit Metallgefäßen ist aus-schließlich der Funktion
Grill alleine vorbehalten.
Lebensmittel in Aluminiumschalen können jedoch aufgewärmt werden, sofern sie durch einen Teller vom Grillrost
getrennt werden.
Grillrost
Kombibetrieb (Mikrowelle + Grill)
Mit dieser Funktion können Lebensmittel wie Überbackenes und Fleisch gebräunt werden.
Je nach Rezept kann dies vor oder nach dem Garen erfolgen.
• Der Grill kann zum leichteren Reinigen nach unten geklappt werden.
1. Horizontaler Grill : zum Überbacken und Grillen auf dem Grillrost
2. Abgeklappter Heizstab : zum Drehspießgrillen und zur Reinigung der
Garraumdecke.
Das Gerät nicht mit Grill in abgeklappter Position in Betrieb nehmen,
da dadurch nicht reparierbare Schäden an Ihrem Gerät entstehen könnte.
Vor dem Berühren des Heizstabs mindestens 25 Minuten nach Gebrauch warten.
•
Bei Einsatz des Grills müssen die Hände gut geschützt sein, um die Gefäße aus dem Ofen
zu nehmen. Außerdem müssen Gefäße benutzt werden, die hohen Temperaturen standhalten,
wie z. B. feuerbeständiges Glas oder Keramik.
•
Es stehen zwei Leistungsstufen zur Verfügung:
Starker Grill (einmaliges Drücken
der Taste Grill) und Medium Grill (zweimaliges Drücken).
Im Allgemeinen sollte der Starke Grill für das Grillen von Flaisch und Fisch verwendet
werden und der Medium Grill im Kombibetrieb Mikrowelle + Grill zum Überbacken
sowie zum Braünen empfindlicher Lebensmittel.
Grillbetrieb
Positionen
des Grills
1
2
Page 68

68
Grillprogrammierung
Einsatz des Grills mit zwei Leistungsstufen
▼▼
Einmaliges Drücken der Taste Grill wählt den starken Grill ,
zweimaliges Drücken den milden Grill .
▼▼
Warten, bis “00:00” blinkt, gewünschte
mit Hilfe des Drehwählers programmieren.
▼▼
Starttaste drücken.
Ein dritter Druck auf die Taste Grill stoppt den Grill.
Kombibetrieb (gleischzeitiger Einsatz von Mikrowelle + Grill) :
▼▼
Auf die Taste Lebensmittel drücken, Wahl treffen.
▼▼
Auf die Taste Funktionen drücken, Anschließend
Funktion Kombibetrieb .
Die Leistung der Mikrowelle und des Grills werden
automatisch an die Speise angepaßt.
▼▼
Warten, bis “00:00” blinkt, gewünschte
mit Hilfe des Drehwählers programmieren.
▼▼
Starttaste drücken.
Sollte das Lebensmittel keiner der verschiedenen Gruppen angehören :
▼▼
Auf die Taste Funktionen drücken, Anschließend
Funktion Kombibetrieb .
In diesem Fall werden eine mittlere Leistung der Mikrowelle
und der starke Grill vorprogrammiert.
▼▼
Warten, bis “00:00” blinkt, gewünschte
mit Hilfe des Drehwählers programmieren.
▼▼
Starttaste drücken.
4 : 0 0
6 : 0 0
6 : 0 0
▼▼
Page 69

69
CRAQUINE -Betrieb
Die CRAQUINE-Funktion ermöglicht eine Zeit- und Energieeinsparung und bewahrt
dennoch den Genuß klassischer Rezepte (Geschmack, Farbe und Knusprigkeit).
• In Zusammenhang mit dem Teller ermöglicht die CRAQUINE-Funktion den gleichzeitigen Einsatz von Grill und Mikrowellen.
• Der besonders beschichtete CRAQUINE-Teller nimmt die Mikrowellen von unten auf.
• Sie verteilt diese Hitze unter dem Lebensmittel, um es zu garen oder zu erhitzen und
ihm so die gewünschte Farbe und Knusprigkeit zu verleihen, während der Grill es von
oben bräunt.
2 Einsatzmöglichkeiten:
Ohne Vorwärmen können die meisten tiefgekühlten bzw. frischen Zubereitungen
aus Teig gebacken und gebräunt werden. Sie erhalten dabei die gleiche Knusprigkeit
wie in einem herkömmlichen Backofen.
Mit Vorwärmen - (dem leeren CRAQUINE-Teller max. 2 Minuten vorheizen). So können
kleinere Fleischstücke angebraten und gegart, oder Portions-, tiefgekühlte oder Fertiggerichte auf Teigbasis erhitzt und gebräunt werden.
Hinweise
• Vor dem Garen oder Erhitzen mit der CRAQUINE-Funktion die Lebensmittel aus
ihrer Originalverpackung (Metall, Kunststoff) nehmen.
• Am besten eine sehr geringe Zeit programmieren und gegebenenfalls noch etwas
Zeit anhängen.
• Sämtliche Lebensmittel mit Hülle oder Haut, wie z. B. Kartoffeln oder Wurst, müssen vor dem Garen angestochen werden.
• Nach dem vollständigen Auftauen Fleischstücke gut trocknen, bevor sie mit der
CRAQUINE-Funktion angebraten werden.
• Wie beim herkömmlichen Kochen auf die Färbung der Lebensmittel achten.
• Die Hände müssen gut geschützt sein, um das Gefäß aus dem Ofen zu nehmen, da
dieses sehr heiß wird.
• Gefüllte Lebensmittel dürfen nicht zu schnell verzehrt werden (z. B. kleine Blätterteigpasteten), da sie außen nur lauwarm, innen jedoch sehr heiß sein können.
• Das Kochen oder Erhitzen von Eiern mit der CRAQUINE-Funktion ist untersagt.
• Sollen mehrere Kochvorgänge mit der CRAQUINE-Funktion nacheinander durchge-
führt werden, empfehlen wir das Einhalten einer Wartezeit von ca. 10 Minuten zwischen den einzelnen Kochvorgängen, damit sich der Ofen etwas abkühlen kann und
eine schönere Färbung erzielt wird.
Page 70

70
Die tiefgekühlte Pizza direkt auf der
CRAQUINE-Teller,
und diese wiederum in die Mitte des Drehtellers legen.
Programmierung
Auf die Taste
CRAQUINE
drücken:
Es wird CRAQUINE angezeigt
Warten, bis “00:00” blinkt, gewünschte
mit Hilfe des Drehwählers programmieren.
Starttaste . drücken.
der Drehteller setzt sich in Bewegung,
die Innenbeleuchtung schaltet sich ein.
➤ Nach der Garzeit die Platte mit einem Schutz-
handschuh aus dem Ofen holen.
Beispiel : 1 tiefgekühlte pizza mit 350 g
CRAQUINE-Funktion
6 : 0 0
1
2
3
6:00
Page 71

71
Pflege des
CRAQUINE-Tellers
•Die Innenseite ist antihaftbeschichtet; somit muß
der Teller vor dem Gebrauch nicht eingeölt werden.
•Keine Lebensmittel in dem Teller schneiden, damit
die Beschichtung erhalten bleibt.
•Zum Reinigen des Tellers genügen ein Schwamm,
etwas warmes Wasser und ein flüssiges Reinigungs-
mittel. Keinen metallischen Scheuerschwamm und
kein Scheuerpulver verwenden.
Der Teller kann in der Spülmaschine gespült werden.
Bemerkungen
• Den CRAQUINE-Teller immer auf den Drehteller stehen,
nie auf den Grillrost. Der Einsatz des CRAQUINE-Tellers
auf dem Grillrost kann zu Funkenüberschlägen und
somit zur Beschädigung des CRAQUINE-Tellers führen.
• Den CRAQUINE-Teller niemals in einem herkömmlichen Backofen, auf Kochzonen
(Gas, Strom oder ähnlich) oder auf einer anderen Fläche, die eine große Hitze abstrahlt,
verwenden.
• Kein Küchenutensil in dem heißen CRAQUINE-Teller lassen: die erreichte
Temperatur könnte es beschädigen.
CRAQUINE -Teller
Der CRAQUINE-Teller
Scheuerpulver
Page 72

72
Hinweise
WÄHREND DES KOCHVORGANGS:
• Wurde die Programmierung über die Zeit oder mit der Taste AUTO vorgenommen,
➢ kann die Dauer jederzeit geändert werden.
• Während des Kochvorgangs kann der Drehteller durch Drücken der Taste Drehteller-Stop
angehalten oder gestartet werden.
• Um die Wahl der Funktion oder des Lebensmittels zu ändern, muß die Taste Pause/
Korrektur zweimal gedrückt und die Programmierung erneut vorgenommen werden.
• Sollte die Tür vor Programmende geöffnet werden, diese wieder schließen und auf die
Starttaste drücken, um den Betreib wieder aufzunehmen.
• Sollte das Lebensmittel vor Programmende entnommen werden, müssen die angezeigten
Daten durch zweimaliges Drücken der Taste Korrektur gelöscht werden.
BEMERKUNGEN :
•
Sollte nach Beginn einer Programmierung die
Starttaste nicht inner
halb von 3 Minuten
gedrückt werden, wird das Programm storniert (es wird wieder die Tageszeit angezeigt).
Page 73

73
Reinigung und Pflege
•
WARNUNG: Wir empfehlen Ihnen, die Mikrowelle regelmäßig zu reinigen
und Nahrungsmittelablagerungen ebenso im Innern wie auch außen am
Gerät zu entfernen. Benutzen Sie dafür einen mit Seifenwasser
befeuchteten Schwamm. Wenn das Gerät nicht sauber gehalten wird,
kann seine Oberfläche Schaden erleiden, was ganz sicher seine
Lebensdauer verkürzen und zu einer gefährlichen Situation führen
könnte. Wenn die Tür oder Türdichtung beschädigt ist, darf die Mikrowelle
erst dann wieder benutzt werden, wenn der Schaden durch eine kompetente Person behoben wurde.
•
Das Gerät nicht mit einem Dampfreiniger reinigen.
•
Wir empfehlen Ihnen, keine Scheuermittel, Alkohol oder
Lösemittel zu verwenden.
•
Im Falle von Geruchbildung oder bei einem verschmutzten Mikrowellenherd, eine Tasse mit
Wasser und etwas Zitronensaft oder Essig, 2 Minuten in der Mikrowelle kochen lassen und dann
die Wände mit etwas Spülmittel abwaschen.
•
Bei Geräten mit Grillfunktion werden die Oberfläche und die hinteren Lüftungs-schlitze sehr heiß.
Möglichst diese Bereiche nach dem Gebrauch nicht berühren. Das Innere des Ofens reinigen,
wenn es lauwarm geworden ist. Einen Reinigungsschwamm verwenden.
•
Um die Reinigung zu erleichtern, kann der Teller
herausgenommen werden. Zu diesem Zweck Teller
an den dafür vorgesehenen Stellen ergreifen. Wenn Sie
den Mitnehmer entfernen, das Eindringen von Wasser in
das Loch der Motorachse vermeiden.
Vergessen Sie nicht, den Mitnehmer, den Rollenträger und den Drehteller wieder
einzufügen.
WASSER
+
SEIFE
Scheuerpulver
Page 74

74
Ein kleines Problem ! Was können sie tun ?
Probleme
▼ die Zeit abläuft, das Gerät jedoch nicht
funktioniert (der Drehteller dreht sich nicht,
die Beleuchtung schaltet sich nicht ein
und das Lebensmittel wird nicht erhitzt)?
▼ das Mikrowellengerät ungewohnte
Geräusche verursacht?
▼ die Scheibe sich beschlägt?
▼ der Grill zu Programmbeginn raucht?
▼ beim Betrieb Geräusche entstehen?
▼ sich der Drehteller ruckartig dreht?
▼ die Speisen nicht warm werden?
▼ Funkenüberschlag auftritt?
Ratschläge
▲ 5 Sekunden lang auf die Taste
Drehteller-Stop drücken.
▲ Den einstellbaren Fuß justieren.
▲ Das Kondensierungswasser mit einem
Tuch wegwischen, um Korrosion zu
vermeiden.
▲ Sämtliche Kochreste vom Heizstab ent-
fernen.
▲ Reinigen Sie das Drehkreuz, das unter
dem Drehteller liegt, und den darunter
befindlichen Garraumboden.
▲ Das Ansauggitter unter dem Gerät reinigen.
Prüfen Sie, ob das Geschirr für Mikrowellen geeignet ist.
▲ Überprüfen Sie, ob das Drehkreuz rich-
tig auf dem Antrieb sitzt. Entfernen Sie
eventuelle Fett oder Speisereste aus
dem Garraum und halten Sie metallhaltige Teile mindestens 2 cm von den
Gerätewänden fern.
Niemals Metallteile zusammen mit dem
Grillrost einsetzen.
Page 75

75
• Wenn das Gerät auf irgend eine Weise beschädigt wurde:
- Sich vergewissern, dass die Tür nicht verformt wurde.
• Wenn das Gerät nicht funktioniert, bitte folgendes
überprüfen, bevor
Sie einen Techniker anrufen, um die
Panne zu beheben:
- die Stromzufuhr.
- den korrekten Verschluss der Tür.
- Ihre Programmierung.
ACHTUNG: Versuchen Sie nie, eine Panne selbst zu beheben.
WARNUNG: jede nicht kompetente Person, die einen Kundendienst oder eine Reparatur
durchführt, bei der eine gegen die Energie der Mikrowellen schützende Abdeckung entfernt wird, bringt sich selbst in Gefahr.
Eventuelle Interventionen an Ihrem Gerät dürfen nur von qualifizierten
Spezialisten des Vertragshändlers der Marke vorgenommen werden.
Kundendienst
Page 76

99631452 - 03/04
 Loading...