

Brandt me1245m Instructions For Use Manual

EN INSTRUCTIONS FOR USE
Microwave oven

Dear Customer,
You have just purchased a Brandt microwave oven and we would like
to thank you.
We have placed in this appliance all our passion and know-how
so
that it best meets your needs. Innovation and performance:
we designed
it so that it is always easy to use.
In the line of Brandt products, you will also find a wide range of ovens,
hobs, ventilation hoods, electronic cookers, dishwashers,
refrigerators and freezers that can be coordinated with your new
Brandt microwave oven.
Of course, in an ongoing effort to satisfy your demands with regard
to our products as best as possible, our after-sales service
department is at your disposal and ready to listen in order to respond
to all of your questions and suggestions (contact information at the
end of this booklet).
You can also log on to our web site at www.brandt.com where you
will find all our products, as well as additional,
useful information.
BRANDT
As part of our commitment to constantly improving our products, we
reserve the right to make changes to their technical, functional
and/or esthetic properties in line with their technological
development.
Attention: Before installing and using your appliance, please carefully
read this Guide to Installation and Use, which will allow you to quickly
familiarise yourself with its operation.
2

EN
TABLE OF CONTENTS
3
1/NOTICES TO THE USER
•Safety recommendations . . . . . . . . . . . . . . . . . . . . . . . . . . . . . . . . . . . . . . . . . . 4
• Protecting the environment . . . . . . . . . . . . . . . . . . . . . . . . . . . . . . . . . . . . . . . . 6
2/INSTALLING YOUR APPLIANCE
•Building in . . . . . . . . . . . . . . . . . . . . . . . . . . . . . . . . . . . . . . . . . . . . . . . . . . . . . . 8
•Electrical connection . . . . . . . . . . . . . . . . . . . . . . . . . . . . . . . . . . . . . . . . . . . . . 9
3/DESCRIPTION OF YOUR APPLIANCE
•The appliance . . . . . . . . . . . . . . . . . . . . . . . . . . . . . . . . . . . . . . . . . . . . . . . . . . . 11
•Control panel . . . . . . . . . . . . . . . . . . . . . . . . . . . . . . . . . . . . . . . . . . . . . . . . . . . . 12
•Function selector . . . . . . . . . . . . . . . . . . . . . . . . . . . . . . . . . . . . . . . . . . . . . . . 13
•Display . . . . . . . . . . . . . . . . . . . . . . . . . . . . . . . . . . . . . . . . . . . . . . . . . . . . . . . . . 13
4/USING YOUR APPLIANCE
•Setting and adjusting the time . . . . . . . . . . . . . . . . . . . . . . . . . . . . . . . . . . . . . 14
•Stopping the turntable . . . . . . . . . . . . . . . . . . . . . . . . . . . . . . . . . . . . . . . . . . . . 14
•Programming . . . . . . . . . . . . . . . . . . . . . . . . . . . . . . . . . . . . . . . . . . . . . . . . . . . . 15
•Using the power levels . . . . . . . . . . . . . . . . . . . . . . . . . . . . . . . . . . . . . . . . . . . . 15
•Microwave function . . . . . . . . . . . . . . . . . . . . . . . . . . . . . . . . . . . . . . . . . . . . . . . 16
•Express Microwave Programme . . . . . . . . . . . . . . . . . . . . . . . . . . . . . . . . . . . . 16
•Keep warm function . . . . . . . . . . . . . . . . . . . . . . . . . . . . . . . . . . . . . . . . . . . . . . 17
•Defrosting . . . . . . . . . . . . . . . . . . . . . . . . . . . . . . . . . . . . . . . . . . . . . . . . . . . . . . 18
•Speed Defrost function . . . . . . . . . . . . . . . . . . . . . . . . . . . . . . . . . . . . . . . . . . . 19
•Defrosting guide . . . . . . . . . . . . . . . . . . . . . . . . . . . . . . . . . . . . . . . . . . . . . . . . . 19
•Memory programmes M1 / M2 / M3 . . . . . . . . . . . . . . . . . . . . . . . . . . . . . . . . 20
•Timer . . . . . . . . . . . . . . . . . . . . . . . . . . . . . . . . . . . . . . . . . . . . . . . . . . . . . . . . . . . 20
•Child Safety . . . . . . . . . . . . . . . . . . . . . . . . . . . . . . . . . . . . . . . . . . . . . . . . . . . . . 21
5/CARING FOR AND CLEANING YOUR APPLIANCE . . . . . . . . . . . . . . . . . . . . . . . 21
6/TROUBLESHOOTING . . . . . . . . . . . . . . . . . . . . . . . . . . . . . . . . . . . . . . . . . . . . . . . . 22
7/FUNCTIONAL APTITUDE TESTS . . . . . . . . . . . . . . . . . . . . . . . . . . . . . . . . . . . . . . 23
8/AFTER SELES SERVICE . . . . . . . . . . . . . . . . . . . . . . . . . . . . . . . . . . . . . . . . . . . . . 24

4
EN
IMPORTANT SAFETY INSTRUCTIONS - READ CAREFULLY AND RETAIN FOR
FUTURE USE.
Warning:
Keep this user guide with your appliance. If the appliance is
ever sold or transferred to another person, ensure that the new
owner receives the user guide. Please become familiar with
these recommendations before installing and using your oven.
They were written for your safety and the safety of others.
WARNING:
This appliance may be used by children aged 8 years and older,
and by persons with impaired physical sensorial or mental
capacities, or without experience or knowledge, if they are
supervised or have received prior instructions on how to use the
appliance safely and have understood the risks involved. Children
must not be allowed to play with the appliance. Cleaning and
maintenance operations must not be carried out by children
without supervision.
Children must be supervised to prevent them from playing with
the appliance.
WARNING:
— Only allow children to use the oven without supervision if
adequate instructions have been given so that the child is able to
use the oven safely and understands the dangers of incorrect
use.
— The appliance and the accessible parts of it will become hot
during use. Be careful not to touch the heated elements.
Children under the age of 8 years must not be allowed to touch
the appliance, unless they are supervised continually.
WARNING:
— It is dangerous for anyone other than a qualified person to
perform maintenance or repairs that requires the removal of the
cover providing protection against exposure to microwave power.
1/ SAFETY INSTRUCTIONS

5
EN
WARNING:
Liquids and other foods must not be heated in sealed containers,
as they may explode.
— If the appliance is being used in combination mode, it is
recommended that children only use the oven under adult
supervision due to the temperatures
generated.
— Only use utensils suitable for usage in microwave ovens.
— While heating food items in plastic or paper containers, monitor
the micro-wave's contents, since there is a risk of spontaneous
combustion.
— If smoke appears, stop or unplug the oven and leave the door
closed to smother any flames that may appear.
— Heating beverages in the microwave oven can cause the sudden
and/or delayed splattering of boiling liquid, so care must be taken
when handling their containers.
— The contents of baby bottles and baby food jars must be stirred
or rearranged and the temperature must be checked before
consumption, so as to prevent burning.
— It is not recommended to heat eggs in their shells or whole
hardboiled eggs in a microwave oven, as they may explode, even
after cooking has ended.
This appliance is designed to cook with the door closed.
— Your appliance is designed for standard household use for
cooking, reheating and defrosting foods. The manufacturer
declines any responsibility in the case of inappropriate use.
— This appliance is designed to be used for domestic and similar
applications such as:
— Kitchen areas for the staff of shops, offices and other
professional premises.
— Farms.
— Use by clients of hotels, motels and other residential type
establishments; guest house type environments.
1/ SAFETY INSTRUCTIONS

EN
1/ SAFETY INSTRUCTIONS
6
CARE FOR THE ENVIRONMENT
— This appliance’s packing materials are recyclable. Recycle them
and play a role in protecting the environment by depositing
them in municipal containers provided for this purpose.
— Your appliance also contains many recyclable materials.
It is therefore marked with this logo to indicate that used
appliances must not be mixed with other waste. Recycling
of the appliances organised by your manufacturer will thus
be undertaken in optimum conditions, in accordance with
European directive EC/2002/96 relating to electrical and
electronic equipment waste. Consult your city hall or your retailer
to find the drop-off points for used appliances that is nearest to
your home.
— We thank you for your help in protecting the environment.
WARNING:
— If the door or door seal is damaged, the oven should not be used
until it has been repaired by an authorised person.
— It is recommended that you clean your oven regularly and to
remove any food build-up.
— If the appliance is not cleaned regularly, its surface could become
damaged, permanently affecting the appliance's lifespan and
possibly causing a safety hazard.
— Do not use abrasive cleaning products or hard metal scrapers
for cleaning the glass oven door, as they could scratch the surface
and cause the glass to shatter.
Do not use a steam cleaner.

EN
1/ SAFETY INSTRUCTIONS
7
Warning
If the power cable is damaged, it should be replaced by the manufacturer, its after-sales service department or by a similarly qualified person in order to avoid danger.
STANDBY MODE
In order to limit power consumption, the display will fade after 30
seconds of inactivity.
Depending on the model of oven, when a delayed start is
programmed an animation will be displayed alternately with the
time to indicate that the oven is in “Standby mode”.
The display will return to normal brightness if the cooking
selector is moved or if a button is pressed.
8
EN
2/INSTALLING YOUR APPLIANCE
592
456
547
450 int.
450 int.
600 ext.
550 int.
23
Fig.02
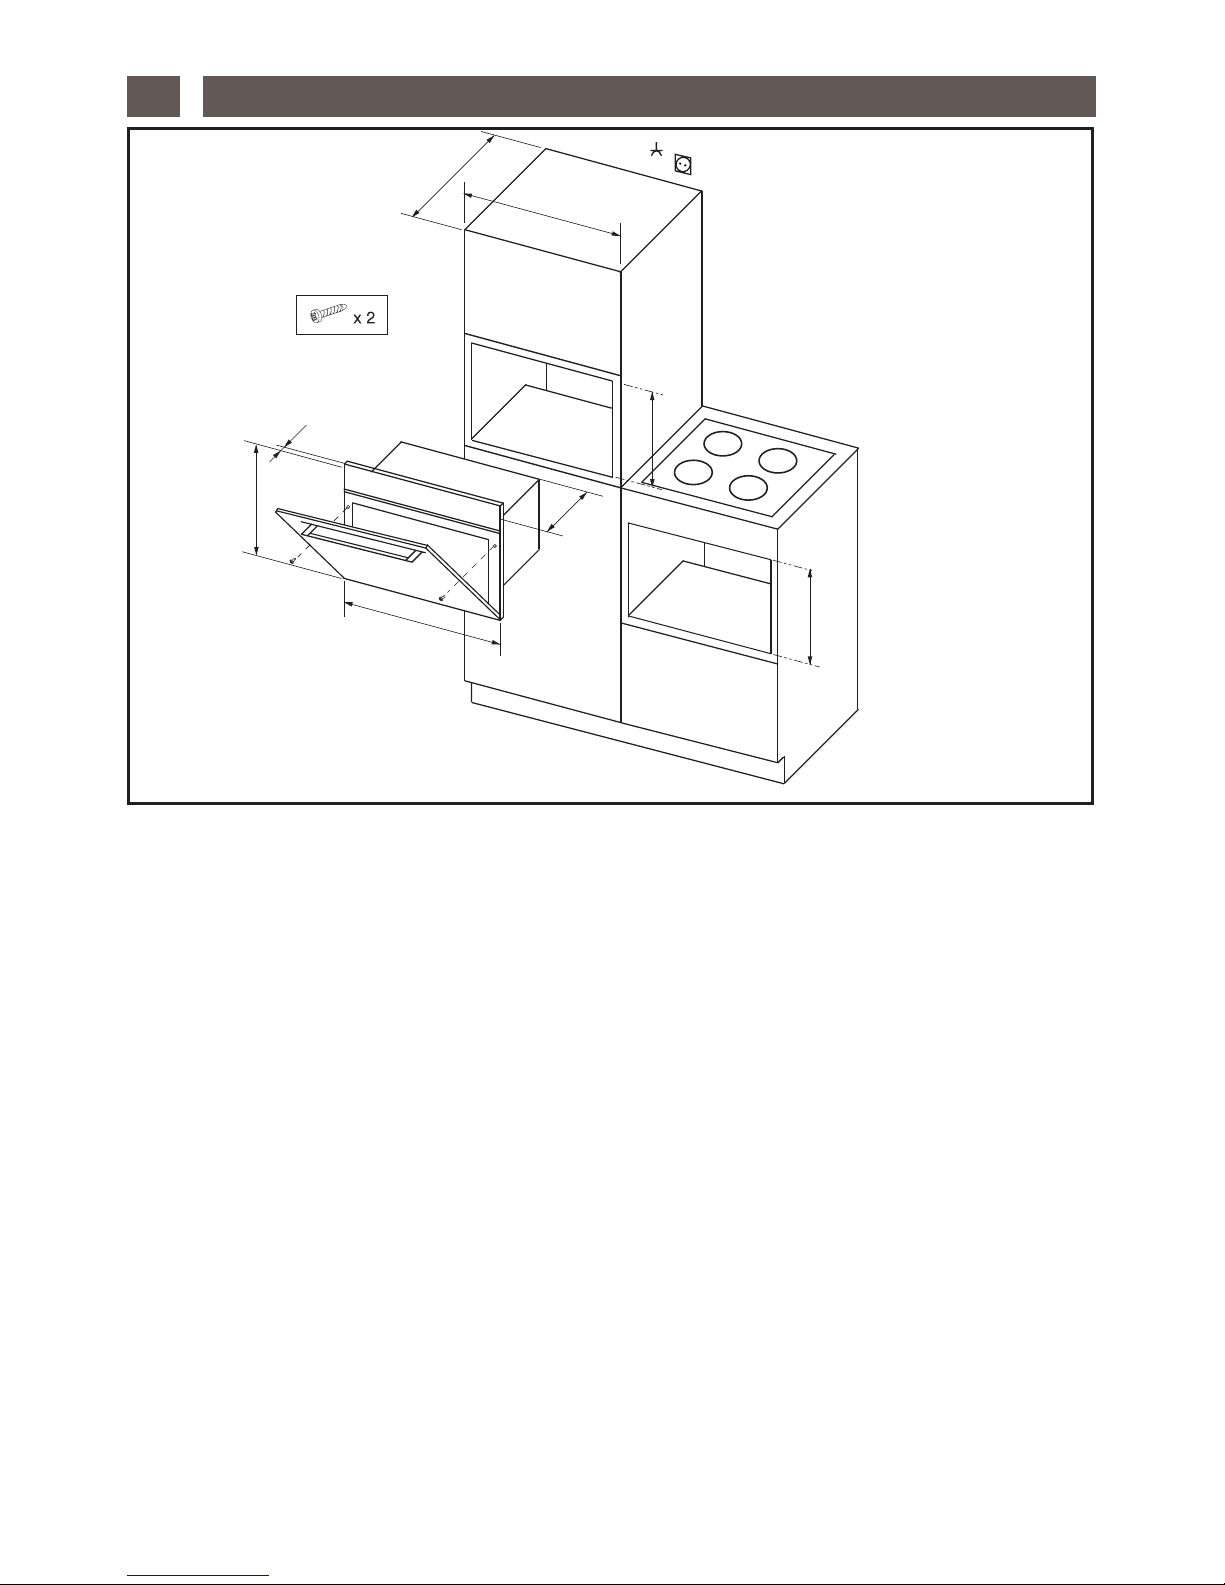
CHOICE OF LOCATION
The diagrams above determine the dimensions of a cabinet that will be able to hold your oven.
The oven can be installed under a work top or in a column of cabinetry (open* or closed) having
the appropriate dimensions for built-in installation (see adjacent diagram).
Your oven has optimised air circulation that allows it to achieve remarkable cooking and cleaning
results if the following guidelines are followed:
• Centre the oven in the cabinet so as to guarantee a minimum
distance of 10 mm between the appliance and the neighbouring
cabinet.
• The material or coating of the cabinet must be heat-resistant.
• For increased stability, fix the oven in the cabinet by means of 2
screws through the holes designed for this purpose on the lateral
mounts (fig.1).
FITTING
To do this:
1) Remove the rubber screw covers to access the mounting holes.
2) Drill a Ø 2 mm hole in the cabinet panel to avoid splitting the wood.
3) Attach the oven with the two screws.
4) Replace the rubber screw covers (they also serve to absorb the shock caused by closing the
oven door).
(*) if the cabinet is open, its opening must be 70 mm (maximum).
 Loading...