

Page 1
Instructions for use and installation
MIXED
MIXED
COOKERS
COOKERS
Ref. KM468WA1
99634221_GB_A.qxd 02/07/04 08:28 Page 1
Page 2

In this Manual,
displays safety instructions
displays tips and hints
List of contents
The layout of your cooker 3
Your cooker in complete safety 4
Installing your cooker : nothing is easier 5-10
Statutory installation conditions 5
Fitting recommendations 6
Electrical connections 6
Gas connections 7
Changing the type of gas supply 7-10
Using your cooker : nothing is easier 11-17
Using the hob burners 11-13
Using the cast-iron hotplate 14
Tips for using oven 15
Cooking guide 15-16
Oven cook settings 17
Using your oven 18
Accessories 19
How to look after your cooker ? 20
Minor maintenance by the user 21
Minor troubleshooting 22-23
2
99634221_GB_A.qxd 02/07/04 08:28 Page 2
Page 3
3
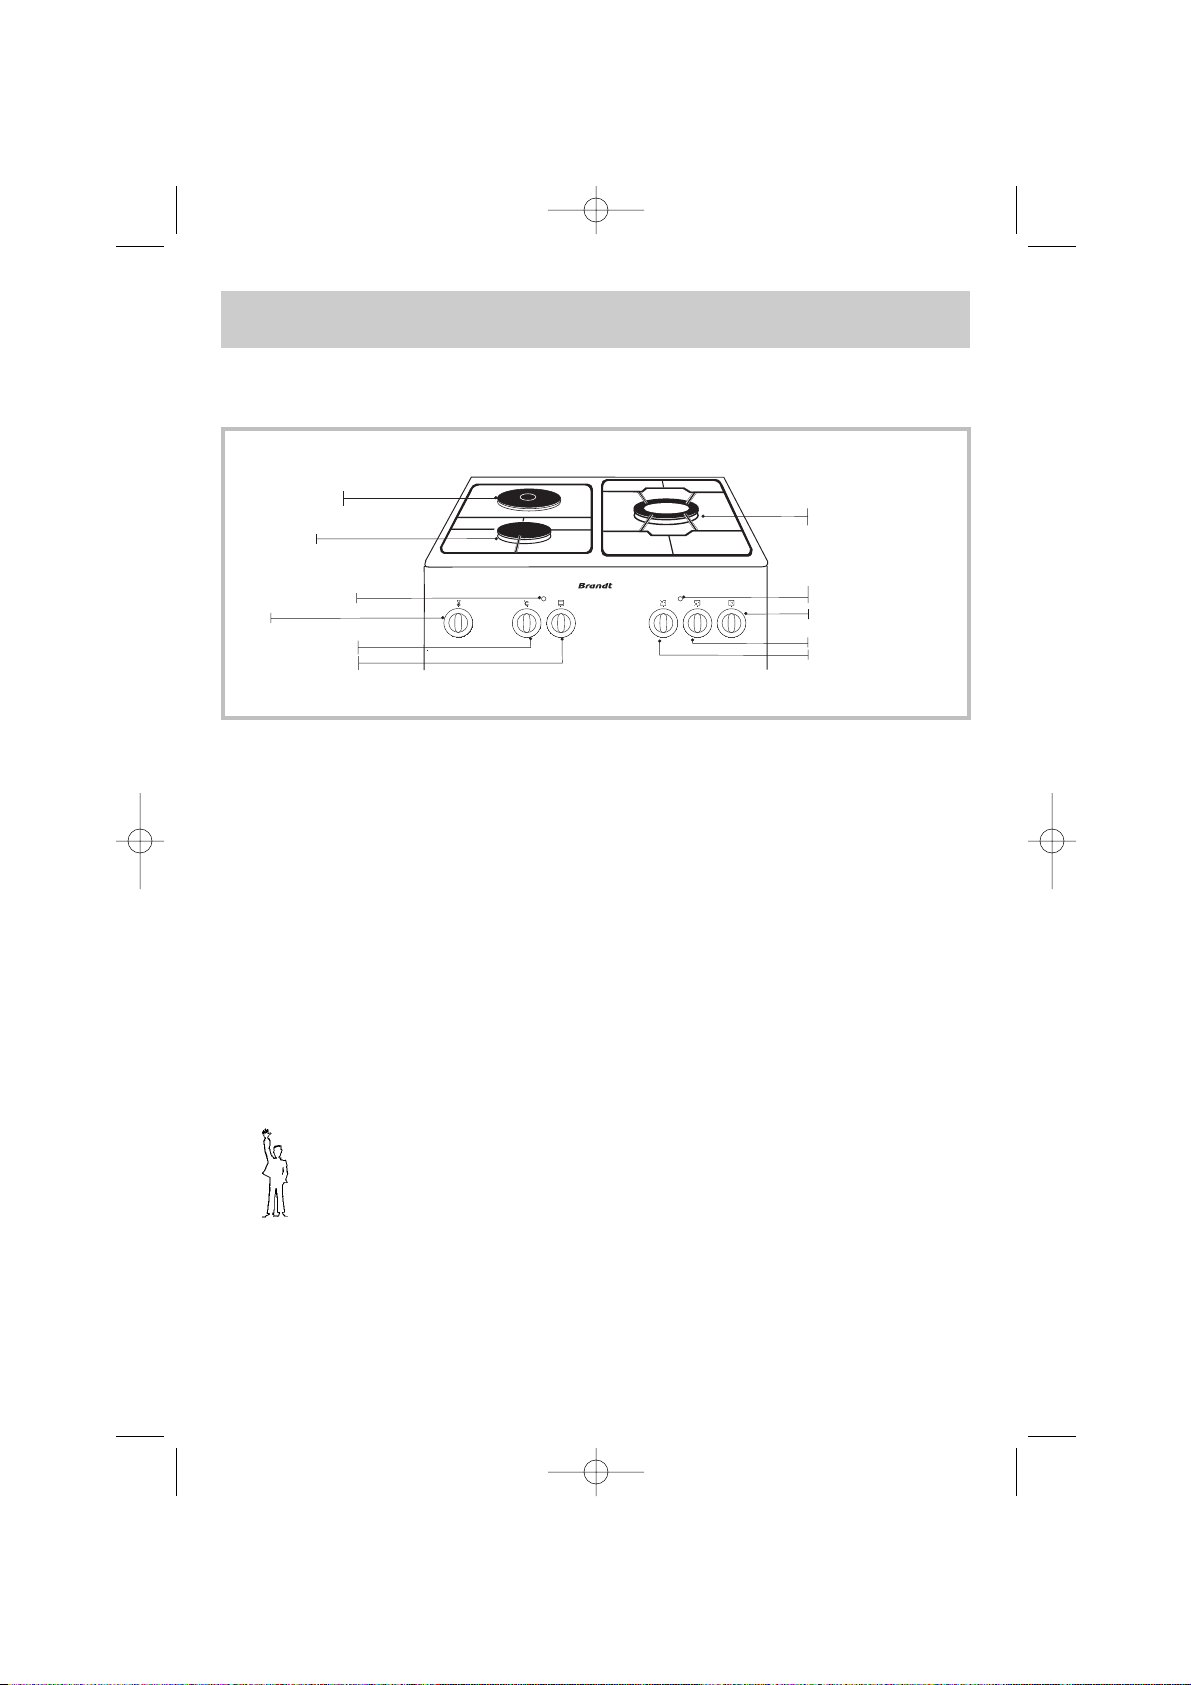
The layout of your cooker
Please read these instructions before installing and using your
cooker.
As our products are being constantly improved, we reserve the right to make
any changes in their technical, functional or aesthetic characteristics as a result
of technical evolution.
To read
Wok burner
(double crown)
Hotplate 1500 W
diameter 145 mm
Extra fast burner
Oven temperature regulator
Oven function selector
Hob hot indicator for each
cooking zone
Minute
minder
Hotplate “ON/OFF”
indicator light
Right cooking zone knob
Back left cooking zone knob
Front left cooking
zone knob
It rings when time is over.
➡ Turn the knob clockwise, and choose the position for the required time.
Minute minder
99634221_GB_A.qxd 02/07/04 08:28 Page 3
Plaque électrique
1500W - diamètre 145 mm
Brûleur grand-rapide
Brûleur WOK
double-couronne
Voyant de thermostat du four
Minuterie
Manette de thermostat du four
Manette des fonctions du four
Voyant de mise sous tension
de la plaque
Manette du brûleur droit
Manette du brûleur avant gauche
Manette de la plaque arrière gauche
Page 4

P
LEASE READ THE INSTRUCTIONS BEFORE
INSTALLING AND USING THIS COOKER
.
■ We have designed your cooker for private
domestic use.
■ Your cooker is designed exclusively for the
cooking of drinks and foodstuffs. It does not
contain any asbestos-based component
parts.
■ Using a gas-powered hob produces both
heat and humidity in the room where it is
used.
Make sure your kitchen is well ventilated :
keep all natural air-vents open or have a
mechanical ventilation system installed (a
mechanically ventilated hood) with a
minimum airflow of 2m3/hr.
■ You must always keep an eye on your
cooking.
■ Prolonged, intensive use of the hob may
require extra ventilation; by opening a
window for example or producing more
efficient ventilation by increasing the power
of the existing mechanical ventilation.
■ Disconnect your cooker from both
electrical and gas supplies before carrying
out any maintenance operations.
■ If you plug in any electrical appliance near
the cooker, make sure that its power cable
is not in contact with any source of heat.
Your cooker in complete safety
4
■ USING THE OVEN FOR THE FIRST TIME
:
Before using your oven for the first time,
heat it up empty with the door closed for
approximately 15 minutes on the MAXIMUM
setting in order to help the appliance to "run
in" properly. The mineral wool which
surrounds the oven cavity may at first
produce a particular smell, which is due to
its composition. Similarly, you may notice
that some smoke is being given off.
This is quite normal.
■ Do not allow anyone to lean or sit on the
open oven door.
.
■ The accessible parts or surfaces may
get hot during operation. Keep young
children away.
■ During use, the appliance gets hot.
Ensure that neither you nor anyone
else touches the hot parts.
■ During use, do not pick up the
saucepans, pans or other accessories
(grill, spits, dripping pan, spit cradle,
etc) using your bare hands. Always
use a handpad or protective cloth to
protect you from the heat.
■ If a knob is difficult to turn, DO NOT FORCE
IT
. Call up your installer.
Using your cooker in complete safety
99634221_GB_A.qxd 02/07/04 08:28 Page 4
Page 5

5
■ This cooker must be installed in confor-
mity with the applicable
rules and used only in a well
ventilated area. Consult the
instructions carefully before installing
and using this cooker.
■ Before installation, ensure that the
local gas distribution conditions (type of
gas and pressure) and the adjustment of
the cooker are all compatible.
■ The adjustment conditions of this
cooker are shown on the label glued
inside the housing.
■ The combustion of the gas is made
possible by the oxygen in the air. It is
therefore necessary that the air should be
renewed constantly and that the combustion
products are removed (an air flow of 2m3per
hour for each kW of power is necessary).
■ This cooker is not connected to an eva-
cuation device for combustion
products. It must be installed and
connected in conformity with the
installation rules applicable and particular
care should be taken with regard to
ventilation.
■ GAS CONNECTIONS :
The gas connection is made at the rear of
the cooker, ensuring that the pipe is never
in contact with the back of the
cooker, that it is not located in a spot
where it is likely to become blocked and
that it cannot come into contact with a
moving item.
The walls (rear and adjacent) must be
made from a heat resistant material or
coated with such a material.
Flexible tubes or pipes must be
accessible along their entire length,
replaced before their expiry date
(shown on the pipe), and have a
maximum length of 2 m.
Connection using a flexible pipe attached
to an end piece is strictly forbidden if
the gas installation is new or modified
(replacement of the gas supply tap).
Installing your cooker : nothing is easier
Statutory installation conditions
99634221_GB_A.qxd 02/07/04 08:28 Page 5
Page 6
6
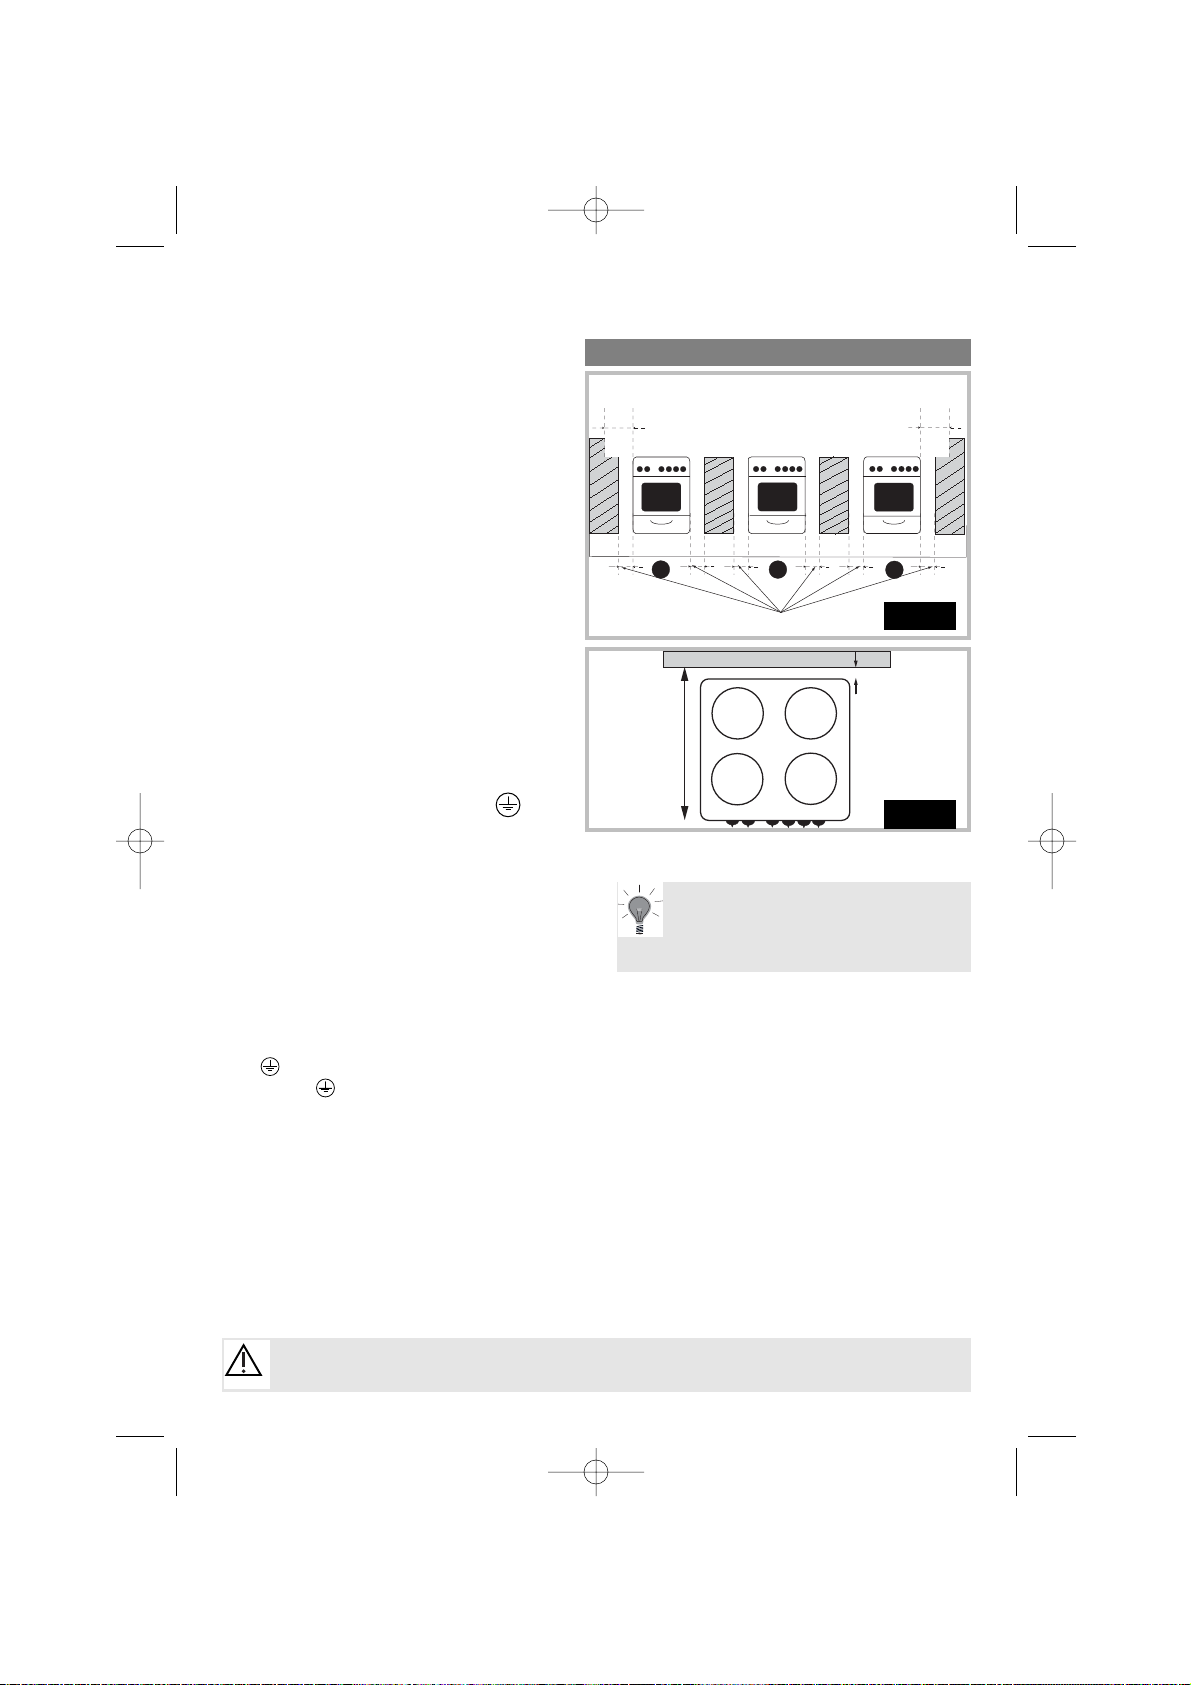
When installing the cooker you should leave the
following minimum gaps between it and its
surroundings (fig. 1 and 2):
- 10 mm between the sides of the appliance
and the walls or furniture.
- 30 mm between the wall and the back of the
appliance, with the cover closed.
- The total distance between the front of the
appliance and the wall behind the appliance:
610 mm (please see the view from above in
fig.2).
- If the cooker is placed on a base, ensure
that it is fastened firmly in place, to avoid
it sliding off the base.
Fitting recommendations
Electrical connections
- We shall not be held responsible in the event of an accident resulting
from an installation that has not been earthed or incorrectly earthed.
Installing your cooker : nothing is easier
3
POSSIBLE INSERTION METHODS
Fig. 1
Fig. 2
The cooker must be connected to the single
phase 220-240 V mains network and the
protective wire (yellow/green) must be
connected to the earth terminal of the
installation.
The cooker is delivered with a power. If it is
necessary to change the power cable or if
the power cable gets damaged, it should be
replaced by the manufacturer, by his after
sales service department or by
similarly qualified persons in order to avoid
all risks. The cable must be of the H 05 RRF
type with three 1.5 mm² conductors.
The power cable must include a green/yellow conductor connected to the earth terminal of the cooker and to the earth
connection on the plug.
The cooker must be connected to the mains
using a CEI60083-standard 2P+E plug or an
all-pole cut-off device with a contact opening distance of at least 3,5 mm.
In the case of connection using a plug
socket, this must remain accessible
following installation.
Do not hesitate to call in an electrical domestic appliance specialist in
order to ensure that your installa-
tion is correct.
99634221_GB_A.qxd 02/07/04 08:28 Page 6
150mm
1
610 mm
2
10mm
150mm
3
30 mm
Page 7

7
THIS COOKER IS DELIVERED PRE
-
ADJUSTED FOR
NATURAL GAS
.
When changing the gas, you must imperatively carry out the three
following operations:
1➡ Adapt the gas connection,
2➡ Change the injectors,
3➡ Adjust the retarder on the taps.
•
The injectors needed for the adaptation to
LPG, or town gas are available at the aftersales services.
When ordering the adapter sachet, be
sure to specify the type of cooker and
gas.
•
Whenever you change the type of gas,
write the new adjustment information on the
leaflet to remind it.
Please refer to paragraphs “gas connection”
on page 5.
1 - Adaptation of the gas connection
Changing the type of gas
supply
Gas connections
-Installation should normally be carried out by qualified installers and
technicians.
Gas connection must be done according to
the installation rules of the country.
Installing your cooker : nothing is easier
99634221_GB_A.qxd 02/07/04 08:28 Page 7
Page 8
8
Changing the type of gas
supply (cont'd)
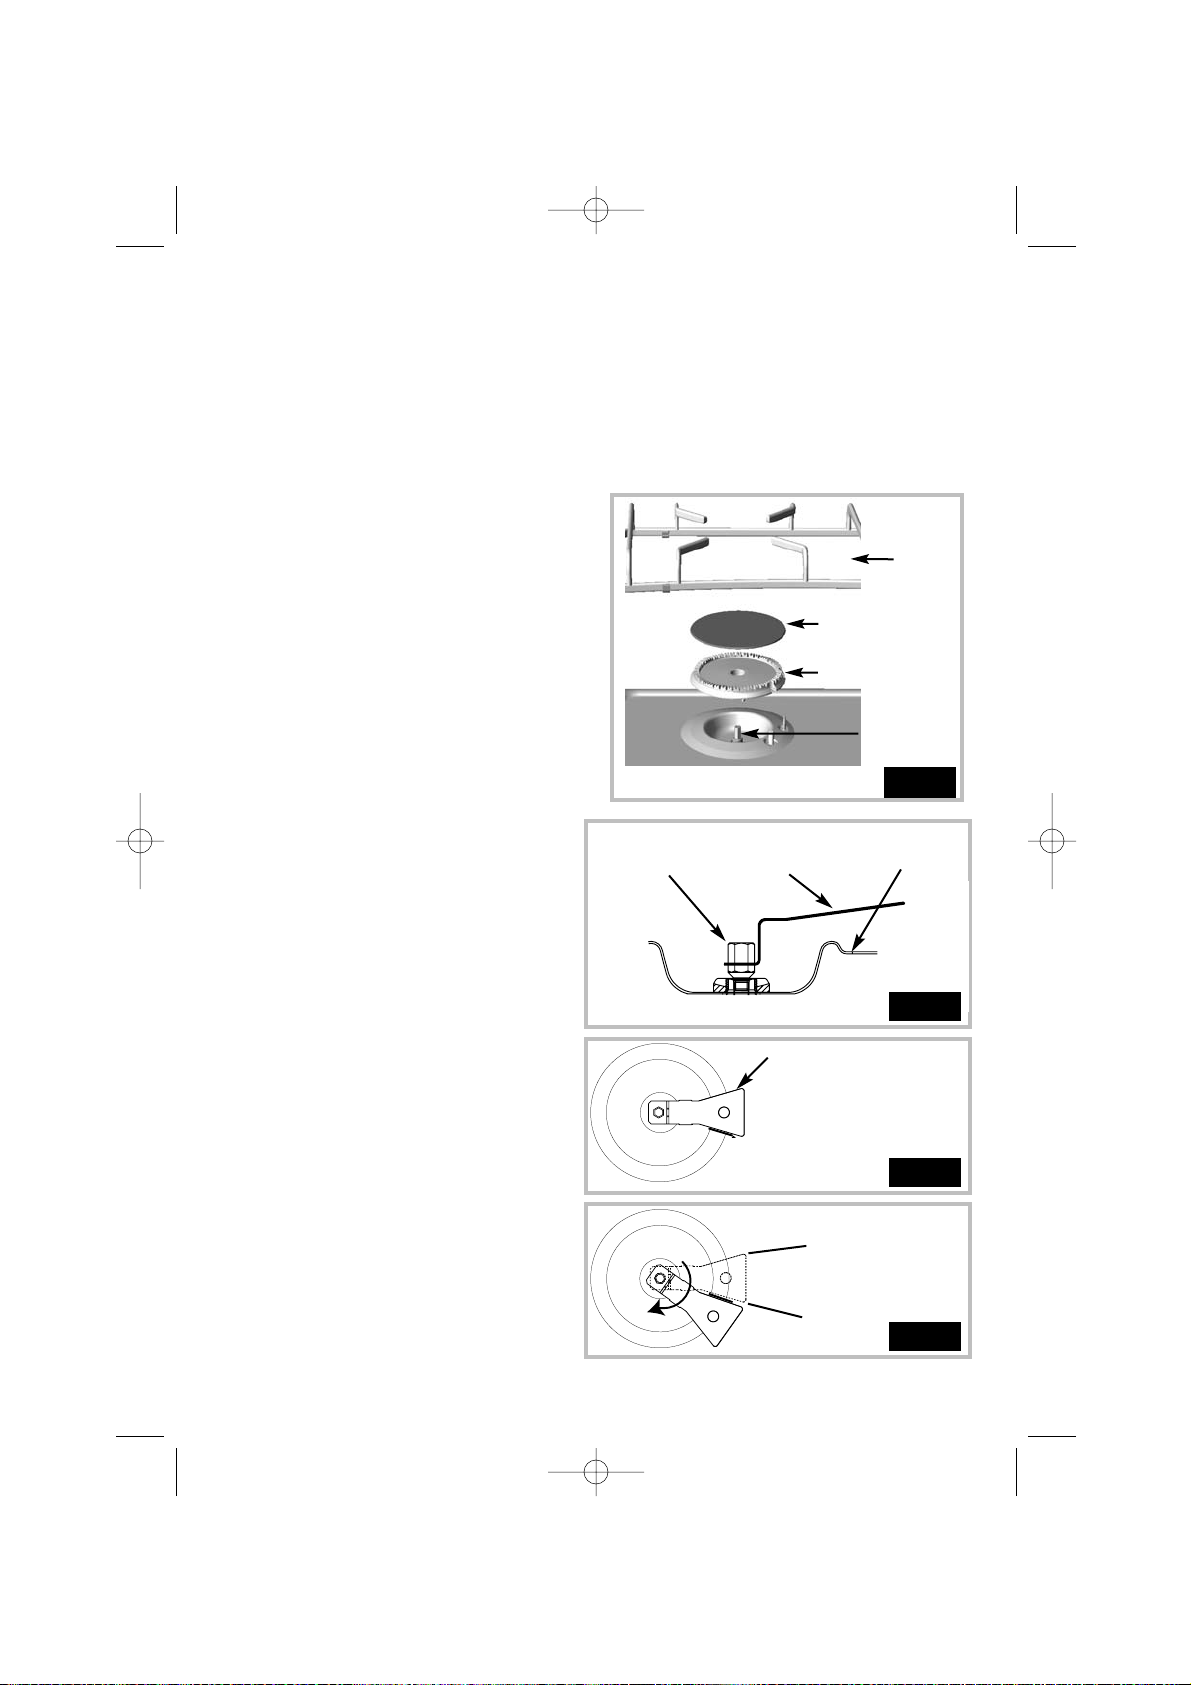
Each injector is identified by a
number engraved upon it.
Change the injectors using an angled
spanner, proceeding as follows:
➡ Remove the grid cap and head of each
burner(fig. 1).
➡ Unscrew the injectors and remove them
(fig. 2).
➡ Replace them with the injectors supplied
by the After sales service, in conformity with the gas characteristics table supplied on
page 10. To do this:
➡ Screw in the injectors by hand until they
are tight.
➡ Screw the injectors with a tool, on an
angle of 32°.
32° angle
Tool
Angle
spanner
Hearthplate
Injector
fig. 2
fig. 3
fig. 4
2 - Changing the injectors of the hob
Installing your cooker : nothing is easier
Burner cap
Burner head
Injector
Grid
Fig. 1
99634221_GB_A.qxd 02/07/04 08:28 Page 8
Page 9

9
Natural gas OR Town gas
➡➡
LPG
➡ Remove the knobs of the gas burners.
➡ Using a small screwdriver, without forcing screw in the brass screws of each tap.
➡ Replace the knobs, light each burner in turn and gently set to the minimum position.
➡ Switch from full flow to reduced flow several times to check that the adjustment is correct.
Changing the type of gas supply (cont'd)
3 - Adjustment of the minimal gas flow for hob burners taps.
LPG
➡➡
Natural gas Or Town gas
➡ Remove the knobs of the gas burners.
➡ Using a small screwdriver, unscrew the brass screws of each tap.
➡ Replace the knobs, light each burner in turn and gently set to the minimum position.
➡ Switch from full flow to reduced flow several times to check that the adjustment is cor-
rect.
Safety tap front view
Brass adjustment screw
Note : after adjusting the taps, when the tap is switched to reduced flow the flame should
not go out. If this happens you have to unscrew the brass screw slightly. If it seems to
you that the reduced flow is too large, you have to screw the brass screw slightly and take
care that the flame will never go out.
Installing your cooker : nothing is easier
99634221_GB_A.qxd 02/07/04 08:28 Page 9
Page 10

10
Changing the type of gas supply (cont'd)
MARK ON THE INJECTORS
N
ATURAL GAS
/
20 mbar
Arrière
Avant
T
OP
Arrière
Avant
T
OP
Oven consumption - Raise up to 200°C : 0,5 kWh
for a 56 l capacity - Maintain 1h at 200°C : 0,8 kWh
HOTPLATE - Back left : 1500 W
ELECTRICITY
GAS
TOWN GAS
/
10 mbar
Back
Front
Back
Front
LPG/28 mbar
Arrière
Avant
TOP
Back
Front
Installing your cooker : nothing is easier
Cooker to use in : LPG Natural gas Town gas
28 mbar 20 mbar 10 mbar
WOK BURNER
Indicator marked on injector 88 147 361
Nominal flow/PCS (kW) 3,2 3,8 3
EXTRA-FAST BURNER
Indicator marked on injector 80 137 231
Nominal flow/PCS (kW) 2,8 3,2 2
Total nominal flow/PCS (kW) 6 7 5
88
80
147
137
361
231
99634221_GB_A.qxd 02/07/04 08:28 Page 10
Page 11

11
Using the hob burners
● Ignition with gas safety
Each burner is controlled by a tap with a safety lock which, in the event of accidental
extinction of the flame (overflows, draughts
etc.) quickly shuts off the arrival of gas and
prevents it from accumulating.
The safety feature for the burners takes the
form of a thermocouple located directly next
to the flame.
■ Knobs with built-in ignition:
➡ Press on the knob and turn it di-
rection until you reach the
"High Flame" position
➡ Keep the knob pushed in. This will trigger off a series of sparks that will light up
the burner.
In the event of a break in the electricity
supply, it is always possible to light the flame by moving a lighted match near the
burner while at the same time keeping
the knob for the corresponding tap
opened at maximum flow and pushed
in.
If ever your flame goes out, relight it
as explain above.
Adjustment to a lower flow is carried out by
moving from the "High Flame" symbol and
the "Low flame" symbol. The ● symbol corresponds to the total closure of the tap.
To set on the safety system, keep
the knob pressed firmly for a few
seconds after the flame has lit up.
Using your cooker : nothing is easier
99634221_GB_A.qxd 02/07/04 08:28 Page 11
Page 12

12
Using the hob burners (cont’d)
Tips for using hob burners.
■ When your preparation reaches boiling
point, there is no need to allow it to boil with large bubbles. The food will not cook more quickly. It will cook better on a lower
light which will maintain gentle
boiling.
■ Adjust the ring of flame to ensure that the
flames do not lick around the saucepan or
other dish Your dishes must be sufficiently
wide to ensure that the flame spreads out
across the base without
encroaching on the sides. Otherwise, you
risk damaging the handle of the dish.
■ Do not use dishes with a domed base or
with a diameter below 12 cm on
reduced flow.
EXTRA BURNER
(
EXTRA-
FAST)
Dishes of 28 cm in diameter or more:
FRY-
UPS,
BRINGING TO THE BOIL
WOK BURNER
(
DOUBLE CROWN
)
Wok + wok support
When simmering on reduced flow, these sizes can be reduced respectively to 14 and 16 cm.
■ We recommend the use of the following dishes:
MAUVAIS
BON
T
A
B
RINGING TO
THE BOIL
S
IMMERING
RIGHT
WRONG
Installing your cooker : nothing is easier
99634221_GB_A.qxd 02/07/04 08:28 Page 12
EBULLI
MIJOT
Page 13

13
Using the hob burners (cont’d)
Tips for using hob burners.
(cont’d)
■ To ensure the correct ignition of your burners, we advise the following:
- Regularly ensure that the sparkers are
perfectly clean and that the various parts
comprising the burners operate properly.
- Before ignition, ensure that the burner
heads and caps are in the correct position
and that you place your saucepans, pans
and other dishes on the burner.
It is recommended that the electronic ignition should not be used if the
burners are not all in place.
-The burner’flames are smaller near the
grid’s fingers to avoid any damage to the
enamel.
- The appearance of yellow specks is due
to the quality of the gas used but in no
way affects the performance of the burners.
- The noise generated by the burners is
related to their power, which in no way
affects the performance of your hob.
- To transfer your dishes from one burner
to another, do not slide them but lift
them in order to avoid moving the grids.
Installing your cooker : nothing is easier
Sparker
Burner head
99634221_GB_A.qxd 02/07/04 08:28 Page 13
Page 14

14
- Rapid cast-iron hob including
temperature limiting device, with control
switches numbered from 0 to 6.
Using the cast-iron hotplate
Tips for using your cast-iron
hotplate
■ Before using the hotplate for the very
first time, allow the hotplate to heat up with
nothing on them at maximum temperature
for 3 minutes to harden the coating.
■ A "Power on" light comes on when the
hotplate is operating.
■ You should use flat bottome dishes which ad-
here to the surface of the ring:
- Made of stainless steel with a thick
or sandwich base.
- Made of aluminium with a thick base
- Made of enamelled steel (thick
sheet metal).
■ You should select a saucepan or pan of a
size suited to your needs. The base diameter of the dish should be equal or
superior to that of the hotplate. Use a lid
as often as possible to reduce losses
through evaporation.
■ When your preparation reaches boiling
point, there is no point in allowing it to boil
with huge bubbles. The food will not cook
more quickly. It will cook better on a
lower light which will maintain gentle boiling.
■ You can turn the hotplate off by setting
it to 0 before the cooking is finished; you
will use the heat accumulated in the
hotplate and therefore save on electricity.
■ Use dishes with a dry base in order to
avoid rusting on the hotplate.
RIGHT
RIGHT
WRONG
Installing your cooker : nothing is easier
99634221_GB_A.qxd 02/07/04 08:28 Page 14
BON
BON
MAUVAIS
Page 15

15
Cooking guide
DISHES
TRADITIONAL COOKING
COOKING SHOULD ALWAYS BE CARRIED OUT WITH THE DOOR CLOSED AND
UNDER YOUR SUPERVISION.
MEAT
Roast pork(1kg)
Roast Veal (1kg)
Roast beef
Lamb (Leg of lamb, Shoulder 2,5 kg)
Poultry (1 kg)
Large poultry pieces
Chicken legs
Pork and veal chops
Beef ribs (1 kg)
Mutton chops
FISH
Grilled fish
Cooked fish (Sea bream)
Fish cooked in tinfoil
VEGETABLES
Gratins (cooked dishes)
Browned potatoes
Lasagnes
Stuffed Tomatoes
VARIOUS
Kebabs
Paté in terrines
Pizza (shortcrust base)
Pizza (bread base)
Quiches
Soufflé
Pies
Bread
Toasted bread
Casseroled dishes (lidded)
Thermostat
*180
*180
*240
210
180
180
*180
*240
*180
*180
*180
*210
*210
*240
*210
*210
*210
180
2
2
2
1
2
1
2
2-3
2
2
2
2
2
3
2
2
1
1
Thermostat
*240
180
*210
1
1
1
Thermostat
210
210
*210
*210-240
210-240
*270
*270
*270
*270
*270
TS
TS
3
3
3-4
4
4
3-4
4
4-5
90
60-70
30-40
50-55
50-70
90-120
15-25
15-20
25-30
10-20
15-20
35-45
10-15
30
55-60
40-45
40-45
15-20
80-100
30-40
15-18
30-45
50
40-45
30-50
1-2
90-180
Add a little water
Instructions overleaf
Placed on the grill
Earthenware dish
Double boiler pan
30 cm baking tin
Multipurpose dish
30 cm baking tin
21 cm baking tin
On the grill
Depending on the preparation
Cooking time
in minutes
indications
Runner
Runner
Runner
°C
°C
°C
99634221_GB_A.qxd 02/07/04 08:28 Page 15
Page 16

16
Cooking guide
Capacity available: 55,2 l
*Preheat to the temperature shown in sequence .
•
Do not cook meat in the dripping pan: risk of spatter.
•
When using a double boiler pan, you should always begin with boiling water: do not overfill the dish.
•
When using the GRILL function, place the item to be grilled on the grill or the turnspit, with the dripping
pan on the level below to catch the juices.
•
TS = Turnspit
Your cooker is equipped with five levels.
For the grill function, using the turnspit do not exceed 210°C (temperature recommended in this
guide) and grill with the door closed.
!
4
PASTRY
Sponge cake
Sponge roll
Brioche
Brownies
Cake - Pound cake
Clafoutis (fruit in batter)
Creams
Cookies - Biscuits
Kugelhopf (Alsatian cake)
Meringues
Madeleines
Choux pastry
Small pastry cakes
Savarin
Shortcrust pastry tarts
Fine puff pastry tarts
Sponge tarts
*210
*180
*180
*180
*180
*180
*180
100
*210
*180
*210
*180
*210
*240
*210
3
1
2
1
2
2
3
2
2
3
3
2
2
2
2
180
180
180
180
180
180
1
1
2
1
1
1
35-45
5-10
25-30
25-30
55-60
35-45
20-45
15-18
45-50
90
5-10
30-40
10-15
30-40
30-40
15-25
35-45
Large glass dish
Double boiler pan
Multipurpose dish
Plates on the grill
depending on size
30 cm baking tin
Multipurpose dish
Multipurpose dish
DISHES
TRADITIONAL COOKING
Thermostat
Thermostat
Thermostat
Cooking time
in minutes
indications
Runner
Runner
Runner
Number
°C
9 maxi
270
1
55275
3
1004125
5
150
6
180
8
240
7
210
EQUIVALENCE : THERMOSTAT SETTING
➜➜
°C
°C
°C
°C
99634221_GB_A.qxd 02/07/04 08:28 Page 16
5
3
2
1
Page 17

17
Oven cook settings
PREHEATING
•
The "preheating" function should be used before cooking.
•
Before placing the dishes in the oven, preheat to the chosen cooking temperature
until the thermostat light goes out.
*TRADITIONAL
•
Cooking takes place from below and above.
•
After preheating cook roasts, vegetable dishes such as browned potatoes, baked
stuffed tomatoes, fish poultry and tarts.
BOTTOM OVEN
•
The cooking takes place from below.
•
Cooking mode recommended for pizzas, milk bread, cakes... Wet cake mixes will
be perfectly cooked underneath.
GRILL +TURNSPIT
•
The cooking is carried out by the top element.
•
You can use it cook all types of poultry using the turnspit, which comprises a bar fit-
ted with two spikes to hold the roast joint in place. This must be centred correctly.
•
Check that the turnspit is fitted correctly, lined up with the motor, and resting cor-
rectly on its cradle.
•
Place the dripping pan on the first shelf setting or on the floor of the oven if the item
to be roasted is large.
GRILL
•
Mode adapted to grill :
• Preheat for 5 min. with the rack in the oven then place the food on it and place on a
suitable runner (depending on size).
• Place the dripping-pan on the 1st runner.
Pour a glass of water into it ; this tip has the advantage of reducing smoke and smells
particularly when grilling meat, sausages…
•
Ideal for making toast.
* Sequence(s) used for the statement featured on the energy label, in conformity with European standard EN 50304 and
European directive 2002/40/CE.
99634221_GB_A.qxd 02/07/04 08:28 Page 17
Page 18

18
Roasting joints
•
Allow all joints to sit at room
temperature for at least 1 hour before
roasting. Remove any excess fat to
prevent smoke and smells.
•
Wherever possible use earthenware
rather than glass dishes (less spitting)
big enough to contain the joint easily.
•
Do not sprinkle with salt before
cooking as this dries the meat out.
•
Add a few tbsp of warm water to the
roasting dish to prevent the juices
burning.
•
Cooking time
- Roast beef 10 to 15 min for 500 g.
- Roast pork 35 to 40 min for 500 g.
- Roast Veal 30 to 40 min for 500 g.
•
After removing from the oven, wrap
the joint in kitchen foil and leave to
recover for 10 to 15 min. The meat will
be more succulent and tender, and
more uniform in colour.
•
Grilling meat: Drizzle with a thin
layer of oil. Avoid pricking red meat
and use a spatula or tongs to turn
over.
•
Prick poultry skin under the wings so
the juices can run out without spitting.
Baking cakes
•
Choosing your cake tin:
Avoid bright shiny tins:
- They require longer cooking times.
- The oven has to be pre-heated.
Use non-stick tins for flans, pies
and quiches. These give crisper
golden pastry on the base.
•
Tip:
Even if your tins are non-stick, use
baking parchment to protect them.
It makes it easier to turn flans etc.
out. Use it too to line enamelled tins
to protect the coating from fruit acids.
Always add yeast last and avoid
contact with salt, which will destroy
the yeast's properties.
Cooking vegetables
•
When preparing a dish topped with
layered potatoes, pre- cook the sliced
potatoes in water or milk.
•
To peel peppers, place them under
a hot grill turning frequently until the
skin bubbles. Pop into a plastic bag
for a few minutes and the skin will
peel away easily.
•
When stuffing tomatoes, slice off
one end and scoop out the pulp and
pips. Salt the inside and leave to drain
on a grid before stuffing.
•
Drain cooked leeks and chicory
thoroughly before coating with a
sauce (ham or béchamel) otherwise
the cooking liquid will water down the
sauce.
•
Mix grated cheese with
breadcrumbs for a topping that is
brown and crispy.
•
When cooking times are long, turn the oven off 5 to 10 minutes before the end and use the residual
heat to finish the dish.
Using the oven
99634221_GB_A.qxd 02/07/04 08:28 Page 18
Page 19

Cooking on a rotisserie is very efficient and
results in flavourful and evenly cooked
joints. To use it:
➡ engage the spit cradle in the 3rd shelf
position from the bottom (check the
direction)
➡ slide one of the forks onto the spit, then
the meat for roasting, slide on the second
fork, centre them and twist the forks to
tighten them, using the handle,
➡ place the spit on its cradle,
➡ push gently to engage the point of the
spit in the square bit drive at the back of the
oven,
➡ place the multi-purpose dripping pan on
the lower shelf position to collect the
cooking juices.
●Rotisserie (fig. 4)
If the spit has an insulated handle,
unscrew and remove it before
closing the door.
The flat shelf can be used for all dishes and
tins containing food to be cooked or
browned, as well as for grilling.
● Flat shelf (fig. 1)
This is used when cooking with a wok. It
can only be used on the double-crown
burner. Make sure that the base of the
wok doesn't touch the burner.
WARNING : at the end of the cooking
time, never touch any of the accessories
(Grid, drip-tray, etc) with your bare
hands.
● Wok support(fig. 3)
This can be used as a baking tray and has
sloping sides. It can be used for cooking
choux buns, meringues, small cakes, flaky
pastry, etc.
Inserted into the runners under the shelf, it
collects the juices and fat produced when
grilling. It can also be used, half-filled with
water, as a bain marie.
Do not roast joints of meat in the dripping
pan as this will inevitably result in fat
splashes on the sides of the oven.
Never place this tray directly on the floor of
the oven.
● Multi-purpose dripping pan (fig. 2)
Fig. 1
Fig. 2
Fig. 3
-CRADLE DIRECTION
- You should place the cradle in such
a manner that the hole for the spit is
fully visible.
Rotisserie
Spit
Fig. 4
Handle
60 cm
model
Cradle
Spit
Fork
19
Accessories
(depending on model)
99634221_GB_A.qxd 02/07/04 08:28 Page 19
poignée
(suivant modèle)
tourne-broche
Berceau
Broche
Fourchette
berceau
Page 20

20
Casing
Control knobs
- Sponge the top with soapy water. In the event of spills, use a
standard non abrasive paste cleaner for enamel. Shine with a dry
cloth, or even better with a shammy-leather. Do not allow acidic liquids
(lemon juice, vinegar…) to lay on the enamel for long.
Before opening the cover, remove all soiling or spattering from this. Do
not close it again while the cooker is still warm.
For polished metal surfaces, use commercial products designed for the
upkeep of polished metal.
- Clean the walls with a cloth soaked in very hot soapy water, to remove
fat splashes. We advise frequent cleaning.
- When a large spillage has occurred, wipe it up if possible with a damp
sponge or a soft brush. Otherwise, take a sponge or a cloth soaked in hot
soapy water or cream cleaner and cover the remaining stains. Leave it
there overnight; the deposits will be easily removed the next day.
- Use soapy water on a damp sponge.
Accessories
- Only use soapy water on a damp sponge. Never use sharp objects.
Gas burners
- The gas injector is at the centre of the burner. Ensure that you do not
block it during cleaning, which would affect the performance of your hob.
To clean the burner covers, use soapy water.
- In the case of persistent stains, you can use a small amount of non-
abrasive cream on a sponge, and then rinse with clean water.
Carefully wipe the burner covers before using your hob again. In the
event of the burner vents becoming blocked or the sparkers getting dirty,
clean them using a brush with firm bristles.
Oven door
window
- After a particularly messy cooking session, we recommend that you clean
the inner window with soapy water on a damp sponge.
Cast-iron
hotplate
- The cast-iron hotplate is protected by a black surface coating. Therefore,
avoid using any abrasive products. After use, wipe it clean with an oily
cloth.
Keep it perfectly dry or slightly oiled if it is not used for long periods.
If ever the hotplate starts to rust, remove the rust with emery paper or
similar and re-coat the hotplate with a high temperature renovating
product to be found at your local distributor.
WHAT TO DO
Before cleaning, allow the cooker to cool down and check that all the knobs are in
the OFF position.
As a general rule, abrasive powders and metallic sponges should not be used.
How to look after your cooker?
- Do not use steam cleaners.
- Never splash or spray the cooker with water.
99634221_GB_A.qxd 02/07/04 08:28 Page 20
Page 21

To make it easier to unscrew the lamp cover put on a rubber glove.
Unplug the cooker before carrying out work on the bulb in order to avoid any risks of electric
shocks and only carry out this work
when the appliance is cold.
Fig. 2
Fig. 1
Minor maintenance by the user
Yours cooker has adjustable feet at the
front making it possible to obtain a
flush fit on any floor surface, by screwing
or unscrewing them.
● Adjustable feet (fig. 1)
Inside the oven (fig. 2) :
The bulb is located on the ceiling of the
oven cavity.
➡ Turn the lamp cover 90° anti-clockwise,
➡ Unscrew the bulb anti-clockwise.
Characteristics of bulb :
● 15 W,
● 220-240 V~
● 300°C,
● E14 base with screw fitting.
➡ Change the bulb then put back the lamp
cover and plug the oven back in.
● Replacing the oven lamp
21
99634221_GB_A.qxd 02/07/04 08:28 Page 21
Page 22

22
WHAT SHOULD YOU DO?
POSSIBLE
CAUSES
IF YOU REALIZE
THAT
You have doubts about whether your cooker is working correctly....
this does not necessarily mean there is a breakdown. Nevertheless, check the
following points :
- This is normal the first time the
cooker heats up.
- Cooking temperature too high.
- Major soiling.
- Household cleaning product on
the walls of the oven.
Your oven produces too
much smoke during cooking or you notice that
major odours are being
given off.
Condensation on the
windows
- Food is wet or too cold.
➡ When cooking food with a high water
content (e.g. stuffed tomatoes), it is advisable to pre-heat the oven to the cooking
temperature; this prevents condensation
forming on the cold glass surfaces.
➡ Use the thermostat to lower the cooking
temperatures; these are given in the cooking guide for information only.
➡ Proceed to clean your oven by rinsing
the cleaning product with water.
NB: You are reminded not to use the multipurpose dripping pan as a roasting tin.
Minor troubleshooting
Your new cooker keeps
tripping out the electric system
- Poor connection
- Several electrical appliances are
running at the same time.
➡ Switch off the electricity supply to the other
appliances.
➡ Check the electrical connections.
- Your cooker is connected incorrectly.
-The temperature selector (thermostat)
is in position 0.Autotimer not initialised.
Your oven does not heat
➡
Check your electrical connection (take care not
to screw into the electrical cable sheath).
➡
Set your thermostat to the desired cooking
temperature.
The electronic ignition
of the burners is not
working properly
- The sparkers are dirty.
- Poor use of the system
➡
Check that the sparkers are clean.
➡
Wait for several sparks.
➡
Follow the ignition instructions in the user guide.
➡
Check that the cover is positioned properly on
the burner head.
99634221_GB_A.qxd 02/07/04 08:28 Page 22
Page 23

23
WHAT SHOULD YOU DO?
POSSIBLE
CAUSES
IF YOU REALIZE
THAT
Your new cooker keeps
tripping out the electric system
- Poor connection
- Several electrical appliances are running
at the same time.
➡ Switch off the electricity supply to the other
appliances.
➡ Check the electrical connections.
The flames are too
small on “high flame
position”
- The injector is blocked after cleaning
➡
Clean out the injector using a needle.
The flames are
streaming off the
burners
- The vents on the burner heads are
blocked.
- Poor positioning of the burner cover.
➡
Clean the vents on the burner head.
➡
Check the gas pressure.
➡
Check the position of the burner covers.
➡➡
Check that you have the right injectors, check the gas used, the gas connections and the flow adjustment.
The length of the flames
from the lower oven
burner vary during use
- This is due to the regulation of the temperature of the oven thermostat
➡
This is normal
The gas flow reduction
is excessive or the
flames go out
- After a change of gas type
➡ after adjusting the taps, when the tap is
switched to reduced flow the flame should
not go out. If this happens you have to unscrew the brass screw slightly. If it
seems to you that the reduced flow is too large,
you have to srew the brass screw
slightly and take care
that the flame will never go out.
Minor troubleshooting
You have doubts about whether your cooker is working correctly.
This
does not necessarily mean there is a breakdown. Nevertheless, check the
following points :
99634221_GB_A.qxd 02/07/04 08:28 Page 23
Page 24

Brandt Appliances - SAS with 10,000,000 euros of capital, RCS Nanterre under the
number 440 302 347
9963-4221 - 07/04
99634221_GB_A.qxd 02/07/04 08:28 Page 24
 Loading...