

Page 1

Using your oven
Le guide d’utilisation de votre four
O guia de utilização do seu forno
П пдзгьт чсЮузтфпх цпэснпх убт
Gebruiksaanwijzing van uw oven
FE 200
GB
FR
PT
NL
GR
99625662_ML_A.qxd 21/05/03 16:47 Page 1
Page 2

Throughout this manual,
indicates safety recommendations,
indicates advice to help you make the
best use of your oven
2
Contents
Introduction P.3
Your oven
How it works P.4
Accessories P.5
Safety recommendations P.6
How to install your oven
Electrical connections P.7-8
Dimensions for installation use P.9
How to use your oven
How to cook straightaway P.10
Changing a bulb
P.10
Looking after your oven P.11
Cooking methods P.12-13
Troubleshooting
P.14
99625662_ML_A.qxd 21/05/03 16:47 Page 2
Page 3
Introduction
Dear Customer,
Thank you for buying a BRANDT oven.
Our design staff have produced a new generation of kitchen equipment,
to make everyday cooking a pleasure.
You will find that the clean lines and modern look of your Brandt oven
blends in perfectly with your kitchen décor. It is easy to use and performs to a high standard.
Brandt also makes a range of products that will enhance your kitchen
such as hobs, extractor hoods, built-in dishwashers and refrigerators.
There are models to complement your new Brandt oven.
Of course, we make every effort to ensure that our products meet all
your requirements, and our Customer Relations department is at your
disposal, to answer all your questions and to listen to all your suggestions (see back cover of manual).
Brandt has always been a leader in the development of new products,
thus enhancing the quality of everyday life by providing increasingly
efficient products, that are easy to use, respect the environment, and are
attractive and reliable.
The BRANDT name.
3
GB
99625662_ML_A.qxd 21/05/03 16:47 Page 3
Page 4
4
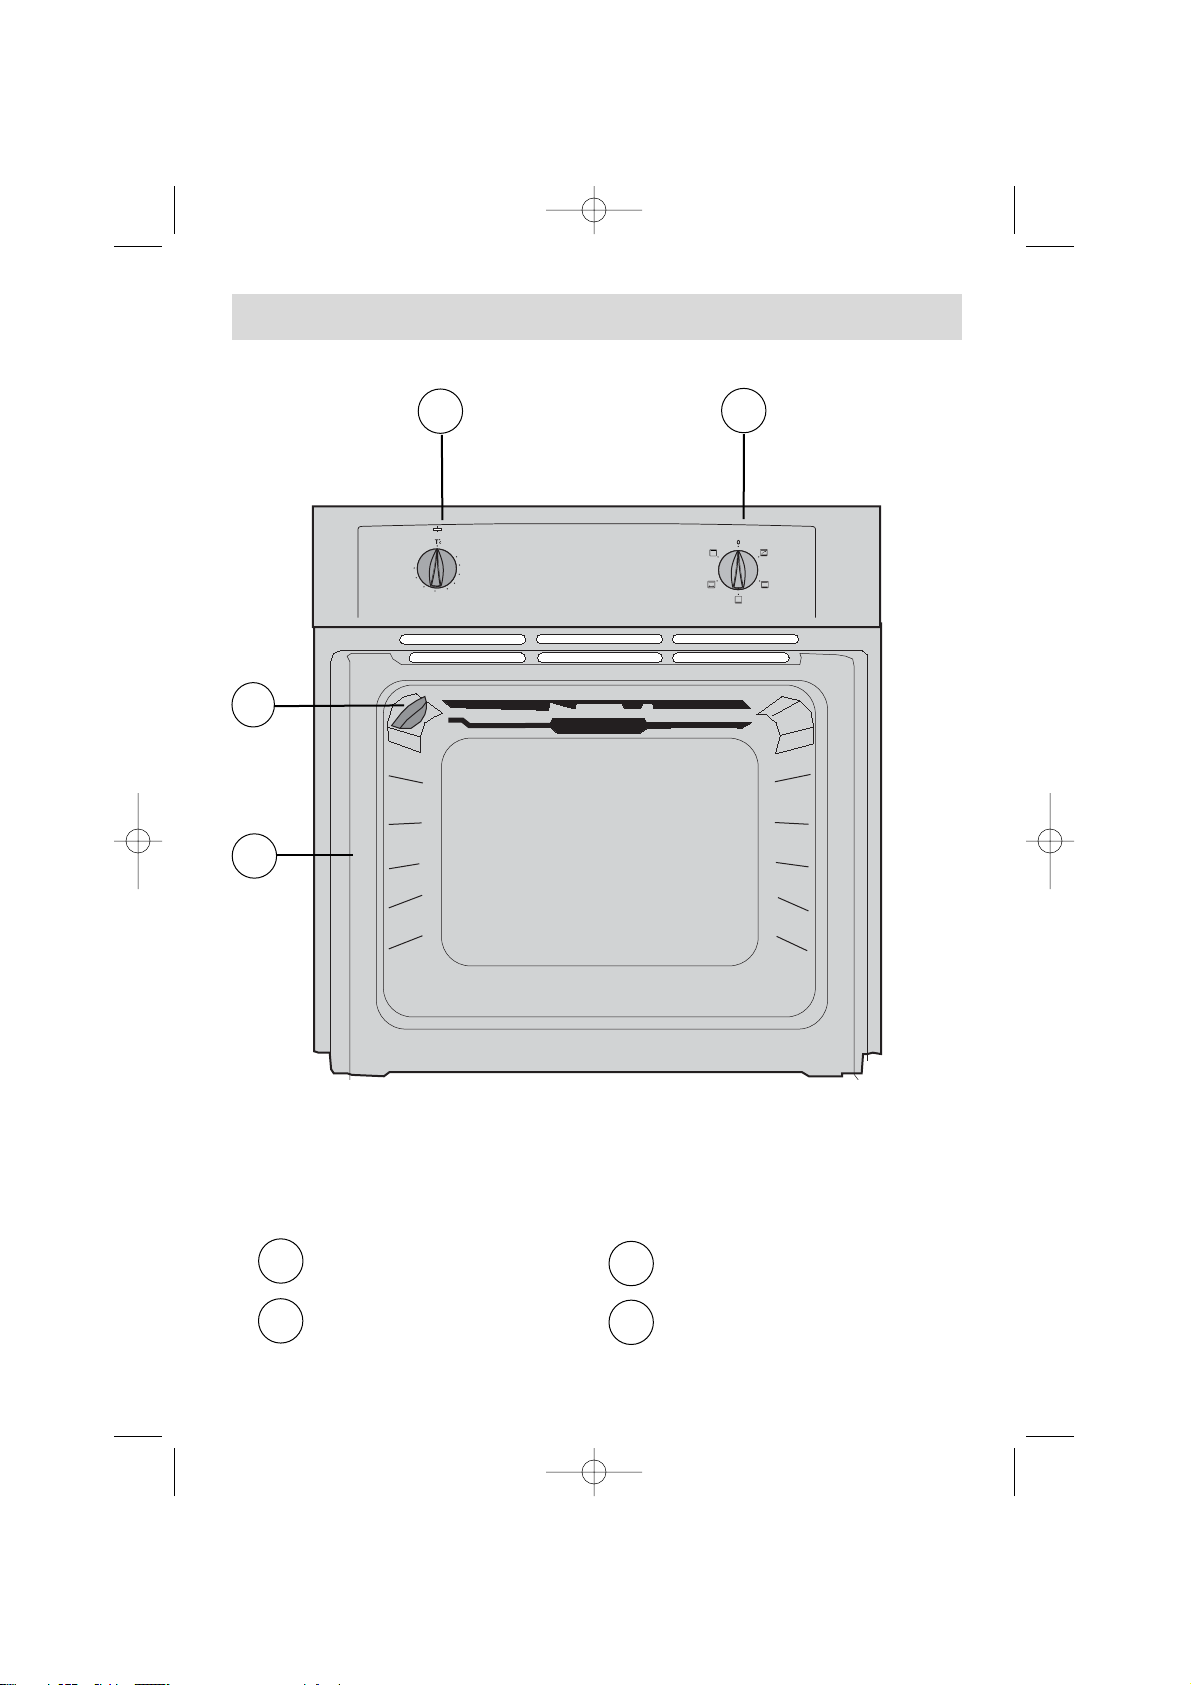
Your oven
1
4
2
3
5
3
1
55
75
100
125
150
180
210
240
270
3
4
2
1
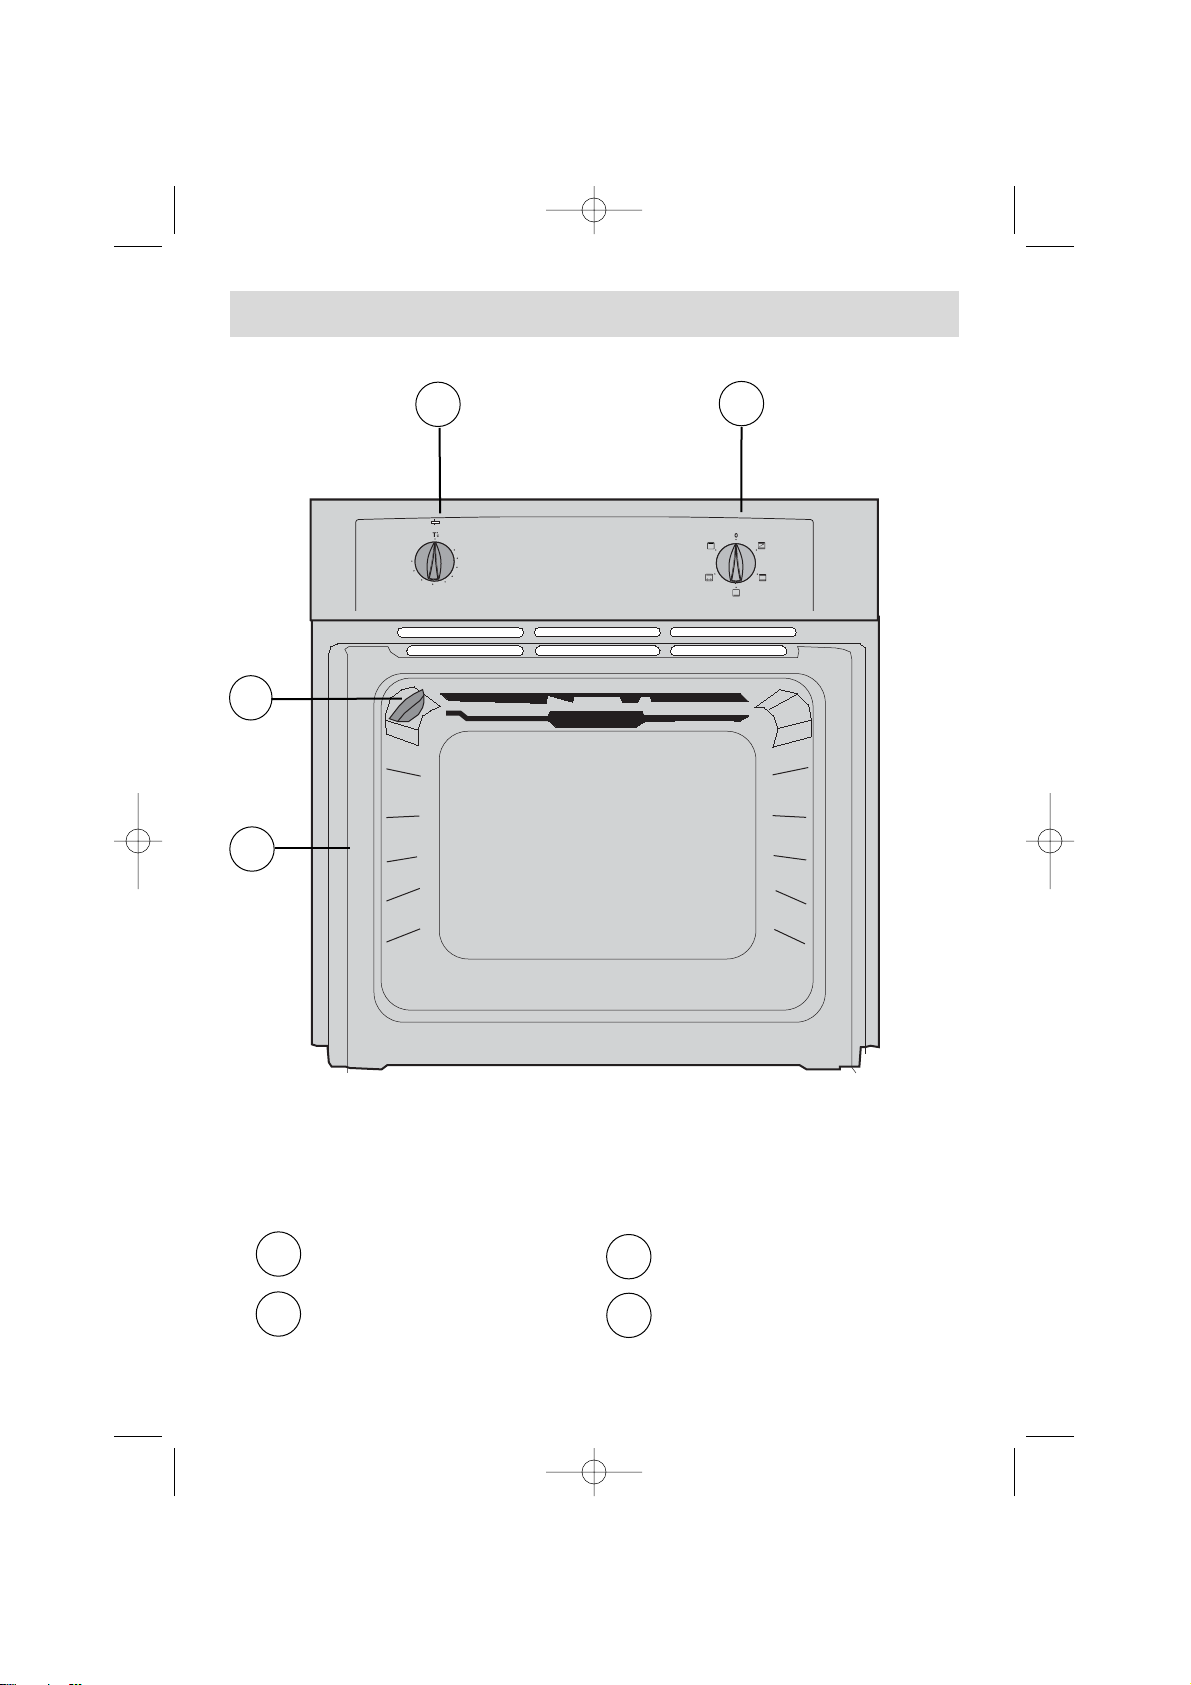
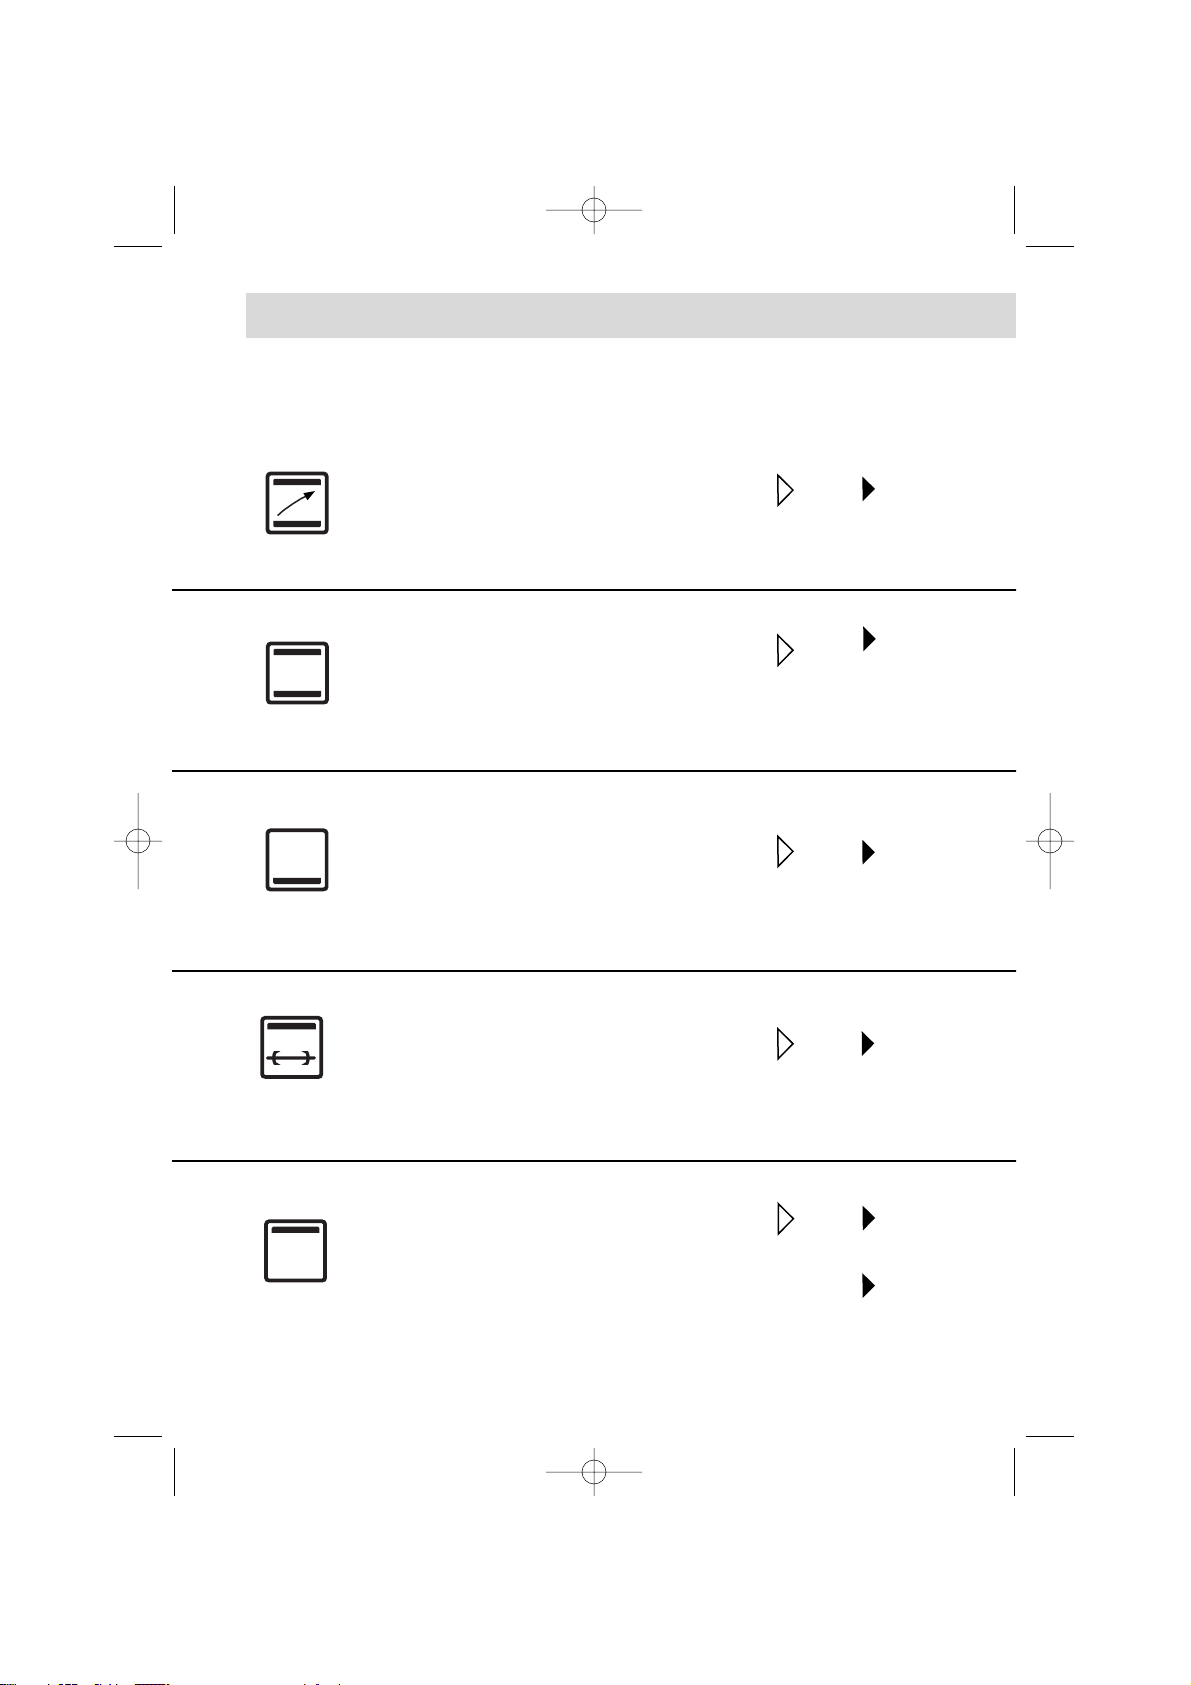
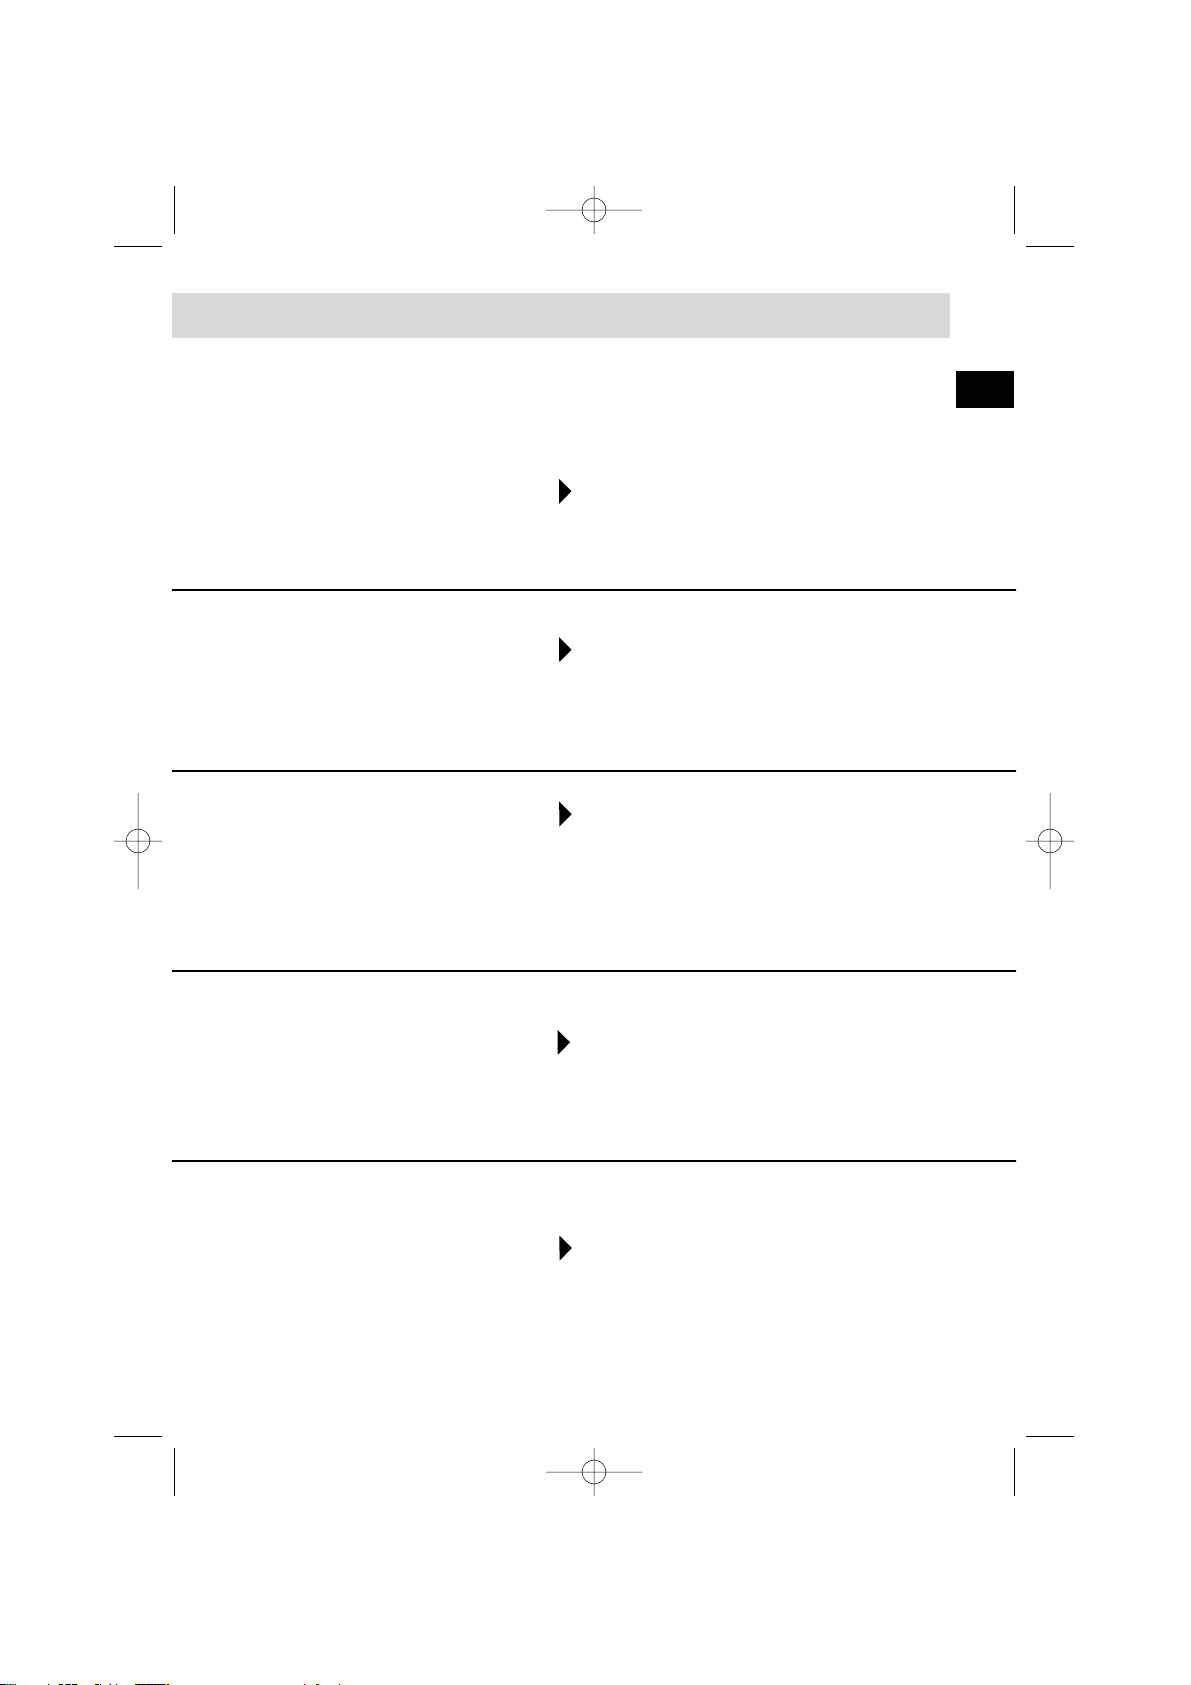
Temperature control
Feature selector
Light
Rail positions
OVEN FEATURES
99625662_ML_A.qxd 21/05/03 16:47 Page 4
Page 5
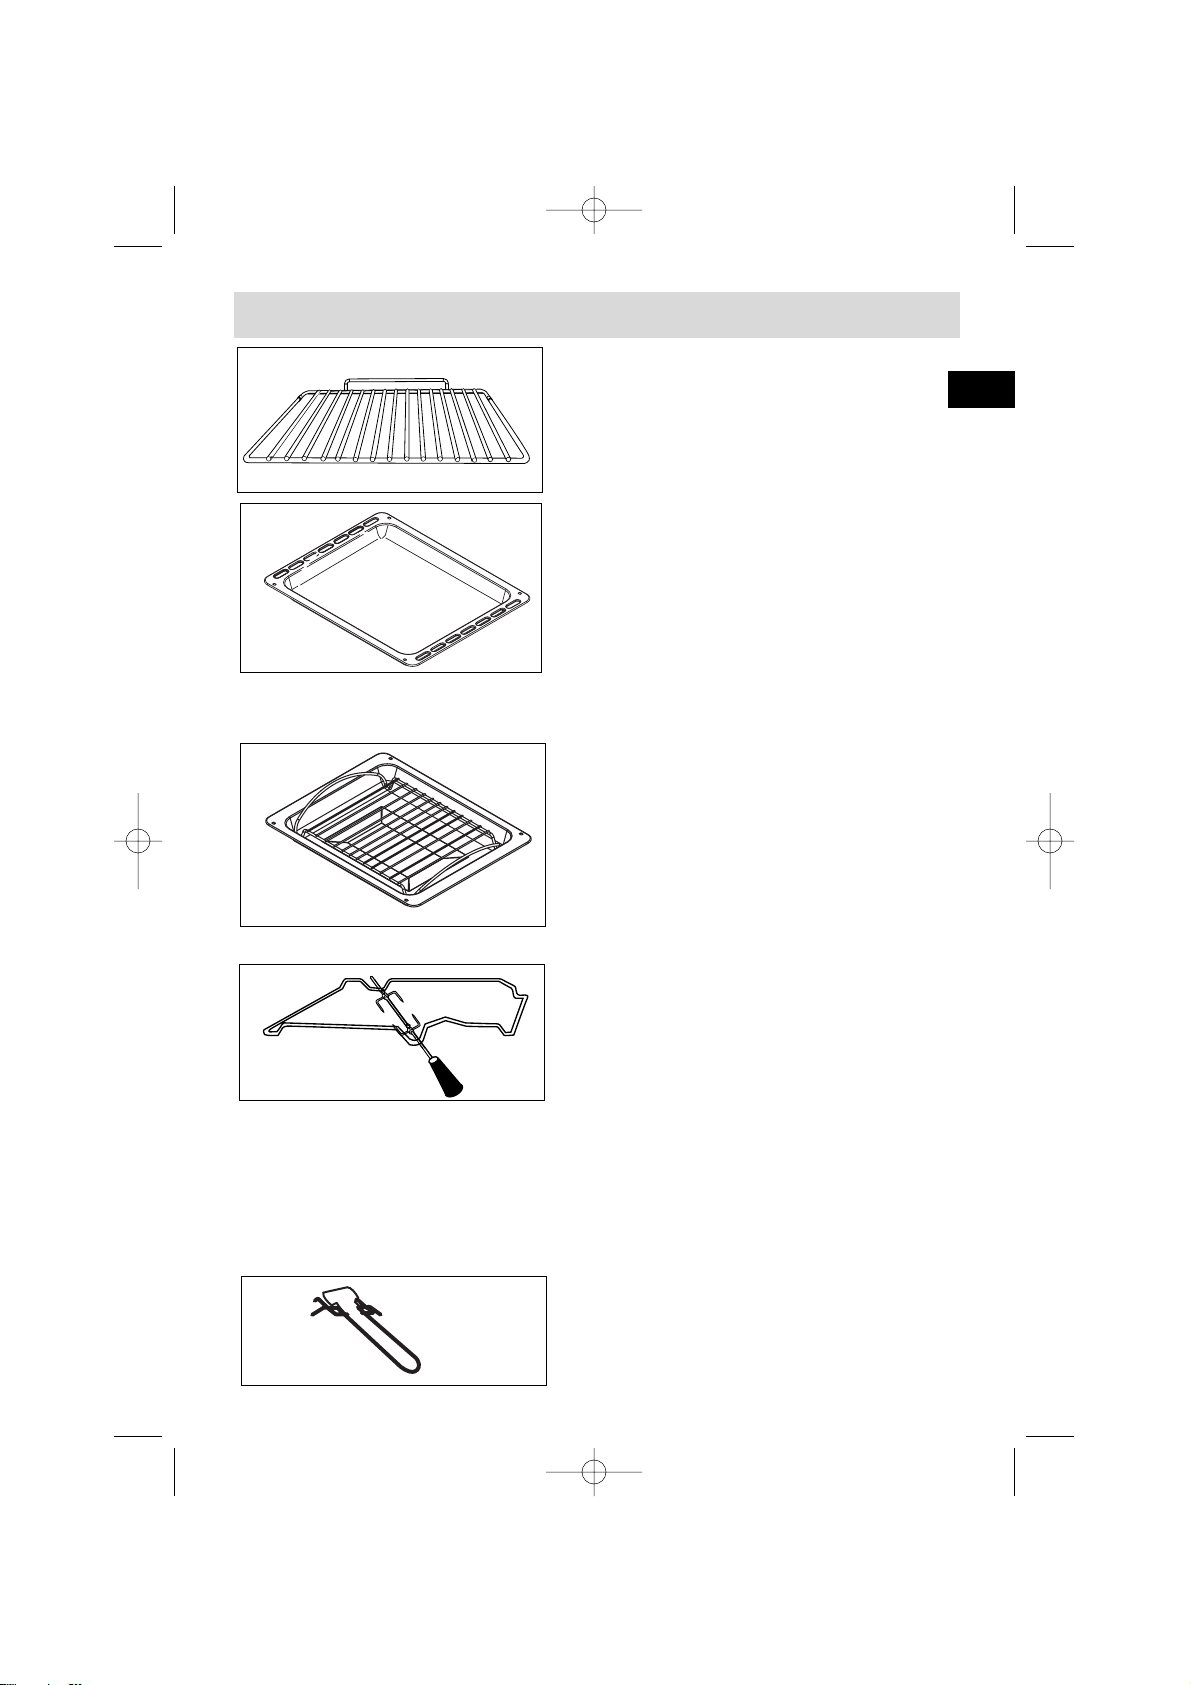
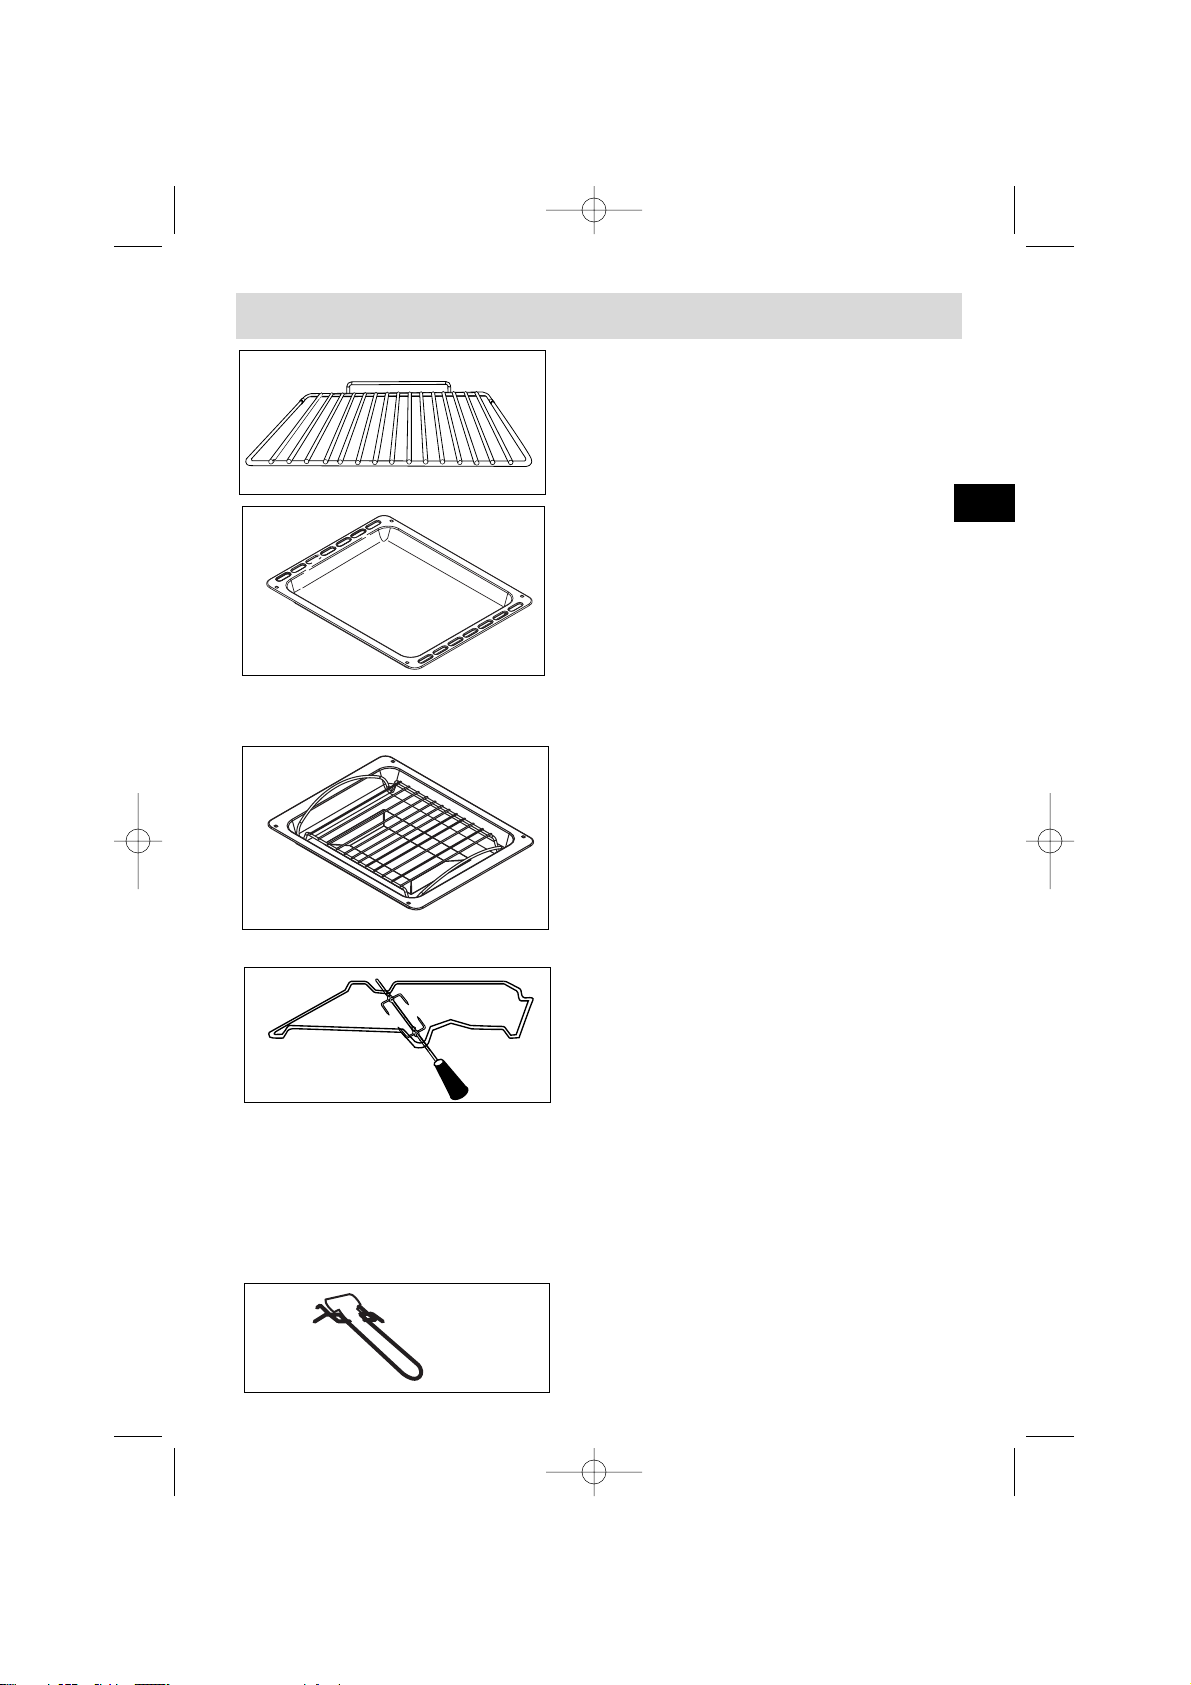
Anti-tip safety shelf
Food can either be placed on the shelf in a
dish or cake tin for cooking or browning, or
may be placed directly on the shelf itself.
Accessories (Depending on model)
5
Multi-purpose baking tray
This tray has a raised edge and can be used
for baking pastries (choux buns, meringues,
small cakes, flaky pasties, etc).
Joints should not be cooked in this tray
uncovered because fat could spit all over the oven sides.
Grill Tray
With special grid for grilling
The tray can be used for collecting juices
when cooking with the grill element by itself
or with the oven set to pulsed grill (grill and
fan). It is particularly useful as a large roasting tray for meat and vegetables.
Never cook with the grill tray sitting on the bottom of the oven.
• Slide one of the forks onto the spit; put the piece of meat to be roasted onto
the spit; slide on the second fork; centre and tighten the two forks.
• Place the spit on its cradle.
• Push gently to locate the tip of the spit in the turning mechanism situated at
the back of the oven (6).
• Remove the handle by unscrewing it. After cooking, screw the handle back
onto the spit to take it out without burning yourself.
Rotisserie
To use it:
• Place the multi-purpose baking tray at level no.
1 to collect the cooking juices or on the bottom
of the oven if the piece of meat to be roasted is
too big.
Handle for grill tray
GB
99625662_ML_A.qxd 21/05/03 16:47 Page 5
Page 6

6
Safety recommendations
Please read these instructions before installing and using your oven.
The oven has been designed for domestic use only for cooking food. No asbestos
has been used in its construction.
USING FOR THE FIRST TIME:
Before you use your oven for the first time, leave it empty and, with the door
closed, turn it on to maximum temperature and let it heat up for 15 minutes. This
"runs the oven in". During this time there may be some smell from the mineral
wool that insulates the oven and there could be some smoke. This is perfectly
normal.
NORMAL USE:
- Always close the door properly. The oven is fitted with a seal designed to
work with a closed door.
- Never lean or let anyone sit on the oven door when it is open.
- The oven parts and accessories can become hot when the door is
left partially open and the grill on. Always keep children at a safe distance.
- When the oven is on it will get hot. Take care not to touch the heating
elements inside the oven.
- Always protect your hands with oven gloves or something similar when
removing food, accessories or containers from the oven.
- Do not line your oven with kitchen foil. The metal will increase the heat pro-
duced and could ruin the food and damage the enamel.
- Never use a spray or a high-pressure washer to clean the oven.
- During self-cleaning, surfaces can become hotter than in normal use.
Children must be kept at a distance.
99625662_ML_A.qxd 21/05/03 16:47 Page 6
Page 7
7
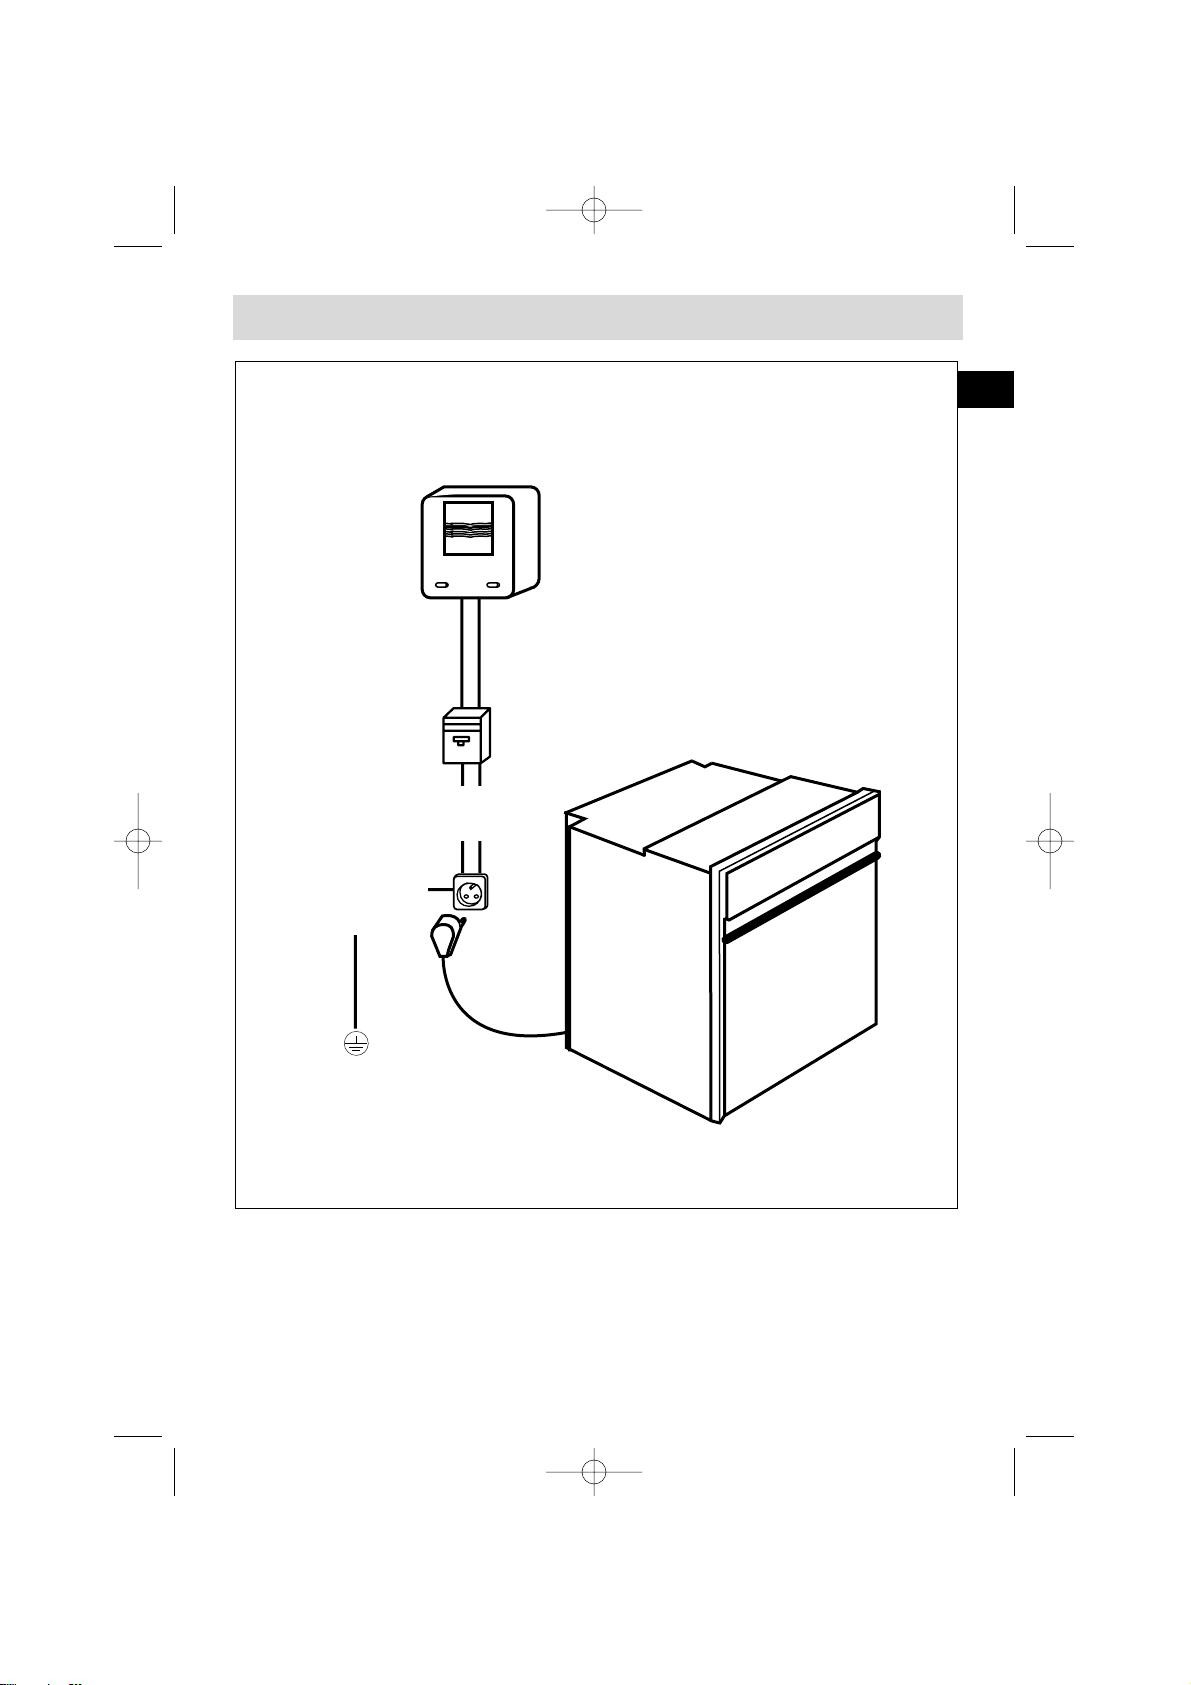
How to install your oven
Electricity meter (mains)
(20A, single-phase
220-240 V alternating
current 50 Hz)
Socket
2 -pin with earth
220-240 V single phase
alternating current supply
Electrical connections
• Before connecting your oven, make sure you are using the correct size cable.
The cross-section should be the same as the cable connected to the oven. Use a
16-amp fuse.
Connecting cable
approx 1.50 m.
long
Fused 16A or differential
circuit breaker
GB
99625662_ML_A.qxd 21/05/03 16:47 Page 7
Page 8
How to insta
8
We cannot accept any liability in the event of an accident
resulting from non-existent or faulty earthing.
• The supply cable (H05 RR-F, H05 RN-F or H05 W-F) must be long enough to allow
the oven to rest on the floor in front of its housing.
With the oven sitting on the floor and disconnected:
• Open the trapdoor at the bottom right hand side at the back of the oven by
removing the 2 screws and swinging the door away.
• Remove the sheath from each wire in the new cable up to 12 mm.
• Twist the ends carefully together.
• Unscrew the terminal screws and remove the wires that need changing.
• Pass the new cable through the wire clamp to the right of the terminals.
• Connect the wires up in accordance with the markings on the terminals.
• Make sure all wires are trapped under the screws.
• The brown wire (live) going to terminal marked L.
• The green and yellow wire (earth) going to the one marked .
• The blue wire (neutral) going to the terminal marked N.
• Tighten the screws and check, by tugging on each wire, that they are firmly connected.
• Tighten the clamp to hold the cable.
• Close the trapdoor using the two screws.
Fitting new wiring and/or changing cables.
The electrical connections are made before the oven is installed in its housing.
• The oven must be connected using an approved 3-core cable (live, neutral and
earth
) with 1.5 mm square conductors. This should be connected via a 3- pin-
socket (live, neutral, and earth to the main supply which should be should be a
220-240V, alternating single-phase current. If the oven is not connected using a
plug and socket, it must be connected to a multi-pole switch with a minimum gap
of 3 mm between contacts. The earth wire (green and yellow) should be connected
to the terminal marked with the earth symbol on the appliance and to the earth
in the switch.
• Where the oven is connected using a separate plug and socket this must be
accessible after the oven has been installed.
• The neutral wire (blue) of the oven must be connected to the neutral in the main supply.
99625662_ML_A.qxd 21/05/03 16:47 Page 8
Page 9
9
If you are unsure about fitting this oven yourself please use a
qualified electrician.
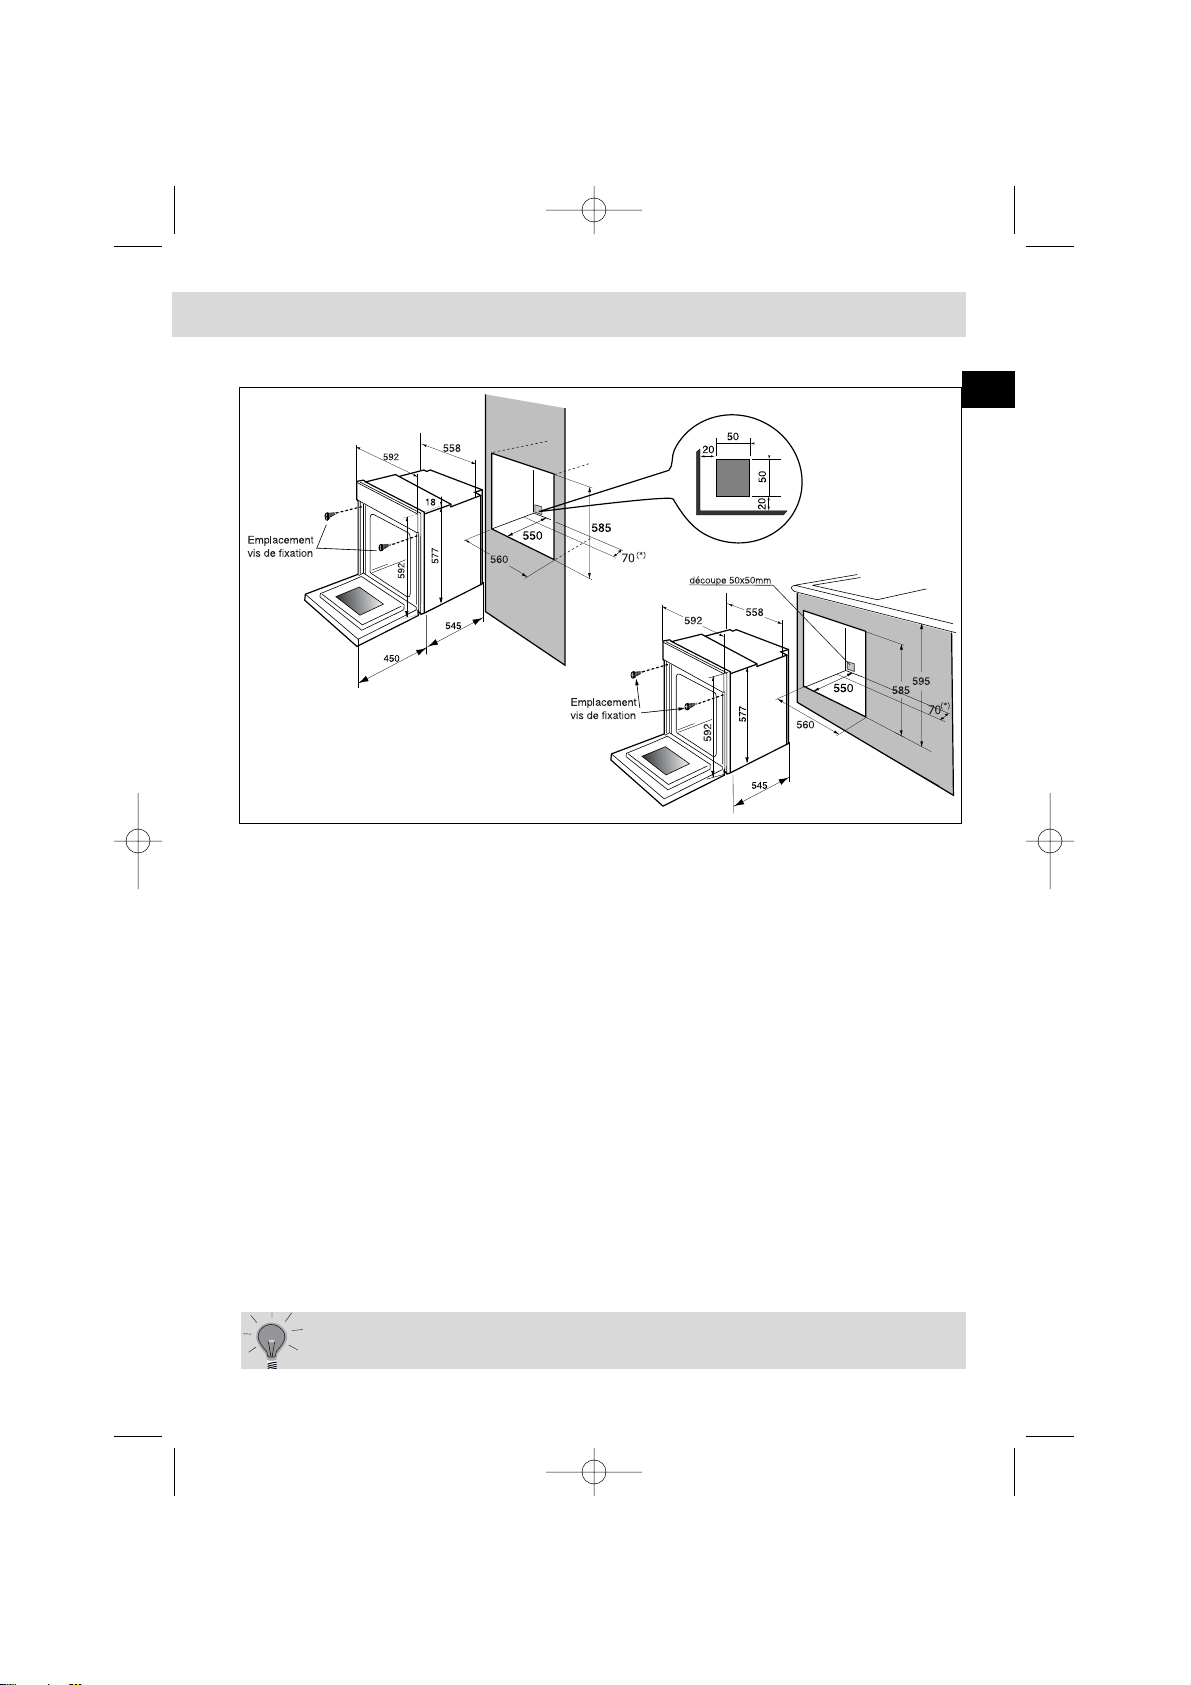
Dimensions for installation use
The oven may be housed either under a work surface or built into a
column that is open* or closed with a suitable opening.
Your oven works at its best and produces excellent results when cooking and cleaning itself, if its air circulation is not compromised:
• The oven must be centred in the unit so that there is a minimum distance of 5
mm between it and the surrounding unit.
• The housing unit or its outer surface must be capable of withstanding heat.
• To ensure the oven rests firmly in the housing, screw it to the housing unit using
the holes on the side uprights provided (see diagram).
To do this:
1) Remove the rubber stoppers masking the fixing holes.
2) To prevent the housing unit splintering, drill two holes 3 mm in diameter in the wall of the
housing unit opposite the fixing holes.
3) Attach the oven using the two screws.
4) Conceal the hole using the rubber stoppers. (These also help to cushion the
closing of the oven door).
(*) If the housing unit is open at the back, the gap must not be more
than 70 mm.
GB
99625662_ML_A.qxd 21/05/03 16:47 Page 9
Page 10
10
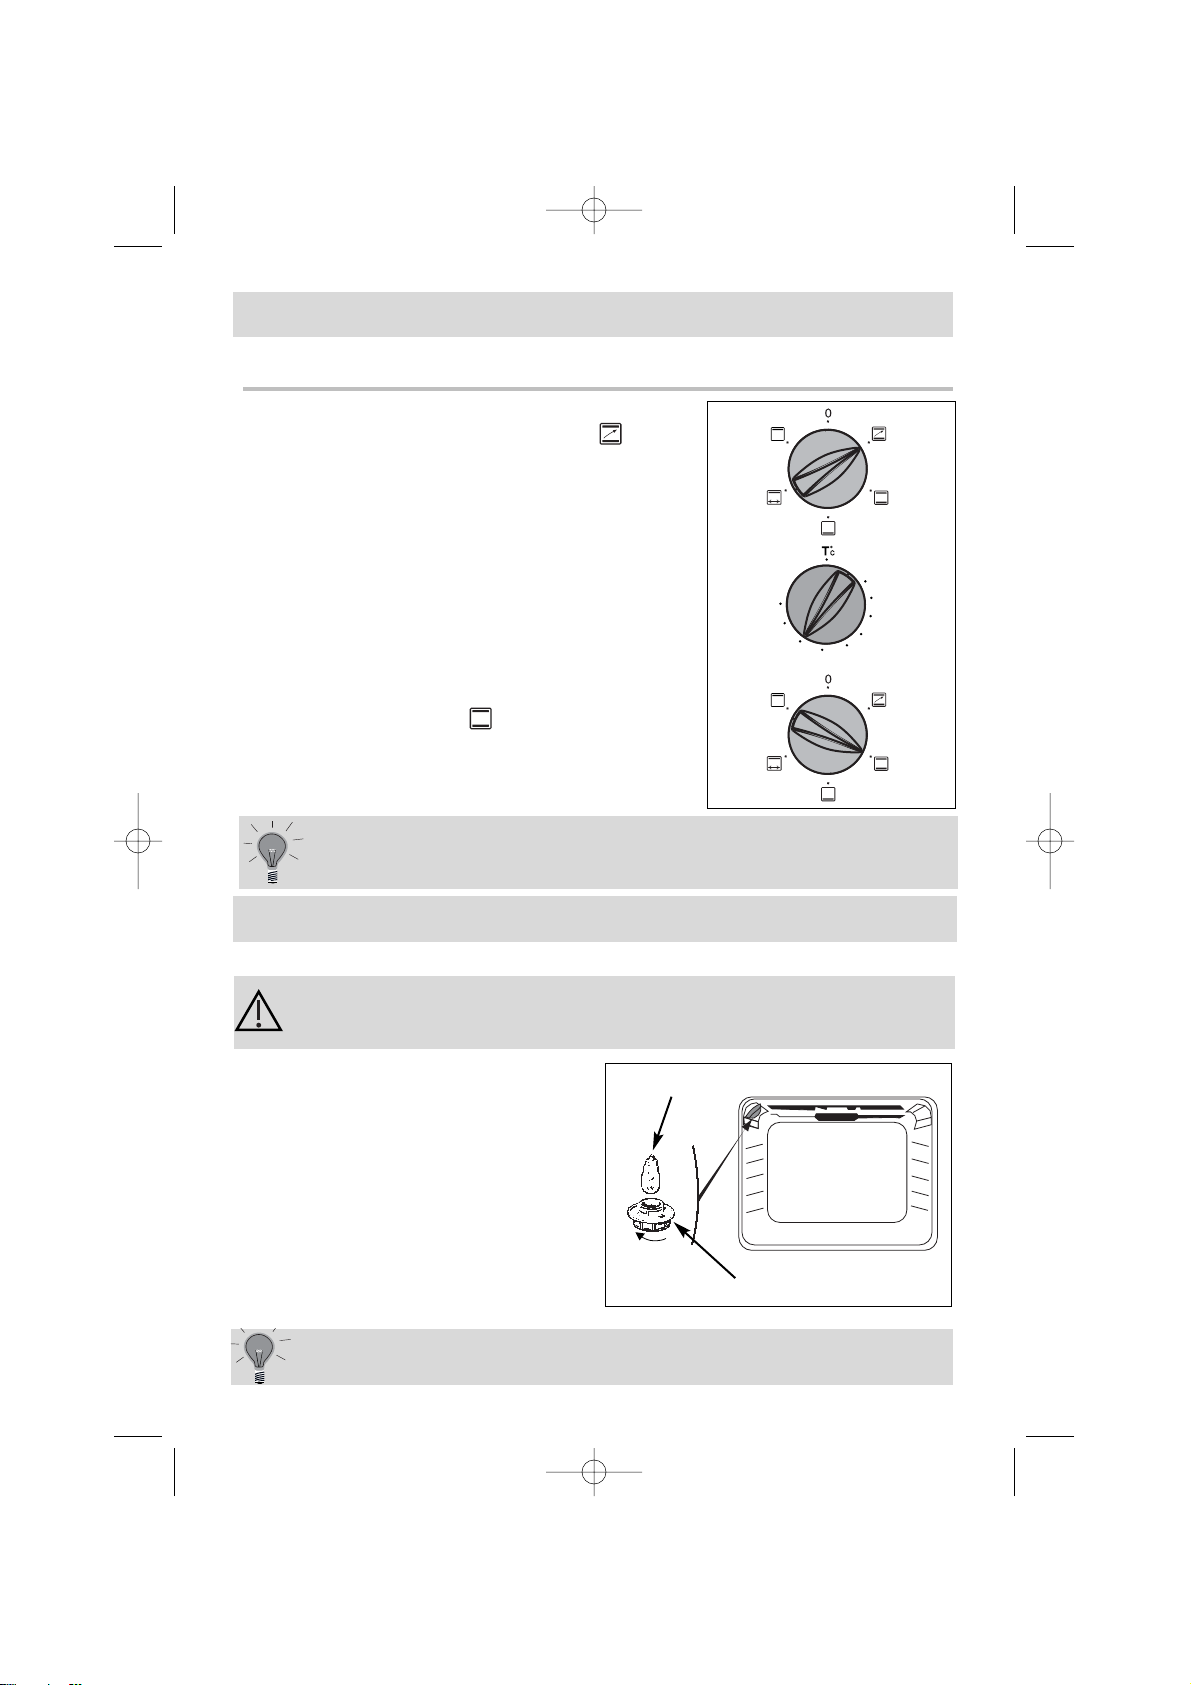
• The light bulb is housed in the ceiling of your oven.
a) Unscrew the protective shade (see
diagram).
b) Unscrew the bulb in the same direction.
The bulb used is a:
- 15 W
- 220-240 V
- 300°C
- E 14 screw-fitting bulb
c) Change the bulb, replace the shade and
switch your oven back on at the mains.
C hanging a bulb
bulb fitting
unscrew
cover
It is easier to unscrew the shade and bulb if you wear a rubber
glove.
Warning! Switch off the power at the main switch before
attempting to change the bulb. Leave the oven to cool if
necessary.
H
ow to use your oven
• Preheat the oven using the function " "
• Select the temperature for your recipe
Example: 210° temperature mark
• When the temperature light goes out, put your
dish in the oven.
• Do not forget to turn the function selector to the
position of your choice.
Exemple : position " ".
• After this, the oven heats up, the thermostat light
glows on and off as the oven temperature adjusts.
How to cook straightaway
After cooking, the fan continues to operate for a while in
order to cool the elements right down.
99625662_ML_A.qxd 21/05/03 16:47 Page 10
55
270
240
210
180
75
100
125
150
Page 11
Looking after your oven
Cleaning the inside
Before cleaning your oven let it cool down and make sure all switches are off.
General advice:
* Never spray water into the oven.
* Never use scouring pastes or scourers on the oven.
POLISHED METAL SURFACES
Only used materials recommended for polished metal.
GLASS IN OVEN DOOR
If the food cooked produces lots of splashes, wipe the glass on the inside with soapy
water.
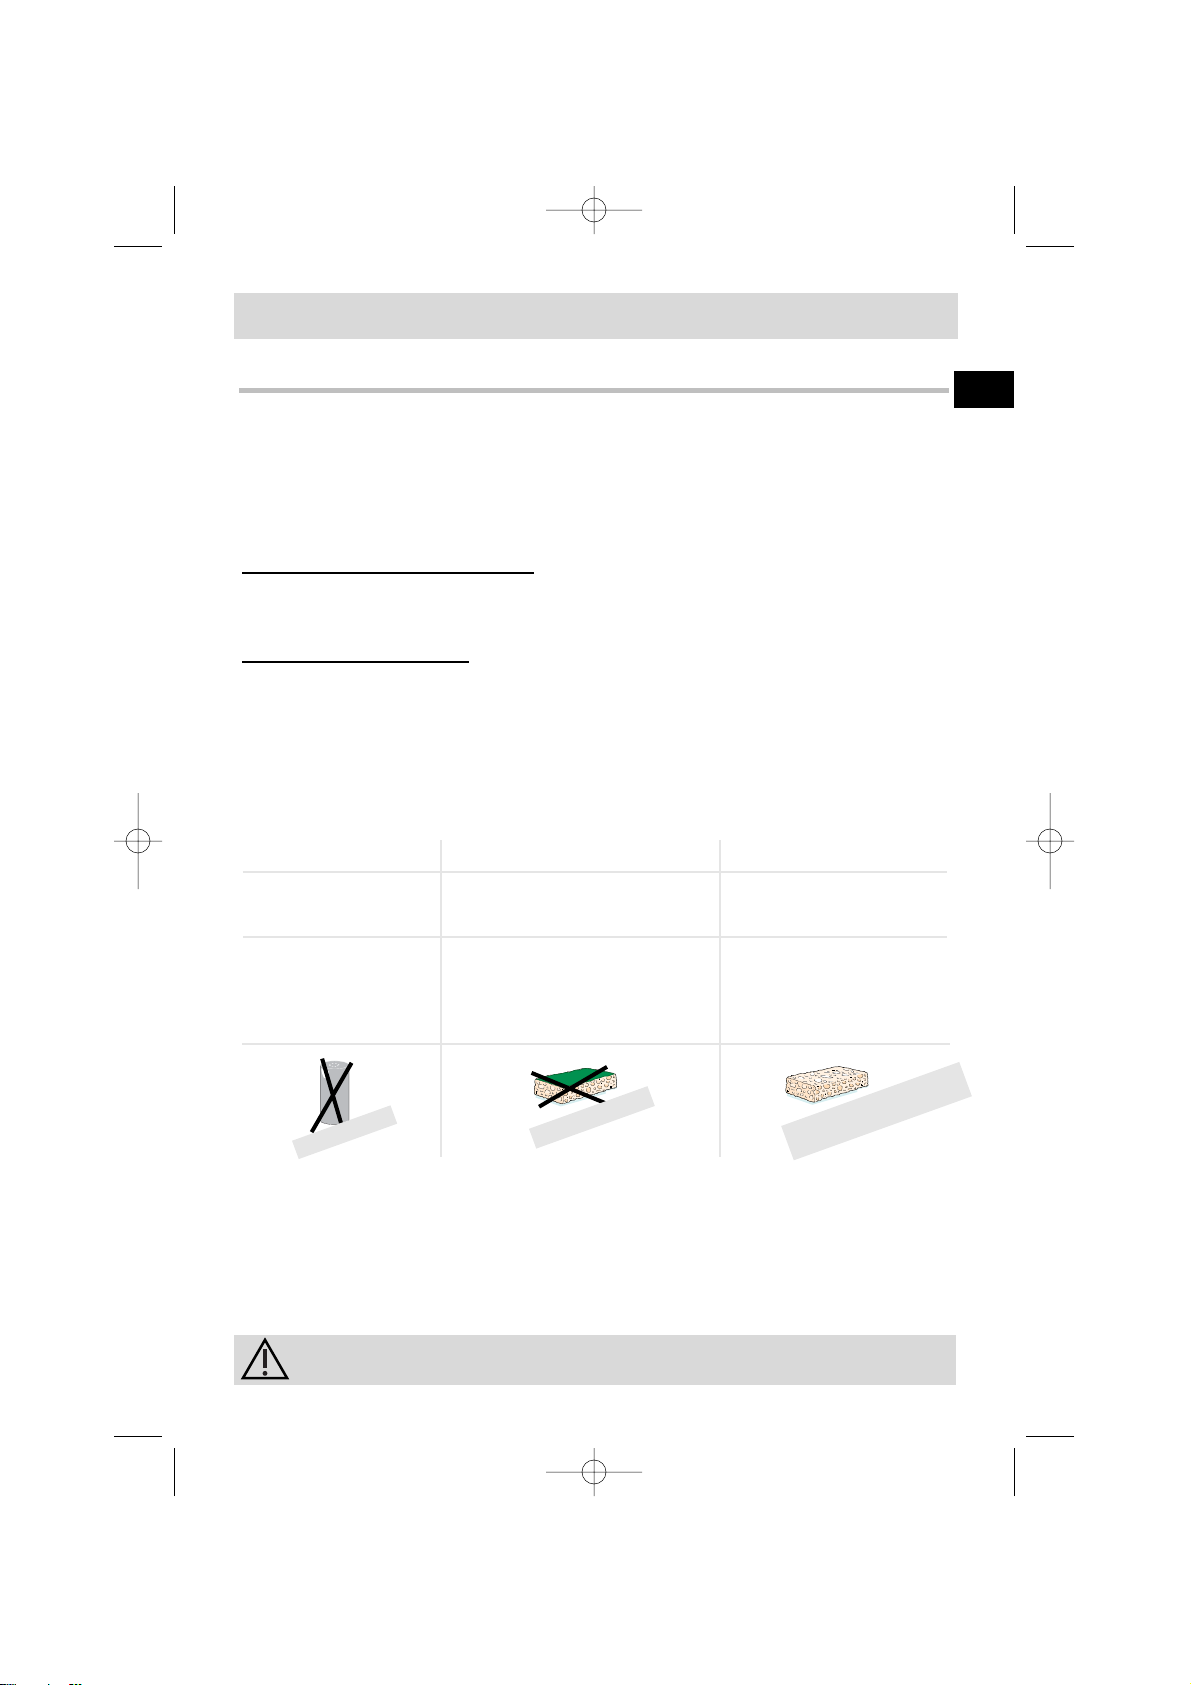
Type of marks
Lightly soiled
Built up deposits
Soak the area well with warm
water
Washing-up sponge
Leave for 30 mins in a warm
oven or overnight in a cold one
Aerosol specially designed
for ovens. Follow advice on
the container
What to use
Treatment
Your oven is easily cleaned. Here is a guide to help you:
Powder
Abrasive sponge
Special sponge for delicate
items
Always check that the oven is off before you clean the inside.
11
GB
99625662_ML_A.qxd 21/05/03 16:47 Page 11
Page 12
12
Cooking
Grill +Rotisserie
Food is cooked by the top element.
C
onventional oven
Food is cooked by a top and bottom
element.
Pre-heating ne
temperature.
Symbol
Feature
Oven bottom
Only the bottom element heats up.
Pre-heating re
underneath. U
Pre-heat
Use this befor
Full grill
Cooking is done by the top element
only
Pre-heat for 5
Slide the grill p
No need to pre
Poultry and jui
The spit contin
is opened.
Put the drippin
*
*
Cooking methods referred to in the advertisement about energy labelling in acco
99625662_ML_A.qxd 21/05/03 16:47 Page 12
Page 13
13
methods
eeded to reach the required
Recommended for food requiring
slow, careful cooking such as game
and braising joints. Ideal for sealing red
meat joints and simmering lidded cas-
seroles whose contents have been partially cooked on the hob first.
Description
Recommendations
Recommended for dishes with a lot of
liquid (quiches and fruit pies) as the
pastry base is cooked through. Use also
for food that rises (bread and cakes)
and uncovered soufflés.
re cooking some foods.
Set the temperature to the one you wish
to cook at. At the end of the pre-heat
cycle make sure you turn the selector to
the method of your choice.
For grilling large amounts that can
be spread out across the grid.
Recommended for all poultry or spit
roasts.
thoroughly cooking gigot lamb
chops, and sides of beef. Also good for
cooking fish in breadcrumbs.
GB
99625662_ML_A.qxd 21/05/03 16:47 Page 13
Page 14
14
Troubleshooting
If you're not sure that your oven is working properly, it doesn't necessarily
mean that there's a problem.
In all cases, check the following points:
If you realize that..
Possible causes what should you do?
The oven isn't heating.
• The oven isn't connected
to the power supply.
• The fuse has blown.
• The temperature selected
is too low.
• The thermostat is faulty.
- Connect to power supply.
- Change the fuse, checking
that it is 16A.
- Increase the temperature
selected.
- Contact the After-Sales
Service.
The temperature light
does not go out.
• Faulty thermostat.
- Contact the After-Sales
Service.
The light inside the oven
isn't working.
• The lamp is unusable.
• The oven isn't connected
to the power supply or the
fuse has blown.
- Change the bulb.
- Connect to power supply
or change fuse.
Copy here the details that are on your oven manufacturer's plate:
MADE IN FRANCE
220 - 240V ~ 50 Hz
BRANDT APPLIANCES SAS
7 rue Henri Becquerel
92500 RUEIL MALMAISON
99625662_ML_A.qxd 21/05/03 16:47 Page 14
Page 15

FR
15
99625662_ML_A.qxd 21/05/03 16:47 Page 15
Page 16

Tout au long de la notice,
vous signale les consignes de sécurité,
vous signale les conseils et les astuces
16
Sommaire
Edito P.17
Comment se présente votre four ?
Descriptif de l’appareil P.18
Accessoires P.19
Conseils de sécurité P.20
Comment installer votre four ?
Raccordement électrique P.21-22
Dimensions utiles pour encastrer votre four P.23
Comment utiliser votre four ?
Comment faire une cuisson immédiate ? P.24
Comment changer l’ampoule ?
P24
Comment entretenir votre four ? P.10
Modes de cuisson du four P.26-27
Que faire en cas d’anomalies de fonctionnement ? P.28
99625662_ML_A.qxd 21/05/03 16:47 Page 16
Page 17
Edito
Chère Cliente, Cher Client,
Vous venez d'acquérir un four BRANDT et nous vous en remercions.
Nos équipes de recherche ont conçu pour vous une nouvelle génération
d'appareils pour cuisiner chaque jour avec plaisir.
Avec des lignes pures et une esthétique moderne, votre nouveau four
Brandt s'intègre harmonieusement dans votre cuisine et allie parfaitement facilité d'utilisation et performances de cuisson.
Vous trouverez également dans la gamme des produits Brandt, un vaste
choix de tables de cuisson, de hottes aspirantes, de lave-vaisselle et de
réfrigérateurs intégrables, que vous pourrez coordonner à votre nouveau
four Brandt.
Bien entendu, dans un souci permanent de satisfaire au mieux vos exigences vis à vis de nos produits, notre service consommateurs est à
votre disposition et à votre écoute pour répondre à toutes vos questions
ou suggestions (coordonnées à la fin de ce livret).
A la pointe de l'innovation, Brandt contribue ainsi à l'amélioration de la
qualité de la vie quotidienne en vous apportant des produits toujours plus
performants, simples d'utilisation, respectueux de l'environnement, esthétiques et fiables.
La Marque BRANDT.
17
FR
99625662_ML_A.qxd 21/05/03 16:47 Page 17
Page 18
18
Comment se présente votre four ?
1
4
2
3
5
3
1
55
75
100
125
150
180
210
240
270
3
4
2
1
Sélecteur de température
Sélecteur de fonctions
Lampe
Indicateur de gradin
DESCRIPTIF APPAREIL
99625662_ML_A.qxd 21/05/03 16:47 Page 18
Page 19
Grille sécurité anti basculement
La grille peut être utilisée pour supporter tous
les plats et moules contenant des aliments à
cuire ou à gratiner. Elle sera utilisée pour les
grillades (à poser directement dessus).
Accessoires (selon modèle)
19
Plat multi usages
(pâtisserie)
Il sert de plat à gâteaux et dispose d'un
rebord incliné. Il s'utilise pour la cuisson de
pâtisseries telles que choux à la crème,
meringues, madeleines, pâtes feuilletées...
Evitez de poser directement dans ce plat
des rôtis ou des viandes car vous aurez automatiquement d'importantes projections sur les parois du four.
Plat creux équipé d'une grille support
spéciale grillades
Il sert à recueillir le jus et les graisses de
cuisson réalisées en gril fort ou gril pulsé.
Il peut être utilisé comme plat de cuisson en
appropriant la taille du morceau à cuire
(ex: une volaille avec les légumes autour, à
température modérée).
Ne jamais poser ce plat directement sur la sole, sauf en position GRIL.
• enfilez une des fourchettes sur la broche ; embrochez la pièce à rôtir ; enfilez
la deuxième fourchette ; centrez et serrez en vissant les deux fourchettes.
• placez la broche sur son berceau.
• poussez légèrement pour engager la pointe de la broche dans le carré d'entraînement situé au fond du four (6).
• retirez la poignée en la dévissant. Après la cuisson, revissez la poignée sur la
broche pour la retirer sans se brûler.
Tournebroche
Pour l'utiliser :
• disposez le plat multi-usages au gradin
N°1 pour recueillir les jus de cuisson ou sur
la sole si la pièce à rôtir est trop grosse.
Poignée pour plat creux
FR
99625662_ML_A.qxd 21/05/03 16:47 Page 19
Page 20

20
Conseils de sécurité
Merci de prendre connaissance de ces conseils avant d’installer et
d’utiliser votre four. Ce four a été conçu pour être utlilisé par des particuliers
dans leur lieu d’habitation. Il est destiné exclusivement à la cuisson des denrées
alimentaires. Ce four ne contient aucun composant à base d’amiante.
PREMIERE UTILISATION :
Avant d’utiliser votre four pour la première fois, chauffer le à vide, porte fermée,
pendant 15 minutes environ sur la position maxi afin de “roder” l’appareil. La laine
minérale qui entoure la cavité du four peut dégager, au début, une odeur particulière due à sa composition. De même, vous constaterez peut être un dégagement
de fumée. Tout ceci est normal.
UTILISATIONS SUIVANTES :
- Assurez vous que votre porte de four est bien fermée afin que le joint d’é-
tanchéité remplisse correctement sa fonction.
- Ne laissez personne s’appuyer ou s’asseoir sur la porte du four ouverte.
- Les parties accessibles ou les surfaces peuvent devenir chaudes
lors de l’utilisation du gril porte entrouverte. Eloignez les jeunes enfants.
- Lors de son utilisation, l’appareil devient chaud . Veillez à ne pas toucher
les éléments chauffants situés à l’intérieur du four.
- Après une cuisson, ne prenez pas à main nue la casserolerie (grille,
tourne broche, léchefrite, berceau de tournebroche...), utilisez une manique ou un
tissu isolant.
- Ne garnissez pas votre four de feuilles en aluminium. Sinon, il en
résulterait une accumulation de chaleur qui influencerait désavantagement le
résultat de la cuisson et du rôtissage et endommagerait l’émail.
- Ne pas utiliser de nettoyeur vapeur ou à haute pression.
- Lors du nettoyage les surfaces peuvent devenir plus chaudes qu'en usage
normal, il faut éloigner les jeunes enfants.
99625662_ML_A.qxd 21/05/03 16:47 Page 20
Page 21

21
Comment installer votre four?
Compteur 20A Mono
220-240 V ~ 50 Hz
Prise de courant
2 pôles + terre
norme CEI 83
Ligne Mono 220-240 V ~
Raccordement électrique
• Avant d'effectuer le branchement, s'assurer que les fils de votre installation électrique sont d'une section suffisante pour alimenter normalement l'appareil (section au minimum égale à celle du câble d'alimentation). Le fusible de votre
installation doit être de 16 Ampères.
Câble
d'alimentation
longueur 1,50 m
environ
Disjoncteur différentiel
ou fusible 16A
FR
99625662_ML_A.qxd 21/05/03 16:47 Page 21
Page 22
Comment instal
22
Notre responsabilité ne saurait être engagée en cas d'accident
consécutif à une mise à la terre inexistante, défectueuse ou
incorrecte.
• Le câble d’alimentation (H05 RR-F, H05 RN-F ou H05 VV-F) doit avoir une longueur
suffisante pour être raccordé au four à encastrer posé au sol devant le meuble.
Pour cela l’appareil étant déconnecté du réseau :
• Ouvrez la trappe située en bas à droite du capot arrière en dévissant les 2 vis,
puis faîtes pivoter la trappe.
• Dénudez chaque fil du nouveau câble d’alimentation sur 12mm.
• Torsadez soigneusement les brins.
• Desserrez les vis du bornier et retirez le cordon d’alimentation à changer.
• Introduire le câble d’alimentation par le côté du capot dans le serre-câble situé à
droite du bornier
• Raccordez les fils du câble conformément au(x) repère(s) écrit(s) sur le bornier.
• Tous les brins des fils d’alimentation doivent être emprisonnés sous les vis.
• Le fil de la phase sur la borne L.
• Le fil de terre couleur vert-jaune doit être relié à la borne .
• Le fil du neutre (bleu) sur la borne N.
• Vissez à fond les vis du bornier et vérifiez le branchement en tirant sur chaque fil.
• Fixez le câble au moyen du serre-câble situé à droite du bornier.
• Refermez la trappe à l’aide des 2 vis.
Mise en place et/ou changement du câble d’alimentation
Le raccordement électrique est à réaliser avant la mise en place de l'appareil dans
le meuble.
• Le four doit être branché avec un câble d'alimentation (normalisé) à 3 conducteurs de 1,5 mm2 (1 ph +1 N + terre ) qui doivent être raccordés sur réseau
220-240 V ~ monophasé par l'intermédiaire d'une prise de courant 1 ph +1 N +
terre normalisée CEI 83 ou d'un dispositif à coupure omnipolaire ayant une distance d'ouverture des contacts d'au moins 3 mm. Le fil de protection (vert-jaune)
est relié à la borne de l'appareil et doit être relié à la terre de l'installation.
• Dans le cas d’un branchement avec prise de courant, celle-ci doit rester
accessible après l’installation de l’appareil.
• Le neutre du four (fil bleu) doit être raccordé au neutre du réseau.
99625662_ML_A.qxd 21/05/03 16:47 Page 22
Page 23

23
ler votre four?
Pour être assuré d’avoir une installation conforme, n’hésitez
pas à faire appel à un spécialiste électroménager.
Dimensions utiles pour encastrer votre four
Le four peut indifféremment être installé sous un plan de travail ou dans
un meuble en colonne (ouvert* ou fermé) ayant les dimensions d’encastrement adaptées (voir schéma ci-contre).
Votre four possède une circulation d’air optimisée qui permet d’obtenir des résultats
de cuisson et de nettoyage remarquables en respectant les éléments suivants :
• Centrez le four dans le meuble de façon à garantir une distance mini de 5 mm
avec le meuble voisin.
• La matière du meuble d’encastrement doit résister à la chaleur (ou être revêtu
d’une telle matière).
• Pour plus de stabilité, fixez le four dans le meuble par 2 vis au travers des trous
prévus à cet effet sur les montants latéraux (cf schéma).
Pour ce faire :
1) Retirez les cache vis en caoutchouc pour accéder aux trous de fixation.
2) Effectuez un trou de Ø 3 mm dans la paroi du meuble pour éviter l’éclatement du bois.
3) Fixez le four avec les 2 vis.
4) Remettez les cache vis en caoutchouc (ceux-ci servent également à amortir la
fermeture de la porte du four).
(*) si le meuble est ouvert, son ouverture doit être de 70 mm (maxi).
FR
99625662_ML_A.qxd 21/05/03 16:47 Page 23
Page 24

24
• L'ampoule se situe au plafond de la cavité de votre four.
a) Dévissez le hublot (voir ci-contre).
b) Dévissez l'ampoule dans le même sens.
Caractéristiques de l'ampoule :
- 15 W
- 220-240 V
- 300°C
- culot E 14
c) Changer l'ampoule puis remonter le
hublot et rebrancher votre four.
C omment changer l’ampoule ?
Ampoule
Dévissez
Hublot
Pour dévisser le hublot et la lampe, utiliser un gant de caoutchouc
qui facilitera le démontage.
Débrancher votre four avant toute intervention sur l'ampoule
pour eviter tout risque de choc électrique et laisser refroidir si
besoin l’appareil.
Comment utiliser votre four ?
• Préchauffez le four sur la fonction " "
• Choisissez la température de votre recette
Exemple : repère de température 210°.
• Lorsque le voyant de température s’éteint,
enfournez votre plat.
• N’oubliez pas de placer le sélecteur de fonction
sur la position de votre choix.
Exemple : position " ".
• Après ces actions, le four chauffe, le voyant de
thermostat s’allume et s’éteint au rythme des
régulations.
Comment faire une cuisson ?
Après un cycle de cuisson, le ventilateur du four continue de
fonctionner pendant un certain temps, afin de garantir un bon
refroidissement des éléments.
99625662_ML_A.qxd 21/05/03 16:47 Page 24
55
270
240
210
180
75
100
125
150
Page 25

Comment entretenir votre four ?
Nettoyage de l’enceinte
Avant de procéder au nettoyage, laissez refroidir l'appareil et vérifiez que toutes
les manettes sont sur la position ARRET.
De façon générale :
* ne pas asperger d’eau l’appareil.
* les poudres abrasives et les éponges métalliques sont à proscrire.
SURFACES METALLIQUES POLIES
Utilisez les produits du commerce prévus pour l'entretien des métaux polis.
VITRE DE PORTE DE FOUR
Après une cuisson ayant provoqué des salissures, il est conseillé de nettoyer la vitre
intérieure avec de l’eau savonneuse.
Type de salissures
Légères
Accumulation de
salissures recuites
Bien détremper la zone avec de
l’eau chaude
Eponges à vaisselle
Laissez agir de 30 min sur un
four tiède, à une nuit sur un four
froid.
Aérosol “spécial nettoyant
pour four”
Respectez les conseils
d’ utilisation.
Comment procéder
Produits à utiliser
Votre four se nettoie facilement, pour vous aider voici quelques conseils :
poudre
éponge abrasive
éponge sanitaire spéciale
vaisselle délicate
pour toute intervention de nettoyage dans la cavité, le four
doit être arrêté.
25
FR
99625662_ML_A.qxd 21/05/03 16:47 Page 25
Page 26

26
Modes de cuis
Gril +Tournebroche
La cuisson s’effectue par l’élément
supérieur
.
Traditionnel
La cuisson s’effectue par les éléments inférieur et supérieur.
Nécessite un pré
plat.
Symbole
Nom de la fonction
Descrip
Sole
La cuisson s’effectue par l’élément
inférieur.
Nécessite un pré
Cuisson par le d
Placez la grille s
Préchauffage
A utiliser avant
Gril fort
La cuisson s’effectue par l’élément
supérieur
.
Effectuez un pré
minutes.
Glissez la léche
Préchauffage inu
Volailles et rôtis
tes les faces.
Le tourne broche
l’ouverture de la
Glissez la lèche f
*
* Séquences(s) utilisée(s) pour l’annonce écrite sur l’étiquette énergétique conformé
99625662_ML_A.qxd 21/05/03 16:48 Page 26
Page 27

27
sson du four
Recommandé pour les cuissons lentes
et délicates : gibiers moelleux...
Pour saisir rôtis de viande rouge
Pour mijoter en cocotte fermée plats
préalablement démarrés sur table de
cuisson (coq au vin, civet...).
Recommandations
Recommandé pour les plats humides
(quiches, tartes aux fruits juteux...).
La pâte sera bien cuite dessous.
Recommandé pour les préparations
qui lèvent (cake, brioche, kouglof...) et
pour les soufflés qui ne seront pas bloqués par une croute dessus.
Thermostat réglé sur la température de
cuisson.
A la fin du préchauffage, n’oubliez pas
de ramener le sélecteur de fonction sur
la position de cuisson choisie.
Recommandé pour griller de grandes
quantités que vous répartirez sur toute
la surface de la grille.
utile
Recommandé pour toutes les volailles
ou rôtis au tourne-broche.
Pour saisir et cuire à coeur gigot,
côtes de boeuf.
Pour garder leur fondant aux pavés
de poissons.
FR
99625662_ML_A.qxd 21/05/03 16:48 Page 27
Page 28

28
Que faire en cas d’anomalies de
fonctionnement ?
Vous avez un doute sur le bon fonctionnement de votre four, ceci ne
signifie pas forcément qu'il y a une panne.
Dans tous les cas, vérifiez les
point suivants :
Vous constatez que...
Les causes possibles Que faut-il faire ?
Le four ne chauffe pas.
• Le four n'est pas branché.
• Le fusible de votre installation est hors service.
• La température sélectionnée est trop basse.
• Le thermostat est défectueux.
- Brancher le four.
- Changer le fusible de votre
installation et vérifier sa valeur (16A).
- Augmenter la température
sélectionnée.
- Faire appel au Service
Après-Vente.
L’indicateur de T°c reste
allumé en permanence.
• Thermostat défectueux .
- Faire appel au Service
Après-Vente.
La lampe du four ne fonctionne plus.
• La lampe est hors service.
• Le four n'est pas branché
ou le fusible est hors service.
- Changer la lampe.
- Brancher le four ou changer le fusible.
Reportez ci-dessous les indications figurant sur la plaque signalétique de votre four :
MADE IN FRANCE
220 - 240V ~ 50 Hz
BRANDT APPLIANCES SAS
7 rue Henri Becquerel
92500 RUEIL MALMAISON
99625662_ML_A.qxd 21/05/03 16:48 Page 28
Page 29

PT
29
99625662_ML_A.qxd 21/05/03 16:48 Page 29
Page 30

Ao longo do folheto,
assina-lhe as instruções de segurança,
assinala-lhe os conselhos e as astúcias
30
Sumário
Editorial P.31
Como se apresenta o seu forno?
Descrição do aparelho P.32
Acessórios P.33
Conselhos de Segurança
P.34
Como instalar o seu forno?
Ligação eléctrica P.35-36
Dimensões úteis para encastrar o seu forno P.37
Como utilizar o seu forno?
Como fazer uma cozedura imediata? P.38
Como mudar a lâmpada? P.38
Como cuidar do seu forno? P.39
Modos de cozedura do forno
P.40-41
Que fazer em caso de anomalias de funcionamento? P.42
99625662_ML_A.qxd 21/05/03 16:48 Page 30
Page 31

Editorial
Estimado(a) Cliente,
Acabou de adquirir um forno BRANDT e estamos-lhe gratos por isso.
As nossas equipas de pesquisa conceberam, pensando em si, uma nova
geração de aparelhos para que o acto de cozinhar seja um prazer no dia
a dia .
Com linhas puras e uma estética moderna, o seu novo forno Brandt
integra-se harmoniosamente na sua cozinha e alia perfeitamente facilidade de utilização e performance de cozedura.
Encontrará igualmente na gama dos produtos Brandt, uma vasta escolha
de placas de cozedura, de exaustores, de máquinas de lavar loiça e de
refrigeradores integráveis, que poderá coordenar ao seu novo forno
Brandt.
Evidentemente, com a preocupação permanente de satisfazer da melhor
maneira possível as suas expectativas em relação aos nossos produtos, o
nosso serviço de consumidores encontra-se à sua disposição e à sua
escuta para responder a todas as suas perguntas ou sugestões (coordenadas no final do presente manual).
Na ponta da inovação, Brandt contribui assim para o melhoramento da
qualidade da vida do dia a dia, proporcionando-lhe produtos cada vez
mais performantes, de utilização simples, amigos do ambiente, com um
lindo design e fiáveis.
A Marca BRANDT.
31
PT
99625662_ML_A.qxd 21/05/03 16:48 Page 31
Page 32

32
Como se apresenta o seu forno?
1
4
2
3
5
3
1
55
75
100
125
150
180
210
240
270
3
4
2
1
Programador de temperatura
Selector de funções
Lâmpada
Indicador de alheta
DESCRIÇÃO DO APARELHO
99625662_ML_A.qxd 21/05/03 16:48 Page 32
Page 33

A grelha pode ser utilizada para suportar todos os
pratos e formas contendo alimentos para cozer
ou gratinar. Ela será utilizada para os grelhados
(a colocar directamente em cima).
Acessórios (consoante o modelo)
33
Prato multiusos
(pastelaria)
Serve de prato para bolos e dispõe de um rebordo
inclinado. Utiliza-se para a cozedura de bolos tais
como os choux à la creme,
suspiros, madalenas, massas folhadas... Evite colocar directamente neste prato assados ou carnes porque se o fizer
provocará automaticamente projecções significativas contra as paredes do forno.
Ele serve para recolher o molho e as gorduras de
cozedura realizados em grelhador forte ou grelhador pulsado. Pode ser utilizado como prato de
cozedura adaptando o tamanho do pedaço a cozer
(ex: uma ave com legumes à volta, a temperatura
moderada).
Nunca colocar este prato directamente sobre a base , excepto em posição GRELHADOR.
• enfie um dos garfos no espeto; enfie no espeto a peça a assar; enfie o segundo garfo; centre e aperte aparafusando os dois garfos.
• introduza o espeto no seu berço.
• empurre ligeiramente para introduzir a ponta do espeto no quadrado de movimentação situado no fundo do forno (6).
• retire o punho desatarraxando -o. Após a cozedura, aparafuse novamente a
pega no espeto para retirá-lo sem se queimar.
Espeto de manivela
Para o utilizar:
• disponha o prato multiusos na alheta n°1 para
recolher os molhos de cozedura ou sobre a base
se a peça a assar for demasiado grande.
Punho para prato oco.
Grelha de segurança
anti-oscilamento
Prato oco
equipado com uma grelha de suporte
especial grelhados
PT
99625662_ML_A.qxd 21/05/03 16:48 Page 33
Page 34

34
Conselhos de Segurança
Agradecemos que tome conhecimento destes conselhos antes de instalar e utilizar o seu forno. Este forno foi concebido para ser utilizado por parti-
culares no seu local de habitação. Ele destina-se exclusivamente à cozedura de
alimentos. Este forno não contém qualquer componente à base de amianto.
PRIMEIRA UTILIZAÇÃO:
Antes de utilizar o seu forno pela primeira vez, proceda ao aquecimento com o
forno vazio e a porta fechada, durante cerca de 15 minutos em posição máxima
afim de "rodar" o aparelho. No início, a lã mineral que reveste a cavidade do forno
pode desprender um cheiro particular devido à sua decomposição. Do mesmo
modo, é possível que possa constatar um desprendimento de fumo. Este fenómeno é normal.
UTILIZAÇÕES SEGUINTES:
- Assegure-se de que a porta do seu forno está bem fechada, a fim que a junta
de estanquecidade desempenhe correctamente a sua função.
- Não deixe ninguém apoiar-se ou sentar-se sobre a porta do forno aberta.
- Quando utilizar o grelhador com a porta entreaberta, as partes
acessíveis ou as superfícies podem aquecer. Mantenha as crian
ças afastadas.
- Durante a utilização o aparelho aquece. Tome precauções de maneira a
não tocar nos elementos aquecidos situados na cavidade do forno.
- Após uma cozedura, não segure qualquer acessório do forno (grelha,
espeto de manivela, pingadeira, berço de espeto de manivela...) com as
mãos desprotegidas, utilize luvas especiais ou um tecido isolante.
- Não guarneça o interior do seu forno com folha de alumínio. Caso contrário,
resultaria uma acumulação de calor que deturparia o resultado da cozedura e da
assadura e danificaria o esmalte.
- Não utilize um dispositivo de limpeza a vapor ou a alta pressão.
Durante a limpeza, as superfícies acessíveis aquecem mais do que durante uma
utilização normal. Mantenha as crianças afastadas.
99625662_ML_A.qxd 21/05/03 16:48 Page 34
Page 35

35
Como instalar o seu forno?
Contador 20 A Mono
220-240 V ~50 Hz
Tomada de corrente
2 pólos + terra
norma CEI 83
Linha Mono 220-240 V ~
Ligação eléctrica
• Antes de efectuar a ligação, assegure-se de que a secção dos fios da instalação
eléctrica é suficientemente grande para alimentar normalmente o aparelho (no
mínimo, a secção deve ser igual à do cabo eléctrico).
O fusível da sua instalação deve ser de 16 Amperes.
Cabo eléctrico
com cerca de
1,50 m de com-
primento
Disjuntor diferencial
ou fusível 16 A
PT
99625662_ML_A.qxd 21/05/03 16:48 Page 35
Page 36

Como instalar
36
Não podemos ser responsabilizados em caso de acidente consecutivo a uma ligação à terra inexistente, defeituosa ou incorrecta.
• O cabo eléctrico (H05 RR-F, H05 RN-F ou H05 VV-F) deverá ser suficientemente
comprido para ser ligado ao forno a encastrar colocado no chão em frente do móvel.
Para o fazer o aparelho deve estar desligado da rede:
• Abra o alçapão situado em baixo à direita da chapa traseira desatarraxando os 2
parafusos, em seguida gire o alçapão.
• Retire o revestimento de cada fio do novo cabo eléctrico ao longo de 12 mm.
• Torça cuidadosamente os filamentos.
• Desatarraxe os parafusos do bloco terminal e retire o fio eléctrico a substituir.
• Introduza o cabo eléctrico pelo lado da chapa no serra-cabos situado à direita do
bloco terminal.
• Ligue os fios do cabo em conformidade com as marca(s) inscrita(s) na caixa.
• Todos os filamentos dos fios eléctricos devem ficar presos sob os parafusos.
• O fio da fase sobre o terminal L.
• O fio de terra de cor verde-amarelo deve ser ligado ao terminal. .
• O fio do neutro (azul) ao terminal N.
• Aparafuse completamente os parafusos do bloco terminal e verifique a ligação
puxando por cada fio.
• Fixe o cabo por intermédio do serra-cabos situado à direita do terminal.
• Feche o alçapão servindo-se dos 2 parafusos.
Instalação e/ou substituição do cabo eléctrico
A ligação eléctrica deverá ser efectuada antes da instalação do aparelho no
móvel.
• O forno deverá ser ligado com um cabo eléctrico (normalizado) de 3 condutores
de 1,5 mm2 (1 ph + 1 N + terra
)
que deverão estar ligados à rede 220-240 V
monofásico por intermédio de uma tomada eléctrica 1 ph + 1 N + terra
normalizada CEI 83 ou com um dispositivo de corte omnipolar com uma distância de
abertura dos contactos de pelo menos 3 mm. O fio de protecção (verde-amarelo) é
ligado ao terminal do aparelho e deve ficar ligado à terra da instalação.
• Se a ligação for realizada com tomada de corrente, esta última deverá ficar acessível após a instalação do aparelho.
• O neutro do forno (fio azul) deverá estar ligado ao neutro da rede.
99625662_ML_A.qxd 21/05/03 16:48 Page 36
Page 37

37
o seu forno?
Para ter a certeza de que a sua instalação é conforme, não hesite em
recorrer aos serviços de um técnico especializado em electrodomésticos.
O forno pode ser instalado indiferentemente sob um plano de trabalho
ou num móvel em coluna (aberto* ou fechado) com as dimensões de encastramento adaptadas (ver esquema ao lado).
O seu forno possui uma circulação de ar optimizada que permite obter resultados
de cozedura e de limpeza notáveis respeitando os seguintes elementos:
• Centre o forno no móvel e de maneira a garantir uma distância mínima de 5 mm
em relação ao móvel vizinho.
• A matéria do móvel de encastramento deve resistir ao calor (ou ser revestido
com este tipo de matéria).
• Para uma maior estabilidade, fixe o forno no móvel através de 2 parafusos ou através
dos orifícios previstos para este efeito sobre os montantes laterais (confira o esquema).
Para o fazer:
1) Retire as tampas de borracha dos parafusos para aceder aos orifícios de fixação.
2) Efectue um orifício Ø 3 mm na parede do móvel para evitar estalar a madeira.
3) Fixe o forno com os 2 parafusos.
4) Coloque de novo as tampas de borracha dos parafusos (eles servem igualmen-
te para amortecer o fecho da porta do forno).
(*) Se o móvel é aberto, a sua abertura deve ser de 70 mm (no máximo).
Dimensions utiles pour encastrer votre four
PT
99625662_ML_A.qxd 21/05/03 16:48 Page 37
Page 38

38
• A lâmpada está situada no tecto da cavidade interna do seu forno.
a) Desaparafuse a janela (ver ao lado).
b) Desenrosque a lâmpada no
mesmo sentido
Características da lâmpada:
- 15 W
- 220-240 V
- 300°C
- casquilho E 14
c) Mude a lâmpada e torne a montar a
armação em forma de postigo. Ligue
novamente o forno.
Como mudar a lâmpada?
Ampola
Desenrosque
Armação em forma
de postigo
enfie uma luva de borracha para poder desmontar com mais
facilidade a armação e a lâmpada.
Desligue o seu forno antes de efectuar qualquer tipo de intervenção sobre a lâmpada e deixe arrefecer o aparelho, se necessário for
Como utilizar o seu forno?
• Pré-aqueça o forno sobre a função " "
• Escolha a temperatura recomendada na sua receita
Exemplo: indicação de temperatura 210°.
• Quando o indicador luminoso de temperatura se
apagar, enforne o prato.
• Não se esqueça de colocar o selector de funções
na posição desejada.
Exemplo: posição " ".
• Após estes passos, o forno aquece, o indicador de
termóstato acende e apaga ao ritmo das regulações.
Como realizar uma cozedura
Após um ciclo de cozedura, o ventilador do forno continua a
funcionar durante um certo tempo, a fim de garantir um arrefecimento normal dos elementos.
99625662_ML_A.qxd 21/05/03 16:48 Page 38
55
270
240
210
180
75
100
125
150
Page 39

Como cuidar do seu forno?
Limpeza da cavidade
Antes de proceder à desmontagem, deixe arrefecer o aparelho e verifique se o
selector de cozedura está na posição PARAGEM.
De maneira geral:
* não borrifar o aparelho com água.
* nunca utilizar pós abrasivos e esponjas metálicas.
SUPERFÍCIES METÁLICAS POLIDAS
Utilize os produtos disponíveis no comércio previstos para a manutenção dos
metais polidos.
VIDRO DE PORTA DE FORNO
Após uma cozedura que tenha provocado sujidade, aconselha-se que limpe o vidro
interior com água de sabão.
Tipo de sujidade
Ligeira
Sujidade acumulada
Humedecer com água quente a
zona suja.
Esponjas para loiça.
Deixe agir durante 30 mn, com o
forno morno, a uma noite, com
o forno frio.
Aerossol "especial limpeza
do forno".Respeite os
conselhos de utilização.
Como proceder
Produto a utilizar
O seu forno limpa-se facilmente, para o ajudar apresentamos a seguir
alguns conselhos:
Pó
Esponja abrasiva
Esponja sanitária ou especial
para loiça delicada
Para qualquer intervenção de limpeza na cavidade, o forno
deve estar parado.
39
PT
99625662_ML_A.qxd 21/05/03 16:48 Page 39
Page 40

40
Modos de coze
Grelhador + espeto de manivela
A cozedura efectua-se através do elemento superiorr
.
Tradicional
A cozedura efectua-se através dos
elementos inferior e superior.
Necessita um p
o prato.
Símbolo
Nome da função Desc
Base
A cozedura efectua-se através do elemento
inferior
.
Necessita um p
Cuisson par le
Coloque a grel
Pré-aquecimento
Utilizar antes d
Grelhador forte
A cozedura efectua-se através do elemento superiorr
.
Efectue um pré
Introduza a pin
É inútil pré-aqu
Aves e assados
todas as faces.
O espeto de m
abertura da po
Introduza a pin
*
* Sequência(s) utilizada(s) para o anúncio escrito na etiqueta energética em confor
99625662_ML_A.qxd 21/05/03 16:48 Page 40
Page 41

41
pré-aquecimento antes de enfornar
Recomendado para as cozeduras lentas e
delicadas: caça macia...
Para "saisir" os assados de carne vermelha.
Para cozer lentamente em panela fechada os
pratos que começaram a ser cozinhados na
placa de cozedura (coq au vin, caça guisada...)
Recomendações
pré-aquecimento
lha sobre a alheta baixa.
Recomendado para os pratos húmidos
(quiches, tartes de frutos sumarentos...
A massa ficará bem cozida por cima.
Recomendado para os preparados que
levedam (cake, brioche, kouglof...) e
para os souflés que não serão bloqueados por uma crosta por cima.
Termóstato regulado sobre a temperatura
de cozedura.
No fim do pré-aquecimento, não se
esqueça de voltar a colocar o selector de
funções na posição de cozedura desejada.
ngadeira na alheta de baixo.
Recomendado para grelhar grandes
quantidades que repartirá por toda a
superfície da grelha.
s com molho e estaladiços em
Recomendado para todas as aves ou assados
realizados com o espeto de manivela.
Para "saisir" e cozer até ao centro a
perna de carneiro, costeletas de vaca.
Para conservar o fundente aos
"pavés" de peixe.
PT
99625662_ML_A.qxd 21/05/03 16:48 Page 41
Page 42

42
Que fazer em caso de anomalias de fun-
cionamento?
O seu forno apresenta defeitos de funcionamento, isto não significa obriga-
toriamente que esteja avariado..
Seja qual for o problema, verifique os pon-
tos seguintes:
P
roblema constatado.
C
ausas possíveis
O
que se deve fazer?
O forno não aquece.
• O forno não está ligado.
• O fusível da sua instalação
eléctrica está fundido
• A temperatura seleccionada é demasiado baixa.
• O sensor está defeituoso
- Ligar o forno.
- Mudar o fusível da sua instalação e verificar a intensidade a que corresponde
(16A).
- Aumentar a temperatura
seleccionada.
- Chamar o Serviço de
Assistência Pós-Venda.
O indicador de temperatura T°c acende por intermitência
• O sensor está defeituoso
- Chamar o Serviço de
Assistência Pós-Venda.
A lâmpada do forno não funciona.
• A lâmpada está fundida.
• O forno não está ligado
ou o fusível está fundido.
- Mudar a lâmpada.
- Ligar o forno ou mudar o
fusível.
Inscreva em baixo as indicações incluídas na placa de características do seu forno:
MADE IN FRANCE
220 - 240V ~ 50 Hz
BRANDT APPLIANCES SAS
7 rue Henri Becquerel
92500 RUEIL MALMAISON
99625662_ML_A.qxd 21/05/03 16:48 Page 42
Page 43

GR
43
99625662_ML_A.qxd 21/05/03 16:48 Page 43
Page 44

Уе ьлп фп егчейсЯдйп, фп
убт ерйузмбЯней фйт пдзгЯет буцблеЯбт,
убт ерйузмбЯней фйт ухмвпхлЭт кбй фб фечнЬумбфб
44
Ресйечьменб
ЕйубгщгЮ óåë.45
Рщт цбЯнефбй п цпэснпт убт;
ÐесйгсбцЮ фзт ухукехЮт óåë.46
ÅобсфЮмбфб óåë.47
УхмвпхлЭт буцблеЯбт óåë.48
Рщт нб егкбфбуфЮуефе фпн цпэснп убт
ÇлекфсйкЮ уэндеуз óåë.49-50
×сЮуймет дйбуфЬуейт гйб нб енфпйчЯуефе фпн цпэснп убт óåë.51
Рщт нб ухнфзсЮуефе фп цпэснп убт
Ðщт нб кЬнефе Энб Ьмеуп шЮуймп óåë.52
Рщт нб бллЬоефе фз лхчнЯб
óåë.52
Рщт нб чсзуймпрпйЮуефе фп цпэснп убт óåë.53
Фсьрпй шзуЯмбфпт фпх цпэснпх óåë.54-55
Фй нб кЬнпхме уе ресЯрфщуз бнщмблйюн уфз лейфпхсгЯб; óåë.56
99625662_ML_A.qxd 21/05/03 16:48 Page 44
Page 45

ЕйубгщгЮ
БгбрзфЮ РелЬфйууб, БгбрзфЭ РелЬфз,
Мьлйт брпкфЮубфе Энбн цпэснп BRANDT кбй убт ехчбсйуфпэме гй' бхфь.
Пй есехнзфйкЭт мбт пмЬдет учедЯбубн гйб убт мйб нЭб генйЬ ухукехюн гйб
нб мбгейсеэефе кЬие мЭсб ме ехчбсЯуфзуз.
Ме брлЭт гсбммЭт кбй мпнфЭснб бйуизфйкЮ, п нЭпт убт цпэснпт Brandt
енущмбфюнефбй бсмпнйкЬ уфзн кпхжЯнб убт кбй ухндхЬжефбй Ьшпгб
дйехкплэнпнфбт фз чсЮуз кбй фйт ерйдьуейт фпх шзуЯмбфпт.
Иб всеЯфе ерЯузт уфз уейсЬ фщн рспъьнфщн фзт Brandt, мйб фесЬуфйб рпйкйлЯб
брь учЬсет шзуЯмбфпт, брпсспцзфЮсщн, рлхнфзсЯщн рйЬфщн кбй енфпйчйжьменщн
шхгеЯщн рпх мрпсеЯфе нб фбйсйЬоефе ме фп нЭп убт цпэснп Brandt.
ЦхуйкЬ, нйюипнфбт мйб ухнечЮ бгщнЯб гйб фзн йкбнпрпЯзуз уфп мЭгйуфп фщн
брбйфЮуеюн убт уе учЭуз ме фб рспъьнфб мбт, з хрзсеуЯб кбфбнблщфюн мбт
всЯукефбй уфз дйЬиеуЮ убт кбй убт ресймЭней гйб нб брбнфЮуей уе ьлет фйт
есщфЮуейт убт Ю фйт рспфЬуейт убт (фб уфпйчеЯб фзт уфп фЭлпт бхфпэ фпх
егчейсйдЯпх).
Уфп брпкпсэцщмб фзт рсщфпрпсЯбт, з Brandt ухмвЬллей уфз велфЯщуз фзт
кбизмесйнЮт рпйьфзфбт жщЮт рспуцЭспнфЬт убт рспъьнфб ьлп кбй рйп
брпдпфйкЬ, брлЬ уфз чсЮуз, рпх уЭвпнфбй фп ресйвЬллпн, кблбЯуизфб кбй
бойьрйуфб.
Фп емрпсйкь уЮмб BRANDT.
45
GR
99625662_ML_A.qxd 21/05/03 16:48 Page 45
Page 46

46
Рщт цбЯнефбй п цпэснпт убт;
1
4
2
3
5
3
1
55
75
100
125
150
180
210
240
270
3
4
2
1
ЕрйлпгЭбт иесмпксбуЯбт
ЕрйлпгЭбт лейфпхсгйюн
ЛЬмрб
ДеЯкфзт укЬлбт
РЕСЙГСБЦЗ УХУКЕХЗУ
99625662_ML_A.qxd 21/05/03 16:48 Page 46
Page 47

Чсзуймеэей уфз ухгкЭнфсщуз фщн чхмюн кбй фщн
лйрюн фпх шзуЯмбфпт рпх гЯнефбй уе дхнбфь гксйл Ю
гксйл ме бЭсб. МрпсеЯ нб чсзуймпрпйзиеЯ щт фбшЯ
шзуЯмбфпт фбкфпрпйюнфбт фп мЭгеипт фпх
кпммбфйпэрпх иб шзиеЯ (р.ч. Энб рпхлесйкь ме
лбчбнйкЬ гэсщ - гэсщ, уе мЭфсйб иесмпксбуЯб).Мзн
фпрпиефеЯфе рпфЭ бхфь фп фбшЯ уфзн рлЬкб Эдсбу-
зт, рбсЬ мьнп уфз иЭуз ГКСЙЛ.
ÓчЬсб буцблеЯбт
кбфЬ фзт рфюузт
ЕобсфЮмбфб (бнЬлпгб ме фп мпнфЭлп)
47
ÔбшЯ рпллюн чсЮуещн
(жбчбспрлбуфйкЮ)
Чсзуймеэей гйб фбшЯ гйб глхкЬ кбй дйбиЭфей
чеЯлпт ме клЯуз. ЧсзуймпрпйеЯфбй гйб фп
шЮуймп глхкюн ьрщт упх ме ксЭмб, мбсЭгкет,
мбнфблЭнет, жэмет уцплйЬфбт Брпцэгефе нб
фпрпиефЮуефе брехиеЯбт у' бхфь фп фбшЯ шзфЬ Ю ксЭбфб гйбфЯ иб Эчефе бхфпмЬфщт
екфпоеэуейт уфб фпйчюмбфб фпх цпэснпх.
Âáèý ôáøß
еопрлйумЭнп ме учЬсб уфЮсйозт
ейдйкь гйб шзфЬ уфз учЬсб
ресЬуфе Энб брь фб рйспэнйб уфз упэвлб, упхвлЯуфе фп кпммЬфй рпх иб шЮуефе,
ресЬуфе фп деэфесп рйспэнй, еуфйЬуфе кбй уцЯофе вйдюнпнфбт фб дэп рйспэнйб.
фпрпиефЮуфе фз упэвлб уфз вЬуз фзт.
урсюофе елбцсЬ гйб нб вЬлефе фзн Ьксз фзт упэвлбт уфп фефсЬгщнп фспцпдпуЯбт
рпх всЯукефбй уфпн рЬфп фпх цпэснпх (6).
вгЬлфе фз лбвЮ оевйдюнпнфЬт фзн. МефЬ фп шЮуймп, обнбвйдюуфе фз лбвЮ уфз упэвлб гйб нб
фз вгЬлефе чщсЯт нб кбеЯфе.
Óпэвлб
Гйб нб фз чсзуймпрпйЮуефе:
вЬлфе фп фбшЯ рпллбрлюн чсЮуещн уфз укЬлб Бс.
1 гйб нб ухгкенфсщипэн фб жпхмйЬ брь фп шЮуймп
Ю рЬнщ уфзн рлЬкб Эдсбузт бн фп кпммЬфй рпх
шЮнефбй еЯнбй рплэ чпнфсь.
ËáâÞ ãéá âáèý ôáøß
З учЬсб мрпсеЯ нб чсзуймпрпйзиеЯ гйб нб уфзсЯоей
ьлб фб фбшйЬ кбй фйт цьсмет рпх ресйЭчпхн фсьцймб
гйб шЮуймп Ю гйб гксбфйнЬсйумб. Иб чсзуймпрпйзиеЯ кбй гйб фб шзфЬ уфзучЬсб (нб фпрпиефпэнфбй
брехиеЯбт рЬнщ фзт).
GR
99625662_ML_A.qxd 21/05/03 16:48 Page 47
Page 48

48
УхмвпхлЭт буцблеЯбт
Убт ехчбсйуфпэме рпх мелефЬфе бхфЭт фйт ухмвпхлЭт рспфпэ егкбфбуфЮуефе кбй
чсзуймпрпйЮуефе фпн цпэснп убт. Бхфьт п цпэснпт Эчей учедйбуфеЯ гйб нб чсзуймпрпйеЯфбй
брь йдйюфет уфп чюсп кбфпйкЯбт фпхт. РсппсЯжефбй брпклейуфйкЬ гйб фп шЮуймп рспъьнфщн
дйбфспцЮт. Бхфьт п цпэснпт ден ресйЭчей кбнЭнб ухуфбфйкь ме вЬуз фпн бмЯбнфп.
РСЩФЗ ЧСЗУЗ:
Рспфпэ чсзуймпрпйЮуефе фпн цпэснп убт гйб рсюфз цпсЬ, иесмЬнефЭ фпн Ьдейп, ме
клейуфЮ фзн рьсфб, гйб 15 лерфЬ ресЯрпх уфз мЭгйуфз иЭуз пэфщт юуфе нб "уфсюуефе"
фз ухукехЮ. Фп псхкфь мбллЯ рпх ресйвЬллей фзн еупчЮ фпх цпэснпх мрпсеЯ нб
екрЭмрей, уфзн бсчЮ, мйб йдйбЯфесз мхсщдйЬ рпх пцеЯлефбй уфз уэниеуЮ фпх. ПмпЯщт,
иб дйбрйуфюуефе Яущт мйб екрпмрЮ кбрнпэ. ¼лб бхфЬ еЯнбй цхуйплпгйкЬ.
ЕРПМЕНЕУ ЧСЗУЕЙУ:
- ВевбйщиеЯфе ьфй з рьсфб фпх цпэснпх убт еЯнбй кблЬ клейумЭнз пэфщт юуфе
п уэндеумпт уфегбньфзфбт нб екрлзсюуей ущуфЬ фз лейфпхсгЯб фпх.
- Мзн бцЮнефе кбнЭнбн нб бкпхмрЮуей Ю нб кбиЮуей рЬнщ уфзн бнпйкфЮ
рьсфб фпх цпэснпх.
- КбфЬ фз чсЮуз фпх гксйл ме мйуЬнпйчфз фзн рьсфб, фб рспувЬуймб
мЭсз Ю пй ерйцЬнейет мрпсеЯ нб иесмбнипэн. Брпмбксэнефе фб мйксЬ рбйдйЬ.
- КбфЬ фз чсЮуз фзт з ухукехЮ иесмбЯнефбй. РспуЭофе нб мзн бкпхмрЬфе фб
иесмбнфйкЬ уфпйчеЯб рпх всЯукпнфбй уфп еущфесйкь фпх цпэснпх.
- МефЬ брь Энб шЮуймп, мзн рйЬнефе ме гхмнь чЭсй фб укеэз (учЬсб, упэвлб,
лбмбсЯнб гйб фз ухгкЭнфсщуз лЯрпхт, вЬуз уфЮсйозт упэвлбт), чсзуймпрпйеЯуфе
Энб рспуфбфехфйкь гЬнфй Ю Энб эцбумб брь мпнщфйкь хлйкь.
- Мз гемЯжефе фпн цпэснп убт ме блпхмйньчбсфб. ДйбцпсефйкЬ, иб рспкэшей
мйб ухууюсехуз иесмьфзфбт рпх иб ерзсеЬуей дхуЬсеуфб фп брпфЭлеумб фпх мбгейсЭмбфпт кбй фпх шзуЯмбфпт кбй иб влЬшей фп умЬлфп.
- Мз чсзуймпрпйеЯфе фпн кбибсйуфЮ бфмпэ Ю хшзлЮт рЯеузт.
КбфЬ фз дйЬскейб фпх кбибсйумпэ, пй рспувЬуймет ерйцЬнейет гЯнпнфбй рйп
жеуфЭт бр' ьфй уфзн кбнпнйкЮ чсЮуз кбй рсЭрей нб брпмбксэнефе фб мйксЬ рбйдйЬ.
99625662_ML_A.qxd 21/05/03 16:48 Page 48
Page 49

49
Рщт нб егкбфбуфЮуефе фпн цпэснп убт
МефсзфЮт 20Б Mono
220-240 V ~ 50 Hz
РсЯжб
2 рьлпй + геЯщуз
рсьфхрп CEI 83
ГсбммЮ Mono 220-240 V ~
ЗлекфсйкЮ уэндеуз
Рспфпэ рсбгмбфпрпйЮуефе фз уэндеуз, вевбйщиеЯфе ьфй фб кблюдйб фзт злекфсйкЮт
убт егкбфЬуфбузт Эчпхн ербскЮ дйбфпмЮ гйб нб фспцпдпфпэн кбнпнйкЬ фз ухукехЮ
(дйбфпмЮ фпхлЬчйуфпн Яуз ме екеЯнз фпх кблюдйпх фспцпдпуЯбт). З буцЬлейб фзт
егкбфЬуфбуЮт убт рсЭрей нб еЯнбй 16 Ampиres.
Кблюдйп
фспцпдпуЯбт
мЮкпт 1,50 м.
ресЯрпх
Дйбцпсйкьт дйбкьрфзт
Ю буцЬлейб 16Б
GR
99625662_ML_A.qxd 21/05/03 16:48 Page 49
Page 50

Рщт нб егкбфбуфЮуе
50
Ден Эчпхме ехиэнз уе ресЯрфщуз бфхчЮмбфпт рпх пцеЯлефбй уе бнэрбскфз, елбффщмбфйкЮ Ю лбнибумЭнз геЯщуз.
Фп кблюдйп фспцпдпуЯбт (H05 RR-F, H05 RN-F Ю З05 W-F) рсЭрей нб Эчей ербскЭт
мЮкпт гйб нб ухндеиеЯ ме фпн цпэснп рпх иб енфпйчйуфеЯ фпрпиефзмЭнп уфп Эдбцпт
мрспуфЬ брь фп Эрйрлп.
Гй' бхфь фп льгп з ухукехЮ рсЭрей нб еЯнбй брпухндедемЭнз брь фп дЯкфхп:
БнпЯофе фп рпсфЬкй рпх всЯукефбй кЬфщ уфб деойЬ фпх рЯущ кблэммбфпт
оевйдюнпнфбт фйт 2 вЯдет, Эрейфб ресйуфсЭшфе фп рпсфЬкй.
Брпгхмнюуфе кЬие уэсмб фпх нЭпх кблщдЯпх фспцпдпуЯбт уе 12mm.
УхуфсЭшфе рспуекфйкЬ фб бущлЮнщфб Ьксб.
Оевйдюуфе фйт вЯдет фзт пмЬдбт бкспдекфюн кбй вгЬлфе фп кблюдйп фспцпдпуЯбт рпх
иб бллбчиеЯ.
ЕйуЬгефе фп кблюдйп фспцпдпуЯбт брь фзн рлехсЬ фпх кблэммбфпт уфпн уцйкфЮсб
кблщдЯщн рпх всЯукефбй уфб деойЬ фзт пмЬдбт бкспдекфюн.
УхндЭуфе фб уэсмбфб фпх кблщдЯпх уэмцщнб ме фп(фб) узмеЯп(б) бнбцпсЬт рпх
еЯнбй гсбммЭнп(б) уфзн пмЬдб бкспдекфюн.
¼лб фб бущлЮнщфб Ьксб фщн кблщдЯщн фспцпдпуЯбт рсЭрей нб еЯнбй клейумЭнб
кЬфщ брь фйт вЯдет.
Фп уэсмб фзт цЬузт уфпн рьлп L.
Фп уэсмб фзт геЯщузт чсюмбфпт рсбуйнп-кЯфсйнпх рсЭрей нб ухндеиеЯ ме фпн рьлп .
Фп уэсмб фпх пхдЭфеспх (мрле) уфпн рьлп Н.
Вйдюуфе кблЬ фйт вЯдет фзт пмЬдбт бкспдекфюн кбй елЭгофе фз уэндеуз фсбвюнфбт
кЬиеуэсмб.
Уфесеюуфе фп кблюдйп мЭущ фпх уцйкфЮсб кблщдЯщн рпх всЯукефбй уфб деойЬ фзт
пмЬдбт бкспдекфюн.
ОбнбклеЯуфе фп рпсфЬкй ме фз впЮиейб фщн 2 вйдюн.
ÔпрпиЭфзуз кбй/Ю бллбгЮ фпх кблщдЯпх фспцпдпуЯбт
З злекфсйкЮ уэндеуз рсЭрей нб рсбгмбфпрпйеЯфбй рсйн фзн фпрпиЭфзуз фзт ухукехЮт мЭуб уфп
Эрйрлп.
П цпэснпт рсЭрей нб ухндЭефбй ме Энб кблюдйп фспцпдпуЯбт (уэмцщнб ме фп рсьфхрп) ме 3
бгщгпэт 1,5 mm2 (1 ph + 1 N + геЯщуз ) рпх рсЭрей нб еЯнбй ухндедемЭнпй ме
дЯкфхп 220-240 V ~ мпнпцбуйкь мЭущ мйбт рсЯжбт 1 ph + 1 Н геЯщуз
уэмцщнб ме фп рсьфхрп
CEI 83 Ю мЭущ мйбт дйЬфбозт дйбкпрЮт сеэмбфпт рпх ухндЭей ьлпхт фпхт рьлпхт кбй рпх Эчей
брьуфбуз бнпЯгмбфпт фщн ербцюн фпхлЬчйуфпн 3 mm. Фп кблюдйп рспуфбуЯбт (рсЬуйнп-кЯфсйнп)
ухндЭефбй ме фпн рьлп фзт ухукехЮт кбй рсЭрей нб еЯнбй ухндедемЭнп ме фз геЯщуз фзт
егкбфЬуфбузт.
Уе ресЯрфщуз уэндеузт ме рсЯжб, бхфЮ рсЭрей нб рбсбмЭней рспувЬуймз мефЬ фзн егкбфЬуфбуз
фзт ухукехЮт.
Фп пхдЭфесп фпх цпэснпх (мрле кблюдйп) рсЭрей нб еЯнбй ухндедемЭнп ме фп пхдЭфесп фпх
дйкфэпх.
99625662_ML_A.qxd 21/05/03 16:48 Page 50
Page 51

51
ефе фпн цпэснп убт
Гйб нб вевбйщиеЯфе ьфй з егкбфЬуфбуз Эгйне ущуфЬ, мз дйуфЬуефе нб
кблЭуефе Энбн ейдйкь уфйт пйкйбкЭт злекфсйкЭт ухукехЭт.
ЧсЮуймет дйбуфЬуейт гйб нб енфпйчЯуефе фпн цпэснп убт?
П цпэснпт мрпсеЯ нб егкбфбуфбиеЯ еоЯупх кЬфщ брь Энб фсбрЭжй есгбуЯбт Ю
мЭуб уе Энб Эрйрлп уе уфЮлз (бнпйчфЮ* Ю клейуфЮ) Эчпнфбт рспубсмпумЭнет
дйбуфЬуейт енфпйчйумпэ (влЭре фп рбсбкЬфщ учедйЬгсбммб).
П цпэснпт убт ресйЭчей мйб мегйуфпрпйзмЭнз кхклпцпсЯб бЭсб рпх ерйфсЭрей фзн
брькфзуз бойпузмеЯщфщн брпфелеумЬфщн уфп шЮуймп кбй фпн кбибсйумь бн фзсЮуефе
фб бкьлпхиб уфпйчеЯб:
ЕуфйЬуфе фпн цпэснп уфп Эрйрлп кбфЬ фсьрп рпх нб еггхЬфбй мйб елЬчйуфз брьуфбуз
5 mm брь фп гейфпнйкь Эрйрлп.
Фп хлйкь фпх ерЯрлпх енфпйчйумпэ рсЭрей нб еЯнбй бниекфйкь уфз иесмьфзфб (Ю нб
еЯнбйерендедхмЭнп ме Энб фЭфпйп хлйкь).
Гйб ресйууьфесз уфбиесьфзфб, уфесеюуфе фпн цпэснп уфп Эрйрлп ме 2 вЯдет мЭущ
фщн прюн рпх рспвлЭрпнфбй гй' бхфьн фпн укпрь уфпхт рлЬгйпхт псипуфЬфет (влЭре
учедйЬгсбммб).
Гйб нб гЯней бхфь:
1) БцбйсЭуфе фб кблэммбфб вЯдбт брь кбпхфупэк гйб нб Эчефе рсьувбуз уфйт фсэрет
уфесЭщузт.
2) БнпЯофе мйб фсэрб Ш 3 mm уфп чюсйумб фпх ерЯрлпх гйб нб брпцэгефе нб укЬуей фп оэлп.
3) Уфесеюуфе фпн цпэснп ме фйт 2 вЯдет.
4) ОбнбвЬлфе фб кблэммбфб вЯдбт брь кбпхфупэк (бхфЬ чсзуймеэпхн ерЯузт кбй гйб
нб мейюупхн фз дэнбмз фпх клейуЯмбфпт фзт рьсфбт фпх цпэснпх).
(*) бн фп Эрйрлп еЯнбй бнпйкфь, фп ЬнпйгмЬ фпх рсЭрей нб еЯнбй 70 mm (фп рплэ).
GR
99625662_ML_A.qxd 21/05/03 16:48 Page 51
Page 52

52
З лхчнЯб всЯукефбй уфзн пспцЮ фзт еупчЮт фпх цпэснпх убт.
a) Оевйдюуфе фп цщфйуфйкь (влЭре
брЭнбнфй).
в) Оевйдюуфе фз лхчнЯб рспт фзн Ядйб
кбфеэихнуз.
ЧбсбкфзсйуфйкЬ фзт лхчнЯбт:
- 15 W
- 220-240 V
- 300°C
- вЬуз E 14
г) БллЬофе фз лхчнЯб, Эрейфб бневЬуфе фп
цщфйуфйкь кбй обнбухндЭуфе фпн цпэснп убт.
Рщт нб бллЬоефе фз лхчнЯб
НфпхЯ
Оевйдюуфе
Цщфйуфйкь
гйб нб оевйдюуефе фп цщфйуфйкь кбй фз лЬмрб, чсзуймпрпйЮуфе
рлбуфйкь гЬнфйрпх иб дйехкплэней фзн брпухнбсмпльгзуз.
БрпухндЭуфе фпн цпэснп убт рсйн брь кЬие рбсЭмвбуз уфз лхчнЯб гйб нб
брпцэгефе кЬие кЯндхнп злекфспрлзоЯбт кбй еЬн чсейбуфеЯ бцЮуфе нб
ксхюуей з ухукехЮ.
Ðщт нб чсзуймпрпйеЯфе фпн цпэснп убт
РспиесмЬнефе фп цпэснп уфз лейфпхсгЯб " "
ЕрйлЭофе фз иесмпксбуЯб фзт ухнфбгЮт убт
РбсЬдейгмб: узмеЯп бнбцпсЬт иесмпксбуЯбт 210°.
¼фбн фп цщфЬкй фзт иесмпксбуЯбт увЮней, вЬлфе фп
фбшЯ убт уфп цпэснп.
Мзн оечЬуефе нб вЬлефе фпн ерйлпгЭб лейфпхсгЯбт
уфз иЭуз фзт ерйлпгЮт убт.
РбсЬдейгмб: иЭуз " ".
МефЬ брь бхфЭт фйт енЭсгейет, п цпэснпт
иесмбЯнефбй, фп цщфЬкй фпх иесмпуфЬфз бнЬвей кбй
увЮней кбфЬ фпн схимь фщн схимЯуещн.
Ðщт нб рсбгмбфпрпйЮуефе Энб шЮуймп
МефЬ брь Энбн кэклп шзуЯмбфпт, п бнемйуфЮсбт фпх цпэснпх ухнечЯжей нб
лейфпхсгеЯ гйб Энб псйумЭнп дйЬуфзмб, пэфщт юуфе нб еггхЬфбй ьфй фб
еобсфЮмбфб иб ксхюупхн.
99625662_ML_A.qxd 21/05/03 16:48 Page 52
55
270
240
210
180
75
100
125
150
Page 53

Рщт нб ухнфзсеЯфе фпн цпэснп убт
Êбибсйумьт фпх ресйвлЮмбфпт
Рспфпэ рспчщсЮуефе уфзн брпухнбсмпльгзуз, бцЮуфе фз ухукехЮ нб ксхюуей кбй
елЭгофе ьфй п ерйлпгЭбт шзуЯмбфпт еЯнбй уфз иЭуз ARRET (уфбмЬфзмб).
ГенйкЬ:
* мз сЯчнефе несь уфз ухукехЮ.
* пй уфйлвщфйкЭт укьнет кбй фб мефбллйкЬ уцпхггЬсйб брбгпсеэпнфбй.
ЛЕЙЕУ МЕФБЛЛЙКЕУ ЕРЙЦБНЕЙЕУ
ЧсзуймпрпйЮуфе фб рспъьнфб емрпсЯпх рпх рспвлЭрпнфбй гйб фз ухнфЮсзуз фщн
леЯщн мефЬллщн.
КСХУФБЛЛП ФЗУ РПСФБУ ФПХ ЦПХСНПХ
МефЬ брь Энб шЮуймп рпх рспкЬлеуе лекЭдет, ухнйуфЬфбй нб кбибсЯжефе фп еущфесйкь
фжЬмй ме несь кбй убрпэнй.
ЕЯдпт лекЭдщн
МйкспЯ
Ухууюсехуз
обнбжеуфбмЭнщн
лекЭдщн
МпхукЭшфе кблЬ фзн ресйпчЮ ме
жеуфь несь
УцпхггЬсйб гйб рйЬфб
БцЮуфе нб енесгЮуей гйб 30 лерфЬ
уе члйбсь цпэснп, Эщт мйб нэчфб
уе ксэп цпэснп.
Беспжьл "ейдйкь кбибсйуфйкь
гйб цпэснп"ФзсЮуфе фйт
пдзгЯет чсЮузт.
Рщт нб рспчщсЮуефе
Рспъьнфб рпх иб
чсзуймпрпйЮуефеaa
П цпэснпт кбибсЯжефбй еэкплб, гйб нб убт впзиЮупхме убт дЯнпхме месйкЭт ухмвпхлЭт:
укьнз
уфйлвщфйкь
уцпхггЬсй
уцпхггЬсй ейдйкь гйб фп
рлэуймп ехбЯуизфщн рйЬфщн
гйб кЬие ерЭмвбуз кбибсйумпэ уфзн еупчЮ, п цпэснпт рсЭрей нб мз
лейфпхсгеЯ.
53
GR
99625662_ML_A.qxd 21/05/03 16:48 Page 53
Page 54

54
Фсьрпй шзуЯмбф
Ãêñéë + Óпэвлб
Фп шЮуймп рсбгмбфпрпйеЯфбй брь фп
Ьнщ уфпйчеЯп.
Ð
бсбдпуйбкь
Фп шЮуймп рсбгмбфпрпйеЯфбй брь фб
рЬнщ кбй кЬфщ уфпйчеЯб.
БрбйфеЯ рспиЭ
уфп цпэснп.
Уэмвплп
¼нпмб лейфпхсгЯбт Ресйгс
ÐлЬкб Эдсбузт
Фп шЮуймп рсбгмбфпрпйеЯфбй брь фп
кЬфщ уфпйчеЯп.
БрбйфеЯ рспиЭ
ШЮуймп брь кЬ
ФпрпиефЮуфе ф
ÐспиЭсмбнуз
Нб чсзуймпрпй
псйумЭнб цбгз
Äхнбфь гксйл
Фп шЮуймп рсбгмбфпрпйеЯфбй брь фп
рЬнщ уфпйчеЯп.
РсбгмбфпрпйЮ
ВЬлфе фз лбмб
уфзн кЬфщ укЬ
РесйффЮ з рспи
РпхлесйкЬ кбй
фйт рлехсЭт.
З упэвлб ухне
бнпЯоей з рьсфб
ВЬлфе фз лбмбс
уфзн кЬфщ укЬ
*
*
БкплпхиЯб(ет) рпх чсзуймпрпйеЯфбй(пэнфбй) гйб фзн гсбрфЮ бнбкпЯнщуз уфзн ефйкЭфб енЭсгейб
99625662_ML_A.qxd 21/05/03 16:48 Page 54
Page 55

55
фпт фпх цпэснпх
УхнйуфЬфбй гйб фб бсгЬ кбй ехбЯуизфб мбгейсЭмбфб: мблбкЬ изсЬмбфбГйб нб фуйгб-
сЯуефе фб кьккйнб ксЭбфб Гйб нб уйгпвсЬуефе
уе клейуфЮ кбфубсьлб фб цбгзфЬ рпх Эчефе рспзгпхмЭнщт оекйнЮуей уфб мЬфйб фзт кпхжЯнбт
(кькпсбт ксбуЬфпт, ксЭбт всбуфь ме
лбчбнйкЬ)
УхуфЬуейт
УхнйуфЬфбй гйб фб хгсЬ цбгзфЬ (кйт, фЬсфет
ме жпхмесЬ цспэфбЗ жэмз иб еЯнбй кблЬ
шзмЭнз брь кЬфщ. УхнйуфЬфбй гйб фб
рбсбукехЬумбфб рпх цпхукюнпхн (кЭйк,
мрсйьт, kouglof) кбй гйб фб упхцлЭ рпх
ден иб фб емрпдЯжей з кспэуфб брь рЬнщ.
ИесмпуфЬфзт схимйумЭнпт уфз иесмпксбуЯб шзуЯмбфпт. Уфп фЭлпт фзт рспиЭсмбнузт, мзн оечЬуефе нб обнбвЬлефе фпн
ерйлпгЭб лейфпхсгЯбт уфзн ерйлегмЭнз
иЭуз шзуЯмбфпт.
УхнйуфЬфбй гйб нб шЮнефе уфз учЬсб
мегЬлет рпуьфзфет рпх иб кбфбнЭмефе
уе ьлз фзн ерйцЬнейб фзт учЬсбт.
иЭсмбнуз.
УхнйуфЬфбй гйб ьлб фб рпхлесйкЬ Ю фб
шзфЬ уфз упэвлб.Гйб нб фуйгбсЯуефе кбй
нб шЮуефе кблЬ мрпэфй, впдйнЬ рбъдЬкйб.
Гйб нб рбсбмеЯнпхн мблбкЭт пй чпнфсЭт
цЭфет шбсйпэ.
GR
99625662_ML_A.qxd 21/05/03 16:48 Page 55
Page 56

56
Фй нб кЬнпхме уе ресЯрфщуз
бнщмблйюн уфз лейфпхсгЯб;
¸чефе кЬрпйб бмцйвплЯб гйб фзн кблЮ лейфпхсгЯб фпх цпэснпх убт,áõôü äåí
узмбЯней ьмщт прщудЮрпфе ьфй хрЬсчей кЬрпйб влЬвз. Уе кЬие ресЯрфщуз, елЭгофе
фб бкьлпхиб узмеЯб:
Äйбрйуфюнефе ьфй...
Ïй рйибнЭт бйфЯет Ôй рсЭрей нб кЬнщ?
П цпэснпт ден иесмбЯнефбй.
П цпэснпт ден еЯнбй
ухндедемЭнпт.
Ç буцЬлейб фзт
егкбфЬуфбуЮт убт еЯнбй
екфьт лейфпхсгЯбт.
З ерйлегмЭнз иесмпксбуЯб
еЯнбй рплэ чбмзлЮ.
Ï ухллЭкфзт еЯнбй
елбффщмбфйкьт.
- УхндЭуфе фпн цпэснп.
- БллЬофе фзн буцЬлейб фзт
егкбфЬуфбуЮт убт кбй
елЭгофе фзн фймЮ фзт (16Б).
- БхоЮуфе фзн ерйлегмЭнз
иесмпксбуЯб.
- КблЭуфе фзн ХрзсеуЯб
ЕохрзсЭфзузт МефЬ фзн Рюлзуз.
П деЯкфзт фзт T°c
бнбвпувЮней.
Елбффщмбфйкьт ухллЭкфзт
иесмпксбуЯбт.
- КблЭуфе фзн ХрзсеуЯб
ЕохрзсЭфзузт МефЬ фзн Рюлзуз.
З лЬмрб фпх цпэснпх ден
лейфпхсгеЯ.
З лЬмрб еЯнбй екфьт
лейфпхсгЯбт.
П цпэснпт ден еЯнбй
ухндедемЭнпт Ю з буцЬлейб
еЯнбй екфьт лейфпхсгЯбт.
- БллЬофе фз лЬмрб.
- УхндЭуфе фпн цпэснп Ю
бллЬофе фзн буцЬлейб.
МефбцЭсефе рбсбкЬфщ фйт ендеЯоейт рпх емцбнЯжпнфбй уфзн ресйгсбцйкЮ рйнбкЯдб
фпх цпэснпх убт:
MADE IN FRANCE
220 - 240V ~ 50 Hz
BRANDT APPLIANCES SAS
7 rue Henri Becquerel
92500 RUEIL MALMAISON
99625662_ML_A.qxd 21/05/03 16:48 Page 56
Page 57

NL
99625662_ML_A.qxd 21/05/03 16:48 Page 57
Page 58

In deze gebruikshandleiding
geeft symbool
veiligheidsaanwijzingen en symbool,
tips en praktische richtlijnen aan
58
Inhoud
Inleiding
P.59
Indeling van uw oven
Beschrijving van de oven P.60
Oventoebehoren P.61
Veiligheidsaanwijzingen P.62
Installatie van uw oven
Elektrische aansluiting P.63-64
Nuttige afmetingen voor de inbouw van uw oven P.65
Gebruik van uw oven
Onmiddellijk bakken P.66
Vervanging van de ovenlamp P66
Onderhoud van uw oven P.67
Bakwijzen van de oven
P.68-69
Problemen en oplossingen P.70
99625662_ML_A.qxd 21/05/03 16:48 Page 58
Page 59

Inleiding
Geachte klant,
U heeft net een oven van BRANDT aangekocht. We willen u hier graag
voor bedanken.
Onze onderzoeksteams hebben voor u een nieuwe generatie van
apparaten ontworpen waarmee koken en bakken dag na dag een waar
plezier wordt.
Dank zij het moderne en verfijnde ontwerp zal uw nieuwe BRANDT-
oven harmonieus in uw keuken kunnen worden ingepast. Uw oven is
een geslaagde combinatie van gebruiksvriendelijkheid, optimale
bakprestaties en esthetische schoonheid.
In het gamma van BRANDT-producten vindt u tevens een ruime keuze
aan kookplaten, afzuigkappen, vaatwasautomaten en koelkasten die
allemaal harmonieus met uw BRANDT-oven kunnen worden
gecombineerd.
Uiteraard wensen wij onze klanten ook na de aankoop altijd tevreden te
houden. Onze servicedienst zal u altijd met uw vragen of suggesties
verderhelpen (zie achteraan deze handleiding).
BRANDT staat niet alleen voor technologische innovatie, maar verbetert
tevens de kwaliteit van uw dagelijkse leven. BRANDT biedt u immers
apparaten met een bijzonder mooie vormgeving die prestaties en
gebruiksgemak aan milieuvriendelijkheid en betrouwbaarheid koppelen.
BRANDT
59
NL
99625662_ML_A.qxd 21/05/03 16:48 Page 59
Page 60

60
Indeling van uw oven
1
4
2
3
5
3
1
55
75
100
125
150
180
210
240
270
3
4
2
1
Temperatuurknop
Keuzeknop
Lamp
Nummer inschuifsleuf
BESCHRIJVING VAN DE OVEN
99625662_ML_A.qxd 21/05/03 16:48 Page 60
Page 61

Ovenrooster met kantelbeveiliging
Op dit rooster kan u alle soorten schotels en bakvormen met het te bereiden of te gratineren
gerecht plaatsen. Dit rooster wordt gebruikt voor
grillgerechten (plaats het gerecht op het rooster).
Oventoebehoren (volgens model)
61
Multifunctionele ovenschaal
(patisserieplaat)
Deze ovenschaal dient als bakplaat en heeft
een gebogen rand. Gebruik deze bakplaat
voor de bereiding van patisserie zoals soezen,
meringue, madeleinekoekjes, gebak van
bladerdeeg...
Leg nooit te roosteren of te braden vlees in de braadslee. De braadslee zal dan
sterk spatten op de ovenwanden.
Diepe ovenschaal
met een speciaal grillrooster
Plaats deze ovenschaal onder het ovenrooster
om braadvet en braadsap op te vangen (in de
stand "sterke grill" of "grill + hetelucht"). U
kan deze ovenschaal ook als bakplaat
gebruiken.Let er wel op dat de grootte van het
te bakken gerecht aangepast is (bv. gevogelte
met een groentenkrans bij een matige tempera-
tuur). Plaats de ovenschaal nooit op de ovenbodem, behalve in de stand GRILL.
• Schuif een eerste braadvork op het spit, plaats vervolgens het te braden vlees tegen
de vork op het spit en schuif tenslotte de tweede braadvork op het spit. Schuif het vlees
met de twee vorken tot in het midden van het braadspit en draai de twee vorken vast.
• Plaats het braadspit op het draagkader.
• Druk de punt van het braadspit voorzichtig in de opening achteraan in de oven om het
spit vast te zetten (6).
• Verwijder het handvat door het los te schroeven. Na de bereiding kan u dit handvat
opnieuw op het spit vastschroeven zonder zich te verbranden.
Draaispit
Hoe gebruik ik het draaispit?
• Plaats de diepe ovenschaal in de eerste
inschuifsleuf vanaf de ovenbodem om
braadsappen op te vangen. Indien u een
zeer groot stuk vlees dient te bereiden, kan u de
diepe ovenschaal op de ovenbodem plaatsen.
Handvat voor de diepe ovenschaal
NL
99625662_ML_A.qxd 21/05/03 16:48 Page 61
Page 62

62
Veiligheidsaanwijzingen
Lees eerst aandachtig de volgende tips alvorens uw oven te installeren
en te gebruiken. Dit apparaat is bestemd voor huishoudelijk gebruik. Deze oven
is uitsluitend ontworpen voor het bakken van voedingsmiddelen. Deze oven bevat
geen enkel bestanddeel op basis van asbest.
EERSTE GEBRUIK :
Alvorens uw oven voor de eerste maal te gebruiken, laat u de lege oven eerst met
gesloten deur ongeveer 15 minuten in de maximumstand werken. Door de
specifieke samenstelling van de staalwolbekleding van de ovenruimte kan de oven
in het begin immers een bijzondere geur verspreiden. Bij deze proefverwarming
kan er mogelijk eveneens rookvorming optreden. Dit is normaal.
AANBEVELINGEN :
- Let erop dat de ovendeur altijd goed gesloten is. Enkel dan sluit de
afdichtingsvoeg de oven volledig af.
- Let erop dat niemand op een open ovendeur gaat leunen of zitten.
- Indien u de grill met de ovendeur op een kiertje gebruikt, kunnen
de ovenwanden en andere delen van de oven heet worden. Hou
kinderen op een afstand.
- Tijdens het gebruik van de oven wordt de oven warm. Raak uiteraard nooit
de verwarmingselementen binnen in de oven aan.
- Neem na een bakcyclus de oventoebehoren nooit met de blote hand vast
(rooster, draaispit, braadslee, draagkader voor het draaispit enz...). Gebruik altijd
een ovenwant of een hittebestendige doek.
- Plaats geen aluminiumfolie op de ovenwanden. Aluminiumfolie leidt tot
oververhitting van de oven wat tot een slecht bak- of braadresultaat en
beschadiging van het email kan leiden.
- Gebruik geen hogedrukstoomreiniger.
- Tijdens een ovenreiniging worden de onderdelen van de oven warmer dan
tijdens een normaal gebruik van de oven. Hou kinderen op een afstand.
99625662_ML_A.qxd 21/05/03 16:48 Page 62
Page 63

63
Installatie van uw oven
20A teller mono
220-240 V ~ 50 Hz
Stopcontact 2 polen
+ aarding
CEI-norm 83
Monokabel 220-240 V ~
Elektrische aansluiting
• Controleer vóór de elektrische aansluiting of de doorsnede van de elektrische
installatiedraden groot genoeg is voor de elektrische voeding van het fornuis.
De zekering van uw installatie dient 16 Ampère te bedragen.
Voedingskabel
lengte :
ongeveer 1,50 m
Differentieelschakelaar
of zekering 16 A
NL
99625662_ML_A.qxd 21/05/03 16:48 Page 63
Page 64

Installatie
64
Onze aansprakelijkheid vervalt bij een ongeval ten gevolge van
een afwezige, defecte of foute aarding.
• De voedingskabel (H05 RR-F, H05 RN-F of H05 W-F) dient lang genoeg te zijn om te
kunnen worden aangesloten op de oven wanneer de oven met het oog op de
inbouw op de grond voor het keukenmeubel wordt geplaatst.
Werkwijze (koppel eerst de oven van het elektriciteitsnet af) :
• Open het toegangsplaatje rechts onderaan de achterwand. Draai hiervoor de 2
schroeven los en draai het plaatje weg.
• Ontbloot elke draad van de nieuwe voedingskabel over een lengte van 12 mm.
• Tors de draadjes van elke draad voorzichtig ineen.
• Draai de schroeven van het klemmenbord los en verwijder de te vervangen
voedingskabel.
• Steek de voedingskabel langs de zijkant van de achterwand in de kabelklem rechts
van het klemmenbord.
• Verbind de draden van de voedingskabel overeenkomstig het (de) schema('s) op
het toegangsplaatje.
• Alle draadjes van elke draad van de voedingskabel dienen onder de schroeven vast te zitten.
• De fasedraad moet worden verbonden met de L-klem.
• De aardingsdraad (groen-geel) moet worden verbonden met de aardingsklem .
• De nulleider (blauwe draad) moet worden verbonden met de N-klem.
• Draai de schroeven van het klemmenbord stevig vast en controleer de stevigheid
van de
aansluiting door even aan elke draad te trekken.
• Leg de voedingskabel vast door middel van de kabelklem rechts van het
klemmenbord.
• Schroef het toegangsplaatje met de 2 schroeven opnieuw vast.
Plaatsing en/of vervanging van de voedingskabel
Voer de elektrische aansluiting uit alvorens de oven in het meubel in te bouwen.
• Voor de aansluiting van de oven gebruikt u een voedingskabel (genormaliseerd)
met 3 geleiders met een doorsnede van 1,5 mm2 (1 fasedraad + 1 nulleider +1
aarding
). Deze geleiders worden aangesloten op een elektriciteitsnet van
220-240 V ~ (monofasig) via een genormaliseerd stopcontact 1 fasedraad +
1 nulleider +
aarding overeenkomstig de norm of via een element met
omnipolaire schakelaar met een minimale afstand tussen de kontakten van 3 mm.
De beschermingsdraad (groen-geel) is verbonden met de aardingsklem van het
apparaat en moet worden verbonden met de aarding van de installatie.
• Indien u kiest voor een aansluiting op een stopcontact, dient u ervoor te zorgen
dat het stopcontact ook na de aansluiting gemakkelijk bereikbaar blijft.
• De nulleider van de oven (blauwe draad) dient met de nulleider van het
elektriciteitsnet te worden verbonden.
99625662_ML_A.qxd 21/05/03 16:48 Page 64
Page 65

65
van uw oven
Voor een installatie overeenkomstig de wettelijke richtlijnen raden wij u
aan een beroep te doen op een erkend elektrotechnicus.
Nuttige afmetingen voor de inbouw van uw oven
De oven kan naar keuze onder een werkblad of een (open* of gesloten)
kolommeubel met de juiste afmetingen voor de inbouw van de oven
worden geïnstalleerd (zie schema).
Uw oven beschikt over een optimale luchtcirculatie die vlekkeloze bakresultaten en
een optimale reiniging garandeert. Voor een optimale luchtcirculatie dient u met de
volgende punten rekening te houden :
• Plaats de oven centraal in het meubel met een minimale afstand van 5 mm
tussen de zijwanden van de oven en de zijwanden van het inbouwmeubel.
• Het inbouwmeubel moet van hittebestendig materiaal gemaakt of ermee bekleed zijn.
• Voor meer stabiliteit schroeft u de oven met 2 schroeven in de in zijrand
voorziene schroefgaten in het meubel vast (zie schema).
Werkwijze :
1) Verwijder de rubberen schroefkapjes van de schroefgaten.
2) Maak een opening met een diameter van 3 mm in de wand van het meubel om te
vermijden dat het hout gaat barsten.
3) Bevestig de oven met de 2 schroeven.
4) Plaats de rubberen schroefkapjes opnieuw op de schroeven (de kapjes dempen
tevens het geluid bij het sluiten van de ovendeur).
(*) bij een open kolommeubel dient de opening (maximaal) 70 mm te bedragen.
NL
Schroefgaten
Schroefgaten
Uitsnijding 50 x 50
99625662_ML_A.qxd 21/05/03 16:48 Page 65
Page 66

66
• De ovenlamp bevindt zich bovenaan in de ovenruimte.
a) Schroef het vensterkapje los (zie tekening).
b) Draai het lampje naar links los.
Kenmerken van het lampje :
- 15 W
- 220-240 V
- 300°C
- schroeffitting E 14
c) Plaats een nieuwe lamp en draai het
vensterkapje opnieuw dicht. Sluit de
oven opnieuw aan.
V ervanging van de ovenlamp
lampje
Losschroeven
Vensterkapje
Gebruik een rubberen handschoen voor het losschroeven van
het vensterkapje en de lamp (praktisch!).
Trek altijd de stekker van uw oven uit alvorens de ovenlamp te
vervangen om elektrische schokken te vermijden. Laat indien
nodig de oven afkoelen.
Gebruik van uw oven
• Verwarm de oven voor in de stand " "
• Kies de aanbevolen temperatuur voor uw gerecht.
Voorbeeld : temperatuurknop in de stand 210°.
• Zodra het temperatuurlampje uitgaat, zet u de
ovenschotel in de oven.
• Zet de functiekeuzeknop in de gewenste stand.
Voorbeeld : stand " ".
• De oven begint nu te werken en het
thermostaatlampje gaat branden en gaat opnieuw
uit zodra de ingestelde temperatuur is bereikt.
Kookwijzen
Om een goede afkoeling van de verwarmingselementen van
uw oven te garanderen, zal de ventilator van de oven na elke
bakcyclus nog even blijven doorwerken.
99625662_ML_A.qxd 21/05/03 16:48 Page 66
55
270
240
210
180
75
100
125
150
Page 67

Onderhoud van uw oven
Reiniging van de binnenkant van de oven
Laat de oven eerst afkoelen alvorens aan de reiniging te beginnen. Ga na of alle
knoppen in de UIT-stand staan.
Algemene richtlijnen :
* sproei geen water over de oven.
* gebruik nooit schuurpoeders en metalen sponsen.
GEPOLIJSTE METALEN OPPERVLAKKEN
Gebruik in de handel verkrijgbare speciale producten voor de reiniging van
gepolijste metalen oppervlakken.
GLASPANEEL VAN DE OVENDEUR
Na een bakcyclus waarbij de oven vuil is geworden, raden wij u aan de binnenzijde
van het glaspaneel van de ovendeur met zeepwater te reinigen.
Types vlekken
Lichte vlekken
Ingebakken vlekken
De vlekken goed doorweken met
warm water
sanitairsponsje
Laat het water bij een lauwe
oven 30 minuten en bij een
koude oven een hele nacht
inwerken.
Gebruik een speciale
spuitbusreiniger voor
ovens. Volg de
aanwijzingen op de
spuitbus.
Reinigingsmethode
Benodigdheden
Uw oven kan makkelijk worden schoongemaakt. Hieronder volgen enkele
praktische tips :
poeder
schuurspons
speciale sanitaire spons voor
delicate afwas
Zet de oven altijd af alvorens een reiniging aan de binnenzijde
van de oven uit te voeren.
67
NL
99625662_ML_A.qxd 21/05/03 16:48 Page 67
Page 68

68
Bakwijzen v
Grill +Draaispit
Het bakken gebeurt met het
bovenste verwarmingselement.
Traditioneel
Het bakken gebeurt met het
onderste en het bovenste
verwarmingselement van de oven.
Verwarm de ov
Symbool
Functie Beschr
Onderste verwarmingselement
Het bakken gebeurt met het
onderste verwarmingselement.
Voorverwarmin
Het bakken ge
verwarmingsele
Plaats het oven
inschuifsleuf.
Voorverwarming
Bepaalde gere
voorverwarmd
Sterke grill
Het bakken gebeurt met het
bovenste verwarmingselement.
Verwarm de ov
Schuif de braa
Geen voorverw
Gevogelte en g
aan alle zijden.
Het draaispit bl
opent.
Plaats de braad
*
* Gebruikte sekwenties voor de schriftelijke mededeling op het energie-etiket overeen
99625662_ML_A.qxd 21/05/03 16:48 Page 68
Page 69

69
Aanbevolen voor langzame en
delicate bereidingen : zachte
wildgerechten...
Braden van rood vlees.
Stoven van gerechten in een stoofpot met
deksel waarvan de bereiding op een
kookplaat is begonnen (coq au vin,
wildragout...).
Aanbevelingen
lement.
Aanbevolen voor vochtige bereidingen
(quiches, taarten met saphoudend fruit...).
Het deeg krijgt onderaan een goed
gebakken en krokante structuur.
Aanbevolen voor bereidingen met
gistdeeg (cake, brioche, kuglof...) en
soufflés die bovenaan geen hinderlijke
korst nodig hebben.
Zet de thermostaat in de gewenste
temperatuurstand.
Zet de functiekeuzeknop na de
voorverwarming in de gewenste stand.
Aanbevolen stand voor het grillen van
grote hoeveelheden. Spreid het
vlees, de vis enz. over de hele
oppervlakte van het ovenrooster.
dslee in de onderste inschuifsleuf.
Aanbevolen stand voor het braden van
gevogelte en gebraad op het draaispit.
Om lamsbouten en grote stukken
rundsvlees te doorbakken.
Om vismoten te grillen en tegelijk
aan de binnenzijde zacht te houden.
NL
99625662_ML_A.qxd 21/05/03 16:48 Page 69
Page 70

70
Problemen en oplossingen
U twijfelt over de goede werking van uw oven. Dit betekent niet automatisch
dat er een defect is.
Controleer in elk geval eerst de volgende punten :
P
robleem
M
ogelijke oorzaken
O
plossingen
De oven wordt niet warm.
• De oven is niet
aangesloten.
• De zekering van de
installatie is defect.
• De baktemperatuur is te
laag.
• De thermostaat is defect.
- Sluit de oven aan.
- Vervang de zekering van
uw installatie (16 A).
- Verhoog de
baktemperatuur.
- Neem contact op met de
servicedienst.
De temperatuurindicator
blijft ononderbroken
branden.
• De thermostaat is defect.
- Neem contact op met de
servicedienst.
De ovenverlichting werkt
niet meer.
• De lamp is defect.
• De oven is niet
aangesloten of de zekering
is defect.
- Vervang de lamp.
- Sluit de oven aan of
vervang de zekering.
Noteer hieronder de gegevens van het identificatieplaatje van uw oven :
MADE IN FRANCE
220 - 240V ~ 50 Hz
BRANDT APPLIANCES SAS
7 rue Henri Becquerel
92500 RUEIL MALMAISON
99625662_ML_A.qxd 21/05/03 16:48 Page 70
Page 71

71
99625662_ML_A.qxd 21/05/03 16:48 Page 71
Page 72

99625662 05/03
99625662_ML_A.qxd 21/05/03 16:48 Page 72
 Loading...