

Brandt D3120X User Manual

FR
GUIDE D'INSTALLATION & D'UTILISATION
O PERATING AND INSTALLATION INSTRUCTIONS
NL GEBRUIKS - EN INSTALLATIEHANDLEIDING
Réfrigérateur-Congélateur
Fridge-Freezer
Ijskast - Diepvrieskast
EN

Contents
EN
1 Safety and the environment
• Safety instructions............................................................................................ 29
• Respecting the environment and saving energy................................................. 30
• BIOCARE - anti-bacterial walls .......................................................................... 30
2 Description of your appliance
3 How to carry out your initial installation
• Reversing the direction the doors open ............................................................. 32
• Installing your appliance................................................................................... 34
• Electrical connection......................................................................................... 35
4 How to use your refrigerator
• Setting your refrigerator's temperature.............................................................. 36
• Mixed or regulated cold (depending on the model)............................................ 37
• Preparing food for the refrigerator.............................................................. 38
• Arranging food in your refrigerator.................................................................... 38
• Your refrigerator’s modular layout..................................................................... 39
• The Maxi-Fresh area (depending on the model)................................................. 39
• Automatic defrosting ........................................................................................ 39
• Anti-odour system (depending on the model).................................................... 40
5 How to use your freezer
• Frozen and deep-frozen food...................................................................... 41
• Preparing food for freezing............................................................................... 41
• Food freezing guide................................................................................... 42
• Arranging food in your freezer .......................................................................... 45
• Defrosting food................................................................................................ 45
• Automatic defrosting of your freezer ................................................................. 45
6 Ongoing maintenance of your appliance
• Cleaning your appliance.................................................................................... 46
• Changing the light bulb .................................................................................... 47
• Clearit.............................................................................................................. 47
7 Noises, inconveniences and minor breakdowns
• Normal operating noises................................................................................... 48
• Inconveniences or minor breakdowns ............................................................... 48
This guide to installing and using your fridge-freezer is applicable to several models.
There may be slight differences between your appliance's details and features and
those described here.
As you read through the guide, you will come across the following symbols, to warn you of:
Safety precautions that must be observed
Danger of a gas bursting into flame
An electrical danger
Important information and advice
27

Dear Customer,
You have just acquired a BRANDT fridge-freezer and we would like to thank you.
We have invested all our dedication and know-how in this appliance so that it would
best meet your needs. With innovation and performance, we designed it to be always
easy to use.
In the BRANDT product range, you will also find a wide choice of dishwasher,
washing machine and dryer, freezers, cooker range and oven, cooking hobs and
ventilation hoods, that you can coordinate with your new BRANDT fridge-freezer.
Visit our website www.brandt.com
where you will find all of our products, as well
as useful and complementary information.
BRANDT
As part of our commitment to constantly improving our products, we reserve the right to make
changes to them based on technical advances to their technical and functional features and
appearance.
Warning:
Before installing and using your appliance, please carefully read this Guide to
Installation and Use, which will allow you to quickly familiarise yourself w ith
its operation.
28

Safety instructions
This appliance is intended for domestic use only. It has been designed for preserving and freezing
food.
EN
The following instructions are for your own safety and should be observed without
fail. We can neither be held responsible, nor uphold the guarantee in case of failure to observe these recommendations, which may lead to material damage or
physical injury.
Your appliance must be installed, fixed if necessary and used in compliance with the instructions in this operating and installation
instructions manual in order to avoid any
damage and/or danger due to any lack of stability or faulty installation.
If the appliance has been delivered to
your home in a horizontal position,
stand it upright and then wait 2 hours
before plugging it in. A small amount of
oil may have flowed into the refrigeration circuit, and you must allow time for
this to flow back towards the motor before connecting the appliance. Failure
to do so may damage the appliance.
If you appliance is fitted with castors, please
remember that they are only designed to assist in small movements. Do not use them for
longer journeys.
Carry out an initial cleaning operation (see
the section on "Installing your appliance") before connecting your appliance to the electrical supply. Disconnect your appliance prior to
performing any maintenance operation.
Grasp the plug directly, instead of pulling on
the power cable.
Do not place bottles or jars containing liquids
in the freezer unless they are only two-thirds
full: freezing causes liquids to expand, which
can cause the container to explode.
Do not use any other method than those we
recommend in this manual for speeding up
defrosting.
Do not use electrical equipment inside compartments designed for preserving frozen
food unless the manufacturer recommends
otherwise. Do not let children play with the
appliance and keep your pets well away from
it. Worn out appliances must be rendered unusable. Unplug and cut the electric cable flush
with the appliance. Render the door catch unusable or, better still, remove the door, so as
to ensure that no child or animal risks being
shut inside whilst playing. If a problem arises
that you are unable to resolve using the advice given (see the "Noise, inconveniences,
minor breakdowns" section), please contact
an official after-sales service or a qualified
professional.
Your appliance's refrigeration circuit
is filled with isobutane refrigerant
(R600a), a natural, non-polluting gas
that is, however, inflammable. Ensure
that none of the components in your
appliance's refrigeration circuit have
been damaged during transport or installation. If you detect any damage,
keep your appliance away from flames
or any type of source of heat or combustion and ventilate it location.
29

Respecting the environment and sa ving energy
To reduce your appliance’s electrical consuption:
- Install it in a suitable place (see "Installation of your appliance" section).
- Leave the door open as little as possible. Do not place food that is still hot in your refrigerator or
freezer, particularly in the case of soups or dishes that release a lot of steam.
- Ensure that you appliance operates optimally by not allowing too much frost to build up in the
freezer (de-frost it when the frost is more than 5-6 mm thick) and clean its condenser periodically
(See the "Ongoing maintenance of your appliance" section).
- Periodically check the door seals and make sure that the doors close firmly. If they do not, lease
contact our After-sales service.
In compliance with the latest legislation concerning environme ntal protection, your appliance does
not contain any CFCs. Instead it uses a gas called R600a. The exact type of refrigerant used in
your appliance is also clearly indicated on the identification plate inside your appliance's refrigerator
section, low down on the left-hand wall.
R600a is a non-polluting gas that does not harm the ozone layer and whose contribution to the
greenhouse effect is virtually zero.
EN
ENVIRONMENTAL PROTECTION
This appliance's packaging material is recyclable. Help recycle it and protect the environment by dropping it off in the municipal receptacles provided for this purpose. Your
appliance also contains a great amount of recyclable material. It is marked with this label
to indicate the used appliances that should not be mixed with other waste. This way,
the appliance recycling organised by your manufacturer will be done under the best
possible conditions, in compliance with European Directive 2002/96/EC on Waste Electrical and
Electronic Equipment. Contact your town hall or your retailer for the used appliance collection
points closest to your home.
We thank you doing your part to protect the environment.
BIOCARE - anti-bacterial walls
This is a specific coating on the lining of your refrigerator consisting of silver ions, which prevent
bacteria from developing.
The anti-bacterial coating does not require any particular treatment and remains active throughout
your appliance's operating life.
However, you must clean your appliance regularly. See the section on "Cleaning your appliance".
30
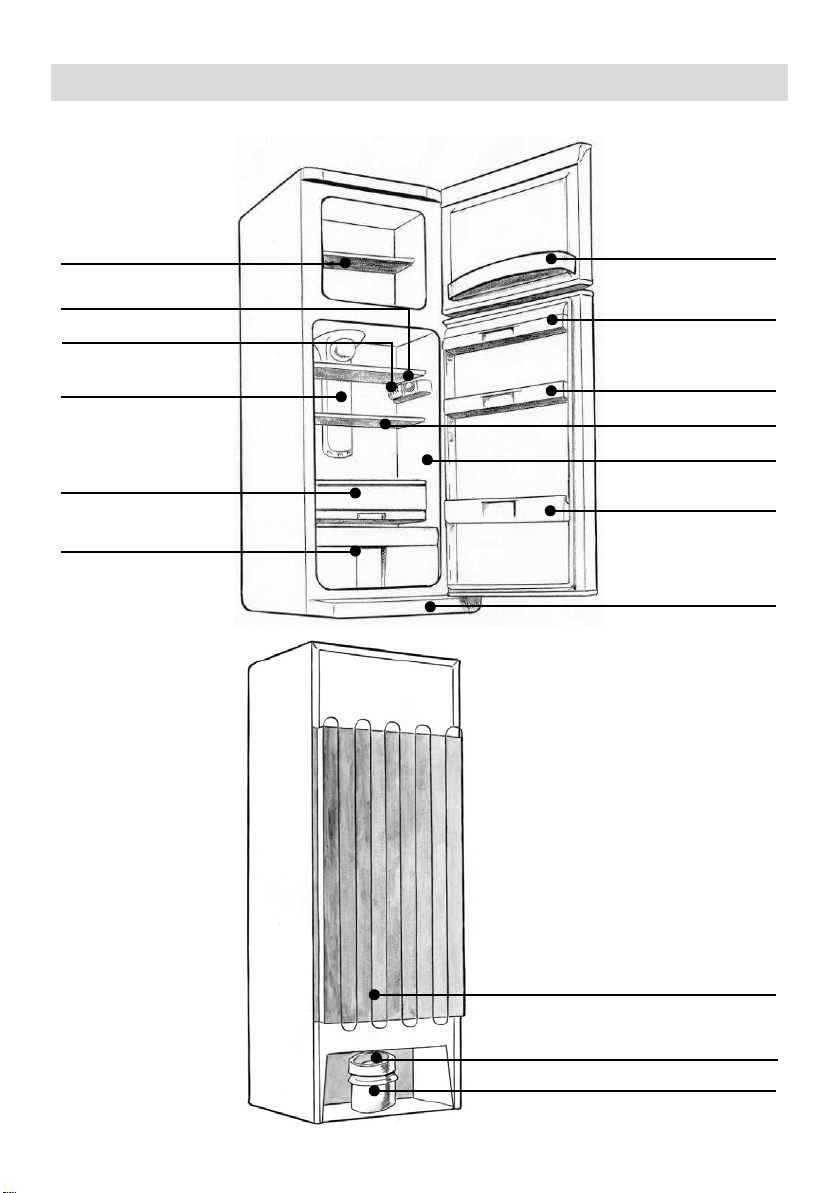
Description of your appliance
Shelves
EN
Freezer door rack
(as an option)
Thermostat
Lightning
Ventilation System*
Maxi-Fresh*
Vegetable drawer
Butter rack with
glass shutter
Door rack
Removables shelves
Anti-bacterial walls
Bottle rack
Plinth
* depending on the models
This guide to installing and
using your fridge-freezer is
applicable to several models.
There may be slight differences between your appliance's
details and features and those
described here.
31
Condenser
Water collection tank
Motor
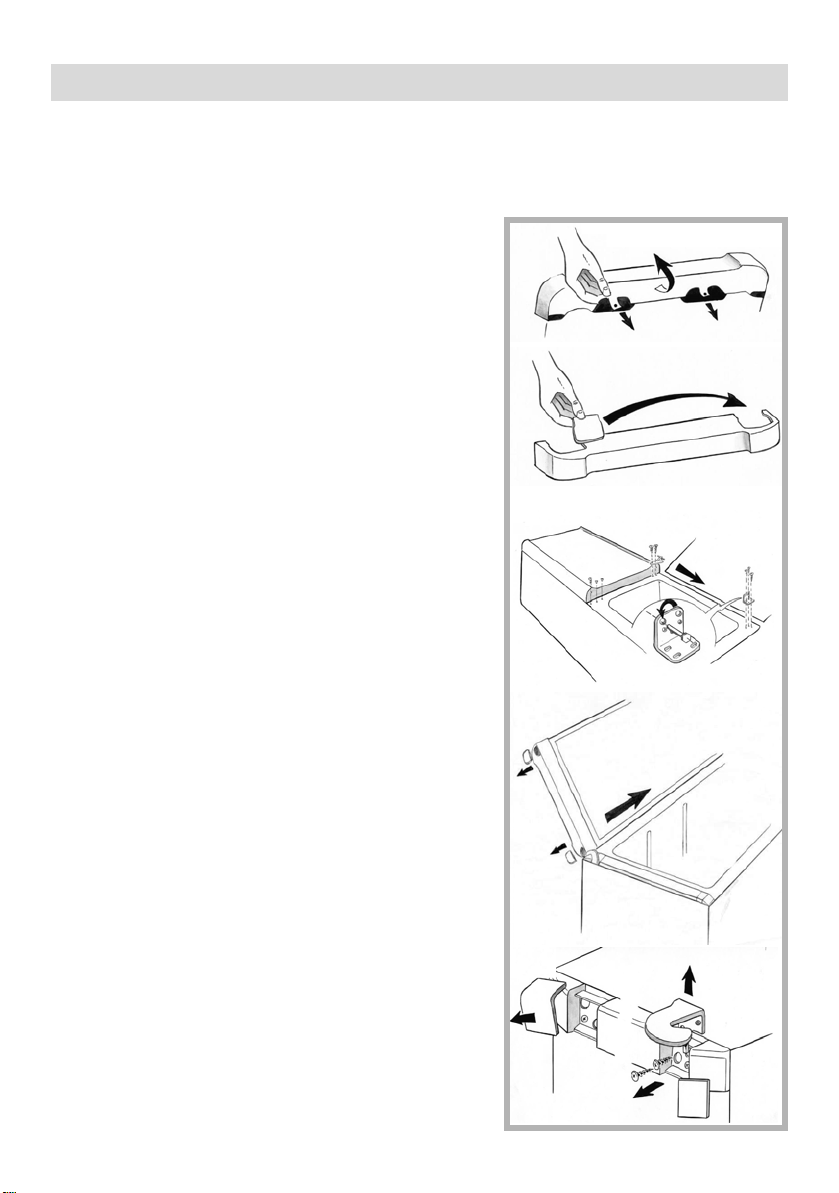
Reversing the direction the doors open
The doors normally open to the left (hinges on the right); if you wish to open the door to the right,
you can modify the direction in which it opens by following the inst ructions below. To ensure correct installation, please scrupulously follow the directions and the sequence of operations below
1. Gently tilt the appliance backwards (with the doors
facing upwards).
2. Remove the plinth by pulling the lugs A on the lower
part towards you and swivelling the plinth upwards
to disengage it (R1). Remove cover B from its housing on the left and insert it in the housing on the right
(R2).
3. Remove the bottom hinge pin and release it from its
housing C ; retrieve the plastic distance piece placed
between the door and the hinge on the pin; unscrew
the bottom hinge D and screw the pin into the lefthand hole in the hinge (R3).
4. Remove the refrigerator's door (R3).
5. Unscrew the middle hinge E, taking care not to lose
the plastic distance pieces inserted on the pin (R3).
drawing R1
A
drawing R2
B
drawing R3
E
F
EN
A
D
C
.
6. Remove the covers G on top of the freezer’s door
(R4).
7. Free the freezer’s door from the top hinge (R4).
8. Remove the screw and the covers F on the left- hand
side of the appliance and insert them in the holes on
the right-hand side (R3) .
9. Remove the covers H from the control panel (R5 ).
10. Unscrew and remove the top right-hand hinge I
(R5).
32
drawing R4
G
drawing R5
I
H
H

Reversing the direction the doors open
EN
11. The upper left-hand hinge L is placed inside the
plinth (R6). Remove it and inset it into the hous ing on
the left on the control panel M . Fasten it with the
two screws (R7).
12. Insert the covers N and fasten them onto the control
panel (R7).
13. So as not to lose the top right-hand hinge, which yo u
may need later, store it in the housing in the plinth
(R6) .
14. Remove the hole covers O on the left-hand side of
the refrigerator's door (R8).
15. Unscrew the metal door stop P on the right-hand
side of the refrigerator's door, turn it over and screw
it to the left-hand side of the freezer's door, aligning
the hole in the plate with the one in the door ( R8).
Unscrew the metal door stop P on the right-hand
side of the freezer's door, turn it over and screw it to
the left-hand side of the refrigerator's door, aligning
the hole in the plate with the one in the door (R8).
16. Insert the hole cover O , previously placed on the
left-hand side of the refrigerator's door on the righthand side of the same door (R8).
17. Insert the freezer's door in the top hinge (R9).
18. Insert the middle hinge and screw it in place, check-
ing that the plastic distance pieces are correctly inserted on the pin (R9).
19. Insert the refrigerator's door into the middle hinge
(R9).
20. Insert the bottom hinge into the refrigerator's door,
checking that the plastic distance piece is correctly
inserted on the pin between the hinge and the door.
Screw the hinge in place. (R9).
21. Re-install the plinth.
22. Insert the upper covers .
23. Return the appliance to vertical position .
Wait two hours before restarting your
refrigerator.
drawing R6
L
drawing R7
M
N
N
drawing R8
P
O
drawing R9
33
 Loading...