

Brandt BWW574I User Instructions
Mode d’emploi
User instructions
FR
EN
BWW574I
FR
TOUS NOS
COMPLIMENTS
En achetant cet appareil ménager
Rosieres, vous avez démontré que
vous n’acceptez aucun compromis:
vous voulez toujours ce qu’il y a de
mieux.
Rosieres a le plaisir de vous proposer
cette nouvelle machine à laver qui
est le résultat d’années de
recherches et d’études des besoins
du consommateur.Vous avez fait le
choix de la qualité, de la fiabilité et
de l’efficacité.
Rosieres vous propose une large
gamme d’appareils
électroménagers: machines à laver
la vaisselle,machines à laver et
sécher le linge, cuisinières, fours à
micro-ondes, fours et tables de
cuisson, hottes, réfrigerateurs et
congélateurs.
Demandez à votre Revendeur le
catalogue complet des produits
Rosieres.
Cet appareil a pour vocation d’être
utilisé au sein du foyer,ou dans ces
différentes situations:
- zones réservées au personnel dans
les magasins, bureaux et autres
environnements de travail;
- exploitation agricoles;
- par les clients dans les hôtels, motels
et autres environnements résidentiels;
- environnement de type bed and
breakfast.
Une utilisation autre que domestique,
comme par exemple une
démonstration commerciale ou une
session de formation,est à exclure
également dans les lieux cités ci-
dessus. Une utilisation détournée de
l’appareil est proscrite.
Si l’appareil doit être utilise de
manière incompatible comme défini
ci-dessus, la durée de vie de
l’appareil pourrait être réduite et la
garantie du fabricant serait annulée.
Tout dommage causé à l'appareil,
résultant d’une mauvaise utilisation
de l’appareil (même si l’utilisation en
est faite au sein du foyer),ne permettra
pas de recours auprès du fabriquant,
comme il est établi par la loi.
Nous vous prions de lire
attentivement les conseils contenus
dans ce livret. Il contient
d’importantes indications
concernant les procédures
d’installation, d’emploi, d’entretien et
quelques suggestions utiles en vue
d’améliorer l’utilisation de la
machine à laver.
Conservez avec soin ce livret: vous
pourrez le consulter bien souvent.
Quand vous communiquez avec
Rosieres, ou avec ses centres
d’assistance, veuillez citer le Modèle,
le n° et le numéro G
EN
OUR COMPLIMENTS
With the purchase of this Rosieres
household appliance, you have
shown that you will not accept
compromises: you want only the
best.
Rosieres is happy to present their
new washing machine,the result of
years of research and market
experience through direct contact
with Consumers. You have chosen
the quality, durability and high
performance that this washing
machine offers.
Rosieres is also able to offer a vast
range of other household
appliances: washing machines,
dishwashers, washer-dryers,
cookers, microwave ovens.
Traditional ovens and hobs,
refrigerators and freezers.
Ask your local retailer for the
complete catalogue of
Rosieres
products.
This appliances is intended to be
used in household and similar
applications such as:
- staff kitchen areas in shops,offices
and other working environments;
- farm houses;
- by clients in hotels, motels and
other residential type
environments;
- bed and breakfast type
environments.
A different use of this appliance
from household environment or
from typical housekeeping
functions, as commercial use by
expert or trained users, is excluded
even in the above applications.
If the appliance is used in a
manner inconsistent with this it may
reduce the life of the appliance
and may void the manufacturer’s
warranty.
Any damage to the appliance or
other damage or loss arising
through use that is not consistent
with domestic or household use
(even if located in a domestic or
household environment) shall not
be accepted by the manufacturer
to the fullest extent permitted by
law.
Please read this booklet carefully
as it provides important guide lines
for safe installation,use and
maintenance and some useful
advise for best results when using
your washing machine.
Keep this booklet in a safe place
for further consultation.
When contacting
Rosieres
or a Customer Services Centre
always refer to the Model,No., and
G number (if applicable of the
appliance see panel).
This appliances is intended to be
used in household and similar
applications such as:
- staff kitchen areas in shops,offices
and other working environments;
- farm houses;
- by clients in hotels, motels and
other residential type
environments;
- bed and breakfast type
environments.
A different use of this appliance
from household environment or
from typical housekeeping
functions, as commercial use by
expert or trained users, is excluded
even in the above applications.
If the appliance is used in a
manner inconsistent with this it may
reduce the life of the appliance
and may void the manufacturer’s
warranty.
Any damage to the appliance or
other damage or loss arising
through use that is not consistent
with domestic or household use
(even if located in a domestic or
household environment) shall not
be accepted by the manufacturer
to the fullest extent permitted by
law.
Please read this booklet carefully
as it provides important guide lines
for safe installation,use and
maintenance and some useful
advise for best results when using
your washing machine.
Keep this booklet in a safe place
for further consultation.
Cet appareil a pour vocation d’être
utilisé au sein du foyer, ou dans ces
différentes situations:
- zones réservées au personnel dans
les magasins, bureaux et autres
environnements de travail;
- exploitation agricoles;
- par les clients dans les hôtels, motels
et autres environnements résidentiels;
- environnement de type bed and
breakfast.
Une utilisation autre que domestique,
comme par exemple une
démonstration commerciale ou une
session de formation,est à exclure
également dans les lieux cités cidessus. Une utilisation détournée de
l’appareil est proscrite.
Si l’appareil doit être utilise de
manière incompatible comme défini
ci-dessus, la durée de vie de
l’appareil pourrait être réduite et la
garantie du fabricant serait annulée.
Tout dommage causé à l'appareil,
résultant d’une mauvaise utilisation
de l’appareil (même si l’utilisation en
est faite au sein du foyer),ne permettra
pas de recours auprès du fabriquant,
comme il est établi par la loi.
Nous vous prions de lire
attentivement les conseils contenus
dans ce livret. Il contient
d’importantes indications
concernant les procédures
d’installation, d’emploi, d’entretien et
quelques suggestions utiles en vue
d’améliorer l’utilisation de la
machine à laver.
Conservez avec soin ce livret: vous
pourrez le consulter bien souvent.
2

3
FR
INDEX
Avant-propos
Notes générales à la
livraison
CHAPITRE
CHAPTER
1
15
EN
INDEX
Introduction
General points on delivery
Instruction pour le montage
de la porte
Instruction for mounting door
Mesures de sécurité
Données techniques
Mise en place, installation
Description des commandes
Tableau des programmes
Sélection
Tiroir à lessive
Le produit
Lavage
Séchage
Cycle automatique de
lavage/séchage
Nettoyage et entretien
Recherche des pannes
2
3
4
5
6
7
8
9
10
11
12
13
14
Safety Measures
Technical Data
Setting up and Installation
Control Description
Table of Programmes
Selection
Detergent drawer
The Product
Washing
Drying cycle
Automatic washing/Drying
cycle
Cleaning and routine
maintenance
Faults Search

4
C
AB
C
D
IT
CAPITOLO 1
NOTE GENERALI
ALLA CONSEGNA
Alla consegna controlli che
con la macchina ci siano:
A) MANUALE
D’ISTRUZIONE
B) INDIRIZZI DI ASSISTENZA
C) CERTIFICATI DI
GARANZIA
D) TAPPI
E) CURVA PER TUBO
SCARICO
F) BACINELLA DETERSIVO
LIQUIDO O
CANDEGGIANTE
CONSERVATELI
e controlli che non abbia
subito danni durante il
trasporto, in caso contrario
chiami il centro Candy più
vicino.
B
DE
KAPITEL 1
ALLGEMEINE
HINWEISE ZUR
LIEFERUNG
Kontrollieren Sie bei
Anlieferung des Gerätes, ob
das folgende Zubehör
mitgeliefert wurde:
A) BEDIENUNGSANLEI-
TUNG
B) VERZEICHNIS DER
KUNDENDIENST-
STELLEN
C)GARANTIESCHEIN
D) STÖPSEL
E) ROHRBOGEN FÜR
ABLAUFSCHLAUCH
F) EINSATZ FÜR
FLÜSSIGWASCHMITTEL
BZW. BLEICHMITTEL
BITTE GUT AUFBEWAHREN
Gerät bei Lieferung auf
eventuelle
Transportschäden
untersuchen und
gegebenenfalls beim
Händler reklamieren.
FR
CHAPITRE 1
NOTES GENERALES
A LA LIVRAISON
A la livraison veuillez,
contrôler que le matériel
suivant accompagne la
machine:
A) LIVRET
D’INSTRUCTIONS
B) BOUCHONS
C) COUDES POUR LE TUBE
DE VIDANGE
D) BAC POUR LES
PRODUITS LESSIVIELS
LIQUIDES OU POUR LES
PRODUITS
BLANCHISSANTS
LIQUIDES
LES CONSERVER
et contrôler que ce matériel
soit en bon état; si tel n’est
pas le cas appelez le centre
Candy le plus proche.
EN
CHAPTER 1
GENERAL POINTS
ON DELIVERY
On delivery, check that the
following are included with
the machine:
A) INSTRUCTION MANUAL
B) CAPS
C) BEND FOR OUTLET TUBE
D) LIQUID DETERGENT OR
LIQUID BLEACH
COMPARTMENT
(CONTAINER)
KEEP THEM IN A SAFE
PLACE
Check that the machine has
not incurred damage during
transport. If this is the case,
contact your nearest Candy
Centre.
Check that the machine has
not incurred damage during
transport. If this is the case,
contact your nearest
Technical Assistance Centre.
et contrôler que ce matériel
soit en bon état; si tel n’est
pas le cas appelez le centre
d’assistance technique le
plus proche.
B) INDIRIZZI DI ASSISTENZA
B) VERZEICHNIS DER
KUNDENDIENST-
B) BOUCHONS
B) CAPS
C) CERTIFICATI DI
GARANZIA
C)GARANTIESCHEIN
C) COUDES POUR LE TUBE
DE VIDANGE
C) BEND FOR OUTLET TUBE
D) TAPPI
E) CURVA PER TUBO
SCARICO
D) STÖPSEL
E) ROHRBOGEN FÜR
ABLAUFSCHLAUCH
D) BAC POUR LES
PRODUITS LESSIVIELS
LIQUIDES OU POUR LES
PRODUITS
BLANCHISSANTS
LIQUIDES
D) LIQUID DETERGENT OR
LIQUID BLEACH
COMPARTMENT
(CONTAINER)
C
D
B
A
5
FR
CHAPITRE 2
MESURES DE
SECURITE
ATTENTION:
EN CAS
D’INTERVENTION DE
NETTOYAGE ET
D’ENTRETIEN
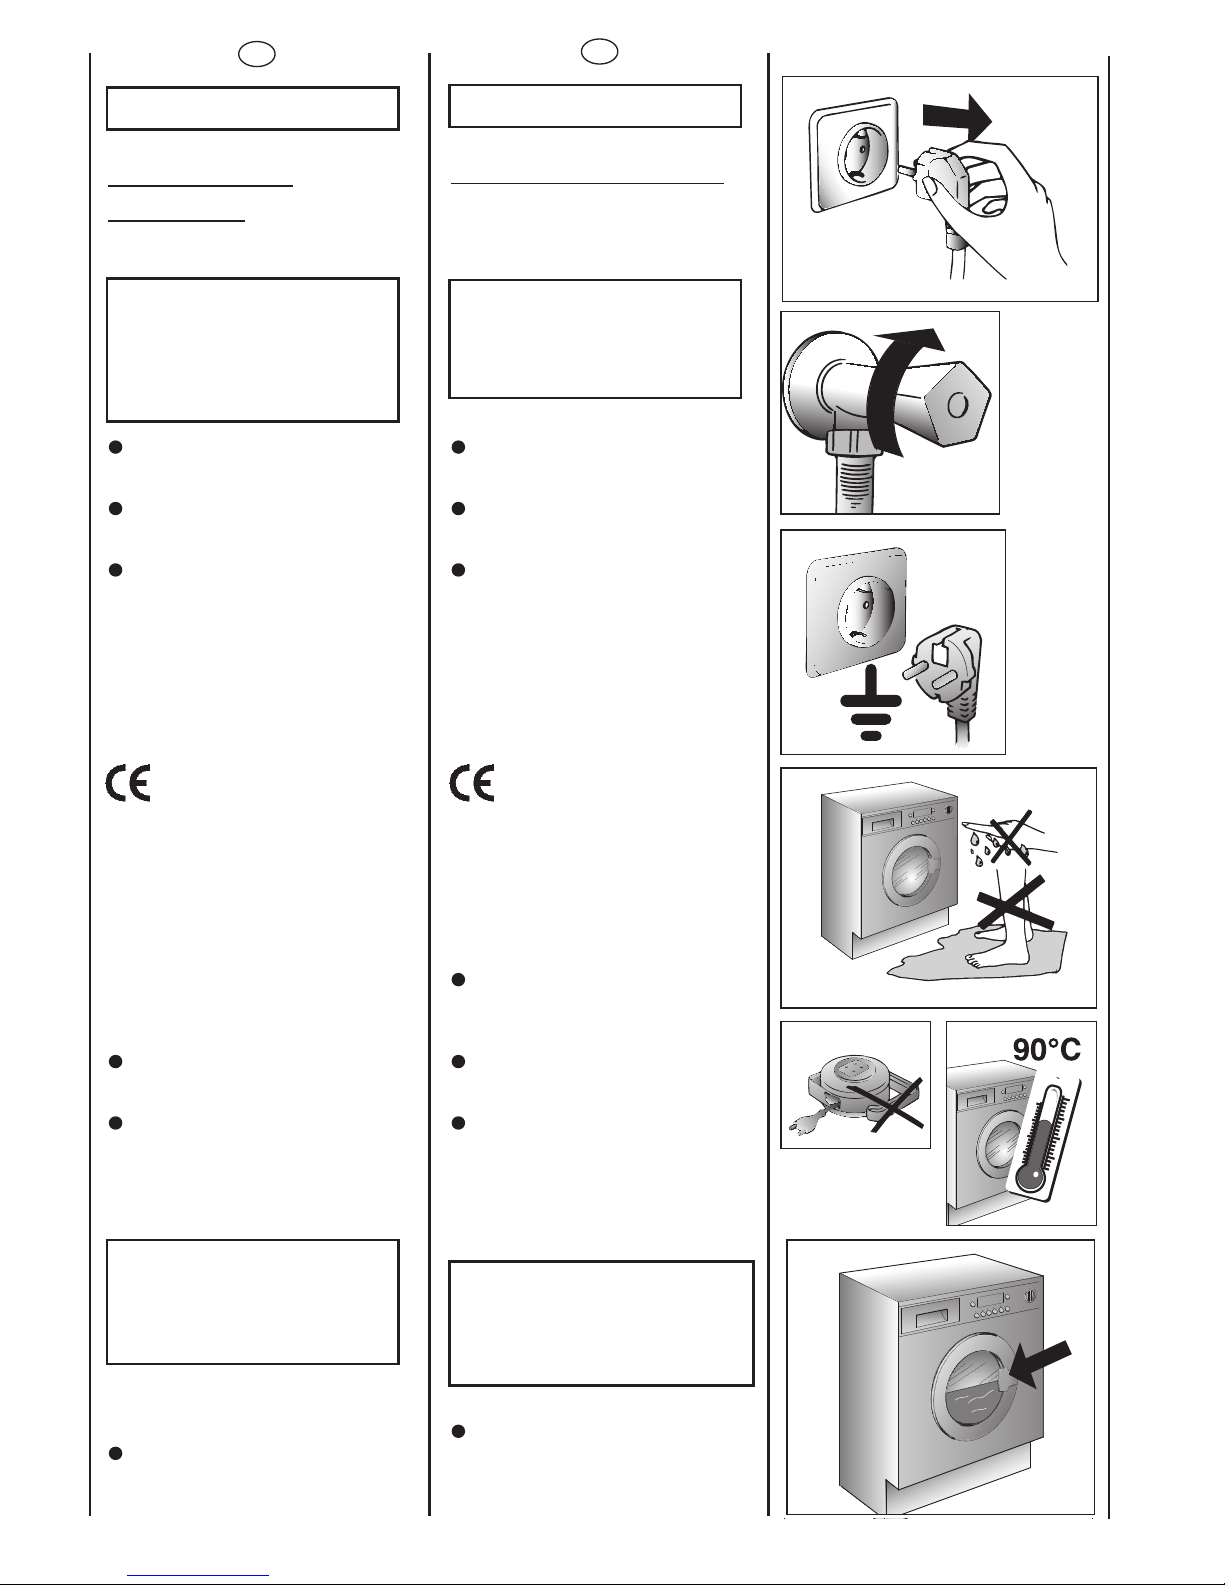
Débrancher la prise de
courant.
Fermer le robinet
d’alimentation d’eau.
Toutes les machines
sont pourvues de mise à la
terre.
Vérifier que l’installation
électrique soit alimentée par
une prise de terre, en cas
contraire demander
l’intervention du personnel
qualifié.
Produit compatible
avec les Directives
Européennes 73/23/EEC et
89/336/EEC, remplacé par
2006/95/EC et 2004/108/EC,
et les amendements
successifs.
Ne pas toucher l’appareil
pieds nus.
Autant que possible éviter
l’usage de rallonges dans les
salles de bains ou les
douches.
ATTENTION:
PENDANT LE LAVAGE
L’EAU PEUT ATTEINDRE
90°C.
Avant d’ouvrir le hublot
vérifier que le tambour soit
sans eau.
EN
CHAPTER 2
SAFETY MEASURES
IMPORTANT:
FOR ALL CLEANING
AND MAINTENANCE
WORK
Remove the plug
Turn off the water inlet tap.
All appliances are
earthed. Ensure that the
main electricity circuit is
earthed. Contact a qualified
electrician if this is not the
case.
Appliance complies
with European Directives
73/23/EEC and 89/336/EEC,
replaced by 2006/95/EC and
2004/108/EC, and
subsequent amendments.
Do not touch the
appliance with wet or damp
hands or feet.
Do not use the appliance
when bare-footed.
Extreme care should be
taken if extension leads are
used in bathrooms or shower
rooms.Avoid this where
possible.
WARNING: DURING THE
WASHING CYCLE, THE
WATER CAN REACH A
TEMPERATURE OF 90°C.
Before opening the
washing machine door,
ensure that there is no water
in the drum.
6
FR
Ne pas utiliser
d’adaptateurs ou de prises
multiples.
Cet appareil n’est pas
destiné à être utilisé par des
personnes (notamment les
enfants) incapables,
irresponsables ou sans
connaissance sur l’utilisation
du produit, à moins qu’elles
ne soient surveillées, ou
instruites sur l’utilisation de
l’appareil, par une personne
responsable de leur sécurité.
Surveillez les enfants pour
être sûr qu’ils ne jouent pas
avec l’appareil.
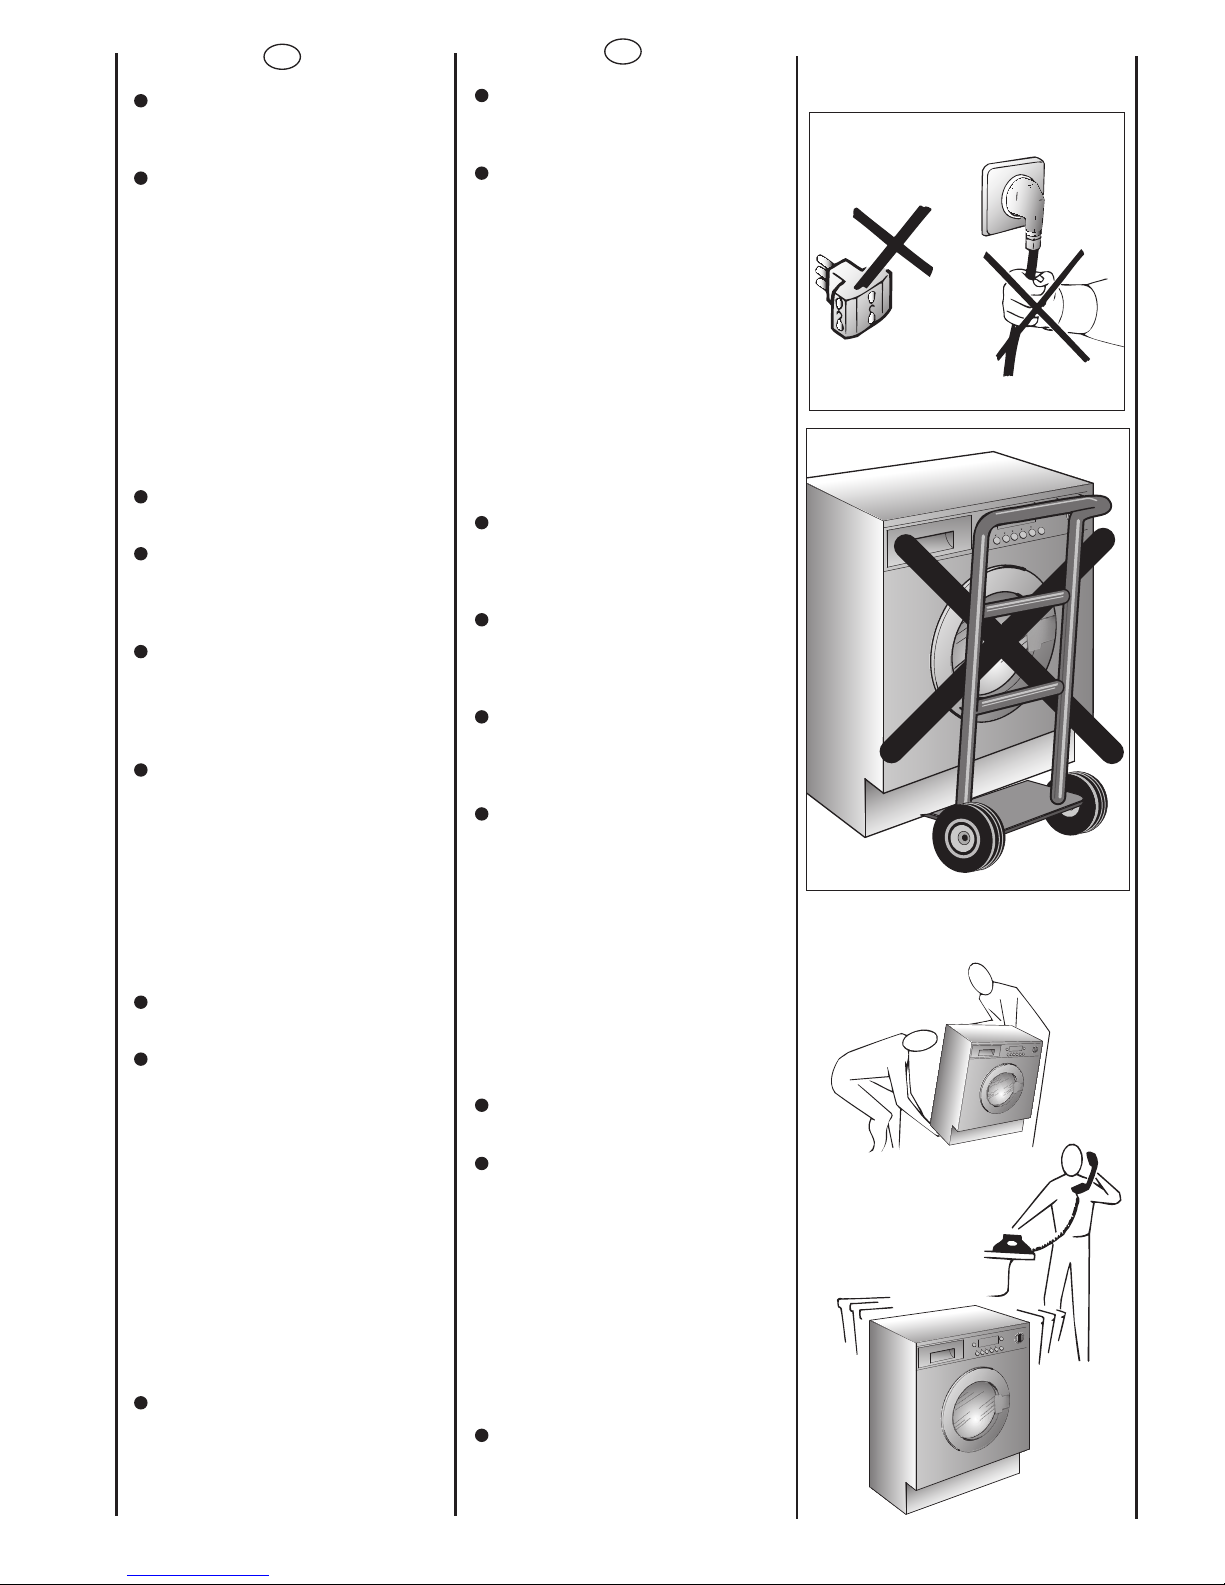
Pour débrancher la prise,
ne pas tirer sur le câble.
Ne pas laisser la machine
exposée aux agents
atmosphériques (pluie, soleil,
etc...).
En cas de déménagement
ne jamais soulever la
machine par les boutons ou
par le tiroir des produits
lessiviels.
Pendant le transport ne
pas appuyer le hublot sur le
chariot.
Important!
Les ouvertures à la base de
l’appareil ne doivent en
aucun cas être obstruées par
des tapis, moquette ou
autres objets.
2 personnes pour soulever
la machine (voir dessin).
En cas de panne et/ou de
mauvais fonctionnement
éteindre la machine, fermer
le robinet d’alimentation
d’eau et ne pas toucher à la
machine.Pour toute
réparation adressez-vous
exclusivement à un centre
d’assistance technique
en demandant des pièces
de rechange certifiées
constructeur.Le fait
de ne pas respecter les
indications susmentionnées
peut compromettre la
sécurité de l’appareil.
Si le remplacement du
câble d’alimentation s’avère
nécessaire, il devra être
remplacé par un câble
special fourni par le service
après-vente.
EN
Do not use adaptors or
multiple plugs.
This appliance is not
intended for use by persons
(including children) with
reduced physical,sensory or
mental capabilities, or lack of
experience and knowledge,
unless they have been given
supervision or instruction
concerning use of the
appliance by a person
responsible for their safety.
Children should be
supervised to ensure that
they do not play with the
appliance.
Do not pull the mains lead
or the appliance itself to
remove the plug from the
socket.
Do not leave the
appliance exposed to
atmospheric agents (rain, sun
etc.)
In the case of removal,
never lift the appliance by
the knobs or detersive
drawer.
During transportation
do not lean the door against
the trolley.
Important!
When the appliance
location is on carpet floors,
attention must be paid so as
to ensure that there is no
obstruction to the bottom
vents.
Lift the appliance in pairs
as illustrated in the diagram.
In the case of failure
and/or incorrect operation,
turn the washing machine
off, close the water inlet tap
and do not tamper with the
appliance. Contact a
Technical Assistance Centre
for any repairs and ask for
original spare parts.
Avoidance of these norms
may compromise the
safety of the appliance.
Should the supply cord
(mains cable) be demaged,
this is to be replaced by a
specific cable available from
the after sales service centre.
7
FR
EN
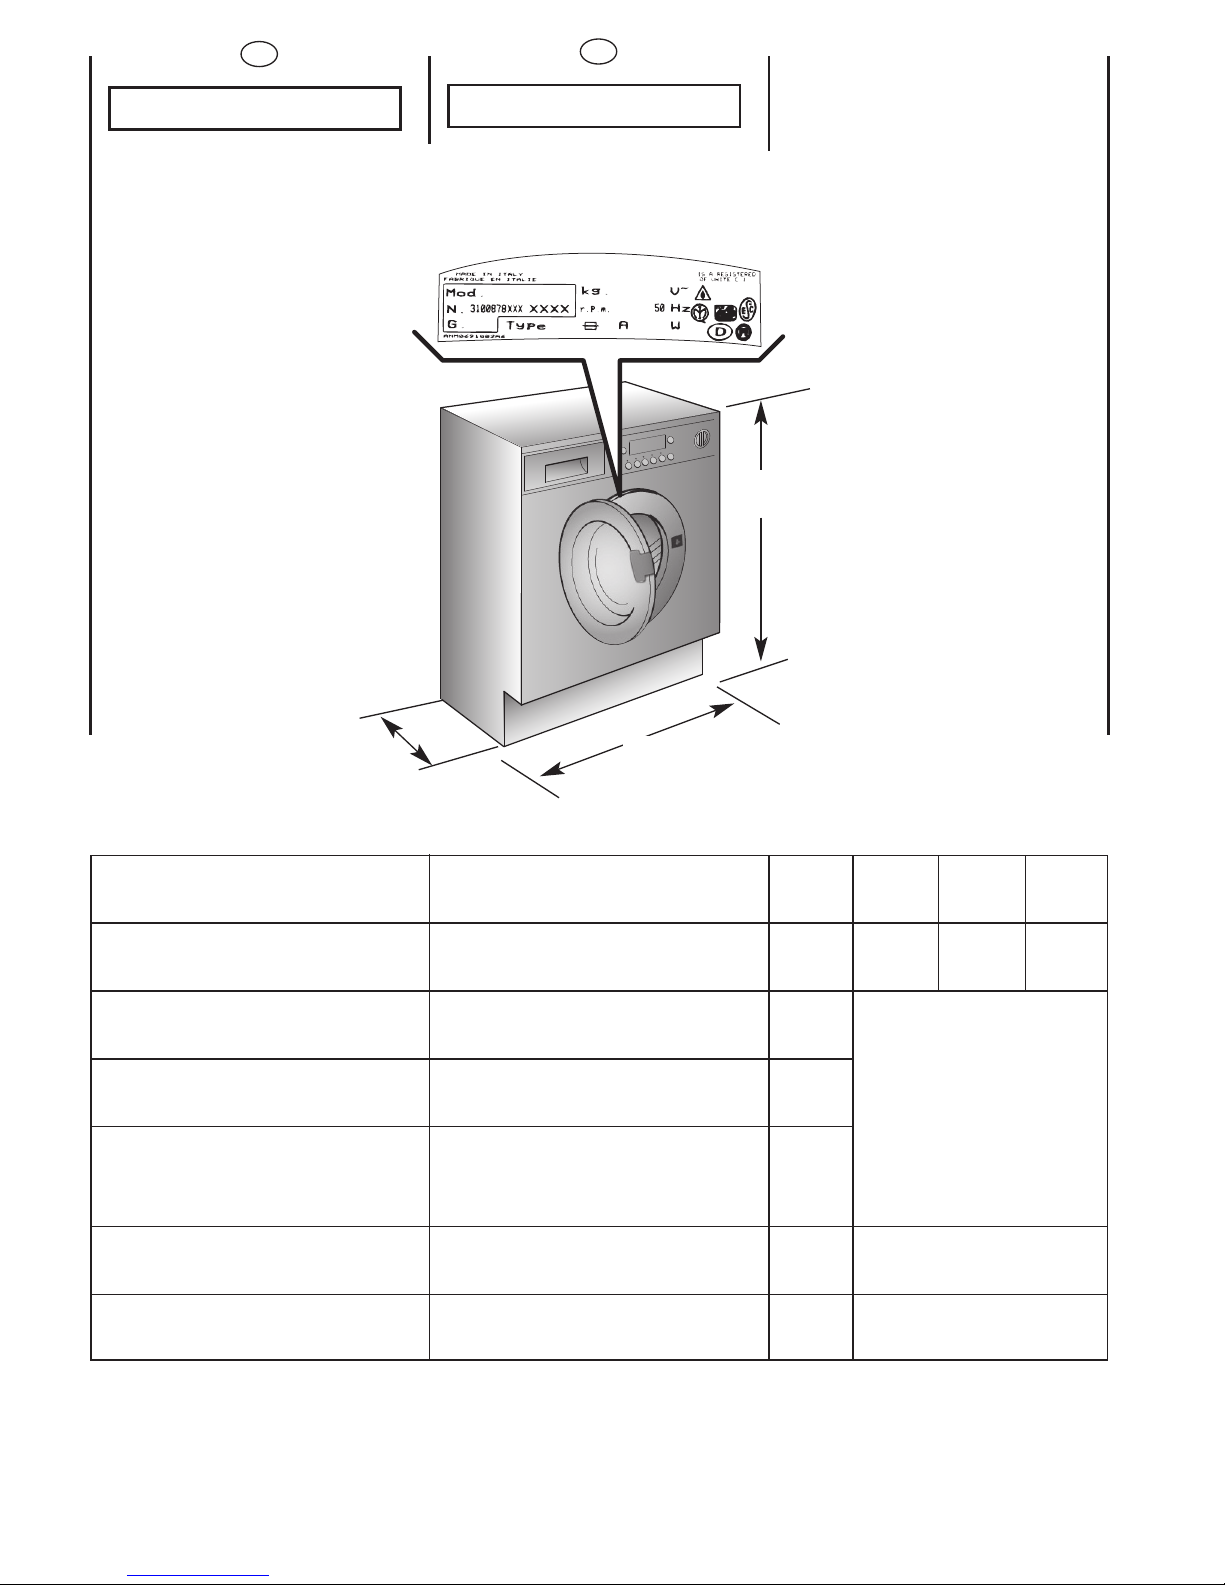
CHAPTER 3
CHAPITRE 3
CAPACITE DE LINGE
SEC
PUISSANCE
ABSORBEE
AMPERAGE
ESSORAGE
(Tours/min.)
PRESSION DANS
L’INSTALLATION HYDRAULIQUE
TENSION
DONNÉES TECHNIQUES
MAXIMUM WASH
LOAD DRY
POWER INPUT
POWER CURRENT FUSE
AMP
SPIN
r.p.m.
WATER PRESSURE
SUPPLY VOLTAGE
TECHNICAL DATA
5kg
min. 0,05
max. 0,8
220-240
W
A
MPa
V
7
Lavage
Washing
Séchage
Drying
82 cm
60 cm
54 cm
82 cm
60 cm
54 cm
CONSULTER LA PLAQUE
TECHNIQUE
SEE RATING PLATE
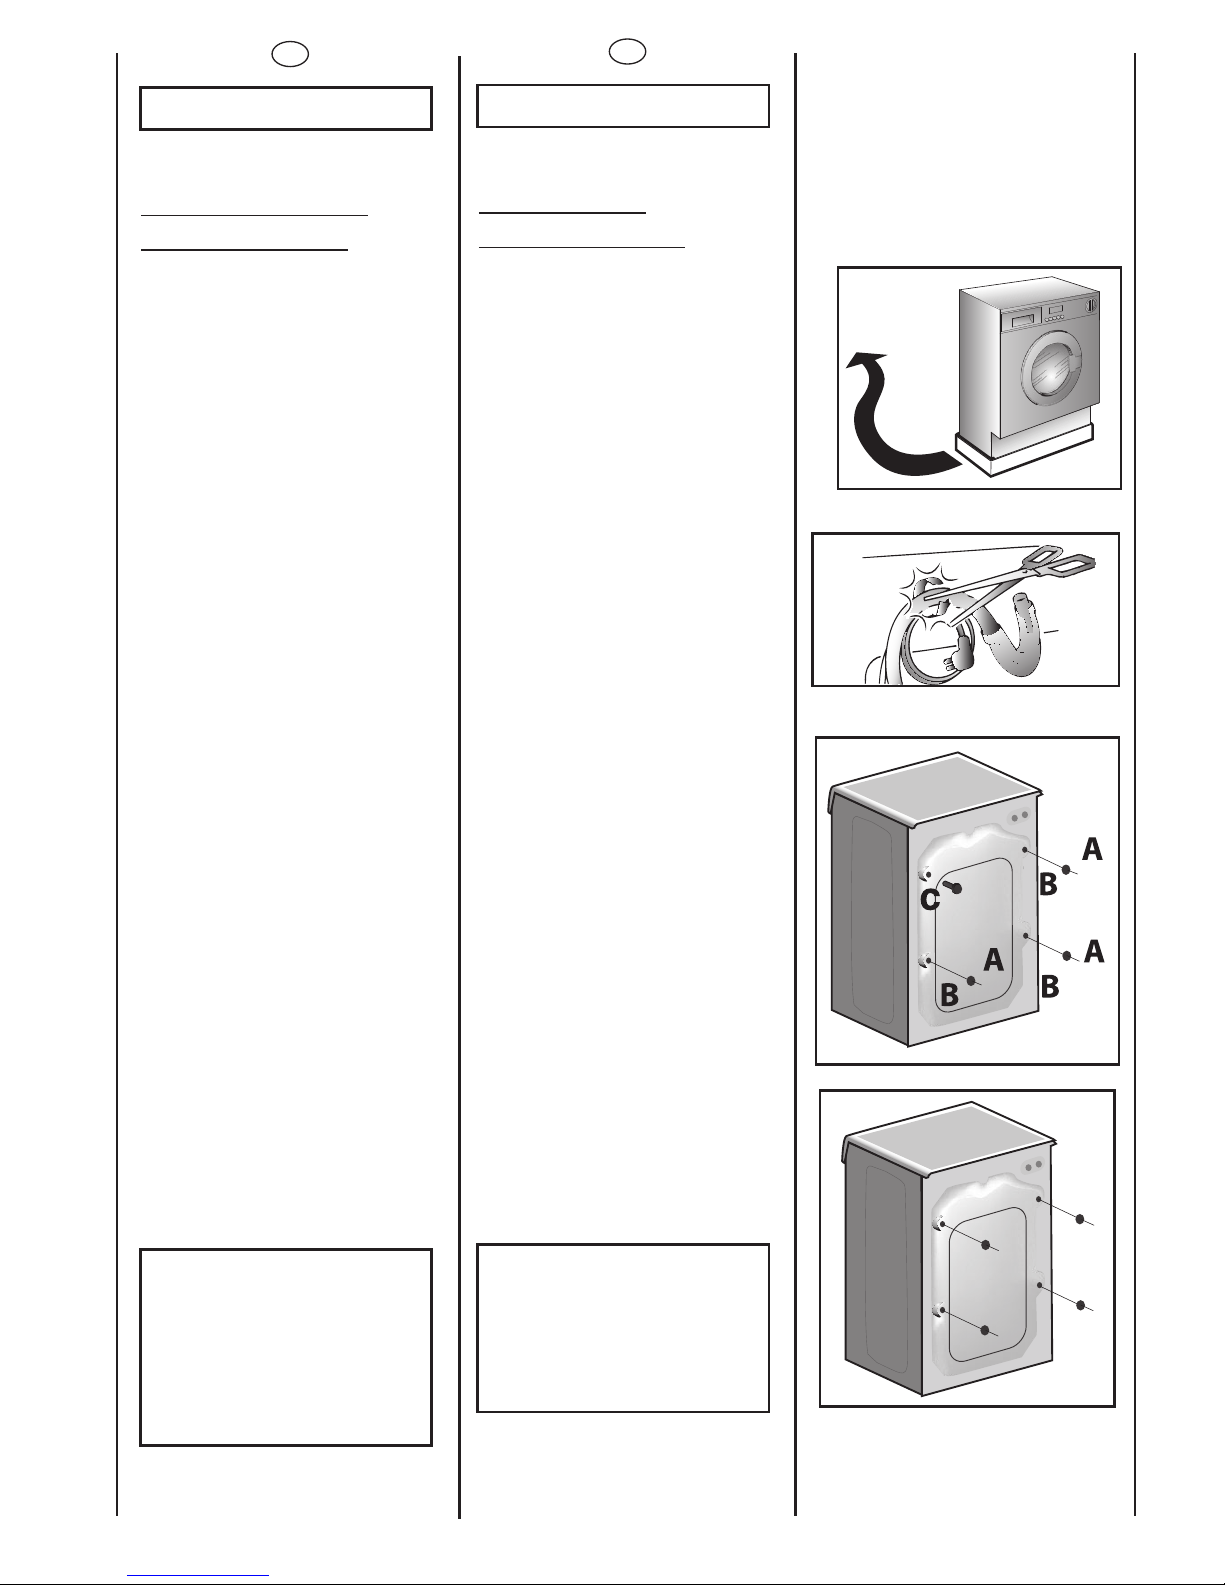
FR
CHAPITRE 5
MISE EN PLACE
INSTALLATION
Placer la machine près du
lieu d’utilisation sans la base
d’emballage.
Couper avec précaution le
cordon qui maintient le
tuyeau d’évacuation et le
cable d’alimentation
Enlever les 3 vis de fixation
indiquées en (A) et enlever
les espaces indiqués en (B)
Dévisser la vis (C).
Un élément en plastique
tombera à l’intérieur de la
machine à laver.
Incliner la machine vers
l’avant et enlever l’élément
plastique ci-dessus.
Couvrir les quatre trous en
utilisant les capuchons
prévus à cet effet dans le
sachet où se trouve la
notice
ATTENTION:
NE PAS LAISSER À LA
PORTÉE DES ENFANTS
DES ELEMENTS
D’EMBALLAGE QUI
PEUVENT CAUSER DES
RISQUES.
EN
CHAPTER 5
SETTING UP
INSTALLATION
Move the machine near its
permanent position without
the packaging base.
Carefully cut the securing
strap that holds the main
cord and the drain hose.
Remove the 3 fixing screws
marked (A) and remove the
3 spacers marked (B)
Remove the screw (C).
A spacer will fall inside the
machine.
By tilting the machine,
remove the above
mentioned spacer.
Cover the 4 holes using the
caps provided in the
instruction booklet pack.
WARNING:
DO NOT LEAVE THE
PACKAGING IN THE
REACH OF CHILDREN
AS IT IS A POTENTIAL
SOURCE OF DANGER.
1
8
CHAPITRE 4
CHAPTER 4
9
min 50 cm
max 85 cm
+2,6 mt max
max 100 cm
min 4 cm
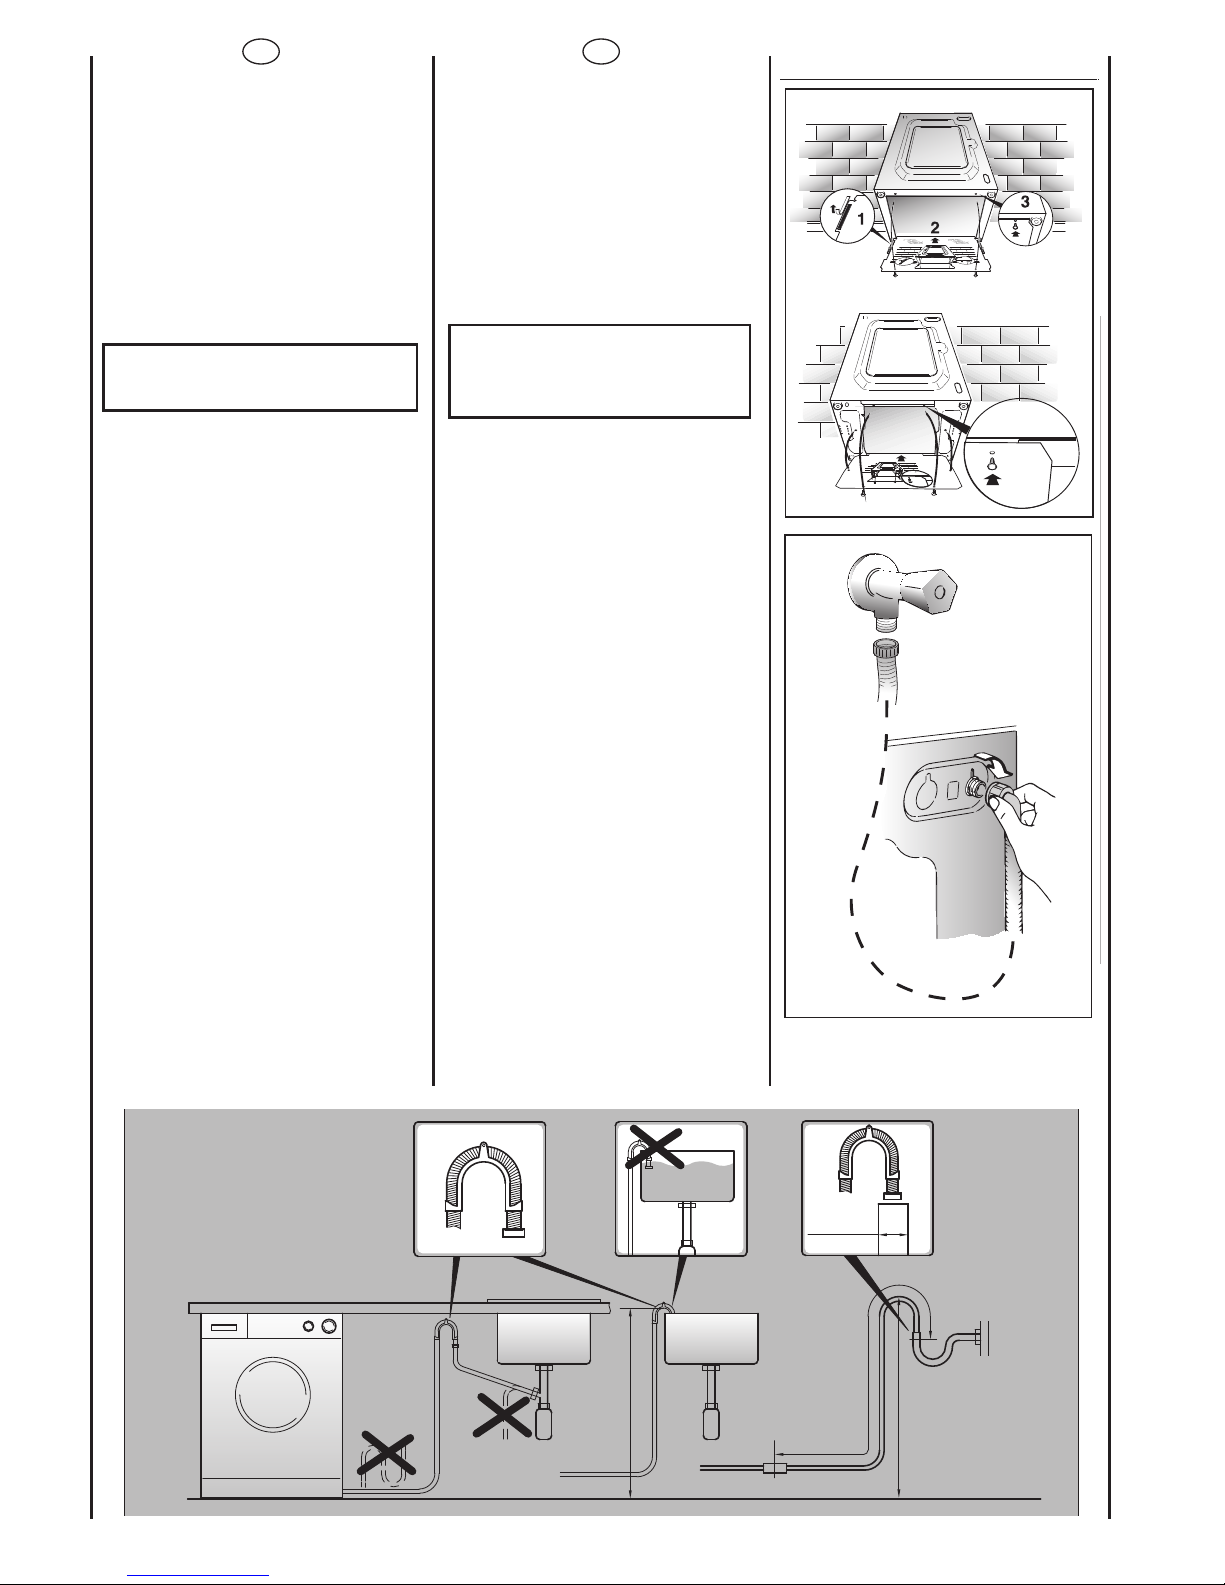
EN
Fix the sheet of corrugated
material on the bottom as
shown in picture.
Connect the fill hose
to the tap.
The appliance must be
connected to the water mains
using new hose-sets.The old
hose-sets should not be reused.
The water-stop device protects
against water damages
caused by leaks on the fill hose
which could develop due to
natural ageing of the hose.
In the water-stop system the
leaking water fills the
corrugated hose and activates
a stop valve which cuts off the
water supply to the machine.
This fault is shown by a red
sector on the window «A».
Would this occur, please refer
to your Service Agent.
IMPORTANT:
DO NOT TURN THE TAP
ON AT THIS TIME.
Position the washing machine
next to the wall.Hook the
outlet tube to the edge of the
bath tub, paying attention that
there are no bends or
contractions along the tube.
It is better to connect the
discharge hose to a fixed
outlet of a diameter greater
than that of the outlet tube
and at a height of min. 50 cm.
If is necessary to use the plastic
sleeve supplied.
The appliance must not be
installed behind a lockable
door, a sliding door or a door
with a hinge on the opposite
side to that of the washer
dryer.
Appliquer la feuille
supplémentaire sur le fond
comme dans la figure.
Raccorder le tuyau d’arrivée
d’eau au robinet.
L'appareil doit être relié à
l'arrivée d'eau exlusivement
avec les tuyaux fournis .
Ne pas réutiliser les anciens
tuyaux.
Le tuyau d’alimentation,doublé
d’une gaine, est équipé d’un
dispositif de blocage de l’eau.
Dans le cas où le tuyau se
détériorerait (usure naturelle ou
surpression), l’eau s’écoulerait
dans la gaine et actionnerait le
dispositif de blocage de l’eau
directement au robinet.
Cet incident serait alors signalé
par un témoin rouge situé dans
la petite fenêtre “A”.
Dans ce cas, fermez le robinet
d’eau et changez le tuyau.
ATTENTION:
NE PAS OUVRIR LE ROBINET
Approcher la machine contre le
mur en faisant attention à ce
que le tuyau n’ait ni coudes ni
étranglements.
Raccorder le tuyau de vidange
au rebord de la baignoire ou,
mieux encore, à un dispositif fixe
d’évacuation,hauteur mini. 50
cm, et de diamètre supérieur au
tuyau de la machine à laver.
En cas de besoin, utiliser le
coude rigide livré avec la
machine.
L’appareil ne doit pas être
installé derrière une porte
fermée à clef,une porte
coulissante ou une porte avec
une fermeture sur le côté
opposé à celui de l’appareil.
FR
Dispositif
antidévissage
(appuyer pour
devisser l’embout)
Safety antitwist
device (press and
twist to remove
the washer)
A
ATTENTION:
NE PAS OUVRIR LE ROBINET
Approcher la machine contre le
mur en faisant attention à ce
que le tuyau n’ait ni coudes ni
étranglements.
Raccorder le tuyau de vidange
au rebord de la baignoire ou,
mieux encore, à un dispositif fixe
d’évacuation,hauteur mini. 50
cm, et de diamètre supérieur au
tuyau de la machine à laver.
En cas de besoin, utiliser le
coude rigide livré avec la
machine.
L’appareil ne doit pas être
installé derrière une porte
fermée à clef,une porte
coulissante ou une porte avec
une fermeture sur le côté
opposé à celui de l’appareil.
IMPORTANT:
DO NOT TURN THE TAP
ON AT THIS TIME.
Position the washing machine
next to the wall.Hook the
outlet tube to the edge of the
bath tub, paying attention that
there are no bends or
contractions along the tube.
It is better to connect the
discharge hose to a fixed
outlet of a diameter greater
than that of the outlet tube
and at a height of min. 50 cm.
If is necessary to use the plastic
sleeve supplied.
The appliance must not be
installed behind a lockable
door, a sliding door or a door
with a hinge on the opposite
side to that of the washer
dryer.
Dispositif
antidévissage
(appuyer pour
devisser l’embout)
Safety antitwist
device (press and
twist to remove
the washer)
A
Type 1
Type 2
min 50 cm
max 85 cm
+2,6 mt max
max 100 cm
min 4 cm

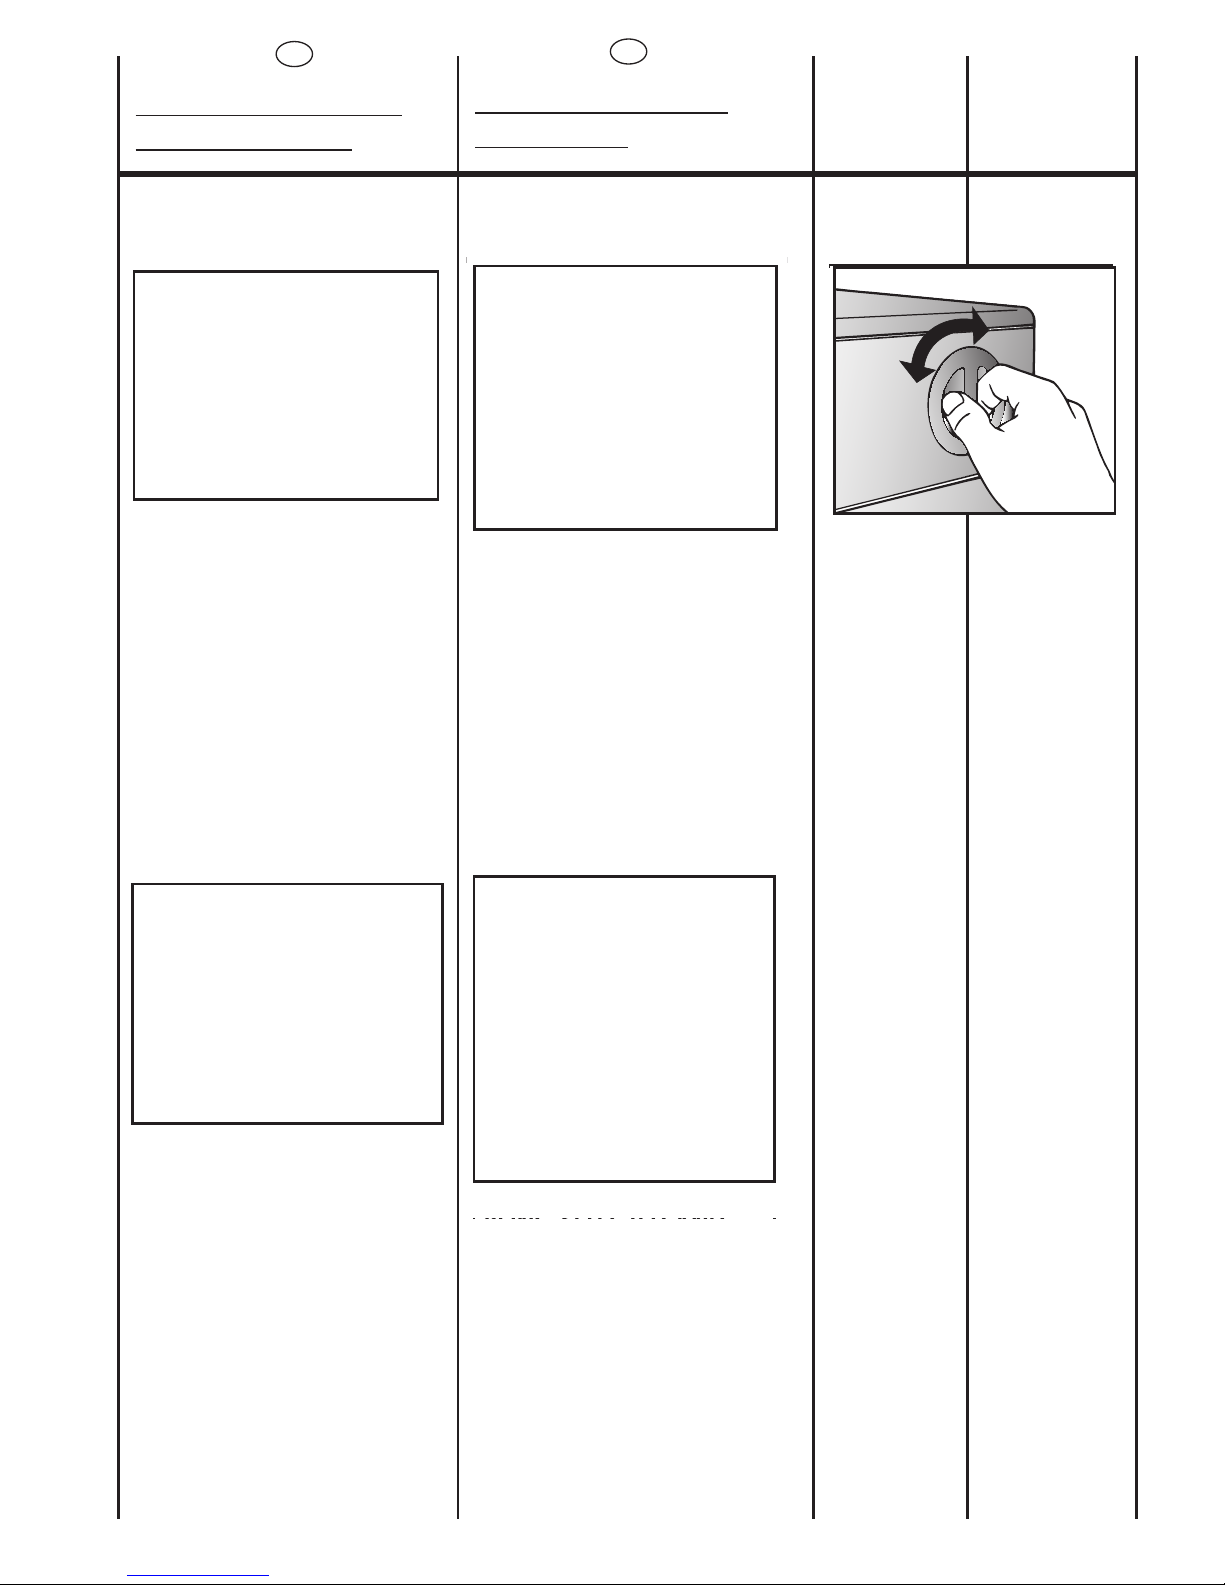
FR
Mettre la machine à niveau
en reglant les 4 pieds:
a) Tourner dans le sens des
aiguilles d’une montre
l’écrou de façon à
dévérouiller la vis du pied.
b) Tourner le pied et le faire
monter ou descendre
jusqu’à obtenir une parfaite
adhérence au sol.
c) Enfin bloquer le pied en
revissant l’écrou dans le sens
inverse des aiguilles d’une
montre et le faire adhérer au
fond de la machine.
Vérifier que la manette soit
sur la position “OFF” et que le
hublot soit fermé.
Brancher la prise.
ATTENTION:
Au cas où il serait nécessaire
de remplacer le cable
d’alimentation, assurez vous
de respecter les codescouleur suivants dans le
branchement de chacun
des fils:
BLEU - NEUTRE (N)
MARRON - PHASE (L)
VERT-JAUNE - TERRE ( )
Une fois l'appareil installé, la
prise électrique doit rester
accessible.
EN
Use the 4 feet to level the
machine with the floor:
a) Turn the nut clockwise to
release the screw adjuster of
the foot.
b) Rotate foot to raise or
lower it until it stands firmly on
the ground.
c) Lock the foot in position
by turning the nut anticlockwise until it comes up
against the bottom of the
machine.
Ensure that the knob is on the
“OFF” position and the load
door is closed
Insert the plug.
ATTENTION:
should it be necessary to
replace the supply cord,
connect the wire in
accordance with the
following colours/codes:
BLUE - NEUTRAL (N)
BROWN - LIVE (L)
YELLOW-GREEN - EARTH ( )
After installation, the
appliance must be
positioned so that the plug is
accessible.
A
B
C
10

CHAPITRE 5
COMMANDES
Manette des programmes de
lavage avec OFF
Touche Selection Temperature
Touche Essorage
Touche Temps de lavage
Témoin de Bouton
Touche "Très Sale"
Touche
Aquaplus
Touche Départ Différé
Touche de sélection du
programme de séchage
Touche début/pause
Temoin de verrouillage de
porte
FR
A
B
C
D
E
F
G
H
I
L
M
N
O
P
EN
CHAPTER 5
CONTROLS
Timer knob for wash
programmes with OFF position
Wash Temperature button
Spin Speed button
“Wash Time” button
Buttons indicator light
Intensive button
Aquaplus button
Start Delay button
Drying programme selection
button
Start button
Door locked indicator light
Poignée d’ouverture du hublot Door handle
Bacs à produits Detergent drawer
Ecran Digital Digital Display
SENS RO
906040 30 20
30’
120’ 90’
60’
A
P
F
D
E
G
H
N
CILM B
O
11
12
FR
DESCRIPTION DES
COMMANDES
TOUCHE D’OUVERTURE PORTE
MANETTE DES PROGRAMMES
DE LAVAGE AVEC OFF
LORSQUE LE SELECTEUR
EST POSITIONNE SUR UN
PROGRAMME, L’ECRAN
MONTRE LES DETAILS DU
CYCLE CHOISI.
N.B. AFIN D’ETEINDRE
COMPLETEMENT LA
MACHINE, PLACER LE
SELECTEUR SUR " OFF "
Appuyez sur la touche
"MARCHE/PAUSE" pour
commencer le cycle.
Le cycle de lavage se
réalisera avec la manette
des programmes arrêtée sur
le programme sélectionné
jusqu'à la fin de celui-ci.
A la fin du lavage, mettez la
machine à l' arrêt en
tournant la manette
programmes sur la position
"OFF"
NOTE: LORS DE LA MISE EN
MARCHE DU CYCLE DE
LAVAGE SUIVANT, LE
SELECTEUR DE
PROGRAMME DOIT ETRE
REMIS EN POSITION OFF
AVANT DE SELECTIONNER
ET DE LANCER LE
PROGRAMME SUIVANT.
A
IT
DESCRIZIONE
COMANDI
TASTO APERTURA OBLÒ
MANOPOLA PROGRAMMI CON
OFF
RUOTANDO LA
MANOPOLA IL DISPLAY SI
ILLUMINA VISUALIZZANDO
I PARAMETRI DEL
PROGRAMMA SCELTO.
N.B. PER SPEGNERE LA
MACCHINA RUOTARE LA
MANOPOLA PROGRAMMI
SULLA POSIZIONE “OFF”.
Premere il tasto "Avvio/Pausa"
per iniziare il ciclo di lavaggio
Il ciclo di lavaggio avverrà con
la manopola programmi
ferma sul programma
selezionato sino alla fine del
lavaggio.
A fine ciclo spegnere la
lavabiancheria portando la
manopola programmi in
posizione "OFF".
NOTA:
LA MANOPOLA
PROGRAMMI DEVE ESSERE
SEMPRE PORTATA IN
POSIZIONE DI OFF ALLA
FINE DI UN LAVAGGIO E
PRIMA DI SELEZIONARNE
UNO NUOVO.
B
MANETTE DES PROGRAMMES
DE LAVAGE AVEC OFF
LORSQUE LE SELECTEUR
EST POSITIONNE SUR UN
PROGRAMME, L’ECRAN
MONTRE LES DETAILS DU
CYCLE CHOISI.
N.B. AFIN D’ETEINDRE
COMPLETEMENT LA
MACHINE, PLACER LE
SELECTEUR SUR " OFF "
Appuyez sur la touche
"MARCHE/PAUSE" pour
commencer le cycle.
Le cycle de lavage se
réalisera avec la manette
des programmes arrêtée sur
le programme sélectionné
jusqu'à la fin de celui-ci.
A la fin du lavage, mettez la
machine à l' arrêt en
tournant la manette
programmes sur la position
"OFF"
NOTE: LORS DE LA MISE EN
MARCHE DU CYCLE DE
LAVAGE SUIVANT, LE
SELECTEUR DE
PROGRAMME DOIT ETRE
REMIS EN POSITION OFF
AVANT DE SELECTIONNER
ET DE LANCER LE
PROGRAMME SUIVANT.
MANOPOLA PROGRAMMI CON
OFF
RUOTANDO LA
MANOPOLA IL DISPLAY SI
ILLUMINA VISUALIZZANDO
I PARAMETRI DEL
PROGRAMMA SCELTO.
N.B. PER SPEGNERE LA
MACCHINA RUOTARE LA
MANOPOLA PROGRAMMI
SULLA POSIZIONE “OFF”.
Premere il tasto "Avvio/Pausa"
per iniziare il ciclo di lavaggio
Il ciclo di lavaggio avverrà con
la manopola programmi
ferma sul programma
selezionato sino alla fine del
lavaggio.
A fine ciclo spegnere la
lavabiancheria portando la
manopola programmi in
posizione "OFF".
NOTA:
LA MANOPOLA
PROGRAMMI DEVE ESSERE
SEMPRE PORTATA IN
POSIZIONE DI OFF ALLA
FINE DI UN LAVAGGIO E
PRIMA DI SELEZIONARNE
UNO NUOVO.
B
DOOR OPEN BUTTON
PROGRAMME SELECTOR WITH
OFF POSITION
WHEN THE PROGRAMME
SELECTOR IS TURNED THE
DISPLAY LIGHTS UP TO
SHOW THE SETTINGS FOR
THE PROGRAMME
SELECTED.
N.B. TO SWITCH THE
MACHINE OFF, TURN THE
PROGRAMME SELECTOR
TO THE “OFF” POSITION.
Press the "Start/Pause"
button to start the selected
cycle.
The programme carries out
with the programme
selector stationary on the
selected programme till
cycle ends.
Switch off the washing
machine by turning the
selector to OFF.
NOTE
:
THE PROGRAMME
SELECTOR MUST BE
RETURN TO THE OFF
POSITION AT THE END OF
EACH CYCLE OR WHEN
STARTING A
SUBSEQUENT WASH
CYCLE PRIOR TO THE
NEXT PROGRAMME
BEING SELECTED AND
STARTED.
DESCRIPTION OF
CONTROL
EN
13
C
TOUCHE “SELECTION
TEMPERATURE”
Après sélection d’un
programme,le voyant
correspondant à la
température correspondante
conseillée s’allume. Il est
possible de diminuer ou
d’augmenter cette
température en appuyant
plusieurs fois sur la touche.A
chaque pression de la
touche, le voyant
correspondant à la
température sélectionnée
s’allume.
TOUCHE "ESSORAGE"
La phase d'essorage est très
importante pour la
préparation à un bon
séchage et votre modèle est
doté d'une grande flexibilité
pour satisfaire chaque
exigence.
En agissant sur cette touche
vous pouvez réduire la vitesse
maximale possible pour le
programme sélectionnée,
jusqu'à une complète
élimination de l'essorage.
Pour réactiver l'essorage, il
suffit de presser la touche de
nouveau,jusqu'à atteindre la
vitesse choisie.
Pour la sauvegarde des tissus,
il n'est pas possible
d'augmenter la vitesse
d'essorage, au-delà de celle
qui est indiquée
automatiquement au
moment de la sélection du
programme.
Il est toujours possible de
modifier la vitesse d'essorage,
sans mettre la machine en
PAUSE.
NOTE:
LA MACHINE EST DOTEE
D’UN DISPOSITIF
ELECTRONIQUE QUI
EMPECHE LE DÉPART DE
L’ESSORAGE SI LES
CHARGES SONT MAL
REPARTIES ET LIMITE LES
VIBRATIONS ET LE BRUIT
DURANT LE LAVAGE.
“WASH TEMPERATURE” BUTTON
When a programme is
selected the relevant
indicator will light up to show
the recommended wash
temperature.
The Temperature button can
be used to decrease or
increase the temperature of
your chosen wash cycle.
Each time the button is
pressed, the new
temperature level is shown on
the Wash Temperature
Indicator.
“SPIN SPEED” BUTTON
The spin cycle is very
important to remove as
much water as possible from
the laundry without
damaging the fabrics.You
can adjust the spin speed of
the machine to suit your
needs.
By pressing this button, it is
possible to reduce the
maximum speed,and if you
wish, the spin cycle can be
cancelled.
To reactivate the spin cycle is
enough to press the button
until you reach the spin
speed you would like to set.
For not damage the fabrics,
it is not possible to increase
the speed over that
automatically suitable during
the selection of the program.
It is possible to modify the
spin speed in any moment,
also without to pause the
machine.
NOTE:
THE MACHINE IS FITTED
WITH A SPECIAL
ELECTRONIC DEVICE,
WHICH PREVENTS THE SPIN
CYCLE SHOULD THE LOAD
BE UNBALANCED.
THIS REDUCES THE NOISE
AND VIBRATION IN THE
MACHINE AND SO
PROLONGS THE LIFE OF
YOUR MACHINE.
EN
FR
D
température sélectionnée
s’allume.
TOUCHE "ESSORAGE"
La phase d'essorage est très
importante pour la
préparation à un bon
séchage et votre modèle est
doté d'une grande flexibilité
pour satisfaire chaque
exigence.
Indicator.
“SPIN SPEED” BUTTON
The spin cycle is very
important to remove as
much water as possible from
the laundry without
damaging the fabrics.You
can adjust the spin speed of
the machine to suit your
D
Après sélection d’un
programme,le voyant
correspondant à la
température cor
respondante
conseillée s’allume. Il est
possible de diminuer ou
d’augmenter cette
température en appuyant
plusieurs fois sur la touche.A
chaque pression de la
touche, le voyant
correspondant à la
température sélectionnée
Si vous souhaitez lancer un
programme de lavage à froid
tous les voyants doivent être
éteints.
s’allume.
TOUCHE “SELECTION
TEMPERATURE”
FR
TOUCHE "ESSORAGE"
La phase d'essorage est très
importante pour la
préparation à un bon
séchage et votre modèle est
doté d'une grande flexibilité
pour satisfaire chaque
exigence.
En agissant sur cette touche
vous pouvez réduire la vitesse
maximale possible pour le
programme sélectionnée,
jusqu'à une complète
élimination de l'essorage.
Pour réactiver l'essorage, il est
suffisant de presser la touche
de nouveau,jusqu'à atteindre
la vitesse choisie.
Pour la sauvegarde des tissus,
il n'est pas possible
d'augmenter la vitesse
d'essorage, au-delà de celle
qui est indiquée
automatiquement au
moment de la sélection du
programme.
Il est toujours possible de
modifier la vitesse d'essorage,
sans mettre la machine en
PAU SE .
NOTE:
LA MACHINE EST DOTEE
D’UN DISPOSITIF
ELECTRONIQUE QUI
EMPECHE LE DÉPART DE
L’ESSORAGE SI LES
CHARGES SONT MAL
REPARTIES ET LIMITE LES
VIBRATIONS ET LE BRUIT
DURANT LE LAVAGE.
“WASH TEMPERATURE” BUTTON
When a programme is
selected the relevant
indicator will light up to show
the recommended wash
temperature.
The Temperature button can
be used to decrease or
increase the temperature of
your chosen wash cycle.
Each time the button is
pressed, the new
temperature level is shown on
the Wash Temperature
Indicator.
If you want carry out a cold
wash all the indicators must
be off.
EN
“SPIN SPEED” BUTTON
The spin cycle is very
important to remove as
much water as possible from
the laundry without
damaging the fabrics.You
can adjust the spin speed of
the machine to suit your
needs.
By pressing this button, it is
possible to reduce the
maximum speed,and if you
wish, the spin cycle can be
cancelled.
To reactivate the spin cycle is
enough to press the button
until you reach the spin
speed you would like to set.
For not damage the fabrics,
it is not possible to increase
the speed over that
automatically suitable during
the selection of the program.
It is possible to modify the
spin speed in any moment,
also without to pause the
machine.
NOTE:
THE MACHINE IS FITTED
WITH A SPECIAL
ELECTRONIC DEVICE,
WHICH PREVENTS THE SPIN
CYCLE SHOULD THE LOAD
BE UNBALANCED.
THIS REDUCES THE NOISE
AND VIBRATION IN THE
MACHINE AND SO
PROLONGS THE LIFE OF
YOUR MACHINE.
E
EN
“WASH TIME” BUTTON
By selecting this button
(active only on COTTON and
MIXED FIBRES programmes)
there is a choice of 3 levels
of wash intensity, depending
on how much the fabrics
are soiled.
Once the programme has
been selected the indicator
light will automatically show
the wash time set for that
programme.Selecting a
different wash time the
relevant indicator will light
up. For example: Using this
button on the Rapid Wash
cycle will enable you to
select either a 14, 30 or 44
minute wash cycle.
BUTTONS INDICATOR LIGHT
These light up when the
relevant buttons are
pressed.
If an option is selected that
is not compatible with the
selected programme then
the light on the button first
flashes and then goes off.
FR
TOUCHE “TEMPS DE LAVAGE”
L’activation de ce bouton
(uniquement sur les
programmes COTON et
MIXTES) permet le choix de 3
niveaux d’intensité de
lavage selon le degré de
salissure du linge.
Lorsque le programme est
selectionné, l’écran
indiquera automatiquement
à l’aide d’un voyant, le
temps de lavage le plus
adapté.
En choisissant un temps de
lavage différent, le voyant
indiquera le temps
correspondant.
En utilisant cette touche
après avoir sélectionné le
programme Rapide, il est
possible de choisir parmi 3
programmes de 14mn,30mn
et 44mn.
TEMOIN DE BOUTON
Ces témoins s’allument
lorsque qu’une option est
choisie
Si une option est
incompatible avec le
programme,le témoin de
l’option clignotera puis
s’éteindra.
F
14
G
FR
Les options doivent être
sélectionnées AVANT d’appuyer
sur la touche “MARCHE”.
TOUCHE “REPASSAGE FACILE”
Si vous utilisez cette touche
(Non disponible sur les
programmes COTON),il vous
sera possible de réduire la
formations des plis, selon le
programme choisi et la
nature du tissu lavé.
Tissu mixte et synthetique:
- le refroidissement de l’eau
sera fait graduellement pour
éviter les chocs thermiques;
- la vidange sera faite sans
aucune action mécanique
du tambour;
- une phase d’essorage
doux, pour assurer la
distension maximale des
fibres.
Tissu délicat:
- Votre lave-linge effectuera
les actions ci dessus
mentionnées, ensuite un
"arrêt cuve pleine" après le
dernier rinçage.
Laine et soie:
- Votre lave linge effectuera
un "arrêt cuve pleine".
Le indicateur d’option
clignote et le linge reste dans
l’eau du tambour.
Pour terminer le cycle des
tissus délicats, de la laine et
soie, les opérations à
accomplir sont les suivantes:
1. Relâcher la touche de
repassage facile pour
terminer le cycle.
2. Sinon, vous pouvez
effectuer une simple vidange
- Tourner le sélecteur de
programme à la position
“OFF”;
- Sélectionner le programme
“Uniquement vidange” ;
- Allumer de nouveau la
lave-linge en appuyant sur
la touche “MARCHE/PAUSE”.
IT
I tasti opzione devono essere
selezionati prima di premere il
tasto AVVIO.
TASTO STIRO FACILE
Attivando questa funzione
(non disponibile per i
programmi cotone) è
possibile ridurre al minimo la
formazione di pieghe
personalizzando ulteriormente
il ciclo di lavaggio in base al
programma scelto ed al tipo
di biancheria da lavare.
In modo particolare per i
tessuti misti e sintetici l’azione
combinata di una fase di
raffreddamento graduale
dell’acqua, l’assenza di
rotazione del cesto durante
gli scarichi dell’acqua ed una
centrifuga delicata a bassa
velocità assicura la massima
distensione dei capi.
Per i tessuti delicati vengono
svolte le fasi già descritte
sopra per i tessuti misti ad
eccezione del
raffreddamento graduale
dell’acqua ma con
l’aggiunta di una fase di
fermo acqua in vasca con
stop dopo l’ultimo risciacquo.
Nel programma lana e seta
questo tasto ha la sola
funzione di lasciare i capi
immersi nell’acqua alla fine
dell’ultimo risciacquo al fine di
distendere perfettamente le
fibre.
Durante la fase di fermo
acqua in vasca la spia del
tasto lampeggia ad indicare
che la macchina è in pausa.
Per terminare il ciclo dei
tessuti delicati, della lana e
seta, le operazioni possono
essere:
- rilasciare il tasto per
terminare il ciclo.
Nel caso in cui si voglia
effettuare solo lo scarico:
- portare la manopola
programmi prima in posizione
di “OFF”;
- selezionare il programma
solo scarico ;
- riavviare la macchina
premendo nuovamente il
p
ulsante “AVVIO/PAU SA”.
TOUCHE "TRÈS SALE"
En pressant cette touche,
les capteurs du nouveau
“Sensor” System agissent sur
la température sélectionnée
pour la maintenir constante
durant toutes les phases du
cycle de lavage et sur la
rotation du tambour.
En effet, le tambour tourne à
deux vitesses différentes dans
les moments déterminants.
Quand la lessive pénètre
dans le linge, le tambour
tourne de manière à ce
qu’elle se répande de façon
homogène ; la vitesse
augmente au moment du
lavage et du rinçage pour
que l’action mécanique soit
maximale.Grâce à cette
option, l’efficacité de lavage
des taches réputées difficiles
est très largement améliorée
SANS AUGMENTER LA DUREE
DU PROGRAMME.
TASTO LAVAGGIO INTENSIVO
Premendo questo tasto,
entrano in funzione dei sensori
che agiscono sia sulla
temperatura selezionata,
mantenendola costante
durante tutte le fasi del ciclo
di lavaggio,sia sull’ azione
meccanica del cesto.
Il cesto viene fatto girare a
due diverse velocità nei
momenti cruciali. Quando il
detersivo entra nei capi il
cesto ruota in modo che non
si formino disomogeneità
nella distribuzione dello stesso,
la velocità aumenta, invece,
al momento del lavaggio e
del risciacquo in modo che
l’azione pulente sia massima.
Grazie a questo speciale
sistema si migliora l’efficacia
del lavaggio SENZA
AUMENTARE LA DURATA DEL
PROGRAMMA.
CREASE GUARD BUTTON
The Crease Guard function
(Not available on COTTON
programmes) minimizes
creases as much as possible
with a uniquely designed
anti-crease system that is
tailored to specific fabrics.
MIXED FABRICS - the water is
gradually cooled
throughout the final two
rinses with no spinning and
then a delicate spin assures
the maximum relaxation of
the fabrics.
DELICATE FABRICS – final two
rinses with no spinning and
then the fabrics are left in
water until it is time to
unload.When you are ready
to unload, press the "Crease
Guard" button – this will
drain.
WOLLENS/SILK – after the
INTENSIVE BUTTON
By pressing this button, a
sensors system come into
operation.They affect both
the selected temperature,
keeping it at a constant level
throughout the wash cycle,
and the mechanical function
of the drum.
The drum is made to turn at
two different speeds at
crucial moments. When the
detergent enters the
garments, the drum rotates in
such a way that the
detergent is distributed in a
uniform manner; during the
wash and rinse procedures,
however, the speed increases
in order to maximise the
cleaning action.Thanks to
this special system, the
efficiency of the wash
procedure is improved
WITHOUT ANY INCREASE IN
THE LENGTH OF THE
PROGRAM.
EN
The option buttons should be
selected before pressing the
START button
15

H
EN
“AQUAPLUS” BUTTON
By pressing this button you
can activate a special new
wash cycle in the Colourfast
and Mixed Fabrics
programs, thanks to the new
Sensor System.This option
treats with care the fibres of
garments and the delicate
skin of those who wear
them.
The load is washed in a
much larger quantity of
water and this, together with
the new combined action
of the drum rotation cycles,
where water is filled and
emptied, will give you
garments which have been
cleaned and rinsed to
perfection.The amount of
water in the wash is
increased so that the
detergent dissolves
perfectly, ensuring an
efficient cleaning action. The
amount of water is also
increased during the rinse
procedure so as to remove
all traces of detergent from
the fibres.
This function has been
specifically designed for
people with delicate and
sensitive skin, for whom even
a very small amount of
detergent can cause
irritation or allergy.
You are advised to also use
this function for children’s
clothing and for delicate
fabrics in general, or when
washing garments made of
towelling,where the fibres
tend to absorb a greater
quantity of detergent.
To ensure the best
performance for your wash,
this function is always
activated on the Delicates
and Woollens/Handwash
programs.
FR
TOUCHE "AQUAPLUS"
Grâce au nouveau Sensor
System, il est possible, en
activant la touche Aquaplus,
d’effectuer un cycle de
lavage spécifique pour les
tissus résistants et mixtes.Le
lavage ainsi effectué permet
d’éliminer tout résidu lessiviel
et donc de prendre soin des
peaux délicates qui seront
en contact avec ces fibres.
L’ajout d’une plus grande
quantité d’eau au lavage
ainsi que l’action renforcée
de 5 rinçages avec
essorages intermédiaires
permettent d’obtenir un
linge propre parfaitement
rincé. Afin d’obtenir un
résultat optimal de lavage,la
quantité d’eau est accrue
pendant cette phase du
cycle garantissant une
parfaite dilution de la lessive.
La quantité d’eau est
également accrue au
moment du rinçage de
manière à éliminer toute
trace de lessive des fibres.
Cette fonction a été
spécialement étudiée pour
les PEAUX DELICATES ET
SENSIBLES pour lesquelles
même un minimum de résidu
de lessive peut causer
irritations ou allergies.
Il est aussi conseillé d’utiliser
cette fonction pour le LINGE
DES ENFANTS, pour le LINGE
DELICAT en général ainsi que
pour le lavage des TISSUS
EPONGE dont les fibres
tendent à retenir la lessive.
Pour assurer une meilleure
prestation de lavage,cette
fonction est toujours active
pendant les programmes
Délicat et Laine/lavage a la
main.
16

17
TOUCHE “DEPART DIFFERE”
Cette option permet de
programmer le départ du
cycle de lavage jusqu’à 24
heures.
Afin d’utiliser cette fonction,
suivez la procédure cidessous :
Choisissez le programme
Pressez le bouton départ
différé pour l’activer (h00
apparaît sur l’écran) puis
pressez le à nouveau pour
choisir un départ différé
d’1 heure (h01 apparaît sur
l’écran) ; à chaque pression
le départ différé augmentera
d’1 heure jusqu’à ce que 24h
apparaisse sur l’écran, une
pression supplémentaire
réinitialisera le départ différé.
Confirmez en appuyant sur
"DEBUT/PAUSE" (la lumière sur
l’écran clignotera).Le
compte à rebours
commencera et à son terme
le programme débutera
automatiquement.
Il est possible d’annuler le
départ différé selon la
procédure suivante :
Maintenez le bouton appuyé
durant 5 secondes jusqu’à ce
que l’écran montre les
réglages du programme
choisi.
A cette étape il est possible
soit de lancer le programme
en appuyant sur
"DEBUT/PAUSE" soit d’annuler
le départ différé en
positionnant le
programmateur sur OFF puis
en sélectionnant un autre
programme.
“DELAY START” BUTTON
This button allows you to preprogramme the wash cycle
to delay the start of the cycle
for up to 24 hours.
To delay the start use the
following procedure:
Set the required programme.
Press the button once to
activate it (h00 appears on
the display) and then press it
again to set a 1 hour delay
(h01 appears on the display);
the pre-set delay increases
by 1 hour each time the
button is pressed, until h24
appears on the display, at
which point pressing the
button again will reset the
delay start to zero.
Confirm by pressing the
“START/PAUSE” button (the
light on the display starts to
flash). The countdown will
begin and when it has
finished the programme will
start automatically.
It is possible to cancel the
delay start by taking the
following action:
Press and hold the button for
5 seconds until the display will
show the settings for the
programme selected.
At this stage it is possible to
start the programme
previously selected by
pressing the “START/PAUSE”
button or to cancel the
process by setting the
selector to the OFF position
and then selecting another
programme.
EN
FR
I
 Loading...