

Brandt BCR115PB Instruction Manual
EN PROJECTION ALARM CLOCK RADIO
FR RADIO RÉVEIL PROJECTEUR
NL RADIOWEKKER MET PROJECTOR
ES RADIO DESPERTADOR CON PROYECTOR
CZ PROJEKČNÍ RADIOBUDÍK
SK RÁDIOBUDÍK S PROJEKCIOU ČASU
BCR115PB
INSTRUCTION MANUAL
NOTICE D’UTILISATION
GEBRUIKSAANWIJZING
MANUAL DE INSTRUCCIONES
NÁVOD K OBSLUZE
NÁVOD NA OBSLUHU

WARNINGS
This appliance is intended for domestic household use only and should not be used
for any other purpose or in any other application, such as for non-domestic use or in
a commercial environment.
Prior to cleaning or other maintenance, the appliance must be disconnected from the
supply mains.
The ventilation should not be impeded by covering the ventilation openings with
items, such as newspapers, table-cloths, curtains, etc.
No naked flame sources, such as lighted candles, should be placed on the apparatus.
The apparatus shall not be exposed to dripping or splashing and that no objects filled
with liquids, such as vases, shall be placed on the apparatus.
Ventilation
Allow at least a 10 cm gap all around the product.
This apparatus is not suitable for use in a tropical climate.
Batteries (battery pack or batteries installed) shall not be exposed to excessive heat
such as sunshine, fire or the like.
To protect the environment, use local recycling facilities for battery disposal.
Where the MAINS plug or an appliance coupler is used as the disconnect device, the
disconnect device shall remain readily operable.

EN-1
IMPORTANT SAFETY INSTRUCTIONS
Symbols
This equipment is double
insulated and an earth
connection is not required.
compatibility standards.
Battery handling and usage
Only adults should handle battery. Do not allow a child to use this apparatus unless
the battery cover is securely attached to the unit.
The battery type used in the unit is 2 size AAA batteries which are accessible and can
be replaced.
This mark is applied to show the
equipment conforms to European
safety and electro-magnetic
Remove the battery cover located at the bottom of the unit to remove the batteries.
EN-2
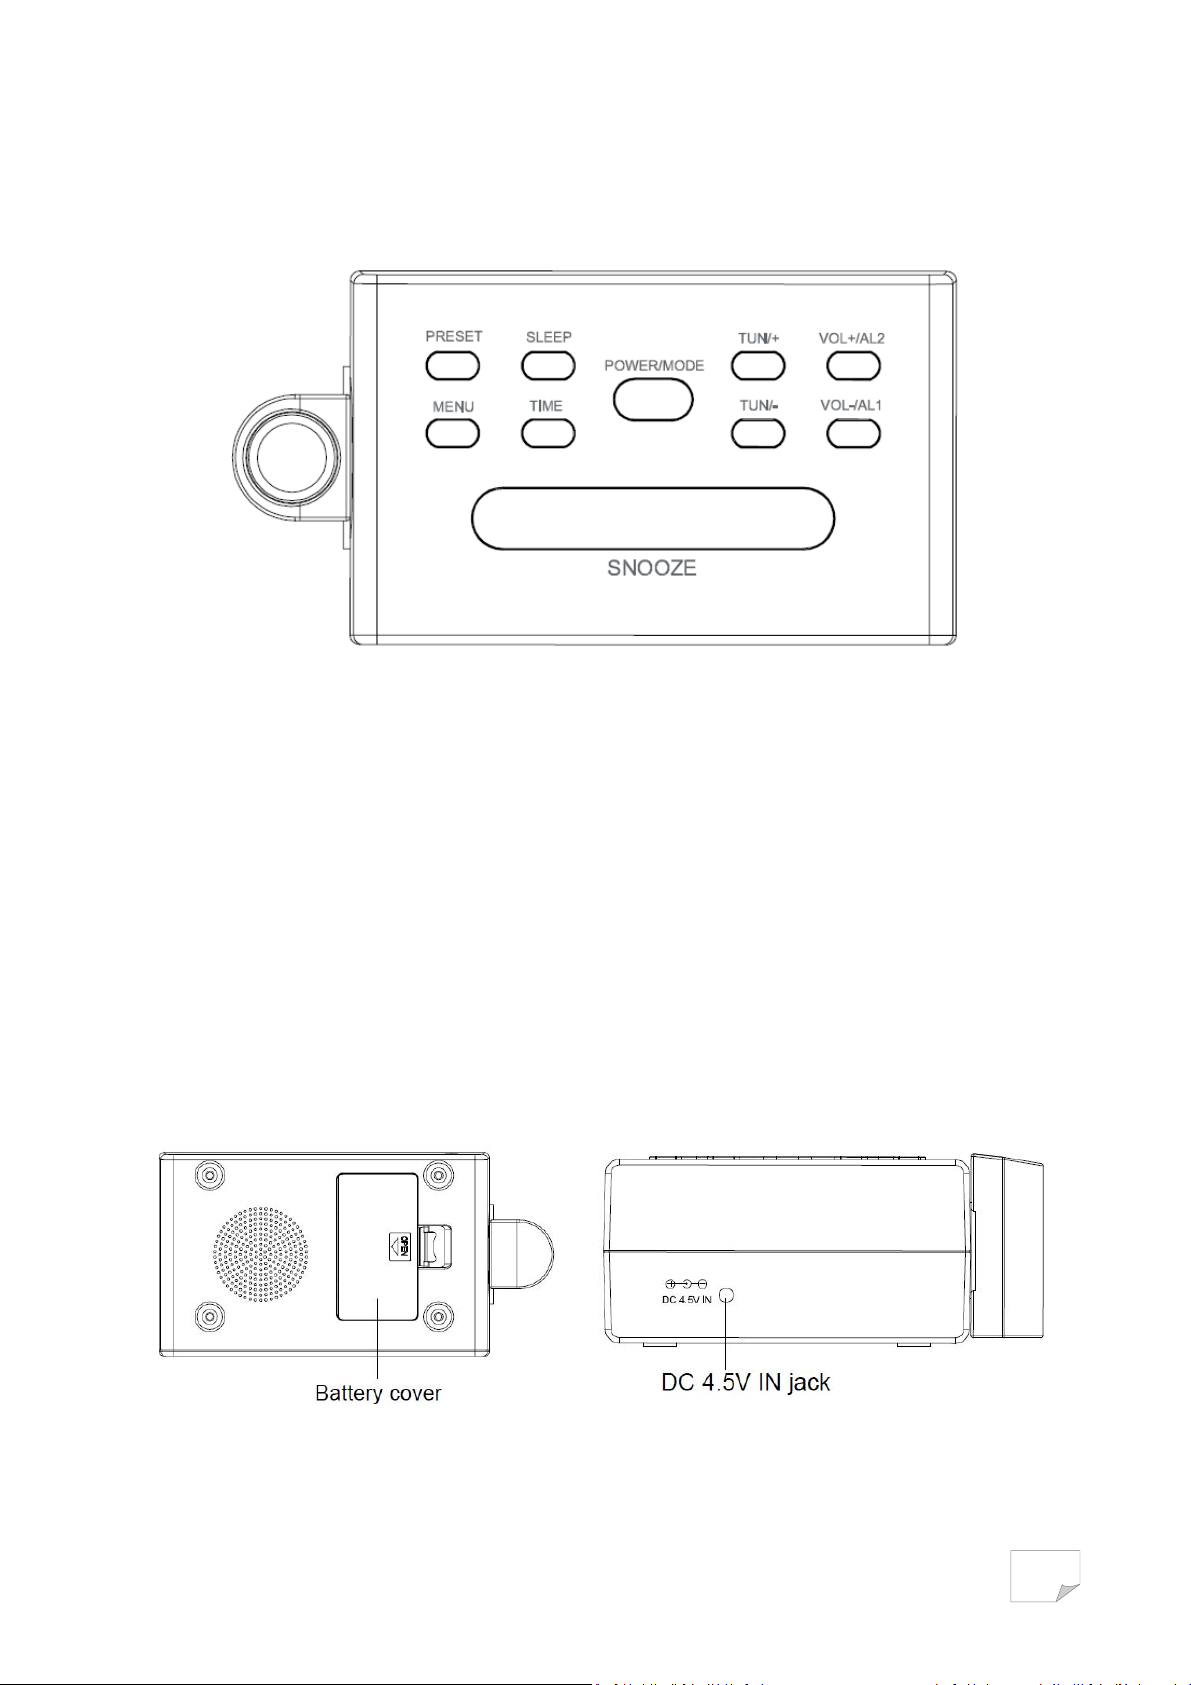
CONTROLS
Top View
Buttons:
POWRE/MODE Turn the unit on or make the unit enter the standby state /
TUN/+ Tune-+/ time setting
TUN/- Tune-/time setting
VOL-/AL1 Volume -/alarm 1 setting
VOL+/AL2 Volume +/alarm 2 setting
PRESET Listen to preset radio stations
SNOOZE Temporarily turn off alarm
SLEEP Sleep timer setting
MENU Preset radio stations
TIME Clock setting
Bottom View
Switch the unit to radio FM/AM mode
Rear View
EN-3
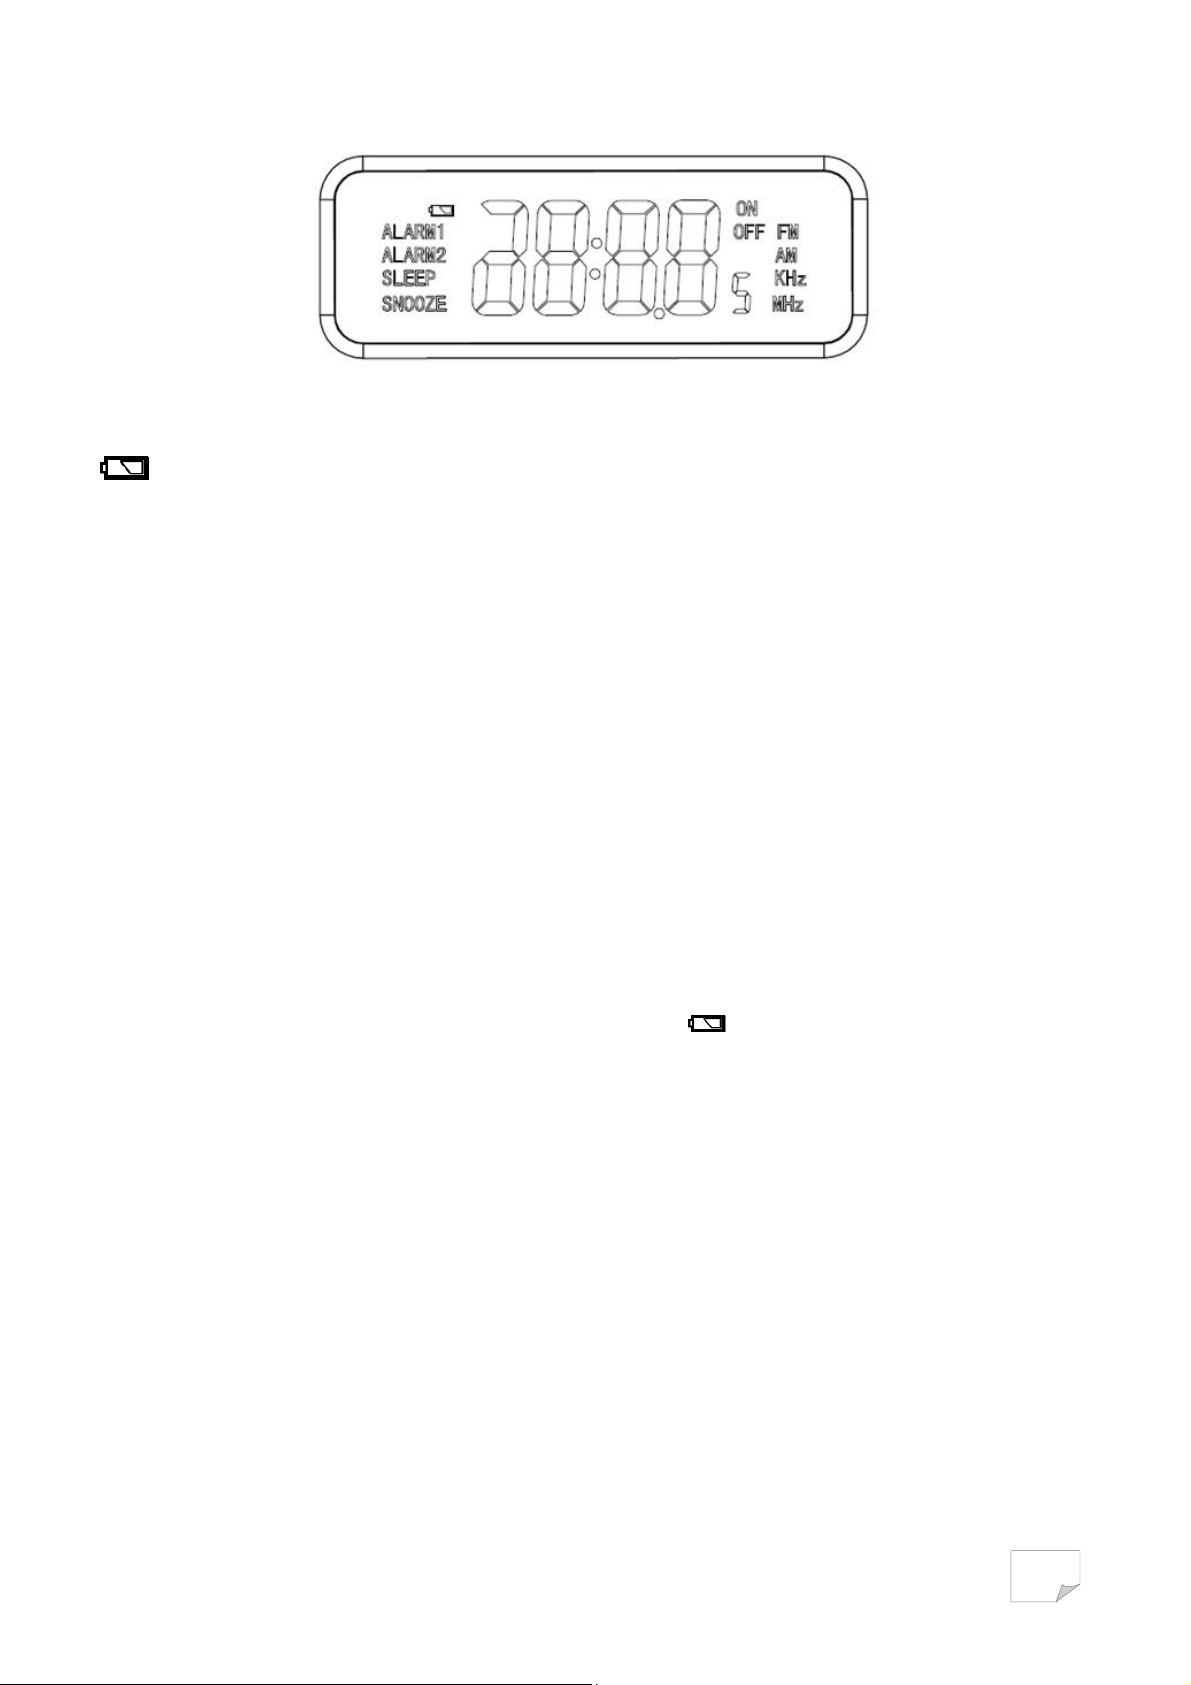
DISPLAY
Indicator light
No battery backup SNOOZE Turn off the alarm temporarily
ALARM1 Alarm 1 activated ON, OFF Power on or standby
ALARM 2 Alarm 2 activated FM, AM Radio frequency
SLEEP Sleep timer KHz, MHz Radio frequency units
BATTERY BACKUP
The clock and alarm settings can be protected against AC power failure with the batteries for a short
period of time. If no backup batteries are installed or the power failure is prolonged, you will need to set
the clock again.
STANDBY STATE
Place the unit on a flat stable surface and plug the power adapter into the mains socket.
The “OFF” indicator light will illuminate, indicating the unit is in standby state. “0:00” will flash on
the display.
If no batteries are installed in the unit, the battery icon will flash on the display.
SETTING THE CLOCK
1. In standby state, press and hold TIME until only the hour digits flashes.
2. Repeatedly press TUN/+ or TUN/- to set the hours.
3. Press TIME to confirm. The minute digits will flash.
4. Repeatedly press TUN/+ or TUN/- to set the minutes.
5. Press TIME to confirm.
The hour and minute digits will stop flashing.
POWER ON/RADIO MODE
Press POWER/MODE to switch the unit on and enters the raido mode.
The radio frequency will briefly appear on the display and then return to clock time.
The “ON” indicator light will illuminate.

EN-4
RADIO OPERATION
1. Press POWER/MODE to turn on the radio.
The default FM radio frequency is 87.5 MHz.
2. Repeatedly press POWER/MODE to select the radio frequency AM or FM.
The corresponding indicator lights (“AM” and “KHz” or “FM” and “MHz”) will illuminate.
3. Adjust the volume by repeatedly pressing VOL-/AL1 or VOL+/AL2.
4. Repeatedly press TUN/+ or TUN/- to tune into the desired station.
Press and hold TUN/+ or TUN/- for auto forward or backward radio station searching.
NOTE:
For the best FM reception, extend the FM aerial to its full length.
For the best AM reception, rotate the unit slowly and horizontally.
PRESETTING YOUR FAVOURITE RADIO STATION
Up to 20 FM and 20 AM radio stations can be preset.
1. Follow steps in "RADIO OPERATION" and tune in to the station that you wish to preset.
2. Press MENU, “P01” will flash on the display.
3. Repeatedly press TUN/+ or TUN/- to select the desired memory slot.
4. Press MENU again to store the station.
5. Repeat steps above to store desired stations.
To listen to preset radio stations, repeatedly press PRESET to select the desired radio station.
DUAL ALARMS OPERATION
Before setting the alarm time, make sure the Clock has been set.
Setting Alarm 1 or Alarm 2
1. In standby state, press and hold VOL-/AL1 or VOL+/AL2 for 2 seconds.
“bU” will flash.
2. Repeatedly press TUN/+ or TUN/- while “bU” is flashing to select the wake-up mode (Buzzer, AM or
FM radio).
3. Press VOL-/AL1 or VOL+/AL2 to confirm.
The hour digits will flash.
4. While the hour digits are flashing, set the hours by repeatedly pressing TUN/+ or TUN/-.
5. Press VOL-/AL1 or VOL+/AL2 to confirm.
The minute digits will flash.
6. While the minute digits are flashing, set the minutes by repeatedly pressing TUN/+ or TUN/-.
7. Press VOL-/AL1 or VOL+/AL2 to confirm.

EN-5
Checking alarm time
Press VOL-/AL1 or VOL+/AL2, the alarm time will briefly appear on the display.
To cancel the alarm, press VOL-/AL1 or VOL+/AL2 until the alarm indicator light goes out on the display.
Snooze function
This function can be used to stop the alarm temporarily for about 9 minutes once the alarm is activated.
When the snooze button is pressed, the buzzer alarm sounds will stop and sound again after about 9
minutes.
The alarm and “SNOOZE” indicator lights will flash.
SLEEP TIMER
The sleep function is designed to automatically turn off the Radio.
In the Radio mode, repeatedly press SLEEP select the desired sleep time from 120, 90, 60, 45, 30 or 15
minutes.
The radio will be turned off after the set sleep time has elapsed.
To check remaining sleep time, press SLEEP.
To turn off the radio before the sleep time has elapsed, press and hold POWER/MODE until the “OFF”
indicator light illuminate on the display.
TIME PROJECTOR
Press any button to light up projection lamp, after 30 seconds it will automatically turn off.
SPECIFICATIONS
FM: 87.5 MHz – 108 MHz
AM: 522 KHz – 1620 KHz
Input: DC 4.5V 500mA
Backup batteries: DC 3V 2x AAA
Power consumption: 2.25 W
We apologise for any inconvenience caused by minor inconsistencies in these instructions, which may
occur as a result of product improvement and development.
Kesa Electricals © UK: EC1N 6TE 27/08/2013

AVERTISSEMENTS
Cet appareil est destiné à un usage domestique uniquement. Toute utilisation autre
que celle prévue pour cet appareil, ou pour une autre application que celle prévue,
par exemple une application commerciale, est interdite.
Qu’avant le nettoyage ou autre entretien, l’appareil doit être déconnecté de
l’alimentation.
Il convient que l’aération ne soit pas gênee par l’obstruction des ouvertures
d’aération par des objets tels que journaux, nappes, rideaux, etc.
Il convient de ne pas placer sur l’appareil de sources de flammes nues, telles que des
bougies allumées.
L’appareil ne doit pas être exposé á des égouttements d'eau ou des éclaboussures et
de plus qu'aucun objet rempli de liquide tel que des vases ne doit être placé sur l’
appareil.
Aération
Prévoyez un espace libre d'au moins 10 cm tout autour du produit.
Cette appareil n'est destiné pas a être utilise sous un climat tropical.
Les piles et les batteries ne doivent pas être exposées à une chaleur excessive, par
exemple celle de la lumière du soleil, d’un feu, etc.
Déposez vos piles usagées auprès d'installation de recyclage pour protéger notre
environnement.
Lorsque la prise du réseau d'alimentation ou une prise placée sur l’appareil est utilise
comme dispositif de déconnexion, ce dispositif doit demeure aisément accessible.

FR-1
CONSIGNES DE SÉCURITÉ IMPORTANTES
Symboles
Cet appareil est équipé
d’une double isolation, il
n’est donc pas nécessaire
de le connecter à la terre.
Manipulation et utilisation de la batterie
Les piles ne doivent être manipulées que par les adultes. Ne laissez jamais les enfants
utiliser cet appareil sauf si le couvercle du logement des piles est solidement fermé.
Cet appareil fonctionne avec 2 piles AAA. Ces piles sont accessibles et peuvent être
changées.
Ce symbole indique que l'appareil
est conforme aux normes
européennes de sécurité et de
compatibilité électromagnétique.
Ouvrez le couvercle du logement des piles sous l’appareil pour pouvoir sortir les piles.
FR-2
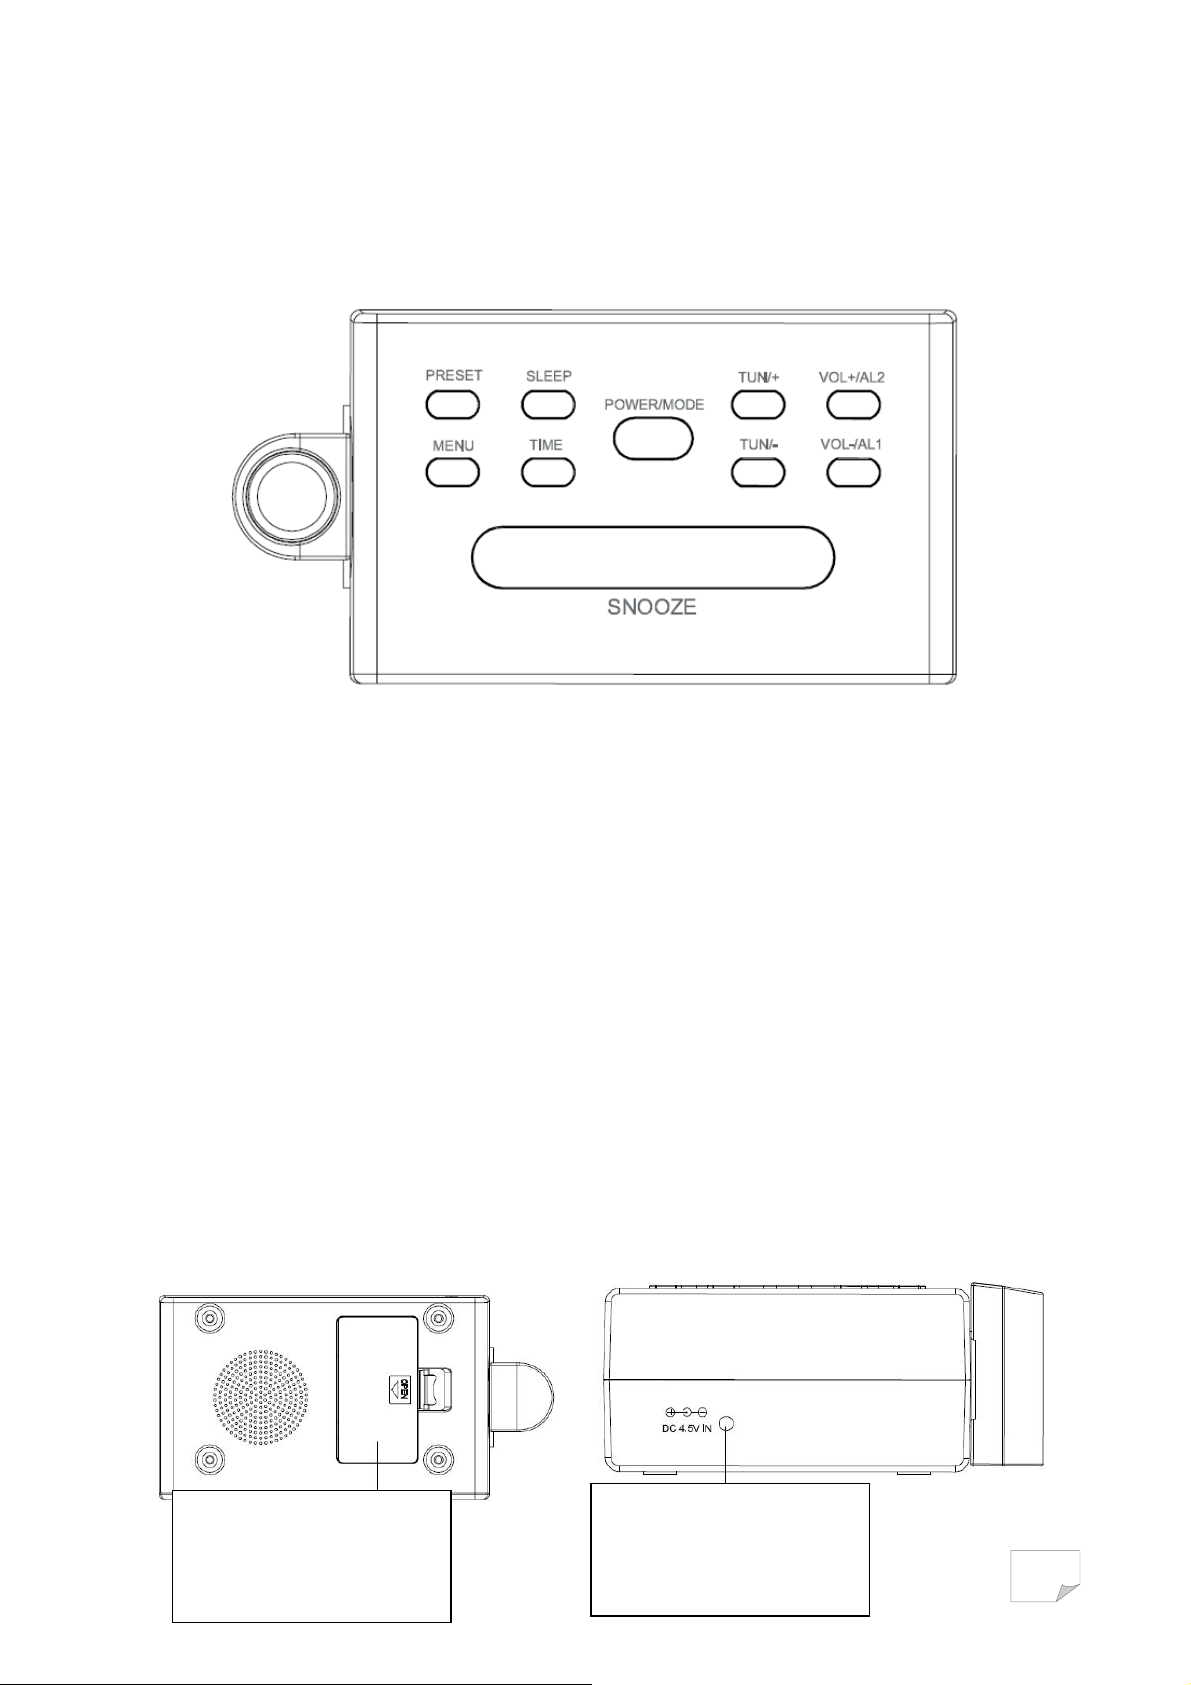
COMMANDES
Vue de dessus
Touches :
POWER/MODE Allumer l’appareil ou le mettre en veille /
TUN/+ Fréquence + / Régler l’heure
TUN/- Fréquence - / Régler l’heure
VOL-/AL1 Volume - / Régler l’alarme 1
VOL+/AL2 Volume + / Régler l’alarme 2
PRESET Écouter les stations de radio préréglées
SNOOZE Éteindre temporairement l’alarme
SLEEP Régler la minuterie d’arrêt automatique
MENU Prérégler des stations de radio
TIME Régler l’horloge
Vue de dessous
Allumer l’appareil dans le mode radio FM/AM
Vue arrière
Couvercle du logement
des piles
Prise d’alimentation CC
4,5 V

FR-3
AFFICHAGE
Indicateurs lumineux
Pas de piles de
sauvegarde
ALARM1 Alarme 1 activée
ALARM2 Alarme 2 activée
SLEEP Minuterie d’arrêt
SNOOZE Désactiver temporairement
l’alarme
ON/OFF Allumé ou En Veille
FM/AM Fréquences radio
KHz/MHz Unités de fréquence radio
automatique
PILES DE SAUVEGARDE
En cas de coupure de courant, les piles de sauvegarde permettent de conserver en mémoire pendant
une période courte les réglages de l’horloge et des alarmes. S’il n’y a pas de piles de sauvegarde dans
l’appareil ou s'il y a une coupure de courant prolongée, il faudra à nouveau régler l'horloge.
MODE VEILLE
Posez l’appareil sur une surface plane et stable, puis branchez son adaptateur secteur dans une prise
secteur.
L’indicateur « OFF » s’allume pour indiquer que l’appareil est en veille. « 0:00 » se met à clignoter.
S’il n’y a pas de piles dans l’appareil, l’icône pile clignote.
RÉGLER L'HORLOGE
1. Dans le mode veille, appuyez sur TIME jusqu’à ce que les chiffres des heures se mettent à clignoter.
2. Appuyez plusieurs fois sur TUN/+ ou TUN/- pour régler les chiffres des heures.
3. Appuyez sur TIME pour confirmer. Les chiffres des minutes se mettent à clignoter.
4. Appuyez plusieurs fois sur TUN/+ ou TUN/- pour régler les chiffres des minutes.
5. Appuyez sur TIME pour confirmer.

FR-4
Les chiffres des heures et des minutes s'arrêtent de clignoter.
ALLUMER L’APPAREIL/MODE RADIO
Appuyez sur POWER/MODE pour allumer l’appareil et entrer dans le mode radio.
La fréquence s’affiche momentanément, puis elle disparaît et l'heure s'affiche.
L’indicateur « ON » s’allume.
RADIO
1. Appuyez sur POWER/MODE pour allumer la radio.
La fréquence FM par défaut est de 87.5 MHz.
2. Appuyez plusieurs fois sur POWER/MODE pour régler la fréquence radio AM ou FM.
Les indicateurs correspondants (FM et MHz ou AM et KHz) s’allument.
3. Réglez le volume en appuyant plusieurs fois sur VOL-/AL1 ou VOL+/AL2.
4. Réglez la fréquence radio en appuyant plusieurs fois sur les touches TUN/+ ou TUN/-.
Maintenez la touche TUN/- ou TUN/+ appuyée pour rechercher la station précédente ou suivante.
REMARQUE :
Pour optimiser la réception FM, déployez complètement l’antenne FM.
Pour optimiser la réception AM, tournez lentement l’appareil en le maintenant à l’horizontale.
PRÉRÉGLER VOS STATIONS DE RADIO PRÉFÉRÉES
Vous pouvez prérégler jusqu'à 20 stations FM et 20 stations AM.
1. Réglez la fréquence d’une station de radio en procédant comme indiqué au chapitre « RADIO ».
2. Appuyez sur MENU, « P01 » clignote.
3. Sélectionnez un numéro de mémoire en appuyant plusieurs fois sur TUN/+ ou TUN/-.
4. Appuyez à nouveau sur MENU pour mémoriser la station.
5. Répétez cette procédure pour prérégler d’autres stations de radio.
Pour écouter l’une des stations de radio préréglées, appuyez plusieurs fois sur la touche PRESET pour la
sélectionner.
 Loading...