

229100
HUMIDISTAT OWNERS MANUAL
INSTALLER:
I. SAFETY
WARNING! Improper electrical wiring can result in fire or loss of humidity
control. Disconnect electrical power before installing and servicing. Failure to
disconnect electrical power may result in injury or death. The wiring must
conform to all building codes and ordinances as required by local and
national code authorities having jurisdiction for this installation.
The 229100 must be installed by a qualified Technician. Failure to properly
install the 229100 may result in property damage or personal injury.
Homeowners must read instructions and understand the operation of the
229100 and the humidifier(s) it controls.
Improper operation can result in over or under humidification. Over
humidification can result in condensation, structural damage and mold.
Condensation within a building's structure can cause loss of structural
strength. Condensation can also enable mold and mildew growth resulting in
personal injury and damage to building structure and contents.
II. APPLICATION
The 229100 humidistat provides low voltage control of humidifiers installed in
central heating systems. The humidistat has a SPST switch and is designed
for mounting on the return air duct.
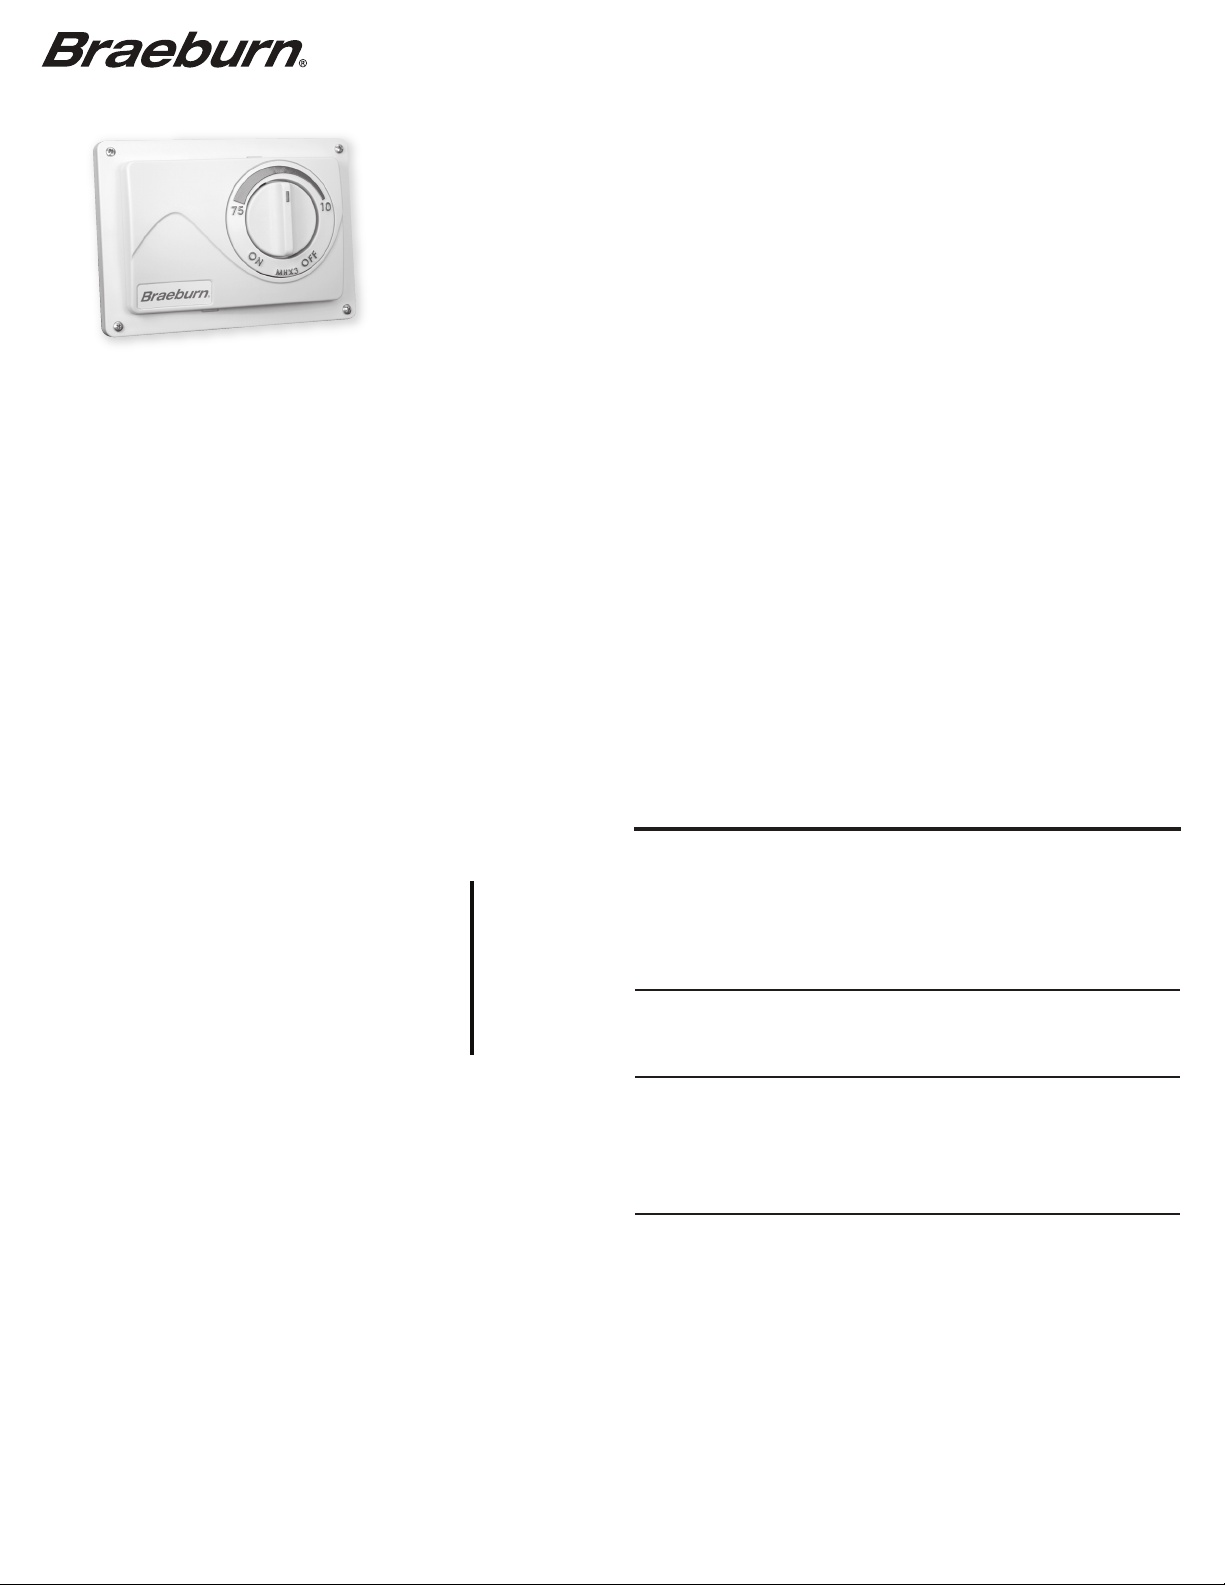
RANGE: 10% to 85% RH ELECTRICAL RATING: 30 VAC / 60 VA
OPERATION
Set the control knob to the desired humidity
setting. The recommended setting for
optimum humidification is 30% to 50%. The
vertical position on the knob is approximately
42% RH.
Setting the humidistat above or below the
recommended settings may not provide
satisfactory results for your home.
III. INSTALLATION INSTRUCTIONS
PRECAUTIONS
The installer must be a qualified technician. Disconnect electrical power
before beginning installation. Do not install the humidistat on the warm air
duct. Conduct a thorough checkout before leaving the installation.
DUCT MOUNTING ON THE RETURN AIR - PREFERRED METHOD
Do not install the humidistat on the warm air duct or within 48” of UV light.
1. Locate the humidistat at least 24" upstream of the humidifier or
bypass on the return air duct. Avoid areas of direct radiation like
secondary heat exchangers in the fan compartment.
2. Remove face by inserting screwdriver into pry slot and twisting
(see fig 2)
3. Use the plastic duct mount plate as a template. Accurately mark and
drill the (4) 3/32”mounting holes and cut away the 4-1/4” x 2-1/2”
section of the duct inside the duct mount plate.
4. Place duct mount base gasket on the humidistat base and mount the
base with four screws. Low voltage wire may enter the humidistat
under the gasket (see fig 2).
5. Connect wires to screw terminals on the control assembly as shown in
wiring diagrams. Replace face and knob.
PLEASE LEAVE OWNERS MANUAL WITH HOME OWNER.
OUTDOOR
TEMPERATURE
RECOMMENDED
SETTING
40°F 4°C 45
30°F -1°C 40
20°F -7°C 35
10°F -12°C
0°F -18°C
-10°F - 23°C
-20°F -29°C
30
25
20
15
WALL MOUNTING INSTRUCTIONS
NOTE: Requires wall mount kit (Model 229110)
1. Chose a location for the 229100 about five feet above the floor
on an inside wall with average room temperature and relative
humidity conditions.
2. Drill a small hole in the wall and run low voltage wiring to the
location chosen. Pull about 6” of wire through the hole. Use the entire
mounting gasket (both inside and outside portions) to seal the wall
opening or use foam tape to prevent drafts from affecting the
humidistat operation. (see fig. 3)
3. Remove the knob on the humidistat. Squeeze the top and
bottom of the base to release the face of the humidistat.
4. Mount the base horizontally over the wires. Attach directly to
the wall, using the two screws provided in the slotted holes.
5. Connect wires to screw terminals on the control assembly as
shown in wiring diagrams. Replace face and knob.
WIRING
WARNING! Disconnect electrical power before beginning installation.
The wiring must conform to all building codes and ordinances as required by
local and national code authorities having jurisdiction for this installation.
Refer to the following wiring diagrams.
CHECKOUT
With furnace in operation, turn humidistat to "ON" position. Observe
humidifier operation.
SETTINGS
WARNING! Do not set relative humidity too high during cold weather. Over
humidification can result in condensation, structural damage and mold.
Condensation within a building's structure can cause loss of structural
strength. Condensation can also enable mold and mildew growth resulting in
personal injury and damage to building structure and contents.
Refer to OPERATION for proper settings.
TROUBLESHOOTING
SYMPTOM DIAGNOSTIC STEPS
No Humidifier
Operation in
"ON" position
DO NOT LEAVE IN "ON" POSITION, OVER HUMIDIFICATION WILL OCCUR.
Humidifier
operation in
"ON" position
only
Humidifier
operation
continuous
Humidifier
turns on and
off repeatedly
1. Set thermostat to operate both furnace burner and blower.
Operation may be necessary for system power.
2. Check voltage at humidifier control terminals.
There should be no voltage for Power Humidifier.
Voltage should be 20-30 VAC for most others.
3. Inspect humidifier wiring. Refer to wiring diagrams.
1. Humidity level in the home is higher than knob setting.
Humidifier control will not operate the humidifier until
humidity level is reduced.
1. When the humidity in the home is less than the knob
setting, the control will operate humidifier until the
humidity is higher. Reduce knob setting.
2. Use "ON" position. Verify that the humidifier operates.
3. Remove wires from control terminals. If humidifier
continues to operate, check solenoid valve.
1. Check voltage at humidifier control terminals.
There should be no voltage for a Power Humidifier.
Voltage should be 20-30 VAC for most others.
2. If mounted on return air duct, make sure humidifier control
is at least 24" upstream of humidifier's air discharge.

PRECAUTIONS
The installer should be a qualified Technician. Disconnect electrical power before beginning installation. Use contacts C and NO
for humidifier operation. Use contacts C and NC for a dehumidifier. Conduct a thorough checkout before leaving the installation.
WIRING DIAGRAMS FOR BRAEBURN® 220500 and 220600 HUMIDIFIERS
24V. SOLENOID VALVE
24V. SOLENOID VALVE
HUMIDISTAT
NC
NO
L2
C
24 V. TRANSFORMER
24V. SOLENOID VALVE
24 V. TRANSFORMER
AIR PRESSURE
HUMIDISTAT
C
ON-OFF SWITCH
NO
C
NC
NO
SWITCH
ON-OFF SWITCH
229050
CURRENT
SENSING
RELAY
115v.
60CY.
(HOT)
L1
FURNACE
COMMON LEAD
C
(HOT)
ACC
EAC
115v.
60CY.
C
MULTI
SPEED
HI
BLOWER
LO
MOTOR
WIRING DIAGRAMS FOR BRAEBURN® 220700 HUMIDIFIER
120 VAC WITH CONTROL FROM FURNACE BOARD
FURNACE
OR FAN
CONTROL
120 VAC
FURNACE
CONTROL
NOTE: Red wires are for humidistat power if required.
DO NOT CONNECT RED WIRES TO ANOTHER POWER
SOURCE OR ONE ANOTHER. DOING SO WILL VOID WARRANTY.
NOTE:Yellow wires are for Humidistat Control. DO NOT APPLY VOLTAGE
TO YELLOW WIRES. DOING SO WILL VOID WARRANTY.
FIELD SUPPLIED
RECEPT & SWITCH
ACC
EAC
HOT
C
MANUAL HUMIDISTAT
HUMIDIFIER
RED
POWER TO HUMIDISTAT
YELLOW
CONTROL
On furnaces with output terminals ACC, or EAC check output voltage to determine
that terminals are 115V. Connect on-off switch in series with the hot wire.
USE OUTSIDE
PORTION ONLY
WITH DUCT
MOUNTING
USE BOTH WITH
WALL MOUNTING
WALL MOUNT BASE (229110)
(can mount on duct with
gaskets shown)
FIG. 3*
GASKET PLACEMENT
* Requires wall mount kit (Model 229110)
USE WITH DUCT
MOUNTING ONLY
C
CAP OFF DO NOT CONNECT
TOGETHER
NC
HUMIDISTAT
NO
SCREWDRIVER PRY SLOT
NC
HUMIDISTAT
HUMIDISTAT
FIELD SUPPLIED
RECEPT & SWITCH
HOT
C
NOTE: Red wires are for humidistat power if required.
DO NOT CONNECT RED WIRES TO ANOTHER POWER
SOURCE OR ONE ANOTHER. DOING SO WILL VOID WARRANTY.
NOTE:Yellow wires are for Humidistat Control. DO NOT APPLY
VOLTAGE TO YELLOW WIRES. DOING SO WILL VOID WARRANTY.
NO
C
NC
NO
C
24 V. TRANSFORMER
120 VAC WITH CURRENT SENSING RELAY
MANUAL HUMIDISTAT
HUMIDIFIER
FURNACE
CONTROL BOARD
C
24v.
60CY.
HUM
ON-OFF SWITCH
POWER TO HUMIDISTAT
YELLOW
CURRENT
SENSING
RELAY
FURNACE
RED
BOARD
(HOT)
24V. SOLENOID VALVE
C
115v.
60CY.
ACC
EAC
C
SINGLE OR
MULTI-SPEED FAN
CAP OFF DO NOT CONNECT
TOGETHER
NC
HUMIDISTAT
NO
C
HI
LO
On furnaces where it is desirable to use a current sensing relay, the
humidifier may be wired from a continuous 115 volt power source. Install the
on/off switch in series with the hot or black wire. Install the Braeburn
® 229050
Current Sensing Relay in series with the humidistat circuit. The Current
Sensing Relay will detect furnace operation and supply power to the
humidifier accordingly.
FIG. 2
DUCT MOUNT
VERSION
DUCT MOUNT BASE
DUCT MOUNT BASE
GASKET
LIMITED WARRANTY
Braeburn Systems LLC warrants each new Braeburn humidistat against any defects that are due to faulty material or workmanship for a period of one year after
the original date of purchase by a professional service technician. This warranty and our liability does not include damage to merchandise or the humidistat
resulting from accident, alteration, neglect, misuse, improper installation or any other failure to follow Braeburn installation and operating instructions.
Braeburn Systems LLC agrees to repair or replace at its option any Braeburn humidistat under warranty provided it is returned postage prepaid to our warranty
facility in a padded carton within the warranty period, with proof of the original date of purchase and a brief description of the malfunction. This limited warranty
does not include the cost of removal or re-installation.
This warranty gives you specific legal rights and you may also have other rights that vary from state to state or province to province. Answers to any questions
regarding our limited warranty may be obtained by writing our corporate offices.
Braeburn Systems LLC
2215 Cornell Avenue • Montgomery, IL 60538
Technical Assistance: www.braeburnonline.com
Call us toll-free: 866-268-5599 (U.S.)
630-844-1968 (Outside the U.S.)
WARRANTY
FACILITY: Braeburn Systems LLC
Attn: Warranty Department
2215 Cornell Avenue
Montgomery, IL 60538
©2014 Braeburn Systems LLC • All Rights Reserved • 229100-100-002 (MHX3-06B REV B)
 Loading...