

Page 1

Printer Applicator System
PAM 3600
Service Manual
Edition 1/07
Page 2

W.H. Brady
Lindestraat 21
Industriepark C3
9240 Zele Belgium
Phone: +32 52 457 811
e-mail: support@brady.be
All specications about delivery, design, performance and weight are given to the best of our current knowledge and are
subject to change without prior notice.
Identication Solutions Division
6555 W. Good Hope Road
PO Box 2131
Milwaukee, WI 53201 U.S.A.
Phone: 1-800-537-8791
Fax: 1-800-292-2289
Page 3

Service Manual PAM 3600 Table of Contents
Table of Contents
1 Introduction ................................................................................................................................................ 5
1.1 Scope of Information ................................................................................................................................... 5
1.2 Important Information .................................................................................................................................. 5
1.3 General Safety Instructions ......................................................................................................................... 6
1.4 Safe Handling of Electricity .......................................................................................................................... 7
1.5 Printer Types ............................................................................................................................................... 7
1.6 Component Location ................................................................................................................................... 8
Printer ....................................................................................................................................................8
Applicators ............................................................................................................................................. 9
Options................................................................................................................................................. 10
2 Expanded Functions for Servicing ........................................................................................................ 11
2.1 The Service Key and the OEM Key ............................................................................................................11
2.2 Expanded Functions in the "Setup" Menu ................................................................................................. 12
Print Parameters .................................................................................................................................. 12
Interfaces ............................................................................................................................................. 12
2.3 Expanded Functions in the "Test" Menu .................................................................................................... 13
Status Print ..........................................................................................................................................13
Device List ...........................................................................................................................................15
Label Prole ......................................................................................................................................... 16
Printhead Prole ..................................................................................................................................16
Event Log ............................................................................................................................................. 18
Print Directory of IFFS ......................................................................................................................... 18
2.4 Expanded functions in the "Service" Menu ................................................................................................ 19
Clearing the Service Counter ............................................................................................................... 19
Adjusting the Label Edge Sensor......................................................................................................... 20
Saving the NVRAM .............................................................................................................................. 20
Loading the NVRAM ............................................................................................................................ 21
Setting the Device Name ..................................................................................................................... 21
3 Maintenance .............................................................................................................................................22
3.1 General Cleaning ...................................................................................................................................... 22
3.2 Cleaning the Printhead .............................................................................................................................. 22
3.3 Cleaning the Print Roller and the Transport System ................................................................................. 23
3.4 Cleaning the Brake .................................................................................................................................... 24
3.5 Cleaning the Pad ....................................................................................................................................... 25
4 Replacing Assembly Units......................................................................................................................26
4.1 Recommended Tools ................................................................................................................................. 26
Standard Tools ..................................................................................................................................... 26
Special Tools ........................................................................................................................................ 26
4.2 Replacing the Printhead ............................................................................................................................ 27
4.3 Replacing the Print Roller and the Feed Roller ......................................................................................... 28
4.4 Replacing the Transport Locking Roller ..................................................................................................... 29
4.5 Replacing the Pinch Roller ........................................................................................................................ 30
4.6 Replacing the Label Edge Sensor ............................................................................................................. 32
4.7 Replacing the Slip Clutches ....................................................................................................................... 33
Replacing the Slip Clutch on the Ribbon Take Up Hub ........................................................................ 34
Replacing the Slip Clutch on the Ribbon Supply Hub .......................................................................... 35
Replacing the Slip Clutch on the Internal Rewinder............................................................................. 35
4.8 Replacing the Main Drive Motor ................................................................................................................ 36
4.9 Replacing the CPU PCB ............................................................................................................................ 37
4.10 Replacing the Power Unit .......................................................................................................................... 39
4.11 Replacing the Applicator Control PCB and Firmware Update of the Applicator Module ............................ 40
4.12 Replacing the Sensors .............................................................................................................................. 41
Sensors of the Printer Module ............................................................................................................. 41
Sensors of the Applicator Module ........................................................................................................ 46
4.13 Disassembling the Energy-Chains ............................................................................................................ 47
5 Adjustments .............................................................................................................................................48
5.1 Adjusting the Peel-off Table ....................................................................................................................... 48
5.2 Adjusting the Printhead ............................................................................................................................. 49
3Printer Applicator System PAM 3600
Page 4

Service Manual PAM 3600Table of Contents
5.3 Adjusting the Guide Plate .......................................................................................................................... 50
5.4 Adjusting the Sensors of the Peel-off Table ............................................................................................... 51
5.5 Adjusting the Sensors of the Printhead ..................................................................................................... 52
5.6 Adjusting the Torques at the Hubs ............................................................................................................. 53
Measuring the Traction at the Internal Rewinder ................................................................................. 53
Measuring the Traction at the Ribbon Take Up and the Ribbon Supply Hub ....................................... 54
Adjusting the Torques ..........................................................................................................................55
5.7 Adjusting the Brake at the Media Supply Hub ........................................................................................... 56
5.8 Adjusting the Label Edge Sensor .............................................................................................................. 57
5.9 Setting the Speed of the Compressed Air Driven Assemblies ................................................................... 57
Setting the Speed of the Peel-off Table Movement .............................................................................. 57
Setting the Speed of the Printhead Movement .................................................................................... 58
Setting the Speed of the Turn/Lift Cylinder Movement ........................................................................ 59
Setting the Speed of the Main Cylinder Movement.............................................................................. 60
5.10 Pneumatic Setting of the Printhead Pressure ............................................................................................ 61
5.11 Pneumatic Setting of the Brake ................................................................................................................. 62
5.12 Pneumatic Setting of the Supporting Air .................................................................................................... 63
5.13 Pneumatic Setting of the Table .................................................................................................................. 64
5.14 Adjusting the Sensors of the Applicator Module ........................................................................................ 65
Adjusting the Sensor Turn/Lift Cylinder................................................................................................ 65
Adjusting the Labeling Position Sensor ............................................................................................... 66
Adjusting the Sensor 1 Main Cylinder .................................................................................................. 67
Adjusting the Sensors 2 Main Cylinder (PAM 3602 only) .................................................................... 68
6 Problem Solution .....................................................................................................................................69
6.1 Errors During Printing ................................................................................................................................ 69
6.2 Failure of Device Functions ....................................................................................................................... 71
6.3 Permanently Displayed Hardware Errors .................................................................................................. 72
Appendix A: Block Diagram ............................................................................................................................. A-1
Appendix B: Circuit Diagrams ......................................................................................................................... B-1
PCB CPU: CPU, Clock Timer, Clock, BDM..........................................................................................................B-1
PCB CPU: Centronics, Interface Slot, RS-232 ....................................................................................................B-2
PCB CPU: dRAM, Flash ......................................................................................................................................B-3
PCB CPU: Printhead Connection ........................................................................................................................B-4
PCB CPU: FPGA, History RAM ...........................................................................................................................B-5
PCB CPU: Power Supply, Motor Driver ...............................................................................................................B-6
PCB CPU: Sensors, AD Converter ......................................................................................................................B-7
PCB CPU: USB Host ...........................................................................................................................................B-8
PCB 1 Control Panel ............................................................................................................................................B-9
PCB Control Panel .............................................................................................................................................B-10
PCB Applicator Control: Controller.....................................................................................................................B-11
PCB Applicator Control: Inputs/Outputs .............................................................................................................B-12
PCB Valve Connection .......................................................................................................................................B-13
PCB Ribbon Sensor ...........................................................................................................................................B-13
Appendix C: Layout Diagrams......................................................................................................................... C-1
PCB CPU: Components side .............................................................................................................................. C-1
PCB CPU: Soldering side ................................................................................................................................... C-2
PCB 1 Control Panel: Components side ............................................................................................................. C-3
PCB 1 Control Panel: Soldering side .................................................................................................................. C-3
PCB Control Panel .............................................................................................................................................. C-3
PCB Applicator Control: Components side ......................................................................................................... C-4
PCB Applicator control: Soldering side ............................................................................................................... C-4
PCB Valve Connection ........................................................................................................................................ C-5
PCB Ribbon Sensor: Components side .............................................................................................................. C-5
PCB Ribbon Sensor: Soldering side ................................................................................................................... C-5
Appendix D: Pneumatic Diagrams .................................................................................................................. D-1
PAM 3600 with Applicator 3602 .......................................................................................................................... D-1
PAM 3600 with Applicator 3603 .......................................................................................................................... D-2
Index I-1
4
Printer Applicator System PAM 3600
Page 5

Service Manual PAM 3600 1 Introduction
1 Introduction
1.1 Scope of Information
This manual is intended for use by qualied service and maintenance personnel.
The technical information included relates to hardware and mechanical parts of the Printer Applicator System PAM
3600.
Information related to operation will be found in the Operator's Manual.
If a problem occurs, which cannot be solved with the help of this manual, please contact the Technical Service
Department.
To adress see page 2.
1.2 Important Information
Important information contained in this manual is marked as follows:
WARNING!
Impending danger!
May cause death or physical injuries.
CAUTION!
Dangerous situation!
May cause equipment/material damage or data loss.
NOTICE!
Helpful additional information and tips for use.
In special cases a second symbol is additionally used to characterize the kind of danger.
See a sample for the risk of electric shock:
WARNING!
Mortal danger by electric shock!
Unplug power cord before opening the cover!
Printer Applicator System PAM 3600
5
Page 6

1.3 General Safety Instructions
Follow the general safety rules below:
Keep the area around the device clean at all times!
•
Avoid performing maintenance which might expose persons to danger or make the device a source of danger!
•
Keep housing or other parts of the device removed in a safe place during maintenance!
•
Keep tools out of the way to avoid injury to yourself or others not involved in the maintenance!
•
Do not wear loose clothing that could be caught in moving parts of the device. Button up your shirt or jacket
•
sleeves or roll them up. Tie back or put up long hair. Tuck the ends of scarves, ties and shawls into your
clothing and attach them with a non-conducting clip.
Do not wear jewelry, glasses with metal frame or clothing with metal fasteners!
•
WARNING!
Mortal danger by electric shock!
If such metal parts contact the device, they cause an increased current ow due to
good conductivity!
Service Manual PAM 36001 Introduction
Wear protective goggles at work as follows:
•
while driving pins or similar parts in or out with a hammer,
while working at an electric drilling machine,
while using spring hooks or springs,
while releasing or using of springs, snap rings and grip rings,
while soldering,
while using solvents, cleansers or other chemical substances,
in any case where injury to the eyes is possible.
-
Ret all protective devices such as covers, safety instructions, and grounding cable upon completion of the
•
maintenance work!
Replace all faulty or defective parts!
6
Printer Applicator System PAM 3600
Page 7

Service Manual PAM 3600 1 Introduction
1.4 Safe Handling of Electricity
Follow the additional instructions below when handling electricity:
Find out the positions of the emergency and the power switch in order to operate them quickly in an emergency
•
situation!
Do not work alone under dangerous working conditions or while working on devices with non-protected
•
voltages (over 50 V AC or 120 V DC)!
Turn off power to the printer before:
•
removing or installing power units,
working in the immediate vicinity of open power supply parts,
mechanical checkup of power supply parts,
changing circuit boards or electrical parts.
-
If you cannot avoid working on devices with non-protected voltages, follow these safety precautions:
•
Have a person nearby who is aware of the position and operation of the power switches, who will switch off
the power in case of danger.
Use only tools and test devices, which are suitable for the work being done.
Work only with one hand on devices that are switched on. Keep the other hand behind your back or in your
pocket until you have nished.
NOTICE!
A shock occurs only with a closed circuit. By using only one hand, as described above, you
would avoid a current ow through your own body.
Do not use worn or defective tools!
•
Never assume that a circuit is not powered. Always verify that there is no voltage present!
•
Always examine the work area for possible sources of danger, such as wet oors, defective extension cords,
•
faulty protective grounding connectors etc.
If you observe an accident with electricity:
•
Be careful and avoid danger to yourself.
-
Switch off power.
-
Request medical assistance.
-
Give rst aid if necessary.
-
1.5 Printer Types
There are two printers for the PAM 3600 systems available:
PAM 3630 with a printhead resolution of 300 dpi and
•
PAM 3660 with a printhead resolution of 600 dpi.
•
Both printers can be equipped with one of the applicator types
PAM 3602, tamp-blow applicator with vertical lift (main) cylinder and turn cylinder and
•
PAM 3603, tamp-blow applicator with vertical lift (main) cylinder and horizontal lift cylinder.
•
Printer Applicator System PAM 3600
7
Page 8

1.6 Component Location
21 22 23 24 25 26 272019
17 18
1 3 4 5 6 7
8
9
2
1110 12 1413
1615
Printer
Service Manual PAM 36001 Introduction
1 Ribbon take up hub
2 Control panel and display
3 Ribbon supply hub
4 Swing arm with guide roller
5 Guide roller
6 Media supply hub
7 Internal rewinder
8 Power connector
9 Power switch
10 Compressed air connector
11 Silencers
12 Frame
13 Sensor connector for the applicator
14 Compressed air connectors for the applicator
15 Printhead
16 Print roller
17 Peel-off table
18 Guide roller
19 Slot for an additional interface card
20 Connector warning sensor ribbon end
21 Connector warning sensor label end
22 PLC interface port
23 Connector warning light
24 RS-232 interface
25 USB master interface
26 Bi-directional parallel interface
27 Cover
Figure 1a Overview printer
8
Printer Applicator System PAM 3600
Page 9

Service Manual PAM 3600 1 Introduction
1
2
4
3
4
5
8
9
7
6
Applicators
PAM 3602 PAM 3603
Figure 1b Overview applicators
1 Energy-chains
2 Sensor 1 main cylinder
3 Main cylinder
4 Sensor 2 main cylinder (PAM 3602 only)
5 Slide valve
6 Lift cylinder (PAM 3603 only)
7 Turn cylinder (PAM 3602 only)
8 Pad holder
9 Pad
Printer Applicator System PAM 3600
9
Page 10

Options
1
2
3
4
5
Service Manual PAM 36001 Introduction
Figure 1c Overview options
1 Warning light
2 Warning sensor, ribbon end
3 Warning sensor, label end
4 Antistatic burst
5 Blow tube
10 Printer Applicator System PAM 3600
Page 11

Service Manual PAM 3600 2 Expanded Functions for Servicing
21
2 Expanded Functions for Servicing
2.1 The Service Key and the OEM Key
There are a service key (Part No. 5540301) and an OEM key (Part No. 5540304) for accessing special service
functions which are not accessible to the operator.
The OEM key enables:
selecting the correct device name (Set OEM Name).
•
The service key enables, among other functions:
adjustment of the label edge sensor,
•
clearing the service counters,
•
printing an expanded status report,
•
printing an event log,
•
saving the conguration data on a memory module (Save NVRAM),
•
loading the conguration data from a memory module (Load NVRAM).
•
Moreover, the conguration parameters stored in the printer for optional components (interface boards) are
also accessible with the service key inserted, even if they are not currently installed.
The information contained in the test printout is also expanded.
The printer offers the option of protecting certain functions - such as the complete printer conguration and
security-relevant memory module functions - from unauthorized access by means of a code number (PIN).
There is no PIN prompt when accessing the stated functions with the service key inserted, i. e. the protective
function is circumvented.
NOTICE!
Please ask your cab dealer about obtaining the service key or the OEM key.
Insert the respective key (1) into the USB master interface (2) on the side of the printer. This can be done while the
device is switched on.
Figure 2a Inserting the service key or the OEM key
1 Key
2 USB master interface
11Printer Applicator System PAM 3600
Page 12

2.2 Expanded Functions in the "Setup" Menu
There are a variety of parameters that can be set to congure the printer to specic requirements.
There are three different methods to set the parameters of the Printer Conguration:
Conguration via the control panel (see Operator's Manual),
•
Conguration via the optional Ethernet interface accessing the internal web server of the printer using a Java
•
enabled browser (see Operator's Manual of the optional Ethernet interface),
Conguration via immediate commands (described in the Programming Manual, chapter "Immediate
•
Commands").
Print Parameters
Protocol Error
With the service key inserted, the parameter "Protocol error" is accessible in the "Print parameters" submenu.
The protocol error parameter is "ON" in the standard setting. As a result, the printer switches to the error state after
receiving unknown or faulty data.
When working with older computer operating systems, it may happen that the operating system’s print spooler
sends normal printer status messages (e.g. end of paper) back to the printer as ASCII text.
The printer cannot interpret this data and produces a long series of protocol errors. The protocol error display can
be switched off in such a case.
Service Manual PAM 36002 Expanded Functions for Servicing
CAUTION!
Data loss!
Protocol errors arising from faulty programming are also ignored in the "OFF" setting. There is a
risk of losing data.
Insert the service key into the Master USB socket.
1.
Switch from online mode to the ofine menu by pressing the key.
2.
Press the or key until you reach the "Setup" menu, and then press the key.
3.
Now select the "Print parameters" submenu and then the "Protocol error" parameter, then press the key.
4.
Set the parameter according to your requirements.
5.
Interfaces
The following parameters can be called or congured in the "Interfaces" submenu:
Character set,
•
IEEE1284,
•
RS-232.
•
If the optional interfaces
RS-422/485,
•
Ethernet and
•
Keyboard
•
are installed then these are also shown for setting.
12
NOTICE!
The parameters of the options "RS-422/485 interface", "Ethernet interface" and "Keyboard" can
be accessed with the service key, even if these components are not present.
Please refer to the "Printer Conguration" section of the printer or optional component operator's manuals for
instructions on how to perform the conguration and set the parameters.
Printer Applicator System PAM 3600
Page 13

Service Manual PAM 3600 2 Expanded Functions for Servicing
2.3 Expanded Functions in the "Test" Menu
The test functions allow the operator or the service personnel to obtain an overview of the most important printer
settings and hardware congurations.
The following functions can be called in the "Test" menu.
Short status*
•
Status print
•
Font list*
•
Device list
•
ASCII dump mode*
•
Test grid*
•
Label prole
•
Printhead prole
•
Event log
•
IFFS Print directory
•
NOTICE!
For functions marked with an * refer to the Operator's Manual. You will nd all the information
you need there.
Additional information to the Operator's Manual about the other test functions you will nd in
this section.
In order to reach the "Test" submenu, use the key to switch from online mode to the ofine menu.
Press the or key until you reach the "Test" menu, and then press the key.
Now select the desired test function.
Status Print
The status print contains information about the printer conguration and the status.
It will be printed with the heat level and the print speed set in the "Setup" menu.
NOTICE!
With the service key inserted, the status print also contains parameter settings of optional
components, even if these have not been installed and the values of the service counters.
You obtain the expanded status print as follows:
Insert the service key into the Master USB socket.
1.
Switch from online mode to the ofine menu by pressing the key.
2.
Press the key or until you reach the "Test" menu, and then press the key.
3.
Select the "Status print" function with the or key and conrm with the key.
4.
Start the printout with the pre-dispense key.
The printout can be aborted with the key.
The status printout contains the following information:
A Device type, version and date of the rmware
B Values of selected conguration parameters
C Switch-on time, number of prints and the print length, values of the service counters
D Printhead temperature, heating voltage
E Details about the working points of the label edge sensor
F Line pattern for evaluating the quality of the printed image
O Parameter settings of optional components
A typical status printout is shown in the following gure.
Printer Applicator System PAM 3600
13
Page 14

Service Manual PAM 36002 Expanded Functions for Servicing
D
C
B
A
F
E
O
O
Figure 2b Status Print with Service Key inserted
14
Printer Applicator System PAM 3600
Page 15

Service Manual PAM 3600 2 Expanded Functions for Servicing
Device List
The most important hardware components installed in the printer and the connected optional devices are listed in
the "Device list" submenu.
Please also refer to the "Test Functions" section of the Operator's Manual for the printout of the device list and
further information.
Proceed as follows to print the device list:
Insert the service key into the Master USB socket.
1.
Switch from online mode to the ofine menu by pressing the key.
2.
Press the or key until you reach the "Test" menu, and then press the key.
3.
Select the "Device list" function with the or key and conrm with the key.
4.
Start the printout with the pre-dispense key.
The printout can be aborted with the key.
The printout contains the following information:
CPU Type and serial number of the CPU PCB, revision number of the CPU PCB and FPGA
TPH Resolution and number of hot points of the thermal printhead
CARD* Capacity, manufacturer, serial number and version number of the FlashCard
SLOT* Type, serial number and revision number of the interfaces expansion card
USB [a]* Type and revision number of the installed
[b/c] s USB devices
a: Number of the USB device
b: Number of the USB device to which device a is connected
c: Port number of device b, to which device a is connected
s: Speed of the USB device (Low Speed or Full Speed)
Only with inserted service key:
Mfr. Manufacturer ID indicates the manufacturer of the USB device
Class Code number for the USB device class
Protocol Code number for the type of communication with the USB device
Phase Internal value for debugging purposes
(* This information is only printed if the corresponding devices are installed.)
Figure 2c Device List with Service Key inserted
Printer Applicator System PAM 3600
15
Page 16

Service Manual PAM 36002 Expanded Functions for Servicing
5
6
7
8
9
1
2
3
4
Label Prole
The label prole printout contains additional information with the service key inserted.
Print out the label prole as follows:
Insert the service key into the Master USB socket.
1.
Select the "Test" menu in the ofine menu and conrm with the key.
2.
Press the or key until you reach the "Label prole" function and conrm with the key.
3.
Start the printout with the pre-dispense key.
The printout can be aborted with the key.
Figure 2d Label Prole with Service Key inserted
1 Device name and current rmware version
2 Method of label detection (transmitted light/reex bottom)
3 Print speed and service information for adjusting the label sensor
4 Scale factor for the derivative diagram *
5 Coordinate in the direction of paper ow at which the label start was detected
6 Type of peripheral device connected
7 Information for the rmware developer
8 Stroke between start and end of the negative derivative *
9 Width of the negative derivative in motor increments *
Information marked with * are only available with the service key inserted.
Printhead Prole
When selecting the option "Printhead prole", a diagram will be printed which shows the resistance values for the
single printhead dots. This printout makes it possible to see the status of the printhead.
When a dot is damaged or defective its resistance value increases. When this error occurs, it causes white lines in
the print image from top to bottom. In some cases, the white line could cause an invalid scan of certain barcodes.
To print the printhead prole, load media (labels, continuous paper) and a transfer ribbon (if applicable), which
extends over the entire print width of the printer.
With "Printhead prole", the printer will not sense any label gaps, and will print non-stop.
Continuous paper works best for the prints.
NOTICE!
16
Printer Applicator System PAM 3600
Page 17

Service Manual PAM 3600 2 Expanded Functions for Servicing
Insert the service key into the Master USB socket.
1.
Switch from online mode to the ofine menu by pressing the key.
2.
Select the "Test" menu in the ofine menu and conrm with the key.
3.
Select the option "Printhead prole" by pressing the key or the key and conrm by pressing the key.
4.
NOTICE!
The measurement of the resistance values can take several minutes.
You will see the progress of this measurement on the display.
5. When the measurement has nished, start the printout by pressing the pre-dispense key.
6. The "Printhead prole" will be printed with the heat level and print speed set in the "Setup" menu.
To cancel the print, press the key.
The printout has a scale which marks the actual geometric position of the dots. The scale will be printed underneath
the black bar with the text "Printhead prole". It is possible to compare a single dot to the scale as demonstrated in
the following diagram.
The gure indicates a print image failure around 22.5 mm in the black bar. In the scale section of the diagram, a dot
with an increased resistance value appears around 22.5 mm. Using this comparison makes it clear that the image
fault on the top line is caused by a defective printhead and not a case of a dirty printhead surface.
Figure 2e Printhead Prole with Service Key inserted
Printer Applicator System PAM 3600
17
Page 18

2 Expanded Functions for Servicing
Event Log
The label printer stores the following events in the event log:
Hardware fault
•
Adjustment of the label sensor
•
Firmware updates
•
Service counters reset
•
The event log can only be called with the service key inserted.
Print out the event log as follows:
Insert the service key into the Master USB socket.
1.
Select the "Test" menu in the ofine menu and conrm with the key.
2.
Press the or key until you reach the "Event log" function and conrm by pressing the key.
3.
Start the printout by pressing the pre-dispense key.
The printout can be aborted with the key.
Service Manual PAM 3600
Figure 2f Event log
Print Directory of IFFS
The IFFS (Internal Flash File System) is located on a Flash EPROM in the printer.
NOTICE!
As long as there was no write access on the IFFS the function "Print directory" is not shown.
The function "Print directory" can only be called with the service key inserted.
Start the printout of the directory as follows:
Insert the service key into the Master USB socket.
1.
Select the "Test" menu in the ofine menu and conrm with the key.
2.
Press the or key until you reach the "Print directory" function and conrm by pressing the key.
3.
Start the printout by pressing the pre-dispense key.
The printout can be aborted with the key.
From the printout you can get the following information:
First line: headline
•
For each le in the IFFS one line is printed with information about le name, le type, size of le in byte, date
•
and time for last change of le.
Last line: free memory in IFFS
•
18
Directory of internal Flash:
DEFAULT LBL 786 16.06.04 17:10
64718 bytes free
Figure 2g Printout Directory of IFFS
Printer Applicator System PAM 3600
Page 19

Service Manual PAM 3600 2 Expanded Functions for Servicing
2.4 Expanded functions in the "Service" Menu
In the "Service" menu, the operator only has access to the "Firmware update" and "Firmware from card" function.
The following functions are available after the service key respective the OEM key have been inserted:
Firmware update
Firmware from card*
Clear service counter
Adjust gap sensor
Save NVRAM*
Load NVRAM*
Set OEM Name
Functions marked with * are only available if the CF memory card is installed.
Clearing the Service Counter
The printer has two counter sets, a total and a service counter. The following data is recorded in both counter sets:
Operative time: time the printer has been switched on
Number of labels: number of labels printed
Transfer print: length of material printed in transfer print
Thermal direct: length of material printed in direct thermal print
The total counter contains the values for the total elapsed service life of the printer. The values of the total counter
are shown in both the short status and in the status printout.
The service counter can be reset with the use of the service key after major maintenance or repair work.
The service counter consequently provides information about the print output since the last reset.
The service counter is reset as follows:
Switch from online mode to the ofine menu by pressing the key.
1.
Press the or key until you reach the "Service" menu, and then press the key.
2.
Now select the "Clear service counter" function, and then press the key.
3.
"No" appears in the display. Change the selection to "Yes" with or and press .
4.
This resets the service counter.
You can check the value reset in the status printout.
Printer Applicator System PAM 3600
19
Page 20

Service Manual PAM 36002 Expanded Functions for Servicing
Adjusting the Label Edge Sensor
The function "Adjust gap sensor" enables the label edge sensor to be adjusted. This is necessary when the label
edge sensor itself or the CPU PCB are replaced.
NOTICE!
In order to avoid the inuence of light from the outside, check the adjustment of the sensor with
the cover closed and housing mounted!
Perform the adjustment as follows:
Insert the service key into the Master USB socket.
1.
Select the "Service" menu in the ofine menu and conrm with the key.
2.
Select the "Adjust gap sensor" function in the "Service" menu and conrm with the key.
3.
Open the printhead.
4.
The request "Please remove label stock" from label edge sensor appears in the display. Obey the request,
5.
close the printhead and conrm with the key.
The display now requests "Please insert liner" into the label edge sensor.
6.
Insert the liner material (without labels) into the label edge sensor, lock the printhead and conrm with the
key.
NOTICE!
Ensure that there are not any labels on the liner in the vicinity of the label edge sensor. This
would lead to a faulty alignment and a device malfunction.
7. "OK" appears in the display when the adjustment has been successful. Press the key again. The adjustment
has been completed now.
The message "Error" appears in the display if a fault occurs during the adjustment. If a fault recurs when the
adjustment is repeated, then there could be a defect in the following components:
Label edge sensor,
•
Label edge sensor connection cable or
•
CPU PCB.
•
Saving the NVRAM
The "Save NVRAM" function is used to save a printer conguration on a CompactFlash memory module.
This function is only accessible with the service key inserted and the CF card in the slot.
Save on the NVRAM as follows:
The printer is switched on.
Insert a CF card into the CF slot.
1.
Insert the service key into the Master USB socket.
2.
Select the "Save NVRAM" function in the "Service" menu and press the key.
3.
"No" appears in the display.
Change the selection to "Yes" with or and press the key. The saving begins and is indicated by the
4.
green LED next to the CF slot.
CAUTION!
Data loss!
Do not press the ejection key for the CF card while the green LED is lit.
If an error message appears in the display, this may indicate an unreadable CF card (e.g. unknown card type,
unformated card).
NOTICE!
To format the CompactFlash memory module, please refer to the "Memory Modules" section of
the Operator's Manual.
20 Printer Applicator System PAM 3600
Page 21

Service Manual PAM 3600 2 Expanded Functions for Servicing
Loading the NVRAM
The "Load NVRAM" function is used to reload a previously saved printer conguration from a CompactFlash
memory module.
This function is only accessible with the service key inserted and the CF card in the slot.
Load the NVRAM as follows:
The printer is switched on.
Insert a CF card containing the stored printer conguration into the CF slot.
1.
Insert the service key into the Master USB socket.
2.
Select the "Load NVRAM" function in the "Service" menu and press the key.
3.
"No" appears in the display.
Change the selection to "Yes" with the or key, and press the key.
4.
The loading process begins and is indicated by the green LED next to the CF slot.
CAUTION!
Data loss!
Do not press the ejection key for the CF card while the green LED is lit.
5. "OK" appears in the display when the loading process has nished. Press the key again.
An error message appears in the display if a fault occurred during the loading process.
In this case, try to repeat the loading process.
If an error occurs again, you have to reset the conguration parameters of the printer individually.
Setting the Device Name
The "Set OEM Name" function is used to adapt the CPU PCB to operating in the actual printer, because the CPU
PCB is qualied for several printer types. This adjustment is necessary after replacing the CPU PCB to detect
exactly the printer type over the interfaces.
This function is only accessible with the OEM key inserted.
Insert the OEM key into the Master USB socket.
1.
Select the "Set OEM Name" function in the "Service" menu and press the key.
2.
Select the device name with the or key.
3.
Conrm the selection by pressing the key.
4.
21Printer Applicator System PAM 3600
Page 22

3 Maintenance
1
The printer requires little maintenance.
It is important to clean the thermal printhead regularly. This guarantees a consistently good printed image and plays
a major part in preventing premature wear of the printhead.
Otherwise, the maintenance work is limited to occasion cleaning of the device and the rollers.
3.1 General Cleaning
Dust particles collect during operation, particularly around the printer’s mechanical parts.
Remove this dust with a soft brush or vacuum cleaner.
The outer surface of the printer may be cleaned with an all-purpose cleanser.
CAUTION!
Material damage!
Do not use abrasive cleansers or solvents!
3.2 Cleaning the Printhead
Service Manual PAM 36003 Maintenance
After extensive printer operation or if poor quality paper or ribbon has been used, foreign particles may collect on
the printhead. They cause characters or bar codes to appear light or faded, and can cause continuous light streaks
to always appear in the same physical position.
When this happens, you must clean the printhead.
We recommend cleaning the printhead every time changing the ribbon.
To clean the printhead, proceed as follows:
WARNING!
Mortal danger by electric shock!
Disconnect power supply!
Switch off compressed air!
Figure 3a Cleaning the printhead
1 Print surface
Remove label stock and transfer ribbon from the printer.
1.
Remove the dirt and adhesive from the print surface (1) of the printhead using a cleaning pen.
2.
CAUTION!
Material damage!
Do not use any sharp objects to clean the print surface!
3. Allow the printhead to dry for 2 - 3 minutes.
22 Printer Applicator System PAM 3600
Page 23

Service Manual PAM 3600 3 Maintenance
1 2 3 2 2
3.3 Cleaning the Print Roller and the Transport System
If the print roller and the rollers of the transport system become contaminated with dirt, label adhesive, ink or rest of
labels, the movement of the media and print quality may also be adversely affected.
WARNING!
Mortal danger by electric shock!
Disconnect power supply!
Switch off compressed air!
Figure 3b Cleaning the transport rollers and the print roller
1 Knurled knob
2 Roller
3 Print roller
Remove label stock and transfer ribbon from the printer.
1.
Unlock the transport locking roller by pressing the knurled knob (1) downward.
2.
Using a clean cloth and isopropyl alcohol, wipe off any accumulated dirt from the rollers (2) of the transport
3.
system and from the print roller (3).
Lock the transport locking roller.
4.
23Printer Applicator System PAM 3600
Page 24

3.4 Cleaning the Brake
1 2 3
It is recommended to clean the brake regularly. Otherwise it is possible that the transport of the paper is adversely
affected.
WARNING!
Mortal danger by electric shock!
Disconnect power supply!
Switch off compressed air!
Service Manual PAM 36003 Maintenance
Figure 3c Cleaning the brake
1 Brake
2 Screw
3 Brake plate
Remove label stock and transfer ribbon from the printer.
1.
Loosen the screw (2).
2.
Remove the brake plate (3).
3.
Using a soft brush or a vacuum cleaner, wipe off any accumulated dirt from the area around the brake (1).
4.
Remount the brake plate (3) and tighten the screw (2).
5.
24 Printer Applicator System PAM 3600
Page 25

Service Manual PAM 3600 3 Maintenance
1 2
3.5 Cleaning the Pad
During operation, dust particles accumulate on the pad. It is recommended to clean the pad regularly.
WARNING!
Mortal danger by electric shock!
Disconnect power supply!
Switch off compressed air!
Figure 3d Cleaning the pad
1 Valve
2 Pad
Slightly pull the valve (1) until the bleed position is reached. So it is possible to move the pad manually.
1.
Slide the pad (2) to a position where the underside of the pad is easily accessible.
2.
Clean the underside of the pad.
3.
Remove particles with a soft brush or a vacuum cleaner.
Remove label fragments and traces of adhesive with alcohol if necessary.
The suction holes on the underside of the pad must be free.
4.
Perform a visual check of the pad (2) and the slide foil on the underside of the pad. If the slide foil is damaged,
5.
it must be replaced.
NOTICE!
Slide the valve (1) back to the operate position!
25Printer Applicator System PAM 3600
Page 26

4 Replacing Assembly Units
4.1 Recommended Tools
The following tools are recommended for servicing the PAM 3600 Printer-Applicator-System:
Standard Tools
double open-end wrench 4x5
double open-end wrench 5,5x7
double open-end wrench 8x9
double open-end wrench 10x13
double open-end wrench 12x14
double open-end wrench 14x17
allen key 1,5; angular
allen key 1,25; angular
allen key 2; angular
allen key 2,2; angular
allen key 3; angular
allen key 4; angular
allen key 5; angular
norm allen key 2,5; with hilt
precision allen key size 0
Philipps screw-driver size 1
Philipps screw-driver size 2
socket wrench 4,5
socket wrench 7
snap ring pliers
at pliers
Torx TX 20
-
Service Manual PAM 36004 Replacing Assembly Units
Special Tools
allen key 0.9 with long hilt (cab part number: 5945114)
spring hook (cab part number: 5906109)
spring scale 5 N (cab part number: 5909017)
spring scale 25 N (cab part number: 5909018)
spring scale 10 N (cab part number: 5906108)
test collar (cab part number: 5534199)
manometer (cab part number: 5538317)
tube loosener (manufacturer: SMC; SMC part number: TG-1)
-
26 Printer Applicator System PAM 3600
Page 27

Service Manual PAM 3600 4 Replacing Assembly Units
1 2 2 3
4.2 Replacing the Printhead
WARNING!
Mortal danger by electric shock!
Disconnect power supply!
Switch off compressed air!
CAUTION!
Damages by electrostatic loading!
Ground yourself to the chassis before you remove or install the printhead. This will prevent a
static discharge from your body through the printhead to ground.
Figure 4a Replacing the printhead
1 Printhead locking screw
2 Plug
3 Printhead with head plate
Remove label stock and transfer ribbon from the printer.
1.
Release the printhead locking screw (1) and remove the printhead with the head plate (3) from the positioning
2.
pins.
Move the printhead with the head plate (3) and both cables carefully sideward until the plug connectors (2) are
3.
accessible.
Pull out the plug connectors (2) carefully.
4.
Connect the plugs (2) to the new printhead with head plate.
5.
Make sure that the PCB at the printhead will not be stressed mechanically.
CAUTION!
Material damage!
Handle the new printhead carefully to avoid scratching! The positioning pins must snap in on
both sides!
6. Slide the printhead with the head plate (3) onto the positioning pins. Make sure that the printhead is correctly
set into the positioning pins and then tighten the printhead locking screw (1) slightly. Note that the printhead ts
tightly in the bracket across the entire bracket.
7. Check the position of the both printhead cables. Make sure that the cables will not be stressed mechanically
and that they do not hinder other parts.
8. Perform a test print and adjust the printhead if necessary.
27Printer Applicator System PAM 3600
Page 28

4.3 Replacing the Print Roller and the Feed Roller
1 2 3 4
WARNING!
Mortal danger by electric shock!
Disconnect power supply!
Switch off compressed air!
Service Manual PAM 36004 Replacing Assembly Units
Figure 4b Replacing the print roller or the feed roller
1 Head plate
2 5 screws
3 Feed roller
4 Print roller
Remove label stock and transfer ribbon from the printer.
1.
Loosen and remove the 5 screws (2) from the head plate (1).
2.
Remove the head plate (1).
3.
Pull out the print roller (4) or the feed roller (3).
4.
Mount the components in reverse order.
5.
28 Printer Applicator System PAM 3600
Page 29

Service Manual PAM 3600 4 Replacing Assembly Units
1 2 3
4.4 Replacing the Transport Locking Roller
WARNING!
Mortal danger by electric shock!
Disconnect power supply!
Switch off compressed air!
Figure 4c Replacing the transport locking roller
1 Transport locking roller
2 E-ring
3 Knurled knob
Remove label stock and transfer ribbon from the printer.
1.
Remove the two E-rings (2) from the axle.
2.
Unlock the transport locking roller (1) by pressing the knurled knob (3) downward.
3.
Pull out the knurled knob (3) with the axle.
4.
Remove the transport locking roller (1) and replace it.
5.
Mount the components in reverse order.
6.
29Printer Applicator System PAM 3600
Page 30

4.5 Replacing the Pinch Roller
1 2 3 4
5 6 7
WARNING!
Mortal danger by electric shock!
Disconnect power supply!
Switch off compressed air!
Service Manual PAM 36004 Replacing Assembly Units
Figure 4d Preparation
1 Gear
2 Belt
3 4 screws
4 Main motor
5 Belt
6 Pulley
7 Snap ring
Remove label stock and transfer ribbon from the printer.
1.
Unlock the transport locking roller by pressing down the knurled knob (10).
2.
Remove the cover at the rear side.
3.
Loosen the belt (2) by taking off it from the gear (1).
4.
Remove the four screws (3) at the main drive motor and take off the motor (4).
5.
Remove the belt (5) from the pulley (6).
6.
Remove the snap ring (7) from the axle of the pinch roller and take off the pulley (6).
7.
30 Printer Applicator System PAM 3600
Page 31

Service Manual PAM 3600 4 Replacing Assembly Units
9
10 11
138 12 14
Figure 4e Replacing the pinch roller
8 Transport locking roller
9 Spring
10 Knurled knob
11 Bearing plate
12 4 screws
13 Pinch roller
14 Guide roller
8. Hang out the spring (9).
NOTICE!
Pay attention on the spring on the other side of the transport locking roller (8), do not hang out it
by moving the roller or the knurled knob.
9. Loosen and remove the four screws (12) on the bearing plate (11).
10. Remove the bearing plate (11).
11. Replace the pinch roller (13).
12. Mount the bearing plate, consider here to thread the guide roller (14).
13. Lock the transport locking roller by pressing the knurled knob (10) upward.
14. Hang up the spring (9).
15. Mount the other components in reverse order.
31Printer Applicator System PAM 3600
Page 32

4.6 Replacing the Label Edge Sensor
43221
WARNING!
Mortal danger by electric shock!
Disconnect power supply!
Switch off compressed air!
Service Manual PAM 36004 Replacing Assembly Units
Figure 4f Replacing the label edge sensor
1 Cable
2 Label edge sensor
3 Hole
4 Screw
Remove label stock and transfer ribbon from the printer.
1.
Remove the cover at the rear side.
2.
Pull out the cable (1) from the label edge sensor (2).
3.
Remove the screw (4).
4.
Remove the label edge sensor (2) by pushing it through the mounting plate to the rear side.
5.
Push the new label edge sensor through the mounting plate.
6.
Put the screw (4) through the sensor into the hole (3) of the plate and tighten it.
7.
Reassemble the other parts in reverse order.
8.
NOTICE!
Make sure that the cable does not touch or hinder moving parts.
9. Adjust the label edge sensor (see section 2.4).
32 Printer Applicator System PAM 3600
Page 33

Service Manual PAM 3600 4 Replacing Assembly Units
1
3
4
2
4.7 Replacing the Slip Clutches
The rewinders for the ribbon and the media and the brake for the ribbon supply hub are equipped with slip clutches.
A slip clutch has to be replaced when it can not longer be adjusted. The assembly instructions for the clutches also
have to be observed when a winder has to be replaced.
The winding torque of the clutch always has to be readjusted after replacing a clutch or if it has been disassembled
at any intermediate time.
WARNING!
Mortal danger by electric shock!
Disconnect power supply!
Switch off compressed air!
Figure 4g Slip clutches
1 Clutch of the ribbon take up hub
2 Motor for the ribbon take up hub
3 Clutch of the ribbon supply hub
4 Clutch of the internal rewinder
Remove label stock and transfer ribbon from the printer.
1.
Remove the cover at the rear side.
2.
Replace the respective clutch as described on the next pages.
3.
Mount the cover at the rear side.
4.
33Printer Applicator System PAM 3600
Page 34

Replacing the Slip Clutch on the Ribbon Take Up Hub
1 21 3 54
7 86 4 59
Service Manual PAM 36004 Replacing Assembly Units
Figure 4h Slip clutch on the ribbon take up hub
1 Screw
2 Motor bracket
3 Tappet
4 Slip clutch
5 Bearing on the take up hub
6 Lugs of the clutch
7 2 set screws
8 Knurled nut of the clutch
9 Feeler gauge
Pull out the plug of the motor (g. 4g, 2).
1.
Remove the two screws (1) and the bracket (2) with the motor assembly and the tappet (3).
2.
Loosen the knurled nut (8) of the slip clutch (4) by a few turns clockwise to reach the two set screws (7).
3.
Loosen the two set screws (7).
4.
Remove the slip clutch (4) from the axle of the ribbon take up hub.
5.
Slide the new clutch onto the axle.
6.
When pressing the clutch against the bearing (5) the knurled nut (8) must not touch the bearing. Check it by
7.
using a feeler gauge (9) or a label strip.
If the knurled nut touches the bearing, tighten the knurled nut a little and check the clearance again.
Press the clutch against the bearing and tighten the two set screws (7).
8.
Mount the complete motor bracket (2) with the screws (1).
9.
Ensure that all lugs (6) of the slip clutch snap into the slots of the tappet (3).
Put the plug of the motor into the corresponding socket.
10.
Adjust the torque of the new slip clutch (see section 5.6).
11.
34 Printer Applicator System PAM 3600
Page 35

Service Manual PAM 3600
5
3
3
4
4
5
6
6
7
7
2
2
1
1
1 2 3 4 5 6
5
3
3
4
4
5
6
6
7
7
2
2
1
1
1 2 3 4 5
Replacing the Slip Clutch on the Ribbon Supply Hub
Figure 4i Slip clutch on the ribbon supply hub
1 Snap ring
2 Washer
3 Clutch
4 Lug
5 Flat
6 Spring legs
4 Replacing Assembly Units
Remove the snap ring (1) and the washer (2).
1.
Remove the clutch (3).
2.
Insert the new clutch, make sure that the lug (4) is located between the spring legs (6) and that the clutch has
3.
the right position to the at (5) on the hub.
Remount the washer (2) and the snap ring (1).
4.
Replacing the Slip Clutch on the Internal Rewinder
Figure 4k Slip clutch on the internal rewinder
1 Snap ring
2 Washer
3 Clutch
4 Slot
5 Lug
Remove the CPU PCB.
1.
Remove the snap ring (1) and the washer (2).
2.
Remove the clutch (3).
3.
Insert the new clutch, make sure that the lugs (5) snap into the slots (4).
4.
Remount the washer (2) and the snap ring (1).
5.
Remount the CPU PCB.
6.
35Printer Applicator System PAM 3600
Page 36

4.8 Replacing the Main Drive Motor
Ribbon
G-TESTED
05/N31
MOTORHEADLOCKPERIPERIPANEL
PRINTHEAD
POMER SUPPLY
GAP SENSOR
IEEE1284
USB MASTER SERIAL
1 2
3 4 5 6
WARNING!
Mortal danger by electric shock!
Disconnect power supply!
Switch off compressed air!
Service Manual PAM 36004 Replacing Assembly Units
Figure 4l Replacing the main drive motor
1 CPU PCB
2 Plug
3 Gear
4 Belt
5 4 screws
6 Main drive motor
Remove the cover at the rear side.
1.
Loosen the belt (4) by taking off it from the gear (3).
2.
Pull out the plug (2) of the motor from the CPU PCB.
3.
Remove the four screws (5) of the motor (6).
4.
Replace the main drive motor (6).
5.
Fasten the motor by tightening the four screws (5).
6.
Put the plug (2) of the new motor into the socket of the PCB.
7.
Tighten the belt (4) by putting it on the gear (3).
8.
Mount the cover at the rear side.
9.
36 Printer Applicator System PAM 3600
Page 37

Service Manual PAM 3600 4 Replacing Assembly Units
1
3 42 5
4.9 Replacing the CPU PCB
WARNING!
Mortal danger by electric shock!
Disconnect power supply!
Switch off compressed air!
Figure 4m Replacing the CPU PCB
1 Fixing screw
2 Stepper motor driver
3 CPU PCB
4 Heat conductor pad
5 Cooling rib
If possible backup the settings of the printer conguration on a CompactFlash card as described in the chapter
1.
"Save NVRAM".
Pull out all interface connectors at the side of the printer.
2.
Remove a possibly installed interface card (Ethernet, USB Slave, Twinax-/Coax Converter, RS-422/485).
3.
Remove the cover.
4.
Remove the cable across the CPU PCB (3).
5.
Pull out all plugs of the CPU PCB (3).
6.
Remove the 4 screws (1) xing the PCB.
7.
Remove the CPU PCB (3).
8.
To provide reliable functioning of the printer, a good thermal contact between the stepper motor driver (2) on the
CPU PCB (3) and the cooling rib (5) of the chassis is necessary. Therefore a pad of heat conductor foil (4) is located
between the cooling rib and the stepper motor driver.
When replacing the CPU PCB, the pad may remain on the defective board. To replace a pad, one spare pad (Part
No. 5943182) is delivered with the replacement board.
9. Check if the heat conductor pad (4) is sticking on the cooling rib (5) after removing the defective board.
10. Before attaching the new heat conductor pad, remove any pieces of old foil from the cooling rib. Peel the cover
foil from the white pad surface rst and stick it to the cooling rib as shown in the gure.
11. Now peel the cover foil from the pink surface of the heat conductor pad.
37Printer Applicator System PAM 3600
Page 38

G-TESTED
05/N31
MOTORHEADLOCKPERIPERIPANEL
PRINTHEAD
POMER SUPPLY
GAP SENSOR
IEEE1284
USB MASTER SERIAL
ibbonR
9
6
7
11
10
12
13
14
8
Figure 4n Connectors at the CPU PCB
6 Label edge sensor
7 Low-voltage input from power pack
8 Printhead logic connector
9 Control panel
10 Transfer ribbon sensor
11 Applicator control PCB
12 Applicator control PCB (alternative)
13 Sensor transport locking roller
14 Motor
Service Manual PAM 36004 Replacing Assembly Units
Mounting the CPU PCB:
12. Attach the PCB and secure it with four screws M4x10 (1).
13. Insert all plugs (see gure 4n).
14. Reinstall the cable across the CPU PCB (3).
15. Reassemble the cover.
16. Reinstall the power supply connector and the connectors for the peripheral interfaces, your optional interface
card inclusive.
17. If necessary carry out a rmware update.
18. Adjust the label edge sensor (see section 5.8).
19. Perform the needful adjustments in the Printer Conguration.
38 Printer Applicator System PAM 3600
Page 39

Service Manual PAM 3600 4 Replacing Assembly Units
3
4
1
6
2
5
4.10 Replacing the Power Unit
WARNING!
Mortal danger by electric shock!
Disconnect power supply!
Switch off compressed air!
WARNING!
Mortal danger by electric shock!
While switched-on, the power unit has a voltage of up to 380 V as a function of the
capacitor. However, when the printer or power unit is switched off, this voltage falls to
non dangerous levels (< 42 V) within one minute. Be aware of these hazards!
Figure 4o Replacing the power unit
1 Fixing screw for the cover plate
2 Power input module connector
3 Cover plate
4 Fixing screw for the power unit
5 Power cable connector
6 Printhead power cable connector
Remove the cover.
1.
Dismount the CPU PCB as described in section 4.9.
2.
Remove the three screws M4x6 (1) and the cover plate (3).
3.
Pull out the following connectors from the power unit:
4.
- power input (2)
- power cable (5)
- printhead power connection (6).
Remove the two screws (4) and the power supply.
5.
To t the new power supply follow the above steps in reverse order.
6.
39Printer Applicator System PAM 3600
Page 40

Service Manual PAM 36004 Replacing Assembly Units
1 2 3
24
4.11 Replacing the Applicator Control PCB and Firmware Update of the Applicator Module
WARNING!
Mortal danger by electric shock!
Disconnect power supply!
Switch off compressed air!
Figure 4p Replacing the applicator control PCB
1 Fixing screw
2 Controller with rmware
3 Applicator control PCB
4 PLCC extractor
Replacing the PCB
Remove the cover.
1.
Dismount the CPU PCB as described in section 4.9.
2.
Pull out all plugs from the applicator control PCB (3).
3.
Remove the three screws (1) xing the PCB (3).
4.
Remove the PCB and replace it.
5.
Reassemble in reverse order.
6.
Firmware Update
Dismantle the applicator control PCB.
1.
Pull off the controller (2) with a PLCC extractor (4) and press in the controller containing the new rmware.
2.
Reassemble in reverse order.
3.
40 Printer Applicator System PAM 3600
Page 41

Service Manual PAM 3600 4 Replacing Assembly Units
Ribbon
G-TESTED
05/N31
MOTORHEADLOCKPERIPERIPANEL
PRINTHEAD
POMER SUPPLY
GAP SENSOR
IEEE1284
USB MASTER SERIAL
LED8
STRT1
LED7
EUEB
LED6
RST
LED5
ESP
LED4 LED3
START
LED9
VWE
LED10
VWT
LED11
TIV
LED12
TIH DKO
LED14
DKU
LED1
LED2
CON3
CON5
CON6
CON4
CON8
CON7
CON2
CON1
OC4
OC3
OC5
OC7
OC6
OC8
OC1
OC2
OC9
OC10
IC8 IC5 IC4
IC7
IC9
IC6
IC1
C1
Q1
C2C2
C23
C3
IC2
IC3
LED13
1 2 3 4 6 75
4.12 Replacing the Sensors
WARNING!
Mortal danger by electric shock!
Disconnect power supply!
Switch off compressed air!
Sensors of the Printer Module
Figure 4q Replacing the sensors of the printer module
1 Cable holder, sensors peel-off table
2 Cable holder, sensor printhead cylinder
3 Applicator control PCB
4 Plug for switch paper end
5 Plug for sensors peel-off table and printhead cylinder
6 CPU PCB
7 Plug for sensor transport locking roller
41Printer Applicator System PAM 3600
Page 42

Sensors peel-off table
View AC
A
B
D-A93V
D-A93V
View B
View C
11 12 129 108 10
Service Manual PAM 36004 Replacing Assembly Units
Figure 4r Replacing the sensors peel-off table
8 Canal
9 Cable
10 Screw
11 Base plate
12 Sensor peel-off table
Remove label stock and transfer ribbon from the printer.
1.
2.
3.
4.
Remove the cover.
Remove the cable from the cable holder (1).
Remove the plug (5) from the applicator control PCB (3), loosen the screws of the concerning cable and
remove it.
Loosen the screw (do not remove it) on the concerning sensor (12) and remove the sensor.
5.
Pull out the cable with the sensor.
6.
Therefore loosen (not remove) the two screws (10) on the base plate (11) below the peel-off table.
Now it is possible to move the cylinder above the base plate to push the sensor with the cable (9) through the
canal (8) and the mounting plate to the rear side.
Replace the sensor and reassemble in reverse order.
7.
NOTICE!
Pay attention before tighten the two screws (10):
Put the cable carefully in the canal (8) and click the holes of the cylinder into the positioning
pins at the base plate.
8. Connect the printer to the power supply, switch on printer and compressed air.
9. Check the replaced sensor of correct adjusting and adjust it if necessary (see section 5.4).
42 Printer Applicator System PAM 3600
Page 43

Service Manual PAM 3600 4 Replacing Assembly Units
13 14
View A
A
15 1516 17 18
Sensor transport locking roller
Figure 4s Preparation
13 Head plate
14 5 screws
Remove label stock and transfer ribbon from the printer.
1.
Remove the cover.
2.
Pull out the concerning plug (g. 4q, 7) on the CPU PCB (g. 4q, 6).
3.
Loosen the ve screws (14) and remove the head plate (13).
4.
Move the whole mounting forward.
5.
Figure 4t Replacing the sensor transport locking roller
15 Screw
16 Bracket
17 Screw
18 Sensor transport locking roller
6. Loosen the two screws (15) on the bracket (16).
7. Take out the bracket with the mounted sensor.
8. Loosen the two screws (17) holding the sensor (18).
9. Replace the sensor and reassemble in reverse order.
10. Connect the printer to the power supply, switch on printer and compressed air.
43Printer Applicator System PAM 3600
Page 44

Sensors printhead cylinder
19 19
Service Manual PAM 36004 Replacing Assembly Units
Figure 4u Replacing the printhead cylinder sensors
19 Printhead cylinder sensor
Remove the cover.
1.
Loosen the screw on the concerning sensor (19).
2.
Remove the cable from the cable holder (g. 4q, 2).
3.
Remove the plug (g. 4q, 5) from the applicator control PCB (g. 4q, 3), loosen the screws of the concerning
4.
cable and remove it.
Replace the sensor and reassemble in reverse order.
5.
Connect the printer to the power supply, switch on printer and compressed air.
6.
Check the replaced sensor of correct adjusting and adjust if necessary (see section 5.5).
7.
44 Printer Applicator System PAM 3600
Page 45

Service Manual PAM 3600 4 Replacing Assembly Units
BLOW-
AIR
VACUUM
LIFT
CYL.
BRAKE
TABLE
SUPPORT
AIR
PRINT
HEAD
ROTATE
CYL.
20 2221 23
Switch paper end
Figure 4v Replacing switch paper end
20 Switch paper end
21 3 screws
22 Plate
23 Screw
Remove label stock and transfer ribbon from the printer.
1.
Remove the cover.
2.
Remove the ange and the adapter from the media supply hub.
3.
Remove the three screws (21) and the plate (22) from the media supply hub.
4.
Remove the two screws of the micro switch paper end (20).
5.
Pull out the concerning plug (g. 4q, 4) on the applicator control PCB (g. 4q, 3).
6.
Remove the four screws (23), move the manifold assembly with the concerning PCB and pull out the plug (g.
7.
4q, 4) through the hole in the mounting plate.
Mount all components in reverse order.
8.
45Printer Applicator System PAM 3600
Page 46

1 1 1
9135303_02
2
1
3
4
5
7
8
6
9
2 3
4 Replacing Assembly Units
Sensors of the Applicator Module
Service Manual PAM 3600
Figure 4w Unscrewing the sensors of the applicator module
1 Sensors
Unscrew the respective sensor (1) by loosening the corresponding screw.
1.
Figure 4x Replacing the sensors of the applicator module
2 Plug
3 Screw
2. Pull out the plug (2).
3. Remove the cover of the plug by loosen the screw (3).
4. Remove the concerning cable from the connector by loosen the respective screws.
5. Open the energy-chains if necessary (see section 4.13).
6. Replace the sensor and reassemble in reverse order.
7. Connect the printer to the power supply, switch on printer and compressed air.
8. Adjust the replaced sensor if necessary (see section 5.14).
46 Printer Applicator System PAM 3600
Page 47

Service Manual PAM 3600 4 Replacing Assembly Units
2 31
4.13 Disassembling the Energy-Chains
If a cable contained in the energy-chains is to be changed, proceed as follows:
Figure 4y Disassembling the energy-chains
1 2 screws
2 Holder
3 First track link
Loosen the two screws (1) of one of the holders (2) and take the chains from the holder.
1.
Zip the outer side of the chains open by pulling out the rst track link (3).
2.
Change the respective cable and reassemble the chains in reverse order.
3.
47Printer Applicator System PAM 3600
Page 48

5 Adjustments
1 2 3
A
2 4
5.1 Adjusting the Peel-off Table
For optimum print and application quality, it is important to adjust the front position and the back position of the peeloff table exactly.
This adjustment has already been performed in the factory. Nevertheless, it may become necessary to adjust it.
WARNING!
Mortal danger by electric shock!
Disconnect power supply!
Switch off compressed air!
Service Manual PAM 36005 Adjustments
Figure 5a Adjusting the peel-off table
1 Peel-off table
2 Threaded pin with nut
3 Bearing plate
4 Threaded pin with nut
Adjusting the front position
Slide the peel-off table (1) to its front position.
1.
Check the front position by measuring the distance A between the rear edge of the table (1) and the front edge
2.
of the bearing plate (3).
A distance A on 52 ± 0.2 mm is recommended.
If an adjusting is necessary, carry out the following steps.
Loosen the nut on the threaded pin (2).
3.
Align the table to the recommended value by turning the threaded pin (2).
4.
Tighten the nut on the threaded pin (2).
5.
Check the function of the sensor for the front position of the peel-off table (see section 5.4).
6.
Adjusting the back position
Slide the peel-off table (1) to its back position.
1.
Check the back position by measuring the distance A between the rear edge of the table (1) and the front edge
2.
of the bearing plate (3).
A distance A on 26 ± 0.2 mm is recommended.
If an adjusting is necessary, carry out the following steps.
Loosen the nut on the threaded pin (4).
3.
Align the table to the recommended value by turning the threaded pin (4).
4.
Tighten the nut on the threaded pin (4).
5.
Check the function of the sensor for the back position of the peel-off table (see section 5.4).
6.
48 Printer Applicator System PAM 3600
Page 49

Service Manual PAM 3600 5 Adjustments
1 2 3 4 5
5.2 Adjusting the Printhead
For optimum print quality, the line of heating elements on the printhead must be parallel and adjusted correctly to
the print roller. This adjustment has already been performed in the factory.
Nevertheless, it may become necessary to adjust it.
A misaligned printhead causes a poor quality which appears as described below:
the print image looks generally light, spotted, and irregular or
•
the print image appears uneven from one side to the other.
•
When these errors occur it is recommended to adjust the printhead.
WARNING!
Mortal danger by electric shock!
Disconnect power supply!
Switch off compressed air!
Figure 5b Adjusting the printhead
1 Screw
2 Printhead mounting screw
3 Nut
4 Screw
5 Screw
Adjusting the printhead horizontally parallel to the print roller
Leave the material inside the printer.
1.
Release the printhead mounting screw (2).
2.
Adjust the printhead by turning the both screws (5).
3.
Perform a test print.
4.
Horizontal lines must be parallel to the label edge
Go on adjusting if necessary.
5.
Tighten the printhead mounting screw (2) if the adjustment is nished.
6.
Adjusting the printhead vertically parallel to the print roller
Leave the material inside the printer.
1.
Loosen the screw (1).
2.
Loosen the nut (3).
3.
Adjust the printhead by turning the screw (4).
4.
Perform a test print, for instance a wide black line over the whole width of the label.
5.
Go on adjusting if necessary.
6.
Tighten the nut (3) and the screw (1) if the adjustment is nished.
7.
49Printer Applicator System PAM 3600
Page 50

5.3 Adjusting the Guide Plate
1 21 4 133 5
It is possible that the guide plate (2) becomes loose by the movement during the operating process. For that reason
it is necessary to readjust the guide plate to guarantee a proper print image.
WARNING!
Mortal danger by electric shock!
Disconnect power supply!
Switch off compressed air!
Service Manual PAM 36005 Adjustments
Figure 5c Adjusting the guide plate
1 Guide wheel
2 Guide plate
3 Guide wheel
4 Bushing
5 Nut
Remove the cover.
1.
Check the clearance of the guide plate (2) by moving the four guide wheels (1, 3) on both sides of the plate
2.
manually.
When the clearance is too large it is possible to move the wheels lightly.
Loosen the nuts (5) of the two guide wheels (1) on the left side.
3.
Tighten the two guide wheels (1) by screwing the respective hexagon adapter bushing (4) to readjust the guide
4.
plate. These wheels are mounted eccentrically.
Tighten the two nuts (5).
5.
Mount the cover.
6.
50 Printer Applicator System PAM 3600
Page 51

Service Manual PAM 3600 5 Adjustments
LIFT
CYL.
VACUUM
BLOW-
AIR
BRAKE
TABLE
SUPPORT
AIR
PRINT
HEAD
ROTATE
CYL.
1
2 3
D-A93V
D-A93V
4
5 6
5.4 Adjusting the Sensors of the Peel-off Table
After replacing a sensor ore after mechanical adjustments it is necessary to adjust the sensors of the peel-off table.
The correct adjustment of the peel-off table can be checked by watching the concerning LEDs on the applicator
control PCB. If one of the LEDs does not shine during the table movement the sensor has to be adjusted.
Figure 5d Checking the LEDs
1 Valve key table
2 LED TIV
3 LED TIH
Remove the cover.
1.
Release a movement of the table (4) by pressing the integrated key (1) on the concerning valve.
2.
Check the LEDs (2, 3).
3.
LED TIV (2) must shine if the front position of the table is adjusted.
LED TIH (3) must shine if the back position of the table is adjusted.
Figure 5e Setting the peel-off table position
4 Table
5 Upper sensor - front position
6 Lower sensor - back position
4. Loosen the screw on the concerning sensor (5, 6) by using a 1 mm screwdriver.
The lower sensor (6) recognizes the back position of the peel-off table. LED TIH (3) is shining.
5. Shift the respective sensor (5, 6).
6. Release a movement of the table (4) by pressing the integrated key (1) on the concerning valve.
The upper sensor (5) recognizes the front position of the table. LED TIV (2) is shining.
7. Check the LEDs (2, 3).
8. Repeat the adjustment if necessary.
9. Tighten the screw on the sensor if the table is adjusted correctly.
10. Mount the cover.
51Printer Applicator System PAM 3600
Page 52

5.5 Adjusting the Sensors of the Printhead
LIFT
CYL.
VACUUM
BLOW-
AIR
BRAKE
TABLE
SUPPORT
AIR
PRINT
HEAD
ROTATE
CYL.
1
2
3
4
5
After replacing a sensor it is necessary to align the concerning sensor of the printhead.
By watching the concerning LEDs on the applicator control PCB the correct adjustment of the printhead can be
checked. If one of the LEDs is not shining during the printhead movement the sensor has to be adjusted.
Figure 5f Checking the LEDs
1 Valve key printhead
2 LED DKO
3 LED DKU
Service Manual PAM 36005 Adjustments
Remove the cover.
1.
Release a movement of the printhead by pressing the integrated key (1) on the concerning valve.
2.
Check the LEDs (2, 3).
3.
Figure 5g Setting the printhead position
4 Left sensor - upper position
5 Right sensor - lower position
4. Loosen the screw on the concerning sensor (4, 5) by using a 1 mm screwdriver.
The left senor (4) recognizes the upper position of the printhead.
The right sensor (5) recognizes the lower position of the printhead.
5. Shift the respective sensor (4, 5).
NOTICE!
The ribbon consumption is dependent on the right sensor for the lower position (5).
To save ribbon, adjust this sensor in the lowest possible position.
6. Release a movement of the printhead by pressing the integrated key (1) on the concerning valve.
7. Check the LEDs (2, 3).
8. Repeat the adjustment if necessary.
9. Tighten the screw on the sensor if the printhead is adjusted correct.
10. Mount the cover.
52 Printer Applicator System PAM 3600
Page 53

Service Manual PAM 3600 5 Adjustments
Bereit
1
2
5.6 Adjusting the Torques at the Hubs
The rewinders for the transfer ribbon and the media are equipped with slip clutches. The transfer ribbon supply hub
is braked during printing by another slip clutch. The slip clutches are used to adjust the torques of the hubs.
The correct adjustment of the torques of these clutches is essential:
Ribbon take up hub for the exact transport of the transfer ribbon during label transport,
Internal rewinder for a good rewinding quality at the media,
Ribbon supply hub for avoiding wrinkles at the transfer ribbon feed.
The rotation is characterized by the torque. The torque results from the traction F which works vertical to the rotary
axis and the distance l between the working line of the traction and the rotary axis.
So the physical relation between torque and traction is as follows:
M = F x l M = torque
F = traction
l = distance
Measuring the Traction at the Internal Rewinder
The traction is measured by using a string which is wound around the rewinder.
In this case the distance l results from the radius of the rewind hub (20 mm).
Figure 5h Measuring the traction at the internal rewinder
1 Spring scale, 25 N
2 Internal rewinder
Remove all label stock from the printer.
1.
Wind the string several times around the internal rewinder (2).
2.
NOTICE!
Pay attention to the wind direction as shown in the gure.
3. Attach the spring scale (1), 25 N, to the end of the string and move it vertically upwards until the hub starts to
rotate.
4. Read the measured traction value F.
If the readings differ from the set value, the clutch has to be adjusted.
Set value:
Internal rewinder M = 20 - 30 Ncm
l = 2 cm
--> F = 10 - 15 N
53Printer Applicator System PAM 3600
Page 54

Service Manual PAM 36005 Adjustments
Bereit
Bereit
41 2
32
1
Measuring the Traction at the Ribbon Take Up and the Ribbon Supply Hub
The traction at the ribbon take up and at the supply hub is measured by using a test collar (Part no. 5534199).
In this case the distance l results from the radius of the test collar (30 mm).
Figure 5i Measuring the traction at the hubs of the transfer ribbon
1 Spring scale, 10 N
2 Test collar
3 Ribbon take up hub
4 Ribbon supply hub
Remove the transfer ribbon from the printer.
1.
Attach the test collar (2) to the appropriate hub (3 or 4).
2.
Clamp the test collar (2) with the spreading mechanism (turn the knurled nut in counterclockwise direction).
3.
Wind the string attached to the test collar (2) several times around it.
4.
NOTICE!
Pay attention to the wind direction as shown in the gure.
5. Attach the spring scale (1), 10 N, to the end of the string and move it vertically upwards until the hub starts to
rotate.
6. Read the measured traction value F.
If the readings differ from the set values, the concerning clutch has to be adjusted.
Set values:
Transfer ribbon take up hub M = 10.5 - 13.5 Ncm
l = 3 cm
--> F = 3.5 - 4.5 N
Transfer ribbon supply hub M = 4.5 - 6.0 Ncm
l = 3 cm
--> F = 1.5 - 2.0 N
54 Printer Applicator System PAM 3600
Page 55
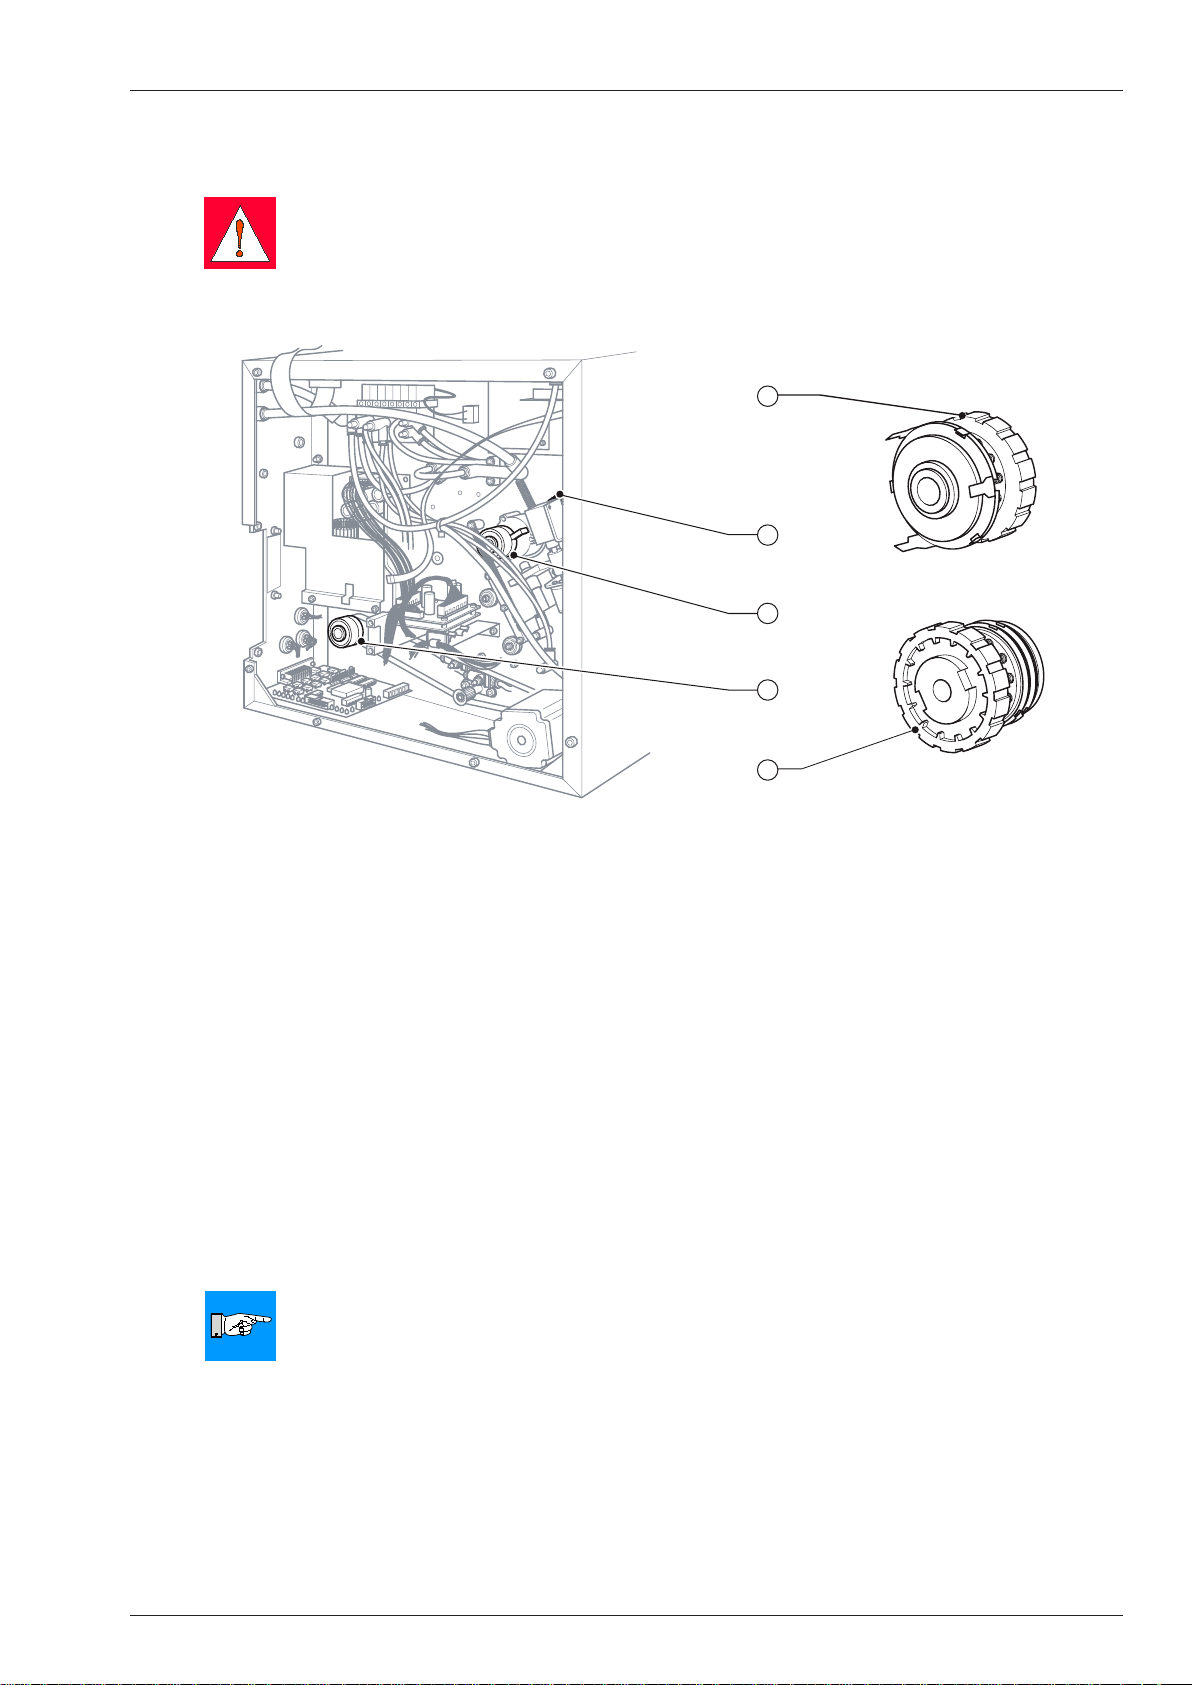
Service Manual PAM 3600 5 Adjustments
5
3
3
4
4
5
6
6
7
7
2
2
1
1
2
3
4
5
1
Adjusting the Torques
If the measured values differ from the set values proceed the adjustment as follows.
WARNING!
Mortal danger by electric shock!
Disconnect power supply!
Switch off compressed air!
Figure 5k Adjusting the torques
1 Knurled nut of the clutch ribbon take up hub
2 Clutch of the ribbon take up hub
3 Clutch of the ribbon supply hub
4 Clutch of the internal rewinder
5 Knurled nut of the clutches ribbon supply hub and internal rewinder
Remove the cover.
1.
To adjust the torque at the internal rewinder, remove the CPU PCB (see section 4.9).
2.
Ribbon supply hub and internal rewinder:
3.
Adjust the winding torque by pressing in the knurled nut (5) of the corresponding clutch (3, 4) and turning it.
Note the numbers on the nut:
Turning to a higher number increases the torque,
turning to a lower number decreases the torque.
Ribbon take up hub:
Adjust the winding torque by turning the knurled nut (1) of the clutch (2).
Turning it counterclockwise increases the torque,
turning it clockwise decreases the torque.
NOTICE!
If there are numbers on the knurled nut, they are no setting values but for orientation only.
4. Repeat the measuring.
5. Remount the CPU PCB if necessary and mount the cover.
6. Connect the printer to the power supply, switch on printer, switch on compressed air.
55Printer Applicator System PAM 3600
Page 56

5.7 Adjusting the Brake at the Media Supply Hub
Bere
it
1 4 5 6 7
1 3 4 5 6
2
The media supply hub is equipped with a brake system. The torque of this system is depending by the position of
the swing arm (1).
This system of brake and swing arm make it possible:
to speed up the media supply hub soft also when using heavy label stock and high print speed,
•
to guarantee a nearly constant torque at the media regardless of the diameter of the label stock, this is
•
necessary for a precise media movement.
A misaligned system can cause several errors as follows:
The swing arm hits the upper limitation, it is forming a loop of media and the media runs sideward, so it can
•
cause damages of the media.
The swing arm hits the lower limitation, this can cause a faulty media transport mainly when speeding up heavy
•
label stock.
Service Manual PAM 36005 Adjustments
Figure 5l Brake at the media supply hub
1 Swing arm
2 Media supply hub
3 Tension spring attachment
4 Fixing screw
5 Tension spring
6 Slotted hole plate (standard attachment)
Normally, it is not necessary to adjust the brake.
In exceptional cases, e.g. for particularly loosely wound labels, the tension spring attachment (3) is to be adjusted.
Loosen the xing screw (4), shift the slotted hole plate (6) accordingly and tighten the screw (4) again.
56 Printer Applicator System PAM 3600
Page 57

Service Manual PAM 3600 5 Adjustments
LIFT
CYL.
VACUUM
BLOW-
AIR
BRAKE
TABLE
SUPPORT
AIR
PRINT
HEAD
ROTATE
CYL.
2 31
5.8 Adjusting the Label Edge Sensor
To adjust the label edge sensor see section 2.4.
5.9 Setting the Speed of the Compressed Air Driven Assemblies
Setting the Speed of the Peel-off Table Movement
The speed of the peel-off table movement can be set via two valves. Those valves regulate the speed of the
compressed air.
Figure 5m Setting the speed of the peel-off table movement
1 Valve for forward movement
2 Valve for backward movement
3 Valve key table
Remove the cover.
1.
Turn one of the valves (1, 2) to regulate the speed.
2.
Turning clockwise will close the valves.
A wider opening of the top valve (1) speeds up the table moving forward.
-
A wider opening of the bottom valve (2) accelerates the backward movement.
-
3. Check the speed by releasing a movement of the table. For that purpose press the integrated key (3) on the
concerning valve.
4. If the setting is correct mount the cover.
57Printer Applicator System PAM 3600
Page 58

Service Manual PAM 36005 Adjustments
LIFT
CYL.
VACUUM
BLOW-
AIR
BRAKE
TABLE
SUPPORT
AIR
PRINT
HEAD
ROTATE
CYL.
2 31
Setting the Speed of the Printhead Movement
The speed of the printhead movement can be set via two valves. Those valves regulate the speed of the
compressed air.
Figure 5n Setting the speed of the printhead movement
1 Valve for upward movement
2 Valve for downward movement
3 Valve key printhead
Remove the cover.
1.
Turn one of the valves (1, 2) to regulate the speed.
2.
Turning clockwise will close the valves.
A wider opening of the top valve (1) speeds up the printhead moving upward.
-
A wider opening of the bottom valve (2) accelerates the downward movement.
-
3. Check the speed by releasing a movement of the printhead. For that purpose press the integrated key (3) on
the concerning valve.
4. If the setting is correct mount the cover.
58 Printer Applicator System PAM 3600
Page 59

Service Manual PAM 3600 5 Adjustments
LIFT
CYL.
VACUUM
BLOW-
AIR
BRAKE
TABLE
SUPPORT
AIR
PRINT
HEAD
ROTATE
CYL.
1 2 3
6 54 5
Setting the Speed of the Turn/Lift Cylinder Movement
The speed of the turn cylinder (PAM 3602) respective the lift cylinder (PAM 3603) movement also can be set via two
valves.
Figure 5o Setting the speed of the turn/lift cylinder movement
1 Valve key turn/lift cylinder
2 Valve for movement from the dispense edge
3 Valve for movement to the dispense edge
4 Pad PAM 3603
5 Dispense edge
6 Pad PAM 3602
Remove the cover.
1.
Turn one of the valves (2, 3) to regulate the speed.
2.
Turning clockwise will close the valves.
A wider opening of the top valve (2) speeds up the pad (4, 6) moving from the dispense edge (5) of the
-
printer.
A wider opening of the bottom valve (3) speeds up the pad (4, 6) moving to the dispense edge (5) of the
-
printer.
3. Check the speed by releasing a movement of the turn/lift cylinder. For that purpose press the integrated key (1)
on the concerning valve.
4. If the setting is correct mount the cover.
5. Check the time for the turning movement.
59Printer Applicator System PAM 3600
Page 60

Service Manual PAM 36005 Adjustments
LIFT
CYL.
VACUUM
BLOW-
AIR
BRAKE
TABLE
SUPPORT
AIR
PRINT
HEAD
ROTATE
CYL.
1 2 3 4
Setting the Speed of the Main Cylinder Movement
The speed of the lift cylinder movement can be set via two throttle valves which are mounted on the cylinder.
Those valves regulate the speed with which the compressed air escapes the two air containers.
The valves are adjustable by turning the respective throttle screws.
Figure 5p Setting the speed of the main cylinder movement
1 Bottom valve main cylinder
2 Top valve main cylinder
3 Valve key main cylinder upward
4 Valve key main cylinder downward
Remove the cover.
1.
Turn the screw in the bottom valve (1) to set the speed of the downward movement.
2.
Turn the screw in the top valve (2) to set the speed of the upward movement.
Turning clockwise will close the valves.
A wider opening of the bottom valve (1) speeds up the pad moving down.
A wider opening of the top valve (2) accelerates the upward movement.
-
4. Check the speed by releasing a movement of the main cylinder. For that purpose press the integrated key (3,
4) on the concerning valve.
Pressing the key (4) the downward movement (bottom valve) is carrying out.
Pressing the key (3) the upward movement (top valve) is carrying out.
-
5. If the setting is correct mount the cover.
60 Printer Applicator System PAM 3600
Page 61

Service Manual PAM 3600 5 Adjustments
BLOW-
AIR
VACUUM
LIFT
CYL.
BRAKE
TABLE
SUPPORT
AIR
PRINT
HEAD
ROTATE
CYL.
1 2 4 2 63 5
5.10 Pneumatic Setting of the Printhead Pressure
If there are problems with the print quality the pressure of the printhead can be measured and adjusted to the
recommended value.
Figure 5q Setting the printhead pressure
1 Screw
2 Tube
3 Valve key printhead
4 Tube
5 T-tting
6 Manometer
Switch off the printer, switch off the compressed air.
1.
Remove the cover.
2.
Pull the tube (2) out of the pressure regulator of the printhead valve and push it into the push-in T-tting (5) of
3.
the manometer (6).
Push the tube (4) of the manometer (6) into the regulator of the printhead valve.
4.
Switch on the printer, switch on the compressed air.
5.
Release a printhead movement by pressing the integrated key (3) on the valve.
6.
During pressing the key it is possible to measure the value of the compressed air on the printhead cylinder.
7.
The recommended value is 6 bar.
If necessary set the compressed air value to the recommended value by turning the screw (1) on the pressure
8.
regulator of the printhead valve.
To reach the value of 6 bar, the valve must be opened completely by turning the screw clockwise.
9. Switch off the printer, switch off the compressed air.
10. Restore the normal tube connection.
11. Mount the cover.
61Printer Applicator System PAM 3600
Page 62

5.11 Pneumatic Setting of the Brake
BLOW-
AIR
VACUUM
LIFT
CYL.
BRAKE
TABLE
SUPPORT
AIR
PRINT
HEAD
ROTATE
CYL.
1 2
3 2 54
If there are problems with the brake during operation the pressure of the brake can be measured and adjusted to
the recommended value.
Service Manual PAM 36005 Adjustments
Figure 5r Setting the pressure on the brake
1 Screw
2 Tube
3 Tube
4 T-tting
5 Manometer
Switch off the printer, switch off the compressed air.
1.
Remove the cover.
2.
Pull the tube (2) out of the valve of the brake and push it into the push-in T-tting (4) of the manometer (5).
3.
Push the tube (3) of the manometer (5) into the valve of the brake.
4.
Switch on the printer, switch on the compressed air.
5.
Measure the value of the compressed air on the brake.
6.
If necessary set the compressed air value to the recommended value by turning the screw (1) on the valve.
7.
The recommended value is 2 bar.
Switch off the printer, switch off the compressed air.
8.
Restore the normal tube connection.
9.
Mount the cover.
10.
62 Printer Applicator System PAM 3600
Page 63

Service Manual PAM 3600 5 Adjustments
BLOW-
AIR
VACUUM
LIFT
CYL.
BRAKE
TABLE
SUPPORT
AIR
PRINT
HEAD
ROTATE
CYL.
1 2
5.12 Pneumatic Setting of the Supporting Air
If a blow tube is installed sometimes it is necessary to set the strength of the supporting air.
It is dependent from the size and the format of the label.
Figure 5s Setting the strength of the supporting air
1 Screw
2 Valve key supporting air
Remove the cover.
1.
Set the supporting air by turning the screw (1) on the concerning valve.
2.
Check the supporting air on the blow tube by pressing the integrated key (2) of the valve.
3.
Mount the cover.
4.
63Printer Applicator System PAM 3600
Page 64

5.13 Pneumatic Setting of the Table
BLOW-
AIR
VACUUM
A
View A
LIFT
CYL.
BRAKE
TABLE
SUPPORT
AIR
PRINT
HEAD
ROTATE
CYL.
H5/06
8
6
4
2
0
16
14
12
10
200
150
100
50
psi
bar
1bar=0,1MPa
1 2 5 6 443
If there are problems with the table during operation the pressure of the table can be measured and adjusted to the
recommended value.
Service Manual PAM 36005 Adjustments
Figure 5t Setting the pressure on the table
1 Screw
2 Tube
3 Valve key table
4 Manometer
5 T-tting
6 Tube
Switch off the printer, switch off the compressed air.
1.
Remove the cover.
2.
Pull the tube (2) out of the valve of the table and push it into the push-in T-tting (5) of the manometer (4).
3.
Push the tube (6) of the manometer (4) into the valve of the table.
4.
Switch on the printer, switch on the compressed air.
5.
Measure the value of the compressed air on the table.
6.
If necessary set the compressed air value to the recommended value by turning the screw (1) on the valve.
7.
The recommended value is 2 bar.
Switch off the printer, switch off the compressed air.
8.
Restore the normal tube connection.
9.
Mount the cover.
10.
64 Printer Applicator System PAM 3600
Page 65

Service Manual PAM 3600 5 Adjustments
1 2 3
5.14 Adjusting the Sensors of the Applicator Module
Normally the sensors are adjusted by the factory. But it can be necessary to adjust the sensors e.g. after replacing
one of the sensors.
Adjusting the Sensor Turn/Lift Cylinder
The sensor checks the movement of the turn respective the lift cylinder.
PAM 3602:
Sensor (1) recognizes if the turn cylinder is in the 90°-position (away from the peel-off edge).
Sensor (2) recognizes if the turn cylinder is in the 180°-position (away from the peel-off edge).
PAM 3603:
Sensor (3) recognizes if the lift cylinder is in the position away from the peel-off edge.
Figure 5u Adjusting the sensor turn/lift cylinder
1 Sensor turn cylinder PAM 3602 for 90°-position
2 Sensor turn cylinder PAM 3602 for 180°-position
3 Sensor lift cylinder PAM 3603
Switch off the compressed air.
1.
Check the integrated LED of the respective sensor.
2.
The LED is switched on if the sensor (1, 2, 3) is adjusted correctly in his position.
If the sensor (1, 2, 3) is not adjusted correctly, loosen the screw on the sensor using a 1,2 mm allen key, slide
3.
the sensor until the LED is switched on and tighten the screw.
Move the pad manually and check if the LED is switched on and off correctly.
4.
Repeat the adjustment if necessary.
5.
Switch on the compressed air.
6.
65Printer Applicator System PAM 3600
Page 66

Service Manual PAM 36005 Adjustments
1
2
Adjusting the Labeling Position Sensor
This sensor checks if the main cylinder reaches the application position. If the pad is in the position to apply the
label (lower end position) the integrated LED is switched on.
The labeling pressure for stamping the label onto the product can be altered by moving the labeling position sensor.
Figure 5v Adjusting the labeling position sensor
1 Screw
2 Sensor
Switch off the compressed air.
1.
Loosen the screw (1).
2.
Move the sensor (2).
3.
Moving the sensor (2) upwards will reduce the labeling pressure.
Tighten the screw (1).
4.
Switch on the compressed air.
5.
66 Printer Applicator System PAM 3600
Page 67

Service Manual PAM 3600 5 Adjustments
1
2
3
Adjusting the Sensor 1 Main Cylinder
The sensor checks if the main cylinder reaches its upper end position. If the sensor is adjusted exactly the
integrated LED is switched on.
Figure 5w Adjusting the sensor 1 main cylinder
1 Sensor
2 Screw
3 Holder
Switch off the compressed air.
1.
Check the integrated LED.
2.
The LED is switched on if the sensor (1) is adjusted correctly in the upper end position.
If the sensor (1) is not adjusted correctly, loosen the screw (2) of the holder (3), slide the holder until the LED is
3.
switched on and tighten the screw (2).
Slide the manual valve on the applicator to the bleed position.
4.
Move the cylinder manually and check if the LED is switched on and off correctly.
5.
Repeat the adjustment if necessary.
6.
Slide the manual valve on the applicator to the operate position.
7.
Switch on the compressed air.
8.
67Printer Applicator System PAM 3600
Page 68

Service Manual PAM 36005 Adjustments
1
2
3
4
5
6
Adjusting the Sensors 2 Main Cylinder (PAM 3602 only)
There are two sensors 2 main cylinder to check if the pad reaches the intermediate position correctly. At the
intermediate position the turn cylinder carries out the swing movement of the pad. It is very important that the pad
swings without damage. For that reason the area for the swing movement has to be free.
The upper sensor recognizes this position during the movement downward and the lower sensor during the
movement upward.
If the sensors are adjusted correct the integrated LED of the corresponding sensor is switched on and off during the
cylinder movement.
The sensors have to adjust corresponding to the special requirements.
Figure 5x Adjusting the sensors 2 main cylinder
1 Screw
2 Upper sensor
3 Holder
4 Screw
5 Lower sensor
6 Holder
Switch off the compressed air.
1.
Slide the manual valve on the applicator to the bleed-position.
2.
Move the cylinder manually downward.
3.
Check on which position it is possible to swing the pad without collision with the putting up area or any other
components.
Adjust the upper sensor (2) by loosen the screw (1) and sliding the holder (3) into the required position so, that
4.
the sensor could recognize this position. Tighten the screw (1).
Move the cylinder up and down and check if the LED integrated in the sensor (2) is switched on and off.
5.
Move the cylinder manually upward.
6.
Check on which position it is possible to swing the pad without collision with the putting up area or any other
components.
Adjust the lower sensor (5) by loosen the screw (4) and sliding the holder (6) into the required position so, that
7.
it could recognize this position.
Move the cylinder up and down and check if the LED integrated in the sensor (5) is switched on and off.
8.
Slide the manual valve on the applicator to the operate position.
9.
Switch on the compressed air.
10.
Release a labeling process by alternately pressing the "feed" key and the pre-dispense key on the printer.
11.
Check the movement of the main and the turn cylinder and if the integrated LEDs are switched on and off.
12.
Readjust the respective sensor if necessary.
13.
The upper sensor (2) checks the Stop during the movement downward,
The lower sensor (5) checks the Stop during the movement upward.
68 Printer Applicator System PAM 3600
Page 69

Service Manual PAM 3600 6 Problem Solution
6 Problem Solution
6.1 Errors During Printing
Error Cause and Solution
The printer has a print job but
does not print
Transfer ribbon wrinkles Printhead balance is not correctly adjusted; re-adjust the printhead balance (see
Printed image has smears or
voids.
Printed image is lighter on one
side.
Printed image is too light after
replacing the printhead.
Printer does not stop after transfer ribbon runs out.
Printer does not print;
error message
"Out of Paper" or
"No label found"
Printer moves label stock, but
transfer ribbon does not move.
Printer prints sequence of characters instead of label format.
Printer prints every second label. Label height setting in software is too large; correct setting.1.
Vertical white lines in the printed
image.
Error message ”Out of ribbon”
although ribbon is still available.
Printhead is not in its upper
position; error message
"Head not up"
is shown in the display.
Printhead is not in its lower posi-
tion; error message
"Head not down"
is shown in the display.
Table is not in its rear position;
error message "Table not in rer"
is shown in the display.
The input signals to start the print of every single label is not connected or not used;
1.
check the connections at the PLC interface.
1.
Operator‘s Manual).
Transfer ribbon is too wide; use transfer ribbon which is max. 10% wider than the
2.
label media.
Not enough ribbon tension; check tension at ribbon supply hub.
3.
Printhead is dirty; clean the printhead.
1.
Temperature too high; reduce heat setting using software.
2.
Unsuitable ribbon/label combination; choose a different transfer ribbon.
3.
Printhead is dirty; clean the printhead.
1.
Printhead is out of alignment; re-align the printhead.
2.
Printhead balance is not correctly adjusted; re-adjust the printhead balance (see
3.
Operator‘s Manual).
Printhead out of adjustment; re-adjust printhead.
1.
Printhead parameter set incorrectly; change heat level in the setup.
2.
Printer is set to direct thermal printing, choose transfer printing mode in the soft-
1.
ware.
Labels not fed through label edge sensor, load labels correctly.
1.
Label edge sensor dirty, clean label edge sensor.
2.
Label edge sensor is not adjusted (f.e. after replacing the CPU PCB); carry out the
3.
adjustment.
Label edge sensor defective, replace sensor.
4.
Swing arm in upper end position, since the release spring for swing arm is misad-
5.
justed, re-adjust the release spring.
Swing arm in upper end position, since label roll is not locked at the media unwind-
6.
er. Lock the label roll using the adapters.
Transfer ribbon loaded incorrectly; check if coated side is facing towards the labels.
1.
Unsuitable ribbon/label combination, leads to insufcient friction between labels and
2.
ribbon; choose different transfer ribbon.
Torques at the ribbon hubs are misadjusted, re-adjust the torques.
3.
Printer in monitor (ASCII dump) mode; quit this mode by pressing the key.1.
Printhead is dirty; clean the printhead.
1.
Printhead defective (failure of heating elements); replace printhead.
2.
Transfer ribbon roll is not locked to the take up hub; take up does not turn; tighten
1.
the roll at the hub.
Loss of compressed air, check all connections.
1.
Sensor printhead cylinder not adjusted, adjust it.
2.
Sensor printhead cylinder defective, replace it.
3.
Applicator control PCB defective, replace it.
4.
Loss of compressed air, check all connections.
1.
Sensor printhead cylinder not adjusted, adjust it.
2.
Sensor printhead cylinder defective, replace it.
3.
Applicator control PCB defective, replace it.
4.
Loss of compressed air, check all connections.
1.
Sensor peel-off table not adjusted, adjust it.
2.
Sensor peel-off table defective, replace it.
3.
Applicator control PCB defective, replace it.
4.
69Printer Applicator System PAM 3600
Page 70

Service Manual PAM 36006 Problem Solution
Error Cause and Solution
Table is not in its front position;
error message "Table not in frt" is
shown in the display..
PAM 3602: Turn cylinder has not
left the 90°/180°-position.
PAM 3603: Small lift cylinder has
not left the retracted position.
Error message "Nozzle 0° error"
is shown in the display.
PAM 3602: Turn cylinder has not
reached the 90°/180°-position.
PAM 3603: Small lift cylinder
has not reached the retracted
position.
Error message "Nozzle 90° error"
is shown in the display.
Pad has not reached the upper
end position;
error message "Upper position"
is shown in the display.
Pad has not reached the labeling
position;
error message "Lower position"
is shown in the display.
Insufcient vacuum on pad Loss of compressed air, check all connections.
Fault in cylinder movement In cyclical operation the cylinder control valves are not controlled (red LEDs in
Error in the transfer of the label
to the pad;
error message "Vacuum plate
empty" is shown in the display.
Loss of compressed air, check all connections.
1.
Sensor peel-off table not adjusted, adjust it.
2.
Sensor peel-off table defective, replace it.
3.
PCB applicator control defective, replace it.
4.
Loss of compressed air, check all connections.
1.
Sensor turn/lift cylinder defective, replace it.
2.
PCB applicator control defective, replace it.
3.
Loss of compressed air, check all connections.
1.
Sensor turn/lift cylinder not adjusted, adjust it.
2.
Sensor turn/lift cylinder defective, replace it.
3.
Applicator control PCB defective, replace it.
4.
Loss of compressed air, check all connections.
1.
Sensor 1 main cylinder not adjusted, adjust it.
2.
Sensor 1 main cylinder defective, replace it.
3.
Applicator control PCB defective, replace it.
4.
Loss of compressed air, check all connections.
1.
Labeling position sensor not adjusted, adjust it.
2.
Labeling position sensor defective, replace it.
3.
Applicator control PCB defective, replace it.
4.
1.
In cyclical operation, the vacuum control valve is not controlled (red LED in the
2.
valve "Vacuum" on the valve terminal does not light up); applicator control PCB
defective, replace PCB.
No sufcient vacuum at the outlet of the vacuum generator; vacuum generator/si-
3.
lencer on vacuum generator dirty/defective; clean or replace vacuum generator/silencer.
No sufcient vacuum at the outlet of the vacuum tube; vacuum tube defective,
4.
replace vacuum tube.
No sufcient vacuum at the pad; suction holes or channels on the pad blocked,
5.
clean pad.
1.
valves do not light up).
Applicator control PCB defective; replace PCB.
2.
Cylinder movement not switched over despite intact applicator control PCB;
3.
cylinder control valve defective, replace control valve.
Cylinder movement is very slow; throttle valves are defective or badly out of adjust-
4.
ment, replace or readjust the valves.
Incorrect setting of the pad in the upper end position; readjust the pad height or the
1.
rotary movement of the pad.
Incorrect setting of the supporting air; readjust the blow tube and the supporting air
2.
throttle valve.
Incorrect setting of the peel-off-offset; readjust offset.
3.
70 Printer Applicator System PAM 3600
Page 71

Service Manual PAM 3600 6 Problem Solution
6.2 Failure of Device Functions
Error Possible Solutions
No movement of material Mechanical check of the gears and belts, replace damaged gears or belts.
No printing (no printed image) Check the printhead cable, re-seat if necessary.
No display and navigator pad
function
No display function
(navigator pad okay)
No navigator pad function
(display okay)
No I/O functions Check if printer port and computer port are congured identically,
No function of applicators Check, if the applicator is activated in the setup.
No function of the warning sensors
1.
Replace CPU PCB.
2.
Replace stepper motor.
3.
1.
Check printhead cable for damage, replace printhead cable if necessary.
2.
Replace printhead.
3.
Replace CPU PCB.
4.
Check whether LED1 (green) on CPU PCB is on.
1.
If LED1 is off --> Power unit or CPU PCB is defective.
If LED1 ashes --> Firmware update has failed; load rmware le via Centronics
interface.
Check cable connection between CPU PCB and PCB Control Panel.
2.
Check voltages 3 V and 5 V at the measuring points on CPU PCB.
3.
If both voltages are off --> Power unit could be defective.
If only one voltage is off --> CPU PCB could be defective.
Replace PCBs Control Panel.
4.
Check cable connection between LCD module and PCB 1 Control Panel.
1.
Replace LCD module.
2.
Replace PCB 1 Control Panel.
3.
Check cable connection between PCB 1 Control Panel - PCB Control Panel.
1.
Replace PCB Control Panel.
2.
Replace PCB 1 Control Panel.
3.
1.
congure ports if necessary.
For Ethernet connection, check whether IP address and SubNet-mask are correct.
2.
Check interface cable, replace bad I/O cable.
3.
If function of the PLC port fails, replace PCB applicator control.
4.
If function fails completely, replace CPU PCB.
5.
1.
Check cables between CPU PCB, applicator control PCB, PCB valve connection
2.
and the 9-pin applicator connector. Replace cables if necessary.
Replace applicator control PCB.
3.
Replace CPU PCB.
4.
Check the sensor function at the LED inside the sensor.
1.
Check the sensor cables. Replace cables if necessary.
2.
Check the reective foils. Replace the foils if necessary.
3.
Check, if the sensor holder are bended. Replace the sensor holders if necessary.
4.
Check the sensors. Replace the sensors if necessary.
5.
Replace applicator control PCB.
6.
71Printer Applicator System PAM 3600
Page 72

6 Problem Solution
Service Manual PAM 3600
6.3 Permanently Displayed Hardware Errors
Error Message Possible Solutions
ADC malfunction Error of CPU PCB; replace PCB.
dRAM malfunction Error of CPU PCB; replace PCB.
FPGA malfunction Error of CPU PCB; replace PCB.
Head open Error of sensor transport locking roller;
check sensor, adjust switch lever, replace sensor if necessary.
Invalid setup Error of CPU PCB; carry out a rmware update, replace PCB.
ROM malfunction Error of CPU PCB; replace PCB.
Voltage error V
Voltage error V
BAT
MOT
Voltage error 24V 24 V too low; check voltage at measuring point P24 (see page C-2)
Voltage error 24V ext. 24 V at the peripheral connector too low;
Voltage error 5V ext. 5 V at the Centronics interface too low; an interface converter with a current
Battery voltage on CPU PCB too low; replace CPU PCB.
Motor voltage too low;
Check voltage at measuring point (see page C-2),
if voltage is too low --> replace power unit,
if voltage is okay --> replace CPU PCB.
if voltage is too low --> replace power unit,
if voltage is okay --> replace CPU PCB.
remove peripheral device (applicator),
if the error still occurs --> replace CPU PCB,
if the error disappears --> peripheral device defective.
consumption which is too high may have been connected;
remove interface converter,
if the error still occurs --> replace CPU PCB,
if the error disappears --> unsuitable interface converter.
72 Printer Applicator System PAM 3600
Page 73

Service Manual PAM 3600 Appendix A: Block Diagram
Appendix A: Block Diagram
A-1Printer Applicator System PAM 3600
Page 74

Service Manual PAM 3600Appendix A: Block Diagram
A-2 Printer Applicator System PAM 3600
Page 75

Service Manual PAM 3600 Appendix B: Circuit Diagrams
Appendix B: Circuit Diagrams
PCB CPU: CPU, Clock Timer, Clock, BDM
B-1Printer Applicator System PAM 3600
Page 76

PCB CPU: Centronics, Interface Slot, RS-232
Service Manual PAM 3600Appendix B: Circuit Diagrams
B-2 Printer Applicator System PAM 3600
Page 77

Service Manual PAM 3600 Appendix B: Circuit Diagrams
PCB CPU: dRAM, Flash
B-3Printer Applicator System PAM 3600
Page 78

PCB CPU: Printhead Connection
Service Manual PAM 3600Appendix B: Circuit Diagrams
B-4 Printer Applicator System PAM 3600
Page 79

Service Manual PAM 3600 Appendix B: Circuit Diagrams
PCB CPU: FPGA, History RAM
B-5Printer Applicator System PAM 3600
Page 80

PCB CPU: Power Supply, Motor Driver
Service Manual PAM 3600Appendix B: Circuit Diagrams
B-6 Printer Applicator System PAM 3600
Page 81

Service Manual PAM 3600 Appendix B: Circuit Diagrams
PCB CPU: Sensors, AD Converter
B-7Printer Applicator System PAM 3600
Page 82

PCB CPU: USB Host
Service Manual PAM 3600Appendix B: Circuit Diagrams
B-8 Printer Applicator System PAM 3600
Page 83

Service Manual PAM 3600 Appendix B: Circuit Diagrams
PCB 1 Control Panel
B-9Printer Applicator System PAM 3600
Page 84

PCB Control Panel
Service Manual PAM 3600Appendix B: Circuit Diagrams
B-10 Printer Applicator System PAM 3600
Page 85

Service Manual PAM 3600 Appendix B: Circuit Diagrams
PCB Applicator Control: Controller
B-11Printer Applicator System PAM 3600
Page 86

PCB Applicator Control: Inputs/Outputs
Service Manual PAM 3600Appendix B: Circuit Diagrams
B-12 Printer Applicator System PAM 3600
Page 87

Service Manual PAM 3600 Appendix B: Circuit Diagrams
PCB Valve Connection
PCB Ribbon Sensor
B-13Printer Applicator System PAM 3600
Page 88

Service Manual PAM 3600Appendix B: Circuit Diagrams
B-14 Printer Applicator System PAM 3600
Page 89
Service Manual PAM 3600 Appendix C: Layout Diagrams
Appendix C: Layout Diagrams
PCB CPU: Components side
C-1Printer Applicator System PAM 3600
Page 90

PCB CPU: Soldering side
Important Measuring Points
1 - GND
2 - 3,3 V
3 - 5 V
4 - V
MOT
5 - 24 V
6 - 1,8 V
7 - 2,5 V
8 - 24 V ext. (Peripherals)
9 - V
BAT
1
3
2
6
5
4
7
8
9
Service Manual PAM 3600Appendix C: Layout Diagrams
C-2 Printer Applicator System PAM 3600
Page 91

Service Manual PAM 3600 Appendix C: Layout Diagrams
PCB 1 Control Panel: Components side
PCB 1 Control Panel: Soldering side
PCB Control Panel
C-3Printer Applicator System PAM 3600
Page 92

PCB Applicator Control: Components side
Service Manual PAM 3600Appendix C: Layout Diagrams
PCB Applicator control: Soldering side
C-4 Printer Applicator System PAM 3600
Page 93

Service Manual PAM 3600 Appendix C: Layout Diagrams
PCB Valve Connection
PCB Ribbon Sensor: Components side
PCB Ribbon Sensor: Soldering side
C-5Printer Applicator System PAM 3600
Page 94

Service Manual PAM 3600Appendix C: Layout Diagrams
C-6 Printer Applicator System PAM 3600
Page 95

Service Manual PAM 3600 Appendix D: Pneumatic Diagrams
82584
1
EXHAUST GAS OF THE WORK
EXHAUST GAS
SUPPLY
82584
1
MANIFOLD ASSY.
A
P
P
L
I
C
A
T
O
R
VIDE
0°
90°
Support air
Printhead
PRINTER
Brake
Table
Main cylinder Pad Turn cylinder
Table
2
4
3
5
1
14 1212
Brake
2
4
3
5
1
14
12
Printhead
2
4
3
5
1
14
Support air
2
4
12
3
5
1
14
Main cyl.
2
4
3
5
1
14
12
Slide valve
2
3
1
VACUUM SENSOR ASSY.
E
V
VE1
P
Turn cylinder
2
4
12
3
5
1
14
3
5
1
Blow air
2
4
14
12
Vacuum
2
4
12
3
5
1
14
Appendix D: Pneumatic Diagrams
PAM 3600 with Applicator 3602
D-1Printer Applicator System PAM 3600
Page 96

82584
1
EXHAUST GAS OF THE WORK
EXHAUST GAS
SUPPLY
82584
1
MANIFOLD ASSY.
A
P
P
L
IC
A
T
O
R
VIDE
Support air
Printhead
PRINTER
Brake
Table
Main cylinder Pad Lift cylinder
Table
2
4
3
5
1
14 1212
Brake
2
4
3
5
1
14
12
Printhead
2
4
3
5
1
14
Support air
2
4
12
3
5
1
14
Main cyl.
2
4
3
5
1
14
12
Slide valve
2
3
1
VACUUM SENSOR ASSY.
E
V
VE1
P
Lift cylinder
2
4
12
3
5
1
14
3
5
1
Blow air
2
4
14
12
Vacuum
2
4
12
3
5
1
14
PAM 3600 with Applicator 3603
Service Manual PAM 3600Appendix D: Pneumatic Diagrams
D-2 Printer Applicator System PAM 3600
Page 97

Service Manual PAM 3600 Index
Index
A
Adjust gap sensor ............................................................... 20
Antistatic burst .................................................................... 10
Applicator control PCB, replacing ....................................... 40
Applicators, overview............................................................9
Applicator types .................................................................... 7
B
Blow tube ............................................................................ 10
Brake, cleaning ................................................................... 24
Brake, pneumatic setting .................................................... 62
Brake at the media supply hub, adjusting...........................56
C
Cleaning, general ...............................................................22
Control panel ........................................................................8
CPU PCB, connectors ........................................................ 38
CPU PCB, replacing ........................................................... 37
D
Device list ...........................................................................15
Device name, setting .......................................................... 21
Display .................................................................................. 8
L
Label edge sensor, adjusting ..............................................20
Label edge sensor, replacing..............................................32
Labeling position sensor, adjusting.....................................66
Label prole ........................................................................ 16
Lift cylinder ...........................................................................9
Lift cylinder movement, setting the speed ..........................59
Load NVRAM......................................................................21
M
Main cylinder ........................................................................9
Main cylinder movement, setting the speed .......................60
Main drive motor, replacing ................................................36
Media supply hub .................................................................8
N
NVRAM, loading ................................................................. 21
NVRAM, saving ..................................................................20
O
OEM key ............................................................................. 11
Options ...............................................................................10
Overview printer ...................................................................8
E
Energy-chains.......................................................................9
Energy-chains, disassembling ............................................ 47
Errors during printing .......................................................... 69
Event log.............................................................................18
Expanded functions for servicing........................................ 11
Expansion card, interfaces .................................................15
F
Failure of device functions .................................................. 71
Feed roller, replacing .......................................................... 28
Firmware update, applicator module ..................................40
FlashCard ........................................................................... 15
G
Guide plate, adjusting ......................................................... 50
H
Hardware errors..................................................................72
I
IFFS .................................................................................... 18
Interfaces, menu ................................................................. 12
Interfaces expansion card ..................................................15
Internal ash le system ..................................................... 18
Internal rewinder ................................................................... 8
Internal rewinder, measuring the traction ...........................53
Internal rewinder, slip clutch ............................................... 35
P
Pad .......................................................................................9
Pad, cleaning ...................................................................... 25
Pad holder ............................................................................9
Peel-off table ........................................................................8
Peel-off table, adjusting ...................................................... 48
Peel-off table movement, setting the speed .......................57
Pinch roller, replacing ......................................................... 30
Power connector...................................................................8
Power switch ........................................................................8
Power unit, replacing .......................................................... 39
Print directory of IFFS.........................................................18
Printer, overview ................................................................... 8
Printer types .........................................................................7
Printhead ..............................................................................8
Printhead, adjusting ............................................................ 49
Printhead, cleaning ............................................................. 22
Printhead, pressure setting.................................................61
Printhead, replacing............................................................27
Printhead movement, setting the speed ............................. 58
Printhead prole .................................................................16
Print parameters, menu ...................................................... 12
Print roller .............................................................................8
Print roller, cleaning ............................................................ 23
Print roller, replacing ...........................................................28
Protocol error, parameter....................................................12
I-1Printer Applicator System PAM 3600
Page 98

R
Ribbon supply hub ................................................................ 8
Ribbon supply hub, measuring the traction ........................54
Ribbon supply hub, slip clutch ............................................ 35
Ribbon take up hub ..............................................................8
Ribbon take up hub, measuring the traction ....................... 54
Ribbon take up hub, slip clutch...........................................34
S
Save NVRAM .....................................................................20
Sensor 1 main cylinder, adjusting .......................................67
Sensor lift cylinder, adjusting .............................................. 65
Sensors 2 main cylinder, adjusting ..................................... 68
Sensors applicator module ................................................. 46
Sensors applicator module, adjusting.................................65
Sensors peel-off table .........................................................42
Sensors peel-off table, adjusting ........................................51
Sensors printer module, replacing ...................................... 41
Sensors printhead, adjusting .............................................. 52
Sensors printhead cylinder ................................................. 44
Sensor transport locking roller ............................................ 43
Sensor turn cylinder, adjusting ...........................................65
Serial number CPU PCB ....................................................15
Service counter...................................................................19
Service counter, clearing .................................................... 19
Service key ......................................................................... 11
Set OEM Name ..................................................................21
Setup, menu .......................................................................12
Slide valve ............................................................................9
Slip clutches, replacing ....................................................... 33
Status print .........................................................................13
Supporting air, pneumatic setting ....................................... 63
Switch paper end ................................................................ 45
Service Manual PAM 3600Index
T
Table, pneumatic setting ..................................................... 64
Test, menu ..........................................................................13
Test functions......................................................................13
Thermal printhead, resolution and number of hot points .... 15
Torques at the hubs, adjusting............................................53
Transport locking roller, replacing ....................................... 29
Transport system, cleaning ................................................23
Turn cylinder ......................................................................... 9
Turn cylinder movement, setting the speed ........................59
U
USB device class................................................................15
USB devices, installed ........................................................ 15
W
Warning light .......................................................................10
Warning sensor, label end ..................................................10
Warning sensor, ribbon end ................................................ 10
I-2 Printer Applicator System PAM 3600
 Loading...