


Apollo
Programming Guide
May 2000
Copyright © Tharo Systems, Inc.
Tharo Systems, Inc
2866 Nationwide Parkway
P.O. Box 798
Brunswick, Ohio 44212-0798
Phone: (330)273-4408
Fax: (330)225-0099
Email: techsupport@tharo.com
http://www.tharo.com
cab-Produkttechnik GmbH
Postfach 19 04 D-76007 Karlsruhe
Haid-und-Neu -Straße 7 D-76131 Karlsruhe
Telefon:0721 / 66 26-00
Telefax: 0721 / 66 26-259
Email: cab_gmbh@csi.com
http://www.cabgmbh.com

Copyright and Trademark Notices
© 2000 by Tharo Systems, Inc.
It is illegal to photocopy this manual or any portion of its content for any means or
purpose without the publisher's permission. Fines of up to $10,000 may be
imposed for violation.
Speedo™ and Swiss™ are registered trademarks of Bitstream® Inc.,
U.S. Patent No. 5,099,435.
All brand or product names are trademarks or registered trademarks of their respective
companies.
=====================================================================================

This page intentionally left blank
=====================================================================================

Table of Contents
_________________________________________________________________
Command Overview ............................................................................................ 1
Command / Data Types................................................................................. 1
Command Syntax........................................................................................... 1
Command List................................................................................................ 2
Immediate Commands............................................................................. 2
ESC Sequence Commands.................................................................... 3
Label Format Commands........................................................................ 4
Special Content Fields............................................................................. 5
Print Orientation / Home Position for Commands...................................... 8
__________________________________________________________________
Immediate Commands....................................................................................... 9
Comment Line ................................................................................................ 9
Start ASCII Dump........................................................................................... 9
Direct Cut........................................................................................................ 9
Download Data...............................................................................................10
Erase Data......................................................................................................12
Formfeed.........................................................................................................12
Change Language/Country...........................................................................13
Set Measuring Unit.........................................................................................14
Pause Printer..................................................................................................14
Query Printer...................................................................................................15
Reset Printer...................................................................................................15
Set Date/Time.................................................................................................16
Run Printer Self-Test......................................................................................16
Firmware Version...........................................................................................16
Set Peripheral Signal Bits.............................................................................17
Sl ashed Zero Selection.................................................................................18
__________________________________________________________________
ESC Sequence / Network Commands.............................................................19
__________________________________________________________________
Label Format Commands..................................................................................21
Amount of Labels............................................................................................21
Bar Code Field Definition ..............................................................................23
Code 39......................................................................................................28
UPC-A........................................................................................................29
UPC-E........................................................................................................30
=====================================================================================

Table of Contents
Bar Code Field Definition (cont.)
2 of 5 Interleaved.......................................................................................30
Code 128...................................................................................................32
EAN -13/JAN-13.........................................................................................34
EAN -8/JAN-8.............................................................................................35
HIBC............................................................................................................36
Codabar.....................................................................................................37
MSI Plessey...............................................................................................38
Add-On 2....................................................................................................39
Add-On 5....................................................................................................40
Code 93......................................................................................................41
Postnet ........................................................................................................42
UCC128/EAN128.....................................................................................43
FIM ..............................................................................................................45
Maxicode....................................................................................................46
DataMatrix..................................................................................................48
Plessey.......................................................................................................51
UPC-E0......................................................................................................51
PDF417......................................................................................................52
Cutter Parameters..........................................................................................53
Global Object Offset.......................................................................................54
Define Files.....................................................................................................55
Font Number...................................................................................................56
Graphic Field Definition.................................................................................57
Circle...........................................................................................................58
Line .............................................................................................................59
Rectangle ...................................................................................................61
Fill................................................................................................................62
Shade.........................................................................................................63
Outline.........................................................................................................64
Heat, Speed, Method of Printing ..................................................................65
Image Field Definition....................................................................................66
Job Start..........................................................................................................67
Memory Card Access....................................................................................68
Set Print Options ............................................................................................71
Set Peel -Off Mode..........................................................................................72
Replace Field Contents.................................................................................73
Set Label Size ................................................................................................74
Text Field Definition.......................................................................................75
Internal Fonts..............................................................................................78
Examples....................................................................................................81
Synchronous Peripheral Signal Settings.....................................................84
=====================================================================================

Table of Contents
_________________________________________________________________
Special Content Fields ......................................................................................85
Field Calculations and Comparisons...........................................................92
__________________________________________________________________
Appendix A - Tables and Lists...........................................................................94
UCC/EAN Application Identifiers..................................................................94
[U: ] Command - Common Control Codes..................................................96
__________________________________________________________________
Appendix B - Coding Examples ........................................................................97
Text File Label Coding Example ..................................................................97
QBASIC Program Label Coding Example..................................................100
ESC Command Demonstration ....................................................................101
Memory Card - QBASIC Programs and Text Files - Summary.................103
Memory Card - Front Panel Access.............................................................105
Memory Card - Format, Display Info/Directory............................................106
Memory Card - Store Font.............................................................................107
Memory Card - Store Image..........................................................................108
Memory Card - Database File......................................................................109
Memory Card - Serial File.............................................................................110
Memory Card - Store Label...........................................................................111
Memory Card - Store Label 2.......................................................................112
Memory Card - Load Label Formats and Print...........................................113
Memory Card - Print from Database............................................................114
Memory Card - Load Label Formats and Print...........................................115
Memory Card - Operator Prompt..................................................................116
Memory Card - Load Label Format and Print.............................................118
Memory Card - Replace Existing Data........................................................119
Memory Card - Incrementing Number from Operator Prompt...................120
Memory Card - Incrementing Serial Number from Serial File...................121
RS485 Network Card.....................................................................................122
__________________________________________________________________
Index......................................................................................................................125
=====================================================================================

This page intentionally left blank
=====================================================================================

Command / Data Types
There are three basic types of commands used on the Apollo printer, and one special type of
data. Each of the following are described in separate sections of this manual:
? Immediate Commands
are a single lower case letter. They perform a variety of printer
functions. When the printer receives an Immediate command, it will immediately perform
the command function, regardless of any other operation taking place. The effects of this
command remain in place until the printer is reset.
? ESC Sequence Commands
are a specialized group of commands frequently used for
program control of network attached printers, when hands -on access to the control panel
is not available.
? Label Format Commands
are specified as a single upper case letter. They define the
label and informa tion to be printed on it, and are in effect for only one label job.
? Special Content Fields
are used within Label Format commands. They consist of
specific predefined words coded in brackets , [ ], that provide for various data insertion
and data manipulation functions.
Command Syntax
? No special characters are needed to create a label format. Any text editor may be used
to enter commands.
? There is no strict format within a command.
? Where<CR> is shown, it may be a CR, a LF, or a CR/LF.
? For readability, parameters may be aligned with SPACES, TABS or additional ZEROES
in numeric parameters.
? Parameters are separated with a comma or semicolon.
? Comment lines can be included by coding a semicolon (;) in the first position.
? Optional parameters are shown in command definitions within brackets [ ]. Special
content fields are an exception - their optional fields are shown in { }.
=====================================================================================
Command Overview 1

Command List
Immediate Commands Description Page
; comment Comment line 9
a Start ASCII dump 9
c Direct cut 9
d type;name Downloads data 10
e type;name Erase data 12
f Formfeed 12
l name Change language/country 13
m unit Set measuring unit 14
p status Pause printer 14
q f Query free memory 15
q i;name Query image availability 15
q m Query memory type 15
q p Query peripheral types 15
q s;name Query scaleable font availability 15
r Reset printer 15
s datetime Set date/time 16
t Run printer self-test 16
v Request firmware version 16
x d;ao Set peripheral (x) bits directly 17
x e;ao Set peripheral (x) error value 17
x m ;mask Set peripheral (x) mask bits 17
x s;ao Set peripheral (x) standby value 17
z option Slashed zero selection 18
=====================================================================================
2 Command Overview

Command List
ESC Sequence / Network Commands Description
Page
ESC ESC Replaces ESC in binary data 20
ESC ! ESC ! Hard reset 19
ESC ? Request for free memory. 19
ESC * Activate all network printers 19
ESC A - ESC Z Activates individual network printer 19
ESC c Cancel Job 19
ESC p0 Ends printer pause state 19
ESC p1 Sets printer to pause state 19
ESC s Printer status request 20
ESC t Total Cancel 20
=====================================================================================
Command Overview 3

Command List
Label Format Commands Description Page
; comment Comment line 9
A [NO] n Amount of labels (end job/print) 21
B [:name;] x, y, r, type, . . ,size,data Barcode field definition 22
C cnt[,disp1[,disp2]] Set cutter parameters 52
C e Set cutter to end-of-job 52
D x,y Global Object Offset 53
E DBF;name Defines the database file 54
E LOG;name Defines the log file 54
E TMP;name Defines the serial file 54
F number;name Font number 55
G [:name;] x, y, r; type:options, . . . Graphic field definition 56
H speed [,heat][,method][,ribbon] Heat, speed, and printing method 64
I [:name;]x,y,r[,mx,my];imagename I mage field definition 65
J [comment] Job start 66
M c Memory card-contents list 67
M d type;name Memory card-delete file from card 67
M f;name M emory card-format card 68
M l type;name M emory card-load file from card 68
M s type;name Memory card-store data on card 68
O [M,][R,][T,][N,][p] Set print options 69
P [disp] Set peel-off mode 70
R name:newcontent Replace field contents 71
S [type:]yo,xo,length,dy,wide. . . Set label size 72
T [:name;] x,y,r, font,size . . ;data Text field definition 73
X y[;ao] Synchronous peripheral signal set 82
=====================================================================================
4 Command Overview

Command List
Special Content Fields Description
[?:{H},{Default},{F},{D},{Lx},{Mx},{R}] Operator Prompt Line 84
[C:fill{,base}] Set zero fill character 84
[DATE] Print date 85
[DAY02] Print 2-digit day (01-31) 85
[DBF:keyfield,keyvalue,entryfield] Database Field 83
[DOFY] Print numeric day (1-366) 85
[H12] Print hour in 12-hr form (1-12) 86
[H24] Print hour in 24-hr form (1-24) 86
[H012] Print hour in 12-hr form (01-12) 86
[H024] Print hour in 24-hr form (01-24) 86
Page
[I] Make field invisible 87
[MIN] Print minutes (00-60) 86
[MONTH02] Print 2-digit month (01-12) 85
[mon] Print 3-character month name 86
[month] Print complete month name 86
[name] Insert contents of field 87
[name,m{,n}] Insert substring from field 88
[ODATE:+ddd{,+mm}{,+yy}] Print date with offset 85
[OWEEK:+ww] Print week with offset 88
[RTMP] or [RTMP:x] Read from serial file 88
[S:name] Numeric script style 83
[SEC] Print seconds (00-60) 86
[SER:start{incr,{freq}}] Insert serial number field 83
[TIME] Print time (hhmmss) 86
[U:x] Insert Unicode character 87
[WDAY] Print numeric day of week (1-7) 85
[WEEK] Print numeric week (1-52) 85
[wday] Print complete weekday name 86
[wday2] Print 2-character weekday name 86
=====================================================================================
Command Overview 5

Command List
Special Content Fields Description Page
[wday3] Print 3-character weekday name 86
[WLOG] Write to log file 88
[WTMP] Write to serial file 88
[XM] Print am or pm indication 86
[YY] Print 2-digit year (00-99) 85
[YYYY] Print 4-digit year (ie.1998) 85
=====================================================================================
Command Overview 7

Command List
Special Content Fields/ Description Page
Field Calculations and Comparisons
[+:oper1,oper2. . ,operx] Add 87
[-:oper1,oper2] Subtract 87
[*:oper1,oper2. . ,operx] Multiply 87
[/ : oper1,oper2] Divide 87
[%: oper1,oper2] Modulo 87
[<: oper1,oper2] Less than 87
[>: oper1,oper2] Greater than 87
[=: oper1,oper2] Equal 87
[&:oper1,oper2] Logical And 87
[|:oper1,oper2] Logical Or 87
[D:m,n] Set number of digits to print 88
[J:ml] Justification 88
[P:name,mn{o}] Print result in price format 88
[R:x] Rounding 88
=====================================================================================
8 Command Overview
Print Orientation / Home Position for Commands
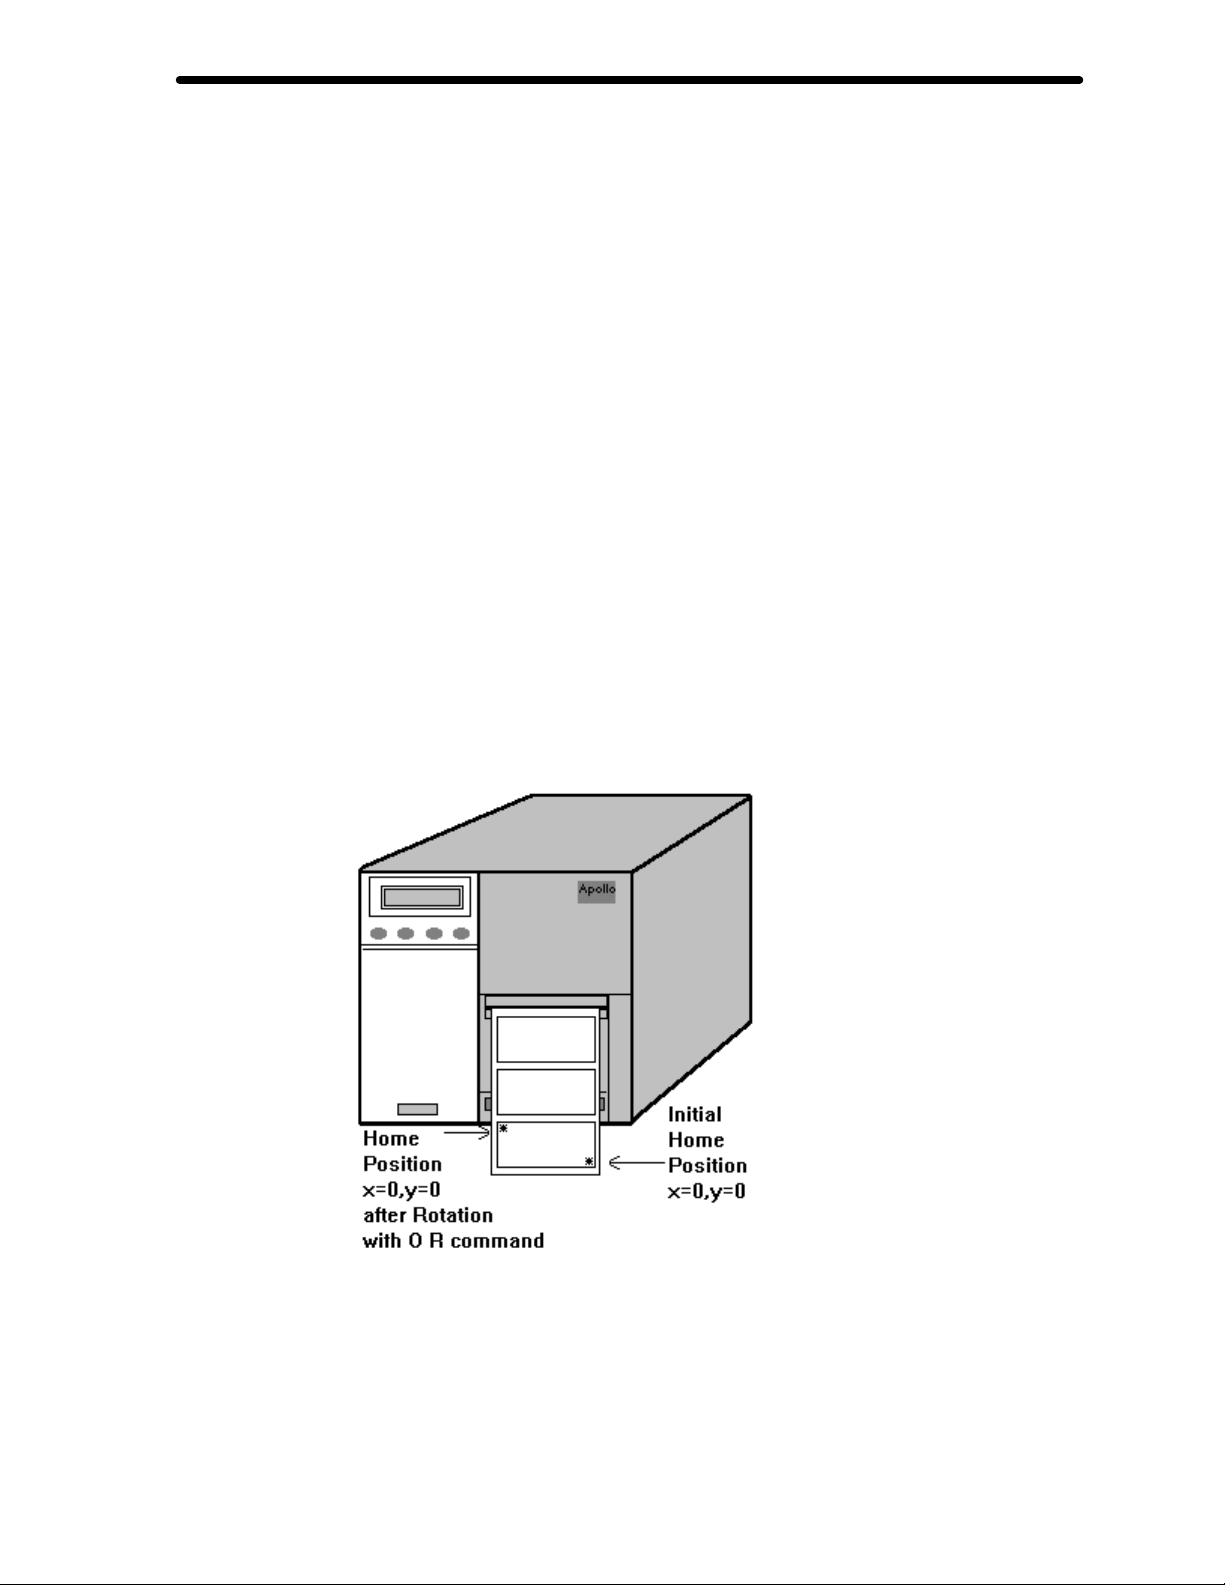
It is important to understand print orientation and home position before attempting to use
label format commands. Orientation refers to where the top of the label is found for layout
purposes. Home Position refers to the top-left corner of the label. The figure below shows
the Apollo printer and the Home positions that are possible.
As shown below, the initial Home position is on the leading right edge of the label, the first
edge that exits the printer. As viewed from the front of the printer, this would appear to make
the label orientation upside-down. This is the default position.
As an alternative, the orientation can be “rotated” using the "O", Print Options command,
with the "R", Rotate parameter. After executing this command, the new Home position is on
the trailing edge of the label, the last edge that exits the printer. With this orientation, as
viewed from the front of the printer, the label would appear to be right side up. When the O
command with R parameter is used, it remains in effect only for the current label command
set.
For easier understanding throughout this manual, many examples use the O command with
R parameter to present them with a top to bottom approach, as if viewed from in front of the
printer. The important thing to remember is that all parameters specified are in reference to
the top-left, or Home position of the label. Whether that Home position is on the leading or
trailing edge of the label, does not matter.
=====================================================================================
Command Overview 9

; - Comment Line
The ; identifies a comment line. A comment may be placed anywhere within the command
set, on a line by itself. The printer ignores comment lines.
Command Format / Usage:
; comments <CR> Marks this line as a comment
a - Start ASCII Dump
The a command places the printer in ASCII dump mode. After the command is sent to the
printer, the printer’s LCD panel will display “ASCII Dump Mode.” Any commands or label
formats sent to the printer after this point are printed as the printer receives them, without
interpretation. Pressing the on-line (ONL) button on the printer’s front panel resets the printer
to its normal mode of operation. This mode can also be entered by holding down the form
feed key while powering on the printer.
Command Format / Usage:
a <CR> Set ASCII dump mode on.
c - Direct Cut
The c command initiates an immediate cycle of the printer’s cutter. If necessary, the printer
will perform a formfeed to find a label edge, prior to making the cut.
Command Format / Usage:
c <CR> Cuts label immediately.
=====================================================================================
10 Immediate Commands

d - Download Data
The d command accomplishes downloading of data files to the Apollo. Most often, it may be
used to download graphics or additional fonts. The option [SAVE] will download and
simultaneously create a copy on the PCMCIA memory card. There are two methods shown
below for including the data with the command. Method 1 is the most reliable, but may
require editing of the data before download. Method 2 will use whatever data is presented,
but may occasionally misinterpret imbedded ESC-sequences in the data as a command. If
at all possible, use of method 1 is recommended.
Command Formats:
d type; name[SAVE] [B: ? value] <CR> ESC. data ESC. (method 1)
d type; name[SAVE] [B: ? value] <CR> ESC: data
Where:
d = Download data command.
type = The type of data that will follow, using standard file name extensions:
GIF - Graphic Interchange Format
PCX - Paintbrush format
TIF - TIFF Format© Aldus Corp
IMG - GEM Image format
BMP - Windows bitmap format
SPD - Speedo™ font format
TTF - TrueType font format
MAC - MacPaint format
DBF - dBASE Database
TMP - ASCII Serial file
name = The name to be associated with the downloaded data for later referencing
by other commands.
[SAVE] The option for downloading to the PCMCIA memory card. (See Memory
Card Section for further instructions and examples)
B: ± value = Controls the brightness of dithering on color graphics. Valid up to ± 20. i.e.
B:-10 makes the picture 10 steps darker.
E
SC”end-of-data” (method 2)
=====================================================================================
Immediate Commands 11

d - Download Data
E
SC. data ESC. = Method 1 for delineating data. Data is in binary format, enclosed with
ESC. (escape dot, which is an ASCII character 27, followed by ASCII
character 46) at the start and end. For this method to work, any single
ESC characters found in the data must be replaced by double escapes,
ESCESC, prior to download. Other ESC commands for the Apollo will
continue to work during this transmission. (See Appendix B for example of
graphic download program with filter statements to replace ESC with
ESCESC automatically).
Example: d PCX;logoname <CR> ESC. binary data ESC.
E
SC: data
Example: d PCX;logoname<CR> ESC: data ESC"end-of-data"
E
SC”end-of-data” = Method 2 for delineating data. Data is in binary format,
preceded by ESC: (escape colon, whic h is ASCII character 27, followed by
ASCII character 58) and followed by ESC”end-of-data”(escape "end-ofdata", which is ASCII character 27, followed by ASCII text string “end-ofdata"). There may be ESC sequences present in the data, but there must
not be any ESC”end-of-data” imbedded in the data stream, as this marks
the end of the data stream. Note: This method will not work on a RS485
network.
=====================================================================================
12 Immediate Commands

e - Erase Data
The e command will erase various types of data, for example fonts and graphics, from the
printer’s memory. The e command does not erase data from the PCMCIA memory card.
See the M - Memory Card Access to delete files from the memory card.
Command Format:
e type; name <CR>
Where:
e = Erase data command.
type = The type of data being removed, equivalent to standard file name
extensions: GIF, PCX, TIF, IMG, BMP, SPD, TTF, MAC, FNT.
name= The name attached to the font or graphic when it was sent to the printer. A
“*” may be used as the name to delete all files of the same type.
Example:
e PCX;* <CR> Erases all PCX graphics currently in the
printer’s memory
f - Formfeed
The f command feeds one label until the top-of-form is under the printhead. This command
has the same effect as pressing the “FF” form-feed button on the front panel.
Command Format / Usage:
f <CR> Causes an immediate formfeed.
=====================================================================================
Immediate Commands 13

l - Change Language/Country
The l command changes the language and country settings. Country affects the date
formats and currency. Using the l command does not affect the language displayed on the
LCD panel of the printer. To change the language of the printer’s front panel prompts, you
must select the ‘Country’ option in the printer’s setup.
Command Format:
l name <CR>
Where:
l = Change language/country command.
name = The DOS short keyboard code for the country from the following:
BE - Belgium, French
CZ - Czech Republic
DK - Denmark
FR - France
GR - Germany
UK - Great Britain
IT - Italy
SP - Spain
SU - Suomi (Finland)
SF - Switzerland, French
SG - Switzerland, German
US - United States
Example:
l SP <CR> Changes printer language/country to Spain. If the date is Tuesday February
11, 1997 and the Language is set to Spain, then Martes Febrero 11, 1997 will print on the
label. See the Special Content Fields Section for more on printing dates.
=====================================================================================
14 Immediate Commands

m - Set M easuring Unit
The m command specifies the unit of measure in effect for all following label format
commands. The Apollo’s default unit of measure depends on the Country assignment from
the front panel setup. For country US, default measuring unit is inches. For all other
countries, default measuring unit is millimeters. This command does not effect the printers
default measuring unit. The measuring unit is only changed for the individual format being
printed.
Command Format:
m unit<CR>
Where:
m = Set measuring unit command.
unit = The measuring system desired, m for metrics (millimeters) or i for inches
(inches, tenths and hundredths of an inch).
Example:
m i <CR> Sets measuring unit to inches.
p - Pause Printer
The p command places the printer in a pause status, or removes it from pause status.
Command Format:
p status <CR>
Where:
p = Pause printer command.
status = The pause status, with 0 for pause off and 1 for pause on.
Example:
p 1 <CR> Sets printer pause on.
=====================================================================================
Immediate Commands 15

q - Query Printer
The q command provides a way to query the printer and obtain various types of information.
The command has different formats depending on the information desired.
Command Formats / Usage:
q d; name<CR> d
atabase inquiry. Asks the printer if the database (DBF) file
called "name" is available on the PCMCIA memory card. The
printer's response will be Y or N.
q e; name<CR> me
"name" is available. The printer's response will be Y or N.
q f <CR> f
q i; name<CR> i
q l; name<CR> l
q m <CR> m
q p <CR> p
ree memory. Reports the free (available) memory, which may
be used for downloaded data, to the serial port. Response will
look like “0512345 bytes free”.
mage inquiry. Asks the printer if the image (IMG) file called
"name" is available. The printer’s response will be Y if in
memory, C if on the memory card, or N if not available.
abel inquiry. Asks the printer if the label (LBL) file called "name"
is available. The printer's response will be Y or N.
inserted. Response examples: "No Card", or "SRAM, 512kByte",
etc.
eripherals inquiry. Reports the type of peripheral devices that
are connected. Possible responses are:
NONE, CUTTER, DEMAND SENSOR, BLOW ON, TRIGGER
dia inquiry. Asks the printer if the media (FMT) file called
emory card display. Displays the type of memory card currently
q s;name <CR> s
caleable font inquiry. Asks the printer if the scaleable font (FNT)
called "name" is available. The response will be Y if in memory, C
if on the memory card, or N if not available.
r - R
The r command resets all settings on the printer to the original default values. This
command does not change the printer's configuration settings.
Command Format / Usage:
r <CR> Resets printer setting to default values.
=====================================================================================
16 Immediate Commands
eset Printer

s - Set Date/Time
The s command sets the printer’s date and time to the value specified.
Command Format:
s datetime <CR>
Where:
s = Set date/time command.
datetime = A string value representing the date and time in the format of
yymmddhhmmss.
Example:
s 981015082000 <CR> Sets printer date and time to:
October 15, 1998 8:20 a.m.
t - Run Printer Self-T est
The t command starts a self-test print. Apollo’s self-test print includes: patterns for head
check, state of the printer, list of fonts. This command has the same effect as holding the
“ONL” (on-line) button down during printer power-up.
Command Format / Usage:
t <CR> Initiates printer self-test.
v - Firmware Version
The v command will inquire about the current firmware revision level and printer model. The
response will include the level, date and model.
Command Format / Usage:
v <CR> Firmware level inquiry; will produce response such as: 2.37 Dec 20 1996
(Apollo 1)
=====================================================================================
Immediate Commands 17

x - Set Peripheral Signal Bits
The x commands set the signal bits for the peripheral connector on the front of the Apollo
(output pins). This makes possible the control of a peripheral device, which is usually other
than a standard cutter or applicator. The four bits available for use on the connector may be
used individually or as a group. Pin/bit assignments and usage are:
Pin 3 = Control bit 0, set on at the start of printing a label
Pin 11 = Control bit 1, toggled when a new job is started
Pin 4 = Control bit 2 , set on for error
Pin 12 = Control bit 3, set on when label is in peel-off position
Each of the bits may be set or reset individually. These bit signals may be used to switch
simple mechanical devices or enable bar code verifiers.
Note: These peripheral signal bits are not reset when an Immediate Command “r” is
executed. To reset these bits, use ESC!ESC! (see ESC Sequence commands)
x m; mask <CR> Set the bits to system or user defined mode.
mask is a hex nibble. Where mask is bit-on,
selects the system status value for the bit, and
where mask is bit-off selects the user defined
value for the bit.
Example: x m; E <CR> Sets bit 0 to user defined mode. Leaves bits 1,
2, 3 at system st atus values.
x d; ao <CR> Set/Reset mask bits directly. a is an AND mask
and o is an OR mask, both being a hex nibble,
written together as a hex byte.
Example: x d; E8 <CR> Clears bit 0; sets bit 3 on.
x e; ao <CR> Set value for all bits when error is detected. a is
AND mask and o is OR mask, both being a hex
nibble, written together as a hex byte.
Example: x e; BB<CR> Clears bit 2; sets bits 0, 1, 3 on.
x s; ao <CR> Sets standby value, for no job in process. a is
AND mask and o is OR mask, both being a hex
nibble, written together as a hex byte.
Example: x s; 07<CR> Clears bits 0,1,2,3; sets bits 0,1,2 on.
=====================================================================================
18 Immediate Commands

z - Slashed Zero Selection
The z command selects the style of zero to be printed in label text, whether it should appear
with a slash (/), or not. This command can only effect internal bitmapped fonts, and will have
no effect on internal outline or downloaded outline fonts.
Command Format:
z option <CR>
Where:
z = Slashed zero selection command.
option = Code the number 0 to specify slashed zero (Ø) printing; code the upper
case letter O to specify unslashed zero (0) printing.
Example:
z 0 <CR> Selects zero printing as Ø
z O <CR> Selects zero printing as 0
=====================================================================================
Immediate Commands 19

ESC Sequence / Network Commands
The ESC sequences that follow affect the printer’s status , and are immediately executed when
received by the printer. When printers are networked, every network printer listens on the bus
and waits for its' commands. These commands are most often used when a program
(QBASIC, C, etc.) is issuing the commands to the printer. Some can also be used from a text
file, but the text editor would need the capability of accepting ESC within the text. Otherwise,
most of these functions are available through standard lower case Immediate commands for
inclusion in a text file.
Note: See Appendix B for sample program on ESC command usage.
Command Formats / Usage:
ESC * Activate all network printers.
ESC A - ESC Z Activates an individual network printer using designations A
through Z, and deselects all other printers not specified.
ESC ! ESC ! Performs a hard reset on the active printer(s), equivalent to
turning the printer off then on.
ESC c Cancels the current job or activity on the printer. This has the
same effect as pressing the “Cancel” (CAN) key on the front of
the printer.
ESC p0 Ends printer pause state.
ESC p1 Sets printer to pause state.
ESC ? Printer free-memory inquiry, will return a response of 0-9,
where:
0= 0-9%, 1=10-19%, . . . 9 = 90-99%.
=====================================================================================
20 Label Format Commands

ESC Sequence / Net work Commands
ESC s Printer status inquiry, will return a response as follows:
XYNNNNNNZ
where:
X = On-line (Y=yes, N=no)
Y = Type of error:
-........................................................................No error
a...............................Applicator error – upper position
b...............................Applicator error – lower position
c.....................Applicator error – vacuum plate empty
d......................Applicator error – label not deposited
e..............................Applicator error – host stop/error
f............Applicator error – reflective sensor blocked
B ..............................................................Protocol error
C.......................................................Memory card error
D............................................................Printhead open
E..............................................................No label found
F...............................................................End of ribbon
H..................................................Illegal heating voltage
M.............................................................Cutter jammed
N............................................Media too thick for cutter
O.............................................................Out of memory
P.................................................................Out of paper
S...........................................Ribbon saver malfunction
V.....................................................Input buffer overflow
W........................................................Print head too hot
X..........................................................External I/O error
Z ..................................................Printhead damaged.
NNNNNN = Number of labels left to print
Z = Job status (Y/N) Y means printer is working on a job. N
means standby. The printer delivers Y immediately after
starting a job and sets the flag back to N when the last
label of that job is printed.
ESC t Cancels the current job or activity and clears the input buffer of
all data or jobs.
=====================================================================================
Label Format Commands 21

ESC ESC Use as a replacement for single ESC in binary data while
remaining transparent to networks.
A - Amount of Labels
The A command specifies the amount of labels to be printed. It is used to end a label definition.
It may be sent as often as necessary to reprint the last label sent to the Apollo.
Usage:
A [NO] n | [?] | [?,R] | [$DBF] <CR>
Where:
A= Amount of labels command.
[NO] Used only when saving a label to the PCMCIA memory card. If the [NO] option
is used the label will not print until the label is accessed from the memory card.
If the [NO] option is not used, the label will print immediately when the label is
sent to the printer. (See Appendix B for examples of using the A command
with a memory card).
n or [?] or [?,R] or [$DBF]
n Number of labels to print. If omitted, an infinite number of labels will
be printed.
[?] Prompts the user for the number of labels to be printed. This is the
same as if the A command were omitted. It is intended for several
jobs within the same program code, such as with multiple R
commands separated by multiple A [?].
[?,R] Prompts the user for the number of labels to print. And when the job
finishes printing, it prompts for the number to print again. Any
incrementing number continues where it left off.
[$DBF] Prints the number of labels equal to the number of records in a
database on the memory card. (See example on next page)
Example:
A 15 <CR> Prints 15 labels.
A [NO] <CR> Does NOT print the label when sent to the memory card.
=====================================================================================
22 Label Format Commands

A - Amount of Labels (Cont.)
This sample Apollo code illustrates the usefulness of the [$DBF] switch. The database
“shipping” on the memory card has 450 records, sequentially numbered from 0001 to 0450. The
text field memdbfld is assigned a sequentially incrementing number by [SER:0001]. The
database field D1 loads the data from the specified record number defined by memdbfld and the
A [$DBF] causes exactly 450 records to print.
m m
J
H 86,-10,T
O R
S l1;.0,.0,152.4,155.4,101.6
E dbf;shipping
T:memdbfld;37.8,99.0,.0,3,6.4;[SER:0001][I]
T:D1;17.1,11.3,.0,3,6.4;[DBF:RECNBR,memdbfld,RECNBR][I]
T:D2;16.8,20.4,.0,3,6.4;[DBF:RECNBR,memdbfld,NAME]
A [$DBF]
=====================================================================================
Label Format Commands 23

B - Bar Code Field Definition
The B command is used to place a bar code field in the current label format.
Currently, there are twenty-two (22) symbologies plus two "add-on" symbologies supported by
Apollo. Depending on the symbology chosen, the parameters used within the command will
vary. The bar code is normally printed in one of four (4) rotations with variable element widths
and variable height. The corresponding text interpretation may be printed if desired.
Usage:
B [:name;] x, y, r, type, [ +options, ] size; data <CR>
\ /
[+MODxx] [+WSsize] [+BARS] [+ELx] [+XHRI]
Where:
B= Bar code field definition command.
[:name;] = Optional parameter. A unique name given to this bar code field. “name” must
begin with a colon may be up to ten characters long, and may not contain any
special characters. The field “name” may be used later to concatenate fields,
in field data replacement or in field calculations and comparisons
x= Coordinate "x" specifies the horizontal position of the bar code. This is the
distance, in inches or millimeters, from the left edge of the printable area to the
start position of the bar code. The printable area is defined by Label Size
command “S". Start position of the bar code refers to the upper left corner of
the bar code symbol. The unit of measurement, either inches or millimeters, is
set by the Immediate Command “m".
y = Coordinate "y" specifies the vertical position of the bar code. This is the
distance, in inches or millimeters, from the top of the label to the start position
of the bar code. Start position of the bar code refers to the upper left corner of
the bar code symbol. The unit of measurement, either inches or millimeters, is
set by the Immediate command “m”.
r = Rotation of the bar code field. The rotation may be given in any one of 360
degrees, but for a scaleable bar code rotation should be given as 0, 90, 180 or
270 degrees. In determining rotation, consider the current orientation of the
label, as specified by the Option command, Rotate parameter.
=====================================================================================
24 Label Format Commands

B - Bar Code Field Definition
type= The bar code symbology type selected. Symbology type is specified as either
the full bar code name or a single letter short code as shown in the table
below.
When using the full bar code name, the Apollo extracts only characters and
digits from the named type, so UPC-A, UPC A and UPCA have the same
result. Use of upper or lower case characters when naming the type of bar
code controls printing of human readable interpretations, HRI, under the bar
code. Type named in upper case causes HRI to be printed, and when named
in lower case, causes no HRI printing. The Apollo HRI print size varies with the
bar code height chosen.
Symbology types:
Bar Code Name Short
Code
CODE 39 A ratio 27
UPC-A B non-ratio 28
UPC-E C non-ratio 29
2 OF 5 INTERLEAVED D ratio 30
CODE 128 E non-ratio 31
EAN-13 F non-ratio 33
JAN-13 F non-ratio 33
EAN-8 G non-ratio 34
JAN-8 G non-ratio 34
HIBC H ratio 35
CODABAR I ratio 36
MSI K ratio 37
ADD-ON 2 M non-ratio 38
ADD-ON 5 N non-ratio 39
CODE 93 O non-ratio 40
POSTNET ** P ** non-ratio 41
UCC-128 Q non-ratio 42
EAN-128 Q non-ratio 42
FIM ** S ** non-ratio 44
MAXICODE ** U non-ratio 45
DATAMATRIX ** W ** non-ratio 46
PLESSEY X ratio 47
UPC-E0 Y non-ratio 48
PDF417 ** Z ** non-ratio 49
* Ratio vs Non-Ratio bar codes will use different options
for the size parameter.
** Upper case does not produce HRI on this symbology.
Ratio
Type *
Page
=====================================================================================
Label Format Commands 25

B - Bar Code Field Definition
size = Represents the bar height and width in a bar code. For Ratio bar codes, size
is defined as height, narrow element, ratio. For Non-Ratio bar codes, size
is defined as height, narrow element or as SCx for UPC/EAN bar codes.
(See Symbology Type table with ‘type’ above for ratio/non-ratio designations)
height = Bar code height given in inches, or millimeters, limited
only by label size.
narrow element= Width of narrow bar elements given in inches or
millimeters. Apollo 1, Apollo 2, Apollo 3/300 and Apollo
4/300 prints at 300 dots per inch, or 12 dots per
millimeter, limiting actual narrow bar element size to
multiples of .0033 inches, or .083 mm. Apollo 3 and
Apollo 4 prints at 203 dots per inch, or 8 dots per
millimeter, limiting actual narrow bar element size to
multiples of .0049 inches, or .125 mm. Any size not a
correct multiple will be rounded to the nearest multiple.
ratio = Relation of wide bar to narrow bar. Given as a ratio
value (i.e. 5:2).
SCx = Prints a bar code based on UPC/EAN
recommendations. Height of the bar code is 80% of the
width. SC0 produces a bar code at 80% and SC1
provides a 100% bar code
data = String of ASCII characters to be encoded in the bar code symbol. Each bar
code symbology has unique restrictions on the characters allowed, the length
and the format of the string to be encoded. See individual symbology
descriptions following for more specific information on the data allowed.
=====================================================================================
26 Label Format Commands

B - Bar Code Field Definition
+options = Options depend on the symbology being used. With the individual symbology
descriptions on the following pages, appropriate options are shown with each.
Options available include:
+MODxx= Allows addition of Check Digits to the symbology:
MOD10 Numeric data only,
MOD11 Numeric data only, typically used with MSI.
MOD43 Code 39 only.
MOD16 Codabar only.
MOD10GP German Parcel Service, Interleaved 2 of 5 only
+WSsize = Prints quiet zone markers around the bar code to use as a
design aid. A quiet zone is a clear area required around
every bar code to ensure proper scanning. size is the length
of the marker in inches or millimeters. These markers
should be used only during design of a label, and should be
removed before printing the final labels.
+BARS= Prints bearer bars above and below the symbology.
Normally used with Interleaved 2 of 5 and Plessey bar codes.
+ELxx = Error Level is valid only with PDF417. It defines the amount
of redundancy included in the bar code. xx is a value from
00-08.
+XHRI= Enhanced HRI is valid only with Code 39, Code 93, UPC-A
and UPC-E. It provides additional human readable
interpretation options.. For Code 39 it will print optional
asterisks for start/stop. For Code 93 it will print optional
boxes for start/stop. For UPC-A and UPC-E, it reduces the
size of the product code and check digit symbols that are
printed preceding and trailing the bar code.
+NOCHECK = Disables the automatic check digit generation for variable
weight barcodes (EAN 13 and UPC A only)
+RECT = DataMatrix can be printed as a square which is the default or
as a rectangle which is the purpose of the +RECT
command. (DataMatrix only)
=====================================================================================
Label Format Commands 27

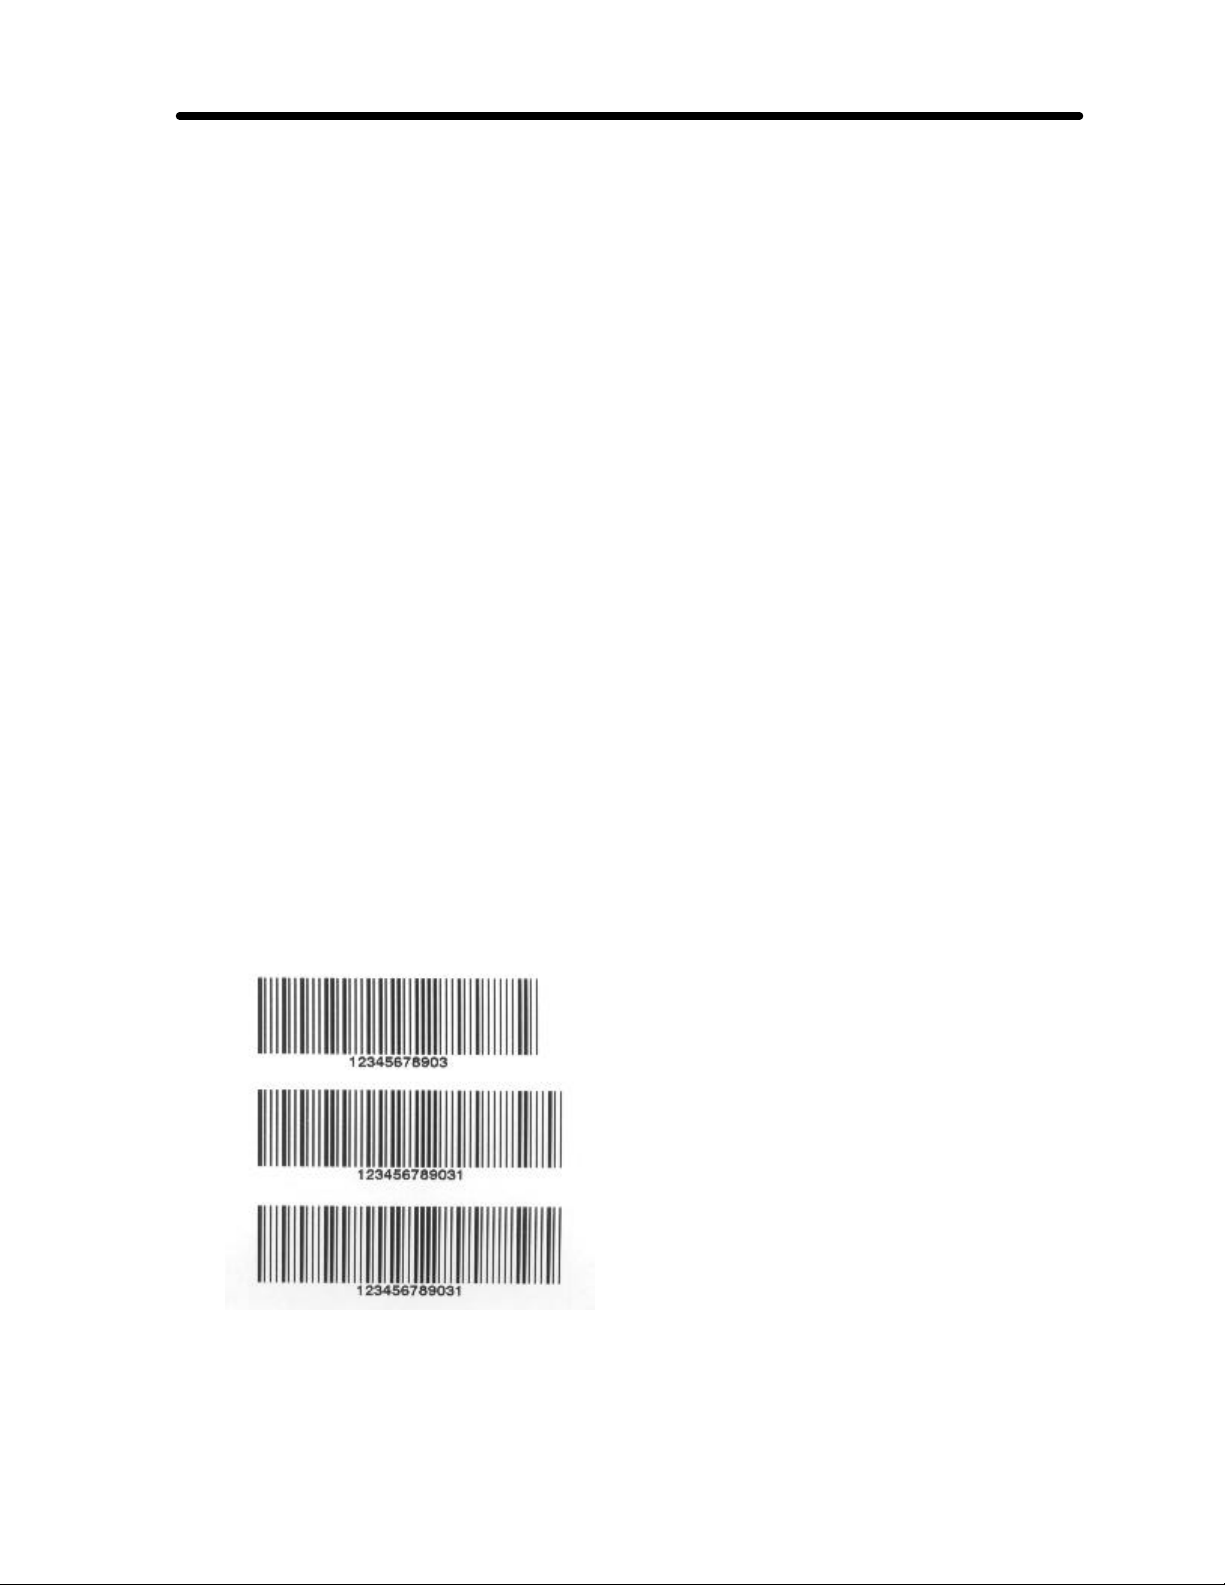
B - Bar Code Field Definition
The following label shows the x and y coordinates in relation to the Home position when it is
located in the top left corner of the label.
The bar codes on the following label are each positioned x=2.00 and y=1.30. The rotations
shown are at 0, 90, 180 and 270.
=====================================================================================
28 Label Format Commands

B - Bar Code Field Definition
Bar Code Name: CODE 39 (Code 3 of 9)
Short Code: A
Command:
B [:name;] x, y, r, CODE39, [+WSize,] [+XHRI, ] height,narrow,ratio; data <CR>
Description:
Code 3 of 9 is a variable-length alphanumeric code. Valid characters uppercase letters A-Z,
digits 0-9 and the special characters - . $ / + % and space. Apollo inserts the required start/stop
character automatically. If the +XHRI option is used, the start/stop characters will be printed as
'*'. There is no check digit.
Examples:
m i
J
O R
S l1;.0,.0,2.5,2.5,4.26
B:CODE39;1.0,0.25,0,CODE39,0.4,.015,3:1;ABC123
B:CODE39;1.0,0.75,0,code39,0.4,.015,3:1;ABC123
B:CODE39;1.0,1.30,0,A+XHRI,0.4,.015,3:1;ABC123
A 1
=====================================================================================
Label Format Commands 29

B - Bar Code Field Definition
Bar Code Name: UPC-A
Short Code: B
Command:
B [:name;] x, y, r, UPCA, [+WSize, ] [+XHRI] [+NOCHECK,] height,narrow; data <CR>
{ or SCx }
Description:
UPC-A is a fixed-length of 12, numeric -only bar code. The Apollo accepts the first eleven digits
of data with the command, then automatically calculates and appends a Mod 10 check digit as
the twelfth digit. If the +XHRI option is used, the print size of the product code and check digit,
which precede and trail the bar code, will be reduced in size.
Examples:
m i
J
O R
S l1;.0,.0,2.5,2.5,4.26
B:UPCA1;0.75,0.25,0,UPCA,0.9,.013;01234554321
B:UPCA2;0.75,1.35,0,B+XHRI,SC1;01234554321
A 1
=====================================================================================
30 Label Format Commands

B - Bar Code Field Definition
Bar Code Name: UPC-E
Short Code: C
Command:
B [:name;] x, y, r, UPCE, [+WSize] [+BARS] [+XHRI] height,narrow; data <CR>
{ or SCx }
Description:
UPC-E is a fixed-length of eight, numeric -only bar code. The Apollo accepts seven digits with
the command, where the first must be a zero, then automatically calculates and appends a
check digit as the eighth. If the +XHRI option is used, the print size of the product code and
check digit, which precede and trail the bar code, will be reduced in size.
Examples:
m i
J
O R
S l1;.0,.0,2.5,2.5,4.26
B:UPCE;1.0,0.22,0,UPCE,0.7,.013;0123456
B:UPCA;1.0,1.32,0,C+XHRI,SC1;0123456
A 1
=====================================================================================
Label Format Commands 31

B - Bar Code Field Definition
Bar Code Name: 2 OF 5 INTERLEAVED
Short Code: D
Command:
B [:name;] x, y, r, 2OF5INTERLEAVED, [+MODxx,] [+WSize,] [+BARS,] . . .
. . height,narrow,ratio; data <CR>
Description:
Interleaved 2 of 5 is a variable-length numeric-only bar code. This symbology encodes numbers
in pairs, so if an odd number of numeric characters is sent, a leading zero will be added to the
data encoded in the bar code. Adding the optional parameter +MODxx to the symbology name
attaches a check digit to the end of the bar code. In many cases, Interleaved 2 of 5 should be
printed with bearer bars at the top and bottom to prevent partial scans of the bar code. The
+BARS option will produce the bearer bars when desired.
Examples:
m i
J
O R
S l1;.0,.0,2.5,2.5,4.26
B:I2of5;1.0,0.40,0,D,0.5,.015,3:1;1234567890
B:BAR2 ;1.0,1.00,0,2of5interleaved+BARS,0.5,.015,3:1;1234567890
B:BAR3 ;1.0,1.60,0,2 OF 5 INTERLEAVED+MOD10,0.5,.015,3:1;1234567890
A 1
=====================================================================================
32 Label Format Commands

B - Bar Code Field Definition
Bar Code Name: CODE 128
Short Code: E
Command:
B [:name;] x, y, r, CODE128, [+MODxx,] [+WSize, ] [+BARS] . . .
. . height,narrow; [U:codeset character] data <CR>
Description:
Code 128 is a variable-length code that includes all of the 128 standard ASCII characters. The
Apollo automatically calculates and appends the mandatory mod 103 check digit. If an additional
check digit is desired, it may be added with the +MOD option.
Available Codesets:
The default Subset for Code 128 is Subset B. Depending on the data in the Code 128 bar code,
the Apollo printer switches to the correct Subset automatically. If you want to force a particular
Subset and prevent shifting to another Subset, use the [U:CODEx] option.
Code 128 Subset A includes all of the standard uppercase alphanumeric keyboard characters
plus the control and special characters. To manually select Code 128 Subset A, place
[U:CODEA] before the data to be encoded.
Code 128 Subset B includes all of the standard uppercase alphanumeric keyboard characters
plus the lowercase alphabetic and special characters. To manually select Code 128 Subset B,
place [U:CODEB] before the data to be encoded.
Code 128 Subset C includes the set of 100 digit pairs from 00 through 99 inclusive, as well as
special characters. Code 128 Subset C is used for double density encoding of numeric data.
To manually select Code 128 Subset C, place [U:CODEC] before the data to be encoded.
Subset C can only encode numeric data.
=====================================================================================
Label Format Commands 33

B - Bar Code Field Definition
Bar Code Name: CODE 128
Short Code: E
Examples:
m i
J
O R
S l1;.0,.0,2.5,2.5,4.26
B:bar1;1.00,0.30,0,CODE128,.6,.015;[U:CODEA]ABC123
B:bar2;1.00,1.00,0,CODE128,.6,.015;[U:CODEB]ABCxyz123
B:bar2;1.00,1.70,0,CODE128+MOD10,.6,.015;[U:CODEC]123456
A 1
=====================================================================================
34 Label Format Commands

B - Bar Code Field Definition
Bar Code Name: EAN-13/JAN-13 (European/Japanese Article Numbering)
Short Code: F
Command:
B [:name;] x, y, r, EAN13, [+WSize, ] [+BARS,] [+NOCHECK,] height,narrow; data <CR>
{ or SCx }
Description:
EAN/JAN 13 is a fixed-length of 13, numeric-only bar code. The Apollo accepts 12 data
characters with the command, then automatically calculates and appends the check digit as the
thirteenth. JAN-13 (Japanese Article Numbering system) is a special application of EAN-13
where the first two values entered must be “49”, designating Japan.
Examples:
m i
J
O R
S l1;.0,.0,2.5,2.5,4.26
B:EAN13;1.65,0.11,0,EAN13,SC1;402345607891
B:EX2;1.65,1.1,0,EAN13,.6,.013;402345607891
B:JAN13;1.65,1.8,0,JAN13,.6,.013;490005607891
A 1
=====================================================================================
Label Format Commands 35

B - Bar Code Field Definition
Bar Code Name: EAN-8, JAN-8 (European/Japanese Article Numbering)
Short Code: G
Command:
B [:name;] x, y, r, EAN8, [+WSize, ] [+BARS,] height,narrow; data <CR>
{ or SCx }
Description:
EAN/JAN 8 is a fixed-length of 8, numeric -only bar code. The Apollo accepts 7 data characters
with the command, then automatically calculates and appends the check digit as the eighth.
JAN-8 (Japanese Article Numbering system) is a special application of EAN-8 where the first two
values entered must be “49”, designating Japan.
Examples:
m i
J
O R
S l1;.0,.0,2.5,2.5,4.26
B:EAN8;1.66,0.11,0,EAN8,SC1;4023456
B:EX2;1.66,1.00,0,G,.6,.013;4023456
B:JAN8;1.66,1.70,0,EAN8,.6,.013;4900056
A 1
=====================================================================================
36 Label Format Commands

B - Bar Code Field Definition
Bar Code Name: HIBC (Health Industry Bar Code)
Short Code: H
Command:
B [:name;] x, y, r, HIBC, [+WSize,] [+BARS,] height,narrow,ratio; data <CR>
Description:
The Health Industry Bar Code is a variable-length alphanumeric bar code. It is a variation of
Code 3 of 9 with mod 43 check digit. The characters allowed are the uppercase letters A-Z,
digits 0-9 and the special characters - . $ / + % and space. The Apollo automatically
calculates and appends the mod 43 check digit and adds the start and stop characters. Any
required leading '+' characters must be sent in the data string.
Examples:
m i
J
O R
S l1;.0,.0,2.5,2.5,4.26
B:CODE39;.5,.35,0,HIBC,0.6,.015,3:1;+123AB78
B:39CODE;.5,1.00,0,hibc,0.6,.015,3:1;+123AB78
B:CO39DE;.5,1.70,0,H,0.6,.015,3:1;+123AB78
A 1
=====================================================================================
Label Format Commands 37

B - Bar Code Field Definition
Bar Code Name: CODABAR
Short Code: I
Command:
B [:name;] x, y, r, CODABAR, [+MOD16,] [+W Size,] [+BARS,] . . .
. . . height,narrow,ratio; data <CR>
Description:
Codabar is a variable-length bar code that can encode 16 different characters, including digits 09 and the special characters - . $ + : / . In addition, it requires an A B C or D as start/stop
characters. A MOD16 check digit may be added by using the +MOD option.
Examples:
m i
J
O R
S l1;.0,.0,2.5,2.5,4.26
B:F0O1;1.0,0.1,0,CODABAR,.60,.013,3:1;A12345678A
B:F0O2;1.0,0.9,0,I,.60,.013,3:1;A23456789C
B:F0O3;1.11,1.70,0,CODABAR+MOD16,.60,.013,3:1;A13572468C
A 1
=====================================================================================
38 Label Format Commands
B - Bar Code Field Definition
Bar Code Name: MSI (MSI Plessey)
Short Code: K
Command:
B [:name;] x, y, r, MSI, [+MODxx,] [+WSize, ] [ +BARS, ] . . .
. . . height,narrow,ratio; data <CR>
Description:
MSI bar code is a variant of the Plessey bar code, which is a variable-length numeric only bar
code. The Apollo automatically calculates and appends the correct Mod 10 check digit. If
desired, additional check digits may be added with +MODxx.
Examples:
m i
J
O R
S l1;.0,.0,2.5,2.5,4.26
B:MSI ;0.80,0.20,0,K,0.6,.013,2:1;1234567890
B:msi10;0.80,0.95,0,MSI+MOD10,0.6,.013,2:1;1234567890
B:MSI11;0.80,1.73,0,MSI+MOD11,0.6,.013,2:1;1234567890
A 1
=====================================================================================
Label Format Commands 39

B - Bar Code Field Definition
Bar Code Name: ADD-ON2 (UPC/EAN Addendum 2)
Short Code: M
Command:
B [:name;] x, y, r, ADDON2, [+BARS, ] height,narrow; data <CR>
{ or SCx }
Description:
UPC/EAN Addendum 2 is a fixed-length numeric-only bar code addendum. This bar code is
normally used in conjunction with symbologies UPC-A, UPC-E, EAN-8, EAN-13 and frequently
represents the two -digit month of a periodical publication (i.e. 03 for March).
Because the addendum is an add-on to a separate bar code, it should be consistent with that
base bar code. Therefore, the size specified, whether as height and narrow element, or as SCx,
must match the size of the UPC-A, EAN-8 or EAN-13 base bar code. For positioning, the
UPC/EAN Addendum must be placed a minimum of 9 times the width of the narrow element to
the right of the main bar code. If an interpretation is printed, it will appear above the bar code.
Examples:
m i
J
H 5.2,0,T,R0
O R
S l1;.0,.0,2.5,2.6,4.26
B:BAR1;1.100,0.75,0,UPCA,SC2;01234567890
B:ADD4;2.519,0.75,0,ADDON2,SC2;09
A 1
=====================================================================================
40 Label Format Commands

B - Bar Code Field Definition
Bar Code Name: ADD-ON5 (UPC/EAN Addendum 5)
Short Code: N
Command:
B [:name;] x, y, r, ADDON5 [+BARS, ] height,narrow ; data <CR>
{ or SCx }
Description:
UPC/EAN Addendum 5 is a fixed-length numeric-only bar code addendum. This bar code is
normally used in conjunction with symbologies UPC-A, UPC-E, EAN-8, EAN-13 and frequently
represents the price of a publication (i.e. 00399 for $3.99).
Because the addendum is an add-on to a separate bar code, it should be consistent with that
base bar code. Therefore, the size specified, whether as height and narrow element, or as SCx,
must match the size of the UPC-A, UPC-E, EAN-8 or EAN-13 base bar code.. For positioning,
the UPC/EAN Addendum must be placed a minimum of 9 times the width of the narrow element
to the right of the main bar code. If an interpretation is printed, it will appear above the bar code.
Examples:
m i
J
H 5.2,0,T,R0
O R
S l1;.0,.0,2.5,2.6,4.26
B:BAR1;1.1,0.75,0,EAN13,SC2;019876543210
B:ADD5;2.519,0.75,0,ADDON5,SC2;00399
A 1
=====================================================================================
Label Format Commands 41

B - Bar Code Field Definition
Bar Code Name: CODE 93
Short Code: O
Command:
B [:name;] x, y, r,CODE93,[+WSize,][+BARS,][+XHRI, ] height,narrow; data <CR>
Description:
Code 93 is a variable-length alphanumeric bar code, which can encode all 128 ASCII characters
including lower case and control characters. Special two-character sequences are used to
designate some characters. The Apollo automatically calculates and appends the check digit.
It also inserts the correct start and stop characters. The +XHRI option can be used to print the
start and stop characters as a box ( ? ) in the HRI below the bar code. The +BARS option can
be used to place bearer bars at the top and bottom of the bar code.
Examples
m i
J
O R
S l1;.0,.0,2.5,2.5,4.26
B:F0O1;1.75,0.20,0,CODE93+XHRI,0.7,.011;ABC1 23
B:F0O2;1.75,1.00,0,code93,0.6,.011;ABC123
B:F0O3;1.75,1.70,0,O+BARS,0.7,.011;ABC123
A 1
=====================================================================================
42 Label Format Commands

B - Bar Code Field Definition
Bar Code Name: POSTNET (U.S. Postal Service)
Short Code: P
Command:
B [:name;] x, y, r, POSTNET, [+Wsize,]; data <CR>
Description:
Postnet is used by the United States Post Service to encode zip codes. Any length string of data
can be used, although it is usually a nine digit zip code (zip + 4) followed by the check digit value.
Sometimes a two digit post office code will be attached to the zip code. HRI (human readable
interpretation) will not be printed with this bar code.
Individual bars, which make up the Postnet bar code, should be printed so that the height of the
tall bars is 0.125 inch ? 0.010 inch, and the height of the short bars is 0.050 inch ? 0.010 inch.
Examples:
m i
J
O R
S l1;.0,.0,2.5,2.5,4.26
B:POSTNET1;1.0,.75,0,postnet,.5,.05;442120798
B:POSTNET2;1.0,1.5,0,P,.5,.05;441361234
A 1
=====================================================================================
Label Format Commands 43

B - Bar Code Field Definition
Bar Code Name: UCC128/EAN128
Short Code: Q
Command:
B [:name;] x, y, r, UCC128, [+WSize, +BARS,] height,narrow; data <CR>
{ or SCx }
Description:
UCC/EAN128 is a unique version of Code 128 used to encode serialized shipping container
information. Each bar code has an application identifier embedded, and all applications share a
similar bar code structure. Each UCC/EAN-128 bar code is composed of five (5) structural
elements:
1. The Start Code. Start (B or C), FNC 1. The Apollo printer will generate a start character
B or C FNC1 automatically. Start C will be used when the data begins with 4 or more
numeric characters.
2. AI (Application Identifier) and Data. The number of data characters allow ed in the bar
code is determined by the Application Identifier chosen. See Appendix A for list of
Application Identifiers. The AI is surrounded by parenthesis in the data string. The
parenthesis will not be encoded in the bar code symbol, but will be printed in the HRI. If
the correct number of digits are not supplied, the barcode will print with three question
(?) marks, indicating an error.
3. The mandatory Mod 103 Symbol Check Character. (If a Mod 10 check character is
needed, it must be calculated and included in the Data. The Apollo will not calculate this
character; do not use +MOD10.)
4. The Stop Character.
5 The Quite Zones.
=====================================================================================
44 Label Format Commands
B - Bar Code Field Definition
Bar Code Name: UCC128/EAN128
Short Code: Q
Examples:
m i
J
O R
S l1;.0,.0,2.5,2.5,4.26
B:UCCEAN128;1.0,0.15,0,EAN128,0.6,0.013;(00)345678901234567890
B:UCC2;1.0,0.85,0,UCC128,0.6,0.013;(00)345678901234567890
B:UCC3;1.0,1.55,0,Q,0.6,0.013;(00)345678901234567890
A 1
=====================================================================================
Label Format Commands 45

B - Bar Code Field Definition
Bar Code Name: FIM (Facing Identification Mark)
Short Code: S
Command:
B [:name;] x, y, r, FIM, [+WSize,] [+BARS,] height,narrow; data <CR>
Description:
Facing Identification Mark is a 9 position bar/no-bar pattern. The FIM patterns are used by
business mailers on preprinted mailing pieces for compatibility with various United States Postal
Service automatic sorting systems. There are four FIM patterns (A, B, C and D) that can be
printed on the Apollo printer, these are:
A FIM-A is used on Courtesy Reply Mail, with preprinted Postnet symbology in the
address.
B FIM-B is used on Business Reply, Penalty, and Franked mail with no preprinted
Postnet symbology.
C FIM-C is used on Business Reply, Penalty, and Franked mail with preprinted
Postnet symbology.
D FIM-D is for OCR readable mail with no Postnet symbology
Examples:
m i
J
H 5.2,0,T,R0
O R
S l1;.0,.0,2.5,2.6,4.26
B:UCCODE;2.00,0.10,0,FIM,0.60,0.0133;A
B:UCCODE;2.00,0.90,0,FIM,0.60,0.0133;B
B:UCCODE;2.00,1.70,0,S,0.60,0.0133;C
A 1
=====================================================================================
46 Label Format Commands

) into datastream. The
header is only valid with Mode 2 and Mode 3. The data following the
3 digit country code, 3 digit
B - Bar Code Field Definition
Bar Code Name: MAXICODE
Short Code: U
Command:
B [:name;] x, y, r, MAXICODE [+MODE]; [ZIP], [COUNTRY], [SERVICE],
. . . . . . . [MESSAGE] <CR>
Description:
Maxicode is a fixed-size matrix symbology which is made up of offset rows of hexagonal
modules arranged around a unique finder pattern. The symbologies dimension is fixed at one
inch by one inch. The symbology is use by the United Parcel Service for the tracking of
packages. Maxicode has modes which are used to define the structuring of the data and error
correction with a symbol. The available modes are as follows:
MODE2 Designed for the transport industry, Mode 2 is used in the US and encodes the
zip code as numeric data.
MODE3 Designed for the transport industry, Mode 3 is used internationally and encodes
the zip code as alphanumeric data.
MODE4 Mode 4 encodes a text message of 93 characters
MODE6 Mode 6 encodes a text message of 93 characters. This mode is used for reader
programming since no data is transmitted.
ZIP 9 digit zip code for Mode 2, 6 characters for Mode 3.
COUNTRY 3 digit UPS country code
SERVICE 3 digit UPS service code
MESSAGE 84 character message for Mode’s 2 and 3, 93 characters for Modes 4 and 6.
MaxiCode Special Content Fields
[U:ANSI_TM] Embeds the ANSI message header [)>
R
G
01
S
S
header is a two digit year, 5 or 9 digit zip code,
service code and a message.
Example:
[U:ANSI_TM]98442120798,840,024,Tharo Systems, Inc.
=====================================================================================
Label Format Commands 47

B - Bar Code Field Definition
Bar Code Name: MAXICODE
Short Code: U
Examples:
m i
J
O R
S l1;.0,.0,2.5,2.5,4.26
H 5.2,0,T
B:MAXICODE;4.00,2.30,0,MAXICODE+MODE2;442120798,840,123,Parcel for Tharo Systems,
Inc.
B:MAXICODE;4.00,1.20,0,MAXICODE+MODE3;ABC123,840,123,Parcel for International Zip
Code
B:MAXICODE;1.50,2.30,0,MAXICODE+MODE4;Parcel for Tharo Systems, Inc.
B:MAXICODE;1.50,1.20,0,MAXICODE+MODE6;Parcel for Tharo Systems, Inc.(Reader Only)
A 1
=====================================================================================
48 Label Format Commands

B - Bar Code Field Definition
Bar Code Name: DATAMATRIX
Short Code: W
Command:
B [:name;] x, y, r, DATAMATRIX [+RECT],Height; data <CR>
Description:
DataMatrix is a variable size two-dimensional bar code symbology capable of encoding a
number of different character sets, including all 128 ASCII characters. Every DataMatrix symbol
consists of an array of data cells within a distinct perimeter pattern. DataMatrix can encode up
to 2000 characters per symbol. DataMatrix can be printed in two forms, either as a square or as
a rectangle.
For coding DataMatrix symbols, the following unique details apply:
? If data cannot be coded, an empty symbol of size 8 x 8 will be printed.
? Height parameter is the dimension of the cell size.
DataMatrix Special Content Fields
The following Special Content fields are available for DataMatrix only. Special Content fields are
acronyms that allow special characters to be embedded by using standard keyboard characters.
[U:ANSI_AI] Embed ANSI Application Identifier [)>
trailer.
[U:ANSI_DI] Embed ANSI Data Identifier [)>
[U:PROG] A Reader Programming character indicates that the symbol
encodes a message used to program the reader system.
[ECE:x] Extended Channel Interpretation protocol allows the output data
stream to have interpretations different from the default character
set. Four broad types of interpretations are supported in
DataMatrix:
1. International character sets (or code pages)
2. Encryption and compaction
3. User defined for closed systems.
4. Control information for structured append in unbuffered
mode.
See DataMatrix specification for information on using Extended Channel Interpretations.
R
G
05
header and
S
S
R
G
06
header and
S
S
RSE
RSE
O
trailer.
T
O
T
=====================================================================================
Label Format Commands 49

B - Bar Code Field Definition
Bar Code Name: DATAMATRIX
Short Code: W
DataMatrix Special Content Fields (cont.)
[APPEND:m,n,id1,id2] Up to 16 symbols may be appended in a structured format. This
allows files of data to be represented in up to 16 DataMatrix
symbols. The original data can be correctly reconstructed
regardless of the order in which the symbols are scanned.
Where:
m = The number of the actual symbol. Value range is 1 to 16.
n = The number of all symbols together. Value range is 1 to 16.
id1 and id2 = A value between 1 and 254 which must be identical on all symbols.
Examples:
m i
J
O R
S l1;.0,.0,2.5,2.5,4.26
B:BAR1;1.50,0.50,0,DATAMATRIX,.04;Tharo Systems, Inc.
B:BAR2;1.50,1.75,0,W+RECT,.04;Tharo Systems, Inc.
A 1
=====================================================================================
50 Label Format Commands

B - Bar Code Field Definition
Bar Code Name: PLESSEY
Short Code: X
Command:
B [:name;] x, y, r, PLESSEY, [+WSize,] [+BARS,] height,narrow,ratio; data <CR>
Description:
Plessey bar code is a variable length non-self checking symbology that can encode the digits 0-9
and letters A-F. This symbology is not in widespread use, and is usually seen only in older
library and grocery applications. When bearer bars are desired at the top and bottom of the bar
code, the +BARS option should be used.
Examples:
m i
J
O R
S l1;.0,.0,2.5,2.5,4.26
B:PLESSEY;0.75,0.50,0,PLESSEY+BARS,0.7,.015,2:1;1234567890
B:plesse2;0.75,1.30,0,plessey,0.6,.015,2:1;1234567890
A 1
=====================================================================================
Label Format Commands 51

B - Bar Code Field Definition
Bar Code Name: UPC-E0
Short Code: Y
Command:
B [:name;] x, y, r, UPCE0, [+WSize] [+BARS] [+XHRI] height,narrow; data <CR>
{ or SCx }
Description:
UPC-E0 is a fixed-length of eight, numeric-only bar code. The Apollo accepts 11 or 12 digits with
the command, where the first digit must be a zero. Leaving the leading zero in position 1, the
remaining 10 digits are compressed with zero suppression to six digits, filling positions 2-7 in the
final number. Based on these six digits, Apollo automatically calculates and appends a check
digit as the eighth.
Examples:
m i
J
O R
S l1;.0,.0,2.5,2.5,4.26
B:UPCE0A;1.0,0.22,0,UPCE0,0.7,.013;03210000678
B:UPCE0B;1.0,1.32,0,Y,SC1;01230000088
A 1
=====================================================================================
52 Label Format Commands

B - Bar Code Field Definition
Bar Code Name: PDF417
Short Code: Z
Command:
B [:name;] x, y, r, PDF417, [+WSize,] [+ELx,] height,narrow,dimensional ratio; data
<CR>
Description:
PDF417 is a two-dimensional bar code symbol capable of encoding information at about one
thousand bytes per symbol. Every PDF417 symbol is composed of a stack of rows. Each row
consists of several code words. Each code word is constructed of 17 modules arranged into
four bars and four spaces. The first and last code words in each row are row indicators. There
are two checksums for a PDF417 symbol. For coding PDF417 symbols, the following unique
details apply:
? Error levels of 00 to 08 may be specified with +ELxx on the Apollo printer. The higher
the error level, the more redundancy that will be included in the symbol, and the larger
the symbol will appear.
? Carriage return/line feed can be inserted into the text by using Unicode [U:13][U:10] or
given as HEX values [U:$0D] [U:$0A].
Examples:
m i
J
O R
S l1;.0,.0,2.5,2.5,4.26
B:BAR1; 0.75,0.30,0,PDF417+EL0,0.05,.011,.26;THARO SYSTEMS INC[U:13][U:10]2866
NATIONWIDE PKWY[U:13][U:10]BRU NSWICK OH 44212
B:PDF417;0.75,1.00,0,Z+EL5,0.05,.011,.66;THARO SYSTEMS INC[U:CR][U:LF]2866
NATIONWIDE PKWY[U:CR][U:LF]BRUNSWICK OH 44212
A 1
=====================================================================================
Label Format Commands 53

C - Cutter Parameters
The C command sets the cutter parameters. Cutting can be set specifically by counting labels,
with or without additional displacements, or the ‘end’ of the current job can be selected.
Usage:
C cnt [,disp1 [,disp2]] <CR>
C e <CR>
Where:
'cnt' = A number of labels after which the cutter should cut.
'disp1' = The displacement from the end of the label for cutting in inches or millimeters.
This specifies where, within the gap between labels, the cut should be made.
'disp2' = An offset from the first cut for a second cut in inches or millimeters. This
second cut could be used to cut out reflective marking on continuous (endless)
media.
e = Sets the cutting to be performed once at the end of the current job. (End of job
is determined by the label count in the A command).
Example:
C 5,0,.20 <CR> Sets cutting at every five labels, cutting after an offset of 2/10th extra
inches past the fifth label's trailing edge.
=====================================================================================
54 Label Format Commands

D - Global Object Offset
The D command moves the origin of all objects on a label the specified values . This command
is useful if you change from one label size to another, and need to center the data on the new
label without changing the values of each object. However, if you exceed the limits of your label
size, your data will be cut off. The preferred method for moving objects is using the S command
- Set Label Size which will not cut off your data if you exceed the limits of your label.
Usage:
D x,y <CR>
Where:
x = Specifies the horizontal amount of offset. The unit of measurement, either
inches or millimeters, is set by the Immediate Command “m”
y = Specifies the vertical amount of offset. The unit of measurement, either inches
or millimeters, is set by the Immediate Command “m”
Example:
D 0.5, 0.5 <CR> Sets the Global Offset at 1/2 inch horizontally and 1/2 inch vertically.
Whatever values are defined for all other fields on the label, will be
offset by this amount.
=====================================================================================
Label Format Commands 55

E - Define Files
The E command defines database, serial and log files for use on the PCMCIA memory card.
Note: See Appendix B for sample programs and text files demonstrating E commands.
E DBF;name <CR>
This command must be added to formats that access fields from a database.
Where:
name = Specifies the name of the database on the PCMCIA memory card. The
database must be present on the memory card.
Example:
E DBF;ZIPCODE <CR> Defines the database ZIPCODE.DBF for use on the PCMCIA
memory card.
E TMP;name <CR>
Where:
name = Specifies the name of the serial file on the PCMCIA memory card.
Example:
E TMP;SERIAL <CR> Defines the serial file SERIAL.TMP for use on the PCMCIA
memory card.
E LOG;name <CR>
Where:
name = Specifies the name of the log file on the PCMCIA memory card.
Example:
E LOG;TRACK <CR> Defines the log file TRACK.LOG for use on the PCMCIA
memory card.
=====================================================================================
56 Label Format Commands

F - Font Number
The F command allows assignment of an optional, alternate number for a font. This alternate
font number can simplify use, make formats easier to read, and provide a simple way to replace
the font throughout an entire format. With this command, the font identifier would be changed on
this single command, instead of in each individual text format command.
On TrueType fonts, the number found in the typeface file is used as the default.
Usage:
F number;name <CR>
Where:
F = Font command
number = Alternate number to assign to the font.
name = Name of the font selected. For a downloaded font, this will be the name
assigned at download. For internal fonts, the font number shown in the printer
self-test should be used to identify the font.
All fonts on Apollo have a default number which is encrypted in the font header. This number
can be found on the Apollo’s status printout.
For example, a font “Aurora” might have a number such as ‘1137’. This number, 1137, would be
used in each text field definition command, every time the user wants to use the Aurora typeface.
To simplify font selection, the user may create their own alternate number. The user could code
‘F 5;Aurora’ (for a downloaded font), or 'F5;1137' (for an internal font) early in the label command
set. Then, in each text field definition command, the ‘5’ could be used to specify font.
If the user wishes to change the Aurora typeface to Arial at some later time, they could
accomplish this by changing the ‘F 5; Aurora’ to ‘F 5;Arial’. This would eliminate the need for
changing each individual text field definition command.
Example:
F 4; Swiss 721 <CR> Assigns user’s chosen alternate number 4 to Swiss™ 721
font.
=====================================================================================
Label Format Commands 57

G - Graphic Field Definition
The G command specifies a graphic field definition statement to add a line, rectangle or ellipse
field to the current label format.
Usage
G [:name;] x, y, r; type:type options [,shade options] [,outline options] <CR>
Where:
G = Graphic field definition command.
[:name;] = Optional parameter. A unique name given to this graphic field. “name” must
begin with a colon may be up to ten characters long, and may not contain any
special characters. The field “name” may be used with the R - Replace
Command. See the R - Replace Command for instructions on using this
command.
x = Coordinate "x" specifies the horizontal position of the graphic field. This is the
distance, in inches or millimeters, from the left edge of the printable area to the
start position of the graphic field. Start position of the graphic varies by graphic
type; see individual type descriptions. The printable area is defined by the
Label Size Command “S". The unit of measurement, either inches or
millimeters, is set by the Immediate Command “m".
y= Coordinate "y" specifies the vertical position of the graphic field. This is the
distance from the top of the label to the start position of the graphic field. Start
position of the graphic varies by graphic type; see individual type descriptions.
The unit of measurement, either inches or millimeters is set by the Immediate
Command “m".
r= Rotation of the graphic field. Rotation may be given in any one of 360 degrees.
In determining rotation, consider the current orientation of the label, as
specified by the Option command, Rotate parameter.
type = Type identifies the shape of the graphic, where:
C = Circle
L = Line
R = Rectangle
See Type and Type Options definitions on the following pages.
type options = The graphic’s type options specify the size of the object in terms appropriate
for the object’s shape. See Type and Type Options definitions on the following
pages.
=====================================================================================
58 Label Format Commands

G - Graphic Field Definition
Graphic Type: C - Circle
Command:
G [:name;] x, y, r, C: radius1 [,radius2 [,width] ] [,shade options] [,outline options]
Type Options:
radius1 = Radius of circle in inches or millimeters, or horizontal radius (in relation to
rotation 0) if ellipse.
radius2 = Radius2 is the vertical radius (in relation to rotation 0) of an ellipse in inches or
millimeters.
width = Width of line in inches or millimeters.
Note: x, and y, coordinates point to the center of the circle or ellipse. See example
below.
Example:
m i
J
O R
S l1;.0,.0,2.5,2.5,4.26
G 1.83,1.35,0;C:0.83,0.83,0.05
G 0.00,1.35,0;L:1.82,0.03
G 1.83,0.00,270;L:1.32,0.03
T:TEXT1;0.01,0.11,0,596,pt10;HOME
T:TEXT2;0.80,1.30,0,596,pt10;X
T:TEXT3;1.90,0.33,270,596,pt10;Y
A 1
=====================================================================================
Label Format Commands 59

G - Graphic Field Definition
Graphic Type: L - Line
Command:
G [:name;] x, y, r, L: length, width [,start [,end] ] [,shade options] [,outline options]
Type Options:
length = Length of the line in inches or millimeters.
width = Width of the line in inches or millimeters.
start = Type of line start (s=squared (default), r=rounded, a=arrowed).
end = Type of line end (s=squared (default), r=rounded, a=arrowed).
Note: x, and y, coordinates point to the center of the starting point of the line.
See example below.
Examples:
m i
J
H 5.2,0,T,R0
O R
S l1;.0,.0,2.5,2.5,4.26
T:Text1;0.10,0.10,0,596,.10,h.10;HOME
G .01,1.15,0;L:1.2,.015
G 1.23,1.15,90;L:1.32,.015
G 1.23,1.15,0;L:2.45,.22
T:XTEXT;.615,1.13,0,596,.10,h.10;X
T:YTEXT;1.25,.575,270,596,.10,h.10;Y
A 1
=====================================================================================
60 Label Format Commands

G - Graphic Field Definition
Graphic Type: L - Line
Examples:
The following example shows the different line ends available.
m i
J
OR
S l1;.0,.0,2.5,2.5,4.26
G 1.40,0.50,.0;L:1.50,0.08,a,a
G 1.40,1.00,.0;L:1.50,0.08,s,a
G 1.40,1.50,.0;L:1.50,0.08,r,r
G 1.40,2.00,.0;L:1.50,0.08
A 1
=====================================================================================
Label Format Commands 61

G - Graphic Field Definition
Graphic Type: R - Rectangle
Command:
G [:name;] x, y, r, R: hor,ver [,horw [,verw] ] [,fill option] [,shade options] [,outline]
Type Options:
hor = Horizontal length of the rectangle in inches or millimeters.
ver = Vertical length of the rectangle in inches or millimeters.
horw = Width of horizontal lines in inches or millimeters.
verw= Width of vertical lines in inches or millimeters.
Note: x, and y, coordinates point to the top right, outside corner of the rectangle.
See example below.
Example:
m i
J
O R
S l1;.0,.0,2.5,2.5,4.26
G 1.30,0.75,0;R:1.60,0.50,0.04,0.04
G 0,0.75,0;L:1.25,0.02,s,a
G 1.30,0,270;L:0.69,0.02,s,a
T:X;0.65,0.65,0,596,pt10;X
T:Y;1.35,0.375,270,596,pt10;Y
T:TEXT1;0.03,0.12,0,596,pt10;HOME
A 1
=====================================================================================
62 Label Format Commands
G - Graphic Field Definition
Graphic Option: Fill
Fill provides for the filling of all graphic objects with a specified pattern or dot density.
Command:
G [:name;] x, y, r, type:type options, [F:name] [shade] [outline]
Fill Parameters:
F: = Fill parameter.
name = Name of the fill pattern desired from the following:
0%, 6%, 12%, 25%, 38%, 50%, 100% (for dot density)
left, right, grid, diamond, dots (predefined patterns)
user1, user2, user3, user4 (downloaded images)
Note: Downloaded user images should be 32 by 32 dots.
Note: The fill option with its parameter must be coded in brackets [ ].
Example:
m i
J
O R
S l1;.0,.0,2.5,2.5,4.26
H 4,0,T,R0
G :square1;0.50,0.75,0;R:0.75,0.80,0.40,0.40[F:grid][O]
G :circle1;2.20,1.22,0;C:0.37,0.37,0.37[F:38%][O]
G :square2;3.20,0.75,0;R:0.75,0.80,0.40,0.40[F:left][O]
A 1
=====================================================================================
Label Format Commands 63

G - Graphic Field Definition
Graphic Option: Shade
Shade provides for the gradient filling of all graphic objects.
Command:
G [:name;] x, y, r, type:type options, [S:percent1[,percent2[,direction]] [outline
Shade Parameters:
S: = Shade parameter.
percent1 = Beginning value of darkness, as a percent of black.
percent2 = Ending value of darkness, as a percent of black. Using this parameter causes
a gradient shading, rather than a constant shading.
direction = Angle of shading, if other than horizontal gradient is needed.
Note: The shade option with its parameters must be coded in brackets [ ].
Example:
m i
J
O R
S l1;.0,.0,2.5,2.5,4.26
G 2.30,1.90,150.5;L:1.60,0.08
G 2.30,1.90,120.0;L:1.60,0.08[S:60]
G 2.30,1.90,090.6;L:1.60,0.08[S:45]
G 2.30,1.90,060.8;L:1.60,0.08[S:30]
G 2.30,1.90,030.2;L:1.60,0.08[S:15]
A 1
=====================================================================================
64 Label Format Commands

G - Graphic Field Definition
Graphic Option: Outline
Outline prints a one dot outline around any filled graphic object .
Command:
G [:name;] x, y, r, type:type options [shade options] [O]
Parameter:
[O] = Outline is to be applied to this filled object.
Note: The outline parameter must be coded in brackets [ ].
Example:
m i
J
O R
S l1;.0,.0,2.5,2.5,4.26
G 0.75,0.75,0;R:0.75,0.80,0.40,0.40[S:60,10,45][O]
G 2.45,1.22,0;C:0.37,0.37,0.37[S:60,10,75][O]
A 1
=====================================================================================
Label Format Commands 65

H - Heat, Speed, Method of Printing
The H command defines the speed, heat and method of printing to be used for the current label.
Usage:
H speed [,heat] [,method] [,ribbon] <CR>
Where:
speed = Specified in inches or millimeters per second (depending on current measuring
unit). For example, with inches 5.2 is 5.2 inches/second, and with millimeters
100 is 100 mm/second. Standard speeds per second available:
Apollo 1 and Apollo 2:
2.6”, 3.9”, 5.2”, 6.3”, 7.9” and 66mm, 100mm, 133mm, 160mm, 200mm.
Apollo 3 and Apollo 4:
2.0”, 3.0”, 3.9”, 5.0” and 50mm, 75mm, 100mm, 125mm.
Apollo 3/300 and Apollo 4/300:
1.3”, 2.0”, 2.5”, 3.0”, 3.4" and 33mm, 50mm, 63mm, 75mm, 87mm.
Any speed coded that is not one of the standard speeds will be rounded to the
next existing speed. If this parameter is not used, the default for Apollo 1 and 2
is 160 mm/sec. The default for Apollo 3 and 4 is 100mm/sec. The default for
Apollo 3/300 and 4/300 is 75mm/sec.
heat = Specified as a value which ranges from -10 to +10. Default is 0.
method= Specify as T for transfer printing and D for direct thermal printing. Default is
set on front panel.
ribbon = Controls ribbon saving when using T, transfer printing method. Specify R0 for
ribbon saving off, R1 for ribbon saving on. Default is set on front panel.
Ribbon Saver is only available on Apollo 1.
Example:
H 5.2,0,D <CR> Sets speed to 5.2 inches/sec, nominal heat and direct thermal printing.
H 3.9,T,R1 <CR> Sets speed to 3.9 inches/sec, heat level to +1, thermal transfer printing,
with ribbon saving on.
=====================================================================================
66 Label Format Commands

I - Image Field Definition
The I command is used to place a graphic image field in the current label format. The graphic
image must have been previously downloaded (see Immediate Command “d” and Appendix B
for information on downloading graphics).
Usage
I [:name;] x, y, r [,mx,my] ;imagename <CR>
Where:
I = Image field definition command.
[:name;] = Optional parameter. A unique name given to this image field. “name” must
begin with a colon may be up to ten characters long, and may not contain any
special characters. The field “name” may be used with the R - Replace
Command. See the R - Replace Command for instructions on using this
command.
x = Coordinate "x" specifies the horizontal position of the image field. This is the
distance, in inches or millimeters, from the left edge of the printable area to the
start position of the image field. The printable area is defined by the Label Size
Command “S". The unit of measurement, either inches or millimeters, is set by
the Immediate Command “m".
y= Coordinate "y" specifies the vertical position of the image field. This is the
distance from the top of the label to the start position of the image field. The
unit of measurement, either inches or millimeters, is set by the Immediate
Command “m".
r= Rotation of the image field. Rotation may be given in any one of 360 degrees.
In determining rotation, consider the current orientation of the label, as
specified by the Option command, Rotate parameter.
mx,my = Optional parameters. These are magnification factors, 1 to 10, to be applied
for horizontal and vertical expansion of the image. “mx” is horizontal
magnification and “my” is vertical magnification.
imagename = The name of the previously downloaded graphic image to be used. This name
was stored in the printer’s memory by the Immediate Command “d”. (See
Appendix B for download example)
Example:
I:PIC1;.01,.05,0,2,4;LOGO Print the image named LOGO, magnified by 2 horizontally and by
4 vertically.
=====================================================================================
Label Format Commands 67

J - Job Start
The J command starts a new label definition job by setting all parameters to their default values.
Usage:
J [comment] <CR>
Where:
J= Job start command.
comment = Optional parameter. Text which describes the label job. This text may be
printed on the printer’s LCD while selecting a label from memory card, giving a
better idea of the label than 8 byte DOS-type filenames. The comment can be
up to 16 characters in length.
Example:
J Test Label Sets the job start command and names the format ‘Test Label’.
When the label is recalled for printing from the memory card,
‘Test Label’ will be displayed on the printer’s LCD.
=====================================================================================
68 Label Format Commands

M - Memory Card Access
The M commands provide access to the memory card for listing its' contents, and for deleting,
formatting, loading, and storing data.
Note: See Appendix B for sample programs and text files demonstrating M commands.
Command Formats:
For the following Memory commands, where type is shown, specify the file type as:
FMT - Media format definition (Label size, heat, speed, method, etc. can be
specified separately from the format definition if desired)
FNT - Font file (any font file, including SPD, TTF, etc.)
IMG - Image file (any image file, including BMP,GIF, IMG, MAC, PCX,
TIF, etc.)
LBL - Label format definition (any label command set)
DBF - Database definition
M c <CR> contents list (directory) of the card.
Produces a list similar to the following, with date shown as dd:mm:yy :
Directory of 'TESTCARD '
TESTFONT FNT 338 14:03:95 15:10
TESTLABL LBL 3530 14:03:95 15:45
1024512 bytes free
M d type; name<CR> deletes a file from the card.
where:
type = As defined above.
name = The datafile name following DOS conventions, up to 8 characters.
Example: M d FNT;MYFONT Deletes FNT named MYFONT from card.
=====================================================================================
Label Format Commands 69

M - Memory Card Access (Cont.)
Command Formats:
M f; name<CR> formats a memory card with the correct file system.
RAM cards are formatted using a FAT file system. Flash
cards will be formatted using the Flash File 2.0 system.
where:
name = The name to be assigned to the memory card, up to 8 characters.
Example: M f;myfiles Formats the card and names it 'myfiles'.
M l type; name<CR> load a datafile into the printer from the memory card.
where:
type = As specified above.
name= The datafile name following DOS conventions, i.e., 8 character name.
Example: M l IMG;MYIMAGE Loads IMG named MYIMAGE from the card.
=====================================================================================
70 Label Format Commands

M - Memory Card Access (Cont.)
Command Formats:
M s type; name<CR> stores data on the memory card. Command is used to start and
end store operation.
where:
type = As specified above.
name The datafile name following DOS conventions, i.e., 8 character name. When
storing a label, this command is also used at the end of the label data stream to stop the
store process.
Note: Images and Fonts to be stored must be downloaded prior to issuing this
command. Label and Media format statements follow the store command as
shown below.
Example: M s LBL;MYLABEL Begins label storing
. . . Label commands are sent next . . . Label data here
M s LBL Ends label storing
M u type; name<CR> Upload a datafile from the memory card to the host .
where:
type = As specified above.
name= The datafile name following DOS conventions, i.e., 8 character name.
Example: M u LBL;MYLABEL Uploads label named MYLABEL from the card. During
a Hyper-Terminal session, this text can be copied with
a <Ctrl>C and Pasted with a <Ctrl>V into a file opened
in text mode, such as Notepad.
Attention: When uploading other types of files, such as IMG, the data is in sent in it’s
raw binary form. The only exception is the <ESC> conversion to a double,
<ESC><ESC>, that’s also used in the d (download) command. See
Appendix B for an example Basic program showing this conversion.
=====================================================================================
Label Format Commands 71

O - Set Print Options
The O command provides a variety of options to be used while printing a label.
Usage:
O [M,][R,][S,][T,][N,][U,][p] <CR>
Where:
O = Print Options command.
M= M activates the Mirrored image effect in printing.
R = R causes the Home position for the label to be Rotated by 180 degrees.
Without this command, Home is at the bottom right of the label, as viewed
from the front of the printer. With this command, Home positioned at the top
left of the label, as viewed from the front of the printer. (See Command
Overview section for more information)
S= S switches the printer to Single Page Buffering. The next format is not imaged
until the current label is finished printing.
T = T places the printer in Tear-off mode. This is used to advance the label
forward to the tear plate, then backfeed and print the next label.
N = N causes Negative image printing, which results in white characters on a black
background.
U = U provides for Sec urity by eliminating label re-prints. Pressing the PSE key or
the F2/F3 on an external keyboard will not re-print the label.
p = Enables the printer to overlap the operations of starting to print a new label,
while the old one is being cut or peeled off without backfeeding the label. This
feature can also be set as a default in the printer’s setup using the ‘Backfeed’
option. Using P activates this feature and is the same as selecting ‘smart’ in
the printer’s setup. Using D the printer will backfeed before printing the next
label. This is the same as selecting ‘always’ in the printer’s setup. We
recommend using the D option to avoid lines or imperfections on your fields.
These commands function identically to the ‘always’ and ‘smart’ options
available under ‘Backfeed’ from the printer’s setup.
Examples
O R,T <CR> Rotates orientation to place Home position at top left of label
and places printer in Tear-off Mode.
=====================================================================================
72 Label Format Commands

P - Set Peel-Off Mode
The P command sets the printer in peel-off mode, which causes it to pause after each label is
printed, allowing the labels to be peeled off individually. An error will occur if a present sensor is
not attached to the printer.
Usage:
P [disp] <CR>
Where:
P = Set Peel-Off command.
disp = Optional parameter. A displacement in inches or millimeters (dependent on
the m - set measuring unit command) relative to the normal peel-off position of
the label set from the front panel setup. The displacement can be a negative
or positive value and has no range limitation. After advancing the label the
specified amount, the printer will stop to let you peel off the label, or enable it to
be grabbed for handling by an applicator. Proper adjustment with this
command will enable proper applicator grasping of various size labels or
successful peeling of labels.
Example:
P <CR> Sets peel-off mode
P .25 <CR> Sets peel-off mode and adjusts the placement of the label edge .25 inches past
the default peel position.
P -.25 <CR> Sets peel-off mode and adjusts the placement of the label edge .25 inches
before the default peel position.
=====================================================================================
Label Format Commands 73

R - Replace Field Contents
The R command provides for replacing the contents of a field, without recoding an entire label
command set to include the new value. This option would be very us eful where the user did not
want to retransmit the entire label, only the fields that change. This option does work with
graphics, but with limitations. You cannot change the position or rotation of the graphic image. If
the graphic that is replacing the first graphic is larger, the graphic field could overlap or even
cover other fields on the label. The graphic that is replacing the original graphic must be
previously downloaded using the ‘d - Download Data’ command.
Usage:
R name; newcontent<CR>
Where:
R = Replace command.
name; = The name of the text data field or bar code data field.
newcontent = The new value of the field, which will replace it’s former value. This field may
be any length, and does not have to match the former length.
Example:
R article;01234512345 <CR> Sets new content for field named 'article'.
R PCX;FISH <CR> Sets new image for field named 'PCX'. The image must have been
downloaded previously using the ‘d - Download Data’ command.
=====================================================================================
74 Label Format Commands

S - Set Label Size
The S command provides for definition of the label size in length and width, characteristics and
repetition.
Usage:
S [type;] xo, yo, length, dy, wide [,dx ,col] [;name] <CR>
Where:
S = Set label size command.
Type; = Optional parameter. Specifies the type of labels from:
e for continuous (endless) media with no die cuts.
l0 (lowercase L, zero) for labels with reflective marker on the upper side of media. The
l0 option is not available on Apollo 3, Apollo 3/300, Apollo 4 or Apollo 4/300.
l1 (lowercase L, 1) for die cut labels with gap sensor detection (default).
l2 (lowercase L, 2) for labels with reflective marker on the lower side of media.
xo= The horizontal displacement, in inches or millimeters, to move the print on the
label, shifting the starting point of print to the side - the left margin.
yo = The distance, in inches or millimeters, from the top of the form to the starting
point of print - the top margin.
length = The length of the label, in inches or millimeters.
dy = The distance from the starting point of the one label to the starting point of the
next label, in inches or millimeters.
wide = The width of one label, in inches or millimeters.
dx = The horizontal distance between labels, from the start of one label to the start
of the next label, in inches or millimeters.
col = The number of labels across the label roll.
name = Optional parameter. The media name, which may be displayed on the LCD to
show the user which media he has to insert.
Example:
S l1; 0,0, 6.00, 6.10, 4.00 <CR> Sets size of the label to six inches by four
inches, with no horizontal or vertical displacement.
=====================================================================================
Label Format Commands 75

T - Text Field Definition
The T command is used for text field definition, to add a text field to the current label format. The
text may be printed in any rotation, but most often text is printed in one of four rotations: 0, 90,
180 or 270 degrees. Bitmap fonts can only print in rotations of 0, 90, 180 or 270 degrees. The
Apollo printer has eight internal character sets and the ability to generate character bit maps
from downloaded TrueType fonts.
Usage:
T [:name;] x, y, r, font,size [, effects]; data <CR>
Where:
T = Text field definition command.
:name; = Optional parameter. A unique name given to this text field. May be used later
to concatenate fields, in field data replacement or in field calculations and
comparisons “name” may be up to ten characters long, no comma, colon or
semicolon allowed.
x= Coordinate "x" specifies the horizontal position of the text field. This is the
distance, in inches or millimeters, from the left edge of the printable area to the
start position of the text field. The printable area is defined by Label Size
command “S". Start position refers to the upper left corner of the text field
area. The unit of measurement, either inches or millimeters is set by the
Immediate Command “m".
y = Coordinate "y" specifies the vertical position of the text field. This is the
distance, in inches or millimeters, from the top of the label to the baseline of
the text field. Baseline refers to the bottom corner of the text field area. The
diagram below illustrates the position of the baseline. The unit of
measurement, either inches or millimeters is set by the Immediate command
“m”.
r = Rotation of the text field. The rotation may be given in any one of 360 degrees,
but is most often given as 0, 90, 180 or 270 degrees. Bitmap fonts can only
print in rotations of 0, 90, 180 or 270 degrees. In determining rotation, consider
the current orientation of the label, as specified by the Option command,
Rotate parameter.
=====================================================================================
76 Label Format Commands

T - Text Field Definition
font = The number of the font used, which provides selection of the style for printing
the text string. Either one of the printer’s own internal character sets or a
downloaded font can be used. To obtain the information contained in the Font
file, perform a printer self test (see Immediate Command “t”). The internal
character sets available are:
Font
No
-1 _DEF1 Bitmap Default Size 12x12 dots
-2 _DEF2 Bitmap Default Size 16x16 dots
-3 _DEF3 Bitmap Default Size 16x32 dots
-4 OCR_A_I Bitmap OCR-A Size I
-5 OCR_B Bitmap OCR-B
3 BX000003 Scaleable Swiss 721(TM)
5 BX000005 Scaleable Swiss 721 Bold(TM)
596 BX000596 Scaleable Monospace 821
size = Defines the size of the characters.
- With Scaleable fonts , size may be set by point size “pt x”, in hundredths
of an inch, or in millimeters.
- For bitmapped fonts , a magnification factor may be used for vertical and
horizontal expansion of the characters “x mx, y my”, where mx and my
are expansion values 1 to 10 (see text samples on the following pages).
Name Type Description
=====================================================================================
Label Format Commands 77

T - Text Field Definition
effects = Optional parameters. Describes special effects to be applied to the
characters. Depending on the font not all effects may be available.
The following effects are available for most fonts:
b = bold
s = slanted
i = italic
n = negative (reverse print)
u = underlined
l = light
z = slanted left
k = kerning is auto-adjusting of the space between printed
characters.
v = print text in vertical alignment.
qn = squeeze characters, where n is a percentage (10 -1000 only, default
percentage is 100)
hn = width of upper case “H” , with n in inches or millimeters.
m n = horizontal spacing of text, with n in inches or millimeters.
The following effects are available only with internal bitmapped fonts:
o = outlined (not for OCR font)
g = gray (not for OCR font)
xn = horizontal expansion factor, where n = 1 to 10
y n = vertical expansion factor, where n = 1 to 10
data = string of ASCII, EBCDIC, CODEPAGE 850, CODEPAGE 852, MACINTOSH,
ISO 8859-8, WINDOWS 1250, WINDOWS 1252 or ISO 8859-1 characters to
be printed as text on the label format. The string of characters representing
'data' may also consist of special content fields, including calculations (see
Special Content Fields section). Note: Selecting a codepage is done during
front panel setup. The option is labeled ‘Character Set’.
=====================================================================================
78 Label Format Commands

T - Text Field Definition
Internal Fonts
The following are examples of the Apollo’s internal bitmapped fonts . Character sets labeled 2x
2y are shown doubled in size for better readability.
=====================================================================================
Label Format Commands 79

T - Text Field Definition
Internal Fonts
The following are examples of the Apollo’s internal smooth (scaleable) fonts.
=====================================================================================
80 Label Format Commands

T - Text Field Definition
Internal Fonts
The following shows two of Apollo’s scaleable fonts in point sizes from 6 to 36.
=====================================================================================
Label Format Commands 81

T - Text Field Definition
Examples:
This example shows four different bitmapped fonts with text rotated in four different orientations.
m i
J
H 5.2,0,T,R0
O R
S l1;.0,.0,2.5,2.6,4.26
T:PEAR;.45,.50,.0,-3,x6,y6;PEAR
T:BANANA;.22,2.43,90.0,-2,x6,y6;BANANA
T:ORANGE;1.98,.05,270.0,596,.60,h.4;ORANGE
T:APPLE;1.73,2.3,180.0,-1,x6,y6;APPLE
A 1
=====================================================================================
82 Label Format Commands

T - Text Field Definition
Examples:
The following example demonstrates some of the special effects available with the Apollo’s
internal bitmapped fonts:
m i
J
O R
S l1;.0,.0,2.5,2.5,4.26
T:F0O5;0.5,0.20,0.0,-3,x2,y2;Font -3
T:F0O4;0.5,0.55,0.0,-3,x2,y2,u;Font -3 Underline
T:F0O1;0.5,0.90,0.0,-3,x2,y2,o;Font -3 Outline
T:F0O3;0.5,1.25,0.0,-3,x2,y2,g;Font -3 Gray
T:F0O2;0.5,1.60,0.0,-3,x2,y2,s;Font -3 Slanted
T:F0O7;0.5,1.95,0.0,-3,x2,y2,n;Font -3 Reverse
T:F0O6;0.5,2.30,0.0,-3,x2,y2,s,u,o,n;Font -3 Effects Combined
A 1
=====================================================================================
Label Format Commands 83

T - Text Field Definition
The following demonstrates some of the special effects available with the Apollo’s internal
scaleable fonts.
m i
J
O R
S l1;.0,.0,2.5,2.5,4.26
T:F0O1;.50,0.30,.0,3,PT 10;Swiss
T:F0O2;.50,0.50,.0,5,PT 10;Swiss Bold
T:F0O3;.50,0.65,.0,3,PT 10,u;Swiss Underline
T:F0O4;.50,0.85,.0,3,PT 10,s;Swiss Slanted
T:F0O5;.50,1.02,.0,3,PT 10,n;Swiss Reverse
T:F0O6;.50,1.22,.0,5,PT 10,s,u,n;Swiss Effects Combined
A 1
=====================================================================================
84 Label Format Commands

X - Synchronous Peripheral Signal Settings
The X command provides for synchronous setting of signals to the peripheral connector on the
front of the printer. These signals may be used to switch simple mechanical devices or enable
bar code verifiers. This is similar to the Immediate Command “x”, which sets signals, with the
addition of control over exactly when the signal is set, which is the synchronous component of
this command. (see x command)
Note: The list of positions (all signal settings) is cleared wh en starting a new job.
Usage:
X y[;ao] <CR>
Where:
X = Synchronous Peripheral Signal Setting Command
y = Coordinate of printing when signal change should be applied. Specify as the
distance from start of print, in inches or millimeters, for example as .5 inches
after start of print on the label.
ao= This is a combination of two values. The a-value is an AND-mask and the o-
value is an OR-mask, both being a hex nibble, written together as a hex byte.
These values will be used to set or reset the peripheral signal. If the ao
operand is omitted entirely, the item is cleared from the internal list.
Example:
X .5;E0 <CR> Clears bit 0 when the printhead reaches
.5 inch from the top of the label.
=====================================================================================
Label Format Commands 85

Special Content Fields
Special Content Fields provide predefined values which are used to insert data into label
format commands. They also provide special data manipulation functions useful in label
format commands. When Special Content Fields are coded, each field is enclosed in
brackets, [ ]. The brackets enclosing a name listed in the table below will not be printed on
the label. If brackets enclose a value that is not a valid name from the list below, the
brackets, [ ], will be printed on the label.
In this section only, optional parameters are shown enclosed in { } brackets.
Comprehensive examples showing many of the following operands are shown in the
Appendix B Samples.
[SER:start{incr,{freq}}]
Insert Serial Number field. start represents the initial value of the incrementing field.
The incr field is the amount added to the start value. The freq field is the number of labels to
print before each increment. The fields incr and freq default to 1 if no value is specified.
Serial Number fields do not work with operator prompted fields.
Example: [SER:1000,1,2]
Start with a value of 1000. Print two labels with each value before incrementing by 1.
[DBF:keyfield,keyvalue,entryfield]
A special text to be used in text and barcodes to access data from a database. The keyfield
field is the name of the field in a database which is checked for the value of the keyvalue
field. If this is located, it reads the value of entryfield and uses this as the text or barcode
data.
Example: [DBF:ZIP,ZIPCODE,CITY]
Search the database using the keyfield of ZIP, attempting to find and match a record with
the value of the ZIPCODE field. Once this match is found, the value of CITY will be printed in
the text or barcode field
[S:name]
Set the script style for numeric values. The name field can be either LATIN or ARABIC.
Latin is the default without this parameter. The Arabic selection is valid only with font
-3 and some special Arabic download fonts.
Example: [SER:1000,1] [S:ARABIC]
Print serial number in Arabic script style.
=====================================================================================
86 Special Content Fields

Special Content Fields
[?:{Headline},{Default},{Frequency},{D}|{J},{Lx},{Mx},{R}]
Special content field to place a prompt on the LCD panel for either keyboard or keypad entry.
Headline: The text appearing on the LCD display
Default: The default value assigned to this field
Frequency: The frequency of the value to be entered
D | J: The Delete will remove any previous input. The J marks the Prompt
for repeated prompting whenever the printer prompts for a new
number of labels. This is especially useful with the “A [?,R]” command
because the printer continuously loops on this prompt and the number
to print. See example in Appendix B.
L: The length “L” is followed by a decimal value between 1 and 200.
M: The input mask “M” is followed by a value for each input digit. If the
M is followed by a ‘!’, the input must not have blanks. The following
values are valid:
1 Numeric
2 Lower case letters
3 Alphanumeric Lower
4 Upper case letters
5 Alphanumeric Upper
6 Upper and Lower case letters
7 Alphanumeric Upper and Lower
8 All characters
0 Sign and decimal point
R: Repeat prompt if an error occurs such as a record not found in a
database.
Example:
[?:Part Number,123456,,,L6,M!111111]
Display “Part Number” on the LCD panel with a default value of 123456, entering 6
numeric digits with no blanks and a length of 6.
Example:
[?:Part Number,123456,,J,L6,M!111111]
A [?,R]
Display “Part Number” on the LCD panel with a default value of 123456, entering 6
numeric digits with no blanks and a length of 6. After printing the number of labels
prompted to print, printer will re-prompt Part Number and the process will start over
again. Incrementing numbers will not reset, but continue where they left off.
=====================================================================================
Special Content Fields 87

[C:fill{,base}]
Set replacement character fill for leading zero digits. Optional base is counting system for
serialized fields (default: 10). Values for base that are supported include from base 2
through base 36. The character fill can be used with [DATE] and [ODATE] to allow a leading
zero for single digit months. (Example January would be 01). See the date options in the
Special Contents Field.
Example: [C: ]
Replaces leading zeros with spaces. If number is 0010, it will print as 10.
Example: [C:0,4]
Using a serial number field starting with 000, and sending a quantity of 10 labels to the printer
would print 000, 001, 002, 003, 010, 011, 012, 013, 020 and 021.
[DATE]
Prints actual date in the format of the defined country (see I
command). The [C:0] option can be used to have a leading zero for single digit months.
Example: [DATE]
Produces 10-15-1998 or Oct 15, 1998, if country is US.
[DAY02], [MONTH02], [YY], [YYYY]
Prints numeric values for Day (01-31), Month (01-12) and Year (00-99 or as 1998 . . .)
Example: [MONTH02][DAY02][YY]
Produces 101598 for October 15, 1998.
Example: [MONTH02] - [YYYY]
Produces 10-1998 for October 1998.
=====================================================================================
88 Special Content Fields

Special Content Fields
[WEEK], [DOFY], [WDAY]
Prints numeric values for week of the year (1-53), day of the year (1-366) and day of the
week , weekday (1-7).
Example: [DOFY]
Produces 034 for February 3
Example: [WDAY]
Produces 4 for Thursday
[ODATE:+ddd{,+mm}{,+yy}]
Prints the date with an offset of dd-days, and/or mm-months, and/or yy-years (i.e. 'use
before. . .'). The parameters are positional, and should be specified as 0 when not used to
hold the position. The [C:0] can be used to have a leading zero for single digit months.
Example: [ODATE:+015]
Produces 10-20-1998 by adding 15 days, if today is Oct 5, 1998
Example: [ODATE:+0,+3][C:0]
Produces 01-05-1999 by adding 3 months if today is Oct 5, 1998.
[OWEEK:+ww]
Prints the week (01-52) with an offset. Used to calculate a ‘Use Before:’ or ‘Best By:’ date.
Example: [OWEEK:+4]
Produces 06 if today is Jan 10 (wk 02)
[wday], [wday2], [wday3]
Prints the weekday name, as a complete name, or as a 2 or 3 character abbreviation.
Example: [wday]
Produces Monday or Tuesday and so on
Example: [wday3]
Produces Mon or Tue and so on
[month], [mon]
Prints the name of the month or its 3 character abbreviation.
Example: [month]
Produces January or February and so on
Example: [mon]
Produces Jan or Feb and so on
=====================================================================================
Special Content Fields 89

Special Content Fields
[TIME]
Prints actual time in the format of the defined country (see ‘I - Change Language’ command).
Example: [TIME]
Produces 14:30:00 pm for 2:30 pm.
[H24], [H12], or [H024], [H012], [MIN], [SEC], [XM]
Prints actual time in 12 or 24 hour format, including minutes, seconds and am/pm as
specified (using XM parameter).
Example: [H24] [MIN] [SEC]
Produces 153010 for 3:30:10 pm
Example: [H12]:[MIN]:[XM]
Produces 3:30:pm for 3:30 pm
Example: [H012]:[MIN]:[XM]
Produces 03:30:pm for 3:30 pm
[I]
Makes text field invisible. Most often used to hide results of calculations or to hide parts of a
string that are concatenated for printing later.
=====================================================================================
90 Special Content Fields

Special Content Fields
[U:x]
Inserts Unicode character x into text or barcodes. x may be any of the following:
Decimal value
Hex value (indicated by a '$')
ASCII control code symbolic name
Code 128 control code name
Any standard Unicode characters may be inserted with this command. For a list of standard
ASCII Control Codes and Code 128 Control Code names, see Appendix A.
Example: [U:13][U:10]
Produces characters needed for Carriage Return/Line Feed
Example: [U:$C]
Produces a Formfeed character.
Example: [U:CR]
Produces Carriage Return character.
Example: [U:FNC1]
Produces Code 128 Function 1 character. Use the following example to embed a Function 1
character between 123 and 456 in the Code 128 bar code symbology:
B:FUNCTION1;1.00,1.50,0,CODE128,.6,.015;123[U:FNC1]456
(See the Bar Code Field Definition Section for further examples of Code 128).
[name]
Inserts the contents of a previously defined field "name" into text (see the :name; parameter
in Label Format commands B and T). With this field, specific text can be coded once and
used multiple times on the same label. A common use would be to concatenate results of
multiple calculations into one text field.
Example:
T:TESTFLD;0.20,0.30,0,596,PT 10;Apollo
T:TESTLINE;0.20,0.60,0,596,PT 14;Printer is *[TESTFLD]*
Produces the following, where contents of TESTFLD (Apollo) have been placed in the
TESTLINE text string:
Apollo
Printer is *Apollo*
=====================================================================================
Special Content Fields 91

Special Content Fields
[name,m{,n}]
Inserts a substring from previously defined field "name" into text (see the :name; parameter
in Label Format commands B and T). m represents the first character position to be copied.
n is the number of characters to be copied, if not all remaining characters. With this field,
parts of previously defined fields can be used again without recoding the values. Often used
in connection with a serialized field, to obtain and use part of the number.
Example:
T:TESTFLD;0.20,0.30,0,596,PT 10;Apollo
T:TESTLINE;0.20,0.60,0,596,PT 14;Printer is *[TESTFLD,2,3]*
Produces the following, where contents of TESTFLD (Apollo), starting with second character
for a total of 3 characters, have been placed in the TESTLINE text string:
Apollo
Printer is *pol*
[RTMP] or [RTMP:x]
Reads the value from the serial file and stores the value in the fieldname. In the example
below, the value from the 'sample' file is stored in the XVALUE fieldname. The 'x' determines
how many times this value will repeat.
[WTMP]
Writes the value specified to the serial file on PCMCIA memory card. In the example below,
the value of XVALUE is written to the PCMCIA memory card after the field has incremented.
Example:
E TMP;sample
T:XVALUE;0,0,0,3,PT 16;[RTMP,2][I]
T:SERIAL;0,0,0,3,PT 16;[+:XVALUE,1][C:0][I][WTMP]
T:TESTFIELD;1.00,1.00,0,3,PT 16;Serial number is: [SERIAL]
[WLOG]
Writes data to a log file on a PCMCIA memory card. This log file can be used as an audit
trail of labels that have been printed. In the example below, a transaction containing the
incremented number along with the Date and Time, will be recorded on the 'sample' log file
for each incremented value.
Example:
E LOG;sample
T:XVALUE;1.00,1.00,0,3,PT 16;[SER:0001]
T:TESTFIELD;0,0,0,3,PT 16;Label #[XVALUE] processed at [DATE] on [TIME].[WLOG][I]
=====================================================================================
92 Special Content Fields

Field Calculations and Comparisons
Text fields that have previously been assigned a name can be further manipulated using
calculations, comparisons and concatenation. In most cases, the operations shown below
can use a combination of previously defined fields and literal values for their operands.
Simple calculations may be done with field contents by placing arithmetic symbols before
field names or values (see [:name;] in Label Format commands B and T). Operations
available include: add, subtract, multiply, divide, and modulo operation. The figure resulting
from the calculation will be inserted as the value of the field. For all calculations, a default of
2 decimal positions is used. The result of the calculation is placed in the text field defined by
:name;.
The following arithmetic operations are available:
[+: oper1,oper2. . ,operx] Operand1 plus operand2.
[-: oper1,oper2] Operand1 minus operand2.
[*: oper1,oper2. . ,operx] Operand1 multiplied times operand2.
[/ : oper1,oper2] Operand1 divided by operand2.
[%: oper1,oper2] Operand1 minus operand2, remainder Modulo
Example: [*: weight, pricepound]
Multiplies weight by price per pound resulting in the item’s total price, which is
inserted where indicated by this field.
A comparison between field contents is accomplished by placing the compare symbol
before the field names or values (see [:name;] in Label Format commands B and T).
Comparisons available include: less than, equal to, greater than, logical-and and logical-or.
The result of a comparison can be: 1=True, 0=False. The result of the comparison is
placed in the text field defined by :name;.
[<: oper1,oper2] Is operand1 less than operand2?
[>: oper1,oper2] Is operand1 greater than operand2?
[=: oper1,oper2] Is operand1 equal to operand2?
[&: oper1,oper2] Logical And operand1 with operand2, all on?
[|: oper1,oper2] Logical Or operand1 with operand2, any on?
Example: [=:netwt,grosswt]
Compares field netweight to field grossweight, testing for an equal condition. Result
is set to 1 if equal, 0 if not equal.
=====================================================================================
Special Content Fields 93

Field Calculations and Comparisons
The appearance of the result from a calculation may be additionally affected using the
following options:
[D:m,n] Set number of digits to print. m = digits (default
is infinite) and n = fractional digits (default of 2).
Example: [/:10,3] [D:4,3]
Produces 3.333
[P:name,mn{o}] Prints the result in a price format for field
'name'. m is the thousands separator, n is the
character used as decimal point, o is an
optional string inserted when the result has no
fractional part to show after the decimal.
Example: $[P:price,.,-]
For 1000.00 prints $1.000, -- For 6543.21
prints $6.543,21
[R:x] Rounding for math operations, where x is: u=
rounding up, d= rounding down, m = round
mathematically, to next, n= do not round
(default)
Example: [R:d]
Round the result down.
[J:ml] Sets justification within a fixed length string. m
is the orientation of the string where: l=left,
c=centered and r=right. l is the length of area
for the string in inches or millimeters (see m
command).
Example: [J:r3.00]APOLLO
Right justifies the text within a 3.00 inch area, producing:
APOLLO
=====================================================================================
94 Special Content Fields
 Loading...