

Page 1
Outfall Database
For IDDE Manual
User Guide
Version 1 – July 2006
Page 2

Outfall Database
User Guide – IDDE Manual – July 2006
Table of Contents
z General Comments – System Requirements
z Main Menu
¾ Additional Information
z Inventory Module
¾ Inventory Data Entry
z Inspection Module
¾ Inspection Data Entry
z Investigation Module
¾ Investigation Data Entry
z Reporting Function
z Export Function
z Administration Function
Disclaimer:
This Outfall Database was originally developed for internal use only by the
Northeast Ohio Regional Sewer District. It was adapted to share with northeast
Ohio communities in 2003 to support NPDES Phase II Permit requirements and
further adapted to share as part of the IDDE Manual. The District makes no
warranties, expressed or implied, with respect to the use of this outfall database
to support NPDES Phase II Permit requirements or for any other specific purpose.
The District and its employees expressly disclaim any liability that may result from
the use of this database.
For More Information - Contact:
Mary Maciejowski or Jeffrey Duke
(maciejowskim@neorsd.org
Northeast Ohio Regional Sewer District
3900 Euclid Avenue
Cleveland, Ohio 44115-2506
(216) 881-6600
or dukej@neorsd.org)
Page 2 of 23
Page 3

Outfall Database
User Guide – IDDE Manual – July 2006
General Comments – System Requirements (TOC)
y Software Version – The NEORSD Comprehensive Outfall Database (COD)
needs to run on Microsoft Access 2000 or later version.
y Resolution/Monitor Size – The recommended screen resolution setting is
1024x768. Also, to minimize user scrolling throughout the database screens, a
17” monitor or greater is recommended.
y File Location – The COD should be loaded onto a centralized file storage
location (hard drive or server) with at least 1 Gb of available memory. This will
allow for the addition of photos and other graphical files.
y File Structure
¾
Root Directory
¾
Subdirectories
– e.g. C:\IDDEManual_OutfallDatabase\ (User Identified)
Documentation – Required for the Main Menu to access associated
documentation files.
Extra – Required, along with file mdac_typ.exe to allow for exports
Images – Required for individual database modules to access files.
Subdirectories are automatically created by the database as the user
creates outfalls and adds images. Examples of images subdirectories
that may be created:
•
ACMB
– Abrams Creek Main Branch root subdirectory for the stream
– Abrams Creek Main Branch.
♦
ACMB0010
ACMB0020
♦
– subdirectory for outfall ACMB0010
– subdirectory for outfall ACMB0020
Storm Sewer Maps – Required for Main Menu to access storm maps –
these maps are added by the user into this specific subdirectory (PDF
Version only).
Watershed Maps – Required for Main Menu to access watershed maps -
these maps are added by the user into this specific subdirectory (PDF
Version only).
¾
User-defined subdirectories
– The user is able to create subdirectories as
necessary to store related files. These subdirectories will not be linked to
the outfall database.
OutfallDB_UserGuide_IDDEManual_V1.doc Page 3 of 23
Page 4

Outfall Database
User Guide – IDDE Manual – July 2006
y Adobe Acrobat Reader – In order to access the watershed maps and database
documentation, the user will need to have Adobe Acrobat Reader (Version 5.0
or greater) installed on their computer.
y Database Setup – See Administration Function - Pg. 21 for information on how
to login to the database an administrator.
¾
User Setup –
The Database Administrator will need to setup users for the
database
¾
Receiving Streams –
The Database Administrator will need to setup streams
for use by the Outfall Database. See the corresponding stream naming
convention document for guidelines on how to identify (“name”) streams for
use by this database
¾
Communities
– The Database Administrator will need to add the communities
as necessary for the database. The communities will be used by the
inventory module’s data entry form
Page 4 of 23
Page 5
Outfall Database
User Guide – IDDE Manual – July 2006
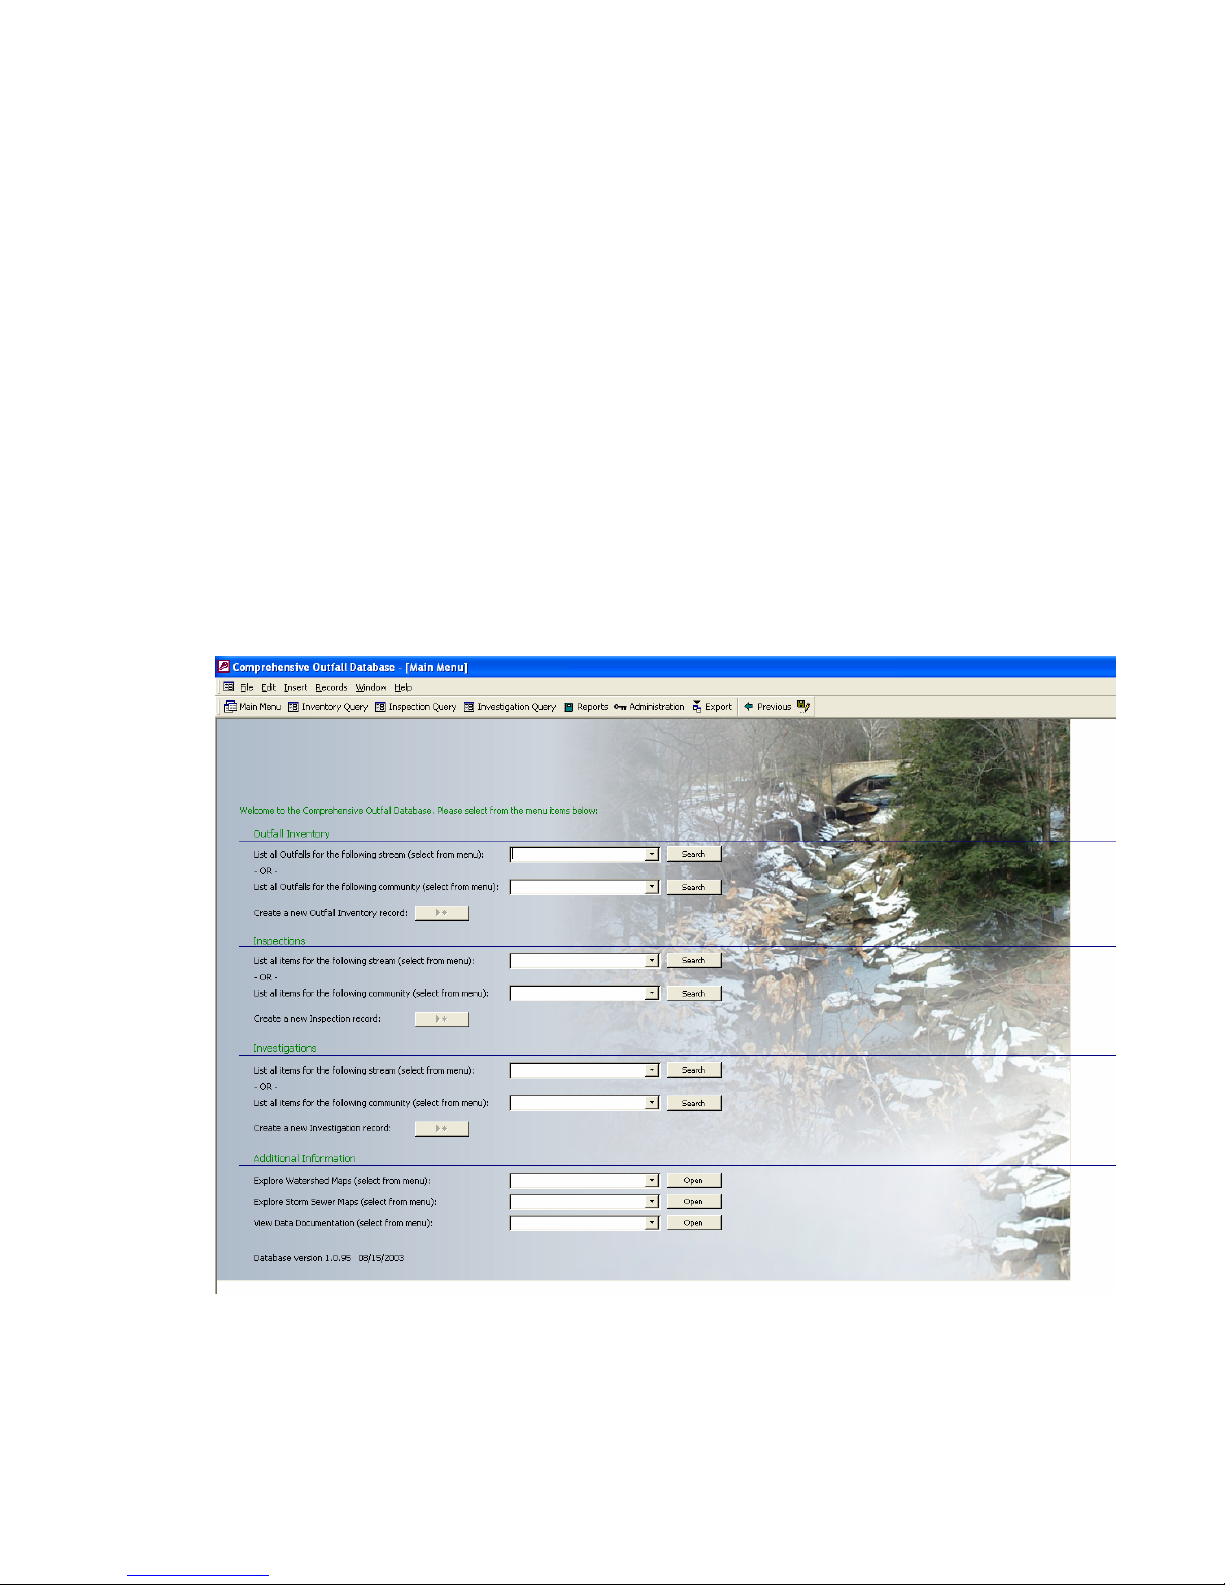
Main Menu (TOC)
The Main Menu (shown below) will automatically open upon launching the Outfall
Database (IDDE_OutfallDatabaseV1.mdb). This menu can be used to access the
Inventory, Inspection and Investigations modules.
Main Toolbar
The Main Toolbar (shown below) is set to show on top of the database. This
toolbar will allow the user to access all of the menus. Additional module-specific
functions will appear on this toolbar as the user navigates through the database.
Page 5 of 23
Page 6

Outfall Database
User Guide – IDDE Manual – July 2006
Outfall Inventory Module (TOC)
• List all Outfalls for Stream – all users can use this function.
• List all Outfalls for Community – all users can use this function.
• Create a new Outfall Inventory record – users must have Administrator (Data
Entry) rights and login through the administrator menu – see pg. 21.
Notes: _______________________________________________________
_____________________________________________________________
_____________________________________________________________
Inspection Survey Tracking Module
• List all items (Inspections) for Stream – all users can use this function.
• List all items (Inspections) for Community – all users can use this function.
• Create a new Inspection record – users must have Administrator (Data Entry)
rights and login through the administrator menu – see pg. 21.
Notes: _______________________________________________________
_____________________________________________________________
_____________________________________________________________
Problem/Investigation Status Module
• List all items (Investigations) for Stream – all users can use this function.
• List all items (Investigations) for Community – all users can use this function.
• Create a new Investigation record – users must have Administrator (Data
Entry) rights and login through the administrator menu – see pg. 21.
Notes: _______________________________________________________
_____________________________________________________________
_____________________________________________________________
Page 6 of 23
Page 7
Outfall Database
User Guide – IDDE Manual – July 2006
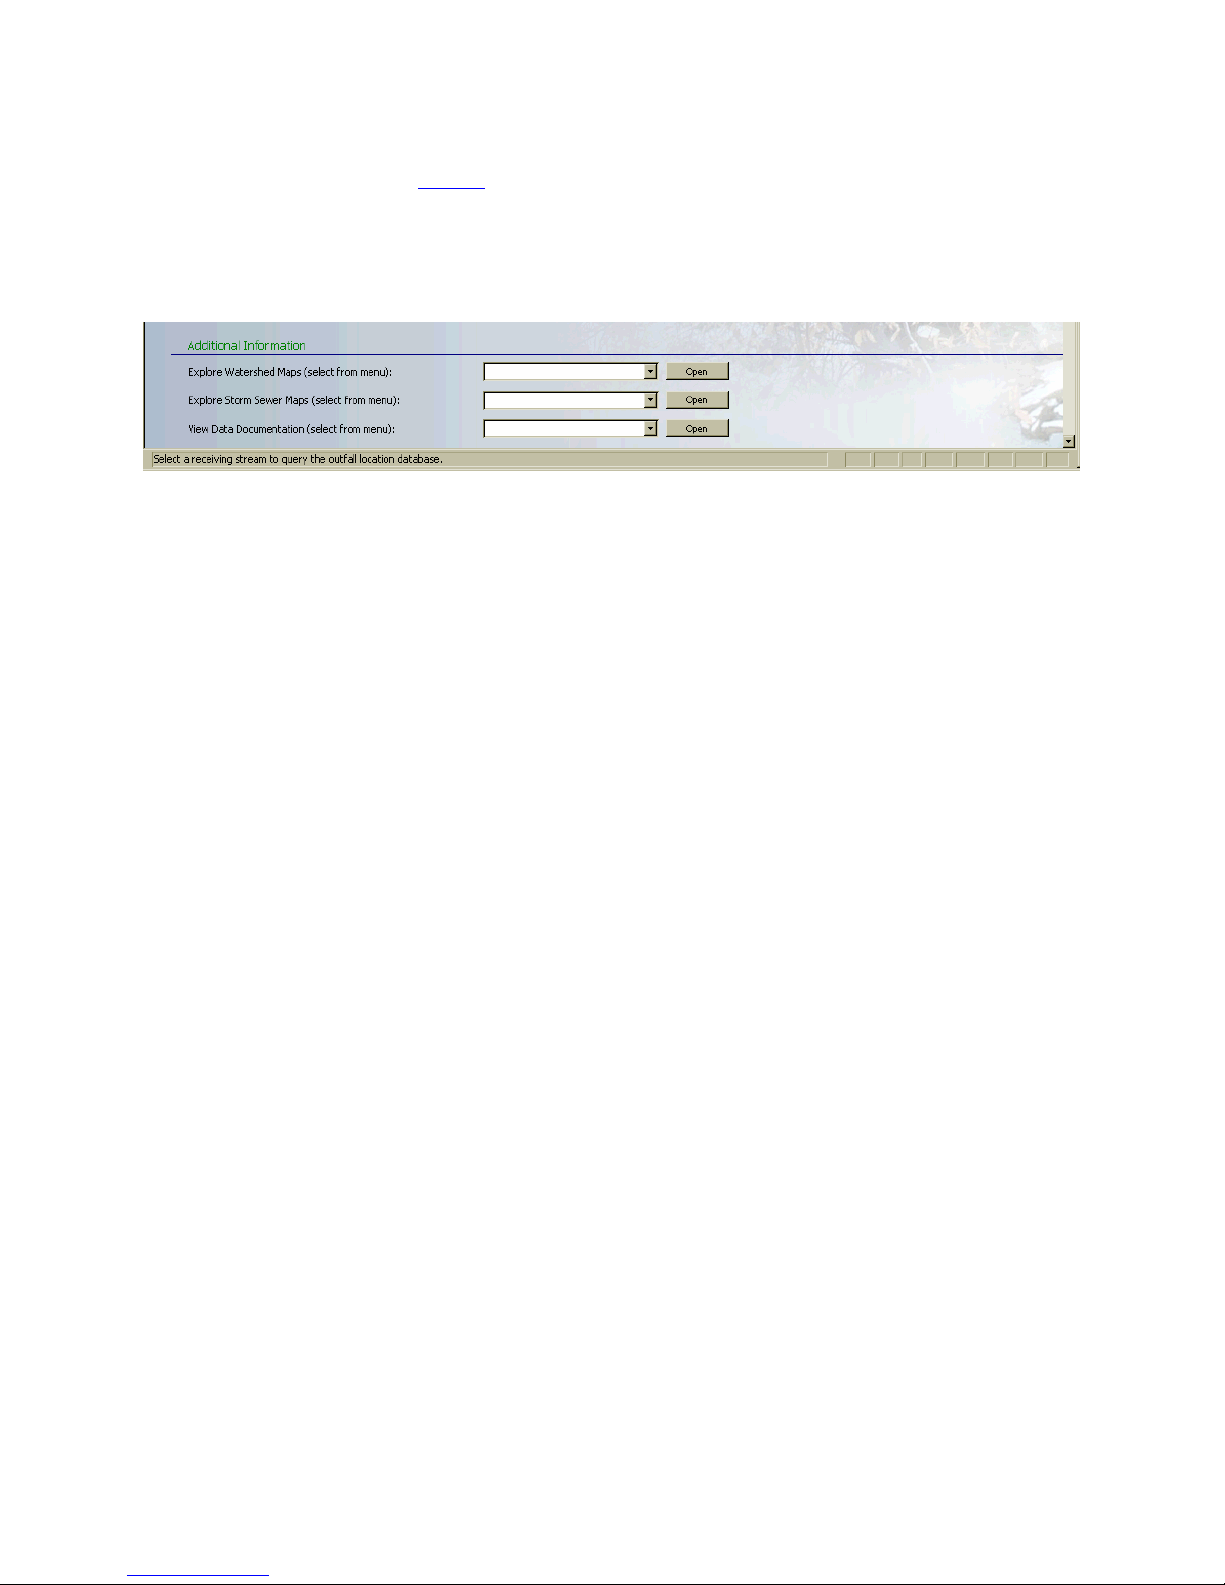
Additional Information (TOC)
The user can access additional information from the functions at the bottom of
the Main Menu (see graphic below).
• Explore Watershed Maps – all users can use this function.
¾
Available Watershed Maps –
There are 2 example watershed map “books” to
demonstrate some of the types of maps that users can add for additional
information.
¾
Adding Watershed Maps –
Users can add a Watershed Map by placing the
map file (in PDF format) in the Watershed Maps subdirectory.
• Explore Storm Sewer Maps – all users can use this function.
¾
Available Storm Sewer Maps –
There are 2 example “storm sewer maps”
demonstrate some of the types of maps that users can add for additional
information.
¾
Adding Storm Sewer Maps -
Users can add a Storm Sewer Map by placing
the map file (in PDF format) in the Storm Sewer Maps subdirectory.
• View Data Documentation – all users can use this function.
Available Data Documentation
¾
Blank Inventory Form (for Field Data Collection)
Blank Inspection Form (for Field Data Collection)
Blank Investigation Form (for Field Data Collection)
Stream Designation Guidelines
User Guide – OutfallDB_UserGuide_IDDEManual_V1.doc
¾
Adding Data
Documentation – Users can add a data documentation files by
placing the files (in PDF format) in the Documentation subdirectory.
Notes: _______________________________________________________
_____________________________________________________________
_____________________________________________________________
_____________________________________________________________
Page 7 of 23
Page 8

Outfall Database
User Guide – IDDE Manual – July 2006
Outfall Inventory Module (TOC)
The Outfall Inventory Module can be accessed by any of the following methods:
• Main Menu – Summary Screen – Users utilize the main menu to query on
existing outfall inventory, bring up a query summary screen (shown below) and
then view outfall inventory information by selecting an outfall and using the
View Outfall function.
• Outfall Inventory Function (Top Menu) – Users can utilize the outfall
inventory function on the top menu (shown below) to query on existing outfall
inventory and then select an outfall from the query summary screen.
• New Outfall (Main Menu) – Users can utilize the New Outfall function on the
Main Menu to access the Outfall Inventory data entry form. Users will first
have to enter an Outfall ID in the New Outfall Inventory Record dialog box
(shown below).
Page 8 of 23
Page 9

Outfall Database
User Guide – IDDE Manual – July 2006
Outfall Inventory Module – Data Entry (TOC)
For data entry for new outfalls (or editing existing outfall inventory), the user will
utilize the Outfall Inventory Module data entry screen (shown below).
Major sections of the Outfall Inventory Module include the following:
• Outfall Location – The user inputs general information about the location of the
outfall in this section. Fields include the following:
Outfall ID –
¾
¾
Receiving Stream Stream Segment –
¾
Already selected by user
Already selected by user
Users can use this field to tie into the ODNR/OEPA
Stream Identification system. Default setting is that this field is inactive
¾
Watershed
Community
¾
¾
County
¾
Parcel Number
Location Description/Address
¾
¾
State Plane North/State Plane East
Page 9 of 23
Page 10

Outfall Database
User Guide – IDDE Manual – July 2006
¾
CRGS North/CRGS East
- Cleveland Regional Geodetic Survey Coordinate
System
¾
Latitude/Longitude –
This coordinate system is tied into the Map function at
the top toolbar. Allows users to create and copy a Map from
www.mapquest.com
¾
Elevation
• Storm Sewer Map Info – The user input general information about the mapping
status of the outfall in this section. Field include the following:
¾
Outfall/Sewer Shown on Map
¾
Map ID
¾
Map Source
¾
Outfall Location (Facing Downstream) –
Users should use the following
guidelines:
Outfall RR – For a pipe on the right side of the waterway
Outfall RL – For a pipe on the left side of the waterway
Confluence RR – For a ditch, swale, tributary or other open channel on the
right side of the waterway
Confluence RL - For a ditch, swale, tributary or other open channel on the
left side of the waterway
Midstream – For any sampling points (permanent or temporary) not tied
to an outfall pipe or confluence.
• Outfall Pipe Characteristics – The user input general information about the
outfall pipe in this section. Field include the following:
Pipe Shape
¾
¾
Pipe Size (Height/Width)
¾
Pipe Material
Pipe Condition
¾
¾
Height from Outfall to Stream –
assume an average dry-weather stream
flow level.
Notes: _______________________________________________________
_____________________________________________________________
_____________________________________________________________
_____________________________________________________________
_____________________________________________________________
Page 10 of 23
Page 11

Outfall Database
User Guide – IDDE Manual – July 2006
• Outfall Type – Ownership - The user input general information about the
outfall ownership in this section. Field include the following:
¾
Outfall Type –
¾
Owner
¾
Authority
¾
Other ID
¾
NPDES Permit Number
Determine Public vs. Private
• Comments – The user can input general comments in this section.
• Graphical Information – The user can utilize the COD as a library to store
digital images related to the Outfall Inventory. The graphical information is
categorized as one of the following:
¾ Photos
¾ Area Location Maps
¾ Additional Details
These graphical windows can access typical graphical files (.jpg, .gif, .tif, .bmp).
As the user adds these images to the database, the database automatically
copies and renames these images into the related outfall subdirectory.
Page 11 of 23
Page 12

Outfall Database
User Guide – IDDE Manual – July 2006
Inspection-Survey & Sampling Module (TOC)
The Outfall Inspection Module can be accessed by any of the following methods:
• Main Menu – Summary Screen – Users utilize the main menu to query on
existing outfall inspection data, bring up a query summary screen (shown below)
and then view outfall inspection data by selecting an outfall and using the View
Inspection Data function.
• Inspection Query Function (Top Menu) – Users can utilize the inspection query
function on the top menu (shown below) to query on existing outfall inspection
data and then select an outfall from the query summary screen.
• New Inspection (Main Menu) – Users can utilize the New Inspection Record
function on the Main Menu to access the Inspection data entry form. Users will
first have to select an Outfall from the New Outfall Inspection Dialog box
(shown below).
Page 12 of 23
Page 13

Outfall Database
User Guide – IDDE Manual – July 2006
Outfall Inspection Module – Data Entry (TOC)
For data entry for new inspections (or editing existing outfall inspection data), the
user will utilize the Outfall Inspection Module data entry screen (shown below).
Major sections of the Outfall Inventory Module include the following:
• Inventory Info – This is summary information from the Outfall Inventory that
identifies the outfall, receiving stream, community and locations.
• Inspection Info – The user can input general inspection information in this
section to assist in tracking who did the inspection and why. Fields include the
following:
Project
¾
¾
Inspection Date
¾
Time
Type –
¾
Page 13 of 23
User should identify if this is an initial or follow-up inspection
Page 14

Outfall Database
User Guide – IDDE Manual – July 2006
¾
Agency
¾
Dept
¾
Crew Leader
¾
Crew Member 1
¾
Crew Member 2
¾
Time of Last Rain
¾
Pipe Flow/Pipe Submergence
¾
Inspection Comments
• Sampling Info - The user can input general sampling information in this section
to assist in tracking the sampling performed. Fields include the following:
¾
Sample Collected –
¾
Sample Description
¾
Estimated Flow Rate/Estimation Method
¾
Comments
¾
Sampling Strategy
• Analytical Results - The user can input general analytical results in this
section to assist in tracking illicit discharges. Fields include the following:
¾
Lab Analysis ID
¾
Sample Analyzed By
¾
Fecal Coliform
¾
E. Coli
¾
Ammonia
¾
Temperature
pH
¾
¾
¾
¾
¾
Specfic Conductance
Phosphorus
Dissolved Oxygen
Other Parameters/Results
The user needs to select Yes to activate the following
• Recommendations - The user can input recommendations for additional
investigations in this section to assist where problem source investigations
should be performed. Fields include the following:
¾
Action Required –
¾
Comments
No further action or Perform Investigation
Page 14 of 23
Page 15

Outfall Database
User Guide – IDDE Manual – July 2006
• Inspection Photos – The user can input inspection photographs and other
related documentation in this section.
information function in the Outfall Inventory Section of this document.
See details regarding the graphical
Notes: ________________________________________________________
______________________________________________________________
______________________________________________________________
______________________________________________________________
______________________________________________________________
______________________________________________________________
______________________________________________________________
______________________________________________________________
______________________________________________________________
______________________________________________________________
______________________________________________________________
______________________________________________________________
______________________________________________________________
______________________________________________________________
______________________________________________________________
Page 15 of 23
Page 16

Outfall Database
User Guide – IDDE Manual – July 2006
Investigation Module (TOC)
The Outfall Investigation Module can be accessed by any of the following methods:
• Main Menu – Summary Screen – Users utilize the main menu to query on
existing outfall investigation data, bring up a query summary screen (shown
below) and then view outfall investigation data by selecting an outfall and using
the View Investigation Data function.
• Investigation Query Function (Top Menu) – Users can utilize the investigation
query function on the top menu (shown below) to query on existing outfall
investigation data and then select an outfall from the query summary screen.
• New Investigation (Main Menu) – Users can utilize the New Investigation
Record function on the Main Menu to access the Investigation data entry form.
Users will first have to select an Outfall from the New Outfall Investigation
Dialog box (shown below).
Page 16 of 23
Page 17

Outfall Database
User Guide – IDDE Manual – July 2006
Outfall Investigation Module – Data Entry (TOC)
For data entry for new inspections (or editing existing outfall inspection data), the
user will utilize the Outfall Inspection Module data entry screen (shown below).
Major sections of the Outfall Investigation Module include the following:
• Investigation Information - This is summary information from the Outfall
Inventory that identifies the outfall, receiving stream, community and locations
and investigation case number.
• Field Investigations - The user can input field investigation information (using
the Add Info function at the bottom of the summary screen) to assist in
tracking who/when investigations were performed. Fields include the following:
Investigation Date
¾
Page 17 of 23
Page 18

Outfall Database
User Guide – IDDE Manual – July 2006
¾
Agency
¾
Crew Involved
¾
File Number
¾
Investigation Description
¾
Comments
• Problems Sources - The user can input problem source information in this
section.
• Incoming Correspondence - The user can input incoming correspondence
tracking information in this section.
• Outgoing Correspondence - The user can input outgoing correspondence
tracking information in this section.
• Remediation Information - The user can input remediation information to
track the status of the illicit discharge elimination.
¾
Remediation Status
¾
Remediation Date
¾
Remediation Method
¾
Remediation Comments
¾
Field Verified
¾
Verification Date
¾
Verification Agency/Dept.
¾
Verification Crew
• Follow-up Recommendations - The user can input follow-up investigation
recommendation information.
Page 18 of 23
Page 19

Outfall Database
User Guide – IDDE Manual – July 2006
Reporting Function (TOC)
Several pre-formatted reports are in the database for the user to use. The user
can use the Reporting Function (Top Toolbar) to access the dialog box (shown
below).
To create a report, users follow the four steps outlined in the dialog box.
• Step 1: Select Report – Select a report from the drop-down menu. The
report names are fairly logical and easy to identify. However, a report guideline
will be developed and sent to users in the future.
• Step 2: Select Criteria – Users can utilize the established pre-set queries to
select the outfalls that reports will be created for. Use the Add to Set
function on the right to add the outfalls to the report selection set.
• Step 3: Review Selection Set – Users should review the selection set to
ensure that the outfalls desired for the report are in the selection set.
• Step 4: Run Report – Run the report and print or save as necessary.
Page 19 of 23
Page 20

Outfall Database
User Guide – IDDE Manual – July 2006
Export Function (TOC)
Users can use the Export Function (Top Toolbar) to export data, images and
database forms for data sharing or use in other applications (e.g. GIS). The
Export Function has the same selection dialog box as the Report Function.
To export a database selection set, users follow the four steps outlined in the
dialog box.
• Step 1: Select Export Type – Select the data types that you want to export
from the drop-down menu. Be sure to click on the Images & Database Forms
checkbox if these items are desired to be included in the Database Export.
• Step 2: Select Criteria – Users can utilize the established pre-set queries to
select the outfalls that will be exported. Use the Add to Set function on the
right to add the outfalls to the export selection set.
• Step 3: Review Selection Set – Users should review the selection set to
ensure that the outfalls desired for the export are in the selection set.
• Step 4: Export Data – Export the data, and select the applicable directory
when the dialog box prompts you to do so.
Page 20 of 23
Page 21

Outfall Database
User Guide – IDDE Manual – July 2006
Administration Function (TOC)
The Administration Functions allows the users to perform several database
administration functions, such as adding a stream designation and adding a
community. The tools provided by the Administration Function are as follows:
• Login (Data Entry)
• Security
• Receiving Stream
• Community
• Login (Data Entry) – To perform outfall data entry or other administrative
functions, the user must login as an administrator. To do so, select the
Administration function from the Main Toolbar. After selecting the function, a
dialog box will pop up (see below), press OK to go to the login menu.
At the administration login menu, enter username and password to access
database administration functions. The defaults are:
- Username: admin
- Password: admin
Note:
usernames and passwords for those users who will be required to perform data
entry or other administrator functions.
Page 21 of 23
It is recommended that the database administrator create unique
Page 22

Outfall Database
User Guide – IDDE Manual – July 2006
• Security – The Administrator can add new users (login IDs and passwords) in
the Administration Function by selecting the Security Tab and updating as
necessary.
• Receiving Streams – The Administrator can add new receiving streams in the
Administration Function by selecting the Receiving Streams Tab and updating as
necessary. The user should update the stream designation documentation
accordingly.
Page 22 of 23
Page 23

Outfall Database
User Guide – IDDE Manual – July 2006
• Communities – The Administrator can add new communities in the
Administration Function by selecting the Communities Tab and inserting
communities and adding as necessary.
Notes: _______________________________________________________
_____________________________________________________________
_____________________________________________________________
_____________________________________________________________
_____________________________________________________________
_____________________________________________________________
_____________________________________________________________
_____________________________________________________________
_____________________________________________________________
_____________________________________________________________
_____________________________________________________________
_____________________________________________________________
_____________________________________________________________
_____________________________________________________________
Page 23 of 23
 Loading...