

Page 1

Inspection Manager FLX
Basic User’s Guide
Page 2

2
Inspection Manager FLX
Copyright © 2003 by TISCOR. All rights reserved. Printed in the USA.
TISCOR, makes no representations or warranties with respect to the contents or use of this
manual or of the products which this publication describes and specifically disclaims any express
or implied warranties of merchantability or fitness for any particular purpose. Further, TISCOR
reserves the right to revise this publication and make changes to its content, at any time, without
obligation to notify any person or entity of such revisions or changes.
Further, TISCOR makes no representations or warranties with respect to any TISCOR software,
and specifically disclaims any express or implied warranties of merchantability or fitness for any
particular purpose. TISCOR reserves the right to make changes to any and all parts of the
TISCOR software series, at any time, without obligation to notify any person or entity of such
changes.
The distribution and sales of this product are intended for the use of the original purchaser only
and for use only on the computer system specified. This document may not, in whole or part, be
copied, photocopied, reproduced, translated or reduced to any electronic medium or machine
readable form without the prior written consent of TISCOR.
TISCOR™ is a trademark of TISCOR. U.S. and foreign patents pending.
Internet Explorer®, Microsoft Windows™, Windows NT™, Windows® 95, Windows® 98,
Windows® 2000, Microsoft Access™, SQL Server®, and Microsoft Project™ are trademarks of
Microsoft Corporation.
ORACLE™ is a registered trademark of Oracle Corporation.
SPT 1550, SPT 1800, Spectrum24, Spectrum One, and Symbol are registered trademarks of
Symbol Technologies, Inc.
Pentium™ is a registered trademark of Intel Corporation.
NetWare™ is a registered trademark of Novell Corporation.
Crystal Reports™ is a registered trademark of Seagate Technologies.
©Copyright 2003, Rights reserved.
TISCOR
12250 Parkway Centre Drive
Poway, California 92064-6849
800-443-0495 Technical Support
858-513-2500
858-513-8497 FAX
www.tiscor.com
Page 3

3
Professional Services
TISCOR offers professional training services for Inspection Manager FLX in a variety of
settings that effectively enhance many industry operations. TISCOR’s training experts assure that
an organization’s technological investments are continuously maximized. Professional services
are offered in the following formats, including:
• Pre-Visit Telephone Consultation
• System Configuration
• Software and Hardware Installation
• Database Building Assistance
• Custom Report Assistance
• Device Training
Corporate Training
TISCOR welcomes clients to attend training at its headquarters in San Diego, CA. Corporate
training offers an additional advantage of having multiple experts in-house.
End-User Training
End-User Training is conducted when a TISCOR project manager visits the client facility and
provides site-specific system instructions to individuals or groups.
Re-Training
Re-training sessions are “refresher courses” for customers whose systems are operational. This
training is frequently requested during periods of employee turnover when a manager does not
have sufficient time to train staff members or when more in-depth training is desired for new
employees.
WebDemo or NetMeeting Training
Clients with an Internet connection and Internet Explorer™ 5.0 or higher may participate in
training sessions with TISCOR project managers.
Implementation Services
Prior to implementing a system, professional consultation is recommended. TISCOR’s project
managers have years of experience in varied industries. After thoroughly reviewing a facility, the
project manager proposes the most efficient solution for handling site-specific inspection needs.
Customer Support
Our team of customer support representatives is here to answer your hardware and software
questions. Our support hours are from 6 a.m. until 5 p.m. Pacific Standard Time, Monday through
Friday.
TISCOR has remained a leader in the mobile data collection software industry since 1982, due in
part to our commitment to unparalleled customer service. Our systems are updated regularly,
incorporating user’s suggestions with the latest software and hardware advancements.
Page 4

4
Table of Contents
System Overview ...........................................................................................................7
Benefits.........................................................................................................................7
Glossary of Terms...........................................................................................................8
Installation and Registration.........................................................................................9
Minimum System Requirements........................................................................................9
Enterprise Connectivity....................................................................................................9
Palm Desktop Software Installation and Configuration......................................................10
PC Software: Standalone Installation.............................................................................. 12
PC Software: Network Server Installation........................................................................ 12
PC Software: Network Client Installation......................................................................... 13
Starting Inspection Manager FLX....................................................................................13
Database Registration..................................................................................................14
Database Registration with Access..................................................................................14
Database Installation with Oracle...................................................................................15
Database Registration with SQL......................................................................................16
Registering Inspection Manager FLX..................................................................................................................17
Network Licensing/License Increment................................................................................................................17
Palm Inspection Manager FLX Installation........................................................................ 18
Palm Registration.............................................................................................................................................19
System Setup ...............................................................................................................20
Menu Overview............................................................................................................ 20
Toolbar Overview ......................................................................................................... 21
Tables Overview...........................................................................................................22
Editing Overview .......................................................................................................... 22
Setup............................................................................................................................25
System Configuration.................................................................................................... 25
General Tab.....................................................................................................................................................25
Priorities Tab....................................................................................................................................................26
User Defined Setup....................................................................................................... 27
User Defined Table Names................................................................................................................................27
User Defined Fields...........................................................................................................................................28
Restore Default button......................................................................................................................................28
User ID and Password Table..........................................................................................29
Tables...........................................................................................................................31
Team Table .................................................................................................................31
Inspector Table............................................................................................................32
Contact Table............................................................................................................... 34
Tenant Table................................................................................................................ 35
General Tab.....................................................................................................................................................35
Page 5

5
User Defined Tab..............................................................................................................................................36
To Do Tab........................................................................................................................................................36
Violation Tab....................................................................................................................................................36
Notes Tab........................................................................................................................................................36
Building Table.............................................................................................................. 38
General Tab.....................................................................................................................................................38
User Defined Tab..............................................................................................................................................38
Tenant Tab ......................................................................................................................................................39
Notes Tab........................................................................................................................................................39
Question Table............................................................................................................. 40
Question Types................................................................................................................................................41
Question Set Table....................................................................................................... 43
Regulation Table .......................................................................................................... 45
Regulation Set Table..................................................................................................... 47
Task Description Table.................................................................................................. 48
Task To Do Table......................................................................................................... 49
Violation Table............................................................................................................. 51
Inspector Device Assignment Table................................................................................ 52
Load Buildings..................................................................................................................................................52
Send Violation for Tenant.................................................................................................................................. 52
Send History Back ............................................................................................................................................53
Which Tasks.....................................................................................................................................................53
Send these Files when Sync..............................................................................................................................53
Reports Overview.........................................................................................................54
Report Toolbar.................................................................................................................................................54
Report Selection Criteria...................................................................................................................................54
Date and Time Selection...................................................................................................................................54
Store/Recall.....................................................................................................................................................55
Log All New Inspections................................................................................................55
History Report.............................................................................................................. 57
Inspection Report......................................................................................................... 57
Violation Report............................................................................................................57
Custom Report Wizard .................................................................................................. 58
Custom Report Designer................................................................................................58
List Reports .................................................................................................................59
Advanced Features and Tools......................................................................................60
Archiving & Deleting History..........................................................................................60
View Archived History.......................................................................................................................................60
Data Transfer............................................................................................................... 61
Import/Export Formats tab................................................................................................................................61
Scheduled Import/Export tab............................................................................................................................62
Transfer Log Tab..............................................................................................................................................62
Repair and Compact Database.......................................................................................64
Recover Unprocessed Data............................................................................................64
Palm Use ......................................................................................................................65
Launching Inspection Manager FLX on your Palm.............................................................65
Palm Inspection............................................................................................................65
Page 6

6
Violation Type..................................................................................................................................................68
Closing Violations.............................................................................................................................................68
Task Type........................................................................................................................................................68
Options .......................................................................................................................69
Menu Button ....................................................................................................................................................69
List Button .......................................................................................................................................................69
Palm Sync....................................................................................................................70
Sync Speed......................................................................................................................................................71
Sorting, Searching and Finding..........................................................................................................................71
Palm Tips ....................................................................................................................72
Graffiti.............................................................................................................................................................72
Page 7

7
System Overview
Inspection Manager FLX is a management tool designed to schedule, track and document
building inspections.
With Inspection Manager FLX, your inspector records inspection information by keying data
directly into a hand-held computer or Palm device. The Palm prompts your inspector for
information about the facility and the inspection process, eliminating manual data entry and
ensuring regulatory compliance.
The PC software maintains a list of regulatory codes, building, contact, violation and tenant
information. This information is available to the inspector on the Palm. Users may define a list of
tasks or questions that need answering for specific inspections.
At the conclusion of the data collection cycle, the data is transmitted from the Palm to
Inspection Manager FLX. The information is processed and stored in an archival format. In
addition to the reports generated from data transmissions, a variety of reports can be generated
directly from the tables maintained by the application.
Benefits
Among its many benefits, Inspection Manager FLX specifically enables you to do the
following:
Eliminate Log Sheets
Inspection Manager FLX electronically transfers data to your PC, stores it, and allows you to
retrieve it easily for reports and analysis; you will no longer need to manually transcribe log sheet
data into a database.
Increase Accuracy
Transcription errors are eliminated with Inspection Manager FLX because data is entered
electronically into a Palm while out in the field.
Track Violations
Your organization can track code violation and occupant compliance information. The program
shows all open violations, when they were entered, when they were last checked and when they
are due for a follow-up check.
Respond Quickly
If a regulatory violation is found, the Palm alerts the inspector of the specific code in question.
Inspection Manager FLX highlights abnormal conditions, helping occupants address problems
immediately.
Customize Field Names and User Defined Fields
Inspection Manager FLX allows you to customize the look of your application by providing
Custom Field Names and User Defined Fields (UDFs). Custom Field Names allow you to
use the terminology that is most appropriate for your specific inspection process. The UDF option
permits you to enter a caption for each UDF in the selected table.
Customize Reports
Inspection Manager FLX gives you the option to create custom reports, allowing you to
document just the information you need, and view it the way you want.
Page 8

8
Glossary of Terms
As inspection processes vary, Inspection Manager FLX allows you the flexibility to customize
the terms and features that the program uses. The following terms are commonly used
throughout the program and this user guide, but many terms can be changed to suit your needs.
Abnormal
The abbreviation Abn is used for abnormal responses in the Question Table for multiple-choice or
numeric question types. Abnormal responses may display a special warning or message, or even
automatically log a violation.
Custom Reports
Custom Reports are designed by an end-user and utilize only selected criteria. You can choose
what data is shown and what format it is shown in. You can even add your organization’s logo to
the report. Reports can be saved to use the same format many times over.
HotSync
HotSync or Sync is how the PC and Palm transfer data. Palm HotSync technology helps you
connect and synchronize between your Palm data and related PC data.
i-button
The Information Button (i-button) allows you to quickly view information relating to a
topic. For example, the i-button next to a tenant contact gives you the phone number,
address and other information related to the contact.
Questions
Questions is a term used in the program to describe inquiries that the program asks users at
specific inspection checkpoints. The questions prompt the user to perform steps or tasks for a
particular inspection.
Question Set
Question Set, or Qset, is the grouping of questions. Question Sets may be assigned to inspections
to guide inspectors through the inspection process. Question Sets may also be assigned to
specific regulations to ensure that relevant information is gathered.
Task
A Task is a scheduled or unscheduled inspection activity at a specified tenant’s site. A Task may
have a question set to guide an inspector through the inspection steps if needed. The program
tracks when Tasks are completed for each Tenant. Tasks can also be scheduled to be performed
at regular intervals, such as weekly or annually.
Task To Do
The Task To Table allows you to assign and monitor inspection Tasks that need to be performed
for specific Tenants. With Task To Do Scheduling, you can easily identify Tasks that are due or
overdue, and prove that schedule requirements have been kept up to date.
User Defined Fields
The User Defined Fields (UDFs) option gives you the added flexibility to gather the specific
information you need. This function permits you to enter a caption for each UDF in a selected
table.
Page 9

9
Installation and Registration
This section provides general information that helps you install and configure both Inspection
Manager FLX on the PC and the Palm. It includes information about computer system
requirements, operating system requirements, installation directions, program registration and
database registration.
Minimum System Requirements
The following hardware is required to ensure the smooth performance of Inspection Manager
FLX:
Standalone Computer
Pentium 500Mhz, or above
128MB RAM
16MB video card
Windows 9x or XP, Windows NT 4.0, 2000 Workstation
200MB free space on the hard disk
Network Workstation
Pentium 500Mhz, or above
128MB RAM
16MB video card
Windows 9X or XP, or Windows NT 4.0, 2000 Workstation
200MB free space on the hard disk
Network Server*
Pentium 500Mhz, or above
256MB RAM
200MB free space on the hard disk
Windows NT Server 4.0, 2000, XP Server
Palm Computers
Symbol 1500, 1550, 1700, 1800 series
4 MB RAM
Palm OS 3.5 or greater
*Preferred
1.2Ghz, or above
512MB RAM
500MB free space on the hard disk
Enterprise Connectivity
Inspection Manager FLX supports Microsoft SQL versions 7.0 and 2000 and Oracle
versions 8 and 9.
Page 10
10
Palm Desktop Software Installation and Configuration
The following section will help you to install the Palm Desktop software and
Palm/PC Inspection Manager FLX application. All installation sections may not
apply to your site. Please review Symbol’s Palm manual before beginning the
installation.
If you have any problems or questions, contact TISCOR Technical Support at 1-800-553-1234. If
you find that your Palm is not operating properly, you may wish to consult the Symbol Palm
manual that accompanied the device (manual also found at www.symbol.com/services/manuals).
The following steps will install and configure the Palm Desktop software on your PC:
Step 1. Unpack the Palm and cradle
from the shipping container
Step 2. Install the battery
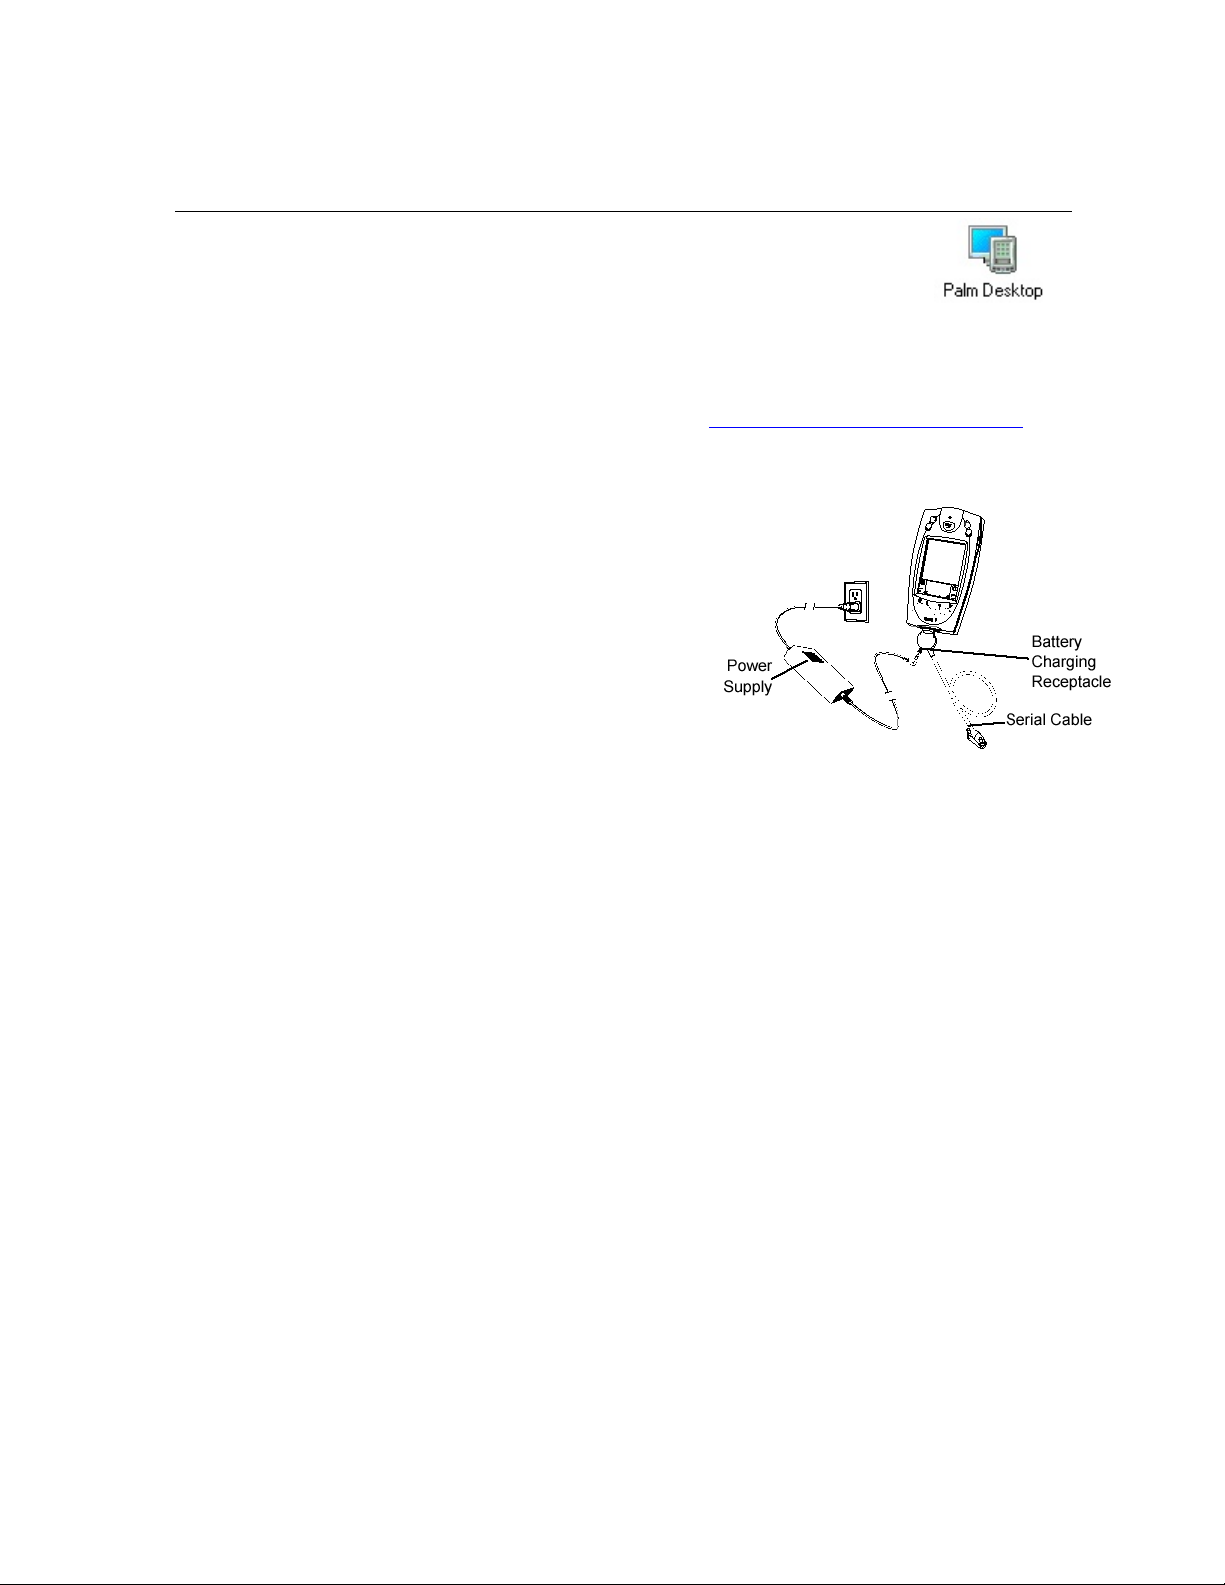
Step 3. With your PC turned off, connect
your Palm cable or cradle to
your PC workstation. To establish
a communication link between
the Palm and your PC:
a. Connect a serial cable to the
RS-232 connector on the charger/interface, or cradle, and to the
communications port on the PC. Use either a 9-9 pin or a 9-25-pin serial
cable, depending on your PC's communications port
b. Plug the AC adapter into the charger/interface, or cradle
c. Plug the AC adapter into a wall outlet
d. Place the Palm in the charger/interface, or cradle
NOTE:
Step 4. Turn on the Palm’s power switch and follow the on-screen instructions to
align the touch screen with the stylus, and set the date and time. Repeat
steps 1 through 4 for each additional Palm.
Step 5. Install the Palm Desktop software onto your PC from the SPT Desktop
Installation CD that came with the Palm. This installs the HotSync
Manager that stays active in your PC’s system tray.
Step 6. Close the Palm Desktop window on the PC
Step 7. From the Applications screen, tap the HotSync icon on the Palm. The name
of the Palm is in the upper right-hand corner of the HotSync screen. If the
Palm is not named, the upper right-hand corner will be blank.*
a. If the Palm is named: write down the name for the next step
b. If the Palm name is blank: the application will guide you through the
naming process
When asked for a name, use the name you wrote down in the previous step. If your Palm is not
named, we suggest using generic names such as Palm1, Palm2, Fire1, Fire2, or use your facility
initials (TISCOR) T1, T2.
Page 11
11
Step 8. Test sync each Palm:
Cradle
a. Place the Palm into the cradle
b. Press the HotSync button on the cradle
c. Repeat for each Palm
Cable
a. Turn off Palm and securely attach the cable to the Palm
b. Turn on the Palm
c. Tap the HotSync icon
d. Tap the Local HotSync option
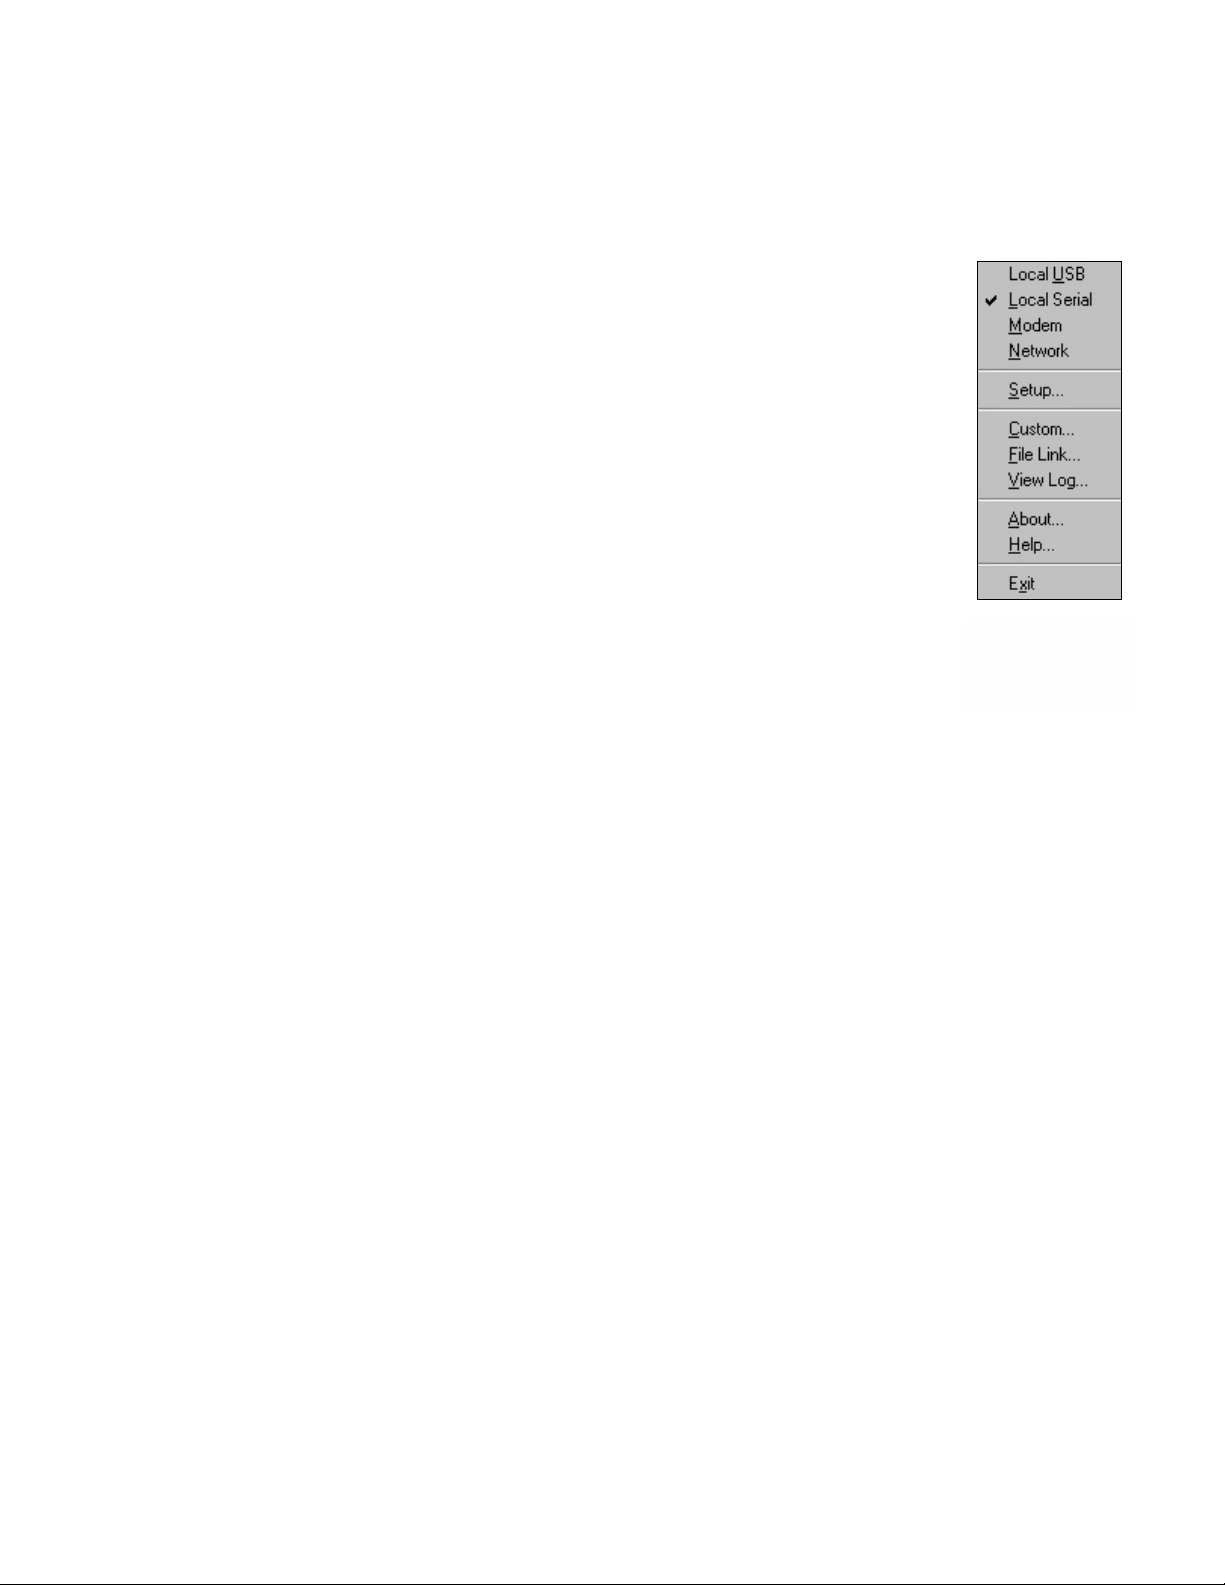
Step 9. On PC, right click on the HotSync icon in the system tray; make
sure that a check (√) is next to the Local Serial option and there
is no check (√) next to the Local USB or Modem option. The
Menu display will vary depending on your HotSync version.
Step 10. Exit HotSync when you finish with all Palms
a. To exit HotSync, find the HotSync icon on the Windows
system tray
b. Right click on the HotSync icon
c. Choose Exit from the Menu. You must exit HotSync so that when the
program starts again it will be able to communicate with the Palm
application. If a confirmation screen appears, make sure to turn off the
option to confirm again by checking Don't ask this Question again
and selecting Yes.
Figure
HotSync Manager
Menu
Page 12
12
PC Software: Standalone Installation
IMPORTANT:
The Palm Desktop software should be installed before you install the Inspection Manager
FLX application. Failure to do so will result in Palm Desktop’s inability to recognize Inspection
Manager FLX.
To install a full version of Inspection Manager FLX on your standalone PC’s hard drive:
Step 1. Close any open applications on your PC
Step 2. Insert the Inspection Manager FLX CD into the CD-ROM drive.
The CD should automatically launch the program. If for some reason it does
not, the following steps will allow you to complete the installation.
a. Double click the My Computer icon on your desktop
b. Double click on the CD-ROM drive
c. Double click on Setup.exe
d. Follow the screen prompts to complete the installation of
Inspection Manager FLX
When installing the program, you have the option of installing the Scheduled Import/Export
Program (SIEP). SIEP will install a background program for exporting Inspection Manager
FLX data to a third party program. If you choose not to install SIEP during the initial setup, you
can install SIEP at a later time from Start > Programs > Inspection Manager FLX > SIEP
Installer. See
NOTE:
The installation program selects the default directory, C:\Program Files\Tiscor\FLX. You can either accept
this selection or enter a different drive and directory name.
Advanced Features and Tools
section for more information.
PC Software: Network Server Installation
To install a full version of Inspection Manager FLX on your network server’s hard drive:
Step 1. Close any open applications on your PC
Step 2. Insert the Inspection Manager FLX CD into the CD-ROM drive.
The CD should automatically launch the program. If the application does not
launch, the following steps will allow you to complete the installation:
a. Double click the My Computer icon on your desktop
b. Double click on the CD-ROM drive
c. Double click on Setup.exe
d. Follow the screen prompts to complete the installation of
Inspection Manager FLX
Page 13

13
e. Make sure to change the Install Directory to the Mapped Network
Server’s drive. This location is where you want the application to reside.
When installing the program, you have the option of installing the Scheduled Import/Export
Program (SIEP). SIEP will install a background program for exporting Inspection Manager
FLX data to a third party program. If you choose not to install SIEP during the initial setup, you
can install SIEP at a later time from Start > Programs > Inspection Manager FLX > SIEP
Installer. See
Advanced Features and Tools
section for more information.
PC Software: Network Client Installation
To install a client version of Inspection Manager FLX on a network client’s hard drive:
Step 1. Close any open applications on your PC
Step 2. Go to the network server directory of your network server installation
Step 3. Double click on the Client directory
Step 4. Double click on Setup.exe
Step 5. Follow the screen prompts to complete the installation of Inspection
Manager FLX
Remember to install Palm Desktop at each workstation that will Sync with the Palm
installing Inspection Manager FLX. When installing the program, you have the option of
installing the Scheduled Import/Export Program (SIEP). SIEP will install a background
program for exporting Inspection Manager FLX data to a third party program. If you choose
not to install SIEP during the initial setup, you can install SIEP at a later time from Start >
Programs > Inspection Manager FLX > SIEP Installer. See
section for more information.
Advanced Features and Tools
before
Starting Inspection Manager FLX
Now that Inspection Manager FLX is installed, you are ready to log in. Double click on the
Inspection Manager FLX icon and the System Login screen will appear.
The default to launch the program is USER ID: SUPER (not case sensitive), with no password.
Page 14
14
Database Registration
Database Registration with Access
Inspection Manager FLX has the ability to work with more than one database. The Database
Registry is a list of all of your Inspection Manager FLX database files. This list includes live
application databases and archive databases. In order to use the program, you must first
Register and Attach to your Database.
To Register and Attach to your newly installed Database:
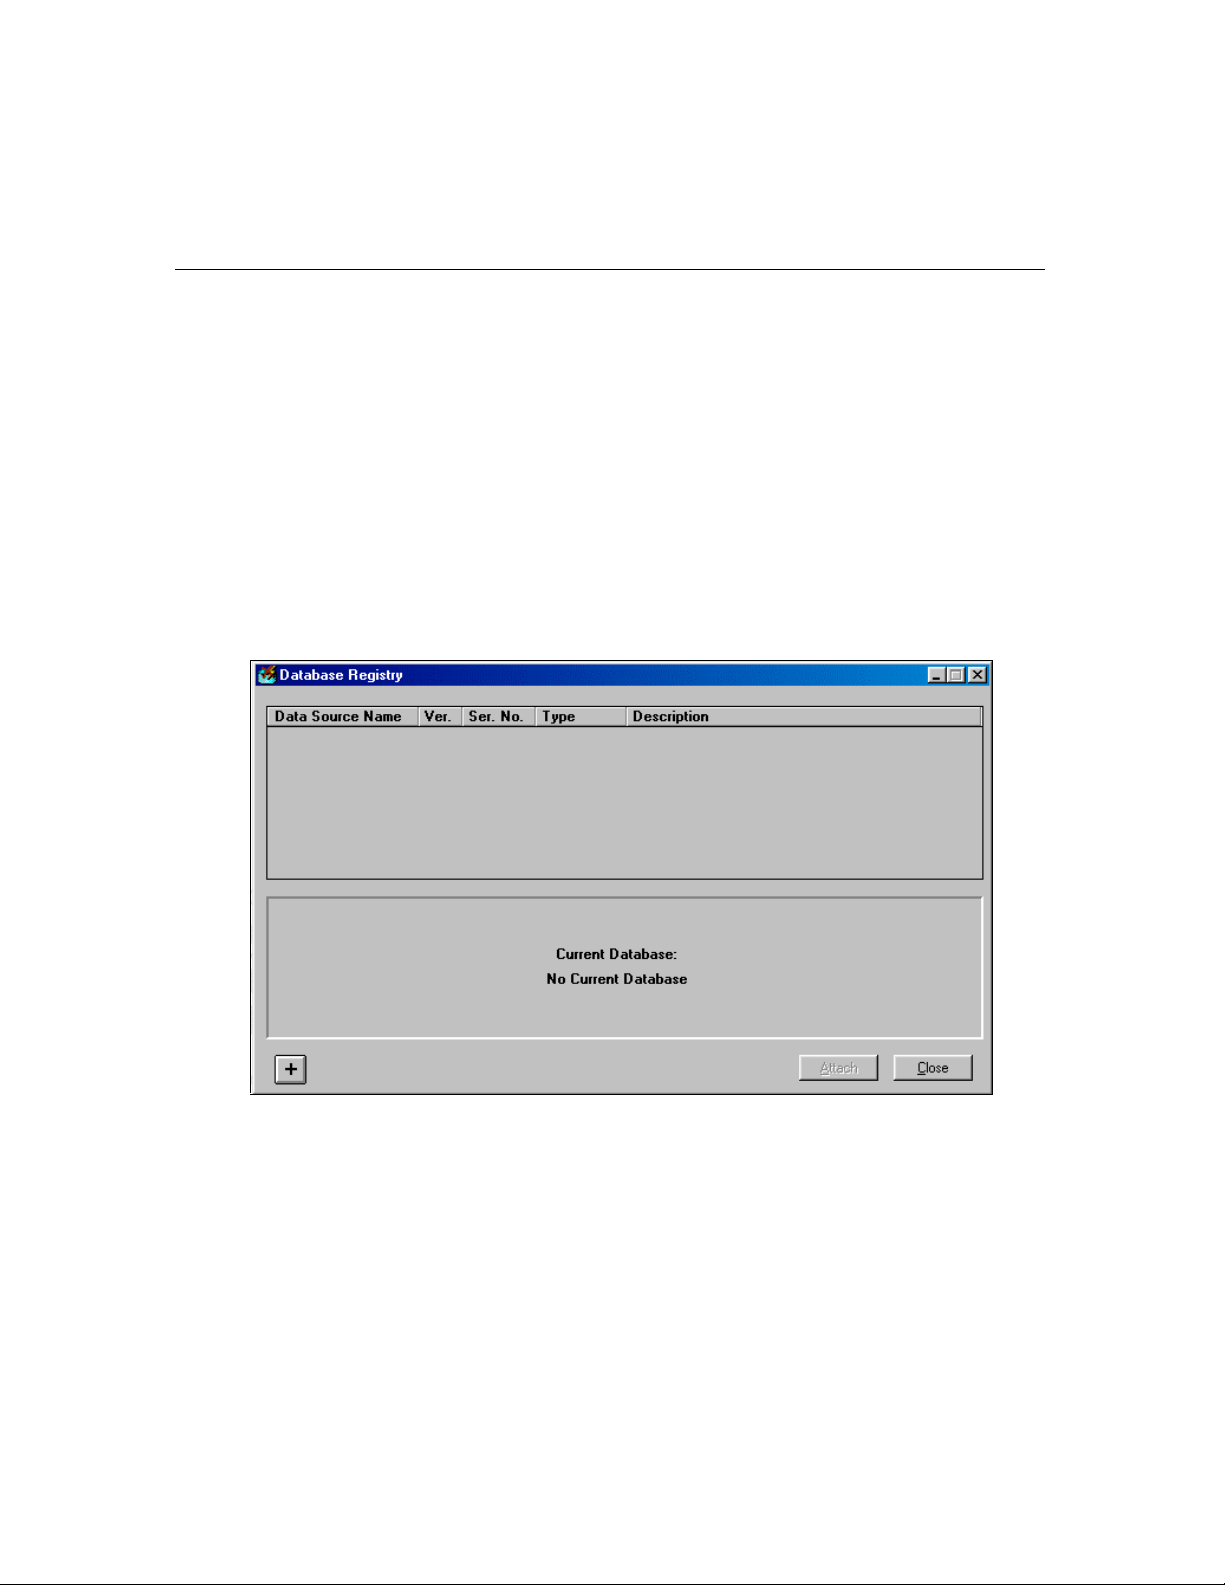
Step 1. In Inspection Manager FLX, open File > Database Registry
Step 2. To add a new database to the registry, click the Add button (plus sign) in
the lower left corner
Step 3. Click Browse
Step 4. Click Browse again to open your Inspection Manager FLX directory
Step 5. Browse to the location of your database, and highlight the file with the mdb
extension
Step 6. Click Open
Step 7. Click OK
Step 8. Click Attach and click OK to restart Inspection Manager FLX
Page 15

15
Database Installation with Oracle
Inspection Manager FLX has the ability to work with more than one database. The Database
Registry is a list of all of your Inspection Manager FLX database files. This list includes live
application databases and archive databases. In order to use the program, you must first
Register and Attach to your Database.
To Register and Attach to your newly installed Database:
Step 1. Open Inspection Manager FLX > File > Database Registry
Step 2. Click Add and click ODBC. ODBC Manager will open.
Step 3. Click Add in the ODBC Data Source Administrator window
Step 4. Select Microsoft ODBC for Oracle; the Microsoft ODBC for Oracle
window displays
Step 5. Enter Data Source Name: enter any name
Step 6. Enter Description: optional entry
Step 7. Enter User Name: enter user_name created in ORACLE
Step 8 Enter Server: enter Server Name created in earlier steps
Step 9. Click OK
Step 10. Click OK to exit ODBC Manager, and re-enter Inspection Manager FLX
Step 11. Select the Data Source created in ODBC Manager
Step 12. Give User ID: Enter
OK. The database now appears in the registry.
Step 13. Click Attach and click OK. Inspection Manager FLX will restart and
attach to the selected database.
user_name
and
Password
created in earlier steps; click
Page 16

16
Database Registration with SQL
Inspection Manager FLX has the ability to work with more than one database. The Database
Registry is a list of all of your Inspection Manager FLX database files. This list includes live
application databases and archive databases. In order to use the program, you must first
Register and Attach to your Database.
To Register and Attach to your newly installed Database:
Step 1. In Inspection Manager FLX, select File > Database Registry, click
Add, then click Add ODBC
Step 2. Select the driver SQL Server and click Finish
NOTE:
If you are using an operating system prior to Windows 2000, you may not find the SQL Server
Driver listed. Contact your system administrator to install the appropriate SQL Client for your
operating system and server at each workstation.
Step 3. In the ODBC Data Source Administrator window, enter a Name for
Data Source: example, imfsqlserver2000
Step 4. Enter Description (optional): example, imfsqlserver2000
Step 5. Enter Server: example, webmaster
Step 6. Click Next in the Create a New Data Source to SQL Server window
Step 7. Click Next to confirm settings
Step 8. Check the option Change the default database to: and select the newly
created database from the drop-down list. Click Next.
Step 9. Click Finish
Step 10. In ODBC Microsoft SQL Server Setup window, click Test Data Source
Step 11. Click OK to close
Step 12. In the ODBC Data Source Administrator window, click OK
Step 13. Select the Data Source that you created in the previous steps: example,
imfsqlserver2000
Step 14. Enter User ID: example, imf
Step 15. Enter Password: example, imf
Step 16. Click OK
Page 17

17
Step 17. Select the Data Source Name from the grid and click Attach. Click OK.
Inspection Manager FLX will restart and attach to the selected database.
Registering Inspection Manager FLX
After installing Inspection Manager FLX, you will have 30 days to register the software for
licensed use. To license your software, contact TISCOR Technical Support at 1-800-553-1234 and
a representative will assist you.
NOTE:
Once your 30 days has expired you will not be allowed to log into Inspection Manager FLX until you have
registered the program.
Network Licensing/License Increment
After installing Inspection Manager FLX you must specifically license it for multi-user access.
To license the software for multi-user access, contact TISCOR Technical Support at 1-800-5531234 and a representative will assist you.
Page 18

18
Palm Inspection Manager FLX Installation
Now that you have installed the Palm Desktop software and Inspection Manager FLX on
your PC, you are ready to install the Inspection Manager FLX application on your Palms:
Step 1. In Inspection Manager FLX, select Device > Install Palm Application
Step 2. From the Inspection Manager FLX Palm Installer window, select the
User Name. This name must be the same name assigned to the Palm to
which you are Syncing.
Step 3. Click Install
Step 4. On the Palm, tap the HotSync icon, then press the HotSync
button on your Palm or cradle
Step 5. For each additional Palm, repeat steps 1 through 4
Step 6. Exit HotSync when you have finished with all the Palms
Step 7. On the PC, right click on the HotSync icon in the system tray. Make
sure that a check (√) is next to the Local Serial option, and that
there is no check (√) next to the Local USB option.
Step 8. Exit HotSync when you finish with all Palms
a. To exit HotSync, find the HotSync icon on the Windows
system tray
b. Right click on the HotSync icon
c. Choose Exit from the Menu. You must exit HotSync so the program
can communicate with the Palm application when the program starts
again. If a confirmation screen appears, make sure to turn off the option
that requires confirmation each time you exit the program by checking
Don't ask this Question again, and selecting Yes.
d. Restart HotSync, Start > Programs > Palm Desktop > HotSync
Manager
HotSync Manager
Menu
Page 19
19
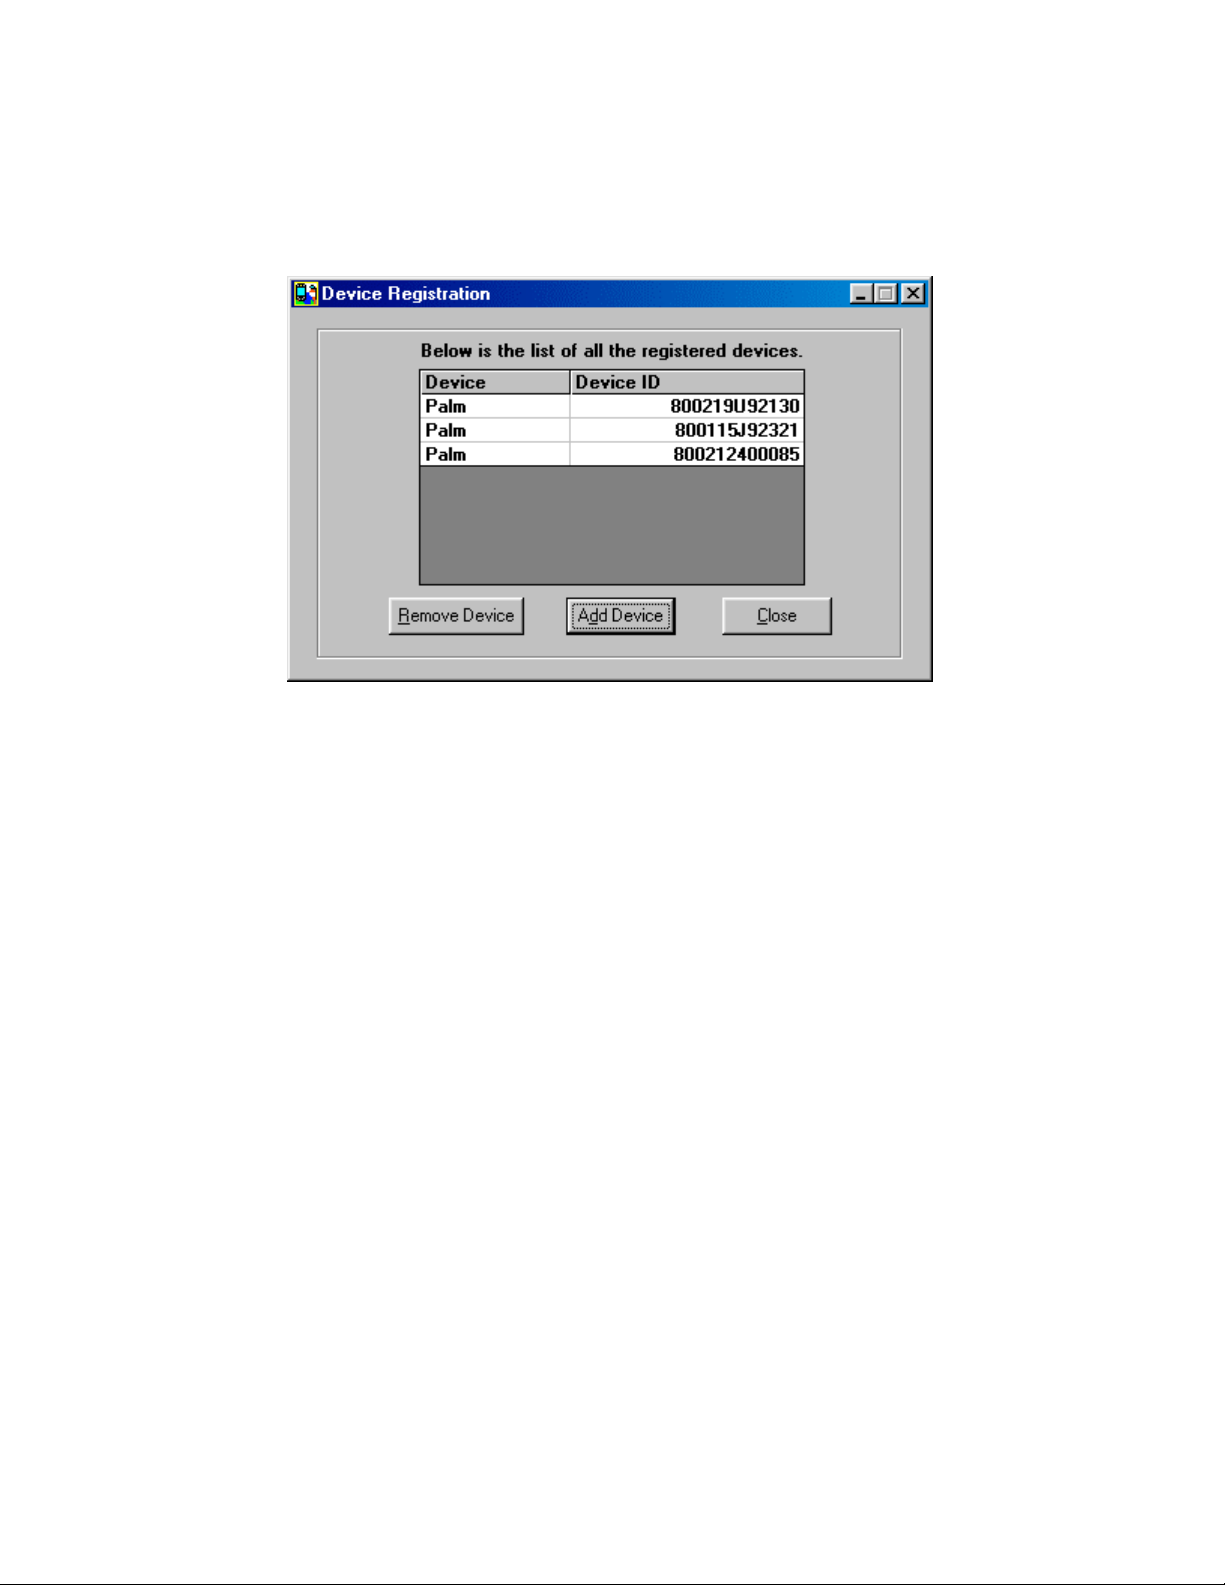
Palm Registration
Registering the Palm allows you to Sync live inspection data to and from the Palm with the
program on the PC. Keep in mind that you can Sync demo data without registering your device.
Adding a Device Registration
To Register your Palm, contact TISCOR Technical Support at 1-800-553-1234 and a technician
will assist you.
Deleting a Device Registration
You can Delete a Device from your Registry. You might want to delete a device if it is
inoperable or if a serial number was entered incorrectly.
To Delete a Device:
Step 1. Select Setup > Register Device
Step 2. Highlight the Palm you want to delete from the Device List
Step 3. Click Remove Device
Page 20
20
System Setup
Menu Overview
TIP:
Press ALT once to display the hotkey shortcuts. Each menu can be accessed by clicking it with the mouse
pointer or by pressing the ALT key and the underlined letter (i.e. for File, press ALT + F). A drop-down list
of selections for that menu will appear.
The Inspection Manager FLX work area contains the following menus:
File – (ALT + F) Use the File menu to open database tables, print lists, increment your
network license, register databases, and exit the program.
Edit – (ALT + E) Use the Edit menu to add, change, delete, find, import, or insert information.
Device – (ALT + D) Use the Device menu to install the Palm application, Sync (send and
receive data to/from the Palm), and access the Inspector Device Assignment Table
(assign inspections and tasks to an inspector or team).
Reports – (ALT + R) Use the Reports menu to log new data, print a variety of standard
reports, or create custom reports.
Tools – (ALT + T) Use the Tools menu to archive and delete history, recover unprocessed data,
transfer data, and compact and repair your database.
Setup – (ALT + S) Use the Setup menu to control system configuration; access the User
Defined Setup, User ID and Password information; and register your Palm.
Windows – (ALT + N) Use the Windows menu to alter the toolbar and windows arrangement
on the screen.
Help – (ALT + H) Use the Help menu to access Inspection Manager FLX’s Online help, view
product version information, or access TISCOR’s website.
Page 21
21
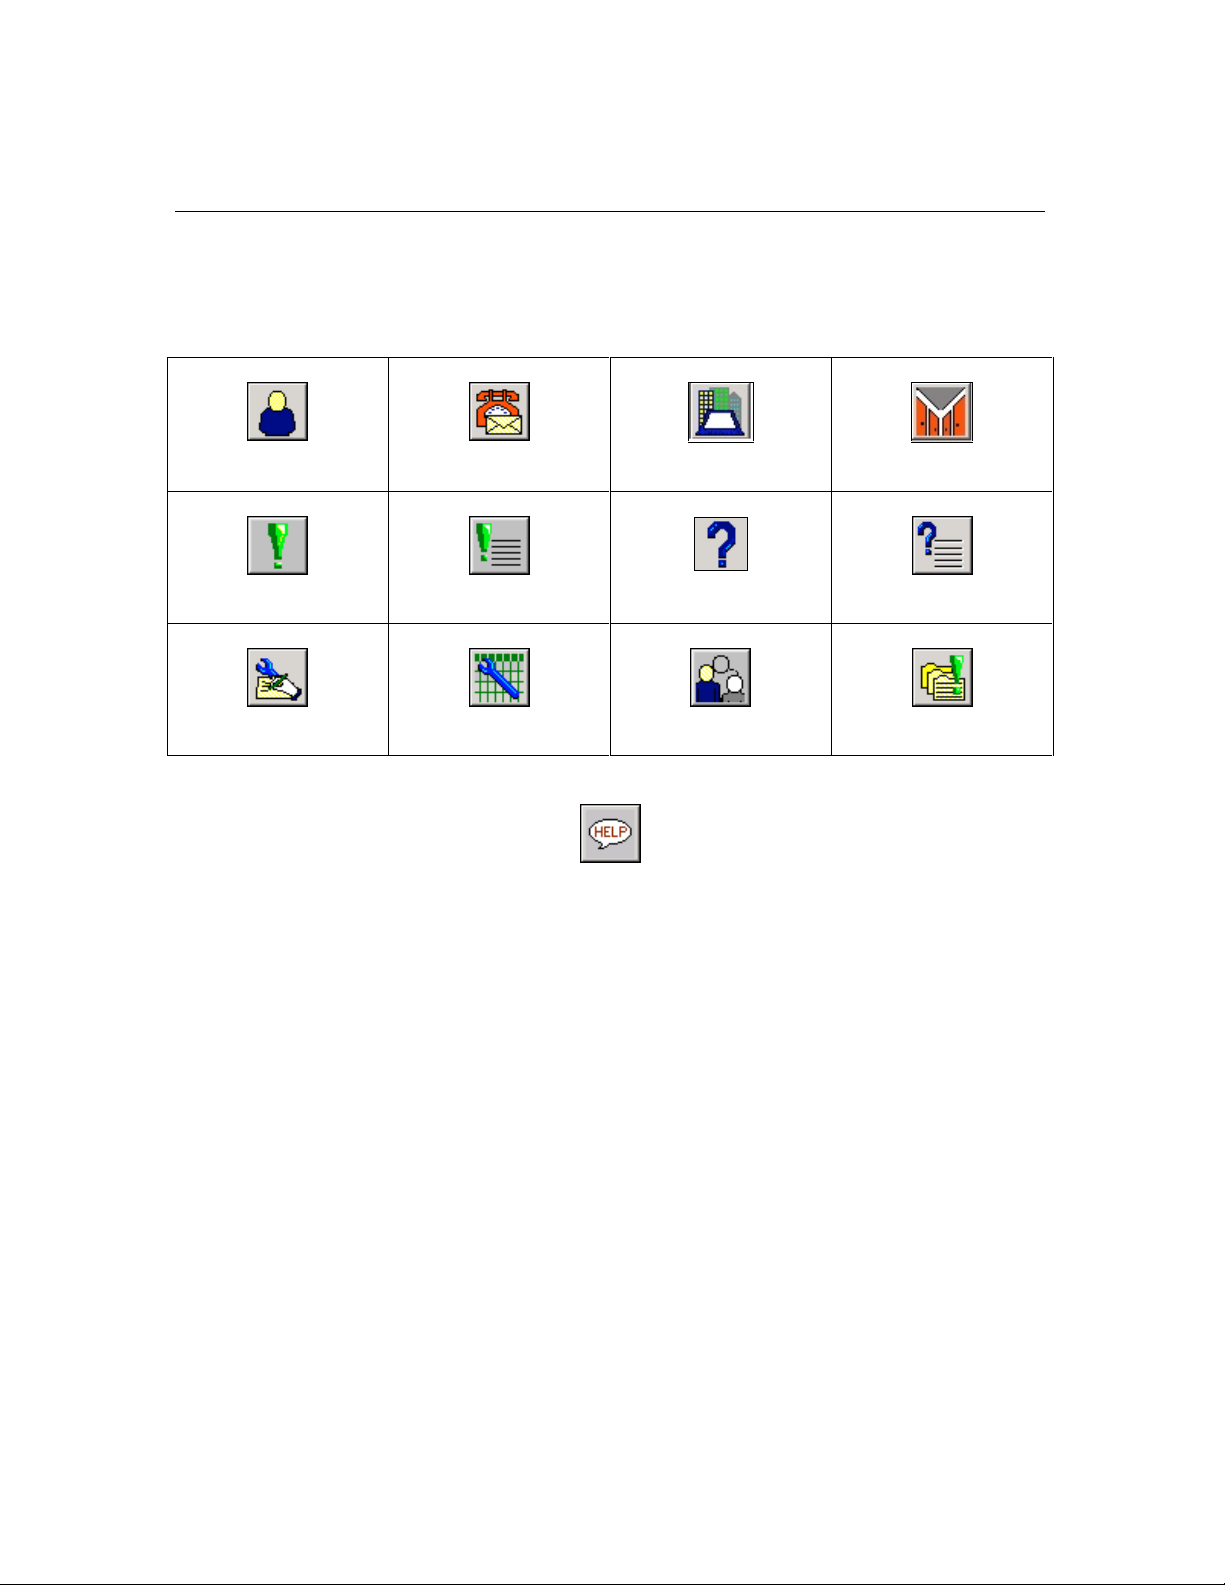
Toolbar Overview
The Main Toolbar is located across the top of the Inspection Manager FLX work area. The
most frequently used database Tables have icons.
The Tables represented by the Toolbar Buttons are:
Inspector Contact
Regulation Regulation Set*
Task Description Task To Do Team Violation
Help
Building Tenant
Question
Question Set
The Regulation Set Table only appears if you have marked the Regulation Set Checkbox in
System Configuration (Setup > System Configuration).
NOTE:
As you rest your mouse pointer over a table’s icon, a tip text describing the button’s function appears on the
line below the toolbar.
Page 22
22
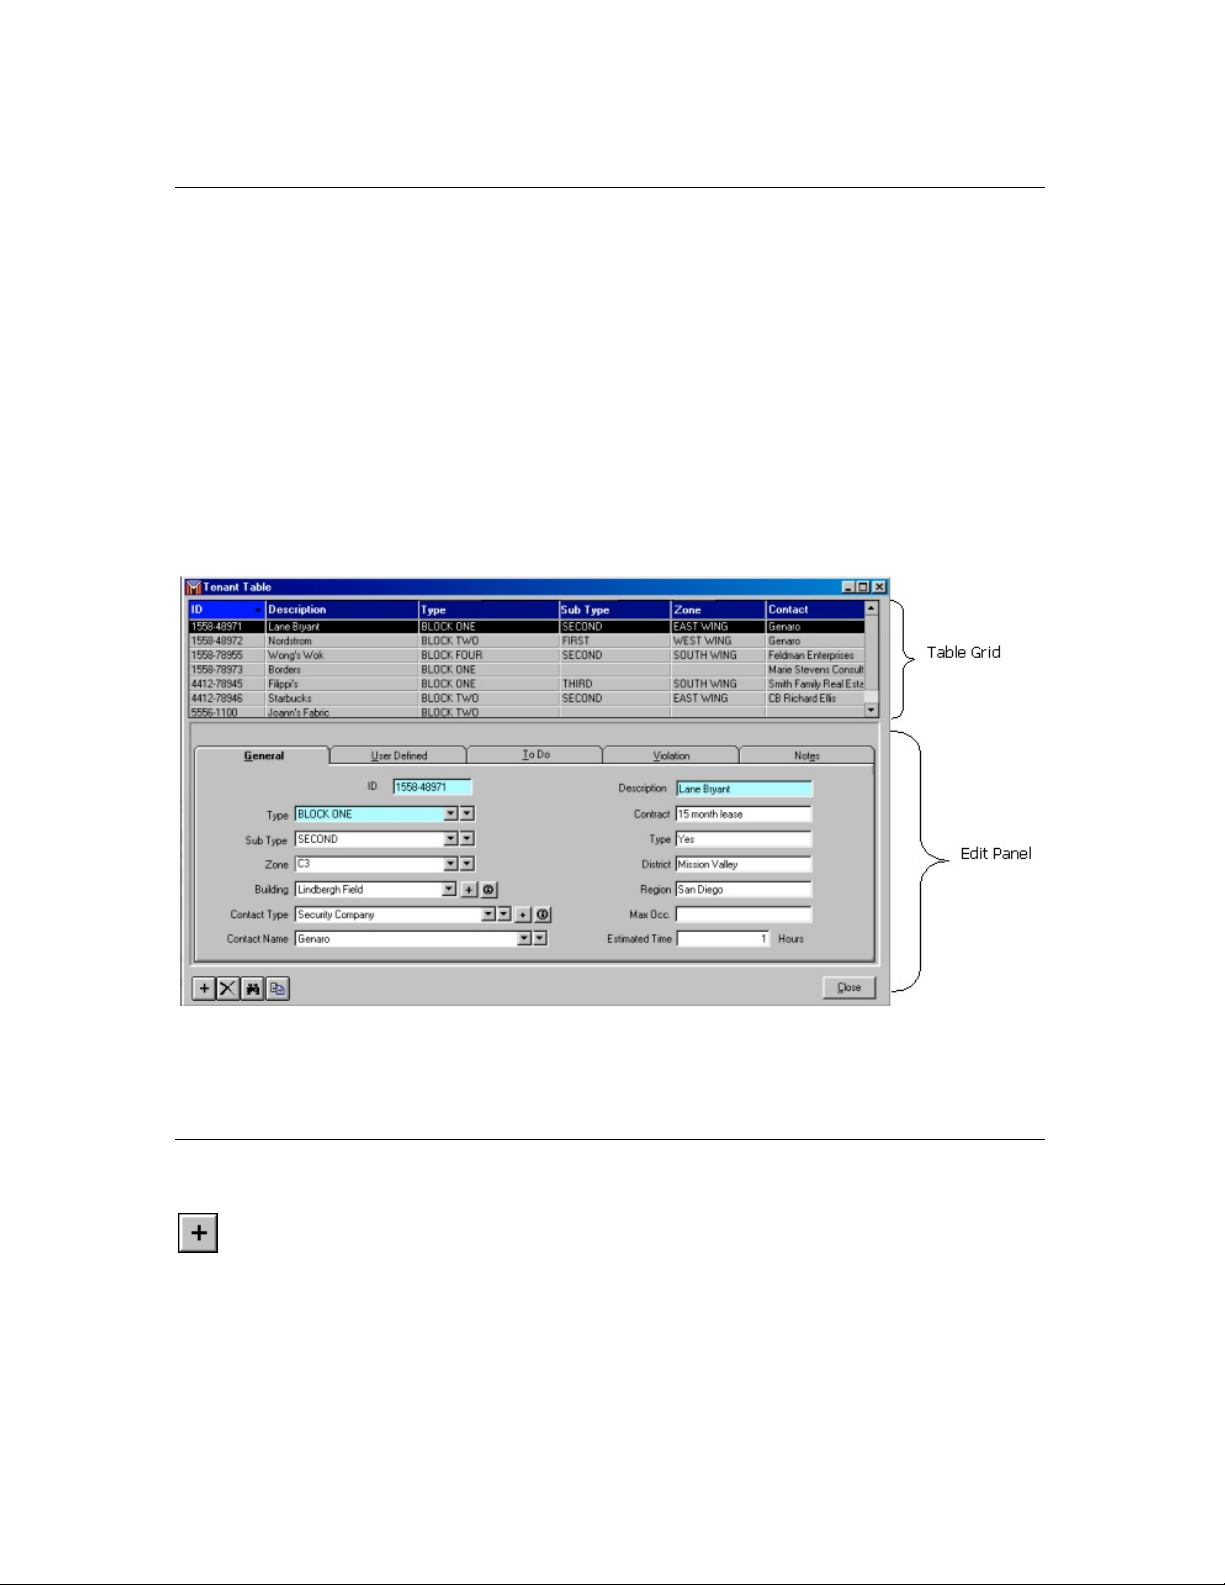
Tables Overview
The Inspection Manager FLX database is divided into Tables where your data is stored. To
access a Table, click the Toolbar icon for that Table or access it through the File menu. An
exception is the Inspector Device Assignment Table, which is accessed under the Device
menu.
Each Table window is divided into two sections: a Grid and an Edit Panel. You can select
Records in the Grid and edit them in the Edit Panel. The Grids may be either horizontal or
vertical panels.
The Edit Panel allows you to select and Edit a Record from a Table. All Editing activities take
place in this panel.
Once you are in the Edit Panel, you cannot exit until you complete your action by either clicking
OK to save your data, or Cancel to cancel any updates. If you click OK to save your data, the
updated Record immediately appears in the Grid.
NOTE:
You will notice that some fields within tables are light blue. This color indicates a required field.
Editing Overview
These edit commands will assist you in adding, modifying and maintaining the information within
your tables.
Add
The following steps will apply to all Add functions in the program.
You can Add a record three ways:
• Click the Add button on the lower left-hand corner of the window
• Click on Edit Menu > Add
• Hold down the CTRL key on your keyboard and press the letter A
Page 23
23
Change
There may be times when you want to Change an existing Record. Perhaps the Record was
entered inaccurately or the information has changed since it was added.
You can Change a Record three ways:
• Click your mouse in the field you wish to Change
• Click the Edit Menu > Change
• Hold down the CTRL key and press the letter C
Each of these methods will enter the Record into Change mode, at which point you can make
any updates.
Copy
You might have buildings or regulatory codes with similar types and categories. When entering
data into some of the program’s forms, you can use the Copy feature to eliminate redundant
data entry.
To Copy a Record:
Click the Copy button on the lower left-hand corner of the table, then Add/Modify the
information for the new Record
Find
There will be times when you will want to view a specific Record. You can use the Find feature
to locate that Record quickly and easily.
You can Find a Record three ways:
• Click the Find button on the lower left-hand corner of the window
• Click the Edit Menu > Find
• Hold down the CTRL key and press the letter F
Each of these methods will enter the Record into Find mode, at which point you can enter any
combination of information you feel is necessary for Finding the Record you seek. If there are
multiple matches for the criteria that you entered, you will be asked at each match if you want to
proceed to the next one.
Sort
When viewing a Table you can change the order in which the Records are displayed in the Grid
area. To change the display order, click on the column header for the Field you want to Sort by.
A light blue column header indicates the current Sort Order. The triangle in the column header
indicates whether the Sort Order is ascending or descending. If the triangle is pointing up, the
column is Sorted in ascending order from the smallest to the largest volume. If the triangle is
pointing down, the column is Sorted in descending order.
Page 24

24
Insert
There are some Tables in the program where the order in which you enter the Records
matters. For example, the order in which you enter Questions into a Question Set dictates the
order in which the Questions will appear on the Palm. In these Tables, the Insert option will
be available when you are in the Active Question Grid. The Insert option behaves like the
Add option except that the Record is added above the currently selected Record instead of at
the bottom of the list.
You can Insert a Record three ways:
• Click the Insert button on the lower left-hand corner of the window
• Click the Edit Menu > Insert
• Hold down the CTRL key and press the letter I
Import
There will be times when you want to Copy all the Sub-records from one Record to another.
This can be a very useful and timesaving step, eliminating extra data entry. For example, there
might be times when one Question Set contains many of the same Questions as another Set.
In these cases, you can Import all Questions from one Set to another.
You can Import a Set of Records three ways:
• Click the Import button on the lower left-hand corner of the window
• Click the Edit Menu > Import
• Hold down the CTRL key and press the letter M
Print
Many of the Tables have a Print option. This option allows you to Print a list according to your
criteria. The Reports provide Sorting and Filtering parameters to allow greater control of the
information.
You can Print a Table three ways:
• Click the Print button that appears on the right-hand side of the main toolbar
• Click the File Menu > Print
• Hold down the CTRL key and press the letter P
Page 25

25
Setup
The following section will walk you through the elements of Inspection Manager FLX,
including how to Customize the program to meet your unique inspection needs, and how to
Enter Data into the program.
System Configuration
We will begin the process of tailoring Inspection Manager FLX in the System Configuration
screen. Access System Configuration through the Main Menu > Setup > System
Configuration.
This screen is divided into two tabs: General and Priorities.
General Tab
Use this area to specify your Company Information:
Licensee – Enter your Company Name in the Licensee field. The information entered
into this field will appear in the heading of Reports.
Database Description – The Database Description field allows you to enter or
change the Description of the database you are currently
attached to. What you enter here will appear in the description
section of the Database Registry.
Report Summary – The value entered into the Report Summary will display at the
end of every report. The default text is ***End of Report***.
Print Time of Day on Report Checkbox – This option can be used to include the
Time of Day on your Reports.
SIEP Check Interval – This option specifies the default interval for the Scheduled
Import/Export Program (SIEP). The default entry is 15
minutes (see
Interval feature does not apply if you have not installed SIEP.
Data Transfer
section). The SIEP Check
Page 26

26
Show Timer on Device – If you would like to enable the inspection timer on the
device, mark this checkbox.
Regulation Set Checkbox – If you will store multiple Regulations by category in your
database, mark this checkbox to enable the Regulation
Set Table.
Inspection Scheduling– A recurring inspection can be scheduled based either on the
previous due date (Fixed inspections), or on the previous
actual inspection date (Floating inspections). All inspections
that you conduct through this program will be scheduled as
either Fixed or Floating; not a combination of the two. The
option that you select here in System Configuration will
affect the next scheduled inspection date in the Task To Do
Table.
Enable Device Password – If you enable the Device Password, you can create a
password in the Inspector Table that will be necessary
to use the Palm.
Priorities Tab
There are five possible Priorities that you may assign to Regulations. Priorities are assigned
to Regulations and Questions, then carried down to Violations. Priority is a required Field
and the default is Normal; however, you may change the Default Priority in the drop-down
box.
Tutorial
To get started, follow these steps:
Step 1. Select Setup > System Configuration
Step 2. Enter your Company Name in the Licensee field
Step 3. Enter a Database Description; the information will appear in the
description section of the Database Registry
Step 4. Select either Fixed or Floating Scheduling
Step 5. Enter a Report Summary line
Step 6. Click OK
Page 27

27
User Defined Setup
User Defined Table Names
Field Names are used to define the terminology that the system will use. For example, if the
people who perform your inspections are referred to as Fire Marshals, you might want to use
the word Marshal instead of Inspector.
Access this area from the Main Menu > Setup > User Defined Setup. The term you specify
will appear on all screens, reports and on the Palm. To change a Field Name, click on the Field
you wish to change, then enter the new terminology. Field Names are limited to ten-characters
maximum. The following Tables and Fields can be defined by the user.
Send to Device
A Send to Device checkmark will transfer the User Defined Field Name to the Palm. If an
inspector will need to see or access the User Defined information, then mark the checkbox. If
only the PC user needs access to the information, then leave the checkbox blank.
NOTE:
The more information that is sent to the Palm, the longer the Sync process can take.
Page 28

28
User Defined Fields
User Defined Fields are provided in many of the Tables to allow you to track specific
information. The Fields are assigned to individual tables as indicated below:
Table Names Number of User Defined Fields
Violation 0
Regulation 3
Tenant 28
Contact 4
Building 25
Question 2
Team 0
Inspector 1
Regulation Set will be defined by whatever term you select for the Regulation Table.
Restore Default button
If you would like to return to the program’s default Table Names and User Defined Fields
(UDFs), click the Restore Default button.
NOTE:
At this point you should take a little time to review Inspection Manager FLX. Take a few minutes to look at
each of the tables and decide how best to configure each one to meet your needs. Here are few questions you
should ask yourself:
Does the standard Inspection Manager FLX terminology meet my needs?
If the answer is no, use the Field Names feature to customize the Field Names to meet your needs.
Does Inspection Manager FLX track all the information that is vital to my facility or inspection process?
If the answer is no, use the User Defined Fields feature to add the necessary Fields.
Page 29

29
User ID and Password Table
In order to assign appropriate user rights, it is vital to understand the difference between Users
and Inspectors. An Inspector is the employee who will be using the Palm to perform
inspections. Inspector information is entered in the Inspector Table. A User is the employee
who will be using and maintaining the PC side of the Inspection Manager FLX application.
User information is entered here. In some cases, the same person will be entered as both a
User and an Inspector.
A six-character maximum User ID (and twelve-character maximum password, if one was
assigned) must be entered each time you launch Inspection Manager FLX. Access to the
system is denied if an invalid User ID or Password is entered. By defining your User IDs and
Passwords, you regulate access to Inspection Manager FLX and to the functions the user
can perform. The Reset Password button allows you to change a user’s Password.
NOTE:
New users are automatically granted access to all functions in the system until you modify their Rights.
A User’s Rights are broken up into five sections:
File – The File option controls the User’s access to View and Modify data within Tables,
including Database Registry.
Reports – The Reports option controls the User’s ability to access specific Reports, and log
new data.
Tools – The Tools option controls the User’s access to special Tools such as Archive and
Delete History and Data Transfer.
Setup – The Setup option controls the User’s access to System Setup Options such as
System Configuration, User ID and Password and Register Device.
Device – The Device option controls the User’s ability to transfer data, initialize the Palm, or
access the Inspector Device Assignment Table.
Page 30

30
NOTE:
IDs and CODES:
Some IDs and Codes in Inspection Manager FLX are populated by the program when you add a Record,
but some will require you to enter a value during Setup. For your convenience, it is best to establish a
consistent standard. For example, you may decide that all User IDs will be employees’ initials.
Tutorial
To add a User:
Step 1. Open Setup > User ID & Password
Step 2. Add a New User Record
Step 3. Enter a User ID
Step 4. Enter a Password
Step 5. Select the files the User will need to access
Step 6. Select the Reports, Tools, System Setup and Palm features the User will
need to access
Step 7. Select OK to save
Step 8. Log in as this User to verify Password and Access Rights
Page 31

31
Tables
Team Table
We will start with the Team Table. The Team Table contains a list of groups that can be
assigned to an Inspector. For example, if you assign a Team Code, you can Filter the code so
that only specific Team Tasks are sent to the Palm. Team Codes can represent groupings
such as Shifts, Regions, Skill Levels and/or Inspection Groups (see
The Team Code field is ten-characters. Teams can be applied to the Inspector Table,
Inspector Device Assignment Table and Task To Do Table. You can also use the Sub-Add
feature to Add teams directly into the Inspector Table.
Task To Do
table).
Tutorial
To add a Team:
Step 1. Open File > Team
Step 2. Add a new Team record
Step 3. Enter a unique Team Code
Step 4. Enter a Team Description
Step 5. Select OK to save
Page 32

32
Inspector Table
Inspectors are the people who use the Palm to record information during Tenant
Inspections. For the Palm to recognize the particular Inspector collecting the information, all
Inspectors must enter their Names and IDs when launching the Inspection Manager FLX
Palm application, and when Syncing data. You can sort the Data by clicking the Grid column
headers. You can add a Team directly from the Inspector Table.
The Inspector Table Grid displays the following information:
• ID
• Name
• Team
• Team Code
• Inactive Status
Inactive Checkbox – If an inspector leaves your organization but has data associated with his
or her Inspections, you will not want to delete the person from the
database. Instead, you can mark the Inspector as Inactive. Inactive
Inspectors cannot be selected from pick lists or sent to the Palm, and
their data is marked as Inactive.
Reset Password – The Reset Password feature allows you to change the existing Password.
Inspectors must enter their ID and Password on the Palm. The
Password is not case sensitive. The device will require re-entering of the
Password on Login, Handoff or Sync, unless the Enable Device
Password is unchecked. See the
System Configuration
section.
Page 33

33
Tutorial
To add an Inspector:
Step 1. Open File > Inspector
Step 2. Add a New Inspector Record
Step 3. Enter the Inspector’s ID
Step 4. Enter the Inspector’s Name
Step 5. Enter any other information that is pertinent to this Inspector, such as the
Date of Employment, Contact Information, Schedule and Team
Step 6. Select OK to save
NOTE:
To make it easier to reference Inspectors, be consistent when entering Names. For example, you
may decide to always enter a last Name first followed by a first Name.
Page 34

34
Contact Table
The Contact Table serves as a comprehensive Rolodex, helping you store information for
managers, store owners, and other key contacts. If this information changes, the inspector can
update it in the field. You can assign contacts to both the Tenant and Building Tables. The
Contact ID field can be used for an account code, lease number or any other identifying traits.
Active Checkbox
The default for contacts is Active.
There are four tabs in the Contact Table: General, Contacts, Links and Notes.
Tutorial
To add a Contact:
Step 1. Open File > Contact
Step 2. Add a new Contact record
Step 3. Enter the Contact Reference ID
Step 4. Enter the Contact Name
Step 5. Enter or select a Contact type
Step 6. Enter any other specific information such as Links (directory, file or website)
Step 7. Click OK to save
or Notes
Page 35

35
Tenant Table
Each record in the Tenant Table represents an occupant of an inspection area. For example, if
you refer to Building Tenants as Occupants, you can change the default term in User
Defined Setup.
The Tenant Table Tabs include: General, User Defined, To Do, Violation and Notes.
General Tab
The General Tab of the Tenant Table holds the most commonly used Tenant information.
Type – This area is designated for the category of the Tenant’s facility Type. This area can be
used to enter an inspection type, or type of business (a required field).
Sub Type – This option allows you to enter the Tenant’s Sub Type.
Zone – This function provides a way to identify your organization’s Tenant inspection areas and
types.
i-button – This button provides an internal reference link to detailed Building or Contact
information. Clicking the Information Button will open the Building or Contact
Table.
ID – This field lets you enter a code used to reference Tenants (a required field).
Description – This option is designated for a company name or establishment description (a
required field).
Estimated time – This field is provided to record the length of time needed to inspect a
Tenant’s facility.
Contact Type – This area is for the description of the Contact Type for a Tenant.
Contact Name – This area is for the Contact Name of a Tenant. You can add a Contact, get
more information for this Contact, or filter for Contacts based on the
Contact Type (use the double drop-down box).
Page 36

36
User Defined Tab
The User Defined Tab is where you store additional information regarding a Tenant. You can
customize the data you track. See
User Defined Setup
section.
To Do Tab
The To Do Tab stores the scheduled inspection Tasks for a Tenant. The Edit buttons allow
you to Add a scheduled inspection Task, delete a Task or Edit an existing Task. Tasks can be
added both here and in the Task To Do Table.
Violation Tab
The Violation Tab stores the regulatory violation history for a Tenant, including the date and
time that the violation was created. The tab fields will be blank until data is collected on the
Palm during an inspection.
Notes Tab
The Notes Tab contains any Notes that you want to make visible on the Palm.
Page 37

37
Tutorial
To add a Tenant:
Step 1. Open File > Tenant
Step 2. Add a New Tenant Record
Step 3. Enter the Tenant’s ID
Step 4. Enter the Tenant’s Description
Step 5. Enter the Type, Sub Type and Zone of the Tenant
Step 6. Select the Tenant’s Building, or Add a New Building
Step 7. Enter any other information you will need for the Tenant such as User
Defined Fields (UDFs) or an estimated time to complete the inspection
Step 8. Click OK to save
NOTE:
To enter a Tenant with similar information, click the Copy button. Clicking Copy will create a duplicate
Tenant with a blank ID field. From here, you can edit any information in the new record that might be
different from the first Tenant entry.
Page 38

38
Building Table
Each record in the Building Table represents a physical location where an inspection is
performed. You can assign multiple Tenants to a Building from the Tenant Tab of the
Building Table.
There are four tabs in the Building Table: General, User Defined, Tenant and Notes. The
Building Table Grid displays the following: ID, Description, Contact 1, Contact 2, UDF 1
and UDF 2.
General Tab
The General Tab displays the Building ID (a required field), the Building Description (a
required field), User Defined Fields and Contact Information.
User Defined Tab
The User Defined Tab displays up to 20 additional User Defined Fields for a building.
Page 39

39
Tenant Tab
The Tenant Tab displays all the Tenants assigned to a building. Note that a Tenant can only
reside in one Building at a time. From this tab, you can add Tenants to a Building. The
Tenants can be people who are Currently Unassigned to a Building, or you can select from
All Tenants. If you choose to add a Tenant that is already assigned to a Building, the
program will remove the Tenant from the old Building and Add it to the selected one.
NOTE:
Clicking the Delete button does not delete the Tenant from the Tenant Table. This function only Deletes
the Tenant from the selected Building.
Notes Tab
The Notes Tab stores your Building Notes and are visible on the Palm.
Tutorial
To add a Building:
Step 1. Open File > Building
Step 2. Add a New Building Record
Step 3. Enter the Building’s ID
Step 4. Enter the Building’s Description
Step 5. Assign the Building’s Tenants
Step 6. Enter any other information you will need for this Building, such as User
Defined Fields (UDFs) and Contact Information
Step 7. Click OK to save
NOTE:
To enter a similar Building, click the Copy button to create a duplicate Building with a blank ID field and
description field. From the new record, you can edit any information that might be different from the first
Tenant entry.
Page 40

40
Question Table
The Question Table contains a list of every unique Question existing in Inspection Manager
FLX. There are six different types of Questions, and different behaviors can be assigned these
Question responses. The program automatically generates the Question ID, but you can
associate two User Defined Fields (UDFs), a Priority and an Estimated Completion Time
with each Question.
The Question Table Grid displays the Question, ID, Type, Violation (Y or N), Estimated
Time and one UDF.
Priority – The Priority is the status assigned to a Violation generated by a failed Question.
Est Time – Estimated Time is the time allotted to answer this Question.
Violation Checkbox – A Question that is designated to Generate Violation will automatically
create a Violation if the response fails (i.e. has an Abn response). A
Violation will not be created if one has already been created for the
specified issue at the specified location.
NOTE:
The Priority field and Violation Checkbox apply only to Multiple-Choice and Numeric
Questions.
Page 41

41
Question Types
There are six different Question Types in Inspection Manager FLX. When you select a
Question Type, the Edit Panel prompts you for the required information for that specific
Question Type.
Multiple-Choice
Multiple-Choice Questions allow you to customize up to four possible four-character
responses. You can do this by entering the responses in the text boxes.
Beneath each response, there are fields where you can indicate the following:
Abn Checkbox – Abnormal: If this response is selected on the Palm, the question has failed
and is marked as Abnormal in the inspection data
Wrn Checkbox – Warning: If the response is abnormal, the Palm will display the warning
message that you entered in the Warning Message field
Warning Message – If the response is marked to warn the inspector, the text message here
will be displayed on the Palm. Both Abn and Wrn must be checked for a
warning message to appear.
Violation Checkbox – A Question that is designated to Generate Violation will automatically
create a Violation if the response fails (has an Abn response). A
Violation will not be generated if one has already been created for the
specified issue at the specified location.
Tutorial
To create a Multiple- Choice Question:
Step 1. Open File > Question
Step 2. Add a new Question record
Step 3. Enter the Question
Step 4. Select Multiple-Choice for the Question Type
Step 5. Enter your possible responses and designate which, if any, are Abnormal or
will generate Warnings
Step 6. Designate if a Violation will be created
Step 7. Assign a Priority
Step 8. Enter any other Question-specific information
Step 9. Click OK to save
Numeric
A Numeric Question requires a number as a Response. You can specify an acceptable range
for the Response. By indicating a standard range, any response outside of this range is
Abnormal. Abnormal Responses can display a warning message on the Palm. You may
choose to leave either one or both values blank if no range requirements apply.
Page 42

42
Unit – Assign numeric values to a unit, example: PSI, pounds per square inch
Reading – Track a Numeric Reading for the Question, example: the reading of a hydrant’s
pressure.
Violation Checkbox – A Question that is designated to Generate Violation will automatically
create a Violation if the response fails (i.e. has an Abn response). A
Violation will not be generated if one has already been created for the
specified issue at the specified location.
Tutorial
To create a Numeric Question:
Step 1. Open File > Question
Step 2. Add a new Question record
Step 3. Enter the Question
Step 4. Select Numeric for the Question Type
Step 5. Enter an acceptable high or low, if either applies, and any Warning
messages you want displayed
Step 6. Designate if a Violation will be created
Step 7. Enter a Unit and Estimated Time if appropriate
Step 8. Enter any other Question-specific information
Step 9. Click OK to save
Text
The Text Question Type allows for a flexible response, but it cannot trigger a Violation or
Warning message. The inspector responds by manually entering the text on the Palm.
Tutorial
To create a Text Question:
Step 1. Open File > Question
Step 2. Add a new Question record
Step 3. Enter the Question
Step 4. Select Text for the Question Type
Step 5. Enter any other Question-specific information
Step 6. Click OK to save
Date
The Date Question Type is used for questions that require a calendar date response.
For example, Question: Date of tenant’s last emergency drill?
Response: Inspector selects date from the Palm calendar.
Tutorial
To create a Date Question:
Step 1. Open File > Question
Step 2. Add a new Question record
Step 3. Enter the Question
Step 4. Select Date for the Question Type
Step 5. Enter any other Question-specific information
Step 6. Click OK to save
Page 43

43
Bar Code
The Bar Code Question Type is used when you expect the answer to the Question to be a
bar code. For instance, in a Question Set for a fire extinguisher inspection, a Question could
ask the inspector to scan or type the serial number on the fire extinguisher. If the fire
extinguisher has a serial number but not a bar code, the extinguisher can still be entered as a
Bar Code Question.
Example
Question: Scan Fire Extinguisher A?
Response: Bar code of fire extinguisher equipment appears
Tutorial
To create a Bar Code Question:
Step 1. Open File > Question
Step 2. Add a new Question record
Step 3. Enter the Question
Step 4. Select Bar Code for the Question Type
Step 5. Enter any other Question-specific information
Step 6. Click OK to save
Palm Picklist
The Palm Picklist Question Type allows for unlimited choices that the inspector selects from a
pre-defined list. This Question Type cannot trigger a Violation or Warning message.
Tutorial
To create a Palm Picklist Question:
Step 1. Open File > Question
Step 2. Add a new Question record
Step 3. Enter the Question
Step 4. Select Palm Picklist for the Question Type
Step 5. Enter any other Question-specific information
Step 6. Click OK to save
Question Set Table
A Question Set is an ordered list of Questions for a particular Task or a specific Regulation.
NOTE:
When defining a Question Set, you can either select Questions from the Question Table or enter new
Questions directly into the Question Set Table.
Page 44

44
When you are naming your Questions Sets you may want to indicate the associated
Inspection Task. For instance, you might have Questions Sets labeled Restaurant –
Inspection, Retail – Inspection, or Industrial – Inspection.
If you assigned estimated times to Questions in the Question
Table, the Question Set Table will tally the total estimated time
for the set. If this Question Set will contain many of the same
Questions as an existing Question Set you can import
Questions by clicking the Import button or the Import
Questions Checkbox.
Tutorial
To create a Question Set:
Step 1. Open File > Question Set
Step 2. Highlight the grid on the left titled Question Set
Step 3. Add a new Question Set record
Step 4. Assign a Name to the set
Step 5. Highlight the grid on the right titled Question
Step 6. Add a new Question record
Step 7. Select Questions from the drop-down menu, or Add a new Question in
the field available
Step 8. Click OK to save
Step 9. Repeat steps 6 through 8 as many times as necessary to Add all the
Questions to the Question Set
Page 45

45
Regulation Table
The Regulation Table stores all the regulatory codes that you enforce during a building
inspection. An inspector can record abnormalities and other problems by selecting a pre-coded
Regulation from a Palm Picklist.
Violation Checkbox– A Regulation infraction that is designated to Generate Violation will
cause a Violation to be created when the Regulation is selected on the
Palm. Once the Violation Checkbox is marked, the Priority field also
becomes enabled.
The following fields are listed in the Regulation Table:
Number – Enter the specific Regulation Number
Description – Enter a general Regulation Description (a required field)
Type – Enter a Regulation Category, such as OSHA, NFPA or UBC
Priority – Enter the Priority. If the Violation Checkbox is marked, you can change the
Priority of the Violation (a required field).
Question Set – Enter a Question Set associated with this Regulation
Fine – Enter a dollar value Fine for non-compliance (a numeric field)
Follow up – Enter the number of days until a Follow-Up inspection will occur (a numeric field)
Violation checkbox – Mark if Regulation noncompliance causes a Violation
Notes – Enter Notes associated with this Regulation
Regulation User Defined Fields 1 and 2 – See
NOTE:
Only one Regulation User Defined Field will appear on the Palm screen (due to the Palm screen size), but
both will be sent to the Palm.
User Defined Setup
information
section for more
Page 46

46
Tutorial
To add a Regulation:
Step 1. Open File > Regulation
Step 2. Add a New Regulation record
Step 3. Enter the Regulation Description
Step 4. Designate if a Violation will be created
Step 5. Enter any other Regulation-specific information or related Question Sets
Step 6. Click OK to save
NOTE:
Use the Copy button to enter similar Regulations. The duplicate record will have blank Number
and Description fields.
Page 47

47
Regulation Set Table
The Regulation Set Table is where you can categorize Regulation Groups. Regulation Sets
appear on Palm lists to make selecting Regulations easy.
The Grid displays the following information: Regulation Description, Number, Type and
Priority.
NOTE:!
If the Regulation Set Table does not appear as an icon or in your table list, the Regulation Set Checkbox is
not marked in the System Configuration.
Tutorial
To add a Regulation Set:
Step 1. Open File > Regulation Set
Step 2. Add a new Regulation Set record
Step 3. Enter the Regulation Description
Step 4. Click the right-hand heading titled Description
Step 5. Select Regulation Description from drop-down list or enter a new
Regulation
Step 6. Repeat steps 4 through 5 to add Multiple Regulations to a Set
Step 7. Click OK to save
NOTE:
If this Regulation Set will contain many of the same Regulations already entered in another set, use
the Import button to import those Regulations.
Page 48

48
Task Description Table
The Task Description Table allows you to define the inspection tasks that will be performed.
This table also allows you to set up Cascaded Tasks. The program automatically generates the
Task Code.
A Cascaded Task will automatically update the Last Performed field of the Cascaded Tasks.
For example, as part of performing an annual inspection you might conduct an inspection that
includes tasks that would normally be completed during a monthly or weekly inspection. The
Cascading function will automatically update the tasks. You do not need to perform the tasks
separately.
Cascade a task by left-clicking on the task in the Unused Task list and dragging the task to the
Cascaded Task list.
Tutorial
To add a Task Description:
Step 1. Select File > Task Description
Step 2. Add a new Task Description record
Step 3. Enter a Task that will be performed
Step 4. Select any applicable Cascaded Tasks
Step 5. Click OK to save
Page 49

49
Task To Do Table
The Task To Do Table allows you to indicate the frequency of a specific inspection or inspection
task. Inspection Manager FLX allows you to schedule individual Tenants for a particular
inspection on a particular date. Each individual Tenant may be scheduled for a particular
inspection in a particular year, month, week or day. Inspections can be scheduled manually by
typing in a Next Due Date or automatically, by checking the Repeat Every Checkbox and
specifying an interval. Manual inspections are useful for one-time inspections, such as a new
construction inspection.
You can apply a Question Set or Team Code to assign to the Task. For example, you can
assign all Hazardous Questions to a particular Task. You can make a Task more specific by
assigning a Team to a Task.
Wildcard Add/Bulk Inserts
You can schedule one Tenant or a whole group of Tenants (such as all Tenants in a specific
Zone) using the Wildcard Add feature. When you add a schedule record, enter a single asterisk
(*) in any tenant field. Since Tenant and Task Description are mandatory fields, you must
enter a value (either a wildcard or a drop-down selection) in those fields. The wildcard * can be
used in any of the four Tenant fields, in any combination.
All matching Tenant records that are not already scheduled for that specific Task will have an
inspection schedule created for them. If an existing Tenant is scheduled for the same Task, the
Wildcard Add will not change the existing Task’s scheduled date.
An empty field (such as Type, Sub Type or Zone) is considered a value when using Wildcards.
For example, if you enter the Type Restaurant and leave the Sub Type field blank when using
a Tenant Wildcard, the system will search for all Restaurant Types that have a blank Sub
Type field.
Page 50

50
Wildcard Add/Bulk Insert
Figure
Repeat Every Checkbox
A recurring inspection can be scheduled based on either the previous due date (Fixed
inspections) or on the previous actual inspection date (Floating inspections). This scheduling
method is defined in the System Configuration. Review your System Configuration settings
to check if you have selected Fixed or Floating scheduling.
The Repeat Every Checkbox allows you to select your schedule interval and carries an implied
duration of the interval. For example, if you would like to conduct a particular inspection once a
year, and it does not matter when the inspection occurs during the year, you can select an
annual inspection to repeat every 1 Year(s). This interval would send the inspection Task to the
Palm immediately and the Task can be done anytime during the year.
If you would like to conduct an inspection once a year, and the inspection can be completed
anytime between the beginning and end of a particular month, you can select the annual
inspection to occur every 12 months. On the first of the specific scheduled month, the Task
would be sent to the Palm as Due and could be completed anytime during the month.
If you would like to conduct an inspection once a year, and the inspection should be completed
exactly one year from the day you scheduled it (not to be conducted over a range of time), you
can select the annual inspection to occur in 365 days.
Unscheduled Inspections
If you will perform tenant inspections from time to time that are not scheduled in advance,
assign them in the Task To Do Table but leave the Next Due Date field blank. This action will
allow the inspection to be available on the Palm (unless Send Only Due is selected in the
Inspector Device Assignment Table).
Tutorial
To set up a Task To Do Schedule:
Step 1. Open File > Task To Do
Step 2. Add a new Task To Do record
Step 3. Select a unique Task Description and Tenant Description combination
Step 4. Enter the scheduling information
Step 5. Select a Question Set
Step 6. Select a Team Code
Step 7. Click OK to save
Page 51

51
Violation Table
Violations are issues that you want to track or address. You determine what triggers
Violations by checking the Violation Checkbox on either the Question or Regulation
Tables. If a Question is marked to create a Violation, then an Abnormal response to that
question will generate one.
A Violation cannot be created on the PC; it must be created by an Abnormal condition that is
recorded during an inspection. However, you can delete a Violation, and edit Violation Notes
on the PC.
NOTE:
To print a report of Tenant Violations, open the Violation Table and click the Printer icon.
Page 52

52
Inspector Device Assignment Table
Building inspections are assigned in advance to an inspector or to a team. The user in charge of
managing the Inspector Device Assignment Table controls when and what information is
sent to the Palm.
Every time an Inspector syncs his or her Palm to the PC, the system searches for the Inspector’s
matching Device Assignment record. If the record is found, the system uses it to download
new inspections or other information. If the record is not found, the system searches for the
inspector’s Team Device Assignment record and uses that if found. If neither is found, an
error is displayed on both the Palm Sync Screen and the PC. For example, if inspector Wise
attempts to download her inspection tasks to her Palm, and a PC user had deleted her
Inspector Device Assignment, the PC would not know which tasks to send to her and the
system would generate an error. In order to download the tasks, the Inspector’s Device
Assignment record would need to be recreated.
The Grid displays: Inspector ID, Inspector/Team Name, Buildings, Assigned On Date
and Time and Last Synced Date and Time.
Load Buildings
Check each Building you would like to send to the Palm every time work is downloaded. You
can select an inspection due date to assist with filtering which buildings, tenants and tasks are
sent to the Palm. If you do not select to send a Building to the Palm, you will only be able to
send Regulations and Question Set files.
Send Violation for Tenant
If you want the Violation History for tenants on the Palm, mark the Send Violation for
Tenant Checkbox.
Page 53

53
Send History Back
If you have selected to Load Buildings and Send Violation for Tenant, you can also select
how far back you want the program to search for a specific Tenant’s Violation History.
Which Tasks
Which Tasks controls which specific inspection tasks are available on the device. You can select
to send All Tasks, No Tasks or Only Tasks Selected Below (the Tasks checked in the Task
List). You can further filter the Tasks by selecting a Team. For a Task to appear associated
with a Tenant, it must have been assigned in the Task To Do Table or scheduled in the
Tenant Table To Do Tab.
Send these Files When Sync
After the initial Sync, you may not wish to reload files each time unless you have had significant
changes to the following lists:
• Regulations
• Question Sets
Tutorial
To Assign inspections to an Inspector or Team:
Step 1. Open Device > Inspector Device Assignment
Step 2. Add a new Assignment record
Step 3. Select the Name of the Inspector or Team
Step 4. Select OK to Add the record
Step 5. Select the data to send on the next Sync (select buildings, inspection due
date and specific inspection tasks)
Step 6. Select OK to save changes
NOTE:
Uncheck all the boxes in the Inspector Device Assignment if you will be changing the inspection
assignments for the inspector’s next Sync.
Page 54

54
Reports Overview
The power of Inspection Manager FLX resides in its ability to organize your data into
meaningful reports. These reports give you control of your data in a convenient organized
manner. The program allows you to view or print one or more reports in the background while
simultaneously performing other Inspection Manager FLX functions.
Below is a list of the various types of reports available in Inspection Manager FLX:
• History Report
• Inspection Report
• Violation Report
• Custom Report Designer
• Custom Report Wizard
• Listing Reports
NOTE:
To access a report, select Reports from the Menu bar and click on the desired report.
Report Toolbar
The Report Toolbar is visible in the Print Preview of a report. It will display the number of
records and the number of pages in the report. Report VCR buttons allow you to scroll forward
and backward through the report.
Scrolls to the first page of the report
Scrolls to the previous page of the report
Scrolls to the next page of the report
Scrolls the last page of the report
Prints the report
Exports the report to third party programs
Report Selection Criteria
Each report filter window consists of tabbed pages of categorized information, the sorting options
and the correlating time period.
Date and Time Selection
Most reports are printed to document activities during a specific time period. To print a report for
a specific time period, enter the start and end dates, or use the Calendar button to select a
date. Leaving a beginning date blank will generate a report that includes all information from
when you first started recording data. A blank end date indicates that you would like the report
to print in its entirety. Start and end times are optional. Use these times if you need to be more
specific about which data to include for a date range.
Page 55

55
Store/Recall
The Store/Recall Tab can be used to save report selection criteria. Using this option eliminates
the need to enter selection criteria repeatedly for common report parameters.
Tutorial
To save a Report Selection Criteria:
Step 1. Select a Report
Step 2. Enter your Report Selection Criteria
Step 3. Click the Store/Recall Tab
Step 4. Enter a Name for the Report Definition
Step 5. Click Store
To Recall a Report Selection Criteria:
Step 1. Select a Report
Step 2. Click on the Store/Recall Tab
Step 3. Select the Report Definition Name from the list box
Step 4. Click Recall
To Delete a Report Selection Criteria:
Step 1. Select a Report
Step 2. Click on the Store/Recall Tab
Step 3. Select the Report Definition name from the list box
Step 4. Click Delete
Log All New Inspections
All inspection information is flagged as New Inspection Data until explicitly logged. This
function is beneficial for producing reports on inspections that have just been completed. To
report on New Inspections Only, click the checkbox in the Report Selection Criteria area
labeled New Inspections Only. To run a report that includes both new inspections and
existing history, do not check the box. When you log all new inspections, the program removes
the new inspection flag.
TIP:
If possible, it is best to establish a regular routine, such as daily or weekly, for logging new inspections. This will
help retrieve consistent Inspection Reports of daily or weekly activity, and keeps New Inspection data from
accumulating unnecessarily.
Page 56

56
To Log New Inspections:
Step 1. Select Reports > Log All New Inspections
Step 2. Click Yes
NOTE:
Once you have logged new inspections, you can still single out the data by selecting date and time ranges in the
Report Selection Criteria area.
Page 57

57
History Report
The History Report allows you to report on information recorded in your inspection history.
This report provides sorting and filtering parameters to allow better control of the information.
Tutorial
To run the History Report:
Step 1. Open Reports > History Report
Step 2. Enter any filtering or sorting criteria
Step 3. Press the Create Report button to view a print preview of the report
Step 4. Press the Printer icon on the toolbar to print the report, or press the Letter
icon to export the information
Inspection Report
The Inspection Report displays a chronological history of your inspection activity. The report is
useful when you need to see exactly what happened in the order it occurred. The report outlines
building and tenant inspections, questions and responses, regulation and violation notes, and
keyboard entry comments. This report also provides sorting and filtering parameters to allow
better control of the information.
Any Inspection that begins within the selected date/time range is printed in its entirety, even if
part of the Inspection is completed outside of the selected range. If a portion of an Inspection
occurs during the selected date/time range, but the Inspection start date/time is outside of the
range, the Inspection is not included in the report.
Tutorial
To run the Inspection Report:
Step 1. Open Reports > Inspection Report
Step 2. Enter any filtering or sorting criteria
Step 3. Press the Create Report button to view a print preview of the report
Step 4. Press the Printer icon on the toolbar to print the report, or press the Letter
icon to export the information
Violation Report
The Violation Report allows you to print outstanding Tenant Violations. You can sort the
report by Tenant, Inspector or Building. You can also print a Signature Prompt, which will
include the text you provide in the report’s footer. The Signature Prompt can include
information such as a request for a Tenant’s or Inspector’s signature, Fine Remittance
information or your organization’s address .
Tutorial
To run the Violation Report
Step 1. Open Reports > Violation Report
Step 2. Enter any filtering or sorting criteria (date range, sort by and signature
prompt)
Step 3. Press the Create Report button to view a print preview of the report
Step 4. Press the Printer icon on the toolbar to print the report, or press the Letter
icon to export the information
Page 58

58
Custom Report Wizard
The Custom Report Wizard guides you through creating a first time custom report. The
directions are as follows:
Step 1. Select Reports > Custom Report Wizard
Step 2. Click New Report
Step 3. Click the table that you want to use for your report information; click Next
Step 4. Enter a Title for your report; click OK
Step 5. In the Seagate Crystal Report Wizard dialog box, select the Table
Fields that you want to include in your report. Use the horizontal arrow
buttons to add or remove the fields to the report, or the vertical arrow
buttons to change their display order.
Step 6. Click Next
Step 7. Select Groups for your information (optional); click Next
Step 8. Add Sub-Sets to the report (optional); click Next
Step 9. Select a Format Style
Step 10. Select a Destination Path. Click Finish and the report will preview.
Custom Report Designer
This advanced feature allows you customize the program’s reporting capability. The Custom
Report Designer allows you to create, run, store and manipulate custom reports. This option
allows you to better customize Inspection Manager FLX to meet your organization’s specific
needs.
Custom Reports uses Seagate’s Custom Report Wizard that will prompt through the
customization process.
Tutorial
To create a Custom Report:
Step 1. Open Reports > Custom Report Designer
Step 2. Click the Add button
Step 3. Select either Create from Existing Report or Start from Scratch
Step 4. The Custom Reports window will display a list of available Tables or
Parent Reports, from which you can create your report. Select a Parent
Report and customize the New Report Name.
Step 5. In the Report Designer view, you can Add and Remove Data Fields to
create your report
Step 6. You can preview your report at any time. Click Save to save the report or
Cancel to discard changes.
Page 59

59
List Reports
In addition to Inspection Manager FLX’s standard reports, you can print list reports from most
tables in the program. Once you select a table to print, you will be prompted to confirm your
report definitions and report title.
The following List Reports are available:
• Inspector List (Inspector Table)
• Inspector Device Assignment List (Inspector Device Assignment Table)
• Contact List: All Contacts or Selected Contacts (Contact Table)
• Building List (Building Table)
• Tenant List: All Tenants, Specific Tenants, Tenant Violations (Tenant Table)
• Regulation List (Regulation Table)
• Regulation Set List: Regulation Set with details (Regulation Set Table)
• Question List with Question Types (Question Table)
• Question Set List with or without individual questions (Question Set Table)
• Task List: print individual tasks or all with Cascaded Tasks (Task Description Table)
• Task To Do List: print tasks for individual tenants or all scheduled tasks with due dates
(Task To Do Table)
• Team List (Team Table)
• Violation List (Violation Table)
To print a List Report, open a Table and click the Printer icon or go to File > Print, or select
Reports > List Reports.
Page 60

60
Advanced Features and Tools
Archiving & Deleting History
You should periodically Archive and Delete your inspection history if your database becomes
too large. Data corruption may occur if your database is too big. An Access Database may
experience data corruption if its size exceeds 40 to 50 MB.
Tutorial
To Archive and Delete:
Step 1. Go to Tools > Archive and Delete History
Step 2. Click on the Selection Tab and enter the criteria and the date range for the
data you want archived. Each time you archive, a separate archive database
is created.
Step 3. In the Path Field, enter the correct path for the database. For example:
C:\Program Files\Tiscor\FIM\APR03.mdb.
Step 4. Click the checkbox for archive only if you want to archive data for a
particular customer. Checking this box allows you to maintain data in your
active database while giving users the freedom to print their own reports.
NOTE:
If you’re using an Access Database, make sure you use the colon and the backslashes in your pathing
statement, and that Inspection Manager FLX automatically assigns the file extension MDB to your database
file.
View Archived History
To View Archived History:
Step 1. Click on the File menu and select Database Registry. Note that all archive
databases share the serial number of their original parent database.
Step 2. Follow the procedures in Registering a Database. You can view tables
and print reports only after attaching to an archive database.
NOTE:
The archive database inherits the user rights and passwords of the original database.
Page 61

61
Data Transfer
The Data Transfer feature allows you to send or receive selected data to and from several
different kinds of file formats, either manually or according to a schedule. The Data Transfer
Import/Export Table is broken down into three tabs: Import/Export Formats, Scheduled
Import/Export, and Transfer Log.
If you want to automate importing/exporting, you will need to install the Scheduled
Import/Export Program (SIEP) and leave SIEP running. Access the program by going to
Start > Programs > Inspection Manager FLX > SIEP Installer. SIEP periodically checks
Inspection Manager FLX for changes in the database and will export according to the
schedule that you created. The default SIEP Check Interval is fifteen minutes, but the interval
can be changed in the System Configuration.
Import/Export Formats tab
The Import/Export Formats Tab contains detailed information about the transfer format:
Format Type, File Type, Operation, Table and External File Target/Destination Path
and Name. This tab also includes Compression and Filter options.
NOTE:
Transfers may be performed manually from within the table by pressing the Run Now button.
Page 62

62
Scheduled Import/Export tab
The Scheduled Import/Export Tab allows you to schedule existing Import/Exports. You
may also specify a Frequency for a Scheduled Import/Export. The Last Run Log contains
the date and time of performed transfers.
Transfer Log Tab
The Transfer Log Tab logs detailed information about all performed transfers.
Tutorial
To Add an Import/Export Format:
Step 1. Open Tools > Data Transfer
Step 2. Add a new Format record
Step 3. Enter a Format Name
Step 4. Select an Operation Type
Page 63

63
Step 5. Select a File Type
Step 6. Select a Table
Step 7. Check appropriate Fields
Step 8. Select appropriate Options (if applicable)
Step 9. Enter or select a File Name and Path
Step 10. If the selected file is Access or ODBC, enter the appropriate Table, User
Name and Password (if applicable)
Step 11. Click OK to save
Tutorial
To Schedule an Import/Export Format:
Step 1. Open Tools > Data Transfer
Step 2. Click the Scheduled Import/Export Tab
Step 3. Add a New Schedule record
Step 4. Select the appropriate Format Name from the drop-down list
Step 5. Enter the Date and Time of the transfer
Step 6. Enter Frequency (if applicable)
Step 7. Click OK to save
Page 64

64
Repair and Compact Database
Inspection Manager FLX’s Repair and Compact Database feature reclaims unused space in
database files. This is especially useful after deleting history. It will reorganize the space in your
database to maximize its performance. Access this tool by the Main Menu > Tools > Repair
and Compact Database.
Recover Unprocessed Data
The Recover Unprocessed Data feature is used to fix errors that might have occurred during
data transmission from the Palm. Please contact TISCOR Technical Support for assistance with
this feature at (800) 553-1234.
Page 65

65
Palm Use
This section reviews the basic procedures for using your Palm, sending and retrieving data, and
performing an inspection. For information on registering the Palm, refer to the
section of this user guide.
Launching Inspection Manager FLX on your Palm
You can launch the Palm Inspection Manager FLX program from the IM FLX icon on the
main screen, or you can program a different button to launch the program (see
section).
Palm Inspection
To begin an inspection, you must have entered your inspector information on
the PC and created an Inspector Device Assignment record. The
Inspector Device Assignment record will determine what inspection
information is downloaded to the Palm (see
Table
section for more information).
NOTE:
In order to begin inspections, the Inspection Manager FLX must be installed on the
Palm, and the Palm must also be registered in the PC program.
Inspector Device Assignment
Palm Registration
Palm Tips
Using Inspection Manager FLX on the Palm:
Step 1. Tap the IM FLX icon on the Main Menu
Step 2. Enter your Inspector ID, select Name from drop-down list and enter
Password. Tap Login.
Step 3. If this is your first time using the Palm for an inspection,
the Palm may not recognize your ID. If the device does
not recognized your ID, you will be prompted to sync
(see
Palm Sync
section).
Page 66

66
Step 4. From the Main Menu, tap Inspections. Your choices from this screen are
Inspections, Sync Data, Misc. Menu and Logout.
Step 5. Tap the Building to inspect from the list. From the Building General Tab,
you can tap the Tenant button to view Tenants within the selected
Building, or tap the Building Details Tab to verify building information.
From the Details Tab, you can edit building information. Tap the Tenant
button for the list of all Tenants due for an inspection within the building.
NOTE:
For Contact Information, tap the information (i) button. If you tap the information button for either
Tenant or Building, the system brings you to the Contact Information screen.
Page 67

67
Step 6. Tap the Tenant that is due for inspection from the Tenant List or enter the
Tenant ID in the Code field. To Filter for Tenants with inspections that
are due, or for those with Open Violations, tap the down-arrow for the
Filter menu.
Figure
Tenant Filter
Step 7. If you have enabled the device timer in the PC
System Configuration, you will be provided with the
option to start an Inspection Timer when you select
a Tenant. Select Yes or No. If you select Yes, you
can stop the timer at any time during the inspection
and resume it if you are interrupted.
Step 8. Conduct your inspection from the Tenant screen.
There are four tabs on the Tenant screen: General, Details, More Info
and To Do.
1. General displays basic Tenant information
2. Details displays more specific Tenant values such as Tenant User
Defined Fields from the PC
3. More Information displays any notes associated with
the Tenant
4. To Do lists all inspections that are due
The To Do list for the Tenant Inspection will display when you begin the
inspection. You may select a task to conduct from the list. The Ty heading
indicates the Inspection Type of the Task. V corresponds to Violation
and T corresponds to Task.
NOTE:
X=Done
V=Violation
T=Task
Figure
Inspection Timer
Page 68

68
Violation Type
If the inspection is a Violation Type (Violation follow up), you can review the Violation,
change the Priority, and mark it Still Open or Closed. If you need to review the regulatory
specifics, tap the i-button to view the Regulation Details screen. Tap Back to return to your
Task List for the Tenant.
Closing Violations
At any time during an inspection, you can close an open Violation. After you perform the
required action, simply tap on the open Violation, and then tap Closed. The Palm
automatically records the date and time the Violation was closed and the inspector who closed
it.
Task Type
To conduct a Task Type inspection, you may or may not have Question Sets assigned. If you
have Question Sets assigned to a particular inspection Task, the Palm will prompt for the
responses. If not, the inspection will be considered complete when you tap Do Task.
The Palm will prompt you if the
selected Task has no Question
Figure
Sets assigned to it.
Page 69

69
Options
You can select from the following buttons located at the bottom of the screen at any time:
Menu, List, Exit
Menu Button
Tapping the Menu button brings you to the Building Menu.
Regulations – Regulations will display a list of Code
Regulations
Run Question Set – Run Question Set will display a list of
Question Sets that can guide you through
a particular inspection Task or assist in
gathering specific information. An inspector
can run a Question Set at any time during
an inspection.
Hand Off to a Different Inspector – Hand Off will log you out
of the Palm and bring
you back to the Login screen
List Button
Tapping the List button brings you to the Tenant List; however, tapping List during a Tenant
inspection will interrupt the inspection and Inspection Timer.
Page 70

70
Palm Sync
The Palm Sync is what allows data to be sent to and retrieved from the Palm. In order to send
and receive data, your Palm must be registered and an inspector assigned to it.
Download – New data is sent to the Palm.
Upload – All collected data is sent to the PC.
When you perform a Sync, both the PC and the Palm must be prepared for the process.
Step 1. Verify that the HotSync Manager is in the system tray on the PC taskbar
Step 2. From the PC, select Device > Sync with Palm
Step 3. On the Palm, enter your Inspector Login
Step 4. From the Inspection Manager FLX screen on the Palm, tap the Sync
Data button.
Step 5. The Palm will display the HotSync screen; tap the HotSync icon
When you Sync data between the PC and the Palm, all collected data is sent to the PC for
processing. At the same time, new data from the Inspector Device Assignment Table is
being sent to the Palm.
When inspection information is transferred to the PC, the data is given a New Inspection
status. This New Inspection status enables you to easily print Inspection Reports for newly
completed inspections separately from the rest of your inspection history. Once you have
completed all reporting on new inspections, use the Reports menu > Log New Inspections to
remove the New Inspection status from the data (see
Reports: Log New Inspections
section).
Page 71

71
Sync Speed
In order to speed up the Sync process:
Step 1. On the PC, right-click on the HotSync Manager icon
Step 2. Select Custom
Step 3. Scroll to bottom and select System
Step 4. Click Change
Step 5. Select Do Nothing and set as default. Make sure to set this function as the
default or the settings will return to normal after one Sync.
Step 6. Click OK
Step 7. Click Done
NOTE:
The Palm will automatically turn itself off to conserve power if it is not used for a couple of minutes. Even
with the power off, the unit will remember all data, and will restart where you left off.
Sorting, Searching and Finding
You can use the up/down scrolling button on your Palm to move within a list. If you are in a
list, and there is more information to view, arrows will be visible in the top right and bottom right
corners of the list. The arrows indicate that you can scroll for more information. Tap on the
arrows to scroll.
If there is more information about a certain record, there will be arrows on the outside of the list
pointing either to the right or to left, depending on where the information is located. Tap these
arrows to scroll.
Page 72

72
Palm Tips
The following section will help you become more familiar with your Palm and help you perform
common Palm tasks.
Graffiti
To enter data in a field, tap on the field. You will see a blinking cursor there. To replace the
existing data, if any, run the stylus over the entire field to highlight the information. Then press
on the letters ABC at the bottom of the screen to bring up an onscreen keyboard. Type letters by
tapping on them. Tap the Done button when you are finished. If you are familiar with the Palm
handwriting recognition system Graffiti, you can also enter letters in the box at the bottom of
the screen.
To customize Palm buttons:
Step 1. Go to the Applications screen for All or System
Step 2. Tap on Prefs. Use the down arrow in the upper right corner and select
Buttons.
Step 3. Use the down arrows to select a program to customize the buttons. If you tap
Default, the buttons will be set back to the factory settings.
To change the Date and Time:
Step 1. Tap on the Applications button
Step 2. In the upper right-hand corner use the pull-down list to select General
Step 3. Tap anywhere in the Date or Time fields to change the information
To turn the Sound On/Off:
Step 1. To change the Sound settings, tap on the Applications button
Step 2. In the upper right-hand corner use the pull-down list to select General
Step 3. Tap on any of the Sound Options to change them
To Add an Application Category:
Step 1. Go to the Applications screen
Step 2. In the upper right-hand corner, tap the down arrow
Step 3. Select Edit Categories. You may create a New category, Rename a
category, or Delete a category.
To Add Programs to an Application Category:
Step 1. Go to the Applications screen
Step 2. Tap the Menu icon at the lower left of the permanent screen
Step 3. From the Menu, tap Category
Step 4. By using the down arrows on the right side of the programs, select the
Category that you want to display that program icon for
Step 5. You can scroll through the Application Categories by tapping on the
Application icon, or you can go to the different categories by selecting them
from the pull-down list
To view Applications by List or Icons:
Step 1. Go to the Applications screen
Step 2. Tap the Menu icon at the lower left of the permanent screen
Step 3. Tap Options
Step 4. Tap Preferences. View By: Select List or Icon. If you check Remember
Last Category, the same Category will display when exiting a program
Page 73

73
To access Graffiti Help (Grand Stroke):
Putting your stylus in the rectangle at the bottom of the Graffiti area screen and
sweeping upward to the upper right corner of the display area is called the Grand
Stroke. This action will bring up Graffiti Help, a tutorial on how to use Graffitti,
unless you have changed the meaning of the action.
To change Grand Stroke meaning:
Step 1. Go to the Applications screen for All or System
Step 2. Tap on Prefs
Step 3. Use the down arrow in the upper right corner and select Buttons
Step 4. Tap the Pen… button at the bottom of the screen
Step 5. Use the down arrow to select the feature you want to access by dragging your
stylus from the writing area to the top of the screen
To find the Palm’s name:
Step 1. Go to the Applications screen for All or System
Step 2. Tap on the HotSync icon. The device name is in the upper right-hand corner
of the screen. If this space is blank, the device is not yet named.
To change a Palm’s name:
Step 1. Click on the Palm Desktop icon on your PC desktop
Step 2. From the menu bar select Tools
Step 3. From the drop-down list select Users. Here you have the option to Add a
Name, Delete a Name or to Rename a Name. Any changes that you make
will be in the next Sync with that Palm.
To correct Palms with the same name:
Step 1. If two Palms are named TISCOR, you will need to change one of them
Step 2. Enter Palm Desktop on the PC
Step 3. Rename the existing TISCOR to TISCOR1
Step 4. Sync the Palm
Step 5. Add TISCOR back to the User List in Palm Desktop
To change Auto Off:
Step 1. Tap on the Applications button
Step 2. In the upper right-hand corner, use the pull-down list to select General
Step 3. Go down the screen until you see Auto Off After
Step 4. Use the down arrow next to the Auto Off field to change the setting. You can
change the delay to one, two, or three minutes. The default is two minutes.
To perform a Soft Reset:
A Soft Reset, also called a Soft Boot, restarts the Palm. To perform a Soft Reset on
the 1550 Palm, turn the Palm over and gently press a paper clip into the small hole
labeled Reset. On the 1800 Palm, turn the Palm over, remove the battery cover, and
press the black button on the right side of the battery compartment.
Page 74

74
To perform a Hard Reset:
A Hard Reset, also called a Cold Boot, deletes data and downloaded programs There
are two ways to perform a Hard Reset:
1. Remove the batteries for 15 minutes. You will need to reset your Preferences
and the Device Name and load all of your programs.
2. Push the Reset button while holding down the Power button. Then scroll up.
The Palm will reset itself.
Page 75

75
A
G
Abn, 8, 41
Violation checkboxes, 40
Abnormal, 8, 41
Access
Access databases, 14
Add button
Adding data to tables, 22, 24, 41, 42, 43, 50, 51, 54,
64, 74
Adding a device, 19
Advanced Tools
Compact database, 65
Archive and Delete History, 29, 61
Archived History, View, 61
Audit flags, 56
B
Building Table, 38
Buildings, 38
Bulk Inserts, 50
C
Change button, 23, 72
Compact Database, 65
Contact Table, 34
Contact types, 34
Copy button, 23, 37, 39
Custom Reports, 7, 8, 20, 29, 56, 57, 59, 71
D
Data Transfer, 25, 29, 62, 63, 64
Database Description, 25
Database Registration with Access, 64
Database Registry, 25
Default priority, 25, 26
Deleting a device, 19
Device menu, 20
Device registration, 19
E
Glossary, 8
H
Hard Reset, 74
Hardware requirements, 9
Help menu, 20
History Report, 7, 8, 20, 29, 55, 56, 57, 58, 71
HotSync, 8, 10, 11, 18, 71, 72, 74
I
i-button, 8, 35, 69
Import button, 24, 25, 62, 63, 64
Import data, 29, 62, 63, 64
Import Questions, 44
Insert button, 24
Inspection Scheduling, 26
Inspector passwords, 15, 26, 29, 30, 32, 66
Inspectors
Inspector information, 26, 29, 32
Install Palm Application, 18
Installing the program on the Palm, 18
L
Launching the program, 13
License Increment, 17
Licensee, 25
light blue, 22
Listing Reports, 60
Log All New Tours, 56
Logging inspection data, 56
M
Managing inspections, 51, 53, 66
Mandatory fields
light blue fields, 22, 23
Menus, 20
Minimum System Requirements, 9
Multi-user access, 17
edit commands, 22
Edit menu, 20
Editing grids within tables, 22
Enterprise Connectivity, 9
Exporting data, 29, 62, 63, 64
F
File menu, 20
Find button, 23
Fines
punitive fines, 46
N
Network Client, 13
Network Server, 9, 12
Network Workstation, 9
O
Open violations, 68
Oracle, 9, 15
P
Palm Desktop software installation, 10
Palm registration, 19
Page 76

76
Palm Sync, 71
Palm Tips, 73
Palm Use, 66
Palm, sending information to, 51, 53, 66
Print button, 24, 25
Printing table lists and reports, 24, 25
Priorities
Priority status, 25, 26
Program Menus, 20
Q
Question Set, 8
Question Sets
Groups of questions, 44
Questions
Inspection questions, 40
R
Reading, 42
Registering, 17
Regulation Set checkbox, 21, 25, 26, 29, 48, 51
Regulation sets, 48
Regulations, 46
Repeat every, 51
Report criteria, 56
Report Summary, 25
Reports menu, 20
Reports Overview, 55
Reset Password, 32
Restore default settings, 28
S
Scheduled Import/Export, 25, 29, 62, 63, 64
Scheduled Import/Export Program, 62
Scheduling inspection tasks, 50, 51
Send to Device, 27
Sending information to the Palm, 51, 53, 66
Setup menu, 20
SIEP, 62
Soft Reset, 74
Sort feature
Sorting columns, 23
SQL, 9, 16
ODBC Manager, 16
Standalone, 12
Station, 35
Station, Shift, Unit, 35
Sub Type, 35
Sub-adding data to tables, 31
Sync Speed, 72
System Configuration, 21, 25, 26, 29, 48, 51
T
Task, 8
Task Schedule, 8, 31
Task To Do Table, 50
Tasks
Inspection tasks, 49
Team Table
Team codes, 31
Tenant Table, 35
Tenant violation history, 35
Terms used in the program, 8
To Do, 68
Tools menu, 20
Tour Report, 7, 8, 20, 29, 56, 57, 71
Training, 3
Type, 35
U
Unit, 42
Unscheduled Inspections, 51
User defined fields, 7, 8, 28, 46
User defined table names
User defined fields, 20, 27, 35, 36, 46
User ID and Password, 20, 29
V
VCR buttons, 55
Violation, 46
Violation checkbox, 40, 41, 42
Violation Table, 52
Violations
tenant violation history, 52
W
Warning messages, 41
Wildcard Add, 50
Windows menu, 20
Wizards, 59
Wrn, 41
Z
Zone, 35
 Loading...