

Page 1

HTML Form Generator
User’s G uide
DOC-- GU--GFHTML--US--11/07/00
Page 2

The informationinthepresentdocumentationisnotofacontractualnature.Itis
subject to modification without prior notice.
The software described in this manual is regulated by a user license. The
software cannot be used, copied or reproduced on any media whatsoever,
except in compliance with the terms of this license.
No partofthismanualmaybecopied,reproducedor transmittedby anymeans
whatsoever (unless itis forthe purchaser’spersonal use)without thewritten
permission of T eklynx International Co.
E 2000 T eklynx International Co,
All rights reserved.
Windowst, MS-- DOSâ are registered trade marks of the Microsoftâ
Corporation.
IBM, PC, AT PS/2 areregistered trademarks ofthe InternationalBusiness
Machines, Inc.
Page 3

Table of contents
About This Manual Page - 1...................................
1
Documentation provided Page - 1...........................
Typographical conventions Page - 1.........................
HTML Form Generator Page 2 - 2...............................
2
Introduction Page 2 - 2..........................................
Generating a Form Page 2 - 3....................................
Step 1 Page 2 - 3............................................
Step 2 Page 2 - 5............................................
Step 3 Page 2 - 5............................................
Step 4 Page 2 - 7............................................
Step 5 Page 2 - 7............................................
Step 6 Page 2 - 9............................................
Using Data Entry Forms Page 2 - 11...............................
Printing Locally Page 2 - 11....................................
Printing via the Internet Page 2 - 11...........................
Page 4

About This Manual
1
Documentation provided
Typographical
conventions
Complete documentation is available to help you make optimum
use of HTML Form Generator.
The User’s G uide offers you a quick guided tour of the software
to get you off to a good start with its basic functions. In this
manual you will find all the procedures for installing, setting up
and using the software.
This manual distinguishes between different types of information
by using the following conventions:
S terms taken f rom the interface itself, such as commands,
appear in bold;
S keys appear in small caps, as in the following ex ample:
”Press the
S numbered lists mean there is a procedure to follow;
S when the conjunction ”or” appears next to a paragraph it
means there is the choice of another procedure for carrying
out a given task;
S When a menu command contains submenus, the menu name
followed by the command to select appears in bold. Thus,
”Choose File Open” means choose the File menu, then the
Open command.
This symbol gives hints for optimizing certain tasks, speeding up
the execution of commands, and so on.
SHIFT key”;
This symbol highlights important information about a particular
function or procedure.
Page 5

HTML Form Generator
Introduction
HTML Form Generator is a multilingual HTML format data entry
form generator, dedicated to document printing.
HTML Form Generator allows you to create forms quickly and
easily, thanks to a wizard that guides you through the whole
operation.
The application allows you to associate a data entry form with
each existing document, in a similar way to the Form in your
labeling software. The major advantage of using HTML is that it
can be edited quickly and easily using a wide range of software
packages, such as FrontPage, Word, and so on. This gives you
total control over the way your forms look.
2
Once generated, these forms can be used alone on your local
workstation, or coupled with Sentinel Print Pack on your
company’s intranet. When operating in classic Form mode, data
is entered manually by the operator and printed locally. When
operating in automated mode, data is transmitted in the form of
records in a file, with final printing carried out by Sentinel Print
Pack.
Page 6
HTML Form Generator
Generating a Form
"""" Launching HTML Form Generator:
S Launch HTML Form Generator from the Windows Start
menu.
or
Page 2 -- 3
Step 1
S Click on
or
1 Launch your labeling software.
2 Select Tools HTML Form Generator.
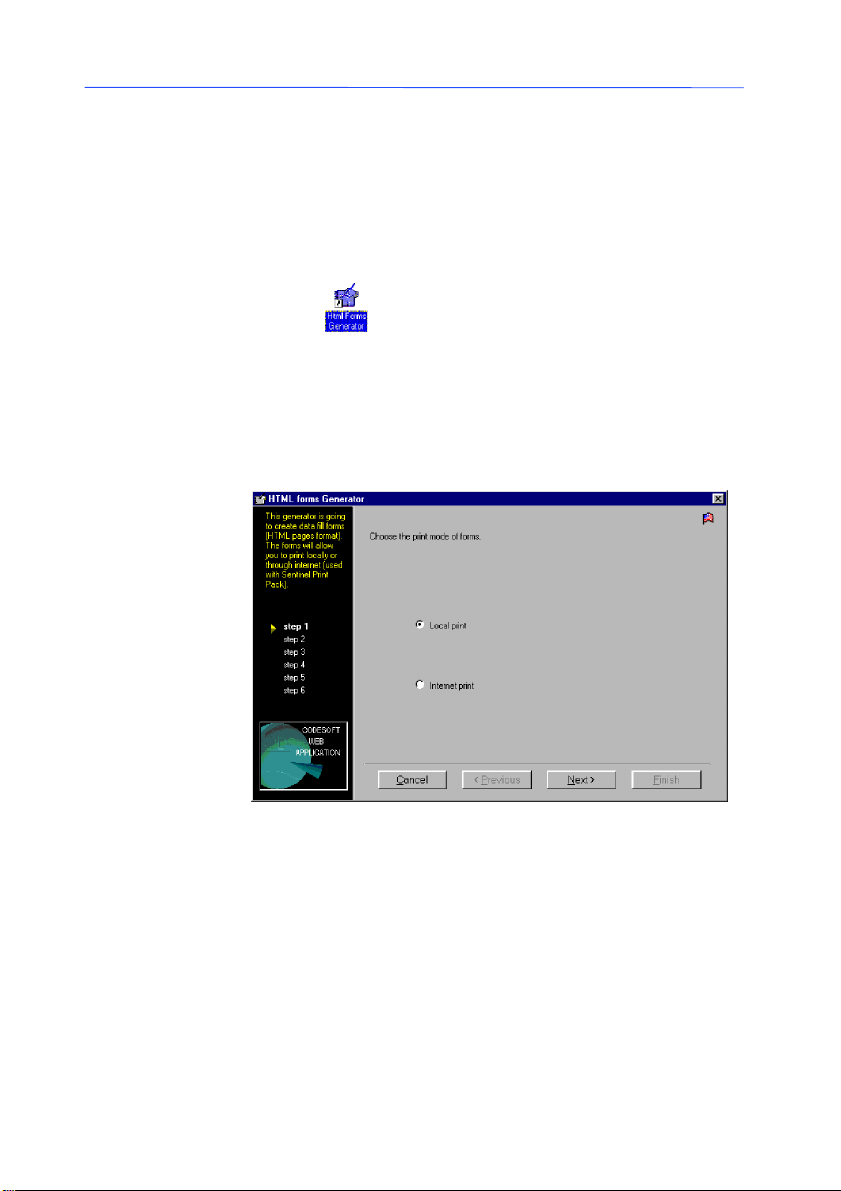
The following window appears: Step 1
This first step allows you to select the Wizard display language
and the print mode.
.
Figure 1 Step 1 of the Wizard
"""" To select the display mode:
HTML Form Generator’s interface display can be translated
instantly.
1 Click on the flag in the top right-hand corner of the window.
The Select language dialog box appears.
2 Select the required language, then click on Close.
Page 7

Page 2 -- 4
HTML Form Generator
You can select the language you prefer at any stage in the form
generation process. The language you choose will also be applied
to the HTML forms.
"""" To define the print mode:
Step 1 allows you to choose the print mode, i.e. local print
(printer connected to your computer) or Internet print (printer
connected via a network).
1 Check Local print
or
Internet print.
2 Click on Next.
The Step 2 window appears.
Figure 2 Step 2 of the Wizard
Page 8

HTML Form Generator
Page 2 -- 5
Step 2
Note
This step allows you to customize your forms. A list of different
page backgrounds is available
"""" To customize your form:
1 Selectthepagebackgroundyouprefer.
2 Click on Next.
The Step 3 window appears.
Figure 3 Step 3 of the Wizard
The program offers you a number of different background images. However, if you prefer, you may also add your own backgrounds (in GIF format) by copying them into the images file of
the installation folder.
Step 3
This step involves specifying a form template.
Youmaychoosefromamongthefollowingsixtemplates:
S Template 1: the form fields are arranged in two columns.
S Template 2: the form fields are arranged in two columns
with a fixed size preview image of the document to be printed.
S Template 3: the form fields are arranged in two columns
with an actual size preview image of the document to be
printed.
S Template 4 the form fields are arranged in a single column.
S Template 5: the form fields are arranged in a single column
with a fixed sized preview image of the document to be printed.
Page 9

Page 2 -- 6
HTML Form Generator
S Template 6 the form fields are arranged in a single column
with an actual size preview image of the document to be
printed.
Note
When using two columns, the HTML coding is more complicated
and thus more difficult to work with. Fields arranged in a single
column, on the other hand, are not organized in any particular
way. They are simply placed in a stack, one on top of the
other. This makes them easier to edit and organize using an
HTML page editor.
"""" To select the form template:
1 Select the required template.
2 Click on Next.
The Step 4 window appears.
Figure 4 Step 4 of the Wizard
Page 10

HTML Form Generator
Page 2 -- 7
Step 4
This step allows you to choose between creating one form, or a
numberofforms.Inthelattercase,HTML Form Generator
gives you the option of creating a summary containing the
names of all the forms you create.
The summary will allow you to access your forms directly.
"""" To name the summary:
1 Check the required options.
2 If necessary, give the summary a different name by entering
it in the text box.
3 Click on Next.
The Step 5 window appears.
Note
Step 5
Figure 5 Step 5 of the Wizard
In the case of network printing (via the Internet), it is advisabletogivethecontentsthesamenameasthatofthedefault
page created by your Internet server. It is usually
DEFAULT.HTM.
This step involves selecting the documents for which you wish to
generate a data entry form.
"""" To select the documents:
1 Click on
The Open box appears, allowing you to select the required
documents.
Page 11

Page 2 -- 8
HTML Form Generator
2 By holding the CTRL (or SHIFT) key down, you can select seve-
ral files at the same time by clicking on them with the
mouse.
3 Confirm your choice by clicking on OK.
All selected documents will appear in the Wizard window.
4 Complete this stage by clicking on the Next button.
The Step 6 window appears (the final step).
Figure 6 Step 6 of the Wizard
Note
You can repeat the file selection process as many times as
necessary, particularly if the files are located in different folders.
If you chose to generate a single form only, you will only be able
to select a single file. In this case, the window will look slightly
different.
Page 12

HTML Form Generator
Page 2 -- 9
Step 6
Note
This final step consists of selecting the folder in which the HTML
forms will be saved.
"""" To select the form archive folder:
1 Click on
.
The Browse for folder dialog box appears. This allows you
to select the folder in which you wish to save your forms.
2 Select the required folder, then click on OK in the dialog box.
The Suppress the old forms from the folder option allows the
selected folder to be cleared instantly. In this way, you can be
certain that all forms located in this folder are up to date.
In the case of n etwork printing (via the Internet), the form
archive folder can be the intranet site ’s root folder. For example:
C:\INETPUB\WWWROOT\[MY SITE].
"""" To launch form generation:
All parameters are now defined, and HTML Form Generator is
ready to create your forms.
S Click on Process to launch form generation.
Form generation takes a few seconds, current status is displayed during the operation. Once form generation is complete, HTML Form Generator launches Microsoft Internet
Explorer then shuts down automatically.
Depending on the option checked earlier, Internet Explorer
will display either the one form, or the summary of forms.
Page 13

Page 2 -- 10
HTML Form Generator
The example below shows an example summary displayed by
Internet Explorer:
Figure 7 Example of a summary displayed by
Internet Explorer version 4 or higher is required for dis-
playing HTML forms.
Internet Explorer
Page 14

HTML Form Generator
Using Data Entry Forms
Page 2 -- 11
Printing
Locally
Printing via
the Internet
The form consists of the following elements:
S The fields corresponding to the document variables currently
being processed;
S The field corresponding to the number of pages to be prin-
ted;
S The field corresponding to the number of copies of each page
to be printed;
S The field corresponding to the number of copies in the batch
to be printed;
S The list of printers. This list is initialized when the HTML page
is loaded, and includes all the your labeling software printers
(Windows or thermal transfer) connected to your PC;
S The Print button.
"""" To launch form printing:
1 Complete the data entry fields.
2 Click on Print.
The data is instantly transmitted to your labeling software, which
handles the document printing.
This mode allows you to delocalize document printing. You can
then launch document printing from any workstation on your
company’s intranet.
This is done by generating and saving all forms on your intranet
site. By simply connecting to the site, the forms can be relocated
to your workstation. The d ata, sent to your site’s b a ck up folder,
is the n intercepted by Sentinel Print Pack, which handles final
document printing.
Printing via the Internet requires a specific hardware configuration. Since HTML Form Generator conforms to Microsoft
standards, your Internet/intranet server must be a Microsoft
Internet Information Server (MIIS), version 3.0 or higher.
However, forms can be accessed using Netscape Navigator as
well as Microsoft Internet Explorer.
This printing mode also requires Sentinel Print Pack to be
installed on the workstation acting as the Internet server.
"""" Installation and Configuration
The diagram below shows how HTML Form Generator functions in
Internet or intranet mode.
Page 15

Page 2 -- 12
Workstation
Copy of th e
”.DAT file”
Forms imported using
http
Print Server + Microsoft I nternet
Server + HTML Form Generator
”site\”
_Private
Reception folder, read/write access not restricted
by the Internet server.
Sentinel
PrintPack
HTML Form Generator
Data
Print
jobs
Note
Network
Network
* MIIS = Microsoft Internet Information Server
Figure 8 Internet/intranet Diagram
This section mainly concerns the Internet administrator.
The following applications must be installed on the Server:
S HTML Form Generator
S Internet Server (Microsoft Internet Information Server, ver-
sion 3)
S Sentinel Print Pack
Users can load the required forms onto any workstation using
the http protocol. Once the d ata entry form is complete, all that
remainsistolaunchprinting.HTML Form Generator sends the
data to the printer in the form of DAT files on the Internet
server, Sentinel Print Pack then analyzes the files and
authorizes document printing.
Page 16

HTML Form Generator
"""" Configuring the File Sentinel
In order for Sentinel Print Pack to recognize the format of the
different data files, a few settings must be adjusted.
1 Launch Sentinel Print Pack.
2 Select an ASCII sentinel in file transfer mode.
3 Click on Add.
4 Name the sentinel, and specify the local folder in which the
Page 2 -- 13
The main Sentinel PrintPack window appears on the screen.
data files transmitted by HTML Form Generator are found.
This is generally the _private directory of your Internet site.
Note
The _private directory is automatically created if you set up
your site using Microsoft FrontPage. This is the only directory
that authorizes read and write access.
If your site does not contain this folder, you will need to create
it and assign the necessary access rights.
5 Configure the Delimiters using the Delimiters tab.
In this case, we are only interested in the delimiters assigned to
table assignment. The default values are described in detail
below. Theoretically, there is no reason why you cannot leave
them as they are.
Delimiter Value
Start of header None
End of header {CR}{LF}
Start of data None
End of data {CR}{LF}
Data separator ,
Page 17

Page 2 -- 14
HTML Form Generator
6 Select the different check variables using the Check varia-
bles tab. The default values are described in detail below.
Theoretically, there is no reason why you cannot leave them
as they are.
Name Value
Document filename LAB_NAME
Documents in a batch LAB_QUANTITY
Copies of each page PAGE_COPY
Copies of each document LABEL_COPY
Labels between cuts INTERCUT
Printer and port THT_NAME
Initializing the printer CDE_LINE
7 Select the target printer (the one forms will be printed on).
"""" Generating and printing forms via the Internet
Explanations concerning form generation are given at the
beginning of this manual.
Note
Once the forms are organized and stored on the site:
1 Connect to the site using the http p rotocol to load the requi-
red form.
Example: http://MachineName.SiteName/my_document.htm.
The form contains the same elements as in local printing mode
(seePage2-11),exceptthelistofprintersasthesearemanaged by Sentinel PrintPack.
2 Complete the data entry fields, then click on Print.
The data is saved as a record in a DAT file. Sentinel Print
Pack analyzes and manages the final printing.
 Loading...