

Page 1
©2003 All Rights Reserved
Return Your
Warranty
Card For An
Additional
6 Month
Warranty!
Page 2
©2003 All Rights Reserved
How to Change a Battery Pack
or AC Adapter
CHARGE NEW BATTERY FOR 5 HOURS PRIOR TO USE
(refer to user’s manual for more detailed information)
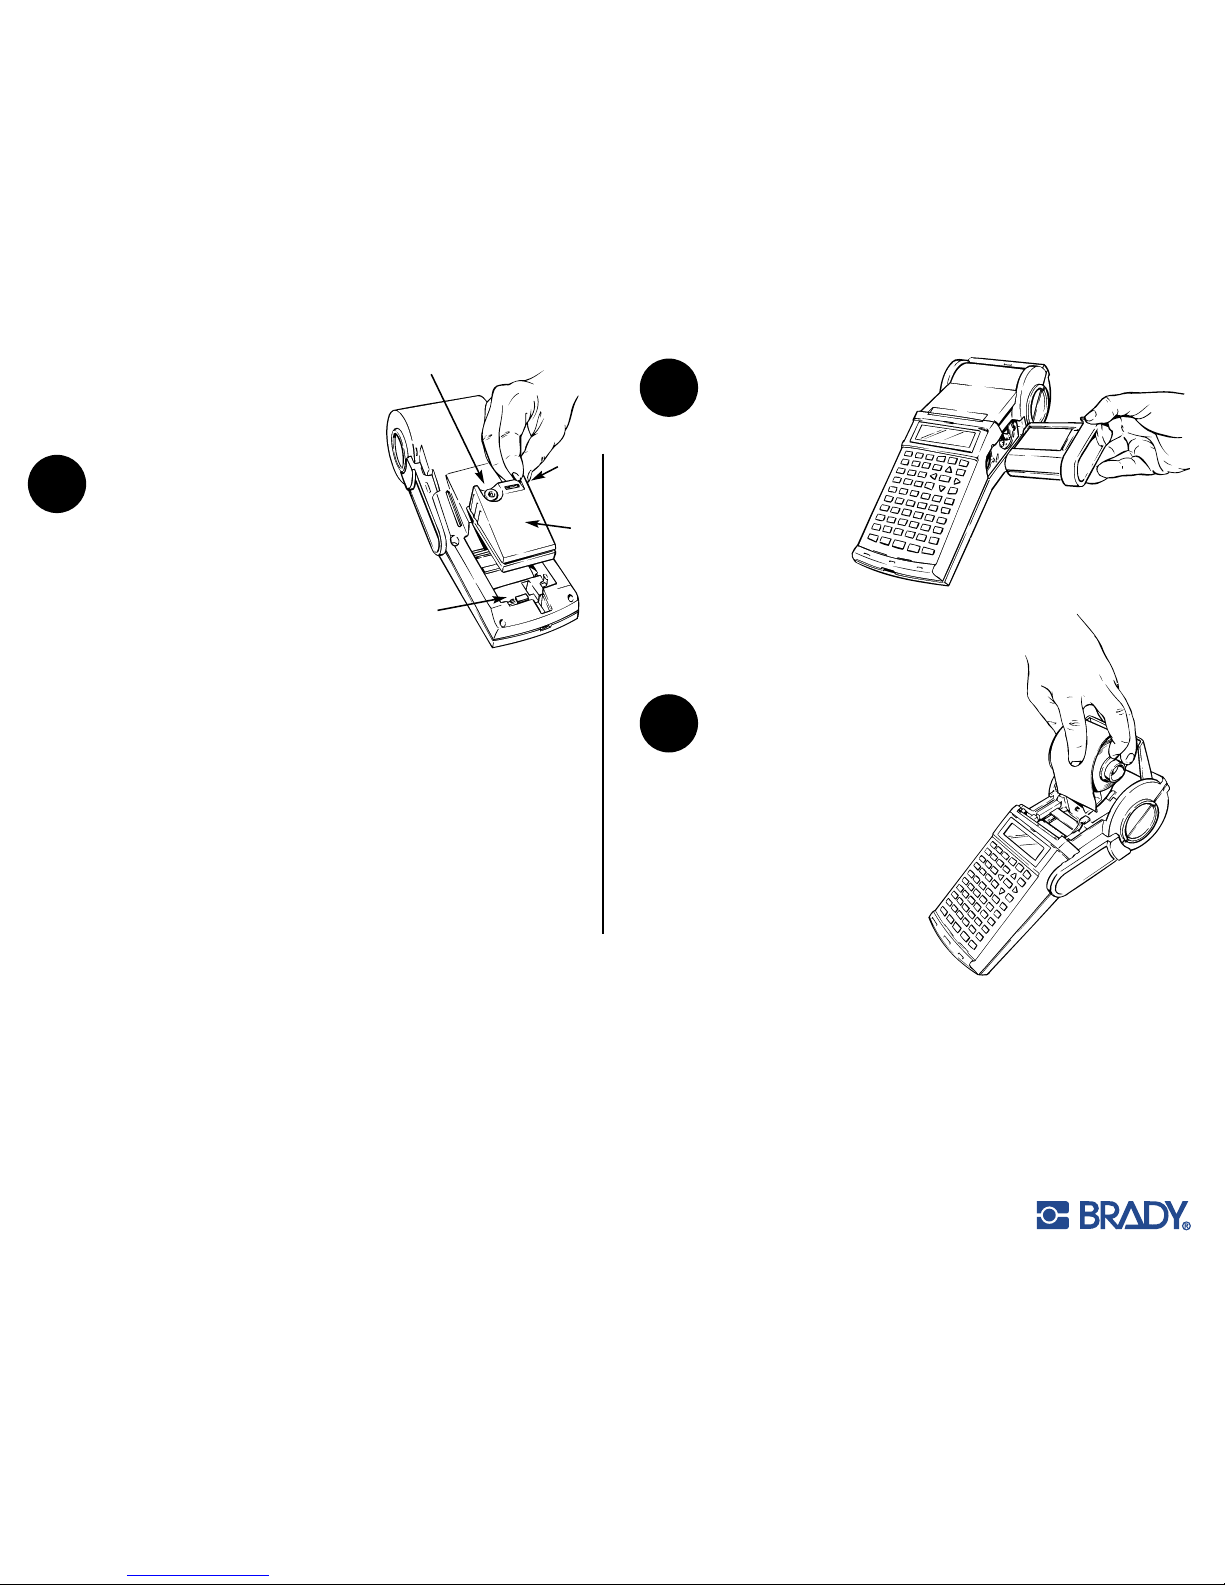
To install a new pack:
a. Make sure the printer is turned off and the battery
lock is in the unlocked position (slide to the left).
b. Insert the battery back in the pocket in the back of
the printer, toward the bottom, and slide it upward.
c. Slide the lock mechanism to the right, or to its
locked position.
d. Verify that the battery is firmly in place.
To remove a battery pack or AC adapter:
a. Make sure the printer is turned off.
b. Slide the battery lock to the left, or the unlocked
position.
c. Grab the battery pack, slide it down and then out.
To install a new ribbon
cartridge:
a. Remove ribbon cartridge from
shrinkwrap, taking care not to
crease the ribbon.
b. Make sure the print
mechanism lock (gray tab)
is in the unlocked, or
down, position. Slide the
ribbon cartridge into the printer as
far as it will go.
c. Move the print mechanism lock to the locked,
or up, position.
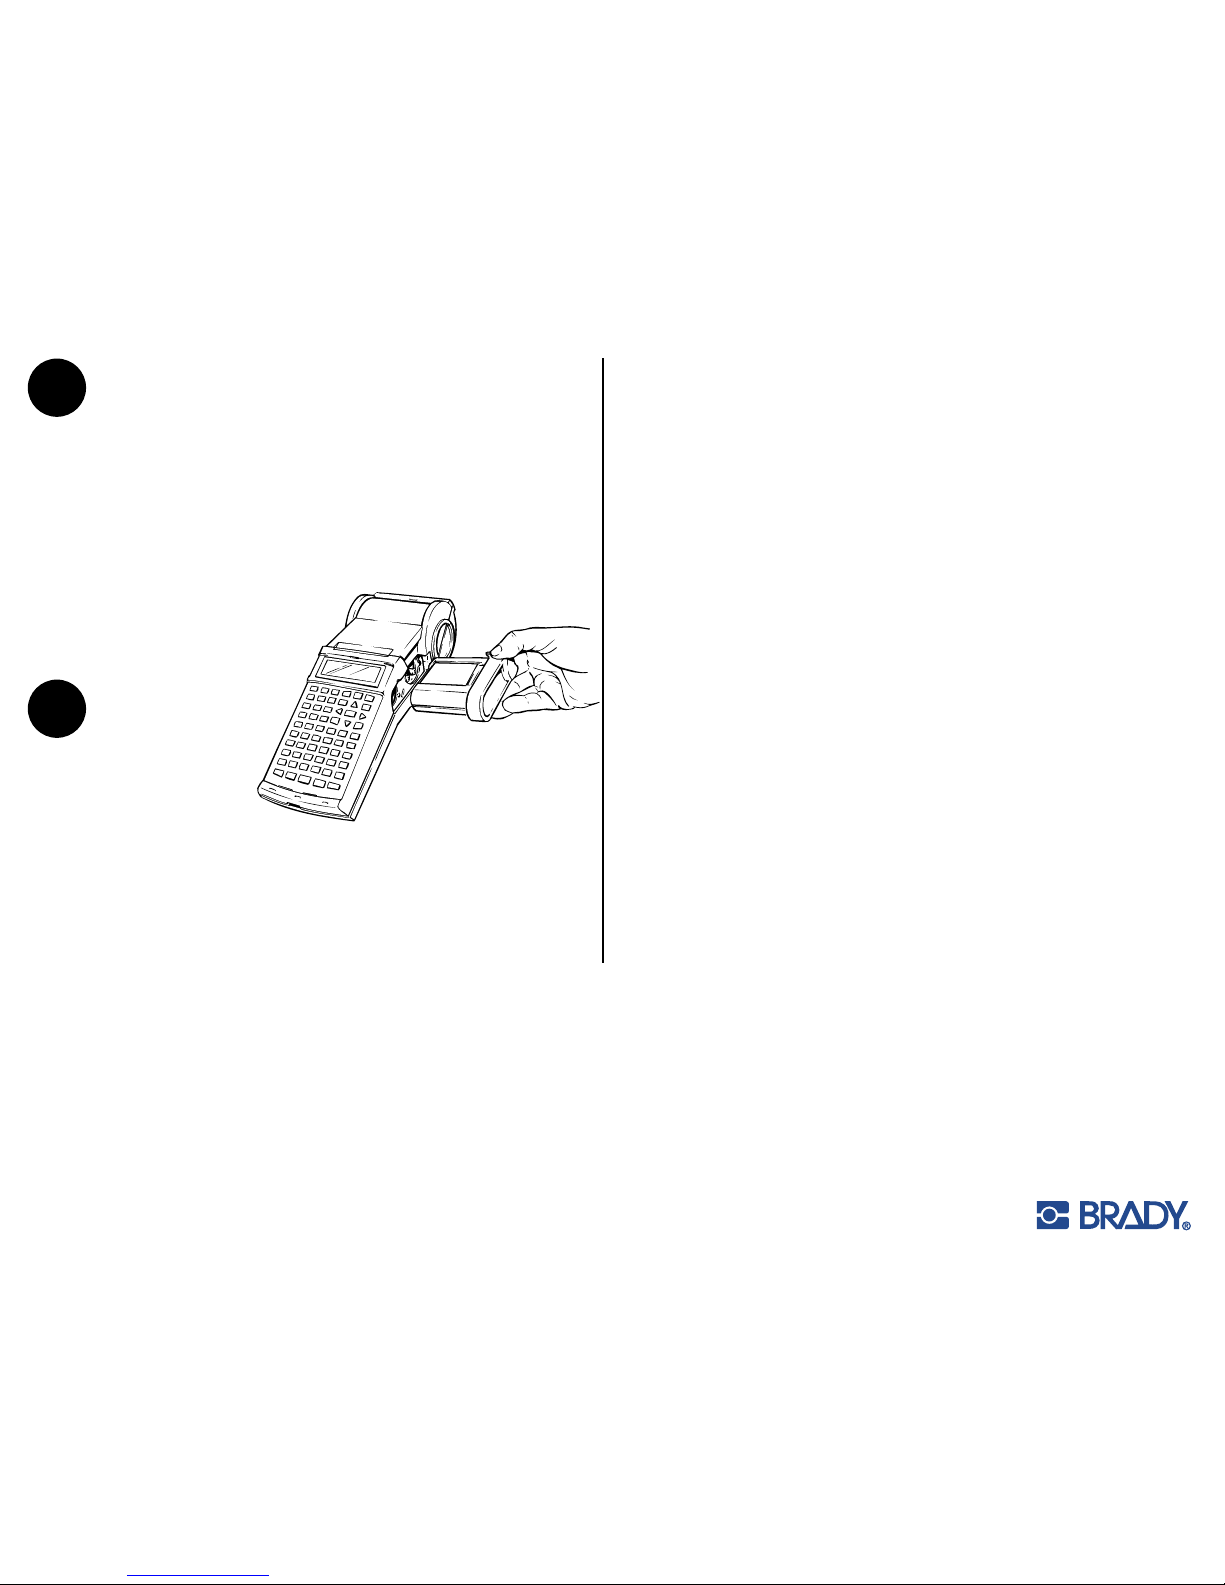
How to Unload/Load a Roll of Tape
To remove a roll of tape:
a. Turn the printer off.
b. Open the roll door on the front of the printer.
There is a tab for the door on the right side,
above the ribbon cartridge.
c. Move the print mechanism lock (gray
tab), on the right underside of the
printer, to the unlocked, or down,
position.
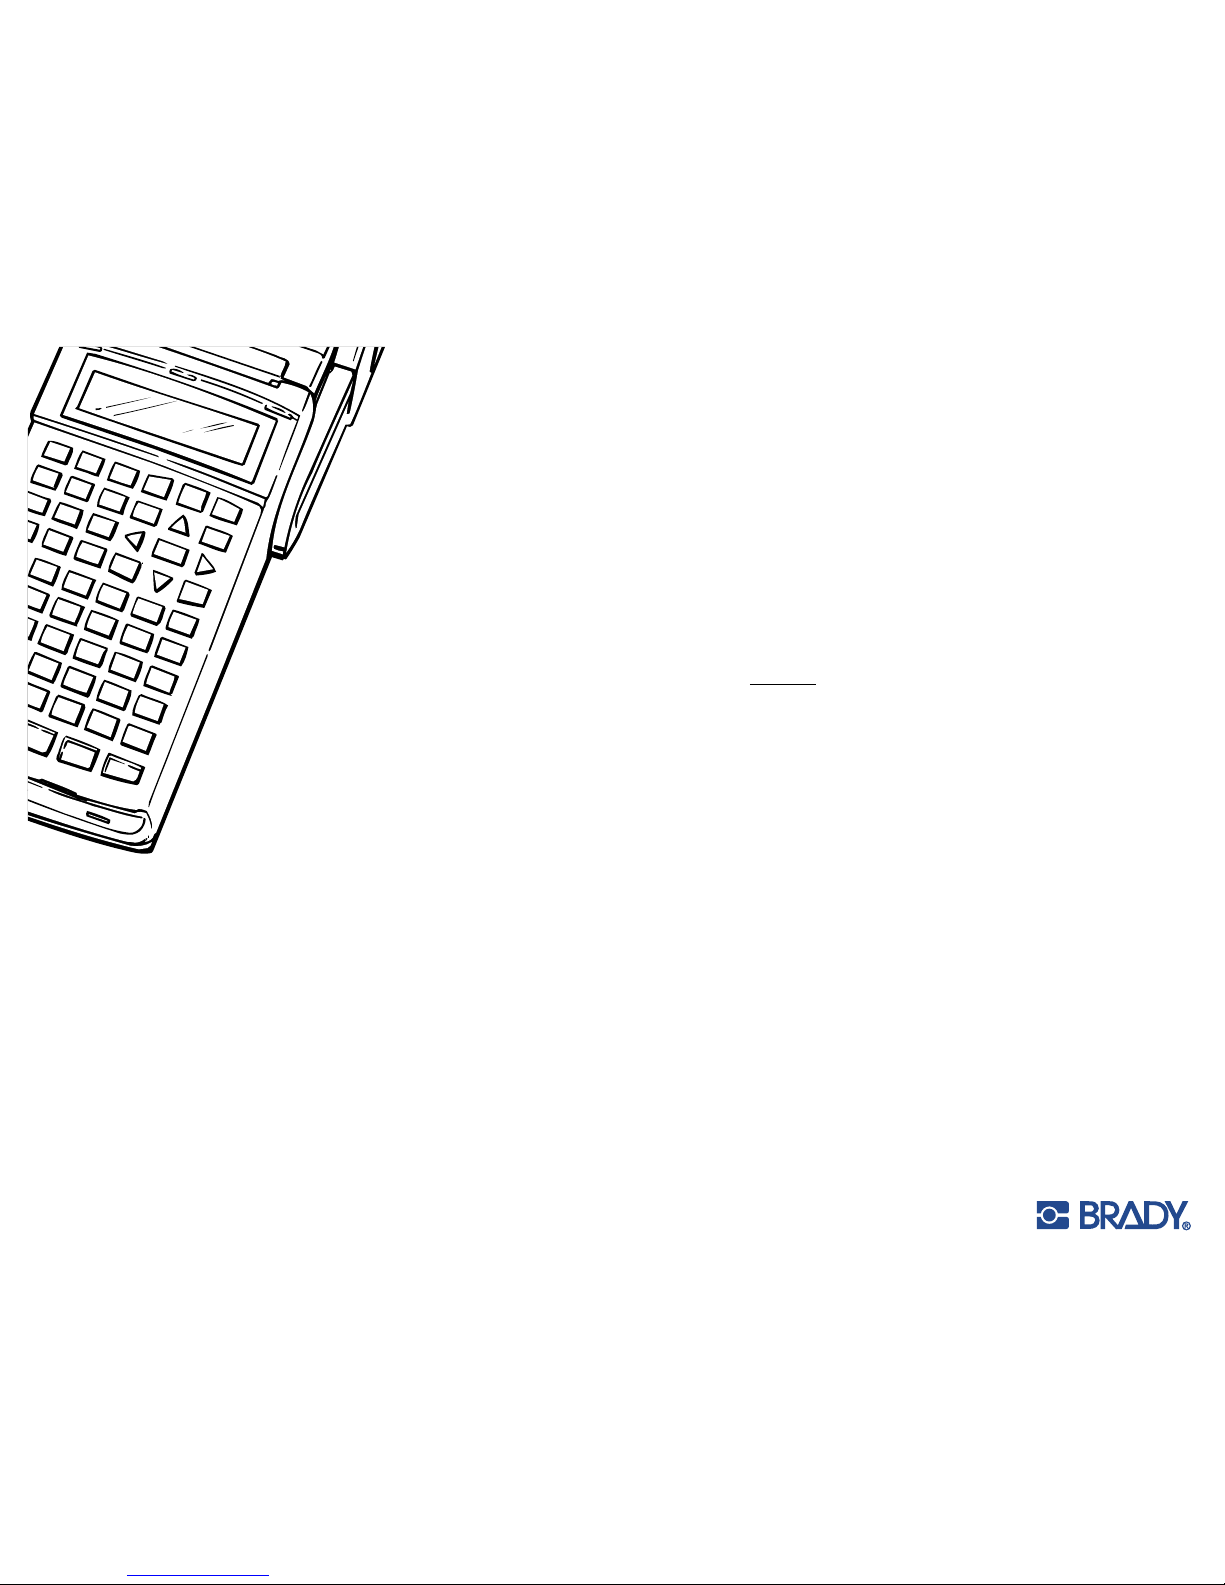
Getting Started With
Your HandiMark
®
STEP
1
STEP
3
STEP
4
2
1. Battery Charger Jack
Connect the charger unit
here. You can charge the
battery pack while it is
either installed or removed
from the label maker.
2. Sliding Lever
Use to lock the battery
pack in place during
installation or to release it
for removal.
3. Power Switch
Turns the label maker “On”
and “Off.”
4. Battery Pack
Install as shown.
1.
2.
3.
4.
Page 3
©2003 All Rights Reserved
How to Turn ON
and Start First Print
a. To turn the printer ON, find the switch on the battery pack (or AC Adapter)
and toggle it to the left or the “I” position.
b. Move print mechanism lock to the Locked position.
c. To print a label, type in the desired text and press the Print/Stop key located
on the top row of keys, second from the right.
d. To turn the printer OFF, toggle the
On/Off switch to the right or the
“O” position.
How to Unload/
Load a Ribbon
Cartridge
To remove a ribbon cartridge:
a. Locate the print mechanism
lock on the right underside of the printer. It is a gray colored tab.
b. Unlock the print mechanism by sliding the lock to the down position.
c. Grab the ribbon cartridge on the right side of the printer (there is a black
tab for the cartridge) and slide it out of the printer.
MAKE SURE THE LOCK IS IN THE UNLOCKED
POSITION WHEN REMOVING TAPE.
d. Grab the roll of tape and remove it.
To install a new roll of tape:
Note: Tape should be installed after ribbon cartridge is in place.
a. Turn the printer off.
b. Open the roll door and set the print mechanism lock to the locked, or up,
position.
MAKE SURE THE LOCK IS IN THE LOCKED POSITION WHEN INSTALLING TAPE.
c. Slide the metal tab inside the printer to the position appropriate for the tape
width you are using. For 2" wide tape, the tab should be all the way to the right;
for 1" wide tape, use the 4th tab from the right; for 1/2" tape, use the left-most
tab. To do this, press down on the tab and slide. Make sure the tab is locked in
place after you release it.
d. Hold the roll of tape so that the metal tab on the core is on the left and the tape
is unwinding off the top of the roll.
Note: For reflective tape, the tape should unwind off the bottom of the roll.
e. Put the roll of tape in place. Make sure the tape is pushed down as far as it will go.
f. Grab the end of the tape, make sure the edge has a clean cut, and guide it in
between the black pieces of plastic until it stops against the platen roller.
g. Turn On the printer and press the Feed key (bottom row of keypad) until the
tape comes out the top of the printer.
h. Close the cover door.
STEP
2
STEP
3
3
Page 4

©2003 All Rights Reserved
4
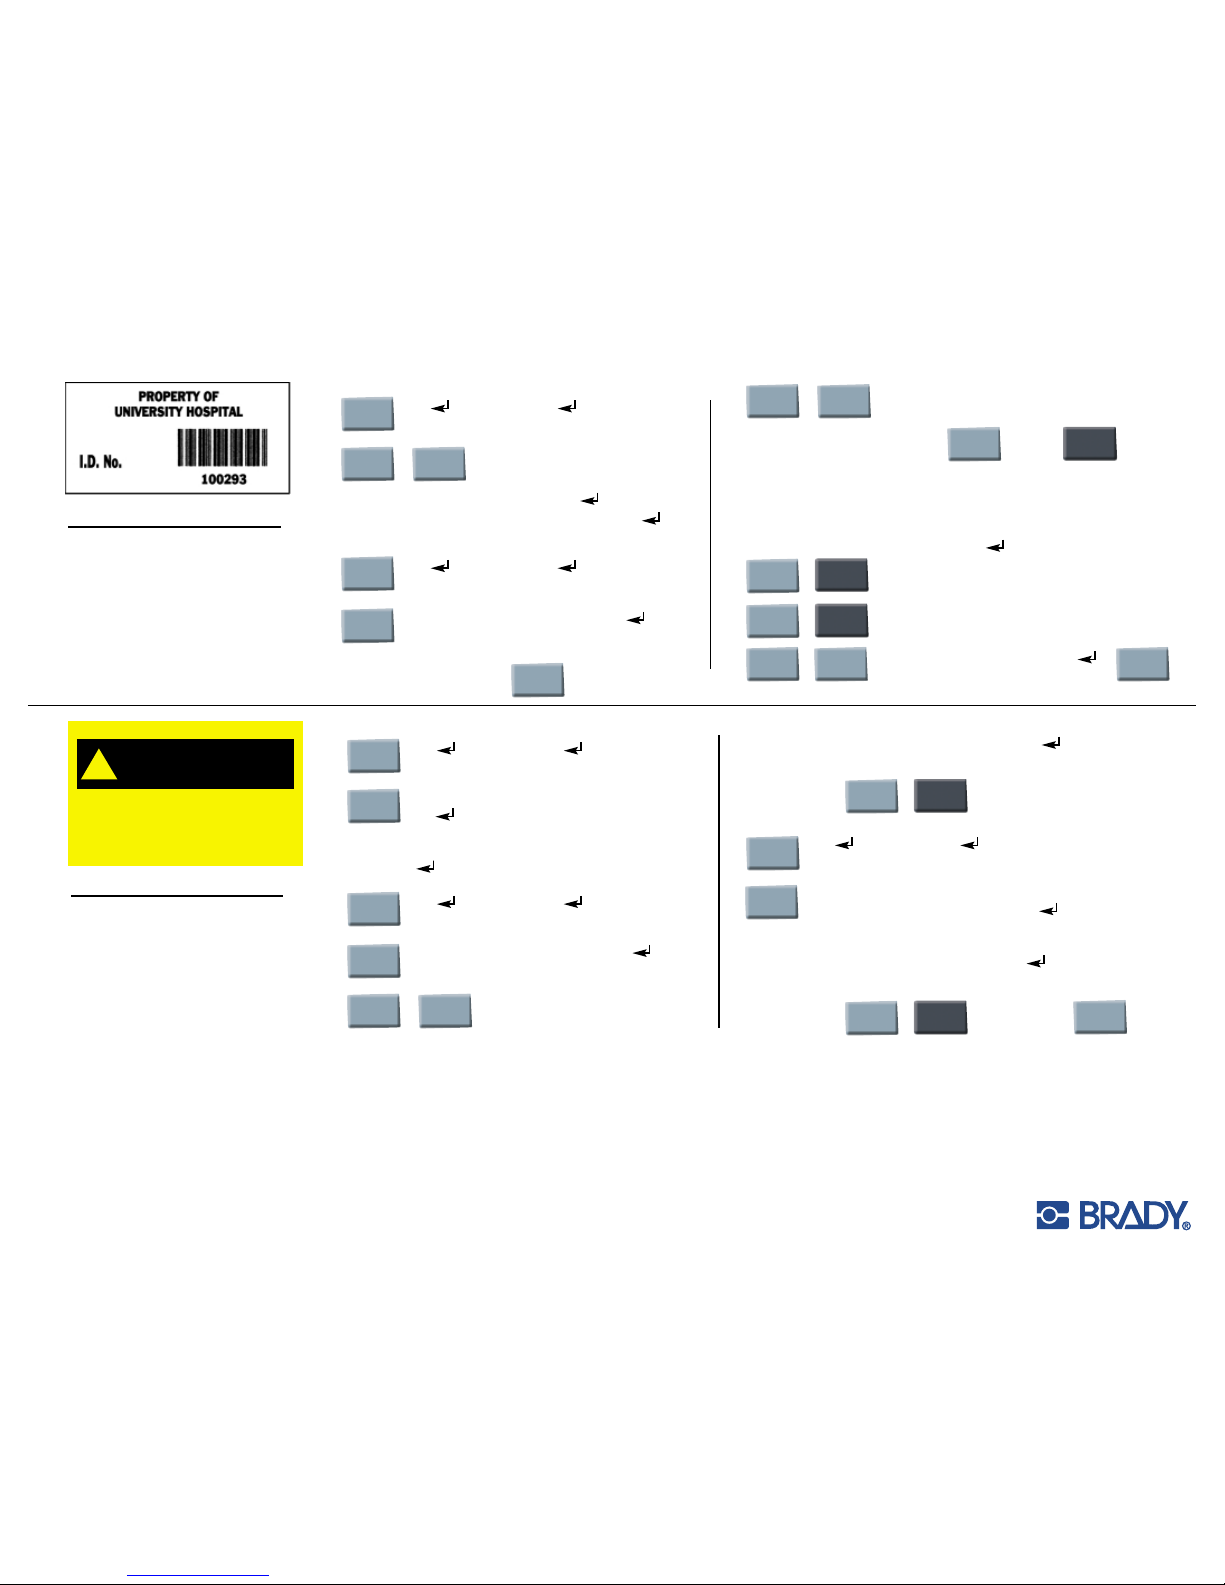
HandiMark®Features used:
• Label Frame, • Expand/Condense
• Multiple-Sized Text
HandiMark®Features used:
• Serialization
• Expand/Condense
• Multiple-Sized Text
SWITCH 237
ACP-1 MAIN DISCONNECT
FUSE P/N
F-06101
FUSE P/N
F-06100
FUSE P/N
F-06102
FUSE P/N
F-06103
Insert Black Ribbon and 2" Reflective Orange Vinyl Tape
Insert Black Ribbon and
1
⁄2" Repositionable White Tape
Caps Lock
Size
Caps Lock
Size
Format
Type
2nd Caps Lock
Size
85 ( ), Change Here ( )
use yellow “down” arrow to select “Change Here”
To enter text in all upper case
Cursor down to “Exp/Cond” 50% ( )
use yellow “left” arrow to select 50%
Type: SWITCH 237
18 ( ), Change Here ( )
use yellow “down” arrow to select “Change Here”
Format
Type
2nd Format
Type
Print/
Stop
Caps Lock
Size
Caps Lock
Size
Format
Type
2nd Caps Lock
Size
2nd
2
10 ( ), Change Here ( )
use yellow “down” arrow to select “Change Here”
To enter text in all upper case
Cursor down to “Exp/Cond” 90% ( )
use yellow “left” arrow to select 90%
Type: FUSE P/N
Use to type the “/”
20 ( ), Change Here ( )
use yellow “down” arrow to select “Change Here”
Format
Type
2nd
H
2nd Serial
Symbol
Cursor down to “Exp/Cond” 100% ( )
use yellow “left” arrow to select 100%
( ) Cursor should be on line #2
Type: F-
Use to type the “–”
Start Seq: 06100
Change By: 1
End Seq: 06103
(“# of labels” is
calculated automatically: 4)
Print/
Stop
Label Directions For Your HandiMark
®
2nd
H
Cursor down to “Exp/Cond” 100% ( )
use yellow “left” arrow to select 50%
( ) Cursor should be on line #2
Type: ACP-1 MAIN DISCONNECT
Use to type the “–”
Cursor down to “FRAME” thin ( )
use yellow right arrow to select “THIN”
Page 5
©2003 All Rights Reserved
10 ( ), Change Here ( )
use yellow “down” arrow to select “Change Here”
To enter text in all upper case
Type: PROPERTY OF ( )
UNIVERSITY HOSPITAL ( )
Cursor should be on line #3
15 ( ), Change Here ( )
use yellow “down” arrow to select “Change Here”
Cursor down to “Exp/Cond” 80% ( )
use yellow “left” arrow to select 80%
Type: I.D. NO. 3 times
5
HandiMark®Features used:
• Bar Code
• Frame
• Expand/Condense
• Multiple-Sized Text
HandiMark®Features used:
• Symbol
• Bold
• Expand/Condense
• Multiple-Sized Text
WEAR APRON, GLOVES
AND FACE SHIELD
HAZARDOUS CHEMICALS!
DANGER
!
Caps Lock
Size
Caps Lock
Size
Format
Type
Space
2nd Caps Lock
Size
2nd
Shift
Print/
Stop
Bar Code
App
Shift
This is the Bar Code options menu to
select the appearance of your Bar Code.
2nd
H
2nd
Bar Code
App
2nd
Format
Ty pe
Height: 30
Density: 10mil
use yellow “down” arrow to move through menu options
HR Text: Below
use yellow “right” arrow to select option setting
Start/Stop: Off Check Char: Off ( )
Cursor down to “FRAME” thin ( )
use yellow right arrow to select “THIN”
Caps Lock
Size
Caps Lock
Size
Format
Type
Serial
Symbol
2nd
Caps Lock
Size
65 ( ), Change Here ( )
use yellow “down” arrow to select “Change Here”
Set B
use yellow “right” arrow to select
49 ( )
use yellow “down” arrow to move cursor to
“Symbol Number” area - #49 correspondes with the
ANSI Danger Header
( ) Cursor should be on line #2
23 ( ), Change Here ( )
use yellow “down” arrow to select “Change Here”
Cursor down to “Exp/Cond” 70% ( )
use yellow “left” arrow to select 70%
To enter text in all upper case
While holding down depress
Type: 100293
Print/
Stop
2nd
8
2nd
9
Format
Type
Caps Lock
Size
Type: HAZARDOUS CHEMICALS ( )
Cursor should be on line #3
Use to type the “!”
12 ( ), Change Here ( )
use yellow “down” arrow to select “Change Here”
Bold – On
use yellow “right” arrow to select “ON”
Cursor down to “Exp/Cond” 100% ( )
use yellow “left” arrow to select 100%
Type: WEAR APRON, GLOVES ( )
AND FACE SHIELD
Use to type the “!”
Insert Black Ribbon and 1" White Tamper Resistant Tape
Insert Black Ribbon and 2" Yellow Vinyl Tape
Page 6
©2003 All Rights Reserved
Keyboard
Functions
Moving Around The Screen
On a clear screen, type in your first
name, then press ENTER, then type your
last name on the second line:
1. Pressing moves cursor one character right.
2. Pressing moves cursor one character left.
3. Pressing moves cursor up to previous line.
4. Pressing moves cursor down to next line.
5. Pressing Shift + moves the cursor to the beginning
of the previous label when entering multiple labels.
6. Pressing Shift + moves cursor to beginning of the next
label when entering multiple labels.
7. Pressing 2nd then moves cursor to the beginning of the
first label when entering multiple labels.
8. Pressing 2nd then moves cursor to the beginning of the last label when
entering multiple labels.
9. Moving the cursor so it is on a character and pressing the Delete Key will delete
the character.
10. To backspace over characters, simultaneously press the Shift & Delete Keys.
11. To insert characters, move the cursor so it is on the character to the right of
what is to be inserted. Insert character(s) by typing them in.
▲
▲
▲
▲
▲
▲
▲
▲
6
To Create A Label
1. Type: Brady USA.
2. Press: Print/Stop key
(top row of keys, above the yellow “up” cursor key). Note that the
tape reverses prior to printing. This is to minimize the amount of unprinted tape
at the start of your label.
3. To remove the label from the printer, pull the cutter lever
(on the left side of the
printer)
toward you.
To Clear a Label
1. Press: Clear key (below yellow “right” cursor key).
2. Leave cursor on All Labels
and press Enter.
3. Press: Enter or the Y key (for YES).
Adding Symbols
Refer to your Symbols Reference Guide for a list of symbols resident in your
HandiMark
®
system.
1. Press: Symbol key.
2. Press: Cursor down to the 2nd line to select “Set A.”
3. Enter: 42. Press: Enter
(Symbol number 42 from Set A is the “Biohazard” symbol).
4. Press: Print/Stop.
5. Clear all
(press Clear, Enter, Enter).
Page 7

©2003 All Rights Reserved
7
Changing The Type Size
1. Press the Size Key.
2. We are going to change the type size to 1/2". Type 5 then 0.
(note that the decimal point is automiatically inserted, so there is no need to press the “.” key)
3. Press Enter. Cursor is already on “Change at start” – press Enter.
4. Type the following:
Line 1: Type: “I can change” Press: Enter.
Line 2: Type: “type sizes” Press: Print/Stop.
5. Notice that all the type sizes are .5".
6. Do NOT
CLEAR label.
Multiple Type Sizes On One Label
1. Using the arrow keys, position the cursor after the last character of the first line.
2. Press the Size Key.
3. Type: 2 then 5. This inputs a type size of 1/4" (0.25). Press: Enter.
4. Cursor down to “Change here” and press Enter.
5. A “change symbol” will appear at the end of the first line
(the symbol appears as a
dark square shape with a checkerboard pattern on it)
. All text following the “symbol” will
print on your label at the new size
(characters on the screen will appear the same size as
those before the “symbol”)
.
6. Press Print/Stop.
7. Clear all
(press Clear, Enter, Enter).
Typing Accented Characters
1. Type: ^ (do this by pressing and releasing the yellow 2nd key; waiting a moment,
then pressing the U key).
2. Type: A.
3. Press: Print/Stop.
4. Clear all
(press Clear, Enter, Enter).
Accessing “Yellow Characters” on Keypad
1. To print keys with 2 characters:
a. To type 5: Press “5” key.
b. To type ?: Press “2nd” key, then press “?”
(do not press them simultaneously).
2. Press: Print/Stop key.
3. Clear all
(press Clear, Enter, Enter).
Review: To access any character on the keypad printed in yellow, first press and release the
2nd key, wait to see “2nd…” on the display screen, then press the desired yellow key.
Page 8

©2003 All Rights Reserved
Keyboard Functions (cont.)
Type Options
You can change the look of the text using the Type key.
1. Press the Type Key.
Bold Of
f On
Underline Off On
Exp/Cond 50% to 200% in 10% increments (100% is default)
Italics Off On
Vertical Off On
Pos Normal, Subscript, Superscript
Press Escape.
2. Change the type size to .25". To do this, press Size key, then type in 2, then 5,
then Enter. Select Change at start, then press Enter.
3. Type the following:
Line 1 Type: Underline Press: Enter
Line 2 Type: Expand Press: Enter
Line 3 Type: Italics
4. Go to the beginning of line 1. Press the Type key. Use the down cursor key to
cursor to “Underline”. Use right cursor key to turn it “On”. Press Enter.
5. Place the cursor at the beginning of Line 2. Press Type key. Use the down cursor
key to move to “Underline”, then the right cursor key to turn it “Off”. Cursor
down further to “Exp/Cond” and use the right cursor key to expand type to
150%.
Press Enter.
6. Place the cursor at the beginning of Line 3. Press Type key. Use the down cursor
key to move to “Exp/Cond” and the right cursor key to reset the value to “100%”.
Cursor down further to “Italics” and use the right cursor key to turn “On”.
Press Enter.
7. Press Print/Stop.
8. Clear all
(press Clear, Enter, Enter).
Defaults, Saving (cont.)
Label Format
Other Format settings that can be changed through the Format key are:
Frame – Thin, Medium, Wide, or No Frame
Justify Text – Right, Center, or Left
Mirror – On or Off
Let’s use some format options.
1. Type the following:
Line 1 Type: Let’s do Press: Enter
Line 2 Type: format options
2. Press and release the 2nd key, wait a moment, then press the Format key.
3. Press the down arrow key to Frame. Use the right arrow key to turn on or select a
medium frame. Press Enter
(Note: if you don’t press Enter, the change won’t be accepted).
4. Press Print/Stop.
We only did one of the several options. Take a few minutes to experiment with
other format options.
IMPORTANT: the “Clear, Use Defaults” Clear function
5. To clear the labels after making Format changes, press Clear key, then cursor
down to “Use defaults”. This will clear the frame on future labels.
Setup Key
This key sets the operating system defaults which will be in effect each time you
turn the machine on.
1. Turn OFF machine. Wait 5 seconds. Turn ON Machine.
2. To change a default setting, like type size, press and release the 2nd key, wait a
moment, then press the Setup key.
3. Cursor to “Type size:” and change to 1.0" (press 1, then 0, then 0). Press: Enter.
4. Turn OFF machine. Wait 5 seconds, Turn ON machine. Press the Size key. Notice
the size has now changed to 1.0" when the machine is turned on.
5. Spend a few minutes experimenting with the other setup defaults.
8
Page 9

©2003 All Rights Reserved
Defaults, Saving
File Key (storing labels in memory)
This option lets you Save, Get, or Delete a file. There is a 10,000 byte
memory resident in the HandiMark
®
.
1. Type your name.
2. Press and release the 2nd key, wait a moment, then press the File key.
3. Name file: NAME. Press: Enter.
4. Press Clear
(use Defaults).
5. Press and release the 2nd key, wait a moment, then press the File key. Cursor
down to “Get”. Press right cursor key until your file, NAME.OS, appears.
Press: Enter.
Note: If you have saved more than one file, you will need to use the left and right cursor keys to locate
the file name. Or, you can type the file name if you know it. You must use the .OS extension for files
saved in the operating system. Use the .PM extension for files saved in the pipe marker application.
6. The file you just created is retrieved.
7. Press Clear (use Defaults) – see p. 9 of tutorial for explanation of this special clear
function.
The File function also lets you print a list of all the files stored in memory.
To do this:
1. Press and release the 2nd key, wait a moment, then press the File key.
2. Cursor down to Print File List. Press: Enter.
3. The list of files stored in memory prints, including their 2-letter extension.
Density (print density)
Whenever a tape or ribbon is installed into the HandiMark
®
, the system is set to its
nominal print density setting. However, due to variations in printers and the
printing environment, it may be necessary to adjust the print density setting.
1. Press and release the 2nd key, wait a moment, then press the Density key.
2. Press the left or right cursor key once for each increment desired. The right cursor
key increases the print density and the left cursor key decreases it.
3. Press: Enter.
Note: the print density is reset to the nominal value when a new ribbon or tape is installed.
“Label” Key (“next label” key)
Use to enter several different labels to print at the same time.
1. Type the following (check to be sure that Type Size is less then 0.4”):
Line 1: Type: Brady Press: Enter
Line 2: Type: USA
2. Press the Label Key
(2nd from the bottom row, 2nd in from the right) Screen will clear.
3. Type the following:
Line 1: Type: HandiMark Press: Enter
Line 2: Type: Label Maker
4. Press: Print/Stop.
5. Do NOT clear.
Note: the “Area” Key (“next area” key) is a future feature of HandiMark®and is not operational on your
printer at this time.
9
Page 10

©2003 All Rights Reserved
Como Cambiar un Paquete de
Batería o Adaptador
CARGA LA BATERÍA NUEVA POR 5 HORAS
ANTES DE USARLA. (Refiérase al Manual de
usarios para infomación más detallado)
Para instalar un paquete nuevo:
a. Asegurese que la impresora está apagada y la
cerradura de la batería está en la posición abierta
(empuje hacia el lado izquierdo).
b. Introduzca la batería en el bolsillo en el parte
de atrás de la impresora, hacia el fondo y empuje
hacia arriba.
c. Empuje el mecanismo de la cerradura hacia la
derecha o su posición cerrada.
d. Verifique que la batería está firmemente en sitio.
Para separar el paquete de la batería o adaptador AC
a. Asegurese que la impresora está apagada.
b. Empuje la cerradura de la batería hasta el lado
izquierdo o en la posición cerrada.
c. Coga el paquete de la batería y empuje hacia abajo
y hacia afuera.
Como Descargar o Cargar
un Rollo de Cinta
Para retirar un rollo de cinta:
a. Apague la impresora.
b. Abra la puerta en el frente de la
impresora. Hay una lengüeta
para la puerta en el lado
derecho arriba del cartucho de cinta.
c. Empuje la cerradura del mecanismo de impresión (la
lengüeta gris), en el ladoderecho de la parte inferior
de la impresora a la posición abierta.
ASEGURESE DE QUE LA CERRADURA ESTÁ EN LA
POSICIÓN ABIERTA CUANDO RETIRE LA CINTA.
d. Coja el rollo de cinta y la retírelo.
Para Instalar un rollo nuevo de cinta:
Nota: El cartucho debe estar en su sitio antes
de instalar la cinta.
a. Apague la impresora.
b. Abra la puerta y mueva el mecanismo de
impresión a la posición cerrada.
ASEGURESE QUE EL TRABADO ESTÁ EN LA POSICIÓN CERRADA CUANDO
INSTALE LA CINTA.
c. Empuje la lengüeta metálica dentro de la impresora a la posición apropriada para
la anchura de la cinta que usa. Asegurese de que la lengüeta esté firmemente en
posición después de desengancharla.
Instrucciónes
de HandiMark
®
STEP
1
STEP
4
10
1. Clavija del Cargador
Conecte aquí la unidad
del cargador. La batería
se puede cargar estando
instalada o fuera del
eitquetador.
2. Palanca Deslizante
Utilícela para colocar en
su sitio la batería
durante la instalación o
para soltaria se desea
quitaria.
3. Interruptor de
Encendido
Sirve para poner el
etiquetador en “On”
y en “Off”.
4. Batería
Instálela tal y como se
muestra.
1.
2.
3.
4.
Page 11

©2003 All Rights Reserved
11
Como Encender y Empezar la Primera Impresión
a. Para encender la impresora encuentre el interruptor en el paquete de la batería y
empuje hacia el lado izquierdo o la posición “I”.
b. Mueva la cerradura del mecanismo de impresión a la posición cerrada.
c. Para imprimir una etiqueta, escriba en la maquina el texto deseado y empuje la
tecla que dice Print/Stop colocado en la primer fila, la tecla segunda del lado
derecho.
d. Para apagar la impresora, empuje la tecla
e apagar y encender hacia la derecha
o la posición “O”.
Como Descargar o
Cargar un Cartucho de
Cinta Para retirar el
cartucho de cinta:
a. Localice la cerradura del
mecanismo de impresión en
el lado derecho en el parte de abajo
de la impresora. Es una lengüeta gris.
b. Abra la cerradura del mecanismo, empujando la cerradura hacia abajo.
c. Coja el cartucho de cinta en el lado derecho de la impresora (hay una lengüeta
negra por el cartucho) y deslice fuera de la impresora.
Para instalar un cartucho de cinta nuevo:
a. Retire el cartucho de cinta de la película contraíble, teniendo cuidado de que la
cinta no se arrugue.
b. Asegurese de que la cerradura del mecanismo de impresión está en la posición
abierta. Deslice el cartucho de cinta en la impresora lo más que puede.
c. Empuje el mecanismo de impresión hasta la posición cerrada o hacia arriba.
Como Descargar o Cargar un Rollo de Cinta
d. Coja el rollo de la cinta para que la lengüeta en el centro de la cinta esté en el
lado izquierdo y la cinta desenvuelva de arriba del rollo.
Nota: Para cinta reflectante, la cinta debe desenvolver del fondo del rollo.
e. Ponga el rollo en su sitio. Asegurese de que no pueda empujar la cinta más.
f. Coja el fin de la cinta, asegurese de que el borde de la cinta tenga corte limpio, y
guíela entre los pedazos de plástico negro hasta que pare contra el rodillo.
g. Encienda la impresora y empuje la tecla “Feed”(la fila más baja del teclado)
hasta que la cinta venga de arriba de la impresora.
h. Cierra la cubierta.
STEP
2
STEP
3
Page 12

©2003 All Rights Reserved
12
Características de
HandiMark®Usadas:
• Marco
• Ampliar/Condensar
• Texto de diferentes tamaños
Características de
HandiMark®Usadas:
• Serialización
• Ampliar/Condensar
• Texto de diferentes tamaños
INTERRUPTOR 237
DESCONEXION PRINCIPAL ACP-1
FUSIBLE P/N
F-06101
FUSIBLE P/N
F-06100
FUSIBLE P/N
F-06102
FUSIBLE P/N
F-06103
– Introduzca Cinta Negro
– Introduzca Cinta Reflectante de 2”
–
Introduzca Cinta Negro
– Introduzca Cinta Reposicionable de
1
⁄2"
Caps Lock
Size
Caps Lock
Size
Format
Type
2nd Caps Lock
Size
85 ( ), Cambiar Aquí ( )
use la flecha amarilla
hacia abajo para elegir “Cambiar Aquí”
Para escribir el texto en letras
mayúsculas
Mueva el cursor hacia abajo a “Exp/Cond”
50% ( )
use la flecha amarilla hacia la izquierda para
elegir 50%
Escribir: INTERRUPTOR 237
18 ( ), Cambiar Aquí ( )
use la flecha amarilla
hacia abajo para elegir “Cambiar Aquí”
Format
Type
2nd Format
Type
Print/
Stop
Caps Lock
Size
Caps Lock
Size
Format
Type
2nd Caps Lock
Size
2nd
2
10 ( ), Cambiar Aquí ( )
use la flecha
amarilla hacia abajo para elegir “Cambiar Aquí”
Para escribir el texto en letras
mayúsculas
Mueva el cursor hacia abajo a “Exp/Cond”
90% ( )
use la flecha amarilla hacia la izquierda
para elegir 90%
Escribir: FUSIBLE P/N
Use a escribir el “/”
20 ( ), Cambiar Aquí ( )
use la flecha
amarilla hacia la izquierda para elegir 100%
Format
Type
2nd
H
2nd Serial
Symbol
Mueva el cursor hacia abajo a “Exp/Cond”
100% ( )
use la flecha amarilla hacia la izquierda
para elegir 100%
( ) Cursor debe de estar en línea #2
Escribir: F-
Use a escribir el “–”
Inicio: 06100
Cambiar a: 1
Fin Sec: 06103
(“# de etiquetas” está
calculado automáticamente:4)
Print/
Stop
Label Directions For Your HandiMark
®
2nd
H
Mueva el cursor hacia abajo a “Exp/Cond”
100% ( )
use la flecha amarilla hacia la izquierda para
elegir 100%
( ) Cursor debe de estar en línea #2
Escribir: DISCONEXION PRINCIPAL ACP-1
Use a escribir “–”
Mueva el cursor hacia abajo a “MARCO”
FINO ( )
use la flecha amarilla hacia la
derecha para elegir “FINO”
Page 13

©2003 All Rights Reserved
13
Características de
HandiMark®Usadas:
• Código de barras
• Marco
• Ampliar/Condensar
• Texto de diferentes
tamaños
Características de
HandiMark®Usadas:
• Símbolo
• Negrita
• Ampliar/Condensar
• Texto de diferentes tamaños
USE DELANTAL, GUANTES
Y MASCARA
QUÍMICOS PELIGROSOS!
DANGER
!
– Introduzca Cinta Negra
– Introduzca Cinta Resistente a
Violaciones de 1”
Caps Lock
Size
Caps Lock
Size
Format
Type
Space
2nd Caps Lock
Size
2nd
Shift
Print/
Stop
Bar Code
App
Shift
Este es el menú de opciones para código de barra
para elegir la apariencia de su código de barra
2nd
H
2nd
Bar Code
App
2nd
Format
Ty pe
Altura: 30
Densidad : 10mil
use la flecha amarilla hacia abajo para mover a través de
las opciones del menú
Tex Legib: Abajo
use la flecha amarilla hacia la derecha para elegir opciones
Inic/Para: Nada Carac com: Nada ( )
Mueva el cursor hacia abajo a
“MARCO” Fino ( )
use la flecha
amarilla hacia la derecha para elegir “fino”
– Introduzca Cinta Negra
– Introduzca Cinta Amarilla de
Vinilo de 1”
Caps Lock
Size
Caps Lock
Size
Format
Type
Serial
Symbol
2nd
Caps Lock
Size
65 ( ), Cambiar Aquíe ( )
use la flecha amarilla
hacia abajo para elegir “Cambiar Aquí””
Set B
use la flecha amarilla hacia la derecha para elegir
49 ( )
usando la flecha amarilla hacia abajo mueve el
cursor a la área de “Símbolo de Numero: - #49 es el
encabezamiento de ANSI Danger
( ) Cursor debe de estar en línea #2
23 ( ), Cambiar Aquí ( )
use la flecha amarilla
hacia abajo para elegir “Cambiar Aquí”
Mueva el cursor hacia abajo a “Exp/Cond”
70% ( )
use la flecha amarilla hacia la izquierda para
elegir 70%
Para escribir el texto en letras
mayúsculas
Mientra aguanta la tecla apriete
Escribe: 100293
Print/
Stop
2nd
8
2nd
9
Format
Type
Caps Lock
Size
ESCRIBIR: QUÍMICOS PELIGROSOS ( )
Cursor debe de estar en línea #3
Use a escribir el “!”
12 ( ), Cambiar Aquí ( )
use la flecha amarilla hacia
abajo para elegir “Cambiar Aquí”
Negrita - Activo
use la flecha amarilla hacia la derecha para
elegir “Activo”
Mueva el cursor hacia abajo a “Exp/Cond” 100% ( )
use la flecha amarilla hacia la izquierda para elegir 100%
Type: USE DELANTAL, GUANTES ( )
Y MASCARA
Use a escribir el “!”
10 ( ), Cambiar Aquí ( )
use la flecha amarilla
hacia abajo para elegir “Cambiar Aquí”
Para escribir el texto en letras
mayúsculas
Type: PROPIEDAD DEL ( )
HOSPITAL UNIVERSARIO ( )
Cursor debe de estar en línea #3
15 ( ), Cambiar Aquí ( )
use la flecha amarilla
hacia abajo para elegir “Cambiar Aquí”
Mueva el cursor hacia abajo a
“Exp/Cond” 80% ( )
use la flecha amarilla hacia la
izquierda para elegir 80%
Type: I.D. NO. 3 veces
Page 14

©2003 All Rights Reserved
▲
▲
▲
14
Keyboard
Functions
Desplazamiento por la
pantalla
En una pantalla sin texto, escriba su
nombre de pila y presione Enter
(Entrar), después escriba su apellido
en la segunda línea.
1. Presione El cursor se desplazará un
carácter a la derecha.
2. Presione El cursor se desplazará un
carácter a la izquierda.
3. Presione El cursor se desplazará una línea
hacia arriba.
4. Presione El cursor se desplazará una línea hacia
abajo.
5. Presione la tecla de mayúscula Shift y El cursor se
desplazará al principio del letrero anterior cuando se
introducen múltiples letreros, consulte la página 5.
6. Presione la tecla de mayúscula Shift y El cursor se desplazará al principio del
letrero siguiente cuando se introducen múltiples letreros, consulte la página 5.
7. Presione 2nd y El cursor se desplazará al principio del primer letrero cuando
se introducen múltiples letreros, consulte la página 5.
8. Presione 2nd El cursor se desplazará al principio del último letrero cuando se
introducen múltiples letreros, consulte la página 5.
9. Mueva el cursor para que quede sobre un carácter Presione la tecla Delete
(Eliminar). El carácter se eliminará.
10. Para retroceder caracteres, presione simultáneamente las teclas de mayúscula
Shift y Delete (Eliminar).
11. Para introducir caracteres: Mueva el cursor de modo que quede a la derecha de
los caracteres que insertará. Introduzca los caracteres escribiéndolos.
Para crear un letrero
1. Escriba: Brady USA.
2. Presione: La tecla Print/Stop (Imprimir/Detener)
(situada en la fila superior de teclas, sobre
la tecla amarilla de cursor ascendente)
. Fíjese que la cinta se da vuelta antes de imprimir.
Ello permite minimizar la cantidad de cinta no impresa al comienzo del letrero.
3. Para retirar el letrero de la impresora, tire hacia usted la palanca de la compuerta
(situada al lado izquierdo del aparato).
Para borrar un letrero
1. Presione: La tecla Clear (Borrar) (situada bajo la tecla amarilla de cursor derecha).
2. Deje el cursor en All Labels
(Todos los letreros) y presione Enter (Entrar).
3. Presione: La tecla Enter (Entrar) o la tecla Y (para SÍ).
Para agregar símbolos
Consulte la guía de referencia de símbolos, donde encontrará una lista de los
símbolos disponibles en el sistema HandiMark
®
.
1. Presione: La tecla Symbol (Símbolo).
2. Baje el cursor hasta la segunda línea para seleccionar “Set A” (Fijar A).
3. Introduzca: 42 y presione Enter (Entrar). El símbolo del número 42 de Set A
corresponde al símbolo de peligro biológico.
4. Presione: La tecla Print/Stop (Imprimir/Detener).
5. Para borrarlo todo presione Clear [Borrar] y luego Enter [Entrar] dos veces.
▲
▲
▲
▲
▲
Page 15

©2003 All Rights Reserved
15
Para cambiar el tamaño de la letra
1. Presione la tecla Size (Tamaño).
2. Se cambiará el tamaño a 1,27 cm (1/2 pulg). Escriba 5 y luego 0
(fíjese que la coma o
punto decimal se inserta automáticamente, no hay necesidad de pulsar la tecla “,” o “.”).
3. Presione Enter (Entrar). El cursor quedará en “Change at start” (Cambiar al
comienzo). Presione Enter (Entrar).
4. Escriba lo siguiente:
Línea 1: Escriba: Puedo cambiar Presione Enter (Entrar).
Línea 2: Escriba: el tamaño de las letras Presione Print/Stop
(Imprimir/Detener).
5. Fíjese que todos los tamaños de las letras son de 1,27 cm (0,5 pulg.).
6. NO
borre (CLEAR) el letrero.
Tamaños múltiples de letras en un solo letrero
1. Utilizando las teclas de flecha, coloque el cursor después del último carácter de la
primera línea.
2. Presione la tecla Size (Tamaño).
3. Escriba: 2 y luego 5. Esto permite introducir un tamaño de letra de 0,64 cm (1/4
(0,25) pulg.). Presione: Enter (Entrar).
4. Baje el cursor hasta “Change here” (Cambiar aquí) y presione Enter (Entrar).
5. Aparecerá un símbolo de cambio al final de la primera línea
(el símbolo que aparece es
un cuadrado oscuro con un patrón cuadriculado en su interior)
. Todo el texto que está después
de dicho símbolo se imprimirá en el letrero con el nuevo tamaño de letra
(en la
pantalla, los caracteres aparecerán con el mismo tamaño de los que están antes del símbolo)
.
6. Presione Print/Stop (Imprimir/Detener).
7. Para borrarlo todo presione Clear [Borrar] y luego Enter [Entrar] dos veces.
Para escribir caracteres con acentos
1. Escriba:
^
(para ello presione y suelte la tecla 2nd amarilla, espere un momento y
presione la tecla U).
2. Escriba: A.
3. Presione: Print/Stop (Imprimir/Detener).
4. Para borrarlo todo presione Clear [Borrar] y luego Enter [Entrar] dos veces.
Acceso a los caracteres amarillos del teclado
1. Para imprimir teclas con 2 caracteres.
a. Para escribir el 5: Presione la tecla 5
b. Para escribir ?: Presione la tecla “2nd” y luego “?”
(no presione ambas teclas
simultáneamente)
2. Presione: Print/Stop (Imprimir/Detener).
3. Para borrarlo todo presione Clear [Borrar] y luego Enter [Entrar] dos veces.
Resumen: Para acceder a cualquier carácter amarillo del teclado, primero presione
y suelte la tecla 2nd, espere hasta que aparezca “2nd...” en pantalla y presione
la tecla amarilla que desee.
Opciones de letras
Es posible cambiar la apariencia del texto utilizando la tecla Type (Letras).
1. Presione la tecla Type (Letras)
Bold (Negrita) Off (Desactivada) On (Activada)
Underline (Subrayado) Off (Desactivado) On (Activado)
Exp/Cond De 50% a 200% en aumentos de 10% (opción predeterminada
de 100%)
Italics (Cursiva) Off (Desactivada) On (Activada)
Vertical (Vertical) Off (Desactivada) On (Activada)
Pos (Posic.) Normal (Normal), Subscript (Subíndice), Superscript
(Superíndice)
Presione Escape.
2. Cambie el tamaño de las letras a 0,64 cm (0,25 pulg.). Para ello, presione la tecla
Size (Tamaño), escriba 2 y 5 y luego presione Enter (Entrar). Seleccione Change
at start (Cambiar al inicio) luego presione Enter (Entrar).
Page 16

©2003 All Rights Reserved
16
Opciones de letras
3. Escriba lo siguiente:
Línea 1 Escriba: Subrayar Presione Enter (Entrar)
Línea 2 Escriba: Expandir Presione Enter (Entrar)
Línea 3 Escriba: Cursiva
4. Vaya al comienzo de la línea 1. Presione la tecla Type (Letras). Utilice la tecla de
cursor descendente para desplazarse a “Underline” (Subrayado). Utilice la tecla de
cursor derecha para desplazarse a “On” (Activado). Presione Enter (Entrar).
5. Coloque el cursor al comienzo de la línea 2. Presione la tecla Type (Letras).
Utilice la tecla de cursor descendente para desplazarse a “Underline” (Subrayado),
luego la tecla de cursor derecha para desactivarla. Mueva el cursor más abajo
hasta la opción “Exp/Cond” y utilice la tecla de cursor derecha para agrandar las
letras al 150%.
Presione Enter (Entrar).
6. Coloque el cursor al principio de la línea 3. Presione la tecla Type (Letras). Utilice
la tecla de cursor descendente para desplazarse a “Exp/Cond” y la tecla de cursor
derecha para restablecer el valor al 100%. Mueva el cursor más abajo hasta la
opción “Italics” (Cursiva) y utilice la tecla de cursor derecha para activarla.
Presione Enter (Entrar).
7. Presione Print/Stop (Imprimir/Detener).
8. Para borrarlo todo presione Clear [Borrar] y luego Enter [Entrar] dos veces.
Tecla File (Archivo)
(para guardar letreros en la memoria)
Esta opción permite guardar (Save), obtener (Get) o eliminar (Delete) un archivo.
HandyMark
®
tiene una memoria de 10.000 bytes.
1. Escriba su nombre.
2. Presione y suelte la tecla 2nd, espere un momento y luego presione la tecla File
(Archivo).
3. Póngale nombre al archivo: NOMBRE Presione: Enter (Entrar).
4. Presione Clear (Use Defaults) (Borrar, usar valores predeterminados).
5. Presione y suelte la tecla 2nd, espere un momento y luego presione la tecla File
(Archivo). Baje el cursor hasta “Get” (Obtener). Presione la tecla de cursor
derecha hasta que aparezca NAME.OS.
Presione Enter (Entrar).
Nota: Si ha guardado más de un archivo, deberá usar las teclas de cursor izquierda y
derecha para encontrar el nombre del archivo que desea. O bien, podrá escribir el
nombre del archivo si lo conoce. Se debe usar la extensión .OS para los archivos que
se guardan en el sistema operativo. Utilice la extensión .PM para los archivos que se
guardan en la aplicación Marcador de tuberías.
6. El archivo que se acaba de crear se recupera.
7. Presione Clear (Use Defaults) (Borrar, usar valores predeterminados) -
en la
página 30 de la guía de aprendizaje encontrará la explicación de esta función especial de borrado
.
La función File (Archivo) también permite imprimir una lista de todos los archivos
almacenados en la memoria. Para ello:
1. Presione y suelte la tecla 2nd, espere un momento y luego presione la tecla File
(Archivo).
2. Mueva el cursor hacia abajo hasta Print File List (Imprimir lista de archivos).
Presione: Enter (Entrar).
3. Se imprimirá la lista de archivos almacenados en la memoria, incluyendo su
extensión de 2 letras.
Page 17

©2003 All Rights Reserved
17
Tecla Setup (Configuración)
Esta tecla fija los valores por omisión del sistema operativo vigentes
al momento de encender la máquina.
1. Apague la máquina. Espere 5 segundos. Encienda la máquina.
2. Para cambiar un parámetro predeterminado, como el tamaño de letra, presione y
suelte la tecla 2nd, espere un momento y presione la tecla Setup (Configuración).
3. Coloque el cursor en “Type size” (Tamaño de letra) y cámbielo a 2,54 cm (1,0
pulg.) (presione 1 y luego el 0 dos veces).
Presione Enter (Entrar).
4. Apague la máquina. Espere 5 segundos. Encienda la máquina. Presione la tecla
Size (Tamaño). Fíjese que al encender la máquina, el tamaño de letra habrá
cambiado a 2,54 cm (1,0 pulg.).
5. Dedique algunos minutos a experimentar con los otros valores predeterminados
de la configuración.
Densidad (densidad de impresión)
Cada vez que se instale una cinta o banda en el HandiMark®, el sistema se
fija en el parámetro de densidad de impresión nominal. Sin embargo, debido a las
variaciones de las impresoras y al entorno de impresión, puede que sea necesario
ajustar el parámetro de densidad de impresión.
1. Presione y suelte la tecla 2nd, espere un momento y luego presione la tecla
Density (Densidad).
2. Presione la tecla de cursor izquierda o derecha una vez por cada incremento
deseado. Las teclas de cursor derecha e izquierda sirven para aumentar y
disminuir la densidad de impresión respectivamente.
3. Presione Enter (Entrar).
Nota: La densidad de impresión se restablece al valor nominal cuando se instala una
nueva banda o cinta.
Page 18

©2003 All Rights Reserved
18
Comment changer un bloc-piles ou
adaptateur CA
CHARGER LA NOUVELLE BATTERIE PENDANT
5 HEURES AVANT L’UTILISATION
(Pour des renseignements détailleés, consulter
le Manuel de l’utilisateur.)
Comment installer un nouveau bloc-piles:
a. S’assurer que l’imprimante est bien fermée et que
le verrou de la batterie est en position de
déverrouillage (faire glisser vers la gauche).
b. Insérer le bloc-piles dans le réceptacle à l’arrière
de l’imprimante, vers le fond, puis faire glisser vers
le haut.
c. Faire glisser le mécanisme de verrouillage vers la
droite, soit en position de verrouillage.
d. Vérifier pour vous assurer que le bloc-piles est bien
installé solidement.
Comment enlever un bloc-piles ou un
adaptateur CA:
a. S’assure que l’imprimante est fermée.
b. Faire glisser le verrou de la batterie vers la gauche, soit en position de
déverrouillage .
c. Saisir le bloc-piles, le faire glisser vers le bas puis le retirer.
Comment charger et
décharger un rouleau
de bande
Pour retirer un rouleau de bande:
a. Eteindre l’imprimante.
b. Ouvrir la porte du rouleau à
l’avant de l’imprimante. Il y a
un onglet pour la porte au
côté droit, au-dessus de la cartouche
de ruban.
c. Déplacer le verrou du mécanisme d’impression
(onglet gris), au côté droit en dessous de
l’imprimante, en position de déverrouillage, soit vers
le bas.
VOUS ASSURER QUE LE VERROU EST EN POSITION
DE DÉVERROUILLAGE LORS DU RETRAIT DE
LA BANDE.
d. Saisir le rouleau de bande et le retirer.
Pour installer un nouveau rouleau
de bande:
Note: la bande devrait être installée
après que la cartouche de ruban soit en
place.
a. Eteindre l’imprimante.
b. Ouvrir la porte du rouleau et régler le verrou du mécanisme d’impression en
position de verrouillage, soit vers le haut.
VOUS ASSURER QUE LE VERROU EST EN POSITION DE VERROUILLAGE
LORS DE L’INSTALLATION DE LA BANDE.
Comment démarrer
avec le HandiMark
®
STEP
1
STEP
4
1. Prise du Chargeur de
Batterie
Connectez le chargeur
ici. Vous pouvez charger
la batterie, qu’elle soit
installée ou non dans
l’étiqueteuse.
2. Levier Coulissant
Utilsé pour verrouiller la
batterie en place
pendant l’installation ou
la liberér afin de la
retirer.
3. Interrupteur
d’alimentation
Met étiqueteuse sur
marche ou sur arrèt.
4. Batterie
Installez-la de la
manière décrite.
1.
2.
3.
4.
Page 19

©2003 All Rights Reserved
19
Comment activer l’appareil (ON) et débuter
une première impression.
a. Pour activer l’imprimante, trouver le commutateur sur le bloc-piles (ou
adaptateur CA) et le faire basculer vers la gauche ou en position «I».
b. Déplacer le mécanisme de verrouillage en position de Verrouillage (voir en 3.a.).
c. Pour imprimer une étiquette, taper le texte que vous désirez entrer et appuyer
sur la touche d’impression et arrêt indiquée Print/Stop située au haut de la
rangée de touches, la deuxième à partir de la droite.
d. Pour désactiver l’imprimante, faire basculer
le commutateur d’activation et
désactivation en vers la droite, soit
en position «O».
Comment charger et
décharger une
cartouche de ruban
Comment retirer une
cartouche de ruban :
a. Repérer le verrou du mécanisme
d’impression au côté droit sous l’imprimante. Il s’agit d’un onglet gris.
b. Déverrouiller le mécanisme d’impression en faisant glisser le verrou vers le bas.
c. Saisir la cartouche de ruban au côté droit de l’imprimante (il y a un onglet noir
pour la cartouche) et la faire glisser hors de l’imprimante.
Comment installer une nouvelle cartouche de ruban:
a. Retirer la cartouche de ruban de l’emballage sous film rétractable, tout en portant
une attention particulière pour ne pas faire de pli sur le ruban.
b. S’assurer que le verrou du mécanisme d’impression (onglet gris) est en position
de déverrouillage, soit vers le bas. Glisser la cartouche de ruban dans
l’imprimante aussi loin que possible.
c. Déplacer le verrou du mécanisme d’impression en position de verrouillage, soit
vers le haut.
c. Faire glisser l’onglet métallique à l’intérieur de l’imprimante à la
position appropriée à la largeur de la bande que vous utilisez. Pour une
bande de 2 po de largeur, l’onglet devrait être poussé complètement vers la
droite; pour une bande de 1 po de largeur, utiliser le 4e onglet à partir de la
droite; pour une bande de _ po de largeur, utiliser l’onglet à l’extrême gauche.
Pour ce faire, appuyer sur l’onglet vers le bas et le faire glisser. Vous assurer que
l’onglet est bien verrouillé en place lorsqu’il est relâché.
d. Maintenir le rouleau de bande afin que l’onglet métallique sur le
noyau central soit à la gauche et que la bande se déroule par le dessus
du rouleau.
(Par le du dessous du rouleau pour les bandes réfléchissantes seulement).
e. Mettre le rouleau de bande en place. Vous assurer que la bande est poussée vers
le bas aussi loin que possible.
f. Saisir le bout de la bande tout en vous assurant que l’extrémité est coupée
proprement avec un bord franc sans bavure et la guider entre les pièces noires en
plastique jusqu’à ce qu’elle bloque en place contre le rouleau de la platine.
g. Allumer l’imprimante et appuyer sur la touche d’alimentation Feed (rangée au
bas du clavier) jusqu’à ce que la bande ressorte par le dessus de l’imprimante.
h. Refermer le couvercle.
STEP
2
STEP
3
Page 20

©2003 All Rights Reserved
Page 21

©2003 All Rights Reserved
Fonctions utilisées sur la
HandiMark®:
• Cadre d’étiquette
• Expansion/Condensé
• Texte en tailles multiples
Fonctions utilisées sur la
HandiMark®:
• Mise en série
• Expansion/Condensé
• Texte en tailles multiples
SECTIONNEUR
PRINCIPAL 237 ACP-1
F-06101
FUSIBLE N/P
FUSIBLE N/P
FUSIBLE N/P
FUSIBLE N/P
F-06100
F-06102 F-06103
Insérer le ruban noir Insérer la bande en vinyle
réfléchissant de 2 po orange
Insérer le ruban noir Insérer la bande à
repositionner _ po en blanc
Caps Lock
Size
Caps Lock
Size
Format
Type
2nd Caps Lock
Size
85 ( ),
Changer ici
( )
utiliser la flèche jaune “vers le bas” pour sélectionner
“Changer ici”
Pour entrer du texte tout en majuscules
Descendre le curseur jusqu’à “Exp/Cond” 50%
( )
utiliser la flèche jaune “vers la gauche” pour
sélectionner 50%
Taper: SECTIONNEUR
18 ( ),
Changer ici
( )
utiliser la flèche jaune “vers le bas” pour sélectionner
“Changer ici”
Format
Type
2nd Format
Type
Print/
Stop
Caps Lock
Size
Caps Lock
Size
Format
Type
Format
Type
2nd
H
2nd Serial
Symbol
Descendre le curseur jusqu’à “Exp/Cond” 100%
( )
utiliser la flèche jaune “vers la gauche” pour sélectionner 100%
( )
Le curseur devrait se trouver sur la ligne No 2
Taper: F-
Utiliser pour taper le “-”
Débuter la séquence: 06100
Changement de: 1
Terminer la séquence: 06103
(“Nb d’étiquettes”) est automatiquement calculé :4)
Print/
Stop
Label Directions For Your HandiMark
®
2nd
H
Descendre le curseur jusqu’à “Exp/Cond” 100%
( )
Utiliser la flèche jaune “vers la gauche“ pour
sélectionner 100%
( )
Le curseur devrait se trouver à la ligne No 2
Taper: PRINCIPAL 237 ACP-1
Utiliser pour taper le “-”
Descendre le curseur jusqu’à “CADRE“
MINCE
( )
Utiliser la flèche jaune “vers la droite” pour
sélectionner “MINCE”
20
<NOTE FOR LYNN : 237 was
removed because in the
French translation, it comes
later in the text>
2nd
2
2nd Caps Lock
Size
10 ( ),
Changer ici
( )
utiliser la flèche jaune “vers le bas” pour sélectionner
“Changer ici”
Pour entrer du texte tout en majuscules
Descendre le curseur jusqu’à “Exp/Cond” 90%
( )
Utiliser la flèche jaune “vers la gauche” pour sélectionner 90%
Taper: FUSIBLE N/P
Utiliser pour taper la “/”
20 ( ),
Changer ici
( )
utiliser la flèche jaune “vers le bas” pour sélectionner
“Changer ici”
Page 22

©2003 All Rights Reserved
Space
21
Fonctions utilisées sur la
HandiMark®:
• Code à barres
• Cadre
• Expansion/Condensé
• Texte en tailles multiples
Caps Lock
Size
Caps Lock
Size
Format
Type
2nd Caps Lock
Size
2nd
Shift
Print/
Stop
Bar Code
App
Shift
Il s’agit du menu des options pour les codes à barres afin
de sélectionner l’aspect visuel de votre code à barres
2nd
H
2nd
Bar Code
App
2nd
Format
Ty pe
Hauteur:
30
Densité: 10mil utiliser la flèche jaune “vers le bas” pour vous déplacer
parmi les options au menu
Texte HR:Ci-dessous utiliser la flèche jaune « vers la droite » pour
sélectionner le paramètre en option
Démarrage/Arrêt: Désactivé Vérifier carac: Désactivé
( )
Descendre le curseur jusqu’à “CADRE”
MINCE
( )
utiliser la flèche jaune “vers la droite”
pour sélectionner “MINCE”
Appuyer sur le 2e le 1er
tout en maintenant appuyé
Taper: 100293
Insérer le ruban noir. Insérer la bande inviolable
de 1 po en blanc
10 ( ),
Changer ici
( )
utiliser la flèche jaune “vers le bas” pour sélectionner
“Changer ici”
Pour entrer du texte tout en
majuscules
Taper PROPRIÉTÉ DE ( )
L’HÔPITAL UNIVERSITAIRE ( )
Le curseur devrait se trouver à la ligne 3
15 ( ),
Changer ici
( )
utiliser la flèche jaune “vers le bas” pour sélectionner
“Changer ici”
Descendre le curseur jusqu’à “Exp/Cond” 80%
( )
utiliser la flèche jaune “vers la gauche” pour sélectionner 80%
Taper:
No d’identification 3 fois
Fonctions utilisées sur la
HandiMark®:
• Symbol
• Gras
• Expansion/Condensé
• Texte en tailles multiples
PORTER UN TABLIER, DES GANTS
ET UN ÉCRAN FACIAL DE PROTECTION
PRODUITS CHIMIQUES DANGEREUX!
DANGER
!
Caps Lock
Size
Caps Lock
Size
Format
Type
Serial
Symbol
2nd
Caps Lock
Size
Print/
Stop
2nd
8
2nd
9
Format
Type
Caps Lock
Size
Insérer le ruban noir Insérer la bande en vinyle de 2
po jaune
65 ( ),
Changer ici
( )
Utiliser la flèche jaune “vers le bas” pour sélectionner
“Changer ici”
Ensemble B utiliser la flèche jaune “vers la droite” pour
sélectionner
49 ( )
utiliser la flèche jaune
“vers le bas” déplacer le curseur jusqu’à la section “Numéro
de symbole” – No 49 correspond à l’en-tête ANSI indiquant
Danger
( )
Le curseur devrait se trouver à la ligne No 2
23 ( ),
Changer ici
( )
utiliser la flèche jaune “vers le bas” pour sélectionner
“Changer ici”
Descendre le curseur jusqu’à “Exp/Cond” 70%
( )
utiliser la flèche jaune “vers la gauche” pour sélectionner 70%
Pour entrer du texte tout en majuscules
Taper: PRODUITS CHIMIQUES DANGEREUX ( )
Le curseur devrait se trouver à la ligne No 3
Utiliser pour taper le “!”
12 ( ),
Changer ici
( )
utiliser la flèche jaune “vers le bas” pour sélectionner
“Changer ici”
Gras – ACTIVÉ utiliser la flèche jaune “vers la droite” pour
sélectionner “ACTIVÉ”
Descendre le curseur jusqu’à “Exp/Cond” 100%
( )
utiliser la flèche jaune “vers la gauche” pour sélectionner 100%
Taper: PORTER UN TABLIER, DES GANTS ( )
ET UN
É
CRAN FACIAL DE PROTECTION
Utiliser pour taper la “!”
Page 23

©2003 All Rights Reserved
22
Pour supprimer une étiquette
1. Appuyer sur: Touche Clear «Effacer» (en-dessous de la touche jaune de curseur
vers la droite).
2. Laisser le curseur sur Toutes les étiquettes et appuyer sur Enter «Entrer».
3. Appuyer sur: Enter «Entrer» ou sur la touche Y (pour YES «OUI»).
Pour ajouter des symboles
Consulter le Guide de référence des symboles pour obtenir la liste des symboles
résidents de votre système HandiMark
®
.
1. Appuyer sur: Touche Symbol «Symbole».
2. Appuyer sur: Curseur vers le bas à la 2e ligne pour sélectionner l’ensemble A.
3. Entrer: 42 Appuyer sur: Enter «Entrer». Le symbole numéro 42 de l’ensemble
A est le symbole pour “Biorisque”.
4. Appuyer sur: Print/Stop «Impression/Arrêt».
5. Effacer tout (appuyer sur Clear «Effacer», Enter «Entrer», Enter «Entrer»).
Pour entrer des caractères accentués
1. Entrer: ^ (pour ce faire, appuyer et relâcher la touche jaune 2nd, attendre un moment, puis
appuyer sur la touche U).
2. Entrer: A.
3. Appuyer sur: Print/Stop «Impression/Arrêt».
4. Effacer tout (appuyer sur Clear «Effacer», Enter «Entrer», Enter «Entrer»).
Keyboard
Functions
Pour se déplacer dans
l’écran
Après avoir vidé l’écran, entrer
votre prénom, puis appuyer sur
Enter «Entrer», et entrer ensuite
votre nom sur la seconde ligne:
1. Appuyer sur Pour déplacer le curseur
d’un caractère vers la droite.
2. Appuyer sur Pour déplacer le curseur
d’un caractère vers la gauche.
3. Appuyer sur Pour déplacer le curseur à la
ligne précédente.
4. Appuyer sur Pour déplacer le curseur à la ligne
suivante.
5. Appuyer sur Shift et sur Déplace le curseur au
début de l’étiquette précédente pour étiquettes
multiples.
6. Appuyer sur Shift et sur Déplace le curseur au début
de l’étiquette suivante pour étiquettes multiples.
7. Appuyer sur 2nd puis sur Déplace le curseur au début de la première
étiquette pour étiquettes multiples.
8. Appuyer sur 2nd puis sur Déplace le curseur au début de la dernière
étiquette pour étiquettes multiples.
9. Déplacer le curseur pour le positionner sur un caractère. Appuyer sur la touche
Delete «Supprimer». Le caractère est supprimé.
10. Pour se déplacer au-dessus des caractères, appuyer simultanément sur les
touches Shift et Delete «Supprimer».
11. Pour insérer des caractères: Positionner le curseur à la droite du caractère
servant de point d’insertion. Entrer le(s) caractère(s) à insérer.
▲
▲
▲
▲
▲
▲
▲
▲
Page 24

©2003 All Rights Reserved
23
Pour accéder aux “Caractères jaunes ” du clavier
1. Pour imprimer des touches à 2 caractères:
a. Pour entrer 5: Appuyer sur la touche “5”
b. Pour entrer ?: Appuyer sur la touche “2nd”, puis appuyer sur “?”
(ne pas appuyer sur les touches simultanément)
2. Appuyer sur: Touche Print/Stop «Impression/Arrêt».
3. Effacer tout (appuyer sur Clear «Effacer», Enter «Entrer», Enter «Entrer»).
Révision: Pour avoir accès à tout caractère imprimé en jaune sur le clavier, tout d’abord appuyer et relâcher
la touche 2nd, attendre de voir “2nd...” sur le tableau d’affichage, puis appuyer sur la touche jaune
désirée.
Pour modifier la taille des caractères
1. Appuyer sur la touche Size «Taille».
2. Pour modifier la taille à 1/2 po. Entrer : 5 puis 0.
(noter que le point décimal est inséré
automatiquement—la touche “.” n’est pas requise)
3. Appuyer sur Enter «Entrer». Le curseur est déjà positionné sur “Change at start”
«Modifier au début» - Appuyer sur Enter «Entrer».
4. Entrer les lignes suivantes:
Ligne 1 Entrer: Je peux modifier; Appuyer sur: Enter «Entrer»
Ligne 2 Entrer: la taille; Appuyer sur: Print/Stop «Impression/Arrêt»
5. Remarquer que la taille de tous les caractères est de 0,5 po.
6. Ne PAS EFFACER l’étiquette.
Pour utiliser des tailles multiples des
caractères sur une étiquette
1. Utiliser les touches à flèches, positionner le curseur à la droite du dernier
caractère de la première ligne.
2. Appuyer sur la touche Size «Taille».
3. Entrer: 2 puis 5. Ceci règle la taille à 1/4 (0,25) po. Appuyer sur: Enter «Entrer».
4. Déplacer le curseur vers le bas jusqu’à “Change here” «Changer ici»et appuyer
sur Enter «Entrer».
5. Un marqueur de modification apparaîtra à la fin de la première ligne. Tout le texte
situé après le marqueur utilisera la nouvelle taille.
6. Appuyer sur Print/Stop «Impression/Arrêt».
7. Effacer tout (appuyer sur Clear «Effacer», Enter «Entrer», Enter «Entrer»).
Pour créer une étiquette
1. Entrer: Brady Worldwide.
2. Appuyer sur: Touche Print/Stop «Impression/Arrêt»
(rangée de touches supérieures,
au-dessus de la touche jaune de curseur vers le haut)
. Il est à noter que la bande retourne
vers l’imprimante avant l’impression. Cette caractéristique permet de minimiser la
quantité de bande vierge au début de l’étiquette.
3. Pour retirer l’étiquette de l’imprimante, relever le levier de la tranche (situé du
côté gauche de l’imprimante) en votre direction.
Options de saisie
Vous pouvez modifier l’apparence du texte en utilisant la touche Type.
1. Appuyer sur la touche Type.
Bold «Gras» Of
f «Désactiver» On «Activer»
Underline «Souligné» Of
f «Désactiver» On «Activer»
Exp/Cond «Condensé» 50% à 200% par incrément de 10% (100% par défaut)
Italics «Italique» Of
f «Désactiver» On «Activer»
Vertical «Vertical» Of
f «Désactiver» On «Activer»
Pos «Position» Nor
mal, Subscript «Indice», Superscript «Exposant»
Appuyer sur Escape «Échappement».
2. Modifier la taille à 0,25 po. Pour ce faire, appuyer sur la touche Size «Taille»,
puis entrer 2 puis 5 et Enter «Entrer». Sélectionner “Change at start” puis
appuyer sur Enter.
3. Entrer ce qui suit:
Ligne 1 Entrer: Souligné Appuyer sur: Enter «Entrer»
Ligne 2 Entrer: Étendu Appuyer sur: Enter «Entrer»
Ligne 3 Entrer: Italique
4. Aller au début de la ligne 1. Appuyer sur la touche Type. Utiliser la touche de
curseur vers le bas jusqu’à “Underline” «Souligné». Utiliser la touche de curseur
vers la droite pour l’activer “On”. Appuyer sur Enter.
5. Placer le curseur au début de la ligne 2. Appuyer sur la touche Type. Utiliser la
touche de curseur vers le bas jusqu’à “Underline” «Souligné», puis la touche de
curseur vers la droite pour le désactiver “Off”. Utiliser encore la touche de curseur
vers le bas jusqu’à “Exp/Cond” «Étendu/Condensé», puis la touche de curseur vers
la droite pour étendre le texte entré jusqu’à 150 %.
Appuyer sur Enter «Entrer».
Page 25

©2003 All Rights Reserved
Options de saisie (cont.)
6. Placer le curseur au début de la ligne 3. Appuyer sur la touche Type. Utiliser la
touche de curseur vers le bas jusqu’à “Exp/Cond” «Étendu/Condensé», puis la
touche de curseur vers la droite pour remettre l’option à “100%”.Utiliser encore la
touche de curseur vers le bas jusqu’à “Italics” «Italique», puis la touche de
curseur vers la droite pour pour l’activer “On”.
Appuyer sur Enter «Entrer».
7. Appuyer sur Print/Stop «Impression/Arrêt».
8. Effacer tout (appuyer sur Clear «Effacer», Enter «Entrer», Enter «Entrer»).
Touche File «Fichier»
(enregistrement des étiquettes en mémoire)
Cette option vous permet d’Enregistrer “Save”, de Récupérer “Get” ou de Supprimer
“Delete” un fichier. La HandiMark®vous offre 10 000 octets de mémoire résidente.
1. Entrer votre nom.
2. Appuyer sur la touche 2nd et la relâcher, attendre un moment, puis appuyer sur
la touche File «Fichier».
3. Nommer le fichier: NOM.
Appuyer sur: Enter «Entrer».
4. Clear «Effacer» (Use Defaults) «Utiliser les valeurs par défaut».
5. Appuyer sur la touche 2nd et la relâcher, attendre un moment, puis appuyer sur
la touche File «Fichier». Appuyer sur la touche de curseur vers le bas jusqu’à
“Get” «Récupérer» Appuyer sur la touche de curseur vers la droite jusqu’à ce que
le nom de votre fichier, NOM.OS, apparaisse.
Appuyer sur: Enter «Entrer».
Note: Si vous avez enregistré plus d’un fichier, vous devrez utiliser les touches de curseur vers la gauche
et vers la droite pour localiser le nom du fichier. Ou bien, vous pouvez entrer le nom du fichier si vous le
connaissez. Vous devez utiliser l’extension .OS pour les fichiers enregistrés avec le système
d’exploitation. Utiliser l’extension .PM pour les fichiers enregistrés dans l’application de marqueurs de
tuyau.
Touche Setup «Configuration»
Cette touche règle les valeurs par défaut du système d’exploitation qui
seront utilisées à chaque fois que l’appareil sera activé.
1. Fermer l’appareil. Attendre 5 secondes. Relancer l’appareil.
2. Pour modifier une valeur par défaut, telle que la taille, appuyer sur la touche 2nd
et la relâcher, attendre un moment, puis appuyer sur la touche Setup
«Configuration».
3. Appuyer sur la touche de curseur vers le bas jusqu’à “Type size: «Entrer la taille:»
pour la modifier à 1,0 po (appuyer sur 1 puis 0 puis 0). Appuyer sur: Enter
«Entrer».
4. Fermer l’appareil. Attendre 5 secondes. Relancer l’appareil. Appuyer sur la touche
Size «Taille». Il est à noter que la taille est maintenant de 1,0 po lorsque l’appareil
est relancé.
5. Prenez quelques minutes pour expérimenter avec les autres paramètres par défaut.
Touche Density (densité d’impression)
Lorsqu’une bande ou un ruban est installé dans la HandiMark®, le système règle la
densité d’impression à sa valeur nominale. Cependant, à cause des variations des
imprimantes et des environnements d’impression, il pourrait être nécessaire de régler
la densité d’impression.
1. Appuyer sur la touche 2nd et la relâcher, attendre un moment, puis appuyer sur
la touche Density «Densité d’impression».
2. Appuyer une fois sur la touche de curseur vers la gauche ou vers la droite pour
chaque incrément désiré. La touche de curseur vers la droite augmente la densité
d’impression et la touche de curseur vers la gauche diminue la densité
d’impression.
3. Appuyer sur: Enter «Entrer».
Note: la densité d’impression est réinitialisée à sa valeur nominale lorsqu’une nouvelle bande ou un
nouveau ruban est installé.
24
Page 26

©2003 All Rights Reserved
6. Le fichier que vous venez de créer est récupéré.
7. Clear «Effacer» (Use Defaults) «Utiliser les valeurs par défaut»
— consulter la page 9 pour plus d’information sur cette fonction
d’effacement.
La fonction Fichier permet aussi d’imprimer la liste de tous les fichiers enregistrés
en mémoire. Pour ce faire:
1. Appuyer sur la touche 2nd et la relâcher, attendre un moment, puis appuyer sur
la touche File «Fichier».
2. Appuyer sur la touche de curseur vers le bas jusqu’à “Print File List”
«Impression de la liste de fichiers» Appuyer sur: Enter «Entrer».
3. La liste des fichiers enregistrés en mémoire s’impriment incluant
l’extension à 2 lettres.
25
Page 27

©2003 All Rights Reserved
26
A
ccessories Part Number
VersaLabel with HandiMark®PC Cable Kit 42003
PC Cable Kit 42004
Protective Dust Cover 42005
AC Power Supply 42006
Battery Charger 42007
Spare Battery Pack 42008
Cleaning Kit 42009
Spare Hard Carrying Case 42010
Soft Carry Case With Shoulder Strap
• Perfect for taking your HandiMark
®
system out for in-field printing
• Padding provides protection from
bumps and outside elements
AC Power Supply
• Allows you to operate your
HandiMark
®
system from an
AC power wall outlet
Power Supply Packages
Part Number Description
Quick Charger 42124 Charges your HandiMark®battery in as
little as 45 minutes, LCD indicator
displays when battery is charging,
discharging and completely charged
Mega-Charge Package 42072 Contains Quick Charger (42124), spare
battery (42008) and 1 AC power supply
(42006)
Super-Charge Package 42073 Contains Quick Charger (42124) and
spare battery (42008)
Accessories For Your HandiMark
®
Power Supply Package
Power Supply Package
Three Ways to Keep Your HandiMark®Charged...
Keep your HandiMark®Portable Label Maker ready to use anywhere, anytime you need it.
Page 28

©2003 All Rights Reserved
Print Ribbon
Cartridges - 75' rolls
Part Number
Black 42011
White 42012
Red 42013
Blue 42014
Green 42015
Magenta 42016
Yellow 42123
Vinyl Tapes - 50' rolls
Permanent Adhesive
1/2" Wide 1" Wide 2" Wide
White Vinyl 42018 42019 42021
Yellow Vinyl 42022 42023 42025
Green Vinyl 42026 42027 42029
Red Vinyl 42030 42031 42033
Blue Vinyl 42034 42035 42037
Orange Vinyl 42038 42039 42041
Black Vinyl 42042 42043 42045
Grey Vinyl 42046 42047 42049
Brown Vinyl 42050 42051 42053
Gold Vinyl 42054 42055 42057
Purple Vinyl 42058 42059 42061
Clear Vinyl 42076 42077 42079
Light Blue Vinyl – 42133 42134
Tan Vinyl – 42135 42136
Vinyl Tapes - 50' rolls
Repositionable Adhesive
1/2" Wide 1" Wide 2" Wide
White Vinyl 42100 42101 42102
Yellow Vinyl 42103 42104 42105
Tamper Resistant
Tapes - 50' rolls
White Vinyl 42137 42138 42139
Economy Polypropylene
Tapes - 50' rolls
White Vinyl 42068 42069 42071
Reflective Tapes
33' rolls
White Reflective Tape – 42062 42063
Yellow Reflective Tape – 42064 42065
Orange Reflective Tape – 42066 42067
black white red blue
white yellow
green red
blue orange
black grey
brown gold
purple clear
light blue tan
white yellow
white
white
white yellow
orange
green magenta yellow
27
Tapes and Ribbons For Your HandiMark
®
Page 29

Brady Worldwide, Inc. - Signmark®• 2221 W. Camden Road • PO Box 2999 • Milwaukee, WI 53201-2999
Toll-Free 1-800-635-7557 • Milwaukee 414-228-1411 • Fax 1-800-445-7446
In Canada 1-800-263-6179 • Fax 1-800-387-4935
Check us out on the internet at: www.bradysignmark.com
For technical assistance with the use of
your new Brady printer
• trouble shooting
• repairs
• questions about software
interface
Tech Support Hotline
Website www.bradysignmark.com
U.S.A. 1-800-368-3362
Canada 1-800-263-6179
Brazil 01-800-112-7239
Mexico 55 11 3686-4720
Other (Americas) 1-414-540-5560
Assistance technique pour l’utilisation de
votre nouvelle imprimante Brady
• solution de probléme
• réparations
• aide au sujet de l’interface
du logiciel
Numéros d’assistance
technique
Internet www.bradysignmark.com
États-Unis 1-800-368-3362
Canada 1-800-263-6179
Brésil 01-800-112-7239
Mexique 55 11 3686-4720
Autre (Amériques) 1-414-540-5560
Para solicitar ayuda técnica sobre el uso
de su nueva impresora Brady
• solución de problemas
• reparaciones
• consultas sobre interfaz
de software
Línea de respaldo
tecnológico
Internet www.bradysignmark.com
EE.UU. 1-800-368-3362
Canadá 1-800-263-6179
Brasil 01-800-112-7239
México 55 11 3686-4720
Otros países (América) 1-414-540-5560
©2003 All Rights Reserved
 Loading...