

Page 1

COMet
DOC--PEM--COMet6--US--02/08/00
Page 2

The information in the present documentation is not of a
contractual nature. It is subject to modification without prior
notice.
The software described in this manual is regulated by a user
license. The software cannot be used, copied or reproduced on
any media whatsoever, except in compliance with the terms of
this license.
No part of this manual may be copied, reproduced or
transmitted by any means whatsoever (unless it is for the
purchaser’s personal use) without the written permission of
Teklynx International Co.
E 2000 Teklynx International Co,
All rights reserved.
Windowstttt, MS-DOSâ are registered trade marks of the
Microsoftâ Corporation.
IBM, PC, AT PS/2 are registered trade marks of the
International Business Machines,Inc.
Page 3

Table of Contents
About this Manual Page - 1....................................
1
Documents Supplied Page - 1..............................
Typographical Conventions Page - 1........................
Quick Guided Tour Page 2 - 3...................................
2
Introduction Page 2 - 3..........................................
Presentation of the Zoo Shipping Company Page 2 - 4............
Setting Up the Environment Page 2 - 5.......................
Data Acquisition Page 2 - 9...................................
Creating a New Protocol Page 2 - 11..............................
Selecting Settings for the Bar code Rea der Page 2 - 12.........
Page 4

About this Manual
1
Documents Supplied
Typographical Conventions
Complete documentation is available to help you get the most
from COMet.
By means of an example, the Quick Guided Tour aims to
familiarize you quickly with the software, giving you the basic
keys for getting started. This documentation has been designed
as a compliment to the online help.
Online Help is accessible from the application, and outlines all
application procedures.
This manual distinguishes betwee n different types of information
by using the following conventions:
S terms taken from the interface itself, such as commands,
appear in bold;
S keys appear in small caps, as in the following example:
”Press the
S numbered lists mean there is a procedure to be carried out;
S when the conjunction ”or” appears next to a paragraph it
means the re is the choice of another procedure for carrying
out a given task ;
S When a menu command contains submenus, the menu name
followed by the command to select appears in bold. Thus,
”Choose File Open” means choose the File menu, then the
Open command.
SHIFT key”;
Following this symbol you will find hints for optimizing certain
tasks, speeding up the execution of commands, etc.
Page 5
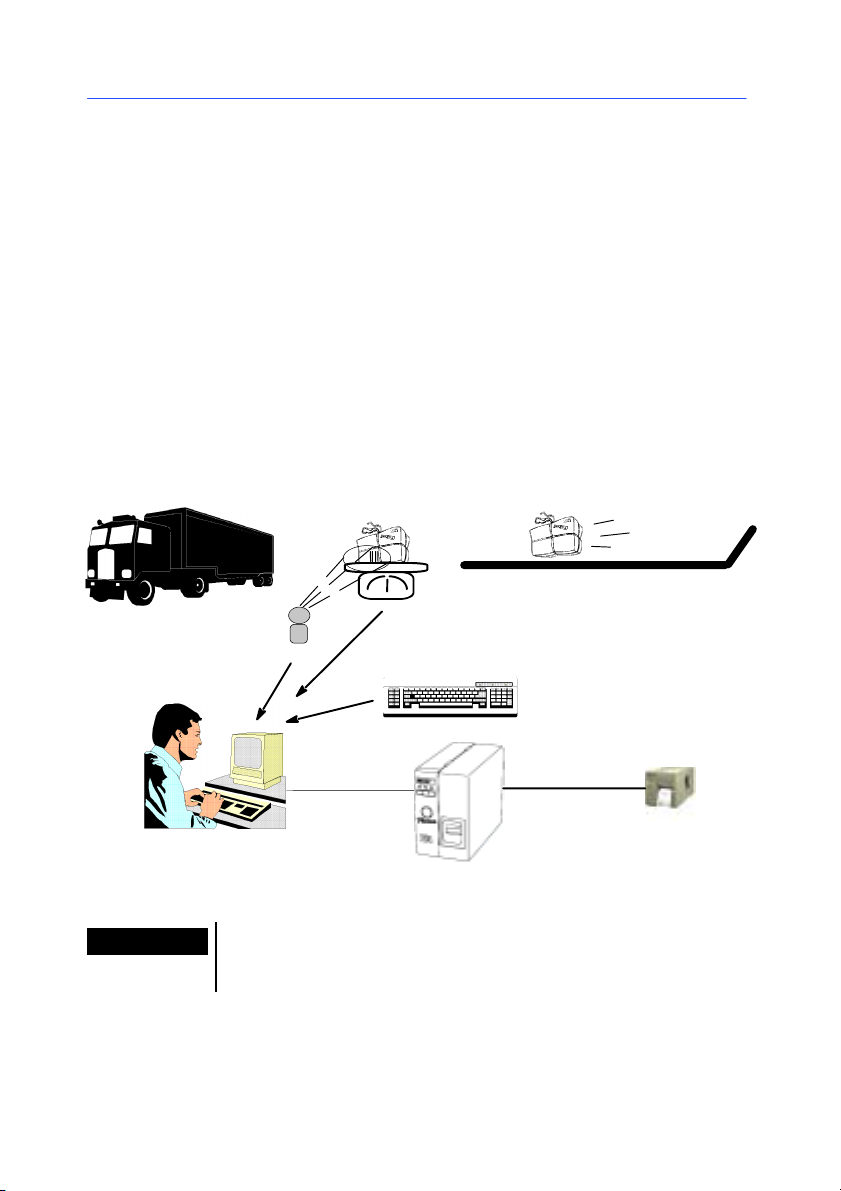
Quick Guided Tour
Introduction
The guided tour provides a quick introduction to get you off to a
good start with the basic functions of COMet.Bymeansofa
practical example, you will learn how to create a new hardware
environment and configure source devices using different
communication protocols.
This example features a weighing machine, a bar code reader
and keyboard data entry as means of gathering the information
needed to ship packages.
2
The information gathered is inserted in the label below :
ZOO SHIPPING COMPANY
kg 5.750
Destination:
x2
Total
11.50
Figure 1 Presentation of the Example Label
Page 6
Page 2 -- 4
Quick Start Guide
Presentation of the Zoo Shipping Company
The ZOO Shipping Company’s dispatch service has developed a
package shipping system using COMet. Each package must be
accompanied by a delivery slip.
Outgoing packages are routinely weighed and a light beam reads
the bar codes on each package. An operator responsible for
supervising the process enters the price per kilo.
Weighing the package makes it possible to calculate its shipping
price, and reading the bar code indicates its destination.
The information gathered is inserted into the shipping label (see
Page 2 - 3). This enables the company to keep a precise
reference number for each outgoing package.
Note
Figure 2 Presentation of the Example Label
This is just an example, of course. In real life, the price of shipping a package, which depends on its destination, would be
calculated by a database, not an operator.
Page 7

Quick Guided Tour
Page 2 -- 5
Setting Up the Environment
Note
This sequence describes the shipping department’s hardware
configuration and gives the procedure for creating the work
environment.
"""" Hardware Devices
S APC
S A printer connected to the PC’s COM 1 port
S A bar code reader connected to the PC’s COM 2 port
S A weighing machine connected to the PC’s COM 3 port
The PC, which originally had only two serial ports, has been
fitted with a multiport card. Four serial ports have been added
to the first two, making a total of six. Using the Options dialog
box, you will have to disable ports 7 and 10, which will not be
used in this example.
"""" Setting Up the Work Environment
Using the COMet interface, you will now create the device group
by adding the bar code reader and the weighing machine to the
above ports.
1 Click on
2 Select Default as hardware environment.
The interface appears as shown below :
or press F2.
Figure 3 The Main COMet Window
3 Go to Port 2, then click on
The Selection dialog box appears.
4 Select the HBCR8000 protocol used by the bar code reader,
then click on OK.
or press F8.
Page 8

Page 2 -- 6
Quick Start Guide
5 Repeat this procedure for Port 3 and select the TEC-SL47
protocol used by the weighing machine.
The table now looks like the example shown below :
Figure 4 Selecting Protocols
"""" Selecting the Target Document
1 Click on
2 Select the Shipping label from the COMet Samples folder.
This label contains several Var fields:
S Destination : the data will be acquired when the bar code
on the package is read; ;
S kg : the value will be acquired when the package is wei-
ghed; ;
S CodeOp : the value is the price per kilo, entered by the ope-
rator; ;
S Total : the result of the formula (kg x CodeOp), which will be
the dispatch price of the package.
"""" Device Settings
When you configure device settings, you must assign an
” uncoded ” name, (unlimited length) to the device, designate a
master device and select the target field in which the data
acquired is to be inserted.
or press F4.
Page 9

Quick Guided Tour
1 Go to port 2.
Page 2 -- 7
Selecting Settings for the Bar code Reader :
2 Click on
or press F9.
The Source device settings dialog box appears :
Complete
the boxes
indicated,
then click on
OK.
Figure 5 Configuring the Bar code Reader
Selecting Settings for the Weighing Machine :
1 Go to port 3
2 Click on
or press F9.
The Source device settings dialog box appears :
Complete
the boxes as
shown, then
click on OK.
Figure 6 Configuring the Weighing Machine
Page 10

Page 2 -- 8
Quick Start Guide
Selecting Keyboard Settings
1 Go to the row in the table corresponding to the keyboard.
2 Click on
or press F9.
The Source device settings dialog box appears. Since the
keyboard is a special device, the dialog box contains only one
box for selecting the target field.
Complete
the box as
shown, then
click on OK.
Figure 7 Configuring the Keyboard
Once the information is entered, the main COMet window looks
like this :
Figure 8 Displaying the Configured Devices
Page 11

Quick Guided Tour
"""" Saving the Environment
Now you have created your environment, you will save it so that
it can be used later.
Page 2 -- 9
Data Acquisition
1 Click on
The Save as dialog box appears :
2 Enter SHIPPING.CMT as the environment name, then click on
OK.
To launch data acquisition:
1 Click on
The Transfer dialog box appears.
or press F3.
or press F6.
Figure 9 The Transfer dialog box
2 Check the Update only box: data will be sent to the labeling
software and inserted into the label Var fields.
or
Check the Update and print box if you wish to both update
the Var fields and print in real time at the same time.
Page 12

Page 2 -- 10
Quick Start Guide
Values are displayed one by one in the table.
Figure 10 Displaying Values during Transfer
To show that the transfer process is taking place, the
ton becomes
Obtaining a Preview
S To better monitor the process, request a label preview by
click on
.
or by pressing F7.
Figure 11 Label Preview
but-
Page 13

Quick Guided Tour
Creating a New Protocol
It is entirely possible that the protocol used by your device is
unavailable in COMet.Ifso,youmustdefineitusingthe
technical information sheet that came with your device.
Let us suppose that the ZOO Shipping Company has just
purchased a new bar code reader, the protocol of which is not
recognized by COMet.
Excerpt from the manufacturer’s information:
Quazar Bar Code Reader
Protocol : TX-22
Type : touch reader
Communication parameter :
Speed : 2,400 baud
Data bits : 8
Parity : none
Stop bit : 1
Initialization :
Page 2 -- 11
Sequence
Configuration
Reading
Check characters on
Check characters off
09 n
OK
01nnn 02
09 01
09 00
n=00or01
nnn =
code data +
check character
Page 14

Page 2 -- 12
Selecting Settings for the
Bar code Reader
Quick Start Guide
1 Click on or press F8.
The protocol Selection dialog box appears.
2 Click on New.
3 Click on
The Source device settings dialog box appears.
4 Using the manufacturer’s information, complete the diffe-
rents boxes as shown below :
5 Once the dialog box has been completed, click on Settings...
The Protocol dialog box appears.
6 Check the Proceed with this step box, then complete the
text boxes by referring to the manufacturer’s information.
Here we are looking to obtain the bar code’s check character.
or press F9.
Figure 12 Configuring a source device
Page 15

Quick Guided Tour
"""" Initialization Step
To retrieve this check character, and in accordance with the
device specifications, you must send the command ” 0901 ”, or
^I^A (see note below).
We will then delete this data check character as in our case, the
sole purpose of initialization is to make sure the reader is working correctly.
Page 2 -- 13
Note
The following special characters cannot be directly entered into
the text box:
- ASCII check characters (ASCII 1 to 31)
- quotation marks (ASCII 34)
- commas (ASCII 44)
- semicolons (ASCII 59)
- equal signs (ASCII 61)
- circumflex accents (ASCII 94)
- spaces (ASCII 32)
- extended ASCII characters (ASCII 128 onwards)
- backslashes (ASCII 124)
To enter these characters, use one of the following notations :
1
^#, # is a capital letter from A to Z and replaces the
ASCII characters from 1 to 26.
Example:^Fforthe6byte.
2 ^###,### is a decimal number above 0 (length
is fixed at 3 digits).
Example: ^034 for the double quotation marks, or ^094
for
the circumflex accent.
S To enter this command, enter ” ^I^A ” (in Windows
enter a space after the circumflex accent) :
^, space, I, ^, space, A.
Still following the manufacturer’s specifications, the reader
should send back an ” OK ”. If there is nothing after 500 ms, the
communication is deemed to have failed, and the user must then
decide what to do.
TM
Page 16

Page 2 -- 14
Quick Start Guide
"""" Wait Stage
Figure 13 Wait Stage
S Check the When receiving a message sent by the device
box, since the data is transmitted as soon as the reader’s
trigger is activated.
"""" Data Acquisition
This step allows you to check whether the data received meets
user expectations.
Figure 14 Data Acquisition
In our case, we are expecting a variable message.
According to the manufacturer’s specifications, and whatever the
nature of the bar code, the message takes the form ” 01 n n n
n¼ check 02 ”. It is contained within the codes ” 01 ” and ” 02 ”,
contains a variable number of characters and may contain a
check code at the end.
Page 17

Quick Guided Tour
S Enter ” ^A*^B ”.
"""" Data Extraction
In this step, we will define the structure and nature of the
message, and specify which part of the message we want to
retrieve.
^A : message start character,
* : joker replacing a given number of characters,
^B : message stop character.
K
Page 2 -- 15
L
M
N
O
Figure 15 Data Extraction
Key:
K We know that the message is of variable length.
L The first data byte is placed in second position, after the
message start byte.
M The stop character is ^B.
N We want an offset of -1 byte to exclude the check character
(it is not necessary to keep this information, since the labeling
program recalculates the check character).
O Coding is Alphanumerical ; bytes received will be transmit-
ted without being converted.
Using the Example box, check that the message features the
correct parameters.
Page 18

Page 2 -- 16
Quick Start Guide
"""" Saving the New Protocol
Now that the protocol is configured, you need to save it.
1 Click on Save as.
The Saving the protocol dialog box appears. :
Figure 16 Saving the Protocol
The box features three text entry boxes allowing you to input
precise reference information for any new protocol.
2 Complete all boxes with the values mentioned above.
Try to include the model revision number in the protocol box as
manufacturers may change the message protocols from one production run to the next.
For example: TX-22 1998
Note
For the sake of simplicity, in this exercise we have not included
a data availability enquiry (Query) or a reset sequence (Reset).
 Loading...