

Page 1

CODESOFT
Sentinel
Print PackTM
Welcome to the printing module for CODESOFT Sentinel Print
Pack, the No. 1 Windows
cover the simplest and most powerful way to meet your labeling
needs.
CODESOFT Sentinel Print Pack combines the user friendliness of a
graphical interface with the high-powered features of a sophisticated
software program.
based computer program for label printing. Dis-
™-
Copyright© 1997 TECHNIQUES AVANCEES
®
Page 2

The information in this documentation manual is not contractual in
nature. It is subject to modification without notice.
The software described in this manual is supplied under a user license.
Its use, duplication, or reproduction on any media whatsoever, except
as provided for under the terms of the license, is not authorized.
No part of the manual may be copied, reproduced or transmitted by
any means whatsoever (unless it is for the purchaser’s personal use)
without the written permission of Techniques Avancées®.
Copyright© 1997 Techniques Avancées®. All rights reserved.
Windows™, MS-DOS® and Paintbrush are registered trademarks of
Microsoft® Corporation.
IBM, PC, and AT PS/2 are registered trademarks of International
Business Machines, Inc.
CODESOFT™ is a trademark of Techniques Avancées®.
Page 3

Table of Contents
Introduction .................................................. Chapter 1
Sentinel Print Mode...................................... Chapter 2
Sentinel File Mode........................................ Chapter 3
Error Files ..................................................... Chapter 4
CODESOFT Sentinel Interface..................... Chapter 5
Appendix 1 — Sentinel Print Mode............. Chapter 6
Appendix 2 — Sentinel File Mode............... Chapter 7
Page 4

Introduction
Introduction 5
Definition of Concepts 5
How Sentinel Print Pack Works 6
Page 5

Introduction
CODESOFT Sentinel Print Pack enables you to print labels created using
CODESOFT on non-Windows
WindowsTM 95 or NT.
CODESOFT Sentinel Print Pack consists of a data capture module
(Sentinel) and a print module (CODESOFT Run Time).
Sentinel Print Pack intercepts the print requests generated by your
applications and re-routes them to CODESOFT Run Time, which does the
final printing. It links your applications’ data to the print functions of
CODESOFT Run Time, whether the applications run on a PC, a
minicomputer or a Mainframe.
Sentinel Print Pack works by monitoring either the print job queues from
your application, or the presence of data files in a specified directory.
Consequently, your application must be able to generate a print job on a
server or copy a file in a directory that is accessible to Sentinel Print Pack.
platforms. The application runs under
TM
Definition of Concepts
CODESOFT Sentinel Print Pack employs new concepts specific to the
application. We will therefore begin by establishing a “mini-glossary” of
terms used. Print Server: a PC running under WindowsTM 95 or Win-
dowsTM NT and installed with a copy of CODESOFT Sentinel Print Pack.
Print Document: this designates a file generated by your application and
containing all the information required to print one or more labels using
CODESOFT Sentinel Print Pack.
Sentinel: a procedure that assumes responsibility for the print document
and transcribes it into print orders for CODESOFT Run Time.
There are three types of Sentinels:
w the Print sentinel;
w the ASCII file sentinel; and
w the Data source sentinel.
Page 6

Delimiters: a character or strings of characters that frame the data (name
and value of variables) in a Print Document.
How Sentinel Print Pack Works
CODESOFT Sentinel Print Pack operates as a background task under
Windows
or directories that contain print documents generated by your application.
When Sentinel Print Pack detects a print document, the module analyzes
it, transcribes it into print orders for CODESOFT Run Time, and deletes
it. As soon as CODESOFT Run Time receives print orders, it starts
printing labels.
Using CODESOFT, you will create your label’s format (background image) by inserting the information you want it to contain (variable fields,
graphics or bar codes). CODESOFT Sentinel Print Pack interprets and
re-routes the data from your application to the label’s field. Since the print
format of the labels is stored in the receiving station, no graphical information moves through your network.
Using the Sentinels, the program monitors either print queues
TM.
Page 7

Print Sentinel
Print Sentinel 8
Structure of the Print Document 9
Syntax for Direct Assignment 9
Syntax Assigned by Table 10
Characteristics of the Print Document 11
Header 11
Label Referred To 11
Delimiters 12
Same Variables 12
Combined Assignment 13
Label Recognition 13
Printing Via Network 13
TCP/IP Protocol 13
Page 8
Print Sentinel
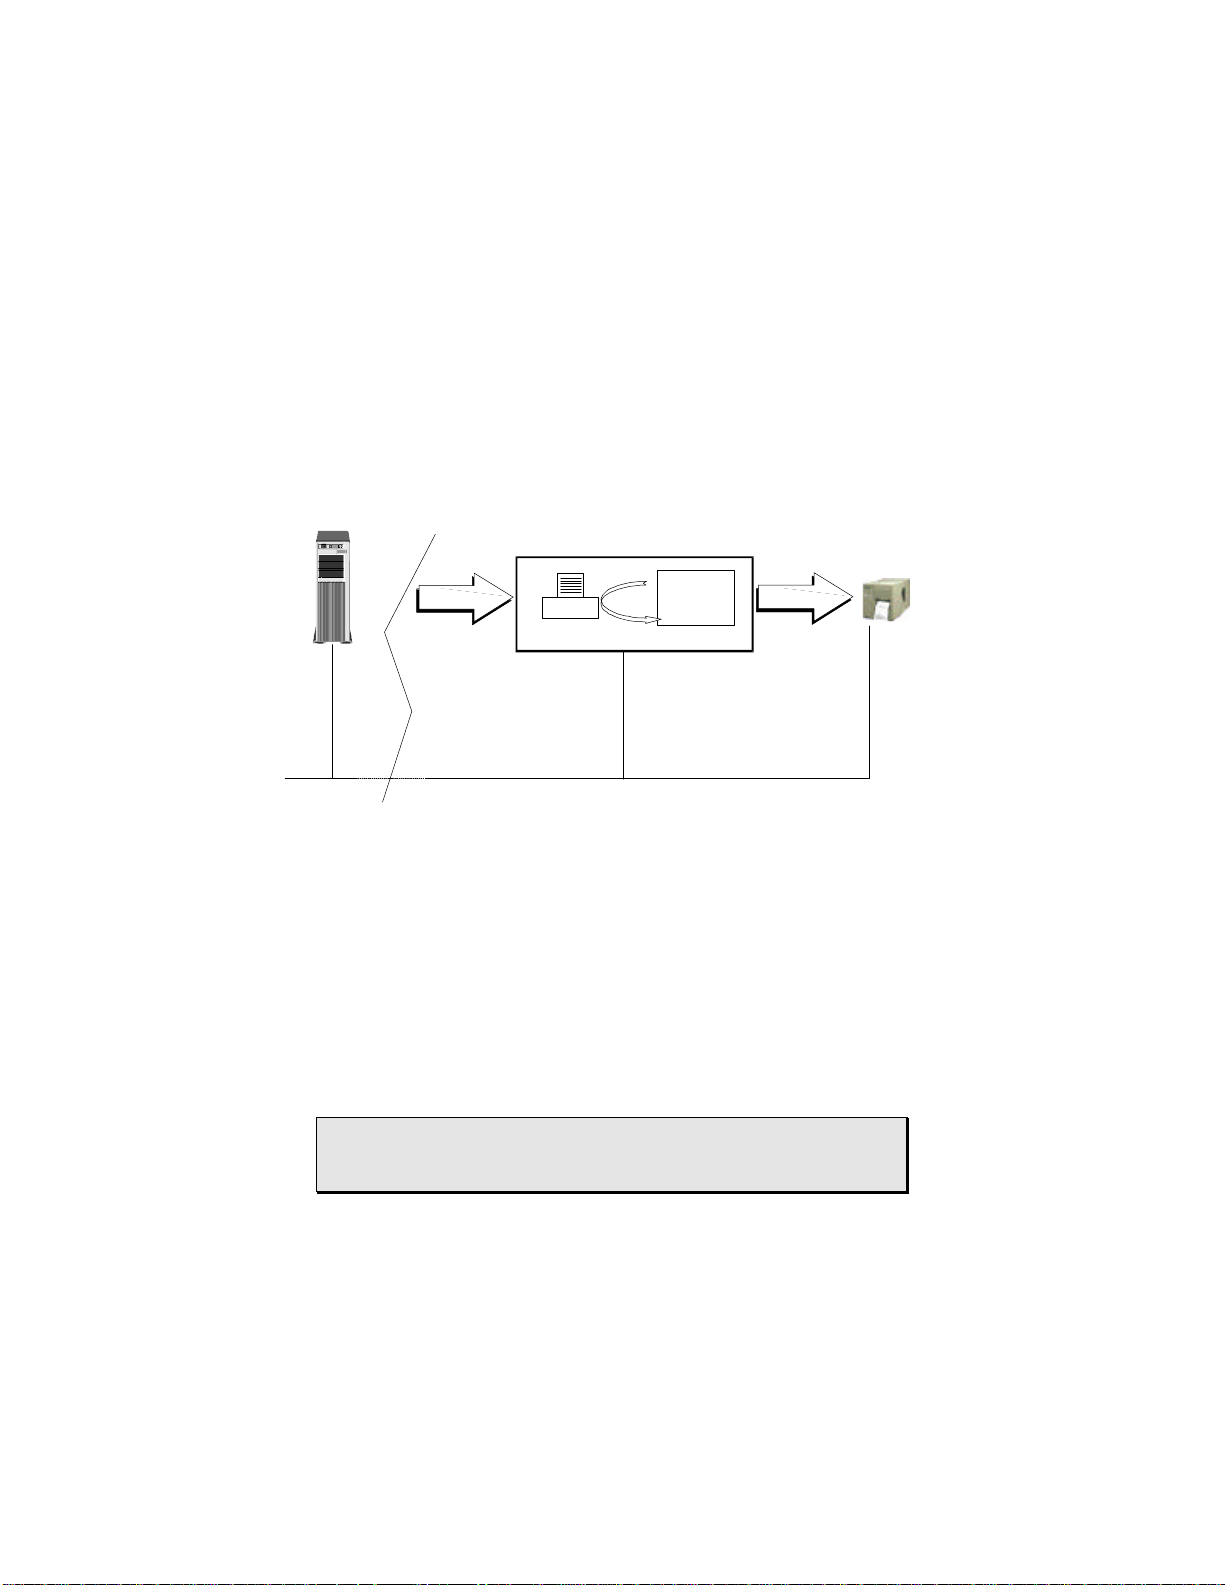
The Print document printed out from your application is added to the print
queue of a Sentinel printer. Figure 1 below illustrates how the Print
sentinel works.
Network
Applications
Unix ,
AS400,
PC,
…
Data
Document
printing by the
application
WindowsTM Station
Printer server
Sentinel
Printer
Network
Sentinel
Pri nt Pack
Data
Print orders
Figure 1: Functional Diagram
By adding a Print sentinel, you automatically create a Sentinel printer of
the same name on the print server.
The Print documents stored in the print queue are analyzed by the Print
sentinel, which transcribes the information into print orders for
CODESOFT Run Time. The Print sentinel is associated with:
w a method for analyzing Print documents;
w an output printer selected earlier in CODESOFT Run Time; and
w print settings (number of labels to print, pages, etc.).
Printer
Note 1: The analysis method, output printer, and all print settings
can be modified from the Print document.
Page 9
Note 2: The print documents will be processed and then erased.
Documents that do not conform to the analytical method will be
destroyed automatically.
Structure of the Print Document
The Print document must feature a specific structure, which is detailed
below. Moreover, APPENDIX 1 (Chapter 7) discusses an example of a
Print Document (Identity.txt).
Print jobs for CODESOFT can be described in full by entering:
w their control variables;
w the label Import variables; and
w additional information such as print settings (number of labels to
print, etc.).
As you can see, the Print document duplicates descriptive label information used in CODESOFT.
In addition to containing information that describes the label, text files
must employ a specific syntax for the assignment of data to label variables.
This can be done in two ways:
w direct assignment; and
w assignment by table.
Syntax for Direct Assignment
A directly assigned file consists of variables whose values were assigned directly; the sum of those variables make up the label.
Labels are described successively following the rules of syntax listed below:
w labels must be separated from one another by an end-of-label
delimiter;
w each line describing a variable to initialize must begin with a
start-of-assignment delimiter, followed by the name of the
Page 10
variable, the assignment operator, and the value of the variable.
It must end with an end-of assignment delimiter (see example
below).
Delimiters: a character or strings of characters whose purpose is to
frame the data (variable name and values) in a Print document.
Example :
[File header]
[start assignment) [variable1] [assignment
operator]
[start assignment] [variable2] [assignment
operator]
... ... ... ... ...
[start assignment] [variableN] [assignment
operator]
[end label]
[start assignment] [variable1] [assignment
operator]
[value] [end assignment]
[value) [end assignment]
[value] [end assignment]
[value] [end assignment]
The variables referred to will either be CODESOFT control variables or
the label’s Import variables.
Label No. 1
Label No. 2
Syntax Assigned by Table
A file assigned by table organizes the variables into a two-part table that
consists of:
w a header specifying the variables associated with the table
columns, framed by a delimiter for the start table header and the
end table header; and
w a set of values associated with header variables, framed by a start
table and an end table delimiter.
Page 11

Each line corresponds to a label:
[file header]
[start header] [variable1] [separator] ... [variableN] [end header]
[start table] [value1] [separator] ... [valueN] [end table]
[start table] [value1] [separator] ... [valueN] [end table]
[start table] [value1] [separator] ... [valueN] [end of table]
... ... ... ... ... ...
The variables referred to will be either CODESOFT control variables or
the label’s Import variables.
Characteristics of the Print Document
Print files, whether made up of direct and/or table assignments, must obey
the following rules.
Header
To be recognized by CODESOFT Sentinel Print Pack, files must begin
with a header specified using the Sentinel Print Pack interface.
Example:
The default header suggested in the interface, which is “SENTINEL,” re-
quires files to begin with the following sequence: ”SENTINEL”
Label Referred To
CODESOFT Run Time print jobs must be associated with a label file
name.
This can be done:
w either through direct assignment (the name of the variable can be
specified in Sentinel Print Pack); or
w through table assignment.
In the case of table assignments, make sure that the name of the
CODESOFT control variable (for example: “LAB_NAME”) is included in
the specification of the table header.
Page 12

Delimiters
The CODESOFT Sentinel Print Pack interface gives you a simple and
user-friendly way to define all the Delimiters needed to analyze print
documents, as well as the name of the CODESOFT control variables that
will make up your label (see Interface, Chapter 5).
Note
As soon as you assign a character (or string of characters) to a delimiter, it becomes a control character and can be used only as such.
However, you may include it in an assignment value, or even within
a variable name, if you take the trouble to duplicate it.
Example
If the delimiter for the start direct assignment line is «start,» and if a
value must be assigned to the «CSstart» variable defined in a
CODESOFT label, write:
start CSstartstart [assignment] [value] [end assignment]
Same Variables
Same Variables allows you to freeze the value of a variable until a new assignment changes it. Thus, if a variable’s value does not change over the
course of several label specifications, you do not need to re-assign it for the
following ones.
A setting option available from the interface of the Sentinel Print Pack
module specifies whether a variable should stay the same or be re-entered
each time a label is defined.
Page 13

Combined Assignment
If the Same Variables option is checked, direct assignment and table assignment can be combined.
Combined assignments set the value of one or more label variables. To do
this, the values requiring setting are defined through direct assignment; the
others are specified using table assignment (see example below):
Example:
>var1 = val1<
>var2 = val2<
[var3,var4, .............]
(val3,val4,...............)
(val5,val6,...............)
For all these labels, the value of the
}
variables var1 and var2 will remain
Label Recognition
A label is sent to be printed when the program encounters an end label or
end table data delimiter.
Printing Via Network
TCP/IP Protocol
If you are using TCP/IP as the communication protocol to link your separate networks, you can use the LPR/LPD services to print your print docu-
ments. First you must install and start up the TCP/IP print services on the
Print Server, which, in this case, must be a WindowsTM NT station.
When employed using an IBM network, the above method requires
CODESOFT Sentinel Print Pack to translate files into EBCDIC format.
To do this, you must check the EBCDIC ASCII conversion option when
setting up Print Sentinel.
Page 14

ASCII File Sentinel
ASCII File Sentinel 15
File Structure 16
Page 15
ASCII File Sentinel
1
0
The Print document is copied from your application into a directory. Figure 2 below illustrates how the ASCII file sentinel works.
Applications
WindowsTM Station
Unix,
AS400 ,
PC,
…
Data
Print document
is copied in the
specified
C :\
Directory
accessible from
Windows
the
station
Sentin el
Print Pack
TM
Data
Print orders
Printer
Network
Network
Figure 2: Functional Diagram
When you add an ASCII file sentinel, you specify a directory dedicated to
monitoring print documents.
The print documents stored in this directory are analyzed by the ASCII file
Sentinel, which transcribes the information into print orders for
CODESOFT Run Time.
The ASCII file is associated with the following:
w an output printer, selected earlier in CODESOFT Run Time; and
w printing parameters (the number of labels to print, etc.).
Note 1: the output printer and all the printing parameters can be
configured from the Print document.
Page 16

Note 2: The print documents will be processed, then erased. Docu-
ments that do not conform to the method of analysis will be destroyed automatically.
We therefore recommend specifying a directory that will be dedicated entirely to the ASCII file sentinel for CODESOFT.
File Structure
ASCII files can consist either of direct and/or table assignments (see
Chapter 2).
ASCII files require neither headers nor start and end-of-line delimiters.
However, it is essential to enter a hard return (CRLF characters) at the end
of each line in the file.
Note: some delimiters are configured by default:
⇒ the assignment delimiter is defined by the ”=“ character;
⇒ the data separation delimiter is defined by the “,” character; and
⇒ the end-of-label delimiter is defined by the “END” character.
However, all of the above parameters can be redefined from the
Sentinel.ini file in the CODESOFT installation directory:
⇒ Affect ==,
⇒ SepData = ,
⇒ SepLabel = END.
Appendix 2 of Chapter 7 presents and discusses a sample print document
for a Print sentinel.
Page 17

Data Source Sentinel
Data Source Sentinel 18
Structure of the Print Document 19
Page 18

Data Source Sentinel
1
0
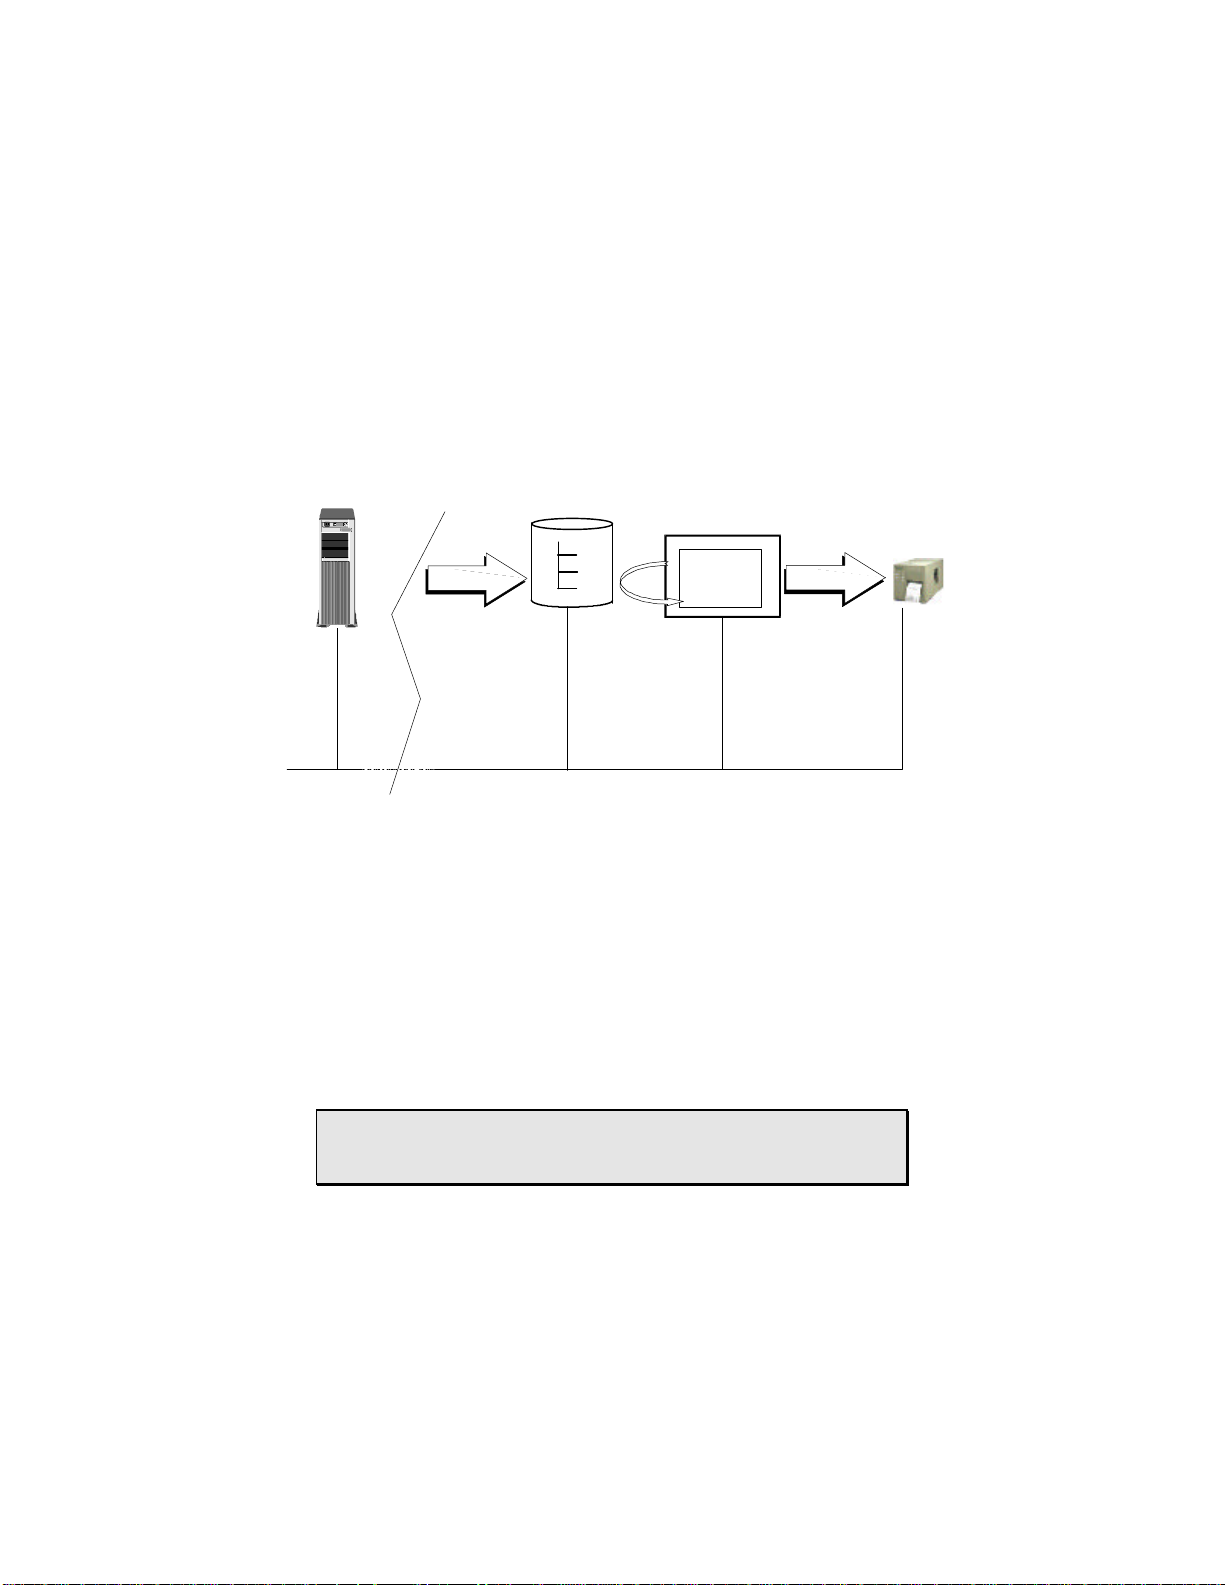
The print document is copied from your application into a directory. Figure
3 below illustrates how the Data source sentinel works.
Applications
WindowsTM Station
Unix,
AS400 ,
PC,
…
Data
Print document
is copied in the
specified
C :\
Directory
accessible from
Windows
the
station
Sentin el
Print Pack
TM
Data
Print orders
Printer
Network
Network
Figure 3: Functional Diagram
Adding a Data source sentinel is the way you define a data source.
The print document, whose format matches the format of the data source,
is analyzed by the Data source sentinel. The file mode method uses Microsoft ODBC 32-bit connections. It requires specifying a data source, so that
an appropriate analysis method can be associated with a file (identified by
its name, path, and type).
The data source will be associated with:
w an output printer;
w an ODBC data source; and
w parameters characterizing the print job.
Data sources may be specified either directly from the CODESOFT Sentinel Print Pack interface, or via the configuration panel of the Windows
station.
TM
Page 19

Attention:
Certain kinds of data sources are not associated with a specific filename, as they are reserved for paths and file name extensions. For
those data sources, the Data source sentinel will analyze all extension files specified in the directory.
Note: Print documents will be processed and then erased.
Documents that do not conform to the method of analysis will be
automatically destroyed. We therefore recommend that you specify a
directory dedicated exclusively to the CODESOFT Data source
sentinel.
Structure of the Print Document
Documents are composed of a header that includes every variable
CODESOFT Run Time uses to print labels, followed by a group of values
to be assigned in turn to the variables.
Each line of the Print Document corresponds to a label specification.
Here too, the variables can be:
w CODESOFT control variables; or
w the label’s Import variables.
Note:
To be recognized, the header must refer to the name of the label to
be printed.
Files appear in table form. The first line of the table is the header specification, which starts with the name of the label to be printed (CODESOFT
system variable), followed by the different Import variables that make up
the label. At the end of the header, the system variable LAB_QUANTITY
allows you to reset the number of labels to be printed, since the default
value set from the interface is «1.»
Page 20

The variable separator is set when the data source is created.
You will note that on line 4, the “FirstName” variable is not filled in. If the
Same Variables option is on, the field will have the same value as the previous label. If not, the field will not appear on the label.
LAB_NAME,Code,Name,FirstName,Address,City,State,Zip,LAB_QUANTITY
identity.lab,1969,O'Hare,Ned,4950 Ave. NE,Seattle,WA,98105,1
identity.lab,2001,Bowman,Dave,1 Discovery Lane,Pueblo,CO,2
identity.lab,2589,Thompson,,2339 Broadway,San Francisco,CA,94123,1
identity.lab,3154,Yee,Emerson,2938 42nd Street,New York,NY,10032,1
Page 21

Error Files
Error Files 22
Structure of Error Files 22
Error Messages 24
Page 22

Error Files
When you start up the CODESOFT Sentinel application, an error file
(ERROR.LOG) is automatically created in its installation directory. Error
files monitor whether or not a copy of Sentinel (print or file mode) is
working as it should.
Error files cannot exceed 50 kb. Once a file has reached maximum size, the
software automatically deletes all errors recorded more than two days before.
Warning:
We recommend that you check error files regularly to avoid losing
information on the functioning of Sentinel Print Mode or Sentinel
File Mode modules.
Structure of the Error File
The number of entries in error files matches the number of Sentinel modules specified in CODESOFT Sentinel.
Error files let you know which jobs were only partially processed and were
found to contain Print Document errors for each active copy of Sentinel.
Page 23

Sample Error File:
Error.log
[Printer 1]
08/20/97 10:29:29=Error in the Print Document: 1 in line
2: End direct assignment not found
08/20/97 10:38:53=Label: identhp.lab Error in the Print
Document: 2 in line 19: Line break character at start
line not found
08/20/97 11:10:58=Label: ident0.lab Error in the Print
Document: 3 in line 15: Unable to load the label in
CODESOFT
[Printer 2]
08/20/97 10:35:12=Label: identhp.lab Error in the Print
Document: 1 in line 15 : Communication error with
CODESOFT
08/20/97 10:37:00=Label: identhp.lab Error in the Print
Document: 2 in line 11: Line break character at start of
the line invalid
[DSR1]
08/20/97 11:29:21=Label: identhp.lab Error in the Print
Document: 1 in line 1: Printer/port pair invalid in
CODESOFT
Page 24

Error Messages
Error messages inform users of the nature and location of errors so that
they can correct them.
They consist of one of the messages described below, preceded by the date
and time.
Unable to connect to CODESOFT
CODESOFT RUNTIME has not been installed or has been shut down
again after being started up by Sentinel.
No label name
The name of the label to be printed has not been specified.
Unable to load the label in CODESOFT
The label specified is not found in the directory indicated or in the default
directory defined in CODESOFT.
The variables specified do not match the label variables
The variable names indicated in the Print Document are not specified in the
label.
No variable is specified in the CODESOFT label
The label specified in the Print Document does not include any variables.
CODESOFT cannot print this label
Sentinel has detected a connection problem with the printer (check the
Printer settings in CODESOFT).
Printer/port pair not valid in CODESOFT
The output printer (printer name + port) is not entered in CODESOFT.
Page 25

Unable to continue the analysis (no more delimiters)
Sentinel cannot find any more Delimiters in the Print Document being
analyzed.
End direct assignment not found
Sentinel could not find the end direct assignment delimiter.
End array header not found
Sentinel could not find the end array header delimiter.
End array data not found
Sentinel could not find the end array delimiter.
Line break character at beginning of line not found
The line break character must appear at both the end and the beginning of
each line break.
No data in table
A table header has been defined but no data follow.
Line break character at the beginning of line invalid
The line break character must appear at both the end and the beginning of
each line break.
End assignment for system variable not found
The assignment of a value to a control variable must end with the character
«.».
Start line delimiter not found
The Print Document does not contain a delimiter (start direct assignment,
start header, start data).
Page 26

Two identical delimiters specified
Sentinel has detected at least two identical Delimiters. All Delimiters
specified in Sentinel must be different.
Communication error with CODESOFT
Check to make sure that CODESOFT has been loaded into memory.
Printing error
The Print Document sent to the Sentinel printer is damaged.
Page 27

CODESOFT
Sentinel Print Pack Interface
The CODESOFT Sentinel Print Pack Interface 28
Print Sentinel Mode 29
The Direct Assignment Tab Section 31
The Table Assignment Tab Section 32
The Control Variables Tab Section 33
The Designated Printers Tab Section 34
Default Values Area 35
The Other Tab Section 36
Print Sentinel Area 36
Print Documents Area 37
ASCII File Sentinel Mode 38
The Control Variables Tab Section 39
The Re-routed Printers Tab Section 39
The Others Tab Section 39
Data Source Sentinel Mode 39
The Control Variables Tab Section 41
The Re-Routed Printers Tab Section 41
Managing Print Documents 41
Print Documents for a Print Sentinel 41
Page 28

The CODESOFT Sentinel Print Pack Interface
The CODESOFT Sentinel Print Pack interface enables you to create and
configure sentinels of your own choice (Print sentinel, ASCII file sentinel,
or Data source sentinel).
One area of the two-part interface is set aside for program execution commands. The other contains five tab sections where the settings for each installed copy of Sentinel Print Pack can be entered.
The command area enables you both to start up the application and add or
remove a sentinel (Print sentinel, ASCII file sentinel, or File sentinel).
Make your choice simply and quickly by selecting either a printer or a data
source:
w printer — Print sentinel;
w ASCII —ASCII file sentinel;
w data source — Data source sentinel.
Depending on the transmission mode, some options will not be active.
Page 29

Print Sentinel Mode
If you use the Print sentinel, you will have to supply the name of a Sentinel
Print Pack Printer to which print documents will be routed.
The Sentinel Print Pack Printer can either be selected from a list of printers
already created or added to the printer list.
§ Click on the Printer button of the Add area.
Ä A window opens listing the printers installed on the Print
Server and based in the specific printing pilot for the
CODESOFT Sentinel Print Pack application.
From the Sentinel Print Pack Printers dialog box, you can:
§ select a printer already created (Confirm button); or
§ add a new printer by clicking on the Add button.
Ä This brings up a Name field, in which you can enter the name
of the new Sentinel Print Pack Printer.
§ Enter the Name you want the printer to have, then confirm.
Page 30

Ä The new Print sentinel appears in the main screen list.
§ To eliminate a Print sentinel from the Sentinels window, select it, then
click Remove.
An analysis method and print settings must then be associated with the
Print sentinel. The following sections discuss the different tab sections
used to configure your print jobs.
Page 31

The Direct Assignment Tab Section
This tab section specifies the Delimiters that will be used in the print
documents to define direct assignments.
Start of assignment: this field uses a character or character string to define
the delimiter identifying each start of direct assignment.
End of assignment: this field uses a character or character string to define
the delimiter identifying each end of direct assignment.
Assignment: this field uses a character or character string to define the direct assignment operator.
End of label: this field uses a character or character string to define the
delimiter indicating a separation of two labels.
Page 32

The Table Assignment Tab Section
The table assignment tab section specifies the Delimiters that will be used
in print documents to define table assignments.
Start of header: this field uses a character or character string to define the
delimiter for the start table header.
End of header: this field uses a character or string of characters to define
the delimiter for the end table header.
Start of data: this field uses a character or character string to define the
delimiter for the start table data.
End of data: this field uses a character or character string to define the delimiter for the end table data.
Data separation: this field defines the delimiter used as a data separator
during table assignment.
Page 33

The Control Variables Tab Section
This tab section defines the name of the CODESOFT control variables
(identifiers), which will appear in Print Documents.
Label file name: this field specifies the name of the Label Filename control
variable, which allows a new label to be loaded into CODESOFT while it is
running.
Labels in the series: this field specifies the name of the Series Labels control
variable.
Copies of Each Page: this field specifies the name of the Copies of Each Page
control variable.
Copies of Each Label: this field specifies the name of the Copies of Each Label control variable.
Labels between cuts: this field specifies the name of the Number of Labels between cuts control variable.
Printer and Port: this field specifies the name of the Printer and Port
control variable.
Page 34

Printer initialization: this field specifies the name of the Initialization
Sequence control variable.
The Designated Printers Tab Section
This tab section can be used to specify the printer default settings (number
of copies, etc.) and to select the output printer by default on which you want
to print your labels.
Name: This scrolling list allows you to specify the default printer on which
CODESOFT Run Time will execute your print jobs.
Page 35

Default Values Area
Copies of Each Label: If the label contains a counter, the counter’s value will
be constant on each copy (except for counters featuring the ISO option).
§ Indicate here the number of identical copies you want made for each la-
bel.
Copies of Each Page: This number is used only when the page contains several
labels, and is used to set the number of copies of each page to be printed. (see the
example in Chapter 21 of the Reference Manual).
Labels in the series: If the document has no Counter variables, this number
simply indicates the number of labels to be printed. If the document does include
a counter, this number determines the number of different labels to print, that
is, the number of counter increments.
Labels between Cuts: this number determines the number of labels to be
printed between each break.
Initialization Sequence: this area can be used to enter a command, in
printer language, which will be transmitted at printing time.
Note: for more information on the above variables, refer to Chapter
21 of the user manual CODESOFT Run Time.
Page 36

The Other Tab Section
The Other tab section establishes the general settings that are shared by all
sentinels (Print sentinel, ASCII file sentinel or Data source sentinel).
Print Sentinel Area
File Header: this field defines the file header that appears at the beginning
of all Print Documents for the Print sentinel.
Hyphenation characters: CODESOFT Sentinel Print Pack limits the
number of characters per line in Print Documents to 400. Depending on
your working configuration, the number of characters per line may be
smaller, and the hyphenation character enables you to exceed 400 characters by splitting the line into several parts. The hyphenation character
works in pairs; it must occur at the end of a line segment and the beginning
of the following segment.
Page 37

Print Documents Area
Kind of conversion: this option allows you to select the type of conversion
you want to apply to the data transmitted.
Continue after error: If an error occurs during the analysis or routing of
data to CODESOFT, the file being analyzed will be eliminated, while
Sentinel Print Pack remains active and ready for other analyses.
Save jobs that do not conform: this option can be used in combination
with the Continue after error option. Indeed, if an error occurs, this
option will allow you to save a file that does not conform. Saving the file
will enable you to check its validity so that it can be corrected. It is up to
you to check whether or not the file is present in the ERROR directory
created by Sentinel Print Pack.
Stop if an error occurs: if you check this option, Sentinel Print Pack will
stop automatically when an error occurs.
Keep the values of the previous label: this setting option specifies whether
the variable values should remain the same or be reset each time a label’s
specifications are entered.
Note: Keeping variables the same freezes the value of a variable until a new assignment modifies the previous one. This eliminates the
need to assign a value to a label variable each time the label is defined, if the value does not change between two specifications.
Page 38

ASCII File Sentinel Mode
In ASCII file sentinel mode, you must define an ASCII file sentinel name
and specify the directory to be analyzed.
§ Click on the ASCII file button of the Add area.
Ä A window with two print areas displays.
Name: input the name of the ASCII file sentinel of your choice.
Directory: specify the directory to be analyzed.
§ To delete an ASCII file sentinel from the Sentinel window, select the
latter and click Delete.
Page 39

The options for direct assignment tab section and table assignment
tab section are not available in ASCII file sentinel mode.
The Control Variables Tab Section
This tab section is where you specify the name of the CODESOFT control variables
(see Print Sentinel Chapter p. 33), which can be used in the print document.
The Re-routed Printers Tab Section
This tab section specifies printing variables and selects the printer on which you want to
print out your labels (see Print Sentinel Chapter p. 34).
The Others Tab Section
This tab section specifies general parameters (see Print Sentinel Chapter p. 34).
Data Source Sentinel Mode
The Data source sentinel requires you to supply the name of a data source
for use in analyzing print documents.
The data source used will either be selected from a list of already created
data sources or added to the list.
§ Click the Data Source button of the Add area.
Page 40

Ä A window opens listing the data sources entered under Print
Server.
From the Data Sources dialog box, you can:
w Select an already created data source (Confirm button), or
w Add or modify a data source (Add/Modify button)
Ä This will bring up the 32-bit ODBC management dialog
box.
Page 41

Once the data source is created or changed, Sentinel Print Pack again displays the Data Sources window.
§ Select the data source of your choice, and confirm.
To delete a File sentinel from the Sentinels window, select the latter, then
click Delete.
The options in the Direct Assignment and Table Assignment tab
sections are not accessible in File sentinel mode.
The Control Variables Tab Section
This tab section specifies the names of the CODESOFT control variables (see the Print
Sentinel Chapter, p. 33) which can be used in Print Documents.
The Re-Routed Printers Tab Section
This tab section enables you to choose print job settings and select the printer on which
you want to output your labels (see the Print Sentinel Chapter, p. 34).
Managing Print Documents
You can check on the status of your print documents at any time during
processing.
Print Documents for a Print Sentinel
§ To access this management window, double-click on the sentinel of
your choice from the Sentinels window.
Ä The management window appears, and displays the list of
documents waiting in the print queue.
Page 42

§ To eliminate print files, select them, then strike the “Delete” key on
your keyboard.
Note: Your files can be eliminated both while they are in the queue
and while they are being processed..
Page 43

Appendices
APPENDIX 1 44
Print Sentinel 44
Table Assignments 45
Combined Assignment 46
APPENDIX 2 49
ASCII File Sentinel 49
Page 44

APPENDIX 1
Print Sentinel
This appendix presents and discusses a sample print file that includes both direct and
table assignments.
Direct assignment
labels are defined one after another.
Header
1 SENTINEL
2>:LAB_NAME = identity.lab:<
3>:LAB_QUANTITY=1:<
4>:PAGE_COPY = 1:<
5>:LABEL_COPY=1:<
6>:INTERCUT =1:<
7 SEP_LABEL = STOP.
8>:Code=1909:<
9>:Name=Cole:<
10>:FirstName=Warren:<
11>:Address=3434 Washington Blvd:<
12>:City=Indianapolis:<
13>:State=IN:<
14>:Zip=46241:<
15>:STOP:<
.
.
.
.
.
32>:Code=7425:<
33>:Name=Mason:<
34>:FirstName=John:<
35>:Address=2421 Prospect Ave.:<
36>:City=Berkeley:<
37>:State=CA:<
38>:Zip=94704:<
39>:STOP:<
Name of the label to be
printed/Specify at the beginning of
the file.
Application system variable (no
delimiters)/Specification of the label
separator: "STOP"
Note
Numbering the lines is strictly
optional. The use of numbers
simply makes it easier to organize your document.
Page 45

40>:City=Auch:<
41>:STOP:<
If the Same Variables option is
active, the label will retain the
values of the previous label fields,
except for “City,” which assume the
value Auch.
Table Assignments
Table separators set from the interface: Start header = [:
End header = :]
Start table = {:
End table = :}
Hyphenation character = />
Variables separator = ,
42 [:Code,Name,FirstName,Address,City,State,Zip:]
43 {:1969,O'Hare,Ned,4950 Pullman Ave. NE,Seattle,WA,98105:}
44 {:2001,Bowman,Dave,1 Discovery Lane,Pueblo,CO,81002:}
45 {:2589,Thompson,Donald,2339 Broadway,Los Angeles,CA,94123:}
46 {:3154,Yee,Emerson,2938 42nd Street,New York,NY,10032:}
47 {:2121 , Bowman , Dave , 1 Discov/>
/>ery Lane , Pueblo , CO , 81002:}
48 {:4789 , Thompson , Donald , 2339 Broadway />
/> , San Francisco , CA , 94123:}
49 {:5688 , Yee , Emerson , 2938 42nd Street />
/>, New York , NY , 10032:}
The Hyphenation character "/>, can split a line of
description when the number of characters in the line
exceeds the maximum set by the printer
Page 46

Combined Assignment
The “Address,” ”City,” ”State,” and ”Zip Code” fields are assigned by table.
The “Code,” “Name,” and ”FirstName” fields are assigned directly.
If the Same Variables option is ac-
50 >:Code=1909:<
51 >:Name=Mason:<
52 >:FirstName=John:<
55 [: Address,City,State,Zip :]
56 {: 1 Discovery Lane , Pueblo , CO , 81002 :}
55 {: 2339 Broadway , San Francisco , CA , 94123 :}
56 {: 2938 42nd Street , New York , NY , 10032 :}
57 >:Code = 1913:<
58 >:Name = Mason:<
59 >:FirstName = John:<
60 >:Address = 2421 Prospect Ave.:<
61 >:City = Berkeley:<
62 >:State = CA:<
63 >:Zip = 94704:<
64 >:STOP:<
tive, the “Code,” “Name” and
“FirstName” fields of the labels
specified in the following table will
assume 1909, Mason et John as
their values.
65 BREAK_LINE = ##. Redefining the Hyphenation Character
66[:Code,Name,FirstName,Address,City,State,Zip]
67{: 3684 , Aberdeen , Roxie , 15 State Street ,##
## Dallas , TX , 75043:}
68{: 4158 , McDougal , Craig , 1 Airport Drive ,##
## Chicago , IL , 60542:}
69{: 4175 , Anderson , Jack , 8947 San Andreas ,##
## Klamath Falls , OR , 97603:}
70{: 5510 , Samuelson , Doris , Bull Run Ranch ,##
## Aurora , CO , 89022:}
71 START_SET = %%.
72 END_SET = **.
Resetting the start line character
Resetting the end line character
Page 47

73 %%Code = 7777**
74 %%Name = DACLIN**
75 %%FirstName = paul**
76 %%Address = Madison Avenue**
77 %%City = New York**
78 %%State = NY**
79 %%Zip = 55230**
80 %%STOP**
Note
Numbering the lines is strictly optional. The use of numbers simply makes it
easier to organize your document.
The file delimiters specified in the CODESOFT Sentinel Print Pack application can all, except for the assignment operator, be redefined in the file
itself.
To do so, just fill in the right system variable through direct assignment
(see the table of pairs), making sure not to assign the same value to two
different delimiters.
The new assignment takes effect on the next line.
Table of Pairs:
direct assignment delimiters
[start line]: START_SET
[end assignment]: END_SET
[end label]: SEP_LABEL
table assignment delimiters
[start header]: START_HEADER
[end header]: END_HEADER
[start table]: START_ARRAY
[end table]: END_ARRAY
[separator]: SEP_DATA
[line break]: BREAK_LINE
Page 48

This type of direct assignment reserved for the control variables of
CODESOFT Sentinel Print Pack must employ the following syntax:
[name of the system variable associated with the delimiter] [assignment]
[value]•
The period at the end of the assignment is necessary to indicate that it has
ended.
If you want to specify a delimiter that includes as part of the delimiter one
or more periods, just double them in the assignment value to make sure
they are recognized.
Example: To redefine the start line delimiter, just bring it up in the print
file.
Example:
...
...
START_SET = >>> •
...
After this line, all the direct assignments will have to begin with: >>>
Page 49

APPENDIX 2
ASCII File Sentinel
This appendix presents and discusses a sample ASCII file featuring both direct and
table assignments.
LAB_NAME = i3240.lab¶
Note that there is no header; the label to be loaded is specified by direct
assignment.
This first label is described entirely by direct assignments.
The “END” delimiter makes it possible to incorporate and print the label.
Code=1909¶
Name=Cole¶
FirstName=Warren¶
Address=3434 Washington Blvd¶
City=Indianapolis¶
State=IN¶
Zip=46241¶
END¶
Direct assignment: note that it is possible to specify another printer from
the ASCII file.
THT_NAME = Tec B572,\\PC 9719\PRINTER¶
Table assignment: each line corresponds to one label.
Code,Name,FirstName,Address,City,State,Zip¶
1969,O'Hare,Ned,4950 Pullman Ave. NE,Seattle,WA,98105¶
2001,Bowman,Dave,1 Discovery Lane,Pueblo,CO,81002¶
2589,Thompson,Donald,2339 Broadway,San Francisco,CA,94123¶
3154,Yee,Emerson,2938 42nd Street,New York,NY,10032¶
Changing printers through direct assignment
THT_NAME = Ubi 91 (203DPI/8dots),LPT1: ¶
Page 50

Direct assignment
Code=7658¶
Name=debie¶
FirstName=LAURA¶
Address=3434 Washington Blvd¶
City=Indianapolis¶
State=IN¶
Zip=46241¶
END¶
Table assignment: the printer variable ”THT_NAME“ is incorporated
into the header of the table, making it possible to change printers with
each new label .
THT_NAME , Code , Name , FirstName , Address , City , State , Zip¶
Tec B572,,\\PC 9719\PRINTER , 1969 , O'Hare , Ned , 4950 Pullman Ave. NE ,
Seattle , WA , 98105¶
Intermec 3240 (400 DPI),,\\PC9604\GENTEXTE , 2001 , Bowman , Dave , 1
Discovery Lane , Pueblo , CO , 81002¶
Ubi 91 (203DPI/8dots),,LPT1:, 2589 , Thompson, Donald , 2339 Broadway,
San Francisco , CA , 94123¶
Note: We have deliberately represented the characters CRLF by ¶ to
highlight the importance of their presence.
 Loading...