

Page 1

ph: 1.800.762.5757 • fx: 888.353.4242
www.boxlight.com
find the light.
Page 2

x User’s Manual
FCC Notice
This equipment has been tested and found to comply with the limits for a Class B digital device, pursuant to part 15 of the FCC Rules.
These limits are designed to provide reasonable protection against harmful interference in residential installation. This equipment
generates, uses and can radiate radio frequency energy and if not installed and used in accordance with the instructions, may cause
harmful interference to radio communications. However, there is no guarantee that interference will not occur in a particular installation.
If this equipment does cause harmful interference to radio or television reception, detectable by turning the equipment in question off
and on, the user is encouraged to try to correct the interference by one or more of the following measures:
x Reorient or relocate the receiving antenna
x Increase the distance between the equipment and the receiver
x Connect the equipment to an outlet on a different circuit than that which the receiver is connected to
x Or consult the dealer or an experienced radio/TV technician for help.
This device complies with Part 15 of the FCC Rules. Operation is subject to following two conditions:
1. This device may not cause harmful interference, and
2. This device must accept any interference that may cause undesired operation.
Page 3

x User’s Manual
Safety Instructions
Read all of these instructions before you operate your projector and save for future reference.
1. Check that the operating voltage of your unit is identical with the voltage of your local power supply.
2. Should any liquid or solid object fall into the cabinet, unplug the unit and have it checked by the qualified personnel before
operating it further.
3. Do not attempt to service this product yourself, as opening or removing covers may damage the components inside and will void
your warranty.
4. Do not place this product on an unstable cart, stand, or table. The product may fall, causing serious damage to the product.
5. Unplug the unit from the wall socket if it is not to be used for several days. To disconnect the cord, pull it out by the plug. Never
pull the cord itself.
6. The wall socket should be near the unit and easily accessible.
7. Do not place the projector where the cord can be stepped on as this may result in fraying or damage to the lead or the plug. Be
alert to tripping hazards.
8. Never look into the projector lens when the lamp is switched on as the bright light can damage your eyes. Never let children look
into the lens when it is on.
9. Do not place your hand or objects near the ventilation holes. The air coming out is hot.
10. Never open any covers on the projector except the lamp cover. Dangerous electrical voltages inside the projector can cause severe
injury. Except as specifically directed in this User's Manual, do not attempt to service this product yourself. Refer all servicing to
qualified service personnel.
11. Unplug the projector from the wall socket before cleaning. Use a damp cloth for cleaning the projector housing. Do not use liquid
or aerosol cleaners.
12. Keep the plastic packing materials (from the projector, accessories and optional parts) out of the reach of children as these bags
may result in death by suffocation. Be particularly careful around the small children.
Page 4

x User’s Manual
13. For ventilation reasons, the fan continues to operate after the projector has been powered off. Please do not unplug the
power cord until the fan stops.
14. The projector is equipped with ventilation holes (intake) and ventilation holes (exhaust). Do not block or place anything near
these slots, or internal heat build-up may occur, causing picture degradation or damage to the projector.
15. When you replace the projector lamp, never touch the new bulb with your bare hands. The invisible residue left by the oil on
your hands may shorten the bulb life. Use lint-free gloves or finger cots are recommended.
16. The product should be situated away from heat sources such as radiators, heat registers, stoves, or other products (including
amplifiers) that produce heat.
17. Do not overload wall outlets, extension cords, or integral convenience receptacles as this can result in a risk of fire or
electric shock.
Page 5
x User’s Manual
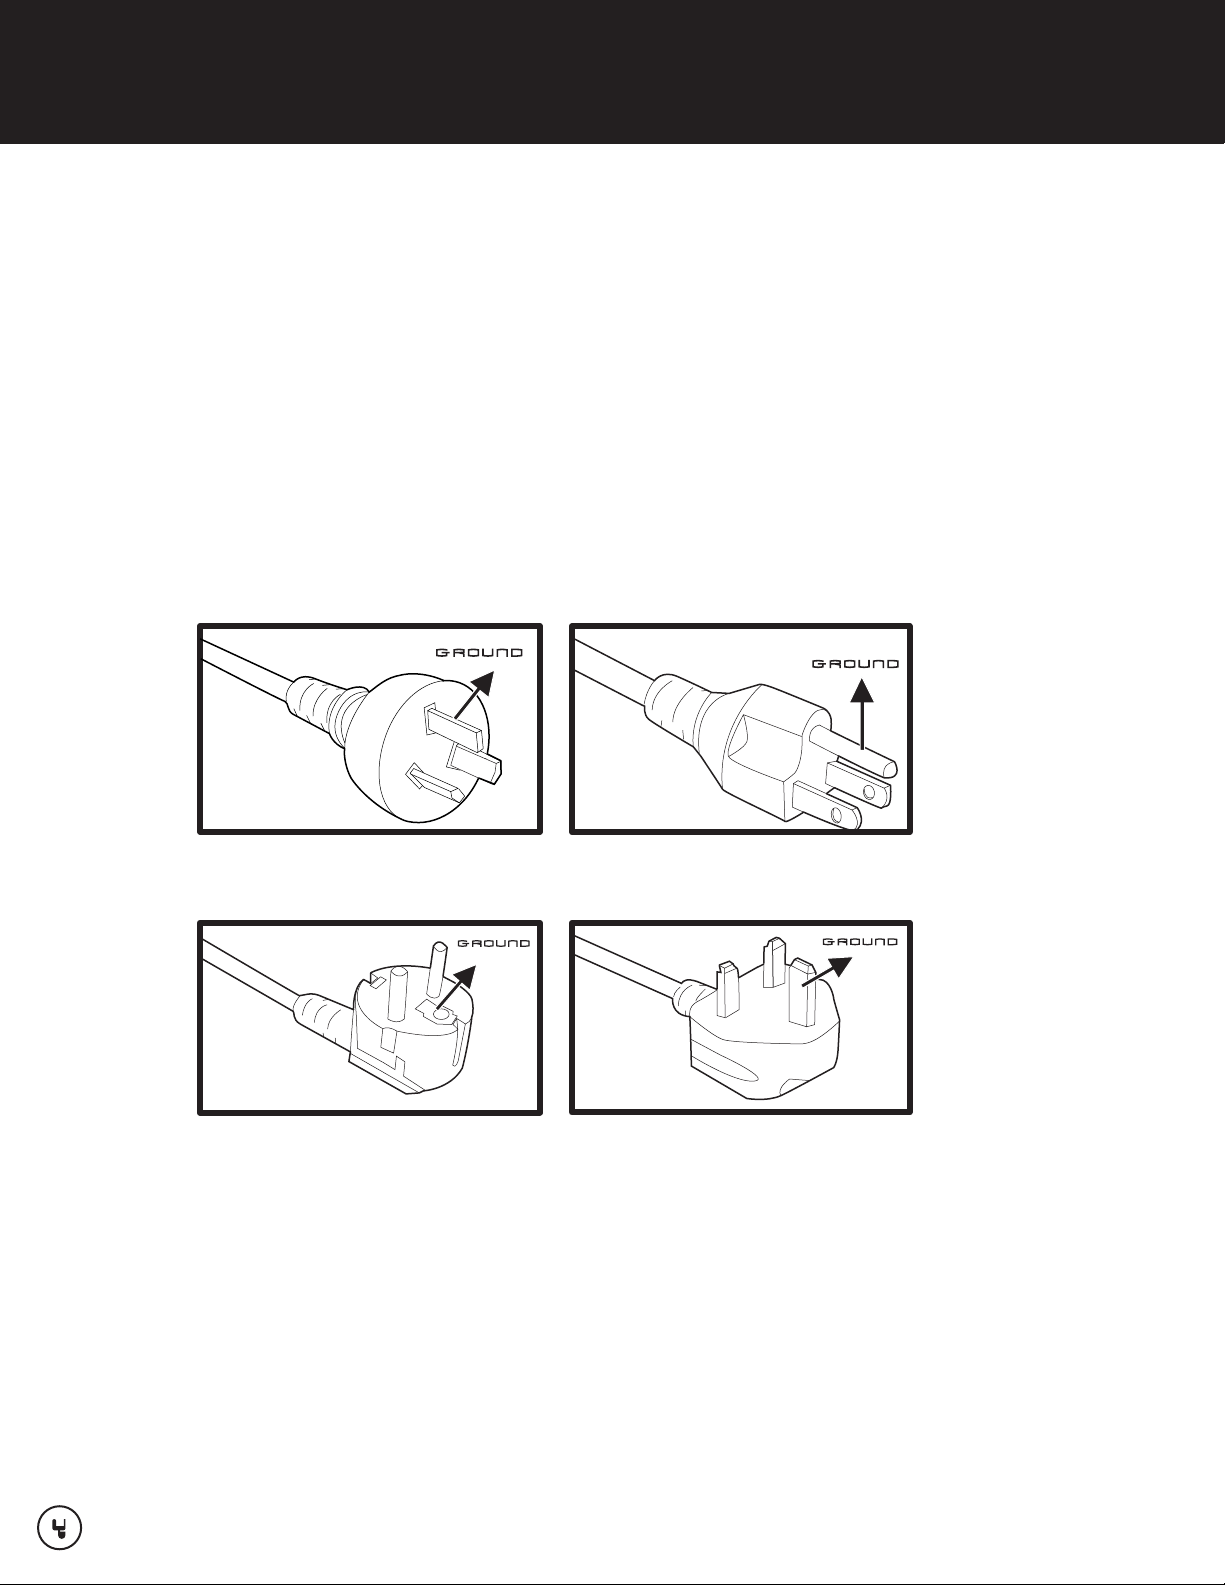
Notes on AC Power Cord
AC Power Cord must meet requirement of country where you use a projector. Confirm an AC plug type
with graphics below and proper AC Power Cord must be used. If supplied AC Power Cord does not match
your AC outlet, contact your sales dealer. This projector is equipped with a grounding type AC line plug. Make
sure that your outlet fits the plug. Do not defeat the safety purpose of this grounding type plug. We highly
recommend using a video source device also equipped with a grounding type AC line plug to prevent from
signal interference due to voltage fluctuation.
For australia and
mainland china
For Continental
Europe
For the u.s.a.
and canada
For the u.k.
Page 6

x User’s Manual
CONTENTS
Product Introduction ........................................................................................................................ 6
Projector Feature .............................................................................................................................. 6
Package Contents ............................................................................................................................ 7
Getting to Know the Projector ....................................................................................................... 8
Projector Components ..................................................................................................................... 8
Remote Control Components ........................................................................................................ 11
Installation ....................................................................................................................................... 12
Connecting the Projector .............................................................................................................. 12
Powering On/Off the Projector ..................................................................................................... 17
Adjusting the Projected Image .................................................................................................... 18
Adjusting the Projector Zoom and Focus ................................................................................... 19
Adjusting Projection Image Size .................................................................................................. 19
Using the Projector ........................................................................................................................ 21
Control Panel ................................................................................................................................... 21
Remote Control ............................................................................................................................... 22
Menu Options .................................................................................................................................. 25
Image ................................................................................................................................................ 26
Video ................................................................................................................................................. 29
Display .............................................................................................................................................. 30
Language ......................................................................................................................................... 31
Advanced ......................................................................................................................................... 32
Audio ................................................................................................................................................. 33
Maintenance ................................................................................................................................... 34
Cleaning the Lens ........................................................................................................................... 34
Cleaning the Projector Housing ................................................................................................... 34
Replacing the Lamp ....................................................................................................................... 35
Technical Specifications ............................................................................................................... 37
Appendix .......................................................................................................................................... 38
Indicator Messages ....................................................................................................................... 39
Preset Signals ................................................................................................................................. 40
Page 7
x User’s Manual
Product Introduction
Projector Features
The projector integrates high-performance optical engine projection and a user-friendly design to deliver
high reliability and ease of use.
The projector offers the following features:
x Single chip 0.55" Texas Instruments DLP™ technology
x SVGA (800 x 600 pixels)
x Compact size, light weight for portability
x 1.2x manual zoom lens
x Auto image re-sizing (Auto-Sync.) to 800 x 600 full screen with scaling compression
compatibility for VGA, SVGA, XGA* and SXGA*.
x State-of-the-art motion adaptive hardware deinterlacing with 3:2 pull down
x 200-watt, user-replaceable lamp
x Compatibility with Macintosh® computers
x Compatibility with NTSC, PAL, SECAM, and HDTV
x Multi-function remote control
x D-Sub 15-pin cable for analog video connectivity
x User-friendly, multi-language on-screen display (OSD)
x Advanced electronic keystone correction
*means compressed.
Page 8
x User’s Manual
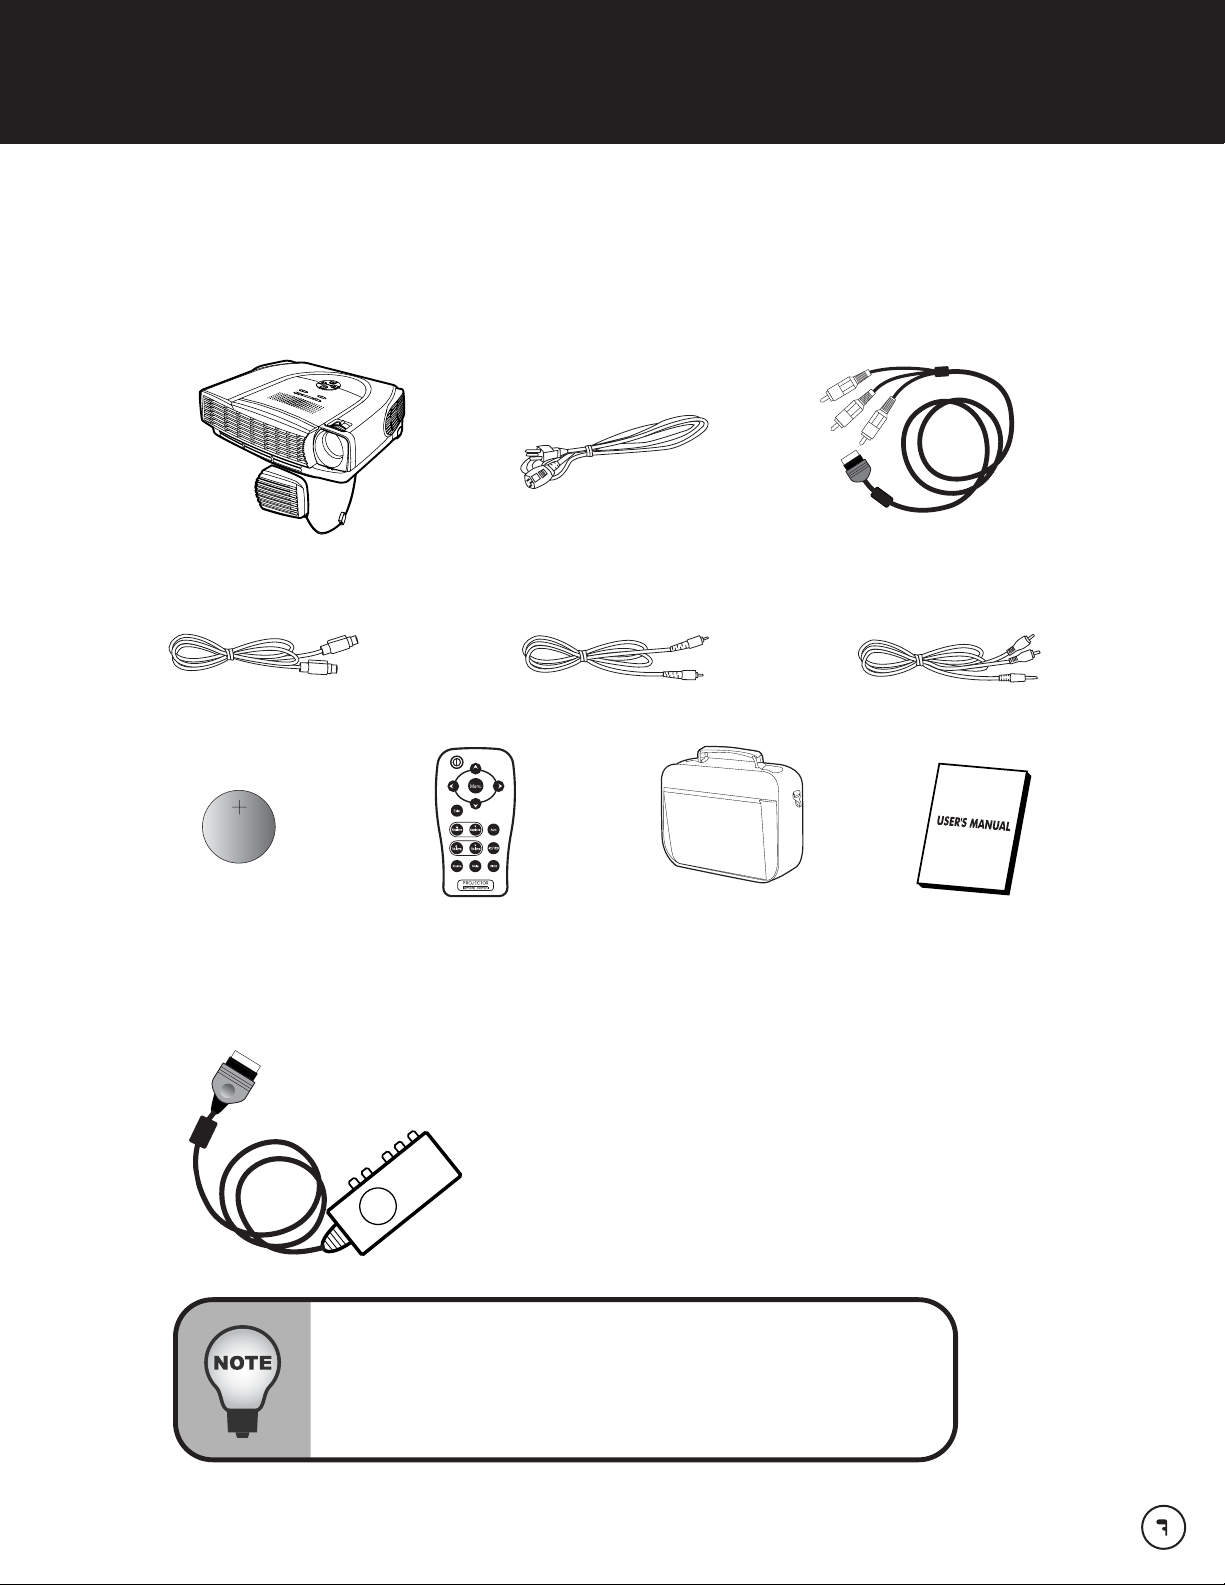
Package Contents
When you unpack the projector, make sure you have all these components:
w Save the original shipping carton and packing material; they will come in handy if you
ever to ship your unit. For maximum protection, repack your unit as it was originally
packed at the factory.
w Accessories and components may vary by retailer and region.
PPrroojjeeccttoorr wwiitthh LLeennss CCaapp AACC PPoowweerr CCoorrdd 2200'' CCoommppoonneenntt VViiddeeoo ttoo VVGGAA
SS--VViiddeeoo CCaabbllee CCoommppoossiittee VViiddeeoo CCaabbllee AAuuddiioo CCaabbllee
BBaatttteerryy ffoorr PPrroojjeeccttoorr
RReemmoottee CCoonnttrrooll RReemmoottee CCoonnttrrooll CCaar
rrryyiinngg CCaassee UUsseerr’’ss MMaannuuaall
Optional Accessory
CCoommppoonneenntt VViiddeeoo AAddaapptteerr
NNOOTTEE:: RReeqquuiirreedd ffoorr 2200'' CCoommppoonneenntt VViiddeeoo HHooookk--uupp
PPlleeaassee ccoonnssuulltt wwiitthh tthhee mmaannuuf
faaccttuurreerr ooff yyoouurr ggaammee ccoonnssoollee
Page 9
x User’s Manual
Getting to Know the Projector
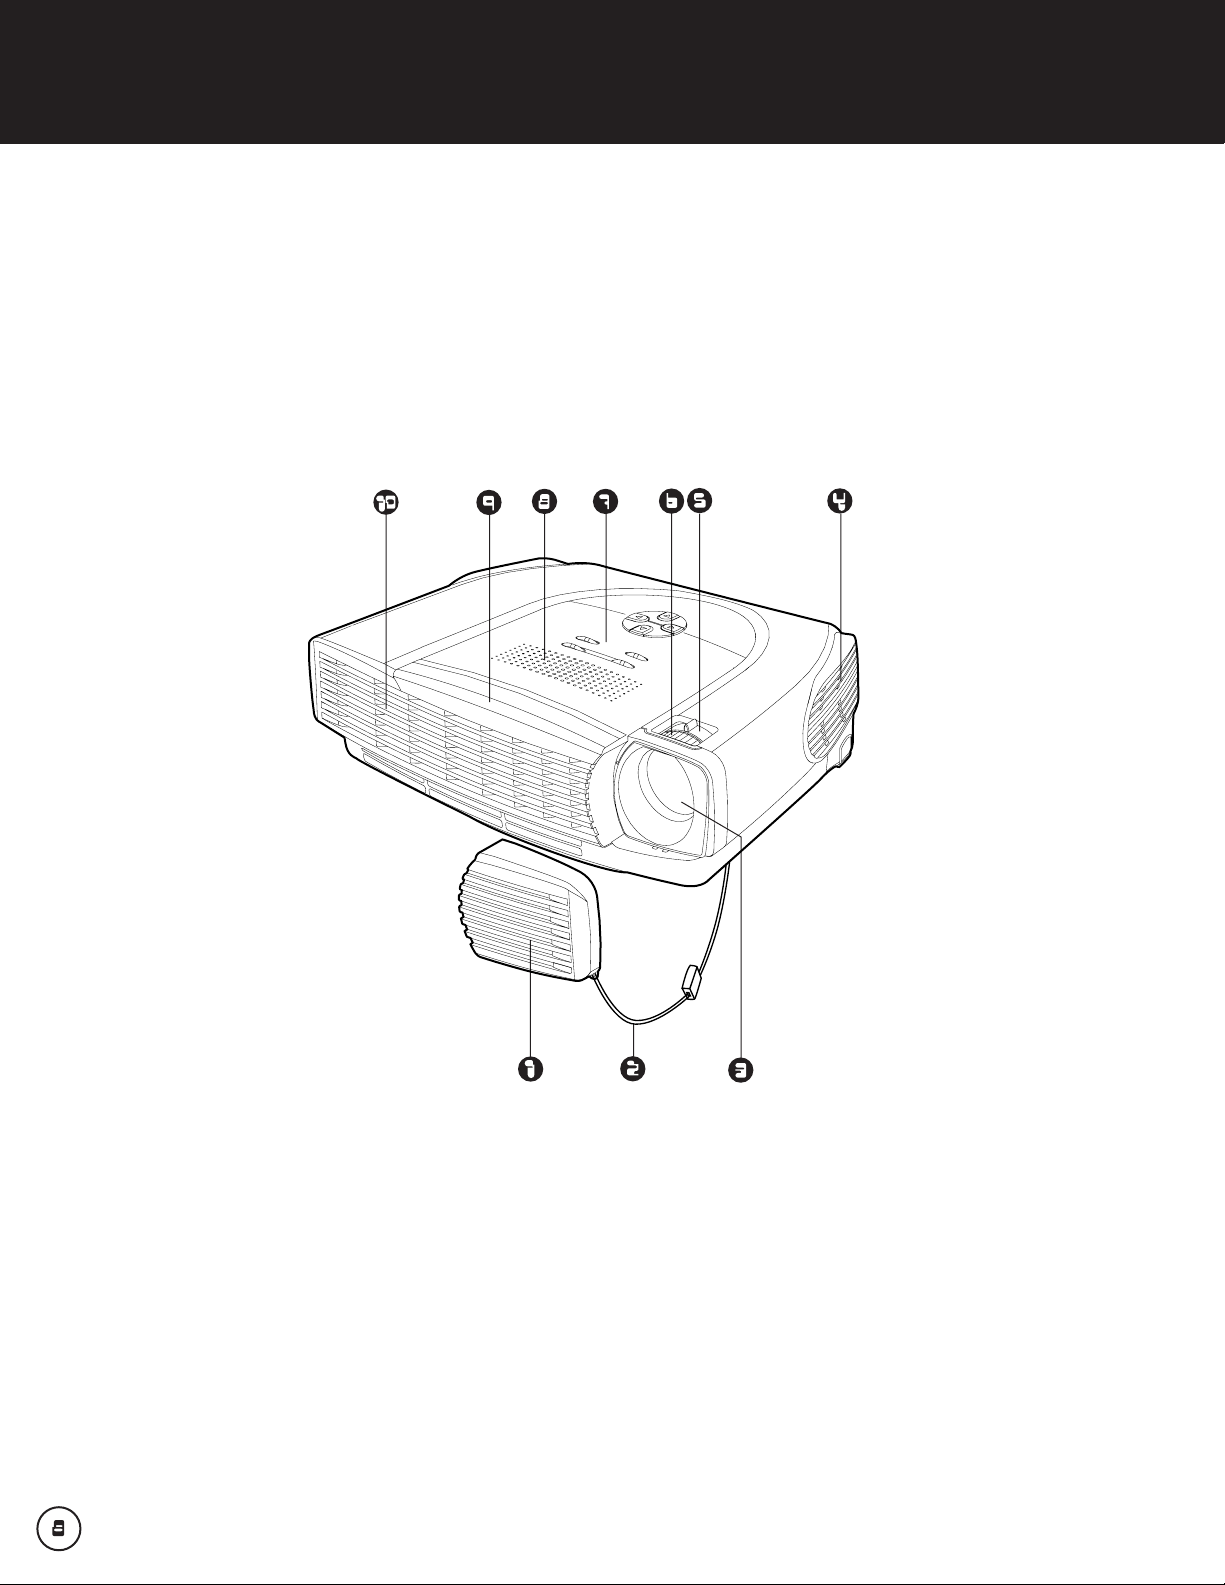
Projector Components
Front View
1. Lens cap 6. Focus ring
2. Lens cap strap 7. Control panel
3. Lens 8. Speaker
4. Ventilation holes (intake) 9. Front IR remote control sensor
5. Zoom ring 10. Ventilation holes (exhaust)
Page 10
x User’s Manual
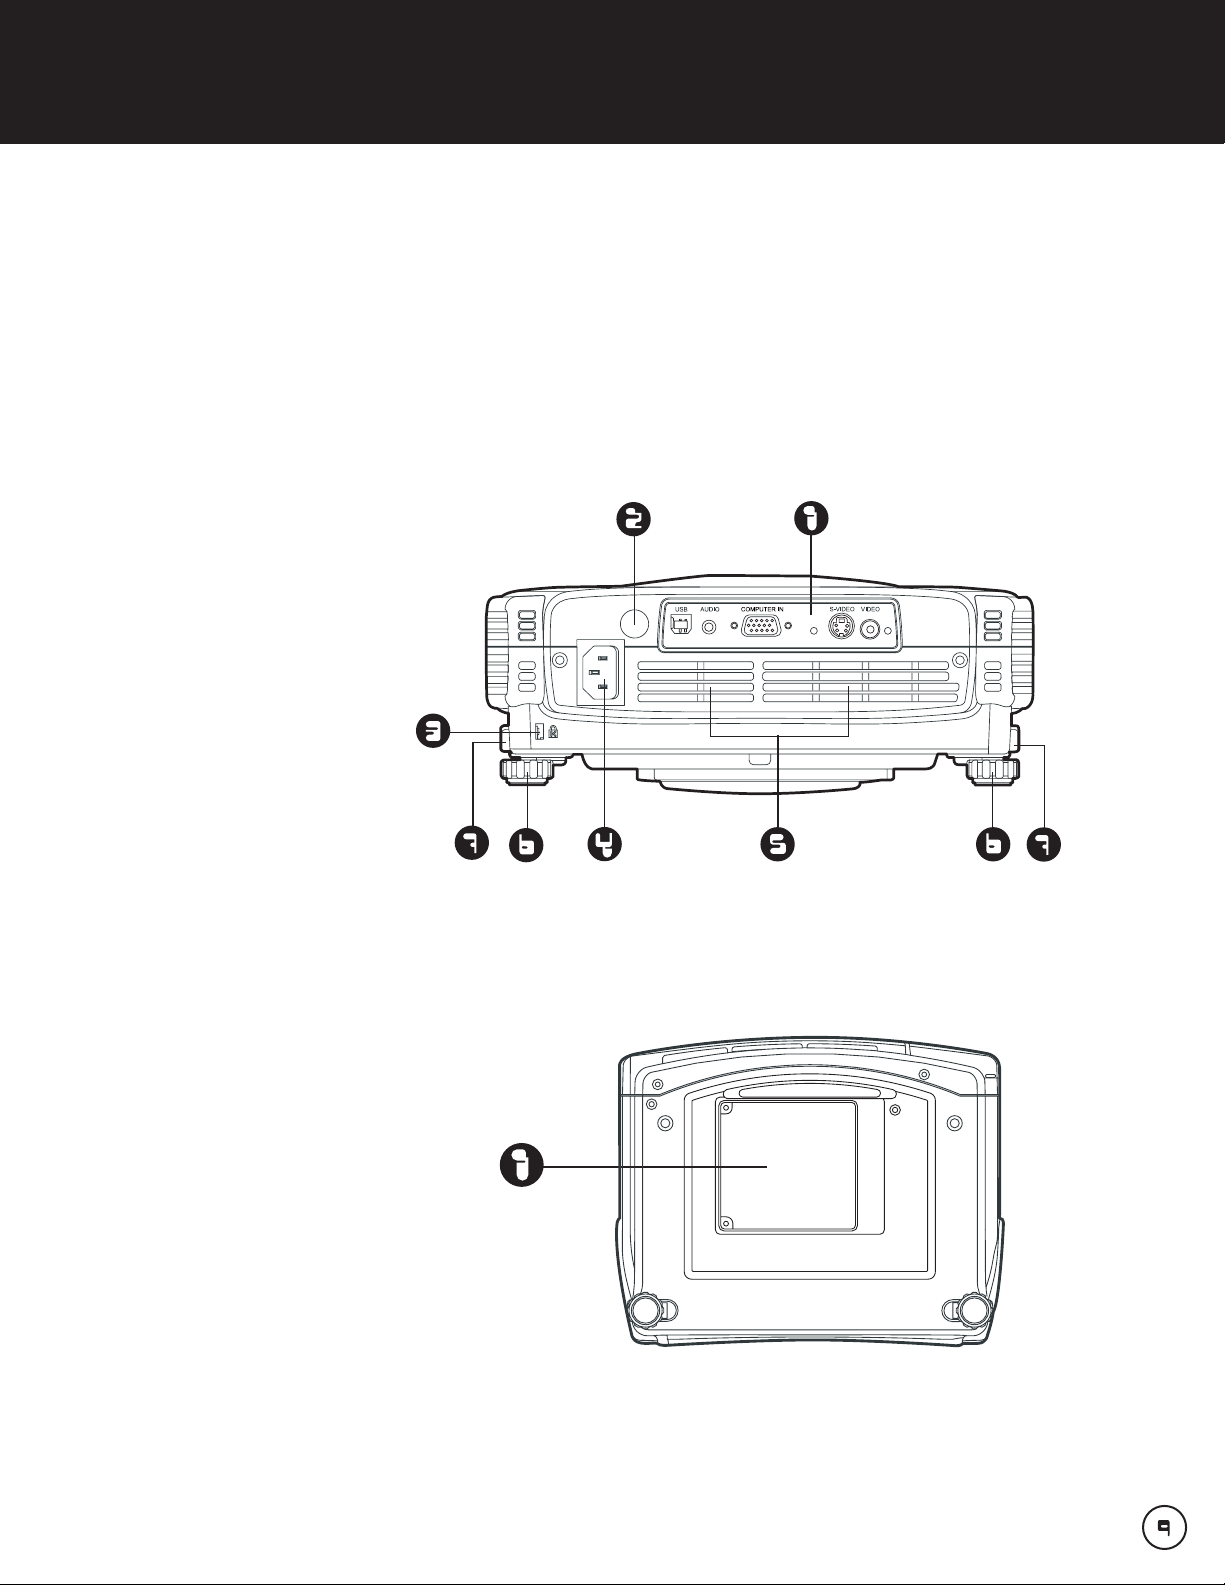
Rear View
Bottom View
1. Lamp cover
1. Interface
2. Rear IR remote control sensor
3. Security Lock Receptacle
4. AC power socket
5. Venilation holes (intake)
6. Foot adjuster
7. Foot adjuster button
Page 11
x User’s Manual
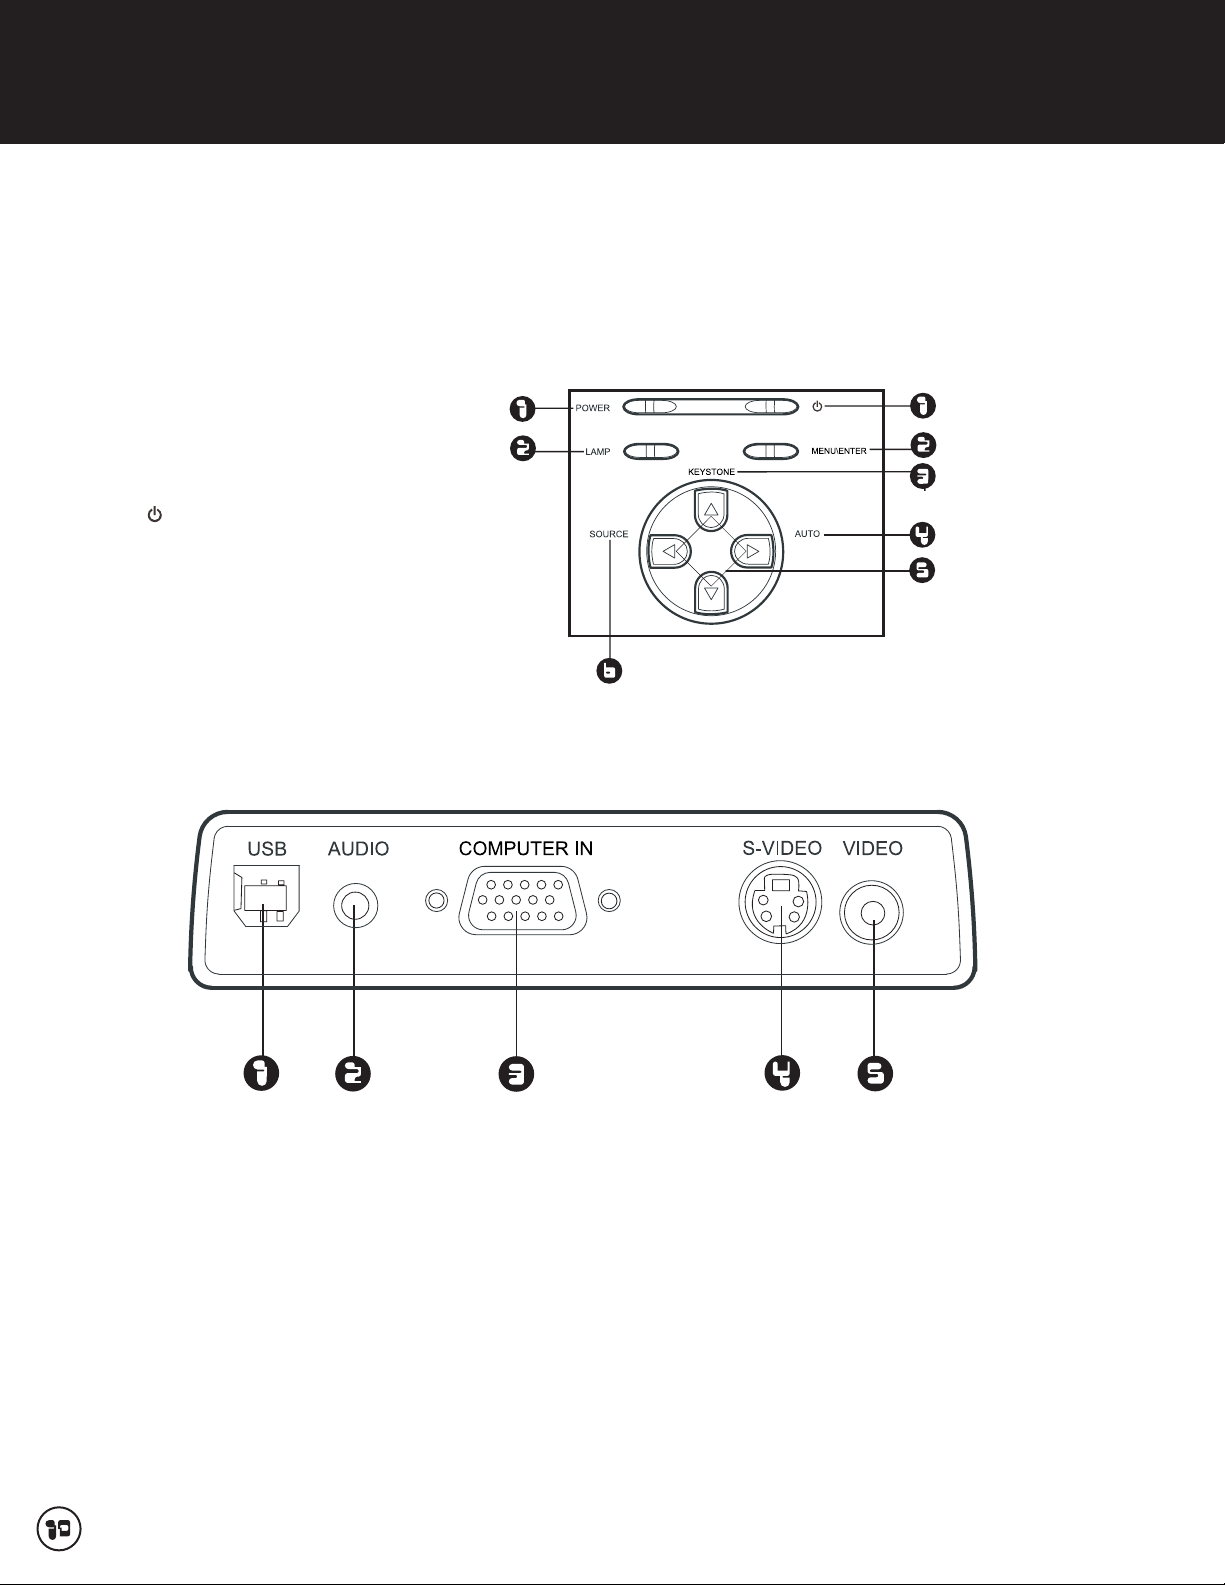
Control Panel
LLEEDD
1. POWER (Power LED indicator)
2. LAMP (Lamp LED indicator)
BBuuttttoonn
1.
2. MENU\ENTER
3. KEYSTONE (v/u)
4. AUTO (t)
5. Four direction buttons
6. SOURCE (s)
Interface Connector
1.
UUSSBB ccoonnnneeccttoorr::
This connector is used for engineering purpose.
2.
AAUUDDIIOO iinnppuutt ccoonnnneeccttoorr::
Connect an audio output from video equipment to this jack.
3.
CCOOMMPPUUTTEERR IINN ((DD--SSUUBB)) ccoonnnneeccttoorr::
Connect image input signal (analog) to this connector.
4.
SS--VVIIDDEEOO ccoonnnneeccttoorr::
Connect S-Video output from video equipment to this jack.
5.
VVI
IDDEEOO ccoonnnneeccttoorr::
Connect composite video output from video equipment to this jack.
Page 12
x User’s Manual
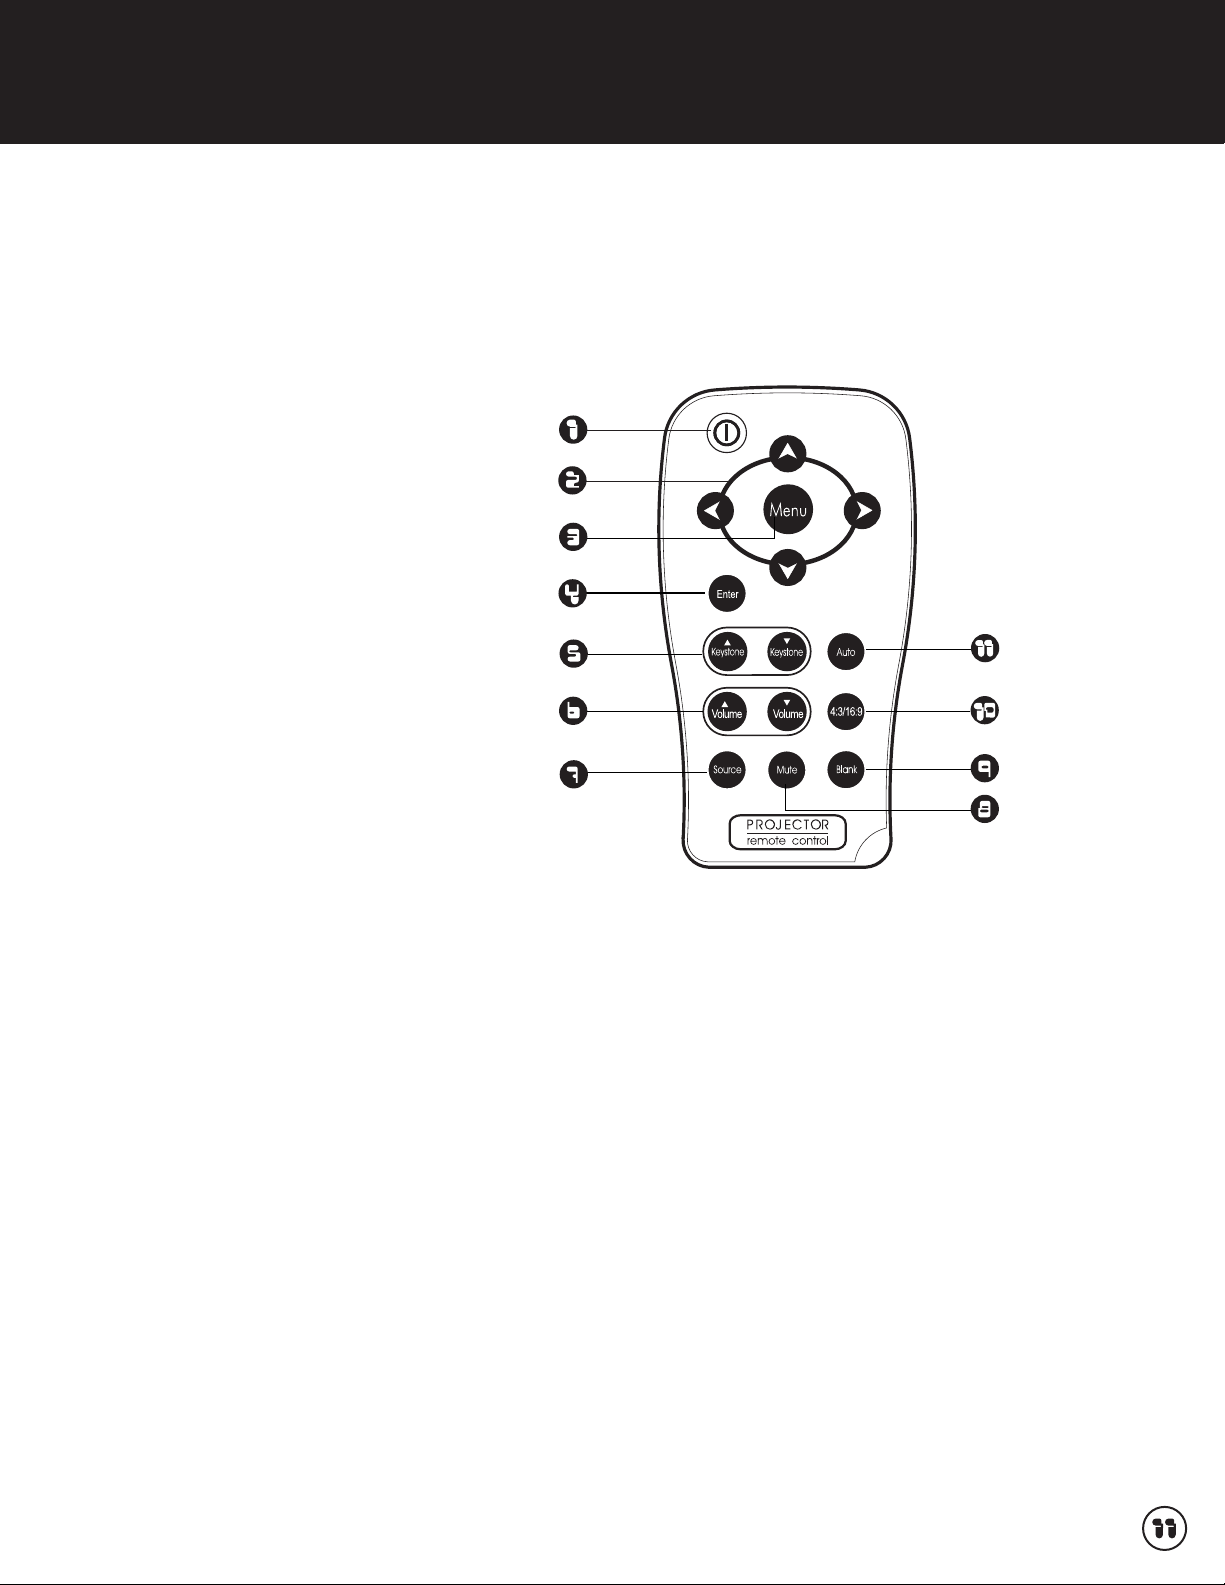
Remote Control Components
1. Power button
2. Four direction buttons
3. Menu button
4. Enter button
5. Keystone v/u buttons
6. Volume v/u buttons
7. Source button
8. Mute button
9. Blank button
10. 4:3/16:9 button
11. Auto button
Page 13
x User’s Manual
Installation
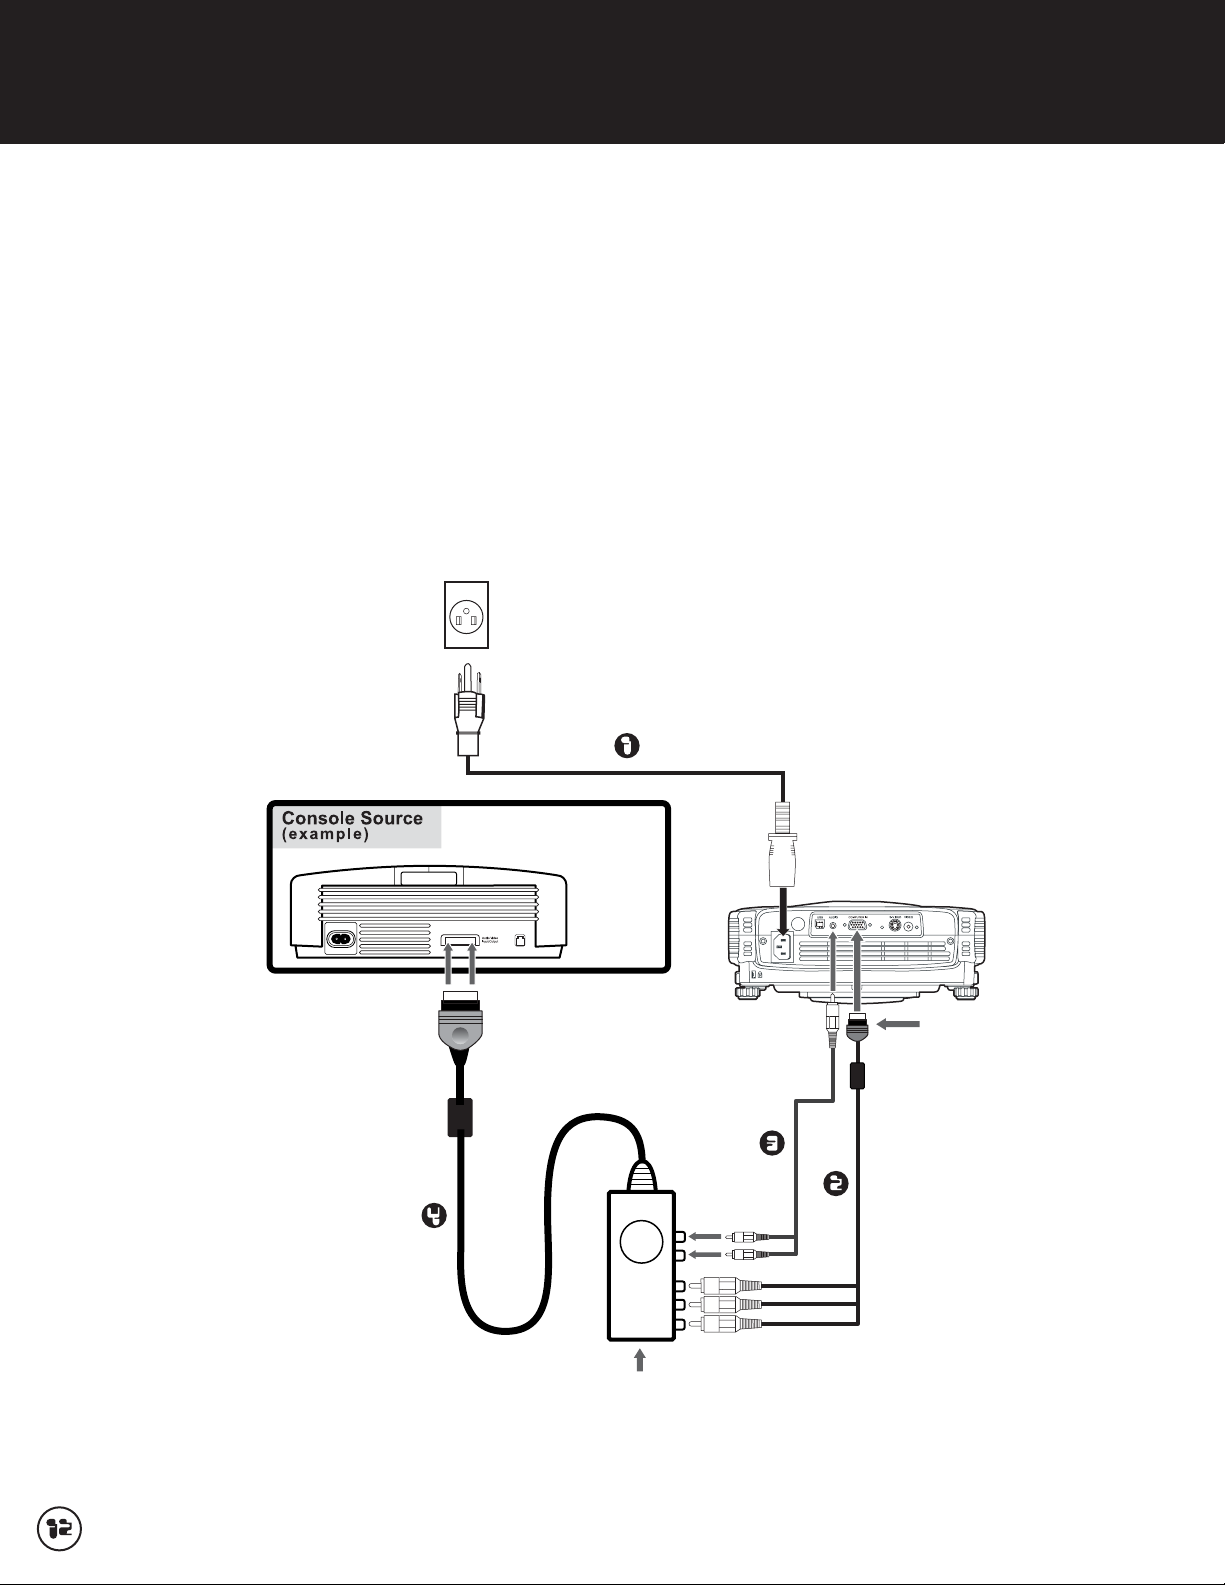
Connecting the Projector
A. Connecting to a Console
1. AC Power Cord
2. VGA Cable to Component Video Adapter
3. Component Video Adadpter to Console
15-pin VGA
Component Video
to 15-pin VGA
Optional Component
Video Adapter
Page 14

x User’s Manual
B. Connecting to a Computer
1. AC Power Cord
2. VGA Cable (D-SUB to D-SUB)
Page 15

x User’s Manual
C. Connecting to a Video Source
Connecting with S-Video Cable
1. AC Power Cord
2. S-Video Cable
3. Audio Cable
Page 16

x User’s Manual
d. Connecting with Composite Video Cable
1. AC Power Cord
2. Composite Video Cable
3. Audio Cable
Page 17

x User’s Manual
E. Connecting with HDTV Cable
1. AC Power Cord
2. D-SUB to HDTV Cable
3. Audio Cable
w When connecting cable, power cords of both a projector and external
equipment should be disconnected from AC outlet.
Video Source
(example)
Video Cassette Recorder
Video Disc Player
Component Video
output equipment
(such as DVD player or
high-definition TV source)
Page 18

x User’s Manual
Powering On/Off the Projector
Powering On the Projector:
1. Remove the projector lens cap.
2. Complete the AC power cord and peripheral signal cable(s) connections.
3. Press the button on the Projector Control Panel or the Power button on the Remote Control to
turn on the power.
4. Turn on your source (computer, notebook, DVD, etc.). The projector automatically detects your source.
x If the ”Searching for source” message appears on the screen, ensure that the appropriate signal
cable(s) are securely connected.
x
If you are connecting multiple sources to the projector simultaneously, press the SOURCE
button on the Projector Control Panel or the Source button on the Remote Control to select the
desired source.
Warning!
x Never look into the lens when the lamp is on. This can damage your eyes. It is especially
important that children are not allowed to look into the lens.
Powering Off the Projector:
1. Press the button on the Projector Control Panel or the Power button on the Remote Control. A message
will appear on the screen:
2. Press the button on the Projector Control Panel or the Power button on the Remote Control again to turn
off the power. Wait until the lamp LED indicator turns off.
w Please wait until the fan motor and the lamp LED turn off before
removing the AC power cord from the projector.
Page 19

x User’s Manual
Adjusting the Projected Image
Adjusting the Projector Height
To raise the projector:
1. Lift up the rear side of the projector, and press the foot adjuster buttons on the two sides.
2. Raise the projector to the desired display height, and then release the buttons to lock the foot
adjusters into position.
To lower the projector:
1. Lift up the rear side of the projector, and press the foot adjuster buttons on the two sides.
2. Lower the projector, and then release the buttons to lock the foot adjusters into position.
w You may turn the foot adjuster to make fine adjustment of the height.
w To avoid damaging the projector, make sure that the foot adjuster
is fully retracted before placing the projector in its carrying case.
Page 20

x User’s Manual
Adjusting the Projector Zoom and Focus
1. Adjust the image size by rotating the zoom ring.
Rotate to the right to reduce the image.
Rotate to the left to enlarge the image.
2. Focus the image by rotating the focus ring.
A still image is recommended for focusing.
Adjusting Projection Image Size
Refer to the graphic and table below to determine the screen size and projection distance.
Page 21

x User’s Manual
* This table is for user reference only.
w Position the projector in a horizontal position; other positions can cause heat build-up
and damage to the projector.
w Make sure the heat ventilation holes are not blocked. Do not use the projector in a
smoky environment. Smoke residue maycause buildup on critical parts (i.e. DMD,
lens assembly, etc.).
Page 22

x User’s Manual
Using the Projector
Control Panel
LED
1. POWER (Power LED indicator)
Refer to ”Indicator Messages”.
2. LAMP (Lamp LED indicator)
Refer to “Indicator Messages”.
Button Function
1.
Refer to “Powering On/Off the Projector”.
2. MENU \ ENTER
Press the MENU\ENTER button to activate the OSD (On-Screen Display) menu. Use the directional buttons and
MENU\ENTER button to navigate through the OSD (On-Screen Display) menu and select choices.
3. KEYSTONE (
u/v)
Adjusts image distortion caused by tilting the projector.
4. AUTO (
t)
Automatically adjusts frequency and phase.
5. Four direction buttons
The four direction buttons
stuvcan be used to scroll through OSD (On-Screen Display) menus and
make adjustments.
6. SOURCE (
s)
Manually selects an input source.
Page 23

x User’s Manual
Remote Control
1. Power
Refer to “Powering On/Off the Projector”.
2. Four direction buttons
The four direction buttons
stuvcan be used to scroll
through OSD (On-Screen Display) menus and make
adjustments.
3. Menu
Press the Menu button to activate the OSD (On-Screen
Display) menu. Use the directional buttons and Menu
button to navigate through the OSD (On-Screen
Display) menu.
4. Enter
Confirms the selection
5. Keystone
uv
Adjusts image distortion caused by tilting the projector.
6. Volume
uv
Press the Volume u button to increase the volume press
the Volume
v button to reduce the volume.
7. Source
Manually selects an input source.
8. Mute
Cuts off the sound temporarily.
9. Blank
Cuts off the screen temporarily.
10. 4:3/16:9
Press the 4:3/16:9 to switch the image aspect ratio from
4:3 to 16:9.
11. Auto
Automatically adjusts frequency and phase.
Page 24

x User’s Manual
Battery Replacement
1. Push and slide the battery compartment lid in the direction shown.
2. Install a battery as indicated by the diagram inside the compartment.
3. Position the lid over the compartment and snap it back into place.
w Keep the battery out of the reach of children. There is a danger of
death by accidentally swallowing the battery.
w Do not recharge the used battery or expose the battery to fire or water.
w Do not dispose of the used battery along with household waste.
Dispose of used batteries according to local regulations.
w Avoid excessive heat and humidity. Danger of explosion may happen if
a battery is incorrectly replaced. Replace only with the same type
recommended by the manufacturer.
Page 25

x User’s Manual
Remote Control Operation
Point the remote control at the infrared remote sensor and press a button.
A. Straight Distance: Within about 7 meters
from the front of the
remote sensor.
B. Direction:
Angle: Within about 20 degrees
of the remote sensor in
every direction.
Distance: within about 3 meters
from the front of the
remote sensor.
w The remote control may not operate when there is sunlight or other
strong light such as a fluorescent lamp shining on the remote sensor.
w Operate the remote control from a position where the remote sensor
is visible.
w Do not drop the remote control or jolt it.
w Keep the remote control out of locations with excessively high
temperature or humidity.
w Do not get water on the remote control or place wet objects on it.
w Do not disassemble the remote control.
20
3m
20
7m
20
20
7m
3m
3m
3m
Page 26

x User’s Manual
Menu Options
The projector has multi-language OSD (On-Screen Display) menus that can only be displayed when an input
source is present. The menus can be accessed using either the Projector Control Panel or the Remote Control.
The OSD (On-Screen Display) menus allow you to make image adjustments and change a variety of settings.
If source is a computer, the OSD (On-Screen Display) allows changes to the Display tab. When using a video
source, the OSD (On-Screen Display) allows changes to the Video tab. The projector automatically detects
the source.
1. Press the MENU\ENTER button on the Projector Control Panel or the Menu button on the
Remote Control.
2. Select the menu tab with the stbuttons either on the Projector Control Panel or the Remote Control.
3. Select the desired menu option item with the uvbuttons either on the Projector Control Panel or the
Remote Control.
x To enter its respective sub-menu, refer to each menu option section for more details.
4. To exit from the menu:
x On the Projector Control Panel: Go back to main menu tab with the uv buttons, and press the
MENU\ENTER button.
x On the Remote Control: press the MENU button.
w The illustrations in this manual are for the purpose of explanation and
may differ from the actual setting of your projector.
Page 27

x User’s Manual
IMAGE
Option Actions/Descriptions
Contrast Controls the degree of difference between the lightes and darkest
parts of the picture. Adjusting the contrast changes the amount of
black and white in the image.
Select the desired setting with the stbuttons:
x Press the s button to decrease the contrast.
x Press the t button to increase the contrast.
Brightness Adjusts the brightness of the image.
Select the desired setting with the st buttons:
x Press the s button to lighten the image.
x Press the t button to darken the image.
Keystone Adjusts image distortion caused by tilting the projector.
Select the desired setting with the stbuttons:
x Press the s button to reduce the upper width.
x Press the t button to reduce the lower width.
Aspect Ratio Selects this function to fit 1:1, 16:9, 4:3 aspect ratio. In order to use the
1:1 aspect ratio, the input must be a computer signal (through VGA
cable) of resolution less than SVGA (800 x 600). If the input signal is a
computer signal greater than SVGA or component 1080i / 720p, only
16:9 or 4:3 aspect ratio will be available.
Page 28

x User’s Manual
Select the desired setting with the stbuttons:
x 1:1: The input source will be displayed without scaling
x 16:9: The input source will be displayed in wide screen mode (16:9)
without scaling. The source will be scaled to fit the width of the screen.
x 4:3: The input source will be scaled to fit the screen.
Blank Screen Blanks the screen temporarily, and selects the screen color when
Blank Screen is active.
Select the desired setting with the stbuttons:
x White
x Black
x Blue
x Gray
x Red
x Green
x Yellow
x Cyan
x Magenta
Gamma Selects Gamma Mode.
Select the desired setting with the stbuttons:
x Film : Dark video image mode
x Photographic: Computer photo mode
x RGB: Computer text mode
x Video : Common video mode
White Peaking White Peaking can be adjusted between 0 and 10.
Select the desired setting with the stbuttons:
x Setting 10 will maximize the brightness.
x Setting 0 will maximize color reproduction quality.
Page 29

x User’s Manual
Color Temperature Adjusts the color temperature. With the higher temperature, the
screen looks colder; with the lower temperature, the screen looks
warmer. Red, Green and Blue mode activate only if the Color
Temperature is set to ”User”.
Select the desired setting with the stbuttons:
x Hi
x Mid
x Low
x User
Red Manually adjusts red.
Select the desired setting with the stbuttons:
x Press the s button to decrease the color temperature.
x Press the t button to increase the color temperature.
Green Manually adjusts green.
Select the desired setting with the stbuttons:
x Press the s button to decrease the color temperature.
x Press the t button to increase the color temperature.
Blue Manually adjusts blue.
Select the desired setting with the st buttons:
x Press the s button to decrease the color temperature.
x Press the t button to increase the color temperature.
Page 30

x User’s Manual
Video
Option Actions/Descriptions
Saturation Adjusts a video image from black and white to fully saturated color.
Select the desired setting with the s t buttons:
x Press the t button to decrease the amount of color in the image.
x Press the s button to increase the amount of color in the image.
Tint Adjusts the color balance of red and green.
Select the desired setting with the s t buttons:
x Press the t button to increase the amount of green in the image.
x Press the s button to increase the amount of red in the image.
Sharpness Adjusts the sharpness of the image.
Select the desired setting with the s t buttons:
x Press the t button to decrease the sharpness.
x Press the s button to increase the sharpness.
Page 31

x User’s Manual
Display
Option Actions/Descriptions
Phase Synchronizes the signal timing of the display with that of the graphic
card. If you experience an unstable or flickering image, use the phase
function to correct it.
Select the desired setting with the s t buttons:
x Press the s button to decrease the value.
x Press the t button to increase the value.
Tracking Changes the display data frequency to match the frequency of your
computer graphic card. If you experience a vertical flickering bar, use
the tracking function to make an adjustment.
Select the desired setting with the s t buttons:
x Press the s button to decrease the value.
x Press the t button to increase the value.
H.Position Adjusts the horizontal position.
Select the desired setting with the s t buttons:
x Press the s button to move the image left.
x Press the t button to move the image right.
V.Position Adjusts the vertical position.
Select the desired setting with the s t buttons:
x Press the s button to move the image up.
x Press the t button to move the image down.
Page 32

x User’s Manual
Language
Option Actions/Descriptions
Language Selects the language for menu and message displayed.
Select the language you prefer with the uv buttons, and confirm the selection
with the MENU\ENTER button on the Projector Control Panel or the Enter
button on the Remote Control.
x English
x Deutsch
x
x
x Français
x Español
x Português
x Italiano
x
x
Page 33

x User’s Manual
Advanced
Option Actions/Descriptions
Auto Source Automatically scans the input source.
Select
x Press the MENU\ENTER button on the Projector Control Panel or the
ENTER button on the Remote Control to active this function.
Rear The image is reversed horizontally.
x Press the MENU\ENTER button on the Projector Control Panel or the
ENTER button on the Remote Control to active this function.
Ceiling The image is inverted vertically.
x Press the MENU\ENTER button on the Projector Control Panel or the
ENTER button on the Remote Control to active this function.
ECO Mode Uses this function to dim the projector lamp light output which will
lower power consumption and increase lamp life.
Select the desired setting with the s t buttons:
x ON
x OFF
Lamp Hours Displays operating hours since lamp timer reset. Lamp hour
counter is displayed in read-only format, and this setting
cannot be manually adjusted.
Page 34

x User’s Manual
Color Space Manually selects signal type.
Select the input signal type with the s t buttons:
x RGB
x YCbCr
x YPbPr
Auto Shutdown Uses this function to automatically turn off the lamp if the projector does not
detect an input signal for specified time period (30 minutes).
Select the desired setting with the s t buttons:
x ON
x OFF
OSD Timeout Duration OSD (On-Screen Display) menu stays active (at idle state by second).
Select the desired setting with the s t buttons.
Menu Position Selects the position of the OSD (On-Screen Display) menu on the screen.
Select the desired setting with the s t buttons.
Factory Reset Resets the projector to its factory default settings.
Press the MENU\ENTER button on the Projector Control Panel or the ENTER button on
the Remote Control to enter its sub-menu, select the desired setting with the s t
buttons, and confirm the selection with the MENU\ENTER button on the Projector
Control Panel or the ENTER button on the Remote Control again.
Audio
Option Actions/Descriptions
Volume Adjusts the volume.
Select the desired setting with the s t buttons:
Press the s button to decrease the volume.
Press the t button to increase the volume.
Mute Cuts off the sound temporarily.
Select the desired setting with the s t buttons:
x ON
x OFF
Page 35

x User’s Manual
Maintenance
The projector needs proper maintenance. You should keep the lens clean as dust, dirt or spots will
project on the screen and diminish image quality. The only part you could replace yourself is the lamp. If
any other parts need replacing, contact your dealer or qualified service personnel. When cleaning any
part of the projector, always switch off and unplug the projector first.
Warning:
Never open any of the covers on the projector except the lamp cover. Dangerous electrical voltages
inside the projector can cause severe injury. Except as specifically indicated in this User's Manual, do
not attempt to service this product yourself. Refer all servicing to qualified service personnel.
Cleaning the Lens
Gently wipe the lens with lens cleaning paper. Do not touch the lens with your hands.
Cleaning the Projector Housing
Gently wipe with a soft cloth. If dirt and stains are not easily removed, use a soft cloth damped with water,
or water and neutral detergent, and wipe dry with a soft, dry cloth.
w Turn off the projector and remove the AC power cord from the power
outlet before beginning maintenance work.
w Make sure the lens is cool before cleaning.
w Do not use detergents or chemicals other than those noted above.
Do not use benzene or thinners.
w Do not use chemical sprays.
w Use a soft cloth or lens paper only.
Page 36

x User’s Manual
Replacing the Lamp
Projector lamps have a finite life. Replace the lamp when:
x The image becomes darker and hues become weaker after a lamp has been for a long period of time.
x The projector lamp LED indicator turns into red. Refer to section titled “Indicator Messages” for
further details.
w The lamp becomes high temperature after turning off the projector with the power button. If you touch the
lamp, you may scald your finger. When you replace the lamp, wait for at least 45 minutes for the lamp to
cool down.
w Do not touch the lamp glass at any time. The lamp may explode due to improper handling, including the
touching of the lamp glass.
w Lamp lifetime may differ from lamp to lamp and according to the environment of use. There is no guarantee of
the same lifetime for each lamp. Some lamps may fail or terminate their lifetime in a shorter period of time
than other similar lamps.
w A lamp may explode as a result of vibration, shock or degradation as a result of hours of use as its lifetime
draws to an end. Risk of explosion may differ according to the environment or conditions in which the projector
and lamp are being used.
w Wear protective gloves and eyeglasses when fixing or detaching the lamp.
w Faster on-off-cycles will damage the lamp and reduce lamp life. Wait at least for 5 minutes to turn off the
projector after powering on.
w Do not operate the lamp in proximity to paper, cloth, or other combustible material nor cover it with such
materials. Otherwise it could cause a fire.
w Do not operate the lamp in an atmosphere containing an inflammable substance, such as thinner. Otherwise it
could cause a fire or explosion.
w Thoroughly ventilate the area or the room when operating the lamp in an oxygen atmosphere (in the air). If
ozone is inhaled, it could cause headaches, nausea, dizziness, etc.
w The inorganic mercury is involved in the lamp. If the lamp bursts, the mercury inside the lamp will go out
of the projector. Leave the area immediately if the lamp shatters while being operated and ventilate the area
for at least 30 minutes in order to avoid the inhalation of mercury fumes. Otherwise it could be harmful to
user's health.
Page 37

x User’s Manual
1. Turn off the projector and unplug the AC
power cord.
2. Place a protective sheet (cloth) beneath
the projector. Turn the projector over so
you can access the lamp cover.
3. Remove the access panel screws and
open the panel.
4. Remove the screws on the bottom of the
lamp assembly.
5. Grasp the lamp handle and pull the lamp
assembly directly out of the projector.
6. Replace with the new lamp.
7. Place back the screws on the bottom of
lamp assembly.
8. Place the panel and screw back the
screws on the lamp cover.
w Dispose of the used lamp according to local regulations.
w Ensure that screws are tightened properly. Screws not tightened fully
may result in injury or accidents.
w Since the lamp is made of glass, do not drop the unit and do not
scratch the glass.
w Do not reuse the old lamp. This could cause the lamp to explode.
w Be sure to turn off the projector and unplug the AC power cord before
replacing the lamp.
w Do not use the projector with the lamp cover removed.
Page 38

x User’s Manual
Technical Specifications
Specifications
Projection System: Single panel 0.55" DLP projector
Native resolution: 480,000 dot x1 (800 x 600 x1)
Image Brightness: 1500 ANSI Lumens
Uniformity: 85%
Lens: Manual Zoom (1.2X)
Focal Length: 0.80" - 0.95" / 20.2 - 24.2mm
Contrast Ratio 2000: 1 (Full on/off)
Aspect Ratio: 1:1, 16:9, 4:3
Screen Size: 30 - 200 inches
Lamp: 200W
Projection Type: Front, Rear, Ceiling
Video Input: PAL,NTSC, SECAM
Input Source: Computer, HDTV, S-Video, Video
Horizontal Frequency: 31 - 79kHz
Vertical Frequency: 50 - 85Hz
Pixel Rate: 108 MHz
Digital Keystone Correction: Vertical: +/- 15 degrees
Analog RGB (input signal): D-Sub connector
HDTV Display: 720p (60Hz), 720p (50Hz), 1080i (60Hz), 1080i (50Hz)
Integrated Speaker: 2W x 1
Audio Noise: 34dB (Typical) and 32dB (in ECO Mode)
Remote Control: Multifunctional
OSD Language: Multilanguage
Operational Ambient Temperature: +5 - +350C
Humidity: 35 - 85%
Certification: UL, CE, FCC Class B, VCCI, C-Tick, CCC
Power Supply: AC 100 - 240 V, 50 - 60Hz
Power Consumption: 250 Watts
Dimension (W x D x H): 10" x 7.96" x 3.86" / 254 x 202 x 98mm
Weight: 4.5 lbs. / 2.0kg
Note: Design and Specifications are subject to
change without prior notice.
Page 39

x User’s Manual
Appendix
Indicator Messages
LED Type Color Status Meaning
Power LED: Green Flashing The projector is powered and ready.
Power LED: Amber Solid The projector system has some problems with its
fan, so the projector cannot start up.
Power LED: Green Solid The projector is in good condition on working.
Lamp LED: Green Solid The lamp is in good condition and is projecting at
maximum brightness.
Lamp LED: Amber Solid The lamp has reached its end of life and must be
changed soon. The lamp will continue to operate
until it fails. Change the lamp. If the lamp is off,
then the ballast will become malfunction.
Lamp LED: Green Flashing The projector is shutting down. The fan motor is cooling
the lamp for shutdown. Do not unplug the power cable
or turn the power switch off before the lamp LED turns
off. The fan motor will turn off when the lamp
has cooled.
Lamp LED: Amber Flashing Temperature is too high. The lamp will turn off.
Page 40

x User’s Manual
Preset Signals
Preset signal fH (kHz) fV (Hz) Sync Size
640 x 480 VGA mode 3 31.469 59.940 H(-), V(-) 800
VGA VESA 72Hz 37.861 72.809 H(-), V(-) 832
VGA VESA 75Hz 37.500 75.000 H(-), V(-) 840
VGA VESA 85Hz 43.269 85.008 H(-), V(-) 832
800 x 600 SVGA VESA 56Hz 35.156 56.250 H(+), V(+) 1024
SVGA VESA 60Hz 37.879 60.317 H(+), V(+) 1056
SVGA VESA 72Hz 48.077 72.188 H(+), V(+) 1040
SVGA VESA 75Hz 46.875 75.000 H(+), V(+) 1056
SVGA VESA 85Hz 53.674 85.061 H(+), V(+) 1048
1024 x 768 XGA VESA 60Hz 48.363 60.004 H(-), V(-) 1344
XGA VESA 70Hz 56.476 70.069 H(-), V(-) 1328
XGA VESA 75Hz 60.023 75.029 H(+), V(+) 1312
XGA VESA 85Hz 68.677 84.997 H(+), V(+) 1376
1152 x 864 SXGA VESA 70Hz 63.995 70.016 H(+), V(+) 1472
SXGA VESA 75Hz 67.500 75.000 H(+), V(+) 1600
SXGA VESA 85Hz 77.487 85.057 H(+), V(+) 1568
1280 x 960 SXGA VESA 60Hz 60.000 60.000 H(+), V(+) 1800
SXGA VESA 75Hz 75.000 75.000 H(+), V(+) 1680
1280 x 1024 SXGA VESA 60 Hz 63.981 60.020 H(+), V(+) 1688
Page 41

x User’s Manual
HDTV Preset Signals
Preset Signals Horizontal Frequency (kHz) Vertical Frequency (Hz)
480i 15.8kHz 60Hz
480p 31.5kHz 60Hz
576i 15.6kHz 50Hz
576p 31.3kHz 50Hz
720p 45.0kHz 60Hz
720p 37.5kHz 50Hz
1080i 33.8kHz 60Hz
1080i 28.1kHz 50Hz
Note: Specifications are subject to change without notice.
Page 42

 Loading...