

Page 1

2nd
ProColor Series1
User Guide
ProColor 652U, 702U, 752U, & 862U
Edition
BOXLIGHT.COM
Page 2

Contents
General
Safety Warning & Statements 3
Control Panel 4
Connector Panel 5
Remote Control 6
Setup 9
Settings 13
Simple Troubleshooting 16
Maintenance 17
Android
Introduction 18
Sidebar 19
Note 22
File Finder 27
Camera/Visualizer 31
Settings 32
Cloud Drive 34
Screen Lock 34
2 | USER GUIDE ProColor 652U, 702U, 752U 862U
Page 3

BOXLIGHT.COM
Safety Warning
Placement
Do not place the unit on an unstable cart, stand, tripod, bracket, table, or shelf.
Do not expose the unit to direct sunlight and other sources of heat.
Do not put the unit near appliances that generate magnetic fields.
Do not put any liquid near or on the unit, make sure do not spill any liquid inside the unit.
Do not put heavy objects on top of the unit.
Power Supply
Check that the unit’s operating voltage is identical with your local power supply.
Please unplug power supply and antenna plug when the weather is thunder-storm or lightning.
Please unplug power supply, when there is nobody home or the unit will be in idle for a long time.
Please keep power cable from physical or mechanical damage.
Please use the original power cable from the accessory bag, don't modify or lengthen it.
Please check and ensure AC source is connected with the ground.
This power cable comes with the device exclusively for this device only.
LED Screen
Never use any other hard or sharp object to replace the touch pen.
Unplug the power cable before cleaning.
Clean the screen with a soft, dustless and dry cloth.
Never use water or the spray type detergent to clean the unit.
For deep clean, please contact an authorized service center.
To extend the panel life and display performance, do not keep the panel at high brightness for long periods of time.
Temperature
Do not place the unit near or over a radiator or a heater.
If your unit is suddenly moved from a cold to a warm place, please unplug the power cable and do not turn it on at least 2 hours,
making sure the moisture inside the unit is all evaporated.
Normal operating temperature is 0 ~ 40℃.
Humidity
Do not expose the unit in rain, or place in high humidity area.
Please make sure indoor environment is dry and cool.Normal operating humidity is 10%~90%RH.
Ventilation
Please put the unit in a well ventilated place, so the heating can be released easily.
Ensure that the unit has enough space for ventilation. Space requirement: left, right and back >10cm, top> 20cm.
Earphone
Extended time periods listening to loud sounds can be damaging to your ears.
Before using earphone, please turn down the volume in advance.
Standby
It will enter standby mode but not turn off the unit after press the standby key.
Battery
Please make sure the battery get proper disposal or recycle after using.
Please keep the battery away from kids and don't throw the battery into fire.
Notes for Cleaning
There are vents on back cover, please do not use any liquid or spray directly during cleaning.
Power Switch Status Signs
“I” means power on, “O” means power off.
Notes for Maintenance
This machine can only be maintained by certified engineer.
USER GUIDE ProColor 652U, 702U, 752U 862U | 3
Page 4
Installation Connecting and Setting Menu Operation Troubleshooting Care Maintenance
Prepare to Install
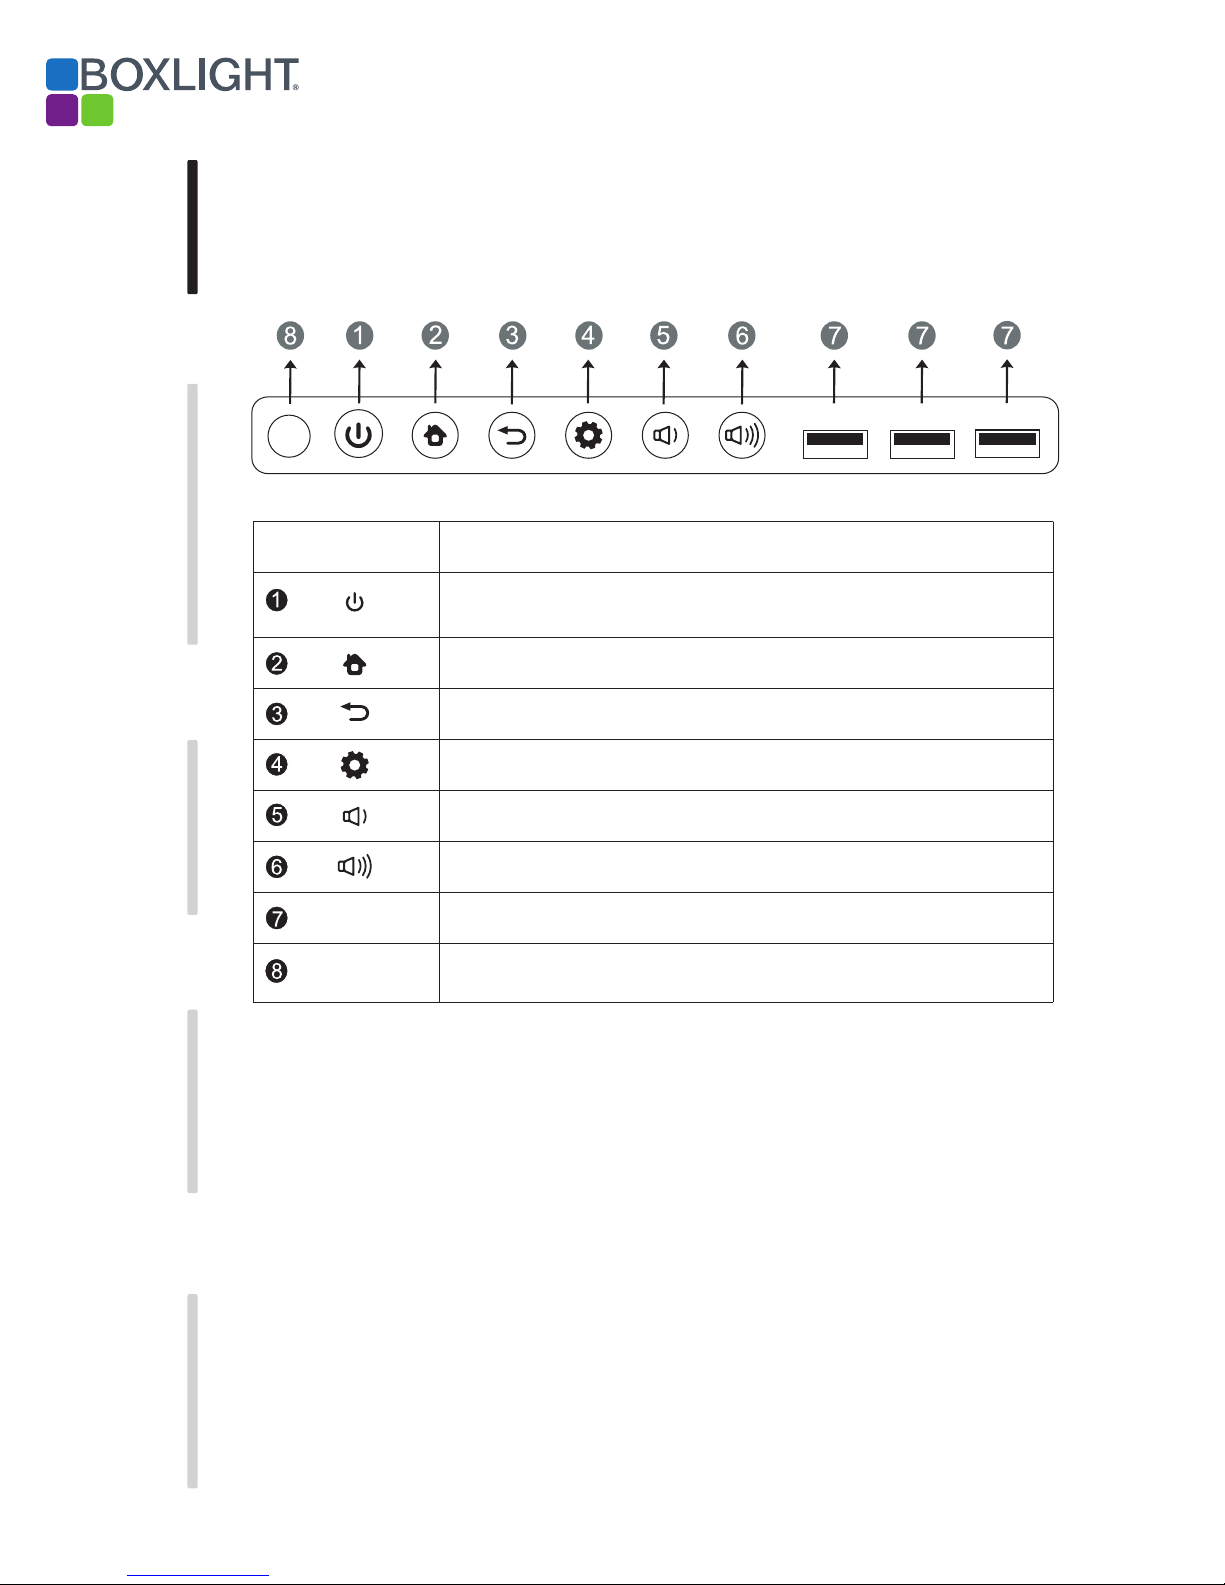
1. Control Panel
Items Function description
Tap to enter EnergySaving function
Press at least 2 seconds to enter standby mode
HOME button: displays home page
Return button: return to previous level menu
Menu button: brings up function menu
Volume down button: lowers volume
Volume up button: raises volume
USB
Remote control
signal receiver
USB interface to Android & PC system
InfraRed receive port for remote control. Do not block or obstruct.
USB
USB USB
4 | USER GUIDE ProColor 652U, 702U, 752U 862U
Page 5
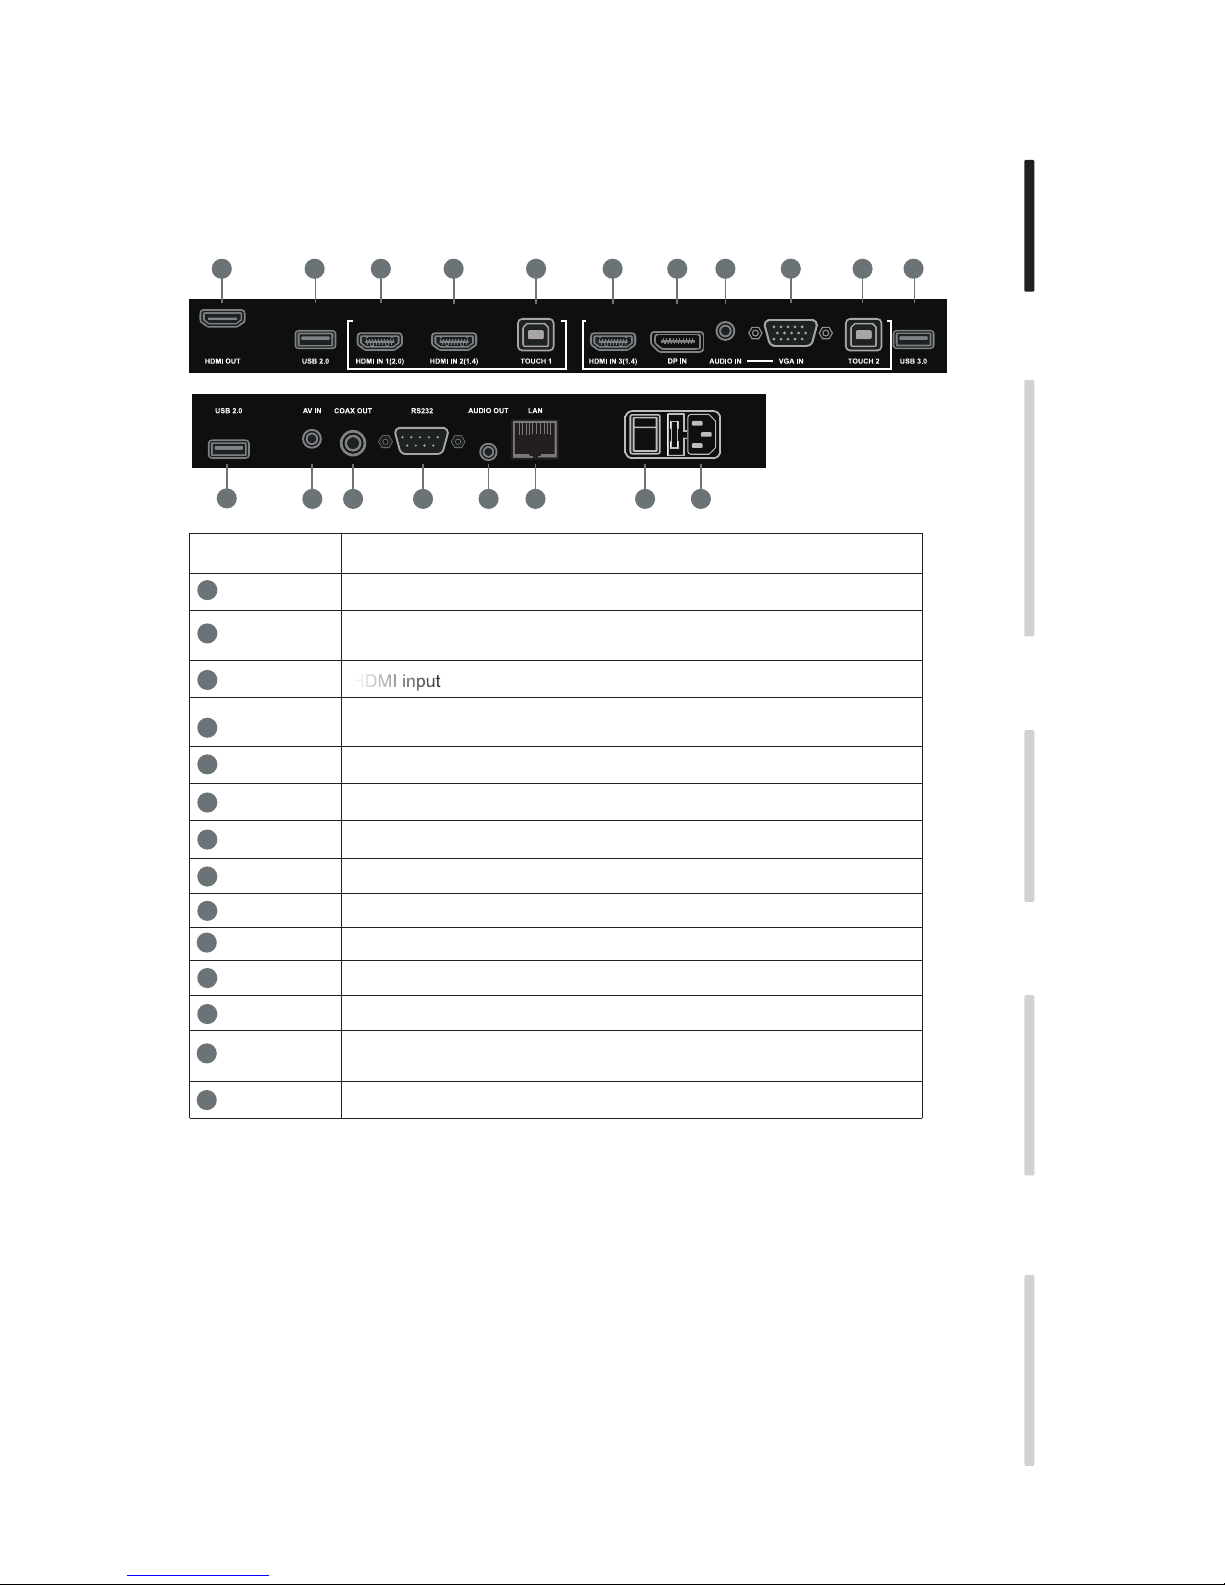
2. Connector Panel
BOXLIGHT.COM
Installation Connecting and Setting Menu Operation Troubleshooting Care Maintenance
1
2
2
8 9 10 11 12 13
3
3
4
LAN
5 63
14
Items Function description
1
HDMI OUT Displays whatever is on the screen, including Android annotation.
2
3
4
5
6
7
8
9
10
11
USB
HDMI IN
TOUCH
DP DisplayPort input
AUDIO IN
VGA IN
AV IN
COAX OUT
RS-232
AUDIO OUT Output to an external amplifier and speaker
Connect USB devices such as mobile hard disk, U disk, USB keyboard
and mouse, USB drives, etc.
HDMI input
Touch signal output for connection to external computer
Line level audio input
VGA input
Composite video + audio input - 3.5mm 4-conductor
Digital audio output - “RCA” connector
Control interface
7 4
2
12
13
AC SWITCH
14
LAN
AC IN
RJ-45 connector
Master power switch
AC power input
HDMI = High-definition multimedia interface
USER GUIDE ProColor 652U, 702U, 752U 862U | 5
Page 6
Installation Connecting and Setting Menu Operation Troubleshooting Care Maintenance
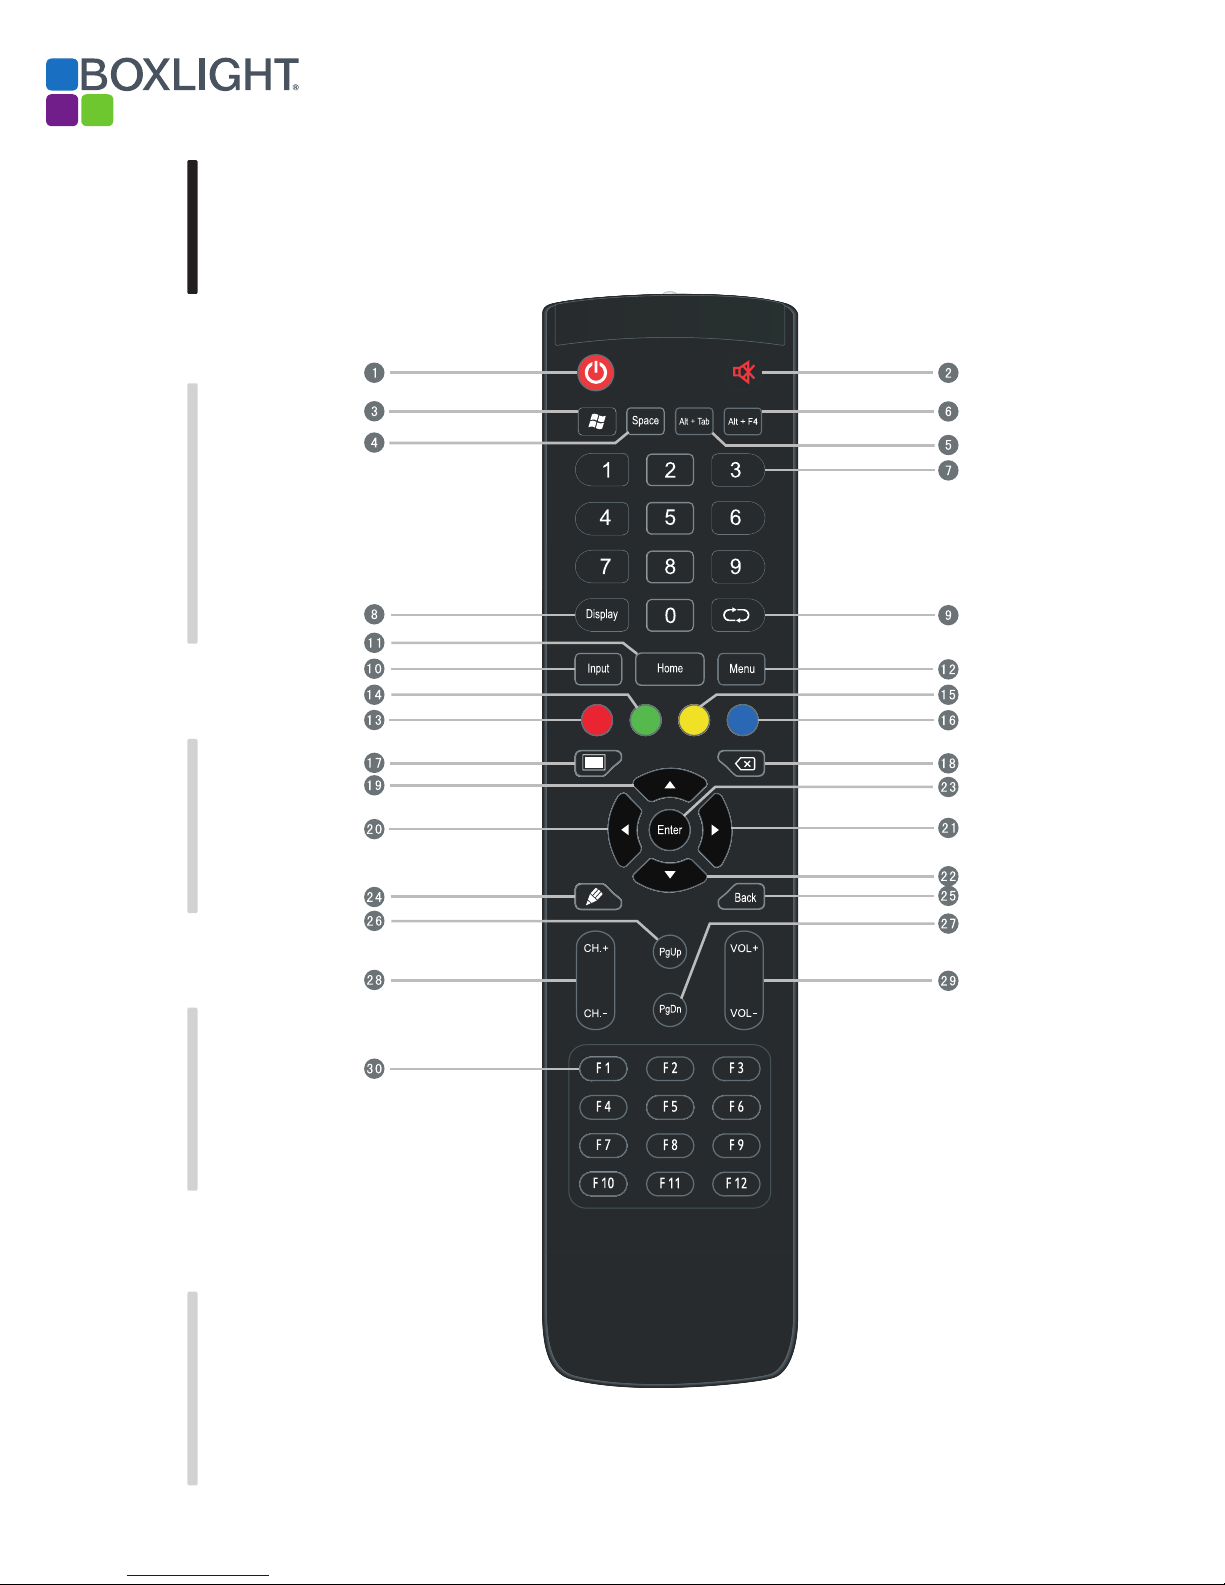
3. Remote Control
1) Remote control button instruction
6 | USER GUIDE ProColor 652U, 702U, 752U 862U
Page 7
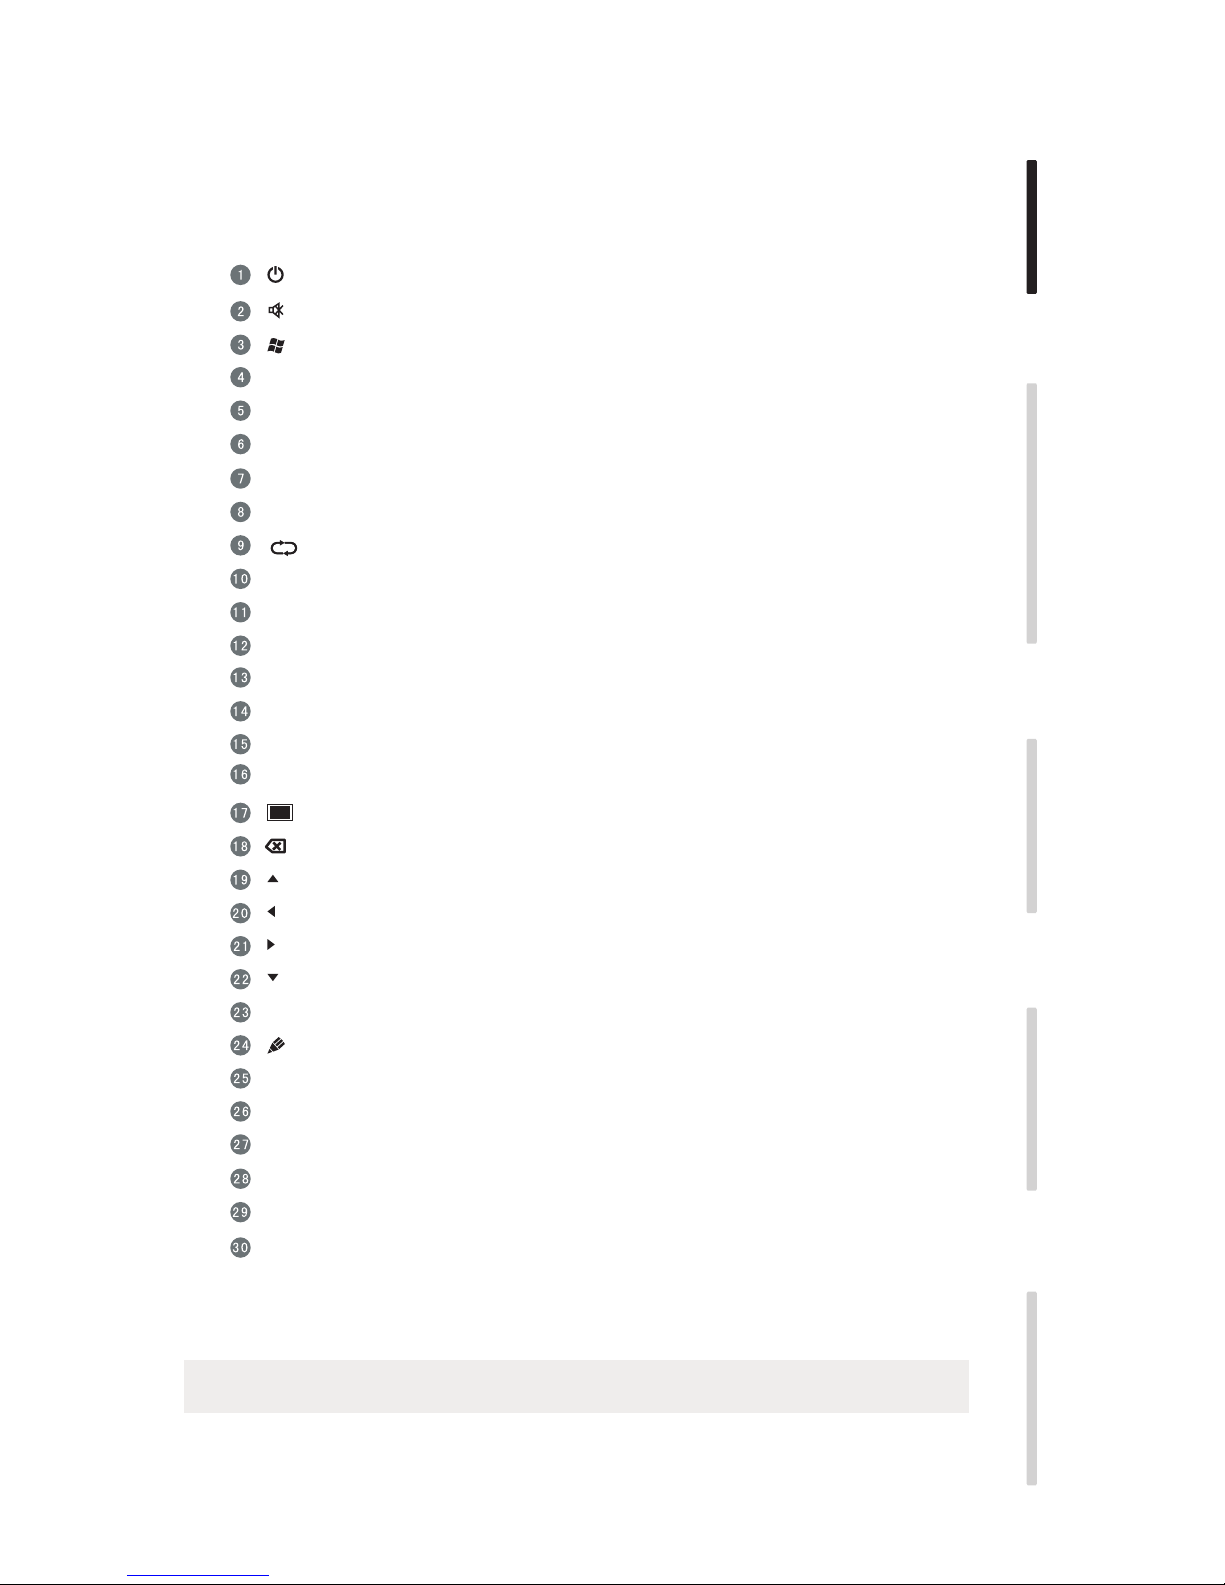
Detailed Function Description
Space
Alt+Tab
Alt+F4
Numeric keys
Display
Input
Home
Menu
Red
BOXLIGHT.COM
Installation Connecting and Setting Menu Operation Troubleshooting Care Maintenance
Power on/off
Mute audio
(Built-in computer Windows key
Built-in computer Space key
Built-in computer spacebar Alt + Tab
Built-in computer program window close button
Numeric input keys
Shows the name of the currently selected input and its resolution
No function at this time
Input signal source select
Android system Home
Settings menu
Disables touch and control panel functions
Green
Yellow
Blue
Enter
Back
PgUp
PgDn
CH.+ \ CH-.
VOL+ \ VOL-
F1-F12
Disables control panel functions
Disables touch function
Activates zoom function, use buttons to adjust
Blanks the screen
Backspace key
Up key
Left key
Right key
Down key
Confirmation key
Starts annotation app
Return key
Built-in computer page (previous page)
Built-in computer page (next page)
No function at this time
Volume raise/lower
Built-in computer F1 - F12 function keys
NOTE: If there is no built-in computer all related function keys will have no operating function.
USER GUIDE ProColor 652U, 702U, 752U 862U | 7
Page 8
Installation Connecting and Setting Menu Operation Troubleshooting Care Maintenance
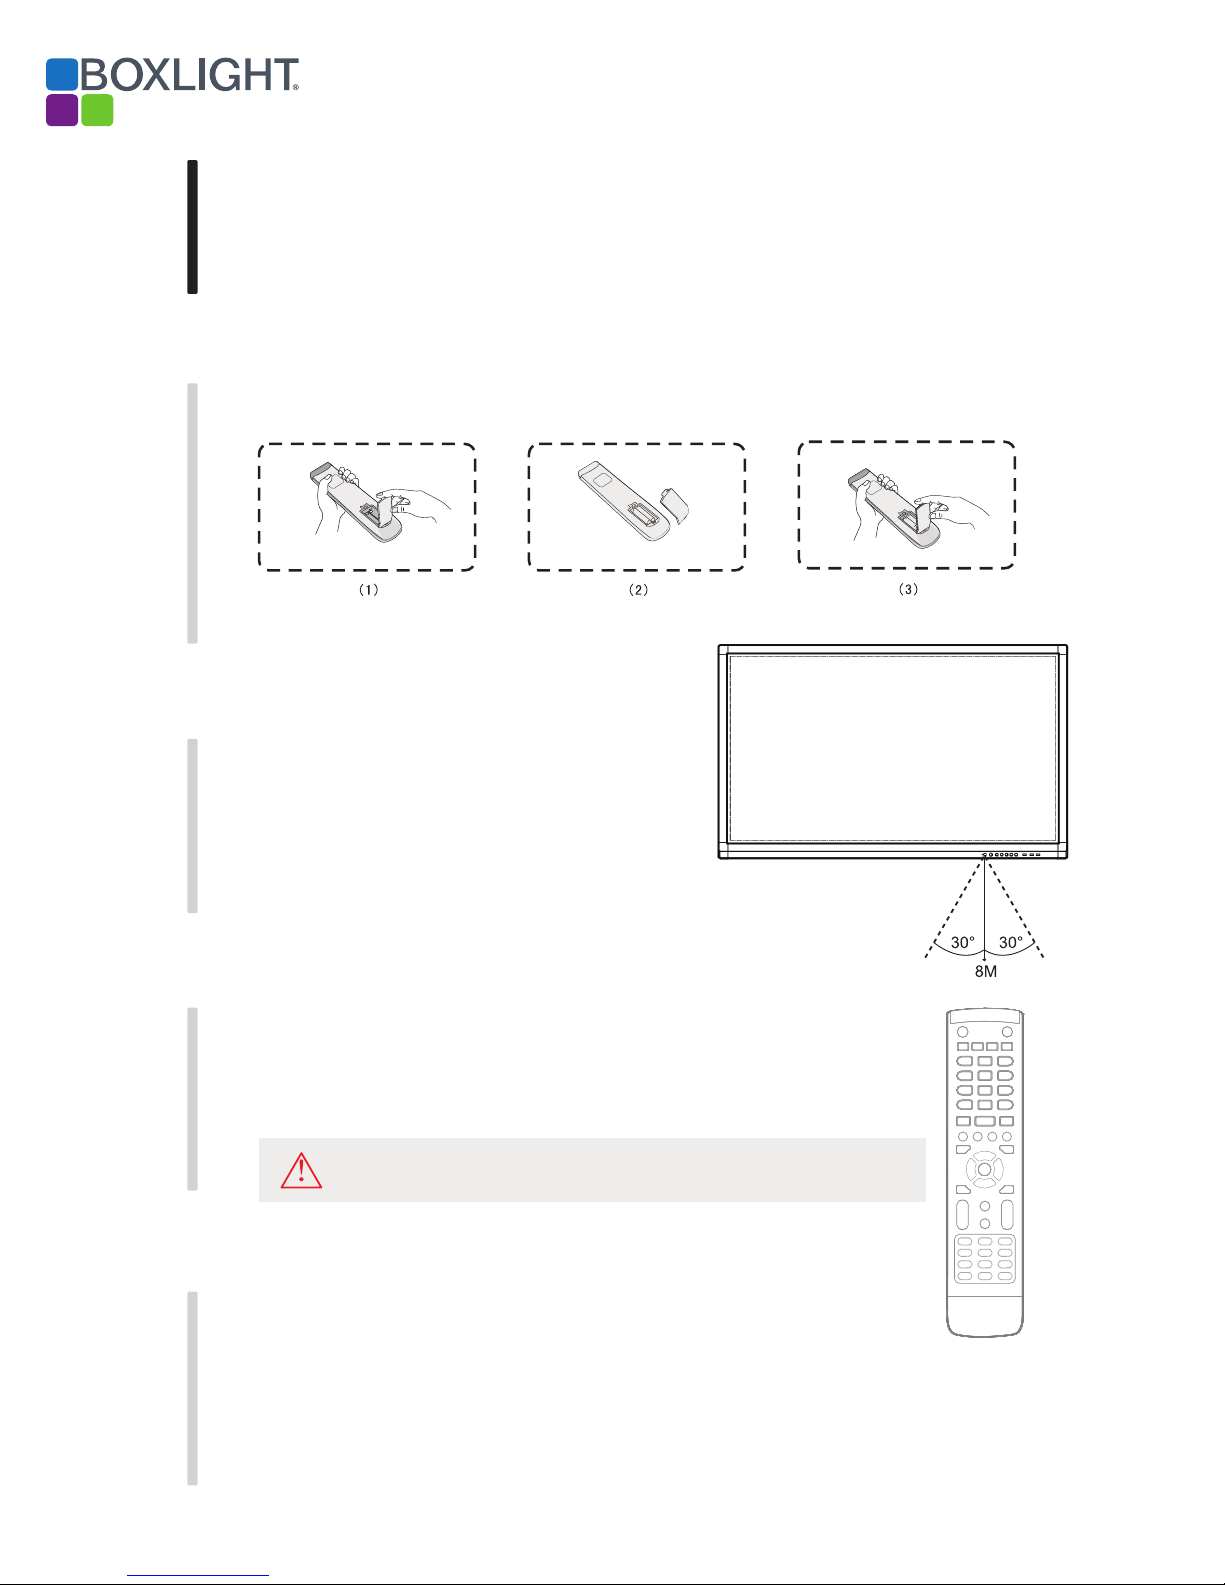
2) Remote Control Instruction
Install Batteries
(1) Open battery compartment cover on the back of the remote control
(2) Install AAA type battery with correct polarity. Do not mix using old and new batteries
(3) After batteries are installed, replace the cover
Range of remote control
The remote control will operate normally within the range of 8 m (25’), and within
30 degrees left and right from the remote control receiver.
Always dispose of batteries in an environmentally friendly manner.
Only use the specified battery type. Using another type can damage
the remote control and may cause the battery to burst.
8 | USER GUIDE ProColor 652U, 702U, 752U 862U
Page 9
Setup
For safety reasons do not connect power until all connections are complete.
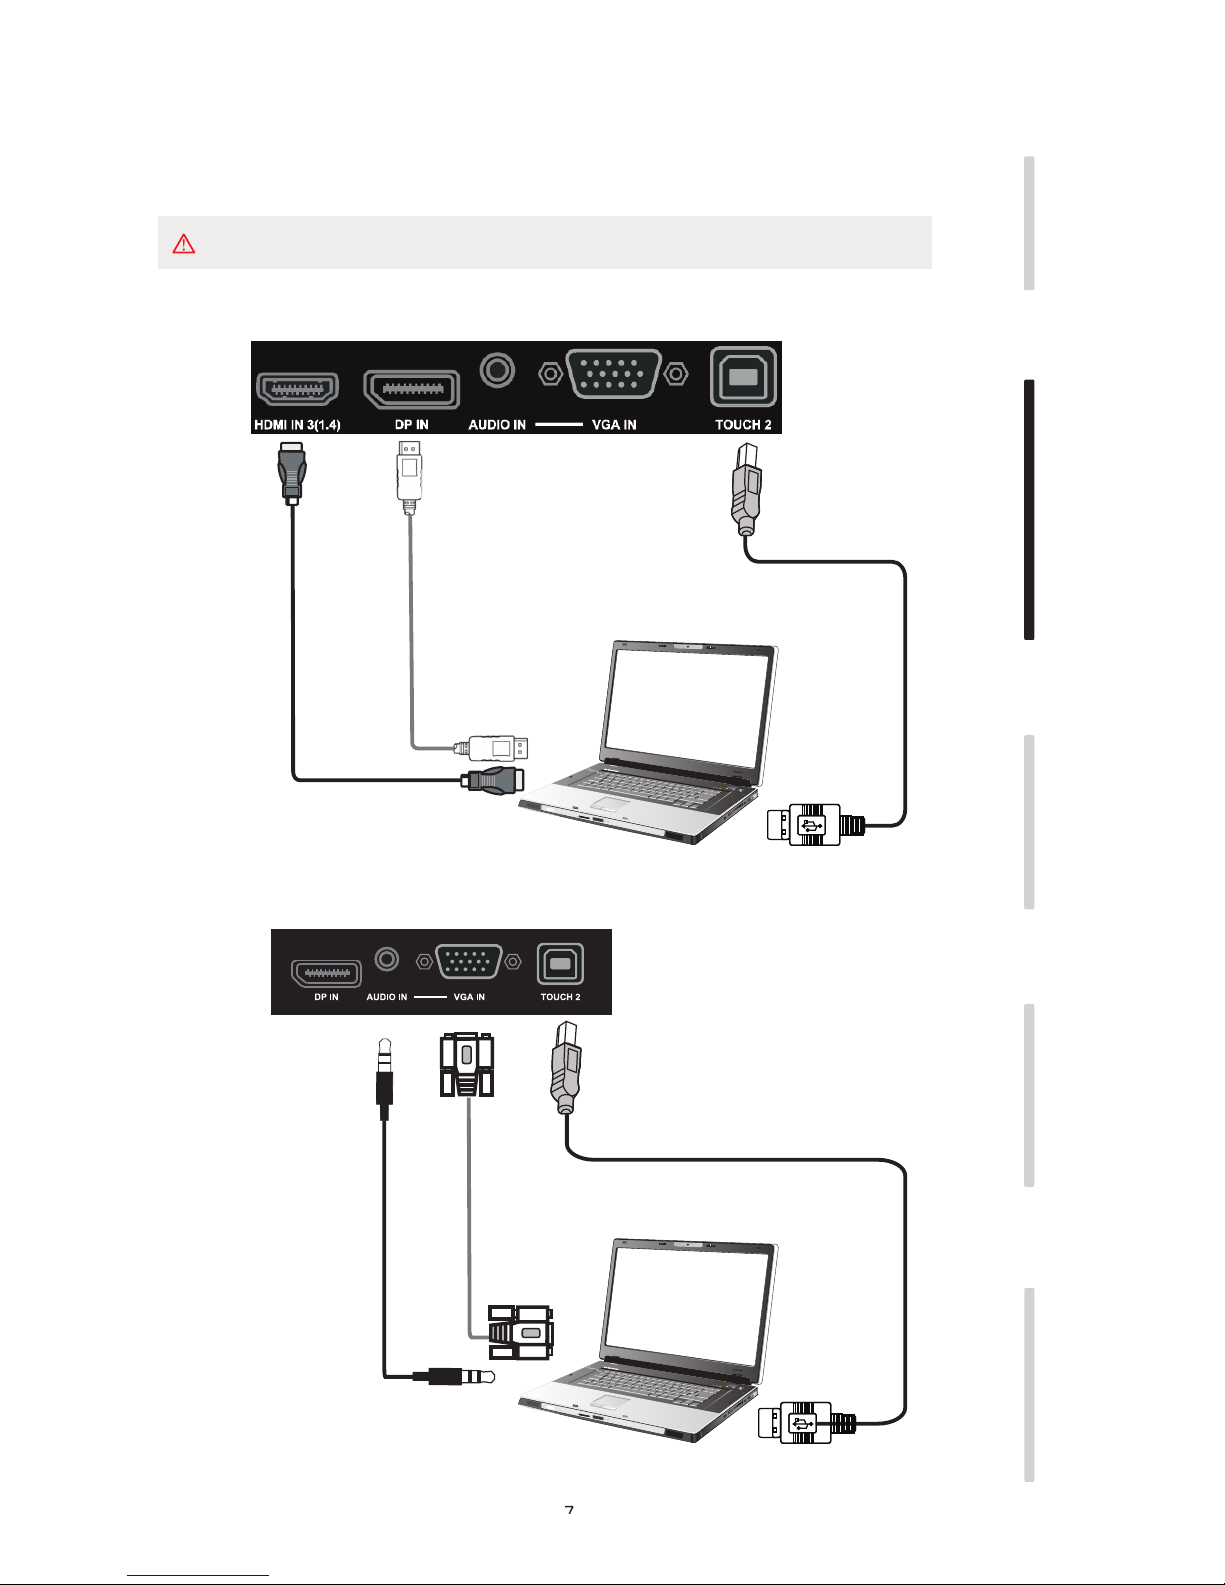
1.A. External Computer Digital Audio/Video plus Touch Connection
The best image and sound quality will be through digital connection using HDMI or DisplayPort
BOXLIGHT.COM
Installation Connecting and Setting Menu Operation Troubleshooting Care Maintenance
HDMI Cable
DisplayPort Cable
Use only one cable
HDMI or DP
Computer
1.B. External Computer Analog Audio/Video plus Touch Connection
USB Cable
USB Cable
Audio Cable
VGA Cable
Computer
USER GUIDE ProColor 652U, 702U, 752U 862U | 9
Page 10
Installation Connecting and Setting Menu Operation Troubleshooting Care Maintenance
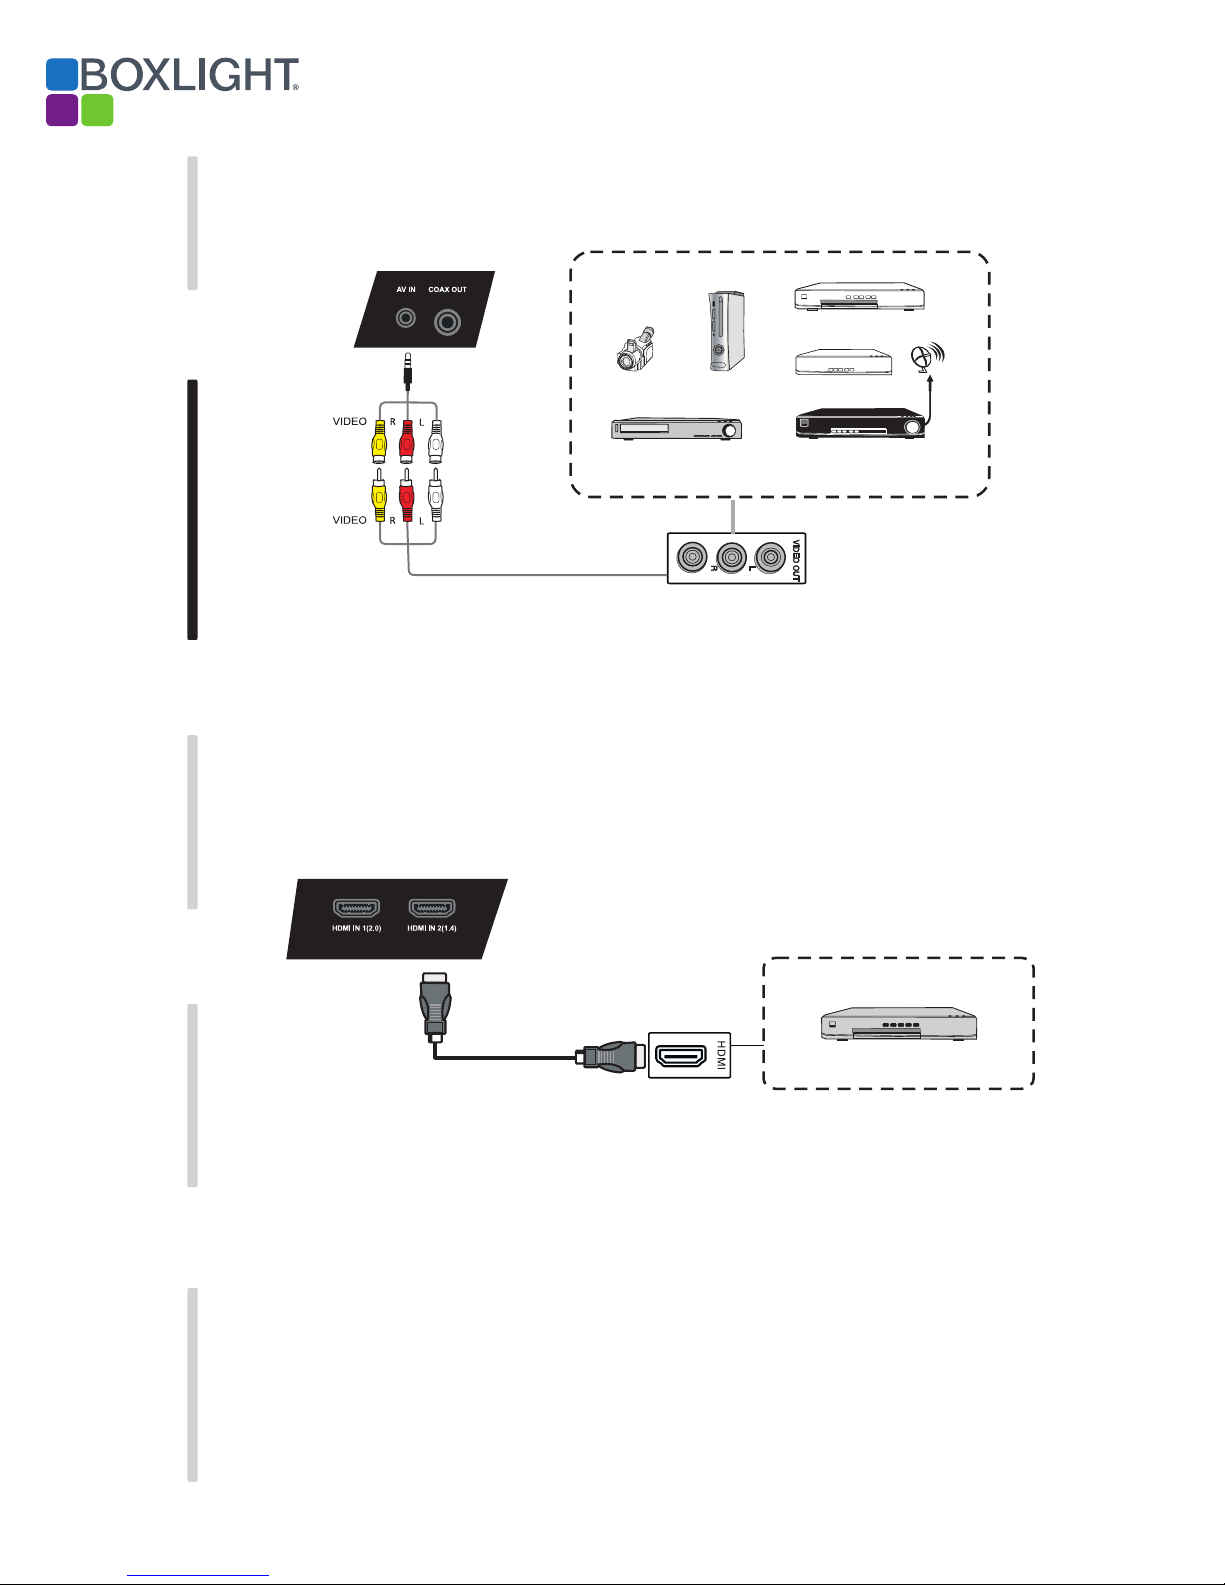
2. Audio and Video Equipment
1) Analog Accessory Connection
DVD
AV Cable
2) HDMI Accessory Connection
Camera
Video recorder
Video Game
Set-top
Satellite TV receiver
10 | USER GUIDE ProColor 652U, 702U, 752U 862U
HDMI Cable
DVD Disc Player
Page 11
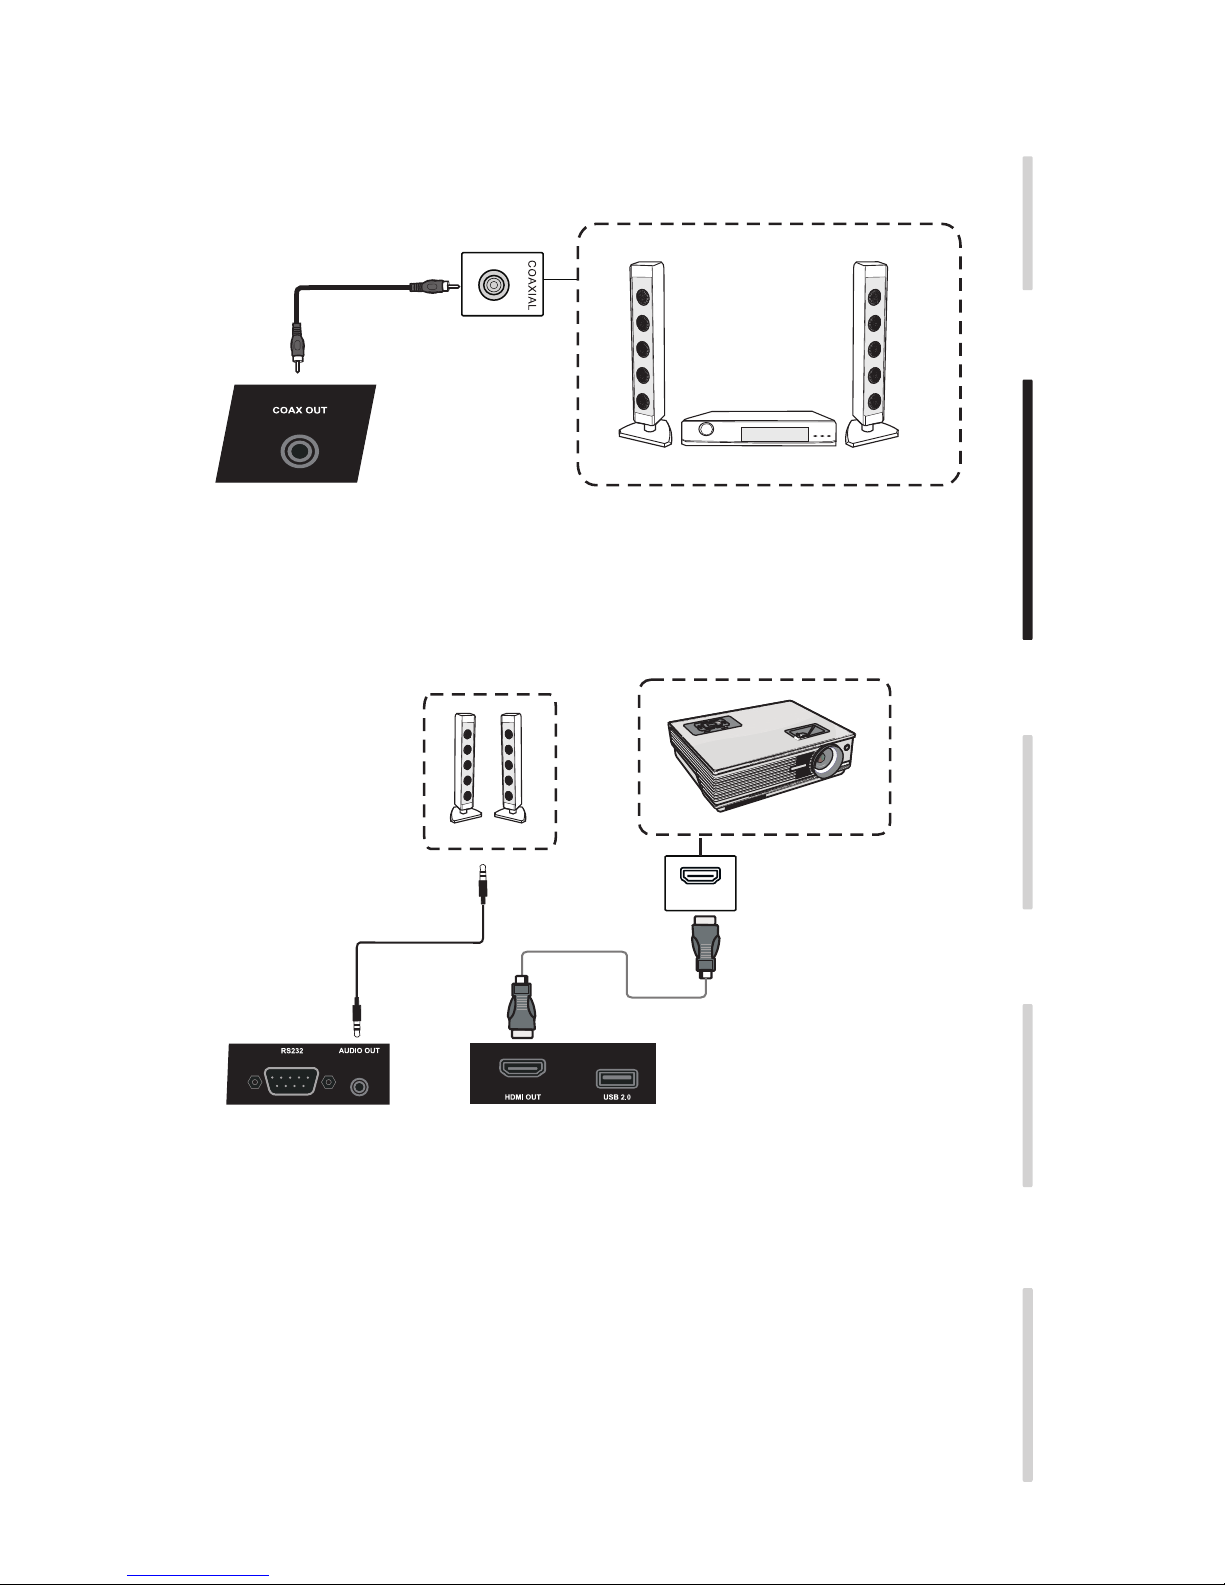
3. Digital Audio Connection
Coaxial Cable
BOXLIGHT.COM
Installation Connecting and Setting Menu Operation Troubleshooting Care Maintenance
Power amplifier/stereo equipment
4. Video Output Connection
Audio Cable
Projector
HDMI IN
HDMI Cable
USER GUIDE ProColor 652U, 702U, 752U 862U | 11
Page 12

Installation Connecting and Setting Menu Operation Troubleshooting Care Maintenance
5. LAN Connection
6. RS232 Connection
LAN
Network Cable
LAN
RS232
Serial Port Cable
Computer
Control of the display via RS-232 requires third-party software on the computer.
12 | USER GUIDE ProColor 652U, 702U, 752U 862U
Page 13

Menu Operation
Touch Menu Operation
Activating the Menu - the “Touch-A” method
Quickly drag at least two fingers up from the bottom center of the screen as shown below.
A
BOXLIGHT.COM
Installation Connecting and Setting Menu Operation Troubleshooting Care Maintenance
Note: The “Touch-A” method mentioned in this manual is as shown above.
Settings Menu
General Setting
Use the INPUT button on the remote control or the Touch-A method to activate.
Using the remote control - use to select the desired input then press “Enter.”
Using touch - touch the relevant icon to select the desired input.
Press the return key on remote control, or touch outside the menu to exit the menu.
Touch and drag to adjust volume or brightness or use the remote control
Note: The icon for the internal PC will only appear the internal PC is installed.
USER GUIDE ProColor 652U, 702U, 752U 862U | 13
Page 14

Installation Connecting and Setting Menu Operation Troubleshooting Care Maintenance
Detail Setting Menu
Press Menu on remote control or touch the icon on the General Setting menu to call up the details settings menu that
Includes Audio, Screen, Display and Adjust.
Audio
Touch the desired setting or press the button on the remote control to select Audio setting menu.
Press on the remote control or directly touch to select the option.
Press Enter on remote control to enter adjustment mode, and press button or directly touch to adjust
Press Back on remote control, or touch outside the menu to exit menu.
Screen
Press button on remote control or touch “Screen” to select Screen setting menu.
Press on remote control or touch to select the option.
Press Enter on remote control or touch to enter the selected mode.
Press Back on remote control, or the screen outside the menu to exit menu.
14 | USER GUIDE ProColor 652U, 702U, 752U 862U
Page 15

Display
Press the button on the remote control or touch Display.
BOXLIGHT.COM
Installation Connecting and Setting Menu Operation Troubleshooting Care Maintenance
Press the buttons on the remote control or touch to select the desired option.
Press Enter on the remote control to enter adjustment mode, and use or touch to adjust.
Press Enter/Back to exit adjustment.
Press Back on the remote control, or touch the screen outside the menu area to exit.
Adjust Video Settings
Press the button on the remote control or touch Adjust.
Use on the remote control or directly touch to select the option.
Press Enter on the remote control to enter adjustment mode, use or directly touch pen to adjust
each option. Press Enter/Back to exit adjustment. Or, the “Auto” icon to adjust automatically.
Press Back on remote control, or touch the screen outside the menu area to exit.
USER GUIDE ProColor 652U, 702U, 752U 862U | 15
Page 16

1. Remove any objects between remote control and the display’s IR port that could be blocking the signal.
Installation Connecting and Setting Menu Operation Troubleshooting Care Maintenance
Simple Troubleshooting
Remote control
not working
Machine automatically
shut down
2. Check whether the battery electrode in the remote control is correct.
3. Check whether remote control needs to replace battery.
1. Determine if auto-sleep has been activated.
2. Confirm the display has power.
PC mode
.
Signal out of range
Background has vertical
lines or streaks
Image lack of color,
color is incorrect
Display format that is
not supported
1. Verify that the computer’s resolution is set properly.
1. Select automatic correction in menu.
2. Adjust clock and phase position in menu.
1. Confirm the video input cable is properly connected.
2. Adjust chromaticity and brightness or contrast in menu.
1. Select automatic correction in menu.
2. Adjust clock and phase position in menu.
Touch Function
Touch function invaild
Touch positioning not
correct
1. Check whether touch driver is installed and started.
2. Confirm the computer recognizes the touch USB connection.
1. Check whether driver is properly installed and make correction.
2. Calibrate.
Video function can't work normally
1. Verify the display is powered up.
No picture or no sound
With horizontal or
vertical stripes or
image dithering
No color, color is weak
or image is weak
2. Confirm the video input cable is properly connected and this input is selected.
3. If in internal computer mode, check whether internal computer is started.
1. Confirm the video input cable is properly connected.
2. Check whether other electronic equipment or power tools are placed around the machine.
1. Adjust chromaticity and brightness or contrast in menu.
2. Check whether signal wire is well connected.
Audio function can't work normally
Video is displayed but
no audio
Only one speaker has
sound
HDMI output without
sound
1. Check whether mute is active.
2. Adjust volume.
3. Verify the input cable is connected correctly.
1. Adjust sound balance in menu.
2. Verify the computer is producing audio on both channels.
3. Verify the input cable is connected correctly
1. Verify the input cable is connected correctly and the computer is producing audio.
16 | USER GUIDE ProColor 652U, 702U, 752U 862U
Page 17

Maintenance
Please unplug power plug before cleaning and maintenance, to prevent electric shock.
Clean screen
Use a commercial cleaner certified for use on flat panel display screens.
Do not use commercial window clearers.
Do not use any abrasive cleaner.
BOXLIGHT.COM
Installation Connecting and Setting Menu Operation Troubleshooting Care Maintenance
Clean face frame
Use a dry, soft, lint-free cloth to wipe front frame. If this is not sufficient use a mild cleaner.
Vacation Setup
If the display will not be used for an extended period of time it is recommended it be
powered down and unplugged.
USER GUIDE ProColor 652U, 702U, 752U 862U | 17
Page 18

Android
Android
Android
The Android feature in Boxlight’s ProColor Interactive Flat Panel Displays adds significant functionality. When
delivered it includes a browser, annotation tools, a file viewer/finder, and the ability to save to cloud storage
services.
Please note: the Android system and its apps are rapidly evolving. Between the date of this writing and the
end of 2017 new apps may be added or existing ones removed.
Figure 1-1 Launcher interface
Click at bottom right to open the apps directory, as shown below
18 | USER GUIDE ProColor 652U, 702U, 752U 862U
Figure 1-2 Apps Directory
Page 19

BOXLIGHT.COM
Click the button on the left or right side of the screen (highlighted by the red circles above)
Sidebar
to open the sidebar.
The figure below shows the sidebar on the right side. The functions of the sidebar include:
Back, Home, Recent, Quick Whiteboard, Annotation tools, Crop, Freeze, and Small Tools.
Android
Back key
Click to return to return to the last operating interface.
Home key
Click to return to return to the desktop.
Recent tasks
Click to display recently tasks.
Quick Note
Click to open Note which enables write, erase, select objects, etc. See section 3 “Note”
for more details.
Annotation tools
Click to pop out the annotation tools which allow writing and drawing on the screen.
The Annotation Tools
USER GUIDE ProColor 652U, 702U, 752U 862U | 19
Page 20

Android
Screen Freeze
Click the button to pop out the screen freezing tools - freeze + zoom is supported.
The Screen Freeze/Zoom Tools
- Zoom in. Click the button to zoom in the current screen.
- Zoom out. Click the button to zoom out the current screen.
- Return. Click the button to return to the original size of the screen.
- Exit. Click the button to exit the screen freezing.
Small tools
Click to pop out the tool choice box, including spotlight, count down and stop watch, and
air class.
Spotlight
Click the icon to open the spotlight, as shown in Fig. 2-7-1-1. The spotlight can be used
to focus attention on a specific area of the image.
- Drag in the black area to move the spotlight.
- Click to open the scale and alpha adjustment window shown below.
Alpha adjusts the transparency of the masked area.
20 | USER GUIDE ProColor 652U, 702U, 752U 862U
Spotlight Interface
Scale adjusts the size of the spotlight.
Page 21

BOXLIGHT.COM
Countdown Small Tool
Click the to open the Countdown Small Tool.
Click the “START” button to start the count down.
Click “PAUSE” to temporarily pause the count down.
Click “RESET” to return to 0:00:00.
Countdown Small Tools
Stopwatch Small Tool
Android
Click open the Stopwatch Small Tool. Functions include start,
pause, continue the stop watch, and reset.
Figure 2-7-3-1 Stop watch
USER GUIDE ProColor 652U, 702U, 752U 862U | 21
Page 22

Android
Note
Click to open Note.
Note Menu
The Note App
Click to open the Note menu which provides the ability to choose
the background, create/open/import/save/export files, and save to cloud
storage services.
Start menu
22 | USER GUIDE ProColor 652U, 702U, 752U 862U
Page 23

BOXLIGHT.COM
NoteOperation
New - Click to create a new Note file.
Open - Click to open the file window which allows opening the native
.enb format file.
Import - Click to import a JPG file to Note.
Save - Click to save the current document in .enb format.
Export - Click to export the current Note to IMG, PDF, SVG, or IWB
format.
Export
Android
Cloud Storage - Click to export and upload the current Note file to
Google Drive or Microsoft OneDrive.
USER GUIDE ProColor 652U, 702U, 752U 862U | 23
Page 24

Android
Background - Click to switch the current page background color. Click
any color to switch the page background.
Color Background Image Background
(7) Brightness disabled. Click to activate the automatic brightness
adjustment, which is disabled by default.
Exit
Click toreturntothemaininterface.
Ifthecurrentdocumentisnotsaved,theSavewindowwillappear.
EnterafilenametosavethecurrentdocumentorjustclosetheSavewindow.
Selection
Click to select objects.
Selected objects can be moved, deleted, etc.
24 | USER GUIDE ProColor 652U, 702U, 752U 862U
Page 25

BOXLIGHT.COM
Pen
Android
Click to open the pen setting window.
Pen setting menu
Pen – Included choices for pencil (default) and several brushes.
Size - Slide the size bar to set size.
Color – Choose a color on the right-hand side palette.
Eraser
Click to select the eraser.
Circle the object you need to erase.
Wipe screen
Click to wipe the entire screen.
Shape
Click open the shape window.
Shape window
Drawing board
Click to open the drawing board.
Pen - Pencil is the default, also offers brushes and an eraser.
Palette - Select the desired color.
Color picker - Click to open the color picker. Drag the round color picker to the
desired.
Color disk - Users can change the color of the color circle by changing the color of the
color disk.
USER GUIDE ProColor 652U, 702U, 752U 862U | 25
Page 26

OS User
Manual
Android
Undo
Click to undo the previous operation.
Redo
Click to redo the previous undo (this icon only appears after an
Undo has been performed)
Add page
Click to add a page.
Go to previous page
Click to go to the previous page
View all
Click load a thumbnail of all pages.
Go to next page
Click to go to the next page.
26 | USER GUIDE ProColor 652U, 702U, 752U 862U
Page 27

BOXLIGHT.COM
OS User
Manual
File Finder
Click to open the file browser. It can browse files saved in the
system such as documents, Notes, video, picture, and audio. It
Android
automatically detects and mounts external USB devices.
File browsing
Browsing by category
Users can browse resources stored in the system according to category,
including document, whiteboard writing (pages saved by the whiteboard
and quick screenshot), video, picture, and audio.
USER GUIDE ProColor 652U, 702U, 752U 862U | 27
Page 28

OS User
Manual
Android
Resource operation
Users can edit the resources stored in the system, including creating,
selecting, selecting all, cancelling selecting, copying, pasting, cutting,
deleting, renaming, and more.
Selecting resources to modify - Click to add a selection box
appears on each resource – click as many as desired.
Selection Interface
Select all. Click to select all resources in the current directory.
28 | USER GUIDE ProColor 652U, 702U, 752U 862U
Select All interface
Page 29

BOXLIGHT.COM
OS User
Manual
OS User
Manual
Cancel selection Click to cancel all selections.
OS User
Manual
OS User
Manual
Select All interface
Cancel selection Click to cancel all selections.
Cancel selection Click to cancel all selections.
Copying. When a resource has been selected, the copy button will
appear – click it to copy the currently selected resource.
New folder
Cut - When one or more resources have been selected, the Cut button will
appear - click to Cut the selected resource.
Android
Delete - Click to delete the selected resource.
Paste - When one or more resources have been copied or cut the icon
appears. Users can paste the copied/cut resource(s) to the specified location
as required. The paste operation executes only when the default folder is
displaying “all” resource locations.
Renaming. Click to rename the selected resource.
Send - Click to pop out the “send to” button. You can send the selected
file to the target folder.
QuickTouch – Click and hold on a resource causes the resource operation
menu to appear. The resource operation menu allows deleting, copying,
cutting, pasting, and renaming on the current resource.
USER GUIDE ProColor 652U, 702U, 752U 862U | 29
Page 30

OS User
Manual
Renaming. Click to rename the selected resource.
Send - Click to pop out the “send to” button. You can send the selected
file to the target folder.
QuickTouch – Click and hold on a resource causes the resource operation menu to
appear. The resource operation menu allows deleting, copying, cutting,
pasting, and renaming on the current resource.
OS User
Manual
Exit
Android
Sort menu
Click the to open the Sort menu which allows sorting according to the
name, type, size, and date/time. The default sort is by name.
Tile - Click to display the resources as icons
List - Click to display the resources in the form of detailed list.
Sort Menu
Click toexitfilebrowsing,andreturntothehomepage.
30 | USER GUIDE ProColor 652U, 702U, 752U 862U
Page 31

OS User
Manual
Exit
Click toexitfilebrowsing,andreturntothehomepage.
Camera/Visualizer
OnceacamerahasbeenconnectedtotheUSBportclickthe buttontostart
theVisualizerApp.TheVisualizerAppfunctionsinclude:displayfullscreen,take
photo,annotation,andsettings.
Visualizer
BOXLIGHT.COM
Android
USER GUIDE ProColor 652U, 702U, 752U 862U | 31
Page 32

Android
Android System Settings
Click to open the Android System Settings menu.
Wireless & Networks
Enable/disable the network, and view network parameters including MAC
address, IP address, mask, and gateway.
Share
For configuring the SAMBA sharing service that enables Android file
sharing and access to Cloud storage services.
Device
For selecting background wallpaper and Anti-burn-in time (how long
before the screen blanks to prevent burn-in).
Personal
Language & Input: Setting language and input method.
Smart Pen Setting: Smart pen pairing.
Startup and shutdown: Set Startup channel
Setting menu
Fig 6-1 Setting menu
Password - Set the password of ScreenLock
Input Setting: Path renaming.
Other Settings: Setting the Slide Toolbar and FloatBar; setting the single
finger and multi-finger of Note writing.
32 | USER GUIDE ProColor 652U, 702U, 752U 862U
Page 33

BOXLIGHT.COM
System
Android
Setting Date & time, and About Device.
Browser
When the network is connected and active click and a URL.
Input
Click to open the General Settings menu.
General Settings
PC: Selects the PC input.
Android: Selects the Android input.
HDMI: Selects the HDMI input.
VGA: Selects the VGA input.
AV: Selects the AV input.
DVI: Selects the DVI input.
USER GUIDE ProColor 652U, 702U, 752U 862U | 33
Page 34

Cloud Dive
Click to connect to the Cloud Dive.
ScreenLock
Click to lock the screen, the Set Password page will appear if you
have not yet set the password.
Set password
Fig 11-1 Set password
If you have set the password, then the screen will be locked. You need to
enter the password to unlock.
Entering the Password
Fig 11-2 Input the password
34 | USER GUIDE ProColor 652U, 702U, 752U 862U
Page 35

BOXLIGHT.COM
USER GUIDE ProColor 652U, 702U, 752U 862U | 35
Page 36

BOXLIGHT.COM
 Loading...