

Boston Acoustics TVee 30 Owner's Manual
IMPORTANT SAFETY INSTRUCTIONS
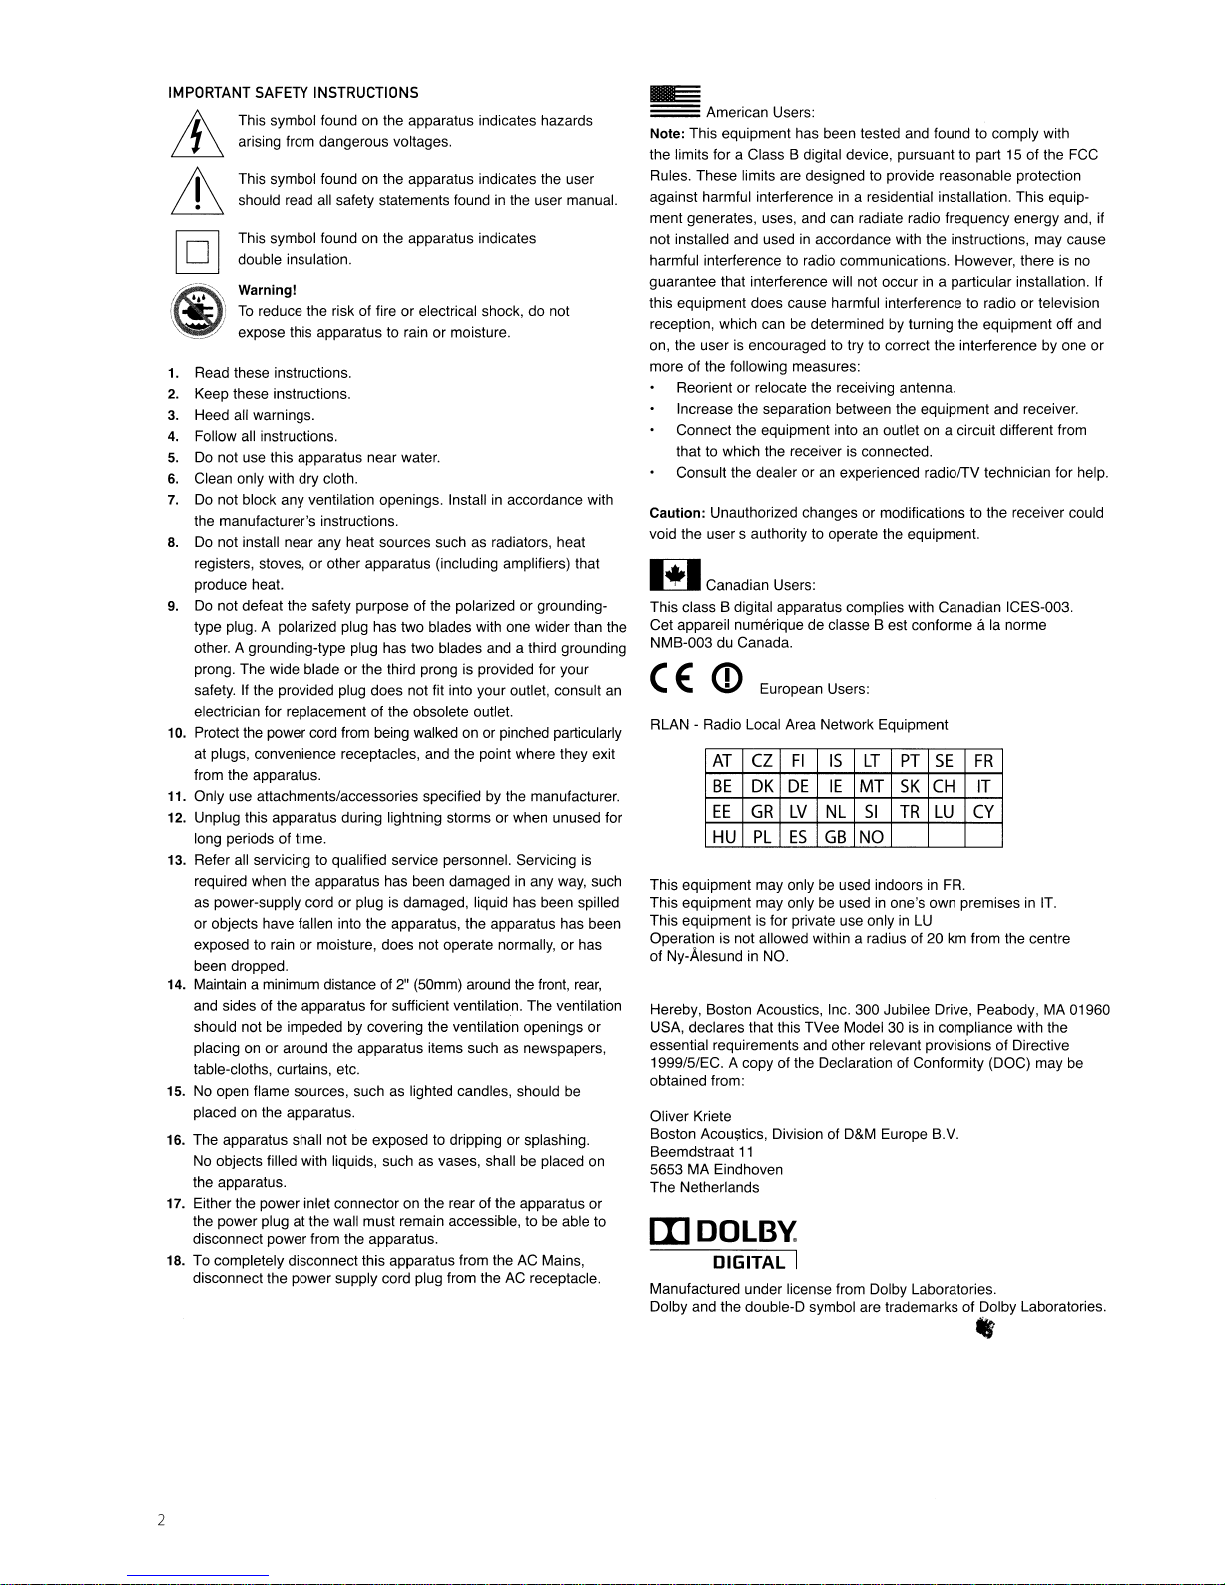
This symbol found on the apparatus indicates hazards
arising from dangerous voltages.
This symbol found on the apparatus indicates the user
should read all safety statements found in the user manual.
This symbol found on the apparatus indicates
double insulation.
Warning!
To
reduce the risk of fire or electrical shock, do not
expose this apparatus to rain or moisture.
1.
Read these instructions.
2.
Keep these instructions.
3.
Heed all warnings.
4.
Follow all instructions.
5.
Do not use this apparatus near water.
6.
Clean only with dry cloth.
7.
Do not block any ventilation openings. Installinaccordance with
the manufacturer's instructions.
8.
Do not install near any heat sources such as radiators, heat
registers,
produce heat.
9.
Do not defeat the safety purpose of the polarized or groundingtype plug. A polarized plug has two blades with one wider than the
other. A grounding-type plug has two blades and a third grounding
prong. The wide blade or the third prong is provided for your
safety. If the provided plug does not fit into your outlet, consult
electrician for replacement of the obsolete outlet.
10. Protect the power cord from being walked
at plugs, convenience receptacles, and the point where they exit
from the apparatus.
11. Only use attachments/accessories specified by the manufacturer.
12. Unplug this apparatus during lightning storms or when unused for
long periods of time.
13. Refer all servicing to qualified service personnel. Servicing
required when the apparatus has been damaged in any way, such
as power-supply cord or plug is damaged, liquid has been spilled
or objects
exposed to rain or moisture, does not operate normally, or has
been dropped.
14. Maintain a minimum distance of
and sides of the apparatus for sufficient ventilation. The ventilation
should not be impeded by covering the ventilation openings or
placing
table-cloths, curtains, etc.
15.
No open flame sources, such as lighted candles, should be
placed on the apparatus.
16.
The apparatus shall not be exposed to dripping or splashing.
No objects filled with liquids, such as
the apparatus.
17.
Either the power inlet connector on the rear of the apparatus or
the power plug at the wall must remain accessible, to be able to
disconnect power from the apparatus.
18.
To completely disconnect this apparatus from theACMains,
disconnect the power supply cord plug from the
stoves, or other apparatus (including amplifiers) that
on
or pinched particularly
have fallen into the apparatus, the apparatus has been
2"
(50mm) around the
on
or around the apparatus items such as newspapers,
vases, shall be placed on
AC
receptacle.
front,
is
rear,
B§
===
American Users:
Note: This equipment has been tested and found to comply with
the limits for a Class B digital device, pursuant to part
Rules. These limits are designed
against harmful interference in a residential installation. This equipment generates, uses, and can radiate radio frequency energy and, if
not installed and used
harmful interference to radio communications. However, there is no
guarantee that interference will not occur
this equipment does cause harmful interference to radio or television
reception, which can be determined by turning the equipment off and
on, the user is encouraged to try to correct the interference by one or
more of the following measures:
Reorient or relocate the receiving antenna.
Increase the separation between the equipment and receiver.
Connect the equipment into an outlet
that to which the receiver
Consult the dealer or
Caution: Unauthorized changes or modifications to the receiver could
void the user s authority to operate the equipment.
~
Canadian Users:
This class B digital apparatus complies with Canadian ICES-003.
Cet appareil numerique de
NMB-003 du Canada.
(E:
an
RLAN - Radio Local Area Network Equipment
<D
AT
BE
EE
HU
This equipment may only be used indoors in
This equipment may only be usedinone's own premises in IT.
This equipment is for private use only in
Operation is not allowed within a radius of 20 km from the centre
of Ny-Alesund in NO.
Hereby, Boston Acoustics, Inc. 300 Jubilee Drive, Peabody, MA 01960
USA, declares that this TVee Model 30
essential requirements and other
1999/5/EC. A copy of the Declaration of Conformity (DOC) may be
obtained from:
Oliver Kriete
Boston Acoustics, Division of D&M Europe B.V.
Beemdstraat
5653 MA Eindhoven
The Netherlands
[I]
11
DOLBY
in
European Users:
CZ
FI
DK
DE
LV
GR
PL
ES
DIGITAL I
Manufactured under license from Dolby Laboratories.
Dolby and the double-D symbol are trademarks of Dolby Laboratories.
to
provide reasonable protection
accordance with the instructions, may cause
in
a particular installation.
on
a circuit different from
is
connected.
an
experienced radiofTV technician for help.
c1asse
Best
conforme ala norme
IS
LT
PT
SE
FR
IE
MT
SK
CH
IT
NL
51
TR
LU
CY
GB
NO
FR.
LU
isincompliance with the
relevant provisions of Directive
.,
15
of the FCC
If
2
Introduction
Thanks for choosing Boston Acoustics and selecting theTVee Model30as
This manual includes
information in
case
important
you have any difficulties.
information on settingupand using your
your
home
entertainment
new
system,aswellastroubleshooting
Smart Features:
•
Easy
one wire
• Soundbar learns your existing remote control
• Better movies, sports, and games
• Better music
• Bluetooth enabled for music streaming
hookup
with
& wireless subwoofer
dedicated
mode
Additional Smart Features Include:
• Boston-engineered
• Simple and Functional design
•Wireless subwoofer can be positioned
• Digital
• Boston's Digitally Optimized Virtual Surround processing for pinpoint, theater-like surround effects
• Exclusive Boston
• Side-mounted mini-stereo
input
clear dialogue
with
best-in-class performance
to
fit
with
any
TV
both
horizontally and vertically
features Dolby Digital decoding for superior surround sound and a dedicated center channel provides
DSP
Control Switchtomaximize performance based on soundbar placement
AUX
inputtoconnect your portable media device
system.
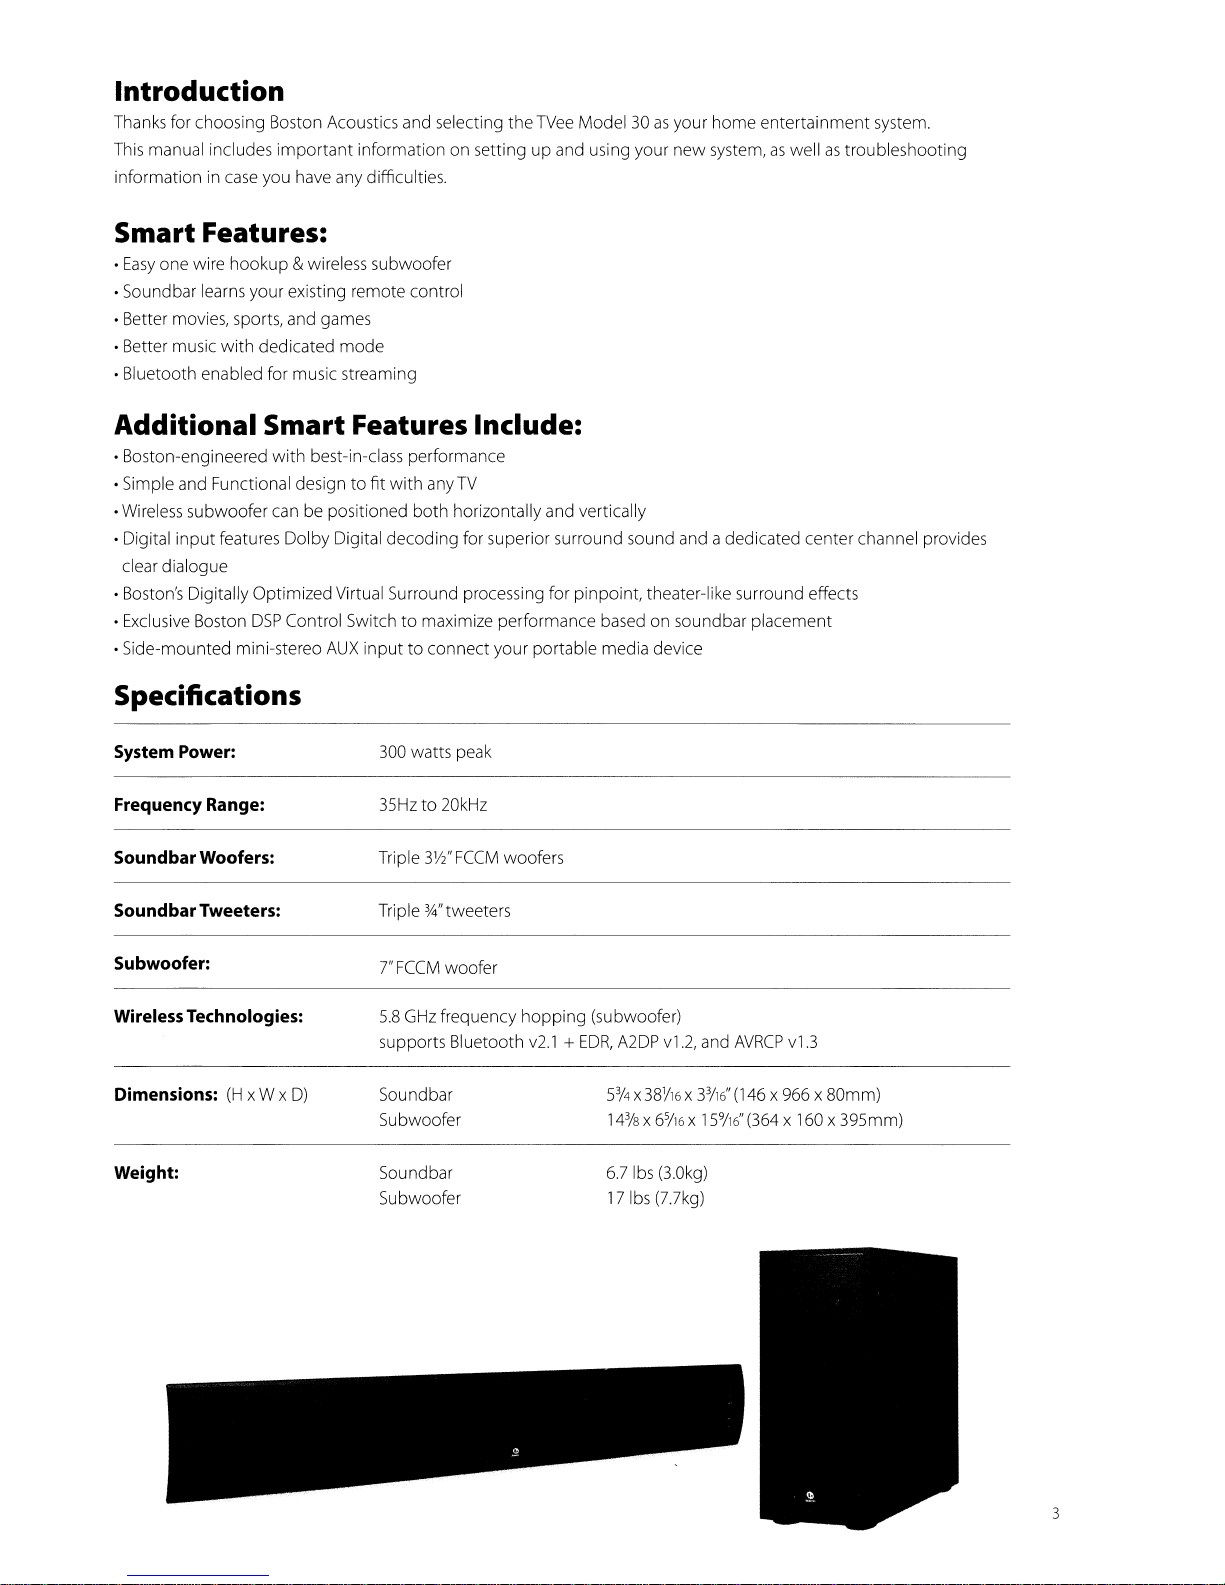
Specifications
System Power:
Frequency Range:
SoundbarWoofers:
SoundbarTweeters:
Subwoofer:
WirelessTechnologies:
Dimensions:
Weight:
(H
xW x
D)
300 watts peak
to
35Hz
Triple 3W'
Triple 3Jl"tweeters
7"
5.8
supports Bluetooth
Soundbar
Subwoofer
Soundbar
Subwoofer
20kHz
FCCM
FCCM
woofer
GHz frequency
woofers
hopping
v2.1+EDR,
(subwoofer)
A2DP
v1.2,
5%
X
38Y16
3
5
14
/8
x 6
6.7
Ibs (3.0kg)
17
Ibs
(7.7kg)
/16
and
AVRCP
3
x 3
116"
(146 x 966 x 80mm)
9
x
15
116"
(364 x 160 x 395mm)
v1.3
3
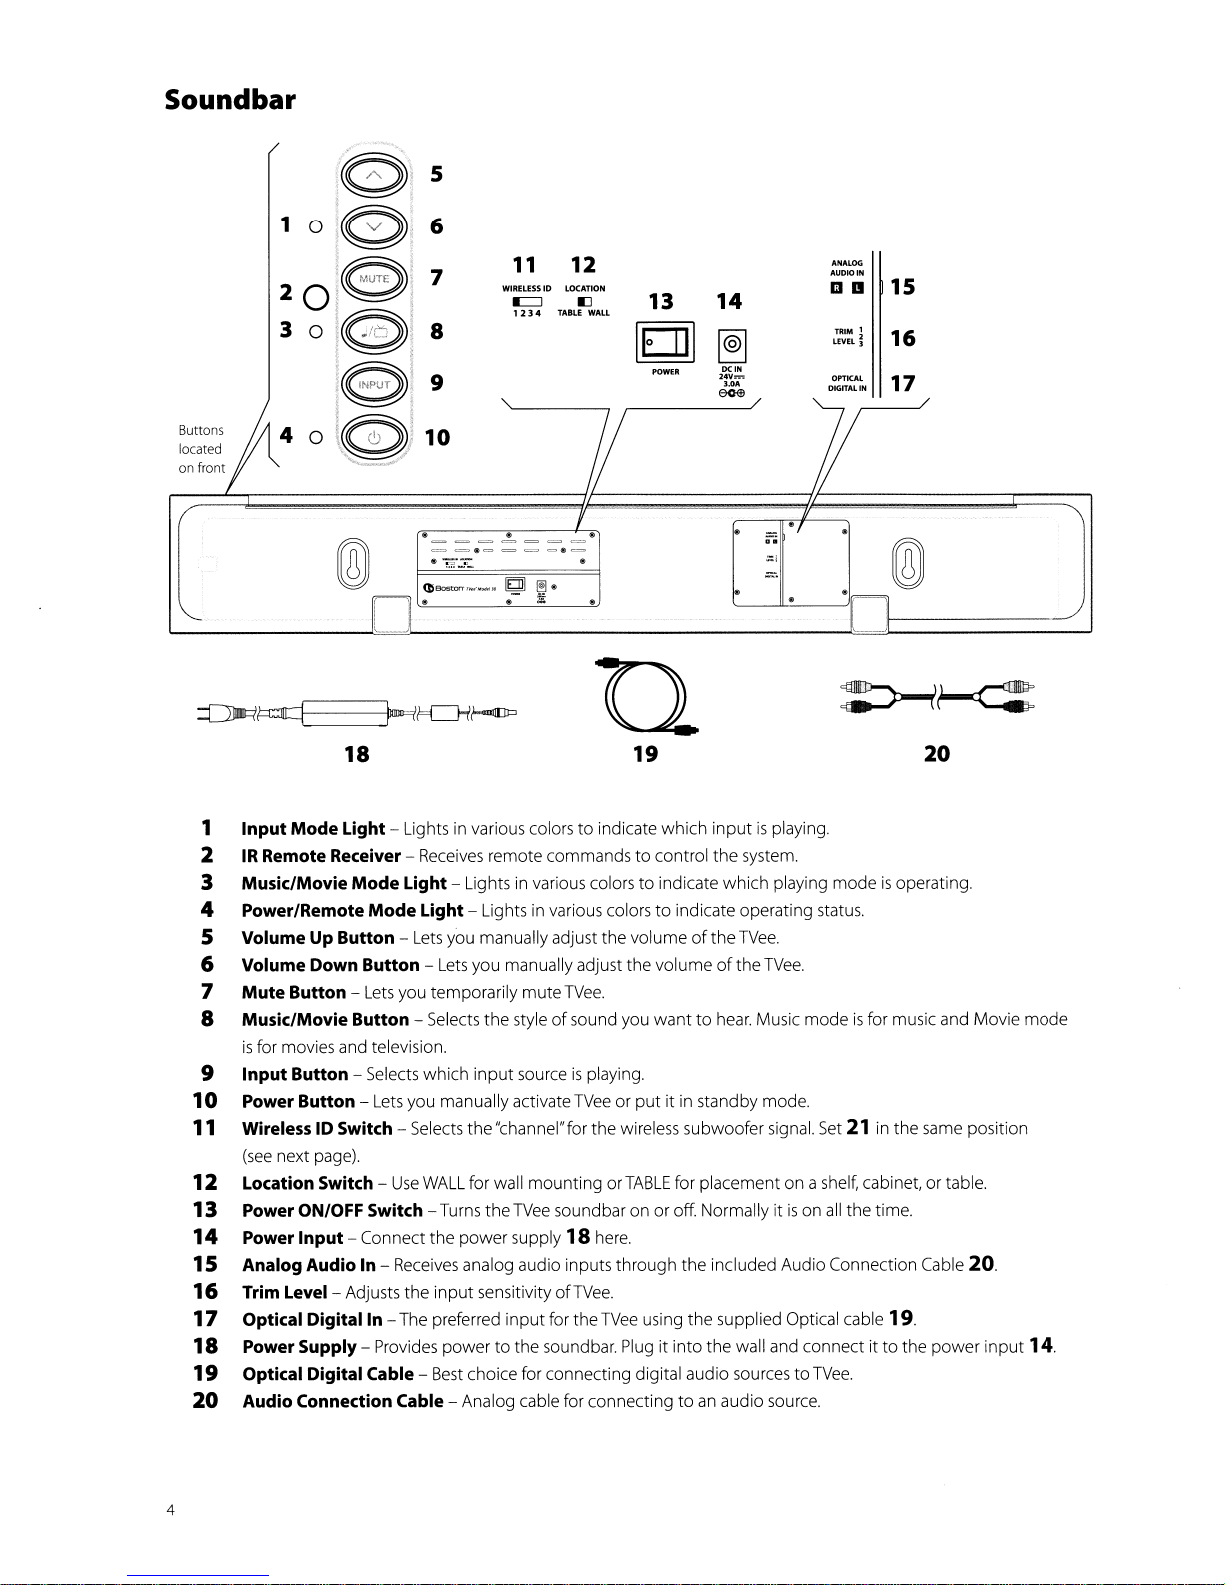
Soundbar
Buttons
located
on front
~~
1
2
3
4
5
6
7
8
9
10
11
12
13
14
15
16
17
18
19
20
11
WIAELESSID
•
===~===
==e====tI=
•
~'.JC
®
11l80s'~~'_.
~
.
~/=CJ-/~
18
Input
Mode
Light - Lights in various colors
IR
Remote Receiver - Receives remote commands
Music/Movie
Power/Remote
Volume Up Button Volume Down Button Mute
Button -
Music/Movie Button - Selects the style
is
for movies and television.
InputButton - Selects
Power Button - Lets you manually activate
Wireless ID Switch - Selects the"channel"for the wireless subwoofer signal.
(see
next pagel.
Location Switch Power ON/OFF Switch - Turns the
Power Input - Connect
Analog Audio In - Receives analog audio inputs
Trim
Level-
Optical
Power Supply - Provides
Optical Digital Cable Audio Connection Cable - Analog cable for connecting
Mode
Lets
Adjusts the
Digitalin
Light - Lights
Mode
Light - Lights in various colors
Lets
you manually adjust the volumeofthe
Lets
you manually adjust the
you temporarily
which
input
Use
WALL
for wall
the
power
input
sensitivity ofTVee.
- The preferred
powertothe soundbar. Plugitinto
Best
input
choice for connecting digital audio sourcestoTVee.
12
LOCATION
~
1234
~.
~
TABLE
.::J
WALL
•
13 14
[g]
POWER
~
DC
I.
24V=
3.0"
e<l$
o.i
;:1
_.
U
19
to
indicate
in
various colorstoindicate which playing
mute
TVee.
of
sound you
sourceisplaying.
TVeeorput
mountingorTABLE
TVee
soundbar onoroff. Normally itison
supply 18 here.
for the
TVee
which
inputisplaying.
to
control the system.
to
indicate operating status.
TVee.
volumeofthe
wanttohear.
it in standby mode.
for placement on a shelf, cabinet,ortable.
through
the included Audio Connection Cable 20.
using
the
toanaudio source.
TVee.
Music modeisfor music and Movie
supplied Optical cable
the wall and connect ittothe
ANALOG
AUDIO
IN
IlID
DIGITALIN
TRIM
LEVEL
OPTKAl
15
1
~
16
17
®
[ J
~~
20
modeisoperating.
Set21in the same position
all
the time.
19.
power
input
mode
14.
4
Subwoofer
@ @ @
@
@
@
@ @ @
C!)
Boston' TVet'
ED
ED
1&
Mod~
ED
30
@
Ci
WIRELESS
~i
voSlM'
10
21
22
23
0
@
_0_
ED
Ie
24
II
25
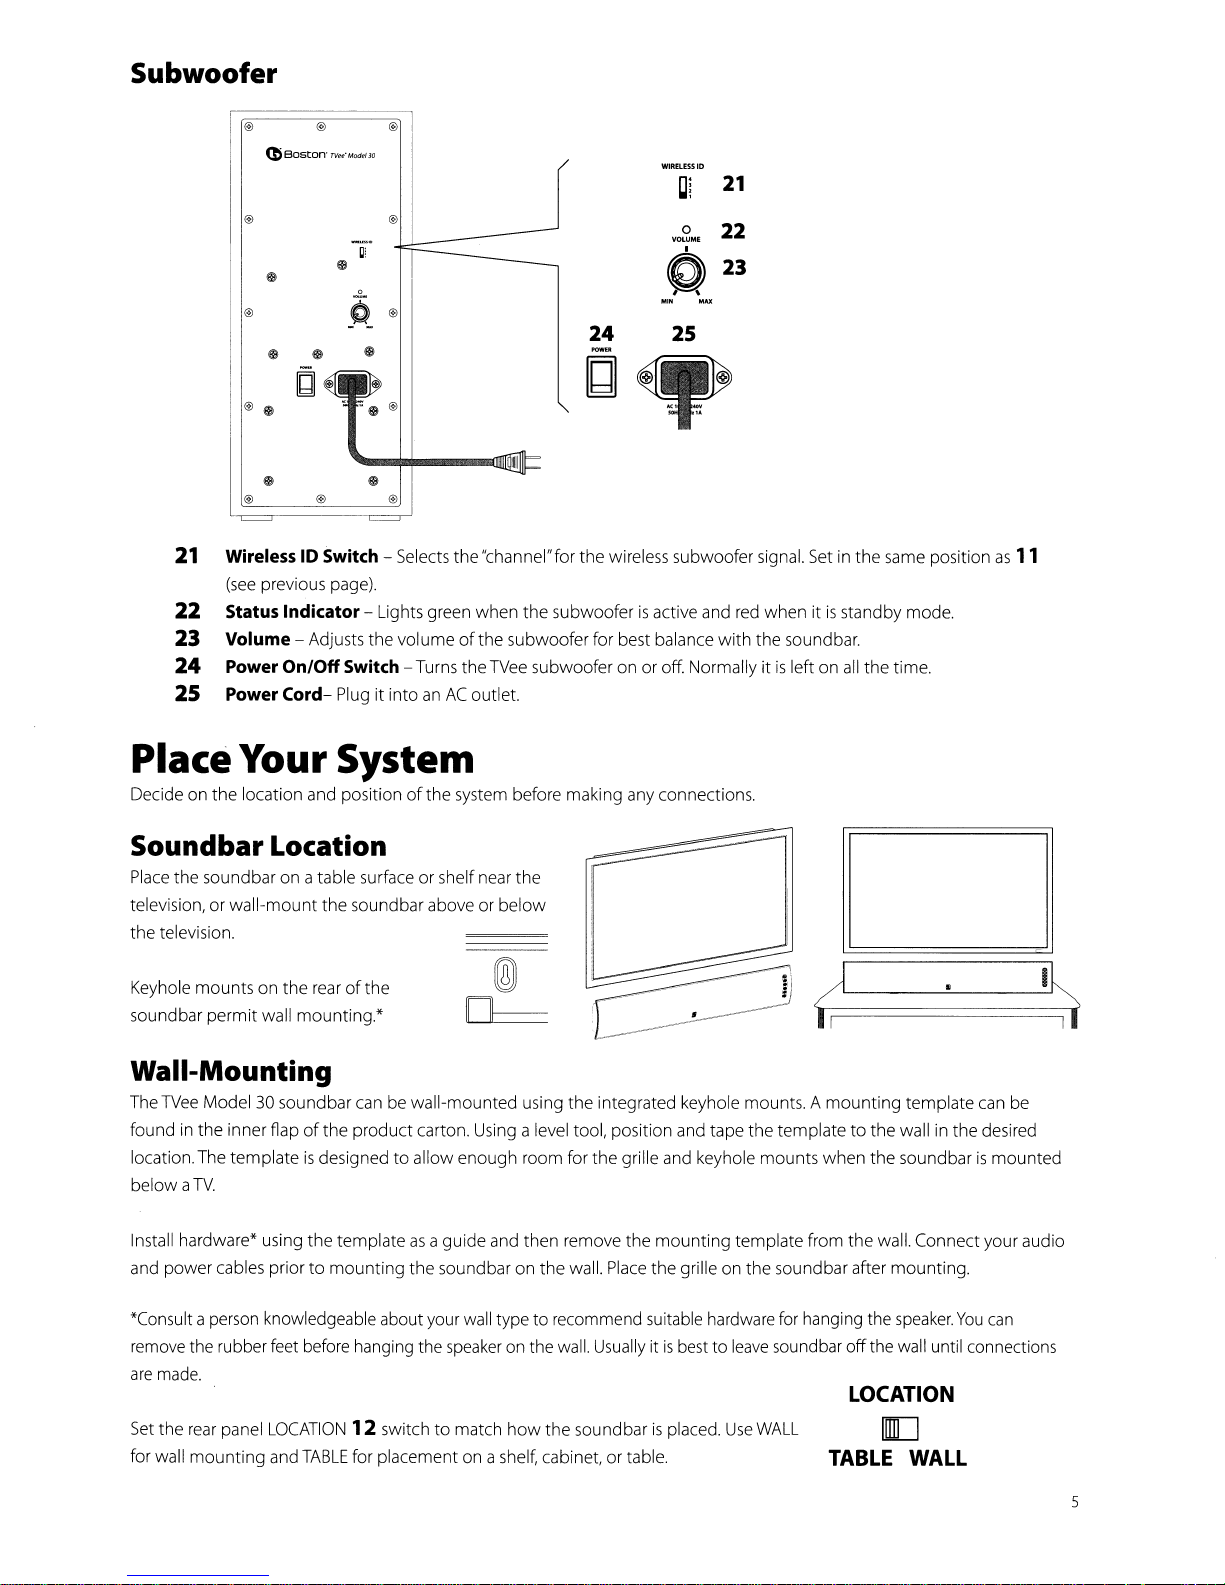
21 Wireless 10 Switch - Selects
(see
previous page).
22
Status Indicator - Lights green
23
Volume - Adjusts the
24
Power
25
Power
On/Off
Cord-
Switch - Turns theTVee subwoofer
Plug it intoanAC
the
volumeofthe subwoofer for best balance
PlaceYour System
Decide on
Soundbar Location
Place
television,orwall-mount
the television.
Keyhole
soundbar
Wall-Mounting
The
found in the inner
location.The
belowaTV.
the
location and positionofthe system before making any connections.
the soundbarona table surfaceorshelf near
the soundbar above or
mountsonthe
permit
TVee
Model30soundbar can be wall-mounted using the integrated keyhole mounts. A
templateisdesignedtoallow enough room for the grille and keyhole
rearofthe
wall
mounting.*
Aapofthe
product
carton. Using a level tool, position and tape the
"channel"for the wireless subwoofer signal.
when
the
subwooferisactive and red
onoroff. Normally itisleft on
outlet.
the
below
with
the soundbar.
mounts
whenitis
Setinthe
mounting
templatetothe wall in the desired
when
same position
standby mode.
all
the time.
template
the
soundbarismounted
as
can be
11
Install hardware* using
power
and
*Consult a person knowledgeable about your wall type to recommend suitable hardware for hanging the
remove the rubber
are
Set
for wall
cables priortomounting
made.
the rear panel
mounting
the
templateasa guide and then remove
the
feet
before hanging the speaker on the wall. Usually itisbesttoleave
LOCATION
and
12switch
TABLE
for placement on a shelf, cabinet,ortable.
soundbar on
to
match
how
the
mounting
the
wall. Place the grille on the soundbar after
the
soundbarisplaced.
template from the wall. Connect your audio
soundbar
Use
WALL
mounting.
speaker.
off
the wall until connections
You
LOCATION
[[[]
TABLE
WALL
can
5
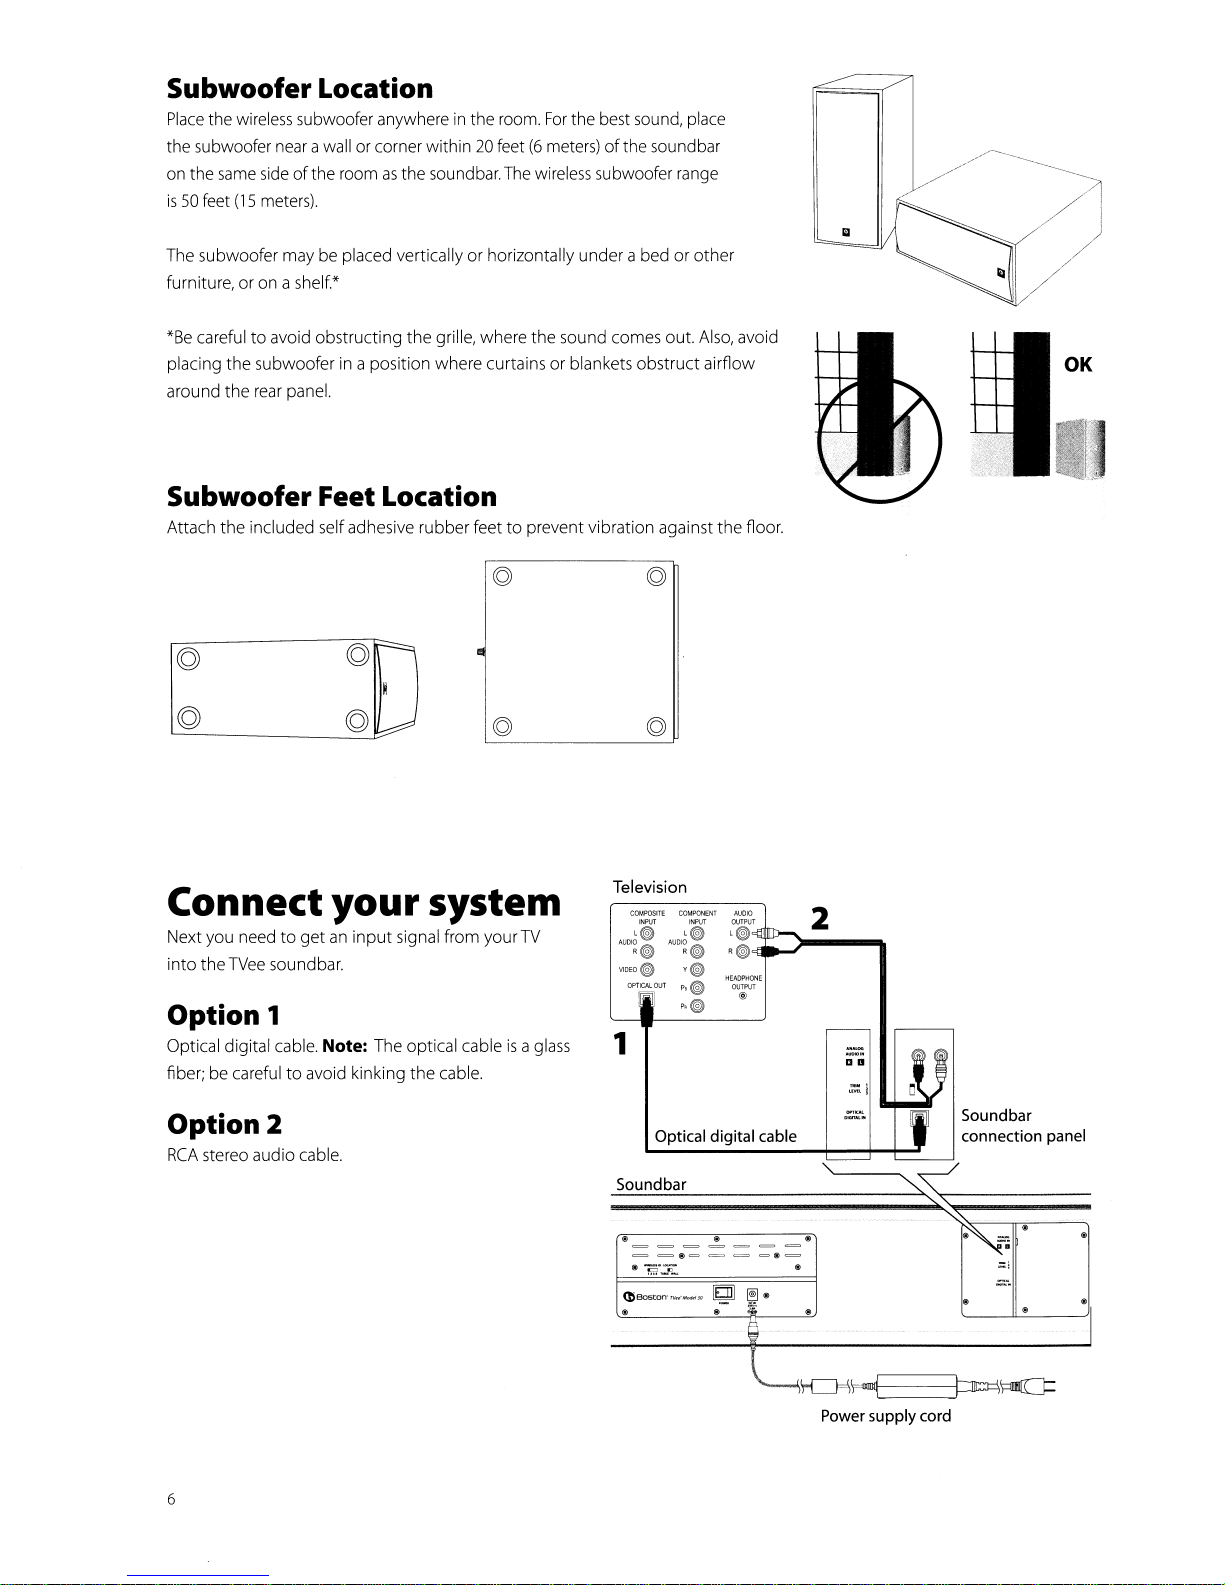
Subwoofer Location
Place
the wireless subwoofer anywhereinthe room.
the subwoofer near a wall or corner within20feet(6meters)ofthe soundbar
on the
same
sideofthe roomasthe sound
is50feet
The subwoofer may be placed vertically or horizontally under a bedorother
furniture, or on a shelf.*
(15
meters).
bar.
For
the best sound, place
The wireless subwoofer range
*Be carefultoavoid obstructing
placing the subwoofer in a position where curtainsorblankets
around
the
rear panel.
the
grille, where the sound comes out. Also, avoid
Subwoofer Feet Location
Attach
the
included self adhesive rubber feettoprevent vibration against
1_:
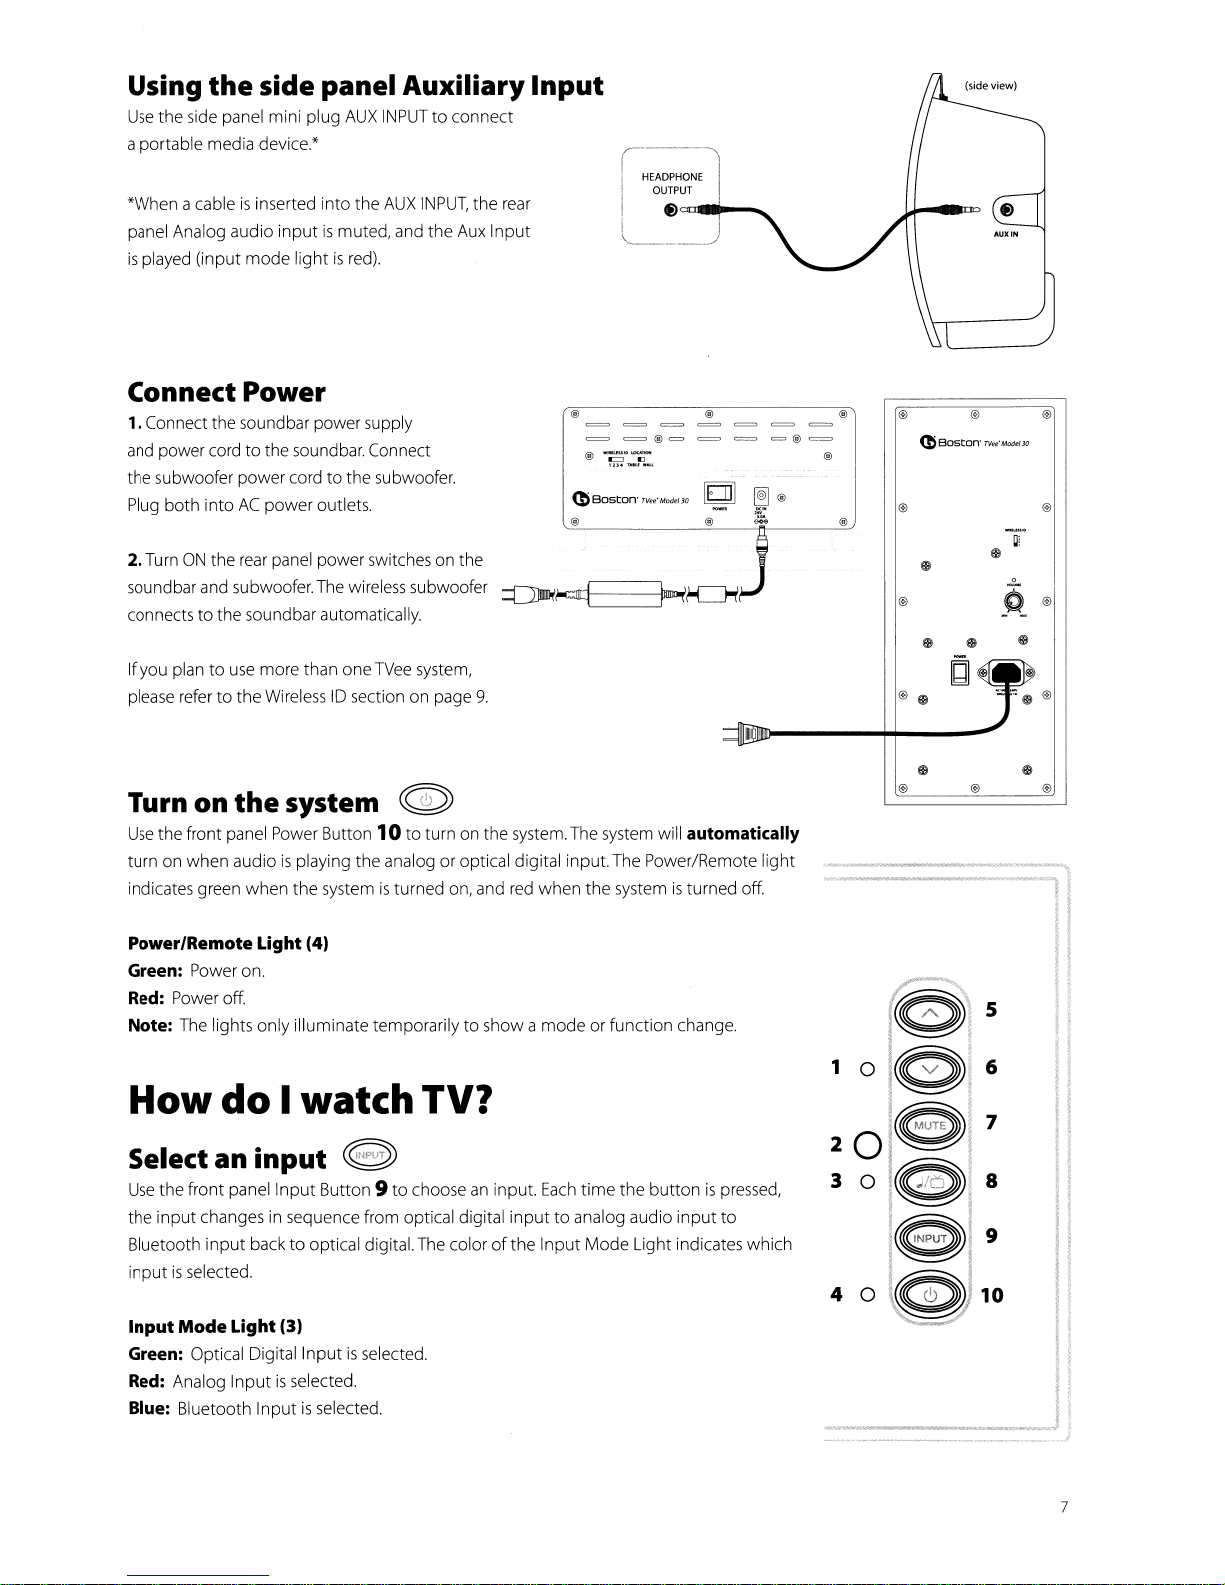
Connect
Nextyou need to
into
the
~:D
TVee
your
getaninput
soundbar.
system
signal from
Television
yourTV
Option 1
Optical digital cable. Note: The optical cableisa glass
fiber; be carefultoavoid kinking the cable.
1
obstruct
COMPOSITE
INPUT INPUT
l@)
AUDIO~
R@I
"DEO@)
OPTICAL
OUT
COMPONENT
l@)
AUDIO
R@
v@)
PI@)
,,@)
airflow
a
the
HEADPHONE
OUTPUT
floor.
2
@
all
u." I
Option 2
RCA
stereo audio cable.
6
Optical digital cable
Soundbar
@ @ @
=======
==8====8=
(I
"f.?-I •
Power supply cord
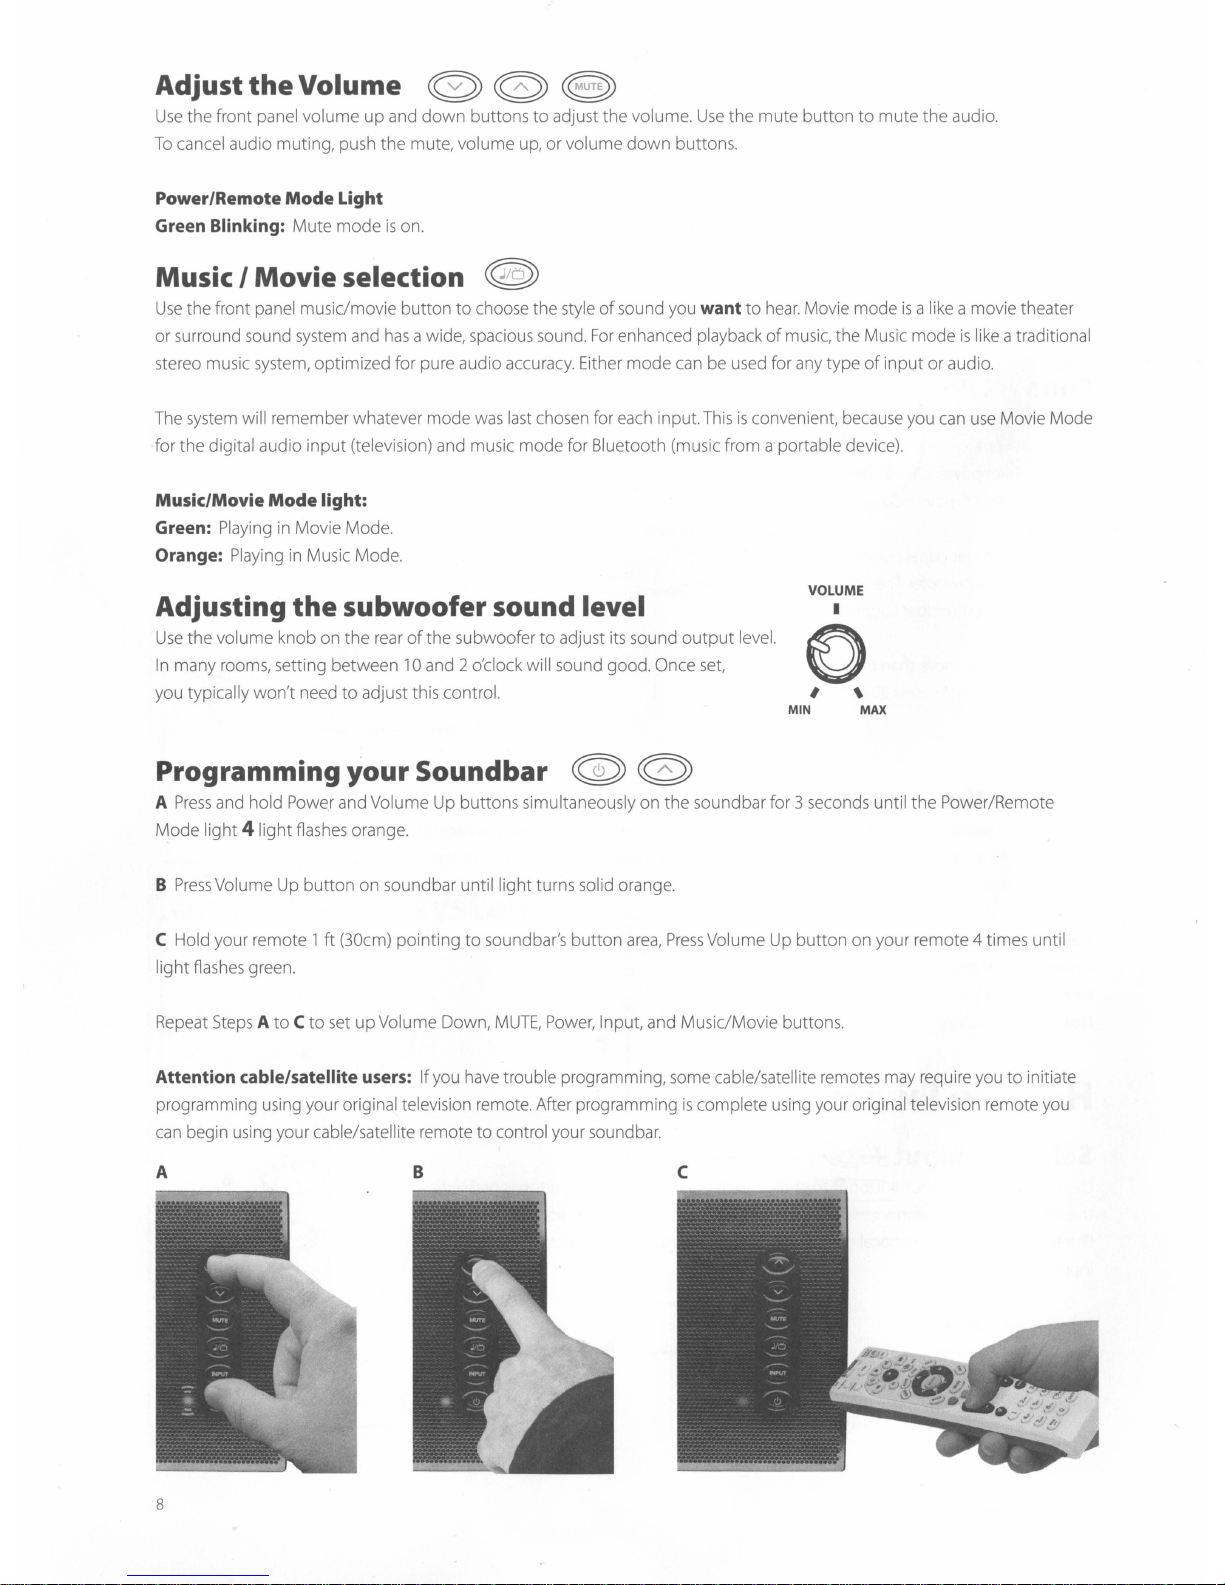
Using
Use
a portable media device.*
*When a cableisinserted
panel Analog audio
is
played (input
the
side panel Auxiliary
the
side panel mini plug
mode
inputismuted, and the Aux
lightisred).
into
AUX
INPUTtoconnect
the
AUX
INPUT,
the rear
Input
Input
HEADPHONE
OUTPUT
Connect Power
1. Connect the soundbar power supply
and power cord
the subwoofer power cord
both
Plug
2.Turn
ON
soundbar and subwoofer.The wireless subwoofer
connects
Ifyou plan
please refer
Turn on
Use
the front panel Power Button
turn on when audioisplaying the analogoroptical digital input.The Power/Remote light
indicates green
to
the sound
intoACpower
the
rear
panel power switches on the
to
the soundbar automatically.
to
use more than
to
theWirelessIDsection on page
the
when
bar.
Connect
to
the subwoofer.
outlets.
one
system
the systemisturned on, and red
TVee
system,
9.
~
10
to
turn on the system. The system will automatically
@ @
=@=
~Bo5ton
when
rv,,·Mod"3D
the systemisturned off.
IEJlI
=@=
@
~
Power/Remote Light (4)
Green:
Red:
Note: The lights only illuminate temporarily
Power on.
Power off.
to
show a
mode
or function change.
@
@
@
® ® ®
C!S
Boston
Nee'
Model
30
®
0;
(I)
®
Ell
®
(!l
® ® ®
(I)
Ell
-~
Ell
®
®
How
Select an
Use
the front panel
input
the
Bluetooth
inputisselected.
Input
Green: Optical Digital
Red:
Blue: Bluetooth
do
I watch TV?
input
Input
changes in sequence from optical digital
input
backtooptical digital. The colorofthe
Mode
Light
(3)
Analog
Inputisselected.
Inputisselected.
~
Button 9
Inputisselected.
to
chooseaninput.
inputtoanalog audio
Each
Input
time
the
buttonispressed,
Mode
Light indicates which
input
to
7
Adjust
Use
To
cancel audio muting, push
the
front panel
the
Volume 0 0 ®
volumeupand
the
down
mute,
volume
buttonstoadjust
up,orvolume
Power/Remote Mode Light
Green Blinking:
Mute
modeison.
Music I Movie selection (@)
Use
the front panel music/movie
or surround sound system and
stereo music system,
optimized
buttontochoose the styleofsound you wanttohear.
has
a wide, spacious sound.
for pure audio accuracy. Either
the
volume.
down
For
enhanced playbackofmusic, the Music
mode
Use
the
mute
buttontomute
buttons.
Movie
can be used for any
typeofinputoraudio.
the
audio.
modeisa like a movie theater
modeislike atraditional
The system will remember whatever
the
for
digital audio
input
(television) and music
Music/Movie Mode light:
Green: Playing in Movie Mode.
Orange: Playing in Music Mode.
Adjusting
Use
the
volume
In
many rooms, setting
you typically
Programming
A
Press
and hold Power and Volume Up
Mode
light
B
Press
Volume Up
C Hold your remote 1ft(30cm)
light
flashes green.
the
subwoofer sound level
knobonthe
between10and 2 o'clock will sound good. Once set,
won't
needtoadjust this control.
your
41ight
flashes orange.
buttononsoundbar until
rearofthe
pointingtosoundbar's
mode
was last chosen for each input. Thisisconvenient, because you can
mode
for Bluetooth (music from a portable device).
VOLUME
subwoofertoadjust its sound
output
level.
o
, \
MIN
Soundbar ® <®
buttons
simultaneously on
light
turns solid orange.
button
area,
the
soundbarfor 3 seconds until
Press
Volume Up
button
I
on your
MAX
use
the
Power/Remote
remote
4 times until
Movie Mode
Repeat Steps A
Attention cable/satellite users: Ifyou have trouble programming, some cable/satellite remotes may require you
programming using your original television remote. After programming
can begin using your cable/satellite remote
A
8
toCto
setupVolume Down,
MUTE,
Power, Input, and Music/Movie buttons.
to
control your soundbar.
B C
to
is
complete using your original television remote you
initiate
 Loading...