

Page 1
P460
P450
P442
P400
P4TS
Compact Stand for the P4, Bravo®II, and Bravo Speakers
Page 2
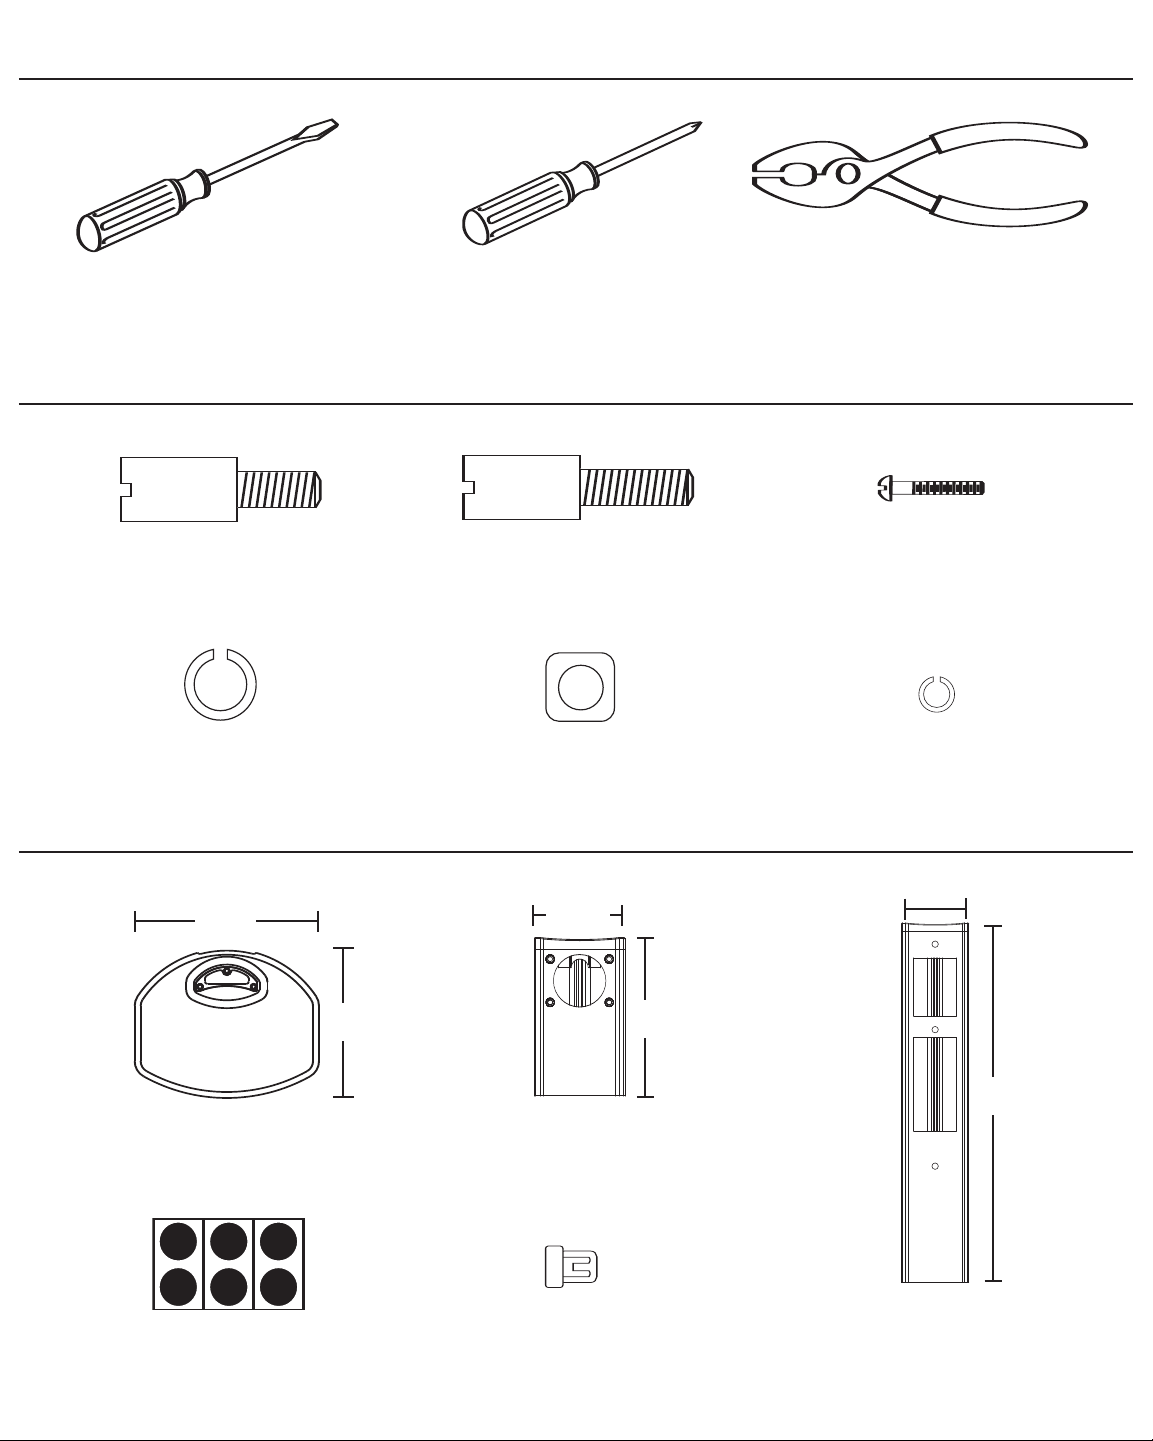
Required Tools: (not included)
• Flat head
Screwdriver
P4TS Included Hardware:
Speaker screw (short)
x 2
Split Washer (large)
x 2
P4TS Included Parts:
• Phillips head
Screwdriver
Speaker Screw (long)
x 2
1
⁄4"-20 Threaded Nut
x 2
• Pliers*
*Required for Bravo II and Bravo only
M5 x 18 Threaded
Machine Screw
x 3
Split Washer (small)
x 3
81⁄4"
210mm
P4TS Base
x 1
Rubber Feet
x 6
61⁄2"
165mm
23⁄4"
70mm
47⁄8"
123mm
P4TS
Horizontal Post
x 1
Plug
x 1
23⁄4"
70mm
14 7⁄32"
136mm
P4TS
Vertical Post
x 1
Page 3

P4 Vertical Mount Assembly Instructions:
This configuration is compatible with Models: P460,
P450, P442, and P430.
Required Tools:
Step One: Attach Base
Attach the base to the vertical
post with the three included
threaded machine screws and
split washers (small) using a
Phillips head screwdriver. The
post has already been threaded
to ease screw installation. Attach
rubber feet to base.
Step Two: Speaker Wire
With the stand still inverted, route
the speaker wire through the
opening in bottom of the base,
down through, and out the opening in the post. Use the top opening for the P430 and P442 and the
bottom opening for the P450 and
P460. Leave several extra inches of
speaker wire exposed to ease connection with the P4 speaker.
•Flat head
Screwdriver
•Phillips head
Screwdriver
Hardware / Parts:
Speaker
Screw
(short) x 2
Threaded
Machine
Screw x 3
Split Washer
(small) x 3
P4TS
Base x 1
P4TS
Vertical
Post x 1
Plug
x 1
Step Three: Mounting the P4 Speaker
Due to the weight of the P4 speaker, it is recommended that the
installation be performed with the P4 speaker laying face down with
the grille removed on a soft surface such as a plush carpeted floor
or the P4 shipping car
ton. Inspect the ar
ea wher
lay making sure that there are no objects that could damage the
speakers or scratch the front of the P4.
Position the P4TS close to the P4 speaker as illustrated.
1.
Connect the speaker wire to the ter
2.
minals on the P4 speaker.
3. Mount the speaker to the post by lining up the two threaded
inserts in the back of the P4 speaker with the two outside
machined holes (middle hole is not used) in the post. Insert the
two speaker scr
ews (shor
t) and tighten. Insert the plug into the
unused machined hole on the post.
Note: Do not over
ake up any slack in the speaker wir
T
4.
-tighten the scr
ews.
e by
at the opening in the base.
e the speaker will
gently pulling the wir
e
Page 4

P4 Horizontal Mount Assembly Instructions:
This configuration is compatible with Models: P460,
P450, P442, P430, and P400.
Step One: Attach Base
Attach the base to the horizontal
post with the three included
threaded machine screws and
split washers (small) using a
Phillips head screwdriver. The
post has already been threaded
to ease screw installation. Attach
rubber feet to base.
Step Two: Speaker Wire
With the stand still inverted, route
the speaker wire through the
opening in bottom of the base, down
through, and out the opening near
the top of the post. Leave several
extra inches of speaker wire exposed
to ease connection with the P4
speaker.
Required Tools:
Phillips head
•Flat head
crewdriver
S
•
Screwdriver
Hardware / Parts:
(short) x 2
Screw x 3
Split Washer
(small) x 3
Speaker
Screw
Speaker
Screw
(long) x 2
Threaded
Machine
P4TS
Base x 1
Step Three: Mounting the P4 to the Stand
1. Using the speaker screws (long) and speaker screws
(short), mount the P4 wall bracket to the P4TS post.
The wall bracket is threaded to accept the speaker
screws. Use the speaker screws (long) on the upper
two threaded inserts and the speaker screws (short)
on the lower two threaded inserts.
Mount the r
2.
and
connect the speaker wire to the terminals on the
etaining scr
back of the P4 Speaker
3. Slide the speaker into the retaining channels. The
speaker is held in place by gravity.
Note: For detailed instructions on installing the speaker to the wall
bracket, please r
ake up any slack in the speaker wir
T
4.
pulling the wir
efer to the P4 owners manual.
e at the opening in the base.
ews (included with P4 speaker)
.
e by
gently
P4TS
Horizontal
Post x 1
Page 5

Bravo Vertical Mount Assembly Instructions:
This configuration is compatible with Models: Bravo II
and Bravo.
Required Tools:
Step One: Attach Base
Attach the base to the vertical
post with the three included
threaded machine screws and
split washers (small) using a
Phillips head screwdriver. The
post has already been threaded
to ease screw installation. Attach
rubber feet to base.
Step Two: Speaker Wire
With the stand still inverted, route
the speaker wire through the
opening in bottom of the base,
down through, and out the slot in
the opening near the top of the
post. Leave several extra inches of
speaker wire exposed to ease
connection with the Bravo speaker.
Step Three: Mounting the Bravo Speaker
1. Using the speaker screws (long), washer,
2. Remove the speaker’s grille by grasping
1
⁄4"-20 threaded nut, mount the
and
Bravo mounting bracket to the P4TS
post.
the back of the cabinet in one hand,
while gently pulling the grille away with
the other hand.
•Flat head
Screwdriver
•Phillips head
Screwdriver
•Pliers
Hardware / Parts:
Screw x 3
Split
Washer
(small)
x 3
1
⁄4"-20
Threaded
Nut x 2
Speaker
Screw
(long) x 2
Threaded
Machine
Plug
x 1
P4TS
Base x 1
P4TS
Vertical
Post x 1
Split
Washer
(large)
x 2
3. Connect the speaker wire to the
terminals on the Bravo speaker.
Align the openings in the back of the speaker with the two
4.
posts protruding from the bracket as shown and attach the
speaker to the bracket by inser
ough the holes in the fr
thr
bracket as shown.
hole on the post.
speaker to the wall bracket, please refer to the Bravo owners manual.
ake up any slack in the speaker wir
T
4.
Insert the plug into the unused machined
Note:
ont of the speaker and into the
For detailed instr
ting the supplied scr
uctions on installing the
e by
gently pulling the wir
at the opening in the base.
ews
e
Page 6

If Service Seems Necessary
First, contact the dealer from whom you purchased the speakers. If that is not possible, write to:
Boston Acoustics, Inc.
Attn: Parts and Service
300 Jubilee Drive
Peabody, MA 01960 U.S.A.
Or contact us via e-mail at:
support@bostonacoustics.com
We will promptly advise you of what action to take. If it is necessary to return your P4TS compact stand to the
factory, please ship it prepaid. After it has been repaired, we will return it freight prepaid in the U.S.A. and Canada.
300 Jubilee Drive
Peabody
U.S.A.
978.538.5000
www.bostonacoustics.com
, MA
01960
Boston, Boston Acoustics, Bravo, and the Boston Acoustics
e r
logo ar
Specifications ar
© 2004 Boston Acoustics, Inc.
ed trademarks of Boston Acoustics, Inc.
egister
e subject to change without notice.
042-002139-1
 Loading...