

Page 1
MicroSystem CD
Owner’s Manual
Page 2

2
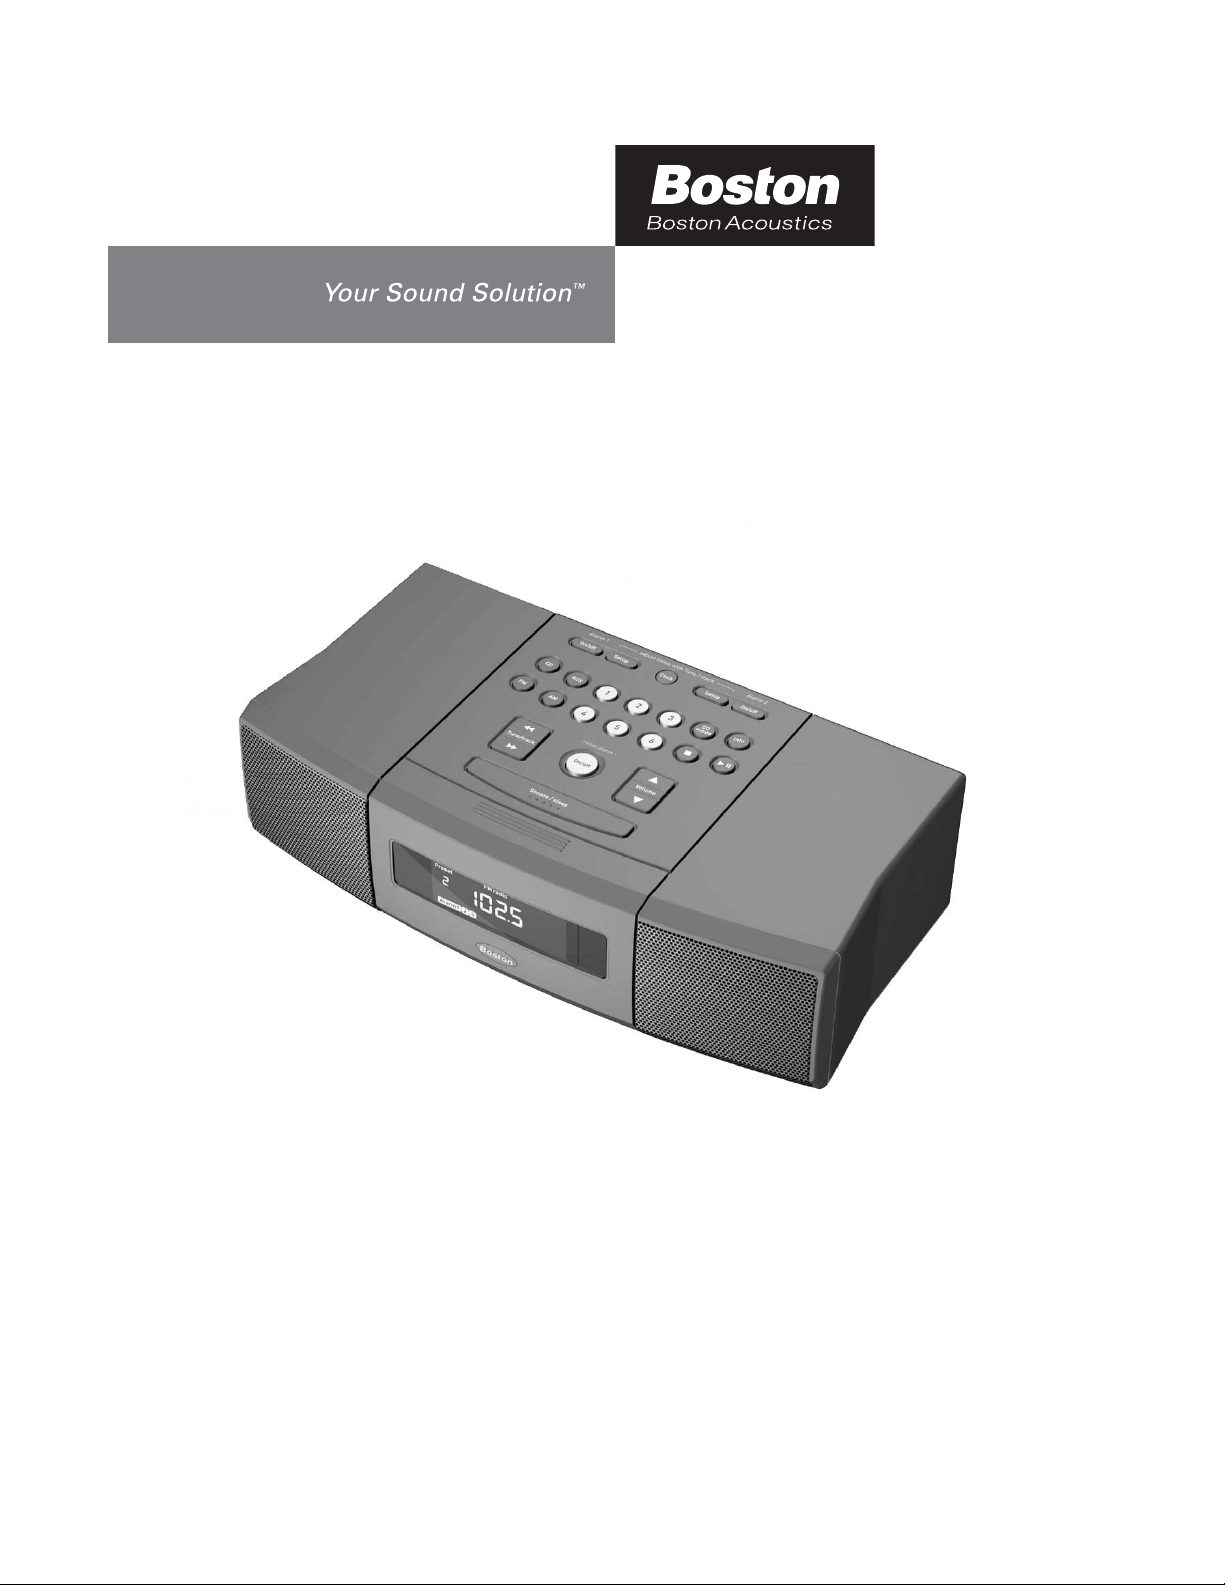
Thank you for choosing the Boston Acoustics®MicroSystem CD.
The MicroSystem CD is a state-of-the-art stereo radio/CD player and a versatile
audio center that delivers the performance and versatility of precisely matched,
separate components in one compact, easy-to-use unit.
Special Features
You can preset as many as 12 FM and 12 AM stations for instant recall. See page 7.
Play MP3, WMA, CD-R, and CD-RW as well as conventional CDs. To navigate your MP3 files,
see page 9.
Play an iPod
®
or other MP3 player through the convenient front-panel jack. See page 15.
Play the sound from your TV and a CD changer or another audio device through the two
rear-panel Auxiliary inputs. See page 13.
Plug in headphones and automatically silence the internal speakers for private listening.
See page 13.
There are two independent alarms. You can choose to wake to music, beeper, or both. You can
choose to fall asleep to one station and wake up to another or to a CD. See page 10.
The built-in Sleep function lets you play the unit for up to 60 minutes before it shuts off
automatically. See page 12.
If there is a power failure or you unplug the MicroSystem CD to move it, the station presets,
clock time, and all other settings are retained for up to 48 hours.
The MicroSystem CD will wake you up even if there is a power failure! See page 3.
When the system is in use, you can change the display to show either the time or status of the
program to which you are listening. See page 12.
The display dims automatically in the darkness. You can change the threshold if you wish.
See page 13.
Store the Remote Control in the flip-down door or use its magnet to “dock” it on a refrigerator
or other metal surface. See page 3.
Play the MicroSystem CD through another sound system or use it as a recording center. Or,
you can connect a subwoofer for use in very large rooms and reconfigure the system’s
operation. See page 14.
Connect external FM and/or AM antennas for even better reception. See page 16.
Page 3
3
Owner’s Manual
Please save this owner’s manual for future reference. If you should need an additional
copy, it may be downloaded from the Boston Acoustics website:
www.bostonacoustics.com/microsystemcd.
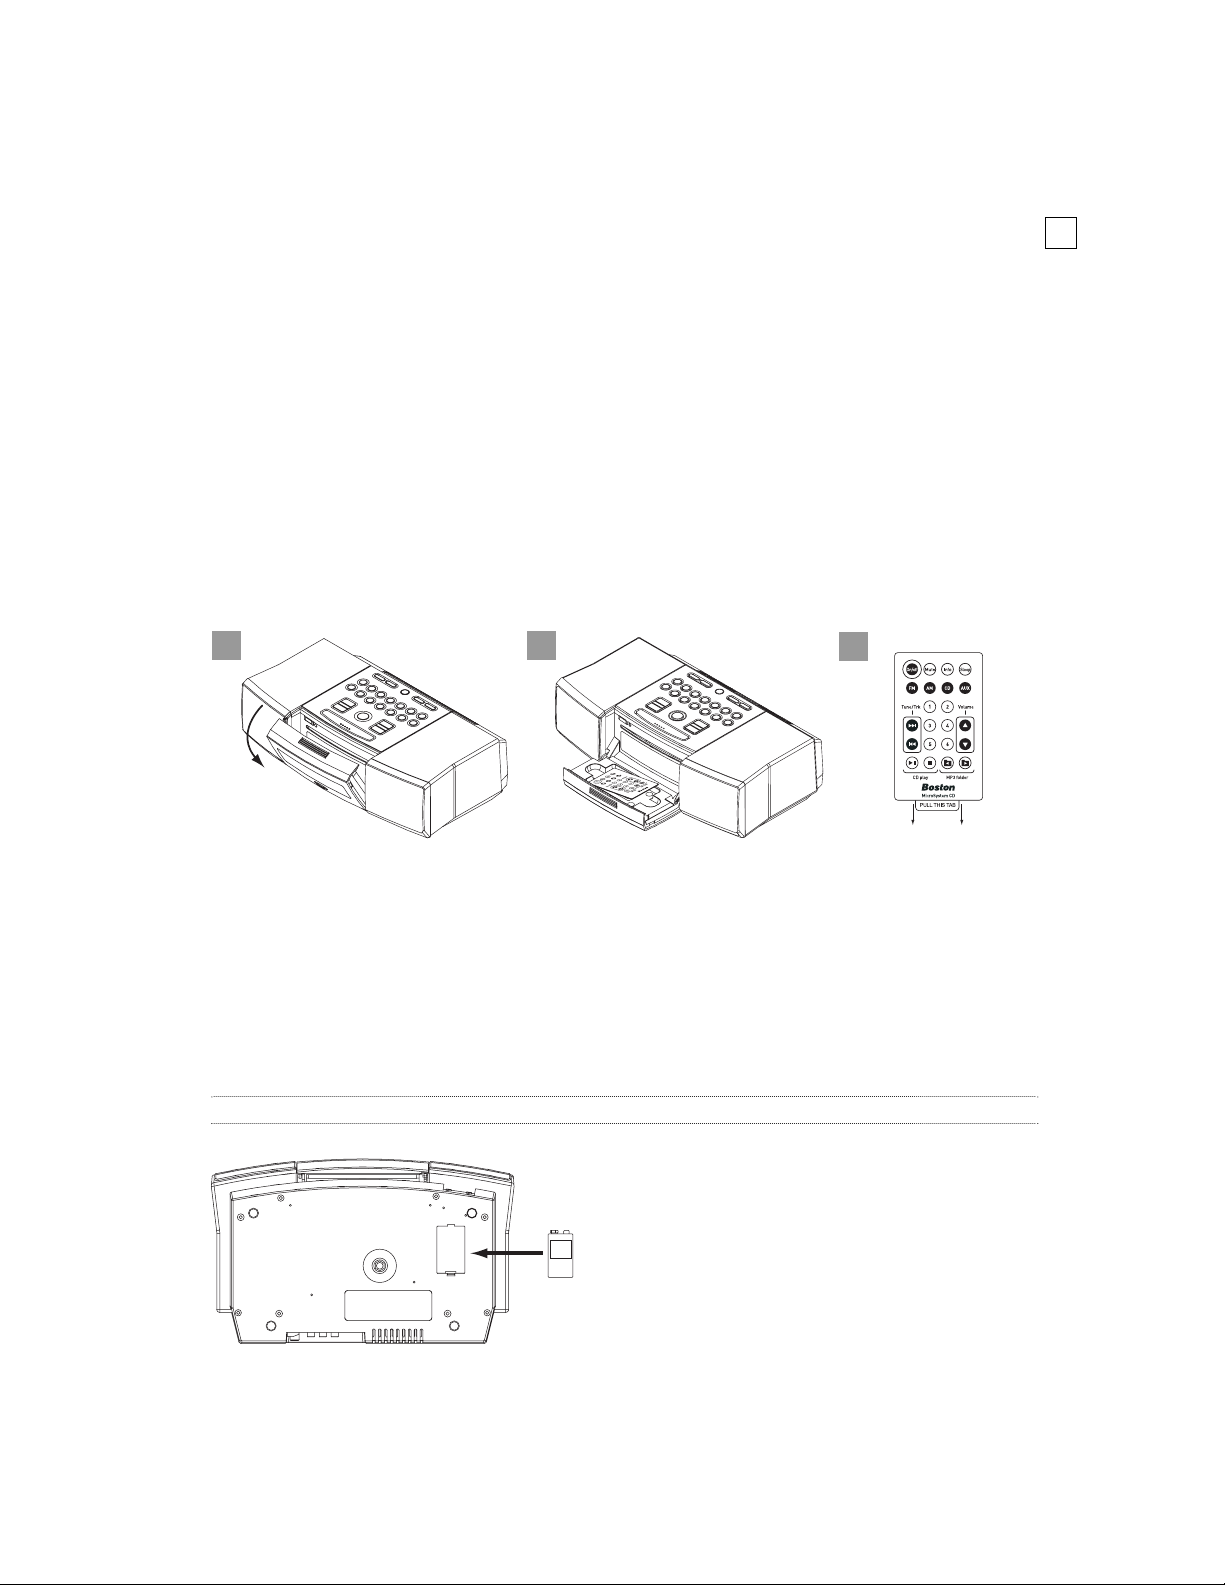
Unpacking the MicroSystem CD
Please save all the original packaging because it will provide the safest way to transport
your unit.
Once unpacked, open the flip-down door and remove the Remote Control. Remove
the paper tab on the Remote Control to activate the battery.
The backup alarm
Installing the supplied 9-volt battery in the compartment on the bottom of the
MicroSystem CD will ensure that a beeper alarm will operate even if there is a power
failure. If the battery needs replacement or if there is not a battery connected, you
will see a “battery low” message whenever the MicroSystem CD is switched on.
Note: Please check with local laws and regulations regarding the proper disposal of batteries.
t
1
2
3
9V
9-vol
Page 4
4
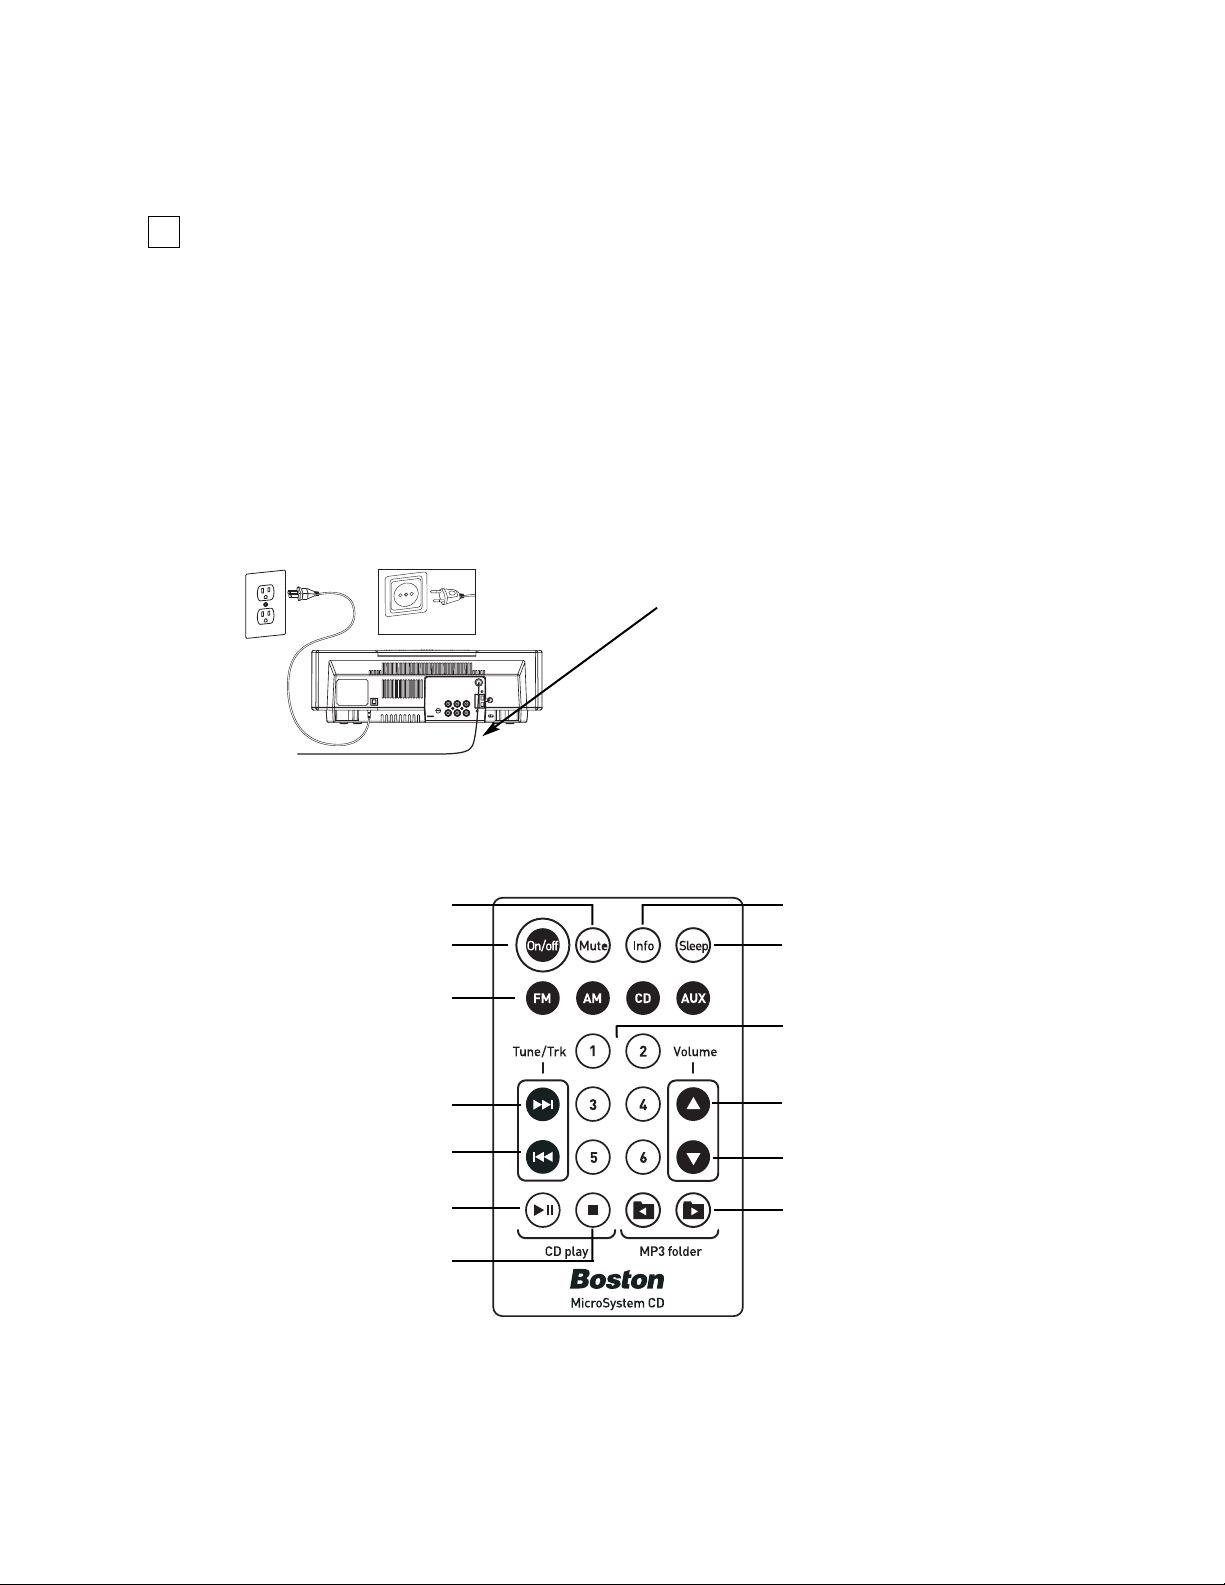
Plugging in the power cord and
Positioning the FM antenna
The FM antenna comes attached.
The Remote Control
Turns Power On or Off
Next Station/CD Track
Previous Station/CD Track
Plays or Pauses a CD
Selects a Source
Snooze/Sleep
Mutes the Sound
Stops a CD
Controls the Display
Volume Up
Volume Down
Select MP3 Folders
Station Presets
1. Straighten out the antenna to its full length.
2. Orient the wire for the best reception. (The position for the best reception is
guaranteed by Murphy’s Law to be wherever it looks the worst, like draped
over the front of the kitchen counter.)
3. You can use the included self-adhesive antenna clips to secure the FM antenna
wire to a surface.
FM Antenna
230v
240v
Page 5
5
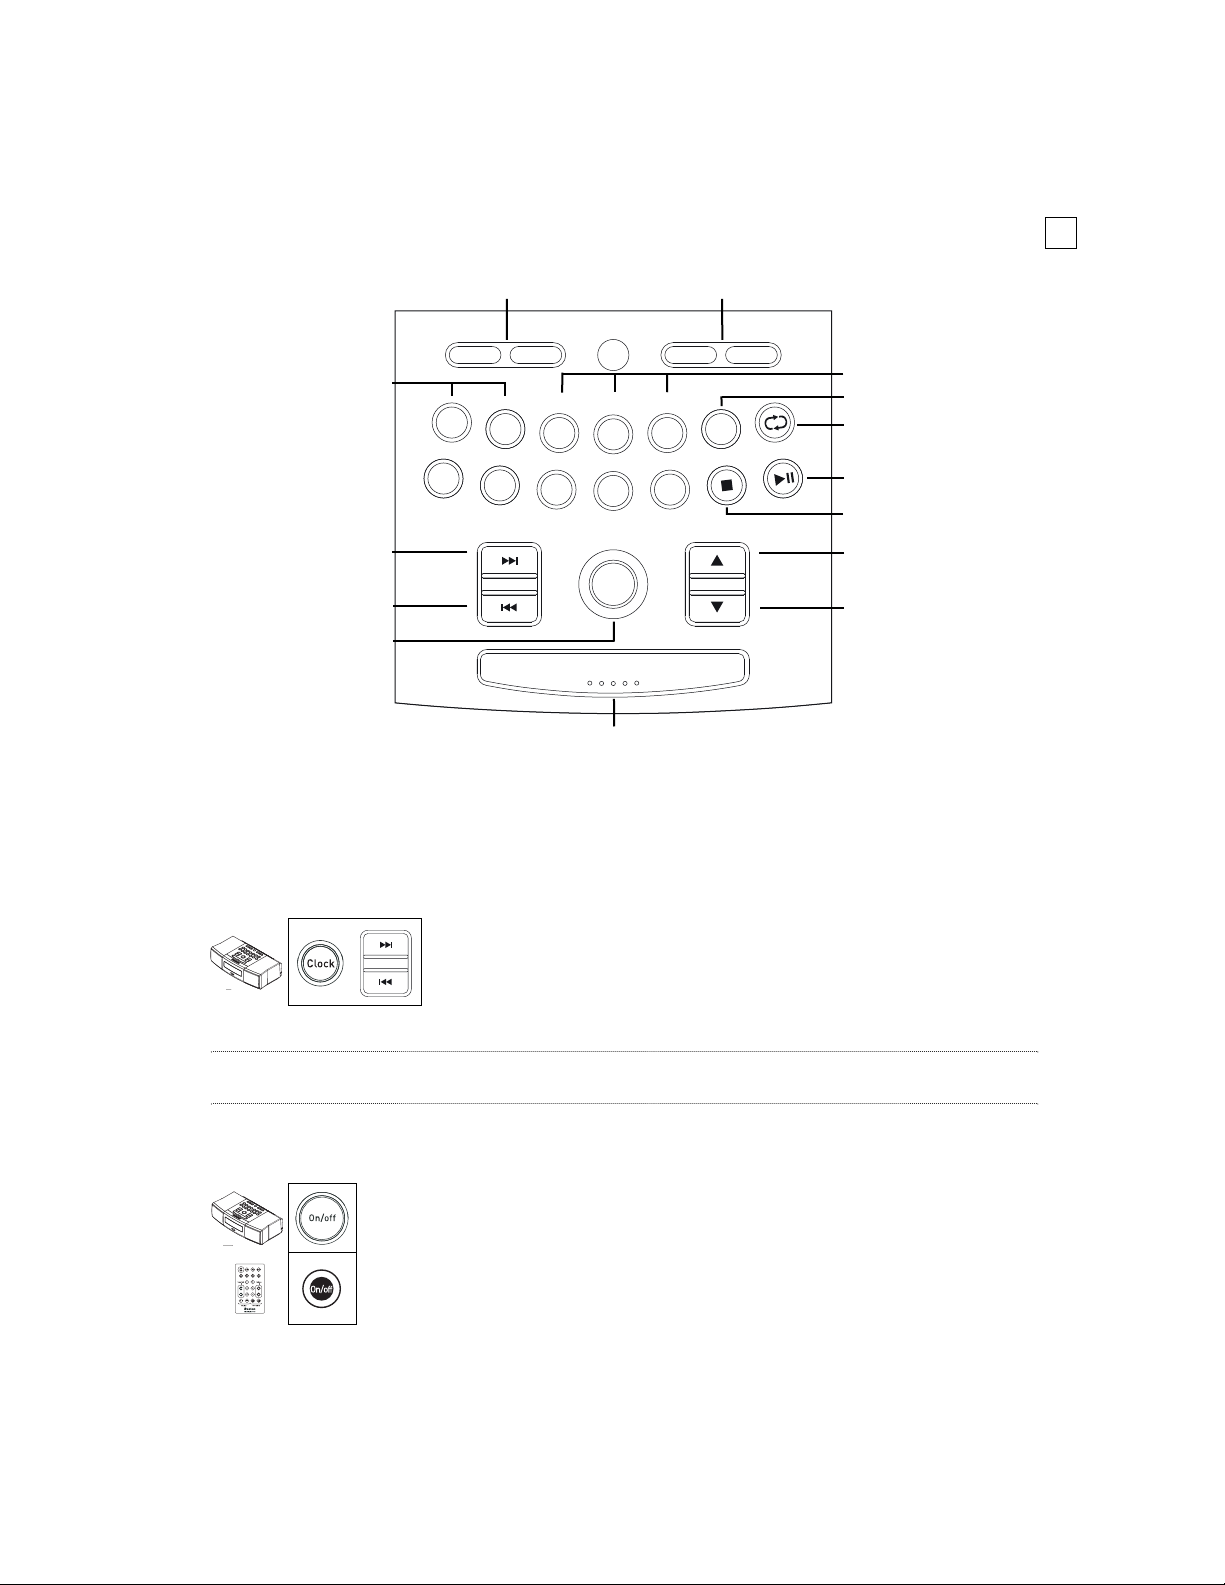
The Control Panel
The Basics
Setting the clock
Note: If there is a power outage or you unplug the MicroSystem CD, the clock will continue to run and all other
settings will remain in memory for up to 48 hours.
Turning on the system
Turns Power On or Off
Next Station/CD Track
Previous Station/CD Track
Selects a Source
Stops a CD
Controls the Display
Volume Up
Volume Down
Station Presets
Repeat/Shuffle a CD
Plays or Pauses a CD
Snooze/Sleep
Sets Alarm 1 Sets Alarm 2
Press the Clock button for one second until the displayed
time begins flashing. While it is flashing, use the Tune/Track
arrow buttons to set the clock time. When you are finished,
the display will stop flashing after a few seconds.
Press the On/off button on the MicroSystem CD or on the Remote
Control to turn on the unit. The MicroSystem CD can also be turned
on by any of the following: pressing a preset station button; pressing
AM, FM, CD, or AUX; or inserting a CD.
SetupAlarm 1 Alarm 2SetupClock
F
M
1
-
C
D
A
U
7
A
M
1
2
-
3
1
0
X
4
9
8
I
3
2
12
11
6
5
DC
o
f
n
-
y
a
l
p
D
C
-
Tune / Track
On/off
Volume
O
n
/
o
f
f
M
u
F
t
M
e
uT
nI
A
n
f
M
o
e
/
rT
k
S
l
e
e
DC
1
p
O
/n
o
f
f
M
u
F
t
M
e
I
n
A
nuT
f
M
o
e
/
T
r
k
S
l
e
DC
1
pe
Snooze / Sleep
Tune / Tr ack
Page 6

6
The Basics (continued)
Turning off the system
Adjusting the volume
Muting the system
The Display
Press the Volume arrow buttons on the MicroSystem CD or on the
Remote Control to adjust the volume. When the MicroSystem CD is
turned on, the volume will return to the previous setting unless it
was very loud, in which case it will go to 60.
Press the On/off button to turn off the system.
Preset Station
No CD Loaded
CD Track/Preset #
CD is Playing
Auxiliary Inputs
AM Radio Playing
FM Radio Playing
System Muted
WMA File Playing
MP3 File Playing
Volume
Repeat Selected
Shuffle Selected
Alarm 1
Sleep
Alarm 1 Beeper
Alarm 1 Music
Subwoofer Output
Alarm 2
Alarm 2 Beeper
Alarm 2 Music
Alarm Battery Low
AM or PM
Main Display
Pressing the Mute button on the Remote Control will mute all
sound. The sound will remain muted until the Mute button or a
Volume arrow button is pressed.
O
o/n
f
f
M
F
tu
M
e
uT
nI
A
n
f
M
o
e
/
T
kr
S
l
e
e
DC
1
p
O
o/n
f
f
M
u
F
t
M
e
nI
A
nuT
f
M
o
e
/
krT
S
l
e
DC
1
pe
Page 7
7
Radio
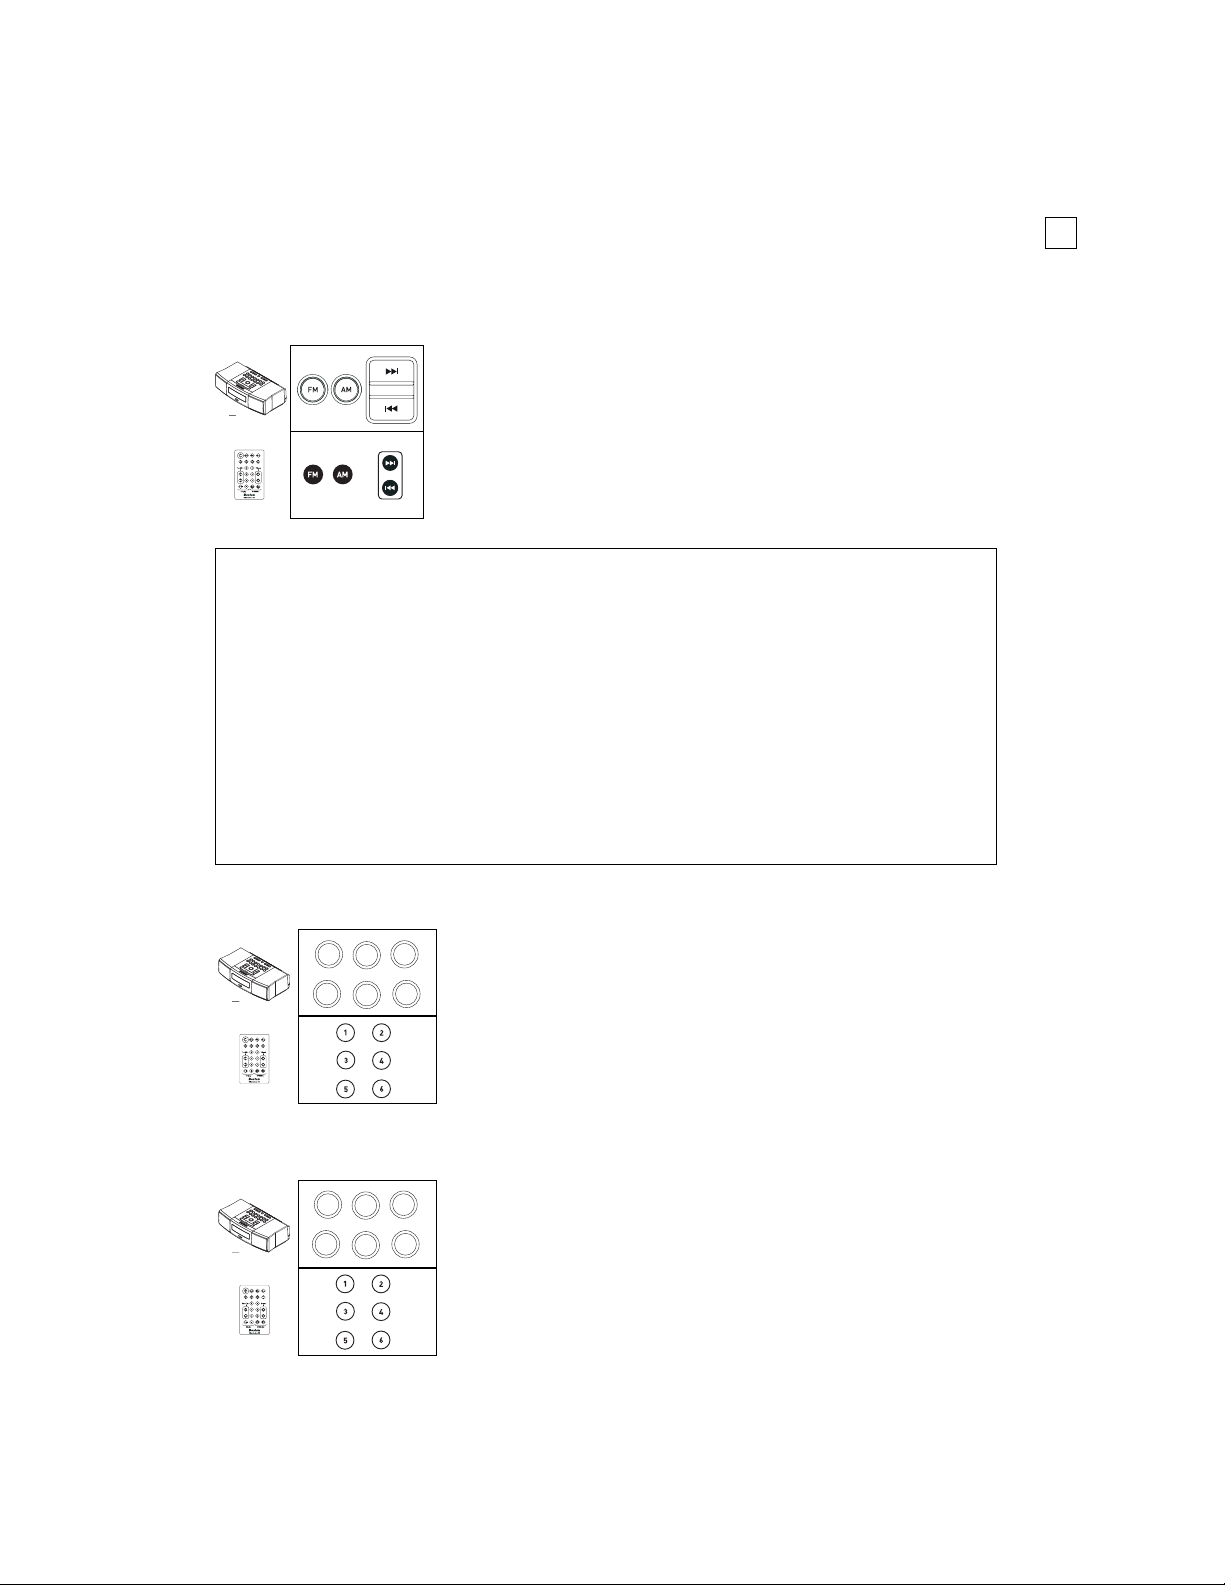
Tuning to an FM or AM station
Storing FM and AM stations
Storing a second set of presets
You can store any station by holding down any one of the
numbered Preset buttons for 3 seconds until the MicroSystem
CD beeps. The display will show the Preset number. Pressing
its Preset button will recall the station and will turn on the
MicroSystem CD if it is off. Each Preset button can store one
station for AM and another for FM.
The MicroSystem CD can store a second group of Presets.
To store Preset numbers 7 through 12, tune to the desired
station, select the Preset button that is paired with the
number printed above it, and quickly tap twice, holding
down on the second tap until you hear the beep. Once
stored, you can select the same station by quickly tapping
this Preset button twice.
About FM Reception
FM signals are like TV signals. One antenna orientation may be best for one station but not for another. The straight
wire antenna supplied with your MicroSystem CD is conveniently small. It should be extended to its full length,
placed as far away from the power cord as possible, and oriented for best reception. If reception is weak, try changing
the position of the wire antenna. Be sure not to run it along the power cord, as this will substantially decrease the
signal reception.
If reception is still weak, you can improve it by connecting an external antenna. Your authorized Boston dealer or
Boston’s Technical Support Department can suggest solutions. In addition, many Cable TV systems provide an FM
feed that can be connected to the MicroSystem CD via its standard Type-F antenna connection. See page 16.
About AM Reception
MicroSystem CD has a built-in AM antenna. If reception is weak, try rotating the system clockwise and
counterclockwise to improve signal strength. If this does not solve the problem, you can improve AM reception by
connecting an external AM antenna. See page 17.
Press the FM or AM button to select the desired band.
• Press the Tune/Track arrow button once to
automatically seek the next clear station.
• Tap the Tune/Track arrow button repeatedly to tune
one frequency at a time.
• Hold down the Tune/Track arrow button to
tune rapidly.
O
/n
o
f
f
M
u
F
t
e
T
I
u
n
AM
n
f
M
o
e
/
rT
k
S
l
DC
1
pee
Tune / Tr ack
O
n
/
o
f
f
M
u
F
t
M
e
T
I
u
n
A
n
f
M
o
e
/
rT
k
S
l
e
DC
1
pe
7
1
1
0
4
9
8
3
2
12
11
6
5
7
1
1
0
O
/n
o
f
f
M
u
F
t
M
e
I
uT
n
A
n
f
M
o
e
/
rT
k
S
l
e
C
D
1
pe
4
9
8
3
2
12
11
6
5
Page 8
8
CD Player
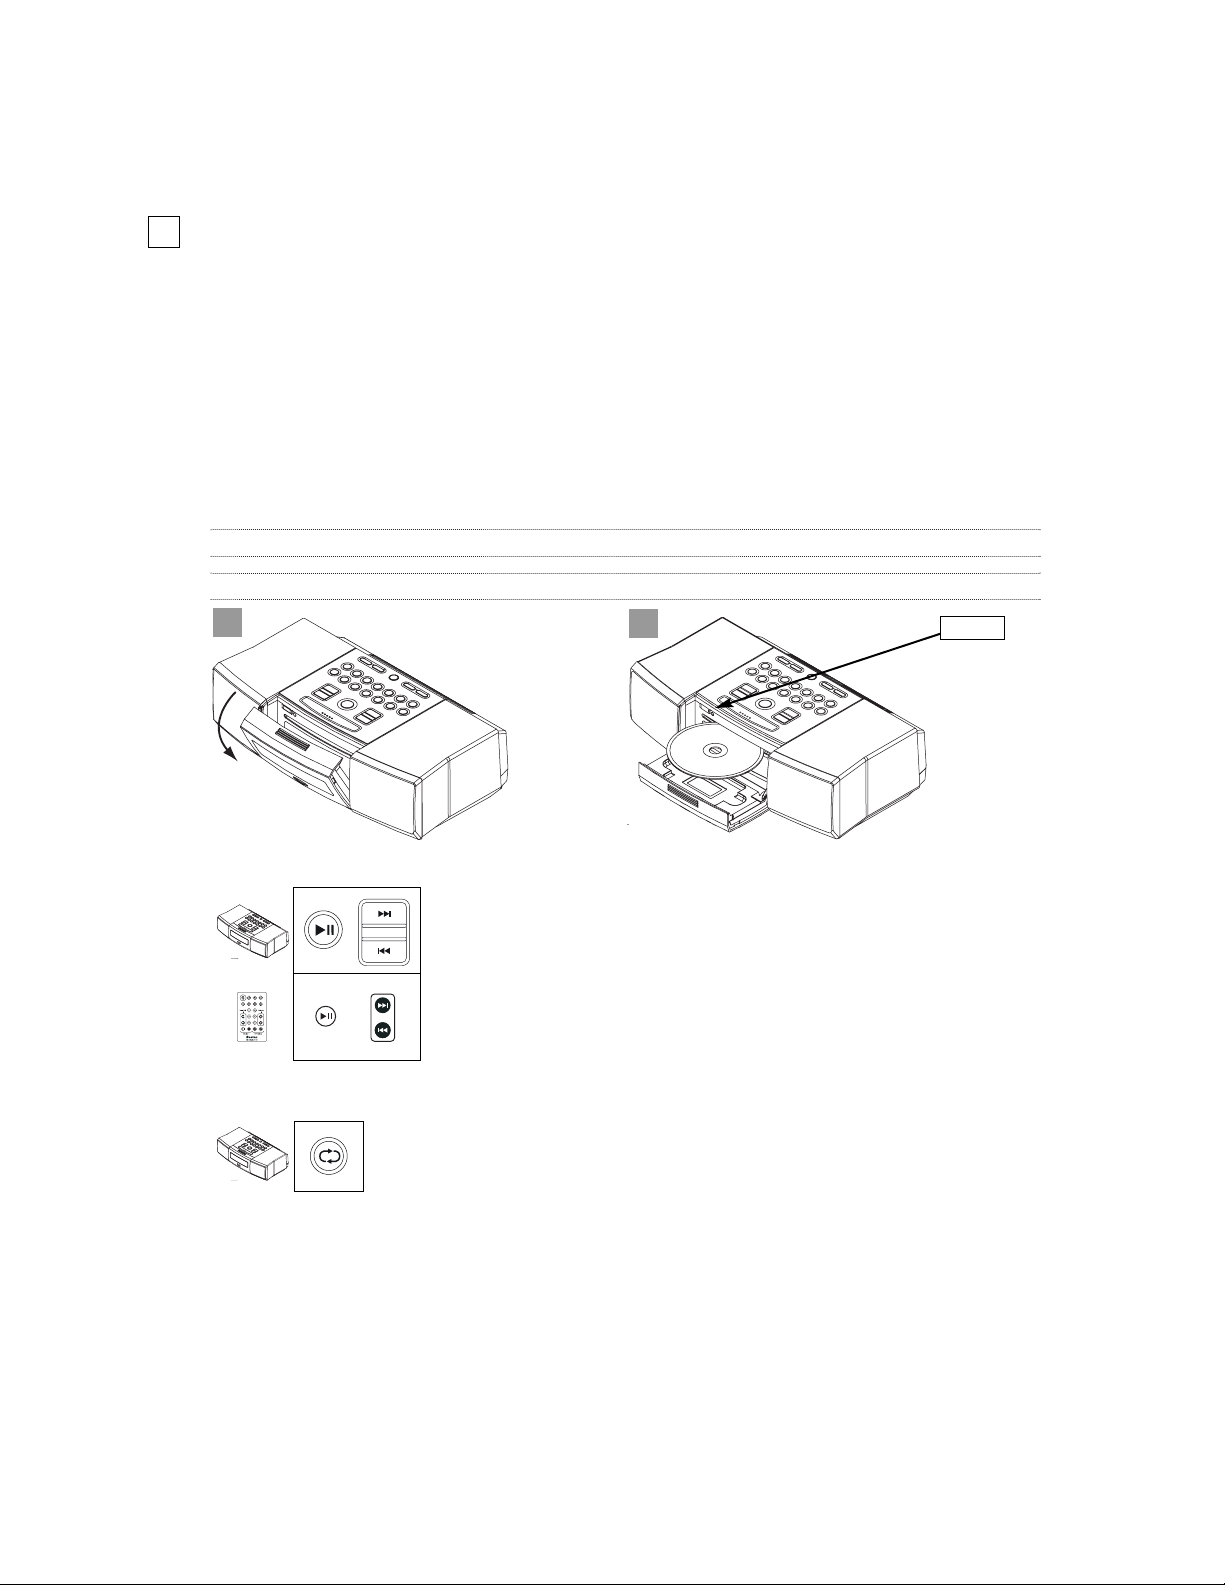
Loading a CD
Open the flip-down door. Insert a disc, label side up, into the slot. The CD player will
automatically draw the disc in and play it.
If the red light next to the Eject button is blinking, there is already a disc in the CD
player. DO NOT INSERT A DISC IF THE RED LIGHT IS BLINKING. Press the
Eject button and the red light will go out after the disc is ejected. When there is no disc
in the CD player, “disc?” will appear in the display.
Warning: Adhesive CD labels may loosen, damaging this or any other CD player. A permanent marker can be used to label the disc.
Note: If a CD fails to eject, press and hold the Eject button for 3 seconds.
Playing a CD
Repeat and Shuffle
Press the Play/Pause button. Press this button again to
pause a disc: The arrow next to “CD” in the display will blink.
Pressing Play/Pause again will resume playback.
To skip to the next or previous track, press the Tune/Track
arrow buttons. You can advance forward or backward within a
track by holding down the Tune/Track arrow button.
The display will indicate whether “Repeat” or “Shuffle” is activated.
Press the Repeat/Shuffle button once on the MicroSystem
CD to repeat a CD continuously. Press the Repeat/Shuffle
button a second time to play the songs in a random order. Press the
Repeat/Shuffle button a third time to activate both Repeat and
Shuffle at the same time. This setting will repeat the shuffle play
order continuously. To return to normal playback, press the
Repeat/Shuffle button until “Repeat” and “Shuffle” disappear
from the display window.
f
f
Eject
1
2
O
/n
o
f
f
M
u
F
t
M
e
I
n
A
nuT
f
M
o
e
/
T
r
k
S
l
e
e
DC
1
p
O
/n
o
f
f
M
u
F
t
M
e
T
I
u
n
A
n
f
M
o
e
/
rT
k
S
l
e
DC
1
pe
M
u
t
e
I
n
f
o
S
l
e
C
e
D
p
Tune / Tr ack
DC
Page 9

9
CD Player (continued)
MP3/WMA discs
The MicroSystem CD can play CD-R and CD-RW discs encoded with MP3 or WMA
music files. “MP3” or “WMA” will appear in the display when these types of files are
playing. These discs behave differently from standard CDs. When a disc is inserted,
the CD player first must read its directory and number all the tracks. This process may
take up to 20 seconds or more if the disc contains many songs. A flashing “CD” will
show in the display.
Creating MP3/WMA discs on your computer
If a disc is created with a little planning, it can be made more convenient to navigate.
If you group the MP3/WMA song files on your disc in a series of top-level folders with
about 10-20 songs (or one album) in each folder, the MicroSystem CD can be conveniently operated like a CD changer from the Remote Control; see “Playing MP3/WMA
discs,” below. Otherwise, you can simply place all your song files at the top level of the
disc or use any other arrangement of files and folders.
Playing MP3/WMA discs
You can navigate MP3/WMA files using the Tune/Track arrow
buttons, just as with standard CD tracks.
To go to the previous or next song file, press the
Tune/Track arrow button.
To move forward or backward within a song, hold down the
Tune/Track arrow button.
The Remote Control has two additional arrow buttons, marked
“MP3 folder.” These jump to the previous or next folder on the
disc. This is a fast and easy way to move through many song files, if
you have created your disc with the songs grouped in top-level folders as explained above. If so, the MP3 folder buttons act like the
disc change buttons on a CD changer.
The MicroSystem CD assigns and displays a track number for
every song file on the disc, in one continuous series, regardless of
any folders.
O
n
o/
f
f
M
u
F
t
M
e
I
n
A
nuT
f
M
o
e
/
T
kr
S
l
e
C
e
D
1
p
Tune / Tr ack
Page 10

10
Alarms
Setting the alarms
Press the Alarm 1 (or Alarm 2) button repeatedly to choose the
desired alarm mode—one press for music, two presses for beeper,
three presses for music + beeper. Pressing the Alarm button a
fourth time will cancel the alarm. The display will indicate if an
alarm is set and its mode of operation. In the music + beeper
setting, the MicroSystem CD plays for 5 minutes and then
switches to the beeper sounds.
After choosing the alarm mode above, press the Setup button
(for Alarm 1 or for Alarm 2). While the display is flashing,
you can set:
• Wakeup time: use the Tune/Track arrow buttons.
• Alarm music source (if music is the alarm mode): Use the FM,
AM, or CD button.
• Alarm radio station: If FM or AM is your preferred music
source, use the Preset buttons to choose a station. The alarm
station must be chosen from the stored presets; see page 7.
• Alarm CD track: If CD is your preferred music source and
there is a CD in the player: Press the CD button repeatedly to
set a wakeup track (because the usual Tune/Track buttons
are temporarily reserved for the wakeup time setting). Press and
hold down the CD button to go back to track 1. If the CD is
removed before the alarm triggers, the source will be
changed to beeper to ensure that an alarm sounds.
• Alarm volume: Use the Volume arrow buttons to set the alarm
volume. The alarm volume is then stored, and is independent of
the volume changes that you make when playing the MicroSystem
CD manually.
O
/n
o
f
f
M
u
F
t
M
e
T
nI
A
nu
f
M
o
e
/
rT
k
S
l
e
e
DC
1
p
O
o/n
f
f
M
F
tu
M
e
T
I
u
n
A
n
f
M
o
e
/
T
r
k
S
el
DC
1
pe
Tune / Tr ack
O
/n
o
f
f
M
u
F
t
M
e
I
n
A
nuT
f
M
o
e
/
rT
k
S
l
e
C
D
1
pe
Page 11

11
Alarms (continued)
Checking the wakeup time
Stopping the alarm when it is sounding
Disabling the alarm (for weekends, etc.)
Using the Snooze function
Press the Setup button for Alarm 1 (or Alarm 2). The wakeup
time and other alarm settings will flash in the display for a few
seconds. To cancel the flashing immediately, press the Setup
button again.
Press the On/off button or any other button except the
Snooze/Sleep button. The alarm will stop, and will trigger again at
the same time the next day.
When the alarm sounds, press the Snooze/Sleep button
on the MicroSystem CD or the Sleep button on the Remote
Control once to silence the alarm for 10 minutes.
If the Snooze/Sleep button or the Sleep button is pressed
again within 3 seconds of the first push, 5 minutes will be
added to snooze time, up to a maximum of 60 minutes.
Example: If the button is pushed rapidly three times, the
MicroSystem CD will go into snooze mode for 20 minutes
(10 + 5 + 5 minutes).
Once the MicroSystem CD is in snooze mode, tapping
the Snooze/Sleep or Sleep button will display the remaining snooze time, counting down. The display will then revert
to normal after 5 seconds.
Press the Alarm 1 (or Alarm 2) button repeatedly until the alarm
icon disappears in the display. The alarm settings will remain stored,
but the alarm will not be active.
O
n
o/
f
f
M
u
F
t
e
I
uT
n
AM
n
f
M
o
e
/
T
kr
S
l
C
D
1
pee
O
/n
o
f
f
M
u
F
t
M
e
I
uT
n
A
n
f
M
o
e
/
rT
k
S
l
C
ee
D
1
p
O
o/n
f
f
M
u
F
t
M
e
T
I
n
A
nu
f
M
o
e
/
T
kr
S
l
e
C
D
1
pe
O
n
o/
f
f
M
u
F
t
M
e
I
n
A
nuT
f
M
o
e
/
rT
k
S
l
e
C
e
D
1
p
Page 12

12
Alarms (continued)
Using the Sleep function
More Features
Changing the display information
When listening to the MicroSystem CD, this function turns
off the MicroSystem CD automatically after a predetermined
“sleep” time.
When the MicroSystem CD is playing normally (no alarm is
sounding), hold down the Snooze/Sleep button on the
MicroSystem CD or the Sleep button on the Remote
Control for 2 seconds. The “Sleep” indicator is shown in
the display, and the initial sleep time of 60 minutes is shown
temporarily.
Each additional press of the Snooze/Sleep or Sleep button
will shorten the sleep time in 10-minute increments to the
nearest 10 minutes.
While the MicroSystem CD is in the sleep setting, press the
Snooze/Sleep or Sleep button once. The remaining sleep
time will be temporarily shown in the display, then the display will revert to its normal readout (either the current clock
time or radio frequency, depending on which has been selected).
You can tailor the display to show your preferred information, such
as whether to show clock time or station frequency while playing the
radio; or to show clock time, CD track number, or CD track time
when playing a disc. Press the Info button repeatedly to pick your
preferred display. Each music source can remember its own preferred
display setting. To check for information that is not currently
displayed, use the Info button to show the information, and then use
it again to return to your previous preferred display.
O
n
o/
f
f
uM
F
t
M
e
T
I
n
A
nu
f
M
o
e
/
rT
k
S
l
e
C
D
1
pe
O
n
o/
f
f
M
u
F
t
M
e
I
uT
n
A
n
f
M
o
e
/
T
r
k
S
l
e
C
e
D
1
p
Page 13

13
More Features (continued)
Using headphones
If you plug headphones into the stereo minijack on the front panel, the speakers will
be muted except for the alarms. Be sure to use the jack marked with the headphones
symbol, not the nearby Aux 3 jack.
Using other devices (Aux 1, 2, and 3)
Note: The Aux inputs cannot be chosen as sources for alarm music. See page 10.
Display dimmer sensor control
You can play external sources such as a TV, CD changer, or MP3
player through the MicroSystem CD. There are three stereo connections: two via RCA input jacks on the rear panel, and a third via a
1/8
" minijack on the front of the MicroSystem CD. The rear-panel
aux inputs are for permanent sources such as a TV or a CD changer.
The front-panel input (Aux 3) is for portable sources such as an
iPod
®
or Walkman®. The Aux 3 front-panel input is optimized for
portable devices and is more sensitive than the rear-panel inputs.
When using a portable device with the Aux 3 input, first make sure
that the volume level on the portable device is not set to the maximum level. You can adjust the volume control on the portable device
to find the best sound without distortion. To choose an Aux source,
press the Aux button repeatedly until the one you want (Aux 1, 2,
or 3) is displayed on the front-panel.
The MicroSystem CD display panel will automatically dim when
the room becomes dark. The amount of light it takes to dim the
display can be adjusted. Press and hold the Info button and then
press the Volume arrow buttons to adjust the threshold. You will
hear a beep on each press of the Volume up and down arrows and
the display will show a number 1 through 9. “1” indicates the
darkest room light setting, and “9” indicates the brightest room
light setting.
O
n
/
o
f
f
M
u
t
e
T
I
u
n
AMF
n
f
M
o
e
/
rT
k
S
l
e
DC
1
pe
O
n
o/
f
f
M
u
F
t
M
e
I
n
A
nuT
f
M
o
e
/
T
r
k
S
l
e
C
D
1
pe
Page 14

14
More Features (continued)
Customizing the MicroSystem CD’s output
The MicroSystem CD has a line output which can feed its audio into an external device.
Uniquely, you can program this output to tailor it for use as:
Note: The subwoofer output is not low-passed. Use the subwoofer’s crossover, set for best blending (about 110Hz).
Programming the line output
Note: If the subwoofer output is set, a small “S” will show in the display to alert you that bass has been removed
from the internal speakers. The subwoofer output sends a summed monaural signal to both left and right RCA jacks.
Using the Bass trim
Fixed-level: With the unit powered off, press Preset 1 and
Snooze/Sleep together for 5 seconds. “L1” will appear in
the display;
Variable-level: With the unit powered off, press Preset 2 and
Snooze/Sleep together for 5 seconds. “L2” will appear in
the display;
Subwoofer output: With the unit powered off, press Preset 3
and Snooze/Sleep together for 5 seconds. “L3” will appear in
the display.
• A fixed-level output that ignores the volume setting (useful for recording or
for feeding the MicroSystem CD’s radio or CD signal to an external receiver
that has its own volume control);
• A variable-level output that responds to the MicroSystem CD’s volume
setting (useful for feeding an external amplifier or powered speaker system
that has no volume control); and
• A subwoofer output that feeds bass to an external powered subwoofer and
simultaneously reduces the bass fed to the MicroSystem CD’s speakers. They
will play louder and will match the subwoofer better.
The Bass trim knob, located on the back of the unit, is used
to adjust the bass level. When the MicroSystem CD is placed
near a wall, the bass can become more pronounced. Setting
the unit away from a wall can sometimes decrease the bass.
Adjust the Bass trim to achieve the desired amount of bass
output.
O
o/n
f
f
M
u
F
t
M
e
I
uT
n
A
n
f
M
o
e
/
T
kr
S
l
e
C
D
1
pe
O
n
o/
f
f
M
u
F
t
M
e
I
n
A
nuT
f
M
o
e
/
rT
k
S
l
e
DC
1
pe
O
n
/
o
f
f
M
F
tu
M
e
T
I
n
A
nu
f
M
o
e
/
T
r
k
S
l
e
e
DC
1
p
Bass trim
Page 15

15
Connections
Connecting other devices
There are three stereo connections: two via RCA input jacks on the rearpanel and a third via a minijack on the front of the MicroSystem CD.
In addition, a stereo line output via RCA jacks on the rear panel can feed
audio into an external device. Example connections are shown in the
diagram below.
Note: The subwoofer output configuration sends a summed monaural signal to both the left and right RCA jacks.
MP3 Player
Headphones
Subwoofer
TV
CD Changer
L
R
Page 16

16
Connections (continued)
Connecting the FM antenna
Optional: Connecting to a cable TV signal
You may be able to obtain better reception if your cable company offers an FM radio
signal on your TV cable. The MicroSystem CD’s FM antenna connector will accept the
cable FM feed from most cable TV systems that provide FM programming. To connect
your radio to the FM signal available from some cable TV providers, contact your
cable TV company for assistance before making any connection.
Be sure that the installation includes a splitter that filters the signal to
prevent any remission of the TV spectrum through the MicroSystem
CD, so only the FM band, not the cable TV signal, is transmitted to the
MicroSystem CD.
The FM antenna comes attached. If the antenna is disconnected, follow
these steps to connect it:
1. Push the Type F connector plug on the end of the antenna into the
receptacle on the MicroSystem CD marked “FM antenna 75
.”
2. Straighten out the antenna to its full length.
3. Orient the antenna wire for the best reception.
Notice for Cable TV System Installer
Please make note of Article 820-40 of the NEC (of USA) that provides
guidelines for proper grounding. In particular, this standard specifies that the
cable ground shall be connected to the grounding system of the building, as
close to the point of cable entry as is practical. CAUTION: When making
connections to the rear of the MicroSystem CD, it is possible to experience
an ESD (Electrostatic Discharge) event. If this happens, simply push the
On/off button on the front and recheck the preset settings.
ȍ
Page 17

17
Connections (continued)
Optional: Connecting to a different external indoor FM antenna
Note: Not included—available at most stores that sell audio/video parts and accessories.
1. Disconnect the supplied external FM antenna from the
back of the MicroSystem CD.
2. Connect the external FM antenna to the 75 Type F connector.
Optional: Connecting to an external indoor AM antenna
Note: Not included—available at most stores that sell audio/video parts and accessories
1. Disconnect the built-in internal AM antenna wires from the
spring terminals on the back of the MicroSystem CD.
2. Connect the wires of the external AM antenna to these terminals.
Optional: Connecting to an outdoor antenna
If you wish to use an outdoor antenna, we suggest that, for safety reasons, you have a
professional installer connect it.
it
Antenna Grounding
Example of antenna grounding,
per the National Electrical Code,
ANSI/NFPA 70.
ȍ
Antenna Lead In Wire
Electric
Service
Equipment
Ground
Clamp
Antenna Discharge Un
(NEC Section 810-20)
Grounding Conductors
(NEC Section 810-21)
Ground Clamps
Power Service Grounding
Electrode System
(NEC ART 250 Part H)
Page 18

18
Troubleshooting
The MicroSystem CD does not power up
• Is the system plugged into a working, unswitched electrical outlet?
• Are you using an operating AC wall outlet?
There is no sound coming from the system
• Is the volume turned up? Try increasing the volume.
• Is the system muted? Press the Mute button on the Remote Control.
• If playing a CD, make sure that the disc is placed label-side up in the slot and
check that the CD Pause is turned off.
• If playing the radio, make sure that the antennas are connected, then try tuning to
another station.
• Make sure that you are not on an auxiliary input.
Discs do not play when inserted into the slot-loading CD player
• The disc may be dirty. Try cleaning the disc.
• The disc may be defective or the wrong format. Try another disc.
• Eject the disc and try loading it again.
Warning: Adhesive CD labels may loosen, damaging this or any other CD player. A permanent marker can be used to label the disc.
The Remote Control does not work
• Check that the pull tab is removed from the Remote Control.
• The Remote Control battery might need to be replaced. (battery type: CR2025 3-volt)
• Move the Remote Control closer to the unit.
There is too much or not enough bass
• Adjust the bass using the Bass trim knob on the rear panel of the
MicroSystem CD. See page 14.
Disc error codes in the display
The following error codes will appear on the display if the CD player encounters a problem. In most
cases the disc can be ejected and the system will perform as normal. However, if an error code remains dis-
played, please contact your local dealer or Boston’s Technical Support Department for further instructions.
E-4 CD drive mechanism is jammed or unresponsive.
E-5 CD dirty/scratched or decode error (Examples: Nonsupported file format or bit rate).
E-6 CD drive cannot understand the disc format.
E-70,71,72 CD drive operation error (Examples: upside-down disc, spin jammed, DVD, no supported
files, blank disc).
Page 19

19
Specifications
Dimensions
Height 4½" (114mm)
Width 14" (355mm)
Depth 8½" (217mm)
Batteries
MicroSystem CD Standard 9-volt
Remote Control CR2025 3-volt
Limited Warranty
For one year from the date of purchase, Boston Acoustics will repair for the original owner any
defect in materials or workmanship that occurs in normal use of the Boston Acoustics
MicroSystem CD, without charge for parts and labor.
Your responsibilities are to use the unit according to the instructions supplied, to provide safe
and secure transportation to an authorized Boston Acoustics service representative, and to present proof of purchase in the form of your sales slip when requesting service.
Excluded from this warranty is damage that results from abuse, misuse, accidents,
shipping, repairs, or modifications by anyone other than an authorized Boston Acoustics
service representative.
This warranty is void if the serial number has been removed or defaced.
This warranty gives you specific legal rights, and you may also have other rights that vary from
state to state.
If service seems necessary:
First, contact the retailer from whom you purchased the system. If that is not possible, write to:
Boston Acoustics, Inc.
300 Jubilee Drive
Peabody, MA 01960 USA
We will promptly advise you of what action to take. If it is necessary to return the
product to the factory, please ship it prepaid. After it has been repaired, we will return it freight
prepaid in the U.S. and Canada.
System Weight
9 lbs (4kg)
Page 20

20
Index
AM
Connecting an external indoor AM antenna page 17
Control Panel diagram page 5
Display diagram page 6
Remote Control diagram page 4
Setting the alarms page 10
Storing AM stations page 7
Tuning to an AM station page 7
Alarms
Checking the wakeup time page 11
Control Panel diagram page 5
Display diagram page 6
Disabling the alarm page 11
Remote Control diagram page 4
Stopping the alarm when it is sounding page 11
Setting the alarms page 10
Using the Sleep function page 12
Using the Snooze function page 11
Antenna
Connecting the FM antenna page 16
Connecting to a cable TV signal page 16
Connecting to a different external indoor FM antenna page 17
Connecting to an external indoor AM antenna page 17
Connecting to an outdoor antenna page 17
Positioning the FM antenna page 4
Auxiliary Inputs
Control Panel diagram page 5
Connecting other devices page 15
Display diagram page 6
Remote Control diagram page 4
Setting the alarms page 10
Bass Trim
Using the Bass trim page 14
Troubleshooting page 18
Battery
Backup alarm page 3
Installing the battery page 3
Specifications page 19
Troubleshooting page 18
Unpacking the MicroSystem CD page 3
CD
Control Panel diagram page 5
Creating MP3/WMA discs page 9
Display diagram page 6
Loading a CD page 8
MP3/WMA discs page 9
Playing a CD page 8
Playing MP3/WMA discs page 9
Remote Control diagram page 4
Repeat and Shuffle page 8
Setting the alarms page 10
Troubleshooting page 18
Page 21

21
Index (continued)
Clock
Control Panel diagram page 5
Display diagram page 6
Setting the clock page 5
Connections
Cable TV signal page 16
External indoor AM antenna page 17
External indoor FM antenna page 17
FM antenna page 16
Other Devices page 15
Outdoor antenna page 17
Power cord page 4
Troubleshooting page 18
Control Panel
Control Panel diagram page 5
Display
Display diagram page 6
FM
Control Panel diagram page 5
Display diagram page 6
External indoor FM antenna page 17
FM antenna page 16
Positioning the FM antenna page 4
Remote Control diagram page 4
Storing FM stations page 7
Setting the alarms page 10
Tuning to an FM station page 7
Headphones
Connecting headphones page 15
Using headphones page 13
Line Inputs
Connecting other devices page 15
Line Output
Connecting other devices page 15
Customizing the line output page 14
Programming the line output page 14
MP3/WMA
Creating MP3/WMA discs page 9
Connecting an MP3 player pages 13, 15
MP3/WMA discs page 9
Playing MP3/WMA discs page 9
Troubleshooting page 18
On/off
Control Panel diagram page 5
Display diagram page 6
Remote Control diagram page 4
Other Devices
Connecting other devices page 15
Owner’s Manual
Download a manual from the Web page 3
Save this owner’s manual page 3
Page 22

22
Index (continued)
Presets
Control Panel diagram page 5
Display diagram page 6
Setting the alarms page 10
Storing FM and AM presets page 7
Storing a second set of presets page 7
Setting the alarm page 10
Radio
Display diagram page 6
Setting the alarms page 10
Storing a second set of presets page 7
Storing FM and AM presets page 7
Tuning to an FM or AM station page 7
Remote Control
Remote Control diagram page 4
Troubleshooting page 18
Repeat
Control Panel diagram page 5
Display diagram page 6
Repeat and Shuffle page 8
Shuffle
Control Panel diagram page 5
Display diagram page 6
Repeat and Shuffle page 8
Sleep
Control Panel diagram page 5
Display diagram page 6
Remote Control diagram page 4
Using the Sleep function page 12
Snooze
Control Panel diagram page 5
Display diagram page 6
Remote Control diagram page 4
Using the Snooze function page 11
Special Features
Special features page 2
Specifications
Batteries page 19
Dimensions page 19
System Weight page 19
Troubleshooting
Disc error codes page 18
Troubleshooting page 18
Unpacking
Unpacking the MicroSystem CD page 3
Volume
Adjusting the volume page 6
Muting the system page 6
Setting the alarms page 10
Warranty
Limited warranty page 19
Page 23

23
Notes:
Page 24

Boston, Boston Acoustics, and the Boston Acoustics logo are registered
trademarks of Boston Acoustics, Inc. iPod and the iPod design are registered
trademarks of Apple Computers. Inc. Walkman is the registered trademark of
Sony Corporation.
© 2004 Boston Acoustics, Inc. All rights reserved. Specifications are subject to
change without notice.
300 Jubilee Drive
Peabody, MA 01960 U.S.A.
978.538.5000
www.bostonacoustics.com
042-002203-3
 Loading...