

BOSTON ACOUSTICS HORIZON DUO User Manual
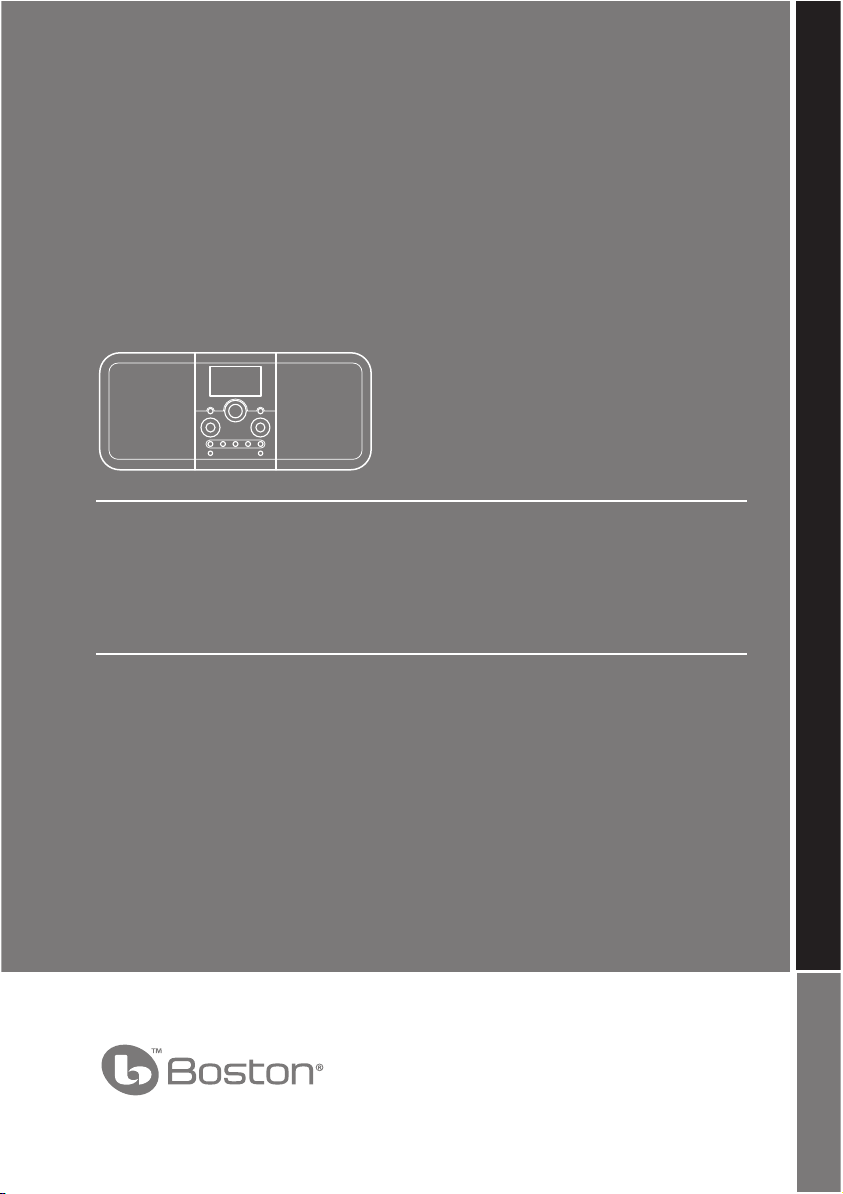
Horizon Duo
High Performance Tabletop Music System
AM/FM Stereo Radio
OWNER’S MANUAL / SAFETY INSTRUCTIONS / COMPLIANCE INFORMATION
Español
Sistema de audio de mesa
de alto rendimiento
Radio AM/FM estéreo
Français
Système de musique de table à
haute performance
Radio AM/FM stéréo
Italiano
Impianto musicale da tavolo
ad alte prestazioni
Radio stereo AM/FM
Svenska
Högpresterande musiksystem
AM/FM-stereoradio
Deutsch
Hochleistungsfähiges Kompakt-
Musiksystem
MW-/UKW-Stereoradio
A Boston P.O.P. Product Make it your own...

E
N
G
IMPORTANT SAFETY INSTRUCTIONS
L
I
S
H
This symbol found on the apparatus indicates
hazards arising from dangerous voltages.
This symbol found on the apparatus indicates the
user should read all safety statements found in the
user manual.
This symbol found on the apparatus indicates
double insulation.
Warning! To reduce the risk of re or electrical
shock, do not expose this apparatus to rain or
moisture.
This symbol found on the apparatus indicates
that the apparatus must be placed in a separate
collection facility for electronic waste and not
disposed with household waste.
1. Read these instructions.
2. Keep these instructions.
3. Heed all warnings.
4. Follow all instructions.
5. Do not use this apparatus near water.
6. Clean only with dry cloth.
7. Do not block any ventilation openings. Install in
accordance with the manufacturer’s instructions.
8. Do not install near any heat sources such as radiators,
heat registers, stoves, or other apparatus (including
ampli ers) that produce heat.
9. Do not defeat the safety purpose of the polarized or
grounding type plug. A polarized plug has two blades
with one wider than the other. A grounding-type plug
has two blades and a third grounding prong. The wide
blade or the third prong is provided for your safety. If
the provided plug does not t into your outlet, consult
an electrician for replacement of the obsolete outlet.
10. Protect the power cord from being walked on or
pinched particularly at plugs, convenience receptacles,
and the point where they exit from the apparatus.
11. Only use attachments/accessories speci ed by the
manufacturer.
12. Unplug this apparatus during lightning storms or when
unused for long periods of time.
13. Refer all servicing to quali ed service personnel.
Servicing is required when the apparatus has been
damaged in any way, such as power-supply cord or
plug is damaged, liquid has been spilled or objects
have fallen into the apparatus, the apparatus has been
exposed to rain or moisture, does not operate normally,
or has been dropped.
14. Maintain a minimum distance of 2” (50mm) around
the front, rear, and sides of the apparatus for su cient
ventilation. The ventilation should not be impeded
by covering the ventilation openings or placing on or
around the apparatus items such as newspapers, tablecloths, curtains, etc.
15. No open ame sources, such as lighted candles, should
be placed on the apparatus.
16. The apparatus shall not be exposed to dripping or
splashing. No objects lled with liquids, such as vases,
shall be placed on the apparatus.
17. Either the power inlet connector on the rear of the
apparatus or the power plug at the wall must remain
accessible, to be able to disconnect power from the
apparatus.
18. To completely disconnect this apparatus from the AC
Mains, disconnect the power supply cord plug from the
AC receptacle.
19. The mains plug of the power supply cord shall remain
readily operable.
American Users:
Note: This equipment has been tested and found to
comply with the limits for a Class B digital device, pursuant
to part 15 of the FCC Rules. These limits are designed to
provide reasonable protection against harmful interference
in a residential installation. This equipment generates, uses,
and can radiate radio frequency energy and, if not installed
and used in accordance with the instructions, may cause
harmful interference to radio communications. However,
there is no guarantee that interference will not occur in a
particular installation. If this equipment does cause harmful
interference to radio or television reception, which can be
determined by turning the equipment o and on, the user
is encouraged to try to correct the interference by one or
more of the following measures:
• Reorient or relocate the receiving antenna.
• Increase the separation between the equipment and
receiver.
• Connect the equipment into an outlet on a circuit
di erent from that to which the receiver is connected.
• Consult the dealer or an experienced radio/TV
technician for help.
Caution: Unauthorized changes or modi cations to
the receiver could void user’s authority to operate the
equipment.
Canadian Users
This class B digital apparatus complies with Canadian
ICES-003.
Cet appareil numérique de classe B est conforme á la norme
NMB-003 du Canada.
2

Introduction
Thank you for choosing Boston Acoustics and congratulations on your purchase of the Horizon Duo High
Performance Tabletop Music System. If you own other Boston products, the outstanding audio performance
and ease-of-use of the Duo should come as no surprise. If you’re new to Boston, welcome – we think you’ve
made a great choice. The Duo is a sophisticated stereo radio and speaker system with dual alarms, auxiliary
inputs and outputs, all in a high-style, soft-touch enclosure – all the things that “Play Smart.” In addition, with
the optional HRD-i docking adapter, you can play your iPod music and videos through the Duo. So check out
all the features and functions of your new music system. We know you’ll enjoy it for years to come.
Features
• Outstanding audio performance from dual 31/2-inch speakers in separate acoustic chambers, vented for
extended response
• BassTrac® audio processing for satisfying bass at any volume
• Three intuitive, easy to use controls operate all the Duo features
• Multi-function remote control
• Large, easy to read display with adjustable brightness that dims automatically in low light conditions
• Highly sensitive AM/FM Stereo tuner
• 10 FM radio station presets; 5 AM radio presets
• External antenna inputs for maximum reception
• Dual alarm functions each with wake-to-alarm and/or wake-to-music
• Easy to use, one-button alarm setting
• Alarms gradually increase in volume for a gentle wake up
• S-n-o-o-o-o-o-z-e bar – the entire outer aluminum trim is a touch sensitive, can’t-miss-it snooze bar
• Sleep function lets you listen to music up to 90 minutes before the Duo turns itself o
• Make it your own! Customize your Duo with optional grilles available at www.bostonacoustic.com/POP
• Time setting, station presets, and alarms settings are remembered during power outages
• Headphone output on the front panel
• Dual auxiliary inputs - front and rear panel
• Internal power supply - no bulky external adapter needed
With the optional HRD-i docking adapter:
• Play your iPod through the Duo speakers
• Use the Duo remote to control your iPod
• The composite video output lets you play iPod TV program through a television
• Your iPod is charged while placed in the HRD-i
© 2008. All rights reserved. Boston, Boston Acoustics and BassTrac are registered trademarks, and the
B/A ellipse symbol, make it your own, and Play Smart are trademarks of Boston Acoustics, Inc.
3

Contents
Unpacking and Setting Up Your Horizon Duo 4
Placement 4
Power Connection 4
AM and FM Antennas 5
About the Front Panel Controls 5
About the Remote Control 5
Basic Control Operations 6
Turning the Horizon Duo On or O 6
Adjusting the Volume 6
Setting the Clock 6
Selecting a Source 7
Tuning In a Radio Station 7
Station Seek 8
Setting a Station Preset 8
Selecting a Preset Station 9
Adjusting Bass and Treble 9
Alarm Clock Features 10
Setting the Alarm Time 10
Setting an Alarm 10
How the Alarms Work 10
The Snooze Feature 11
The Sleep Function 11
Other Control Settings 12
Display Information 12
Display Brightness 12
Connecting Other Equipment 13
Connecting Headphones 13
Using Aux Inputs 13
The HRD-i – iPod Docking Adapter 13
Connecting the HRD-i 13
Selecting the iPod Source 14
Front Panel Control iPod Operation 14
Remote Control iPod Operation 14
About Clock Memory 15
Security Cable Connection 15
Service Port 15
Maintenance and Service 15
Limited Warranty 16
If Service Seems Necessary 16
Unpacking and Setting Up Your Horizon Duo
Carefully unpack the Horizon Duo. If there is any sign of damage from transit, report it immediately to your
dealer and/or delivery service. Keep the shipping carton and packing materials for future use. Be sure to
keep your purchase receipt in a safe place, as it may be required for warranty purposes.
In the box you should nd the Horizon Duo, the remote control and the power cord.
Placement
Your Horizon Duo will sound great just about anywhere.
But if you put it near a wall or corner the bass response
will be enhanced. Don’t block the bass port. Be sure the
FM Antenna Input
AM Antenna Input
iPod Dock Input
vents on the top of the cabinet are unobstructed to
allow for ventilation.
Power Connection
Just connect the power cord to the back of the Horizon
Duo and plug it into the wall power outlet.
4
Output Fixed/Variable Switch
AC Input
Output
Aux 2 Input
AM and FM Antennas
The Horizon Duo comes out of the box ready to use. The internal AM antenna is connected. The FM antenna
is also connected. Just extend the wire connected to the plug. With the standard antennas you’ll probably
pull in more stations than any other radio you own. But if you want to listen to stations that are very far away
then external antennas can be connected to the antenna inputs.
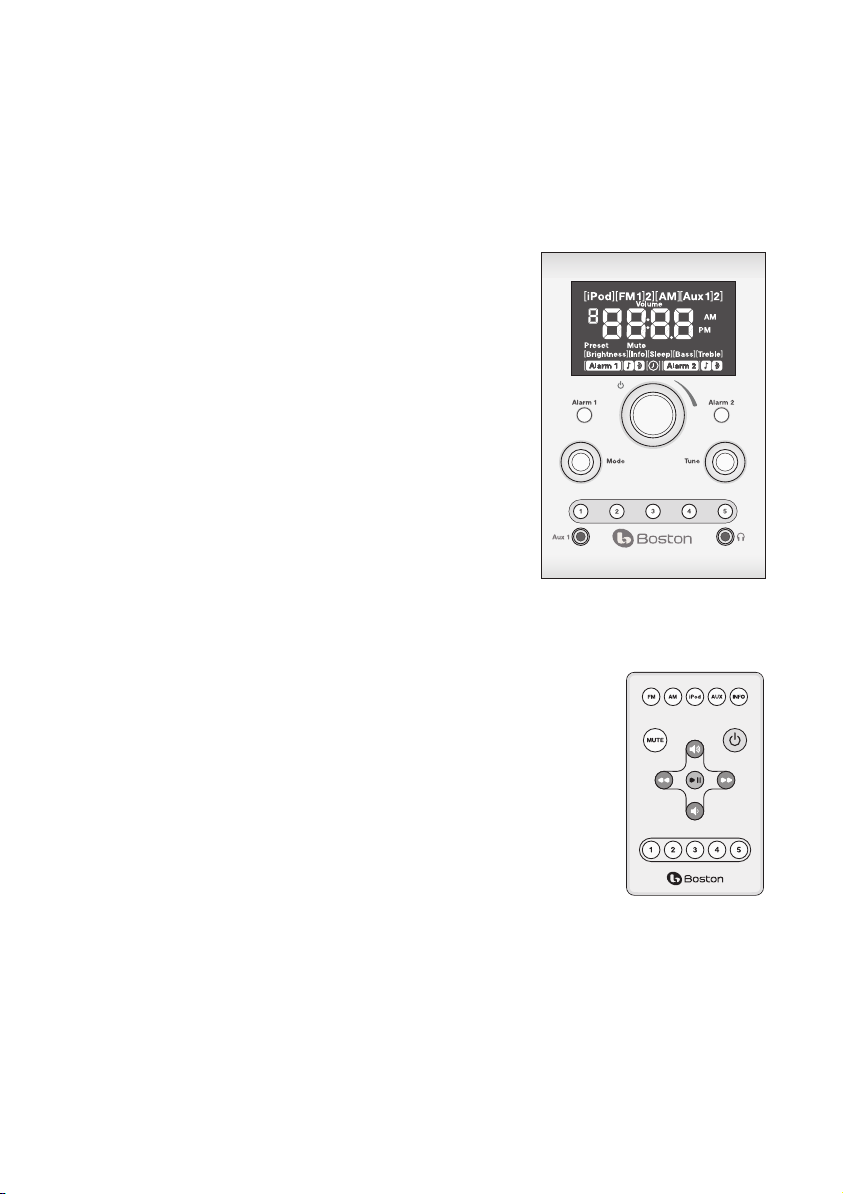
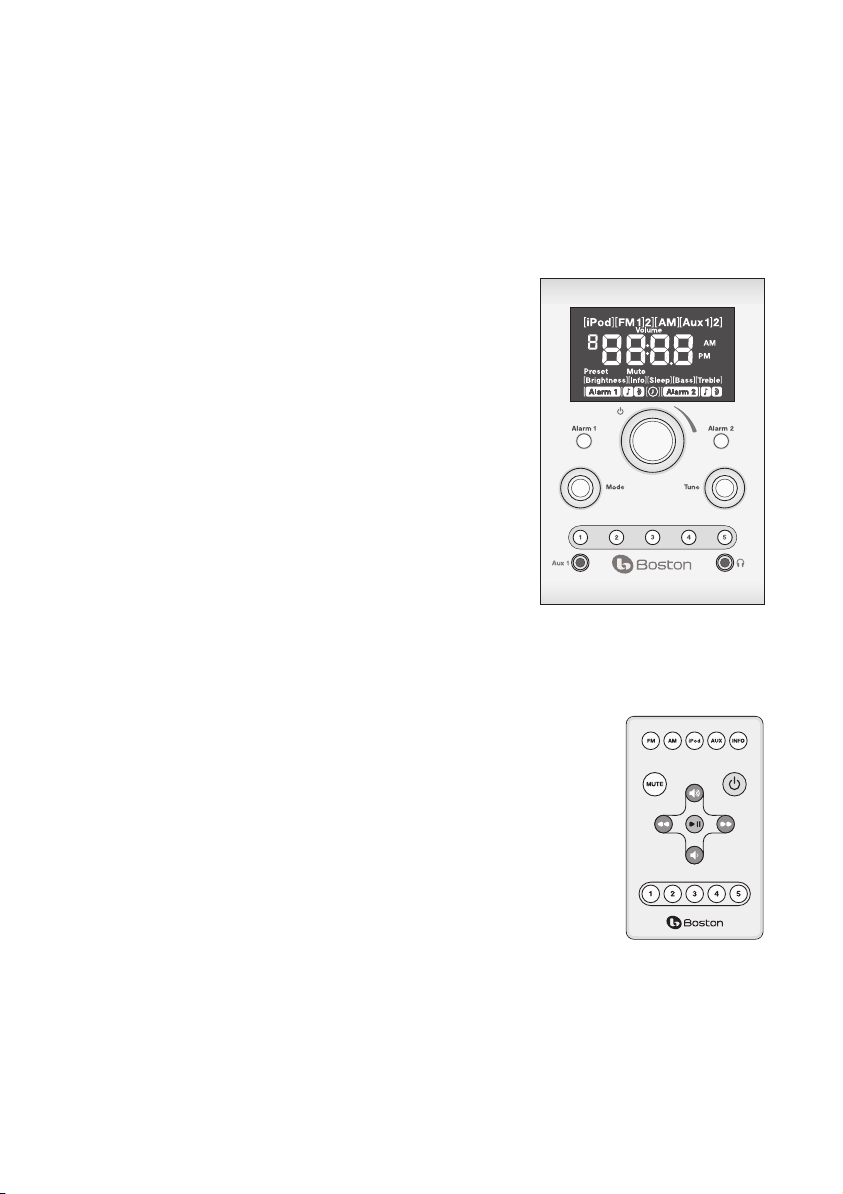
About the Front Panel Controls
Most of the Horizon Duo functions are operated by the three
controls on the front panel.
Power/Volume – Is controlled by the large knob in the center of
the panel.
Mode – Selects the input you want to use or the function you
want to adjust.
Tune – Tunes in a new radio station.
These logical, intuitive controls make it easy to operate the Horizon
Duo. The way you use each contol is the same for each feature.
Once you learn how to control one of the features the rest of them
will be easy. You may not need to refer to this manual once you
understand the way the controls work.
About the Remote Control
Most of the features of the Horizon Duo can be operated with the supplied
remote control. When it’s not being used, the remote control can be
conveniently stored in the recess on top of the Horizon Duo. The remote also
has a magnetic backing so it can be attached to many metal surfaces.
Note: When you unpack your remote control there will be a plastic insulation
tab extending from the battery compartment. Pull out this tab before using the
remote control.
There must be an unobstructed line of sight to the front of the Horizon Duo
when using the remote control. Point the remote control at the front panel of
the Horizon Duo when pressing the buttons. For best results you should be
within 20 feet of the unit and no more than 45° o axis.
Note: Eventually you’ll need to replace the remote battery. If the remote doesn’t reliably operate the Duo, put
in a new CR2025 3V lithium coin type battery.
5
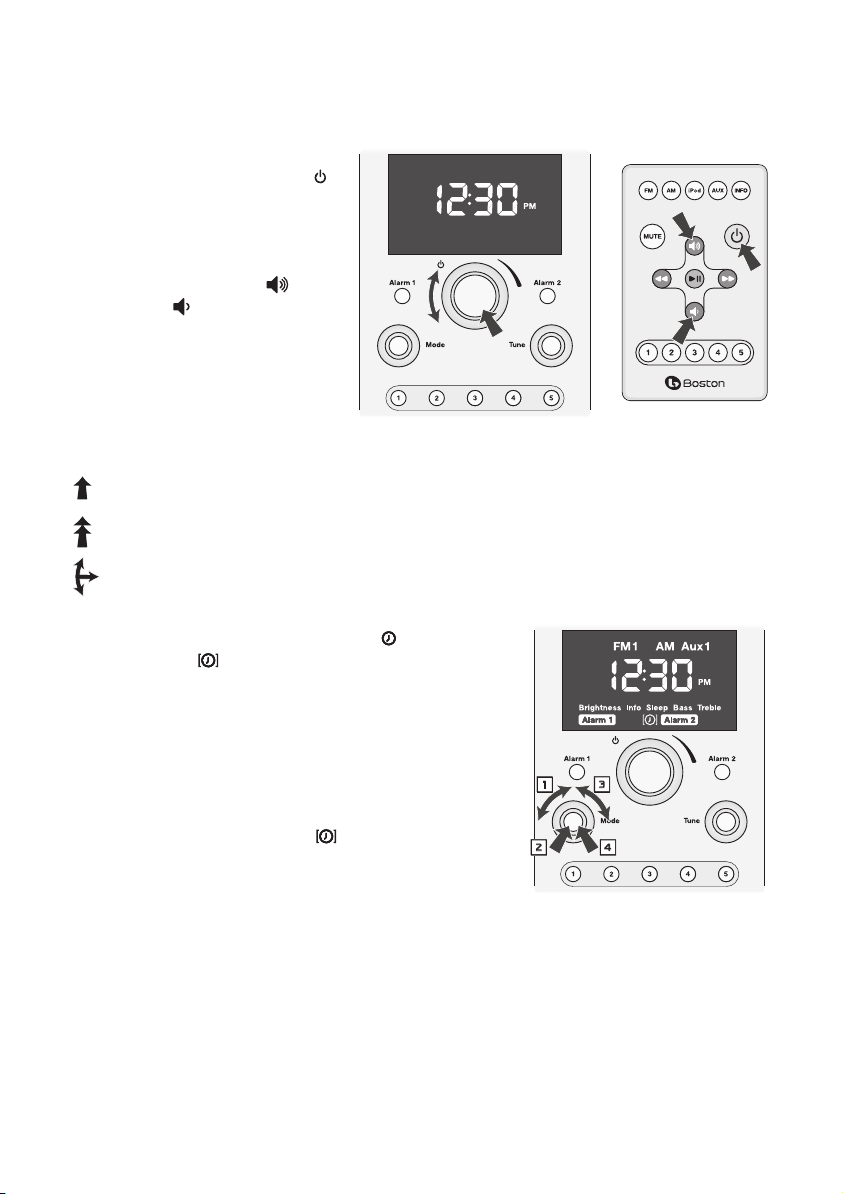
Basic Control Operations
1
2
3
4
Turning the Horizon Duo On or O
Press the POWER/VOLUME control on the
center of the front panel or the green
button on the remote control.
Adjusting the Volume
Turn the front panel POWER/VOLUME
KNOB
or press the VOLUME UP or
VOLUME DOWN buttons on the
remote control.
Note: On the control illustrations –
Regular arrows indicate to press and release the button or control.
Double headed arrows indicate to press and hold the button or control.
This symbol indicates the control is turned then pressed.
Setting the Clock
Turn the MODE control until the clock icon is highlighted
with brackets .
Press the MODE control. The clock icon and time display will
ash.
Turn the MODE control to adjust the time.
Press the MODE control again to set the time. The display
reverts to its previous mode and the new time is set.
Note: The clock can display time in either 12 hour or 24 hour
format. To change the time display turn the MODE control to
highlight the clock icon with brackets . Press and hold the MODE
control for 5 seconds. The display will show “12H” or “24H”. Turn the
MODE control to select the time format you want, then press the
control.
6
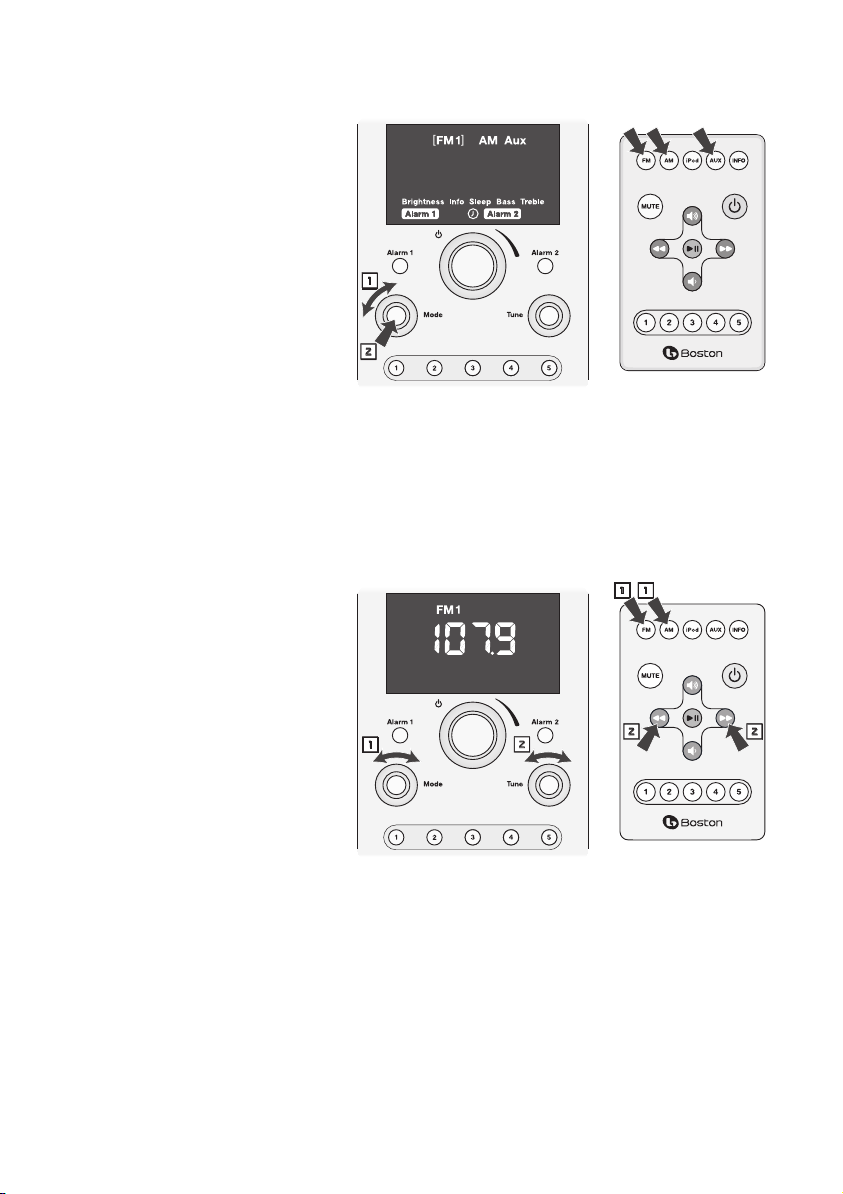
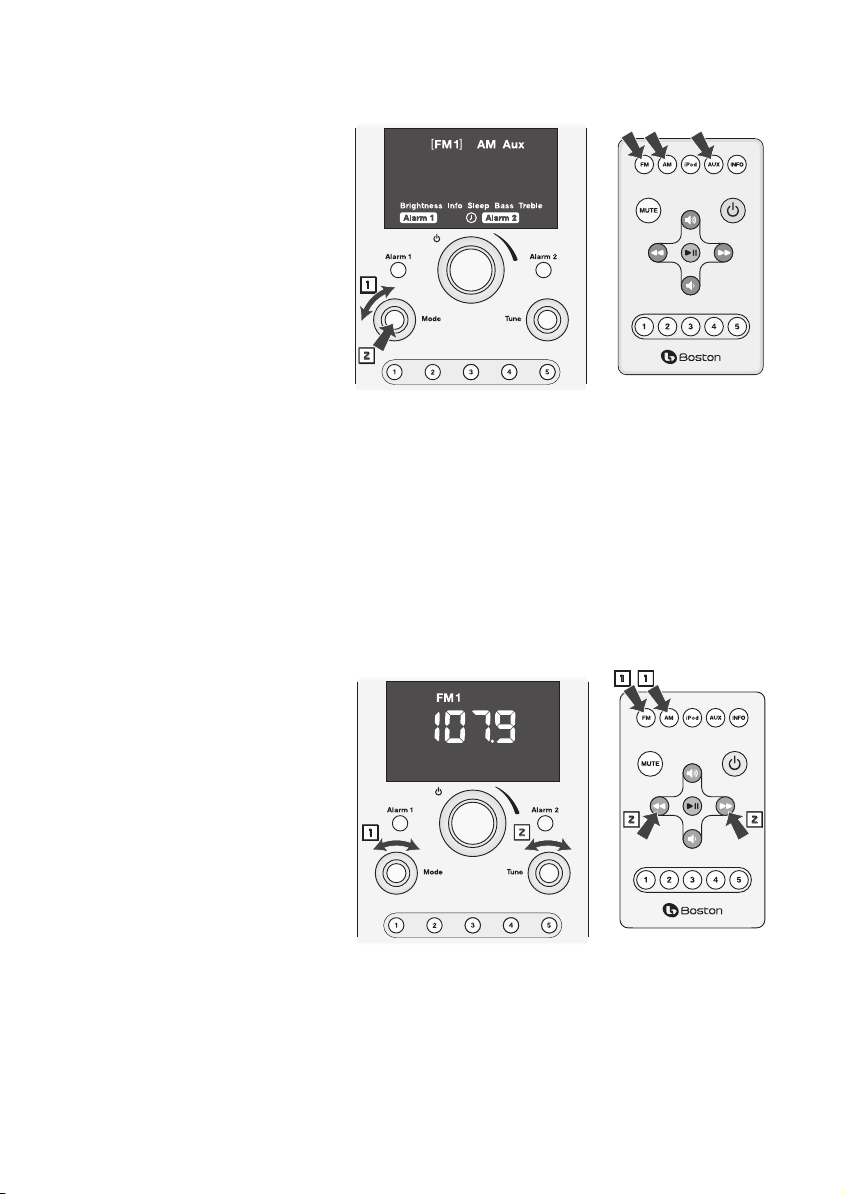
Selecting a Source
1
2
1
2
1
2
Using the Front Panel Controls
Turn the MODE control until the
source you want is highlighted
with brackets. Note that other
function and alarm setting control
icons also may be selected.
Press the MODE control to select
the highlighted item. Or just wait
a few seconds and the source
is automatically selected. The
Duo begins playing the source
selected.
Using the Remote Control
Press the button for the source
you want to select. Press the FM and AUX buttons once for FM 1 or AUX 1 and twice for FM 2 or AUX 2.
Notes:
• There are FM 1 and FM 2 source options. They correspond to the two FM radio preset groups.
• There are Aux 1 and Aux 2 source options. Aux 1 is the front panel input. The Aux 2 input is on the rear
panel.
Tuning In a Radio Station
Using the Front Panel Controls
Use the MODE control to select
the AM radio source or one of the
FM radio sources.
Turn the TUNE control until the
station frequency you want shows
in the display.
Using the Remote Control
Press the AM or FM radio source
button.
Press the [ or ] button once
to step up or down the radio band
to the next station frequency.
Notes:
• If the radio source you want is already selected you can skip step 1 and use the front panel TUNE control
or the remote [ or ] buttons to tune in a new station.
• If the station you select has been assigned to a station preset, the preset indicator and number are
displayed.
7
Station Seek
1
2
3
Using the Front Panel Control
Press the TUNE button. The Duo will
seek up the radio band for the next
receivable station.
Using the Remote Control
Press and hold the
The Duo will seek up or down the radio
band for the next receivable station.
or ] button.
[
Setting a Station Preset
Use the MODE control, or press
the AM or FM button on the
remote control to select the radio
band you want to use. There are
two sets of FM presets. They are
selected by choosing the FM 1 or
FM 2 sources.
Use the front panel TUNE control,
or the [ or ] buttons on the
remote control to tune in the
station you want to assign to a
preset.
Press and hold the front panel or
remote control PRESET BUTTON
(1-5) you want to set up. A tone
will sound and the preset number will light indicating the station has been assigned to the preset.
In this example FM station 107.9 has been assigned to preset 3 in the FM 2 group.
8
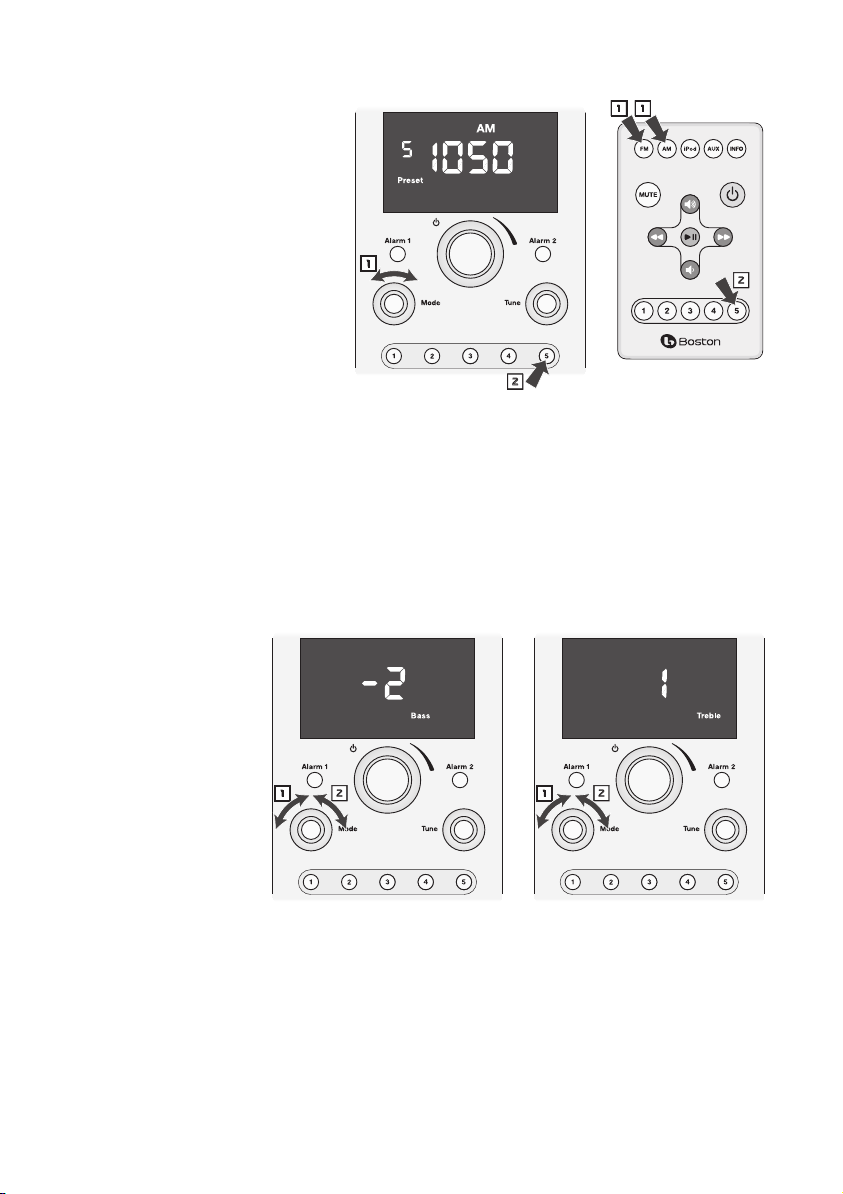
Selecting a Preset Station
1
2
1
2
Turn the MODE control to
highlight the radio band of the
preset you want to select. There
are two sets of FM presets. They
are selected by choosing the FM 1
or FM 2 source.
Press and quickly release the
PRESET BUTTON (1-5) you want to
select. The preset indicator, the
preset number and the station
frequency will light.
In this example AM preset 5, with station
frequency 1050 assigned to it, has been
selected.
Note: Pressing a PRESET BUTTON more than once will switch to the other radio band or preset group. Using
this example, if you press PRESET BUTTON 5 again, then preset 5 in the FM 1 group is selected. Another press
selects preset 5 in the FM 2 group. Press the button one more time and AM preset 5 is selected again.
Adjusting Bass and Treble
Turn the MODE
control to select the
Bass or Treble icon in
the display. The Bass
or Treble icon and
the current setting
ashes in the display.
Turn the MODE
control clockwise
to increase, or
counter-clockwise to
decrease the Bass or
Treble
In these examples the Bass is set to –2 and the Treble is set to +1.
9
Alarm Clock Features
1
2
3
1
The Horizon Duo has two independent alarm settings. Each can have its own type of alarm —wake to tone,
wake to music or both. Both types of alarms start at a low volume level that gently increases.
Setting the Alarm Time
The alarm time can be set when the Duo is turned on or o .
Press and hold the ALARM 1 or ALARM 2 button for one
second. The alarm time and the or icon will
ash.
Turn the MODE control to adjust the alarm time.
Press the MODE control to set the alarm time.
In this example Alarm 2 is set to 7:15 AM.
Note: The alarm time can also be set by using the MODE control
to highlight the or icon. Then press the MODE
control and follow steps 2 and 3 above.
Setting an Alarm
If you plan to use the wake to music function, note that the last
source and volume level
settings will be used for this alarm.
Press the ALARM 1 or ALARM 2 buttons one or more times to
turn on the alarm and set the alarm type. One press selects
wake to music . A second press selects wake to tone . A
third press selects both. Press the button a fourth time to
cancel the alarm.
This example shows how the display might look after the Duo is turned
off . The current time is displayed and the icons show Alarm 1 is on set for
wake to music and tone and Alarm 2 is on set to tone only.
How the Alarms Work
When an alarm is triggered the icon for the alarm starts ashing.
If you selected wake to tone, the alarm tone starts sounding,
quietly at rst then with increasing volume.
If you selected wake to music with a radio, the station you last tuned to is played at a gradually increasing
volume.
If you selected wake to music and tone, the radio station you selected begins playing at a gradually
increasing volume. If you do not turn o the music source alarm after ve minutes the music stops playing
and the alarms tone begins to sound at a gradually increasing volume.
To turn o the alarm press the POWER/VOLUME control.
10
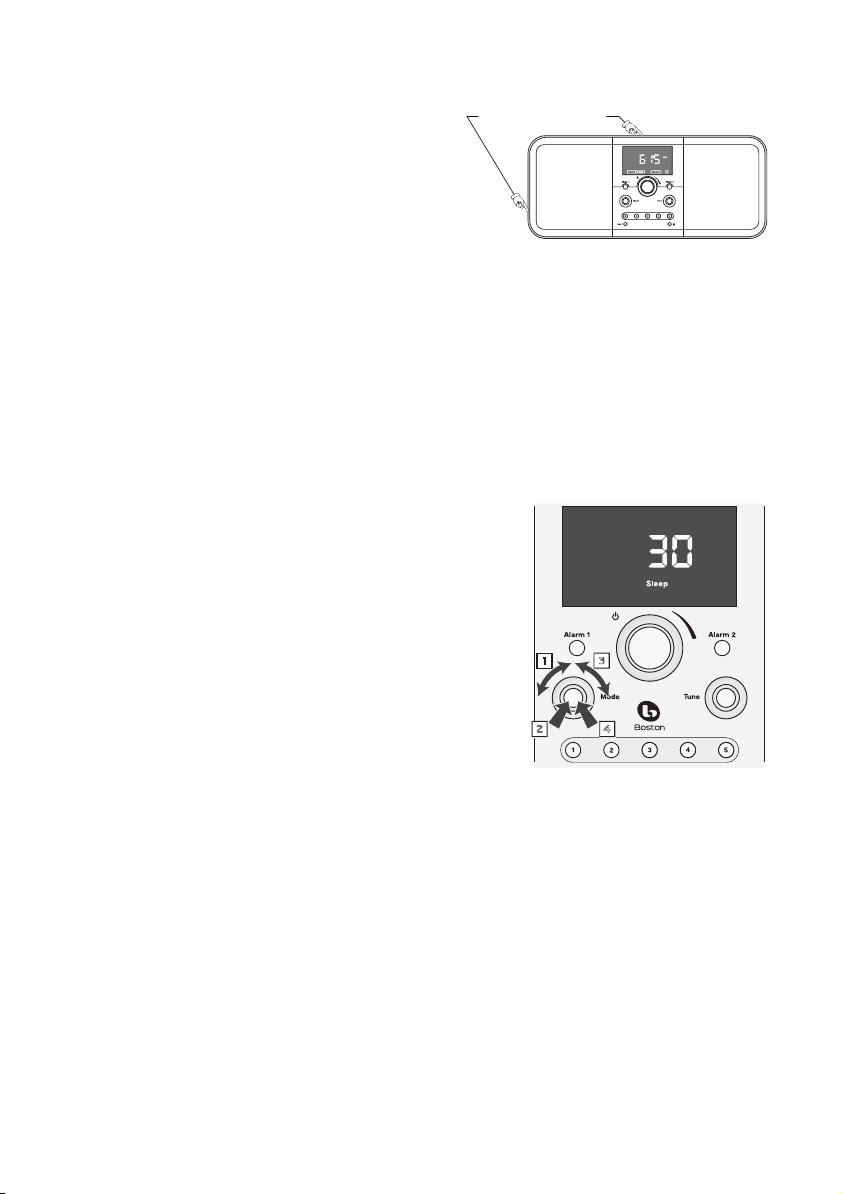
The Snooze Feature
Touch Sensitive Rim
If you want to sleep a while longer after the alarm sounds
you can use the “Snooze “ feature. Simply touch the outer
metal rim around the Duo. This will delay the alarm for
ten minutes. Each additional touch of the rim increases
the length of the “Snooze” alarm delay by 5 minutes. The
maximum delay is 60 minutes. The display shows the
time and a ashing Alarm icon.
To see how much “Snooze” time is left touch the metal rim once. If you touch the rim again another ve
minutes is added to the “Snooze” time for each additional touch.
To cancel the “Snooze” function press the
VOLUME
button.
ALARM 1 or ALARM 2 button for the active Alarm or the POWER/
The Sleep Function
You can set the Horizon Duo to play for up to 90 minutes.
After the speci ed time the Duo shuts o .
Select the source and set the volume level. Use the MODE
1
control to highlight the Sleep icon in the display.
Press the MODE control. The Sleep icon and “OFF” will ash in
2
the display.
Turn the MODE control clockwise until the number of minutes
3
you want is displayed.
Press the MODE control. The brackets around the Sleep icon
4
will ash a few times. The display will return to its previous
state with the Sleep icon lit.
In this example the Sleep turn off delay is set to 30 minutes.
Notes:
• To cancel the Sleep delay before it has nished press the POWER/
VOLUME
control to turn o the Duo.
11

Other Control Settings
1
2
1
2
3
4
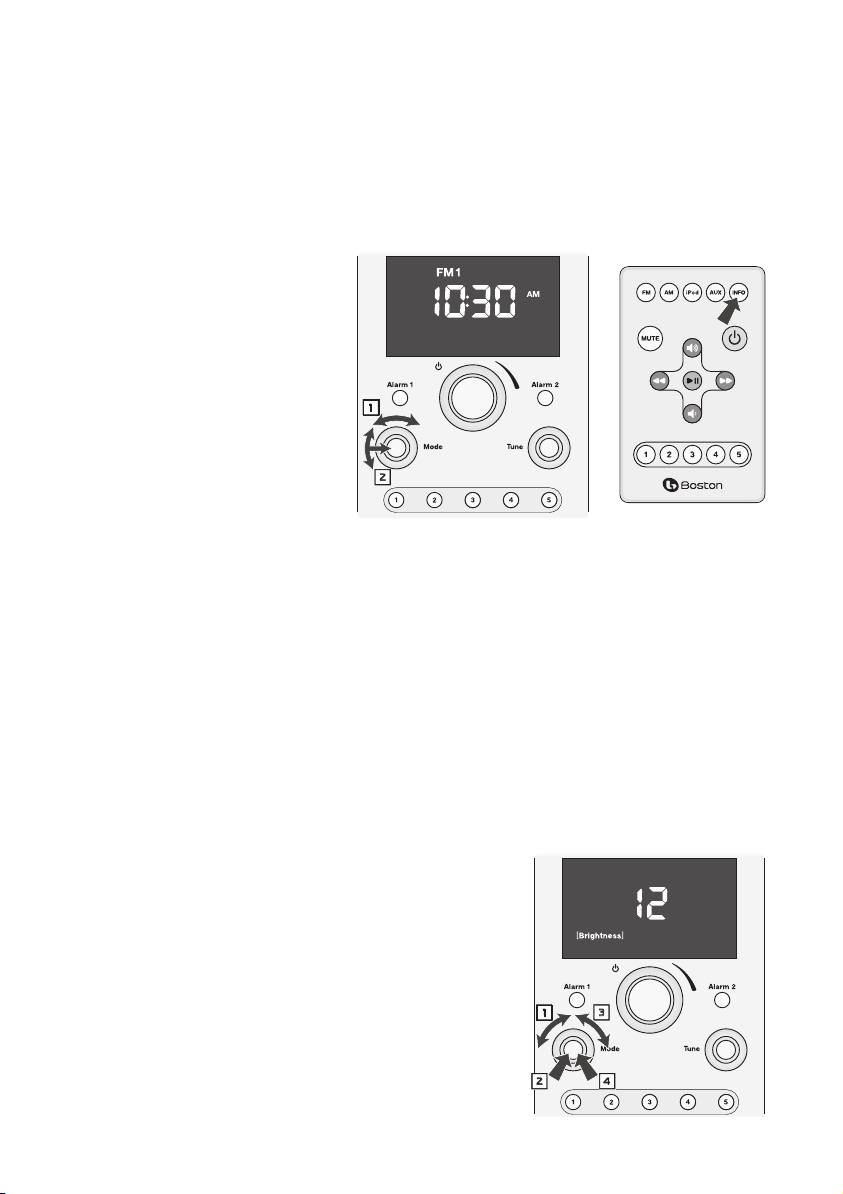
Display Information
When you adjust the controls or settings of the Duo the display shows information and symbols related to
what you are doing. After a few seconds the display goes back to showing the time or the source you are
listening to. You can select which of the default displays you want.
Using the Front Panel Controls
Turn the MODE control to
highlight the Info icon of the
display.
Turn the MODE control to select
the Source display or the Time
display. Press the MODE control to
set the default display.
Using the Remote Control
Press the INFO button to switch
between Source or Time display.
If the display default was set to show
the Time the icon for the currently
selected source ashes a few times. The display now defaults to show the Source.
If the display default was set to show the Source the clock icon ashes a few times. The display now defaults
to show the Time. Note that the icon for the current source displays in addition to the time.
In the example shown above the default display is set to Time and the source is FM1.
Display Brightness
The display brightness varies automatically with changing light conditions. In addition the overall range of
the display brightness can be adjusted to suit personal preference.
Turn the MODE control to highlight the Brightness icon.
Press the MODE control. The Brightness icon and the current
brightness setting will ash.
Turn the MODE control to adjust the brightness setting. The
setting can range from 1 – 20.
Press the MODE control again to set the new display
brightness setting. The brackets around the Brightness icon
ash a few times. Then the display reverts to its previous state.
In this example the brightness is set to 12.
12

Connecting Other Equipment
Connecting Headphones
Connect the headphone plug to the jack beside the symbol. This turns o the Duo internal speakers. If
your headphones have a 1/4-inch plug you will need an adapter.
Using Aux Inputs
Other audio equipment, such as a portable CD player, can be connected to the Duo through the Aux inputs.
The Aux 1 input on the front panel has an 1/8-inch jack. The Aux 2 input on the rear panel uses two RCA
jacks. The right and left channel jacks are color coded red and white respectively. Select the Aux 1 or Aux 2
input using the MODE control as described in the “Selecting a Source” section of this manual.
The HRD-i – iPod Docking Adapter
With the optional HRD-i docking adapter you can use your iPod as a music source for general playback or to
wake to music when using the alarm clock function. If your iPod can store video tracks you can watch them
on an external television when it is docked to the HRD-i.
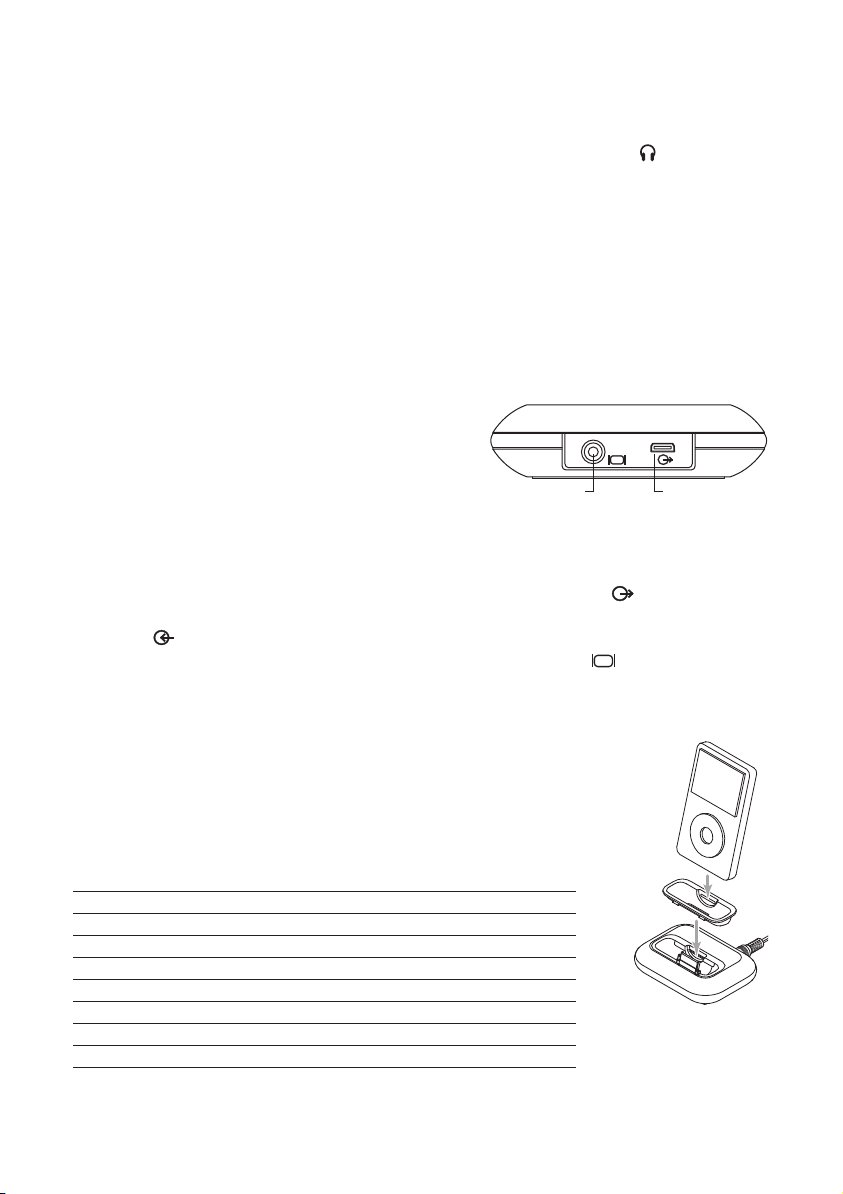
Connecting the HRD-i
Connect one end of the supplied cable to the output
connector beside the symbol on the rear of the HRD-i.
Connect the other end to the input on the rear of the Duo
below the symbol. To play video tracks stored on your
iPod connect a standard RCA plug cable between the output
on the back of the HRD-i beside the symbol and the
composite input of your television. Typically the composite video input of a television is color coded yellow.
Refer to the manual for your television for information on this input and how to use it.
Composite
Video Output
Connect to Duo
HRD-i Input
The HRD-i is supplied with seven docking adapters. These t in the docking
well of the HRD-i to support various iPod models. The table below lists the
iPod models and the docking adapters to use with them. The number of the
docking adapter is molded into the back of the part. Place the appropriate
adapter in the docking well and plug your iPod into the dock.
iPod Model (Capacity) Adapter Number
iPod photo (40 / 60GB), iPod with color display (60GB) 7
iPod nano (2 / 4GB) 8
5G and U2 iPod (30 GB with video), iPod classic (80GB) 9
5G iPod with video (60GB / 80GB), iPod classic (160GB) 10
iPod nano - 2nd generation (2 / 4 / 8GB) 11
iPod nano - 3rd generation (4 / 8GB) 13
iPod touch 8GB & 16GB 14
Docking
Adapter
13
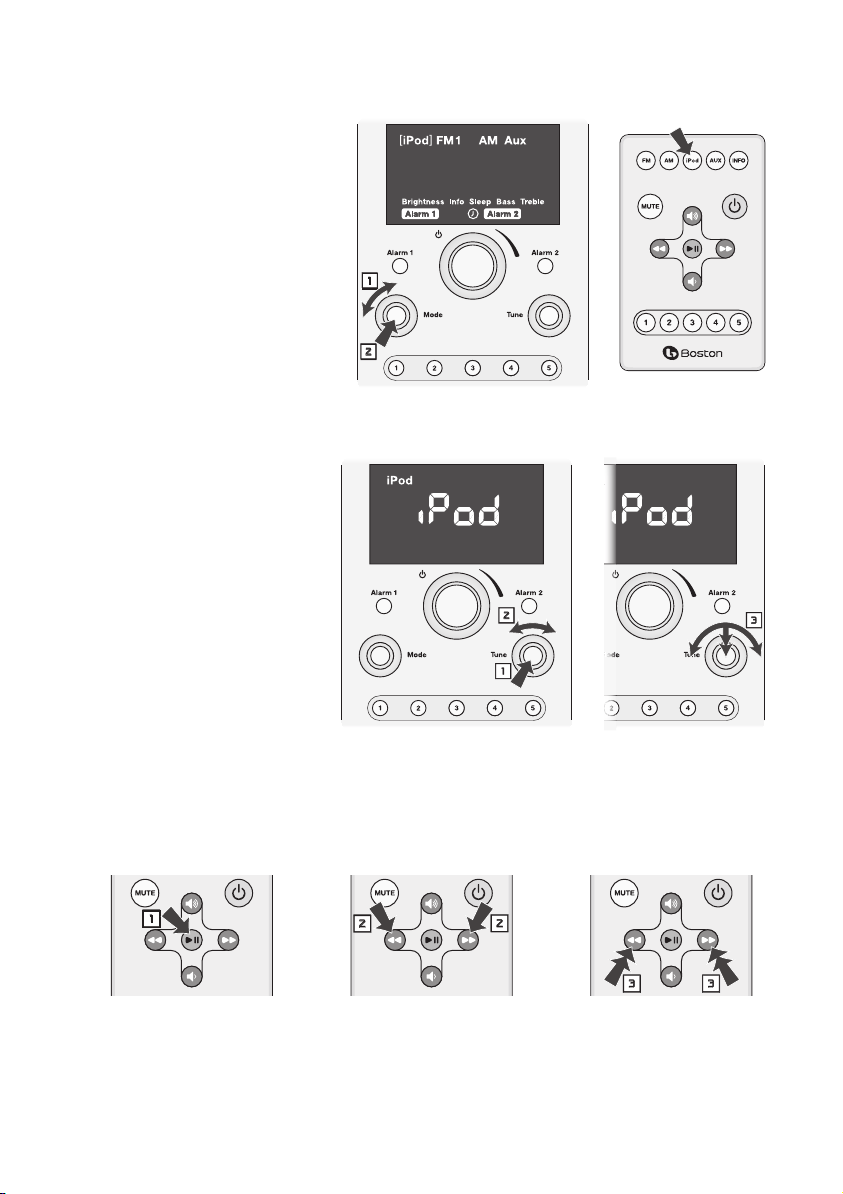
Selecting the iPod Source
1
2
1
2
3
1
2
3
Using the Front Panel Controls
Turn the MODE control until the
iPod icon is highlighted with
brackets.
Press the MODE control to select
the iPod source. Or just wait
a few seconds and the iPod is
automatically selected.
Using the Remote Control
Press the iPod button
Note:
• The iPod source can be selected only
when your iPod is in the dock.
Front Panel Control iPod Operation
Press the TUNE button to
start or pause playback of the
selected track.
Turn the TUNE control to skip
forward or back one or more
tracks.
Press, hold and turn the TUNE
button to start fast forward or
rewind. Press the TUNE button
again to stop fast forward or
rewind and resume playback.
Remote Control iPod Operation
Press the , > button to
play or pause the iPod.
14
Press the [ or ] button
to skip back or forward one
track.
Press and hold the [ or
button to start fast
]
forward or rewind.

About Clock Memory
When power to the Duo is interrupted a special power component called a “super-cap” will keep the clock
functions active for a period of 24-48 hours. If the Duo is without power for a longer period of time you may
need to reset the clock when power is restored.
Security Cable Connection
There is a security cable connection point on the rear of the Duo to the right of the power input connector.
This is the same as the connection point found on most laptop computers. Connect a computer security
cable between the Duo and a solid anchor point to help prevent theft of your Duo.
Service Port
The Service port on the rear panel is for use only quali ed service technician.
Maintenance and Service
The Duo enclosures may be cleaned using a soft cloth to remove ngerprints or to wipe o dust. All wiring
connections should be inspected and remade at least once a year.
In the event that your speakers ever need service, contact your local Boston Acoustics dealer or visit
www.bostonacoustics.com/dealers for a list of dealers in your area.
15

Limited Warranty
Boston Acoustics warrants to the original purchaser of the Horizon Duo that it will be free of defects in
materials and workmanship in its mechanical parts for a period of one year from the date of purchase.
Your responsibilities are to install and use the Duo according to the instructions supplied, to provide safe
and secure transportation to an authorized Boston Acoustics service representative, and to present proof of
purchase in the form of your sales slip when requesting service.
Excluded from this warranty is damage that results from abuse, misuse, improper installation, accidents,
shipping, or repairs/modi cations by anyone other than an authorized Boston Acoustics service
representative.
This warranty is limited to the Boston Acoustics product and does not cover damage to any associated
equipment. This warranty does not cover the cost of removal or reinstallation. This warranty is void if the
serial number has been removed or defaced. This warranty gives you speci c legal rights, and you may also
have other rights which vary from state to state.
If Service Seems Necessary
First, contact the dealer from whom you purchased the product. If that is not possible, write to:
Boston Acoustics, Inc.
300 Jubilee Drive
Peabody, MA 01960 USA
Or contact us via e-mail at:
US: support@bostona.com
Japan: ba_info@dm-holdings.com
Asia Paci c: service@dm-singapore.com
We will promptly advise you of what action to take. If it is necessary to return your Horizon Duo to the factory,
please ship it prepaid. After it has been repaired, we will return it freight prepaid in the United States and
Canada.
For EU Customers Only
This symbol found on the product indicates that the product must not be disposed of with
household waste. Instead, it may be placed in a separate collection facility for electronic
waste or returned to a retailer when purchasing similar product. The producer paid to recycle
this product. Doing this contributes to reuse and recycling, minimizes adverse e ects on the
environment and human health and avoids any nes for incorrect disposal.
16

IMPORTANTES INSTRUCCIONES DE SEGURIDAD
Este símbolo que aparece en el aparato indica
riesgos derivados de voltajes peligrosos.
Este símbolo que aparece en el aparato indica que
el usuario debe leer todas las disposiciones de
seguridad que aparecen en el manual del usuario.
Este símbolo que aparece en el aparato indica la
presencia de una doble aislación.
1. Lea estas instrucciones.
2. Conserve estas instrucciones.
3. Respete todas las advertencias.
4. Siga todas las instrucciones.
5. No utilice este aparato cerca del agua.
6. Limpie el aparato sólo con un trapo seco.
7. No bloquee ninguno de los ori cios de ventilación. Instale
el aparato de acuerdo con las instrucciones del fabricante.
8. No instale el aparato cerca de fuentes de calor tales como
radiadores, rejillas de calefacción, estufas u otros aparatos
que produzcan calor (incluidos ampli cadores).
9. No anule el propósito de seguridad del enchufe
polarizado o de tipo puesta a tierra. Un enchufe
polarizado tiene dos patas, una más ancha que la otra.
Un enchufe de tipo puesta a tierra tiene dos patas más
una tercera pata de puesta a tierra. La pata ancha o la
tercera pata se proveen para su seguridad. Si el enchufe
provisto no se puede utilizar en su tomacorriente,
consulte a un electricista para que reemplace el
tomacorriente obsoleto.
10. Proteja el cable de alimentación para evitar que sea
pisado o quede pinzado, particularmente en los
enchufes, los tomacorrientes y el punto en el cual sale
del aparato.
11. Utilice sólo las conexiones/accesorios especi cados por
el fabricante.
12. Desenchufe este aparato durante las tormentas
eléctricas o cuando no vaya a utilizarlo por un período
de tiempo prolongado.
13. Todo servicio técnico debe ser realizado por personal
cali cado. Se requiere servicio técnico cuando el aparato
ha sido dañado de algún modo, por ejemplo si el cable
de alimentación o el enchufe están dañados, si se ha
vertido líquido o han caído objetos dentro del aparato, si
el aparato ha sido expuesto a la lluvia o a la humedad, si no
funciona normalmente, o si ha sufrido una caída.
14. Mantenga como mínimo una distancia de 2” (50mm)
alrededor de la parte delantera, trasera y laterales del
aparato para asegurar que la ventilación sea su ciente.
La ventilación no se debe obstruir cubriendo los
ori cios de ventilación ni por la presencia de objetos
tales como diarios, manteles, cortinas, etc.. sobre o
alrededor del aparato.
15. No coloque sobre el aparato fuentes de llamas abiertas,
tales como velas encendidas.
16. El aparato no se debe exponer a goteras ni a
17. Tanto el conector para el cable de alimentación que
18. Para desconectar completamente este aparato de
19. El tomacorriente donde enchufa el cable de
Usuarios Estadounidenses:
Nota: Este equipo ha sido sometido a pruebas y ha
demostrado cumplir los límites de un dispositivo digital
Clase B, de acuerdo con el apartado 15 de las Normas de
la FCC. Estos límites han sido diseñados para proporcionar
una protección razonable contra interferencias nocivas
en instalaciones residenciales. Este equipo genera, utiliza
y puede emitir energía de radiofrecuencia y, si no se
instala y utiliza de acuerdo con las instrucciones, puede
causar interferencias nocivas a las radiocomunicaciones.
Sin embargo, no hay garantía de que no se producirá
interferencia en una instalación en particular. Si este
equipo provoca interferencias nocivas a la recepción de
radio o televisión, lo cual puede determinarse apagando
y encendiendo el equipo, se aconseja que el usuario
intente corregir la interferencia mediante una o más de las
siguientes medidas:
• Cambie la orientación o la ubicación de la antena
• Aumente la separación entre el equipo y el receptor.
• Conecte el equipo en un tomacorriente que esté en un
• Consulte con el vendedor o con un técnico de radio/TV
Usuarios Canadienses:
Este aparato digital clase B cumple con la norma
Canadiense ICES-003.
Este aparato digital clase B cumple con la norma NMB-003
de Canadá.
¡Advertencia! Para reducir el riesgo de incendio o
de descarga eléctrica, no exponga este aparato a
la lluvia o a la humedad.
Este símbolo que aparece en el aparato indica
que el aparato se debe desechar en un punto
de recogida especial para desechos electrónicos
y que no debe colocarse junto con los resiDuos
domiciliarios.
salpicaduras. No se deben colocar sobre el aparato
objetos que contengan líquidos, tales como oreros o
jarrones.
se encuentra en la parte trasera del aparato como
el enchufe que se conecta al tomacorriente deben
permanecer accesibles para poder desconectar la
energía eléctrica del aparato.
la red de CA, desconecte el enchufe del cable de
alimentación del tomacorriente.
alimentación debe permanecer fácilmente accesible.
receptora.
circuito diferente al cual está conectado el receptor.
experimentado para obtener ayuda.
E
S
P
A
Ñ
O
L
17

Introducción
Gracias por elegir Boston Acoustics y felicitaciones por la compra de su Sistema de Audio de Alto
Rendimiento Horizon Duo. Si ya tiene otros productos Boston, la excelente calidad de sonido y facilidad de
uso del Duo no lo sorprenderá. Si es su primer producto Boston, bienvenido – creemos que ha realizado
una excelente elección. El Duo consiste en una so sticada radio estéreo y sistema de parlantes con alarma
dual, entradas y salidas auxiliares, todo ello en un exterior de diseño de gran estilo, suave al tacto − y con
características “Play Smart.” Además, con la base opcional para iPod HRD-i podrá reproducir la música y videos
de su iPod a través del Duo. Lo invitamos a descubrir todas las características y funciones de su nuevo sistema
de audio. Estamos seguros de que lo disfrutará por muchos años.
Características
• Calidad de sonido sobresaliente a través de dos altavoces de 31/2 in. en cámaras acústicas separadas, con
ventilación para mayor respuesta
• Procesamiento de sonido BassTrac® para lograr bajos satisfactorios a cualquier volumen
• Tres controles intuitivos y fáciles de usar permiten operar todas las funciones del Duo
• Control remoto multifunción
• Visor grande y de fácil lectura con brillo ajustable que disminuye automáticamente en condiciones de
baja iluminación
• Sintonizador AM/FM estéreo de altamente sensible
• Capacidad para almacenar en memoria 10 emisoras FM y 5 emisoras AM
• Entradas para antena externa para maximizar la recepción
• Doble función de alarma, cada una de ellas permite elegir alarma de tonos y/o despertador con música
• Fácil de usar, programación de alarmas usando un único botón
• Las alarmas aumentan gradualmente de volumen para un despertar más agradable
• Repetición de alarma (función “Snooze”) - la totalidad del borde de aluminio del panel delantero es una
barra sensible al tacto, imposible de no encontrar, que permite activar la función de repetición de alarma
• La función de apagado automático (función “Sleep”) permite escuchar música hasta 90 minutos antes que
el Duo se apague automáticamente
• ¡Hágalo suyo! Personalice su Duo con las grillas opcionales disponibles en www.bostonacoustic.com/POP
• El sistema recuerda la hora programada, las emisoras almacenadas en la memoria y las alarmas
con guradas aunque falte la energía eléctrica
• Conector para audífonos en el panel delantero
• Dos salidas auxiliares - panel delantero y panel posterior
• Fuente de alimentación interna - no requiere voluminosos adaptadores externos
Con la base opcional para iPod HRD-i:
• Reproduzca la música de su iPod a través de los altavoces del Duo
• Use el control remoto del Duo para controlar su iPod
• La salida de video compuesto permite reproducir programas de TV para iPod en un televisor externo
• El iPod se carga mientras está colocado en la HRD-i
© 2008. Todos los derechos reservados. Boston, Boston Acoustics y BassTrac son marcas comerciales
registradas, y el símbolo elíptico de B/A y Play Smart son marcas comerciales de Boston Acoustics, Inc.
18

Contenido
Desembalaje y preparación de su Horizon Duo 19
Opciones de colocación 19
Conexión a la red eléctrica 19
Antenas para AM y FM 20
Controles del panel delantero 20
Acerca del control remoto 20
Operaciones básicas de control 21
Encender o apagar el Horizon Duo 21
Regular el volumen 21
Poner en hora el reloj 21
Seleccionar una fuente 22
Sintonizar una emisora 22
Búsqueda de emisoras 23
Memorizar una emisora 23
Seleccionar una emisora memorizada 24
Ajuste de bajos y agudos 24
Funciones del reloj alarma 25
Programar la hora de la alarma 25
Programar una alarma 25
Cómo funcionan las alarmas 25
Función de repetición de alarma 26
Función de apagado automático 26
Otros controles programables 27
Información que muestra el visor 27
Brillo del visor 27
Conexión de otros equipos 28
Conexión de audífonos 28
Uso de las entradas auxiliares 28
Base para iPod HRD-i 28
Conexión de la HRD-i 28
Seleccionar como fuente el iPod 29
Operación del iPod desde el panel delantero 29
Operación del iPod usando el control remoto 29
Acerca de la memoria del reloj 30
Conexión de un cable de seguridad 30
Puerto de servicio 30
Mantenimiento y servicio técnico 30
Garantía limitada 31
Si piensa que necesita servicio técnico 31
Desembalaje y preparación de su Horizon Duo
Desembale el Horizon Duo cuidadosamente. Si observa algún daño que haya ocurrido durante el transporte,
infórmelo inmediatamente a su vendedor y/o servicio de entrega. Conserve la caja y los materiales de
embalaje para uso futuro. Conserve el recibo de compra en un lugar seguro, ya que podría necesitarlo para
los nes de la garantía.
Dentro de la caja encontrará el Horizon Duo, el control remoto y el cable de alimentación.
Opciones de colocación
Su Horizon Duo tendrá un excelente sonido prácticamente
en cualquier ubicación. Sin embargo, si lo coloca cerca de
un muro o una esquina mejorará la respuesta de bajos. No
bloquee el puerto de bajos. Veri que que los ori cios de
ventilación que se encuentran en la parte superior de la
unidad no estén obstruidos.
Entrada antena FM
Entrada antena AM
Entrada base para iPod
Conexión a la red eléctrica
Simplemente conecte el cable de alimentación a la
parte posterior del Horizon Duo y enchúfelo en un
tomacorriente.
Interruptor salida ja/variable
Entrada AC
Salida
Entrada Aux 2
19
Antenas para AM y FM
El Horizon Duo viene listo para usar. La antena interna para AM está conectada. La antena para FM también
está conectada. Simplemente extienda el cable que sale del conector correspondiente. Con las antenas
estándares probablemente podrá sintonizar más emisoras que con cualquier otra radio que posea. Sin
embargo, si desea escuchar emisoras ubicadas a grandes distancias puede conectar antenas externas usando
las entradas para antenas.
Controles del panel delantero
La mayoría de las funciones del Horizon Duo se operan usando los
tres controles que se encuentran en el panel delantero.
Encendido/Volumen – Controlados mediante la perilla más
grande que se encuentra en el centro del panel.
Modo (“Mode”) – Para seleccionar la entrada que desea utilizar o la
función que desea ajustar.
Sintonizar (“Tune”) – Para sintonizar una nueva emisora.
Estos controles lógicos e intuitivos hacen que el Horizon Duo sea
muy fácil de utilizar. El modo de uso es igual para cada una de las
funciones. Una vez que aprenda a controlar una de las funciones
el resto será muy sencillo. Después que haya comprendido cómo
funcionan los controles es posible que ya no tenga que consultar
este manual nuevamente.
Acerca del control remoto
La mayoría de las funciones del Horizon Duo se pueden operar usando el control
remoto provisto. Mientras no lo utiliza, puede guardar cómodamente el control
remoto en la concavidad que hay en la parte superior del Horizon Duo. Además,
la parte posterior del control remoto está magnetizada de modo que puede
jarlo a cualquier super cie metálica.
Nota: Cuando desembale el control remoto verá una banda plástica aislante
que sale del compartimiento de la batería. Retire esta banda antes de utilizar el
control remoto.
Para utilizar el control remoto es necesario que no haya obstrucciones en la línea
visual entre el control remoto y el frente del Horizon Duo. Cuando presione los
botones apunte el control remoto hacia el panel delantero del Horizon Duo. Para obtener mejores resultados,
manténgase a una distancia menor o igual que 20 pies de la unidad y con un ángulo de desviación no mayor
que 45° respecto del eje.
Nota: Eventualmente será necesario reemplazar la batería del control remoto. Si el control remoto ya no
permite operar el Duo de manera con able, instale una nueva batería de litio de 3V tipo CR2025.
20

Operaciones básicas de control
1
2
3
4
Encender o apagar el Horizon Duo
Presione el control de ENCENDIDO/
VOLUMEN
del panel delantero o el botón verde
del control remoto.
Regular el volumen
Gire la PERILLA DE ENCENDIDO/VOLUMEN
del panel de control o bien presione los
botones SUBIR VOLUMEN o BAJAR
VOLUMEN
Nota: En las guras que ilustran los
controles –
Poner en hora el reloj
Nota: El reloj puede mostrar la hora en formato correspondiente
a 12 horas o 24 horas. Para cambiar la visualización de la hora gire
el control “MODE” para destacar el icono del reloj entre paréntesis
5 segundos. El visor mostrará “12H” o “24H”. Gire el control “MODE”
para seleccionar el formato de hora que desee, luego presione el
control.
que se encuentra en el centro
del control remoto.
Una echa normal indica que se debe presionar y soltar el botón o control.
Una echa de doble cabeza indica que se debe presionar y mantener presionado el botón o control.
Este símbolo indica que el control se debe girar y luego presionar.
Gire el control “MODE” hasta que el icono del reloj aparezca
entre paréntesis .
Presione el control “MODE”. El icono del reloj y la hora titilarán.
Gire el control “MODE” para modi car la hora.
Presione el control “MODE” nuevamente para salvar la
nueva hora. El visor volverá al modo anterior y la nueva hora
quedará programada.
. Presione y mantenga presionado el control “MODE” durante
21
Seleccionar una fuente
1
2
1
2
1
2
Usando los controles del panel delantero
Gire el control “MODE” hasta
que la fuente deseada aparezca
entre paréntesis. Observe que
también puede seleccionar otros
iconos correspondientes a otras
funciones y programación de
alarmas.
Presione el control “MODE”
para seleccionar la fuente que
aparece entre paréntesis. O
bien espere unos segundos y
la fuente quedará seleccionada
automáticamente. La fuente
seleccionada comenzará a sonar.
Usando el control remoto
Presione el botón de la fuente que desea seleccionar. Presione los botones FM y AUX una vez para
seleccionar FM 1 o AUX 1 y dos veces para seleccionar FM 2 o AUX 2.
Notas:
• Las fuentes incluyen FM 1 y FM 2. Estas opciones corresponden a los dos grupos de emisoras FM
almacenadas en la memoria.
• Las fuentes incluyen Aux 1 y Aux 2. Aux 1 es la entrada que está en el panel delantero. La entrada Aux 2 se
encuentra en el panel trasero.
Sintonizar una emisora
Usando los controles del panel delantero
Use el control “MODE” para
seleccionar la fuente AM o una de
las fuentes FM.
Gire el control “TUNE” hasta que el
visor muestre la frecuencia de la
emisora que desee escuchar.
Usando el control remoto
Presione el botón correspondiente
a la fuente AM o FM.
Presione el botón [ o ] una
vez para subir o bajar en la banda
de radio y llegar a la siguiente
frecuencia donde haya una
emisora disponible.
Notas:
• Si la fuente que desea ya está seleccionada puede saltear el paso 1 y utilizar el control “TUNE” del panel
delantero o los botones [ o ] del control remoto para sintonizar una nueva estación.
• Si la emisora que selecciona ya ha sido asignada a una de las memorias, el visor mostrará el indicador de
memoria (“Preset”) y el número de memoria correspondiente.
22
Búsqueda de emisoras
1
2
3
Usando el control del panel delantero
Presione el botón “TUNE”. El Duo
explorará la banda de radio hasta
encontrar la siguiente emisora
disponible.
Usando el control remoto
Presione y mantenga presionado el
botón
banda de radio hasta encontrar la
siguiente emisora disponible.
o ]. El Duo explorará la
[
Memorizar una emisora
Use el control “MODE” o presione
el botón AM o FM del control
remoto para seleccionar la banda
de radio que desea utilizar. Hay
dos grupos de memorias para
emisoras FM. Estos se seleccionan
eligiendo las fuentes FM 1 o FM 2.
Use el control “TUNE” del panel
delantero o los botones [ o ]
del control remoto para sintonizar
la emisora que desea asignar a
una memoria.
En el panel delantero o el control
remoto presione y mantenga
presionado el botón de la
MEMORIA (1-5) que desee programar. Escuchará un tono y el visor mostrará el número de memoria, lo
que indica que la emisora ha sido asignada a dicha memoria.
En este ejemplo la emisora FM 107.9 ha sido asignada a la memoria 3 del grupo FM 2.
23
Seleccionar una emisora memorizada
1
2
1
2
Gire el control “MODE” para
seleccionar la banda de radio
correspondiente a la memoria
que desea seleccionar. Hay
dos grupos de memorias
para estaciones FM. Estas se
seleccionan eligiendo la fuente
FM 1 o FM 2.
Presione y suelte rápidamente el
botón de la MEMORIA 15 que
desea seleccionar. En el visor
se iluminarán el indicador de
memoria (“Preset”), el número
de memoria y la frecuencia de la
emisora correspondiente
En este ejemplo se ha seleccionado la emisora AM asignada a la memoria 5, correspondiente a una frecuencia de
1050.
Nota: Si presiona el botón de una MEMORIA más de una vez pasará a la otra banda de radio o grupo de
emisoras memorizadas. Usando este ejemplo, si presiona el botón de la MEMORIA 5 nuevamente seleccionará
la emisora almacenada en la memoria 5 del grupo FM 1. Si lo presiona una vez más, seleccionará la emisora
almacenada en la memoria 5 del grupo FM 2. Presione el botón otra vez y seleccionará nuevamente la
emisora almacenada en la memoria 5 del grupo de emisoras AM.
Ajuste de bajos y agudos
Gire el control
“MODE” para
seleccionar en el
visor el icono de
Bajos (“Bass”) o
Agudos (“Treble”). El
icono “Bass” o “ Treble”
y la con guración
actual titilarán en el
visor.
Gire el control
“MODE” en sentido
horario para
aumentar, o en sentido antihorario para disminuir, los Bajos o los Agudos
En estos ejemplos los bajos están programados a –2 y los agudos a +1.
24
Funciones del reloj alarma
1
2
3
1
El Horizon Duo tiene dos funciones de alarma independientes. Cada una de ellas puede tener su propio tipo
de alarma — alarma de tonos, despertador con música o ambos. Los dos tipos de alarma comienzan a sonar
con un nivel de volumen bajo que luego aumenta gradualmente.
Programar la hora de la alarma
La hora de la alarma se puede programar con el Duo encendido
o apagado.
Presione y mantenga presionado el botón “ALARM 1” o
“ALARM 2” durante un segundo. La hora de la alarma y el icono
o titilarán.
Gire el control “MODE” para modi car la hora de la alarma.
Presione el control “MODE” para salvar la nueva hora de la
alarma.
En este ejemplo la Alarma 2 se ha programado a las 7:15 AM.
Nota: La hora de la alarma también se puede programar usando
el control “MODE” para hacer que el icono o
aparezcan entre paréntesis. Luego presione el control “MODE” y
siga los pasos 2 y 3 anteriores.
Programar una alarma
Si piensa utilizar la función de despertador con música, recuerde que esta alarma utilizará la última fuente y
nivel de volumen seleccionados.
Presione los botones “ALARM 1” o “ALARM 2” una o más veces
para encender la alarma y elegir el tipo de alarma que desea.
Si presiona el botón una vez seleccionará el despertador
con música . Si lo presiona una segunda vez seleccionará
la alarma de tonos . Si lo presiona una tercera vez
seleccionará ambos tipos de alarma. Presione el botón una
cuarta vez para cancelar la alarma.
Este ejemplo muestra cómo se vería el visor una vez que apague el Duo.
Se visualizará la hora actual y los iconos indican que la Alarma 1 está
programada para despertador con música y alarma de tonos, mientras
que la Alarma 2 está programada sólo para alarma de tonos.
Cómo funcionan las alarmas
Cuando comienza a sonar una alarma el icono correspondiente a la alarma comienza a titilar.
Si seleccionó la alarma de tonos, comenzará a sonar el tono de la alarma, primero suavemente y luego
aumentando el volumen.
Si seleccionó el despertador con música de la radio, comenzará a sonar la última emisora que sintonizó a
un volumen que irá aumentando gradualmente.
Si seleccionó el despertador con música y la alarma de tonos, comenzará a sonar la emisora que
seleccionó a un volumen que irá aumentando gradualmente.
Para apagar la alarma presiona el botón ENCENDIDO/VOLUMEN.
25
Borde sensible al tacto
Función de repetición de alarma
Si después que suena la alarma desea dormir un rato
más puede utilizar la función de repetición de alarma
(función “Snooze “). Simplemente toque el borde exterior
metálico del Duo. Esto hará que la alarma vuelva a
sonar al cabo de diez minutos. Cada vez que toque el
borde nuevamente aumentará 5 minutos el intervalo
de repetición de la alarma. El máximo intervalo es de 60
minutos. El visor muestra la hora y un icono de “Alarma” que titila.
Para ver cuánto tiempo resta hasta la repetición de la alarma toque el borde metálico una vez. Cada vez que
toca el borde se siman cinco minutos al tiempo para la repetición de la alarma.
Para cancelar la función de repetición de alarma presione el botón
la Alarma actva o bien presione el botón ENCENDIDO/VOLUMEN.
“ALARM 1” o “ALARM 2” correspondiente a
Función de apagado automático
Puede programar el Horizon Duo para que suene hasta un máximo de 90 minutos. Luego del tiempo
especi cado el Duo se apagará automáticamente.
Seleccione la fuente y regule el nivel de volumen. Use el
1
control “MODE” para que el icono “Sleep” aparezca destacado
en el visor.
Presione el control “MODE”. El icono “Sleep” y la palabra “OFF”
2
titilarán en el visor.
Gire el control “MODE” en sentido horario hasta visualizar la
3
cantidad de minutos que desea.
Presione el control “MODE”. Los paréntesis que rodean al icon
4
“Sleep” titilarán algunas veces. El visor regresará a su estado
anterior con el icon “Sleep” iluminado.
En este ejemplo el apagado automático está programado para 30
minutos.
Notas:
• Para cancelar la función de apagado automático antes que haya transcurrido el tiempo programado
presione el botón ENCENDIDO/VOLUMEN para apagar el Duo.
26
Otros controles programables
1
2
1
2
3
4
Información que muestra el visor
Mientras ajusta los controles o la programación del Duo el visor muestra información y símbolos relacionados
con lo que está haciendo en ese momento. Luego de algunos segundos el visor vuelve a mostrar la hora o la
fuente que está escuchando. Puede seleccionar cuál de las visualizaciones desea que se muestre por defecto.
Usando los controles del panel frontal
Gire el control “MODE” para que el
icono “Info” aparezca destacado en
el visor.
Gire el control “MODE” para
seleccionar visualización de
la fuente o visualización de la
hora. Presione el control “MODE”
para almacenar la opción de
visualización seleccionada.
Usando el control remoto
Presione el botón “INFO” para alternar entre visualización de la fuente y visualización de la hora.
Si estaba programado que por defecto se visualizara la hora, el icono correspondiente a la fuente
actualmente seleccionada titilará algunas veces. El visor ahora mostrará por defecto la fuente.
Si estaba programado que por defecto se visualizara la fuente, el icono correspondiente al reloj titilará
algunas veces. El visor ahora mostrará por defecto la hora. Observar que además de la hora se visualiza el
icono correspondiente a la fuente actualmente seleccionada.
En el el ejemplo superior la visualización por defecto seleccionada es la hora, y la fuente seleccionada es la FM1.
Brillo del visor
El brillo del visor varía automáticamente cuando cambian las condiciones de iluminación. Además, el rango
total del brillo se puede regular para adaptarlo a sus preferencias personales.
Gire el control “MODE” para seleccionar el icono del brillo
(“Brightness”).
Presione el control “MODE”. El icono “Brightness” y el brillo
actualmente programado titilarán.
Gire el control “MODE” para modi car el valor del brillo
programado. El valor programado puede variar entre 1 y 20.
Presione el control “MODE” nuevamente para almacenar
el nuevo valor del brillo. Los paréntesis alrededor del icon
“Brightness” titilarán algunas veces. Luego el visor regresará a
su estado anterior.
En este ejemplo el valor elegido para el brillo es 12.
27
Conexión de otros equipos
Conexión de audífonos
Introduzca el conector de los audífonos en el conector hembra ubicado junto al símbolo . Esto apaga los
altavoces internos del Duo. Si sus audífonos tienen un conector de 1/4 in. necesitará un adaptador.
Uso de las entradas auxiliares
A través de las entradas auxiliares puede conectar al Duo otros equipos de sonido tales como un reproductor
de CD portátil.La entrada Aux 1 ubicada en el panel delantero tiene un conector de 1/8-in. La entrada Aux 2
ubicada en el panel posterior utiliza dos conectores RCA. Los conectores correspondientes a canal derecho e
izquierdo están codi cados con los colores rojo y blanco respectivamente. Seleccione la entrada Aux 1 o Aux
2 usando el control “MODE” tal como se describe en la sección “Seleccionar una fuente” de este manual.
Base para iPod HRD-i
Con la base opcional para iPod HRD-i podrá usar su iPod
como fuente para escuchar música en general o bien como
fuente para el despertador con música si utiliza esta función
del reloj alarma. Si su iPod tiene capacidad para almacenar
archivos de video, cuando el iPod está colocado en la base
HRD-i podrá mirar estos videos en un televisor externo.
Conexión de la HRD-i
Conecte un extremo del cable provisto a la salida que se encuentra junto al símbolo en la parte posterior
de la HRD-i. Conecte el otro extremo a la entrada que se encuentra en la parte posterior del Duo debajo
del símbolo . Para reproducir archivos de video almacenados en el iPod, conecte un cable RCA estándar
entre la salida que se encuentra en la parte posterior de la HRD-i junto al símbolo y la entrada de video
compuesto de su televisor. Típicamente la entrada de video compuesto de los televisores está codi cada en
color amarillo. Vea el manual del televisor para obtener información sobre esta entrada y cómo utilizarla.
Salida de
video compuesto
Conectar a entrada
para HRD-I del Duo
La base HRD-i viene con siete adaptadores. Estos adaptadores se colocan en
el punto de conexión de la HRD-i y permiten soportar diferentes modelos
de iPod. La tabla siguiente lista los modelos de iPod y los adaptadores
que deberá utilizar con cada uno de ellos. El número del adaptador está
impreso en la parte trasera de cada pieza. Instale en el ori cio de conexión el
adaptador que corresponda y coloque su iPod en la base.
Modelo iPod (Capacidad) No. Adaptador
iPod photo (40 / 60GB), iPod con pantalla color (60GB) 7
iPod nano (2 / 4GB) 8
iPod 5G y U2 (30 GB con video), iPod classic (80GB) 9
iPod 5G con video (60GB / 80GB), iPod classic (160GB) 10
iPod nano - 2da generación (2 / 4 / 8GB) 11
iPod nano - 3ra generación (4 / 8GB) 13
iPod touch 8GB y 16GB 14
28
Adaptador
para iPod
 Loading...