

Page 1
Page 2

To ensure safety while driving
and to comply with laws,
drivers should not watch video or
operate the video device while driving.
Page 3
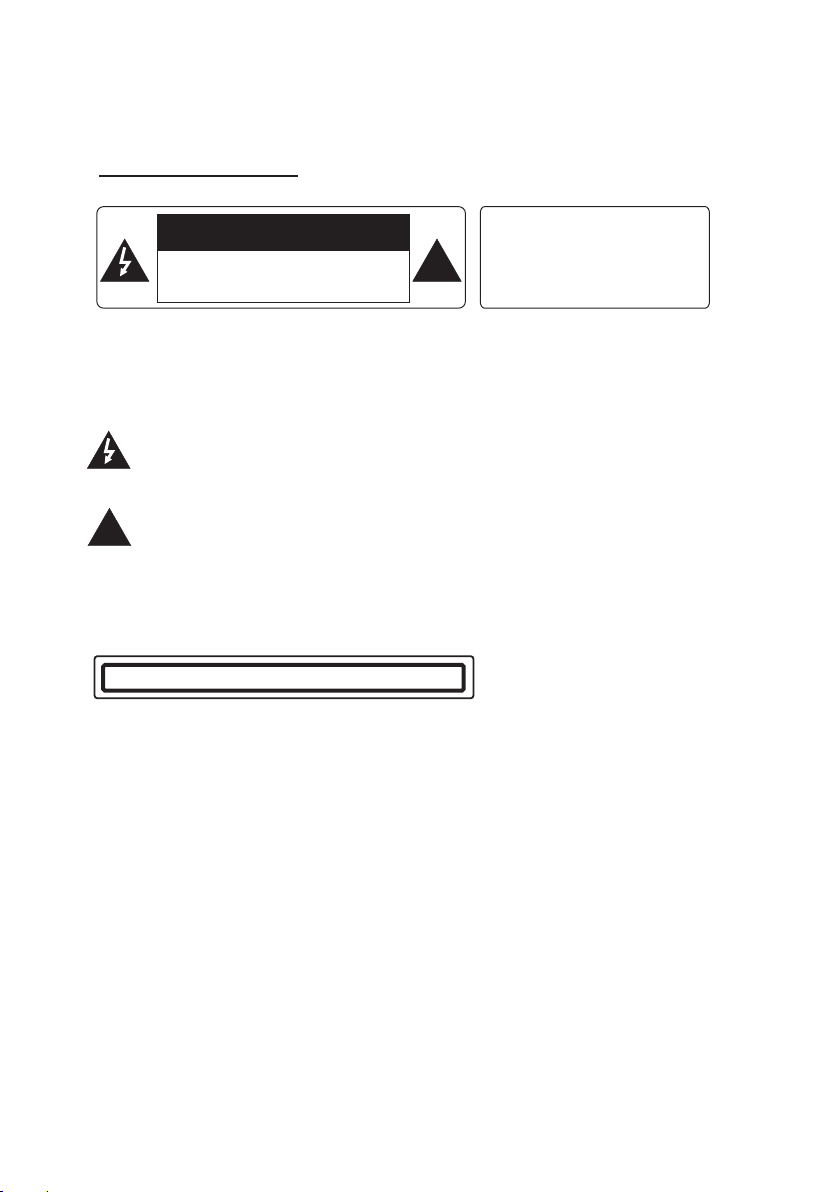
PRECAUTION
CAUTION
RISK OF ELECT RIC S HOCK
DO NOT OPE N
CAUTI ON: TO REDUCE THE RISK OF ELECTRI C SHO CK, D O NOT REMOV E
COVER ( OR BA CK) . NO USER SERVICEABLE PARTS I NSI DE. REFER
SERVICING TO QUA LIFIED SERVICE PERSONNEL .
The lightening flash with arrowhead symbol, with in an e qui lat era l tri ang le, i s
intended to alert the user to the presence of uninsula ted d ang ero us vo lta ge
within the products enclosure that may be of suff ici ent m agn itu de to constitute
a risk of electric shock to persons.
The exclamation point within an equilateral tria ngl e is in ten ded t o ale rt us er to
the presence of important operating and maintena nce ( ser vic ing ) ins tru cti ons
!
in the literature accompanying the appliance.
WAR NING: TO RE DUCE THE
RISK OF FIRE OR E LEC TRIC
SHOCK, DO NOT E XPOSE
!
THIS APPLIAN CE TO RA IN OR
MOISTURE.
CLASS 1 LASER PRODUCT
Laser product symbol: located on the rear panel of the u nit , ind ica te th is pl aye r is a cl ass
laser product, only use weak laser and no hazardous ra dia tio n out sid e of th e uni t.
1.Read through this instruction manual before in sta lla tio n and u se.
2.Before removing the unit, remove the disc fro m the u nit f irs t.
3.Do not open the cover or touch any of the components exp ose d out o f the u nit , onl y for
qualified technicians.
4.Do not expose the unit to direct sunlight or nearby ob jec ts th at ra dia te he at to a voi d
damage the unit.
5.Do not place the unit in moist and humid conditions.
6.Please ensure the ventilation holes are not cove red t o avo id ov erh eat ing a nd ma lfu nct ion .
7.Clear the panel and case with soft dry cloth only, do not apply any kind of thinner,
alcohol or sprays.
-1-
Page 4

Contents
Precaution.... ... ... ... ... ... ... ... ... ... ... ... ... ... ... ... ... ... ... ... ... ... ... ... ...............................1
Contents......... ... ... ... ... ... ... ... ... ... ... ... ... ... ... ... ... ... ... ... ... ... ... ... ............................2
Wires Connection D esc rip tio n.. ... ... ... ... ... ... ... ... ... ... ... ... ... ... ... ... ..........................3
Unit Installatio n.. ... ... ... ... ... ... ... ... ... ... ... ... ... ... ... ... ... ... ... ... ... ................................4
General Knowledg e About Remote Control............................ ... ... ... ... ... ... ... ... ... ... 5
Remote Control Des cri pti on. ... ... ... ... ... ... ... ... ... ... ... ... ... ... ... ... ... ...........................6
Locations and Name s of Co ntr ols o n or in t he Un it. ... ... ... ... ... ... ... ... ... ... ... ... ...........7
Common Operation ... ... ... ... ... ... ... ... ... ... ... ... ... ... ... ... ... ... ... ... ... ... .........................8
Radio Operation. ... ... ... ... ... ... ... ... ... ... ... ... ... ... ... ... ... ... ... ... ... ... ...........................11
Disc, USB and Card Ope rat ion ... ... ... ... ... ... ... ... ... ... ... ... ... ... ... ... ... ... ... .................14
1. Load/unload Dis c, US B or Ca rd. ... ... ... ... ... ... ... ... ... ... ... ... ... ... ... ... ... ... .............14
2. Pause Playback. ... ... ... ... ... ... ... ... ... ... ... ... ... ... ... ... ... ... ... ... ... ... ... ....................16
3. Stop Playback ...... ... ... ... ... ... ... ... ... ... ... ... ... ... ... ... ... ... ... ... ... ... ... ....................16
4. Select Chapter/ Trac k wit h >>| /|< < Button......................................................16
5. Select Chapter/ Trac k wit h Num ber Buttons...................................................16
6. Select Chapter/ Trac k wit h Roo t/PBC Menu....................................................16
7. Playback with Spe ed. ... ... ... ... ... ... ... ... ... ... ... ... ... ... ... ... ... ... ... ... ... ...................17
8. Playback with Slo w Spe ed. ... ... ... ... ... ... ... ... ... ... ... ... ... ... ... ... ... ... ... .................17
9. Display Still Fra me St ep by S tep ... ... ... ... ... ... ... ... ... ... ... ... ... ... ... ... ... ... .............18
10. Playback Repea ted ly............................................ ... ... ... ... ... ... ... ... ... ... ... ... .18
10.1 One/All Repea t.. ... ... ... ... ... ... ... ... ... ... ... ... ... ... ... ... ... ... ... ... ... .......................18
10.2 A-B Repeat.... ... ... ... ... ... ... ... ... ... ... ... ... ... ... ... ... ... ... ... ... ... ... ... ....................18
11. Playback in Scan Mode................................................. ... ... ... ... ... ... ... ... ... ..1 9
12. Playback from a sp eci fie d Cha pte r/Track or a Specified Tim e.. ... ... ... ... ... ... ... .19
13. Playback in Rand om. ... ... ... ... ... ... ... ... ... ... ... ... ... ... ... ... ... ... ... ... ... ..................19
14. Playback in Different Vie w-Angle................................................................19
15. Playback in Zoom M ode ... ... ... ... ... ... ... ... ... ... ... ... ... ... ... ... ... ... ... ... ... ..............19
16. Change Caption L ang uag e.. ... ... ... ... ... ... ... ... ... ... ... ... ... ... ... ... ... ....................20
17. Change Audio L ang uag e.. ... ... ... ... ... ... ... ... ... ... ... ... ... ... ... ... ... ... ....................20
18. Change Video Signal System..................................... ... ... ... ... ... ... ... ... ... ... ... 20
19. Look over Playba ck St atu s.. ... ... ... ... ... ... ... ... ... ... ... ... ... ... ... ... ... ... .................20
20. Program Playba ck. ... ... ... ... ... ... ... ... ... ... ... ... ... ... ... ... ... ... ... ... ... .....................21
21. Playback IMAGE file s.. ... ... ... ... ... ... ... ... ... ... ... ... ... ... ... ... ... ... ... ... ... ................21
22. Playback MP4 fil es. ... ... ... ... ... ... ... ... ... ... ... ... ... ... ... ... ... ... ... ... ... ....................22
23. ESP and ID3 Function................................................. ... ... ... ... ... ... ... ... ... ... .22
24. DVD System Menu Se tup O per ati on. ... ... ... ... ... ... ... ... ... ... ... ... ... ... ... ... ...........22
AUX IN Operation.. ... ... ... ... ... ... ... ... ... ... ... ... ... ... ... ... ... ... ... ... ... ... ... .....................26
Rear View Camera..................................................... ... ... ... ... ... ... ... ... ... ... ... ... ..2 7
iPod Operation.. ... ... ... ... ... ... ... ... ... ... ... ... ... ... ... ... ... ... ... ... ... ... ... .........................28
Bluetooth Hand fre e Sys tem ... ... ... ... ... ... ... ... ... ... ... ... ... ... ... ... ... ..........................29
Tro ubl e Sho oti ng. ... ... ... ... ... .............................................................................
Specification. ... ... ... ... ... ... ... ... ... ... ... ... ... ... ... ... ... ... ... ... ... ... ................................32
31
-2-
Page 5
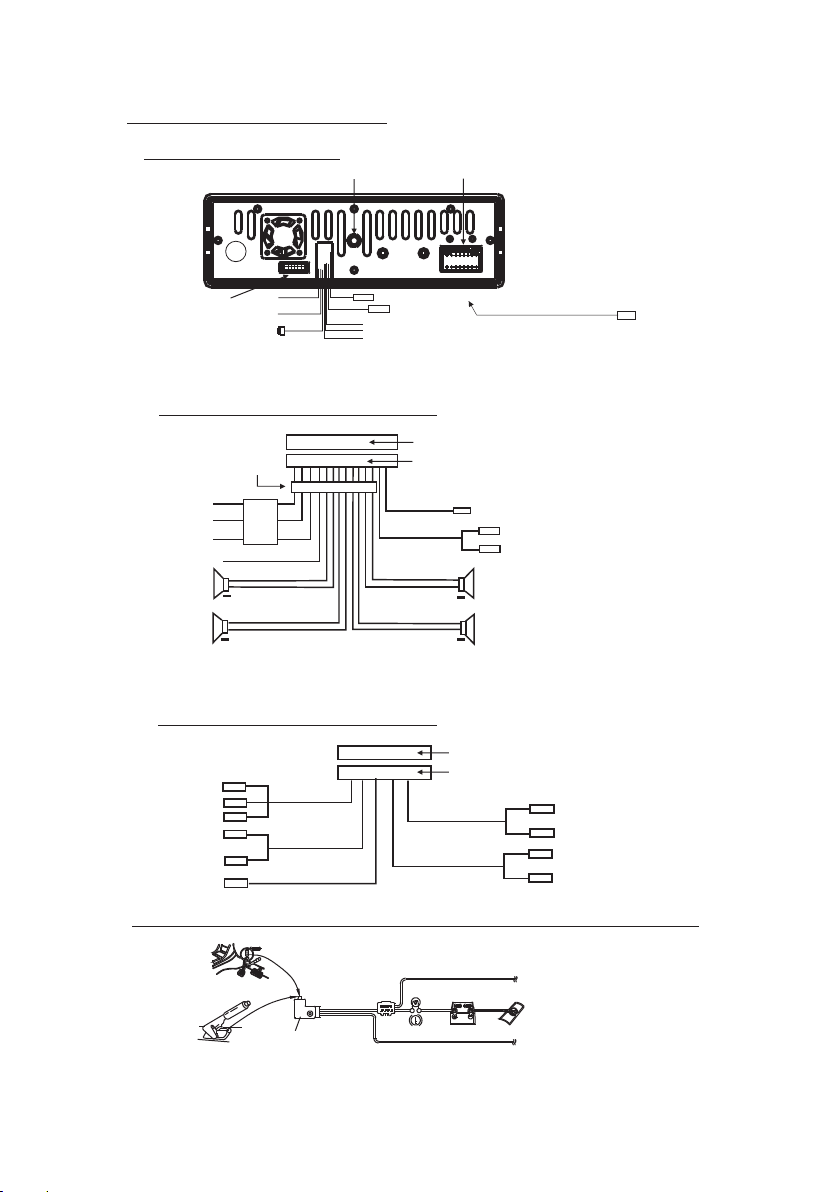
Wires Connection Descrip tion
Description of Wires Connection
Fixing Screw Bolt
GREEN
BLACK
Wiring Connecting Socket 2
1. Parking wire must be connected. And the parking brake must be engaged in order for the monitor to work.
2. Use the clip end of the Ground Wire provided by manufacturer to connect Mounting Screw, using the other
end of the Ground Wire to connect the negative pole of the power source. Otherwise, the video on screen
maybe flashes.
PARKING LINE
WHITE
REVERSAL LINE
BLACK
IPod IN
USB LINE IN
Wiring Connecting Socket 1
Radio Antenna jack
BLACK
KEY GROUND(BLACK)
KEY A(BROWN)
KEY B(YELLOW)
BLACK
from the bottom cover of the chassis
video out yellow
Description of the Wiring Diagram for Socket 1
WIRING CONNECTING SOCKET 1
WIRING CONNECTING PLUG 1
WOOFER LINE OUT
BLACK
FRONT AUDIO RCA OUT
GRAY
GRAY / BLACK
VIOLETGREEN
VIOLET / BLACK
GREEN
RED R
WHITE L
+
FRONT
RIGHT
SP
+
REAR
MEMORY B+
BLACK(GND)
IGNITION SWITCH
FRONT
LEFT
SP
REAR
ISO CONNECTOR
YELLOW
FUSED
FILTER
BOX 1A
& 10 A
RED
FUSES
BLUE AUTO ANT
+
WHITE
WHITE / BLACK
+
GREEN / BLACK
NOT ES:
1. On ly spea kers wi th 4 ohms i mpeda nce may b e used.
2. En sure th at the bl ue auto a ntenn a cable d oes not m ake con tact
wit h any gro und con necti on.
Description of the Wiring Diagram for Socket 2
WIRING CONNECTING SOCKET 2
RED R
WHITE L
YELLOW VIDEO
YELLOW
YELLOW
YELLOW
BROWN
AV IN
GREY
VIDEO RCA OUT
BLACK
REAR VIEW CAMERA
BACKGROUND AUDIO RCA OUT
WIRING CONNECTING PLUG 2
GREY
REAR AUDIO RCA OUT
BLUE
RED R
WHITE L
RED R
WHITE L
Descri ptio n of Con nect ing th e Par king B rake L ine to t he Par kin g Brak e Syst em Bui lt in a Ca r
Par king br ake
Par king br ake wir e(Gre en)
Par king br ake swi tch
(in side th e car)
NOTE: after connecting the Parking Line, the video on the small monitor of the front panel will be display only after braking the car.
To met allic b ody or ch assis o f the car
-3-
Page 6
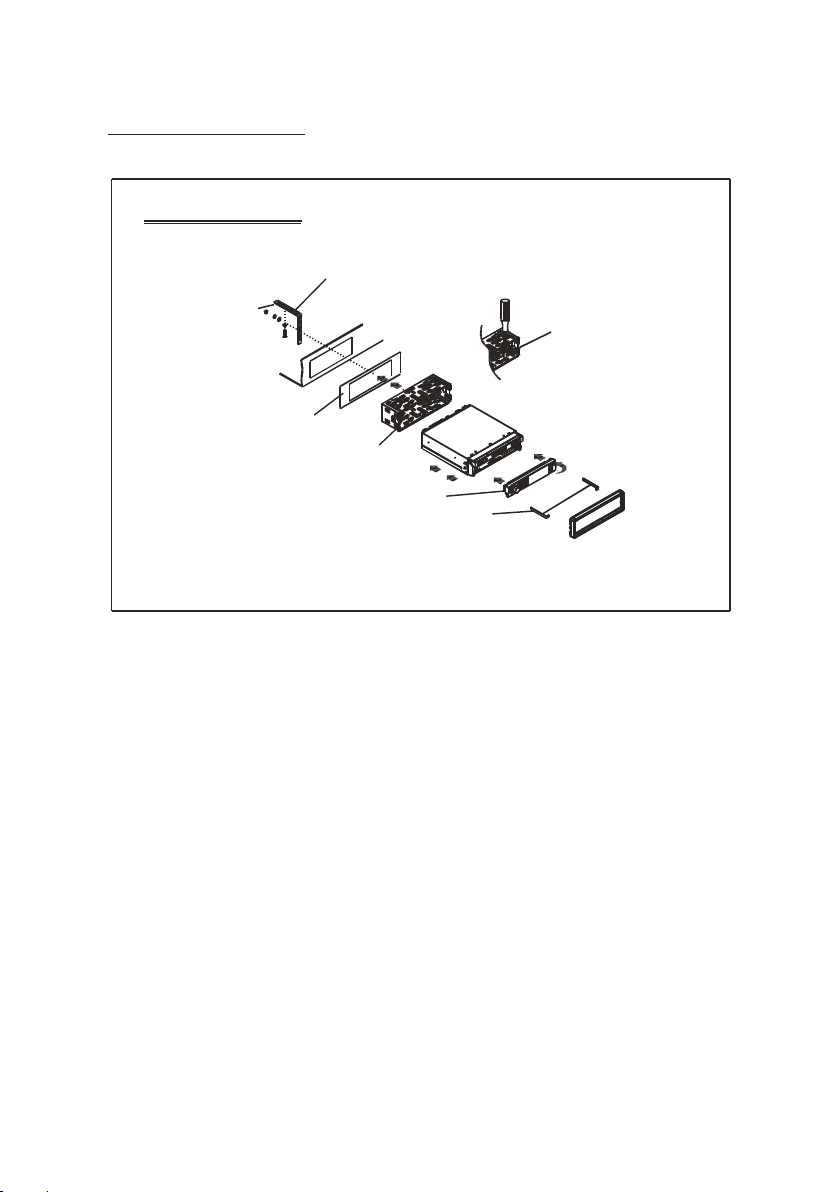
UNIT INSTAL LATION
INS TALLATIO N INSTRU CTION S
TO BOO ST UP THE CAPABILI TY OF
ANTI -JAMMI NG, PLEA SE FIX THE
METAL ST RAP ON THE METAL
CONN ECTED TO THE B OTTOM
BRAC KET OF THE CAR .
METAL ST RAP
DASH B OARD
SLI DING METAL HOU SING
TO DRAW TH E CHASSIS O UT OF
THE SL IDING ME TAL HOUSI NG,
INSE RT THE LEFT AND RI GHT KEY
PLATE S INTO TH E RIGHT POSI TION
OF THE 2 SI DES OF CHASS IS.
PLAS TIC TRIM OU T
UNIT C HASSIS
SELE CT THE PROP ER TAB
FOR FI XING THE SL IDING
METAL HOU SING.
THE UN IT IS INSTA LLED TO BE AN AN TI-THE FT ONE. THE CH ASSIS
OF THE U NIT WEARS A SL IDING MET AL HOUSIN G. PLEAS E DO THE
CONN ECTION O F THE POW ER, SPEAKE RS AND ANTE NNA ACCO RDING
TO THE R EQUIREM ENT OF THE INS TRUCTI ON BOOK , THEN I NSTALL
THE SL IDING ME TAL HOUSIN G IN THE CAR AS FO LLOWS.
FRON T PANEL
-4-
Page 7
GENER AL KNOW LEDGE ABOU T REMOTE CON TROL
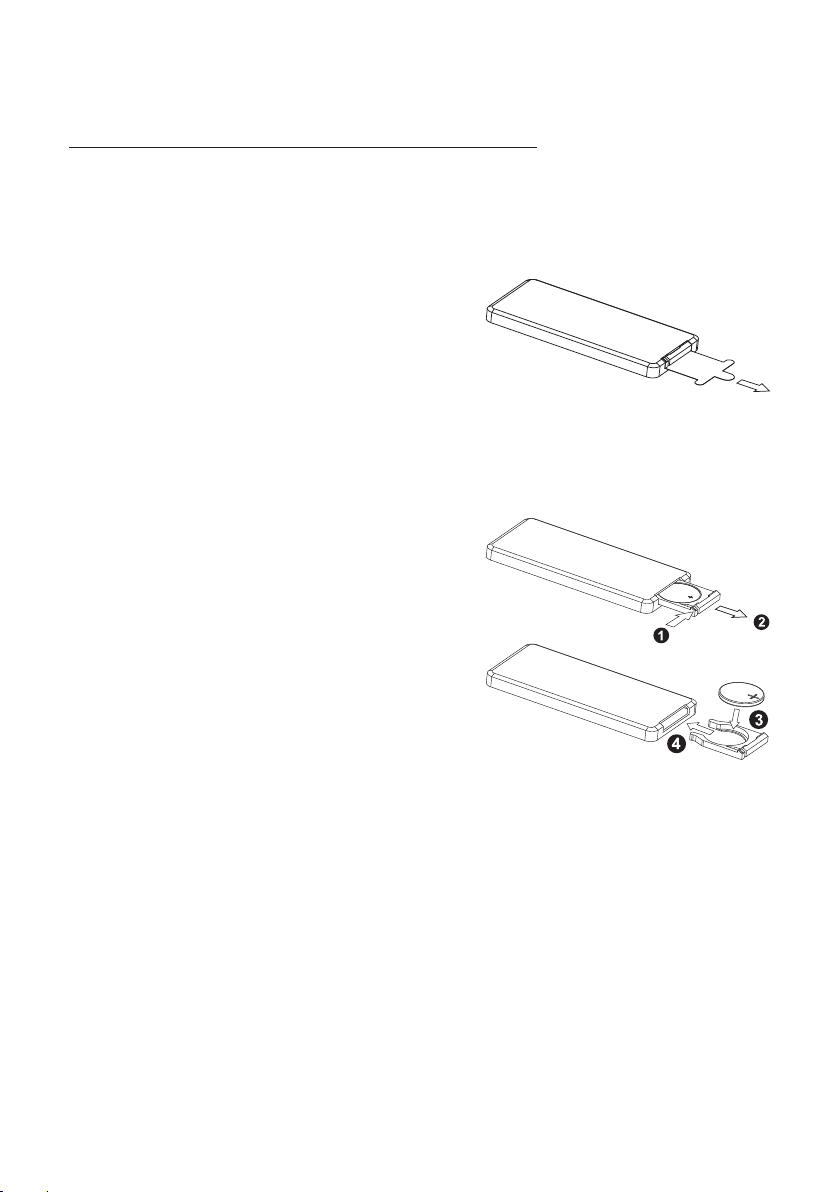
1. Remo ving insulating s heet
If usin g remote control fo r the first ti me, you
can see a n insul ating shee t at the botto m
side of r emote control as ri ght.
you mus t remove the insula ting sheet a s right.
Other wise, the remote co ntrol is dis abled.
2. Repl ace lithium cell
If the el ectric energy of li thium cell i s weak,
repla ce it.
1) Pres s and hol d the movabl e block as dir ection
indic ated by a rrow 1 as righ t, at one time p ull
cell ho lder ou t of remote co ntrol as dir ection
indic ated by a rrow 2 as righ t.
2) Repl ace the o ld cell by a new o ne with (+)
polar ity side upward as ri ght.
3) Inse rt the cell holder in to remote co ntrol again
as righ t.
3. Note a bout using remote c ontrol
1) You should face t he emittin g window of remote co ntrol towa rds the sens or
windo w of the un it.
2) Oper ation a ngle for fro nt panel: Abo ut 30 deg ree
3) The distance bet ween the emi tting window of rem ote contro l and the sensor
windo w of the un it : < 5M .
4. Wa rning for lithium c ells of remo te control
1)Cel l leaka ge may cause d amage to rem ote con trol.
2)Do no t throw c ells into fi re, it may cau se explosion.
.
3.To avoid r isk of accid ent, keep cells out o f reach of chi ldren.
-5-
Page 8
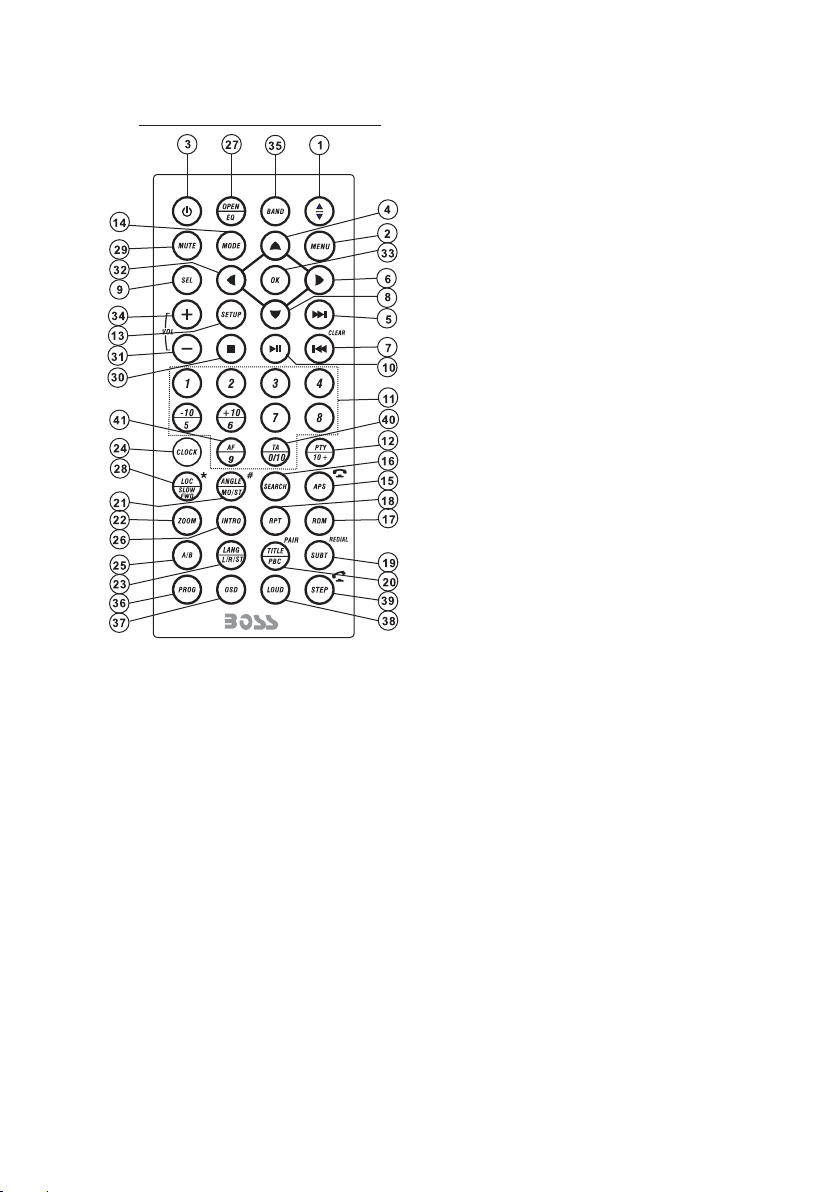
Remote Control Descripti on
1. ANG BUTTON
2. MENU BUTTO N
3. POWER BUTTON
4. ^ BUTTON
5. >>| BUTTON
6. > BUTTON
7. |<< or CLEAR BUTTON
8. v BUTTON
9. SEL BUT TON
10. PLAY/PAUS E BUT TON
11. NUMBER(0 ~10 ,+1 0
-10) BUTTON S
12. 10+/PTY BUTT ON
13. SETUP BUT TON
14. MODE BUTTON
15. APS or HAN G UP BU TTON
16. SEARCH BUTTO N
17. RDM BUTTO N
18. RPT BUTTO N
19. SUBTITLE or REDIAL BUT TON
20. TITLE/P BC or PA IR BU TTON
21. VIEW-AN GLE o r ST/ MON O or # BU TTON
22. ZOOM BUTTON
23. LANG/L/R/ST BUT TON
24. CLOCK BUTTON
25. A-B BUTT ON
26. INTRO BUTTON
27. EQ/OPEN BUTTON
28. LOC/DX or SLOW-FW D or * BU TTON
-6-
29. MUTE BUTTON
30. STOP BUTTON
31. VOLUME- BUTTON
32. < BUTTON
33. OK BUTTON
34. VOLUME+ BUTTON
35. BAND BUTTON
36. PROG BUTTON
37. OSD BUTTO N
38. LOUD BUTTON
39. STEP or TEL BU TTO N
40. TA BUTTON
41. AF BUTTO N
Page 9
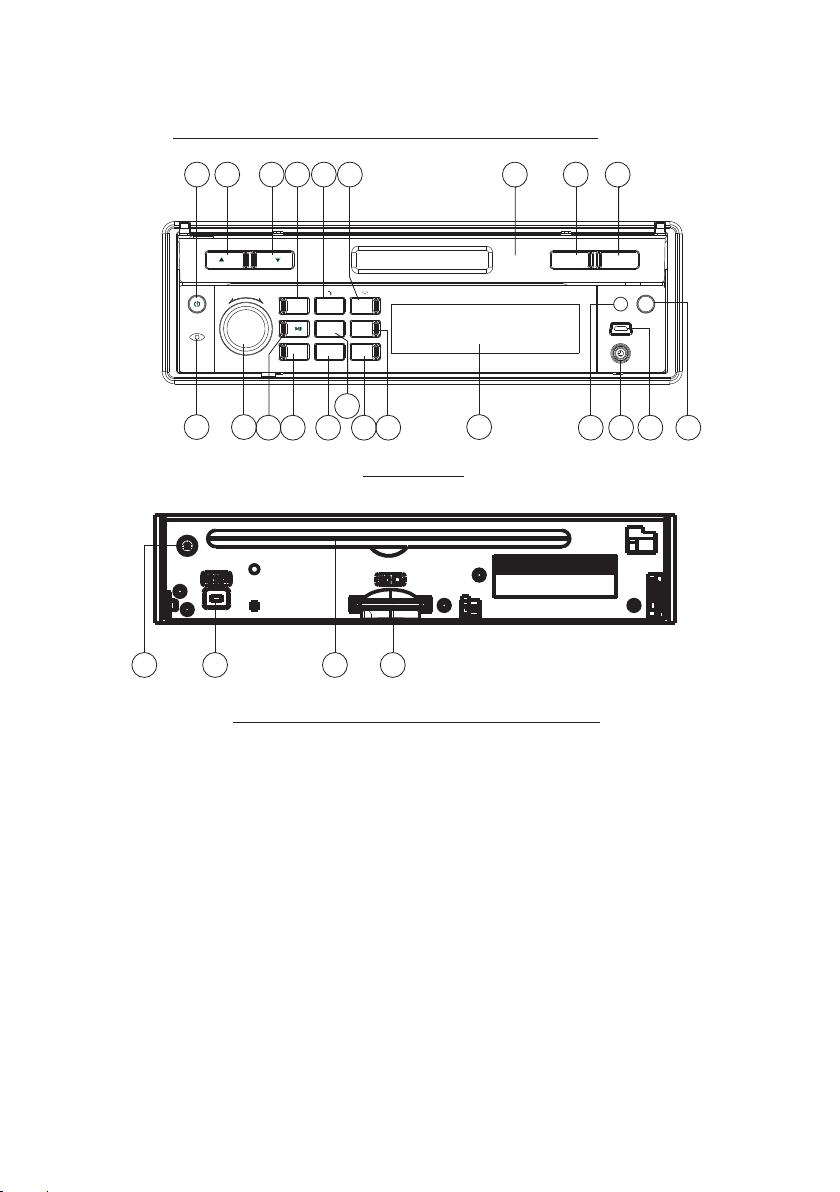
Locations and Names of Contr ols on or i n the uni t
20
10
SEL
- VOL +
11
BAND APSMODE
INT
3
2
1
RDM
4
RPT
-10
+10
5
6
2
MUTE
MIC
19
18
8
13
24
9
15
16
17
14
22
12
Front Panel
SD/ MMC
721
5
The Front Facet after r emovi ng fron t panel
3
26
TA / AF OPEN
23
1
REL
IR
AUX
4
25
6
1. OPEN button
2. POWER/MUTE butto n
3. Monitor
4. AUX socket
5. Disc Slot
6. USB Jack
7. SD/MMC Card Slot
8. MODE button
9. SEL butto n and VOL knob
10. ^ button
11. v butt on
12. PLAY/PAUSE/1 button
13. INT/2 button
14. RPT/3 button
15. RDM/4 button
16. - 10 / 5 button
17. + 10 / 6 button
18. BAND/TEL button
19. APS/H ANG UP button
20. EJECT button
21. RESET button
22. Small LCD Screen
23. IR Remote Sensor
24. Microphone
25. REL button
26. TA/AF but ton
-7-
Page 10
Common Operation
1. To turn on/off t he un it
In power off mo de, s hor t pre ss an y but ton s exc ept R EL to tu rn on t he un it.
In power on mode, long press the POWER butt on on t he fr ont p ane l or sh ort p res s the
POWER button on the remote control to tur n off t he un it.
2. To slide the mon ito r of th e Car Au dio S yst em ou t of th e cha ssi s
Shortly press the OPEN button on the fron t pan el or l ong p res s the O PEN b utt on on
the remote control can slide the monito r of th e Car Au dio S yst em ou t of th e cha ssi s or
slide it into the chassis.
3. To adjust the an gle o f the m oni tor
press the ^ or v button on the monitor to adjus t the a ngl e
of the monitor.
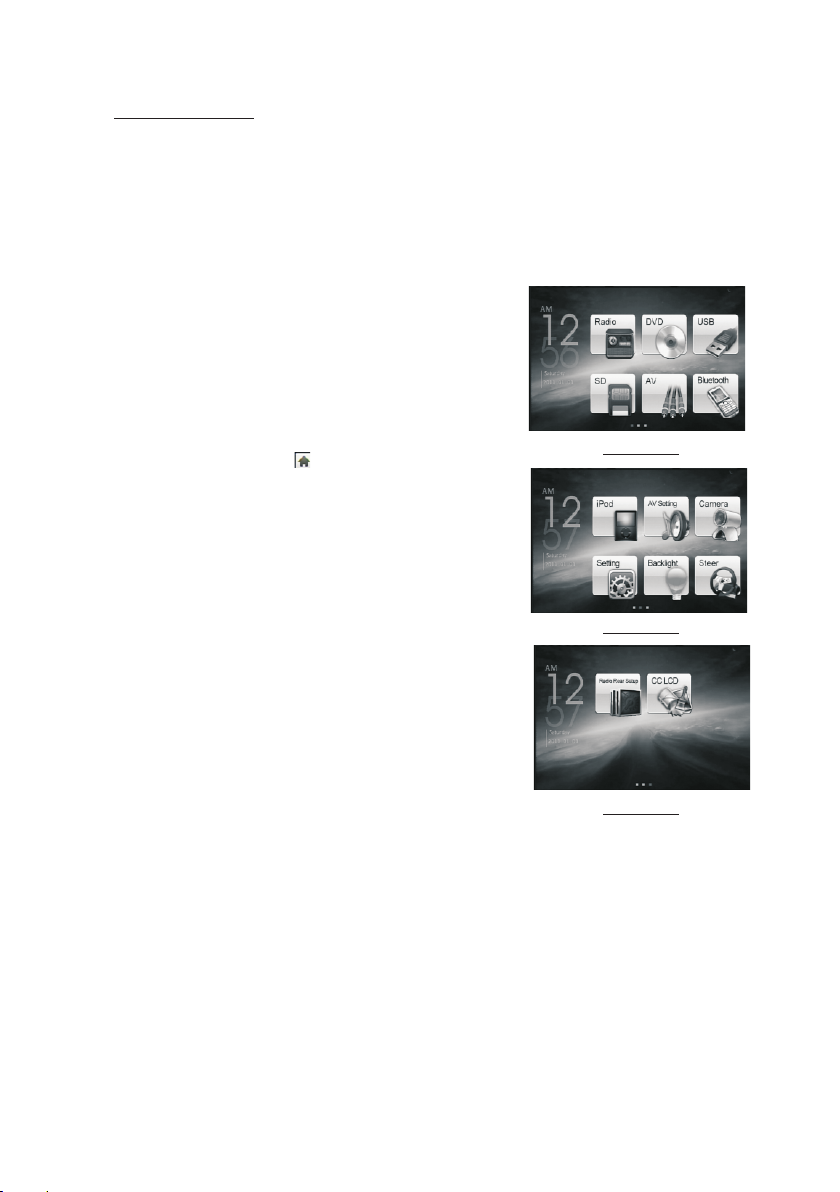
4. To select func tio n mod e
Press the MODE button to select RADIO, DI SC (A fte r
inserting a disc), USB(After insert ing a U SB st ora ge) ,
SD/MMC CARD(After inserting a SD/MM C car d), AU X ,
BLUETOOTH o r iPo d mod e.
In any mode, tapping the icon (after popp ing u p Key -
Mod e Menu 1
board interface for disc/USB/card ) can p op up M ode
Menu 1 as right image, then touch and hold any pla ce
and slide leftward to display the Mode Menu 2 an d Mod e
Menu 3 . finally tap one icon in the Mode Menus to ent er
your desired mode.
5. To adjust soun d lev el
Rotate the VOL kno b on th e front panel or press and
hold the + or - button on the remote control wi ll ad jus t
the volume level.
Mod e Menu 2
6. To adjust audi o and t urn o n or of f the touch screen
Press the SEL button continuously to s wit ch be twe en
VOLUME, BASS, TR EBL E, BA LAN CE an d FADE R.
after switching on a desired audio mode abov e, ro tat e
the VOL kn ob on t he fr ont p anel or press or hold the
VOL+ or VOL- button on the remote control t o set i t.
Long press the SEL button to turn on/off t he to uch s creen.
7. To mute sound
Press the MUTE button on the remote contr ol to t urn
Mod e Menu 3
on/off MUTE m ode .
Pressing the POWER button on the front pa nel s hor tly a lso c an tu rn on /off MUTE mode.
8. To display clo ck ti me
Press the CLK button to display clock tim e on th e mon ito r scr een .
After sliding the monitor into the chassis, p res sin g the C LK bu tto n can d isp lay c loc k
time on the small LCD.
9. To select a desired EQ mode
Press the EQ button on the remote control t o sel ect o ne of t he pr ese t mus ic eq ual ize r
curves: POP, ROC K, CL AS, FLAT. The sound eff ect w ill b e cha nge d.
10. To tur n on/ off LOUD mode
Press the LOUD button on the remote to turn o n/o ff LO UD mo de.
When turning on LOUD mode, it will enhance bas s lev el im med iat ely w hen b ass i s not
enough.
-8-
Page 11
11.To remove the fron t panel
press t he REL but ton to flip do wn the front p anel from
the mai n unit, then h old the righ t end of the fro nt panel
to push l eftward an d pull away.
12.To res et the playe r
When th e monitor , th e small LCD di splay or som e
butto ns are not wor king or soun d is distort ed, remove
the fro nt panel, th en press the R ESET button to re set
the pro gram to fact ory defaul t.
13.To cal ibr ate t he screen
To pop up Calibrati on in ter face during media pl ayb ack,
first p res s the S TOP button, t hen p ress the ZOOM button,
final ly pr ess t he ^ and v buttons in turn .
In the in ter fac e, you can have calibr ati on by a ccurately
tappi ng th e cro ss cursor.
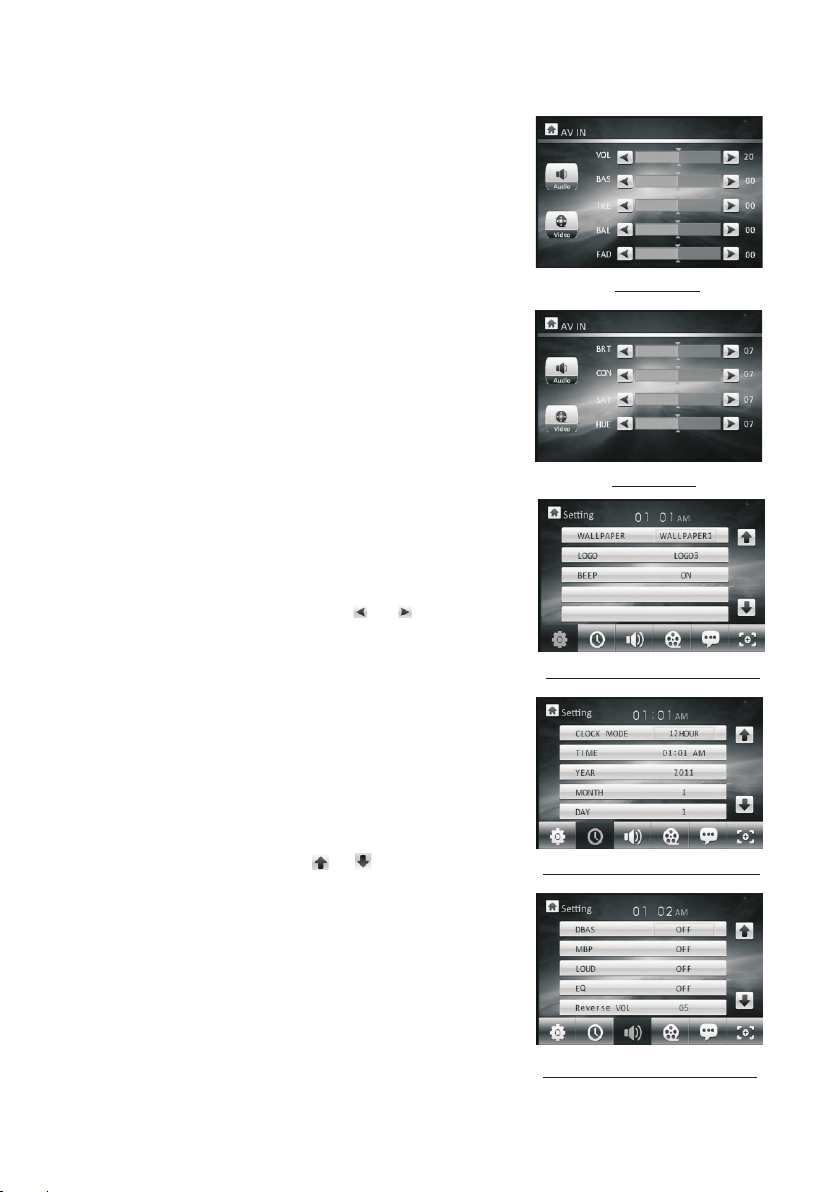
Audio Se ttin g
14.AV Setting
In the Mo de Me nu 2 sc reen, tapping the AV Setting ico n
can pop u p the AV Setting in ter face as right.
In the AV Setting interf ace , tapping the Audio or Video
icon ca n swi tch b etween Aud io Setting and Video Setting
inter fac e.
In thes e 2 int erf aces, tapping the or i con c an se t
one ite m of th em.
In the Aud io Se tti ng interface, you ca n set t he va lue of
the VOL UME , BAS S, TR EBL E, BALANCE and FADER.
In the Video Setting i nte rface, you can set the v alu e of
the BRI GHT NES S, CONTRAST, SATU RATION an d HUE .
15.Ge ner al Se tting
In the Mo de Me nu 2 sc reen, tapping the Se tti ng ic on can
pop up th e 1st p age o f the General Settin g. Then ta ppi ng
one ico n in th e bot tom row can pop up the oth er pa ges.
In thes e pag es, t apping the or icon can s ele ct a
setti ng it em. Af ter selecting a sett ing i tem , tap its value
to set it .
In the 1s t pag e, yo u can set the WAL LPAPER, L OGO
and BEE P.
In the 2n d pag e, yo u can set the CLOCK MODE , TIME,
YEAR, MONTH and DAY.
In the 3r d pag e, yo u can set the DBAS, MBP, LOUD, EQ
and REV ERS E VOI .
Vid eo Set ting
the 1 st Pa ge of th e Gene ral Se ttin g
the 2 nd Pa ge of th e Gene ral Se ttin g
the 3 rd Pa ge of th e Gene ral Se ttin g
-9-
Page 12

the 4 th Pa ge of th e Gene ral Se ttin g
the 5 th Pa ge of th e Gene ral Se ttin g
the 6 th Pa ge of th e Gene ral Se ttin g
In the 4t h pag e, yo u can set the ASPEC T RATIO, BRIGHNES S, CO NTR AST, SATU RATION and STANDARD VIDEO .
In the 5t h pag e, yo u can set RADIO REG ION .
In the 6t h pag e, yo u can calibrate t he sc reen.
16. Bac kli ght Setting
In the Mo de Me nu 2 screen, tapping t he Ba cklight icon
can pop u p the B acklight Setting i nte rface.
In the in ter fac e, tapping the - or + i con c an set the
the B ack ligh t Sett ing in terf ace
backl igh t.
17. Fun cti on setting and appli cat ion for Steer button s
In the Mo de Me nu 2 screen, tapping t he St eer icon can
pop up th e Ste ering Control inte rfa ce.
In the in ter fac e, tapping the ic on ca n res tore the
user se tti ngs t o zero and displa y Ple ase press steer
the 1th k ey fu nct ion , then long pre ss th e 1st b utton
in the st eer t o dis play Please cho ose s teer the 1th
key fun cti on , ta p one function ic on in t he St eering
the S tee ring C ontr ol int erfa ce
Contr ol in terface such as vol- .
Set the f unc tio ns of the other ste er bu tto ns as the underli ned s tep above.
After fi nis hing function sett ing o f all steer buttons , ta p the i con t o save.
CH- and C H+ : In r adio mode, to select p rev ious or next memory st ati on.
Seek- a nd Se ek+ : In BT Mu sic/disc/USB/c ard m ode, to play previou s or ne xt track/
chapt er; I n rad io mode, short pr ess t o man ually tune down o r up fo r a desired
stati on, l ong p ress to automat ica lly s earch down or up fo r an av ailable station.
BTAns. : To rec eive a coming tel eph one.
18. Rad io Re ar Setup
In the Mo de Me nu 3 screen, tapping t he Ra dio Rear
Setup i con c an pop up the Radio Rear S etu p interface.
In the in ter fac e, tapping the AV, DVD, USB, SD or iPo d
icon ca n ent er the background au dio o utput mode of
the AV, DVD, USB, SD or iPod a nd po p up the fore groun d rad io interface as next p age .
-10-
the R adi o Rear S etup i nter face
Page 13

The icons in the foreg rou nd radio interface d esc rib e
as foll ows :
: To return to the Radio Rea r Set up interface.
< and > : To aut oma tically search up or d own f or
an availab le st ation.
CH- and C H+ : To manual ly se arc h up or down for
a desired st ati on.
19. Cha nge C olo r of the LCD
In the Mo de Me nu 3 sc reen, tapping the CC L CD ic on
can pop u p the C C LCD i nterface.
In the in ter fac e, tapping the or icon c an ch ang e
the col or of t he LC D. When the RED word cha nge t o
CUSTO, tapping the - o r + ico n can set the value of the
R, G and B.
C H - C H +
the F ore grou nd Rad io int erfa ce
Radio O per ati on
1. To enter RADIO mod e(M ODE button or RAD IO ic on)
When yo u use M ODE button or Mod e Men u 1 (tapping
RADIO i con ) to enter RADIO mo de, i t will display Ra dio
inter fac e 1 as right.
In the Ra dio i nterface 1, tap pin g the MENU icon can p op
up the Ra dio i nterface 2 as rig ht.
In the Ra dio i nterface, tap pin g the icon can pop up
the Volu me in terface as righ t. In t he Volume interf ace ,
tappi ng th e - or + icon can adjus t the v olume level.
* The fun cti ons of the icons in t he ra dio interface a re sa me
as the sa me bu ttons in the remo te co ntrol or in the mai n
unit.
2. BAND B UTTON
In RADI O mod e, pr ess the BAND button on t he re mot e
contr oll er or o n the front panel to sel ect y our d esired radio
band of F M1, F M2, F M3, AM1 a nd AM2 , and the selected
band wi ll be d isp layed on the small mon ito r on the front panel.
3. TUNE/SEEK UP /DO WN BU TTO NS
In RADI O mod e:
1) Long p res s the > >| or |<< button to auto mat ica lly search up
or down f or a av ail able station from th e cur ren t frequency.
2) Brie fly p res s the >>| or |<< button to m anu all y search up or
down wi th st ep by s tep for your desired s tat ion f rom the
curre nt fr equ ency.
the C C LCD i nter face
RAD IO inte rface 1
RAD IO inte rface 2
RAD IO inte rface 2
-11-
Page 14

4. APS BUT TON
In RADI O mod e:
1) When l ong p res sing the APS b utton, the radio sea rch es from the lowest freque ncy a nd
check s the s ign al strength level un til 1 c ycl e search is finished . And then the 6 s tro ngest
stati ons a re pr eset to the correspo ndi ng pr eset number memory b ank . The AS o per ation
is impl eme nte d in each bank of the sele cte d band. (It can store 3x6 sta tio ns for FM and
2x6 sta tio ns fo r AM)
When th e AS operati on is f ini shed, it will scan eac h pre set station for 5 seconds i n FM or
AM band fr om M1 w hen AP S button is pressed br ief ly. Aft er th e sca nning is finished,
broad cas tin g will resume on the M1.
2) When p res sin g the APS b utt on briefly, the radio will scan e ach p res et station for 5
secon ds in F M or AM ba nd from M1. After finis hin g a cir cle of scanning, it wi ll re sume
broad cas tin g on the M1.
NOTE: I n FM ba nd, F M1,FM2,FM3 is chec ked o ne at a t ime; In AM band, AM1, AM2 is
check ed on e at a ti me.
5. PRES ET STATI ON [ 1- 6 ] BUTTON S
In RADI O mod e:
1) To memorize the cu rre nt fr equency on the curre nt ba nd, l ong press any of the num ber
butto ns (1 -6) o n remote control or on t he fr ont p anel .
2) To recall the pres et me mor y on the current band, b rie fly p ress one of the preset b utt ons
[1-6] o n rem ote c ontrol or on the front p ane l.
6. STER EO/ MON O BUTTON
Press t he ST button on t he re mote control to sele ct th e STE REO or MONO sound mode
for FM ba nd.
7. LOC BU TTON
1) In RAD IO mo de, w hen the signal of the di sta nce r adio station is very w eak a nd the
recei vin g eff ect i s bad d uring tuning. If the re is t he wo rd LOC on the monitor, pr ess t his
butto n to tu rn off the L OC fu nction, then tune ag ain f or th e distance radio sta tio n;
2) In RAD IO mo de, w hen the signal of the lo cal r adio stations are too str ong a nd the inter feren ce do esn t a llow the tuner to lock o n sta tio ns, press this butto n to tu rn on the LOC
funct ion t o dis play the word LOC on the m oni tor, t hen tune again for the l oca l radio
stati ons .
8. PTY (PROGRAM TYPE) BUTTON
Press t he PT Y button s hor tly to select one of the f oll owi ng mode:
PTY MUSIC group- - PTY SPEECH gr oup - - OFF
When PT Y group is o n, pr ess t he VOL+ or VOL- button o n the r emo te control or rotate
the VOL kn ob on the front panel to s ele ct one of PTY pro grams as follows:
<-->N EWS <-- >AFFAIRS<-->INF O<- ->S PORT<- ->EDUCATE<-->DRAMA<-- >CU LTUR E
<-->S CIE NCE <--> VARI ED<-->WEATHER<--> FINANCE< --> CHILDREN<-->SO CIA L
<-->R ELI GIO N<-->PHONE IN<-- >TR AVEL <-- >LE ISURE<-->DOCUM ENT < --> PTY
NONE< --> POP M< --> ROC K M<-->EASY M<-->LIGHT M<--> CLASSICS <-- >OTHER M
<-->J AZZ <-- >COUNTRY<-->NATION M<-->OLDIES<- ->F OLK M<-->
-12-
Page 15

When PT Y group is o n, pr ess ing the 6 number butto ns al so ca n select one of PTY
progr ams a s abo ve.
After s ele cti ng one of the PTY programs, it wil l dis pla y SEEK PTY and automatically
searc h for t he st ation of the PTY program. If the s tat ion o f the PTY pr ogram does not
exist , it wi ll di splay PTY NONE and then return b ack t o the n ormal station.
9. AF [ALTERNATIVE FREQUENCIE S] BU TTO N
When sh ort p res s the AF bu tto n on remote control or l ong p res s the TA/AF button on the
main un it, t he AF sw itching mode is sele cte d and the status of the AF switc hin g mode is
displ aye d by AF se gment on the display.
Segme nt off: AF switc hin g mode off .
Segme nt on : AF swit chi ng mo de on, and has RDS infor mat ion .
Segme nt fl ash ing: AF switching mod e on, b ut RD S information is not r ece ived yet.
When the AF switching mo de is sel ected , the rad io checks the signal strength
of the AF all the time. The interval of checkin g time of e ach AFs depends on
the signal strength o f the cur rent st ation , from a few minute for the strong
station to a few second s for the w eak sta tion. Every time when a new AF is
stronger than the cur rent st ation , it switches over to that frequency for ver y
short time, and the NEW F REQUE NCY is displ ayed fo r 1-2 sec ond. Be cause
the mute time of the AF swit ching o r the che cking t ime is very short, it is almost
inaudible in case of normal pr ogram . (When AF f lashes on the monitor, it will
search for the strong er RDS st ation . If AF and TP flash on the monit or, it can
only search for the tra ffic announceme nt stat ion).
In FM mode, when AF is o n, SEEK , (SCAN), AUTO-MEM ORY functions can
only receive and save t he RDS pr ogram .
10. TA [TR AFFIC ANNOUNCEMENT] BUTTON
Press the TA but ton on th e remot e control or press the TA/A F butto n on the
main unit to turn on TA sea rch mod e.
When traffic announcement is transmi tted:
1).If the unit is in Disc P lay mod e, it wil l switc h to radio mode temporarily.
2).Temporarily switches ov er to an st ation w ith traffi c annou ncement, and TA,
TP wi ll be dis playe d on the mo nitor.
* TA inter ruption function:
The cur rent traff ic anno uncement is cancelled by pressing TA but ton briefly.
* When TA is on, SEE K, (SCA N), AUTO MEMORY functions can b e recei ved
or saved only when traffic program ident ifica tion co de has be en received.
-13-
Page 16

Disc, U SB and Card Opera tion
1. Load /unload di sc , US B or Card
To play files in a d isc, press the RE L button t o flip
down th e front panel, th en insert th e disc into the
disc sl ot and flip up the fr ont panel an d push it onto
the cha ssis till click , then it will a utomaticall y play .
To remove the di sc from the unit, p ress the REL
butto n to flip down the fr ont panel, t hen press the
EJECT butt on to eject disc fr om the disc sl ot an d
then yo u can remove it.
To play fil es in a USB storage , firstly in sert the small
end of a US B cable into the mi ni USB port, t hen insert
the USB s torage into the b ig end of the US B cable,
final ly it will automa tically pl ay. The front an d rear
USB can n ot be played at the s ame time.
To remove the US B storage, dire ctly remov e it.
To play files in a S D/MMC card, fir stly remov e the f ront
panel , then insert the S D/MMC card i nto the SD/MMC
card sl ot, finally it wi ll automat ically play.
To remove the SD /MMC card from th e SD/MMC car d
slot, r emove the front p anel, push i n the card and then
pull it o ut of the Card Slot .
* It supp orts version 1. 1/2.0 USB an d 8 GB SD CARD.
Remar k1: If the disc, US B or SD/MMC ca rd includes
MP3 or WM A files , after load ing , it will disp lay the
File Pl aying interfa ce as right.
The File P lay ing in ter face
The F ile s List o f the Pl ayin g Fold er
If you wa nt to check the dir etory, tap the icon to
displ ay the Files List o f the Playin g Folder, the
Folde rs List of the Play ing File For mat or the Root
The F older s List of t he Play ing Fil e Forma t
inter face.
If the di sc, USB or SD/MMC c ard includ es MPEG4 or
Pictu re files, after l oading, th e screen will pla y video.
tap any p lace in the scree n to display K eyboard and
then ta p the icon to pop up th e Files List o f the
Playi ng Folder, tap the i con to pop up th e Folders
List of t he Playing File F ormat or the R oot interface .
In the Fi les List or Folde rs List inte rface, tappin g the
or icon c an file or folder u p or down.
The Roo t interfac e
Tapping the ic on of the file, fol der or file fo rma t can enter it .
In the ro ot interface, t he Music ico n is for audio file s; the Video icon is for i mage
files ; the Picture ico n is for Video file s. If t here are not a ny files for Musi c, Vi deo
or Pict ure, you can not en ter it.
-14-
Page 17

In the Fi le Playing i nterface , tapping an y place in the
recta ngle of the sc reen can pop u p the Keyboa rd-1
of MP3/ WMA, then ta pping the ic on can pop up
the Key board-2 of M P3/WMA.
Remar k2: After lo ading a CD dis c, the scree n will
displ ay the CD inte rface as rig ht. In the CD in terface,
tappi ng the icon ca n pop up the num ber inter face an d use the icon s of the numbe r, <-- and OK to
selec t a desired tr ack to play; u se the or icon
to trac k up or down. In t he bottom ro w of the CD
inter face, it is th e Keyboard -1 of CD, tapp ing the
icon ca n pop up the Key board-2 of C D.
Remar k3: During v ideo or imag e playback , tap ping an y place on the s creen can po p up the key board -1 of Video/Pic ture as righ t. then tapp ing
the ico n can pop up the K eyboard- 2 or Key board -3 of Video/Pic ture as righ t.
* In any wo rk mode, tap ping the pro gress bar ca n
chang e the curren t start poin t.
All func tion icons a re describ ed as follow s:
: Same as b utton.
: Same as b utton.
or : Same a s or button.
or : Same a s or button.
: Tapping it can p op up the Volum e Bar and tap
the Volu me Bar to adju st the volum e level.
: Same as I NT bu tton.
: Same as L ANG or L/R/S T but ton
: Same as P BC or MENU but ton.
: Same as TITL E button.
: Same as R EPEAT but ton.
: Same as S UBTITLE bu tton.
: tappi ng it can pop up t he number in terface an d
use the i cons of the nu mber, <-- and O K to select
a desir ed track or ch apter to pla y
: Same as t he < / > / ^ /v button o n RC.
: Same as z oom button .
: Same as R DM button.
: Same as AN GLE button .
The K eyb oard -1 of MP 3/WM A
The K eyb oard -2 of MP 3/WM A
The K eyb oard -1 of CD
The K eyb oard -2 of CD
The K eyb oard -1 of Vi deo/ Pict ure
The K eyb oard -2 of Vi deo/ Pict ure
The K eyb oard -3 of Vi deo/ Pict ure
-15-
Page 18

2. Pause Playback
When playing DVD/VC D/CD/ MP3/W MA , press the PAU SE butt on on IR
remote control to pau se the pl aybac k, pres s the PLAY button to r esume
normal playback.
3. Stop Playback
When playing DVD/VC D/MP3 /WMA/ CD , pres s the STOP button o nce to
pause the playback, t hen pre ss the PL AY button to resume the nor mal
playback; press the S TOP button twice to full st op the pl aybac k, then press
the PLAY button to start playing from the beginni ng of the f irst ch apter/track.
4. Select Chapter/Trac k with the >>| or |<< Button
During playback, pr ess the > >| or |<< b utton to select the next or previous
chapter/track to pl aybac k.
Note: Press the >>| or |< < butto n multi ple times to advance multiple chapters
/tracks forward or ba ckwar d.
5. Select Chapter/Trac k with the Number Buttons
When playing DVD/VC D(PBC O FF)/M P3/WMA/CD , press one of the 1~9
and the 0/10 number but tons to d irect ly sele ct and play the 1st to 10th track
/chapter (the 0/10 bu tton is u sed as th e 10 button).
If you want to play the tra ck/ch apter l arger than 10, use the 10+, 1~9 and
0/10 button. Exampl e 1: to pla y the 13t h track/chapter, first press the 10+
button once, then pre ss the 3 bu tton. E xample 2: to play the 34th track/
chapter, first press t he 10+ bu tton 3 ti mes, then press the 4 button.
(The 0/10 button is use d as the 0 bu tton)
Note: long pressing t he +10 or - 10 butt on can pl ay the next 10th or previous
10th chapter/trac k(onl y for MP3 /WMA).
6. Select Chapter/Trac k with the Root/PBC Menu (If the disc i nclud es the
root/PBC menu)
When playing DVD
1. Press the TITLE button on the remote cont rol to di splay t he titl e list.
-16-
Page 19

2. Press the directio n butto ns to sel ect you r desired title, and then press the O K
or PLAY butto n to open t he root m enu of the selected title.
3. Press the directio n butto ns to sel ect you r desired chapter, finally press the
OK or PLAY button to play the selected chapter.
During playback, pr essin g the MEN U butto n can directly display the root
menu of the title that is p layin g.
In VCD mode
1. When starting to tur n on the PB C funct ion, it will play from the beginning of
the disc till it displa y the PBC m enu on TV scre en if the d isc inc lude th e PBC
menu.
2. Press the number but tons to s elect y our des ired track to play.
In MP3/WMA mode
1. The ro ot menu is displayed on the monitor screen a ll the ti me(an d the TITLE
or MENU button is not ava ilabl e).
2. Press the directio n butto ns to sel ect you r desired FOLDER, then press the
OK or PLAY button to open the FOLDER, and then press th e direc tion bu ttons
to select your desire d file, f inall y press t he OK button to play the selected fil e.
In CD mode, the TITLE, PBC, MENU buttons are d isabl ed.
7. Playback with Speed
During normal playback, lo ng pres s the >>| /|<< button continuously to fas t
forwards or backwar ds at the f ollow ing spe eds: x2, x4, x8, x20, normal.
During speed playback, pre ss the PL AY button to resume normal playb ack.
8. Playback with Slow Speed
During playback , pre ss the SL OW_FW D butto n to execute the Slow Forward
function.
With each consecuti ve pres sing of t he SLOW _FWD button, the playback
speed decreases. The speed levels in Slow Forwa rd as fol lows:
x1/2,x1/3,x1/4, x1/5, x1/6, x1/7,normal.
-17-
Page 20

During slow forward , press t he PLAY button to resume normal playbac k.
This fu nction is only for video.
9. Display still fram e step by s tep
If the unit is currentl y playi ng vide o, pres s the TEL button consecutively
to display still fram e step by s tep.
Press the PLAY butto n to resu me normal playback.
10. Playback Repeatedly
10.1 ONE/ALL Repeat
1. In the mode of DVD playb ack:
Press the RPT button to select REP CHAPTER, REP TITLE, REP ALL
or REP OF F.
2. In the mode of VCD(PBC O FF)/C D playb ack:
press the RPT button to select REP ONE, REP ALL or OFF.
When it is in the state of PB C ON, dur ing VCD d isc playing, the RPT
button are not availa ble.
3. In the mode of MP3/WMA pl aybac k:
Press the RPT button to select REP ONE, REP DIR, REP ALL or OFF.
10.2 A-B Repeat
Press the A-B button if y ou want t o repea t a speci fic segment on a disc
that you define:
1. Press the A-B button a t a point ( A) wher e you wan t it to be the start point
of the repeat segment . Press t he A-B bu tton again at a point (B) where you
want it to be the termina l point o f the rep eat seg ment. Then i t will pl ay the
segment repeatedl y.
2. To cance l the A-B repeat mode and r esume n ormal p layba ck, press the A-B
button for the third ti me.
Note:
During VCD/MP3/WM A/CD pl aybac k, poin ts A and B must be within the
same track.
During DVD playback , point s A and B c an be selected from different chapters.
-18-
Page 21

11. Play back in Scan Mode
1. When playing VCD(PBC OFF) /CD , pre ss the IN T but ton to pl ay the pr evious
15 seconds part of each t rack on t he disc . Press the INT butto n again t o
resume normal playb ack.
2. When playing DVD/MP3/WM A , the INT butto n is not av ailab le.
12. Playback from a spe cifie d chapt er/tr ack or a specified time
1. When playing DVD , press the SE ARCH bu tton to d isplay a interface and
highlight the title i tem, th en use th e numbe r buttons to input the serial number
of the title; use the dir ectio n butto ns to hig hlight the chapter item, then use
the number buttons to i nput th e seria l numbe r of the chapter; you can still use
the direction butto ns to hig hligh t the tim e item, then use the number buttons
to input the desired ti me to sta rt play back; finally press the OK or PLAY button
to play the selected ch apter o r play fr om the se lected time.
2. When playing VCD/MP3/WM A/CD , pr ess the S EARCH button to display a
interface and highl ight th e track i tem, th en use the number buttons to input
the serial number of th e track ; you can s till us e the direction buttons
to highlight the time i tem, th en use th e numbe r buttons to input the desired
time to start playbac k; fina lly pre ss the OK or PLAY butto n to play t he selected
track or play from the se lecte d time.
13. Playback in Random
When playing DVD/VC D(PBC O FF)/M P3/WMA/CD , press the RDM button to
switch between RAND OM (ON) /RAND OM OFF. When in RANDOM (ON) mode,
it will play in random.
14. Playback in Different View-Angle
1. When playing VCD/MP3/WM A/CD , th e VIEW-ANG LE butt on on the I R remote
control is not availa ble.
2. When playing DVD , press the VI EW-ANGLE b utton r epeat edly on t he IR
remote control to vie w in different angle.(Th is func tion is o nly for the DVD
media with ANGLE f uncti on)
15. Playback in Zoom Mo de
In video/image mode , durin g playb ack, pr ess the ZOOM button continuously
to enlarge a certain ar ea of the i mages o n the scr een with these multiples:
-19-
Page 22

ZOOMx2,ZOOMx3,Z OOMx4 ,ZOOM x1/2,ZOOMx1/3,ZOOMx1/4, ZOOM OF F.
Press one of the ^/v/>/ < butto ns to sel ect the area you want to enlarge.
16. Change Caption Languag e
When playing DVD , pres s the SUB TITLE b utton r epeatedly to select the
language of the capti on or tur n off the caption.( depen d on the me dia used.)
When playing VCD/MP 3/WMA /CD , the b utton i s not available.
17. Change Audio L angua ge
1. When playing DVD , press the AUD IO butt on repe atedly on the IR remote
control to select the d esire d langu age typ e. (depend on the media used)
2. When playing VCD , press the AUD IO butt on repe atedly to select the sound
mode of the MONO L, MONO R, M IX MONO a nd Ster eo, no language function.
3. When playing CD/WMA/MP3 , t he AUDIO b utton i s disabled.
18. Change Video Signal System
During playback of DV D/VCD , p ress th e BAND( P/N) button on the front
panel or on the remote co ntrol r epeat edly to c hange the VIDEO SIGNAL
SYSTEM mode .
19. Look over Playback Statu s
1. When playing DVD , press the OS D butto n repea tedly on the remote control
to turn on/off the playback status. When i t is on, it w ill dis play th e information
such as: the serial num ber of th e playi ng titl e, the serial number of the playing
chapter, the elapsed t ime of th e playi ng chap ter, the remained time of the
playing chapter, the e lapse d time of t he play ing title, the remained time of the
playing title, etc.
2. When playing VCD/CD , press t he OSD bu tton re peatedly on the remote control
to turn on/off the playback status. When i t is on, it w ill dis play th e information
such as: the serial num ber of th e playi ng trac k, the elapsed time of the playing
track, the remained t ime of th e playi ng trac k, the elapsed time of the disc, the
remained time of the di sc.
3. When playing MP3/WMA , press t he OSD bu tton re peatedly on the remote
control to turn on/off the playback stat us. Whe n it is on, i t will di splay the
information such as : the ser ial num ber of th e playing track, the elapsed time
of the playing track, t he rema ined ti me of the p laying track.
-20-
Page 23

20. Program Pl ayback
It allo ws you to e nter the ord er in which you want so me chapter s/tracks in
DVD/V CD/MP 3/WMA/CD t o play.
1 During playb ack, press t he PROG button to ent er a program i nterface as
follo ws:
for DVD /MP3/WMA for V CD/CD
2 Use the d irect ion button s to move cursor onto t he desired p lace for inputtin g
the seq uence n umber.
3 Use the n umber b utton to inp ut desired sequen ce number of t itle/chapter/
track w ith des ired seque nce.
4 Use the d irect ion button t o move cursor onto Pl ay item, the n press the OK
butto n to play t he program med titles/chap ters/tra cks in programmed o rder;
only pr essin g the PLAY bu tton also ca n play th e programm ed titles/chapt ers
/trac ks in pro grammed or der.
* To exit program playb ack, first p ress the STO P but ton, then pr ess the PLAY
butto n to ente r sequence p layback; or press t he PROG butt on twice again.
* To remove all the progr ammed sequ ence nu mbers, mov e the cursor onto
empty i tem, th en press the O K button.
* To change the program med sequen ce, mov e the cursor o nto the item you
want to c hange , input the de sired sequence nu mber.
* During VCD pla yback, if it i s in PBC ON mode, at the sa me time of ent ering
the sta te of pro gram playb ack, it turns off PBC mode .
21. Playback I MAGE files
1. The root menu is dis played on th e monitor when begi nning to switch on IM AGE
mode. .
In the ro ot menu , the left fil e sort icon is for MP3/ WMA fil e; the middle file so rt
icon is f or JPEG f ile; the rig ht file sort icon is fo r VIDEO file . If one of these 3
file so rt does n ot exist, yo u can not move cursor o nto the file s ort icon.
2. When d ispla ying the roo t menu, press the dir ection but tons to select your
desir ed FOLD ER, file or fi le sort icon, then pr ess the OK or PL AY button to
open th e FOLDE R, or play the s elected file, or pl ay only this s ort of file.
When di splay ing the root m enu, you can also use t he number bu ttons to
selec t the ser ial number o f the file and play the f ile.
When yo u selec t the JPEG fil e sort icon, press th e ^ or > button to s elect the
first J PEG fil e, then pres s the v button to selec t the desire d JPEG file, finall y
press t he OK or PL AY/PAUSE b utton to dis play the JPEG pictu re in full screen
from th e selec ted JPEG pic ture.
-21-
Page 24

3. Duri ng JPEG playbac k, press one of the > /</^/v button s to ch ange the ang le of
viewi ng picture that i s displaying as f ollows:
>: 90 deg c w; <: 90deg ccw; ^: UP<-->DOWN; v : LEF T<-->RIG HT
Durin g JPEG playback , press the PROG bu tton to change th e mode of refresh p ict ure.
Durin g JPEG playback , press the STOP button to stop pl aying and retur n to the root
menu.
* Durin g JPEG playback , the following b uttons are not av ailable: SLOW-FW D,
SUBTI TLE, TIT LE, ANG LE, AUD IO, RDM, INT and A-B.
* In JPEG m ode,the other o perations are s ame as ones in MP3/ WMA mod e.
22. Pla yback MP4 files
1. The root me nu is d isplayed o n the m onitor whe n beg ins to switc h on MP 4 mode, then
it will a utomaticall y play the first fi le.
Durin g playback, pre ss the STO P but ton to stop playi ng and return to th e root menu.
2. When d isplaying the r oot menu, press t he direction bu ttons to select y our desired
FOLDE R ,file or icon, th en press the OK or PL AY button to ope n or play the selec ted
file.
When di splaying the ro ot menu, you can al so use the number b uttons to selec t the
seria l number of the fil e to play the file.
* The ANG LE, PROG, RD M, IN T and TITL E/PBC button ar e not valid.
* The other fu nct ions are sam e as on es in DVD mode ; but t he RPT function is sam e as
one in MP 3/WMA mode.
23. ESP and ID 3 Fun ction
There is ESP functio n for all formats o f discs.
In MP3/ WMA mod e, during playb ack, the inform ation of the file n ame, folder nam e,
song ti tle, artist and a lbum will be scro lling on the LCD di splay. As lo ng as the
curre nt playing MP3 mu sic contains re levant ID3 tag in formation in ve rsion 1.0/2.0
forma t, the 3 items unde rlined above wi ll be scrolling o n the LCD display.
24. DVD S ystem Menu Setu p Operation
1. Pres s the SETUP button on th e rem ote contro l to ac cess the DVD S yst em Menu on
the mon itor.
2. There are 6 s etu p pages for th e Sys tem Menu. Pr ess t he > or < button t o sel ect
desir ed setup page.
3. Pres s the ^ or v button to se lect an setup ite m in the selected s etup page.
4. Pres s the > button to ent er the setup item . The n pre ss the v or ^ butt on to s elect a
desir ed mode of the setu p item, finally p ress the OK butto n to confirm it.
* Press t he < button to retu rn to the previou s level.
* Press t he SETUP button agai n or us e the direct ion b uttons to hi ghl ight EXIT SETUP
and the n press the OK butt on to exit the Setu p Menu.
-22-
Page 25

For the D VD System Me nu, there ar e 6 setup titles. They d isplay as fo llows:
24.1 SY STEM SETUP
TV TYPE
The set up item is for m atching mo nitor screen si ze.
4:3 PS: C hoose this i tem when con necting a monit or with 4:3 sc reen. When p laying
the pic tures with 1 6:9 size, the lef t and right pa rts of the ima ge will be cut o ut,
and dis play in full s creen.
4:3 LB: C hoose this i tem when con necting a monit or with 4:3 sc reen. When p laying
the pic tures with 1 6:9 size, the top a nd bottom pa rts of the mon itor will be
turne d into a black s trip.
16:9: C hoose this i tem when con necting a monit or with 16:9 w ide screen .
PASSWORD
This se tup item is fo r locking or u nlocking the ra ting level o f the Parent al Control.
The def aulted sta te is locked . The defa ulted pass word is 0000 .
You ca n set a new pass word that yo u like: Select th e PASS WORD item an d then
press t he > button to e nter it, then inp ut the origi nal passwo rd 0000, and t hen
press t he OK button t o unlock it. Pres s the > button t o enter it aga in, then inp ut
a new pas sword that y ou like and th en press the OK but ton to make it e ffe ctive.
Befor e the other pe rsons see th e Manual, you sho uld get the pa ssword in mi nd
and cut o ut the part of PASSW ORD in the Manual .
RATING
This it em is for sett ing a new rati ng level of the Par ental Cont rol.
1. Sele ct the PASSWORD it em and press the > bu tton to ente r it, input th e
passw ord mentio ned above, a nd press the OK but ton to unloc k the settin g of
the rat ing level of t he Parenta l Control.
2. Sele ct the RATING item a nd press the > butt on to enter it , use the dire ction
butto ns to select y our desire d rat ing level, p ress the OK bu tton to conf irm.
3. Sele ct the PASSWORD it em again and pres s the > button t o enter it, in put the
passw ord, and pre ss the OK button to l ock the new se tting of the r ating leve l
of the Pa rental Con trol.
DEFAULT
Selec ting DEFAULT will chan ge all the settin gs to origin al factory s etup.
-23-
Page 26

24.2 LANGUAGE SETUP
OSD LANGUAGE
This item is for select ing the l angua ge of the S YSTEM MENU and all operating
prompt interface display ed duri ng play back.
AUDIO LANG
This item is for select ing a aud io lang uage.
SUBTITLE LANG
This item is for select ing a sub title l angua ge.
MENU LANG
This item is for select ing a dis c menu la nguag e.
24.3 AUDIO S ETUP
KEY
It is for selecting you r desir ed basi c music t one(from low to high).
24.4 VI DEO S ETU P
BRIGH TNESS
It is for a djusting the brig htness of th e video output.
CONTR AST
It is for a djusting the cont rast of the vi deo output .
-24-
Page 27

HUE
It is for a djusting t he hue of the video o utput.
SATURATION
It is for a djusting t he saturation o f the video ou tput.
SHARP NESS
It is for a djusting t he sharpness of t he video out put.
24.5 SP EAKER SETU P
DOWNMI X
It is for s electing y our desired sou nd effect when th ere i s not centra l speaker
and sub -woofer. There a re 3 mo de: LT/RT, ST EREO, VSS.
LT/RT: When playin g a disc with PRO LOG IC stereo effec t, choose the ite m,
so it wil l output aud io signal with vi vid theatr e eff ect .
STERE O: If you choo se th is item, whe n outputti ng audio signal w ith 5.1 chan nels,
it will o utput the le ft an d right chan nels of sign al ; when outputt ing audio si gnal
with 2 ch annels, it w ill output the co mmon 2 chann els of stereo sig nal.
VSS: If y ou choose th is it em, when pla ying a disc re corded with 5.1 c hannels,
the mai n channel sp eakers can outp ut audio sig nal with VSS effect.
24.6 DI GITAL SETUP
DYNAM IC RANGE
After s electing t he compressio n mode of LINE O UT, set the item, so yo u can
adjus t the linear c ompression ra tio. If you se t it to be FULL, the Pe ak-to-Pe ak
value o f the audio si gnal is the minim um; if you set i t to be OFF, the Peak-t oPeak va lue is the max imum.
DUAL MONO
It is for s electing a d esired audio ou tput mode fo r the left and righ t ways of sign al.
It is mai nly for Kara oke of Ac3. There are 4 mod es in all as fol low s:
STERE O, MONO L, MON O R, MI X MONO.
-25-
Page 28

AUX IN operation
An external AV system can use the car AV system as monitor and amplifier.
1. Use an AV cable to make the car AV system and the external AV sys tem
connected through the AUX IN jack on con trol pa nel(a udio on ly) or th e AV
IN jacks from the rear cabinet of the car AV system and the AV Out jacks of
the external AV system.
2. Play the external AV system, then use MODE button or the Mode Menu to
enter AUX IN mode fo r the car AV system. By now, the prog ram pla yed by
the external AV system can be output through th e monit or of the c ar AV
system and the speakers connected t o the car AV system.
3. In AUX IN mo de, you c an use SE L, VOL, M UTE, EQ a nd LOUD b uttons to
adjust audio .
-26-
Page 29

REAR VIEW CAMERA
The car AV syste m can mak e you loo k at the actual status behind your ca r when
you change the gear lev el to the b ack pos ition .
1. Use an video cable to make the ca r AV syste m and the r ear vie w camera con nected through the RE AR CAME RA INPUT jack in the rea r cabin et of the c ar AV
system and the VIDEO OU TPUT jack of the rear v iew cam era.
Make the REAR CAMERA SWI TCH lin e in the re ar cabi net of the car AV system
connected to (B+)12 V power s upply.
2. In any running mode, the vide o signa l will sw itch to camera mode (if applicable)
when car is in reverse.
After taking the car out o f rever se, it wi ll resu me to its previous mode.
PI C
A N G L E
Analog on-s ite b ackup Analog on-s ite b ackup
* Note : the external mon itor ca n not dis play th e actual status behind your car.
War ning:
Always chec k the s urrounding e nvi ronment . Obj ect s might be re ver sed . The re ar vi ew
camera is des ign ed only to assis t whi le revers ing . Due t o the limit ati ons o f the camer a
angle and ran ge, i t may cause acci den ts if the dri ver r eli es solely o n the r eve rse camer a
and display.
-27-
Page 30

iPod Op era tio n
1. Ente r iPo d mod e
When in ser tin g the iPod plug into an iP od , it w ill enter iPod mode an d dis pla y the
File Pl ayi ng in terface on touch scr een a s fol lows:
The File P lay ing in ter face
You can als o use M ODE b utton or Mode Menu to en ter i Pod mode.
2. Popp ing u p the K eyboard
In the Fi le Pl ayi ng interface, tapp ing a ny pl ace in the rectangle c an po p up the Key board a s fol low s:
the iPod Keyb oar d
The functions o f the i con s on the iPod Keyboard a re sa me as o nes of the icons on the
Keybo ard o f dis c/USB/card.
3. Play a udi o fil es
Durin g pla yba ck, tap the or icon or pre ss th e but ton to pop up the iPod roo t
as foll ows :
the iPod root the iPod root
Use the v, ^ and OK button or d ire ctly tap one of the item s in th e rec tangle to play a
desir ed fi le in t he iPod.
-28-
Page 31

BLUE TOOTH HANDFREE SYSTEM
1. Enter Bluetooth mode
To enter the Bluetooth mode, press the MODE
button or tap the Bluetooth icon. It will display the
Phone page of the Bluetooth interface as right.
Tapping the icon can pop up the Book page of
the Bluetooth interface, tapping the icon can
pop up the Music page of the Bluetooth.
the P hone pa ge of Blu etoot h inter face
In Bluetooth interface, the icons describe as follows:
: Transfers audio between the Car Audio System and mobile phone.
: Clear the phone numbers entered.
: Same as + button in a mobile phone.
: Same as PAIR button on remote control.
the B ook pag e of Blue tooth i nterf ace
: To pop up the Phone page.
: To dial out by audio.
The other icons are same as ones in the front panel
and Remote Control.
2. Pairing and connection
1) Turn on the Bluetooth mode of the mobile phone;
the M usic pa ge of Blu etoot h inter face
2) Select Finding Bluetooth Device . It will show the name of the Bluetooth Device if
found. Select it and it will ask you to input a password, input the password 0000
and then enter it. Then it will tell you pair OK.
3) Some mobile phones, automatically connect with the BT device of this car audio
system after pairing is successful; for some mobile phones, you need to select the
paired BT device and press the CONNECTION button . When connection is ok, the
LCD of the car audio system will show LINK OK.
* If pairing fails, long press the PAIR button on the remote control to enter to pairing
mode, the LCD will display PAIR START, then pair and connect with mobile phone
again, and repeat the process 1 to 3.
3. Use the mobile phone to connect or disconnect
In the connection status, find the paired and connected Bluetooth Device, press
the disconnection button to disconnect.
In the disconnection status, find the paired and disconnected Bluetooth Device,
press the connection button to connect.
-29-
Page 32

4. In the connection status: the audio of mobile phone transfers to the car audio
system whenever calling out or receiving a call.
5. Dialling when in connection status
5.1 Dial with the mobile phone directly.
5.2 Dial with remote control with the following procedures:
(1) Input telephone number with number buttons 0-9
* Press CLEAR button briefly to cancel the wrongly input number if necessary
(2) Press TEL briefly to execute the dialling.
5.3 To redial the last phone number dialled
Press REDIAL button briefly or tap the icon to validate the last phone number.
6. Accept/Reject/End Call
6.1 During ringing, short press TEL button to accept the call
6.2 During ringing, short press HANG UP button to reject the call
6.3 During talking, short press HANG UP button to end the call
Note: During ringing, the phone number appears on the screen.
7. Bluetooth Audio Streaming
To transfer the audio of a file played by Mobile Phone to the Car Audio Player
In the connection status between the Bluetooth devices of the Car Audio Player
and a Mobile Phone, if the mobile phone can play audio or video files and support
A2DP, when the Mobile Phone plays an audio file(For some Mobile Phones, you
must select Play by BT firstly), the audio of the playing file will be transferred
to the Car Audio Player.
In A2DP mode, if the Bluetooth device of the Mobile Phone support AVRCP, the
functions of the >>|, |<< , PLAY/PAUSE , EJECT, MUTE, EQ, LOUD, VOL and SEL
buttons are the same as one in media mode(no fast forward/rewind functions for
the >>|/|<< buttons). The other buttons available in media mode are not available.
-30-
Page 33

Tro uble Sh ootin g
Please read t he us er’ s manual caref ull y before using t he DV D player. If you ha ve an y troubles
in using this p lay er, try to solve th e pro blems by th e sug ges tions men tio ned b elow. If you c an
not remove th e tro uble afte r usi ng al l the sugge sti ons , please co nta ct th e company o r the
technical s erv ice center aut hor ized by us. F or th e sak e of your saf ety, please do no t ope n the
cover and rep air t he player by you rse lf, if that , it ma y cau se electr ic sh ock .
NO PICTURE, S OUN D AND INDI CATION
* Ensure that t he po wer switc h is on .
* Ensure that t he po wer cord is n ot da mag ed or the fus e is no t blo wn.
* Ensure that t he po wer plug is conn ect ed to the inl et ti ght ly.
NO SOUND BUT HAVE PICT URE
* Ensure that t he pl ayer’s audio outp ut ha s a good connect ion w ith amplifie r’s a udi o input.
* Check wheth er th e audio connec tor i s damaged .
* Check wheth er yo u have turned do wn th e volume.
* Ensure that y ou ha ve set the ri ght AU DIO s etup of the p lay er.
* Ensure that t he au dio is not un der m ute d.
NO PICTURE BU T HAVE SO UND
* Ensure that t he pl ayer’s video outp ut ha s a good connect ion w ith monitor ’s vid eo in put.
* Ensure that y ou ha ve turned y our m oni tor to the AV inp ut channel con nec ting to your pla yer.
* Check wheth er th e video connec tor i s damaged .
* Ensure that y ou ha ve set the ri ght V IDE O setting s of th e pla yer.
BLACK AND WHIT E PIC TURE OR SCR EEN R OLL ING
* Ensure that y ou ha ve set the ri ght T V SYSTEM (e .g. PAL, NTSC) se tti ng.
FLAWS OF PICTURE OR S OUN D
* Check wheth er th e setting o f AUDI O is ri ght.
* Check wheth er th e disc is scr atc hed o r stained .
* Check wheth er th e AV con nec tor and the o utp ut te rminal is s tai ned.
* Check wheth er th ere is condens ati on inside t he Le ns. I f so, leave t he pl aye r off fo r an ho ur
or so, then try a gai n.
* Check wheth er th e installati on an gle is less t han 3 0°.
DISPLAY NO DI SC OR B AD DISC
* Ensure that y ou ha ve put the di sc in t he un it.
* Check wheth er th e disc is put in the r eve rse side.
* Check wheth er th e disc is distor ted .
* Check wheth er th e disc is sta ine d or sc ratched b adl y.
* Ensure that t he di sc format i s com pat ible to the p lay er.
* Ensure that t he te mperatu re in sid e the car is no t too h igh . If so, cool o ff till the ambi ent
temperatu re re turns to no rma l.
* Replace ano the r disc to insert i t int o the disc co mpa rtm ent.
REMOTE CONT ROL IS I NSE NSITIVE OR DOE S NOT WORK
* Check the bat ter ies of remo te co ntr ol and make s ure t hat t hey are pow erf ul an d have
good conduc tiv ity.
* Direct the re mot e control t o the I R sen sor of the pl aye r.
* Check wheth er th ere are some obs tac les betwe en th e rem ote contr ol an d IR se nsor.
SOME FUNCTI ON BU TTON S DO NO T WORK
* Turn off th e pow er, then tur n on ag ain .
* Reset the uni t to ze ro, then tu rn on a gai n.
* Remove the fr ont p anel from t he un it, t hen insta ll it a gai n and then tu rn on a gai n.
THE RADIO DOE S NOT WORK
* Check wheth er th e antenna cabl e is co nnected f irm ly. Or manua lly t une for a statio n.
-31-
Page 34

Specificatio n
General Specif icati on
Power Supply Req uirem ent.. .......................................... ..... .DC 12V
Maximum Pow er Output............4 x 80W(measured at DC 14.4 V)
Dimension s(w x h x d)................................... ..7”W x 2”H x 6.3”D
DVD Deck Specifi catio n
Format........... ..... ..... ..... ...........DVD/VCD/JPEG/MP4/MP3/ WMA/C D
Video S ystem ....................NTSC/PAL/PAL-M/PAL-N/ AUTO(optional)
Audio System.. ..... ..... ..... ..... ..................................... ...24 b it/96 KHz
Loading System ..... ..... ..... .......................................... . Auto Loading
Mounting Angle................. ..... ..... ..... .................................0 to +/-30
Video S pecif ication
Video Type....................... ..... ..... ..... ..... ........................16:9 and 4:3
Video O utput l evel................................. ..... Compo site: 1.0± 0.2Vp-p
Load impedance: 75 ohms
Horizontal Res oluti on... .......................................... ..... ..... ..... ....500
Audio Specific ation
Audio Output(A nalog a udio) .......................................... 2.0 -1.0Vrms
Frequency Resp onse. ..... ..... ..................20Hz ~ 20KHz(at 1KHz 0 d B)
S/N Ratio(Audi o)... ..... ..... ................................≥90dB(a t 1KHz 0 dB )
Separation.. ..... ..... ..... .......................................... ..... ..... ..... ....5 0dB
+0
Radio Specific ation
FM Section
Frequency rang e.... ..... ..... .........................87.5MHz - 107.9M Hz(US )
87.5MHz - 108.0MHz(EU)
Usable sensiti vity..................................... ..... ..... ..... ..................3uV
I.F Frequency.......................................... ..... ..... ..... ..... ......10.7MHz
AM Section
Frequency.. .......................................... ..... ...53 0KHz - 17 10KHz(US)
522KHz - 1620KHz(EU)
-32-
 Loading...