

Page 1
10 R - 02 0896
4
Page 2
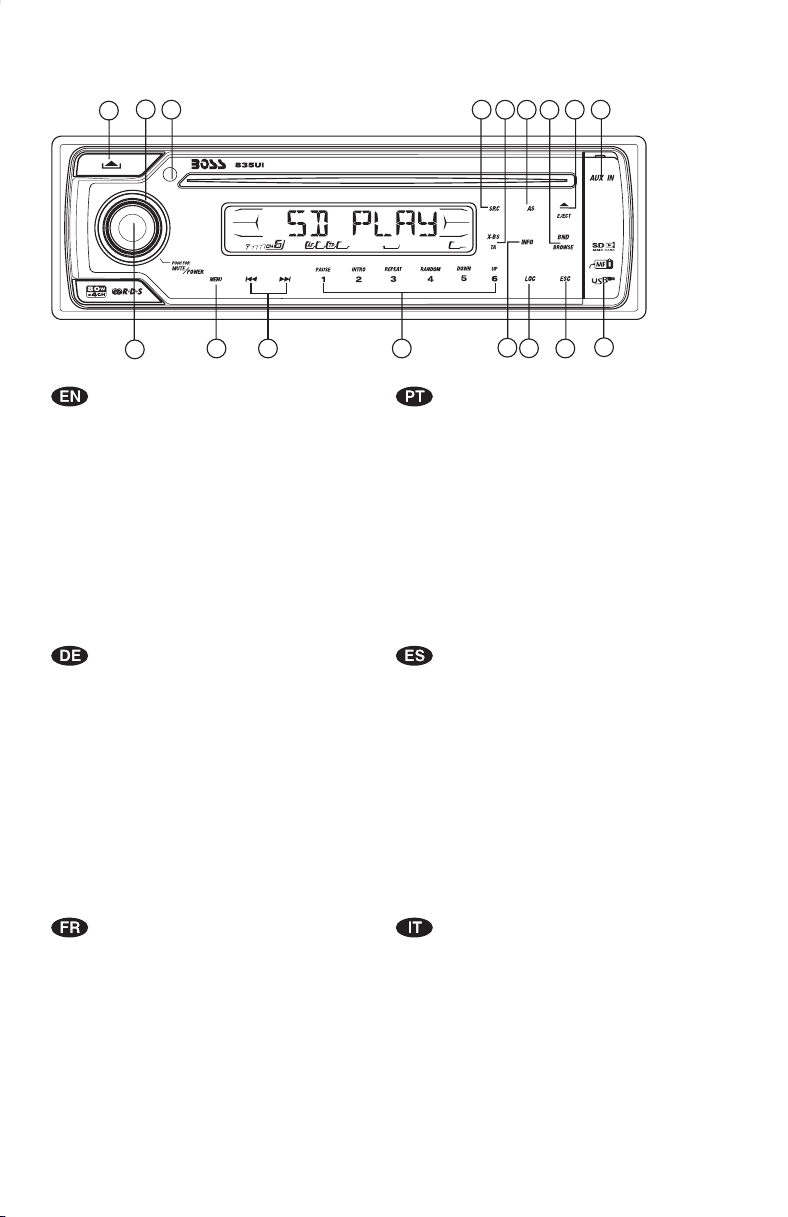
1. BUTTONS LOCATION AND FUNCTIONS
10
14
1
9
8
11
16
3
4
1. Panel ReleaseButton
2. Menu Button
3. CD EjectButton
4. Power /Mute Button
5. ESC Button
6. Local /Distant Button
7. Preset MemoryButtons
8. iX-BassButton / TAButton
9. Source Button
10. Volume Knob
11. AutomaticallyStore / PresetScan Button
12. Band/LoudnessButton / MP3Serach Button
13. TuningUp/Down &Track Up / DownButtons
14. RemoteControl Receiver
15. InformationButton
16. AuxIn Jack
17. USBSlot
1. Entriegel-Taste Bedienteil
2. Menu-Taste
3. CD-Auswurftaste
4. Stumm-Taste /Einschalt-Taste
5. ESC-Taste
6. Local/ Distant-Taste
7. Senderspeichertasten
8.
iX-Bass-Taste/ TA-Taste
9. Source-Taste
10. Lautstärkenregler
11. AMSTaste /MP3 Suchlauf Taste
12. Frequenzband-Taste /MP3 Eingabe-Taste
13. TitelAUF / AB- Taste
14. Fernbedienungs-Taste
15. INFO-Taste
16. Front-Audio-Anschluss
USB -Taste
17.
21213 7
15
6
1.Teclapara removero painelfrontal
2.Teclade ajustede menu
3.Teclapara ejetaro disco
4.TeclaLigar/desligar &TeclaMute
5.TeclaESC
6.TeclaLocal/Distante
7.Teclasde memóriade estações
8.
FunçãoIX-BASS/TecalTA
9.TeclaSource
10.Controle devolume
11.Memorização automática(As) /PresetScan (Ps)
12.TeclaBanda /Loudness /MP3Search
13.Teclasde sintonizaçãode estações/
14.Sensor docontrole remoto
15.Informação MP3-iD3
16.Entrada Auxiliar
17.
EntradaUSB
1. Extraccióndel panel frontal
2. TeclaMenu
3. Aperturadel panel motorizadoy expulsióndel disco
4. Silenciamientorápido / Encendido/Apagado
5. BotónESC
6. BotónDistancia/Local
7. Botonesde estaciones memorizadas
8. BotóniX-Bass /Botón TA
9. Selecciónmodos Radio/CD/Entrada auxiliar
10. BotónDe Volumen
11. MemorizaciónAutomática de emisoras
/ selecciónde memorias
12. SelectorBandas / Bajos/MP3
13. Botónde selección deemisoras &banda de música
14. Receptorde control remoto
15. ID3TAG muestra
16. Entradade auxiliar
17.
Entrada deUSB
17
5
mudançade faixasde música
1. BoutonDe DéclenchementDu Panneau
2. BoutonDe SélectionMenu /Entrée DeMP3
3. BoutonÉjection D'unCd
4. BoutonD'assourdissement /Bouton D'alimentation
5. BoutonESC
6. BoutonLocal/distant
7. BoutonsDes StationsPréréglées (m1~m6)
BoutonDeiX-Bass/ ButtonTA
8.
9. BoutonDe Régime
10.BoutonDeVolume
11.BoutonDeStockageDesStationsDansLaMémoire
12.BoutonDeBande /Entrée DeMP3
13.BoutonDeRechercheDesStations/pistes:EnAvant/EnArrière
14.RécepteurDeLaCommandeÀDistance
15.AffichageD'informationSurLesDisquesMP3
16.AuxAJack
17.
USBSlot
1. TastoRilascio Frontalino
2. MenuControlla
3. TastoEject
4. TastoMute /Tasto Power
5. TastoESC
6. BottoneDistante Locale
7. TastiStazioni MemoriePreimpostate
8.
Bottone Bassi/ Bottone TA
9. TastoMode
10. TastoVolume
11. TastoMenu &AS/PS
12. TastoBanda/Forte& EnterMP3
13. Tastosintonizzazione su/gui& traccia su/gui
14. Destinatariodi controllo remoto
15. Tastoinformazioni
16. EntradaAux
17. EntradaUsb
Page 3

This radio is equipped with the most advanced "TOUCH SENSE PANEL", so that it is easy and
convenient to use while driving.
Here are some tips to show you how easy it is to use this touch sense panel:
Tips
Using a very light touch on the radio panel will activate that feature. You will not need to
"PRESS" hard onthe panelto make thisradio change features.
The power button along with some of the buttons that have dual functions, will need to be
"TOUCHED" from 2to 3 secondsto make the change.
The best areato "TOUCH"on the panelto make itactivate isthe illuminated orlighted area. For
example, just touchfor 2to 3 secondsthe illuminatedpower symbol andthe unitwill turn onor
off.
Page 4
2. NOTE OF DISCS
MOISTURE CONDENSATION
On a rainy day or in a very damp area, moisture may condense on the lenses inside the unit.
Should this occur, the unit will not operate properly. In such a case, remove the disc and wait for
about an houruntil the moisturehas evaporated.
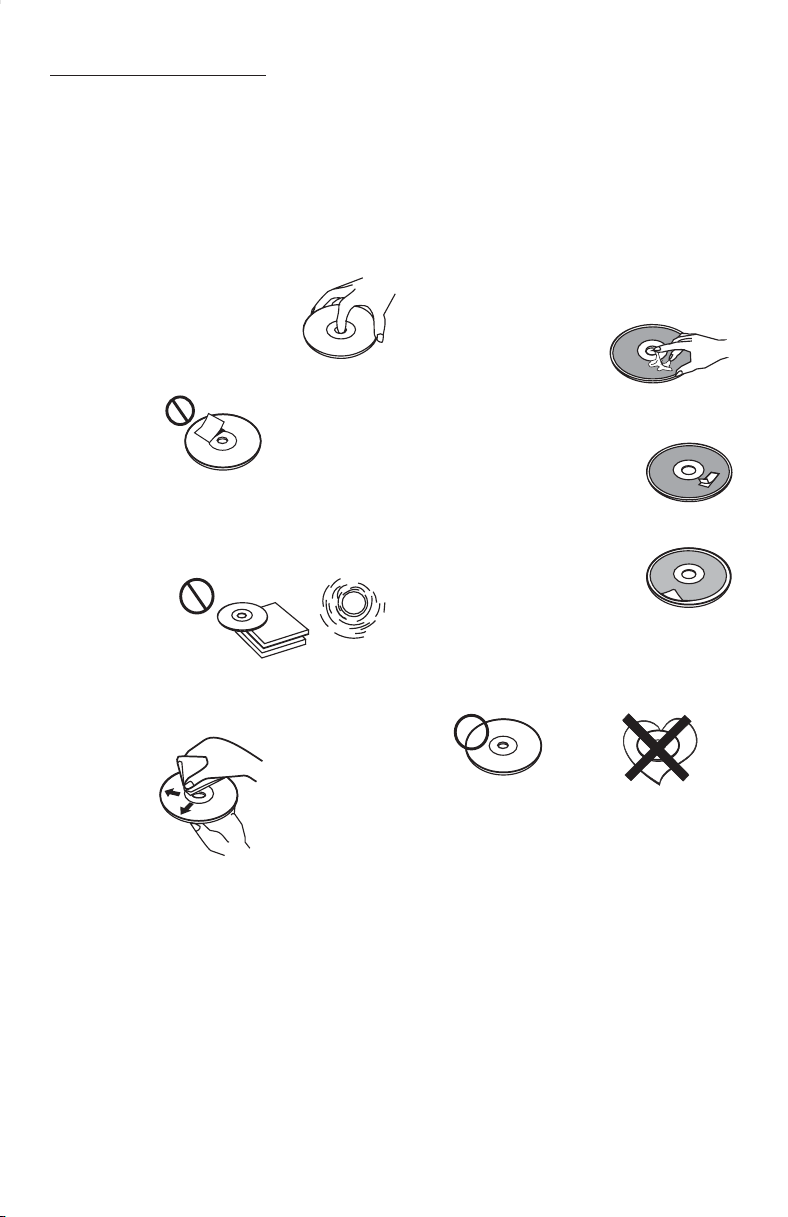
NOTESONCDs
1.
A dirty or defective disc may cause sound
dropouts while playing. To enjoy optimum
sound, handle thedisc as follows.
Handle the disc by its edge. To keep the disc
clean, do nottouch the surface(P.1).
P. 1
Do not stickpaper or tapeon thedisc (P.2).
2.
P. 2
Do not expose the discs to direct sunlight or
3.
heat sources such as hot air-ducts, or leave
them in a car parked in direct sunlight where
there can be a considerable rise in
temperature inside thecar (P.3).
P. 3
4.
Before playing, clean the discs with an
optional cleaning cloth. Wipe each disc from
the centre out (P.4).
NOTESONDISCS
If you use the discs explained below, the
sticky residue can cause the CD to stop
spinning andmay causemalfunction orruin
your discs.
Do not use second-hand or rental CDs that
have a sticky residue on the surface (for
example, from peeled-off stickers or from
ink, or glueleaking from underthe stickers).
There are paste residue.
Ink is sticky (P.5).
P. 5
Do not use rental CDs with old labels that
are beginning topeel off.
Stickers that are beginning
to peel away, leaving a
sticky residue (P.6).
P. 6
Do not use your CDs with labels or stickers
attached.
Labels are attached (P.7).
Do Not Use Special Shape CDs
P. 7
Be sure to use roundshape CDs only for this
unit and do not use any special shape CDs.
Use of special shape CDsmay causethe unit
to malfunction.(P.8).
****
*******
*******
*******
*******
**************
*******
*******
*******
*******
*******
*******
*******
*******
P. 4
Do not use solvents such as benzine,
5.
thinner,commercially available cleaners, or
antistatic spray intendedfor analog discs.
P. 8
Be sure to use CDs with disc mark
CD-Rs and CD-RWs which have not
undergone finalization processingcannot be
played. (For more information on finalization
processing, refer to the manual for your CDR/CD-RW writing software or CD-R/CD-RW
recorder.) Additionally, depending on the
recording status, it may prove impossible to
play certain CDsrecord on CD-R or CD-RW.
CDE VERSION
E - 1
Page 5
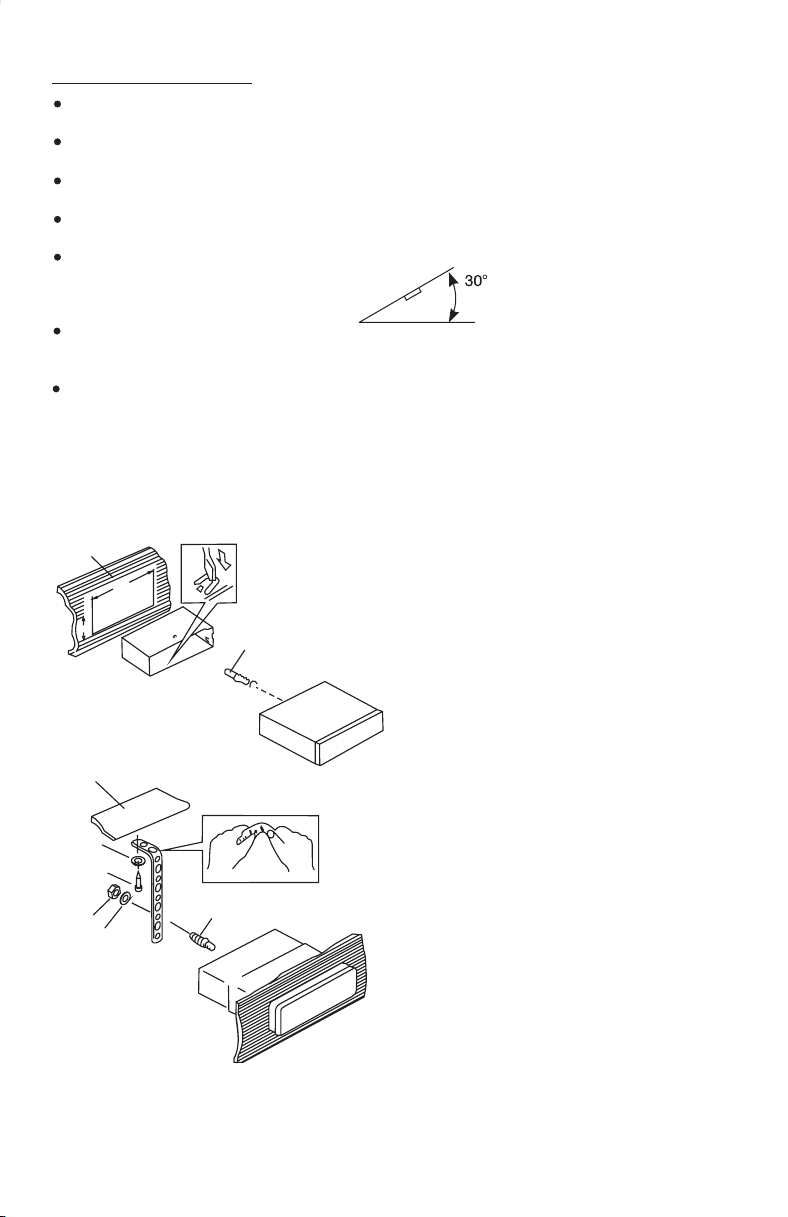
3. INSTALLATION
Before finally installingthe unit,connect the wiringtemporarily and makesure itis all connected
up properly andthe unit andsystem work properly.
Use onlythe parts included with the unit to ensureproper installation. The use of unauthorized
parts can causemalfunctions.
Consult with your nearest dealer if installation requires the drilling of holes or other
modifications of thevehicle.
Install the unitwhere it doesnot getin the driver'sway and cannotinjure the passengerif thereis
a sudden stop,like an emergencystop.
If installation angle exceeds 30° from horizontal, the unit might not give its optimum
performance.
Avoid installing the unit where it would be subject to high temperature, such as from direct
sunlight, or from hot air, from heater, or where it would be subject to dust dirt or excessive
vibration.
Be sure toremove the frontpanel before installing theunit.
DIN FRONT/REAR-MOUNT
This unit canbe property installedeither from “Front” (conventionalDIN Front-mount) or“Rear”(DIN
Rear-mount installation, utilizing threaded screw holes atthe sidesof the unit chassis). For details,
refer to thefollowing illustrated installationmethods A and B.
DIN FRONT-MOUNT (Method A)
Installation the unit
1
2
182
53
3
1. Dashboard
2. Holder
After inserting the half sleeve into the
dashboard, select the appropriate tab
according to the thickness of the
dashboard material and bend them
inwards to secure the holder in place.
3. Screw
1
7
4
2
3
6
5
1. Dashboard
2. Nut (5mm)
3. Spring washer
4. Screw (4x12mm)
5. Screw
6. Support Strap
Be sure to use the support strap to secure
the back of the unit in place. The strap can
be bent by hand to the desired angle.
7. Plain washer
E - 2
Page 6
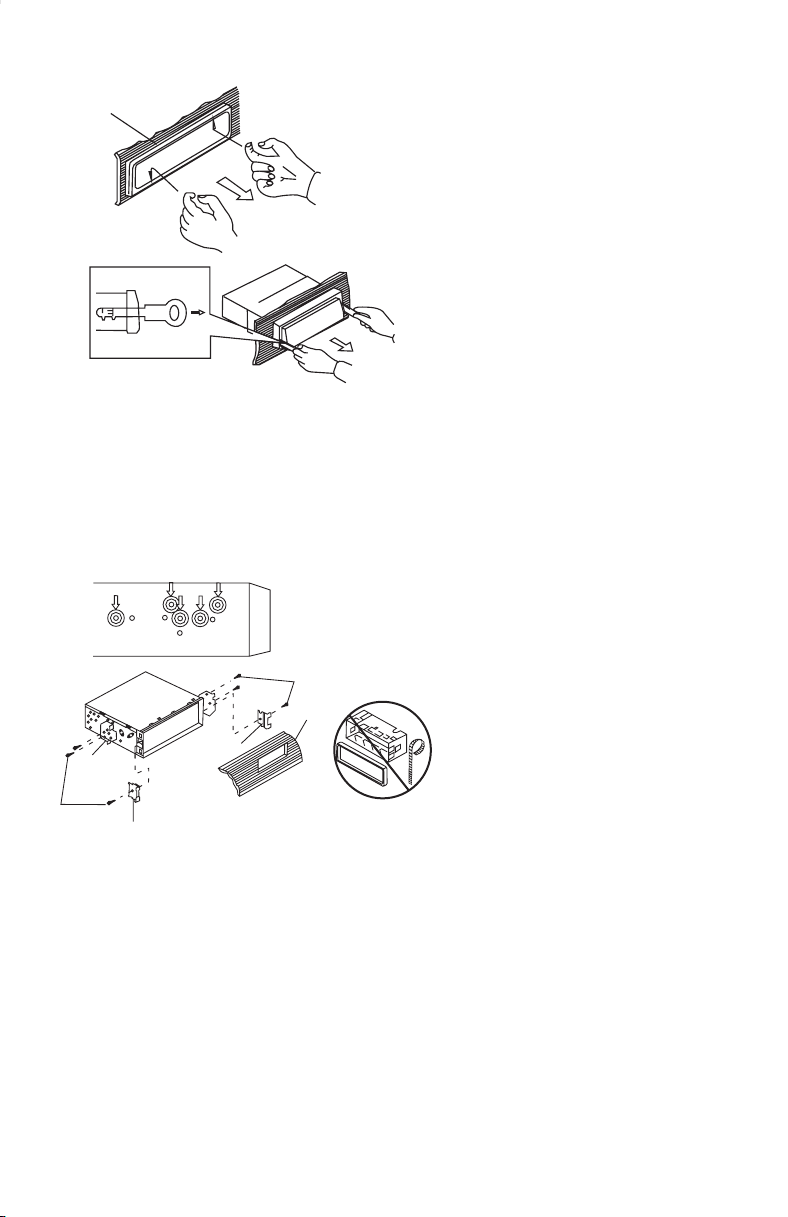
Removing the unit
a
a. Frame
b. Insert fingers into the groove in the
front of frame and pull out to remove
the frame. (When re-attaching the
b
c
Trim Plate Installation:
Push the trim plate against the chassis until it is fitted.
You must do this before you install the front panel, otherwise it can't be attached.
DIN REAR-MOUNT (METHOD B)
Installation using thescrew holes onthe sides of theunit.
Fasteningthe unitto the factoryradio mounting bracket.
2
4
5
3
2
5
frame, point the side with a groove
down wards andattach it.)
c. Insert the levers supplied with the unit
into the grooves at both sides of the
unit asshown infigure untilthey click.
Pulling thelevers makes it possible to
remove the unitfrom the dashboard.
1. Select a position where the screw
holes of the bracket and the screw
holes of the main unit become
aligned (are fitted) and tighten the
screws at 2 places on each side.
2. Screw
3. Factory radio mountingbracket.
4. Dashboard or Console
5. Hook (Remove thispart)
Note: the mounting box, outer trim ring,
and half-sleeve arenot used formethod B
installation.
E - 3
Page 7

4. DETACHABLE CONTROL PANEL (D.C.P.)
Removing The Detachable Control Panel (D.C.P.).
1. Turn the power off
2. Press the D.C.P. release button
PANEL RELEASE
BUTTON
Attaching the DCP
3. Remove the D.C.P.
2
A
B
1. Attach the panel at the right side first, with
point B on the main unit touching point A on the
D.C.P. (Asshown on thediagram).
2. Then pressthe left sideof D.C.P. ontothe main
unit until a“click” sound isheard.
CAUTION
DO NOT insertthe D.C.P from theleft side. Doing somay damageit.
The D.C.P can easilybe damaged byshocks.After removingit, placeit ina protectivecase andbe carefulnot
to drop itor subject itto strongshocks.
When the release button is pressed and the D.C.P is unlocked, the car's vibrations may cause it to fall. To
prevent damage tothe D.C.P, always storeit in aprotective caseafter detachingit.
The rear connectorthat connects themain unit andthe D.C.P isan extremelyimportant part.Be careful not to
damage it bypressing on itwith fingernails,pens, screwdrivers,etc.
Note:
If the D.C.P is dirty, wipe off the dirt with soft,
dry cloth only. And use a cotton swab soaked
in isopropyl alcohol to clean the socket on the
Socket
back of the D.C.P.
RESETTING THE UNIT:
After releasing the front panel, use a pencil or any non-metalic object to press & hold the reset
button for fiveseconds to resetthe unit.
T
E
S
E
R
E - 4
Page 8
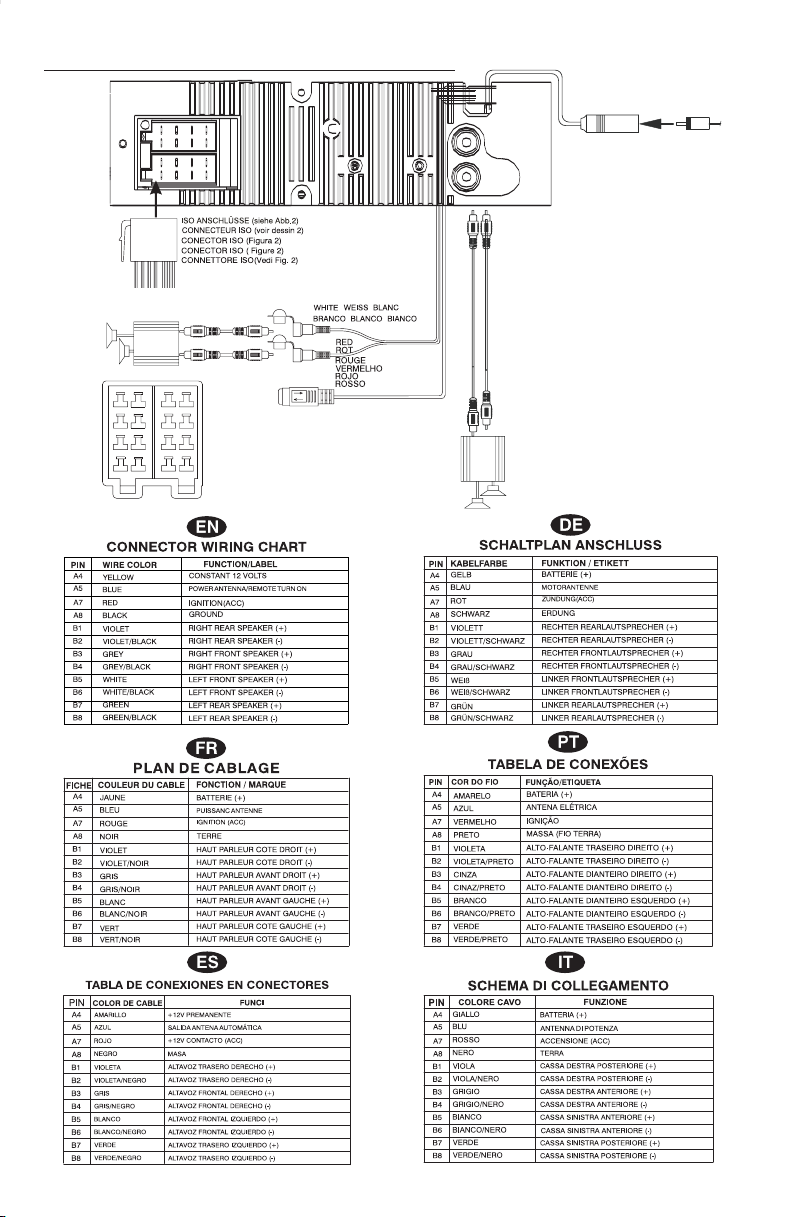
5. WIRING DIAGRAM (BUILT-IN ISO)
FUSE
/SALIDADE LINEA TRASERA/LINE OUT POSTERIORE
FRONT LINE OUT/VORDERER AUSGANG/SAÍDAFRONTAL
RCA-TO-RCACABLES (not supplied)
RCA-TO-RCA-KABEL (nicht geliefert)
CABLESRCA-TO-RCA (non fournis.)
CONNECTOR B
ANSCHLUSS B
CONECTOR B
CONECTEOR B
CONNECTOR B
CONNETTORE B
5
3
1
FIGURE 2/ABB.2/DESSIN 2/FIGURA 2/FIGURE 2/FIG 2
AMP
8
6
4
2
CABOS RCA A RCA (não fornecidos)
CABLESRCA A RCA (no incluidos)
CAVORCA A RCA ( non fornito)
75687
CONNECTOR A
ANSCHLUSS A
CONECTOR A
CONECTEOR A
CONNECTOR A
34
CONNETTORE A
12
L-CH
R-CH
iPod
/
/
/
/
WHITE
iPod READY CABLE
REAR
ANTENNACABLE INPUT
ANTENNENVERLÄNGERUNGSKABEL
CÂBLED'EXTENSION D' ANTENNE
ENTRADAPARA CABO DE ANTENA
CABLEDE ANTENA
CAVO ANTENNA ESTENDIBILE
L
R
/SALIDA DE LINEA TRASERA/
REAR LINE OUT/
RÜCKANSCHLUSS/SORTIE ARRIERE/SAIDA TRASEIRA
LINE OUT POSTERIORE
L-CH
R-CH
AMP
E - 5
Page 9

6. BASIC OPERATIONS
2)PANEL RELEASE BUTTON (REL)
Press this buttonto remove the controlpanel.
3) POWER ON/OFF BUTTON ( POWER/MUTE )
Press POWER/MUTE button or any other button onthe frontof theradio (exceptOpen/Eject)
to turn theunit on. Andhold & press POWER/MUTE button againto turn the unitoff.
3) MUTE BUTTON (POWER/MUTE)
Short press the POWER/MUTE buttonmomentarily tomute the audio volume, and "MUTE"will
flash in the display. Press the POWER/MUTE button again to restore volume to the previous
setting.
10) iX-BASS BUTTON (XBS)
Press the XBS button to turn on the iX-Bass function, and the “X-BAS” icon will appear on the
LCD display. Press theXBS button againto turnoff theiX-Bassfunction.
MODE BUTTON (MODE)
Press MODE button to select a different mode of operation as indicated on the display panel.
Available modes includeTUNER, DISC, USB,AUX-IN , SD CARD iPod
16) AUX IN JACK ON FRONT PANEL
Connect theexternal signal to AUX injack located at the frontof the panel , thenpress Mode
button to select Aux mode. Press Mode Button again to cancel Aux Mode and return to
previous mode.
1
AUX IN
FRONT CABINET
LEFT TRACK
RIGHT TRACK
2
GROUND
OPEN THE AUX-IN JACK DOOR/COVER
TO ACCESS TO THE AUX-IN JACK
AUX IN
5) ENCODER VOLUME BUTTON
To increase the volume, rotate the EncoderVolume Knobclockwise. To decrease thevolume,
rotate the Encoder Volume Knob counter clockwise. When volume is adjusted, the volume
level will beshown on thedisplay panelas anumber rangingfrom 0 (lowest)to 46 (highest).
15) EJECT BUTTON ( )
Press this button to eject the CD from the unit. The receiver will switches to radio mode
automatically.
E - 6
Page 10

7. SYSTEM MENU SETTING
1) MENU FUNCTION LIST (MENU)
Hold& Press MENUbutton toaccess into theSystem Menu settingmode. Will appear
in thedisplay momentarily. Navigatethe menu by pressing MENUmomentarily to move to the
next option. Once the desired option appears in the display, adjust that option by rotating the
Encoder Volume Knob(press the volume up / down button ) within 5 seconds. The following
options are adjustedthrough this menufeature.
PTY (Program Type)
Once into the PTY mode, you can be press Audio button to get into program type item, and
rotate Encoder Volume Konb toselected category.
Music Group
POP M, ROCK M
EASY M, LIGHT M
CLASSICS, OTHER M
JAZZ M, COUNTRY
NATION M, OLDIES M
FOLK M, A-TEXT, ALARM
AF ON/OFF (AlternateFrequencies)
User can rotate the Encoder Volume Knob to turn On / Off the AF ( Alternate Frequencies )
function. When AFin Onmode, the unitwill besearches for anotherstation withstronger signal
but with thesame program identificationas thecurrent stationautomatically.
REG ON/OFF (RegionalRadio)
User can rotatethe Encoder VolumeKnob to turnOn / Offthe Regional function.
[ REG ON]: Only stations inthe current region canbe tuned toautomatically.
[REG OFF]: All stationscan be tunedto automatically.
AREA (TUNER FREQUENCY SPACING)
This option allows the selection of the frequency spacing appropriate for your area. "AREA
U.S.A." is the default setting. Rotate the Encoder Volume Knob to select the U.S.A.,
EUR(Europe)
BEEP ON/OFF ( )
Beep Tone
The beep tone feature allows the selection of an audible beep tone to be heard each time a
button ispressed onthe faceof theradio. "BEEPON" isthe default display. Rotate the Encoder
VolumeKnob (Press thevolume up/downbutton) to selectthe "BEEP OFF”option.
INFO SYS (System Information )
Once into the System Information mode, press the Audio button to view the details system
software informations ofthis unit.
Speech Group
NEWS, AFFAIRS, INFO
SPORT, EDUCATE, DRAMA
CULTURE,SCIENCE, VARIED
WEATHER,FINANCE, CHILDREN
SOCIAL, RELIGION, PHONE IN
TRAVEL, LEISURE, DOCUMENT
E - 7
Page 11

8. ADJUST AUDIO SETTING
Press MENU button to access the Audio Menu. Once the desired menu item appears on the
display, adjust that option by rotate the Encoder Volume Knob. The following menu items can be
adjusted as describedabove.
BAS (Bass Level)
User has 5 seconds to use the Encoder Volume Knob to adjust the desired Bass level range
from -10 to+10.
TRE (Treble Level)
User has5 seconds to use theEncoder VolumeKnob to adjust the desiredTreble level range
from -10 to +10.
BAL (Balance)
User has5 seconds to use theEncoder VolumeKnob to adjust the Balancebetween the right
and left speakers from 10R (full right) to 10L (full left). “C00” represents an equal balance
between the rightand left speakers.
FAD (Fader)
User has 5 seconds to use the Encoder Volume Knob to adjust the Fader between the front
and rear speakers from 10R (full rear) to 10F (full front). “C00” represents an equal balance
between the frontand rear speakers.
E - 8
Page 12

9. TUNER OPERATION
8) BAND BUTTON (BROWSE/BAND)
Press BROWSE/BAND button to changebetween FM bandsand AM(MW)
14) TUNING UP/DOWN BUTTON ( )
Manual Tuning
Hold & press the Up Tuning or Down Tuningbutton tomove theradio frequencynumber up
or down onestep.
Auto Seek Tuning
Press the UpTuningor DownTuningbutton to moveto next stationautomatically.
11) PRESET STATIONS BUTTONS
Six numbered preset buttons store and recall stations for each band.
Store a Station
Select a band (if needed), then select a station. Hold a preset button for 3 seconds. The
preset number willappear in thedisplay.
Recall a Station
Select a band(if needed). Pressa presetbutton to selectthe correspondingstored station.
9) AUTOMATICALLY STORE / PRESET SCAN (AS)
Automatically Store
Automatically select 6strong stations andstore them in thecurrent band. Selecta band (if
needed). Press AS button for more than three seconds. The new stations replace stations
already stored inthat band.
Preset Scan
Scan stations storedin thecurrent band. Selecta band (ifneeded). PressAS button forless
than 3seconds. Theunit willpause forten secondsat each preset station. Press AS button
again to stopscanning when thedesired stationis reached.
STEREO
The unit will automatically pick up a stereo signal, when available. When in stereo mode,
the ST icon appears in the display. When no stereo signal is available, the unit will
automatically revert tomono operation, andno icon will bedisplayed.
7) LOCAL / DISTANCE SELECTOR
Short press theLO/DX button to select betweenLocal or Distant model.This featureis used
to designate the strength of the signals at which the radiowill stopduring automatictuning.
"Distance" is the default, allowing the radio to stop at a broader range of signals. To set the
unit to select only strong local stations during automatic tuning, press this button until
"Local" appears inthe display.
E - 9
Page 13

10. RDS OPERATION
RDS functions
The unit is equipped with the following RDS function:
- AF Alternative Frequencies
- CT Clock Time
- PI Program identifications
- PS Program servicename
- PTY Program Type
- TA TrafficAnnouncement
- TP Trafficprogram
1. TA Function
Hold &press theXBS/TA buttonto turnOn the TA standbymode, the “TA” icon will beappear in
the display. In the stand by mode, when a traffic announcement broadcast starts, the traffic
announcement broadcast willbe receivedas top priorityregardless ofthe function mode.When
a traffic announcement starts, “TRAFFIC INFO” will show on the LCD, press the TA button can
cancelled the broadcast reception while a traffic announcement broadcast is being received.
The unitwill goback tothe previous mode and TA goes into stand by mode again. When the TP
icon is not light up for 60 seconds. A beep Alarm tone is heard and the LCD will show “Lost TP,
TA”. TA seek willautomatic activate andsearches toanother TAstation.
E - 10
Page 14

11. CD /MP3/WMA OPERATION
INSERT AND EJECTCD
Insert a CD label-side up with the unit turned on, and the disc will begin to play. Press the Eject
button to stopCD play andeject the CD. The unit doesnot have tobe turned on toejectthe CD.
CD-DA OPERATION
PAUSE BUTTON ( )
Press the PAUSE button to suspend disc play. Press the PAUSE button again to resume
discPlay.
14) TRACK SELECT ( )
Press theUp Tuning or Down Tuning button ( ) forless thanone secondto advance
to the nexttrack onthe CD, The selectedtrack numberwill appear onthe display. Pressand
hold the Up Tuning or Down Tuning button ( ) for more than one second to fast
forward or fastreverse through thedisc. CDplay startswhen thebutton is released.
M2) INTRO BUTTON (INT)
During disc play, press INT (Intro) button to play the first 10 seconds to each track on the
disc. Whenthe desiredtrack is reached, press INT (Intro) buttonagain toend the scan and
play the selectedtrack.
M3) REPEAT BUTTON (RPT)
Press RPT (Repeat) button during disc play to continuously repeat the track. Press RPT
(Repeat) button againto stop Repeating.
M4) RANDOM BUTTON (RDM)
Press RDM(Random) buttonduring disc play to play all trackson a CD in random, shuffled
order. Press RDM(Random) again to stoprandom play.
MP3/WMA OPERATION
MP3 and WMA (Windows Media Audio) music files are audio compression format. This unit can
play MP3/WMA directlyfrom files containedon a CD-R/RW, USB MemoryStick, SD Card.
Notes on MP3/WMA Play
This unit can play MP3 (MPEG1, 2, 2.5 Audio Layer 3). However, the MP3 recording media and
accepted formats arelimited. When writingMP3/WMA, payattention to thefollowing restrictions.
Acceptable Medium Formats
The following formats are available for the media used in this unit. The maximum number of
characters used for file name including the delimiter (".") and three-character extension are
indicated in parentheses.
ISO 9660 Level 1 (11 characters)
ISO 9660 Level 2 (31 characters)
Joliet (31 characters)
Romeo (31 characters)
Up to 200 characters can be displayed in the long file name format. For a list of available
characters, see the instruction manual of the writing software and the section “Entering File and
FolderNames” below. Themedia reproducibleon thisunit hasthe following limitations:
Maximum number of nested folders: 8
Maximum number of files per disc: 2000
Maximum number of files per media device: 2000
Maximum number of folders per disc: 255
E - 11
Page 15

MP3/WMA writtenin theformats other than the above may notbe successfully played and their file
names or foldernames may notbe properly displayed.
MP3/WMA Encoder and CD Writer Settings
Use the followingsettings when compressingaudio datain MP3data withthe MP3 encoder.
Transfer bit rate : 32- 320 kbps
Sampling frequency : 32,44.1,48 kHz(WMA) 16,22.05,24,32,44.1, 48kHz (MP3)
When using a CD writer to record MP3/WMA up to the maximum disc capacity, disable additional
writing. For recordingon an emptydisc up tothe maximum capacityat once,checkdisc atonce.
Entering ID3 Tag
This unit supports ID3tag versions 1.0and 1.1.
Entering File and Folder Names
Names usingthe codelist characters are the only file namesand foldernames that can be entered
and displayed. Using any other character will cause the file and folder names to be displayed
incorrectly.The unit recognizesand plays onlyfiles with theMP3/WMA extension.
A file name entered with characters not on the code list may not play correctly.
Writing Files into a Media
When amedia containing MP3/WMA data is loaded, theunit checks all data. If the mediacontains
many folders or non-MP3/WMA files,MP3/WMA playwill bedelayed, it may take timefor theunit to
move to the next file, and searches may not be performed smoothly. Loading such a media may
produce loud noise and cause damage to the speakers. Do not attempt to play a media
containing a non-MP3/WMA file with the MP3/WMA extension or a media containing non
MP3/WMA files.
Bit Rates
The unit supports bit rates from 32 - 320 kbps.
E - 12
Page 16

Files Playing Order
When selectedfor play, Folder Search,File Search or Folder Select,files and folders are accessed
in theorder in which theywere written by the PC writer. Because of this, the order inwhich they are
expected to be played may not match the order in which they are actually played. For example, a
media with the following folder/file hierarchy is subject to Folder Search, File Search or Folder
Select as shownbelow.
An outline of a Media with MP3/WMA is shown below. Subfolders are shown as folders in the
folder currently selected.
1 LEVEL 2 LEVEL 3 LEVEL 4 LEVEL
ROOT
01
001.MP3
002.MP3
003.MP3
004.MP3
02
03
04
07
“NOT DISPLAY”
X
005.MP3
006.MP3
007.MP3
008.WMA
009.WMA
010.WMA
011.MP3
012.MP3
016.MP3
017.MP3
05
“NOT DISPLAY”
X
013.MP3
014.MP3
08
018.WMA
019.WMA
020.WMA
The equipment assigns folder
numbers. The user can not assign
folder numbers.
It is not possible to check folders that
do not include MP3/WMA files. (These
folders will be skipped without
displaying the folder number and
name)
“NOT DISPLAY”
X
06
09
“NOT DISPLAY”
015.MP3
021.MP3
022.MP3
023.MP3
X
FILE/FOLDER PLAY
There are three different play methods as following:
File/Folder Intro play:
Press M2 button more than 3 seconds during playing MP3/WMA disc for “intro play” all files of
the currentfolder.Intro play should restart from the firstsong of the current folder, after all files
in the currentfiles have beenintro-played.
Todisable currentfolder “intro play”,long press M2button more than3 seconds
Press M2 button less than 3 seconds is “intro play” all files on the disc. Intro play should restart at thevery first fileof the disc afterall files inthe dischas beenintro played.
Todisable allfiles “intro play”,press M2 buttonless than 3seconds
E - 13
Page 17

File/Folder Repeat play :
Press M3 button more than 3 seconds during playing MP3/WMA disc for “repeat play” all
files of the current folder. And keep on repeat playing the current folder until “repeat play” is
disabled.
Todisable currentfolder “repeat play”,long press M3button more than3 seconds
Press M3 button less than 3 seconds to “repeat play” the current file. And keep on repeat
Playing the currentfile until the“repeat play” is disabled.
Todisable currentfile “repeat play”,press M3 buttonless than 3seconds
File/Folder Random play:
Press M4button more than 3 seconds during playing MP3/WMA disc to “random play” allfiles
of the currentfolder.
Todisable currentfolder “random play”,long press M4button more than3 seconds
Press M4 buttonless than 3seconds is “random play”all files onthe disc.
Todisable allfile “ randomplay”, press M4button less than3 seconds.
Folder Up / Down Play
Press M5 button less than 3 seconds to One Folder Down
Press M6 button less than 3 seconds to One Folder Up
MP3/WMA File or Folder Search
Direct File Number Searching
Press BROWSE/BAND button. The LCD will display , and the will blink.
Rotate theEncoder Volume Knobto select the desired track number, then pressenter to confirm
and play theselected file.
Folder / Files Navigate Searching
Press BROWSE/BANDbutton twice. The LCDwill display , andthe will
blink. Rotate the Encoder Volume Knob to navigate throughall foldersand sub-folders on the disc.
The folder names will be displayed onthe LCD. Press the select knob for more than three seconds
to play thefirst filein the folder. Pressthe selectknob for lessthan three secondsto accessthe subfolders or files.Rotate theEncoder Volume Knobto navigate, then press theselect knob to confirm
and begin file play. During navigation search, press PS or rotate the Encoder Volume Knob
counterclockwise to moveback to thelast upper level ofa folder.
ID3 INFORMATION DISPLAY
If any MP3/WMA file recording with ID3 Tag information. The ID3 information such like Album title,
Track title, Artist Title will be displayed and automatic scrolling through the LCD while the file is
playing. User also allows pressing the INFO button repeatedly to view the ID3 tag information
manually.
E - 14
Page 18

1 . USB OPERATION2
The unit can support USB Host Function. It can playback MP3 and WMA Audio format which are
stored into USB Memory Stick or USB interface Music Player. Please read below before you start
the operation ofUSB HOST Function.
Inserting and Removing USB Drive
2
Inserting the USB stick
Warning:
Never Detach the Panel when a
USB stick was plug on the socket
1
Always remove the USB stick before detach
the panel
Removing USB Drive
1
Step
Secure panel with left hand
2
Step
Carefully remove USB drive
Mode change to USB HOST
Under any other mode while inserting a USB Stick into the front panel USB plug, the unit will
automatically switches frompresent playing modeto USB Host mode.The unit willdisplay
for a whilethen starts the files containedon theUSB Stick. Oncethe unitread the
USB Sticksuccessfully,the firstaudio music file on the USB stick Playback will Automaticallystart.
Press Mode buttonrepeatedly to changeto other modes orswitch back toUSB HOST.
WARNING:
Before remove the USB stick from the Front panel USB plug. Always remember to switch off the
unit's power or switch to other mode then remove out the USB Stick. Never try removing the USB
Stick while playing music file on the USB stick. It may damage the USB Stick and sometimes will
caused the unitsystem lock up.
The unit can support playback Music Playerwhich haveUSB Interface.However dueto the
fast changing decoder technology and different kind of hardware interface. This unit may
or may notbe compatibleto all theMusic Player and USBStick especiallythose USB Stick/
Player which requireto install aprogram driver.
About MusicFlash Playerwith USBInterface, Usually, the unit takes longer time to read this
kind of player than normal USB Stick. Especially, if the Flash Player with built-in power
battery sometimes takes20-30 seconds tostart up the playback
The unit isnot compatible toplaying any Portable Harddisk.
Music File Playback Operation
All the USB playback operationfunction issame asthe operation on CD/MP3/WMA. Please refer to
'CD/MP3/WMA Operation' formore details.
E - 15
Page 19

13. MEMORY CARD OPERATION
The unitcan supportplayback MP3 and WMA Audio format whichare storedinto SD Card. Please
read below beforeyou start theoperation of Memory Card.
Inserting and Removing a SD card on the main unit
1
Detach the
Front Panel
Face
Up
2
Insert the Memory Card
with Label up side
Push in till heard a “click”
3
Click
Inserting the SD card
1
Detach the
Push in till heard a “click” Remove the Memory Card
2
Click
3
Front Panel
Removing the SD card
Mode change to SD Card
After a SDcard was insertedinto themain unitcard slot.Press Mode buttonto select
mode, the unit will automatically playback files contained from the SD Card. Press Mode button
repeatedly is allowingchanging to othermodes or switch backto SD Cardmode.
If no any SD Card is inserted into the main unit card slot. Press mode button will
automatically skip SDCARD mode.
Music File Playback Operation
All the SD Card playback operation function is same as the operation on CD/MP3/WMA. Please
refer for more details.'CD/MP3/WMA Operation'
E - 16
Page 20

14. iPod OPERATION
This unit is equipped with iPod Ready function which allow end user to have direct control of the
iPod on the front panelcontrol buttonand displayiPod songinformation on the unit's LCD display.
Please read belowfor more detailsoperation.
iPod Compatibility Chart
This unit is support following iPod software version
iPod 1G Not Supported
iPod 2G Not Supported
iPod 3G Firmware Version 2.2
iPod Mini All versions
iPod 4G All versions
iPod Photo All versions
iPod Nano Nano All versions(Can not support 3G Nano)
iPod 5G(Video) All versions
Connect the iPod to this unit
8 Din iPod Ready Cable
HEAD UNIT
iPod
iPod iPod
photo
About Video File
This unit is NOT ABLE to select any VIDEO FILE OR VIDEO ALBUM which contained in the iPod
Video. Thisunit will only automaticallyselect Music Album orFile regardless the connectedVideo
iPodlast playingis a VideoFile or Album.
Turning iPod Power On and Off
The iPod power turns on automatically as soon as it is connected to the 30 Pin Connector and as
long as the vehicle's ignition is turned ON. The iPod power can be turned OFF by removing the
iPod from the 30 Pin Connector or if the vehicle's ignition is turned OFF. Under this condition the
iPodwill gointo pause modeand goes intosleep mode about2 minuteslater
While the iPod is connected, the power cannot be turned on or off from the iPod itself.
Tips
“ ” to disconnect will be shown in the iPod's display while it is connected to the unit .
OK to disconnect
iPod Battery Charging
While connected to the unit, the iPod will automatically start re-charging as long as the vehicle's
ignition key isturn to ACCor ON.
Switch to iPod Mode
When the Head unit is power on andiPod isconnected tothe 30 pin connector, press the Mode
button to changeto iPodMode andthe unit willdisplay for a whilethen starts
the musicfiles contained in the iPod and theplayback will automatically
start. Press Modebutton repeatedly to changeto other modes orswitch back to iPodmode.
mini
iPod
nano
iPod Cable
E - 17
Page 21

iPod information Display on the Head Unit LCD
This unit can display the Song, Artist, Album name and Elapsed time on the LCD display, these
information can be displayed by pressing the INFO button repeatedly while a iPod Song file is
playing.
Searching a Desire Song
Under iPod playbackmode, press BROWSE/BAND button to enter intothe iPodSearching Mode.
Pressing BROWSE/BAND button repeatedly to accesses the different searching methods as
below :
1) Playlist
2) Artist
3) Album
4) Song
5) Genre
Once selectedthe desire searching method, within10 second press the AUDIObutton as confirm
& access into the searchingmode, then turn the rotate Encoder Volume Knob to navigate thru the
Album or Artist or Song contained in the iPod. Press the AUDIO button to confirm & play the
selected song.During the searching mode, press INFO asquick moveback to the last upper level
of Album, Playlist,Genre, etc.
Song Select
Press the Track UP(>>) or Track DOWN (<<) button for less than one second to skip to the next
or previous song. Press and Hold Track UP (>>) or Track DOWN (<<) button for more than 3
seconds to fastforward or fastreverse ofthe currentsong.
Song Repeat
Press the M3 button for less than 3 seconds to “REPEAT PLAY” the current song. And keep on
repeat playing the current song until the “REPEAT PLAY” function is disabled. To disable current
song “REPEAT PLAY”,press the M3button less than3 seconds.
Random Play: / Random Album
Long press the M4 button for more than 3 seconds during iPod playback mode to activate the
“RANDOM ALBUM” function. This function allows RANDOM playback of all the albums
contained on the iPod. To disable “RANDOM ALBUM” function, long press M4 button for more
than 3 seconds.
Press the M4 button for less than 3 seconds during iPod playback mode to activate “RANDOM
PLAY”. This function allows the playback of all the songs in the iPod in random sequence. To
disable “RANDOM PLAY”, short pressM4 button againfor less than3 seconds.
E - 18
Page 22

15. REMOTE FUNCTION
OPERATIONS:
KEY
Short
Press
Power
1
Mute
2
Audio
3
Menu
Mode
4
Audio
5
6
Volume Down
7
8
9
10
Return
11
12
13
14
15
16
17
18
19
20
21
SYSTEM
Long
Press
System
Menu
Volume Up
iX-Bass
1
3
7
5
9
10
12
18
14
20
16
TUNER
Long
Short
Press
Press
Tune
Down
AS
Track/File
Trac k/Fi le
Tune Up
Seek Up
Seek
Down
M1
Memory 1
M2
Memory 2
M3
Memory 3
M4
Memory 4
M5
Memory 5
M6
Memory 6
Band
Info Info
TA
PS
CD/MP3/WMA
Short
Press
Enter
Up
Forward
Down
Backward
Pause
/Play
Intro
Repeat
Random
Folder
Folder
File
Browse
Random
Down
Up
2
6
4
8
11
13
19
15
21
17
Long
Press
Fast
Fast
Folder
Intro
Folder
Repeat
Folder
Short
Press
File
Up
File
Down
Pause
/Play
Repeat
Random
iPod
Browse
iPod Info
iPod
Backward
Long
Press
Fast
Forward
Fast
Album
Repeat
Album
Random
E - 19
Page 23

16. SPECIFICATIONS
CD PLAYER
System
Usable disc
Sampling frequency
No ofquantization bits
Frequency
Number ofchannels
S/N Ratio
MEDIA SECTION
USB Host
Memory Card
Support Type ofMemory Card
RADIO SECTION
FM
Frequency Range
Intermediate Frequency
Usable Sensitivity
Stereo Separation
S/N Ratio
AM/MW
Frequency Range
Intermediate Frequency
Usable Sensitivity
S/N Ratio
GENERAL
Power Supply
Polarity
Speaker impedance
Power Output
REMARK :
Specifications subjectto change withoutnotice.
Compact discaudio system
Compact disc
44.1KHz
1bit
5-20,000Hz
2 stereo
70dB
Host 1.1compatibles 2.0
SD andMMC
87.5-107.9MHz U.S.
87.5-108MHz EURO
10.7 MHz
Better than15dB at S/N30 dB
25 dBat 1KHz
50 dB
530-1710KHz U.S.
522-1620KHz EURO
450KHz
Better than45dB
40 dB
DC 11-14V
Negative Ground
4 ohms
4x 80Watts
CD Player
Sistema:
Tipo de disco:
Frequência de Amostragem:
Conversor D/A:
Resposta de frequencia
Número de canais:
Relação sinal/ruído:
Seção Mídia
Porta USB
Cartão de memória
Tipo de cartão compatível
Rádio FM
Faixa de Frequencia:
Frequência Intermediária:
Sensibilidade útil:
Separação estéreo
Relação Sinal/Ruído
AM/MW
Faixa defrequencia:
Frequencia intermediária:
Sensibilidade útil:
Relação Sinal/Ruído:
Geral:
Alimentação:
Polaridade:
Impedancia alto-falantes:
Potência de saída:
Nota:
As especificações estão sujeitas a alterações sem prévio aviso.
Sistema áudioCD
CD
44.1KHz
1bit
5-20,000Hz
2 estéreo
70dB
USB1.1, compatível com 2.0
SD e MMC
87.5-107.9MHz U.S.
87.5-108MHz EURO
10.7 MHz
Better than15dB at S/N30 dB
25 dBat 1KHz
50 dB
530-1710KHz U.S.
522-1620KHz EURO
450KHz
Better than45dB
40 dB
DC 11-14V
Terra negativo
4ohms
80w x 4
CD PLAYER
System
Abspielbare Discs
Sampling-Frequenz
Anzahl Quantisierungsbits
Frequenz
Anzahl Kanäle
Signalrauschabstand
SPEICHERMEDIEN
USB-Anschluss:
Speicherkarten:
RADIOTEIL
FM
Frequenzbereich
Zwischenfrequenz
Nutzbare Empfindlichkeit
Stereotrennung
Signalrauschabstand
AM/MW
Frequenzbereich
Zwischenfrequenz
Nutzbare Empfindlichkeit
Signalrauschabstand
ALLGEMEINES
Stromversorgung
Polarität
Lautsprecherimpedanz
Ausgangsleistung
ANMERKUNG:
Technische Änderungen ohne Meldepflichtvorbehalten.
LECTEUR CD
Système
Disques utilisables
Fréquence échantillonnage
Nbre dequantisation bits
Fréquence
Nombre decanaux
Ratio S/B
SECCION MEDIA
USB HOST
Cartes mémoires
Type decarte mémoire prisen charge
SECTION RADIO
FM
Gamme defréquences
Fréquence intermédiaire
Sensibilité utilisable
Séparation stéréo
Ratio S/B
AM/MW
Plage defréquences
Fréquence intermédiaire
Sensibilité utilisable
Rapport Signal/Bruit
GENERAL
Alimentation
Polarité
Résistance desenceintes
Puissance desortie
REMARQUE :
Les spécifications sont susceptibles d'être modifiées sans
préavis.
Compact DiscAudio System
Compact Disc
44,1 kHz
1 bit
5-20.000Hz
2 Stereo
70 dB
USB 1.1(USB 2.0 kompatibel)
SD,MMC
87.5-107.9MHz U.S.
87.5-108MHz EURO
10.7 MHz
Better than15dB at S/N30 dB
25 dBat 1KHz
50 dB
530-1710KHz U.S.
522-1620KHz EURO
450KHz
Better than45dB
40 dB
DC 11-14 V
Erde negativ
4 Ohm
80 Wx 4
Compact discaudio system
Compact disc
44.1KHz
1bit
5-20,000Hz
2 stéréo
70dB
Host1.1 Compatibles 2.0
SD etMMC
87.5-107.9MHz U.S.
87.5-108MHz EURO
10.7 MHz
Better than15dB at S/N30 dB
25 dBat 1KHz
50 dB
530-1710KHz U.S.
522-1620KHz EURO
450KHz
Better than45dB
40 dB
11 -14VDC
Masse /négative
4 ohms
80W x4
CD PLAYER
Sistema:
Disco:
Frecuencia Muestreo:
Cuantificación:
Frecuencia:
Número decanales:
Relación señal/RuidoS/N Ratio
PUERTO USB/SLOT
TARJETASSD/MMC
Puerto USB:
Slot tarjetas:
RADIO SECCIÓN
FM
Rango Frecuencia:
Frecuencia Intermedia:
Sensibilidad Útil:
Separación estereo:
S/N Ratio:
AM/MW
Rango Frecuencia:
Frecuencia Intermedia:
Sensibilidad útil:
S/N Ratio:
GENERAL
Alimentación:
Polaridad:
Impedancia altavoces:
Potencia desalida:
Nota:
Debido alrápido avance tecnológico,estas especificaciones están
sujetas acambios sin previoaviso.
LETTORE CD
Sistema
Tipo didisco
Frequenza dicampionatura
N° quantizzazioniBit
Frequenza
Numero diCanali
Rapporto S/N
SEZIONE MEDIA
USB Host
Scheda dimemoria
Schede supportate
SEZIONE RADIO
FM
Raggio diFrequenza
Frequenza intermedia
Sensibilità
Separazione Stereo
Rapporto S/N
AM/MW
Raggio diFrequenza
Frequenza intermedia
Sensibilità
Rapporto S/N
GENERALE
Alimentazione
Polarità
Impedenza altoparlanti
Potenza d'uscita
Le specifichesono soggette acambiamenti senza
alcun preavviso.
Compact discaudio system.
Compact Disc.
44.1KHz.
1bit.
5-20,000Hz.
2 estereo.
70dB
Host 1.1compatible con 2.0
Esta unidadsoporta tarjetas SD/MMC
87.5-107.9MHz U.S.
87.5-108MHz EURO
10.7 MHz
Better than15dB at S/N30 dB
25 dBat 1KHz
50 dB
530-1710KHz U.S.
522-1620KHz EURO
450KHz
Better than45dB
40 dB
DC 11-14V.
Negativo a masa.
4 Ohms.
4x80W.
Sistema di Audio CD
CD
44.1KHz
1 bit
5-20,000 Hz
2 stereo
70db
1.1 compatibili2.0
SD eMMC
87.5-107.9MHz U.S.
87.5-108MHz EURO
10.7 MHz
Better than15dB at S/N30 dB
25 dBat 1KHz
50 dB
530-1710KHz U.S.
522-1620KHz EURO
450KHz
Better than45dB
40 dB
Dc11 14V
Terranegativo
4 ohms
4x 80Watts
E - 20
Page 24

17. TROUBLE SHOOTING
Before going through the check list, check wiring connection. If any of the problems persist after
check list hasbeen made, consultyour nearest service dealer.
Symptom
No power
Disc cannot be
loaded or ejected
No sound
The operation keys
do not work
Sound skips.
The radio does not
work.
The radio station
automatic selection
does not work.
ERROR 1
Cause
The car ignition is not on.
The fuse is blown.
Presence of CD disc inside
the player.
Inserting the disc in reverse
direction.
Compact disc is extremely
dirty or defective disc.
Temperature inside the car is
too high.
Condensation.
Volume is in minimum.
Wiring is not properly
connected.
The built-in microcomputer is
not operating properly due to
noise.
The installation angle is
more than 30 degrees.
The disc is extremely dirty or a
defective disc.
The antenna cable is not
connected.
The signals are too weak.
Mechanism Error
Solution
If the power supply is properly connected to
the car accessory terminal, switch the ignition
key to “ACC”
Replace the fuse.
Remove the disc in the player, then
put a new one.
Insert the compact disc with the
label facing upward.
Clean the disc or try to play a new one.
Cool off or until the ambient temperature
returns to normal.
Leave the player to off for an hour or so,
then try again.
Adjust volume to a desired level.
Check wiring connection.
Press the RESET button.
Front panel is not properly fixed into
its place
Adjust the installation angle to less
than 30 degrees.
Clean the compact disc or try to play a
new one.
Insert the antenna cable firmly.
Select a station manually.
Press the reset button to correct the problem.
If the error code does not disappear, consult
your nearest service dealer.
Read Error
No File
Disc Error
The Media Device not able to
play file by the unit
No file Format supports for
Playback on the disc or
Media Device
Maybe disc dirty / disc scratched
/disc upside down.
Replace the Media Device or
Replace the disc or Media Device..
Replace the disc.
If at any time in the future you should need to dispose of this product please note
that Waste electrical products should not be disposed of with household waste.
Please recycle where facilities exist. Check with your Local Authority or retailer for
recycling advice.(Waste Electrical and Electronic Equipment Directive)
E - 21
 Loading...