

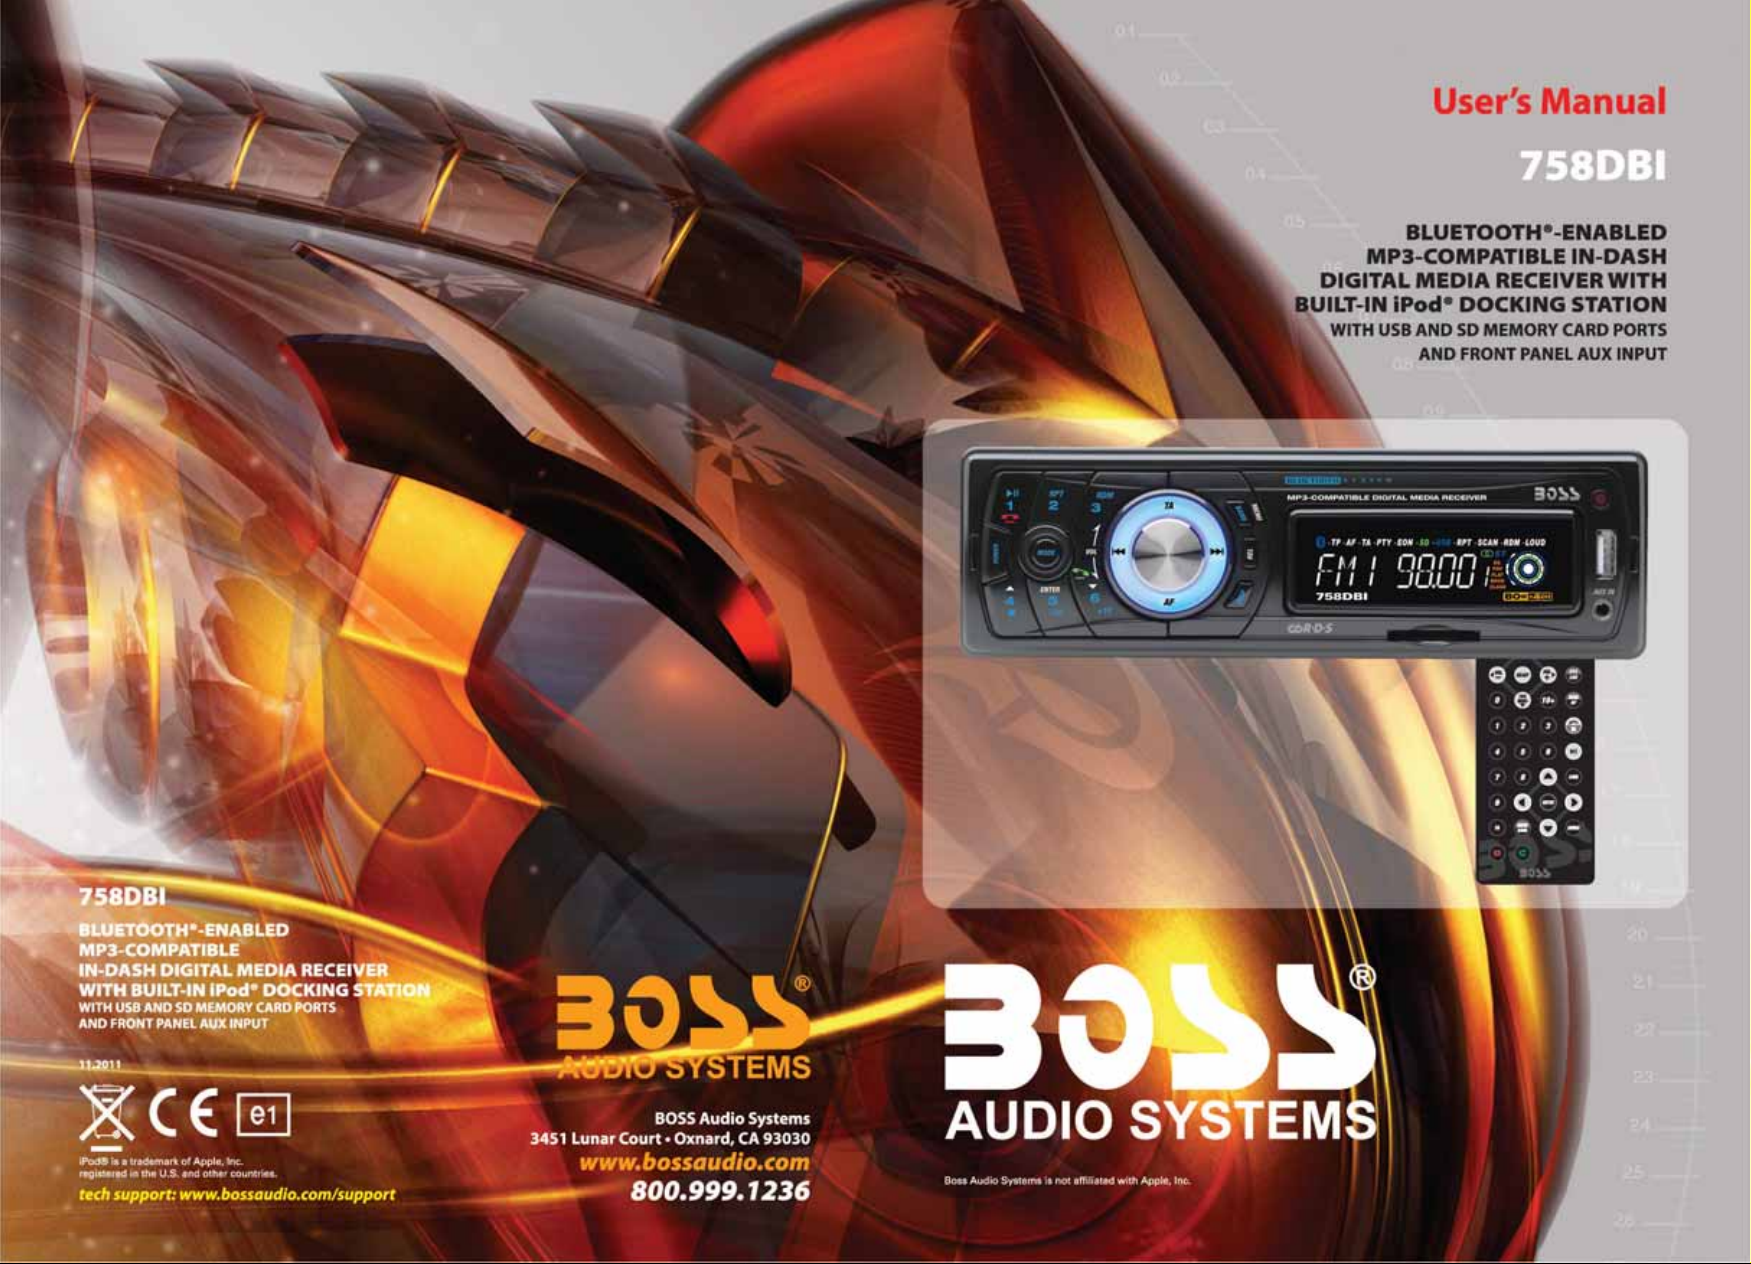
Page 1
Page 2

Trouble Shooting
Beforegoingthroughthe c heck list, checkwiringconnection. If any of the problems persist after check
list has been m ade, consul t your nearest service dealer.
Symptom
No power
No sound
The radio does not
work.
Theradiostation
automatic selection
does not work.
Cause
The car ignition is not on.
The fuse is blown.
Volume is in minimum.
Wiring is not properly
connected.
The antenna cable is not
connected.
The signal are too weak.
Solution
If the power supply is properly connected
to the car accessory terminal, switchthe
ignition key to " ACC "
Replacethe fuse.
Adjust volume to a desired level.
Check wiring connection.
Insert the antenna cable firmly.
Select a station manually.
Specifications
Supply voltage : 12V DC(11V-15V)
Current consumption : Lessthan10A
Audio SignalOutput : 2chlineout
Characteristics : (1) FrequencyResponse: 20Hz-20KHz
S/N Ratio: 50 dB(JIS)(2)
(Europe) (U.S.A.)
FM FM
Frequency Coverage:
87.5 to 108Mhz 87.5 to 107.9Mhz
IF 10.7Mhz 10.7Mhz
Sensitivity(S/N=30dB) : 20dBu 20dBu
AM AM
Frequency Coverage:
IF 450 450
522 to 1620Khz 530 to 1710Khz
Khz Khz
Sensitivity(S/N = 20dB) : 45dBu 45dBu
NOTE:
Specifications and designaresubjecttomodification, without notice,
due toimprovementsintechnology.
Ifatanytimeinthefutureyoushouldneedtodisposeofthisproductpleasenote
that Waste elec trica l product s s houl d not be dispo sed of with house hol d w aste .
Please r ecyc le where facilities e xist. Check w ith your Lo cal Au thorit y o r re taile r for
recycling advic e.(Wa ste Electri ca l and Elect roni c Equip ment Direct i ve)
PDF created with FinePrint pdfFactory trial version http://www.pdffactory.com
Page 3
SettingMode
You can make changes to the syste m setting in the following area:
Radio Frequency Range + Enable/DisableAUX In+ Clock Format
To enter setting mode, input the following command by pressing remote
keys 8, DOWN DIRECTION KEY,9, E NTER""
The display will show TEST MOD breiflyto indicate youare in
system s etting area and then automatica lly change to Radio Frequency
selection mode. At anytime, you can pressthe tostep through
the above areas. When you are ready to leave the System Setting area,
press ENTER. The unit will r eboot to initialize with the new setting.
- Radio Settings
The unit can operate on severa l differentfrequency ranges. P lease see
the following for these ranges.
BANDNAME FREQUENCYRANGE
AMERICA 1 FM:87.5-107.9MHz AM:530-1710kHz
AMERICA 2 F M:87.5-108MHz AM:520-1620kHz
AM ER ICA 3 FM: 87. 5-107. 9MH z AM: 530-16 20kHz
EUROPE FM:87.5-108MHz AM:522-1620kHz
MIDEAST FM:87.5-108 MHz AM:531-16 02kHz
AUST( A U STR A LIA) FM:87. 5 - 108MH z AM:5 2 2-1 7 1 0kH z
RUSSIA FM:65.0-108MHz AM:522-162 0kHz
To change the range to suit your location, press DOWNARROW unit
the desired frequency range is hight lighted. The press ENTER
to save it and move to next setting area.
-AUX Input Enable/Disable
Press DOWN ARROW to mov e between Enable and Disable modes.
When the selection has been made, press ENTER to save it and move to
next s etting area.
IfAUX Input is disable in System Settings, any input con nected will not
be played.
""
DOWNARROW
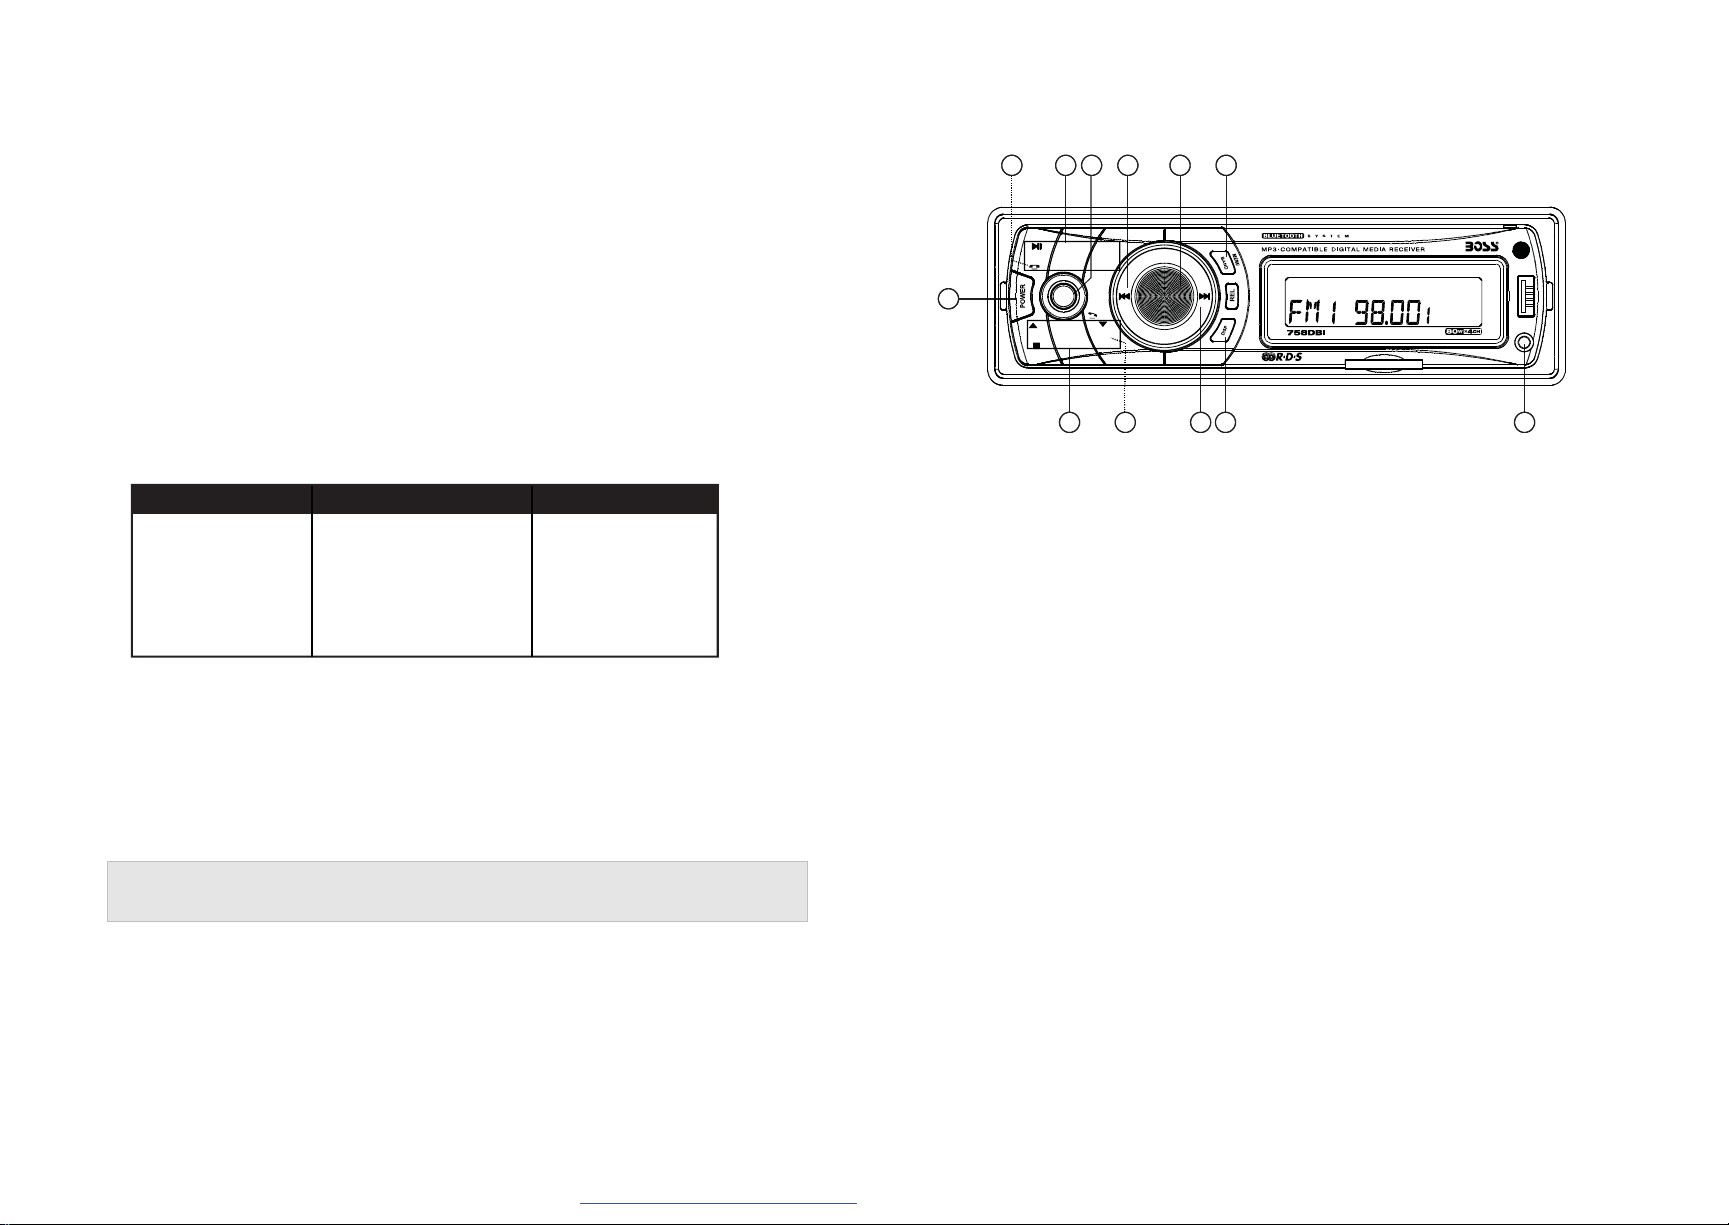
General and Radio Controls
573
RPT
MODE
ENTER
RDM
2
3
6
5
+10
-10
1
2
4
1. VOLUME UP/DOWN KNOB (turn)& AUDIO MOD E SELECTOE (push)
In normal mode, use this knob to increase or decrease the volume level.
To access the various sound parameters push the knob (like a button) to cycle
through the following adjustable settings:
VOLUME -> BASS ->TREBLE -> BALANCE -> FADER
Use the knob to increaseor decrease the settings for Volume, Bass, Treble,
Balanceand Fader.
In each mode, the waiting time is about 5 seconds, and the time wa iting time
is over,it returns to the last display mode.
The control mode of E.VOL is operated with following numeric display.
- VOL: (MIN)00, 01,......46, 47(MAX).
- BAS S/TRE: -07, -06,...,00,...+06,+07
- BAL: 0LR9, 1LR9, ..., 9LR9,..., 9LR1, 9LR0
- FAD: 0FR9,1FR9, ..., 9FR9,...,9FR1, 9FR0
Push and hold the knob(like a button) for more than 2 seconds to turn on
TAON/TAOFF, then push it and repeatedly to select TASEEK/TA A LARM,
PISOUND/PIMUTE, RETUNES/RETUNEL, MASK DPI/MASKALL, BEEP ON
/BEEPOFF,USER SET(FLAT,CLASSIC, ROCK, POP), VOL LAST/ VOL DEFA,
STEREO/MONO ,LOUND ON/LOUND OFF,
DX/LOCAL , CLKON/CLK OFF, CLK12/CLK 24 mode.
(inRADIO mode)
(inRADIO mode)
Use the knob to increaseor decrease the settingsfor these functions.
1911
TA
AF
10 1268 4
AUXIN
- Clock Format (12-hour or 24-hour)
Press DOWN ARROW to move between
12-houror 24-hour format,
press ENTER to save it and turn off this unit.
Page 10
PDF created with FinePrint pdfFactory trial version http://www.pdffactory.com
2. POWER /MUTE
Press POWER to turn unit on. Press the button to MUT E the audio. Press and
hold POWER to turn it off.
3. MODE (Input Select)
Press this button repeatedly to cycle through the audio input sources:
BLUETOOTH > AUX >TUNER > USB > CARD > IPOD
Please note:
iPod Mode can only be selected if an iPod is present in the dock.
Page 1
Page 4

4.AUX IN JACK
This jack is a convenientway to play music from an MP3 music player such
as an ipod through your car audio.
Simplyconnect the headphone output of the MP3 player to this input jack, and
press MODE button to selectAUX as input source and begin playing music on
the MP3 player.
Please note:
AUXIN Mode can only be selectedif it is enabled in the system Settings.
If you are having problems withAUX IN mode, pleasecheck the setting.
5&6. RADIO PRESETS 1-6
Thesebuttons are used to store the presets for radio stations. To set a preset,
tune to the desired radio station.Then press and hold the preset to which you
wishto assign that station for more than one second and release.Toreplace it
with a different station, repeat the process and the new setting will override
the previous one.
7&8. REJECT AND ACCEPT A CALL
To pair th e unit, tu rn on the Blueto oth mode of the mobile phone, then select the item
offinding the BluetoothDeviceand enterit.A fterfinishing the finding, it willshow
the nam e of th e Bluetooth Device if finding a B luetooth Device. Select it and en ter it,
thenit will showa interfacethat ask youto input a password.Inputthe password
0000 and enter it.
Thenit w ill tell you that pair OKand then connectionOK, and theLCD of the car audio
system will sho w CONNECT an d then show the name of th e Bluetooth Device of t he
mobile phone.
In BT mode, when recei ve a call,the LCD will show the receive phone number,
press the8 button to accept the call and press the 7 button to reject the call.
Installation
5mm nut
mounting case
support screw
head unit
Figure 1 Bending the support tabs Figure 2 Forming thesupport bracket
5x15mm
support screw
dashboardattachment
surface
supportstrap
support screw
Please not e (in BT connect mo de):
When your phone is connect to the head unit, the LCD will show BT-READY.
When dialling a call in connection status, the LCD will show CA LL OUT.
9.BAND
Press briefly,repeatedly to cycle between the five radio bands:
FM1>FM2>FM3>AM1>AM2
10&11.TUNE/SEEK UP/DOWN BUTTONS
Press these buttons briefly to step up or down the radio dial in single step
increments. Press and hold for more than one-haft second and the tuner will
enter the SEEK mo de. In this mode the tuner will stop at the next strong
stationavailable.
12.DISPLAY
Press to display or adjust the clock. Press and hold this button until the time
flashing then use the volume knob to adjust the time.
PDF created with FinePrint pdfFactory trial version http://www.pdffactory.com
Figure 3 Insert levers u nit click occurs,
thenuse l evels to pull out head unit.
“”
Page 11Page 2
Page 5

Wiring connection diagram
USB/SD Card (MP3 Playback) Controls
182
0.5A FU SE
RED R
WHITE L
LEFT FRONT
SPEAKER
LEFT REAR
SPEAKER
+
4OHM 4OHM
-
+
4OHM 4OHM
-
RCA LINE OUT
WHITE
WHITE/BLACK
GREEN
GREEN/BLACK VIOLET/BLACK
10A FU SE
GRAY
GRAY/BLACK
VIOLET
YELLOW (CONSTANT12 volts)
BLUE (ANT)
RED (ACC.12 volts)
BLACK (GROUND)
+
RIGHT FRONT
SPEAKER
-
+
RIGHT REAR
SPEAKER
-
RPT
RDM
2
1
MODE
ENTER
45
3457 6
6
-10
TA
3
10
AF
+10
9
AUX IN
To play tracks from a USB drive or S D card,insert the drive into the appropriate
port/slot on the faceplate. The display will show USB or CARD
““”,
”
indicating that the drive is being read.
The unit will display tracks when ready by file name (or, if cr eated with ID3-tag
information,with SongTitle,Artist andAlbum information) and w ill begin playing
the first track in the directory.
1.PLAY/PAUSE
Fileswill begin playback automatically upon insertion. Topause playback,
pressthis button. Press again to resume playback.
2.RPT(Repeat Play Mode)
Press this button to repeat the playback of all the files in the current folder
automatically.
“”RPTON/OFF will be displayed. Press again to cancel.
Page 10 Page 3
PDF created with FinePrint pdfFactory trial version http://www.pdffactory.com
3. STOP
Pressing S TOPwill stop playback.Torestart playback, press PLAY/PAUSE.
Playback will begin with the first song of the current folder directory (NOTthe
track thatwas last playing).
4&5. -10 BUTTON
+10 BUTTON
To skipback or ahead 10 tracks in the current folder,press this button.
6&7.I<< and >>I (Skip back/skip forward, Fast rewind/fast forward)
Press thesebuttons to skip back or ahead one track.
Page 6

8.RDM (Random PlayMode)
Press this button for playback of all the files i n the currentfolder in a random
order. RDM ON/OFF
9.SD CARD slot
Insert SD card in this slot for playback. Please note icon on panel which
shows youhow to orient card (angled cornergoes to left side of sl ot).
10. USB port
InsertUSB drive in this slot for playback.
“”will be displayed. Press again to cancel.
Because the mute time ofAF switching or checking time is veryshort, it is almost
inaudiblein case of normalprogram.
During FM mode, whenAF is on, SEEK, (SCAN),AUTO-MEMORY function can
only recei ve and s ave RD S pro gram .
8.AMS
In Radio mode, press this button to play each preset numberfor several
seconds;press and hold this button to searches from the current frequency
andchecks the signal strength level until 6 station are found.And then the 6
stationfrequency are preset to the correspondingpreset memory numbered
bank.The auto-storage operation is implemented in each selected band.
When the auto-storage operation is finished, the radio execute the Preset scan.
9.TA
In Radio mode,press th is butto n to activ ated as TAmode on or off.
WhenTAmode is on(TAis displayed on LCD), it will begin to seekTAstation
andTASEEK will be displayed on LCD for a while.
When traffic announcement is transmitted:
1).If the unit is in MMC/SD, USB mode, it will switch to radio mode temporarily.
2). If volume level is below 20, volume level is raised to 20, and returns to its
previousmode and volume level when the traffic announcement is over.
If volume is adjusted during traffic announcement, only the traffic
announcementvolume is valid.
* TAinterruption function:
The current traffic announcementis cancelled by pressing this key.B ut the
TA mode will not be off.
* WhenTAis on, SEEK, (SCAN), AUTO MEMORY function can be received or
saved o nly when traffic program identification cod e has been received.
WhenTA is ON, traffic programidentification code is not received during
specifiedtime.
PDF created with FinePrint pdfFactory trial version http://www.pdffactory.com
10.TUNE/SEEK & I<< and >>I (Skip back/skip forward, fast back/fast forward)
In radio mode, Press this button brieflyto step up or down the radio dail in
single step increments. Press and hold for half second to enter SEEK mode.
In this mode the tuner will stop at the next strong station available.
In MP3/SD/MMC mode, press those buttons to skip back or ahead one track.
Press and hold for fast back or fast forward.
11.VOLUME-/VOLUME+
Useto increase or decreasevolume level.
12.SOURCE (Input select, same as MODE on head unit)
Press the button repeatedly to cycle through the 5 audio input sources
in order to select either USBor SD modes.
Page 9Page 4
Page 7

Operationof Remote Controller
1.
POWER Use to turn receiver on/off
2.In BT mode , when receive a call, the LCD will
showthe receive phone number, press this
buttonto accept the call.
3.
In B T m ode, when receive a call, the LCD will
showthe receive phone number, press this
button to reject the call.
11
10
Please not e (in BT connec t mode) :
When yourphone is connect to the head unit, the
LCD will sho w BT-READY.
Whendialling a call inconnection status, the LCD
will sh ow CALL OUT.
4.EQ(PresetEqualizer Curves)
9
3
Pressrepeatedly to cycle through these modes:
FLAT,C LASSIC, ROCK, POP, USER SET.
5.MUTE
Press this button to silence the audio. Pr ess again to restore the previous
audio volume level.
415
12
iPod Playback Controls
Before removing the iP od from the dock, be sure to pause playbackOR use
theMODE swi tch to change to another mode.
12 3
RPT
MODE
ENTER
RDM
2
3
6
+10
-10
54
TA
AF
AUXIN
6
7
8
2
1
45
To play tracks from a iPod, first be sure youhave the proper dock adaptor
inserted in the docking drawer .Then insert the iPod. The display will show
iPod indicatingthat the iPod unit has been recognized. Press
“ RMT ”,
PLAY/PAUSEto begin playback.
6.PTY/LOC
In Radio mode, press this button to select PTY mode:
While selecting PTYTYPE, its selectionis implemented by preset buttons as
describedin preset key.(press one of the 6 preset buttons brieflyand
repeatedlyto select the PTYTYPE in the preset button) When POP M or
NEWS is on, the previous PTY program and PTY word is displayed on LCD.
Ifthere are no keys entered for 2 seconds, previously selected PTY is searched.
During1 loop, if desired PTY is not found, NO PTY is flashed, then return to
previousnormal radio and PTYword disappear.
Press and hold this button to select Local/DX mode:
In s ome areas, reception o f anAM station may b e weak. Changing the reception
mode to LOC by pressing this button allows the receiver to skip the weaker
signals.Press again to return to DISTANTmode.
7.RDM/AF
In Radio mode, press this but ton to activat ed asAF mode on or off.
WhenAFswitching mode is selected,the radio checks the signal strength ofAF
all the time. The interval of checking time of eachAFs dependson the signal
strength of current station, from a few minute forstrong stationto a few seconds
forweak station.
Everytime that newAF is stronger than current station,it switches over to that
frequencyfor very shorttime, and NEW FREQUENCYis displayed for 1-2
second.
Page 8 Page 5
PDF created with FinePrint pdfFactory trial version http://www.pdffactory.com
Most of the iPod s
menu functions can be displayedand controlledby the
758DBI.
However,you can always control the
iPod playback from the iPod itselfif that is
moreconvenient for you.
Please note that the iscompatiblewith almost all of the available
758DBI
iPod units.
If it is not, you can still use theAUX input to c onnect theheadphone output to
the , but you will not be able to control the iPod playback this way.
758DBI
IPod not recognized? Is iPod Enabled in the System Setting?
An iPod in the dock will only be recognized if the iPod function is enabled
in the System Settings. If the 758DBI does not recognize that an iPod is
present, ch eck the System Settings to ma ke sure that the iPo d function
is enabled.
1.PLAY/PAUSE
Pleaseto begin playback. Topause, press again. Press again to resume
playback.
2.RPT (Repeat Play Mode)
Press this button to repeat the playback of the current track.
Page 8

3.RDM (Shuffle Mode)
Press this button for shuffleplayback of all the files in your iPod playlist.
4&5.I<< and >>I (Skip back/skip forward, Fast rewind/fast forward)
Press thesebuttons to skip back or ahead one track. Press and hold for fast
rewind or fast forward.
iPod Dock adaptors
iPod compatibility
The 758DBI and its specially-designed,included dock adaptors are compatible
with a w ide range of iPod ty pes. The compatible m odels are show n below:
The comeswith a set of specialiPod adaptors which fit a wi de range of
758DBI
iPod models. These are specially designed for use with the , and hold
758DBI
the iPod firmly to the dock connector when the vehicle is in motion.
Please install the appropriate dock adaptor as described below.
PLEASE NOTE:
Official Apple Universal Dock Adaptors can not be used in the .
“” 758DBI
Do not attempt to connect you iP od to the dock without the appropriate,
specially-designedadaptor provided withthe .
758DBI
BossAudio Systems can not accept any responsibility for any damage or date
loss thatmay result from using your iPod in the and the specially-desiged
758DBI
dock adaptors.
1.Push on the face of the LCD to release
and open the iPod docking drawer.
Dock adaptor
2.Select the appropriate size dock adaptor
foryour iPod. Lower it into the recess in
the drawer, aligning the notches/tabs on
the FRONT edge first.
Slots on top edge of faceplate
3.Asyou lower the dock into the resess,
be sure to align the tabs on the REAR
edge of the dock adaptor with the slots
on the top edge of the faceplate, and
slide it down securely into place.
iPodMini iPodClassic iPodNano
iPodNano
1GB/2GB/4GB
(1st generation)
iPod Nano
4GB/8GB
(3rdgeneration) (4thgeneration)
iPod Nano
80GB/120GB 2GB/4GB/8GB
iPod video
30GB and ipho ne
(5th g eneratio n)
iPod Nano
(5th generation)
(2nd gener ation)
iPodTouch
8GB/16GB
(1st generation)
iPhone 4
If your iPo d is not o ne of tho se compatible mo dels shown above......
......you can still use the headphone out jack on the iPod and connect it to the
AUX input on the faceplate. Usethe MODE switch to selectAUX IN and use
the controls on your iPod to play music through the 758DBI.
PLEASE N OTE:
Official Apple Universal Dock Adaptor s con not be used in the 758DBI.
“”
Do not attempt to connect your iPod to the dock without the appropriate,
specially-desingedadaptor provided with the 758DBI.
BOSSAudio Systems can not accept any responsibility for any damage or date
lossthat may result from using your iPod int the 758DBI and the speciallydesigneddock adaptors.
4.Insert your iPod into the dock adaptor.
Press PLAY/PAUSEto begin playback.
Page 6
PDF created with FinePrint pdfFactory trial version http://www.pdffactory.com
iPod charging
The 758DBI circuitry is designed t recharge your iPod, giving youmany additional
hours to enjoy listeningto your library of music and Podcasts.
Page 7
 Loading...