

Page 1
Owner’s Manual
Main Features
• Color-changing display for excellent visibility
• Stylish design
• Accu-Pitch Sign function displays an indication and a color change to show that you’ve nished tuning
• Flat Tuning function, indispensable for guitar tuning
English
* 5 1 0 0 0 2 7 9 7 5 - 0 2 *
Before using this unit, carefully read the sections entitled: “USING THE UNIT SAFELY” and “IMPORTANT
NOTES” (supplied on a separate sheet). These sections provide important information concerning the
proper operation of the unit. Additionally, in order to feel assured that you have gained a good grasp of
every feature provided by your new unit, Owner’s Manual should be read in its entirety. The manual should
be saved and kept on hand as a convenient reference.
主な特長
• 多彩に変化するカラー表示で、抜群の視認性
• スタイリッシュなデザイン
• チューニング完了を表示と色の変化で知らせるアキュピッチ・サイン機能
• ギター・チューニングには欠かせないフラット・チューニング機能
日本語
取扱説明書
この機器を正しくお使いいただくために、ご使用前に別紙『安全上のご注意』と『使用上のご注
意』をよくお読みください。
また、この機器の優れた機能を十分ご理解いただくためにも、取扱説明書をよくお読みください。
取扱説明書は必要なときにすぐ見ることができるよう、お手元においてください。
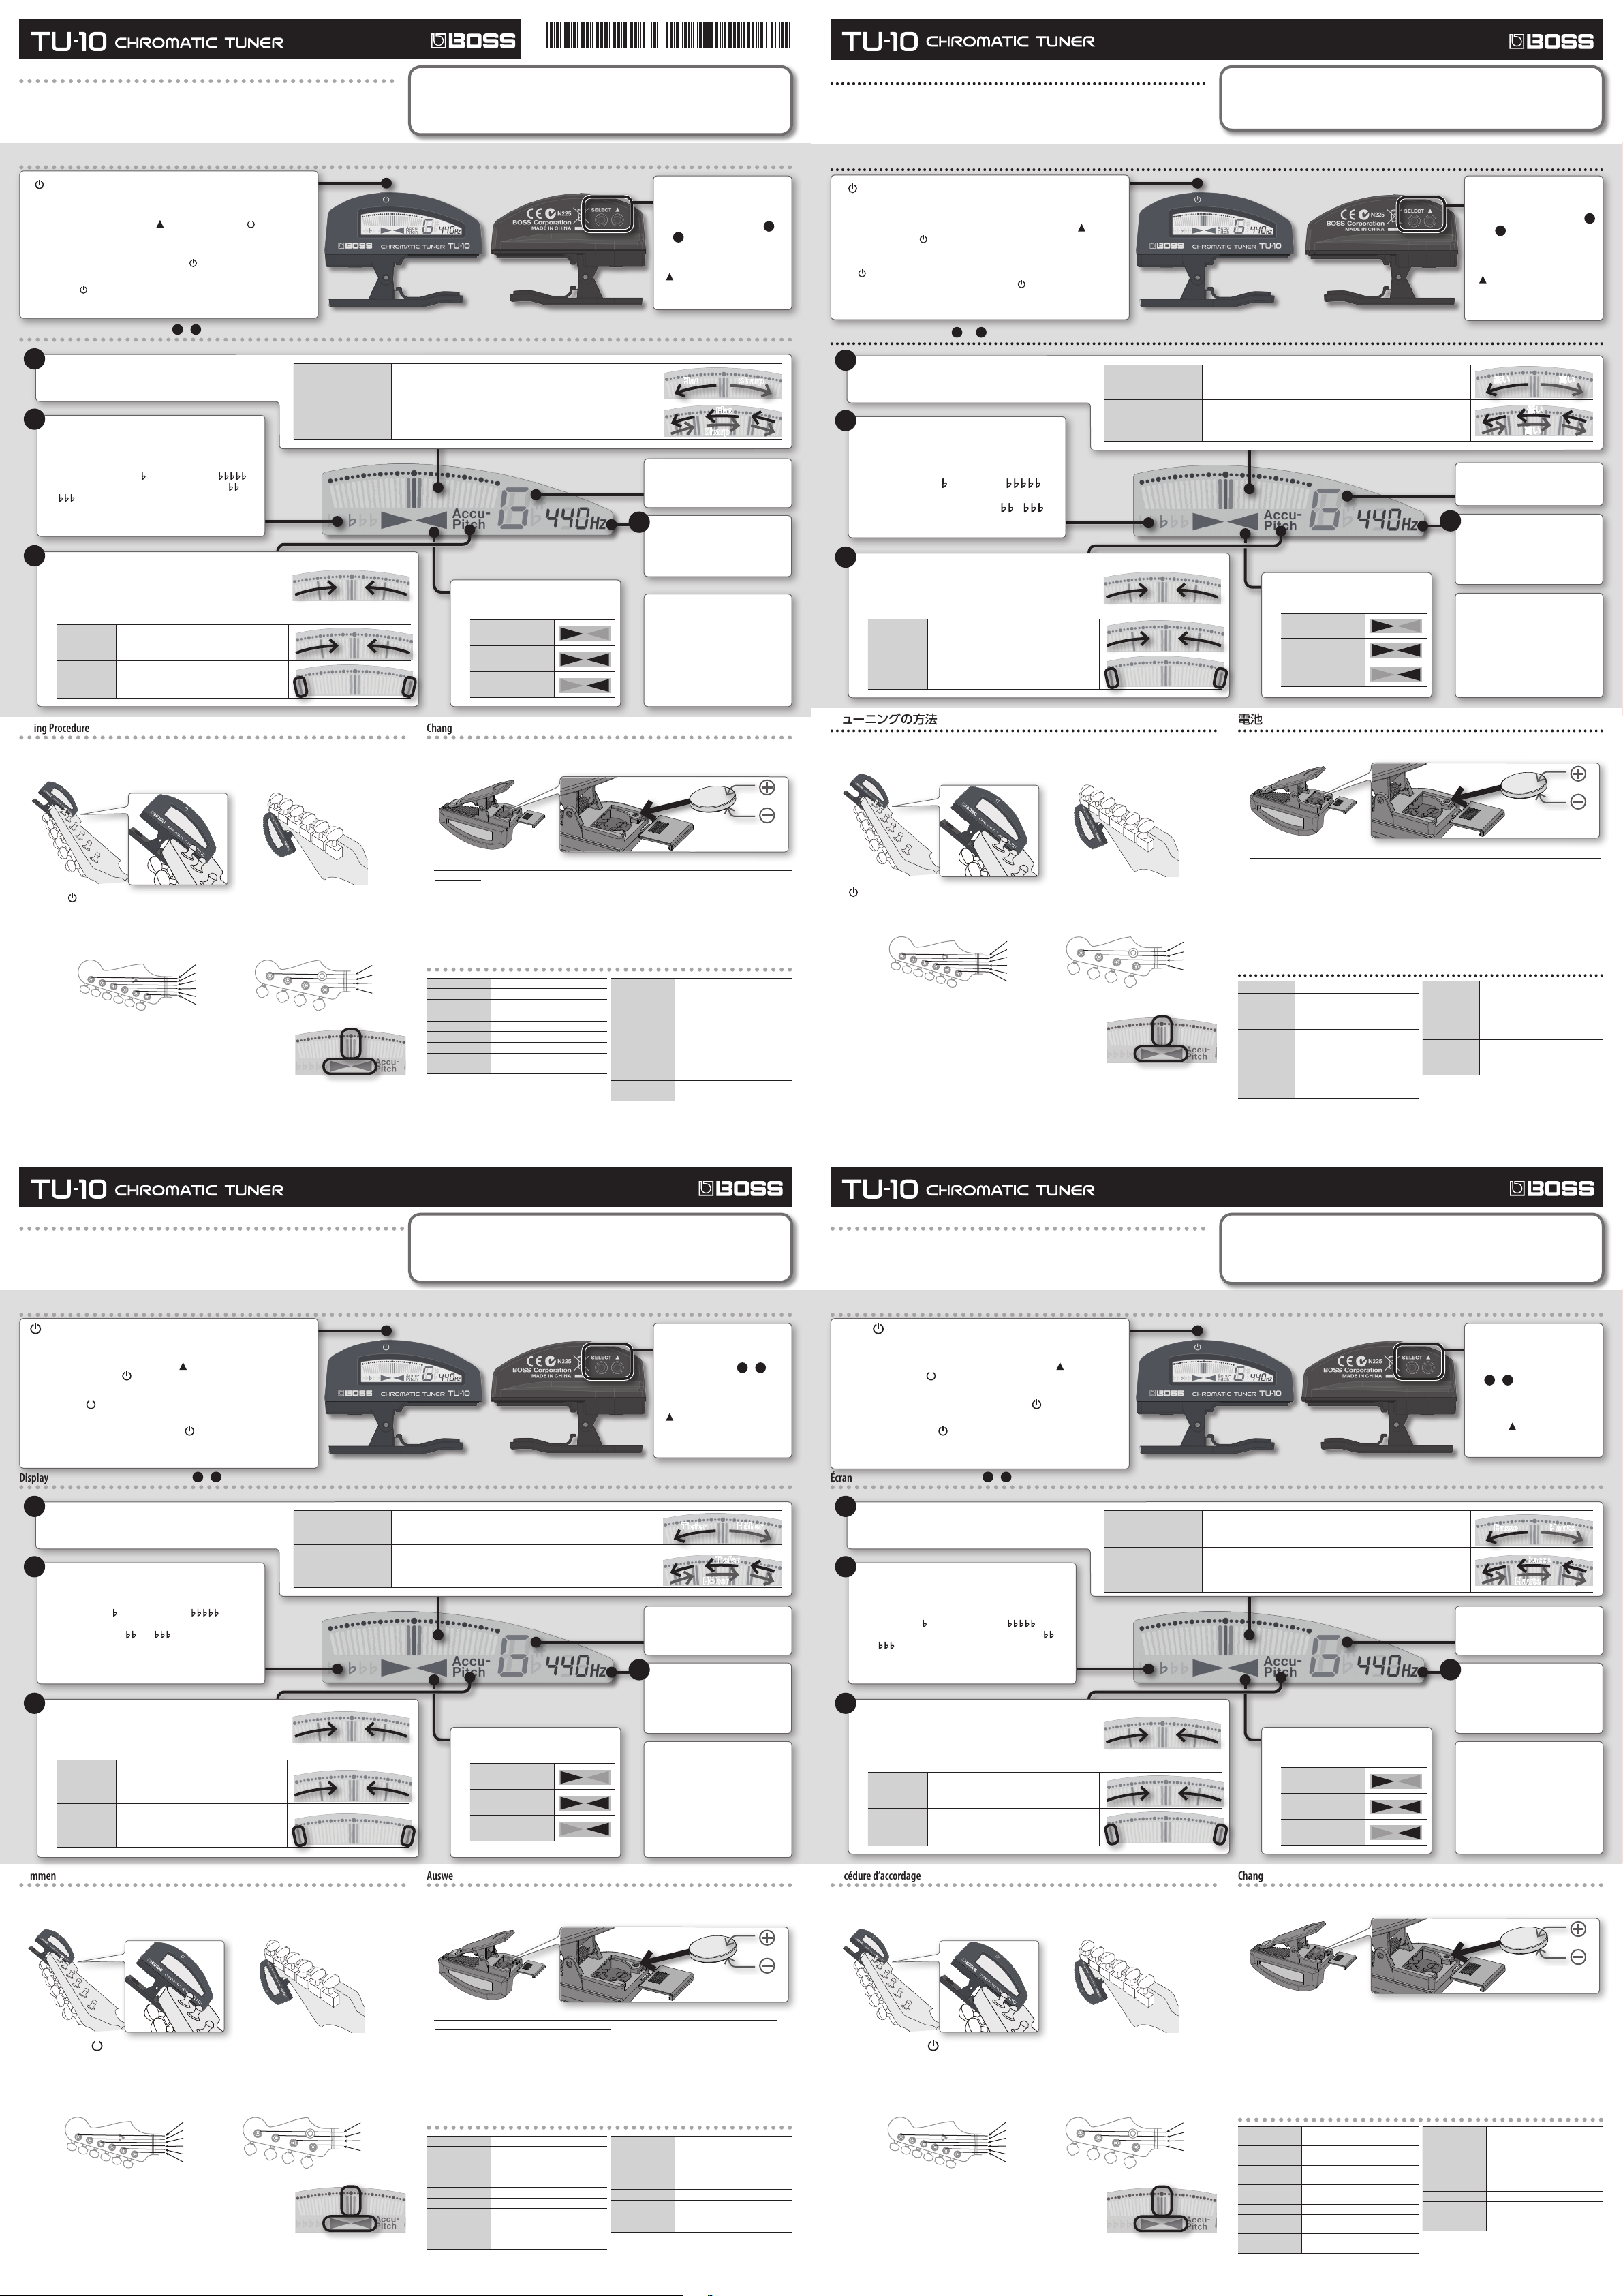
Panel Descriptions
[ ] (POWER) button
Auto O func tion
If no button is pressed for approximately 120 seconds after the power is turned
on, the power will automatically turn o . If you don’t want the power to turn
o automatically, hold down the [
turn the power on. “P“ will pop up in the display and the Auto O function is
disabled.
Monochrome display mode
If you turn on the power by holding down [
backlight will turn o , and the display will switch to showing everything in
black-and-white. You can also toggle the backlight between lit/unlit by holding
down the [
* Under bright light, what you see in the screen may appear to be in black-and-
white, even though the unit is set to display things in color.
Display
4
Meter
This indicates the pitch discrepancy of the input sound.
3
Flat tuning
This lets you tune your instrument so that its overall pitch
is lower (between 1 and 5 semitones lower) than regular
tuning.
The display will indicate
(5 semitones down). When setting this parameter,
will blink alternately if regular tuning is selected.
2
Accu-Pitch Sign function on/o
If the Accu-Pitch Sign function is on, the meter needles will ow
from left and right toward the center when your instrument is
in tune.
When setting this parameter, the indication will be as follows.
On (default)
O The meter needle will point left or right.
Turns the power on/o .
] button and press the [ ] button to
] for one or more seconds, the
] button for one seconds or longer while the power is on.
* I n the illustration, 1 – 4 indicate the order in which the parameters selected by the [SELECT] button will appear.
(1 semitone down)–
The meter needles will ow from left and right
toward the center.
and
Cent display (default)
Stream display
The needle of the meter will move toward the left if the input sound is at,
or toward the right if the pitch is sharp. The needle will be in the center if the
pitch is correct.
The meter will ow toward the left if the pitch is at, or toward the right if the
pitch is sharp. The ow will become slower as you approach the correct pitch,
and will stop when the pitch is correct.
1
Guide indicator
This indicates the approximate tuning.
Pitch is at
Pitch is correct
Pitch is sharp
[SELECT] button
Pressing the [SELECT] button
cycles you through the
parameters in the order of
4
, as shown in the illustration
below. The selected parameter
will blink in the display.
[ ] button
This button changes the value
of the blinking parameter.
Flat Sharp
Flat
Sharp
Note name indication
This indicates the name of the
note.
Reference pitch
You can set the reference pitch
in the range of 436–445 Hz (the
default setting is 440 Hz).
About the backlight
The backlight will light brightly
when sound is input and when
you operate a button. It will
automatically revert to low
brightness when there has been no
sound input or button operation
for approximately 10 seconds.
各部の名称とはたらき
[ ](電源)ボタン
オート・オフ機能
1
–
電源をオンにしたあと、約 120 秒間ボタン操作をしないと、自動的に電
源がオフになります。自動的に電源を切りたくない場合は、[
ンを押しながら[
スプレイに「P」と表示され、オート・オフ機能が解除されます。
白黒表示モード
[
]ボタンを 1 秒以上押して電源を入れると、バックライトが消灯し
白黒表示になります。電源がオンのときに[
ても、バックライトの点灯/消灯を切り替えることができます。
※ 明るい場所では、カラー表示モードであっても、白黒のように見えることがあります。
ディスプレイ
4
メーター
入力音のピッチのズレを表示します。
3
フラット・チューニング
レギュラー・チューニングより実際の音程を全体
に下げた(1 半音から 5 半音げまで)チューニン
グができます。
ディスプレイには、
半音下げ)と表示されます。パラメーター設定時は、
レギュラー・チューニングを選ぶと と が
交互に点滅します。
2
アキュピッチ・サイン機能オン/オフ
アキュピッチ・サイン機能がオンのときは、ピッチが合うと
メーターの針が左右から中央に流れます。
パラメーター設定時は、以下のような表示をします。
オン
(初期値)
オフ メーターの針が左右を指します。
電源をオン/オフします。
]ボタンを押して電源を入れます。このとき、ディ
]ボタンを 1 秒以上押し
※図中の1〜4は[SELECT]ボタンで選ばれるパラメーターの表示順を示してします。
(半音下げ)〜 (5
メーターの針が左右から中央に流れます。
]ボタ
セント
表示(初期値)
ストリーム表示
入力音が低いほどメーターの指針が左に、高いほど右に振れます。ピッ
チが合うと指針が中央になります。
入力音が低いときはメーターが左に流れ、高いときは右に流れます。ピッ
チのズレが小さくなるほど流れる速さが遅くなり、ピッチが合うと流れ
が止まります。
ガイド・インジケーター
チューニングの目安を表示します。
ピッチが低い
ピッチが合っている
ピッチが高い
[SELECT]ボタン
[SELECT]ボタンを押すたび
に、パラメーターが下図の
〜4の順に切り替わります。
ディスプレイでは選ばれたパ
ラメーターが点滅します。
[ ]ボタン
点滅しているパラメーターの
値を変更します。
低い 高い
高い
音名表示
音名を表示します。
1
基準ピッチ
436 〜 445Hz の間で基準ピッ
チを設定することができます( 初
期値は 440Hz)。
バックライトについて
音声入力時とボタン操作時に、
バックライトが明るく点灯しま
す。音声入力やボタン操作が約
10 秒無いと、自動的に低輝度の
点灯になります。
低い
1
Tuning Procedure
1. Install strings on your guitar (bass), and tighten them somewhat.
2. Fasten the clip of the TU-10 to the headstock of the guitar (bass) you want to tune.
If attaching to the surface of the headstock If attaching to the rear of the headstock
3. Press the[ ] (POWER) button.
4. Tune your instrument by playing a single note, starting with the lowest-pitched string (the low “E” string in
the illustration) of your guitar (bass).
The display will show the name of the note closest to the pitch you played.
Guitar string note names Bass string note names
5.
Tune the string so that both of the guide indicators appear, and the meter
needle is in the center.
* The explanation provided here is for when the Cent display setting is
selected. If you’ve selected the Stream display, the meter will appear
di erently.
Copyright © 2012 BOSS CORPORATION All rights reserved. No part of this publication may be reproduced in any form
without the written permission of BOSS CORPORATION.
E
B
G
D
A
E
(for conventional tuning)
G
D
A
E
Changing the Battery
When shipped from the factory, a lithium battery is installed in the unit. To start using the unit, simply pull
out the insulating sheet that extends from the battery compartment. The life of this battery may be limited,
however, since its primary purpose was to enable testing.
Observe the correct
polarity
* When the battery runs low, the backlight will turn o and the display will turn black-and-white and
become dim. Install a new battery as soon as possible.
* The batter y also preserves the settings when the power is o . If you remove the battery or if the battery is
exhausted, all settings that have been stored in memory will return to their factory-set state.
* Use only the speci ed type (model no. CR2032) of lithium battery. Be sure to insert it as directed (to
ensure correct polarity).
* Used lithium batteries must be disposed of in compliance with whatever regulations for their safe
disposal that may be observed in the region in which you live.
* Never keep batteries together with metallic objects such as ballpoint pens, necklaces, hairpins, etc.
Main Speci cations
Tuning Range C0 (16.35 Hz)–C8 (4,186 Hz)
Reference Pitch A4 (436–445 Hz)
Tuning
Accuracy
Display Mode Cent display, Stream display
Flat Tuning Regular–5 semitone lower
Power Supply CR2032 lithium battery x 1
Current Draw
* I n the interest of product improvement, the speci cations and/or appearance of this unit are subject to
change without prior notice.
± 1 cent
Color display: 12 mA
Monochrome display:4 mA
Expected battery life under
continuous use
Dimensions
Weight
Accessories
BOSS TU-10: Clip-on Chromatic Tuner
Color display: Approx. 12 hours
Monochrome display: Approx. 24 hours
* This gure will vary
depending on the actual
conditions of use.
73 (W) x 33 (D) x 62 (H) mm
2-7/8(W) x 1-5/16 (D) x 2-1/2
(H) inches
45 g
2 oz (including batteries)
CR2032 lithium battery,
Owner’s Manual
チューニングの方法
ギター(ベース)の弦を張って、ある程度巻いておきます。
1.
チューニングするギター(ベース)のヘッドを TU-10 のクリップではさみます。
2.
ヘッドの表面に取り付ける場合 ヘッドの裏面に取り付ける場合
3.
[ ](電源)ボタンを押します。
ギター(ベース)を単音で鳴らし、音の低い弦(図の一番下側の E の弦)からチューニングします。
4.
ギター弦の音名 ベース弦の音名
鳴らした音に近い音名がディスプレイに表示されます。
5.
ガイド・インジケーターが両方表示され、メーターの指針が中央にな
6.
るようにチューニングします。
※ここではセント表示で説明しています。ストリーム表示のときは、表
示のしかたが異なります。
©2012 ボス株式会社 本書の一部、もしくは全部を無断で複写・転載することを禁じます。
E
B
G
D
A
E
(一般的なチューニング例)
電池交換の方法
この機器には、工場出荷時にあらかじめ電池が入っています。電池ホルダーの部分から出ている絶縁シートを
引き抜くだけでお使いいただけます。この電池は動作確認用のため、寿命が短い場合があります。
電池の向きに注意!
※電池が消耗してくると、バックライトが消灯し白黒表示になり、ディスプレイの表示が暗くなっ
てきます。なるべく早く新しい電池と交換してください。
※電池は電源オフ時の記憶保持用電源としても使われています。電池を本体から抜いたり、電池が
消耗したりしたときには、メモリー機能で記憶している各種設定は工場出荷時の状態に戻ります。
※リチウム電池を間違えて交換した場合、爆発の危険があります。リチウム電池は、必ず指定のも
の(型番:CR2032)を使用して、+ と−を間違えないように指示どおり入れてください。
※使用済みのリチウム電池は、各地域のゴミ分別収集のしかたに従って、捨ててください。
G
D
A
E
※電池を、金属性のボールペン、ネックレス、ヘアピンなどと一緒に携帯したり、保管したりしな
いでください。
主な仕様
測定範囲 C0(16.35Hz)〜 C8(4,186Hz)
基準ピッチ A4(436 〜 445Hz)
測定精度 ± 1 セント
表示モード セント表示、ストリーム表示
フラット・
チューニング
電源
消費電流
※製品の仕様および外観は、改良のため予告なく変更することがあります。
レギュラー〜 5 半音下
リチウム・ボタン電池
(CR2032)×1
12mA(カラー表示時)
4mA(白黒表示時)
ボスTU-10:クリップオン・クロマチック・チューナー
連続使用時の
電池寿命
外形寸法
質量 45g(乾電池を含む)
付属品
約 12 時間(カラー表示時)
約 24 時間(白黒表示時)
※ 使用状態によって異なります。
73(幅)×33(奥行)×62(高
さ)mm
リチウム・ボタン電池(CR2032)
取扱説明書
、
Bedienungsanleitung
Die wichtigsten Funktionen
• Farbveränderliches Display für hervorragende Sichtbarkeit
• Modernes Design
• ACCU PITCH-Funktion, die das Ende des Stimmvorgangs mit einer Bewegung und Farbveränderung im Display bestätigt
• Flat Tuning-Funktion, um die Gitarre für Hardrock/Metal tiefer zu stimmen
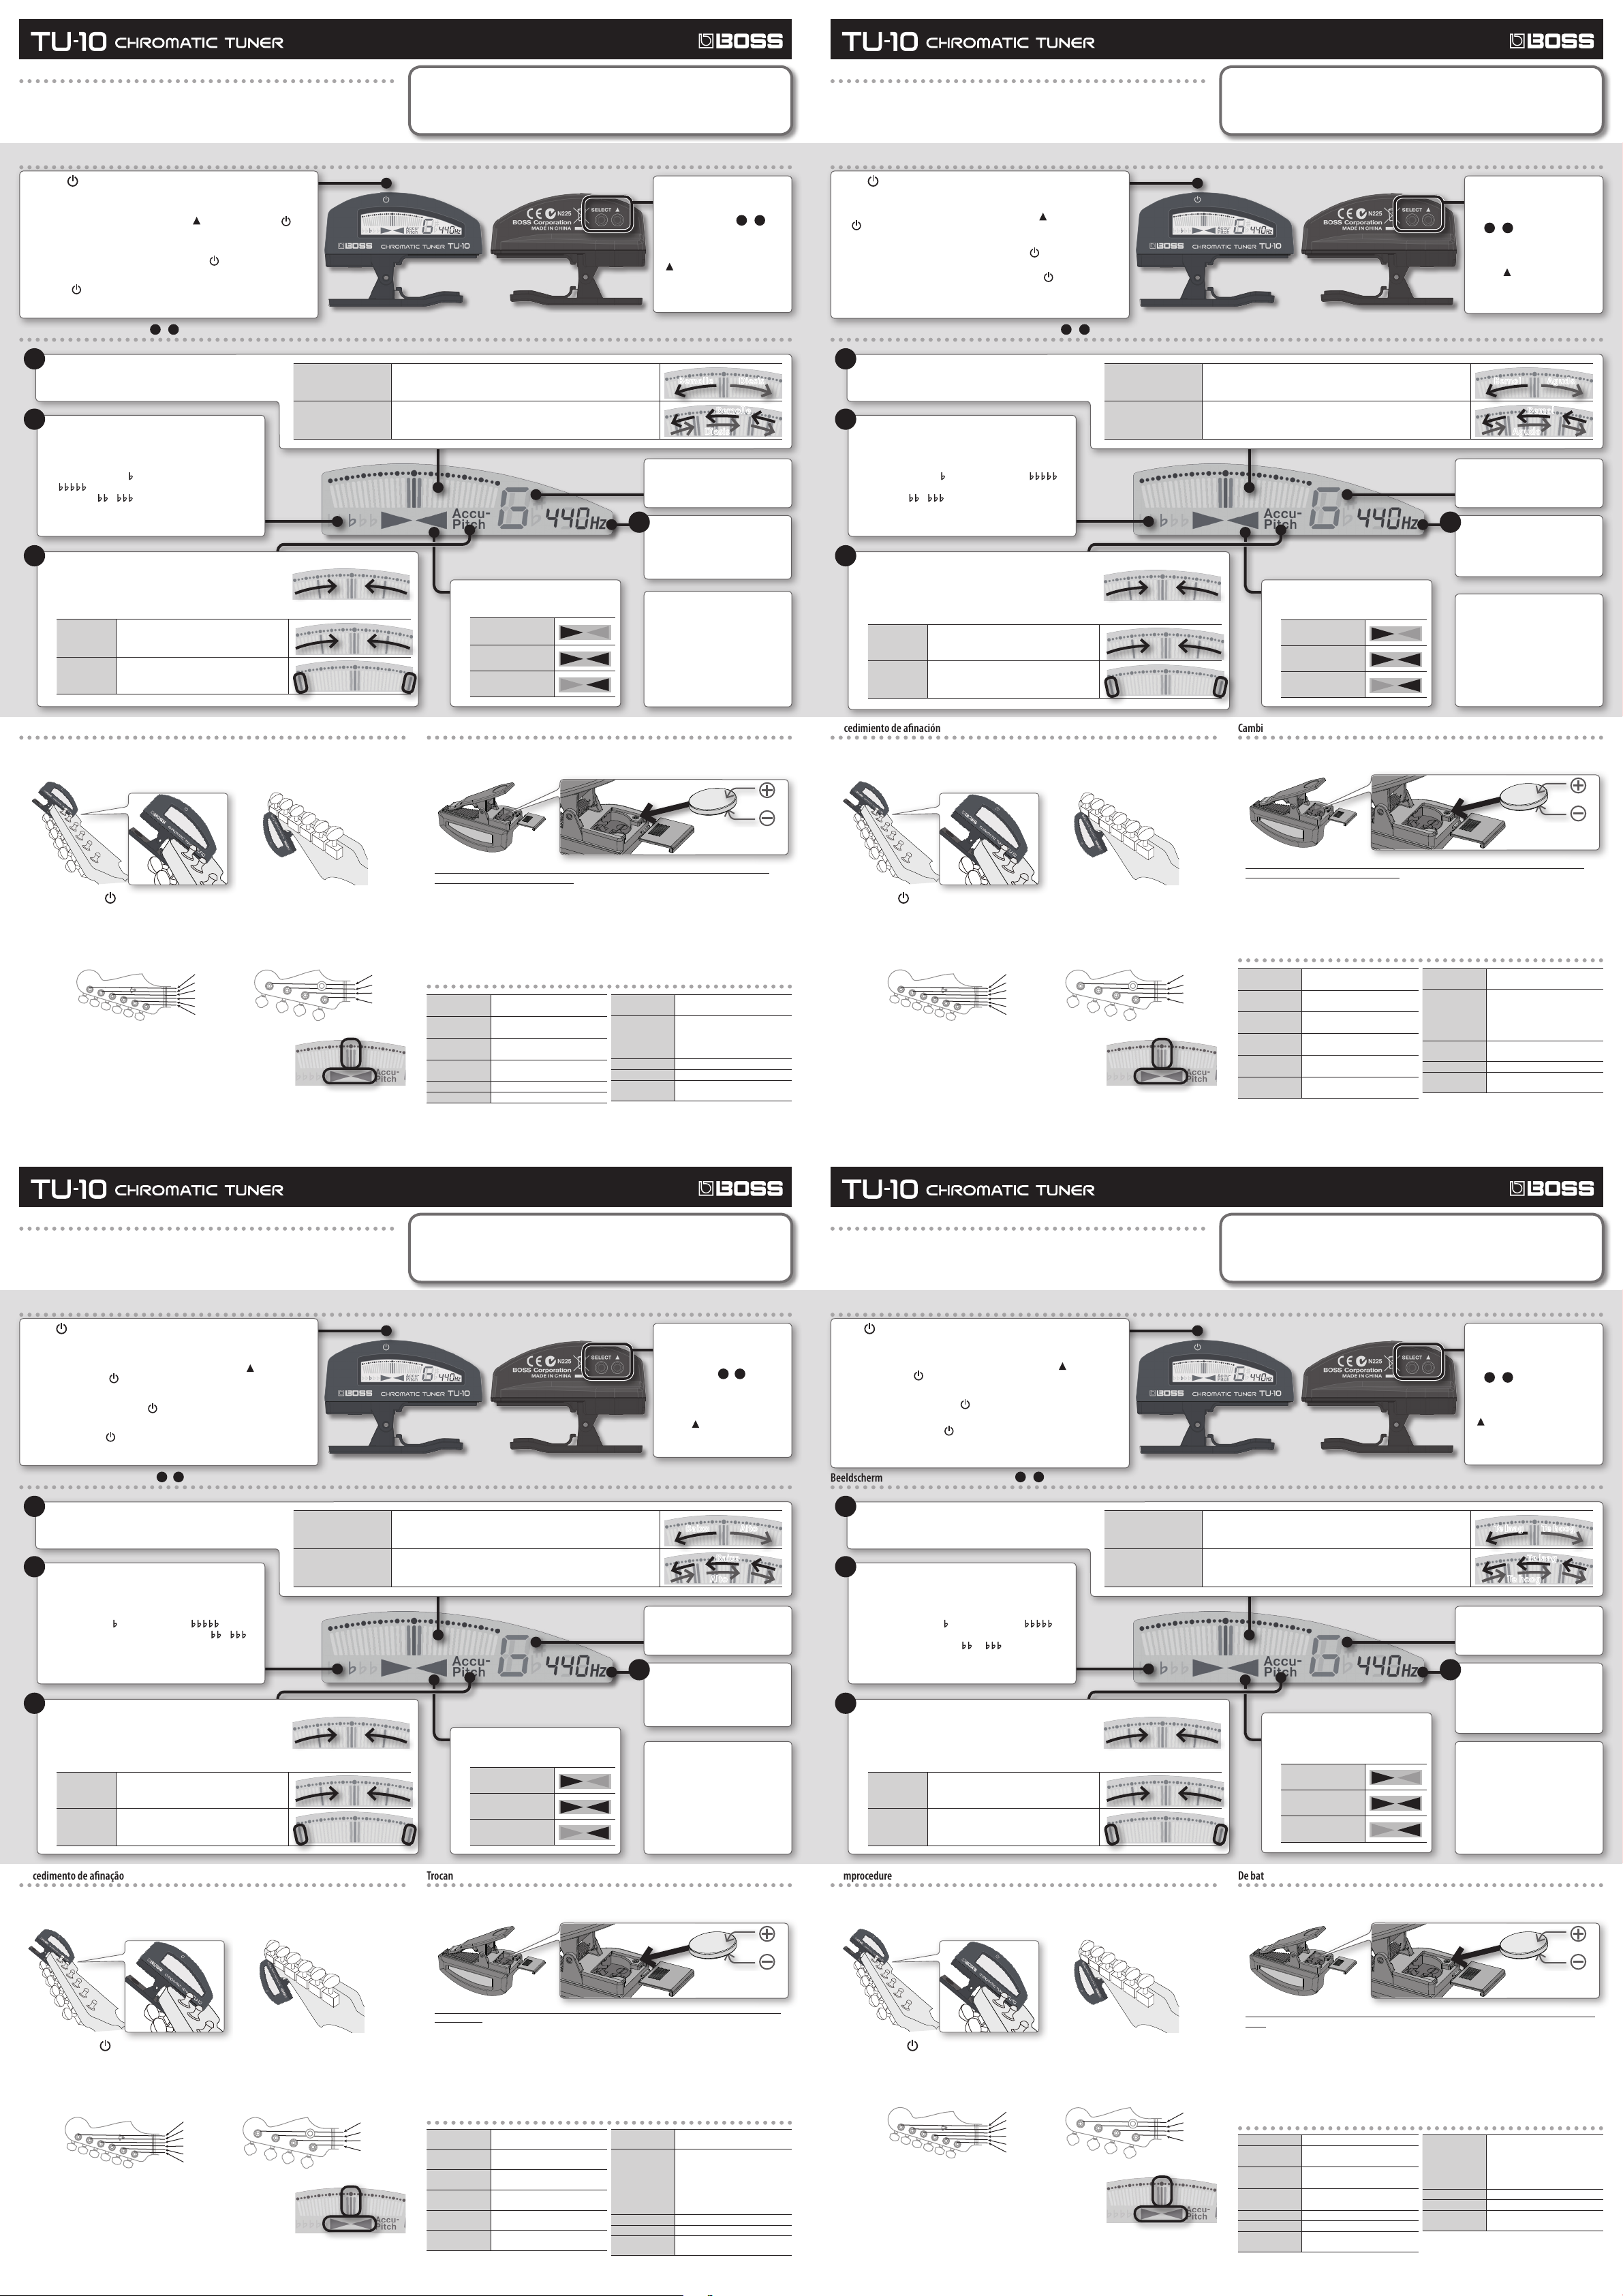
Beschreibungen zum Bedienfeld
[ ] (POWER)-Taste
Automatische Abschaltung
Wenn für ca. 2 Minuten nach dem Einschalten keine Taste gedrückt wird, wird
das Gerät automatisch ausgeschaltet. Wenn das Gerät nicht automatisch
ausgeschaltet werden soll, halten Sie die [
Sie zum Einschalten die [
automatische Abschaltung wird deaktiviert.
Modus „Monochromanzeige“
Wenn Sie die [
halten, wird die Hintergrundbeleuchtung abgeschaltet, und die Anzeige erfolgt
in schwarz-weiß. Sie können die Hintergrundbeleuchtung bei eingeschaltetem
Gerät ein- oder ausschalten, indem Sie die [
gedrückt halten.
* Bei heller Umgebungsbeleuchtung k ann die Displayanzeige schwarz-weiß
erscheinen, obwohl die Farbanzeige aktiviert ist.
Display
4
Tonhöhenanzeige
Zeigt die Tonhöhenabweichung des gespielten Tons an
3
Flat Tuning
Ermöglicht eine tiefere Stimmung des Instruments als
regulär (zwischen 1 und 5 Halbtönen tiefer).
Im Display wird
(5Halbtöne tiefer) angezeigt. Bei Einstellung dieses
Parameters blinken
reguläre Stimmung eingestellt ist.
2
Accu Pitch-Funktion ein/aus
Wenn die Accu-Pitch-Funktion aktiviert ist, bewegen sich die
Zeiger der Tonhöhenanzeige von links und rechts zur Mitte als
Bestätigungssignal bei korrekter Tonhöhe hin.
Wenn Sie diesen Parameter einstellen, sieht die Anzeige folgendermaßen aus.
Ein (Standard)
Aus
Schaltet das Gerät ein/aus
]-Taste. Im Display wird „P“ angezeigt, und die
]-Taste beim Einschalten mindestens eine Sekunde gedrückt
* I n der Abbildung geben 1 – 4 die Reihenfolge an, in der die mithilfe der [SELECT]-Taste ausgewählten Parameter angezeigt werden.
(1Halbton tiefer) bis
und abwechselnd, wenn die
Die Zeiger der Tonhöhenanzeige bewegen sich
von links und rechts zur Mitte hin.
Die Zeiger der Tonhöhenanzeige stehen links
und rechts.
]-Taste gedrückt, und drücken
]-Taste mindestens eine Sekunde
Cent-Anzeige (Standard)
Stream-Anzeige
Vor dem Betrieb des Gerätes lesen Sie bitte die folgenden aufgeführten Abschnitte sorgfältig durch: „SICHERER
BETRIEB DES GERÄTS“ und „WICHTIGE HINWEISE“ (auf einem gesonderten Blatt beiliegend). Diese Abschnitte
enthalten wichtige Informationen über die korrekte Bedienung des Gerätes. Damit Sie das Gefühl bekommen, die
gesamte Funktionalität Ihres neuen Geräts erfasst zu haben, sollten Sie sich die Bedienungsanleitung vollständig
durchlesen. Bewahren Sie die Anleitung an einem sicheren Platz auf und verwenden Sie diese zu Referenzzwecken.
[SELECT]-Taste
Durch Drücken auf die [SELECT]Taste werden die Parameter
in der Reihenfolge
aufgerufen, wie in der folgenden
Abbildung dargestellt. Der
ausgewählte Parameter blinkt
im Display.
[ ]-Taste
Drücken Sie diese Taste, um
den blinkenden Parameter zu
ändern.
Der Zeiger der Tonhöhenanzeige bewegt sich nach links, wenn der gespielte
Ton zu tief ist, oder nach rechts, wenn er zu hoch ist. Der Zeiger steht in der
Mitte, wenn die Tonhöhe richtig ist.
Die Lau icht-Anzeige bewegt sich nach links, wenn der gespielte Ton zu tief
ist, oder nach rechts, wenn er zu hoch ist. Die Bewegung verlangsamt sich,
wenn Sie sich dem richtigen Ton nähern und wird beendet, wenn der Ton
richtig ist.
Tiefer Höher
Höher
Tiefer
Notenname
Zeigt den Namen der Note an
1
Referenzton
Sie können den Referenzton
zwischen 436 und 445Hz
einstellen (Standardeinstellung
ist 440Hz).
Richtanzeige
Zeigt die angenäherte Stimmung an
Ton zu tief
Ton ist richtig
Ton zu hoch
Informationen zur
Hintergrundbeleuchtung
Die Hintergrundbeleuchtung
leuchtet hell, wenn Töne
gespielt werden oder eine Taste
gedrückt wird. Die Helligkeit
wird automatisch verringert,
wenn für ca. 10Sekunden keine
Töne gespielt oder keine Tasten
gedrückt werden.
1
– 4
Deutsch
Principales fonctionnalités
• Un écran multicolore pour une visibilité excellente
• Un design élégant
• La fonction de signalisation Accu-Pitch a che une indication et modi e la couleur pour vous signaler que
l’accordage est terminé.
• Fonction d’accord altéré, indispensable pour l’accordage d’une guitare
Description de l’appareil
Bouton [ ] (POWER)
Fonction Auto O
Si vous n’appuyez sur aucun bouton pendant environ 2 minutes après la mise sous
tension, l’appareil s’éteint automatiquement. Si vous ne souhaitez pas que l’appareil
se mette automatiquement hors tension, maintenez le bouton [
appuyez sur le bouton [
l’écran et la fonction Auto O est désactivée.
Mode d’a chage monochrome
Si vous mettez l’appareil sous tension en maintenant [
plusieurs secondes, le rétroéclairage se désactive et l’écran passe en mode
monochrome. Vous pouvez également activer ou désactiver le rétroéclairage
en maintenant le bouton [
l’appareil est sous tension.
* Dans des conditions très lumineuses, l’a chage peut donner l’impression d’être
monochrome, même si l’appareil est con guré en mode d’a chage couleur.
Écran
4
Vumètre
Indique l’écart avec la note juste du son d’entrée.
3
Accord altéré
Cette fonction vous permet d’accorder votre instrument
a n que sa hauteur tonale globale soit plus basse (entre 1
et 5demi-tons plus bas) que l’accordage normal.
L’écran indique
tons plus bas). Lorsque ce paramètre est con guré,
et
clignotent alternativement si l’accordage normal
est sélectionné.
2
Activation/désactivation de la fonction de signalisation Accu-Pitch
Si la fonction de signalisation Accu-Pitch est activée, les
vumètres convergent de la droite et de la gauche vers le centre
lorsque votre instrument est accordé.
Lorsque ce paramètre est con guré, l’indication suivante s’a che.
ON (par
défaut)
OFF
(Désactivé)
Met l’appareil sous/hors tension.
] pour mettre l’appareil sous tension. « P » s’a che à
] enfoncé pendant une seconde ou plus lorsque
* Dans l ’illustration, 1 – 4 indiquent l’ordre dans lequel les paramètres sélectionnés par le bouton [SELECT] s’a chent.
(1demi-ton plus bas)– (5demi-
Les vumètres convergent de la droite et de la
gauche vers le centre.
Le vumètre pointe vers la gauche et vers la
droite.
] enfoncé et
] enfoncé pendant
A chage CENT (par
défaut)
A chage Stream
Mode d’emploi
Avant d’utiliser cet appareil, lisez attentivement les sections suivantes: «CONSIGNES DE SÉCURITÉ» et
«REMARQUES IMPORTANTES» (livrées séparément). Ces sections fournissent d’importantes informations
relatives au bon fonctionnement de l’appareil. En outre, pour être sûr d’avoir bien intégré chacune des
fonctionnalités fournies par votre appareil, il est nécessaire de lire le mode d’emploi dans son intégralité.
Vous devez conserver ce manuel sous la main a n de pouvoir vous y reporter au besoin.
L’aiguille du vumètre se déplace vers la gauche si le son d’entrée est trop
bas ou vers la droite si la note est trop haute. L’aiguille se situe au centre si la
note est juste.
Le vumètre converge vers la gauche pour indiquer que la note produite est
trop basse, et vers la droite pour indiquer qu’elle est trop haute. L’aiguille
ralentit à mesure que vous vous approchez de la note juste et s’arrête lorsque
la note est correcte.
Guide d’accord
Indique l’accordage approximatif.
La note est trop basse
La note est correcte
La note est trop haute
Bouton [SELECT]
En appuyant sur le bouton
[SELECT], vous faites dé ler
les paramètres dans l’ordre
1
– 4, comme indiqué dans
l’illustration ci-dessous. Le
paramètre sélectionné s’a che
à l’écran.
Bouton [ ]
Ce bouton modi e la valeur du
paramètre clignotant.
Basse Haute
Haute
Indication du nom de note
Indique le nom de la note.
1
Diapason de référence
Il est possible de régler le diapason
de référence sur une plage allant
de 436 à 445Hz (le paramètre par
défaut est de 440Hz).
À propos du rétroéclairage
Le rétroéclairage s’allume
lorsqu’un son arrive en entrée et
lorsque vous utilisez un bouton.
Il s’assombrit automatiquement
en l’absence de son d’entrée ou
lorsqu’aucun bouton n’est utilisé
pendant environ 10secondes.
Français
Basse
Stimmen
1. Ziehen Sie auf die Gitarre (den Bass) Saiten auf, und spannen Sie sie etwas.
2. Befestigen Sie die Klemme des TU-10 am Kopf der zu stimmenden Gitarre (oder des Basses).
Befestigung auf der Vorderseite des Kopfes Befestigung auf der Rückseite des Kopfes
3. Drücken Sie die [ ] (POWER)-Taste.
4. Stimmen Sie das Instrument, indem Sie eine einzelne Leersaiten anschlagen. Beginnen Sie mit der tiefsten
Saite der Gitarre oder des Basses (der tiefen E-Saite auf der Abbildung).
Im Display wird der Name der Note angezeigt, der dem angeschlagenen Ton am nächsten kommt.
5. Stimmen Sie die Saite solange, bis die beiden Richtanzeigen sichtbar
* Die hier bereitgestellten Erläuterungen gelten für die Cent-Anzeige. Wenn Sie
Copyright © 2012 BOSS CORPORATION. Alle Rechte vorbehalten. Diese Publikation darf weder ganz noch teilweise
ohne schriftliche Genehmigung durch die BOSS CORPORATION reproduziert werden.
Bezeichnung der Gitarrensaiten Bezeichnung der Basssaiten
E
B
G
D
A
E
werden, und sich die Messnadel in der Mitte be ndet.
die Stream-Anzeige eingestellt haben, sieht die Skala anders aus.
G
D
A
E
(für die herkömmliche Stimmung)
Auswechseln der Batterie
Bei Auslieferung ist eine Lithiumbatterie in das Gerät eingelegt. Um das Gerät zu verwenden, ziehen Sie
einfach die aus dem Batteriefach ragende Isolierungsfolie heraus. Die Lebensdauer dieser Batterie kann
jedoch eingeschränkt sein, da ihr Hauptzweck darin besteht, Produkttests zu ermöglichen.
Achten Sie auf richtige
Polarität
* Wenn die Spannung der Batterie nachlässt, schaltet die Hintergrundbeleuchtung ab, das Display
wird in schwarz-weiß angezeigt und abgedunkelt. Setzen Sie so bald wie möglich eine neue Batterie ein.
* Die Batterie ermöglicht außerdem die Speicherung der Einstellungen, wenn das Gerät ausgeschaltet ist.
Wenn Sie die Batterie entfernen oder wenn die Batterie leer ist, werden alle Einstellungen im Speicher auf
die Werkseinstellungen zurückgesetzt.
* Verwenden Sie ausschließlich die angegebene Lithiumbatterie (Modell-Nr. CR2032). Setzten Sie sie – wie
in der Abbildung dargestellt – ein (achten Sie dabei auf die richtige Polung).
* Gebrauchte Lithiumbatterien müssen gemäß den gesetzlichen Bestimmungen Ihres Landes bzw. Ihrer
Region entsorgt werden.
* Bewahren Sie Batterien nicht zusammen mit metallischen Gegenständen wie Kugelschreibern,
Halsketten, Haarnadeln usw. auf.
Technische Daten
Stimmbereich C0 (16,35Hz) – C8 (4.186Hz)
Referenztonhöhe
Stimmgenauigkeit
Anzeigemodus Cent-Anzeige, Stream-Anzeige
Flat Tuning Regulär – 5Halbtöne tiefer
Stromversorgung
Durch ussstrom
* Zur Verbesserung des Produkts sind Änderungen der technischen Daten und/oder des Designs dieses
Geräts ohne vorherige Ankündigung möglich.
A4 (436–445Hz)
±1Cent
1x Lithiumbatterie CR2032
Farbanzeige: 12 mA
Monochromanzeige: 4 mA
BOSS TU-10: Chromatisches Stimmgerät zum Anklemmen
Voraussichtliche
Batterielebensdauer bei
Dauernutzung
Abmessungen 73 (B) x 33 ( T) x 62 (H) mm
Gewicht 45 g (einschließlich Batterie)
Mitgeliefertes
Zubehör
Farbanzeige: ca. 12 Stunden
Monochromanzeige: ca. 24 Stunden
* Diese Werte variieren in
Abhängigkeit von den
tatsächlichen Betriebsbedingungen.
Lithiumbatterie CXR2032,
Bedienungsanleitung
Procédure d’accordage
1. Installez les cordes sur votre guitare (basse), puis resserrez-les.
2. Fixez l’attache du TU-10 à la tête de la guitare (basse) que vous souhaitez accorder.
Fixation à l’avant de la tête Fixation à l’arrière de la tête
3. Appuyez sur le bouton [ ] (POWER).
4. Accordez votre instrument en jouant une seule note, en commençant par la corde de la note la plus basse
(la corde «E» dans le bas de l’illustration) de votre guitare (basse).
L’écran a che le nom de la note la plus proche de la note que vous avez jouée.
5. Accordez la corde de sorte que les deux témoins du guide d’accord
s’a chent et que l’aiguille du vumètre soit située au centre.
* L’explication fournie ici concerne les con gurations où l’a chage CENT est
sélectionné. Si vous avez sélectionné l’a chage STREAM, le vumètre se
comporte di éremment.
Copyright © 2012 BOSS CORPORATION Tous droits réservés. Toute reproduction intégrale ou partielle de cette
publication est interdite sous quelque forme que ce soit sans l’autorisation écrite de BOSS CORPORATION.
Nom des notes des cordes de la guitare Nom des notes des cordes de la guitare basse
E
B
G
D
A
E
(pour un accordage normal)
G
D
A
E
Changement de la pile
L’appareil est équipé d’une pile au lithium à sa sortie d’usine. Pour commencer à utiliser l’appareil, retirez
tout simplement le lm isolant qui dépasse du compar timent à piles. L’autonomie de cette pile peut
cependant être limitée car elle est essentiellement destinée à tester l’appareil.
Respectez la polarité
* Lorsque l’appareil arrive à court de batterie, le rétroéclairage se désactive, l’a chage de l’écran
vire au noir et blanc et s’assombrit. Remplacez la pile dès que possible.
* La pile permet également de conser ver les paramètres lorsque l’appareil est hors tension. Si vous retirez
la pile ou qu’elle est épuisée, tous les paramètres stockés en mémoire sont e acés et les paramètres
d’usine sont rétablis.
* N’utilisez que le type de pile au lithium spéci é (modèle n°CR2032). Assurez-vous de les insérer en
respectant les instructions (pour que la polarité soit correcte).
* Les piles au lithium usagées doivent être mises au rebut conformément à la règlementation en vigueur
dans votre pays.
* Ne conser vez jamais les piles à proximité d’objets métalliques, par exemple des stylos à billes, des colliers,
des épingles à cheveux, etc.
Principales fonctionnalités
Plage
d’accordage
Diapason de
référence
Précision
d’accordage
Mode
d’a chage
Accord altéré Normal: 5demi-tons plus bas
Alimentation
électrique
Consommation
* En vue d ’améliorer le produit, ses caractéristiques techniques et/ou son aspect peuvent être modi és
sans avis préalable.
C0 (16,35Hz)–C8 (4186Hz)
A4 (436–445Hz)
± 1cent
A chage CENT, A chage
Stream
Pile au lithium CR2032x1
A chage couleur: 12 mA
A chage monochrome: 4 mA
BOSS TU-10: Accordeur chromatique à pince
Autonomie
prévisible
des piles en
utilisation
continue
Dimensions 73 (L) x 33 (P) x 62 (H)mm
Poids 45 g (pile comprise)
Accessoires
A chage couleur: Environ
12 heures
A chage monochrome:
Environ 24 heures
* Ce chi re varie en fonction
des conditions réelles
d’utilisation.
Pile au lithiumCR2032,
Mode d’emploi
Page 2
Manuale dell'utente
E
Italiano
Español
Manual de instrucciones
Funzioni principali
• Display con cambio dei colori per una visibilità ottimale
• Design elegante
• La funzione Accu-Pitch Sign mostra un'indicazione e un colore diverso a segnalare che l'accordatura è stata
completata
• Funzione Flat Tuning indispensabile per l'accordatura per chitarra
Descrizioni del pannello
Pulsante [ ] (POWER)
Funzione di spegnimento automatico
Se non si preme alcun pulsante per circa 2 minuti dopo aver acceso l'unità,
questa si spegne automaticamente. Se non si desidera che l'unità si spenga
automaticamente, tenere premuto il pulsante [
per accendere l'unità. Sul display comparirà “P” e la funzione di spegnimento
automatico viene disattivata.
Modalità con display monocromatico
Se si accende l'unità tenendo premuto il pulsante [
la retroilluminazione viene disattivata e il display passa in modalità in bianco e
nero. È possibile attivare o disattivare la retroilluminazione tenendo premuto il
pulsante [
* I n condizioni di luce intensa, lo schermo potrebbe sembrare in bianco e nero,
anche se è impostata la modalità di visualizzazione a colori.
] per uno o più secondi mentre l'unità è accesa.
Display
4
Indicatore
Indica la di erenza di tono del suono in ingresso.
3
Accordatura at
Consente di accordare lo strumento con un tono
complessivo più basso (da 1 a 5 semitoni) rispetto
all'accordatura standard.
Sul display compare
(5 semitoni più in basso). Se si imposta questo
parametro,
si seleziona l'accordatura standard.
2
Attivazione/disattivazione della funzione Accu-Pitch Sign
Se si attiva la funzione Accu-Pitch Sign, l'ago dell'indicatore oscilla
da sinistra e da destra verso il centro quando lo strumento è
accordato.
Quando si imposta questo parametro, l'indicazione sarà la seguente.
Attivata
(impostazione
prede nita)
Disattivata
Accende e spegne l'unità.
] e premere il pulsante [ ]
] per uno o più secondi,
* Nella gura 1 – 4 indicano l'ordine con cui saranno visualizzati i parametri selezionati con il pulsante [SELECT].
Visualizzazione
Cent (impostazione
prede nita)
Visualizzazione Stream
(1 semitono più in basso)–
e lampeggiano in modo alternato se
L'ago dell'indicatore oscilla da sinistra e da
destra verso il centro.
Gli aghi dell'indicatore puntano a sinistra e a
destra.
Prima di utilizzare questa unità, leggere attentamente le sezioni intitolate "UTILIZZO SICURO
DELL'UNITÀ" e "NOTE IMPORTANTI" (su un foglio a parte) che contengono importanti informazioni sul
corretto impiego dell'unità. È inoltre consigliabile leggere per intero il Manuale dell'utente, per assicurarsi
di aver compreso appieno tutte le funzioni o erte dalla nuova unità acquistata. Si consiglia di conservare e
tenere a portata di mano il Manuale come riferimento utile.
Pulsante [SELECT]
Premere il pulsante [SELECT]
per scorrere i parametri
seguendo l'ordine
come mostrato nella gura in
basso. Il parametro selezionato
lampeggia nel display.
[ ]
Questo pulsante fa cambiare
il valore del parametro
lampeggiante.
L'ago dell'indicatore oscilla verso sinistra se il tono in ingresso tende al
bemolle o verso destra quando tende al diesis. L'ago si troverà al centro
quando l'intonazione è corretta.
L'indicatore scorre verso sinistra se il tono tende al bemolle o verso destra
quando tende al diesis. Lo scorrimento diventa più lento man mano che ci si
avvicina al tono corretto, no a fermarsi del tutto.
Bemolle Diesis
Bemolle
Diesis
Indicazione del nome della nota
Indica il nome della nota.
1
Tono di riferimento
È possibile impostare il tono di
riferimento entro un intervallo
di 436-445 Hz (l'impostazione
prede nita è 440 H z).
Indicatore guida
Indica l'accordatura approssimativa.
Il tono tende al
bemolle
Il tono è corretto
Il tono tende al diesis
Informazioni sulla
retroilluminazione
La retroilluminazione sarà più
luminosa quando viene ricevuto
l'audio e si preme un pulsante.
Torna automaticamente a una
luminosità minore se non viene
ricevuto alcun suono o se non si
preme alcun pulsante per circa 10
secondi.
1
– 4 ,
Principales características
• Pantalla de color cambiante para una visibilidad excelente
• Diseño elegante
• La función Accu-Pitch Sign muestra una indicación y cambia de color para señalar que la a nación ha nalizado
• Función de a nación bemol, indispensable para a nar la guitarra
Descripción de los paneles
Botón [ ] (POWER)
Función de apagado automático
Si no se pulsa ningún botón durante aproximadamente 2 minutos tras encender
la unidad, esta se apagará automáticamente. Si no desea que la unidad se
apague automáticamente, mantenga pulsado el botón [
[ ] para encender la unidad. Aparecerá “P“ en pantalla y la función de apagado
automático quedará deshabilitada.
Modo de pantalla monocroma
Si enciende la unidad manteniendo pulsado el botón [ ] durante uno o más
segundos, la retroiluminación se apagará y la pantalla cambiará para mostrar todo
su contenido en blanco y negro. También puede alternar la retroiluminación entre
iluminada o no iluminada manteniendo pulsado el botón [ ] durante unos
segundos como mínimo estando la unidad encendida.
* Cuando la iluminación es intensa, podría parecer que lo que se ve en pantalla está
en blanco y negro, aunque la unidad esté con gurada para mostrar la información
en color.
Pantalla
4
Medidor
Sirve para indicar las discrepancias de tono del sonido de entrada.
3
A nación bemol
Le permite a nar su instrumento de forma que el tono
global del mismo sea más bajo (entre 1 y 5 semitonos más
bajos) que su a nación normal.
La pantalla mostrará
(5 semitonos más bajos). Cuando se con gura este
parámetro,
ha seleccionado la a nación normal.
2
Activación y desactivación de la función Accu-Pitch Sign
Si la función Accu-Pitch Sign está activa, las agujas del medidor
se moverán de izquierda y derecha hacia el centro cuando el
instrumento esté a nado.
Cuando se con gura este parámetro, la indicación será la siguiente.
Activada
(valor predet.)
Desactivada
Apaga y enciende la unidad.
] y pulse el botón
* En la ilustración siguiente, la numeración 1 – 4 indica el orden en el que aparecerán los parámetros seleccionados por el botón [SELECT].
Pantalla Cent (valor
predeterminado)
Pantalla Stream
(1 semitono más bajo)–
y parpadearán alternativamente si se
Las agujas del medidor se moverán de izquierda
y derecha hacia el centro.
Las agujas del medidor apuntarán a izquierda
y a derecha.
Antes de utilizar esta unidad, lea atentamente las secciones tituladas: “UTILIZACIÓN SEGURA DE LA
UNIDAD” y “NOTAS IMPORTANTES” (que se suministran en una hoja aparte). En estas secciones encontrará
información importante acerca de la utilización correcta de la unidad. Además, para asegurarse de que
conoce adecuadamente todas las características de su nuevo equipo, debe leer íntegramente el Manual de
instrucciones. El manual se debe guardar en un lugar accesible para consultas futuras.
Botón [SELECT]
Al pulsar el botón [SELECT] se
pasará cíclicamente por los
distintos parámetros en el orden
1
– 4, como se muestra
en la ilustración siguiente.
El parámetro seleccionado
parpadeará en la pantalla.
Botón [ ]
Este botón cambia el valor
del parámetro que está
parpadeando.
La aguja del medidor se moverá hacia la izquierda si el sonido de entrada es
bemol, o hacia la derecha si el tono es agudo. La aguja permanecerá en el
centro si el tono es correcto.
El medidor se moverá hacia la izquierda si el tono es bemol o hacia la
derecha si es agudo. El desplazamiento de la aguja será más lento a medida
que se aproxima al tono correcto y se detendrá cuando el tono es correcto.
Bemol Agudo
Bemol
Agudo
Indicación del nombre de nota
Indica el nombre de la nota.
1
Tono de referencia
Puede de nir el tono de referencia
en el intervalo 436–445Hz (el
ajuste predeterminado es 440Hz).
Indicador de guía
Indica la a nación aproximada.
El tono es bemol
El tono es correcto
El tono es agudo
Acerca de la retroiluminación
La retroiluminación se iluminará
con intensidad cuando entra el
sonido y al accionar cualquier
botón. La intensidad se reducirá
automáticamente cuando
no entre sonido alguno ni se
accione ningún botón durante
aproximadamente 10 segundos.
Procedura di accordatura
1. Montare le corde sulla chitarra o sul basso e metterle in tensione.
2. Fissare la clip del TU-10 alla paletta della chitarra o del basso da accordare.
Collegamento alla super cie della paletta Collegamento al retro della paletta
3. Premere il pulsante [ ] (POWER).
4. Accordare lo strumento suonando una sola nota, partendo dalla corda con il tono più basso ("E", ovvero MI
basso, nella gura) della chitarra o del basso.
Sul display compare il nome della nota più vicina a quella suonata.
5. Tendere o allentare la corda no a quando non compaiono entrambi gli
indicatori guida e l'ago dell'indicatore si trova al centro.
* La spiegazione qui fornita vale quando è selezionata la visualizzazione Cent.
L'indicatore sarà diverso se è selezionata la visualizzazione Stream.
Copyright © 2012 BOSS CORPORATION Tutti i diritti riservati. Nessuna parte di questo documento può essere in alcun
modo riprodotta senza autorizzazione scritta di BOSS CORPORATION.
Nomi delle note delle corde per chitarra Nomi delle note delle corde per basso
E
B
G
D
A
E
(per l'accordatura standard)
G
D
A
E
Sostituzione della batteria
Nell’unità è preinstallata una batteria al litio. Per iniziare a utilizzare l’unità, rimuovere la linguetta di isolante
che sporge dal vano della batteria. La sua durata, tuttavia, potrebbe essere limitata poiché è fornita allo
scopo di consentire il test dell'unità.
Rispettare la polarità
corretta
* Quando la batteria si sta per scaricare, la retroilluminazione viene disattivata e il display è in
bianco e nero, leggermente attenuato. Installare una nuova batteria il prima possibile.
* La batteria consente di conservare le impostazioni quando l'unità è spenta. Se la batteria viene rimossa
o si scarica del tutto, tutte le impostazioni memorizzate andranno perse e verranno ripristinate quelle di
fabbrica.
* Utilizzare una batteria al litio solo del tipo speci cato (n. modello CR2032). Inserire la batteria nella
direzione indicata, rispettando la polarità.
* Le batterie al litio usate devono essere smaltite in conformità alle normative per il corretto smaltimento
vigenti nella regione in cui si trovano.
* Non conser vare mai le batterie insieme a oggetti metallici quali penne a sfera, collane, mollette e così via.
Speci che principali
Gamma di
accordatura
Tono di
riferimento
Precisione
dell'accordatura
Modalità di
visualizzazione
Accordatura at Normale: 5 semitoni più bassa
Alimentazione Batteria al litio CR2032 x 1
* Allo scopo di migliorare il prodotto, le speci che e/o l'aspetto di questa unità sono soggetti a modi che
senza preavviso.
C0 (16,35 Hz)–C8 (4.186 Hz)
A4 (436 - 445Hz)
± 1 centesimo
Visualizzazione Cent e Stream
BOSS TU-10: accordatore cromatico a clip
Portata attuale
Durata
prevista delle
batterie con uso
continuo
Dimensioni 73 (L) x 33 (P) x 62 (A) mm
Peso 45 g (batteria inclusa)
Accessori
Display a colori: 12 mA
Display monocromatico: 4 mA
Display a colori: circa 12 ore
Display monocromatico: circa 24 ore
* Dipende dalle condizioni
di uso.
Batteria al litio CR2032,
Manuale dell'utente
Procedimiento de a nación
1. Ponga las cuerdas de la guitarra (bajo) y ténselas un poco.
2. Coloque el clip del TU-10 en el clavijero de la guitarra (bajo) que desea a nar.
Si se coloca en la super cie del clavijero Si se coloca en la parte trasera del clavijero
3. Pulse el botón [ ] (POWER).
4. A ne el instrumento tocando una sola nota, empiece con la cuerda de tono más grave (la cuerda “E”
inferior de la ilustración) de su guitarra (bajo).
La pantalla mostrará el nombre de la nota más próxima al tono que ha tocado.
5. A ne la cuerda de tal forma que aparezcan los dos indicadores de guía, y
la aguja del medidor quede en el centro.
* La explicación que le ofrecemos aquí es para cuando está seleccionado el
ajuste de la pantalla Cent. Si ha seleccionado la pantalla Stream, el medidor
tendrá un aspecto distinto.
Copyright © 2012 BOSS CORPORATION. Todos los derechos reservados. Ninguna parte de esta publicación se puede
reproducir en forma alguna sin el permiso por escrito de BOSS CORPORATION.
Nombres de nota de las cuerdas de la guitarra Nombres de nota de las cuerdas del bajo
E
B
G
D
A
E
(para a nación convencional)
G
D
A
E
Cambio de la pila
La unidad se entrega de fábrica con una pila de litio ya colocada. Para empezar a usar la unidad, basta con
tirar de la lámina de aislamiento que sale por el compartimento de la pila. No obstante, la vida útil de esta
pila puede ser limitada, ya que su nalidad pr incipal es permitir la realización de pruebas.
Cuidado con la
polaridad
* Cuando a la pila le queda poca carga, la retroiluminación se apagará, la pantalla se pondrá en
blanco y negro y tendrá menor intensidad. Coloque una pila nueva lo antes posible.
* La pila también conser va los ajustes cuando la unidad está apagada. Si la pila se extrae o estuviera
agotada, todos los ajustes que se han almacenado en la memoria volverán a su con guración de fábrica.
* Use únicamente el tipo de pila de litio especi cado (modelo nº. CR2032). Asegúrese de insertarla
conforme a las instrucciones (para garantizar la polaridad correcta).
* Las pilas de litio usadas se deben desechar de acuerdo con la normativa vigente en su lugar de residencia.
* No guarde nunca las pilas con objetos metálicos como bolígrafos, horquillas, collares, etc.
Especi caciones principales
Rango de
a nación
Tono de
referencia
Precisión de
a nación
Modo de
pantalla
A nación
bemol
Fuente de
alimentación
* Con el n de mejorar el producto, las especi caciones y/o el aspec to de la unidad pueden modi carse sin
previo aviso.
C0 (16,35 Hz)–C8 (4.186 Hz)
A4 (436–445 Hz)
± 1 centésima
Pantalla Cent, pantalla Stream
Normal–5 semitonos más bajos
Pila de litio CR2032 x 1
BOSS TU-10: A nador cromático de clip
Consumo
Duración
prevista de la
pila con un uso
continuo
Dimensiones
Peso 45 g (incluida la pila)
Accesorios
Pantalla en color: 12 mA
Pantalla monocroma: 4 mA
Pantalla en color:
Aprox. 12 horas
Pantalla monocroma: Aprox. 24 horas
* Esta cifra varía según las
condiciones de uso reales.
73 x 33 x 62 mm
(ancho x fondo o alto)
Pila de litio CR2032,
Manual de instrucciones
Manual do proprietário
Recursos principais
• Visor que muda de cor para visibilidade excelente
• Design elegante
• A função Accu-Pitch Sign exibe uma indicação e uma alteração de cor para mostrar que a a nação foi concluída.
• Função de A nação em Bemol, indispensável para a a nação de guitarras
Descrições do painel
Botão [ ] (POWER)
Função de Desligamento automático
Caso nenhum botão seja pressionado por aproximadamente 2 minutos após a
energia ser ligada, a energia desligará automaticamente. Caso não deseje que a
energia seja automaticamente desligada, mantenha o botão [
e pressione o botão [
será desativada.
Modo de visor monocromático
Caso ligue a energia mantendo [
a luz de fundo será desligada e o visor será alterado para exibir tudo em preto
e branco. Também é possível alternar a luz de fundo entre acesa/apagada ao
pressionar o botão [
* S ob uma forte luz, o que é visto na tela pode parecer estar em preto e branco,
mesmo se o equipamento estiver con gurado para exibir o conteúdo em cores.
Visor
4
Medidor
Indica a diferença de a nação do som de entrada.
3
A nação em bemol
Permite que o instrumento seja a nado para que a
a nação geral seja mais baixa (entre 1 a 5 semitons
abaixo) do que a a nação regular.
O visor indicará
semitons abaixo). Ao ajustar esse parâmetro,
irão piscar alternadamente caso a a nação regular seja
selecionada.
2
Ativar/desativar a função Accu-Pitch Sign
Se a função Accu-Pitch estiver ligada, as agulhas do medidor se
moverão da esquerda e da direita em direção ao centro quando o
instrumento estiver a nado.
Ao ajustar esse parâmetro, a indicação será como a seguir.
Ligado
(padrão)
Desligado
Liga e desliga o equipamento.
] para ligar. “P“ será exibido no visor e a função Auto O
] pressionado por um ou mais segundos,
] por alguns segundos quando a energia está ligada.
* Na ilustração, 1 - 4 indicam a ordem em que os parâmetros selecionados pelo botão [SELECT] serão exibidos.
(1 semitom abaixo) - (5
As agulhas do medidor se moverão da esquerda
e da direita em direção ao centro.
As agulhas do medidor apontarão para a direita
e para a esquerda.
] pressionado
Exibição Cent (padrão)
Exibição Stream
e
Antes de usar este equipamento, leia com atenção as seguintes seções: “USANDO A UNIDADE COM
SEGURANÇA” e “OBSERVAÇÕES IMPORTANTES” (fornecidos em uma folha separada). Essas seções oferecem
informações importantes sobre o uso correto do equipamento. Além disso, para que você conheça todos
os recursos do seu novo equipamento, o Manual do proprietário deve ser lido por completo. O manual
deverá ser guardado em local de fácil acesso para consultas futuras.
Botão [SELECT]
Pressionar o botão [SELECT]
inicia um ciclo pelos parâmetros
na ordem de
mostrado na ilustração abaixo.
O parâmetro selecionado
piscará no visor.
1
Botão [ ]
Esse botão altera o valor do
parâmetro piscando.
A agulha do medidor irá se mover para a esquerda se o som da nota de
entrada estiver baixo ou para a direita quando ele estiver alto. A agulha cará
no centro se a a nação estiver correta.
O medidor se moverá para a esquerda se a a nação da nota estiver baixa ou
para a direita se ela estiver alta. O movimento se tornará mais lento conforme
você se aproxima da a nação correta e irá parar quando ela estiver correta.
Baixo Alto
Baixo
Alto
Indicação do nome da nota
Indica o nome da nota.
1
A nação de referência
É possível ajustar a a nação de
referência em uma faixa de 436 a
445 Hz (a con guração padrão é
de 440 Hz).
Indicador do guia
Indica a a nação aproximada.
A nação está baixa
A nação está correta
A nação está alta
Sobre a luz de fundo
A luz de fundo acenderá
intensamente quando o som for
recebido e quando um botão for
operado. Ela automaticamente
será revertida para pouco brilho
quando não houver entrada de
som ou operação do botão por
aproximadamente 10 segundos.
Português
- 4, como
Gebruikershandleiding
Belangrijkste functies
• Display die van kleur verandert, voor een optimale leesbaarheid
• Stijlvol ontwerp
• De Accu-Pitch Sign-functie geeft een indicatie weer en verandert van kleur om aan te geven dat u klaar bent met
stemmen
• Flat Tuning-functie, onmisbaar voor het stemmen van gitaren
Paneelbeschrijvingen
Knop [ ] (stroomknop)
Automatische uitschakelingsfunctie
Als na het inschakelen van het apparaat ongeveer 2 minuten voorbijgaan zonder dat
er een knop wordt ingedrukt, wordt de voeding automatisch uitgeschakeld. Als u de
stroom niet automatisch wilt laten uitschakelen, houdt u de knop [
drukt u op de knop [
en de Automatische uitschakelingsfunctie wordt uitgeschakeld.
Weergavemodus zwart-wit
Als u de stroom inschakelt door [
te houden, gaat de achtergrondverlichting uit en wordt op het scherm
alles weergegeven in zwart-wit. U kunt de achtergrondverlichting ook in-/
uitschakelen door de knop [
terwijl de stroom is ingeschakeld.
* Bij helder licht k an het scherm eruit zien alsof de weergave zwart-wit is, ook al is
het apparaat ingesteld op schermweergave in kleur.
Beeldscherm
4
Meter
Geeft het verschil in toonhoogte van het ingevoerde geluid aan.
3
Flat tuning
Hiermee kunt u uw instrument stemmen zodat de
algehele toonhoogte lager is (tussen 1 en 5 halve tonen
lager) dan bij normaal stemmen.
Op het scherm wordt
(5 halve tonen lager) weergegeven. Bij het instellen van
deze parameter knipperen
normaal stemmen wordt geselecteerd.
2
Accu-Pitch Sign-functie aan/uit
Als de Accu-Pitch Sign-functie is ingeschakeld, bewegen de
naalden van de meter van links en rechts naar het midden als het
instrument correct is gestemd.
Bij het instellen van deze parameter is de weergave als volgt.
Aan
(standaard)
Uit
Hiermee schakelt u de voeding in/uit.
] om het apparaat in te schakelen. Op het display verschijnt ‘P’
] een of meer seconden ingedrukt
] één seconde of langer ingedrukt te houden
* I n de afbeelding wordt met 1 – 4 de volgorde aangegeven waarin de met de knop [SELECT] geselecteerde parameters worden weergegeven.
(1 halve toon lager) –
en afwisselend als
De naalden van de meter bewegen van links en
rechts naar het midden.
De naalden van de meter wijzen naar links en
rechts.
] ingedrukt en
Cent-weergave
(standaard)
Stream-weergave
Lees zorgvuldig onderstaande hoofdstukken voordat u dit apparaat gebruikt: “HET APPARAAT VEILIG
GEBRUIKEN” en “BELANGRIJKE OPMERKINGEN” (bijgeleverd op een apart blad). Deze hoofdstukken
bevatten belangrijke informatie over de juiste bediening van het apparaat. Lees bovendien de gehele
gebruikershandleiding om er zeker van te zijn dat u elke functie van uw nieuwe apparaat goed begrijpt.
De handleiding moet als handige referentie worden bewaard en voorhanden zijn.
Knop [SELECT]
Door de knop [SELECT] in te
drukken, bladert u door de
parameters in de volgorde
1
– 4, zoals aangegeven in
de onderstaande afbeelding.
De geselecteerde parameter
knippert in het scherm.
[ ]-knop
Met deze knop wijzigt u de
waarde van de knipperende
parameter.
De naald van de meter beweegt naar links als het ingevoerde geluid te laag
is, of naar rechts als de toonhoogte te hoog is. De naald staat in het midden
als de toonhoogte juist is.
De meter beweegt naar links als de toonhoogte te laag is, of naar rechts als
de toonhoogte te hoog is. De beweging wordt trager naarmate u de juiste
toonhoogte nadert, en stopt wanneer u de juiste toonhoogte hebt bereikt.
Te laag Te hoog
Te hoog
Indicatie van de nootnaam
Hiermee wordt de naam van de
noot aangegeven.
1
Referentietoonhoogte
U kunt de referentietoonhoogte
instellen in het bereik van 436–445
Hz (de standaardinstelling is
Stemgids
Hiermee wordt de stemming bij
benadering aangegeven.
Toonhoogte is te laag
Toonhoogte is juist
Toonhoogte is te
hoog
440 Hz).
De achtergrondverlichting
De achtergrondverlichting brandt
helder als geluid wordt ingevoerd
en wanneer u een knop bedient.
De verlichting gaat automatisch
minder fel branden als er
gedurende ongeveer 10 seconden
geen geluid wordt ingevoerd of
geen knop wordt bediend.
Nederlands
Te laag
Procedimento de a nação
1. Coloque as cordas em sua guitarra (baixo) e aperte-as um pouco.
2. Conecte a presilha do TU-10 ao headstock da guitarra (baixo) que deseja a nar.
Fixando na superfície da cabeça Fixando na parte de trás da cabeça
3. Pressione o botão [ ] (POWER).
4. A ne seu instrumento ao tocar uma única nota, começando com a corda de a nação mais grave (a corda
"E" inferior na ilustração) de sua guitarra (baixo).
O visor exibirá o nome da nota mais próxima à a nação tocada.
5. A ne a corda de modo que os dois indicadores do guia sejam exibidos e a
* A explicação fornecida aqui é para quando a con guração de exibição Cent
Copyright © 2012 BOSS CORPORATION Todos os direitos reservados. Nenhuma parte desta publicação poderá ser
reproduzida em qualquer formato sem permissão por escrito da BOSS CORPORATION.
Nomes das cordas da guitarra Nomes das cordas do baixo
E
B
G
D
A
E
agulha do medidor esteja no centro.
estiver selecionada. Caso tenha selecionado a exibição Stream, o medidor
será exibido de maneira diferente.
G
D
A
E
(para a nação convencional)
Trocando a bateria
O equipamento sai da fábrica com uma bateria de lítio instalada. Para começar a usar o equipamento,
simplesmente retire a película isolante que sai do compartimento da bateria. No entanto, a duração dessa
bateria pode ser limitada, já que seu objetivo principal é possibilitar o teste.
Observe a polaridade
correta
* Quando a bateria ca fraca, a luz de fundo será apagada e o visor se tornará preto e branco e irá
escurecendo. Instale uma nova bateria assim que possível.
* A bateria também preser va as con gurações quando a energia é desligada. Caso remova a bateria ou
ela se esgote, todas as con gurações que foram armazenadas na memória retornarão para seu estado
padrão de fábrica.
* Use apenas o tipo especi cado (nº do modelo CR2032) de bateria de lítio. Certi que-se de inseri-la
conforme orientado (para garantir a polaridade correta).
* As baterias de lítio usadas devem ser descartadas em conformidade com todas as normas de segurança
de descarte da região em que você vive.
* Nunca mantenha as baterias próxima a objetos metálicos como canetas esferográ cas, colares, grampos
de cabelo, etc.
Especi cações principais
Faixa de
a nação
A nação de
referência
Precisão da
a nação
Modo de
exibição
A nação em
bemol
Fonte de
alimentação
* Com a nalidade de aprimorar o produto, as especi cações e/ou aparência deste equipamento estão
sujeitas a mudanças sem aviso prévio.
C0 (16,35 Hz) – C8 (4.186 Hz)
A4 (de 436 a 445 Hz)
± 1 centésimo
Exibição Cent, exibição Stream
Semitom abaixo regular de -5
Bateria de lítio CR2032 x 1
BOSS TU-10: A nador cromático acoplável
Consumo
Expectativa
de duração da
bateria em uso
contínuo
Dimensões 73 (L) x 33 (P) x 62 (A) mm
Peso 45 g (incluindo bateria)
Acessórios
Visor colorido: 12 mA
Visor monocromático: 4 mA
Visor colorido:
Aproximadamente 12 horas
Visor monocromático:
Aproximadamente 24 horas
* Esse número pode variar
dependendo das condições
reais de uso.
Bateria de lítio CR2032,
Manual do proprietário
Stemprocedure
1. Zet snaren op uw gitaar (bas) en draai ze enigszins aan.
2. Bevestig de klem van de TU-10 op de kop van de gitaar (bas) die u wilt stemmen.
Bevestiging op het oppervlak van de gitaarkop
3. Druk op de knop [ ] (stroomknop).
4. Stem uw instrument door een enkele noot te spelen en begin daarbij bij de laagste snaar (de onderste
'E'-snaar in de afbeelding) van de gitaar (bas).
Op het scherm wordt de naam weergegeven van de noot die het dichtst bij de gespeelde toonhoogte ligt.
Nootnamen van gitaarsnaren Nootnamen van bassnaren
5. Stem de snaar zo dat beide stemlampjes verschijnen en de naald van de
meter in het midden staat.
* De hier beschreven verklaring is van toepassing wanneer de Cent-weergave
is geselecteerd. De meter ziet er anders uit als u de Stream-weergave hebt
geselecteerd.
Copyright © 2012 BOSS CORPORATION Alle rechten voorbehouden. Niets uit deze uitgave mag op enige manier
worden gereproduceerd zonder schriftelijke toestemming van BOSS CORPORATION.
E
B
G
D
A
Bevestiging op de achterkant van de gitaarkop
G
D
A
E
(voor traditioneel stemmen)
De batterij vervangen
Bij verzending vanuit de fabriek is in het apparaat een lithiumbatterij geïnstalleerd. Als u het apparaat wilt
gaan gebruiken, trekt u gewoon het isolatiestrookje dat uit het batterijvakje steekt eruit. De levensduur van
deze batterij kan echter beperkt zijn aangezien deze hoofdzakelijk voor testdoeleinden is gebruikt.
Zorg voor de juiste
polariteit
* Als de batterij bijna leeg is, gaat de achtergrondverlichting uit en wordt het scherm zwart-wit en
zwak. Plaats zo snel mogelijk een nieuwe batterij.
* De batterij behoudt tevens de instellingen als de stroom is uitgeschakeld. Als u de batterij verwijdert
of als deze leeg raakt, gaan alle instellingen die in het geheugen zijn opgeslagen terug naar de
fabrieksinstellingen.
* Gebruik alleen het aangegeven type lithiumbatterij (modelnr. CR2032). Plaats deze volgens de
aanwijzingen (voor de juiste polariteit).
* Gebruikte lithiumbatterijen moeten worden weggegooid in overeenstemming met de reglementen voor
veilige afvoer die van kracht zijn in uw regio.
* Bewaar batterijen nooit samen met metalen voorwerpen zoals balpennen, halskettingen, haarspelden enz.
Belangrijkste speci caties
Stembereik C0 (16,35 Hz)-C8 (4.186 Hz)
Referentietoonhoogte
Stemnauwkeurigheid
Weergavemodus
Flat Tuning Normaal–5 halve tonen lager
Voeding CR2032-lithiumbatterij x 1
Stroomverbruik
* M et het oog op productverbetering kunnen de speci caties en/of het uiterlijk van dit toestel worden
gewijzigd zonder voorafgaande kennisgeving.
A4 (436–445 Hz)
± 1 cent
Cent-weergave, Streamweergave
Kleurenscherm: 12 mA
Zwart-witscherm: 4 mA
BOSS TU-10: Chromatisch stemapparaat met klem
Verwachte
levensduur
batterij bij
voortdurend
gebruik
Afmetingen 73 (B) x 33 (D) x 62 (H) mm
Gewicht 45 g (inclusief batterij)
Accessoires
Kleurenscherm: Ongeveer 12 uur
Zwart-witscherm: Ongeveer 24 uur
* Deze waarde varieer t
afhankelijk van de werkelijke
gebruiksomstandigheden.
CR2032-lithiumbatterij,
Gebruikershandleiding
 Loading...