

Page 1

1
Instruction Manual
TPSE201 (181422) - BOSSTM Universal Programmer
TPSE101 (569565) - BOSSTM Universal Timeswitch
Thank you for purchasing this product. If installing for someone else, please ensure that the
instructions are handed to the householder.
Please read this manual prior to installation or use. Retain for future reference.
Always isolate the mains supply before removing the unit from the backplate.
Please leave these instructions with the end user where they should be kept in a safe place for
future reference
Installation
The TPSE201/TPSE101 is easily installed using the backplate supplied. This can be mounted directly to
the wall or a single gang recessed box using the holes provided; cable entry is from the rear.
Specification
Power supply 230V/50Hz
Switch rating 6(2)A
Switch type Single pole, double throw (SPDT)
Operating temperature 0°C - 50°C
Storage conditions -20°C - 60°C
Frost protection temperature 5°C
Programme
5/2, 7 day or daily selectable by jumper
3 setting per day
Time display 12 or 24 hour
Memory Internal memory back-up
Backlight Green LED
Switches/Jumpers
The installer should select the jumper positions required if changing from the factory pre-sets, these
jumpers are found on the rear of the unit. Always enable the internal memory back up battery before
installing the unit,
Switch/Jumpers Function
Program type
3x2 pins jumpers for 5+2 days (factory default setting),
7 days program or daily
P/G (TPSE201 only)
3x1 pin jumper for fully pumped and controlled system
(factory default setting) or gravity-fed hot water system.
Internal backup battery
3x1 pin jumper to enable/disable the internal backup
battery (disabled is the factory default setting)
Page 2

2
BackPlate & Wiring
This unit does not require an earth connection. The earth terminal is provided for safe retention of
circuit earth wires only.
1. Select a suitable location noting the advice in page 1 of this manual, a suitable mounting height is
1.5m above the floor
2. Isolate the AC mains supply, note this must be 230Vac and fused at 6 Amps.
3. Optimum cable size is 1.5mm2
Check the system wiring specification to confirm connections and cable core colour identification.
4. Cable must enter from the rear of the backplate.
5. Securely fix the backplate directly to the wall or fit to a recessed back box.
6. Terminate cables in accordance with the wiring diagram on the unit, ensuring conductors are
firmly gripped between the square brass washers.
7. This appliance is double insulated and must not be earthed. The earth terminal is provided for
safe retention of circuit earth wires only.
8. The backplate has 6 holes through which to fix to the surface of your choice. Please note that
when fitting the controller to the backplate, some pressure downwards is required to lock the
pins in the unit to the connectors in the backplate. Secure the controller to the backplate with the
captive screws at the bottom taking care not to over tighten.
9. Enable the memory back up.
10. Restore mains to system when all the associated items are fully installed and test for correct
operation.
NOTE: mains power is required to programme unit.
Please note: Always isolate the mains power prior to fitting the unit onto the backplate and when
the backplate is exposed.
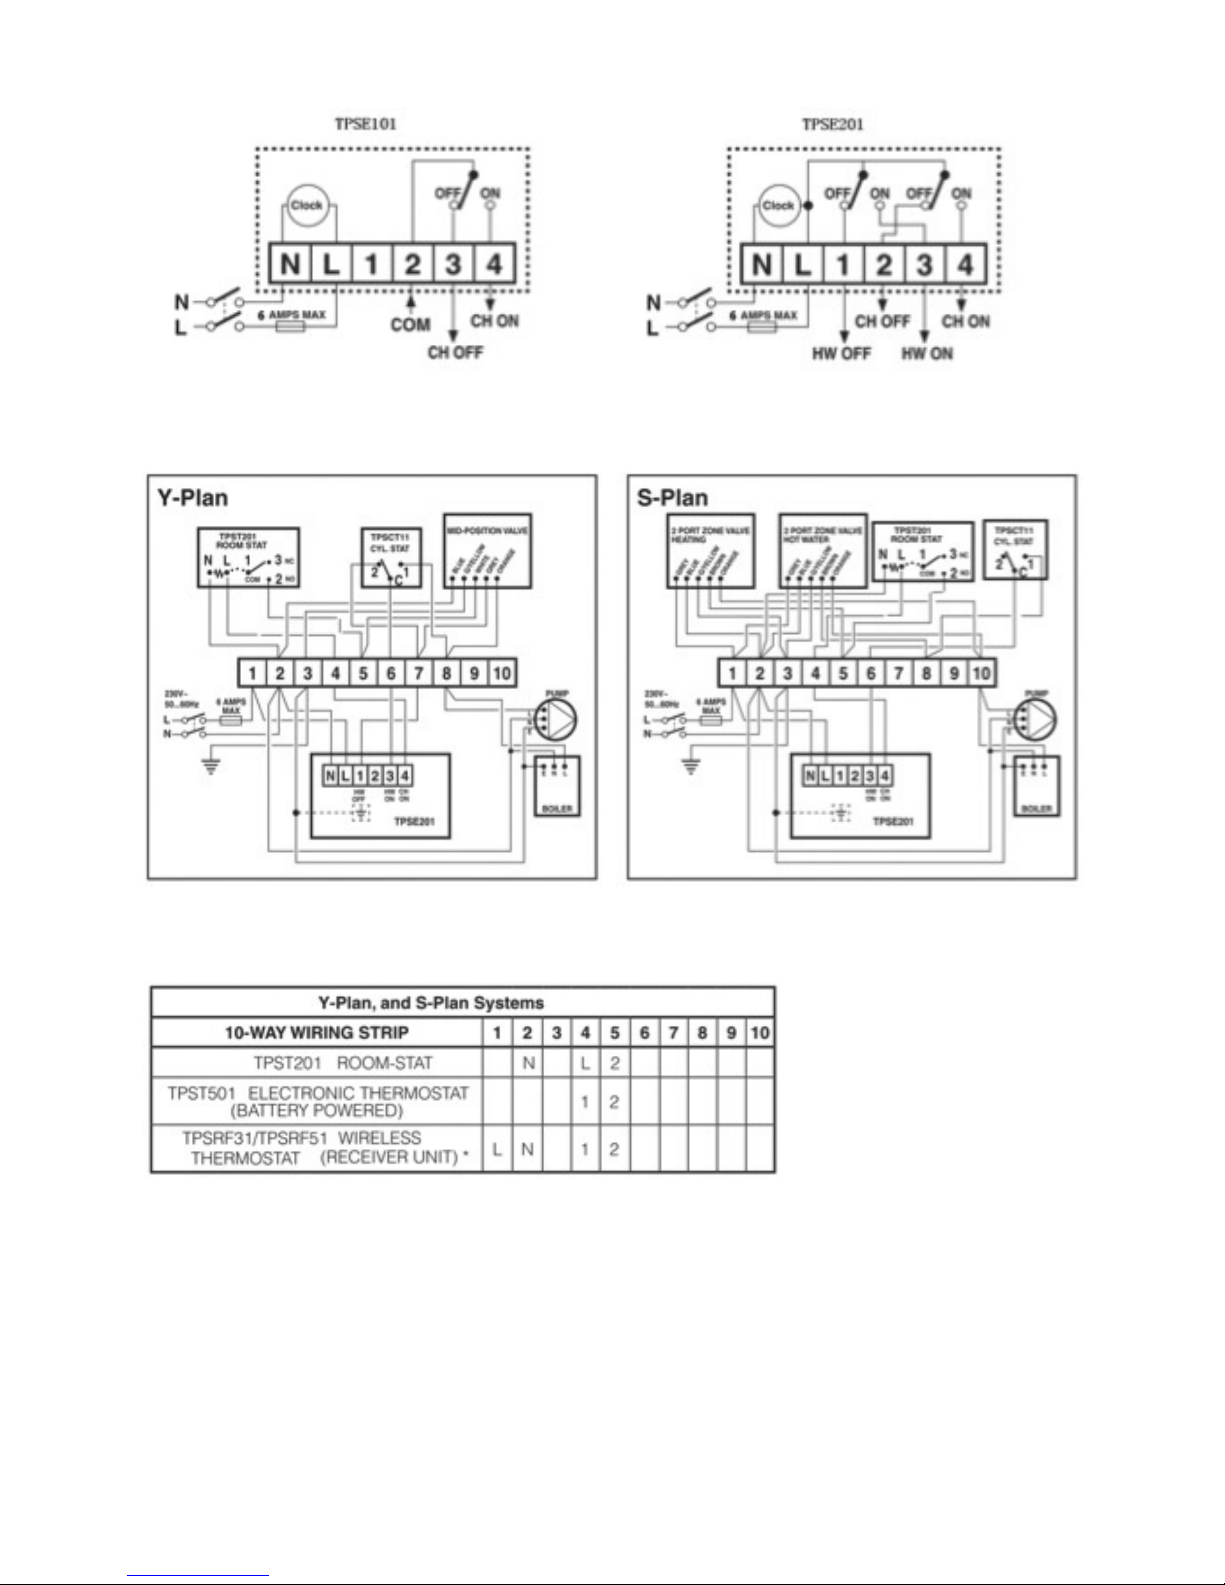
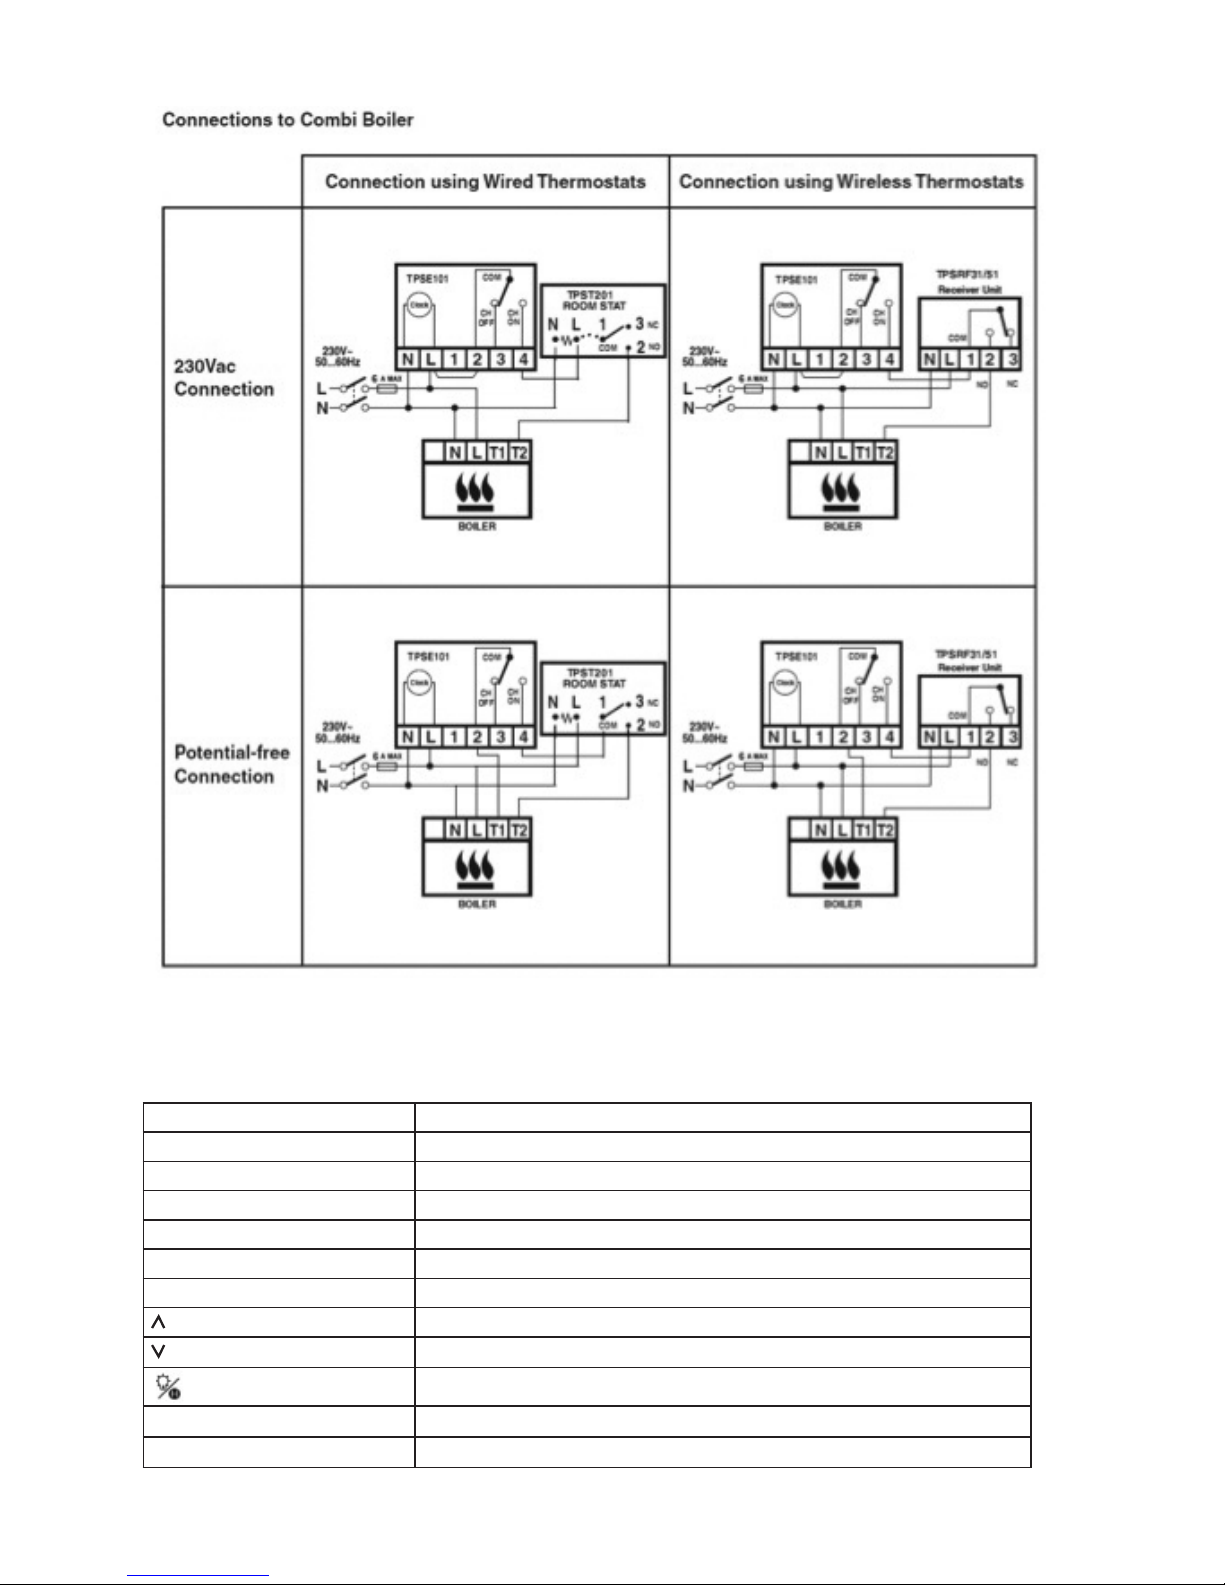
Terminals:
TPSE101
Terminal Name Function
N Neutral
L Live
2 Common (ex-factory with jumper to L)
3 (CH OFF) Central Heating OFF
4 (CH ON) Central Heating ON
E Earth
Remark: For volt free setting, remove jumper between L & 2.
TPSE201
Terminal Name Function
N Neutral
L Live
1 (HW OFF) Hot Water OFF
2 (CH OFF) Central Heating OFF
3 (HW ON) Hot Water ON
4 (CH ON) Central Heating ON
E Earth
Page 3
3
Internal Wiring
Wiring diagrams (TPSE201)
Alternative wiring connections for other BOSSTM room thermostats
* Wireless thermostat receiver unit MUST have permanent mains power from fused spur to operate correctly.
Page 4
4
Wiring diagrams (TPSE101)
Note: Wireless thermostat receiver unit MUST have permanent mains power from fused spur to operate correctly.
User Instructions
Keyboard
Key Function
Mode (CH)
Operating mode selection for Central Heating
Hr+ (CH)
Temporary override for Central Heating
Adv (CH)
Advance to next program for Central Heating
Mode (HW) Only for TPSE201
Operating mode selection for Hot Water
Hr+ (HW) Only for TPSE201
Temporary override for Hot Water
Adv (HW) Only for TPSE201
Advance to next program for Hot Water
Increase set Temperature.
Decrease set Temperature.
Turn on backlight for 10 seconds. Activate/de-activate holiday override.
Set
Press to begin/confirm programming settings.
Select
Press to select day(s)/time/temperature.
Page 5
5
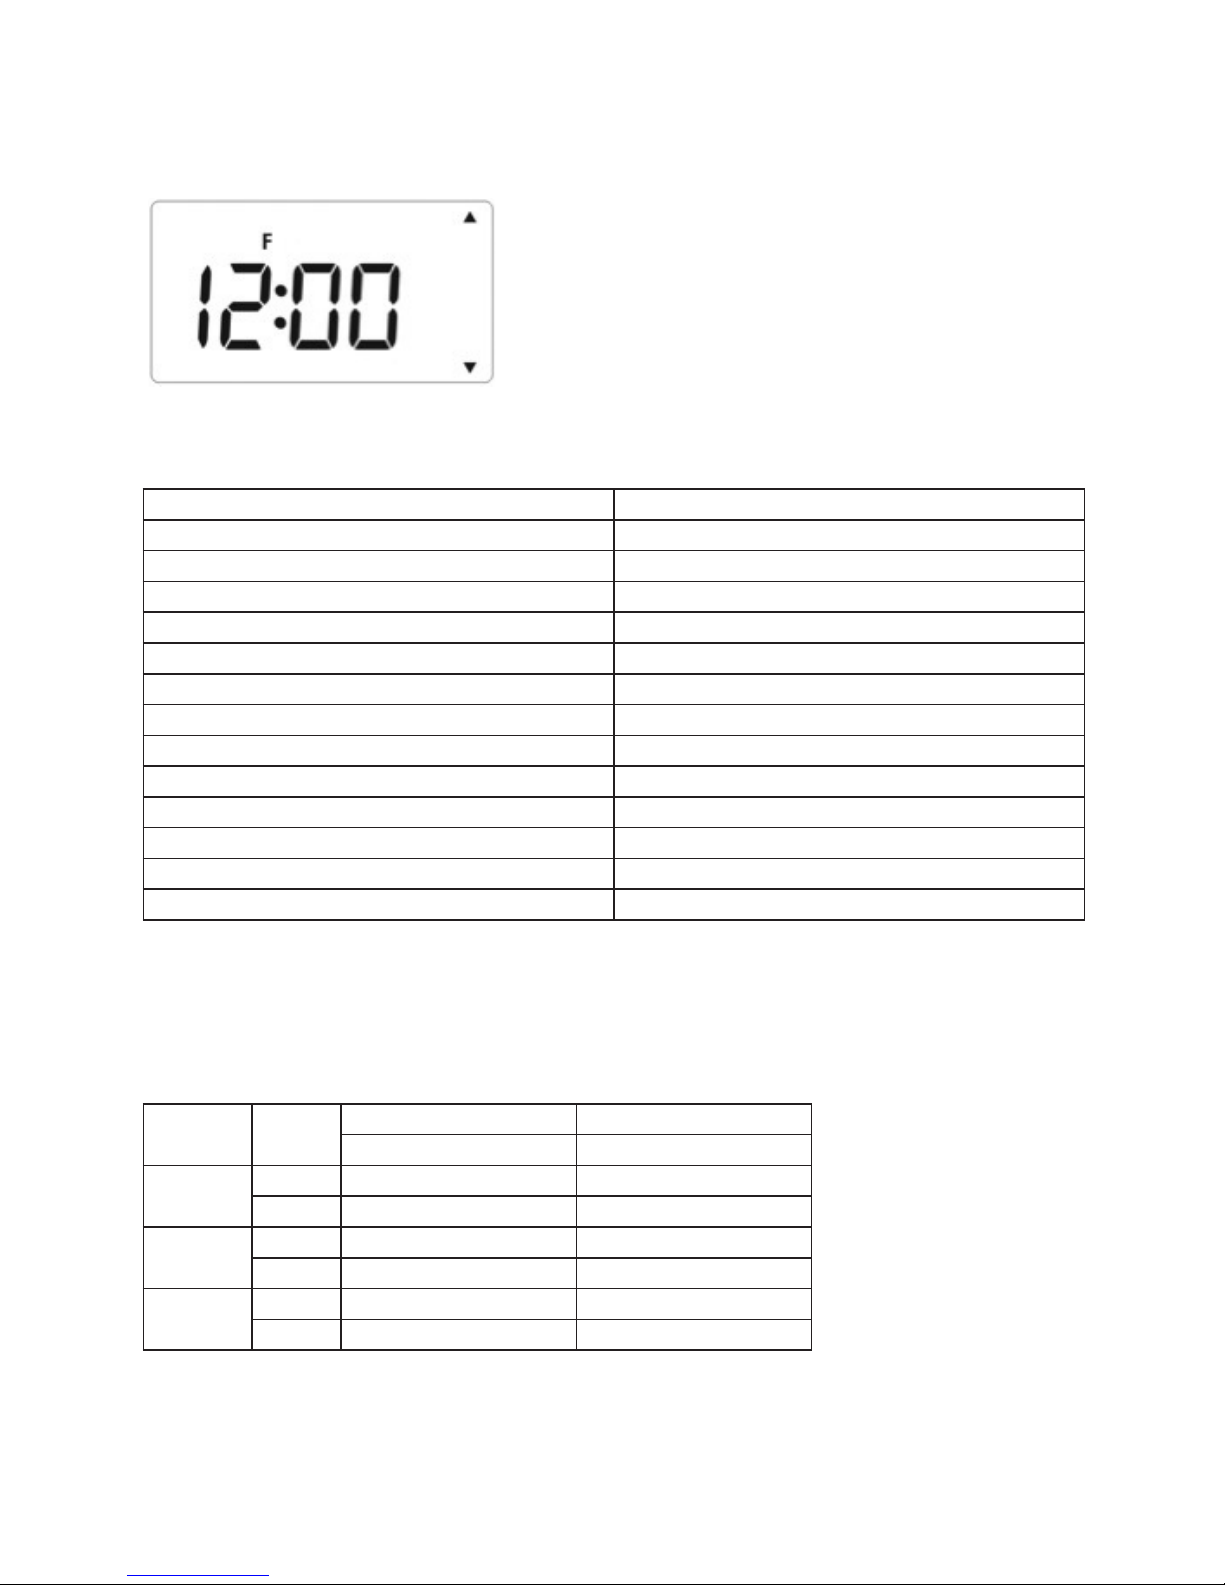
Initial Power Up
• After power up or Reset is pressed, all programmes are reset.
• During system reset, all LCD segments are turned on for 2 seconds. After 2 seconds, the
programmer is initialized and the display will look like this.
Setting of the TPSE201/TPSE101 after reset
Function Status after Reset
Operation Mode Auto mode
12/24 hour 24h
Clock 12:00
AM/PM indicator N/A
Date 2016-Jan-1
Daylight Saving On
Program Default factory setting
Program Number indicator Depends on program
SET indicator Off
PROG indicator Off
Mode indicator(s) “Auto”
CH/HW indicator(s) Depends on program
Output Relay Depends on program
• After reset, the TPSE201/TPSE101 will operate in Auto mode.
Default Program Settings after reset
Same for both 5-2 and 7 days programmes.
Program Output
CH HW
Day of week (Mon to Sun) Day of week (Mon to Sun)
1
On 06:00 06:00
Off 08:00 08:00
2
On 10:00 10:00
Off 12:00 12:00
3
On 18:00 18:00
Off 22:00 22:00
Page 6
6
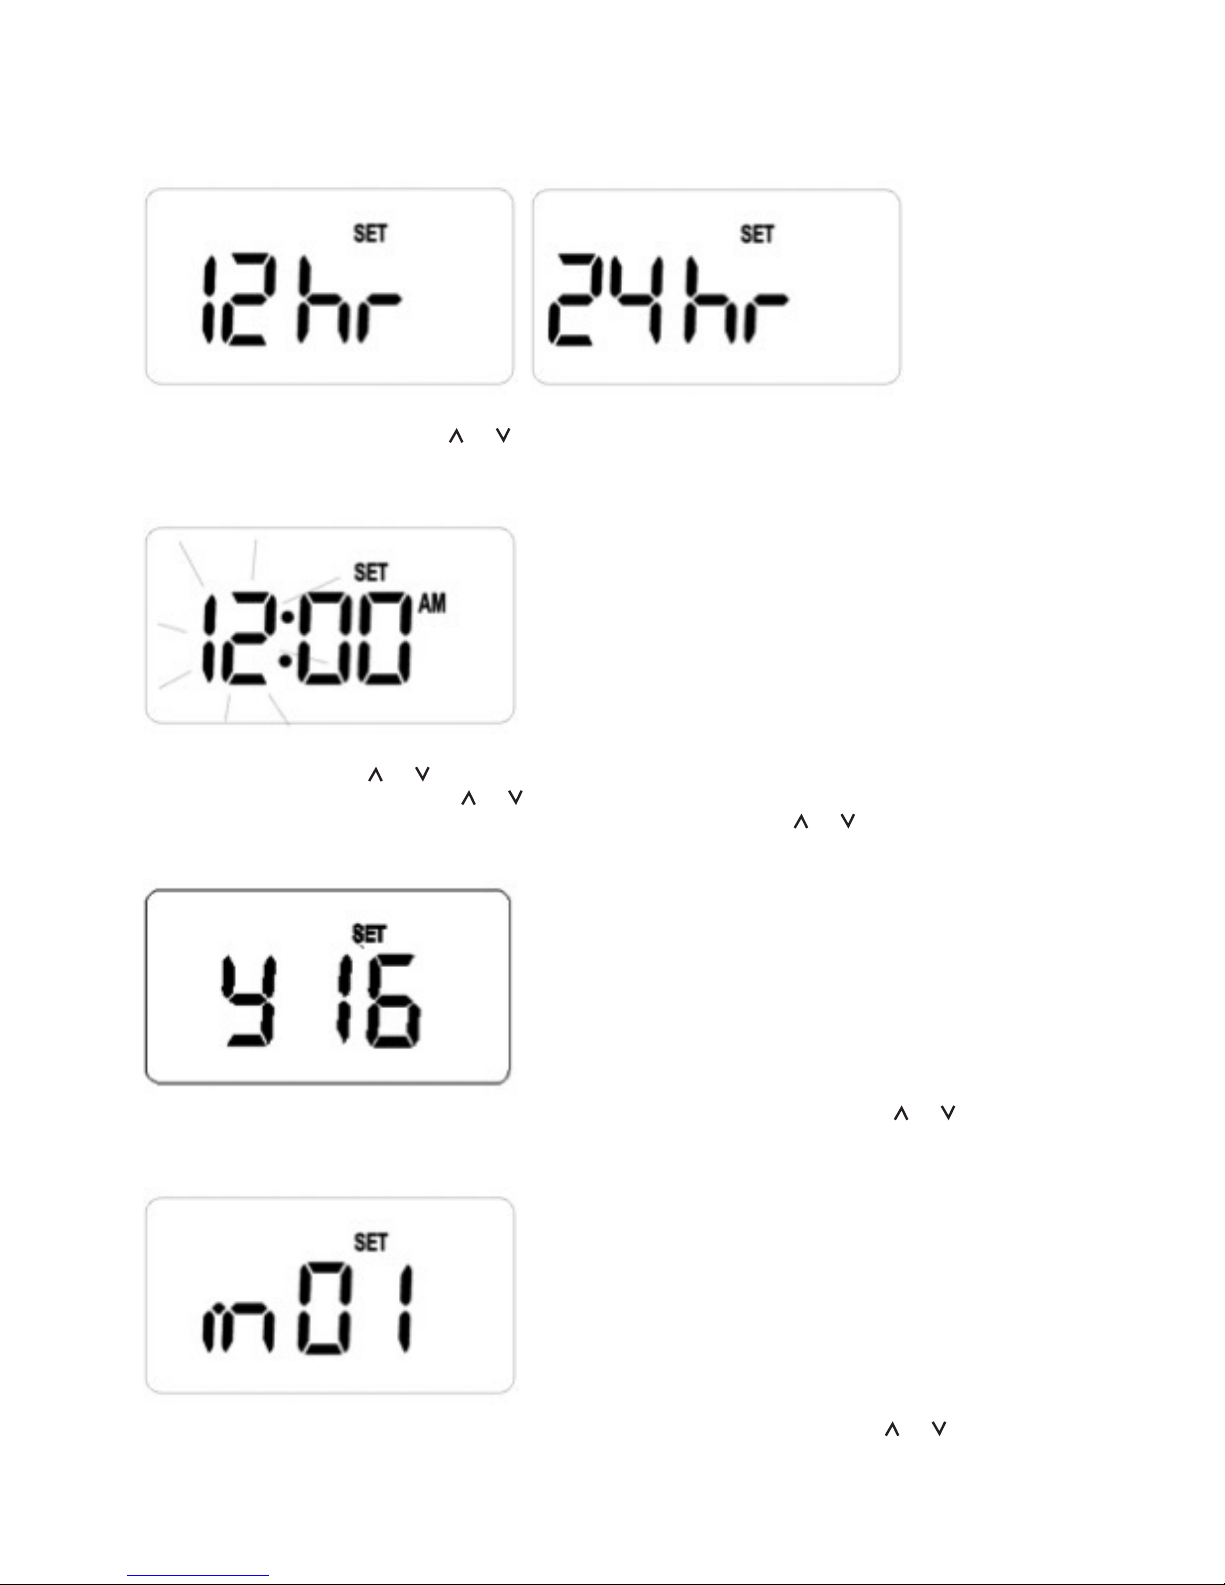
Setting the Clock
• Press and hold Set and Select in Normal mode for 3 seconds to enter Clock setting mode.
“12 hr” or “24 hr”, and “SET” are displayed. All other indicators are cleared.
• Release Set and Select, press or to toggle between “12 hr” or “24 hr” format.
• Press Select, clock and “SET” are displayed. “Hour” is flashing to indicate that it is the selected
item to be adjusted.
• Release Select, press or to increase or decrease the “hour” respectively.
• Press and release Select, press or to increase or decrease the “minute” respectively.
• Press and release Select to set the Year, “y xx” is displayed, press or to increase or decrease
the “year” respectively. The “year” can set between 20”16” and 20”99” inclusive.
• Press and release Select to set the Month of Year, “m xx” is displayed, press or to increase
or decrease the “month” respectively. The “month” can set between “01” to “12”.
• Press and release Select to set the Day of Month, “d xx” is displayed, press or to increase or
decrease the “day” respectively. The “day” can set between “01” to the end of the month which
is determined by the year and month set above.
Page 7

7
• Press and release Select to set Day Light Saving, “dLS xx” is displayed, press or to enable or
disable the Day Light Saving.
• Press and release Select to allow change of “hour” again, but not the 12/24 hour format.
• Press and hold or for 2 seconds to advance the value quickly without repeated presses.
• Selected item will stop flashing when a key is pressed. The selected item will flash again once the
key is released.
• Press Set at any time to confirm the setting and return to normal mode.
• TPSE201 / TPSE101 will return to normal mode after 10 seconds if no key is pressed, the clock is
also updated with the latest setting.
Day Light Saving
When enabled, the clock will automatically shift 1 hour ahead of the current set time from the last
Sunday in March at 2:00am until the last Sunday in October at 2:00am.
5-2, 7 days or daily program
• Programmed events must happen in chronological order i.e., the OFF time cannot be earlier than
the ON time and the time of program 3 cannot be earlier than that of program 2 etc.
• Each time can be set between 3.00 am and 2.50 am (on the next day) to allow you to
programme the CH/HW to stay on past midnight, if required.
• The PROG display indicates the program number.
• The CH/HW display indicates whether CH or HW is being programmed. No CH/HW indicator is
displayed in TPSE101.
• The selected item will be flashing and can be adjusted by or key. Program time is changed in
1 minute steps.
• Press and hold or for 2 seconds to advance the value quickly without repeated presses.
• Selected item will stop flashing when a key is pressed. The selected item will flash again once the
key is released.
• The unit will return to normal mode after 10 seconds if no key pressed, Program settings are
stored.
• Program review/changes are allowed even when Temporary Override or Adv Mode is enabled.
5-2 days program selected
• Central Heating and Hot Water have independent programmes set. 3 different time settings
can be programmed for weekdays or weekend. Total 6 settings for TPSE101, and 12 settings for
TPSE201.
• To review or change program, press Set in normal mode to enter programming mode.
The weekday and “SET PROG” are displayed, all other indicators are cleared. The weekdays are
flashing to indicate that it is the selected item to be adjusted.
Page 8

8
• Press or to select the program set for Weekday/Weekend/CH/HW to be reviewed or
adjusted in the sequences below.
TPSE101: Weekday CH -> Weekend CH -> Weekday CH -> …
TPSE201: Weekday CH -> Weekend CH -> Weekday HW -> Weekend HW -> Weekday CH -> …
• Press Set at any time to confirm the setting and return to normal mode.
• Press Select at any time to confirm the selection. The hour is flashing to indicate that it is the
selected item to be adjusted.
• Press Select to step through the items to be reviewed or adjusted in the sequences below.
(Program 1 ON) “hour” ➝ “minute” ➝
(Program 1 OFF) “hour” ➝ “minute” ➝
(Program 2 ON) “hour” ➝ “minute” ➝
(Program 2 OFF) “hour” ➝ “minute” ➝
(Program 3 ON) “hour” ➝ “minute” ➝
(Program 3 OFF) “hour” ➝ “minute” ➝
and then cycle back to (Program 1 ON)
• Press Set at any time to confirm the setting and return for program set selection.
7 days program selected
• Central Heating and Hot Water have independent programmes set. 3 different time settings
can be programmed for each day of week. Total 21 settings for TPSE101 and 42 settings
for TPSE201.
• To review or change a program, press Set in Normal mode to enter programming mode.
The Monday and “SET PROG” are displayed. All other indicators are cleared. The day of the
week is flashing to indicate that it is the selected item to be adjusted.
Page 9

9
• Press or to select the program set for Day of Week to be reviewed or adjusted in the
sequences below.
Monday CH <-> Monday HW <-> Tuesday CH <-> ... <-> Sunday HW -> Monday CH
• Press Set at any time to confirm the setting and return to normal mode.
• Press Select at any time to confirm the selection. The hour is flashing to indicate that it is the
selected item to be adjusted.
• Press Select to step through the items to be reviewed or adjusted in the sequences below.
(Program 1 ON) “hour” ➝ “minute” ➝
(Program 1 OFF) “hour” ➝ “minute” ➝
(Program 2 ON) “hour” ➝ “minute” ➝
(Program 2 OFF) “hour” ➝ “minute” ➝
(Program 3 ON) “hour” ➝ “minute” ➝
(Program 3 OFF) “hour” ➝ “minute” ➝
and then cycle back to (Program 1 ON)
• Press Set at any time to confirm the setting and return to program selection.
Daily program selected
• Central Heating and Hot Water have independent programmes. 3 different time settings can
be programmed for all days. Total 3 settings for TPSE101 and 3 settings for TPSE201.
• To review or change a setting, press Set in Normal mode to begin programming. The all
day and “SET PROG” are displayed. All other indicators are cleared. All days are flashing to
indicate that it is the selected item to be adjusted.
Page 10

10
• Press or to select the program set for Weekday/Weekend/CH/HW to be reviewed or
adjusted in the sequence below.
Weekday CH -> Weekday HW -> Weekend CH -> Weekend HW -> Weekday CH
• Press Set at any time to confirm the setting and return to normal mode.
• Press Select at any time to confirm the selection. The hour will be flashing to indicate that it
is the selected item to be adjusted.
• Press Select to select among the items to be reviewed or adjusted in the sequences below:
(Program 1 ON) “hour” ➝ “minute” ➝
(Program 1 OFF) “hour” ➝ “minute” ➝
(Program 2 ON) “hour” ➝ “minute” ➝
(Program 2 OFF) “hour” ➝ “minute” ➝
(Program 3 ON) “hour” ➝ “minute” ➝
(Program 3 OFF) “hour” ➝ “minute” ➝
and then cycle back to (Program 1 ON)
• Press Set at any time to confirm the setting and return to program selection.
Operating Mode Selection:
• In normal operating mode, press Mode to step through the four operating modes: On, Once,
Auto, and Off.
• For each press and release of Mode, the operating mode is cycled in the following sequence:
On ➝ Once ➝ Auto ➝ Off ➝ On
• The mode indicator is changed to indicate the selected mode.
Page 11

11
• Function of each operating mode:
Operating Mode Function
On Continuously on
Once On for 1 period a day, from Program 1 ON to Program 3 OFF
Auto Automatic program control
Off Continuously off
• Fully Pumped and Controlled System (P). Central Heating and Hot Water can be operated
independently.
• Gravity-fed Hot Water System (G). Central Heating cannot be operated without Hot Water.
Central Heating (CH) Selectable mode for Hot Water (HW)
On On
Once On, Once
Auto On, Once, Auto
Off On, Once, Auto, Off
In a poorly controlled gravity circulation hot water system, whenever the boiler comes on to
service the heating, there will inevitably be some circulation though the hot water storage
tank, which will then heat up.
Therefore, whenever the HEATING is ON, the HOT WATER is also ON. It is therefore NOT
possible to have independent programmes for heating and hot water hence both CH and HW
are programmed together.
If you have this type of installation (gravity circulation hot water circuit WITHOUT a hot water
control valve), your installer must restrict the Programmer to being a Gravity-fed hot water
system (G).
Page 12

12
Temporary Override:
Hr+ Program Override
• When the device is in either Auto, Once or Off mode, press Hr+ to activate the Hr+ program
override mode.
• “SET” will be displayed, and the mode indicator(s) are lit.
• For TPSE201, “c1” is displayed on the left side for central heating and/or “h1” is displayed on
the right side for hot water. For TPSE101, “1h” is displayed on the right side only.
For TPSE201 with P selected, for hot water, press Hr+ to activate the Hr+ program override.
For TPSE201 with P selected, for central heating, press Hr+ to activate the Hr+ program
override.
For TPSE201 with G selected, for central heating, press Hr+ to activate the Hr+ program
override.
For TPSE101, press Hr+ to activate the Hr+ program override.
Page 13

13
• When Hr+ boost mode is activated, the On mode indicator will flash, together with the
current mode. e.g. If the current mode is auto mode, the On mode icon is flashing and Auto
mode icon remains on.
• For TPSE101, the display shows 0h, 1h, 2h, or 3h in boost mode. For TPSE201, the display
shows C1:h1
• Each press of Hr+ will increase the duration of the override by 1 hour. Maximum duration is
3 hours. Pressing until the number rolls back to “0” will disable the Hr+ program override.
When Gravity-fed Hot Water System is selected, if the HW duration is shorter than the CH
duration, the HW duration will be set to the same duration of CH automatically.
• Press Set or wait 10 seconds without any key press to begin the period of override and return
to the home screen. A channel with override activated is turned on immediately; a channel
with override not activated will keep current operational status. The mode indicator(s) will
flash at the “on” position to indicate the temporary override.
• After 10 seconds, the clock is displayed with the Mode indicator(s) flashing to indicate that
the override mode is activated.
• CH or HW with override activated will return to the previous operating mode at the end of
the set duration and the corresponding Mode Indicator will stop flashing.
• When the Hr+ Program Override mode is activated and the clock is displayed, press Hr+ to
review the current settings. “SET” is displayed, but there is no change of the internal count
down timer(s). If there is no further key press within 10 seconds, the clock will be displayed
again with the mode indicator(s) flashing.
• When reviewing the current settings, subsequent press of Hr+ will add 1 hour to the internal
count down timer(s). Press Set or wait 10 seconds without further key press to start counting
down and return to the home screen. Pressing Hr+ repeatedly until the duration becomes
“0” will stop the corresponding channel. When Gravity-fed Hot Water System is selected,
pressing of HW Hr+ will set the duration the same as CH.
• The channel(s) will enter advance override mode when activated as above. The channel(s)
return to their previous set mode when user disables the advance override.
• The channels will function as above whether the program jumper is set to G or P.
Page 14

14
• When the channel is in Hr+ program mode, the channel cannot be changed to Advance
mode.
• In G mode (Gravity System), when you use the hot water Hr+ function, they will operate
as normal. However, the heating Hr+ function will also bring on the hot water. This is a
consequence of the type of system you have, and is normal.
The following is an example list of CH programmed operations.
Program Output
CH
Day of week
1
On 06:00
Off 08:00
2
On 10:00
Off 12:00
3
On 18:00
Off 22:00
1) In Auto mode
The clock is at 11:00 and is executing program 2 (10:00 turn on, 12:00 turn off). Now user
presses Hr+ twice to begin 2 hours boost mode. Now, the program 2 will extend 2 hours.
i.e. turning off is delayed from 12:00 to 14:00.
2) In Once mode
The clock is at 11:00 and is executing program 1: On to Program 3-Off (06:00 turn on,
22:00 turn off). Now user presses Hr+ twice to begin 2 hours boost mode. Now, the “Once”
program will extend 2 hours. i.e. turning off is delayed from 22:00 to 24:00.
3) In Off mode
The clock is at 11:00. No channel is on. The user presses Hr+ twice to begin 2 hours boost
mode. Now, the channel is turned on and will remain on for 2 hours. i.e. the relay is turned
on at 11:00 immediately and then will turn off at 13:00.
Advance Override
• When the device is in either Auto or Once mode, press Adv to activate the Advance
Override mode.
• The next program will be activated with and ADV icon showed together with
Auto/Once icon.
• When the channel is in Advance mode, the channel cannot be changed to Hr+
override mode.
• In G mode (Gravity System), when you use the hot water ADV function, they will operate as
normal. However, the heating ADV will also bring on the hot water. This is a consequence of
the type of system you have, and is normal.
Page 15

15
The following is an example list of CH programmed operations.
Program Output
CH
Day of week
1
On 06:00
Off 08:00
2
On 10:00
Off 12:00
3
On 18:00
Off 22:00
1) In Auto mode
Case 1: Device is in channel ON state.
- At 11:00. Device is in Program 2 On and the channel is ON.
- The user presses Adv. The relay switches OFF and ADV icon is shown.
- At 12:00, device reaches the time of Program 2 Off. The channel is kept OFF but ADV icon is
NOT shown. i.e. Advance override is finished.
- (Similar when Device in Program 1 Off state)
Case 2: Device is in channel OFF state
- At 9:00 device is in Program 1 Off state and the channel is OFF.
- The user presses Adv. The relay switches ON and ADV icon is shown.
- @10:00, device reaches start time of Program2-On. Now the relay is kept On but ADV icon is
NOT shown. i.e. Advance override is finished.
2) In Once mode
Case 1: Device is in channel ON state.
- At 11:00, device is in Program 2 On and the channel is ON.
- The user presses Adv. The relay switches OFF and the ADV icon is shown.
- At 22:00, the relay is kept OFF but the ADV icon is NOT shown. i.e. Advance override is
finished.
- At 06:00 of the next day, the device reaches the start time of program 1 On and the channel
switches On.
Case 2: Device is in channel OFF state
- At 09:00, device is in Program 1 Off state but the channel is ON while in Once mode
- The user presses the Adv, the channel switches OFF and the ADV icon is shown.
- At 22:00, the channel is kept OFF but the ADV icon is NOT shown. i.e. Advance override is
finished.
- At 06:00 of the next day, the device reaches the start time of program 1 On and the channel
switches On.
Page 16

16
Holiday Override
• In normal mode, press and hold for 3 seconds to activate the Holiday Override
setting mode.
• “1 dy”, “SET”, “H” PROG indicator, and MODE indicator(s) at “off” position are displayed, all
other indicators are cleared. “Day” is flashing to indicate that it is ready to be adjusted.
• Press or to increase or decrease the number of days to turn off the system. Maximum
days to turn off the system is 31 days. If the number rolls back to “0”, Holiday Override will
be disabled.
• Press and hold or for 2 seconds for values to advance quickly.
• Press Set or wait 3 seconds without further key presses to start counting down. “SET” will
disappear and both CH and HW will be turned off immediately.
• Press for 3 seconds again to de-activate the Holiday Override mode. The Programmer
returns to the normal mode.
• The Programmer counts each pass through midnight as a day.
LCD Backlight
• LCD backlight is activated when or any key is pressed. The backlight will be turned off 10
seconds after the last key press.
• LCD backlight will not operate on battery back-up power only.
• LCD backlight is illuminated when changing the Clock, Program, and Temporary Override
Temperature settings.
AC Monitoring
• Mains power is monitored continuously. If the mains fails, output will be turned off
immediately, all the functions will be paused, only the clock and mode icon is displayed, all
other indicators will be cleared.
Page 17

17
• The TPSE101/TPSE201 will return to Normal mode after mains power is resumed.
Backup Battery
The thermostat is shipped from the factory with the battery installed. To stop it from
discharging during shipment and storage, the battery is disconnected by a jumper on the back
of thermostat. This jumper (Memory On) must be moved before the thermostat is mounted
on the wall.
The battery that retains the time and date during a power failure, without mains power,
should last up to one year. If the time and date need to be reset after a power failure, this is an
indication that the battery needs to be replaced.
To replace the battery, open the back of the Thermostat case using a screw driver. Remove the
screw marked by a red tab (see image) and carefully lift off the top circuit board.
Remove the old battery from its clip. Insert a new battery (type CR2032 or equivalent)
observing the correct polarity. Carefully re-position the top circuit board pressing gently back
in to place taking care to engage the pins from the lower circuit board into the socket. Re-fit
the rear casing.
Screw
Socket
Page 18

18
Control Patterns
Control Status Indication
- LED output indicator is illuminated whenever the output is on.
TPSE101
TPSE201
BOSS™ is a registered trademark of the Travis Perkins Group
Registered Office: Travis Perkins plc, Lodge Way House, Lodge Way, Harlestone Road,
Northampton. NN5 7UG
 Loading...