


Owner’s Manual
* This device contains demo phrases (90–99). Once you delete these, they
cannot be recovered. Please back them up as described in “Backing up to
your computer” (p. 14).
* This device will enter Sleep mode (power conservation mode) when ten
hours have elapsed since the last operation, or since the last audio input
while in Stop mode.
If you want to prevent the device from entering Sleep mode, hold down the
pedal while you turn on the power, and continue holding down it down for
ve seconds (p. 18).
English Deutsch Français Italiano Español Português Nederlands

Welcome to the Loop Station!
The RC-3 is a pedal-type recorder that lets you record audio phrases
from your guitar or bass, and play them back by operating the
pedal. You can create a wide variety of performances by layering
sound while you record and carry out play back in real time.
• It’s easy to create loop phrases.
• Up to 99 di erent loop phrases can be saved in phrase memory,
for a total of approximately 3 hours (* total for all phrases).
• You can input audio in stereo.
• Sound from a digital audio player connected to the AUX IN jack
can easily be recorded.
• Recorded phrases can be copied via USB to your computer, or
WAV les from your computer can be loaded into the RC-3 and
played back as loops (p. 14).
Before using this unit, carefully read the sections entitled:
“USING THE UNIT SAFELY” and “IMPORTANT NOTES” (supplied
on a separate sheet). These sections provide important
information concerning the proper operation of the unit.
Additionally, in order to feel assured that you have gained a
good grasp of every feature provided by your new unit, this
manual should be read in its entirety. The manual should be
saved and kept on hand as a convenient reference.
2
Panel DescriptionsMain Features
1 2 3 4 65
7 8
1. [OUTPUT LOOP] knob
This adjusts the volume level of the loop phrase being played back.
* This knob does not adjust the input level of the INPUT and
AUX IN jacks.
2. [OUTPUT RHYTHM] knob
This adjusts the volume level of the rhythm sound (p. 12).

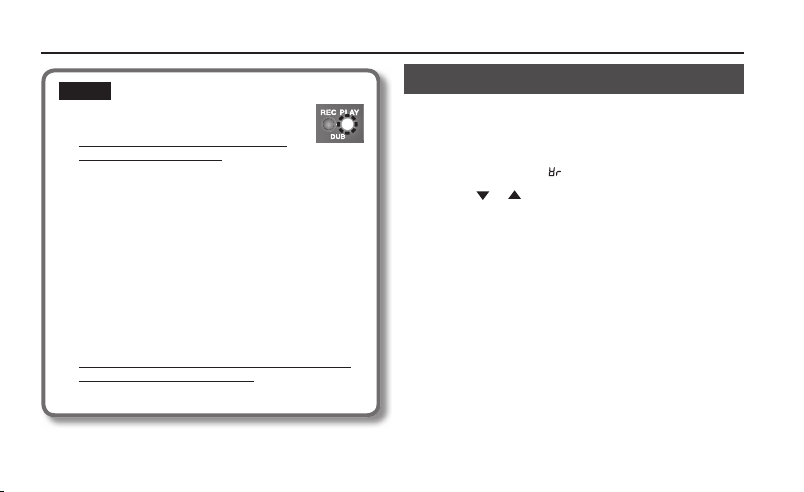
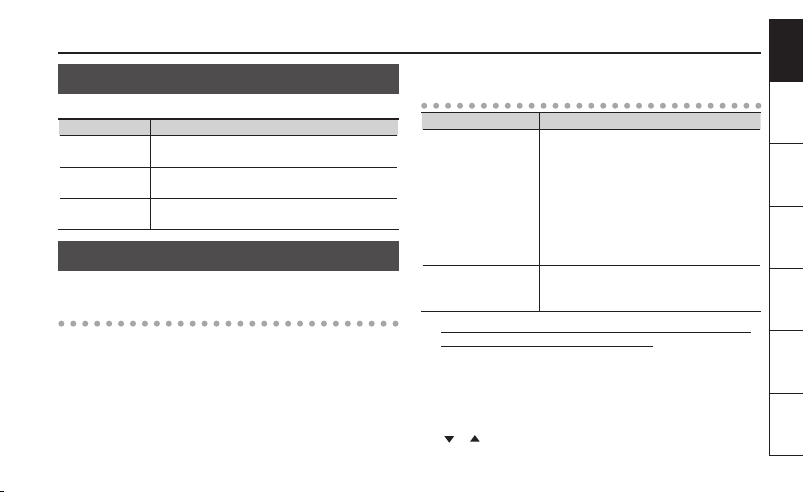
3. REC, PLAY (DUB) indicator
This lights during recording, playback, and overdubbing.
Indicator Explanation
REC (red) During recording
PLAY (green)
Both During overdubbing
During playback (while loading phrase memory,
or during an internal memory operation: blinks
rapidly)
4. Display
This indicates the current phrase memory number, or various other
information (p. 20).
5. [ ] (DOWN) / [ ] (UP) buttons
These decrement or increment the number shown in the display.
6. [WRITE] button
Press this to save the recorded phrase to internal memory (p. 8).
7. [RHYTHM ON/OFF] button
This button turns the rhythm sound on/o (p. 12).
8. [TAP TEMPO] button
Press this button at the desired timing to set the tempo (p. 12).
Panel Descriptions
9
10
9. Pedal Switch
This pedal switches you between phrase recording, overdubbing,
and playback. Press the pedal twice in succession to stop playback
(p. 6).
10. Thumbscrew
When this screw is loosened, the pedal will open, allowing you to
change the battery.
* If you’re using the RC-3 only on a battery, the display will
indicate “
bt ” when the battery runs low. Replace the battery
as described on p. 22.
* A battery was installed in the unit before it left the factory.
The life of this battery may be limited, however, since its
primary purpose was to enable testing.
English Deutsch Français Italiano Español Português Nederlands
3

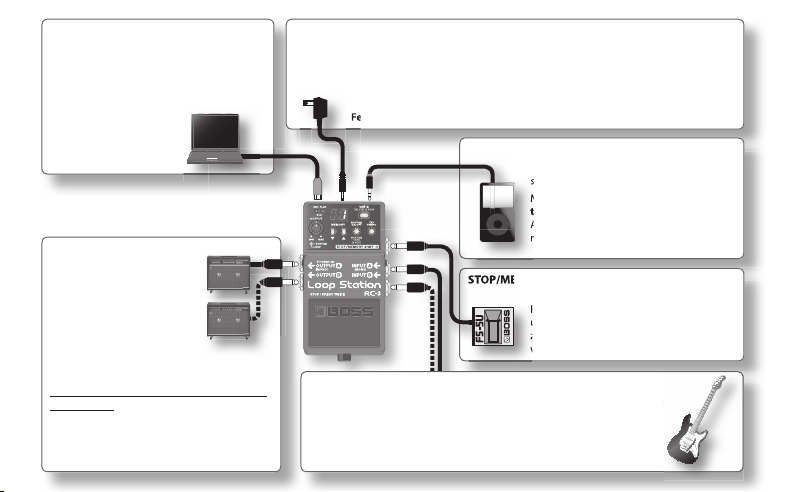
USB connector
may cause malfunction.
AUX IN jack
STOP/MEMORY SHIFT jack
You can use a commercially available
USB cable to connect the RC-3 to your
computer, and use the computer to read/
write RC-3 phrases (WAV les) (p. 14).
DC IN jack
Accepts connection of an AC Adaptor (PSA series; optional). By using an AC Adaptor, you
can play without being concerned about how much battery power you have left.
* Use only the speci ed AC adaptor (PSA series), and connect it to an AC
outlet of the correct voltage. Do not use any other AC adaptor, since this
may cause malfunction.
OUTPUT A/B jacks
Connect these jacks to your
amp or monitor speakers.
If your system is monaural,
use only the OUTPUT A jack.
Sound that was input in
stereo will also be output
monaurally.
The OUTPUT A jack also operates as
a power switch. The power will be on if
a plug is inserted in the OUTPUT A jack.
Remove the plug when you’re not using
the RC-3.
4
AUX IN jack
Use a stereo mini-plug cable to
connect your audio player here.
By using the Auto recording function
(p. 11), you can start recording the
moment your audio player begins
playback.
STOP/MEMORY SHIFT jack
You can connect a separately available
foot switch (FS-5U, FS-6) here, and
use it to stop playback or to switch
phrases (p. 16).
INPUT A/B jacks
Connect your guitar, bass, or e ects unit to these jacks.
Use the INPUT A jack and INPUT B jack when connecting a
stereo-output e ects unit. Use only the INPUT A jack if you’re using
a monaural source.

Español
Português
NOTE
* To prevent malfunction and/or damage to speakers
or other devices, always turn down the volume, and
turn o the power on all devices before making any
connections.
* Before connecting or disconnecting any connection
cables, be sure all the volume controls in your system
are set to minimum.
* Use connection cables that do not contain a built-in
resistor. If you use cables that contain a resistor,
there might be insuffi cient volume from the device
connected to the AUX IN jacks, or it might be inaudible.
* Do not connect headphones to the OUTPUT jack.
Doing so may damage the headphones.
Turning On the Power
Inserting a connecting plug into the OUTPUT A jack turns on the
power to the unit.
Once the connections have been completed, turn on power to
your various devices in the order speci ed. By turning on devices
in the wrong order, you risk causing malfunction and/or damage to
speakers and other devices.
When powering up
When powering down
* This unit is equipped with a protection circuit. A brief interval
(a few seconds) after power up is required before the unit will
operate normally.
Caution when turning off the power
While the RC-3 is in the following states, you must never
turn off the power (i.e., disconnect the plug from the
OUTPUT A jack).
Doing so may cause all the saved data to be lost.
• While the REC or PLAY indicator is lit
(during recording/playback/overdubbing)
• While the PLAY indicator is blinking rapidly
(while phrase memory is being read, or an internal
memory operation is occurring)
Turn on the power to your guitar amp last.
Turn off the power to your guitar amp rst.
English Deutsch Français Italiano Español Português Nederlands
5

Basic Operation
To perform recording, overdubbing, and playback, press the pedal as shown in the diagram.
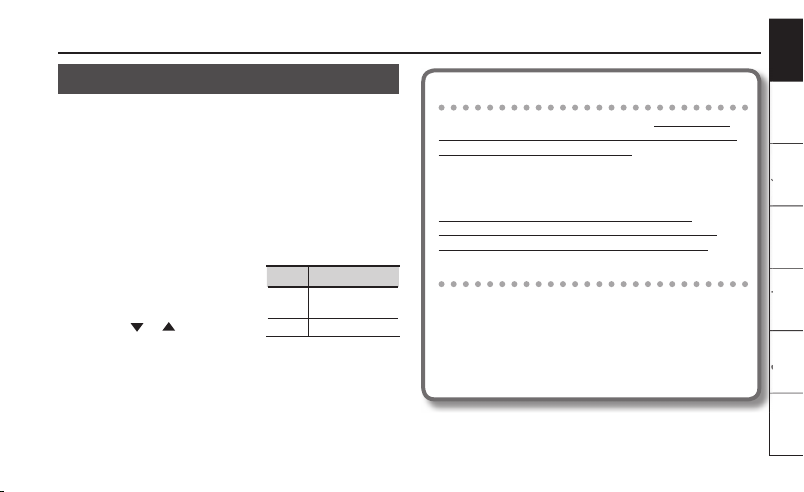
Selecting a Phrase Memory
Use the [ ] / [ ] buttons to select a
phrase memory (1–99).
Display Explanation
Only number
displayed
Dot in lower right
Number and
“
oS ” displayed
alternately
• When shipped from the factory, phrases 90–99 contain
demo phrases.
6
Empty phrase
Press pedal to start recording
Phrase containing data
Press pedal to start loop playback
One-shot phrase
Press pedal to play phrase only once
(not loop)
Recording
Record your guitar or bass performance, or
the sound from an audio player connected
to the AUX IN jack.
• Auto recording (p. 11) lets you start recording the
moment you begin performing.
• You can also record along with rhythm sounds (p. 12).
Refer to”Saving a Phrase for One-Shot Playback” (p. 10).
“Recording” versus “Overdubbing”
In this manual, we refer to the act of recording to an empty
phrase for the rst time as “recording.” Any subsequent
recordings that are made, which are added on top of the
existing recording, we refer to as “overdubbing.”

Basic Operation
Deutsch
Français
Italiano
Português
Nederlands
English Deutsch Français Italiano Español Português Nederlands
Overdubbing
Layer your performances while the phrase
plays as a loop.
Pressing the pedal switches the unit to
playback.
• You can Undo and Redo (p. 10).
Press twice
Loop Playback
Play back phrases as loops.
Pressing the pedal switches the unit to
overdubbing.
• To use the Memory Shift function, press the [
buttons while a phrase is playing; the phrase memory
number will blink, allowing you to select the next
phrase (p. 17).
Stop
During overdubbing or loop playback, you
can stop by pressing the pedal twice in
succession.
• Press the pedal twice within one second.
] / [ ]
7
Basic Operation
NOTE
* While phrase memory is being read, the
PLAY (green) indicator will blink rapidly.
Never turn o the power while the PLAY
indicator is blinking rapidly.
* The minimum recording time for a loop phrase is
approximately 1.5 seconds. If you press the pedal
within approximately 1.5 seconds after you start
recording, recording will continue until the phrase is at
least approximately 1.5 seconds long.
* The maximum recording time for a loop phrase is
approximately 3 hours (total for all phrases). When
the maximum recording time is exceeded, the display
will show “
FL ” to indicate that internal memory is full,
and recording or overdubbing may end before you
intended. If this occurs, delete unneeded phrases (p. 9)
and then try the operation again.
* If you use the Memory Shift func tion before saving a
phrase, that phrase will be erased. For details on how
to save a phrase, refer to p. 8.
8
Saving a Phrase
If you select a di erent phrase memory or turn o the power after
recording or overdubbing, the phrase you recorded will be lost. If
you want to keep the phrase, you must save it.
1. While playback is stopped, press the [WRITE] button.
The display will indicate “ ” (wr).
2. Use the [ ] / [ ] buttons to specify the savedestination phrase memory.
You can skip this step if you want to save to the currently
selected phrase.
You can’t select a phrase memory in which a phrase has already
been saved.
The maximum recording time is a total of approximately 3 hours
for all phrases (including the phrase that has not been saved).
If the phrase cannot be saved because there is insuffi cient
free memory, the display will indicate “
phrase memory number. In this case, delete unneeded phrases
(p. 9) and then try the operation again.
3. Press the [WRITE] button once again; the phrase will
be saved.
If you decide not to save the phrase, press the [TAP TEMPO]
button, the [RHYTHM ON/OFF] button, or the pedal.
FL ” alternately with the

While the phrase is being saved, the number in the display and
the PLAY indicator will blink rapidly.
NOTE
* Never turn o the power while the PLAY indicator is
blinking rapidly. This may cause all saved data to be
lost.
* Please be aware that the contents of memory can
be irretrievably lost as a result of a malfunction or
improper operation of the unit. You should back up
important data as described in “Backing up to your
computer” (p. 14).
* All due care is taken during repairs to avoid the loss
of data. However, in certain cases, such as when there
is damage to the memory, it may not be possible to
restore the data.
* Unfortunately, it may be impossible to restore the
contents of data that was stored in the unit’s memory
once it has been lost. Roland Corporation assumes no
liability concerning such loss of data.
Basic Operation
Deleting a Phrase
* This device contains demo phrases (90–99). Once you delete
these, they cannot be recovered. Please back them up as
described in “Backing up to your computer” (p. 14).
1. Use the [ ] / [ ] buttons to select the phrase
memory that you want to delete.
2. While playback is stopped, hold down the [WRITE]
button for at least two seconds.
The display will indicate “dL.”
* At this point, you can’t change the phrase memory number
that will be deleted.
3. Press the [WRITE] button to delete the phrase.
If you decide not to delete the phrase, press the [TAP TEMPO]
button, the [RHYTHM ON/OFF] button, or the pedal.
While the phrase is being deleted, the number in the display
and the PLAY indicator will blink rapidly.
* Never turn o the power while the PLAY indicator is blinking
rapidly. This may cause all saved data to be lost.
English Deutsch Français Italiano Español Português Nederlands
9

Basic Operation
Saving a Phrase for One-Shot Playback
One-shot playback will play the phrase once from the beginning to
the end, and then stop automatically.
1. Hold down the [TAP TEMPO] button and press the
[WRITE] button.
The display will indicate “oS.”
2. Use the [ ] / [ ] buttons to specify the savedestination phrase memory.
3. Press the [WRITE] button once again; the phrase will
be saved as a one-shot phrase.
If you decide not to save the phrase, press the [TAP TEMPO]
button, the [RHYTHM ON/OFF] button, or the pedal.
* Overdubbing is disabled when one-shot playback is in eect.
If the pedal is pressed during playback of the phrase, the
phrase starts playing from the beginning again (retrigger
playback).
* You need to save the phrase over again in order to cancel
one-shot playback (return to loop playback). (p. 8)
* If you want to stop a One-Shot phrase while it is playing back,
press the pedal twice within a period of 0.5 seconds.
10
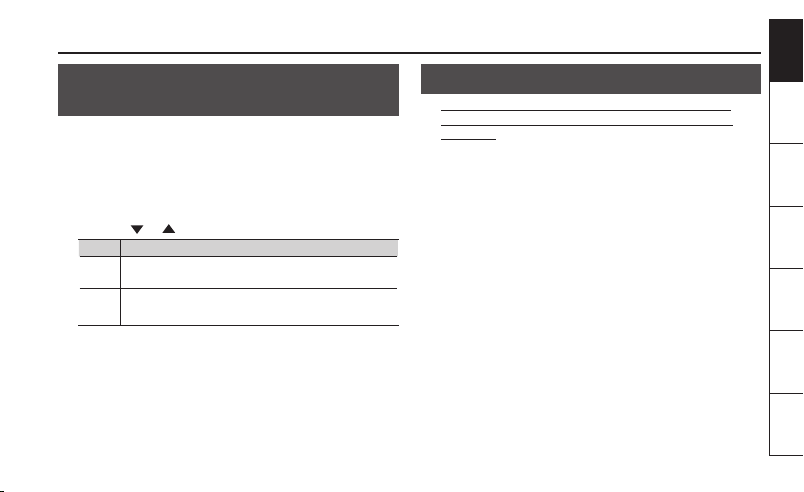
Cancelling an Overdub (Undo/Redo/Clear)
You can undo/redo/clear by holding down the pedal for at least
two seconds.
Operation
Undo
Redo
Clear
During Undo/Redo, the PLAY and REC indicators will blink rapidly.
During Clear, the PLAY indicator will blink rapidly.
Display
Explanation
Hold down the pedal for at least two
seconds during playback or overdubbing;
Un
the recording or the most recent
overdubbing will be cancelled.
If you want to restore the cancelled sound,
hold down the pedal for at least two seconds
rE
while playback once again.
* Redo is only available for overdubbing.
Hold down the pedal for at least two
seconds while stopped; the current phrase
CL
will be cleared. (Clear is temporary; phrases
saved in phrase memory will not be deleted.)

Auto Recording/Count-In Recording Functions
“Auto recording” starts recording the moment you begin playing
your guitar or play back your audio player. “Count-in” sounds the
rhythm for one measure before recording starts.
1. Hold down the [TAP TEMPO] button for at least two
seconds.
The display will indicate “no.”
2. Use the [ ] / [ ] buttons to select the desired
recording mode, and then press the pedal to start
recording.
Display
Mode Explanation
no
AU
Normal
recording
Auto
recording
Recording will begin the instant you press
the pedal.
The REC indicator will blink rapidly, and the
RC-3 will enter recording-standby mode.
When you begin playing, the REC indicator
will light and recording will start.
Basic Operation
Display
Mode Explanation
Count-in
Ct
recording
The recording mode will be reset to Normal recording when you
turn o the power.
The [RHYTHM ON/OFF] button will blink.
When you press the pedal, the REC indicator
will blink rapidly, and the rhythm will sound
for one measure. (You can stop by pressing
the pedal during this time.) When the one
measure of playback has ended, recording
will start. (The rhythm will continue
sounding even after recording has begun.)
For more about the rhythm settings, refer to
“About Rhythm” (p. 12).
English Deutsch Français Italiano Español Português Nederlands
11

About Rhythm
Sounding a Rhythm
1. Press the [RHYTHM ON/OFF] button to switch the
rhythm sound between playing and stopped.
• Use the [OUTPUT RHYTHM] knob to adjust the volume of the
rhythm.
• The [TAP TEMPO] button will blink in time with the rhythm (red
on the rst beat, green on subsequent beats).
• When you save a phrase (p. 8), the rhythm type and time
signature selected at that time will also be saved.
Setting the Tempo
When recording, you can set the tempo before you start recording.
When playing back a saved phrase, you can change the playback
tempo without changing the pitch of the phrase.
1. Use the [ ] / [ ] buttons to select the phrase
memory whose tempo you want to set.
2. Press the [TAP TEMPO] button several times at the
desired tempo.
The tempo will be set to the interval at which you press the
button.
• If the RC-3 is stopped, the rhythm ([RHYTHM ON/OFF] button)
will turn on after you set the tempo.
12
* You can only change the tempo of phrases that have been
saved in phrase memory. If you want to change the tempo of
a phrase immediately after recording or overdubbing, you
must rst save it to phrase memory (p. 8).
* There are limitations on the proportion of the possible tempo
change.
* You can’t specify a tempo that would cause the phrase to
loop in a shorter time than the minimum recording time
(approximately 1.5 seconds).
The tempo setting is stored when you save the phrase (p. 8).
Setting the Rhythm Type
1. Hold down the [RHYTHM
ON/OFF] button for at
least two seconds.
The display will indicate
“r0 ” – “r 9”; the R C-3 is now in
rhythm type selection mode.
2. Use the [ ] / [ ] buttons
to select the desired
rhythm type (r0–r 9).
3. Press the [RHYTHM ON/
OFF] button to return to
normal operation.
Rhythm Type List
Hi-Hat
r0
Kick & Hi-Hat
r1
Rock 1
r2
Rock 2
r3
Pop
r4
Funk
r5
Shue
r6
R & B
r7
Latin
r8
Percussion
r9
About Rhythm
English
Français
Español
Português
English Deutsch Français Italiano Español Português Nederlands
Setting the Time Signature
You can set the time signature before you start recording.
* You can’t change the time signature after recording.
1. Hold down the [RHYTHM ON/OFF] button for at least
two seconds.
The display will indicate “r0” – “r9”; the RC-3 is now in rhythm
type selection mode.
2. While in rhythm type selection mode, hold down the
[RHYTHM ON/OFF] button once again for at least two
seconds.
The display will indicate “b4” or
“b3 ”; the RC-3 is now in time
signature selection mode.
3. Use the [ ] / [ ] buttons
to select the desired time
signature.
4. Press the [RHYTHM ON/OFF] button to return to
normal operation.
Display
b4
b3
Explanation
4/4 beat
(default)
3/4 beat
Recording with the rhythm sound
If you record while the rhythm sound is on, recording will
start from the beginning of the measure the instant you
press the pedal to initiate recording.
By using the “Count-in recording” function (p. 11), you can
start recording after the rhythm sound has played back for
one measure.
Regardless of the timing at which you press the
pedal to end recording, the length of the phrase will
automatically be adjusted to units of one measure.
Recording without the rhythm sound
If you record while the rhythm sound is o , the tempo of
the phrase will be automatically speci ed after recording
has ended.
The automatic tempo setting is calculated by assuming that
you have recorded “1, 2, 4, 8, 16, ... measures in the speci ed
time signature (p. 13).”
13
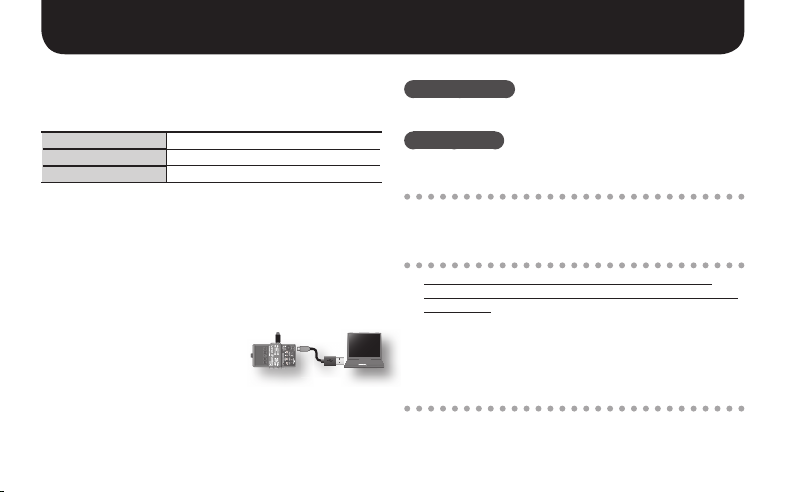
Connecting to Your Computer via USB
You can connect the RC-3 to your computer via a commercially
available USB cable, and back up RC-3 phrases (WAV les) to your
computer or load WAV les from your computer to the RC-3.
Playable WAV le formats
Data Format WAV
Bit Rate 16-bit linear, stereo
Sampling Frequency 44.1 kHz
Maximum WAV le size is 1.7 GB (total of all les), maximum time is
approximately 3 hours (total of all phrases), and minimum time is
approximately 1.5 seconds.
1. Turn on the RC-3’s power (insert a plug into the
OUTPUT A jack).
* The RC-3 will not operate on USB bus power. We recommend
that you use an AC adaptor (sold separately) to ensure that
the power does not turn o while connected via USB.
2. Use a commercially available
USB cable to connect the
RC-3’s USB connector to your
computer’s USB connector
(a connector that supports USB 2.0 Hi-Speed).
The display will indicate “Cn.”
* You can’t make USB connections if the RC-3 is not stopped, or
if there is a phrase that has not been saved.
14
3. Back up the phrases as described below.
Windows users
Within My Computer (or Computer), open “BOSS_RC-3” (or
Removable Disk).
Mac OS users
On the desktop, open the “BOSS_RC-3” icon.
Backing up to your computer
Copy the entire “ROLAND” folder from the BOSS_RC-3 drive to
your computer.
Recovering backed-up data from your computer to the RC-3
* Performing this operation will erase all phrases that are
currently saved in the RC-3. Be sure to make a backup before
you proceed.
In the BOSS_RC-3 drive, delete the “ROLAND” folder, and then
copy the backed-up “ROLAND” folder from your computer to
the BOSS_RC-3 drive.
Writing individual WAV fi les from your computer to the
RC-3’s phrase memory
You can copy WAV les from your computer to the
“001_1”–”099_1” folders within the “ROLAND”–”WAVE”
folder in the BOSS_RC-3 drive. (The XX in “0XX_1” is the phrase
memory number.)

NOTE
15
Français
Español
Português
* Do not delete the folders inside the BOSS_RC-3 drive unless
you are performing a recovery operation.
* You can use the following characters in le names.
A–Z (uppercase letters), 0–9 (numerals), _ (underscore)
* Do not place more than one WAV le in any folder. If a folder
already contains a WAV le, do not overwrite it. Write your
WAV les into empty folders.
4. When you’ve nished copying WAV les, disconnect
the USB drive as follows.
Windows 7 users
In the lower right of your screen, click the [ ] icon g [ ]
icon, and then click “Eject RC-3.”
Windows Vista/Windows XP users
In the lower right of your screen, click the [ ] icon ([ ] in XP)
and then click “Safely remove USB Mass Storage Device.”
Mac OS users
Drag the “BOSS_RC-3” icon to the trash (“Eject ” icon).
5. Disconnect the USB cable from your computer.
When you have disconnected the USB cable, the display will
indicate “dC” and the [RHYTHM ON/OFF] button will blink.
Connecting to Your Computer via USB
6. Press the [RHYTHM ON/OFF] button to return to
normal operation.
The “dC” indication will disappear from the display, and the RC-3
will return to normal operation.
NOTE
* Never use your computer to format the “BOSS_RC-3”
drive. Doing so will cause the RC-3 to stop operating
correctly. If this occurs, executing the format using
the procedure described in “Formatting the Internal
Memory” (p. 19).
* Never perform the following actions until you have
disconnected the USB drive. Doing so might make your
computer freeze, or might result in the loss of all of the
RC-3’s data.
• Disconnect the USB cable.
• Allow your computer to enter suspend (standby) or
hibernate mode, restart it, or shut it down.
• Turn o the RC-3’s power.
* Unfortunately, it may be impossible to restore the
contents of data that was stored in the unit’s memory
once it has been lost. Roland Corporation assumes no
liability concerning such loss of data.
English Deutsch Français Italiano Español Português Nederlands
15
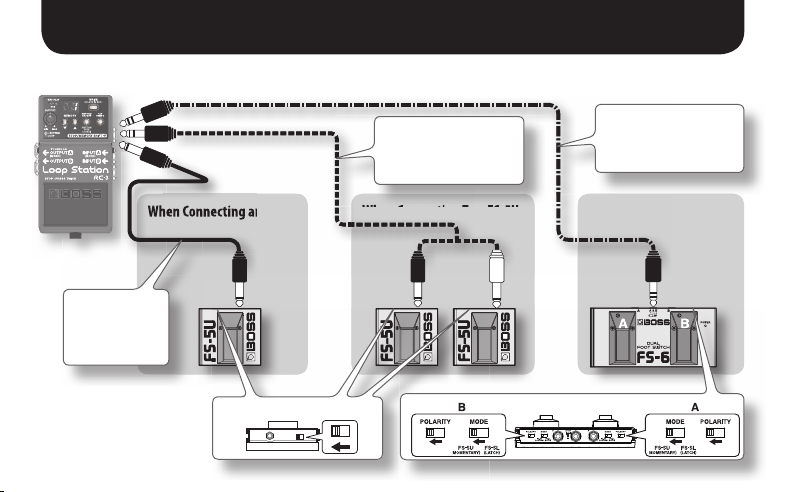
Connecting to an External Footswitch
When Connecting an FS-5U
Connect your foot switch to the STOP/MEMORY SHIFT jack as shown in the illustration, and set its POLARITY switch.
Cable:
1/4” phone type
g
1/4” phone type
16
When Connecting an FS-5U
POLARITY switch
Cable:
Stereo 1/4” phone type
g
1/4” phone type x 2
When Connecting Two FS-5Us
Cable:
Stereo 1/4” phone type
g
Stereo 1/4” phone type
When Connecting an FS-6
oror
MODE/POLARITY switch
When Connecting an FS-5U
* The FS-5L cannot be used.
Operation Explanation
Stop
Tempo setting
Clear phrase
While recording/playing/overdubbing, press the
foot switch to stop.
While stopped, you can press the foot switch
several times to set the tempo.
To clear the phrase, hold down the foot switch
for at least two seconds (p. 10).
When Connecting Two FS-5Us or an FS-6
When you operate an FS-5U connected to the white plug
(stereo L side) or pedal B of an FS-6
The operation will be the same as when a single FS-5U is connected.
Connecting to an External Footswitch
When you operate an FS-5U connected to the red plug
(stereo R side) or pedal A of an FS-6
Operation Explanation
Memory shift (up)
Memory shift (down)
* If the current phrase has not been saved, that phrase will be
lost when you perform the memory shift. For details on how
to save a phrase, refer to p. 8.
• If you perform the memory shift operation near the end of the
phrase, there may be cases in which the shift-destination phrase
memory will not be selected.
• You can also perform memory shift operations by pressing the
[
] / [ ] buttons.
When you press the foot switch, the
next-numbered phrase memory will be
selected.
If you press the foot switch during
playback, the newly selected phrase
memory number will blink in the display,
and the phrase memory will be changed
when the currently playing phrase has
ended.
When you hold down the foot switch for at
least two seconds, the previous-numbered
phrase memory will be selected.
English Deutsch Français Italiano Español Português Nederlands
17

Other Settings
About Sleep Mode
When ten hours have elapsed since the last operation or audio
input, the RC-3 will enter sleep mode (power conservation mode;
only the bypass sound will be output). From sleep mode, you can
press the pedal to return to normal mode.
* Battery power continues to be consumed even in sleep
mode. To prevent battery consumption, turn o the power by
removing the plug from the OUTPUT A jack.
* The RC-3 will not enter sleep mode if there is a phrase that has
not been saved.
Disabling Sleep Mode
1. While holding down the pedal, turn on the power
(insert a plug into the OUTPUT A jack).
2. Continue holding down the pedal for ve seconds.
The display will blink “__.”
3. Release the pedal; the RC-3 will resume normal
operation.
18
Enabling Sleep Mode (default setting)
1. While holding down the pedal, turn on the power
(insert a plug into the OUTPUT A jack).
2. Within two seconds after the display appears, step
on the pedal two more times.
The display will blink “SL.”
After two seconds, the RC-3 will resume normal operation; sleep
mode will be enabled.
Other Settings
English Deutsch Français Italiano Español Português Nederlands
Changing the Switching Order of Recording g
Overdubbing g Playback
When you press the pedal, the RC-3 will switch its operation in the
order of recording g overdubbing g playback (default setting)
(p. 6). However, you can change this so that the order is recording g
playback g overdubbing (RC-2 compatible).
1. While holding down the [TAP TEMPO] button, turn
on the power (insert a plug into the OUTPUT A jack).
2. Use the [
Display
3. Press the [TAP TEMPO] button to return to normal
operation.
] / [ ] buttons to select the desired mode.
Explanation
Operation will switch in the order of Recording g
rd
Overdubbing g Playback (default setting).
Operation will switch in the order of Recording g
rP
Playback g Overdubbing (RC-2 compatible).
Formatting the Internal Memory
* When you format the RC-3’s internal memory, all phrase
memories that were saved will be erased, and cannot be
recovered.
Do not format the internal memory unless the display
indicates “Er” and the RC-3 has stopped operating correctly.
1. While holding down the [WRITE] button and the
[RHYTHM ON/OFF] button, turn on the power (insert
a plug into the OUTPUT A jack).
The display will indicate “FN.”
2. Press the [RHYTHM ON/OFF] button once again.
The display will blink “FN.”
3. Press the [WRITE] button; formatting of the internal
memory will begin.
The indication “FN” in the display will blink rapidly. When
formatting is completed, the RC-3 will return to normal
operation.
* Never turn o the power while “
FN ” is blinking rapidly.
19
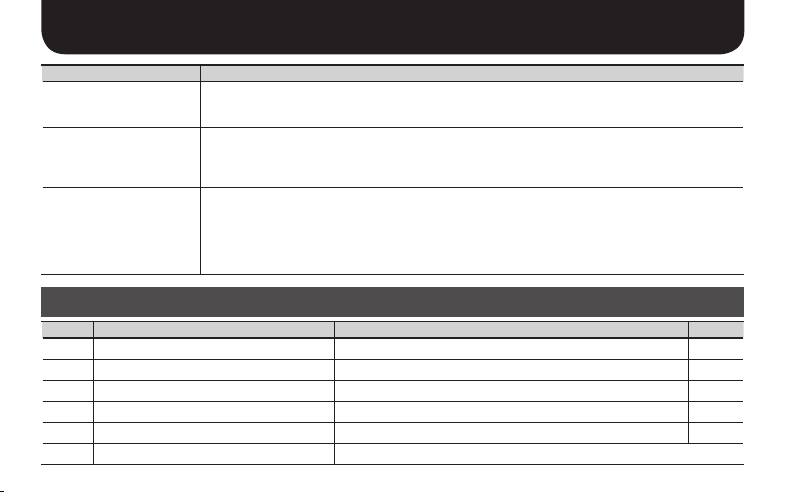
Troubleshooting
Problem Action
Recording does not end
immediately when you press
the pedal
Recording started
immediately even though
Auto recording mode is
selected
Cannot change the playback
tempo
Error Message List
Display Meaning Action Page
The battery has run low. Replace the batter y. p. 22
bt
Memory is full. Delete unneeded phrases. p. 9
FL
This WAV le is unplayable. Check the format of the WAV le. p. 14
UF
Further overdubbing is not possible. Re-save the phrase. p. 8
EF
Internal memory must be formatted. Format the RC-3’s internal memory. p. 19
Er
The RC-3 has malfunctioned. Contact your dealer.
dN
20
If rhythm is on, or if you recorded a phrase that is shorter than the minimum recording time (approximately
1.5 seconds), the length of the phrase is adjusted automatically; this may mean that recording does not end
immediately when you press the pedal.
If due to distortion or other causes there is a signicant amount of noise, that noise may be enough to
trigger the beginning of recording. Reduce the noise, for example by lowering the distortion level.
You cannot change the playback tempo in the following situations.
• If the phrase has not been saved.
• While phrases are being switched (PLAY indicator blinking rapidly).
• When you attempt to set the tempo for a phrase that is looped over an interval shorter than the
minimum recording time (approximately 1.5 seconds).

Other Display Indications
Display Explanation Page
1–9 9
. (dot)
oS
Un
rE
CL
r
dL
no
AU
Ct
r0 –r9
b3 –b4
Cn
dC
SL
__
Phrase memory number
Phrase memory containing data
One-shot phrase p. 10
Undo
Redo
Clear
Save phrase p. 8
Delete phrase p. 9
Normal recording
Auto recording
Count-in recording
Rhythm type p. 12
Time signature p. 13
USB connected
USB disconnected
Sleep mode enabled
Sleep mode disabled
p. 6
p. 10
p. 11
p. 14
p. 18
Troubleshooting
Display Explanation Page
rd
rP
FN
Switch in the order of record/overdub/
play
Switch in the order of record/play/
overdub
Format internal memory p. 19
p. 19
English Deutsch Français Italiano Español Português Nederlands
21
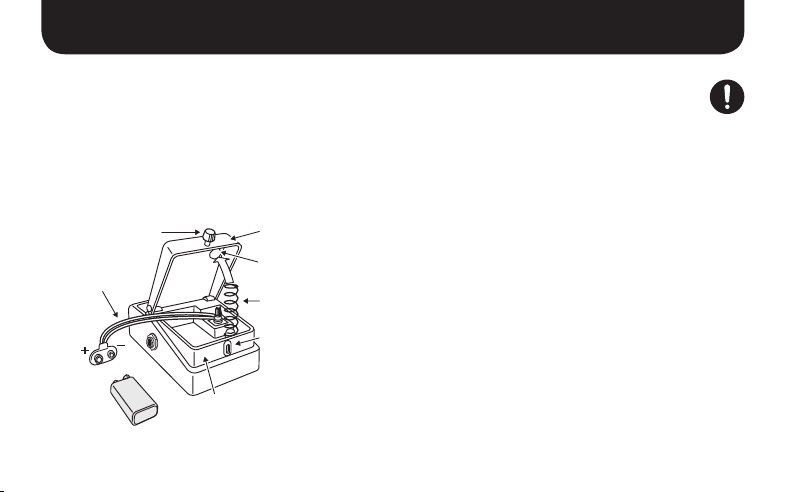
Changing the Battery
If the display indicates “bt,” the batter y has run low. Replace the
battery as described below.
* The use of an AC adaptor is recommended as the unit’s power
consumption is relatively high. Should you prefer to use
batteries, please use the alkaline type.
* Rechargeable Ni-MH batteries cannot be used.
* The contents of internal memory will not be lost when you
replace the battery, but we recommend that you make regular
backups (p. 14) for safety’s sake.
Battery Snap Cord
Battery
Snap
22
Thumbscrew
9 V Battery
Pedal
Spring Base
Coil Spring
Guide Bush Hole
Battery Housing
* Incorrect handling of batteries, rechargeable
batteries, or a battery charger can cause leakage,
overheating, re, or explosion. Before use, you must
read and strictly observe all of the precautions that
accompany the batteries, rechargeable batteries, or
battery charger.
1. Loosen the thumbscrew at the front of the pedal,
then lift the pedal upwards to open the unit.
* The thumbscrew can be left in the pedal while changing the
battery.
2. Remove the old battery from the battery housing,
and remove the battery snap connected to it.
3. Connect the battery snap to the new battery, and
place the battery inside the battery housing.
* Be sure to carefully observe the battery’s polarity (+ versus -).
4. Slip the coil spring onto the spring base on the back
of the pedal, then close the pedal.
* Carefully avoid getting the snap cord caught in the coil
spring.
5. Finally, insert the thumbscrew into the guide bush
hole and fasten it securely.

English Deutsch Français Italiano Español Português Nederlands
• Recording, duplication, distribution, sale, lease, performance, or
broadcast of copyrighted material (musical works, visual works,
broadcasts, live performances, etc.) belonging to a third party in
part or in whole without the permission of the copyright owner is
forbidden by law.
• Do not use this product for purposes that could infringe on a
copyright held by a third party. We assume no responsibility
whatsoever with regard to any infringements of third-party
copyrights arising through your use of this product.
• The copyright of content in this product (the sound waveform
data, style data, accompaniment patterns, phrase data, audio
loops and image data) is reserved by Roland Corporation.
• Purchasers of this product are permitted to utilize said content
for the creating, performing, recording and distributing original
musical works.
• Purchasers of this product are NOT permitted to extract
said content in original or modied form, for the purpose of
distributing recorded medium of said content or making them
available on a computer network.
• BOSS and Loop Station are either registered trademarks or
trademarks of Roland Corporation in the United States and/or
other countries.
• All product names mentioned in this document are trademarks or
registered trademarks of their respective owners.
• The screen shots in this document are used in compliance with
the guidelines of the Microsoft Corporation.
• MMP (Moore Microprocessor Portfolio) refers to a patent
portfolio concerned with microprocessor architecture, which was
developed by Technology Properties Limited (TPL). Roland has
licensed this technology from the TPL Group.
• The SD logo (
SD-3C, LLC.
• This product contains eCROS integrated software platform of
eSOL Co.,Ltd.
eCROS is a trademark of eSOL Co., Ltd. in Japan.
• Featuring digital fonts by Yourname, Inc.
Digital font: Copyright © Yourname, Inc.
Copyright © 2011 BOSS CORPORATION
All rights reserved. No part of this publication may be reproduced in
any form without the written permission of BOSS CORPORATION.
) and SDHC logo ( ) are trademarks of
23

Specications
BOSS RC-3: Loop Station
Nominal Input Level
Input Impedance
Nominal Output Level -20 dBu
Output Impedance 1 k ohm
Recommended Load
Impedance
Recording/Playback
USB Interface USB 2.0/1.1 mass storage device class
Power Supply
Current Draw
Dimensions
24
INPUT: -20 dBu
AUX IN: -10 dBu
INPUT: 1 M ohm
AUX IN: 22 k ohms
10 k ohms or larger
Maximum recording time: Approx. 3 hours
Maximum number of stored phrases: 99 phrases
Data format: WAV (44.1 kHz, 16-bit linear,
stereo)
DC 9 V:
Alkaline battery (9 V, 6LR61),
AC Adaptor (PSA-series: sold separately)
* Rechargeable Ni-MH batteries cannot
be used.
Maximum 70 mA (DC 9 V)
Alkaline battery (9 V, 6LR61)
Approx. 3 hours
* These gures will vary depending on
the actual conditions of use.
73 (W) x 129 (D) x 59 (H) mm
2-7/8 (W) x 5-1/8 (D) x 2-3/8 (H) inches
Weight 450 g/1 lb (including battery)
Accessories
Options
(sold separately)
* 0 dBu= 0.775 Vrms
* In the interest of product improvement, the specications
and/or appearance of this unit are subject to change without
prior notice.
:
Owner’s Manual,
Leaet (“USING THE UNIT SAFELY,”
“IMPORTANT NOTES,” and “Information”),
Alkaline battery (9 V, 6LR61): already
installed in unit
* The battery that was supplied
with the unit is for temporary use,
intended primarily for testing
the unit’s operation. We suggest
replacing this with an alkaline dry
cell.
AC Adaptor (PSA series)
Foot Switch: FS-5U, FS-6
Bedienungsanleitung
* Dieses Gerät enthält Demosequenzen (90-99). Diese können nach dem Löschen
nicht wiederhergestellt werden. Bitte sichern Sie die Sequenzen wie unter
„Sichern auf dem Computer“ (S. 14) erläutert.
* Dieses Gerät wechselt in den Ruhezustand (Energiesparmodus), wenn für zehn
Stunden keine Operation erfolgt, bzw. wenn seit dem Verlassen des Stoppmodus
für zehn Stunden keine Audioeingabe erfolgt.
Wenn das Gerät nicht in den Ruhezustand wechseln soll, halten Sie das Pedal
während des Einschaltens für fünf Sekunden gedrückt (S. 18).
English Deutsch Français Italiano Español Português Nederlands

Die wichtigsten Features
Willkommen bei der RC-3 Loop Station!
Der RC-3 ist ein pedalgesteuertes Aufnahmegerät, mit dem Sie
Audiosequenzen von Ihrer Gitarre oder Ihrem Bass aufnehmen und
durch Bedienen des Pedals wiedergeben können. Sie können zahlreiche
Klangvarianten erzeugen, indem Sie verschiedene Klänge übereinander
legen, während Sie in Echtzeit aufnehmen und Klänge wiedergeben können.
• Die Erstellung von Loopsequenzen ist ganz einfach.
• Im Sequenzspeicher können bis zu 99 unterschiedliche
Loopsequenzen mit einer Gesamtdauer von ca. 3 Stunden
gespeichert werden (* alle Sequenzen insgesamt).
• Die Audioeingabe kann in Stereo erfolgen.
• Musik von einem an der AUX IN-Buchse angeschlossenen MP3-Player
kann auf einfache Weise aufgezeichnet werden.
• Aufgezeichnete Sequenzen können per USB auf Ihren Computer
kopiert werden, oder WAV-Dateien von Ihrem Computer können auf
den RC-3 geladen und als Loops wiedergegeben werden (S. 14).
Lesen Sie vor der Verwendung dieses Geräts sorgfältig die
folgenden Abschnitte: „SICHERER BETRIEB DES GERÄTES“ und
„WICHTIGE HINWEISE“ (auf einem gesonderten Blatt beiliegend).
Diese Abschnitte enthalten wichtige Informationen über die
korrekte Bedienung des Geräts.
Um einen vollständigen Überblick über alle Funktionen des Gerätes
zu erhalten, sollten Sie diese Bedienungsanleitung vollständig
durchlesen. Bewahren Sie diese Anleitung an einem Ort auf, an dem
Sie bei Bedarf schnell darauf zurückgreifen können.
2
Beschreibungen zum Bedienfeld
1 2 3 4 65
7 8
1. [OUTPUT LOOP]-Regler
Dieser regelt den Lautstärkepegel der wiedergegebenen Loopsequenz.
* Dieser Regler passt nicht die Eingangslautstärke der Buchsen
INPUT und AUX IN an.
2. [OUTPUT RHYTHM]-Regler
Dieser regelt den Lautstärkepegel des Rhythmusklangs (S. 12).

3. Anzeigen REC und PLAY (DUB)
Diese leuchtet während der Aufnahme, der Wiedergabe und bei
Overdubbing.
Anzeige Erläuterung
REC (rot) Während der Aufnahme
PLAY (grün)
Beide Während Overdubbing
Während der Wiedergabe (während des Ladens des
Sequenzspeichers oder während einer internen
Speicheroption: schnelles Blinken)
4. Display
Dieses zeigt die Speichernummer der aktuellen Sequenz oder andere
Informationen an (S. 20).
5. [Taster ] (DOWN) / [ ] (UP)
Diese ermöglichen eine Verringerung oder Erhöhung der im Display
angezeigten Zahl.
6. [WRITE]-Taster
Drücken Sie diesen Taster, um die aufgenommene Sequenz im internen
Speicher zu speichern (S. 8).
7. [RHYTHM ON/OFF]-Taster
Dieser Taster schaltet den Rhythmusklang ein oder aus (S. 12).
8. [TAP TEMPO]-Taster
Tappen Sie auf diesen Taster, um das Tempo einzugeben (S. 12).
Beschreibungen zum Bedienfeld
9
10
9. Fußtaster
Mit diesem Pedal schalten Sie zwischen Sequenzaufnahme, Overdubbing
und Wiedergabe um. Drücken Sie das Pedal zweimal hintereinander, um
die Wiedergabe zu beenden (S. 6).
10. Schraube
Wenn Sie diese Schraube lösen, lässt sich das Pedal ö nen, und Sie
können die Batterie wechseln.
* Wenn Sie den RC-3 nur mit Batterie betreiben, wird im Display „
angezeigt, wenn die Batterie schwach ist. Ersetzen Sie die Batterie
dann wie auf S. 22 beschrieben.
* Das Gerät wurde mit einer eingelegten Batterie ausgeliefert.
Die Lebensdauer dieser Batterie ist jedoch eingeschränkt, da ihr
Hauptzweck darin besteht, Produkttests zu ermöglichen.
bt“
English Deutsch Français Italiano Español Português Nederlands
3
USB-Anschluss
Fehlfunktionen auftreten können.
stecker, um Ihren MP3-Player anzuschließen.
Mithilfe der
tion
Augenblick starten, in dem Ihr MP3-Player
mit der Wiedergabe beginnt.
STOP/MEMORY SHIFT-Buchse
Fußtaster (BOSS FS-5U, FS-6) anschließen
und diesen verwenden, um die Widergabe
zu beenden oder zwischen Sequenzen zu
wechseln (S. 16).
Sie können ein handelsübliches USB-Kabel
verwenden, um den RC-3 an Ihren Computer
anzuschließen und diesen zum Lesen/
Schreiben von RC-3-Sequenzen (WAV-Dateien)
verwenden (S. 14).
DC IN-Buchse
Ermöglicht den Anschluss eines Netzadapters (optional erhältlich). Wenn Sie einen Netzadapter benutzen,
brauchen Sie sich keine Gedanken über die verbleibende Lebensdauer der Batterie zu machen.
* Verwenden Sie ausschließlich den passenden Netzadapter (BOSS PSA-230 oder
BOSS PSB-230), und schließen Sie diesen an eine Netzsteckdose der richtigen
Spannung an. Verwenden Sie keinen anderen Netzadapter, da hierdurch
Fehlfunktionen auftreten können.
OUTPUT A/B-Buchsen
Schließen Sie an diese Buchsen
Ihren Verstärker oder Ihre
Monitorlautsprecher an.
Wenn Sie ein Monosystem
verwenden, verwenden Sie nur
die OUTPUT A-Buchse. In Stereo
eingegebene Signale werden
ebenfalls als Monosignal
ausgegeben.
Die OUTPUT A-Buchse fungiert auch als Ein-/
Aus-Schalter. Das Gerät wird eingeschaltet,
wenn in die OUTPUT A-Buchse ein Stecker
eingesteckt wird. Ziehen Sie den Stecker heraus,
wenn Sie das RC-3 nicht verwenden.
4
AUX IN-Buchse
Verwenden Sie ein Kabel mit Stereoklinkenstecker, um Ihren MP3-Player anzuschließen.
Mithilfe der automatischen Aufnamefunk-
tion (S. 11) können Sie die Aufnahme in dem
Augenblick starten, in dem Ihr MP3-Player
mit der Wiedergabe beginnt.
STOP/MEMORY SHIFT-Buchse
Hier können Sie einen separat erhältlichen
Fußtaster (BOSS FS-5U, FS-6) anschließen
und diesen verwenden, um die Widergabe
zu beenden oder zwischen Sequenzen zu
wechseln (S. 16).
INPUT A/B-Buchsen
Schließen Sie an diese Buchsen Ihre Gitarre, Ihren Bass oder ein E ektgerät an.
Verwenden Sie die INPUT A-Buchse und die INPUT B-Buchse, wenn Sie ein
E ektgerät mit Stereoausgabe anschließen. Verwenden Sie nur die INPUT
A-Buchse, wenn Sie eine Monoquelle verwenden.

Español
Português
HINWEIS
* Um Fehlfunktionen und/oder Schäden an Lautsprechern
oder anderen Geräten zu vermeiden, regeln Sie stets die
Lautstärke herunter, und schalten Sie alle Geräte aus, bevor
Sie Verbindungen herstellen.
* Stellen Sie sicher, dass alle Lautstärkeregler in Ihrem System
auf Minimum gedreht sind, bevor Sie Verbindungskabel
anschließen oder trennen.
* Verwenden Sie Verbindungskabel ohne integrierten
Widerstand. Wenn Sie Kabel mit integriertem Widerstand
verwenden, ist die Lautstärke vom angeschlossenen Gerät
zu den AUX IN-Buchsen möglicherweise zu gering oder
gänzlich unhörbar.
* Schließen Sie an die OUTPUT-Buchse keine Kopfhörer an.
Auf diese Weise könnten die Kopfhörer beschädigt werden.
Einschalten des Geräts
Das Gerät wird eingeschaltet, wenn Sie in die OUTPUT A-Buchse ein Kabel
einstecken.
Nachdem Sie die Verbindungen hergestellt haben, schalten Sie Ihre Geräte
in der angegebenen Reihenfolge ein. Wenn Sie die Geräte in der falschen
Reihenfolge einschalten, besteht die Gefahr von Fehlfunktionen und/oder
Schäden an Lautsprechern und anderen Geräten.
Beim Einschalten:
Beim Ausschalten:
* Dieses Gerät ist mit einer Schutzschaltung ausgestattet. Nach dem
Einschalten dauert es einen Moment, bis das Gerät normal arbeitet.
Vorsicht beim Ausschalten des Geräts
Wenn sich das RC-3 in einem der folgenden Zustände be ndet,
darf das Gerät niemals ausgeschaltet werden (z.B. der Stecker
aus der OUTPUT A-Buchse herausgezogen werden).
In diesem Fall können alle gespeicherten Daten verloren
gehen.
• Wenn die REC- oder PLAY-Anzeige leuchtet
(während der Aufnahme, Wiedergabe oder des
Overdubbings)
• Wenn die PLAY-Anzeige schnell blinkt
(während der Sequenzspeicher gelesen wird oder eine interne
Speicheroperation statt ndet)
Schalten Sie den Gitarrenverstärker zuletzt ein.
Schalten Sie den Gitarrenverstärker zuerst aus.
English Deutsch Français Italiano Español Português Nederlands
5

Grundlegende Bedienung
Drücken Sie das Pedal wie im Diagramm dargestellt, um eine Aufnahme, Overdubbing oder eine Wiedergabe auszuführen.
Auswählen eines Sequenzspeichers
Verwenden Sie die Tasten [ ] / [ ], um einen
Sequenzspeicher auszuwählen (1-99).
Display Erläuterung
Es wird nur die
Nummer angezeigt
Punkt unten rechts
Die Nummer und
oS“ werden
„
abwechselnd
angezeigt.
• Werksseitig enthalten die Sequenzen 90-99 Demosequenzen.
6
Leere Sequenz
Drücken Sie das Pedal, um mit der
Aufnahme zu beginnen.
Die Sequenz enthält Daten.
Drücken Sie das Pedal, um mit der
Loopwiedergabe zu beginnen.
Einmalige Sequenz („One Shot“)
Drücken Sie das Pedal, um die Sequenz
nur ein Mal wiederzugeben (nicht als
Loop).
Aufnahme
Nehmen Sie Ihr Gitarren- oder Bassspiel auf
oder die Musik eines an die AUX IN-Buchse
angeschlossenen MP3-Players.
• Die Automatische Aufnahme (S. 11) ermöglicht den Start der
Aufnahme in dem Moment, in dem Sie mit dem Spiel beginnen.
• Sie können auch zusammen mit Rhythmusklängen aufnehmen
(S. 12).
Weitere Informationen nden Sie unter „Speichern einer
Sequenz für die einmalige Wiedergabe (One Shot)“ (S. 10).
„Aufnahme“ im Vergleich zu „Overdubbing“
In diesem Handbuch wird die erstmalige Aufnahme in eine
leere Sequenz als „Aufnahme“ bezeichnet. Alle weiteren
Aufnahmen, die der vorhandenen Aufnahme hinzugefügt
werden, werden als „Overdubbing“ bezeichnet.

Grundlegende Bedienung
Deutsch
Français
Italiano
Português
Nederlands
English Deutsch Français Italiano Español Português Nederlands
Overdubbing
Ergänzen Sie die ursprüngliche Sequenz um weitere
Aufnahmen (Overdubs).
Durch Drücken des Fußtasters wird das Gerät zur
Wiedergabe umgeschaltet.
• Sie können Overdubs wieder löschen (UNDO) oder gelöschte
Overdubs wiederherstellen (REDO), siehe S. 10.
Zweimal
drücken
Loopwiedergabe
Wiedergeben der Sequenz plus Overdubs.
Durch Drücken des Fußtasters wird das Gerät zum
Overdubbing umgeschaltet (an jeder Stelle der
Sequenz möglich).
• Um die Funktion Speicherwechsel zu verwenden,
drücken Sie die Taster [
wiedergegeben wird. Die Nummer des Sequenzspeichers
blinkt und ermöglicht die Auswahl der nächsten Sequenz
(S. 17).
] / [ ], während eine Sequenz
Stopp
Beenden Sie das Overdubbing oder die
Loopwiedergabe durch zweimaliges Drücken des
Pedals.
• Drücken Sie das Pedal innerhalb einer Sekunde zweimal.
7

Grundlegende Bedienung
HINWEIS
* Während des Lesens des Sequenzspeichers
blinkt die PLAY-Anzeige (grün) schnell.
Schalten Sie das Gerät nicht aus, während die
PLAY-Anzeige schnell blinkt.
* Die Mindestaufnahmezeit für eine Loopsequenz beträgt
ca. 1,5 Sekunden. Wenn Sie das Pedal innerhalb von 1,5
Sekunden nach dem Start der Aufnahme drücken, wird die
Aufnahme fortgesetzt, bis die Sequenz mindestens ca. 1,5
Sekunden lang ist.
* Die maximale Aufnahmezeit für eine Loopsequenz beträgt
ca. 3 Stunden (insgesamt für alle Sequenzen). Wenn die
maximale Aufnahmezeit erreicht ist, zeigt das Display
„
FL“ an, um anzuzeigen, dass der interne Speicher voll ist,
und dass die Aufnahme oder das Overdubbing vorzeitig
abbrechen kann. Löschen Sie in diesem Fall nicht benötigte
Sequenzen (S. 9), und versuchen Sie es anschließend erneut.
* Wenn Sie die Funktion „Speicherwechsel“ verwenden,
bevor eine Sequenz gespeichert wurde, wird diese Sequenz
gelöscht. Informationen zum Speichern einer Sequenz
nden Sie auf S. 8.
8
Speichern einer Sequenz
Wenn Sie einen anderen Sequenzspeicher auswählen oder das Gerät
nach der Aufnahme oder dem Overdubbing ausschalten, geht die
aufgenommene Sequenz verloren. Wenn Sie die Sequenz erhalten
möchten, müssen Sie diese speichern.
1. Drücken Sie bei angehaltener Wiedergabe auf den
[WRITE]-Taster.
Im Display wird „ “ (wr) angezeigt.
2. Verwenden Sie die Taster [ ] / [ ], um einen Speicherplatz
auszuwählen.
Sie können diesen Schritt überspringen, wenn Sie in die zurzeit
ausgewählte Sequenz auch auf diesem Platz speichern möchten.
Sie können keinen Sequenzspeicher auswählen, in dem bereits eine
Sequenz gespeichert wurde.
Die maximale Aufnahmezeit beträgt insgesamt ca. 3 Stunden für alle
Sequenzen (einschließlich der noch nicht gespeicherten Sequenz).
Wenn die Sequenz aufgrund von unzureichendem Speicherplatz
nicht gespeichert werden kann, wird im Display abwechselnd mit
der Nummer des Sequenzspeichers „
diesem Fall nicht benötigte Sequenzen (S. 9), und versuchen Sie es
anschließend erneut.
3. Drücken Sie erneut den [WRITE]-Taster. Die Sequenz wird
gespeichert.
Wenn Sie die Sequenz nicht speichern möchten, drücken Sie den
[TAP TEMPO]-Taster, den [RHYTHM ON/OFF]-Taster oder das Pedal.
FL“ angezeigt. Löschen Sie in

Während die Sequenz gespeichert wird, blinken die Nummer im
Display und die PLAY-Anzeige schnell.
HINWEIS
* Schalten Sie das Gerät nicht aus, während die PLAY-Anzeige
schnell blinkt. In diesem Fall könnten alle gespeicherten
Daten verloren gehen.
* Beachten Sie, dass der Speicherinhalt aufgrund einer
Fehlfunktion oder des unsachgemäßen Betriebs des
Geräts unwiederbringlich verloren gehen kann. Sichern
Sie wichtige Daten wie unter „Sichern auf dem Computer“
(S. 14) erläutert.
* Bei Reparaturen wird sorgfältig darauf geachtet, dass keine
Daten verloren gehen. Unter bestimmten Umständen,
etwa bei einem beschädigten Speicher, können die Daten
möglicherweise nicht wiederhergestellt werden.
* Möglicherweise kann der Inhalt verloren gegangener
Daten, die auf Gerät gespeichert waren, nicht
wiederhergestellt werden. Die Roland Corporation
übernimmt in diesem Fall keine Haftung für diesen
Datenverlust.
Grundlegende Bedienung
Löschen einer Sequenz
* Dieses Gerät enthält Demosequenzen (90-99). Diese können nach
dem Löschen nicht wiederhergestellt werden. Bitte sichern Sie
diese wie unter „Sichern auf dem Computer“ (S. 14) erläutert.
1. Verwenden Sie die Taster [ ] / [ ], um den zu löschenden
Sequenzspeicher auszuwählen.
2. Halten Sie bei angehaltener Wiedergabe den [WRITE]-Taster
mindestens zwei Sekunden lang gedrückt.
Im Display wird „dL“ angezeigt.
* Zu diesem Zeitpunkt lässt sich die Nummer des zu löschenden
Sequenzspeichers nicht mehr ändern.
3. Drücken Sie den [WRITE]-Taster, um die Sequenz zu löschen.
Wenn Sie die Sequenz nicht löschen möchten, drücken Sie den [TAP
TEMPO]-Taster, den [RHYTHM ON/OFF]-Taster oder das Pedal.
Während die Sequenz gelöscht wird, blinken die Nummer im Display
und die PLAY-Anzeige schnell.
* Schalten Sie das Gerät nicht aus, während die PLAY-Anzeige schnell
blinkt. In diesem Fall könnten alle gespeicherten Daten verloren
gehen.
English Deutsch Français Italiano Español Português Nederlands
9

Grundlegende Bedienung
Speichern einer Sequenz für die einmalige
Wiedergabe (One Shot)
Bei der einmaligen Wiedergabe wird die Sequenz einmal von Anfang bis
Ende wiedergegeben und dann automatisch beendet.
1. Halten Sie den [TAP TEMPO]-Taster gedrückt, und drücken Sie
den [WRITE]-Taster.
Im Display wird „oS“ angezeigt.
2. Verwenden Sie die Taster [ ] / [ ], um den
Zielsequenzspeicher auszuwählen.
3. Drücken Sie erneut den [WRITE]-Taster. Die Sequenz wird für
einmalige Wiedergabe gespeichert.
Wenn Sie die Sequenz nicht speichern möchten, drücken Sie den
[TAP TEMPO]-Taster, den [RHYTHM ON/OFF]-Taster oder das Pedal.
* Wenn die einmalige Wiedergabe aktiv ist, wird Overdubbing
deaktiviert. Wenn das Pedal während der Wiedergabe der Sequenz
gedrückt wird, beginnt die Wiedergabe der Sequenz von vorne
(erneuter Start der Wiedergabe).
* Sie müssen die Sequenz erneut speichern, um die einmalige
Wiedergabe abzubrechen (Rückkehr zur Loopwiedergabe). (S. 8)
* Wenn Sie eine einmalig wiedergegebene Sequenz während der
Wiedergabe beenden möchten, drücken Sie das Pedal innerhalb
von 0,5Sekunden zweimal.
10
Löschen eines Overdubs (UNDO/REDO) +
Löschen einer Sequenz (Clear)
Sie können die Auswahl für Overdubbing rückgängig machen,
wiederherstellen oder löschen, indem Sie das Pedal für mindestens zwei
Sekunden gedrückt halten.
Funktion
UNDO
REDO
CLEAR
Während UNDO/REDO blinken die PLAY- und die REC-Anzeige schnell.
Während CLEAR blinkt die PLAY-Anzeige schnell.
Display
Erläuterung
Halten Sie das Pedal während des
Overdubbings oder der anschließenden
Un
Wiedergabe für mindestens zwei Sekunden
gedrückt, das letzte Overdub wird gelöscht.
Wenn Sie das gelöschte Overdub
wiederherstellen möchten, halten Sie das
Pedal während der Wiedergabe erneut für
rE
mindestens zwei Sekunden gedrückt.
* Das Wiederherstellen ist nur für
Overdubbing verfügbar.
Halten Sie das Pedal bei gestoppter
Sequenz für mindestens zwei Sekunden
gedrückt, um die aktuelle Sequenz zu
CL
löschen. Das Löschen erfolgt nur temporär,
im Sequenzspeicher gespeicherte
Sequenzen bleiben erhalten.

Aufnahmefunktionen: Automatische
Aufnahme + Aufnahme mit Einzähler
Bei Verwendung der automatischen Aufnahme startet die Aufnahme
in dem Moment, in dem Sie mit dem Spielen der Gitarre oder der
Wiedergabe des MP3-Players beginnen. Count-In gibt einen Takt des
Rhythmus wieder, bevor die Aufnahme startet.
1. Halten Sie den [TAP TEMPO]-Taster mindestens zwei
Sekunden lang gedrückt.
Im Display wird „no“ angezeigt.
2. Verwenden Sie die Taster [ ] / [ ], um den gewünschten
Aufnahmemodus auszuwählen, und drücken Sie dann das
Pedal - ab jetzt wartet der RC-3 auf ein Eingangssignal.
Display
Modus Erläuterung
no
AU
Normale
Aufnahme
Automatische
Aufnahme
Die Aufnahme beginnt in dem Moment, in
dem Sie das Pedal drücken.
Die REC-Anzeige beginnt schnell zu blinken,
und das RC-3 wird in die Aufnahmebereitschaft
versetzt. Wenn Sie mit dem Spielen beginnen,
beginnt die REC-Anzeige zu leuchten, und die
Aufnahme startet.
Grundlegende Bedienung
Display
Modus Erläuterung
Count-in-
Ct
Aufnahme
Durch das Ausschalten des Geräts wird der Aufnahmemodus wieder auf
„Normal“ festgelegt.
Der Taster [RHYTHM ON/OFF] blinkt. Wenn Sie
das Pedal drücken, beginnt die REC-Anzeige
schnell zu blinken, und der Rhythmus wird für
einen Takt wiedergegeben (diesen können Sie
abbrechen, indem Sie währen der Wiedergabe
das Pedal drücken). Nach der Wiedergabe
des einen Taktes beginnt die Aufnahme (die
Wiedergabe des Taktes wird auch nach dem
Beginn der Aufnahme fortgesetzt).
Weitere Informationen zu
Rhythmuseinstellungen nden Sie unter
„Informationen zum Rhythmus“ (S. 12).
English Deutsch Français Italiano Español Português Nederlands
11

Informationen zum Rhythmus
Wiedergeben eines Rhythmus
1. Drücken Sie den [RHYTHM ON/OFF]-Taster, um die
Rhythmuswiedergabe ein- oder auszuschalten.
• Mit dem [OUTPUT RHYTHM]-Regler stellen Sie die Lautstärke des
Rhythmus ein.
• Der [TAP TEMPO]-Taster blinkt synchron mit dem Rhythmus (rot beim
ersten Beat im Takt, grün bei nachfolgenden Beats).
• Wenn Sie einen Rhythmus speichern (S. 8), wird auch der zu diesem
Zeitpunkt ausgewählte Rhythmustyp und die ausgewählte Taktart
gespeichert.
Einstellen des Tempos
Bei einer Aufnahme können Sie das Tempo vor dem Start der Aufnahme
einstellen. Wenn Sie eine gespeicherte Sequenz wiedergeben, können Sie
das Wiedergabetempo ändern, ohne die Tonhöhe der Sequenz zu ändern.
1. Verwenden Sie die Taster [ ] / [ ], um den Sequenzspeicher
auszuwählen, dessen Tempo Sie einstellen möchten.
2. Drücken Sie den [TAP TEMPO]-Taster mehrere Male im
gewünschten Tempo.
Das Tempo wird auf den Zeitabstand eingestellt, in dem Sie den Taster
drücken.
• Wenn der RC-3 angehalten wurde, wird der Rhythmus ([RHYTHM ON/
OFF]-Taster) eingeschaltet, nachdem Sie das Tempo eingestellt haben.
12
* Sie können das Tempo nur für Sequenzen ändern, die im Sequenzspeicher
gespeichert wurden. Wenn Sie das Tempo einer Sequenz sofort nach der
Aufnahme oder dem Overdubbing ändern möchten, müssen Sie diese
zunächst im Sequenzspeicher speichern (S. 8).
* Es bestehen Einschränkungen für das Verhältnis der möglichen
Tempoänderungen.
* Sie können kein Tempo festlegen, das zu einem kürzeren Loop der Sequenz
führen würde, als die Mindestaufnahmezeit (ca. 1,5 Sekunden).
Die Tempoeinstellung wird beim Speichern der Sequenz gespeichert (S. 8).
Einstellen des Rhythmustyps
1. Halten Sie den [RHYTHM ON/
OFF]-Taster mindestens zwei
Sekunden lang gedrückt.
Im Display wird „r0“ – „r9“
angezeigt. Das RC-3 bendet sich
jetzt im Modus für die Auswahl
des Rhythmustyps.
2. Verwenden Sie die Taster
[ ] / [ ], um den
gewünschten Rhythmustyp
auszuwählen (r0-r 9).
3. Drücken Sie den [RHYTHM
ON/OFF]-Taster, um
in den Normalbetrieb
zurückzukehren.
Liste der Rhythmustypen
Hi-Hat
r0
Kick & Hi-Hat
r1
Rock 1
r2
Rock 2
r3
Pop
r4
Funk
r5
Shue
r6
R & B
r7
Latin
r8
Percussion
r9

Informationen zum Rhythmus
English
Français
Español
Português
English Deutsch Français Italiano Español Português Nederlands
Einstellen der Taktart
Sie können die Taktart vor dem Start der Aufnahme einstellen.
* Nach der Aufnahme kann die Taktart nicht mehr geändert werden.
1. Halten Sie den [RHYTHM ON/OFF]-Taster mindestens zwei
Sekunden lang gedrückt.
Im Display wird „r0“ - „r9“ angezeigt. Der RC-3 be ndet sich jetzt im
Modus für die Auswahl des Rhythmustyps.
2. Halten Sie im Modus für die Auswahl des Rhythmustyps den
[RHYTHM ON/OFF]-Taster erneut mindestens zwei Sekunden
lang gedrückt.
Im Display wird „b4“ oder „b3“
angezeigt. Das RC-3 be ndet sich jetzt
im Modus für die Auswahl der Taktart.
3. Verwenden Sie die Taster
[ ] / [ ], um die gewünschte
Taktart auszuwählen.
4. Drücken Sie den [RHYTHM ON/OFF]-Taster, um in den
Normalbetrieb zurückzukehren.
Display
b4
b3
Erläuterung
4/4-Takt
(Standard)
3/4-Takt
Aufnahme mit Rhythmus
Wenn Sie bei eingeschaltetem Rhythmus eine Aufnahme
ausführen, startet die Aufnahme ab dem Beginn des Takts,
sobald Sie das Pedal zum Starten der Aufnahme drücken.
Wenn Sie die Aufnahmefunktion „Count-in“ verwenden (S. 11),
können Sie die Aufnahme starten, nachdem ein Takt Rhythmus
wiedergegeben wurde.
Unabhängig vom Zeitpunkt, zu dem Sie das Pedal zum
Beenden der Aufnahme drücken, wird die Länge der Sequenz
automatisch auf Takteinheiten angepasst.
Aufnahme ohne Rhythmus
Wenn Sie bei ausgeschaltetem Begleitrhythmus eine Aufnahme
ausführen, wird das Tempo der Sequenz automatisch nach der
Beendigung der Aufnahme berechnet.
Die automatische Tempoeinstellung wird unter der Annahme
berechnet, dass Sie 1, 2, 4, 8, 16, ... Takte in der festgelegten Taktart
aufgenommen haben. (S. 13).
13

Anschließen an einen Computer über USB
Sie können den RC-3 mithilfe eines handelsüblichen USB-Kabels an einen
Computer anschließen und RC-3-Sequenzen (WAV-Dateien) auf dem
Computer sichern oder WAV-Dateien vom Computer auf den RC-3 laden.
Wiedergabefähige WAV-Dateiformate
Datenformat WAV
Bitrate 16 bit linear, stereo
Abtastrate 44,1kHz
Die maximale Größe der WAV-Dateien beträgt 1,7 GB (für alle Dateien
insgesamt), die maximale Zeit beträgt ca. 3 Stunden (insgesamt für alle
Sequenzen), die Mindestzeit beträgt ca. 1,5 Sekunden.
1. Schalten Sie den RC-3 ein (stecken Sie einen Stecker in die
OUTPUT A-Buchse).
* Der RC-3 kann nicht über USB mit Strom versorgt werden. Es wird
die Verwendung eines Netzteils empfohlen (separat erhältlich), um
eine Stromunterbrechung während des Anschlusses über USB zu
vermeiden.
2. Verwenden Sie ein handelsübliches
USB-Kabel, um den USB-Anschluss
des RC-3 mit dem USB-Anschluss
des Computers zu verbinden (verwenden Sie einen USB
2.0-Hochgeschwindigkeitsanschluss).
Im Display wird „
* Eine USB-Verbindung kann nicht hergestellt werden, wenn der
RC-3 nicht zuvor angehalten wurde, oder wenn eine noch nicht
gespeicherte Sequenz vorhanden ist.
Cn “ angezeigt.
14
3. Sichern Sie die Sequenzen wie im Anschluss erläutert.
Windows-Anwender
Ö nen Sie unter „Arbeitsplatz“ „BOSS_RC-3“ (oder „Wechseldatenträger“).
Mac-Anwender
Ö nen Sie auf dem Desktop das Symbol „BOSS_RC-3“.
Sichern auf dem Computer
Kopieren Sie den gesamten Ordner „ROLAND“ vom Laufwerk
„BOSS_RC-3“ auf den Computer.
Wiederherstellen von gesicherten Daten vom Computer
auf dem RC-3
* Durch diesen Vorgang werden alle zurzeit auf dem RC-3
gespeicherten Sequenzen gelöscht. Erstellen Sie eine Sicherung,
bevor Sie fortfahren.
Löschen Sie auf dem Laufwerk „BOSS_RC-3“ den Ordner „ROLAND“,
und kopieren Sie anschließend den gesicherten Ordner „ROLAND“
vom Computer auf das Laufwerk „BOSS_RC-3“.
Schreiben von einzelnen WAV-Dateien vom Computer in
den Sequenzspeicher des RC-3
Sie können WAV-Dateien vom Computer in die Ordner „001_1“ bis
„099_1“ im Ordner „ROLAND“ - „WAVE“ auf dem Laufwerk
„BOSS_RC-3“ kopieren. (XX in „0XX_1“ steht für die Nummer des
Sequenzspeichers.)

HINWEIS
Français
Español
Português
* Löschen Sie die Ordner auf dem Laufwerk „BOSS_RC-3“ nur, wenn
Sie eine Wiederherstellung ausführen.
* In den Dateinamen können die folgenden Zeichen verwendet
werden. A-Z (Großbuchstaben), 0-9 (Zi ern), _ (Unterstrich)
* Kopieren Sie nur eine WAV-Datei in jeden Ordner. Wenn ein Ordner
bereits eine WAV-Datei enthält, überschreiben Sie diese nicht.
Kopieren Sie die WAV-Dateien in einen leeren Ordner.
4. Wenn Sie das Kopieren der WAV-Dateien fertiggestellt
haben, trennen Sie die USB-Verbindung wie im Anschluss
beschrieben.
Windows7-Anwender
Klicken Sie unten rechts auf dem Bildschirm auf die Symbole
[ ] g [ ] und anschließend auf „RC-3 auswerfen“.
Windows Vista-/Windows XP-Anwender
Klicken Sie unten rechts auf dem Bildschirm auf das Symbol [ ]
([ ] in XP) und anschließend auf „USB-Massenspeichergerät sicher
entfernen“.
Mac-Anwender
Ziehen Sie das „BOSS_RC-3“-Symbol in den Papierkorb („Auswerfen“Symbol).
5. Trennen Sie das USB-Kabel vom Computer.
Nach dem Trennen des USB-Kabels wird im Display „d C“ angezeigt,
und der [RHYTHM ON/OFF]-Taster blinkt.
Anschließen an einen Computer über USB
6. Drücken Sie den [RHYTHM ON/OFF]-Taster, um in den
Normalbetrieb zurückzukehren.
Die Anzeige „dC“ im Display erlischt, und der RC-3 kehr t in den
Normalbetrieb zurück.
HINWEIS
* Verwenden Sie niemals Ihren Computer, um das
Laufwerk „BOSS_RC-3“ zu formatieren. Dies würde zu
Funktionsstörungen des RC-3 führen. Führen Sie in diesem
Fall das unter „Formatieren des internen Speichers“ (S. 19)
erläuterte Verfahren aus.
* Führen Sie die folgenden Aktionen immer erst aus, nachdem
Sie das USB-Laufwerk getrennt haben. Andernfalls könnte
dies dazu führen, dass der Computer nicht mehr reagiert,
oder es könnten alle Daten des RC-3 verloren gehen.
• Trennen des USB-Kabels
• Versetzen des Computers in den Standbymodus oder
den Ruhezustand, Neustarten oder Herunterfahren des
Computers
• Ausschalten des RC-3
* Möglicherweise kann der Inhalt verloren gegangener
Daten, die auf dem Gerät gespeichert waren, nicht
wiederhergestellt werden. Die Roland Corporation
übernimmt in diesem Fall keine Haftung für diesen
Datenverlust.
English Deutsch Français Italiano Español Português Nederlands
15

Verbinden mit einem externen Fußtaster
Beim Anschluss eines BOSS FS-5U
Verbinden Sie den Fußtaster mit der STOP/MEMORY SHIFT-Buchse, wie in der Illustration dargestellt, und stellen Sie den POLARITY-Schalter ein.
Kabel:
Klinke
g
Klinke
16
Beim Anschluss eines BOSS FS-5U
POLARITY-Schalter
Kabel:
Stereo-Klinke
g
2 x Mono-Klinke
Beim Anschluss von zwei BOSS FS-5U
Kabel:
Stereo-Klinke
g
Stereo-Klinke
Beim Anschluss eines BOSS FS-6
oderoder
MODE/POLARITY-Schalter

Beim Anschluss eines BOSS FS-5U
* Der BOSS FS-5L Fußschalter ist nicht verwendbar, es wird ein FS-5U
Fußtaster benötigt.
Funktion Erläuterung
Stopp
Tempoeinstellung
Sequenz löschen
Drücken Sie während der Aufnahme, der
Wiedergabe oder des Overdubbings zum Stoppen
den Fußtaster.
Nach dem Anhalten des Geräts drücken Sie
mehrmals auf den Fußtaster, um das Tempo
einzustellen.
Um die Sequenz zu löschen, halten Sie den
Fußtaster für mindesten zwei Sekunden gedrückt
(S. 10).
Beim Anschluss von zwei BOSS FS-5U oder
eines BOSS FS-6
Beim Betrieb eines an den weißen Stecker (Stereo links)
angeschlossenen BOSS FS-5U oder des Pedals B eines
BOSS FS-6
Der Betrieb entspricht dem Anschluss eines einzelnen BOSS FS-5U.
Verbinden mit einem externen Fußtaster
Beim Betrieb eines an den roten Stecker (Stereo rechts)
angeschlossenen BOSS FS-5U oder des Pedals A eines
BOSS FS-6
Funktion Erläuterung
Speicherwechsel
(nach oben)
Speicherwechsel
(nach unten)
* Wenn die aktuelle Sequenz nicht gespeichert wurde, geht die
Sequenz nach dem Speicherwechsel verloren. Informationen zum
Speichern einer Sequenz nden Sie auf S. 8.
• Wenn Sie den Speicherwechsel gegen Ende der Sequenz ausführen,
kann es vorkommen, dass die gewünschte Zielsequenz nicht
ausgewählt wird.
• Sie können den Speicherwechsel auch durch Drücken der Taster
] / [ ] ausführen.
[
Wenn Sie den Fußtaster drücken, wird die
nächste Sequenzspeichernummer ausgewählt.
Wenn Sie den Fußtaster während der
Wiedergabe drücken, blinkt die Nummer
des neu ausgewählten Sequenzspeichers
im Display, und der Sequenzspeicher
wird gewechselt, sobald die zurzeit
wiedergegebene Sequenz beendet ist.
Wenn Sie den Fußtaster für mindestens zwei
Sekunden gedrückt halten, wird die vorherige
Sequenzspeichernummer ausgewählt.
English Deutsch Français Italiano Español Português Nederlands
17

Sonstige Einstellungen
Informationen zum Ruhezustand
Wenn für zehn Stunden keine Operation und keine Audioeingabe erfolgt,
wechselt das RC-30 in den Ruhezustand (Energiesparmodus), nur die
angeschlossene Klangquelle wird ausgegeben. Wenn Sie im Ruhezustand
das Pedal drücken, kehrt das Gerät in den Betriebszustand zurück.
* Auch im Ruhezustand wird Batterieleistung verbraucht. Schalten
Sie das Gerät durch Herausziehen des Steckers aus der OUTPUT
A-Buchse aus, um den Verbrauch der Batterie zu verhindern.
* Der RC-3 wechselt nicht in den Ruhezustand, wenn eine noch nicht
gespeicherte Sequenz vorhanden ist.
Deaktivieren der „Ruhezustand“-Funktion
1. Schalten Sie das Gerät bei gedrücktem Pedal ein (stecken Sie
einen Stecker in die OUTPUT A-Buchse).
2. Halten Sie das Pedal für fünf Sekunden gedrückt.
Im Display blinkt „__“.
3. Wenn Sie das Pedal loslassen, setzt das RC-3 den normalen
Betrieb fort.
18
Aktivieren der „Ruhezustand“-Funktion
(Standardeinstellung)
1. Schalten Sie das Gerät bei gedrücktem Pedal ein (stecken Sie
einen Stecker in die OUTPUT A-Buchse).
2. Drücken Sie innerhalb von zwei Sekunden nach dem
Erscheinen der Anzeige erneut zweimal auf das Pedal.
Im Display blinkt „SL“.
Nach zwei Sekunden setzt das RC-3 den normalen Betrieb fort. Die
„Ruhezustand“-Funktion ist aktiviert.

Sonstige Einstellungen
English Deutsch Français Italiano Español Português Nederlands
Ändern der Umschaltreihenfolge von
Aufnahme g Overdubbing g Wiedergabe
Wenn Sie das Pedal drücken, wechselt der RC-3 in der Reihenfolge
Aufnahme g Overdubbing g Wiedergabe (Standardeinstellung) (S. 6).
So können Sie sofort nach der Aufnahme der Grund-Sequenz das erste
Overdub aufnehmen, was ein großer Vorteil ist, wenn Sie viele Aufnahmen
übereinanderschichten wollen. Sie können die Reihenfolge jedoch auch
zu Aufnahme g Wiedergabe g Overdubbing ändern (wie bei den
Vorgängermodellen BOSS RC-2, RC-20 und RC-20XL).
1. Schalten Sie das Gerät bei gedrücktem [TAP TEMPO]-Taster
ein (stecken Sie einen Stecker in die OUTPUT A-Buchse).
2. Verwenden Sie die Taster [
Modus auszuwählen.
Display
Erläuterung
Der RC-3 wechselt in der Reihenfolge Aufnahme g
rd
Overdubbing g Wiedergabe (Standardeinstellung).
Der RC-3 wechselt in der Reihenfolge Aufnahme g
rP
Wiedergabe g Overdubbing.
3. Drücken Sie den [TAP TEMPO]-Taster, um zum Normalbetrieb
zurückzukehren.
] / [ ], um den gewünschten
Formatieren des internen Speichers
* Wenn Sie den internen Speicher des RC-3 formatieren, werden
alle gespeicherten Sequenzen gelöscht und können nicht
wiederhergestellt werden.
Formatieren Sie den internen Speicher nur, wenn im Display
„
Er“ angezeigt wird, und der RC-3 nicht mehr ordnungsgemäß
funktioniert.
1. Schalten Sie das Gerät bei gedrücktem [WRITE]- und
[RHYTHM ON/OFF]-Taster ein (Stecken Sie einen Stecker in die
OUTPUT A-Buchse).
Im Display wird „FN“ angezeigt.
2. Drücken Sie den [RHYTHM ON/OFF]-Taster erneut.
Im Display blinkt „FN“.
3. Drücken Sie den [WRITE]-Taster, die Formatierung des
internen Speichers beginnt.
Die Anzeige „FN“ im Display blinkt schnell. Nach dem Abschluss der
Formatierung kehrt das RC-3 in den normalen Betrieb zurück.
* Schalten Sie das Gerät nicht aus, während „
FN“ schnell blinkt.
19

Fehlerbehebung
Problem Maßnahme
Die Aufnahme wird nicht sofort
nach dem Drücken des Pedals
beendet.
Die Aufnahme startet
sofort, obwohl der Modus
„Automatische Aufnahme“
ausgewählt ist.
Das Wiedergabetempo lässt
sich nicht ändern.
Liste der Fehlermeldungen
Display B edeutung Maßnahme Seite
Die Batteriespannung ist niedrig. Wechseln Sie die Batterie aus. S. 22
bt
Der Speicher ist voll. Löschen Sie nicht benötigte Sequenzen. S. 9
FL
Diese WAV-Datei kann nicht wiedergegeben
UF
werden.
Weiteres Overdubbing ist nicht möglich. Speichern Sie die Sequenz erneut. S. 8
EF
Der interne Speicher muss formatiert werden. Formatieren Sie den internen Speicher des RC-3. S. 19
Er
Im RC-3 liegt eine Fehlfunktion vor. Wenden Sie sich an Ihren Händler oder Roland-Vertrieb.
dN
20
Wenn „Rhythmus“ aktiviert ist oder wenn die aufgenommene Sequenz kürzer als die Mindestaufnahmezeit ist (ca. 1,5
Sekunden), wird die Länge der Sequenz automatisch angepasst. Dies bedeutet, dass die Aufnahme nicht unmittelbar
nach dem Drücken des Pedals beendet wird.
Wenn aufgrund von Verzerrungen oder anderen Ursachen deutliche Geräusche vorhanden sind, können diese für
die Auslösung der Aufnahme ausreichend sein. Reduzieren Sie die Geräusche, beispielsweise durch Verringern der
Verzerrung.
In den folgenden Situationen lässt sich das Wiedergabetempo nicht ändern:
• Wenn die Sequenz nicht gespeichert wurde
• Während des Umschaltens zwischen Sequenzen (die PLAY-Anzeige blinkt schnell)
• Wenn Sie versuchen, das Tempo für eine Sequenz festzulegen, und die Sequenz danach (starke Tempoerhöhung)
kürzer als die Mindestaufnahmezeit wäre (ca. 1,5 Sekunden).
Überprüfen Sie das Format der WAV-Datei. S. 14

Weitere Displayanzeigen
Display Erläuterung Seite
1–9 9
. (Punkt)
oS
Un
rE
CL
r
dL
no
AU
Ct
r0 -r9
b3 -b4
Cn
dC
SL
__
Nummer des Sequenzspeichers
Der Sequenzspeicher enthält Daten.
Einmalige Sequenz = One Shot S. 10
Rückgängig = UNDO
Wiederherstellen = REDO
Löschen = CLEAR
Speichern der Sequenz S. 8
Löschen der Sequenz S. 9
Normale Aufnahme
Automatische Aufnahme
Count-in-Aufnahme
Rhythmustyp S. 12
Taktart S. 13
USB angeschlossen
USB getrennt
Ruhezustand-Funktion aktiviert
Ruhezustand-Funktion deaktiviert
S. 6
S. 10
S. 11
S. 14
S. 18
Fehlerbehebung
Display Erläuterung Seite
rd
rP
FN
Änderung in die Reihenfolge Aufnahme/
Overdubbing/Wiedergabe
Änderung in die Reihenfolge Aufnahme/
Wiedergabe/Overdubbing
Formatierung des internen Speichers S. 19
S. 19
English Deutsch Français Italiano Español Português Nederlands
21

Auswechseln der Batterie
Wenn im Display „bt“ angezeigt wird, ist die Batteriespannung
niedrig. Wechseln Sie die Batterie aus, wie unten beschrieben.
* Da der Stromverbrauch des Geräts relativ hoch ist, wird die
Verwendung eines Netzadapters empfohlen. Wenn Sie die
Verwendung von Batterien bevorzugen, verwenden Sie bitte
Alkalibatterien.
* Ni-MH-Akkus sind nicht verwendbar.
* Beim Wechseln der Batterien geht der Inhalt des internen Speichers
nicht verloren, es wird jedoch empfohlen, aus Sicherheitsgründen
regelmäßige Sicherungen auszuführen (S. 14).
Batterieanschlusskabel
Batterieanschluss
22
Schraube
9-V-Batterie
Pedaldeckel
Federbasis
Spiralfeder
Führungsloch
Batteriegehäuse
* Eine unsachgemäße Handhabung von Batterien,
Akkus oder Akkuladegeräten kann zu Undichtigkeiten,
Überhitzung, Feuer und Explosionen führen. Lesen Sie
vor der Verwendung alle den Batterien, Akkus oder
Akkuladegeräten beigefügten Sicherheitshinweise, und
beachten Sie diese genau.
1. Lösen Sie die Schraube an der Vorderseite des Pedals, heben
Sie den Pedaldeckel an, und önen Sie das Gerät.
* Die Schraube kann während des Batteriewechsels im Pedaldeckel
verbleiben.
2. Entnehmen Sie die alte Batterie aus dem Batteriegehäuse,
und lösen Sie das daran befestigte Batteriekabel.
3. Befestigen Sie das Batteriekabel an der neuen Batterie, und
legen Sie die Batterie in das Batteriegehäuse ein.
* Achten Sie auf die Polarität der Batterie (+ bzw. -).
4. Schieben Sie die Spiralfeder auf die Federbasis auf der
Unterseite des Pedals, und schließen Sie den Pedaldeckel.
* Achten Sie darauf, dass sich das Batteriekabel nicht in der
Spiralfeder verklemmt.
5. Führen Sie die Schraube schließlich in das Führungsloch ein,
und drehen Sie sie fest.

English Deutsch Français Italiano Español Português Nederlands
• Aufnahme, Vervielfältigung, Verteilung, Verkauf, Verleih, öentliche
Auührung oder Ausstrahlung von urheberrechtlich geschütztem
Material (musikalische Werke, visuelle Werke, Ausstrahlungen,
Liveauftritte u.ä.) einer dritten Partei in Teilen oder als Ganzes ohne die
Genehmigung des Urheberrechteigners ist gesetzlich verboten.
• Verwenden Sie dieses Produkt nicht auf eine Weise, die das
Urheberrecht Dritter verletzen könnte. Wir übernehmen keinerlei
Verantwortung bei einer Verletzung des Urheberrechts Dritter, die sich
aus der Verwendung dieses Produkts ergibt.
• Die Inhalte dieses Produkts (Klangwellenformdaten, Stildaten,
Begleitungsmuster, Sequenzdaten, Audioloops und Bilddaten)
unterliegen dem Urheberrecht der Roland Corporation.
• Die Käufer dieses Produkts sind berechtigt, diese Inhalte für die
Erstellung, Auührung, Aufnahme und Weitergabe von musikalischen
Originalwerken zu verwenden.
• Die Käufer dieses Produkts sind NICHT berechtigt, diese Inhalte im
Original oder in veränderter Form zu extrahieren, um sie auf einem
Aufnahmemedium zu verbreiten oder in einem Computernetzwerk
verfügbar zu machen.
• BOSS und Loop Station sind eingetragene Marken der Roland
Corporation in den USA und/oder anderen Ländern.
• Alle in diesem Dokument erwähnten Produktnamen sind Marken oder
eingetragene Marken der jeweiligen Eigentümer.
• Die in diesem Dokument verwendeten Screenshots werden in
Übereinstimmung mit den Richtlinien der Microsoft Corporation
verwendet.
• MMP (Moore Microprocessor Portfolio) bezeichnet ein Patentportfolio,
das sich mit der von Technology Properties Limited (TPL) entwickelten
Mikroprozessorarchitektur befasst. Roland hat diese Technologie von
der TPL Group lizenziert.
• Das SD-Logo (
SD-3C, LLC.
• Dieses Produkt enthält die integrierte eCROS-Softwareplattform von
eSOL Co.,Ltd.
eCROS ist eine Marke von eSOL Co., Ltd. in Japan.
• Das Gerät enthält digitale Schriftarten von Yourname, Inc.
Digitale Schriftart: Copyright © Yourname, Inc.
Copyright © 2011 BOSS CORPORATION
Alle Rechte vorbehalten. Diese Publikation darf weder ganz noch
teilweise ohne schriftliche Genehmigung durch die BOSS CORPORATION
reproduziert werden.
) und das SDHC-Logo ( ) sind Marken von
23

Technische Daten
BOSS RC-3: Loop Station
Nomineller
Eingangspegel
Eingangsimpedanz
Nomineller
Ausgangspegel
Ausgangsimpedanz 1kOhm
Empfohlene
Lastimpedanz
Aufnahme/Wiedergabe
USB-Interface
Stromversorgung
Stromverbrauch
Abmessungen 73 (W ) x 129 (D) x 59 (H) mm
Gewicht 450 g (einschließlich Batterie)
24
INPUT: -20dBu
AUX IN: -10 dBu
INPUT: 1MOhm
AUX IN: 22kOhms
-20 dBu
mindestens 10kOhms
Maximale Aufnahmezeit: ca. 3 Stunden
Maximale Anzahl gespeicherter Sequenzen:
99Sequenzen
Datenformat: WAV (44,1 kHz, 16 bit linear, stereo)
Unterstützt die Massenspeicher-Geräteklasse
USB 2.0/1.1
9V Gleichspannung:
Alkalibatterie (9V, 6LR61),
Netzadapter (BOSS PSA-230 oder PSB-230:
separat erhältlich)
* Ni-MH-Akkus sind nicht verwendbar.
70 mA (9V max.)
Alkalibatterie (9V, 6LR61)
ca. 3 Stunden
* Diese Werte variieren je nach den
tatsächlichen Betriebsbedingungen.
Bedienungsanleitung, Faltblatt („SICHERER
BETRIEB DES GERÄTES“, „WICHTIGE HINWEISE“
und „Informationen“), Alkalibatterie (9V,
6LR61): bereits in das Gerät eingelegt
Zubehör
Optionen (separat
erhältlich)
* 0dBu = 0,775Vrms
* Im Interesse der Verbesserung des Produkts können sich die
technischen Daten und/oder das Erscheinungsbild dieses Geräts
ohne vorherige Ankündigung ändern.
:
* Die mitgelieferte Batterie ist nur zur
vorübergehenden Nutzung vorgesehen.
Ihr Hauptzweck besteht darin, einen
Test des Geräts zu ermöglichen. Es wird
empfohlen, sie durch eine Alkalibatterie
zu ersetzen.
Netzadapter BOSS PSA-230 oder PSB-230
Fußtaster: BOSS FS-5U, BOSS FS-6

Mode d’emploi
* Cet appareil contient des phrases de démonstration (90 à 99). Une fois que
vous les supprimez, il est impossible de les récupérer. Sauvegardez-les de
la manière décrite dans la section «Sauvegarde sur votre ordinateur» (p. 14).
* L’appareil entre en mode de veille (mode d’économie d’énergie) lorsque
dixheures se sont écoulées depuis la dernière opération ou depuis la
dernière entrée audio en mode d’arrêt.
Pour empêcher l’appareil d’entrer en mode de veille, appuyez sur la
pédale lorsque vous allumez l’appareil et maintenez-la enfoncée pendant
cinqsecondes (p. 18).
English Deutsch Français Italiano Español Português Nederlands

Caractéristiques principales
Présentation de la Loop Station
Le RC-3 est une pédale enregistreuse qui vous permet d’enregistrer
des phrases audio à partir de votre guitare ou de votre basse et de les
lire à l’aide d’une pédale. Vous pouvez travailler sur un vaste éventail
d’interprétations en créant plusieurs couches de son pendant même
que vous enregistrez et lisez vos phrases en temps réel.
• La création de phrases en boucle est particulièrement facile à réaliser.
• Vous pouvez stocker en mémoire jusqu’à 99phrases en boucle
di érentes, ce qui correspond à environ 3heures au total
(* total pour toutes les phrases).
• Vous pouvez sampler du son en mode stéréo.
• Enregistrez facilement du son depuis un lecteur audio
numérique connecté à la prise AUX IN.
• Les phrases enregistrées peuvent être ensuite copiées via une
connexion USB sur votre ordinateur. Vous pouvez également
charger des chiers WAV depuis votre ordinateur vers le RC-3 et
les jouer sous forme de boucles (p. 14).
Avant d’utiliser cet appareil, lisez attentivement les sections
intitulées: «CONSIGNES DE SECURITE» et «REMARQUES
IMPORTANTES» (décrites dans un document distinct). Ces
sections fournissent des informations importantes relatives au
bon fonctionnement de l’appareil.
En outre, pour être sûr d’avoir bien intégré chacune des
fonctionnalités fournies par votre appareil, il est nécessaire
de lire le mode d’emploi dans son intégralité. Vous devez
conserver ce manuel à portée de main a n de pouvoir vous y
reporter au besoin.
2
Description de l’appareil
1 2 3 4 65
7 8
1. Commande [OUTPUT LOOP]
Permet de régler le niveau du volume pour la phrase en boucle que
vous lisez.
* Cette commande ne permet pas de régler le niveau d’entrée
des prises INPUT et AUX IN.
2. Commande [OUTPUT RHYTHM]
Permet de régler le niveau du volume pour le rythme (p. 12).

3. Voyants REC, PLAY (DUB)
Ces voyants s’allument durant l’enregistrement, la lecture et
l’overdubbing.
Voyant Explication
REC (rouge) Durant l’enregistrement
PLAY (vert)
Les deux Durant l’overdubbing
Durant la lecture (pendant le chargement d’une
mémoire de phrases ou durant une opération
de mémoire interne: clignote rapidement)
4. Écran
Indique le numéro de la mémoire de phrases active ou d’autres
informations diverses (p. 20).
5. Boutons [ ] (DOWN) / [ ] (UP)
Ces boutons décrémentent ou incrémentent le numéro a ché à
l’écran.
6. Bouton [WRITE]
Appuyez sur ce bouton pour stocker la phrase enregistrée dans la
mémoire interne (p. 8).
7. Bouton [RHYTHM ON/OFF]
Permet d’activer ou de désactiver la lecture du rythme (p. 12).
8. Bouton [TAP TEMPO]
Appuyez sur ce bouton au moment souhaité pour régler le tempo
(p. 12).
Description de l’appareil
9
10
9. Pédale
Cette pédale vous permet de basculer entre l’enregistrement de
phrases, l’overdubbing et la lecture. Appuyez deux fois de suite sur
la pédale pour arrêter la lecture (p. 6).
10. Vis à main
Lorsque cette vis est desserrée, la pédale s’ouvre, permettant ainsi le
remplacement de la pile.
* Si vous utilisez le RC-3 sur pile uniquement, l’écran indique
«
bt » dès que la pile est déchargée. Remplacez la pile de la
manière décrite à la p. 22.
* Une pile a été installée dans l’appareil en sortie d’usine. La
durée de vie de cette pile peut être limitée, son principal
objectif étant de permettre de tester l’appareil.
English Deutsch Français Italiano Español Português Nederlands
3

Connecteur USB
d’autre adaptateur, cela risquerait de provoquer des dysfonctionnements.
raccorder votre lecteur audio à cette prise.
Grâce à la
automatique
commencer à enregistrer au moment
précis où le lecteur audio commence la
Prise STOP/MEMORY SHIFT
Vous pouvez brancher un commutateur au
pied à part (FS-5U, FS-6) dans cette prise
et vous en servir pour arrêter la lecture ou
passer de phrases en phrases (p. 16).
Vous pouvez recourir à un câble USB
courant pour raccorder le RC-3 à votre
ordinateur et utiliser ce dernier pour lire/
écrire des phrases RC-3 ( chiers WAV) (p. 14).
Prise DC IN
Branchement de l’adaptateur secteur (Série PSA: en option). Avec l’adaptateur secteur,
vous pouvez continuer à jouer sans vous soucier de la durée de vie de la pile.
* Utilisez uniquement l’adaptateur secteur fourni (Série PSA) et branchez-le
sur une prise murale fournissant une tension appropriée. N’utilisez pas
d’autre adaptateur, cela risquerait de provoquer des dysfonctionnements.
Prises OUTPUT A/B
Raccordez les enceintes de
votre ampli cateur ou de
votre moniteur à ces prises.
Si votre système est
monophonique, utilisez
uniquement la prise OUTPUT
A. Le son entré en mode
stéréo sera également sorti
en mono.
La prise OUTPUT A fonctionne également
comme un bouton de marche/arrêt.
L’appareil s’allume si un connecteur est
inséré dans la prise OUTPUT A. Retirez le
connecteur lorsque vous n’utilisez pas le
RC-3.
4
Prises INPUT A/B
Raccordez votre guitare, votre basse ou votre appareil d’e ets à ces prises.
Utilisez la prise INPUT A et la prise INPUT B lorsque vous raccordez
un appareil d’e ets avec sortie stéréo. Utilisez uniquement la prise
INPUT A avec une source mono.
Prise AUX IN
Utilisez un câble mini-plug stéréo pour
raccorder votre lecteur audio à cette prise.
Grâce à la fonction d’enregistrement
automatique (p. 11), vous pouvez
commencer à enregistrer au moment
précis où le lecteur audio commence la
lecture.
Prise STOP/MEMORY SHIFT
Vous pouvez brancher un commutateur au
pied à part (FS-5U, FS-6) dans cette prise
et vous en servir pour arrêter la lecture ou
passer de phrases en phrases (p. 16).

Español
Português
REMARQUE
* Pour éviter tout dysfonctionnement et/ou dommage
sur les enceintes ou d’autres appareils, baissez
toujours le volume et mettez tous les appareils hors
tension avant tout branchement.
* Avant de brancher ou de débrancher des câbles de
raccordement, véri ez que les niveaux de volume de
votre système sont réglés sur le minimum.
* Servez-vous de câbles de raccordement sans résistance
intégrée. Si vous utilisez des câbles munis d'une
résistance, le volume de l’appareil raccordé aux prises
AUX IN risque d’être insu sant, voire inexistant.
* Ne raccordez pas un casque d’écoute à la prise
OUTPUT. Vous risqueriez de l’endommager.
Allumage de l’appareil
L’insertion d’un connecteur de raccordement dans la prise OUTPUT
A provoque l’allumage de l’appareil.
Une fois les branchements e ectués, mettez sous tension les
di érents appareils dans l’ordre indiqué. Si vous ne respectez pas
cet ordre, vous risquez de provoquer des dysfonctionnements et/ou
des dommages aux haut-parleurs et aux autres appareils.
Lors de la mise sous
tension
Lors de la mise hors
tension
* Cet appareil est équipé d’un circuit de protection. Un bref
intervalle (quelques secondes) est nécessaire à la mise sous
tension avant que l’appareil puisse fonctionner normalement.
Précautions à prendre lors de la mise hors tension
Lorsque le RC-3 présente l’un des états suivants, vous
ne devez jamais éteindre l’appareil (c.-à-d. retirer le
connecteur de la prise OUTPUT A).
Si vous l’éteignez, vous risquez de perdre l’ensemble des
données stockées.
• Lorsque le voyant REC ou PLAY s’allume (au cours de
l’enregistrement, de la lecture ou de l’overdubbing)
• Lorsque le voyant PLAY clignote rapidement (pendant
la lecture d’une mémoire de phrases ou au cours d’une
opération de mémoire interne)
Allumez l’ampli cateur de votre guitare
en dernier.
Éteignez l’ampli cateur de votre guitare
en premier.
English Deutsch Français Italiano Español Português Nederlands
5

Fonctionnement de base
Pour des opérations d’enregistrement, d’overdubbing et de lecture, appuyez sur la pédale comme indiqué dans le schéma.
Sélection d’une mémoire de phrases
Servez-vous des boutons [ ] / [ ]
pour sélectionner une mémoire de
phrases (1 à 99).
Écran Explication
Seul le numéro
s’a che
Point en bas à
droite
Le numéro et
l’indication
«
oS » s’a chent
alternativement
• Si l’appareil a été livré depuis l’usine, les phrases 90 à 99
sont des phrases de démonstration.
6
Phrase vide
Appuyez sur la pédale pour démarrer
l’enregistrement
Phrase contenant des données
Appuyez sur la pédale pour démarrer
la lecture en boucle
Phrase à lecture unique
Appuyez sur la pédale pour lire une
phrase une seule fois (sans boucle)
Enregistrement
Enregistrez votre morceau de guitare ou de
basse ou encore du son d’un lecteur audio
raccordé à la prise AUX IN.
• L’enregistrement automatique (p. 11) vous permet
d’enregistrer dès que vous commencez à jouer.
• Vous pouvez également enregistrer avec des rythmes
(p. 12).
Reportez-vous à la section «Sauvegarde d’une phrase à
lecture unique» (p. 10).
« Enregistrement » et « overdubbing »
Dans ce manuel, le terme « enregistrement » s’applique à
l’action d’enregistrer une phrase vide pour la première fois.
Tous les enregistrements qui suivent, qui sont ajoutés sur
l’enregistrement existant, sont appelés « overdubbing ».

Fonctionnement de base
Deutsch
Français
Italiano
Português
Nederlands
English Deutsch Français Italiano Español Português Nederlands
Overdubbing
Créez des couches de son alors que la phrase
est lue sous forme de boucle.
Appuyez sur la pédale pour que l’appareil
passe en mode de lecture.
• Vous pouvez e ec tuer des opérations d’annulation et
de rétablissement (p. 10).
Appuyez
deuxfois
Lecture en boucle
Lisez les phrases comme des boucles.
Appuyez sur la pédale pour que l’appareil
passe en mode d’overdubbing.
• Pour utiliser la fonction Memory Shift, appuyez sur les
boutons [
] / [ ] pendant la lecture d’une phrase; le
numéro de la mémoire de phrases clignote, ce qui vous
permet de sélectionner la phrase suivante (p. 17).
Stop
Pour arrêter un overdubbing ou une lecture
en boucle en cours, appuyez deuxfois
consécutives sur la pédale.
• Appuyez sur la pédale deuxfois de suite dans un délai
d’une seconde.
7

Fonctionnement de base
REMARQUE
* Lorsque la mémoire de phrases est en
cours de lecture, le voyant PLAY (vert)
clignote rapidement. N’éteignez jamais
l’appareil alors que le voyant PLAY clignote
rapidement.
* La durée minimale d’enregistrement pour une phrase
en boucle est d’environ 1,5secondes. Si vous appuyez
sur la pédale dans un intervalle d’environ 1,5secondes
après le début de l’enregistrement, l’enregistrement se
poursuit jusqu’à ce que la phrase atteigne une durée
approximative de 1,5secondes.
* La durée maximale d’enregistrement pour une phrase
en boucle est d’environ 3heures (total pour toutes les
phrases). Si la durée maximale d’enregistrement est
dépassée, l’écran indique «
mémoire interne est saturée et que l’enregistrement
ou l’overdubbing prendra peut-être n avant le
moment prévu. Dans ce cas, supprimez les phrases
inutiles (p. 8) et recommencez l’opération.
* Si vous utilisez la fonction Memory Shift avant de
sauvegarder une phrase, cette dernière est e acée.
Pour en savoir plus sur la sauvegarde d’une phrase,
reportez-vous à la p. 8.
FL » pour signaler que la
8
Sauvegarde d’une phrase
Si vous sélectionnez une mémoire de phrases di érente ou éteignez
l’appareil après un enregistrement ou un overdubbing, vous perdez
la phrase que vous avez enregistrée. Pour la conserver, vous devez
la sauvegarder.
1. Quand la lecture est arrêtée, appuyez sur le bouton
[WRITE].
L’écran indique « » (wr).
2. Servez-vous des boutons [ ] / [ ] pour indiquer une
mémoire de phrases où sauvegarder la phrase.
Vous pouvez ignorer cette étape pour e ec tuer la sauvegarde
dans la mémoire de phrases actuellement sélectionnée.
Vous ne pouvez pas sélectionner une mémoire de phrases dans
laquelle une autre phrase a déjà été sauvegardée.
La durée maximale d’enregistrement est d’environ 3 heures
au total pour toutes les phrases (y compris celle qui n’a pas
été sauvegardée). Si la phrase ne peut pas être sauvegardée
car la quantité de mémoire disponible est insu sante, l’écran
alterne l’indication «
phrases. Dans ce cas, supprimez les phrases inutiles (p. 9) et
recommencez l’opération.
3. Appuyez une fois de plus sur le bouton [WRITE] pour
sauvegarder la phrase.
Si vous décidez de ne pas sauvegarder la phrase, appuyez sur
le bouton [TAP TEMPO], sur le bouton [RHYTHM ON/OFF] ou
sur la pédale.
FL » avec le numéro de la mémoire de

Pendant que la phrase est sauvegardée, le numéro a ché à
l’écran et le voyant PLAY clignotent rapidement.
REMARQUE
* N’éteignez jamais l’appareil alors que le voyant PLAY
clignote rapidement. Vous risqueriez de perdre
l’intégralité des données sauvegardées.
* Sachez que le contenu de la mémoire peut être
irréversiblement perdu suite à un dysfonctionnement
ou à une utilisation inadéquate de l’appareil.
Sauvegardez les données importantes de la manière
décrite dans la section «Sauvegarde sur votre
ordinateur» (p. 14).
* Durant toute activité de réparation, il convient de
prendre toutes les précautions nécessaires pour éviter
la perte de données. Toutefois, il arrive, dans certains
cas, par exemple, si la mémoire a été endommagée,
que la restauration des données soit impossible.
* Il est par fois impossible de restaurer le contenu de
données stockées dans la mémoire de l’appareil une
fois qu’elles sont perdues. Roland Corporation ne peut,
en aucun cas, être tenue responsable de ladite perte
de données.
Fonctionnement de base
Suppression d’une phrase
* Cet appareil contient des phrases de démonstration (90 à
99). Une fois que vous les supprimez, il est impossible de
les récupérer. Sauvegardez-les de la manière décrite dans la
section «Sauvegarde sur votre ordinateur» (p. 14).
1. Servez-vous des boutons [ ] / [ ] pour sélectionner
la mémoire de phrases que vous souhaitez
supprimer.
2. Quand la lecture est arrêtée, maintenez enfoncé le
bouton [WRITE] pendant au moins deux secondes.
L’écran indique «d L».
* À ce stade, il est impossible de changer de numéro de
mémoire de phrases à supprimer.
3. Appuyez sur le bouton [WRITE] pour supprimer la
phrase.
Si vous décidez de ne pas supprimer la phrase, appuyez sur le
bouton [TAP TEMPO], sur le bouton [RHYTHM ON/OFF] ou sur
la pédale.
Pendant que la phrase est supprimée, le numéro a ché à l’écran
et le voyant PLAY clignotent rapidement.
* N’éteignez jamais l’appareil alors que le voyant PLAY clignote
rapidement. Vous risqueriez de perdre l’intégralité des
données sauvegardées.
English Deutsch Français Italiano Español Português Nederlands
9

Fonctionnement de base
Sauvegarde d’une phrase à lecture unique
La lecture unique permet de lire la phrase une seule fois du début à
la n, puis de l’arrêter automatiquement.
1. Maintenez enfoncé le bouton [TAP TEMPO] et
appuyez sur le bouton [WRITE].
L’écran indique «o S».
2. Servez-vous des boutons [ ] / [ ] pour indiquer une
mémoire de phrases où sauvegarder la phrase.
3. Appuyez une nouvelle fois sur le bouton [WRITE]
pour sauvegarder la phrase en tant que phrase à
lecture unique.
Si vous décidez de ne pas sauvegarder la phrase, appuyez sur
le bouton [TAP TEMPO], sur le bouton [RHYTHM ON/OFF] ou
sur la pédale.
* L’overdubbing est désactivé si la lecture unique est
active. Si vous appuyez sur la pédale durant la lecture
de la phrase, celle-ci est lue de nouveau depuis le début
(re-déclenchement de la lecture).
* Vous devez réenregistrer la phrase pour annuler la lecture
unique (retour à la lecture en boucle). (p. 8)
* Pour arrêter une phrase à lecture unique pendant sa lecture,
appuyez deuxfois sur la pédale dans un intervalle de
0,5seconde.
10
Annulation d’un overdub (annuler/rétablir/
eacer)
Vous pouvez annuler, rétablir ou eacer un overdub en appuyant
sur la pédale pendant au moins deuxsecondes.
Opération
Annulation
Rétablissement
Eacement
Durant une opération d’annulation ou de rétablissement, les
voyants PLAY et REC clignotent rapidement. Au cours d’une
opération d’eacement, le voyant PLAY clignote rapidement.
Écran
Explication
Appuyez sur la pédale pendant au
moins deuxsecondes durant la lecture
Un
ou l’overdubbing; l’enregistrement ou
l’overdubbing le plus récent est annulé.
Pour rétablir le son annulé, appuyez de
nouveau sur la pédale pendant au moins
deux secondes pendant la lecture.
rE
* Refaire est uniquement disponible
pour l’overdubbing.
Appuyez sur la pédale pendant au
moins deuxsecondes à l’arrêt; la phrase
en cours est eacée. (L’eacement étant
CL
temporaire, les phrases sauvegardées
dans la mémoire de phrases ne sont pas
supprimées.)

Fonction d’enregistrement automatique et
d’enregistrement «Count-in»
L’enregistrement automatique démarre dès que vous commencez
à jouer ou à lire du son depuis votre lecteur audio. Le mode
«Count-in» permet de lire le rythme pour une mesure avant que
l’enregistrement démarre.
1. Maintenez enfoncé le bouton [TAP TEMPO] pendant
au moins deuxsecondes.
L’écran indique «n o».
2. Servez-vous des boutons [ ] / [ ] pour sélectionner
le mode d’enregistrement souhaité, puis appuyez sur
la pédale pour démarrer l’enregistrement.
Écran
Mode Explication
no
AU
Enregistrement
normal
Enregistrement
automatique
L’enregistrement démarre dès que vous
appuyez sur la pédale.
Le voyant REC clignote rapidement,
et le RC-3 entre en mode de pause
de l’enregistrement. Lorsque vous
commencez à jouer, le voyant
REC s’allume, et l’enregistrement
commence.
Fonctionnement de base
Écran
Mode Explication
Enregistrement
Ct
«Count-in»
Le mode d’enregistrement est rétabli sur Normal lorsque vous
éteignez l’appareil.
Le bouton [RHYTHM ON/OFF] clignote.
Lorsque vous appuyez sur la pédale,
le voyant REC clignote rapidement,
et le rythme est lu pour une mesure.
(Durant cet intervalle, vous pouvez
arrêter l’enregistrement en appuyant
sur la pédale). Lorsque l’unique mesure
de lecture se termine, l’enregistrement
commence. (Le rythme continue
d’être joué même après le début de
l’enregistrement).
Pour en savoir plus sur les réglages du
rythme, voir «A propos du rythme»
(p. 12).
English Deutsch Français Italiano Español Português Nederlands
11

A propos du rythme
Lecture d’un rythme
1. Appuyez sur le bouton [RHYTHM ON/OFF] pour
activer ou désactiver la lecture du rythme.
• Utilisez la commande [OUTPUT RHYTHM] pour régler le volume
du rythme.
• Le bouton [ TAP TEMPO] clignote en synchronisation avec le
rythme (voyant rouge sur le premier battement, vert sur les
battements suivants).
• Lorsque vous sauvegardez une phrase (p. 8), le type de rythme
et la métrique sélectionnés à ce moment précis sont également
sauvegardés.
Réglage du tempo
Dans le cadre d’un enregistrement, vous pouvez régler le tempo
avant de commencer à enregistrer. Lorsque vous lisez une phrase
sauvegardée, vous pouvez modier le tempo de lecture sans
changer le pitch de la phrase.
1. Servez-vous des boutons [ ] / [ ] pour sélectionner la
mémoire de phrases dont vous souhaitez régler le tempo.
2. Appuyez plusieurs fois sur le bouton [TAP TEMPO]
pour atteindre le tempo souhaité.
Le tempo sera réglé sur l’intervalle auquel vous appuyez sur le bouton.
• Si le RC-3 est arrêté, le rythme (bouton [RHY THM ON/OFF]) est
activé après que vous réglez le tempo.
12
* Vous pouvez modier uniquement le tempo des phrases
qui ont été sauvegardées dans la mémoire de phrases.
Pour modier le tempo d’une phrase immédiatement après
un enregistrement ou un overdubbing, il convient de la
sauvegarder d’abord dans la mémoire de phrases (p. 8).
* La proportion dans laquelle vous pouvez régler le tempo est
limitée.
* Vous ne pouvez pas régler un tempo qui forcerait la phrase à
former une boucle dans un intervalle de temps plus court que
la durée minimale d’enregistrement (environ 1,5secondes).
Le réglage du tempo est stocké lorsque vous sauvegardez la
phrase enregistrée (p. 8).
Réglage du type de rythme
1. Maintenez enfoncé le
bouton [RHYTHM ON/
OFF] pendant au moins
deuxsecondes.
L’écran ache «r 0» – «r 9»:
le RC-3 est désormais en
mode de sélection du type de
rythme.
2. Servez-vous des
boutons [ ] / [ ] pour
sélectionner le type de
rythme souhaité (r0 –r9 ).
Liste des types de rythme
Hi-Hat
r0
Kick & Hi-Hat
r1
Rock 1
r2
Rock 2
r3
Pop
r4
Funk
r5
Shue
r6
R & B
r7
Latin
r8
Percussion
r9

3. Appuyez sur le bouton [RHYTHM ON/OFF] pour
English
Français
Español
Português
revenir en mode de fonctionnement normal.
Réglage de la métrique
Vous pouvez régler la métrique avant de commencer à enregistrer.
* Vous ne pouvez pas modi er la métrique après
l’enregistrement.
1. Maintenez enfoncé le bouton [RHYTHM ON/OFF]
pendant au moins deuxsecondes.
L’écran a che «r 0» – «r 9», le RC-3 est désormais en mode de
sélection du type de rythme.
2. En mode de sélection du type de rythme, maintenez
enfoncé le bouton [RHYTHM ON/OFF] une nouvelle
fois, pendant au moins deuxsecondes.
L’écran a che «b 4» ou «b 3», le
RC-3 est désormais en mode de
sélection de la métrique.
3. Servez-vous des boutons
[ ] / [ ] pour sélectionner
la métrique souhaitée.
4. Appuyez sur le bouton [RHYTHM ON/OFF] pour
revenir en mode de fonctionnement normal.
Écran
b4
b3
Explication
Battement 4/4
Battement 3/4
A propos du rythme
Enregistrement avec lecture du rythme
Si vous enregistrez avec la lecture du rythme activée,
l’enregistrement démarre au début de la mesure, dès que
vous appuyez sur la pédale pour lancer l’enregistrement.
Grâce à la fonction d’enregistrement «Count-in» (p. 11), vous
pouvez commencer à enregistrer une fois que le rythme a
été lu pour une mesure.
Quel que soit le moment auquel vous appuyez sur la
pédale pour mettre n à l’enregistrement, la durée de
la phrase est automatiquement ajustée sur les unités
d’une mesure.
Enregistrement sans lecture du rythme
Si vous enregistrez avec la lecture du rythme désactivée,
le tempo de la phrase est automatiquement réglé lorsque
l’enregistrement se termine.
Le réglage automatique du tempo est calculé en supposant
que vous avez enregistré «1, 2, 4, 8, 16…mesures dans la
métrique spéci ée (p. 13).»
English Deutsch Français Italiano Español Português Nederlands
13

Connexion USB à votre ordinateur
Vous pouvez raccorder le RC-3 à votre ordinateur au moyen d’un
câble USB courant et sauvegarder des phrases RC-3 ( chiers WAV)
sur votre ordinateur ou charger des chiers WAV depuis votre
ordinateur vers le RC-3.
Formats de chier WAV acceptés
Format de données WAV
Débit binaire 16 bits linéaires, stéréo
Fréquence de
sampling
La taille maximale des chiers WAV est de 1,7Go (total pour tous les
chiers), la durée maximale est d’environ 3heures (total pour toutes
les phrases), et la durée minimale est d’environ 1,5secondes.
1. Allumez le RC-3 (insérez un connecteur dans la prise
OUTPUT A).
* Le RC-3 ne fonctionne pas avec une alimentation par bus
USB. Nous vous conseillons d’utiliser un adaptateur secteur
(vendu séparément) pour vous assurer que l’alimentation est
conservée dans le cas d’une connexion USB.
2. Utilisez un câble USB courant
pour raccorder le connecteur
USB du RC-3 au connecteur USB de votre ordinateur
(prenant en charge le haut débit USB2.0).
L’écran indique « C n ».
* Vous ne pouvez pas établir de connexion USB sans d’abord
arrêter le RC-3 ou si une phrase n’a pas été sauvegardée.
14
44,1kHz
3. Sauvegardez les phrases de la manière décrite ci-dessous.
Utilisateurs Windows
Dans Poste de travail (ou Ordinateur), ouvrez BOSS_RC-3
(ou Disque amovible).
Utilisateurs Mac OS
Sur le bureau, ouvrez l’icône BOSS_RC-3.
Sauvegarde sur votre ordinateur
Copiez l’intégralité du dossier Roland depuis le lecteur
BOSS_RC-3 vers votre ordinateur.
Récupération de données sauvegardées depuis votre
ordinateur vers le RC-3
* Cette opération e ace toutes les phrases actuellement
sauvegardées dans le RC-3. Assurez-vous d’e ectuer une
sauvegarde avant de procéder.
Dans le lecteur BOSS_RC-3, supprimez le dossier ROLAND, puis
copiez le dossier sauvegardé ROLAND depuis votre ordinateur
vers le lecteur BOSS_RC-3.
Copie de fi chiers WAV depuis votre ordinateur vers la
mémoire de phrases du RC-3
Vous pouvez copier des chiers WAV depuis votre ordinateur
vers les dossiers 001_1–099_1 contenus dans le dossier
ROLAND–WAVE sur le lecteur BOSS_RC-3. (La variable XX dans
0XX_1 désigne le numéro de la mémoire de phrases.)

REMARQUE
15
Français
Español
Português
* Ne supprimez pas les dossiers contenus dans le lecteur BOSS_RC-3
à moins que vous n’e ectuiez une opération de récupération.
* Vous pouvez utiliser les caractères suivants dans les noms de
chier. A–Z (majuscules), 0–9 (chi res), _ (trait de soulignement).
* Ne stockez pas plus d’un chier WAV dans un dossier, quel
qu’il soit. Si un dossier contient déjà un chier WAV, ne
l’écrasez pas. Copiez vos chiers WAV dans des dossiers vides.
4. Lorsque vous avez ni de copier les chiers WAV,
déconnectez le lecteur USB comme suit.
Utilisateurs Windows7
Dans la partie inférieure droite de votre écran, cliquez sur l’icône
[ ] g icône [ ], puis cliquez sur « Éjecter RC-3 ».
Utilisateurs Windows Vista/Windows XP
Dans la partie inférieure droite de votre écran, cliquez sur l’icône
[ ] ([ ] sous XP), puis cliquez sur « Retirer le Périphérique de
stockage de masse USB en toute sécurité ».
Utilisateurs Mac OS
Faites glisser l’icône BOSS_RC-3 vers la poubelle (icône Éjecter).
5. Déconnectez le câble USB de votre ordinateur.
Une fois que vous avez débranché le câble USB, l’écran indique
«dC », et le voyant [RHYTHM ON/OFF] se met à clignoter.
Connexion USB à votre ordinateur
6. Appuyez sur le bouton [RHYTHM ON/OFF] pour
revenir en mode de fonctionnement normal.
L’indication «dC» disparaît de l’écran, et le RC-3 retourne en
mode de fonctionnement normal.
REMARQUE
* N’utilisez jamais votre ordinateur pour formater le
lecteur BOSS_RC-3. Sinon, le RC-3 ne fonctionnera
plus correctement. Si cela se produit, e ectuez
un formatage selon la procédure décrite dans
«Formatage de la mémoire interne» (p. 19).
* N’e ectuez jamais les opérations suivantes tant que
vous n’avez pas déconnecté le lecteur USB. Vous
risqueriez de bloquer votre ordinateur ou de perdre
l’ensemble des données du RC-3.
• Déconnectez le câble USB.
• Laissez l’ordinateur entrer en mode de veille ou de
veille prolongée, redémarrez-le ou arrêtez-le.
• Mettez hors tension le RC-3.
* Il est par fois impossible de restaurer le contenu de
données stockées dans la mémoire de l’appareil une
fois qu’elles sont perdues. Roland Corporation ne peut,
en aucun cas, être tenue responsable de ladite perte
de données.
English Deutsch Français Italiano Español Português Nederlands
15

Raccord à un commutateur au pied externe
Si vous raccordez un FS-5U
Raccordez votre commutateur au pied à la prise STOP/MEMORY SHIFT comme indiqué dans le schéma, puis réglez l’interrupteur de polarité.
Câble:
jack 6,35 mm
g
jack 6,35 mm
16
Si vous raccordez un FS-5U
Interrupteur de polarité
Câble:
jack 6,35 mm stéréo
g
jack 6,35 mm stéréo x2
Si vous raccordez deux FS-5U
Câble:
jack 6,35 mm stéréo
g
jack 6,35 mm stéréo
Si vous raccordez un FS-6
ouou
Interrupteur de mode/polarité

Si vous raccordez un FS-5U
* Le commutateur au pied FS-5L ne peut pas être utilisé.
Opération Explication
Stop
Réglage du
tempo
Eacement de
phrase
Lors de l’enregistrement, de la lecture ou de
l’overdubbing, appuyez sur le commutateur au
pied pour arrêter l’opération.
À l’arrêt, vous pouvez appuyer plusieurs fois sur
le commutateur au pied pour régler le tempo.
Pour eacer la phrase, maintenez enfoncé
le commutateur au pied pendant au moins
deuxsecondes (p. 10).
Si vous raccordez deux FS-5U ou un FS-6
Si vous utilisez un FS-5U raccordé à la prise blanche (du
côté L stéréo) ou la pédale B d’un FS-6
Le fonctionnement est le même qu’avec un seul FS-5U raccordé.
Raccord à un commutateur au pied externe
Si vous utilisez un FS-5U raccordé à la prise rouge (du côté
R stéréo) ou la pédale A d’un FS-6
Opération Explication
Memory shift (haut)
Memory shift (bas)
* Si la phrase en cours n’a pas été sauvegardée, elle est perdue
lorsque vous changez de mémoire. Pour en savoir plus sur la
sauvegarde d’une phrase, reportez-vous à la p. 8.
• Si vous changez de mémoire alors que la phrase est sur le point
de se terminer, il arrive que la mémoire de phrase cible ne soit
pas sélectionnée.
• Vous pouvez également changer de mémoire en appuyant sur
les boutons [
Lorsque vous appuyez sur le commutateur
au pied, la mémoire de phrase portant le
numéro suivant est sélectionnée.
Si vous appuyez sur le commutateur au
pied durant la lecture, le nouveau numéro
de mémoire de phrases sélectionné
clignote à l’écran, et la mémoire de phrase
change lorsque la phrase en cours de
lecture se termine.
Lorsque vous appuyez sur le commutateur
au pied pendant au moins deuxsecondes,
la mémoire de phrase portant le numéro
précédent est sélectionnée.
] / [ ].
English Deutsch Français Italiano Español Português Nederlands
17

Autres réglages
A propos du mode Sleep
Lorsque dixheures se sont écoulées depuis la dernière opération
ou entrée audio, le RC-3 entre en mode de veille (mode d’économie
d’énergie, uniquement si du son en bypass est sorti). En mode de
veille, vous pouvez appuyer sur la pédale pour revenir en mode
normal.
* L’alimentation sur pile continue à être consommée même
en mode de veille. Pour éviter que la pile soit consommée,
éteignez l’appareil en retirant le connecteur de la prise
OUTPUT A.
* Le RC-3 entre en mode de veille si l’une des phrases n’a pas
été sauvegardée.
Désactivation du mode Sleep
1. Tout en appuyant sur la pédale, allumez le RC-3
(insérez un connecteur dans la prise OUTPUT A).
2. Continuez à appuyer sur la pédale pendant
cinqsecondes.
L’écran clignote en indiquant «_ _».
3. Lâchez la pédale, le RC-3 retourne en mode de
fonctionnement normal.
18
Activation du mode Sleep (réglage par défaut)
1. Tout en appuyant sur la pédale, allumez le RC-3
(insérez un connecteur dans la prise OUTPUT A).
2. Dans les deux secondes qui suivent l’achage,
appuyez à nouveau deux fois sur la pédale.
L’écran clignote en indiquant «S L».
Une fois les deuxsecondes écoulées, le RC-3 retourne en mode
de fonctionnement normal; le mode de veille est activé.

Autres réglages
English Deutsch Français Italiano Español Português Nederlands
Changement de l’ordre de permutation entre
Enregistrement g Overdubbing g Lecture
Lorsque vous appuyez sur la pédale, le RC-3 change de mode
de fonctionnement dans l’ordre suivant: enregistrement g
overdubbing g lecture (réglage par défaut) (p. 6). Toutefois,
vous êtes libre de changer cet ordre de la manière suivante:
enregistrement g lecture g overdubbing (compatible avec le
RC-2).
1. Tout en maintenant enfoncé le bouton [TAP TEMPO],
allumez le RC-3 (insérez un connecteur dans la prise
OUTPUT A).
2. Servez-vous des boutons [
le mode de fonctionnement souhaité.
Écran
Explication
Le changement de mode de fonctionnement
se fait dans l’ordre suivant: enregistrement g
rd
overdubbing g lecture (réglage par défaut).
Le changement de mode de fonctionnement se fait
dans l’ordre suivant: enregistrement g lecture g
rP
overdubbing (compatible avec le RC-2).
3. Appuyez sur le bouton [TAP TEMPO] pour revenir en
mode de fonctionnement normal.
] / [ ] pour sélectionner
Formatage de la mémoire interne
* Lorsque vous formatez la mémoire interne du RC-3, toutes
les mémoires de phrases sauvegardées sont eacées et sont
irrécupérables.
Ne formatez pas la mémoire interne sauf si l’écran indique
«Er » et que le RC-3 s’est arrêté de fonctionner sans erreur.
1. Tout en maintenant enfoncé le bouton [WRITE] et le
bouton [RHYTHM ON/OFF], allumez le RC-3 (insérez
un connecteur dans la prise OUTPUT A).
L’écran indique «F N».
2. Appuyez une nouvelle fois sur le bouton [RHYTHM
ON/OFF].
L’écran clignote en indiquant «F N».
3. Appuyez sur le bouton [WRITE] pour lancer le
formatage de la mémoire interne.
L’indication «FN» à l’écran clignote rapidement. Une
fois le formatage terminé, le RC-3 retourne en mode de
fonctionnement normal.
* N’éteignez jamais l’appareil alors que le voyant «
rapidement.
FN » clignote
19

Dysfonctionnements
Problème Solution
L’enregistrement ne s’arrête pas
immédiatement lorsque que
vous appuyez sur la pédale.
L’enregistrement démarre
immédiatement même si
le mode d’enregistrement
automatique est sélectionné.
Impossible de modier le
tempo de lecture.
Liste des messages d’erreur
Écran Explication Solution Page
La pile est déchargée. Remplacez la pile. p. 22
bt
La mémoire est saturée. Supprimez les phrases inutiles. p. 9
FL
Le chier WAV ne peut pas être lu. Vériez le format du chier WAV. p. 14
UF
Un overdubbing supplémentaire est
EF
impossible.
La mémoire interne doit être formatée. Formatez la mémoire interne du RC-3. p. 19
Er
Le RC-3 ne fonctionne pas correctement. Adressez-vous à votre revendeur.
dN
20
Si le rythme est activé ou que vous avez enregistré une phrase plus courte que la durée minimale
d’enregistrement (environ 1,5secondes), la durée de la phrase est automatiquement ajustée. Cela
implique parfois que l’enregistrement ne s’arrête pas immédiatement lorsque vous appuyez sur la pédale.
Si une distorsion ou d’autres facteurs sont à l’origine d’un bruit perceptible, ce bruit peut être susant
pour déclencher le début de l’enregistrement. Diminuez le bruit, par exemple en réduisant le niveau de
distorsion.
Vous ne pouvez pas modier le tempo de lecture dans les situations ci-après.
• Si la phrase n’a pas été sauvegardée.
• Pendant que vous changez de phrase (le voyant PLAY clignote rapidement).
• Lorsque vous essayez de régler le tempo d’une phrase qui forme une boucle dans un intervalle de
temps plus court que la durée minimale d’enregistrement (environ 1,5secondes).
Sauvegardez de nouveau la phrase. p. 8

Autres indications achées à l’écran
Écran Explication Page
1–9 9
. (point)
oS
Un
rE
CL
r
dL
no
AU
Ct
r0 –r9
b3 –b4
Cn
dC
Numéro de la mémoire de phrases
Mémoire de phrases contenant des
données
Phrase à lecture unique p. 10
Annulation
Rétablissement
Eacement
Sauvegarde de phrase p. 8
Suppression de phrase p. 9
Enregistrement normal
Enregistrement automatique
Enregistrement «Count-in»
Type de rythme p. 12
Métrique p. 13
Connexion USB active
Connexion USB inactive
p. 6
p. 10
p. 11
p. 14
Dysfonctionnements
Écran Explication Page
SL
__
rd
rP
FN
Mode de veille activé
Mode de veille désactivé
Permutation dans l’ordre
enregistrement/overdubbing/lecture
Permutation dans l’ordre
enregistrement/lecture/overdubbing
Formatage de la mémoire interne p. 19
p. 18
p. 19
English Deutsch Français Italiano Español Português Nederlands
21

Remplacement de la pile
Si l’écran indique «bt», cela signie que la pile est déchargée.
Remplacez la pile de la manière décrite ci-dessous.
* L’utilisation d’un adaptateur secteur est conseillée dans la
mesure où l’appareil consomme beaucoup. Si vous préférez
utiliser une pile, le type alcaline est recommandé.
* Les piles Ni-MH rechargeables ne sont pas prises en charge.
* Même si le contenu de la mémoire interne reste intact lorsque
vous remplacez la pile, nous vous conseillons d’eectuer
régulièrement des sauvegardes (p. 14) pour minimiser les
risques de perte de données.
Branchement
de la pile
22
Vis à main
Câble de
connexion
de la pile
Pile 9V
Pédale
Base du ressort
Ressort
Logement de
la vis
Compartiment de la pile
* Toute utilisation incorrecte des piles, des batteries
rechargeables ou du chargeur de batterie peut
provoquer une fuite, une surchaue ou une
explosion. Avant utilisation, lisez les précautions
fournies avec les piles, les batteries rechargeables et
le chargeur et suivez ces instructions.
1. Dévissez la vis sur l’avant de la pédale, puis levez la
pédale pour ouvrir l’appareil.
* La vis peut rester en place sur la pédale pendant que vous
remplacez la pile.
2. Sortez la pile du compartiment et détachez le câble
de connexion.
3. Branchez le câble sur la nouvelle pile et placez la pile
dans le compartiment.
* Respectez bien la polarité des bornes de la pile (+ et -).
4. Faites glisser le ressort sur sa base à l’arrière de la
pédale, puis refermez la pédale.
* Assurez-vous de ne pas coincer le câble de connexion dans
le ressort.
5. Enn, insérez la vis dans son logement et serrez-la.

English Deutsch Français Italiano Español Português Nederlands
• L’enregistrement, la reproduction, la distribution, la vente, la
location, l’interprétation ou la diusion de contenu protégé par
droits d’auteur (œuvres musicales, œuvres visuelles, émissions,
performances en live, etc.) appartenant en partie ou en totalité à
un tiers, sans l’autorisation du détenteur des droits d’auteurs, sont
interdits par la loi.
• N’utilisez pas ce produit à des ns qui risqueraient de violer les
droits d’auteurs détenus par un tiers. Nous ne pourrons être tenus
responsables, de quelque manière que ce soit, des violations de
droits d’auteurs de tiers découlant de l’utilisation que vous faites
de ce produit.
• Les droits d’auteur relatifs au contenu de ce produit (données
de forme d’ondes sonores, données de style, patterns
d’accompagnement, données de phrases, boucles audio et
données d’image) sont réservés par Roland Corporation.
• Les acquéreurs de ce produit ont le droit d’utiliser ledit contenu
pour créer, interpréter, enregistrer et distribuer des œuvres
musicales.
• Les acquéreurs de ce produit ne sont PAS autorisés à extraire
ledit contenu dans sa forme originale ou modiée, dans le but
de distribuer des supports enregistrés dudit contenu ou de les
rendre disponibles sur un réseau informatique.
• BOSS et le produit Loop Station sont des marques déposées ou
des marques de Roland Corporation aux États-Unis et/ou dans
d’autres pays.
• Tous les noms de produit mentionnés dans le présent document
sont des marques ou des marques déposées de leurs détenteurs
respectifs.
• Les captures d’écran présentées dans ce document le sont
conformément aux directives de Microsoft Corporation.
• MMP (Moore Microprocessor Portfolio) désigne un portefeuille
de patentes relatif à l’architecture de microprocesseur, développé
par Technology Properties Limited (TPL). Roland utilise cette
technologie sous licence accordée par TPL Group.
• Le logo SD (
SD-3C, LLC.
• Ce produit contient une plate-forme logicielle intégrée eCROS de
eSOL Co., Ltd.
eCROS est une marque de eSOL Co., Ltd. au Japon.
• Présentation des polices numériques par Yourname, Inc.
Police numérique: Copyright © Yourname, Inc.
Copyright © 2011 BOSS CORPORATION
Tous droits réservés. Toute reproduction intégrale ou partielle de
cette publication est interdite sous quelque forme que ce soit sans
l’autorisation écrite de BOSS CORPORATION.
) et le logo SDHC ( ) sont des marques de
23

Fiche technique
BOSS RC-3: Loop Station
Niveau d’entrée
nominale
Impédance en entrée
Niveau de sortie
nominal
Impédance en sortie 1 k ohm
Impédance de charge
recommandée
Enregistrement/
Lecture
Interface USB
Alimentation
électrique
24
INPUT: -20 dBu
AUX IN: -10dBu
INPUT: 1 M ohm
AUX IN: 22 k ohms
-20dBu
10 k ohms ou plus
Durée maximale d’enregistrement: environ
3heures
Nombre maximal de phrases stockées: 99
Format de données: WAV (44,1 kHz, 16 bits
linéaires, stéréo)
Prise en charge de la classe de
périphérique de stockage en masse USB
2.0/1.1
CC9V:
pile alcaline (9V, 6LR61),
adaptateur secteur (Série PSA: vendu
séparément)
* Les piles Ni-MH rechargeables ne
sont pas prises en charge.
70 mA (9 V maxi.)
Pile alcaline (9V, 6LR61)
Courant
Dimensions 73 (L) x 129 (P) x 59 (H) mm
Poids 450 g (avec pile)
Accessoires
Options (vendu
séparément)
* 0dBu = 0,775Vrms
* En vue d’améliorer le produit, ses caractéristiques techniques
et/ou son aspect peuvent être modiés sans avis préalable.
environ 3heures
* Ces chires varient en fonction des
conditions réelles d’utilisation.
Mode d’emploi, brochure («CONSIGNES
DE SECURITE», «REMARQUES
IMPORTANTES» et «Informations»),
pile alcaline (9 V, 6LR61): déjà installée
dans l’appareil
* La pile fournie avec l’appareil est
destinée à une utilisation temporaire,
principalement pour tester le
fonctionnement de l’appareil. Nous
recommandons de la remplacer par
une pile alcaline.
Adaptateur secteur (Série PSA)
Commutateur au pied: FS-5U, FS-6
:

Manuale dell'utente
* Questo dispositivo include frasi demo (90–99) che non possono essere
ripristinate in caso di eliminazione. È quindi consigliabile eseguirne il
backup seguendo le istruzioni della sezione “Backup nel computer” (pag. 14).
* Dopo dieci ore dall'ultima operazione o dall'ultimo input audio in modalità
di interruzione, viene attivata la modalità di sospensione, ovvero la
modalità per il risparmio di energia.
Per impedire che venga attivata tale modalità, tenere premuto il pedale per
cinque secondi durante l'accensione (pag. 18).
English Deutsch Français Italiano Español Português Nederlands

Loop Station
RC-3 è un registratore a pedale che consente di registrare frasi audio
dalla chitarra o dal basso e quindi di riprodurle utilizzando il pedale.
È possibile creare una vasta gamma di esecuzioni sovraincidendo i
suoni durante la registrazione e riproducendoli in tempo reale.
• Creazione sempli cata di frasi loop.
• Possibilità di salvare nella memoria no a 99 frasi loop diverse,
corrispondenti a circa 3 ore (* totale di tutte le frasi).
• Possibilità di utilizzare un ingresso audio stereo.
• Registrazione sempli cata del suono di un lettore audio digitale
collegato all'ingresso AUX IN.
• Possibilità di copiare nel computer le frasi registrate mediante
USB e di caricare le WAV dal computer all'unità RC-3 e quindi di
riprodurli come loop (pag. 14).
Prima di utilizzare questa unità, leggere attentamente le
sezioni intitolate “UTILIZZO SICURO DELL'UNITÀ” e “NOTE
IMPORTANTI” (su un foglio a parte), che contengono
importanti informazioni sul corretto impiego dell'unità.
È inoltre consigliabile leggere per intero questo manuale
per assicurarsi di aver compreso appieno tutte le funzioni
off erte dalla nuova unità acquistata. È consigliabile conservare
il manuale e tenerlo a portata di mano per usarlo come
riferimento.
2
Descrizioni del pannelloCaratteristiche principali
1 2 3 4 65
7 8
1. Manopola [OUTPUT LOOP]
Regola il livello del volume della frase loop in corso di riproduzione.
* Questa manopola non consente di regolare il livello degli
ingressi INPUT e AUX IN.
2. Manopola [OUTPUT RHYTHM]
Regola il livello del volume del suono ritmico (pag. 12).

3. Indicatore REC, PLAY (DUB)
Si accende durante la registrazione, la riproduzione e la
sovraincisione.
Indicatore Descrizione
REC (rosso) Si accende durante la registrazione
PLAY (verde)
Entrambi Si accendono durante la sovraincisione
Si accende durante la riproduzione (lampeggia
rapidamente durante il caricamento di una frase
della memoria o durante un'operazione della
memoria interna)
4. Display
Indica il numero della frase corrente o altre informazioni (pag. 20).
5. Pulsanti [ ] (GIÙ) / [ ] (SU)
Aumentano o diminuiscono il numero visualizzato sul display.
6. Pulsante [WRITE]
Premerlo per salvare la frase registrata nella memoria interna (pag. 8).
7. Pulsante [RHYTHM ON/OFF]
Attiva o disattiva il suono ritmico (pag. 12).
8. Pulsante [TAP TEMPO]
Premerlo nel momento desiderato per impostare il tempo (pag. 12).
Descrizioni del pannello
9
10
9. Interruttore a pedale
Consente di passare dalla registrazione alla sovraincisione e alla
riproduzione della frase. Per interrompere la riproduzione, premere
il pedale due volte in successione (pag. 6).
10. Vite a testa zigrinata
Svitando questa vite, è possibile aprire il pedale per cambiare la
batteria.
* Se si utilizza l'unità RC-3 con la sola batteria, il display
indicherà “
bt ” quando la batteria è in esaurimento. Sostituire
la batteria eseguendo la procedura illustrata a pag. 22.
* L'unità viene fornita con una batteria installata. Poiché la
batteria è fornita allo scopo di consentire il test dell'unità,
la sua durata potrebbe essere limitata.
English Deutsch Français Italiano Español Português Nederlands
3

Connettore USB
potrebbe causare malfunzionamenti.
collegare qui il lettore audio.
Mediante la funzione
(pag. 11) è possibile fare in modo che la
registrazione inizi nel momento in cui viene
avviata la riproduzione nel lettore audio.
Ingresso STOP/MEMORY SHIFT
a pedale acquistabile separatamente
(FS-5U, FS-6) e utilizzarlo per
interrompere la riproduzione o passare
da una frase all'altra (pag. 16).
Mediante un cavo USB disponibile in
commercio, è possibile collegare l'unità
RC-3 al computer e quindi utilizzare il
computer per leggere o scrivere le frasi di
RC-3 ( le WAV) (pag. 14).
Uscite OUTPUT A/B
Collegare queste uscite agli
altoparlanti dell'ampli catore
o del monitor.
Se il sistema in uso è mono,
utilizzare solo l'uscita
OUTPUT A. Il suono in uscita
sarà mono anche se il suono
in ingresso è stereo.
L'uscita OUTPUT A funge anche da
interruttore dell'alimentazione. Se si
inserisce un jack nell'uscita OUTPUT A,
l'unità si accende. Quando non si utilizza
l'unità RC-3, rimuovere il jack.
4
Jack DC IN
Serve per collegare un adattatore CA (serie PSA; opzionale). Se si utilizza un adattatore
CA, si può suonare senza preoccuparsi che la batteria si scarichi.
* Utilizzare soltanto l'adattatore CA speci cato (serie PSA) e collegarlo ad
una presa CA con un voltaggio appropriato. L'utilizzo di altri adattatori CA
potrebbe causare malfunzionamenti.
Ingresso AUX IN
Utilizzare un cavo mini-plug stereo per
collegare qui il lettore audio.
Mediante la funzione Auto Recording
(pag. 11) è possibile fare in modo che la
registrazione inizi nel momento in cui viene
avviata la riproduzione nel lettore audio.
Ingresso STOP/MEMORY SHIFT
Qui è possibile collegare un interruttore
a pedale acquistabile separatamente
(FS-5U, FS-6) e utilizzarlo per
interrompere la riproduzione o passare
da una frase all'altra (pag. 16).
Ingressi INPUT A/B
Collegare la chitarra, il basso o l'unità di eff etti a questi ingressi.
Per collegare un'unità di eff etti con uscita stereo, utilizzare entrambi
gli ingressi INPUT A e INPUT B. Per collegare una sorgente mono,
utilizzare solo l'ingresso INPUT A.

Español
Português
NOTE
* Per evitare il malfunzionamento e/o danni alle casse
o ad altri dispositivi, abbassare sempre il volume e
spegnere tutti i dispositivi prima di e ettuare qualsiasi
collegamento.
* Prima di collegare o scollegare un cavo, veri care che
tutti i controlli volume del sistema siano impostati sul
valore minimo.
* Utilizzare cavi di collegamento che non contengano
resistenze. Quando si utilizzano cavi di collegamento
con resistenze, il livello del suono del dispositivo
collegato agli ingressi AUX IN potrebbe risultare
estremamente basso o non udibile.
* Non collegare cuffi e all'uscita OUTPUT poiché
potrebbero venire danneggiate.
Accensione
Se si inserisce un jack nell'uscita OUTPUT A, l'unità si accende.
Dopo avere eseguito i collegamenti, accendere i vari dispositivi
nell'ordine speci cato. Se si segue un ordine di accensione
sbagliato, si rischiano malfunzionamenti e/o danni agli altoparlanti
e agli altri dispositivi.
All'accensione
Allo spegnimento
* Questa unità è dotata di un circuito di protezione. Dopo
l'accensione, è necessario attendere alcuni secondi prima che
l'unità cominci a funzionare normalmente.
Attenzione durante lo spegnimento
Nei casi seguenti l'unità RC-3 non deve mai essere
spenta, (ovvero il jack non deve essere scollegato
dall'uscita OUTPUT A).
Lo spegnimento potrebbe infatti causare la perdita di
tutti i dati salvati.
• Quando l'indicatore REC o PLAY è acceso
(durante la registrazione, la riproduzione o la
sovraincisione)
• Quando l'indicatore PLAY lampeggia rapidamente
(durante la lettura di una frase della memoria o durante
l'esecuzione di un'operazione nella memoria interna)
Accendere l'ampli catore della chitarra per
ultimo.
Spegnere l'ampli catore della chitarra per primo.
English Deutsch Français Italiano Español Português Nederlands
5

Operazioni di base
Per registrare, sovraincidere e riprodurre, premere il pedale come illustrato nel diagramma.
Selezione di una frase della memoria
Utilizzare i pulsanti [ ] / [ ] per
selezionare una frase della memoria
(1–99).
Display Descrizione
Solo numero
Punto in basso a
destra
Numero e “
visualizzati
alternativamente
• L'unità viene fornita con frasi demo memorizzate dal
numero 90 al numero 99.
6
Frase vuota
Premere il pedale per iniziare la
registrazione
Frase contenente dati
Premere il pedale per iniziare la
riproduzione in loop
Frase con riproduzione singola
oS ”
Premere il pedale per riprodurre la
frase solo una volta (non in loop)
Registrazione
Registrare le esecuzioni di chitarra o
basso oppure il suono di un lettore audio
collegato all'ingresso AUX IN.
• La funzione Auto Recording (pag. 11) consente di fare in
modo che la registrazione inizi nel momento in cui inizia
l'esecuzione.
• È possibile registrare anche con i suoni ritmici (pag. 12).
Vedere la sezione “Salvataggio di una frase per la
riproduzione singola” (pag. 10).
“Registrazione” e “sovraincisione”
Nel presente manuale la prima operazione di registrazione
in una frase vuota viene de nita “registrazione”. Ogni
registrazione successiva eseguita, che viene aggiunta sulla
registrazione esistente, viene de nita “sovraincisione”.

Operazioni di base
Deutsch
Français
Italiano
Português
Nederlands
English Deutsch Français Italiano Español Português Nederlands
Sovraincisione
Consente di sovraincidere un'esecuzione
durante la riproduzione in loop di una frase.
Se si preme il pedale, l'unità passa alla
riproduzione.
• È possibile eseguire un'operazione di annullamento o
ripristino (pag. 10).
Premere
due volte
Riproduzione loop
Consente di riprodurre le frasi in loop.
Se si preme il pedale, l'unità passa alla
sovraincisione.
• Per utilizzare la funzione Memory Shift, premere
i pulsanti [
frase. Il numero della frase in memoria lampeggerà
consentendo di selezionare la frase successiva (pag. 17).
] / [ ] durante la riproduzione di una
Interruzione
È possibile interrompere la sovraincisione o
la riproduzione in loop premendo il pedale
due volte in successione.
• Premere il pedale due volte entro un secondo.
7

Operazioni di base
NOTE
* Durante la lettura della frase in memoria,
l'indicatore PLAY (verde) lampeggia
rapidamente. Non spegnere mai l'unità
quando l'indicatore PLAY lampeggia
rapidamente.
* Il tempo minimo di registrazione per una frase loop
è di circa 1,5 secondi. Se si preme il pedale entro 1,5
secondi dall'inizio della registrazione, la registrazione
continua nché la frase non raggiunge una durata di
circa 1,5 secondi.
* Il tempo massimo di registrazione per una frase loop
è di circa 3 ore (totale per tutte le frasi). Quando
si supera il tempo massimo di registrazione, sul
display viene visualizzato il valore “
che la memoria interna è piena. In questo caso, la
registrazione o la sovraincisione potrebbero essere
interrotte prima del previsto. Se si veri ca questo
problema, eliminare le frasi non necessarie (pag. 9) e
riprovare ad eseguire l'operazione.
* Se si utilizza la funzione Memory Shif t prima di salvare
una frase, la frase verrà cancellata. Per ulteriori dettagli
sul salvataggio di una frase, vedere a pag. 8.
8
FL ” per indicare
Salvataggio di una frase
Se si seleziona un'altra frase in memoria oppure si spegne l'unità
dopo la registrazione o la sovraincisione, la frase registrata verrà
persa. Per evitare la perdita della frase, è necessario salvarla.
1. Quando non è in corso la riproduzione, premere il
pulsante [WRITE].
Il display indicherà “ ” (wr).
2. Utilizzare i pulsanti [ ] / [ ] per speci care
la posizione della memoria in cui eseguire il
salvataggio.
Se si desidera eseguire il salvataggio nella posizione selezionata
attualmente, saltare questo passaggio.
Non è possibile selezionare una posizione in cui è già stata
salvata una frase.
Il tempo massimo di registrazione corrisponde a circa 3 ore
totali per tutte le frasi (inclusa quella che non è stata salvata).
Se non è possibile salvare la frase perché la memoria disponibile
è insu ciente, il display indicherà “
numero della frase in memoria. In questo caso, eliminare le frasi
non necessarie (pag. 9) e riprovare ad eseguire l'operazione.
3. Premere di nuovo il pulsante [WRITE]. La frase verrà
salvata.
Se si decide di non salvare la frase, premere il pulsante [TAP
TEMPO], il pulsante [RHYTHM ON/OFF] oppure il pedale.
FL ” alternativamente al

Durante il salvataggio della frase, il numero visualizzato sul
display e l'indicatore PLAY lampeggeranno rapidamente.
NOTE
* Non spegnere mai l'unità quando l'indicatore PLAY
lampeggia rapidamente. Lo spegnimento potrebbe
infatti causare la perdita di tutti i dati salvati.
* È importante tenere presente che in caso di
malfunzionamento o utilizzo non corretto dell'unità,
il contenuto della memoria potrebbe andare
de nitivamente perso. È quindi consigliabile eseguire
il backup dei dati importanti seguendo le istruzioni
della sezione “Backup nel computer” (pag. 14).
* Anche se durante le riparazioni vengono prese tutte
le precauzioni necessarie per evitare la perdita di dati,
in determinati casi, ad esempio quando la memoria
risulta danneggiata, potrebbe non essere possibile
ripristinare i dati.
* In caso di perdita del contenuto della memoria
dell'unità, potrebbe non essere possibile ripristinarlo.
Roland Corporation declina qualsivoglia responsabilità
relativamente alla perdita dei dati.
Operazioni di base
Eliminazione di una frase
* Questo dispositivo include frasi demo (90–99) che non
possono essere ripristinate in caso di eliminazione. È quindi
consigliabile eseguirne il backup seguendo le istruzioni della
sezione “Backup nel computer” (pag. 14).
1. Utilizzare i pulsanti [ ] / [ ] per selezionare la frase
in memoria che si desidera eliminare.
2. Quando non è in corso la riproduzione, tenere
premuto il pulsante [WRITE] per almeno due secondi.
Il display indicherà “dL”.
* A questo punto non è possibile cambiare il numero della frase
in memoria che verrà eliminata.
3. Premere il pulsante [WRITE] per eliminare la frase.
Se si decide di non eliminare la frase, premere il pulsante [TAP
TEMPO], il pulsante [RHYTHM ON/OFF] oppure il pedale.
Durante l'eliminazione della frase, il numero visualizzato sul
display e l'indicatore PLAY lampeggeranno rapidamente.
* Non spegnere mai l'unità quando l'indicatore PLAY lampeggia
rapidamente. Lo spegnimento potrebbe infatti causare la
perdita di tutti i dati salvati.
English Deutsch Français Italiano Español Português Nederlands
9

Operazioni di base
Salvataggio di una frase per la riproduzione
singola
La riproduzione singola consiste nel riprodurre la frase una sola
volta dall'inizio alla ne e quindi interrompere automaticamente la
riproduzione.
1. Premere il pulsante [WRITE] mentre si tiene premuto
il pulsante [TAP TEMPO].
Il display indicherà “oS”.
2. Utilizzare i pulsanti [ ] / [ ] per specicare la
posizione della memoria in cui eseguire il salvataggio.
3. Premere di nuovo il pulsante [WRITE]. La frase verrà
salvata come frase per la riproduzione singola.
Se si decide di non salvare la frase, premere il pulsante [TAP
TEMPO], il pulsante [RHYTHM ON/OFF] oppure il pedale.
* Quando è attiva la riproduzione singola, non è possibile
eseguire la sovraincisione. Se durante la riproduzione della
frase si preme il pedale, la riproduzione della frase ricomincia
dall'inizio (riattivazione della riproduzione).
* Per annullare la riproduzione singola e tornare alla
riproduzione in loop, è necessario salvare di nuovo la frase.
(pag. 8)
* Se si desidera interrompere la riproduzione singola di una
frase, premere il pedale due volte entro mezzo secondo.
10
Cancellazione di una sovraincisione
(annullamento/ripristino/cancellazione)
È possibile eseguire un'operazione di annullamento, ripristino o
cancellazione tenendo premuto il pedale per almeno due secondi.
Operazione
Annullamento
Ripristino
Cancellazione
Durante un'operazione di annullamento o ripristino, gli indicatori
PLAY e REC lampeggiano rapidamente. Durante un'operazione di
cancellazione, l'indicatore PLAY lampeggia rapidamente.
Display
Descrizione
Tenere premuto il pedale per almeno
due secondi durante la riproduzione
Un
o la sovraincisione. Verrà cancellata la
registrazione o la sovraincisione più recente.
Se si desidera ripristinare il suono
cancellato, tenere di nuovo premuto il
pedale per almeno due secondi durante
rE
la riproduzione.
* Il ripristino può essere eseguito solo
per la sovraincisione.
Tenere premuto il pedale per almeno
due secondi quando non è attiva
la riproduzione. La frase corrente
CL
verrà cancellata. La cancellazione è
temporanea. Le frasi salvate nella
memoria non verranno eliminate.

Funzioni di registrazione Auto Recording e
Count-In
Se si utilizza la funzione Auto Recording, la registrazione inizia
nel momento in cui si inizia a suonare la chitarra o quando viene
avviata la riproduzione del lettore audio. Se si utilizza la funzione
Count-In, il ritmo viene suonato per una misura prima dell'avvio
della registrazione.
1. Tenere premuto il pulsante [TAP TEMPO] per almeno
due secondi.
Il display indicherà “no”.
2. Utilizzare i pulsanti [ ] / [ ] per selezionare la
modalità di registrazione desiderata e quindi
premere il pedale per iniziare la registrazione.
Display
Modalità Descrizione
no
AU
Registrazione
normale
Registrazione
Auto
Recording
La registrazione inizia quando si preme
il pedale.
L'indicatore REC lampeggia rapidamente
e viene attivata la modalità standby della
registrazione. Quando si inizia a suonare,
l'indicatore REC si accende e viene avviata
la registrazione.
Operazioni di base
Display
Modalità Descrizione
Registrazione
Ct
Count-In
Quando si spegne l'unità, verrà di nuovo impostata la modalità di
registrazione normale.
Il pulsante [RHYTHM ON/OFF] lampeggia.
Quando si preme il pedale, l'indicatore
REC lampeggia rapidamente e il ritmo
viene suonato per una misura. È possibile
interrompere questa operazione
premendo il pedale. Al termine della
riproduzione della misura, viene avviata
la registrazione. Il ritmo continua a
suonare anche dopo l'inizio della
registrazione.
Per ulteriori informazioni sulle
impostazioni del ritmo, vedere la sezione
“Informazioni sul ritmo” (pag. 12).
English Deutsch Français Italiano Español Português Nederlands
11

Informazioni sul ritmo
Suoni ritmici
1. Premere il pulsante [RHYTHM ON/OFF] per passare
dalla riproduzione all'interruzione del suono ritmico.
• Utilizzare la manopola [OUTPUT RHYTHM] per regolare il
volume del ritmo.
• Il pulsante [ TAP TEMPO] lampeggia a tempo con il ritmo
assumendo il colore rosso durante la prima battuta e il colore
verde durante le battute successive.
• Quando si salva una frase (pag. 8), vengono salvati anche il tipo di ritmo e
l'indicazione del tempo selezionati al momento del salvataggio.
Impostazione del tempo
È possibile impostare il tempo prima di iniziare la registrazione.
Quando si riproduce una frase salvata, è possibile modicare il
tempo della riproduzione senza modicare il tono della frase.
1. Utilizzare i pulsanti [ ] / [ ] per selezionare la frase
in memoria per cui si desidera impostare il tempo.
2. Premere il pulsante [TAP TEMPO] più volte al tempo
desiderato.
Il tempo verrà impostato in base all'intervallo in cui il pulsante
è stato premuto.
• Se nell'unità RC-3 non è in esecuzione alcuna riproduzione,
il ritmo (pulsante [RHYTHM ON/OFF]) viene attivato dopo
l'impostazione del tempo.
12
* È possibile modicare solo il tempo delle frasi salvate nella
memoria. Se si desidera modicare il tempo di una frase
subito dopo la registrazione o la sovraincisione, è necessario
salvare la frase nella memoria (pag. 8).
* Le modiche che possono essere apportate al tempo sono
limitate.
* Non è possibile specicare un tempo che produca una
riproduzione in loop della frase di durata inferiore al tempo di
registrazione minimo, ovvero circa 1,5 secondi.
L'impostazione del tempo viene memorizzata al salvataggio
della frase (pag. 8).
Impostazione del tipo di ritmo
1. Tenere premuto il
pulsante [RHYTHM ON/
OFF] per almeno due
secondi.
Il display indicherà “r0” – “r9”
e per l'unità RC-3 verrà attivata
la modalità di selezione del
tipo di ritmo.
2. Utilizzare i pulsanti [ ] /
[ ] per selezionare il
tipo di ritmo desiderato
(r0 –r9 ).
Elenco dei tipi di ritmo
Hi-Hat
r0
Kick & Hi-Hat
r1
Rock 1
r2
Rock 2
r3
Pop
r4
Funk
r5
Shue
r6
R & B
r7
Latin
r8
Percussion
r9

3. Premere il pulsante [RHYTHM ON/OFF] per tornare al
English
Français
Español
Português
funzionamento normale.
Impostazione dell'indicazione del tempo
È possibile impostare l'indicazione del tempo prima di iniziare la
registrazione.
* Dopo la registrazione, l'indicazione del tempo non può più
essere modi cata.
1. Tenere premuto il pulsante [RHYTHM ON/OFF] per
almeno due secondi.
Il display indicherà “r0” – “r9” e per l'unità RC-3 verrà attivata la
modalità di selezione del tipo di ritmo.
2. In questa modalità tenere di nuovo premuto il
pulsante [RHYTHM ON/OFF] per almeno due secondi.
Il display indicherà “b4” o
“b3 ” e per l'unità RC-3 verrà
attivata la modalità di selezione
dell'indicazione del tempo.
3. Utilizzare i pulsanti [ ] / [ ]
per selezionare l'indicazione
del tempo desiderata.
4. Premere il pulsante [RHYTHM ON/OFF] per tornare al
funzionamento normale.
Display
b4
b3
Descrizione
Battuta in 4/4
(valore
prede nito)
Battuta in 3/4
Informazioni sul ritmo
Registrazione con il suono ritmico
Se si esegue una registrazione quando il suono ritmico
è attivato, la registrazione inizierà dall'inizio della
misura all'istante in cui si preme il pedale per iniziare la
registrazione.
Mediante la funzione di registrazione Count-In (pag. 11), è
possibile fare in modo che la registrazione inizi dopo che il
suono ritmico è stato riprodotto per una misura.
Indipendentemente dal momento in cui si preme il
pedale per terminare la registrazione, la lunghezza della
frase verrà automaticamente regolata su unità di una
misura.
Registrazione senza il suono ritmico
Se si esegue una registrazione quando il suono ritmico
è disattivato, il tempo della frase verrà speci cato
automaticamente al termine della registrazione.
L'impostazione automatica del tempo viene calcolata
presumendo che siano state registrate le misure 1, 2, 4, 8, 16
e così via nell'indicazione del tempo speci cata (pag. 13).
English Deutsch Français Italiano Español Português Nederlands
13

Collegamento al computer tramite USB
Mediante un cavo USB disponibile in commercio, è possibile collegare
l'unità RC-3 al computer e quindi eseguire il backup delle frasi nel
computer ( le WAV) o caricare le WAV dal computer all'unità RC-3.
Formati di le WAV riproducibili
Formato dati WAV
Velocità di trasmissione in bit Lineare a 16 bit, stereo
Frequenza di campionamento 44,1 kHz
La dimensione massima del le WAV è di 1,7 GB (totale di tutti i le),
la durata massima è di circa 3 ore (totale di tutte le frasi) e la durata
minima è di circa 1,5 secondi.
1. Accendere l'unità RC-3, ovvero inserire un jack
nell'uscita OUTPUT A.
* L'unità RC-3 non funziona tramite l'alimentazione del bus USB.
È quindi consigliabile utilizzare un adattatore CA (venduto
separatamente) per evitare lo spegnimento dell'unità mentre
è collegata tramite USB.
2. Utilizzare un cavo USB
disponibile in commercio
per collegare il connettore
USB dell'unità RC-3 al connettore USB del computer
(un connettore che supporti USB 2.0 Hi-Speed).
Il display indicherà “Cn”.
* Non è possibile stabilire collegamenti USB se l'unità RC-3 è in
funzione o se è presente una frase che non è stata salvata.
14
3. Eseguire il backup delle frasi come descritto di seguito.
Utenti di Windows
Utenti di Mac OS
Backup nel computer
Ripristino dei dati di backup dal computer all'unità RC-3
* Poiché l'esecuzione di questa operazione comporta la
Copia di le WAV singoli dal computer alla memoria delle
frasi dell'unità RC-3
In Risorse del computer (o Computer) aprire “BOSS_RC-3”
(o Disco rimovibile).
Sulla scrivania aprire l'icona “BOSS_RC-3”.
Copiare l'intera cartella “ROLAND” dall'unità BOSS_RC-3 al computer.
cancellazione di tutte le frasi attualmente salvate nell'unità
RC-3, è consigliabile eseguire un backup prima di procedere.
Nell'unità BOSS_RC-3 eliminare la cartella “ROLAND” e quindi
copiare la cartella “ROLAND” di backup dal computer all'unità
BOSS_RC-3.
È possibile copiare le WAV dal computer alle sottocartelle
“001_1”–”099_1” della cartella “ROLAND”–”WAVE”
disponibile nell'unità BOSS_RC-3. (Le cifre XX in “0XX_1”
rappresentano il numero nella memoria delle frasi.)

NOTE
15
Français
Español
Português
* Non eliminare le cartelle dell'unità BOSS_RC-3 a meno che
non si stia eseguendo un'operazione di ripristino.
* Nei nomi di le è possibile utilizzare i caratteri seguenti.
A–Z (lettere maiuscole), 0–9 (numeri), _ (carattere di
sottolineatura)
* Non salvare più di un le WAV in ciascuna cartella. Se una
cartella contiene già un le WAV, non sovrascriverlo. Salvare i
le WAV in cartelle vuote.
4. Al termine della copia dei le WAV, scollegare l'unità
USB eseguendo la procedura seguente.
Utenti di Windows 7
Nella parte inferiore destra dello schermo fare clic sull'icona
[ ] g sull'icona [ ], quindi su “Espelli RC-3”.
Utenti di Windows Vista o Windows XP
Nella parte inferiore destra dello schermo fare clic sull'icona
[ ] ([ ] in XP) e quindi su “Rimozione sicura periferica di
archiviazione di massa USB”.
Utenti di Mac OS
Trascinare l'icona “BOSS_RC-3” nel cestino (icona “Espelli”).
5. Scollegare il cavo USB dal computer.
Dopo lo scollegamento del cavo USB, il display indicherà “dC” e
il pulsante [RHYTHM ON/OFF] lampeggerà.
6. Premere il pulsante [RHYTHM ON/OFF] per tornare al
funzionamento normale.
Nel display non sarà più presente l'indicazione “dC ” e l'unità
RC-3 tornerà al funzionamento normale.
NOTE
* Non utilizzare mai il computer per formattare l'unità
“BOSS_RC-3”. L'esecuzione di questa operazione
causerà infatti il non corretto funzionamento
dell'unità. Se il problema si veri ca, eseguire la
formattazione mediante la procedura descritta nella
sezione ”Formattazione della memoria interna” (pag. 19).
* Non eseguire mai le operazioni seguenti nché
non è stata scollegata l'unità USB. L'esecuzione di
queste operazioni potrebbe infatti causare il blocco
del computer o comportare la perdita di tutti i dati
dell'unità RC-3.
• Scollegare il cavo USB.
• Lasciare che nel computer venga attivata la modalità
di sospensione (standby) o di ibernazione oppure che
il computer si spenga.
• Spegnere l'unità RC-3.
* In caso di perdita del contenuto della memoria
dell'unità, potrebbe non essere possibile ripristinarlo.
Roland Corporation declina qualsivoglia responsabilità
relativamente alla perdita dei dati.
English Deutsch Français Italiano Español Português Nederlands
15

Collegamento a un interruttore a pedale esterno
Quando si collega un FS-5U
Collegare l'interruttore a pedale all'ingresso STOP/MEMORY SHIFT come illustrato in gura e impostare l'interruttore POLARITY
dell'interruttore a pedale.
Cavo:
Jack da 1/4”
g
Jack da 1/4”
16
Quando si collega un FS-5U
Interruttore POLARITY
Cavo:
Jack da 1/4” stereo
g
Jack da 1/4” stereo x 2
Quando si collegano due FS-5U
Cavo:
Jack da 1/4” stereo
g
Jack da 1/4” stereo
Quando si collega un FS-6
oppureoppure
Interruttore MODE/POLARITY

Quando si collega un FS-5U
* Non è possibile utilizzare FS-5L.
Operazione Descrizione
Interruzione
Impostazione
del tempo
Cancellazione
di una frase
Durante un'operazione di registrazione,
riproduzione o sovraincisione premere
l'interruttore a pedale per interrompere
l'operazione.
Quando non è attiva la riproduzione, è possibile
premere l'interruttore a pedale più volte per
impostare il tempo.
Per cancellare la frase, tenere premuto
l'interruttore a pedale per almeno due secondi
(pag. 10).
Quando si collegano due FS-5U o un FS-6
Quando si utilizza un FS-5U collegato al connettore
bianco (lato sinistro stereo) o il pedale B di un FS-6
Il funzionamento è analogo a quello descritto per il collegamento
di un solo FS-5U.
Collegamento a un interruttore a pedale esterno
Quando si utilizza un FS-5U collegato al connettore rosso
(lato destro stereo) o il pedale A di un FS-6
Operazione Descrizione
Passaggio alla frase
successiva
Passaggio alla frase
precedente
* Se la frase corrente non è stata salvata, tale frase andrà persa
quando si passa a un'altra frase in memoria. Per ulteriori
dettagli sul salvataggio di una frase, vedere a pag. 8.
• Se si esegue l'operazione per passare a un'altra frase in memoria
quando la riproduzione della frase corrente sta per nire,
è possibile che la frase a cui si desidera passare non venga
selezionata.
• È possibile passare a un'altra frase in memoria anche premendo
i pulsanti [
Quando si preme l'interruttore a pedale,
viene selezionata la frase successiva in
memoria.
Se si preme l'interruttore a pedale durante
la riproduzione, il numero della frase
appena selezionata lampeggia sul display
ma la riproduzione di tale frase inizia al
termine della riproduzione della frase
corrente.
Quando si preme l'interruttore a pedale
per almeno due secondi, viene selezionata
la frase precedente in memoria.
] / [ ].
English Deutsch Français Italiano Español Português Nederlands
17

Altre impostazioni
Informazioni sulla modalità di sospensione
Dopo dieci ore dall'ultima operazione o dall'ultimo ingresso audio,
nell'unità RC-3 viene attivata la modalità di sospensione, ovvero la
modalità per il risparmio di energia, e viene riprodotto solo il suono
bypass. In modalità di sospensione è possibile premere il pedale per
tornare alla modalità normale.
* La batteria viene utilizzata anche in modalità di sospensione.
Per impedire che si scarichi, è quindi consigliabile spegnere
l'unità scollegando il jack dall'uscita OUTPUT A.
* Se è presente una frase che non è stata salvata, la modalità di
sospensione non viene attivata.
Disattivazione della modalità di sospensione
1. Tenendo premuto il pedale accendere l'unità, ovvero
inserendo un jack nell'uscita OUTPUT A.
2. Tenere premuto il pedale per cinque secondi.
L'indicazione “_ _” lampeggerà sul display.
3. Sollevare il piede dal pedale. L'unità RC-3 tornerà al
funzionamento normale.
18
Attivazione della modalità di sospensione
(impostazione predenita)
1. Tenendo premuto il pedale accendere l'unità, ovvero
inserendo un jack nell'uscita OUTPUT A.
2. Entro due secondi dalla visualizzazione del display
premere il pedale due volte.
L'indicazione “S L” lampeggerà sul display.
Dopo due secondi, l'unità RC-3 tornerà al funzionamento
normale e verrà attivata la modalità di sospensione.

Altre impostazioni
English Deutsch Français Italiano Español Português Nederlands
Modica dell'ordine registrazione g
sovraincisione g riproduzione
Quando si preme il pedale, l'unità RC-3 passa da un'operazione
all'altra nell'ordine registrazione g sovraincisione g
riproduzione (impostazione predenita) (pag. 6). È comunque
possibile modicare questo ordine in modo che sia registrazione g
riproduzione g sovraincisione (compatibile con RC-2).
1. Tenendo premuto il pulsante [TAP TEMPO] accendere
l'unità, ovvero inserendo un jack nell'uscita OUTPUT A.
2. Utilizzare i pulsanti [
modalità desiderata.
Display
Descrizione
L'unità RC-3 passa da un'operazione all'altra
nell'ordine registrazione g sovraincisione g
rd
riproduzione (impostazione predenita).
L'unità RC-3 passa da un'operazione all'altra
nell'ordine registrazione g riproduzione g
rP
sovraincisione (compatibile con RC-2).
3. Premere il pulsante [TAP TEMPO] per tornare al
funzionamento normale.
] / [ ] per selezionare la
Formattazione della memoria interna
* Quando si formatta la memoria interna dell'unità RC-3, tutte
le frasi salvate nella memoria vengono cancellate e non
possono più essere ripristinate.
Non formattare la memoria interna a meno che il display non
indichi “Er” e l'unità RC-3 non funzioni più correttamente.
1. Tenendo premuti i pulsanti [WRITE] e [RHYTHM ON/
OFF] accendere l'unità, ovvero inserendo un jack
nell'uscita OUTPUT A.
Il display indicherà “FN”.
2. Premere di nuovo il pulsante [RHYTHM ON/OFF].
L'indicazione “F N” lampeggerà sul display.
3. Premere di nuovo il pulsante [WRITE]. Verrà avviata
la formattazione della memoria interna.
L'indicazione “F N” sul display lampeggerà rapidamente.
Al termine della formattazione l'unità RC-3 tornerà al
funzionamento normale.
* Non spegnere mai l'unità mentre “
rapidamente.
FN ” lampeggia
19

Risoluzione dei problemi
Problema Soluzione
La registrazione non termina
immediatamente quando si
preme il pedale
La registrazione inizia
immediatamente anche se è
selezionata la modalità Auto
Recording
Non è possibile modicare il
tempo della riproduzione
Messaggi di errore
Display Signicato Soluzione Pagina
La batteria è scarica. Sostituire la batteria. pag. 22
bt
La memoria è piena. Eliminare le frasi non necessarie. pag. 9
FL
Il le WAV non è riproducibile. Controllare il formato del le WAV. pag. 14
UF
Non è possibile eseguire altre sovraincisioni. Salvare di nuovo la frase. pag. 8
EF
È necessario formattare la memoria interna. Formattare la memoria interna dell'unità RC-3. pag. 19
Er
L'unità RC-3 non funziona correttamente. Contattare il rivenditore.
dN
20
Se il ritmo è attivato o se è stata registrata una frase di durata inferiore al tempo di registrazione minimo
(circa 1,5 secondi), la lunghezza della frase viene regolata automaticamente. Ciò potrebbe signicare che la
registrazione non termina immediatamente quando si preme il pedale.
Se, a causa della distorsione o per altri motivi, viene prodotta una quantità di rumore signicativa, tale
rumore potrebbe essere suciente per attivare la registrazione. Ridurre il rumore, ad esempio abbassando
il livello di distorsione.
Il tempo della riproduzione non può essere modicato nelle situazioni seguenti.
• Quando la frase non è stata salvata.
• Quando si sta passando da una frase a un'altra, ovvero quando l'indicatore PLAY lampeggia rapidamente.
• Quando si tenta di impostare il tempo per una frase riprodotta in loop in un intervallo di durata
inferiore al tempo di registrazione minimo (circa 1,5 secondi).

Altre indicazioni del display
Display Descrizione Pagina
1–9 9
. (punto)
oS
Un
rE
CL
r
dL
no
AU
Ct
r0 –r9
b3 –b4
Cn
dC
SL
__
Numero della frase in memoria
Frase in memoria contenente dati
Frase con riproduzione singola pag. 10
Annullamento
Ripristino
Cancellazione
Salvataggio della frase pag. 8
Eliminazione della frase pag. 9
Registrazione normale
Registrazione Auto Recording
Registrazione Count-In
Tipo di ritmo pag. 12
Indicazione del tempo pag. 13
USB collegato
USB non collegato
Modalità di sospensione attivata
Modalità di sospensione disattivata
pag. 6
pag. 10
pag. 11
pag. 14
pag. 18
Risoluzione dei problemi
Display Descrizione Pagina
rd
rP
FN
Passaggio da un'operazione all'altra
nell'ordine registrazione/sovraincisione/
riproduzione
Passaggio da un'operazione all'altra
nell'ordine registrazione/riproduzione/
sovraincisione
Formattazione della memoria interna pag. 19
pag. 19
English Deutsch Français Italiano Español Português Nederlands
21

Sostituzione della batteria
Quando il display indica “bt”, signica che la batteria è scarica.
Sostituire la batteria eseguendo la procedura illustrata di seguito.
* Poiché questa unità consuma una quantità considerevole
di energia, è consigliabile utilizzare un adattatore CA. Se si
preferisce utilizzare una batteria, è consigliabile utilizzarne
una alcalina.
* Non è possibile utilizzare batterie Ni-MH ricaricabili.
* Durante la sostituzione della batteria, il contenuto della
memoria interna non andrà perso. Per maggiore sicurezza,
è comunque consigliabile eseguire regolarmente un backup
(pag. 14).
Filo dei contatti
della batteria
Contatti della
batteria
22
Vite a testa
zigrinata
Batteria a 9 V
Pedale
Base della molla
Molla elicoidale
Foro guida
Alloggiamento della batteria
* Un utilizzo non corretto delle batterie, delle batterie
ricaricabili o del caricatore di batterie potrebbe
causare dispersioni, surriscaldamenti, incendi o
esplosioni. Prima dell'utilizzo, leggere attentamente
le istruzioni relative alle batterie, alle batterie
ricaricabili e al caricatore di batterie e prendere
tutte le precauzioni necessarie.
1. Svitare la vite a testa zigrinata nella parte anteriore
del pedale, quindi spostare il pedale verso l'alto per
aprire l'unità.
* Durante la sostituzione della batteria la vite a testa zigrinata
può essere lasciata nel pedale.
2. Rimuovere la vecchia batteria dall'alloggiamento e
scollegare i contatti.
3. Collegare la nuova batteria ai contatti e posizionarla
nell'alloggiamento.
* Assicurarsi di rispettare la polarità della batteria (+ e -).
4. Inserire la molla elicoidale nella rispettiva base sul
retro del pedale e chiuderlo.
* Fare attenzione che il lo dei contatti non si incastri nella
molla elicoidale.
5. Inne, inserire la vite a testa zigrinata nel foro guida
e avvitarla.

English Deutsch Français Italiano Español Português Nederlands
• La registrazione non autorizzata, la distribuzione, la vendita,
il noleggio, l'esibizione pubblica, la trasmissione, o simili, di
un'opera (composizione musicale, video, trasmissione, esibizione
pubblica, o simili) il cui copyright è detenuto da terzi, sono
proibiti dalla legge.
• Non utilizzare mai questa unità per qualsiasi ne che potrebbe
violare i diritti di copyright detenuti da terze parti. Roland
Corporation non si assume alcuna responsabilità in relazione
a violazioni di copyright di terze parti provocate dall'utilizzo di
questo prodotto.
• Il copyright del contenuto di questo prodotto (i dati a forma
di onda relativi al suono, i dati dello stile, gli schemi di
accompagnamento, i dati relativi alle frasi, i loop audio e i dati
relativi alle immagini) è di proprietà di Roland Corporation.
• Agli acquirenti del prodotto è consentito l'utilizzo di tale
contenuto per la creazione, la riproduzione, la registrazione e la
distribuzione di opere musicali originali.
• Gli acquirenti di questo prodotto NON possono estrarne
il contenuto in forma originale o modicata allo scopo di
distribuirlo su supporti registrati o renderlo disponibile in una
rete di computer.
• BOSS e Loop Station sono marchi o marchi registrati di Roland
Corporation negli Stati Uniti e/o in altri paesi.
• Tutti i nomi di prodotto citati nel presente documento sono
marchi o marchi registrati dei rispettivi proprietari.
• Le schermate disponibili nel presente documento sono utilizzate
in conformità alle direttive di Microsoft Corporation.
• MMP (Moore Microprocessor Portfolio) indica un portfolio
brevettato che fa riferimento all'architettura del microprocessore
sviluppato da Technology Properties Limited (TPL). Roland ha
ottenuto la licenza per questa tecnologia da TPL Group.
• Il logo SD (
SD-3C, LLC.
• Questo prodotto include una piattaforma software integrata
eCROS di eSOL Co.,Ltd.
eCROS è un marchio registrato di eSOL Co., Ltd. in Giappone.
• Questo prodotto include caratteri digitali di Yourname, Inc.
Carattere digitale: Copyright © Yourname, Inc.
Copyright © 2011 BOSS CORPORATION
Tutti i diritti riservati. Nessuna parte di questo documento può
essere in alcun modo riprodotta senza autorizzazione scritta di
BOSS CORPORATION.
) e il logo SDHC ( ) sono marchi registrati di
23

Speciche
BOSS RC-3: Loop Station
Livello di ingresso
nominale
Impedenza di
ingresso
Livello di uscita
nominale
Impedenza di uscita 1 k ohm
Impedenza di carico
consigliata
Registrazione/
Riproduzione
Interfaccia USB Supporto per USB 2.0/1.1 MSC
Alimentazione
Portata attuale
INPUT: -20 dBu
AUX IN: -10 dBu
INPUT: 1 M ohm
AUX IN: 22 k ohms
-20 dBu
10 k ohms o superiore
Tempo di registrazione massimo: circa 3 ore
Numero massimo di frasi memorizzate: 99 frasi
Formato dati: WAV (44,1 kHz, Lineare a 16 bit,
stereo)
DC 9 V:
batteria alcalina (9 V, 6LR61),
adattatore CA (serie PSA: disponibile
separatamente)
* Non è possibile utilizzare batterie
Ni-MH ricaricabili.
70 mA (9 V max.)
Batteria alcalina (9 V, 6LR61)
circa 3 ore
* I valori indicati possono variare in base
alle eettive condizioni d'uso.
24
Dimensioni 73 (L) x 129 (P) x 59 (A) mm
Peso 450 g (inclusa la batteria)
Accessori
Opzioni (disponibile
separatamente)
* 0 dBu = 0,775 Vrms
* Allo scopo di migliorare il prodotto, le speciche e/o l'aspetto
di questa unità sono soggetti a modiche senza preavviso.
:
Manuale dell'utente, foglio illustrativo
(“UTILIZZO SICURO DELL'UNITÀ”, “NOTE
IMPORTANTI” e “Informazioni”), batteria
alcalina (9 V, 6LR61) già installata nell'unità
* La batteria fornita con l'unità
prevede un utilizzo temporaneo,
principalmente per vericare
il funzionamento dell'unità. È
consigliabile sostituirla con una
batteria alcalina a secco.
Adattatore CA (serie PSA)
Interruttore a pedale: FS-5U, FS-6

Manual del usuario
* Este dispositivo cuenta con frases de muestra (90–99). Una vez borradas,
estas frases no se pueden recuperar. Haga una copia de seguridad tal y
como se describe en “Copia de seguridad en el ordenador” (pág. 14).
* Este dispositivo pasará al modo Sleep (modo de ahorro de energía) cuando
hayan transcurrido diez horas desde su último uso o desde la última
entrada de audio en el modo Stop.
Si desea evitar que el dispositivo pase al modo Sleep, presione el pedal
mientras enciende el dispositivo y manténgalo presionado durante cinco
segundos (pág. 18).
English Deutsch Français Italiano Español Português Nederlands

Funciones principales
Bienvenido a Loop Station
La unidad RC-3 es un grabador tipo pedal que permite grabar frases
de audio con la guitarra o el bajo, y luego reproducirlas mediante el
pedal. Puede crear una gran variedad de actuaciones sobreponiendo
diferentes capas de sonido mientras graba y reproduce en tiempo real.
• Es fácil crear bucles de frases.
• Puede guardar hasta 99 bucles de frases diferentes que se
pueden guardar en la memoria de frases, hasta un total de 3
horas (* en total para todas las frases).
• Cuenta con entrada de audio en estéreo.
• Puede grabar con facilidad desde un reproductor de audio
digital conectado al conector AUX IN.
• Las frase grabadas se pueden copiar mediante USB en el ordenador
y también se pueden cargar archivos WAV desde el ordenador en la
unidad RC-3 para luego reproducirlos en bucle (pág. 14).
Antes de utilizar esta unidad, lea atentamente las secciones
tituladas: “UTILIZACIÓN SEGURA DE LA UNIDAD” y “NOTAS
IMPORTANTES” (en una hoja aparte). En estas secciones
encontrará información importante acerca de la utilización
correcta de la unidad.
Además, le recomendamos leer íntegramente el presente
manual para conocer bien todas las funciones de su nueva
unidad. Asimismo, se recomienda guardar el manual en un
lugar accesible para consultas futuras.
2
Descripciones de los paneles
1 2 3 4 65
7 8
1. Mando [OUTPUT LOOP]
Ajusta el nivel de volumen del bucle de frases que se está
reproduciendo.
* Este mando no ajusta el nivel de entrada de los conectores
INPUT y AUX IN.
2. Mando [OUTPUT RHYTHM]
Este mando ajusta el volumen del sonido de ritmo (pág. 12).

3. Indicador REC, PLAY (DUB)
Se enciende durante grabación, reproducción y mezcla.
Indicador De nición
REC (rojo) Durante la grabación
PLAY (verde)
Ambos Durante la mezcla
Durante la reproducción (al cargar la memoria
de frases o durante una operación interna de
memoria: parpadea rápidamente)
4. Pantalla
Indica el número de memoria de la frase actual, también puede
mostrar información adicional (pág. 20).
5. [Botones ] (DOWN) / [ ] (UP)
Aumentan o reducen el número mostrado en la pantalla.
6. Botón [WRITE]
Permite guardar la frase grabada en la memoria interna (pág. 8).
7. Botón [RHYTHM ON/OFF]
Este botón enciende o apaga el sonido de ritmo (pág. 12).
8. Botón [TAP TEMPO]
Pulse el botón en el momento deseado para establecer el tempo
(pág. 12).
Descripciones de los paneles
9
10
9. Interruptor del pedal
Este interruptor cambia entre la grabación, mezcla y reproducción
de frases. Púlselo dos veces consecutivas para detener la
reproducción (pág. 6).
10. Tornillo de apriete manual
A ojando este tornillo podrá abrir el pedal para cambiar la pila.
* Si está utilizando el dispositivo RC-3 sólo con la pila, la
pantalla mostrará “
agotarse. Cambie la pila tal y como se indica en la pág. 22.
* Antes de la salida de fábrica, la unidad se ha equipado
con una pila; no obstante, la vida útil de esta pila puede
ser limitada, ya que su nalidad principal es permitir la
realización de pruebas.
bt ” cuando la pila esté a punto de
English Deutsch Français Italiano Español Português Nederlands
3

Conector USB
CA distinto; si lo hace, la unidad podría no funcionar correctamente.
conectar el reproductor de música.
La
(pág. 11) permite iniciar la grabación
automáticamente cuando comience la
reproducción del reproductor de música.
Conector STOP/MEMORY SHIFT
Aquí puede conectar un interruptor del
pedal disponible por separado (FS-5U,
FS-6), que permite detener la reproducción
o cambiar a las frases (pág. 16).
Puede utilizar un cable USB común para
conectar el dispositivo RC-3 al ordenador
y así poder leer o escribir frases del RC-3
(archivos WAV) desde el ordenador (pág. 14).
Conector DC IN
Permite la conexión de un adaptador de CA (serie PSA, opcional). El adaptador de CA
permite el funcionamiento sin necesidad de preocuparse de la duración de la pila.
* Utilice únicamente el adaptador de CA especi cado (serie PSA) y conéctelo
a una toma de CA de voltaje correcto. No utilice ningún otro adaptador de
CA distinto; si lo hace, la unidad podría no funcionar correctamente.
Conectores OUTPUT A/B
Conecte estos conectores al
ampli cador o a los altavoces
monitores.
Si el sistema es monoaural,
utilice sólo el conector
OUTPUT A. El sonido de
entrada en estéreo también
generará sonido monoaural.
El conector OUTPUT A también funciona
como interruptor de alimentación. La
alimentación estará encendida si hay un
cable en el conector OUTPUT A. Extraiga
el cable cuando no esté utilizando el
dispositivo RC-3.
4
Conectores INPUT A/B
Conecte la guitarra, el bajo o la unidad de efectos a estos conectores.
Utilice los conectores INPUT A y INPUT B cuando conecte una
unidad de efectos de salida en estéreo. Utilice sólo el conector
INPUT A si usa una fuente monoaural.
Conector AUX IN
Utilice un minienchufe estéreo para
conectar el reproductor de música.
La Función de grabado automático
(pág. 11) permite iniciar la grabación
automáticamente cuando comience la
reproducción del reproductor de música.
Conector STOP/MEMORY SHIFT
Aquí puede conectar un interruptor del
pedal disponible por separado (FS-5U,
FS-6), que permite detener la reproducción
o cambiar a las frases (pág. 16).
 Loading...