

Boss Dr. Sample SP-303 Owner's Manual

013
• In households with small children, an adult
should provide supervision until the child is
capable of following all the rules essential for the
safe operation of the unit.
..........................................................................................................
014
• Protect the unit from strong impact.
(Do not drop it!)
..........................................................................................................
015
• Do not force the unit’s power-supply cord to share
an outlet with an unreasonable number of other
devices. Be especially careful when using
extension cords—the total power used by all
devices you have connected to the extension
cord’s outlet must never exceed the power rating
(watts/amperes) for the extension cord. Excessive
loads can cause the insulation on the cord to heat
up and eventually melt through.
..........................................................................................................
016
• Before using the unit in a foreign country, consult
with your retailer, the nearest Roland Service
Center, or an authorized Roland distributor, as
listed on the “Information” page.
..........................................................................................................
101b
• The unit and the AC adaptor should be located so
their location or position does not interfere with
their proper ventilation.
..........................................................................................................
102d
• Always grasp only the plug or the body of the AC
adaptor when plugging into, or unplugging from,
an outlet or this unit.
..........................................................................................................
103b
• Whenever the unit is to remain unused for an
extended period of time, disconnect the AC
adaptor.
..........................................................................................................
104
• Try to prevent cords and cables from becoming
entangled. Also, all cords and cables should be
placed so they are out of the reach of children.
..........................................................................................................
106
• Never climb on top of, nor place heavy objects on
the unit.
..........................................................................................................
107d
• Never handle the AC adaptor body, or its plugs,
with wet hands when plugging into, or
unplugging from, an outlet or this unit.
..........................................................................................................
108b
• Before moving the unit, disconnect the AC
adaptor and all cords coming from external
devices.
..........................................................................................................
109b
• Before cleaning the unit, turn off the power and
unplug the AC adaptor from the outlet.
..........................................................................................................
110b
• Whenever you suspect the possibility of lightning
in your area, disconnect the AC adaptor from the
outlet.
..........................................................................................................
118
• Should you remove the screws, make sure to put
them in a safe place out of children’s reach, so
there is no chance of them being swallowed
accidentally.
..........................................................................................................
3

Contents
USING THE UNIT SAFELY........... 2
Main Features.......................... 6
Panel Descriptions ...................7
IMPORTANT NOTES................ 10
QUICK START ......................... 11
Making Connections...............................................11
Turning On the Power.............................................12
Turning Off the Power ............................................12
Listen to the Samples.............................................13
Adding Effects to Samples.....................................14
Try Playing a Pattern ..............................................15
Playing with the Tempo Changed.................................... 15
Chapter 3. Sampling ..............27
Before Sampling..................................................... 27
Selecting Higher Quality Sampling, Extended Sampling,
or Lo-Fi Sampling (Sampling Grade)
Selecting Between Stereo and Mono Sampling .............. 27
About Sampling Time ........................................................ 27
Sampling from a Microphone................................ 28
Sampling from a CD or MD.................................... 29
Sampling With the Tempo Specified Beforehand
Starting Sampling Automatically
(Auto Sampling) ..................................................... 31
To stop auto sampling........................................................ 32
Making Samples with Effects Added
(Resampling) .......................................................... 32
Deleting an Individual Sample .............................. 33
Deleting All Samples Together ............................. 34
Changing the Assignment of Samples to the Pads
Checking the Remaining Sampling Time............. 35
...................................... 27
....... 30
..... 34
Sampling Your Own Sounds..................................16
Lifting the SP-303’s Memory Protection .......................... 16
If you don’t like the sampled sound ................................ 17
Chapter 1. Playing Samples ... 18
Composition of Samples........................................18
Switching Sample Banks........................................18
Number of Samples That Can Be Played
Simultaneously (Polyphony)..................................18
Having a Sample Continue to Play Even
When the Pad is Released (Hold) ..........................19
Playing Sounds Input From External Devices
(EXT SOURCE Pad).................................................19
Adjusting the Volume of the External Input Sounds..... 20
Chapter 2. Using the Effects ... 21
Adding Effects to Samples.....................................21
Turning Effects On and Off Rapidly (Effect Grab)......... 22
Selecting an Effect From MFX ........................................... 22
Applying Effects to Multiple Samples...................22
Applying Effects to All Samples Simultaneously
.........23
Chapter 4.
Changing the Sampling Settings
Playing Phrases Repeatedly (Loop Playback)/
Playing the Sound Only Once (One Shot Playback)
Having Samples Play Only While the
Pad Is Pressed (Gate Playback)............................ 36
Having Samples Play Even If the
Pad Is Not Held Down (Trigger Playback)............ 36
Playing Samples in the Reverse Direction
(Reverse Playback) ................................................ 37
Setting the Sample Volume................................... 38
Preventing Unneeded Portions from Being Played
(Markers/Start Point/End Point)
Adjusting both the Start and End points ......................... 38
Adjusting only the End Point............................................ 39
Adjusting only the Start Point
(End Point is the end of the sample) ................................ 39
Finely Adjusting the Start Point and End Point ............. 40
Deleting Unwanted Portions (Truncate)............... 41
Changing the Sample’s BPM ................................ 41
Changing the Length of a Sample
Without Changing the Pitch (Time Modify)......... 42
................................. 38
..36
.... 36
Effects List...............................................................24
4

Contents
Chapter 5.
Recording Sample Performances
(Pattern Sequencer)
Composition of Patterns ........................................43
Changing the Tempo of a Pattern..........................43
To Synchronize with a CD’s or Turntable’s Tempo....... 43
Stopping Patterns ...................................................44
Switching Patterns While Playback Is in Progress
Recording the Pattern.............................................44
Erasing the Data for Mistakes in Performances.............. 46
Deleting Patterns.....................................................46
Specifying and Deleting a Single Pattern ........................ 46
Deleting All Patterns Together.......................................... 47
Changing the Assignment of Patterns to the Pads
.................. 43
......44
......47
Chapter 6.
Using Memory Cards ............. 48
Chapter 7. Using the SP-303
With Other MIDI Devices ........53
Using the SP-303 With a MIDI Keyboard.............. 53
How to Change the MIDI Channel......................... 53
Note On Operating With MIDI................................ 54
Using the SP-303 With a MIDI Sequencer
(Tempo Sync) ......................................................... 54
Synchronizing the Pattern’s Tempo and Start/Stop
to the MIDI Sequencer........................................................ 54
Synchronizing Only the Pattern Tempo
with a MIDI Sequencer....................................................... 55
Playing Samples Without Synchronizing the Tempo.... 55
Using the SP-303 as a Rhythm Sound Module.... 56
Using the SP-303 With a Rhythm Machine .......... 56
Synchronizing the Performance of the
SP-303’s Patterns with a Rhythm Machine’s Tempo .....56
Using the Note Messages from the Rhythm Machine
to Play the SP-303’s Samples .............................................57
Restoring the MIDI Settings to the Factory Settings
... 58
Memory Cards .........................................................48
Inserting a memory card.................................................... 48
Initializing Memory Cards (Format).......................49
Saving Samples to Memory Cards
(Sample Save)..........................................................49
Loading Sample from a Memory Card
(Sample Load) .........................................................50
Saving Patterns to Memory Cards
(Pattern Save)..........................................................50
Loading Pattern from a Memory Card
(Pattern Load)..........................................................51
Protecting the Data on Memory Cards
(Protect) ...................................................................51
Importing Wave Data to the SP-303
From a Computer ....................................................52
Chapter 8.
Examples of Using the SP-303
Using Pattern Sequencer to Create a
Rhythm Pattern ...................................................... 59
Using the SP-303 with MIDI Devices .................... 61
Using the SP-303 as a rhythm sound module ................. 61
Using the SP-303 With a Turntable....................... 62
Adding Effects to the Turntable Sound ...........................62
Playing a Sample Along With the Sound From a
Turntable ..............................................................................63
....59
Appendices ............................64
Chart of Operations ............................................... 64
Troubleshooting..................................................... 66
Initializing the SP-303’s Memory .......................... 68
Message List........................................................... 69
MIDI Implementation Chart.................................... 71
Specifications......................................................... 72
Index.....................................73
5

Main Features
High-Capacity Memory Cards (SmartMedia)
for Extended Sampling Times
The SP-303 itself provides up to three minutes and twelve
seconds of sampling.
In addition, by using optional memory cards (SmartMedia: 8
MB–64 MB) you can sample for much longer lengths of time.
For example, using a 64 MB SmartMedia card in Standard
mode gives you 33 minutes of samples, and in Lo-Fi mode,
you can get up to 200 minutes.
*1 MB, 2 MB, and 4 MB SmartMedia cards cannot be used.
* SmartMedia is a trademark of Toshiba Corporation.
26 Internal Effects Perfect for Groove Music
The SP-303 features twenty-six internal effects that are
indispensable for creating and performing Groove music,
including a Vinyl Simulator that mimics the sonic qualities of
analog records, filter effects that are essential in Techno
music, an Isolator effect–a must for remixing–a powerful
voice transformer for vocal effects, and more.
You can also use these effects on sounds input from external
sources as well.
Resampling? No Problem
Resampling the playback of sampled sounds with internal
effects added lets you create even more new sounds. And
since the process is entirely digital, there is no degradation in
sound quality. This makes it convenient to create different
variations from sounds that have already been sampled.
Automated Playback of Sampled Sounds
(Pattern Sequencer)
You can run a playback of some sampled sounds, and then
play back the sequence of sounds as a single pattern.
This lets you easily create combinations of rhythms and
samples, and combine different phrases to create a single
song.
Eight-Voice Polyphony
Using mono samples, you can have up to eight voices
playing simultaneously. What’s more, you can use effects
and memory cards with no reduction in polyphony, so you
get plenty of room to work with, even in performances using
layered samples with effects added.
...........................................................................................................
■
Printing Conventions in This Manual
●
Text or numerals enclosed in square brackets [ ]
indicate bottons or pads.
[REC] REC button
BANK [A] Bank A button
[1] Pad 1
[HOLD] Hold pad
6
●
Reference such as (p. **) indicate pages in this
manual to which you can refer.
...........................................................................................................
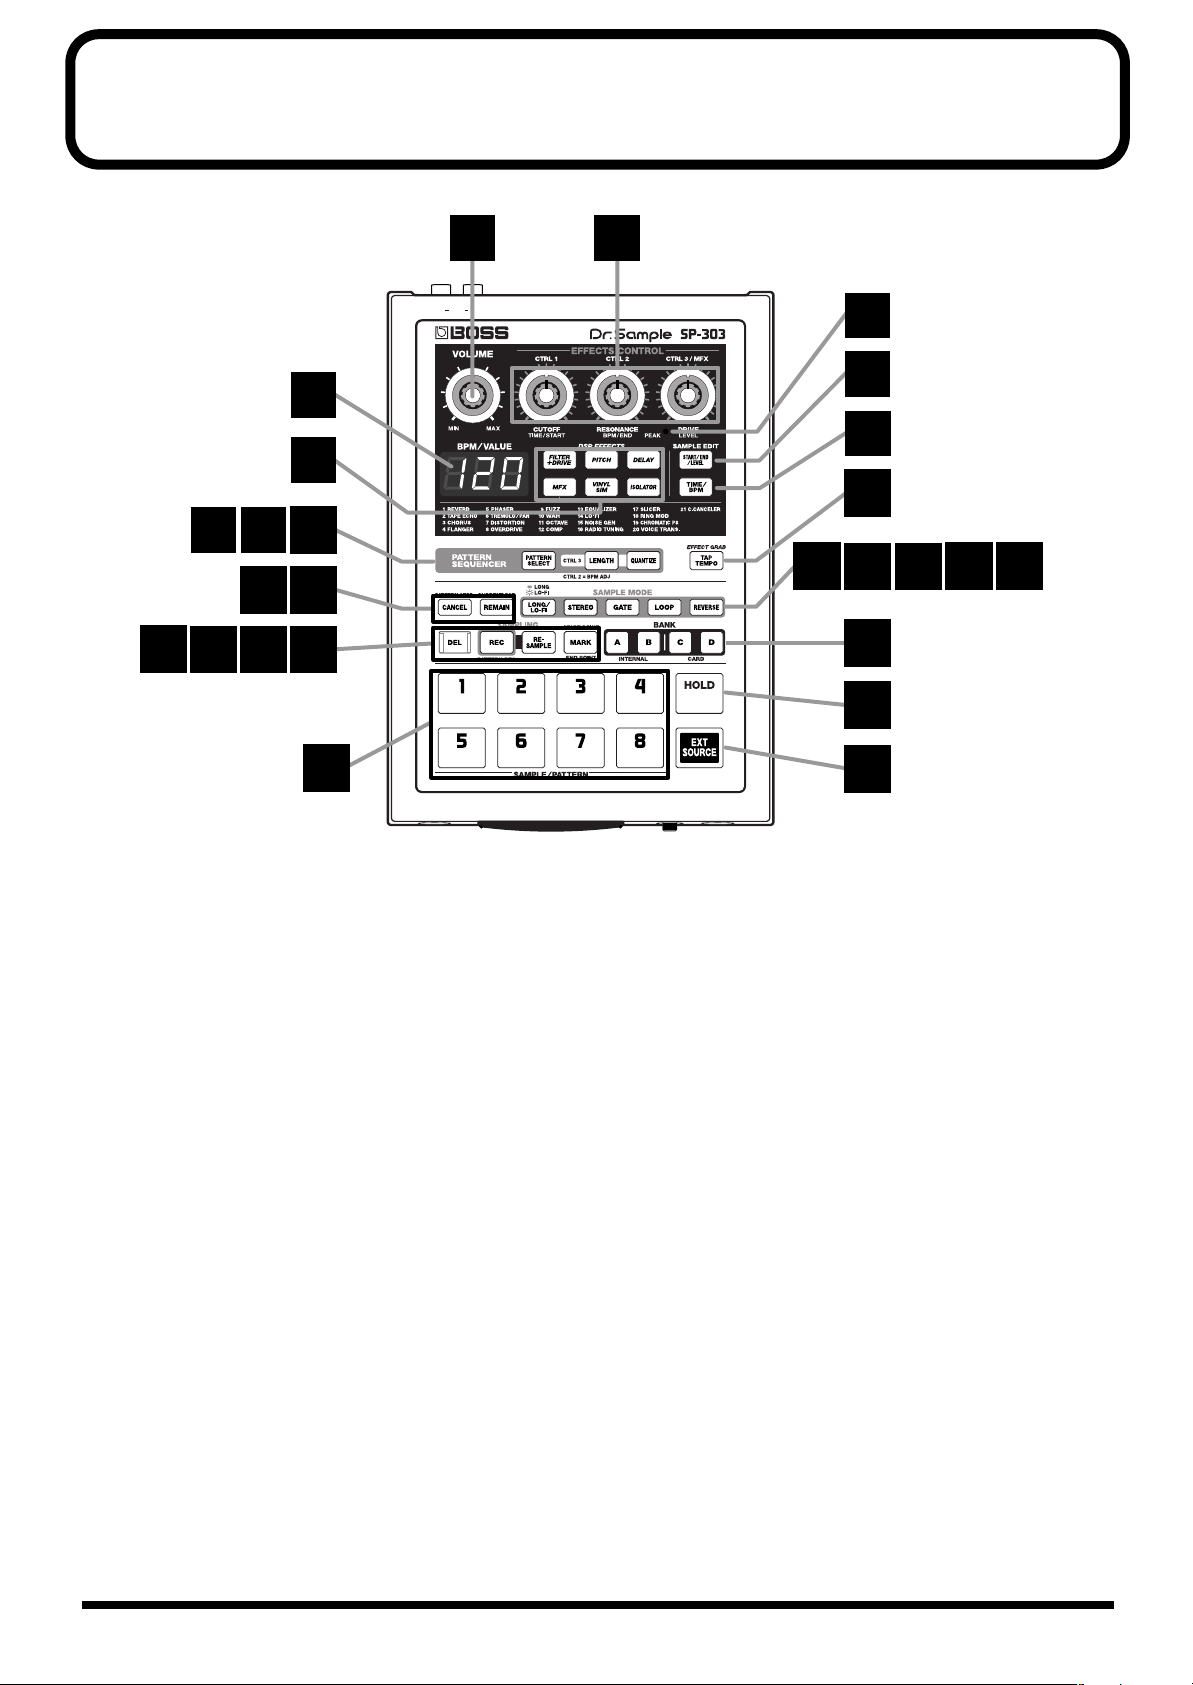
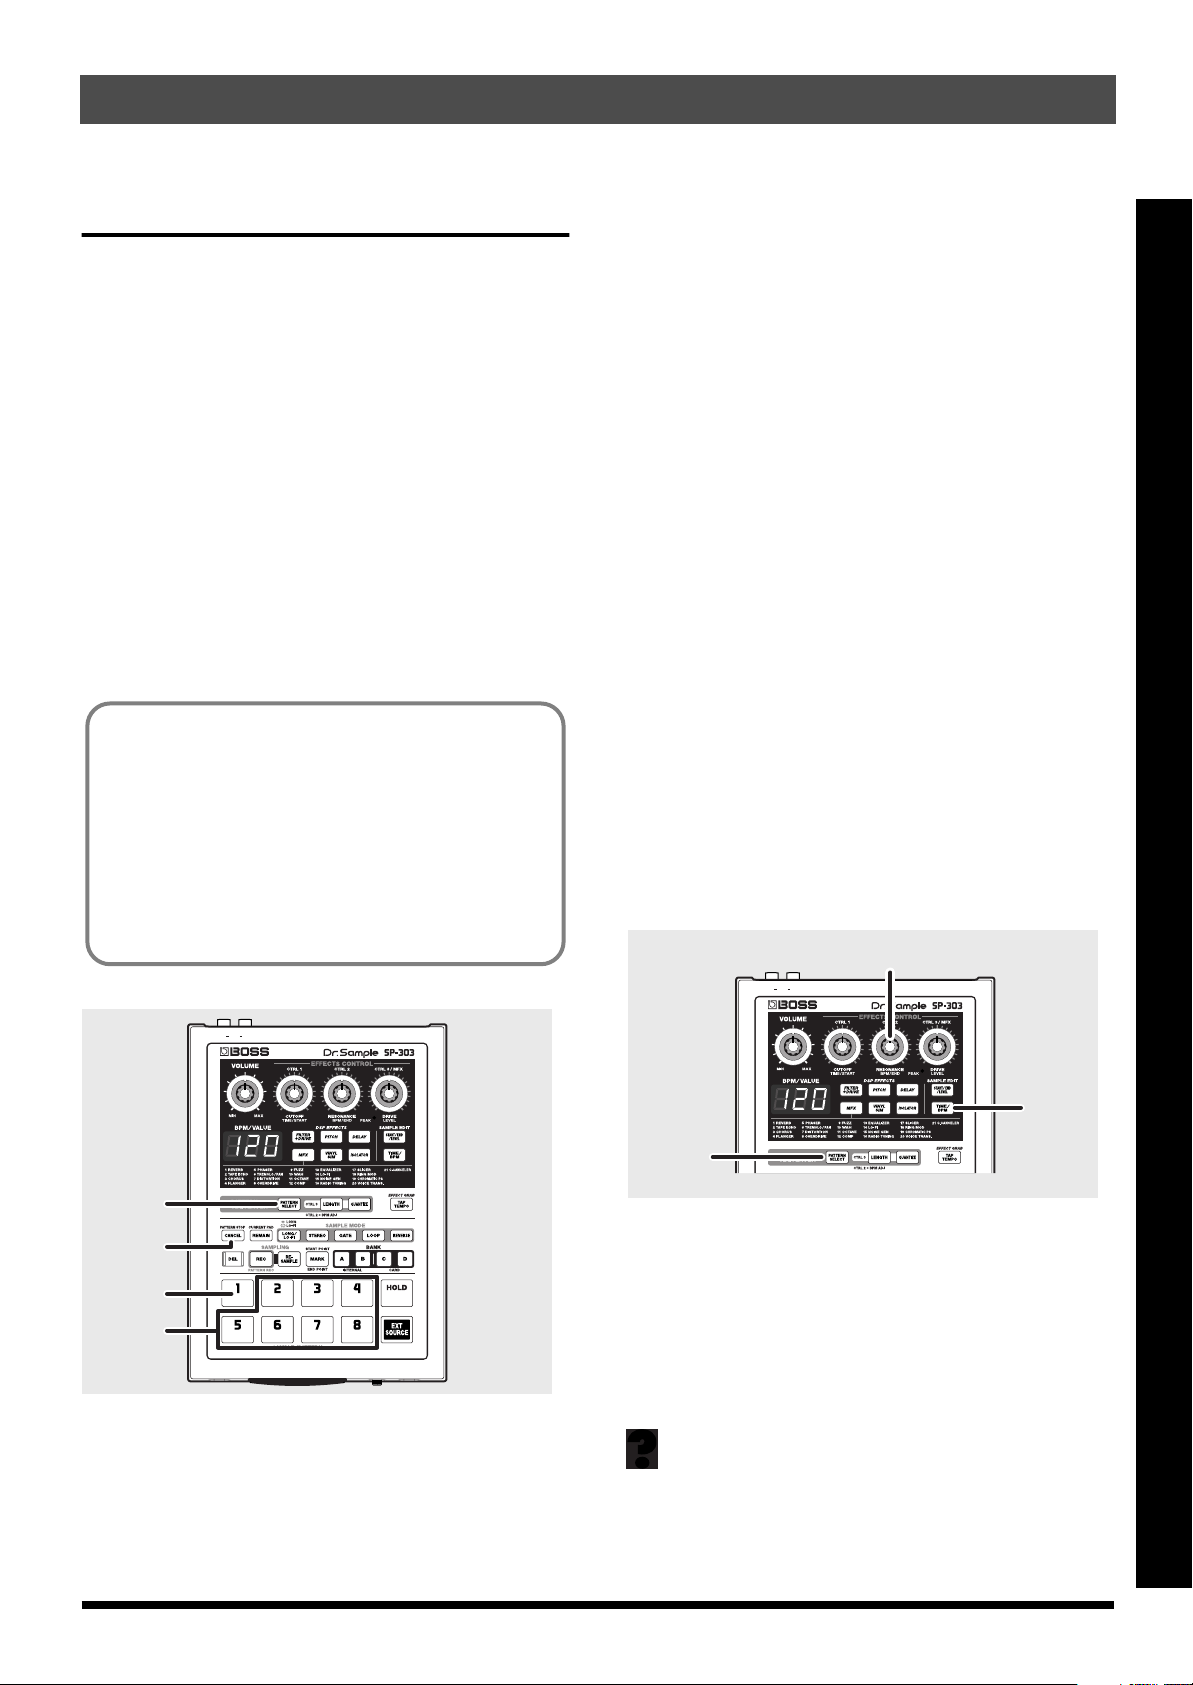
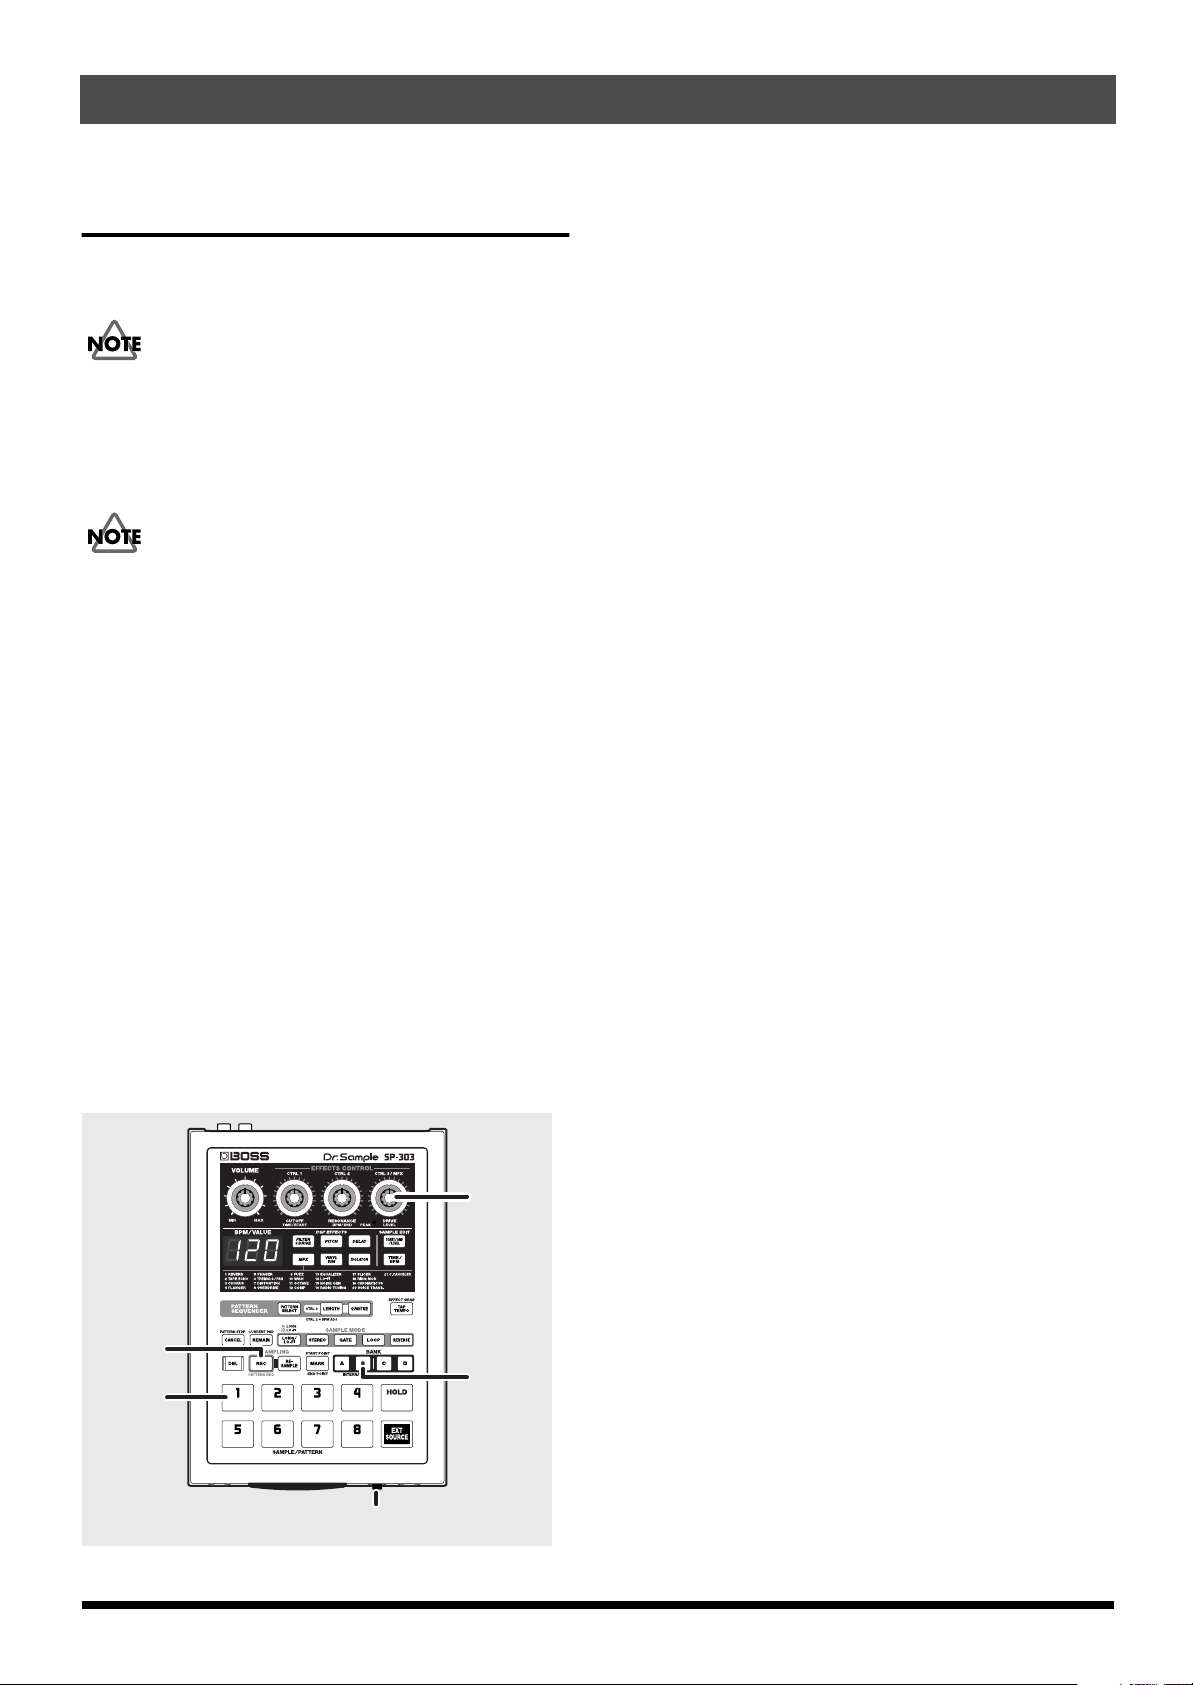
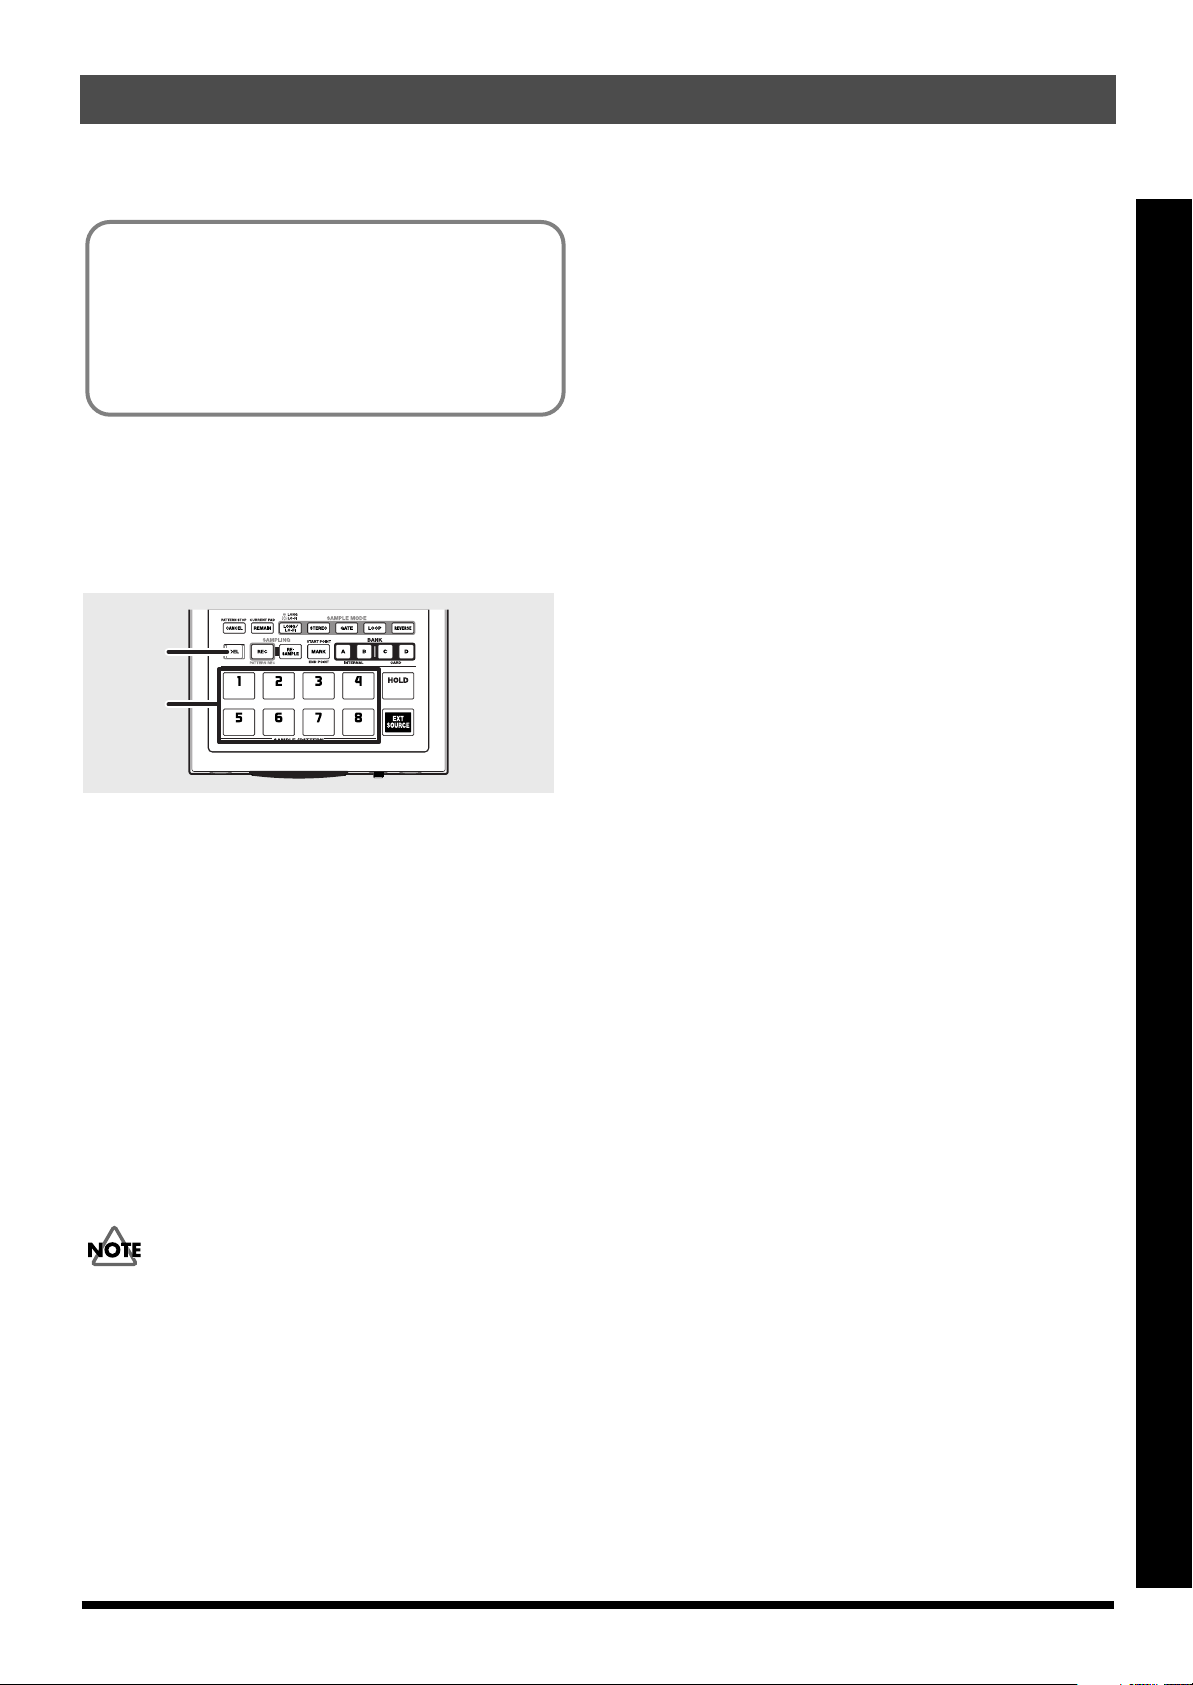
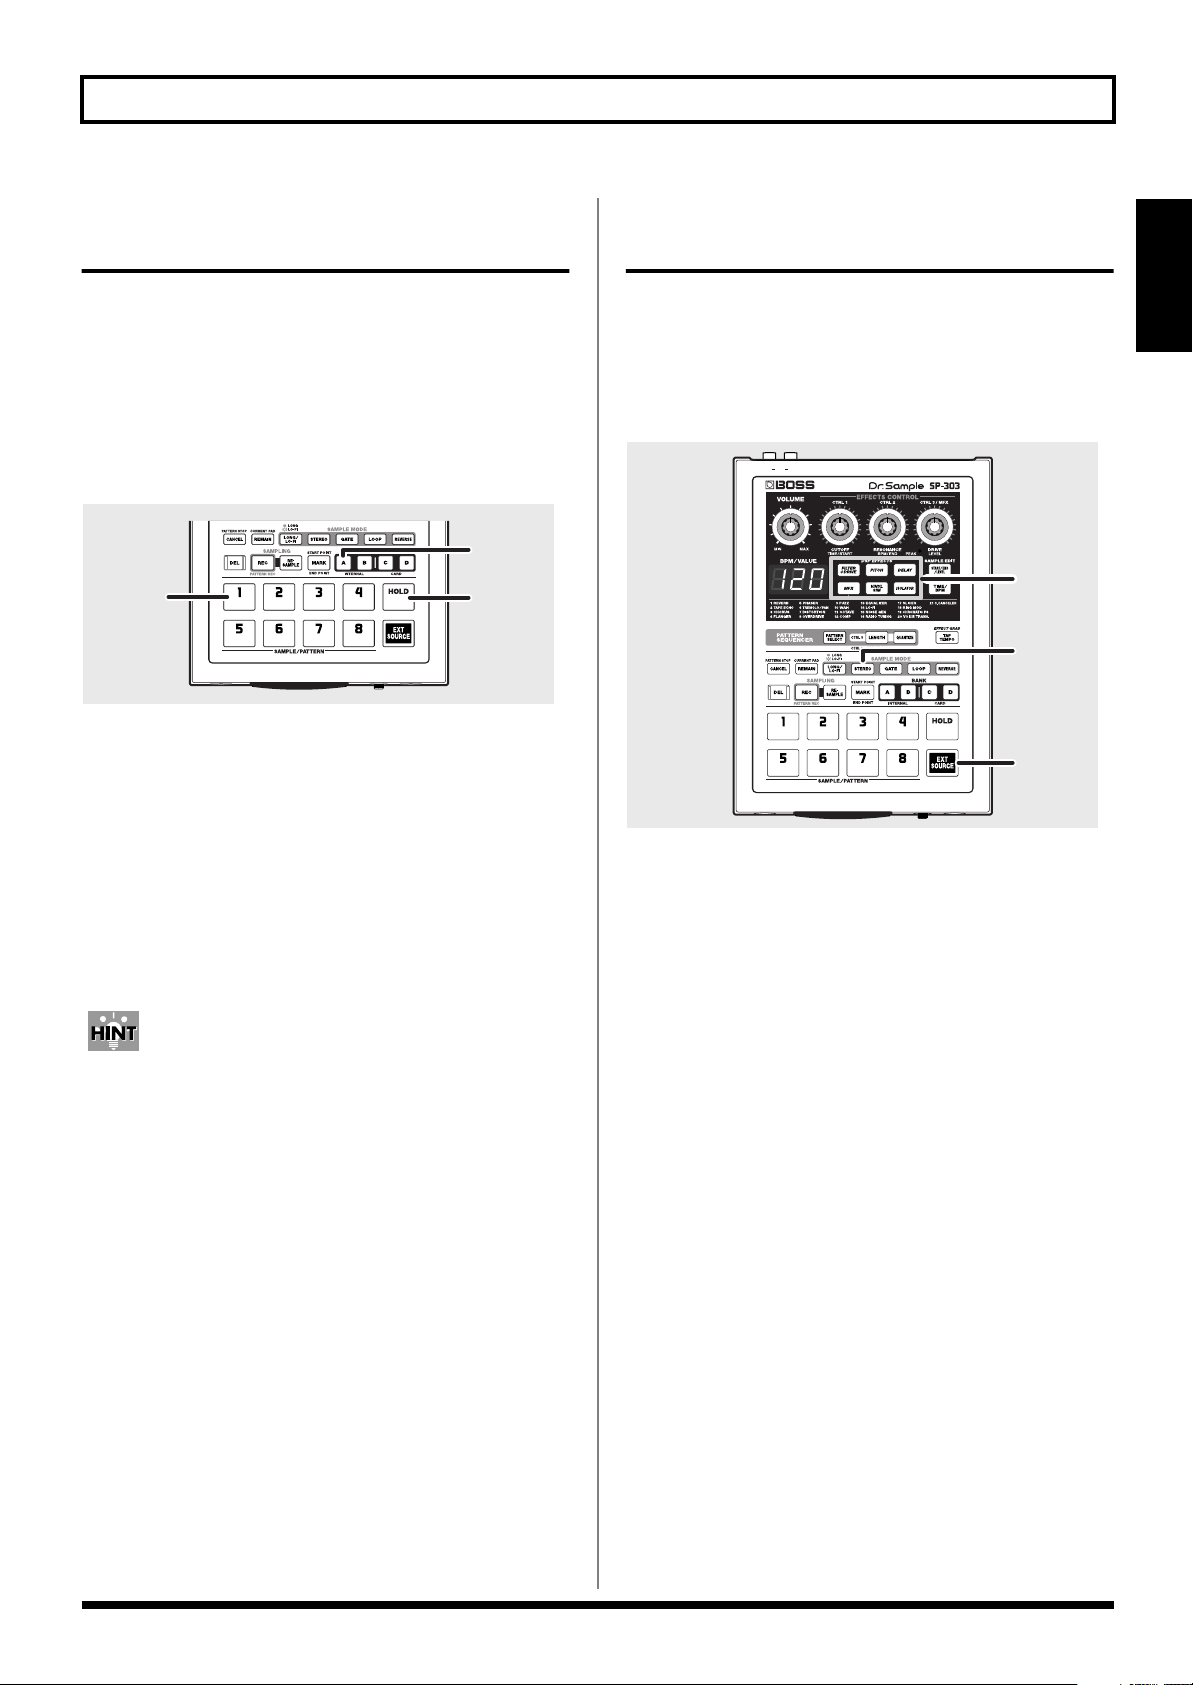
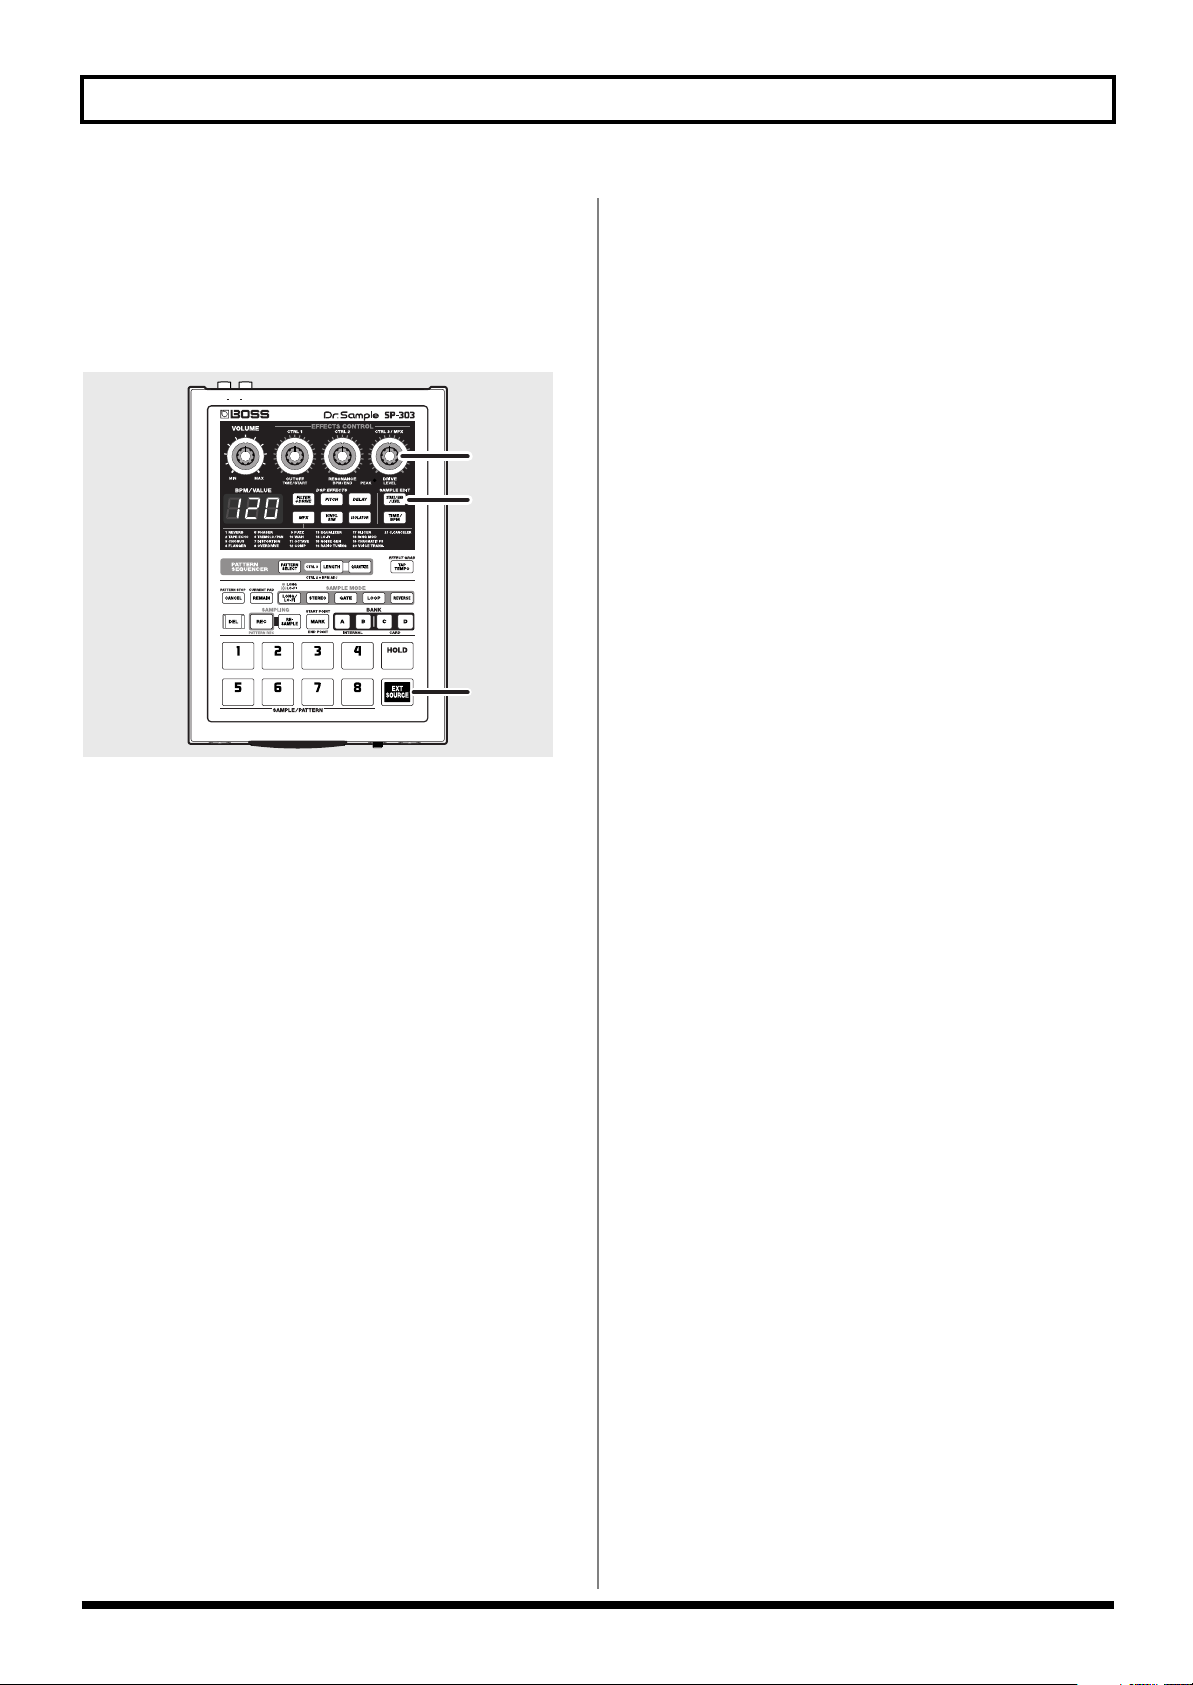
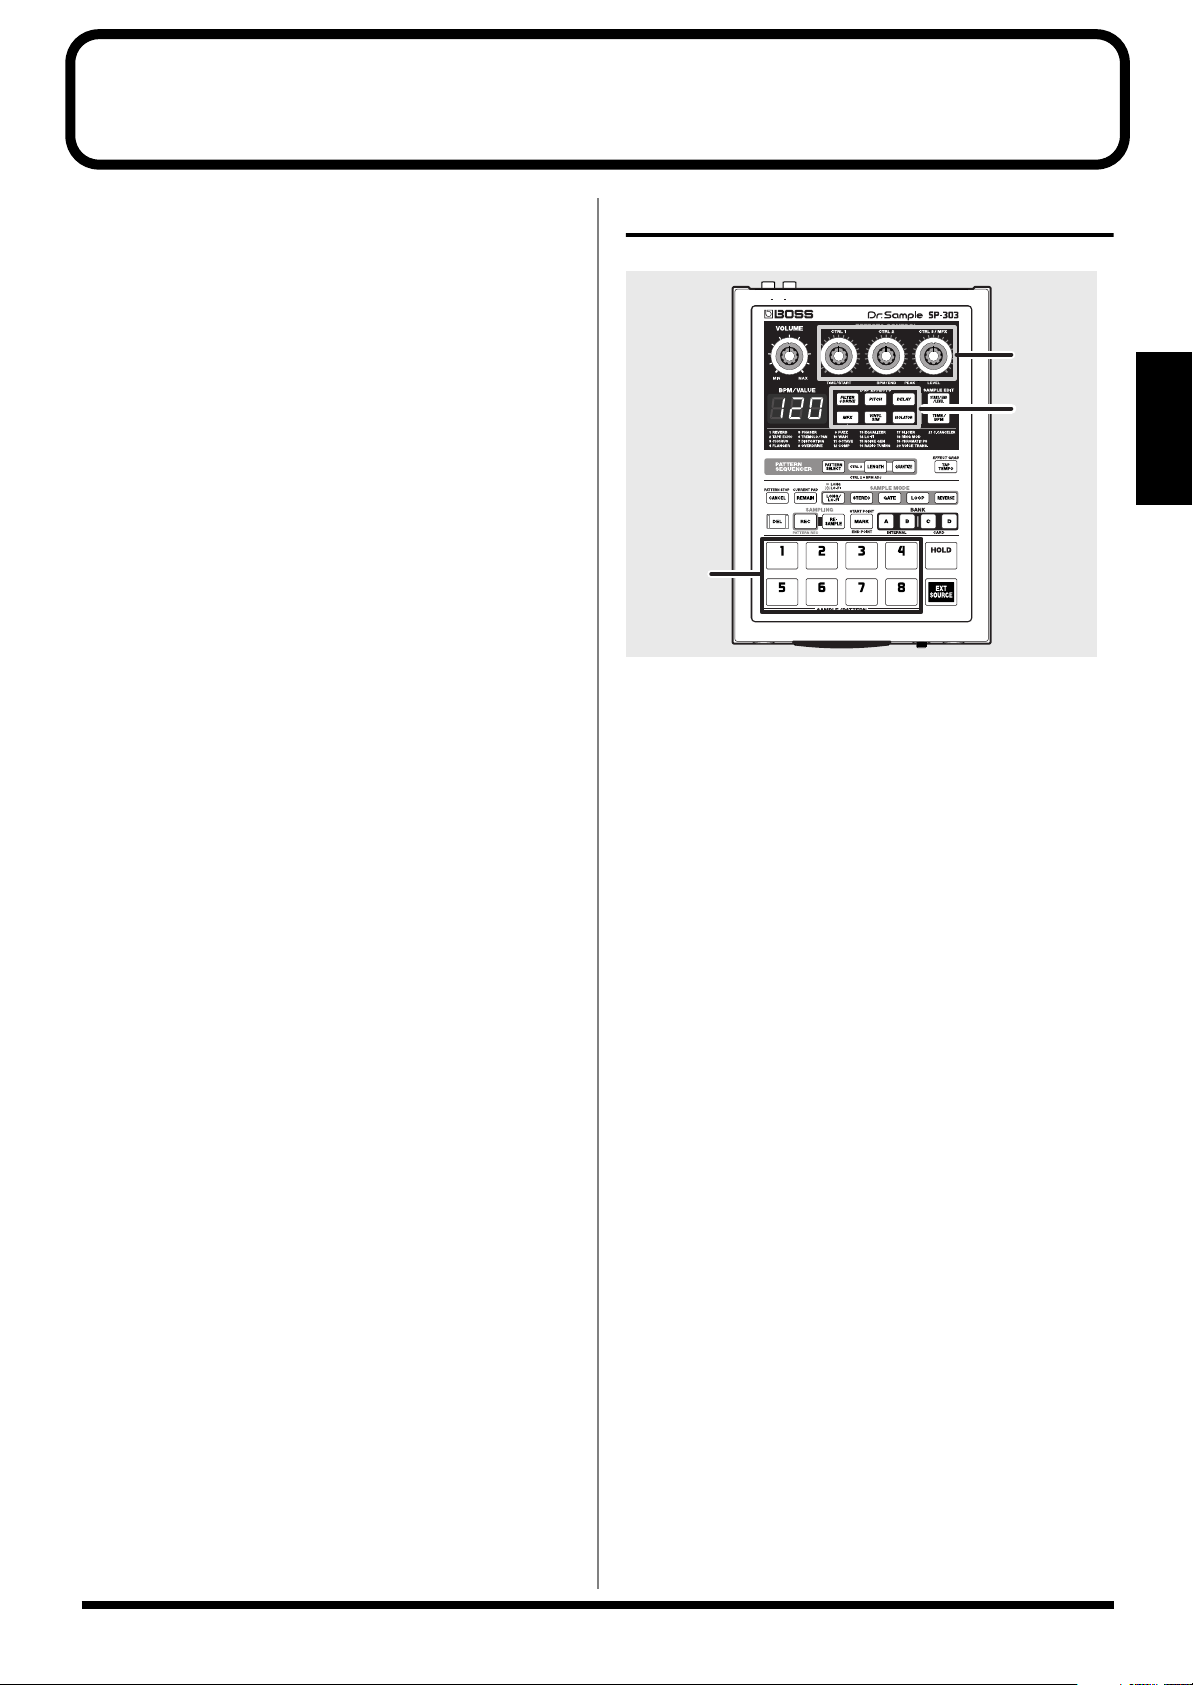
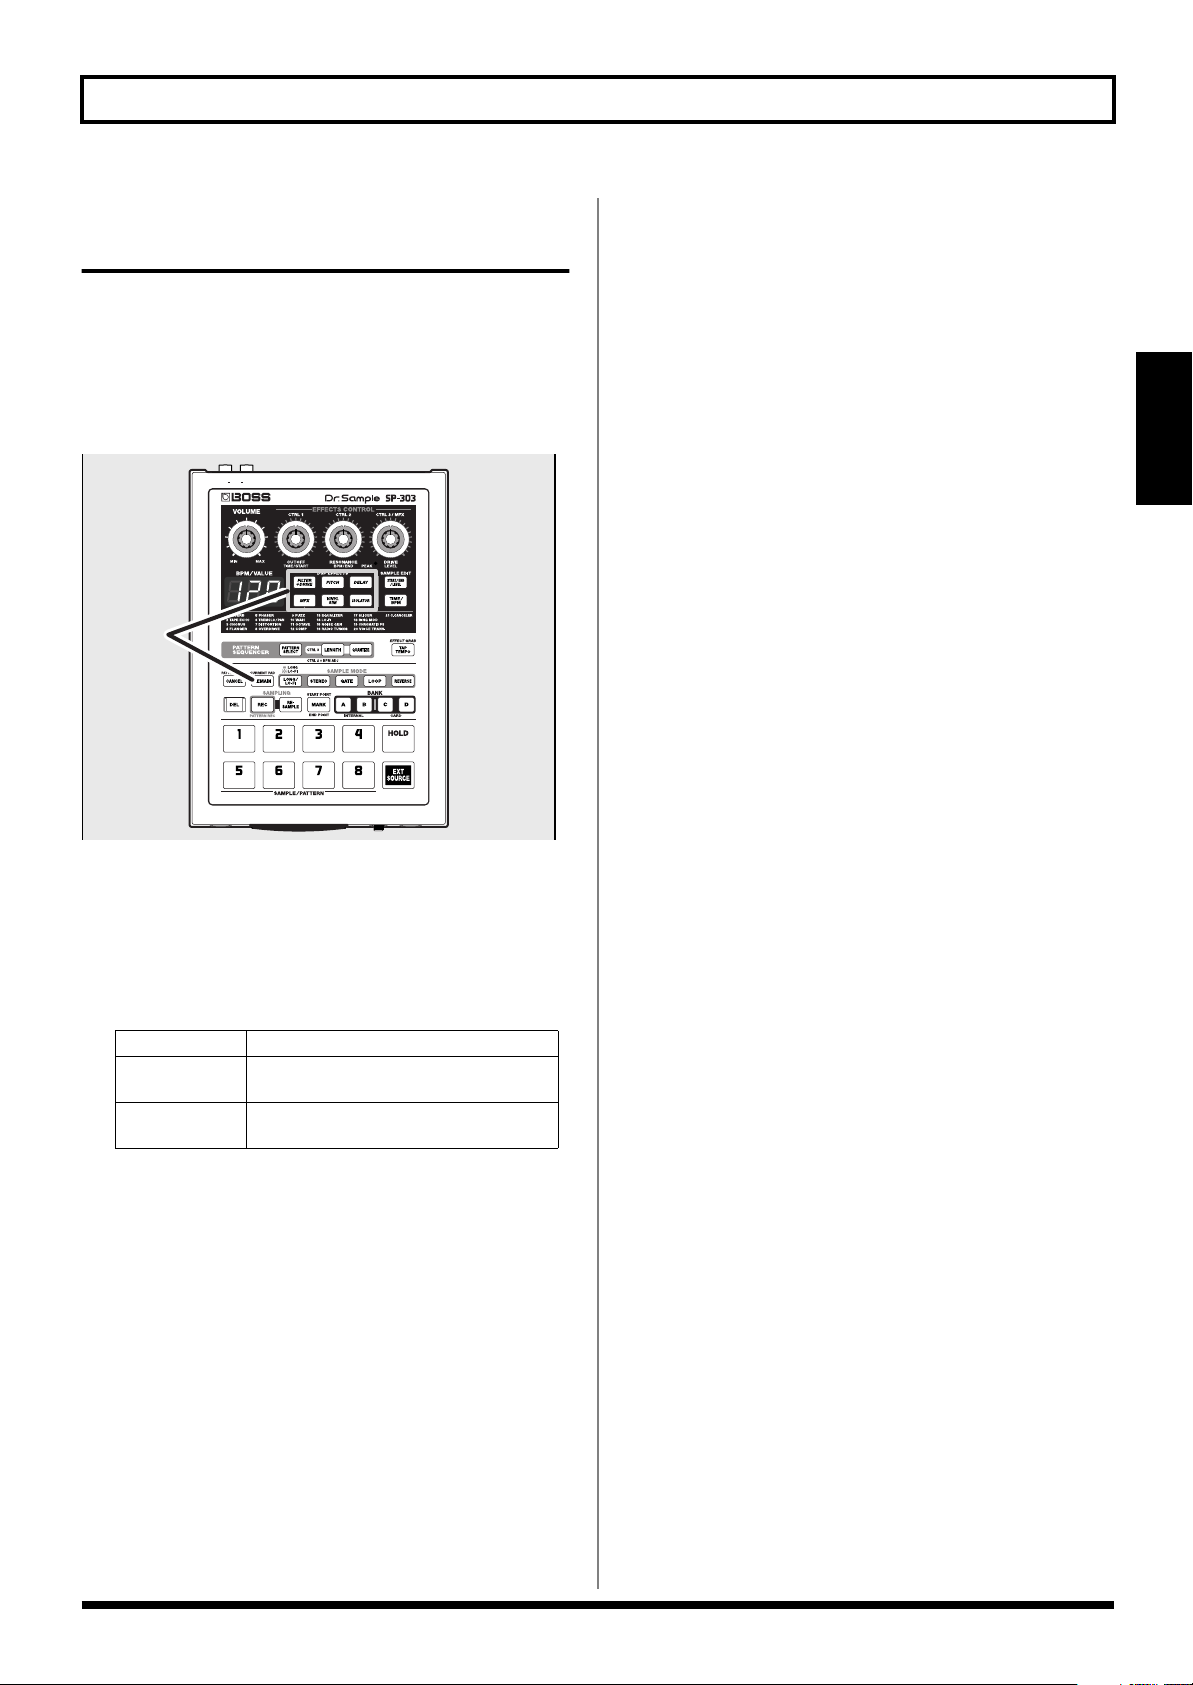
Panel Descriptions
fig.P01
1 2
4
5
3
6
7
11
19
8 9
20 21
12
10
13
22
24
1 VOLUME Knob
Adjusts the volume level of the LINE OUT and
headphones jacks.
2 EFFECTS CONTROL Knobs
Control the parameters assigned to each of the knobs
associated with the selected effect. Also use the knobs in
the following situations.
CTRL 1(Control 1) Knob
Use this to change the sample’s starting point and the
playback time of the sample.
14
15
16
17
18
23
25
26
4 Display
Displays sample and pattern BPM (tempo), settings
values, error messages, and other information. You can
also have the remaining time available for sampling
displayed.
5 EFFECTS Buttons
Select the effects you wish to use. A button is lit when its
effect is on; the light goes out when the effect is turned
off.
* It is not possible to apply two or more effects simultaneously.
CTRL 2 (Control 2) Knob
Use this when changing the BPM (tempo) of the pattern
or when changing the point when the sound of the
sample is to stop.
CTRL 3/MFX (Control 3/MFX) Knob
Use this when selecting the MFX type, or when changing
the sampling level or sampling volume.
3 PEAK Indicator
This indicator helps you to adjust the level when
sampling. For optimal sampling, adjust the level so that
this indicator lights occasionally.
6 START/END/LEVEL Button
Use this to change the point where the sample is to start
and end, and to adjust the level.
7 TIME/BPM Button
Use this to set the length of the playback time and the
BPM (tempo).
8 PATTERN SELECT Button
Press this when playing back or recording patterns.
When this button is lit, you can select patterns by
pressing the pads.
7

Panel Descriptions
9 LENGTH (Pattern Length) Button
Specifies the length of the pattern.
10
QUANTIZE Button
Corrects (quantizes) the timing of the pattern recordings
automatically.
TAP TEMPO Button
11
Tap this button a number of times to change the tempo
so it accords with the timing you used while tapping it.
12
CANCEL Button
By pressing this button you cancel sampling or erasing
samples in progress.
You can also stop playback of the pattern in progress.
REMAIN Button
13
When this button is pressed, the display will indicate the
remaining time available for sampling.
Additionally, by pressing pads while holding down this
button, you can select the samples for which you want to
add effects or change settings.
18
REVERSE Button
This switches the SP-303 to “Reverse Playback,” where
samples are played backwards.
Reverse Playback is in effect when the button is lit; when
not lit, normal Playback is in effect.
19
DEL (Delete) Button
Use this button to delete a sample or pattern. The button
lights up while the deletion is in progress.
REC (Recording) Button
20
Use this when starting and stopping sampling, and
when starting and stopping recording patterns.
21
RESAMPLE (Resampling) Button
Use this when creating new samples made by playing
back previous samples with effects added (resampling).
MARK Button
22
Use this button when you wish to sound only a portion
of a sampled sound. While this button is lit, only the
specified portion will sound.
14
LONG/LO-FI Button
Switches the sampling grade (high-quality/extended
time/Lo-Fi).
Extended time is selected when the button is lit, high-
quality when the button is not lit, and Lo-Fi when the
button is blinking.
15
STEREO Button
Specifies whether sampling will be mono or stereo.
When the button is lit, sampling is in stereo; when not lit,
sampling is mono.
GATE Button
16
This switches between “Gate Playback,” where samples
play only while the pad is held down, and “Trigger
Playback,” whereby the pad is pressed to toggle between
play and stop of the sample.
Gate Playback is in effect when the button is lit; when
not lit, Trigger Playback is in effect.
17
LOOP Button
This switches between “Loop Playback,” where samples
play repeatedly when the pad is pressed, and “One Shot
Playback,” in which the sample is played only one time.
Loop Playback is in effect when the button is lit; when
not lit, One Shot Playback is in effect.
BANK Buttons A/B/C/D
23
When the PATTERN SELECT button is not lit, these
switch sample banks; when PATTERN SELECT is lit, the
buttons switch pattern banks.
The SP-303’s internal Bank A or B is selected by pressing
A or B. Press C or D to select Bank C or D on the memory
card.
Pads (1–8)
24
When [PATTERN SELECT] is not lit, pressing a pad
plays the sample assigned to that pad. The pad is lit
while the sample plays.
When [PATTERN SELECT] is lit, pressing the pad plays
back and stops the playback of patterns.
HOLD Pad
25
If you hold down this pad while pressing another pad,
the sample will continue to play even after you release
the pad.
26
EXT SOURCE (External Source) Pad
By using this pad you can sound/silence the sound from
an external input without having to sample it, and can
apply effects to the sound.
8
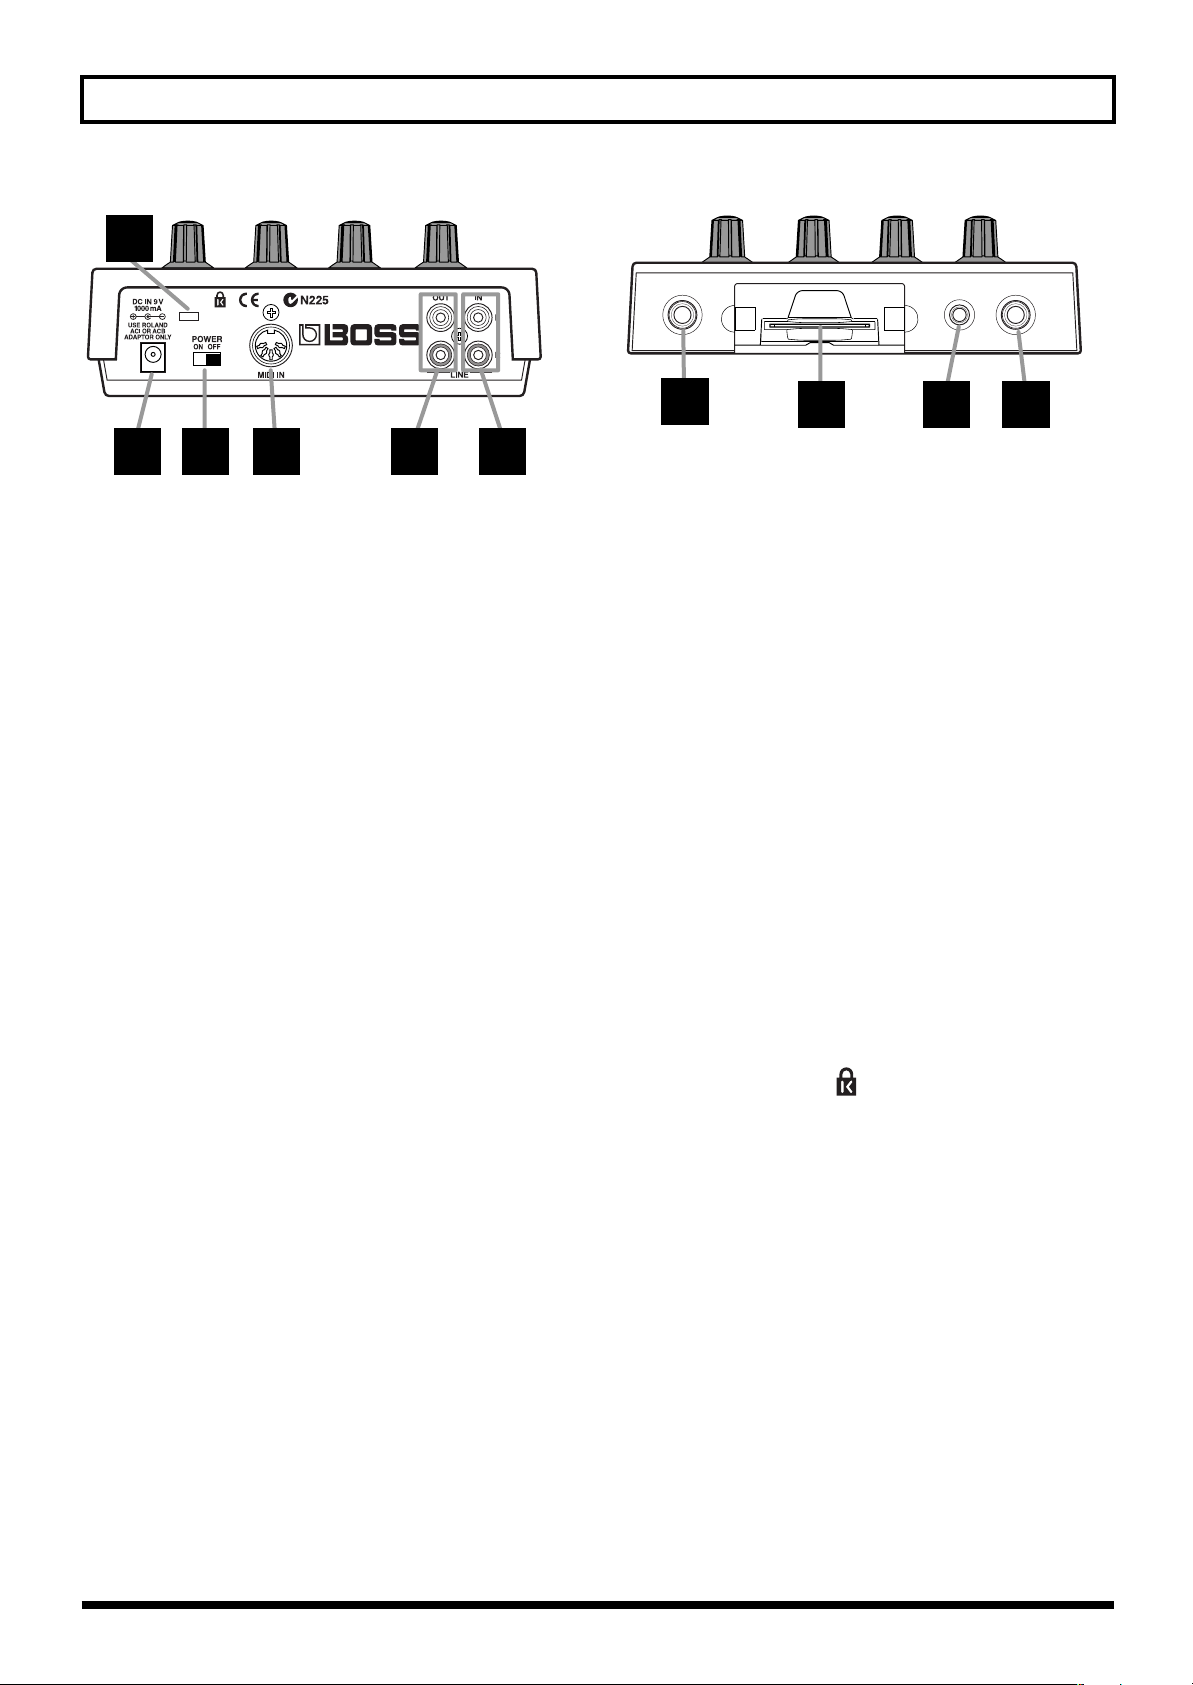
Panel Descriptions
fig.P02
36
27 28 29 30 31
27
AC Adaptor Jack
Connect the AC adapter to this connector.
* Be sure to use only the specified AC adaptor. Doing so may
damage the unit.
Power Switch
28
Turns the power on/off.
29
MIDI IN Connector
You can connect an external MIDI device (such as a
sequencer, keyboard, or rhythm machine), and use the
device to control the SP-303. Use MIDI cable (sold
separately) to make connections.
30
LINE OUT Jacks (L/R)
These audio outputs are RCA phono type jacks for
connection to an amp or mixer through which you wish
to play the sampled sounds.
fig.P03
32
32
PHONES (Headphones) Jack
A set of headphones can be connected here to hear the
same sound as the line outputs. The jack accepts stereo
1/4 inch phone plug.
33
MEMORY CARD Slot
A memory card (SmartMedia: optional) can be inserted
here. It is also possible to use card banks C/D to record
long samples that the internal memory could not
accommodate.
A card can be used to store (backup) the data from
internal memory.
34
MIC LEVEL Knob
Adjusts the volume of the mic sound.
MIC Jack
35
Connect a microphone.
33 34 35
LINE IN Jacks (L/R)
31
RCA phono type audio input jacks for connecting a CD
player or other source device used for taking samples.
36
Security Slot ( )
Web:www.kensington.com
9
IMPORTANT NOTES
291a
In addition to the items listed under “USING THE UNIT SAFELY” on page 2–3, please read and observe the following:
Power Supply
301
• Do not use this unit on the same power circuit with any
device that will generate line noise (such as an electric
motor or variable lighting system).
302
• The AC adaptor will begin to generate heat after long
hours of consecutive use. This is normal, and is not a
cause for concern.
307
• Before connecting this unit to other devices, turn off the
power to all units. This will help prevent malfunctions
and/or damage to speakers or other devices.
Placement
351
Using the unit near power amplifiers (or other equipment
•
containing large power transformers) may induce hum. To
alleviate the problem, change the orientation of this unit; or
move it farther away from the source of interference.
352
• This device may interfere with radio and television
reception. Do not use this device in the vicinity of such
receivers.
354a
• Do not expose the unit to direct sunlight, place it near
devices that radiate heat, leave it inside an enclosed
vehicle, or otherwise subject it to temperature extremes.
Excessive heat can deform or discolor the unit.
355
• To avoid possible breakdown, do not use the unit in a wet
area, such as an area exposed to rain or other moisture.
Maintenance
401a
• For everyday cleaning wipe the unit with a soft, dry cloth
or one that has been slightly dampened with water. To
remove stubborn dirt, use a cloth impregnated with a
mild, non-abrasive detergent. Afterwards, be sure to wipe
the unit thoroughly with a soft, dry cloth.
402
• Never use benzine, thinners, alcohol or solvents of any kind,
to avoid the possibility of discoloration and/or deformation.
Additional Precautions
551
• Please be aware that the contents of memory can be
irretrievably lost as a result of a malfunction, or the
improper operation of the unit. To protect yourself against
the risk of loosing important data, we recommend that
you periodically save a backup copy of important data
you have stored in the unit’s memory on a Memory card
(SmartMedia).
552
• Unfortunately, it may be impossible to restore the contents of
data that was stored in the unit’s memory, and on a Memory
card (SmartMedia) once it has been lost. Roland Corporation
assumes no liability concerning such loss of data.
553
• Use a reasonable amount of care when using the unit’s
buttons, sliders, or other controls; and when using its jacks
and connectors. Rough handling can lead to malfunctions.
554
• Never strike or apply strong pressure to the display.
556
• When connecting / disconnecting all cables, grasp the
connector itself—never pull on the cable. This way you
will avoid causing shorts, or damage to the cable’s
internal elements.
558a
• To avoid disturbing your neighbors, try to keep the unit’s
volume at reasonable levels. You may prefer to use
headphones, so you do not need to be concerned about
those around you (especially when it is late at night).
559a
• When you need to transport the unit, package it in the box
(including padding) that it came in, if possible. Otherwise,
you will need to use equivalent packaging materials.
562
• Use a cable from Roland to make the connection. If using
some other make of connection cable, please note the
following precautions.
Some connection cables contain resistors. Do not use cables
•
that incorporate resistors for connecting to this unit.
The use of such cables can cause the sound level to be
extremely low, or impossible to hear. For information on
cable specifications, contact the manufacturer of the cable.
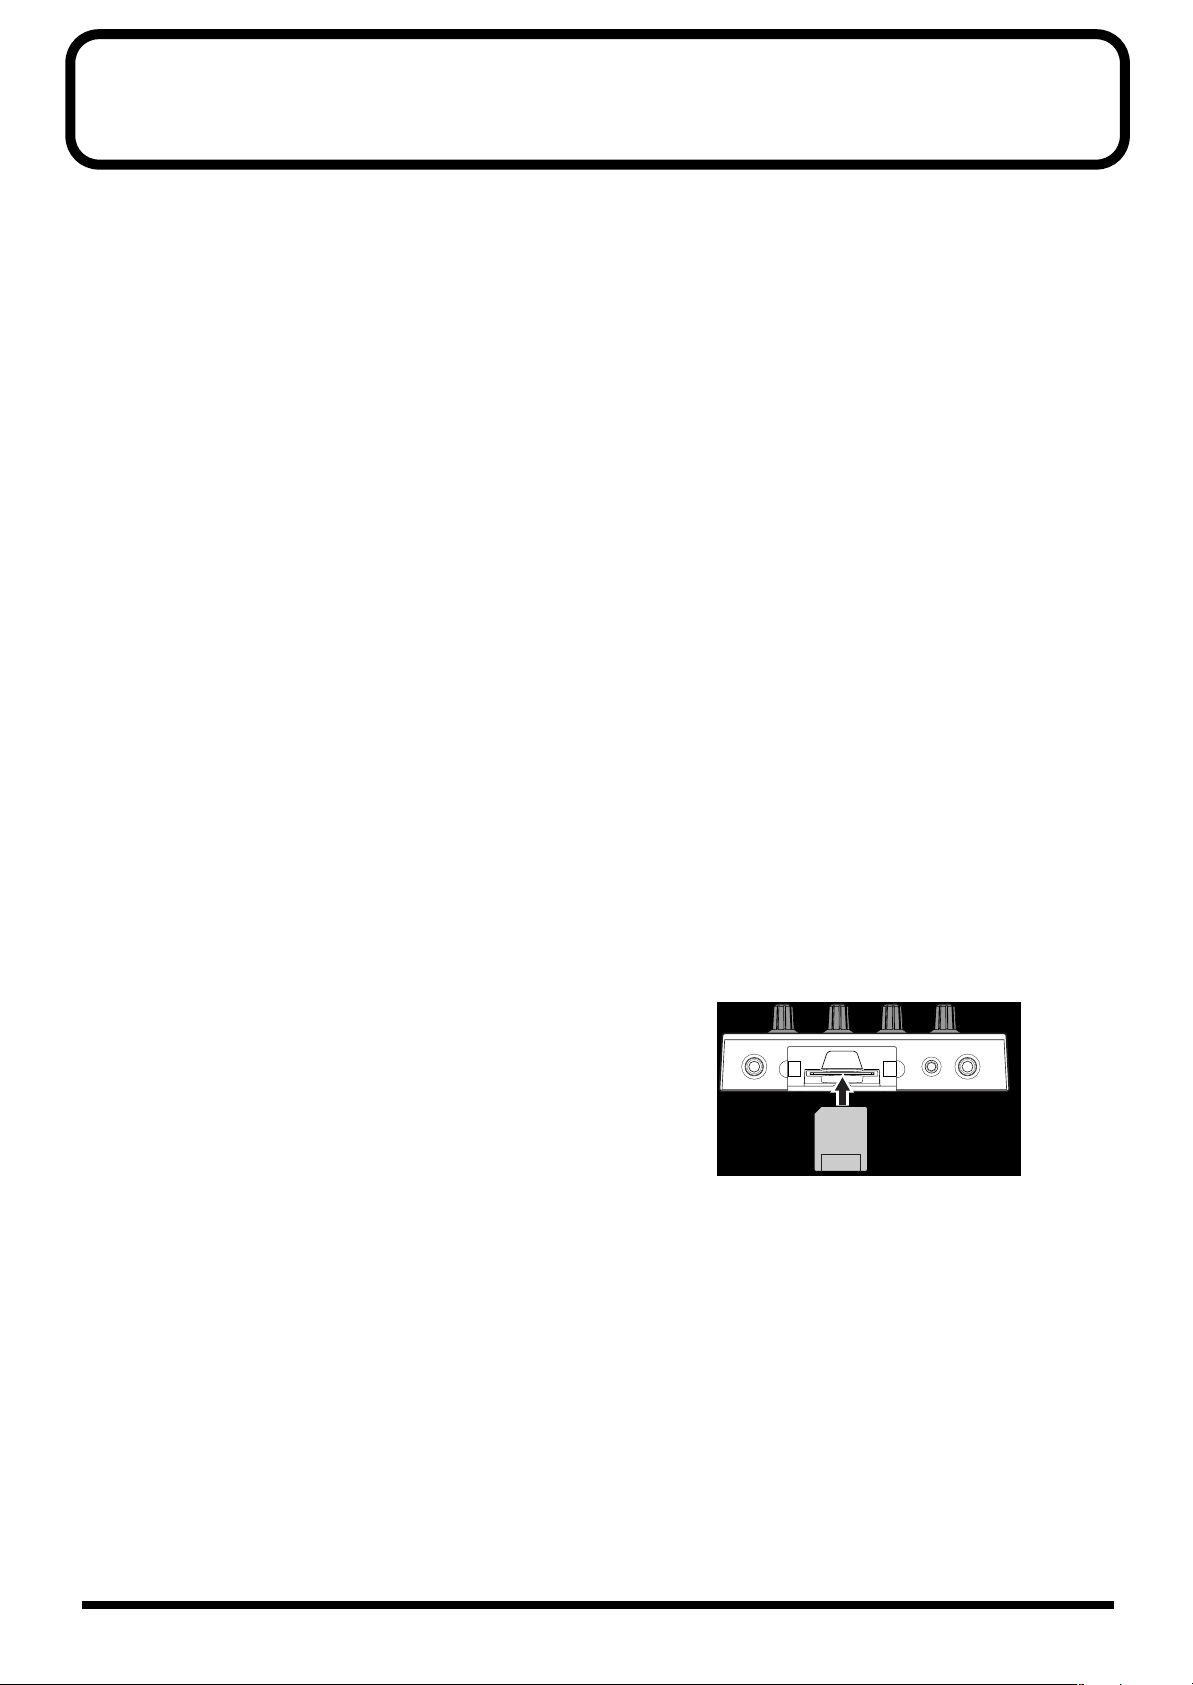
Before Using Cards
Using Memory Cards
• Never insert or remove a memory card while the power to
the SP-303 is on.
704
• Carefully insert the Memory card all the way in—until it is
firmly in place.
fig.00-01
The surface without
gold contacts
must face upward
705
• Never touch the terminals of the DATA card. Also, avoid
getting the terminals dirty.
Copyright
851
• Unauthorized recording, distribution, sale, lending, public
performance, broadcasting, or the like, in whole or in part,
of a work (musical composition, video, broadcast, public
performance, or the like) whose copyright is held by a
third party is prohibited by law.
853
• Do not use this unit for purposes that could infringe on a
copyright held by a third party. Roland assumes no
responsibility whatsoever with regard to any infringements of third-party copyrights arising through your use
of this unit.
10
QUICK START
AC Adaptor
(ACI or ACB series)
MIDI Sequencer etc.
CD/MD player
Stereo Headphones
Microphone
OUTPUT
MIDI OUT
MIDI cable
to an AC Outlet
Audio Set / Amplified Speaker etc.
LINE IN
Audio Cable
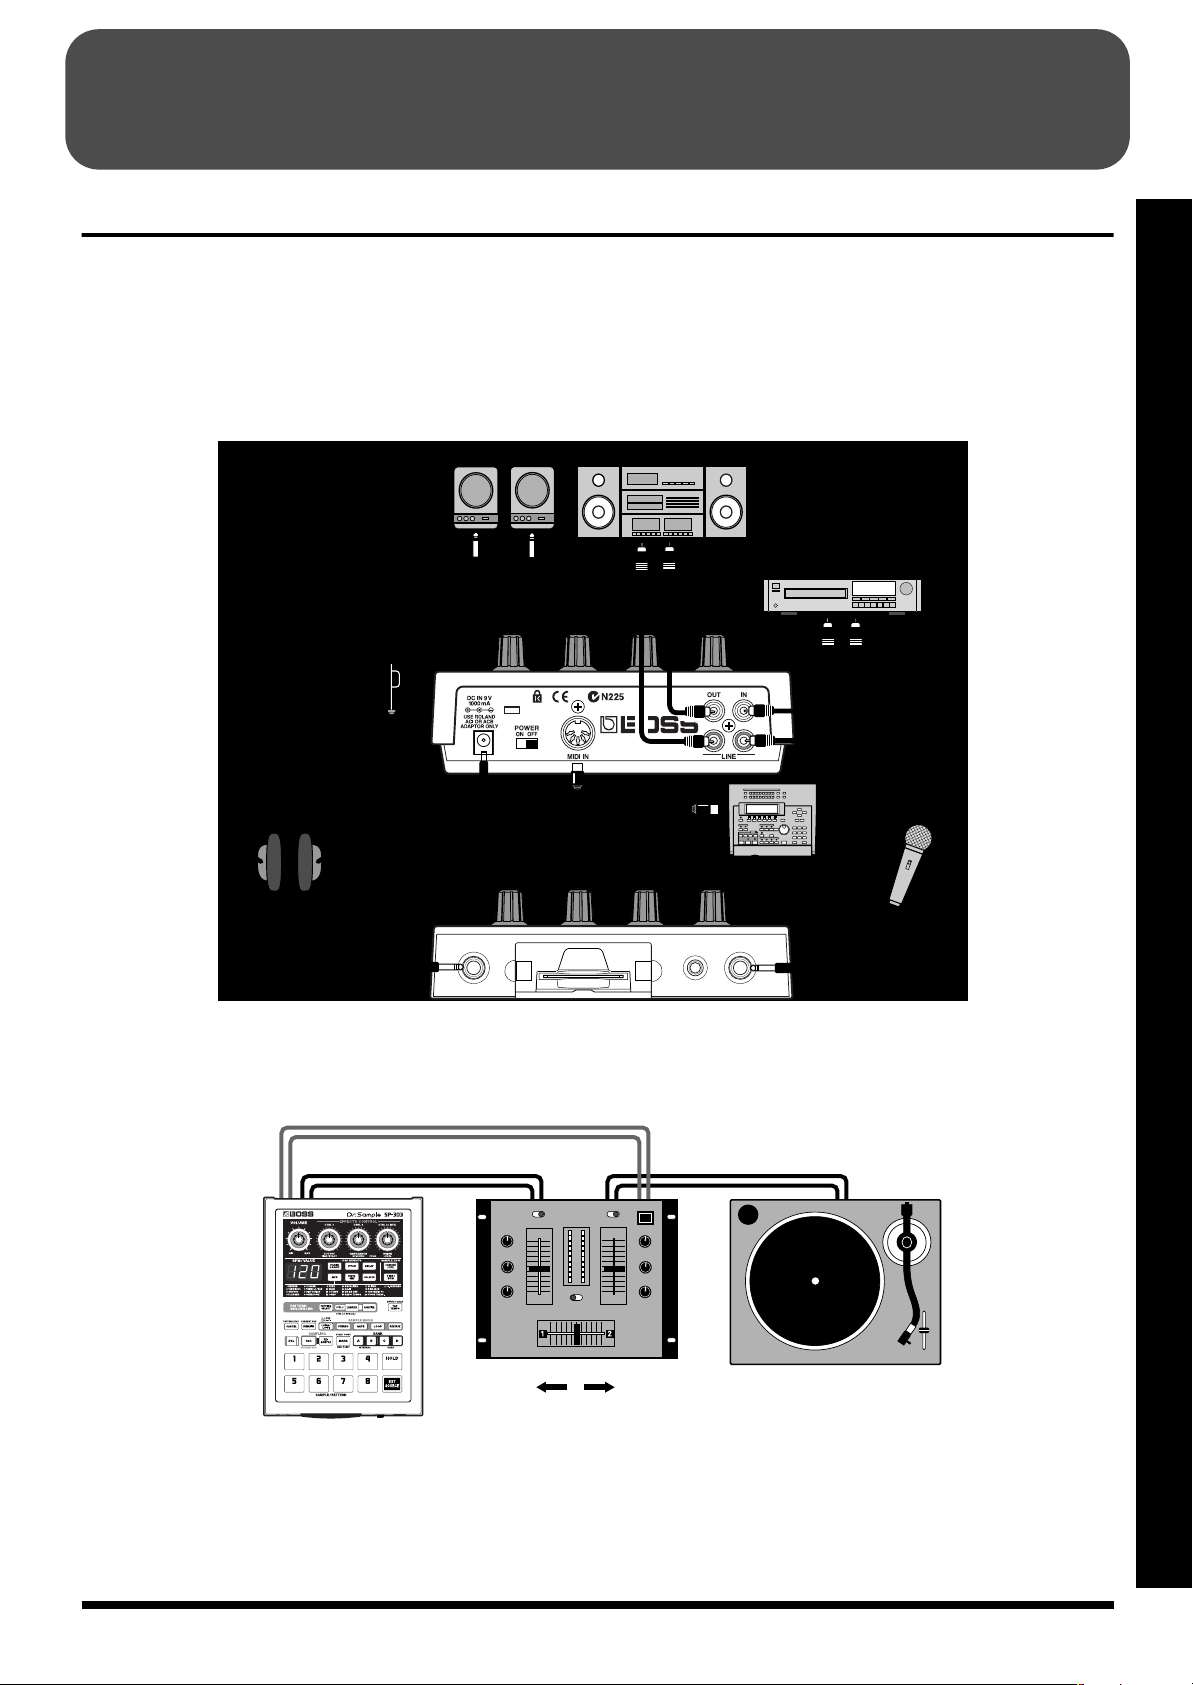
Making Connections
The SP-303 does not contain an amp or speaker. To hear
sound, either connect an amplifier and speakers or use
headphones. Refer to the following diagram and connect the
SP-303 to the other equipment.
fig.Q01
* Audio cables, MIDI cables, stereo headphones, and
microphones are not included. These may be purchased
separately from your dealer.
* To prevent malfunction and/or damage to speakers or other
devices, always turn down the volume, and turn off the power
on all devices before making any connections.
Quick Start
DJ system setup
fig.Q02
When sampling from a record, set the mixer fader to the
Turntable position (maximum).
The volume level during sampling is adjusted by the SP-
303’s REC level (p. 28, 30) and by the mixer’s effect send
level.
LINE
LINE
OUT
IN
CH 1:
LINE IN
SP-303 Turntable
CH 2:
PHONO IN
EFFECT
SEND
Mixer settings
CH 1 Input: line Effect: OFF
CH 2 Input: PHONO Effect: ON
* Settings may be different depending on the mixer. For details
refer to the owner’s manual for your mixer.
11
QUICK START
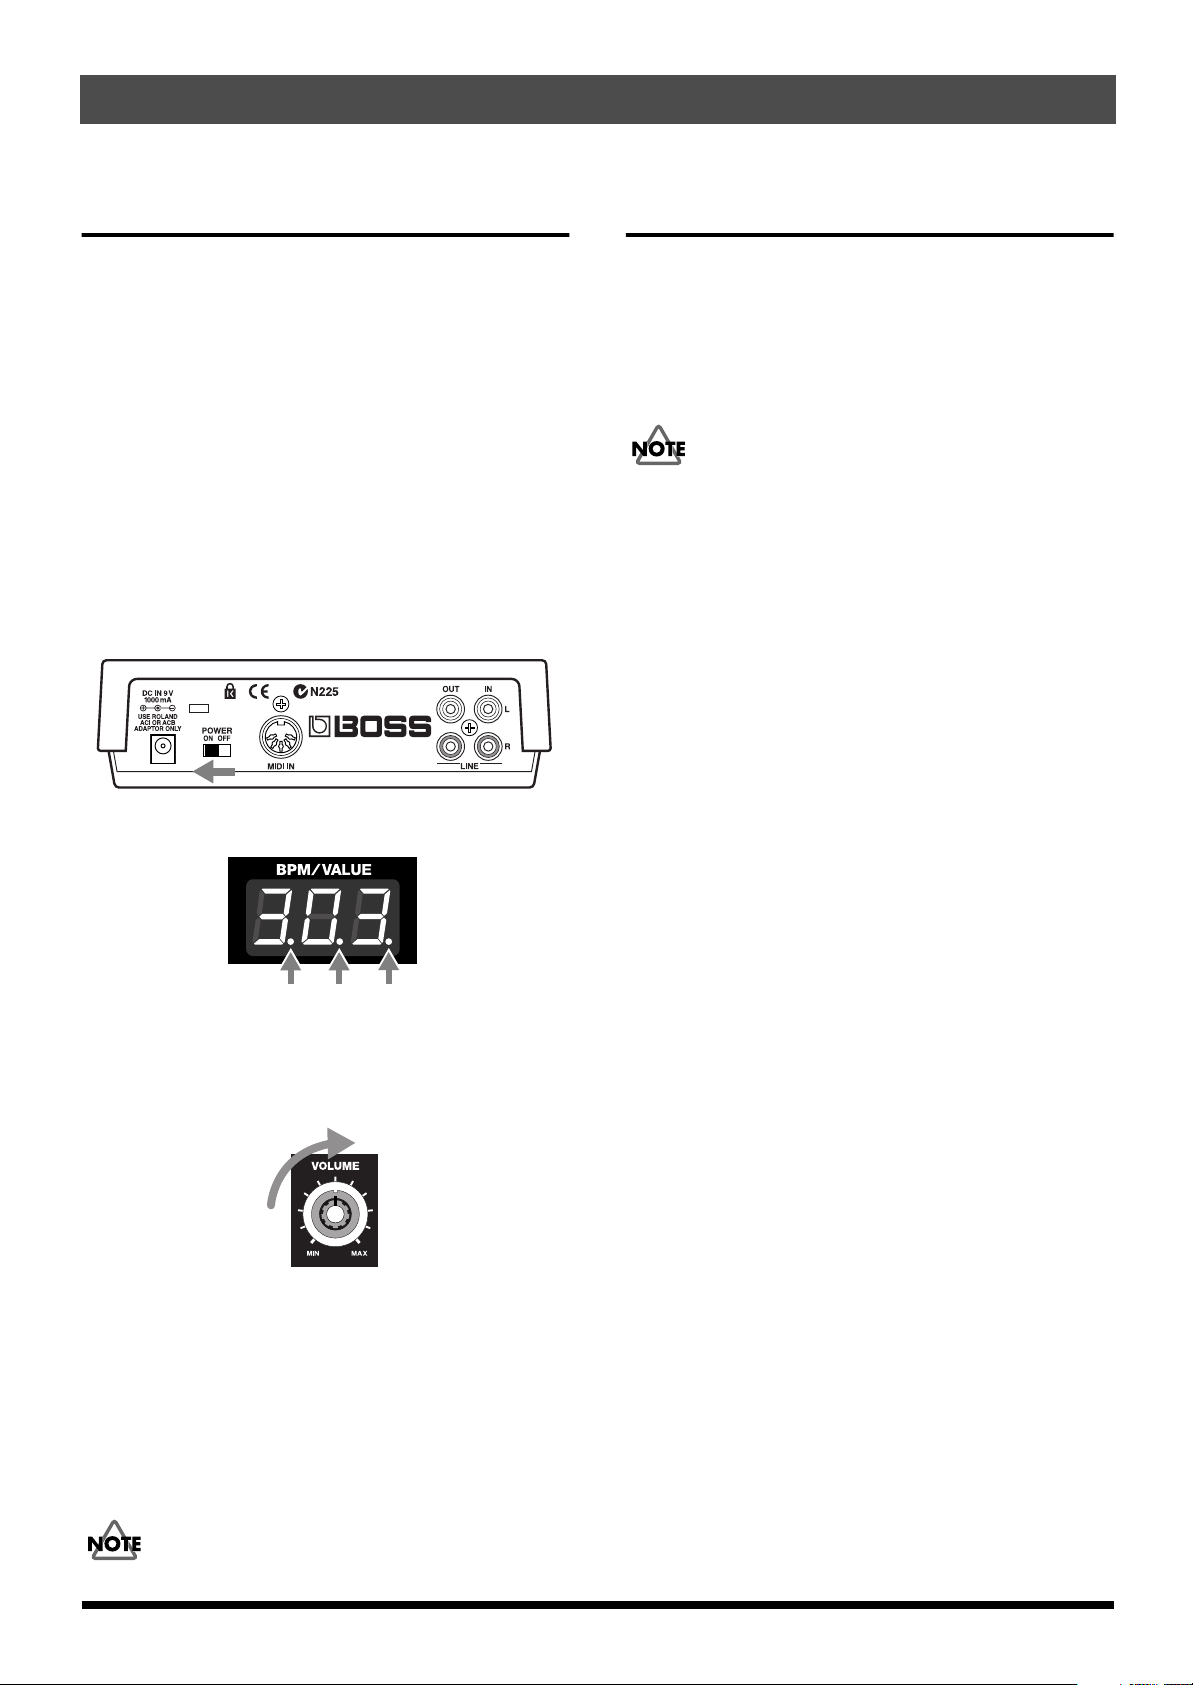
Turning On the Power
Once the connections have been completed (p. 11), turn on
power to your various devices in the order specified. By
turning on devices in the wrong order, you risk causing
malfunction and/or damage to speakers and other devices.
1.
Before you turn the power on, check the following
points.
• Are peripheral devices connected correctly?
• Are the volume levels on the SP-303 and any amp or
mixer that is connected turned down to the lowest
settings?
2.
Turn the SP-303’s power switch ON.
“303” appears on the display for a few seconds. The
will also blink.
fig.Q03
dots
Turning Off the Power
1.
Before you turn off the power, make sure that the
volumes of the SP-303 and the connected amp/mixer
are set to their minimum position.
2.
Turn off the power of the amp/mixer etc.
3.
Turn off the power switch of the SP-303.
Never turn off the power while the dots are blinking.
This may result in corruption of data in the SP-303’s
internal memory or on memory cards.
fig.Q04
Dots
3.
Turn on the power of your amp/mixer etc.
4.
Rotate the VOLUME knob to adjust the SP-303’s volume.
fig.Q05
5.
Also adjust the volume of the connected amp/mixer etc.
* This unit is equipped with a protection circuit. A brief interval
(a few seconds) after power up is required before the unit will
operate normally.
* If you turn on the power with a memory card already inserted,
the dots will blink until the memory card is detected. The unit
will not operate during this time.
Never turn off the power while the dots are blinking.
12
QUICK START
1
2
3
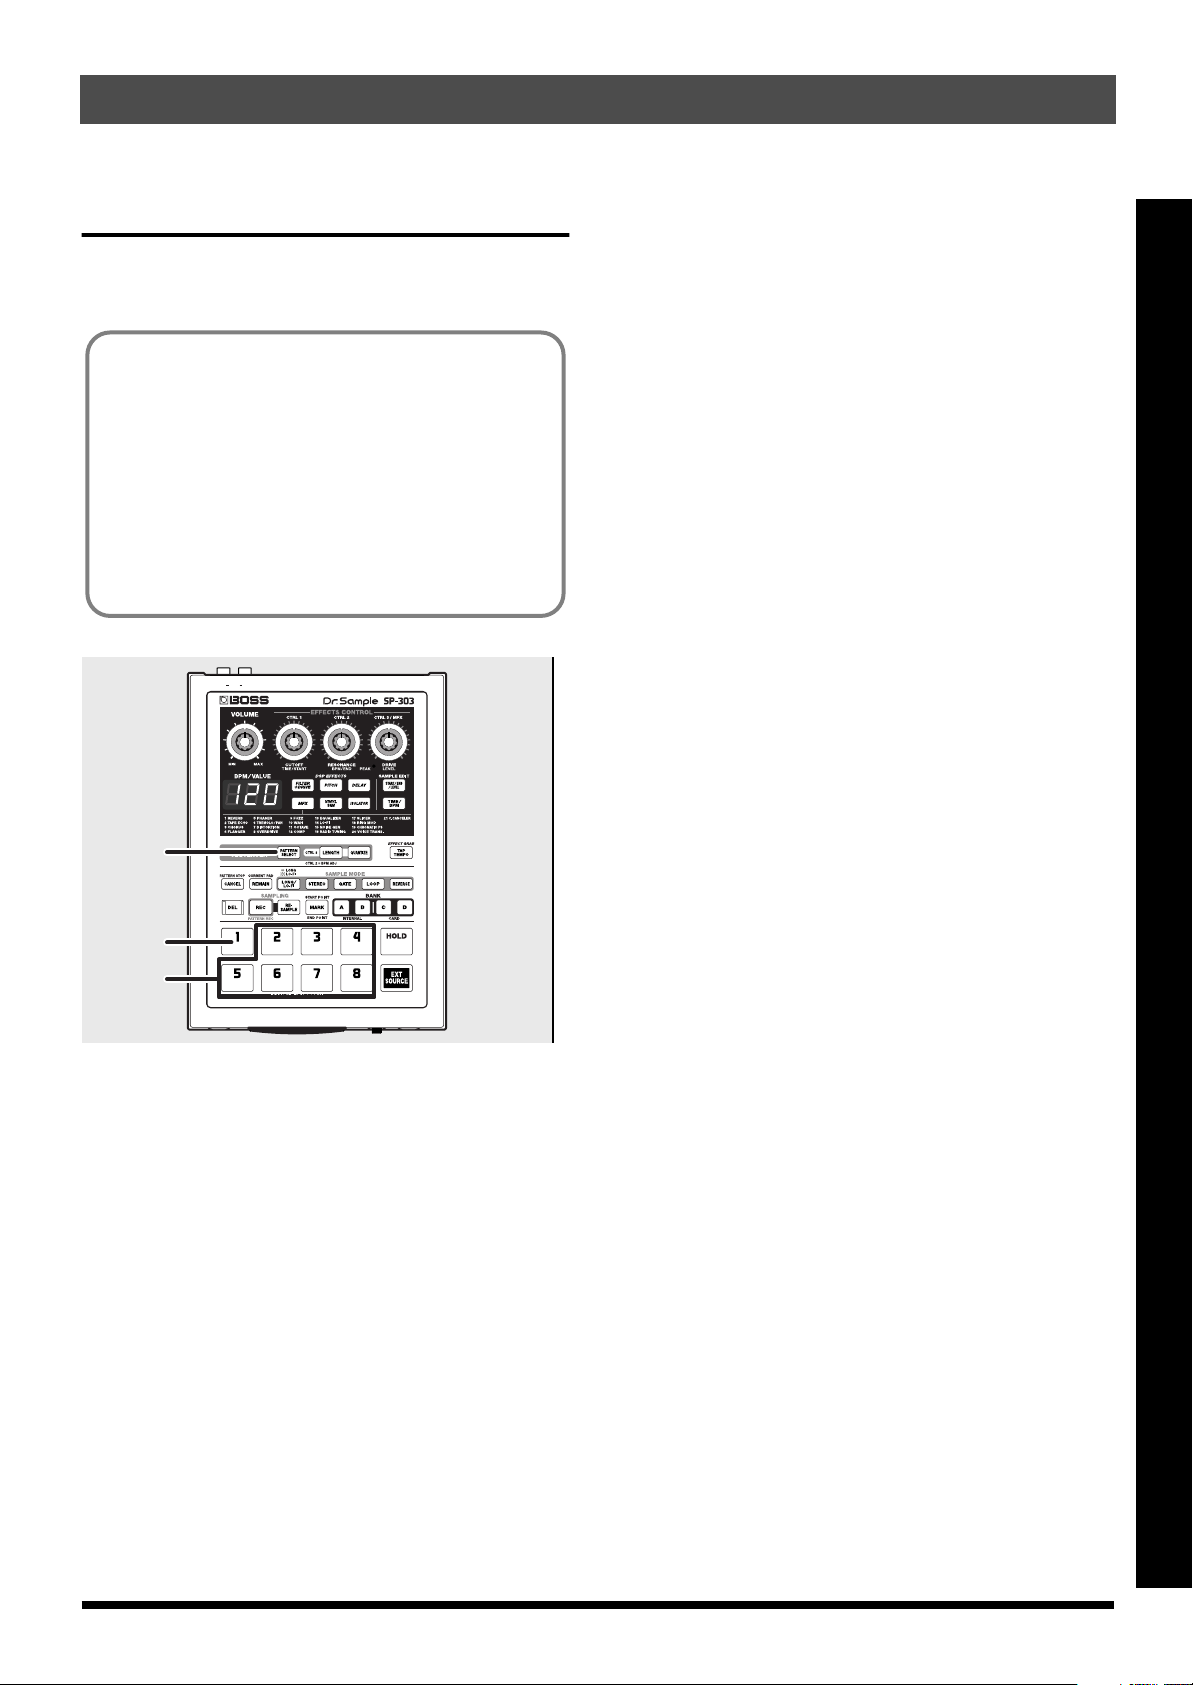
Listen to the Samples
When the SP-303 is shipped from the factory, 1–8 of bank A
already contain samples. Let’s listen to these samples.
● What is a sample?
A sample is a piece of sampled sound (a “waveform”)
together with various settings that determine how it can
be played during a performance, which has been
assigned to a pad.
● What Is a Sample Bank?
The samples that are assigned to each of the eight pads
are collectively referred to as a bank. The SP-303 has four
sample banks: A–D.
fig.Q06
* The SP-303 is able to sound up to eight pads simultaneously.
If you press additional pads in an attempt to play more, the
sound of the first-pressed pad will be turned off (pad dark) to
make way for the newly-pressed pad (last-note priority).
However depending on the settings, it may not be possible to
sound eight pads simultaneously. For more detailed
instructions, refer to “Number of Samples That Can Be Played
Simultaneously (Polyphony)” (p. 18).
* Once deleted, the samples assigned in the factory settings
cannot be recovered. If there is any data you wish to retain,
purchase a memory card (SmartMedia: 8 MB–64 MB)
separately, then save the pattern to the memory card. For
instructions on saving samples to memory cards, refer to
“Saving Samples to Memory Cards (Sample Save)” (p. 49).
Quick Start
1.
Confirm that [PATTERN SELECT] is not lit.
If [PATTERN SELECT] is lit, press it so that the button’s
light goes out.
2.
Press pad 1.
The pad will remain lit while the sample is playing.
3.
After verifying that you hear the sound, try pressing
pads 2–8 as well.
* If pressing a pad does not produce sound, make sure that
sample bank A is selected (BANK [A] is lit). If a different bank
is selected, press the BANK [A] button to switch to bank A.
* The volume does not change in response to playing dynamics.
Applying excessive force to a pad will cause malfunctions. For
more on how to adjust sample volume levels, refer to “Setting
the Sample Volume” (p. 38).
13
QUICK START
1
2
3,5
4
For explanations of the Pitch Shifter, Delay, Vinyl
Simulator, and Isolator effects, as well as instructions for
selecting effects used in MFX and the workings of these
effects, refer to “Chapter 2 Using the Effects” (p. 21).
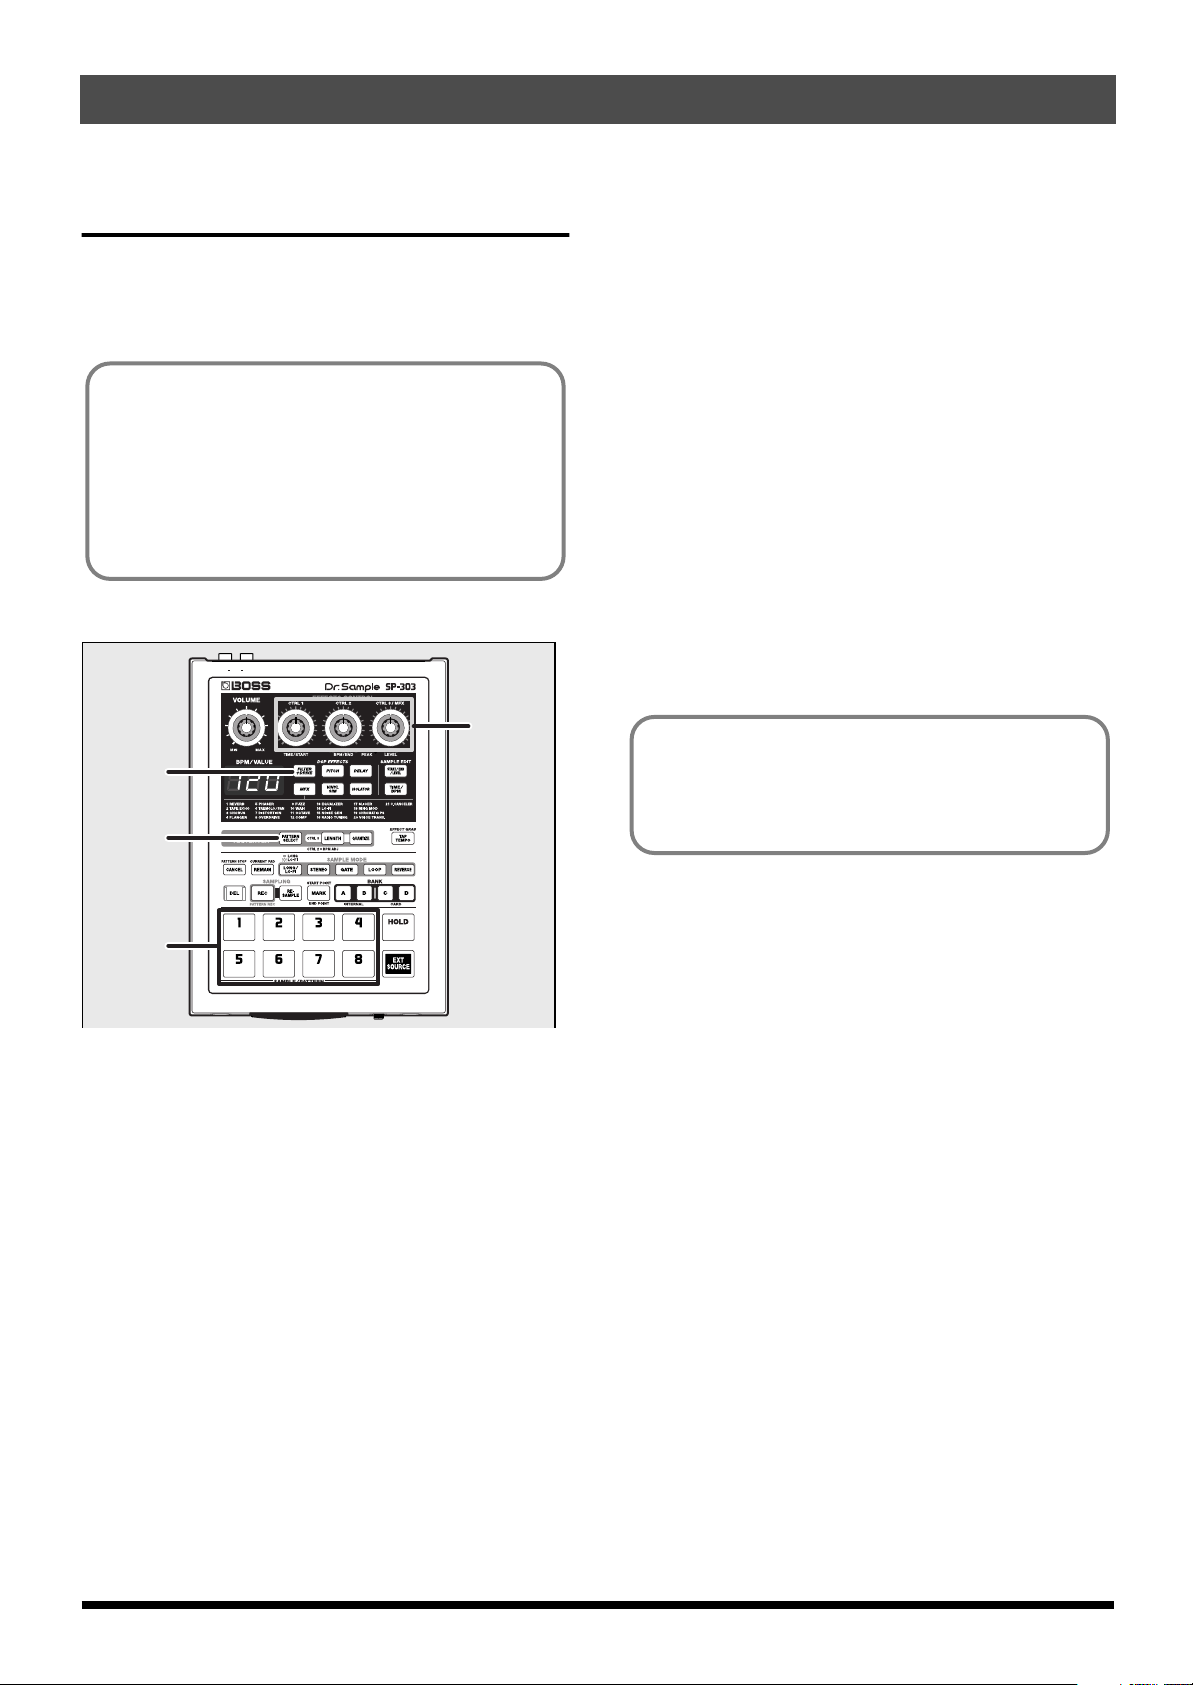
Adding Effects to Samples
The SP-303 has 26 effects which can add special characters to
the sound.
Here’s how to try out these effects and hear what they can do.
Of the twenty-six effects, you can select five of them–
Filter + Overdrive, Pitch Shifter, Delay, Vinyl Simulator,
and Isolator–by directly pressing their buttons.
The other twenty-one effects are grouped together in
MFX (the multi-effects). Hold down [MFX] and turn the
CTRL 3/MFX knob to select which of these twenty-one
effects is to be used.
Here, try applying Filter + Overdrive to the sample.
fig.Q07
4.
Turn the CTRL 1–3 knobs to adjust the amount of Filter
+ Overdrive to be applied.
CTRL 1 (CUTOFF):
Adjusts the filter cutoff frequency. The more the knob is
turned to the left the darker the sound becomes;
conversely, turning this to the right (clockwise) gives the
sound a brighter, clearer feeling.
CTRL 2 (RESONANCE):
Adjusts the filter resonance. The more the knob is turned
to the right, the more the sound’s particular
characteristics are emphasized.
CTRL 3 (DRIVE):
Adjusts the amount of distortion in the filter. The more
the knob is turned to the right, the greater the amount of
distortion, creating a wilder sound.
5.
To turn the Filter + Overdrive off, press
[FILTER+DRIVE]; the light goes out.
1.
Confirm that [PATTERN SELECT] is not lit.
If [PATTERN SELECT] is lit, press it so that the button’s
light goes out.
2.
Press the pad which contains the sample to which you
wish to apply Filter + Overdrive effect.
The pad will light, and the sample will sound.
3.
Press [FILTER+DRIVE], and confirm that the button
has lit.
The Filter + Overdrive are applied to the sample sound.
14
Try Playing a Pattern
● Pattern Banks
With the SP-303, you can press a number of pads in sequence
to play a series of samples, and record that sequence as
played. Such a sequential arrangement of performed samples
is called a “
At the factory settings, a demo pattern is assigned to Pad 1 in
Pattern Bank A. Try listening to this pattern.
* All rights reserved. Unauthorized use of this material for
* Once deleted, the demo pattern cannot be recovered. If you
Just as with the samples, patterns are assigned to the
pads. A set of patterns assigned to the eight pads is
treated collectively as a “pattern bank.”
The SP-303 has four pattern banks: A–D.
Pattern banks and sample banks are different. For
example, you do not necessarily need to use Bank A
samples in Pattern Bank A.
pattern
purposes other than private, personal enjoyment is a violation
of applicable laws.
want to keep the demo pattern, purchase a memory card
(SmartMedia: 8 MB–64 MB) separately, then save the pattern
to the memory card. For instructions on saving samples to
memory cards, refer to “Saving Patterns to Memory Cards
(Pattern Save)” (p. 50).
.”
QUICK START
2.
Press pad 1.
Pad 1 momentarily lights, then goes off, and the
[PATTERN SELECT] light goes out.
The performance of the demo pattern begins.
* If a pattern fails to start playing even when the pad is pressed,
check to make sure that [PATTERN SELECT] is lit, and that
Bank A is selected (BANK [A] is lit). If a different bank is
selected, press [PATTERN SELECT], illuminating the
button, then press BANK [A] to select Bank A.
3.
After verifying that you hear the sound, try pressing
pads 2–8 as well.
The sample for the pad that is pressed is played.
* After the pattern starts playing, play of samples is enabled
when the pads are pressed.
You can then play samples along with the performance
of the pattern.
4.
Press [CANCEL] (PATTERN STOP).
The pattern is stopped.
* After playing or switching patterns, the play of samples is
automatically enabled when the pads are pressed.
Playing with the Tempo Changed
Here’s how to change the tempo at which a pattern will be played.
fig.Q09
3
Quick Start
fig.Q08
1.
Press [PATTERN SELECT], and confirm that the
button has lit.
“Ptn” appears in the display.
2,4
1
1
1.
4
2
3
Press [PATTERN SELECT], and confirm that the
button has lit.
2.
Press [TIME/BPM], and confirm that the button has lit.
3.
Turn the CTRL 2 knob.
The performance tempo of the pattern changes. The
performance tempo is indicated by the BPM in the display.
BPM is short for “beats per minute,” or the number of
quarter notes played in a one-minute interval.
4.
Press [TIME/BPM] once more, and confirm that the
button has turned off.
15
QUICK START
Sampling Your Own Sounds
Here, let’s try sampling to Pad 1 in Sample Bank B, which has
had no samples assigned to it at the factory.
Unauthorized sampling from a CD, record, tape, video
production, or broadcast whose copyright is owned by a
third party is forbidden by law, with the exception of
special cases such as private use.
Lifting the SP-303’s
Memory Protection
1.
Refer to p. 11 for instructions on connecting CD and
MD players, microphones, and other devices.
2.
Press BANK [B], and confirm that the button has lit.
3.
Press [REC] and confirm that the button has lit.
The SP-303 switches to sampling standby mode, and a
pad that has no sample assigned to it is automatically
selected and begins blinking.
* If you now decide not to sample, press [CANCEL].
[REC] light goes out.
4.
Press pad 1.
When Pad 1 is pressed, the other pad lights go out.
[REC] will blink.
The SP-303’s “
the factory to prevent accidental overwriting or deletion of
the samples and demo pattern stored in the SP-303’s memory.
If you attempt to sample, delete, record patterns, or carry out
other such operations while Protect is left on, “Prt” appears
in the display, and no further operations are permitted.
When you first sample or record after purchasing the SP-303,
use the procedure below to lift the Protect function.
1.
Turn off the power.
2.
Hold down [CANCEL] and slide the POWER switch to
ON.
This removes the protection (Protect Off).
* The Protect setting is stored even after the power is turned off,
so once you turn off the protection after purchase of the SP-
303, it remains off afterwards.
* If you want to turn Protect on again, hold down [REMAIN]
while switching ON the POWER switch.
fig.Q10
Protect
” (memory protection) is turned on at
5
5.
Adjust the sampling level.
●
While playing back the sampled sound, then turn the
CTRL 3/MFX (LEVEL) knob, adjusting the level so that
the PEAK indicator lights up only from time to time.
* If the PEAK indicator does not light even when the CTRL 3/
MFX (LEVEL) knob is turned fully clockwise, it may be that
the volume level of the device connected to the input is too low.
While there is no particular problem with sampling under
these conditions, we recommend that the volume of the
connected input device be turned up until the PEAK indicator
lights up from time to time.
●
When sampling with a mic, turn the MIC LEVEL knob
completely to the right (clockwise), then adjust the level
so that the PEAK indicator lights up only from time to
time.
* If the sound input is distorted, turn the MIC LEVEL knob to
the left (counterclockwise) until the sound is no longer
distorted.
6.
Playback of the sound you want to sample, then press
[REC] at the point where you want the sampling to
begin.
The [REC] button will blink, and sampling will start.
3,6,7
16
4,8
7.
Press [REC] at the point you want the sampling to end.
This completes the sampling, and the pad and [REC]
lights go out.
* If the available sampling time is exceeded, “FuL” appears in
2
the display, and sampling stops automatically. Refer to the
“Message List” (p. 69) for an explanation of the message
content.
8.
Press pad 1, and you will hear the sound that you just
sampled.
5
If undesired sound or silence was recorded at the
beginning or end of the sample, you can make settings so
that only the desired portion is played back.
For more detailed information, refer to “Preventing
Unneeded Portions from Being Played (Markers/Start
Point/End Point)” (p. 38).
If you don’t like the sampled sound
Delete the sound that you sampled, and start again from step
3. The procedure is as follows.
fig.Q11
a,c
QUICK START
b
a.
Press [DEL] and confirm that the button has lit.
The pad to which the sample is assigned blinks.
“dEL” appears in the display.
b.
Press the pad to which the unwanted sample is
assigned.
The pad light stays on, and [DEL] blinks.
Press [DEL].
c.
[DEL] changes from blinking to steadily lit, and the dots
in the display blink.
The deletion is complete when the dots remain off.
* The deletion process may take anywhere from several seconds
up to around a minute to complete; please wait until the
process is completed.
Never turn off the power while the dots are blinking.
Turning off the power at this point may result in
corruption of data not only in the sample that was being
deleted, but in other samples as well.
Quick Start
17
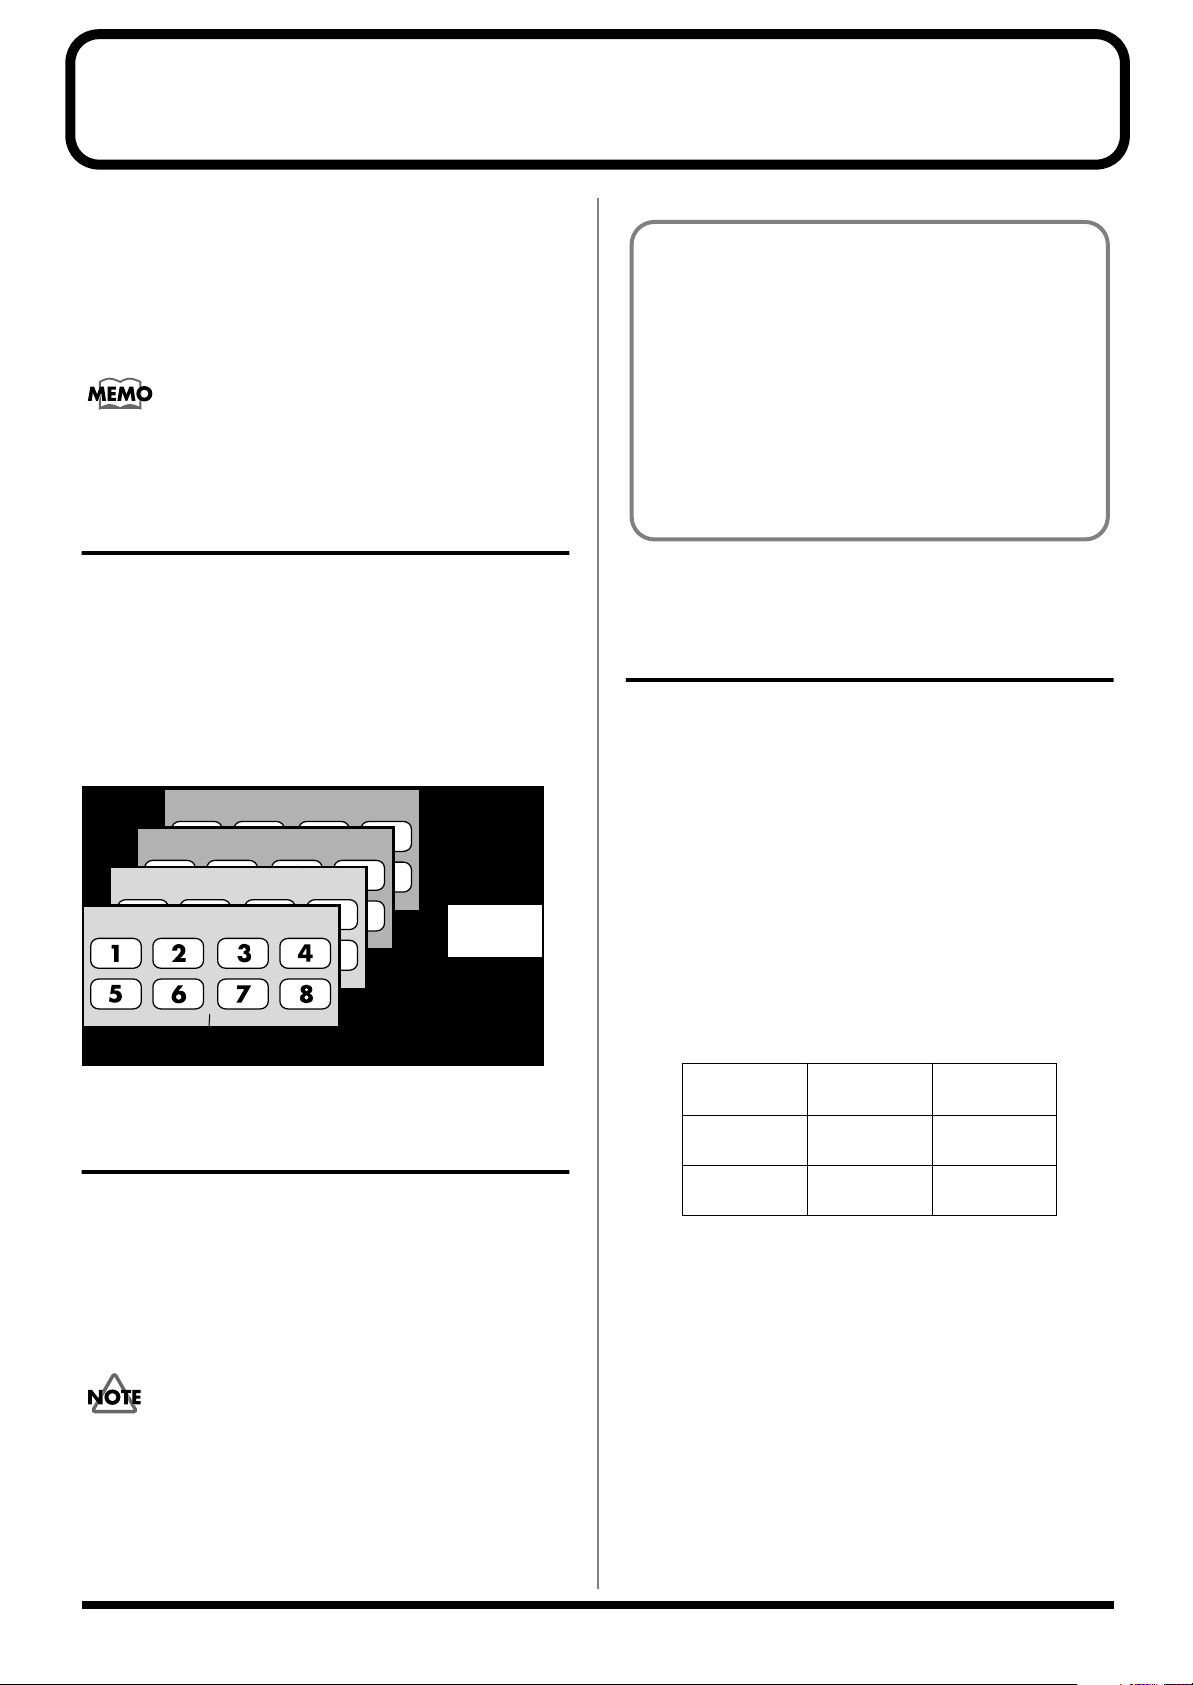
Chapter 1. Playing Samples
Two banks on a
memory card
(total of 16 Samples)
Two banks in an
internal memory
(total of 16 Samples)
Pads 1–8 (Samples)
Sample Bank B
Sample Bank A
Sample Bank D
Sample Bank C
On the SP-303, you can play samples by pressing pads 1–8
and the BANK buttons.
The pad will remain lit while the sample is playing.
The pad most recently pressed to play a sample is called the
“
current pad
is indicated on the panel.
Whenever sample settings are changed, it is the sample
assigned to the current pad that is affected.
.” The settings information for the current pad
Composition of Samples
One sample can be assigned to each of the Pads 1–8 on the
panel. The eight samples assigned to the eight pads are
collectively referred to as a “
allows you to use four banks, A–D. Banks A and B are the SP-
303’s own internal banks, and Banks C and D are banks
stored on memory cards.
* Sample Bank A is selected when the power is turned on.
fig.r01-01
sample bank
,” and the SP-303
When you insert an unused (i.e., unformatted on the SP-
303) memory card, and press BANK [C] or [D], then BANK
[C] and [D] blink, and “FMt” appears in the display.
If you want to format at this time, press BANK [C] or [D].
BANK [C] and [D] then remain lit, and [DEL] begins to
blink. When you press [DEL], formatting then begins.
Formatting the memory card erases all data on the card
and allows the card to be used with the SP-303.
Furthermore, do not turn off the power or remove the
memory card during formatting (while [DEL] is lit).
Number of Samples That Can Be
Played Simultaneously (Polyphony)
The SP-303 can play up to eight samples simultaneously
(eight-voice polyphony). However, when a sample is set to
stereo, the sample uses two of these voices.
*A sample’s stereo/mono setting can only be made when
sampling, and cannot be changed later on. For instructions on
making settings when sampling, refer to “Sampling from a
CD or MD” (p. 29).
Also note that the maximum polyphony during resampling
is four voices.
Switching Sample Banks
To switch sample banks, press one of the BANK buttons [A]–
[D]. The button that is pressed lights up, and the SP-303
switches to that bank.
* If there is no memory card inserted in the slot, you will be
unable to select either Bank C or Bank D, even by pressing
BANK [C] or BANK [D].
Never remove a memory card while samples in Bank C
or D are being played. This can produce unexpected
noises that may result in damage to speakers and amps.
It can also damage the card itself.
* For more information on resampling, refer to “Making
Samples with Effects Added (Resampling)” (p. 32).
Number of Samples That Can Be Played Simultaneously
Stereo
Sample
At
Normal Use
During
Resampling
Mono
Sample
8 4
4 2
18
Chapter 1. Playing Samples
Having a Sample Continue to Play
Even When the Pad is Released (Hold)
You can use the Hold function to cause the sample to
continue sounding even after you release the pad.
This is convenient for continuous repeat play of samples
(Loop Playback: p. 36).
In the following procedure, we will explain how to use the
Hold function with the sample on Pad 1 of Bank A as an
example.
fig.r01-02
Playing Sounds Input From External
Devices (EXT SOURCE Pad)
Just as with samples, you can use the SP-303 to control the
start and stop of sound from external sources, including CD
or MD players and other device connected to the AUX IN
jack, and miked sounds input from the MIC jack; you can
also add effects to these sounds.
fig.r01-03
1
1
1.
Make sure that BANK [A] is lit, and press pad [1] to
sound the sample.
2,3
Chapter
1
4
3
2
2.
Press [HOLD] before releasing the pad.
This turns on Hold, and the sample will continue to
sound even after you release the pad.
* Even though Hold is in effect, [HOLD] does not light.
3.
Press the [HOLD] pad once again to stop the sound.
* The pad will remain lit while the sample is playing.
Hold is valid only for samples set for Gate Playback
(when [GATE] is lit). With samples set for Trigger
Playback ([GATE] not lit), there will be no change in
function even if [HOLD] is pressed.
Gate playback/Trigger playback can be specified
independently for each pad. For more detailed
information, refer to p. 36.
1.
Start playback of the CD or MD. Alternatively, input
vocals from the mic.
2.
Press [EXT SOURCE], and confirm that the pad has lit.
The external input sounds while the pad remains lit.
If [GATE] is lit, the sound will be heard only while you
press the [EXT SOURCE] pad, and it will be silenced
when you release the pad (the pad will go dark).
If [GATE] is not lit, you can press [EXT SOURCE] to
toggle between sounding the sounds (pad lighted), and
muting them (pad extinguished).
GATE is illuminated/extinguished by pressing [GATE].
3.
Press [STEREO], and confirm that the button has
turned on or off, to switch between stereo and mono
external input.
[STEREO] lit:
Sounds from the external input are heard in stereo.
[STEREO] not lit:
Sounds from the external input are heard in mono.
With CDs, MDs, and other input originally recorded in
stereo, you will want to have [STEREO] lit.
4.
You can add effects to the external input sounds by
pressing one of the effects buttons, lighting that button.
* If pressing an effects button still does not add effects to the external
input sounds, hold down [REMAIN] (CURRENT PAD) and press
[EXT SOURCE]. This should apply the effect to the external input.
19
Chapter 1. Playing Samples
Adjusting the Volume of the
External Input Sounds
If excessive input volume levels causes the sound to be
distorted, or if noise becomes noticeable because levels are
too low, use the following procedure to adjust the volume.
fig.r01-04
3
2,4
1
1.
Press [EXT SOURCE], and confirm that the pad has lit.
The external input sounds are played.
2.
Press [START/END/LEVEL], and confirm that the
button has lit.
3.
Turn the LEVEL knob (the CTRL 3/MFX knob) to
adjust the volume of the external input sounds.
Rotating it toward the left will decrease the volume, and
rotating it toward the right will increase the volume.
Adjust the level so that the PEAK indicator lights
occasionally.
* If the input volume of the external source does not change even
when you rotate the LEVEL knob (the CTRL 3/MFX knob),
hold down [REMAIN] and press [EXT SOURCE] (this selects
the external input as the target for volume adjustment).
Afterwards, press [START/END/LEVEL] again, and make the
adjustment with the LEVEL knob.
4.
Press [START/END/LEVEL] again.
The [START/END/LEVEL] light goes out, and the
volume setting is stored.
* At times, the volume level of sounds from a CD, MD, or other
such source may be too high, or if you are using a mic,
distortion may still be audible even after adjusting the volume,
or conversely, that you cannot get enough volume in the
sound. In such situations, adjust the volume of the CD or MD
player, or if using a microphone, turn the MIC LEVEL knob,
adjusting the volume until you achieve the proper level.
20
Chapter 2. Using the Effects
2
4
1,3
The SP-303 features twenty-six internal effects, so you can
add effects to samples to alter the sounds, just with this one
unit.
●
Of the twenty-six effects, you can select five of them–
Filter + Overdrive, Pitch Shifter, Delay, Vinyl Simulator,
and Isolator–by directly pressing their buttons. The other
twenty-one effects are grouped together in MFX (the
multi-effects). By holding down [MFX] and turning the
CTRL 3/MFX knob, you can select which of these
twenty-one effects that is to be used.
●
You can have any one effect turned on at a given time.
Multiple effects cannot be on simultaneously. If you do
want to use multiple effects on a sample, or if you need
to have a different effect applied to each individual
effect, then use “
use a sample that has effects added to it as a new sample.
For more detailed information, refer to “Making Samples
with Effects Added (Resampling)” (p. 32).
resampling
.” Resampling allows you to
Adding Effects to Samples
fig.r02-01a
1.
Confirm that none of the effect buttons is lit.
If any of these buttons is lit, press it so that the light goes
off.
Chapter
2
2.
Press the pad which contains the sample to which you
wish to apply effects.
The pad will light, and the sample will sound. This pad
becomes the current pad.
3.
Press one of the effects buttons.
The pressed button will light.
An effect is on when the button is lit, and off when it is
dark.
* With certain effects, there may be a slight delay after the effect
is turned on before the effect is applied.
4.
Turn the CTRL 1–3/MFX knobs to adjust the
application of the effect.
The settings adjusted by turning the CTRL 1–3/MFX
knobs change according to the selected effect. For more
detailed information, refer to “Effects List” (p. 24).
21
Chapter 2. Using the Effects
1
2,4
3
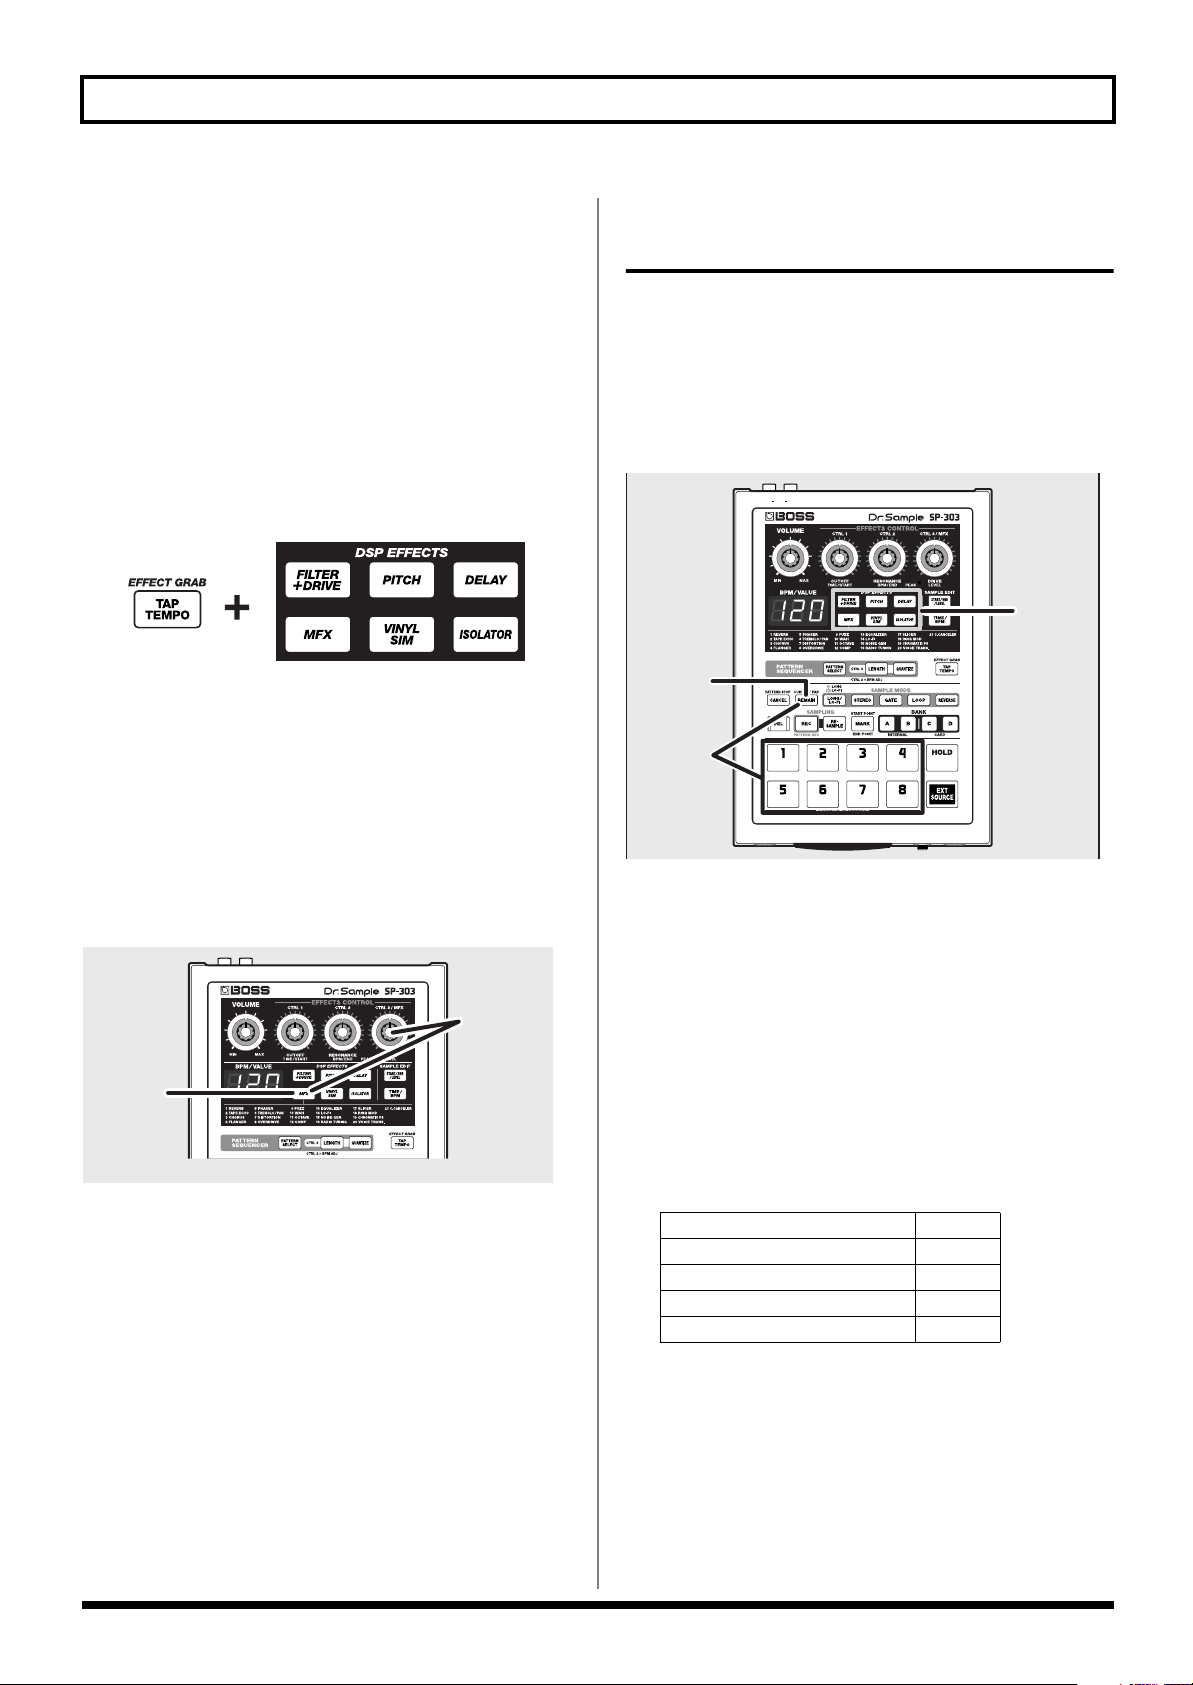
Turning Effects On and Off Rapidly
(Effect Grab)
When using the regular effects buttons, since the effects are
turned on or off each time these buttons are pressed, it means
that if you want to have an effect repeatedly turned on and
off, you then have to press the button many times. This can
be difficult, particularly when repeatedly turning the effect
on and off over a short interval.
In such cases, use the
To use the Effect Grab function, hold down [TAP TEMPO]
(EFFECT GRAB) and press the effect button.
fig.r02-01b
while holding
With [TAP TEMPO] (EFFECT GRAB) held down, the effect is
on only while the effect button is pressed, thus allowing you
to turn effects on and off rapidly in time with what you are
playing.
Effect Grab function
.
Applying Effects to Multiple
Samples
Normally, when an effect is turned on, the effect is applied
only to the sample assigned to the current pad, with no other
samples using the effect.
However, with the procedure described below, you can
apply effects to multiple effects, including that of the current
pad.
fig.r02-04
Selecting an Effect From MFX
Use the following procedure to select the effect from MFX
(the MFX type) that you want to use.
fig.r02-02
1
2
1.
Hold down [MFX] and turn the CTRL 3/MFX knob.
The number indicating the MFX type, from 1 to 21,
appears in the display. Rotating the knob toward the
right will increase the number, and rotating it toward the
left will decrease the number.
2.
When the number for the MFX type you want to select
is displayed, release [MFX].
[MFX] lights up, and the MFX is turned on.
1.
Press the button for the effect to be used, and confirm
that the button has lit.
2.
Press [REMAIN] (CURRENT PAD).
The current pad blinks.
3.
While holding down [REMAIN] (CURRENT PAD),
press the pads for which you want to apply the effect,
in order.
The pressed pad blinks and becomes the new current
pad.
All pressed pads other than the current pad remain lit.
Effect
Pad Lit O
Pad Not Lit X
Current Pad: Long blinks O
Current Pad: Short blinks X
The effect for a pad is alternately switched on and off
each time the same pad is pressed while [REMAIN]
(CURRENT PAD) is held down.
22
4.
When you have pressed the pads for all samples to
have the effect applied, release [REMAIN] (CURRENT
PAD).
* You cannot apply a different effect to each pads.
Applying Effects to All
1
Samples Simultaneously
If you want an effect to be applied to all of the pads at once, it
would be time consuming if you needed to press all the pads.
Thankfully, though, a simple procedure you can use when
applying an effect to all of the pads has been provided.
* This operation applies the effect to all pads in Banks A–D.
fig.r02-05
Chapter 2. Using the Effects
Chapter
2
1.
While holding down [REMAIN] (CURRENT PAD),
press the button for the effect to be used.
The pressed effect button blinks.
All of the pads light up (the current pad blinks), and the
effect is applied to all of the pads.
Effect Button
Lit The effect is applied to one or more
samples.
Blinking The effect is applied to all 32
samples (4 banks x 8 pads).
*A pad to which no sample is assigned doesn’t light up.
* To revert to having the effect applied only to the current pad,
hold down [REMAIN] (CURRENT PAD) again and press the
blinking effect button.
* You cannot apply/remove effects for individual pads while the
effect button is blinking.
Effect
23
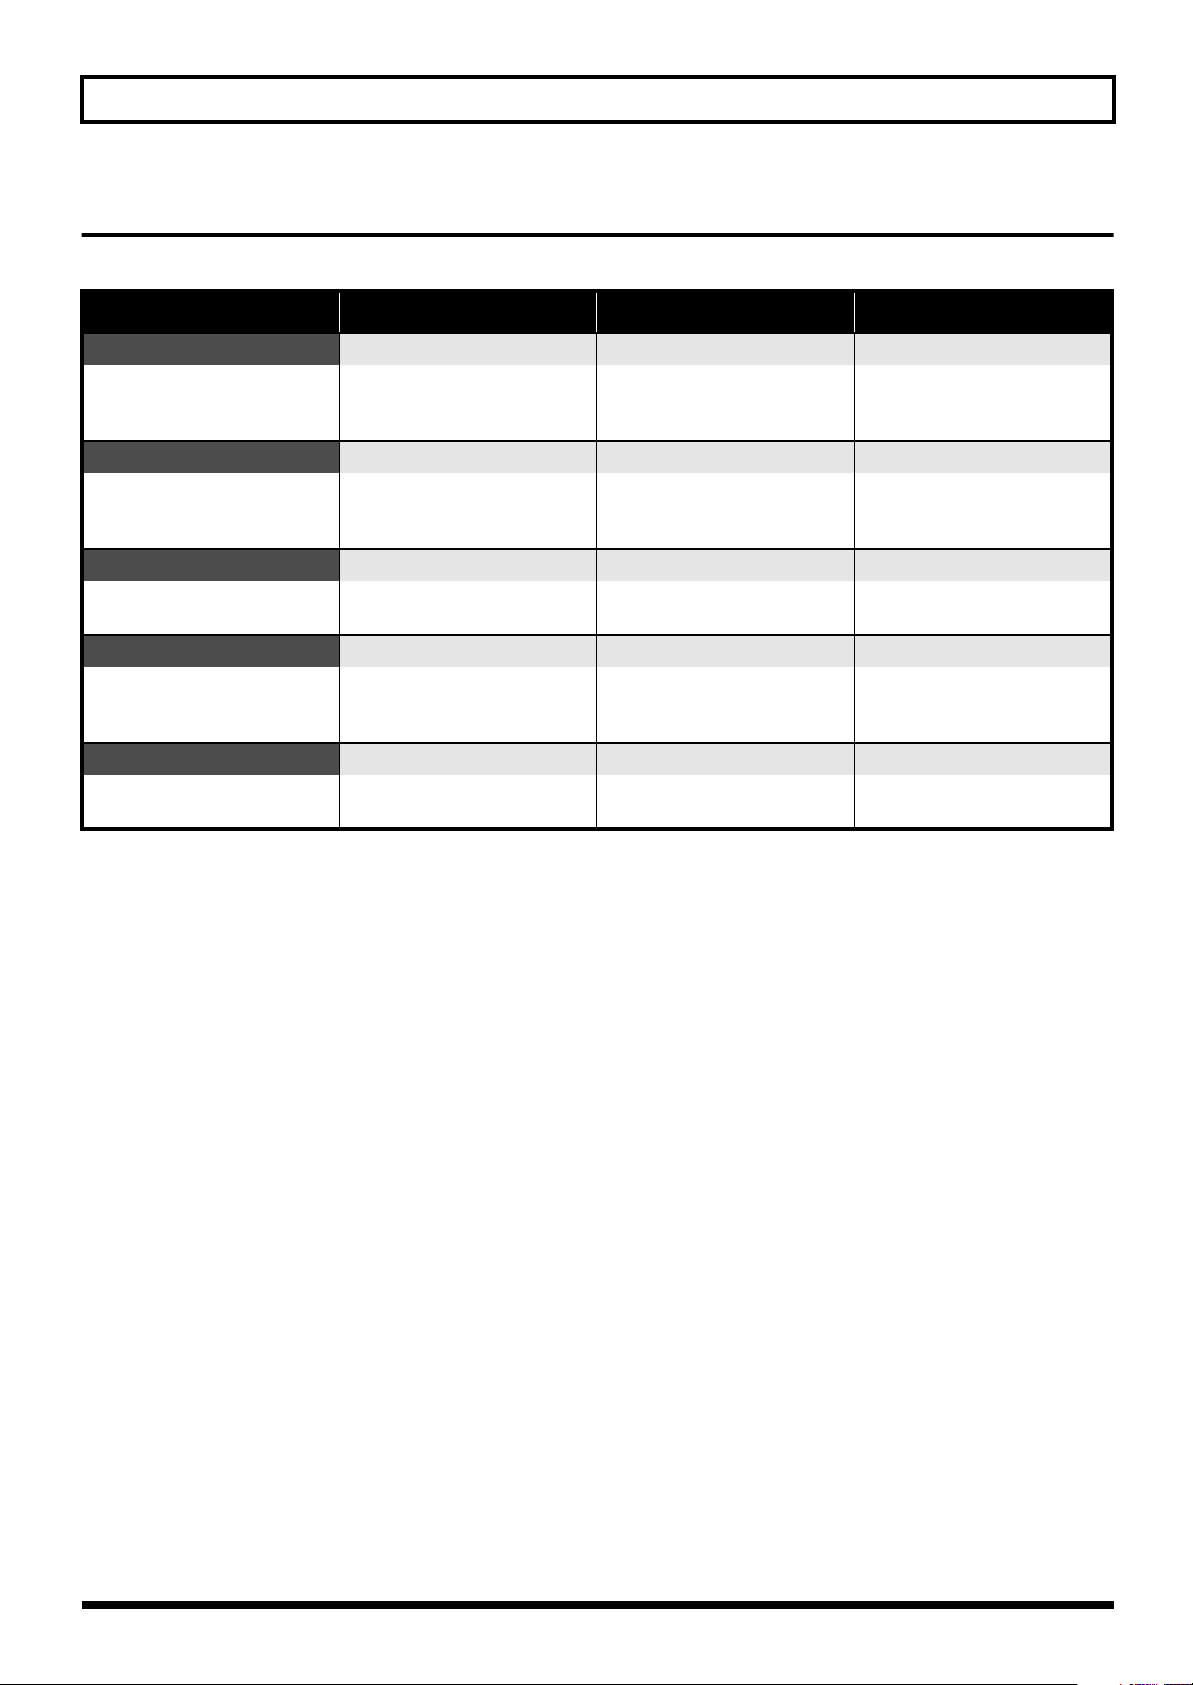
Chapter 2. Using the Effects
Effects List
Effects That Can Be Selected Directly With the Effects Buttons
DSP EFFECTS
FILTER + DRIVE
Low-pass filter with overdrive.
Cuts the high frequencies and
adds distortion.
PITCH
Modifies the pitch. Changes the pitch up or down
DELAY
Repeats the sound. Adjusts the time of the delayed
VINYL SIM
Gives the sound the sonic qualities of an analog record.
ISOLATOR
Extracts and deletes sounds in the
low-, mid-, or high-frequency range.
(*1) Time (Delay Time) is based on the tempo for the longest of the samples to which the effect is applied; the setting is made in
note units.
The types of notes that can be set:
thirty-second note (t32)
sixteenth note (t16)
dotted sixteenth note (t16.)
eighth-note triplets (t8.3)
eighth note (t8)
dotted eighth note (t8.)
quarter-note triplets (t4.3)
quarter note (t4)
dotted quarter note (t4.)
half-note triplets (t2.3)
half note (t2)
dotted half note (t2.)
whole note (t1)
However, you cannot select delay time settings exceeding approximately 1450 milliseconds.
In addition, playback of a pattern is based on the pattern’s tempo.
CTRL 1
CUTOFF (CoF)
Adjusts the cutoff frequency. Adjusts the peak level at the cut-
PITCH (Pit)
two octaves.
DELA Y TIME (t32–t1)
sound. (*1)
COMPRESSOR (CMP) NOISE LEVEL (noS) WOW FLUTTER (FLu)
Adjusts the sense of compression in the sound that is characteristic of analog records.
LOW (Lo) MID (Mid) HIGH (Hi)
Extracts/deletes sounds in the
low-frequency range.
(display)
CTRL 2
RESONANCE (rES) DRIVE (drV)
off frequency.
FEEDBACK (Fdb)
Adjusts the feedback amount of
the pitch shift sound.
FEEDBACK (Fdb) E.LEVEL (LEV)
Adjust the number of times that
the delay will repeat.
Adjusts the volume of analog
record noise.
Extracts/deletes sounds in the
midrange.
(display)
CTRL 3
Adds distortion.
DIRECT/EFFECT BALANCE (dAL)
Adjusts the volume balance
between the effect sound and
the direct sound.
Specifies the volume of the
delay.
Adjusts the rotational irregularities that occur when playing an
analog record.
Extracts/deletes sounds in the
high-frequency range.
(display)
24
 Loading...