

Page 1
Gebrauchsanweisung
쮕
User Instructions
bososcope cardio
Page 2
● Ihr boso-Stethoskop entspricht der
Medizinprodukte-Richtlinie 93/42/EWG
(CE-Kennzeichnung).
● Bitte lesen Sie diese Gebrauchsanweisung vor der Anwendung sorgfältig durch
( ) und bewahren Sie sie gut auf.
● Ihr Stethoskop niemals extremer Kälte
oder Wärme aussetzen.
● Keine Hitzesterilisation mit dem Stethoskop durchführen.
Stethoskop
Ersatz-Ohroliven
Ersatz-Membrane
Gebrauchsanweisung
Allgemeine Informationen
Lieferumfang
● Das Stethoskop nicht in Reinigungsflüssigkeit legen.
● Das Stethoskop kann durch scharfe oder
spitze Gegenstände beschädigt werden.
● Die Ohroliven nicht zu tief in den
Gehörgang stecken, Verletzungsgefahr!
● Die Ohroliven auf Verunreinigungen kontrollieren und diese ggf. entfernen um eine
einwandfreie Funktion des Stethoskopes
zu gewährleisten.
● Das Stethoskop niemals ohne Ohroliven
verwenden, Verletzungsgefahr!
● Das Stethoskop nie ohne Mebrane verwenden.
● Bitte verwenden Sie ausschließlich original boso-Ersatzteile.
2
Page 3

● Dieses boso Qualitäts-Stethoskop dient
als Diagnostik-Instrument zur Auskultation.
● Die Anwendung des Stethoskopes darf
nur durch autorisiertes Fachpersonal
erfolgen.
● Nach dem Aufsetzen des Ohrbügels wird
die Membrane auf die zu untersuchende
Körperstelle unter leichtem Druck aufgelegt.
● Durch Drehen des Bruststückes um den
Anschlussstutzen wird das Stethoskop
auf die Verwendung der Membranseite
bzw. der Trichterseite eingestellt. Drehen
Sie solange, bis Sie ein deutliches
Einrasten spüren.
● Verwenden Sie die Membranseite zur
Auskulatation von hohen Frequenzen, die
Trichterseite zur Auskultation von niedrigen Frequenzen.
● Bei aufgesetzem Ohrbügel können Sie
durch leichtes Streichen über die
Membrane sofort hören, ob die Membrane
aktiv ist.
Anwendungshinweise Verwendung des Doppelbruststücks
3
Page 4
● Ihr bososcope cardio ist werkseitig so
konstruiert und eingestellt, dass es sich
dem Ohr bequem anpasst und akustisch
abdichtet.
● Die Ohroliven sollten beim Einsetzen in
die Ohren nach vorne in Richtung des
Ohrkanals zeigen.
● Sollte die Federspannung dennoch zu
stark oder zu schwach für Ihr persönliches
Empfinden sein, so lässt sich diese einfach anpassen:
Einstellen der Ohrbügel
4
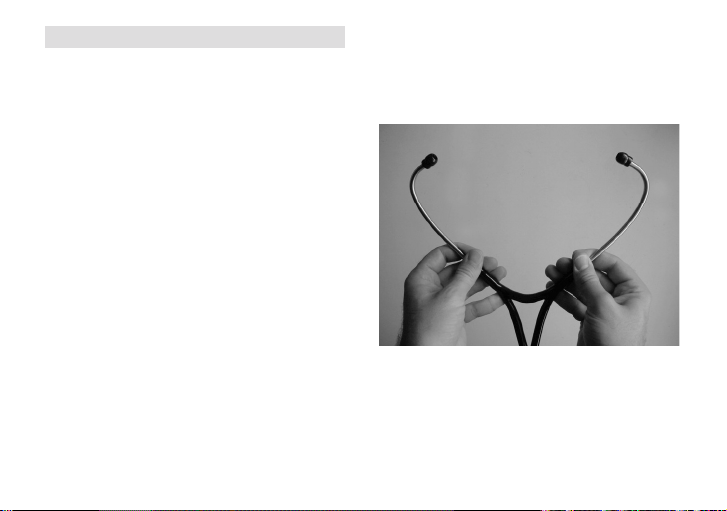
zu stark: halten Sie den Ohrbügel wie
abgebildet fest und ziehen Sie den Bügel
langsam auseinander, bis er ausreichend
gedehnt ist.
Page 5
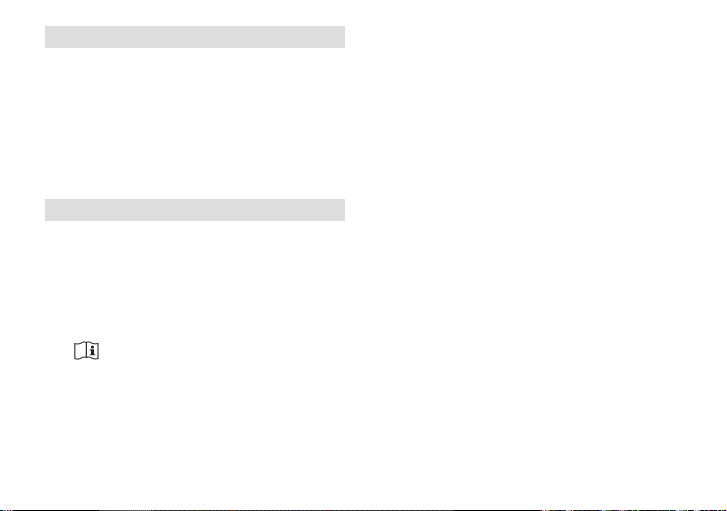
zu schwach: nehmen Sie den Ohrbügel
am Verbindungsstück zwischen Metall
und Kunststoff in Ihre geöffnete Hand und
drücken ihn langsam zusammen bis sich
die beiden Kunststoffschläuche kreuzen.
Wiederholen Sie den Vorgang sooft, bis
die gewünschte Spannung erreicht ist.
Wechseln der Membrane
● Um die Membrane zu entfernen halten
Sie das Bruststück mit der Membranseite
nach oben und rollen den Schutzring mit
Daumen und Zeigefinger beider Hände
nach unten ab.
● Um die Membrane zu montieren legen Sie
diese auf das Bruststück und platzieren
den Schutzring mit dem kürzeren Rand
nach unten direkt auf der Membrane.
Fixieren Sie an einer Stelle den
Schutzring mit dem Daumen und
Zeigefinger einer Hand. Nun drücken Sie
mit dem Daumen der anderen Hand den
Schutzring mit einer kreisenden, dem
Schutzring folgenden Bewegung nach
unten. Richten Sie den Schutzring aus, so
dass die Membrane vollständig fixiert ist.
5
Page 6

6
● Um die Ohroliven zu wechseln, schrauben
Sie die Oliven über das integrierte
Gewinde ab und bringen Sie die neuen
Oliven durch Aufschrauben wieder an.
● Um Verletzungen zu vermeiden, prüfen
Sie vor jeder Anwendung den korrekten
Sitz der Oliven.
Wechseln der Ohroliven
Verwenden Sie zur Reinigung ein mit milder
Seifenlösung oder Alkohol (70% Isopropyl)
befeuchtetes Tuch.
Verwenden Sie niemals kratzende Reinigungsmittel, Verdünner oder Benzol zur
Reinigung.
Reinigung
Page 7

Wir leisten 3 Jahre Garantie für Material- und
Fabrikationsfehler des Produktes. Die Garantie gilt nicht:
● im Falle von Schäden, die auf unsachgemäßer Bedienung beruhen,
● für Verschleißteile,
● für Mängel, die dem Kunden bereits beim
Kauf bekannt waren,
● bei Eigenverschulden des Kunden.
Die gesetzlichen Gewährleistungen des Kunden bleiben durch die Garantie unberührt. Für
Geltendmachung eines Garantiefalles innerhalb der Garantiezeit ist durch den Kunden
der Nachweis des Kaufes zu führen.
Garantiebedingungen
7
Die Garantie ist innerhalb eines Zeitraumes
von 3 Jahren ab Kaufdatum gegenüber der
BOSCH + SOHN GmbH u. Co. KG
Bahnhofstr. 64
72417 Jungingen
Germany
geltend zu machen. Der Kunde hat im Garantiefall das Recht zur Reparatur der Ware bei
unseren eigenen oder bei von uns autorisierten Werkstätten. Weiter gehende Rechte werden dem Kunden (aufgrund der Garantie)
nicht eingeräumt.
Page 8

● Your boso-stethoscope conforms to the
requirements of the European Directive
93/42/EWG (CE-mark).
● Please read this instruction manual carefully before using the stethoscope ( )
and store it afterwards.
● Do not expose the stethoscope to extreme heat or cold.
● Do not steam sterilize the stethoscope.
stethoscope
spare eartips
spare diaphragms
instruction manual
General information
Packaging
● Do not put the stethoscope into cleaning
liquid.
● The stethoscope can be damaged by
sharp or pointed instruments.
● Do not stick the eartips too deep into the
ear otherwise you may hurt yourself.
● Do not use the stethoscope without diaphragm.
● Only use spare parts of boso.
8
Page 9

● The stethoscope is a diagnostic instrument for auscultation.
● The stethoscope should be used by competent persons only.
● After placing the eartips into your ears, the
chest piece has do be put on the relevant
part of the body with careful pressure.
● The stethoscope can be adjusted from
bell to the diaphragm or vice versa as the
chest piece can be turned 180° both directions. A clicking sound can be heard as
soon as the chest piece is engaged correctly on either the bell or the diaphragm.
● Depending on the body part which has to
be auscultated either the diaphragm or
the bell has to be used. The diaphragm is
used for the auscultation of high frequencies, the bell is used for low frequencies.
● Place the eartips into your ears and gently sweep the diaphragm with the finger tip
to test whether it is already active.
General use Using the chest piece
9
Page 10

● The binaural of your bososcope cardio is
constructed and adjusted to fit comfortably to your ear and to conceal other noises
from your ear.
● The ear tips should be placed into the
ears in forward direction.
● If the tension of the binaural is not up to
your personal need, it can be adjusted as
follows:
Adjustment of the binaural
10
too strong: hold the binaural as shown in
the picture and pull the binaural slowly
apart.
Page 11

too soft: take the body of the binaural into
your hand as shown in the picture and
squeeze carefully so that both tubes cross
over each other.
Repeat this until the perfect adjustment for
your needs is achieved.
Changing the diaphragm
● To remove the diaphragm the chest piece
has to be put onto a table with the diaphragm facing upwards. With your thumb
and index finger you can roll the rubber
ring aside until it slips over the edge of the
chest piece.
● To fix the new diaphragm, put the chest
piece onto a table with the diaphragmside facing upwards. Then place the new
diaphragm correctly. Now take the rubber
ring and slip it back again. The easiest
way to do this, is to take the rubber ring
with its thinner brim of the ring facing
downwards. Fix the rubber ring with your
thumb and index finger in one position
and slip the ring with the thumb of the
other hand in a circular movement. Align
the ring in such a way, that the diaphragm
is held firmly.
11
Page 12

12
● Soft eartips as well as hard eartips can be
used on the binaural to adapt to the optimal acoustic sensitivity and comfort of the
stethoscope. To change the eartips simply
screw the required type onto the binaural.
● To avoid injuries, please check the correct
position of the eartips on the binaural.
Changing the eartips
For cleaning use a soft cloth with mild soapy
water or with alcohol (70% Isopropyl). The diaphragm must be cleaned only with a soft
cloth with alcohol (70% Isopropyl).
Never use abrasive cleaning solution, thinner
or benzine for cleaning.
Cleaning
Page 13

There is a 3 years factory warranty for defects
in material and workmanship. From the warranty are excluded:
● all damages caused by improper handling
● accessories subject to normal wear
● damages already known to the buyer
when the instrument is bought
● damages caused by the intervention of
the buyer
A claim for guarantee can only be allowed
within the 3 year period of warranty, if the date
of purchase is proven (e.g. invoice).
Guarantee information
13
For both guarantee and repair work, please
send the instrument carefully packed and
postage paid either to your authorized dealer
or directly to:
BOSCH + SOHN GmbH u. Co. KG
Bahnhofstraße 64
72417 Jungingen
GERMANY
Defects in material or workmanship will be
serviced free of charge by us or a service partner authorized by ourselves. Any further
claims are excluded.
Page 14

14
Page 15

15
Page 16

BOSCH + SOHN GmbH u. Co. KG
Bahnhofstraße 64 · 72417 Jungingen · Germany
Telephone: +49 (7477) 92 75-0 · Fax: +49 (74 77) 1021
Internet: www.boso.de · e-Mail: zentrale@boso.de
07/2008
 Loading...