

Page 1
medilife PC3
Gebrauchs-
anweisung
User
Instructions
Mode
d’emploi
Manuale
di istruzioni
Manual
del Usuario
쮕
2
39
76
113
150
Page 2

2
Inhaltsverzeichnis
Geräteübersicht...............................................................................................................................................4
Lieferumfang
Kurzanleitung
쮕
Einführung
Blutdruckwerte
Inbetriebnahme des Gerätes
Uhrzeit und Datum einstellen
Allgemeine Hinweise zur Selbstmessung des Blutdrucks
Vorbereitung zur Blutdruckmessung
.....................................................................................................................................................5
....................................................................................................................................................6
..........................................................................................................................................................7
.................................................................................................................................................9
Systolischer und diastolischer Blutdruckwert
Grenzwerte der WHO für die Beurteilung der Blutdruckwerte
.................................................................................................................11
Batterien einsetzen
Batterie-Statusanzeige
Batteriewechsel
......................................................................................................................11
...............................................................................................................12
.............................................................................................................................12
...............................................................................................................13
.................................................................................................17
..................................................................9
..............................9
......................................................15
Page 3

Inhaltsverzeichnis
Hinweis zur Manschettengröße............................................................................................17
Anlegen des Gerätes
Blutdruckmessung
.......................................................................................................................................21
Abbruch der Messung
Messwertanzeige
.........................................................................................................................................23
Anzeige des Messwertspeichers
Installation boso-profilmanager / Datenübertragung
Fehleranzeige
.................................................................................................................................................28
Reinigung und Desinfektion
Garantie
...........................................................................................................................................................31
Kundendienst / Entsorgung
Technische Daten
.........................................................................................................................................33
Prüfanweisung für die messtechnische Kontrolle
(nur für geschultes Fachpersonal)
...................................................................................................................18
................................................................................................................22
..........................................................................................................25
............................................................26
..................................................................................................................31
....................................................................................................................32
......................................................................................................36
3
쮕
Page 4
4
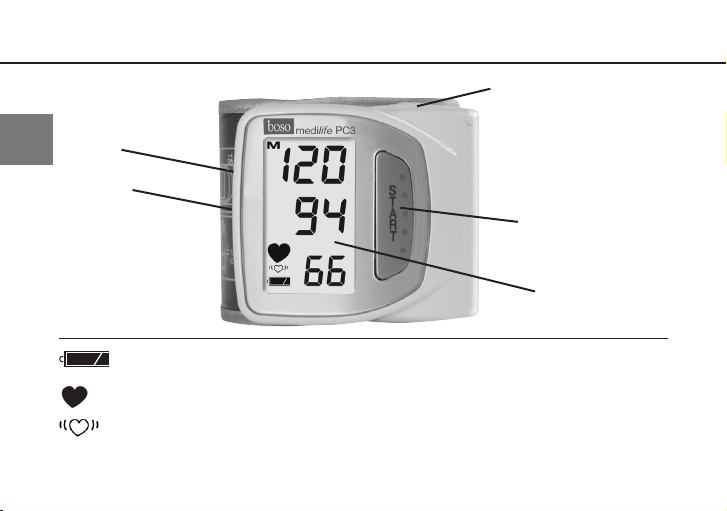
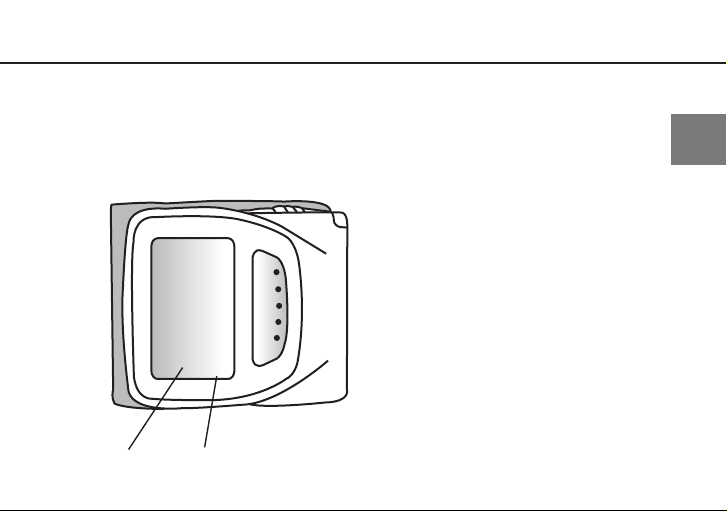
Geräteübersicht
Anschlussbuchse
für PC-Verbindungs-
쮕
kabel
SET-Taste
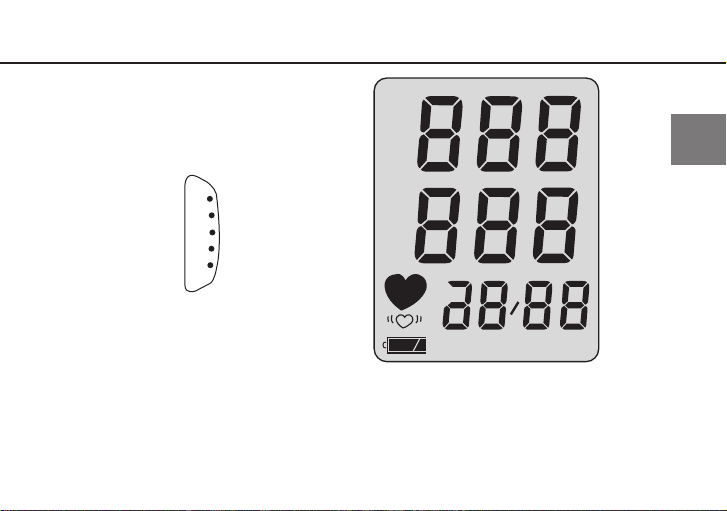
Statusanzeige für Batterien siehe Seite 12
Messung läuft siehe Seite 22
Herzrhythmusstörung während der Messung siehe Seite 24, 30
M
Speicherwert siehe Seite 25
Batteriefachdeckel
START-Taste
LCD-Anzeige
Page 5
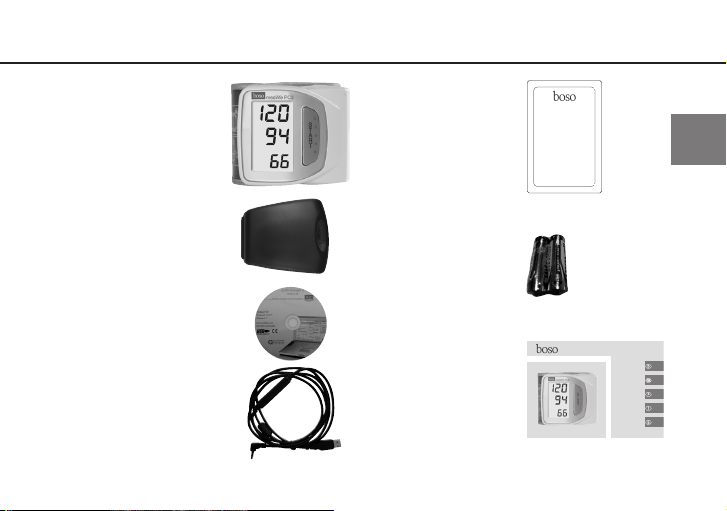
Lieferumfang
medilife PC3
Gebrauchsanweisung
User
Instructions
Mode
d’emploi
Manuale
di istruzioni
Manual
del Usuario
2
39
76
113
150
BOSCH+SOHN GMBH U. CO. KG
FABRIK MEDIZINISCHER APPARATE
BAHNHOFSTR. 64 · D-72417 JUNGINGEN
Diese Garantie-Urkunde ist nur gültig in Verbindung
mit einem Kaufbeleg.
This warranty certificate is valid only in combination
with a proof of purchase (invoice).
Ce certificat de garantie est valable uniquement sur
présentation d'une preuve d'achat (facture)
Este certificado de garantía es válido sólo en
combinación con una prueba de compra (factura).
Questo certificato di garanzia è valido solo in
combinazione con una prova di acquisto (fattura).
GARANTIE-URKUNDE
CERTIFICATE OF WARRANTY
CERTIFICAT DE GARANTIE
CERTIFICADO DE GARANTIA
CERTIFICATO DI GARANZIA
5
1 Blutdruckmessgerät
boso medilife PC3
1 Etui
1 CD boso-
profilmanager
1 PC-Verbindungskabel
1 Garantie-
Urkunde
쮕
2 Batterien
LR 03 (AAA)
1 Gebrauchs-
anweisung
Page 6

6
Kurzanleitung
➡ Batterien einlegen, auf richtige
Polung achten (Seite 11)
➡ Gerät am unbekleideten Handgelenk
쮕
so anlegen, dass sich die Anzeige auf
der Armunterseite befindet. (Seite 18)
Das Handgelenk muß sich bei der
Messung auf Herzhöhe befinden.
➡ Start (und Abbruch) einer Messung
durch Betätigung der START-Taste.
(Seite 21)
Messwerte Systole, Diastole und Puls
werden nach der Messung angezeigt
(Seite 23)
➡ Speicherabruf (Seite 25): Am ausge-
schalteten Gerät die START-Taste
solange gedrückt halten, bis die
zuletzt gespeicherte Messung im
M
Display erscheint (Symbol
werden nacheinander alle Messungen des Speichers für ca. 5 Sekunden
angezeigt. (Befindet sich keine
Messung im Speicher, so erscheint
im Display bei Systole, Diastole und
Puls für ca. 3 Sekunden jeweils eine
„0“). (Seite 25)
). Nun
Diese Kurzanleitung ersetzt nicht
die in der Gebrauchsanweisung enthaltenen detaillierten Informationen zu
Handhabung und Sicherheit Ihres
Blutdruckmessgerätes.
Bitte lesen Sie daher unbedingt
die Gebrauchsanweisung!
Page 7

Einführung
7
Sehr geehrter Kunde, wir freuen uns
sehr, dass Sie sich zum Kauf eines bosoBlutdruckmessgerätes entschieden
haben.
Die Marke boso steht für höchste
Qualität und Präzision und ist auch bei
den Profis die Nummer 1: Aktuell arbeiten 77% aller deutschen Ärzte mit
boso-Blutdruckmessgeräten (GfK Studie
1/2010). Die jahrzehntelange Erfahrung
aus dem Profi-Bereich steckt auch in
allen Patientengeräten für die Selbstmessung zu Hause.
Dieses Gerät hat unsere strenge
Qualitätskontrolle durchlaufen und ist
Ihr sicherer Partner für die Kontrolle
Ihrer Blutdruckwerte.
Bitte lesen Sie diese Gebrauchs-
anweisung vor der erstmaligen Anwendung sorgfältig durch, denn eine korrekte Blutdruckmessung ist nur bei richtiger Handhabung des Geräts möglich.
In dieser Gebrauchsanweisung wird
„➡“ für eine Aktion des Anwenders
verwendet.
Um Hilfe bei der Inbetriebnahme,
Benutzung oder Wartung zu erhalten,
wenden Sie sich bitte an Ihren
Fachhandel oder an den Hersteller
쮕
Page 8

8
Einführung
(Kontaktdaten auf der hinteren Umschlagseite dieser Gebrauchsanweisung).
쮕
Ein unerwarteter Betriebszustand oder
ein Vorkommnis welches den gesundheitlichen Zustand verschlechtert hat
oder hätte verschlechtern können ist
dem Hersteller unverzüglich zu melden.
Bei Veräusserung des Gerätes ist diese
Gebrauchsanweisung beizulegen.
Bei Verwendung des Gerätes in der
Heilkunde (gemäß MedizinprodukteBetreiberverordnung) sind Messtechnische Kontrollen in regelmäßigen Abständen durchzuführen (siehe Seite 36).
Das Blutdruckmessgerät boso medilife
PC3 ist für Patienten jeden Alters geeignet, deren Handgelenkumfang zwischen 13,5 und 21,5 cm liegt. Weitere
Hinweise auf Seite 19. Das Gerät ist
nicht für Neugeborene geeignet.
Drahtlose Kommunikationsgeräte, wie
z.B. drahtlose Heimnetzwerk-Geräte,
Handys, schnurlose Telefone und deren
Basisstationen, Walkie-Talkies können
dieses Blutdruckmessgerät beeinflussen. Daher sollte zu solchen Geräten ein
Abstand von mindestens 3,3 Meter gehalten werden.
Page 9

Blutdruckwerte
9
Um den Blutdruck zu ermitteln, müssen
zwei Werte gemessen werden:
● Systolischer (oberer) Blutdruck-
wert: Er entsteht, wenn der Herzmus-
kel sich zusammenzieht und das Blut
in die Blutgefäße gedrückt wird.
Die Weltgesundheitsorganisation (WHO, 1999) hat folgende Grenzwerte für die
Beurteilung der Blutdruckwerte festgelegt:
Eindeutig erhöhter Blutdruck ab 140 mmHg ab 90 mmHg
Noch normaler Blutdruck 130 bis 139 mmHg 85 bis 89 mmHg
Normaler Blutdruck 120 bis 129 mmHg 80 bis 84 mmHg
Optimaler Blutdruck bis 119 mmHg bis 79 mmHg
● Diastolischer (unterer) Blutdruck-
wert: Er liegt vor,wenn der Herzmus-
kel gedehnt ist und sich wieder mit
Blut füllt.
Die Messwerte des Blutdruckes werden
in mmHg (mm Quecksilbersäule) angegeben.
systolisch diastolisch
쮕
Page 10

10
Blutdruckwerte
Wann eine medikamentöse Therapie
erforderlich ist, hängt nicht allein vom
Blutdruck ab, sondern auch vom
쮕
Risikoprofil des Patienten. Bitte sprechen Sie mit Ihrem Arzt, wenn nur einer
der beiden Werte (Systole, Diastole)
ständig über den Grenzwerten für eindeutig erhöhten Blutdruck liegt.
Bei der Blutdruck-Selbstmessung zu
Hause werden häufig etwas niedrigere
Werte als beim Arzt gemessen. Deshalb
hat die Deutsche Hochdruckliga für die
Messung zu Hause tiefere Grenzwerte
festgelegt:
Messung zu Hause: 135/85 mmHg
Messung in der
Arztpraxis: 140/90 mmHg
Page 11
Inbetriebnahme des Gerätes
11
Das Gerät muss gemäß den Informationen in dieser Gebrauchsanweisung installiert und in Betrieb genommen werden.
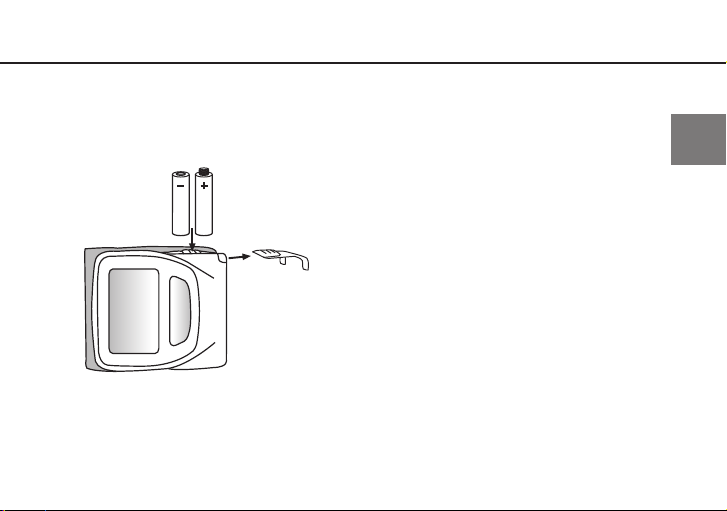
Bild 1
➡ Verwenden Sie ausschließlich hoch-
wertige, auslaufsichere Batterien
der angegebenen Spezifikation
(siehe „Technische Daten” Seite 33).
Mischen Sie nie alte und neue Bat-
terien oder verschiedene Fabrikate.
Bei falscher Polung funktioniert das
Gerät nicht und es kann zu Wärmebildung oder Auslaufen der Batterien und
zur Zerstörung des Gerätes kommen.
➡ Batterien einsetzen
Das Batteriefach befindet sich an der
Oberseite des Gerätes.Setzen Sie die
Batterien entsprechend Bild 1 im
Batteriefach ein.
➡ Wird das Gerät längere Zeit gela-
gert, die Batterien herausnehmen.
쮕
Page 12
12
Inbetriebnahme des Gerätes
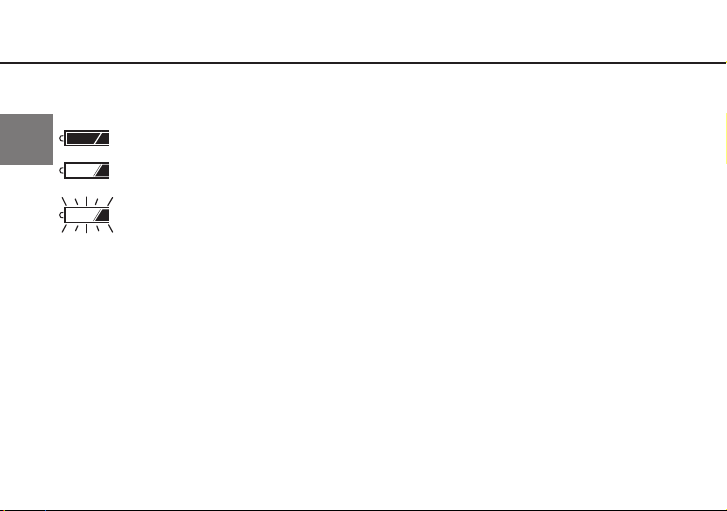
Das Gerät besitzt eine Statusanzeige für
den Batterieladezustand (siehe Seite 4)
쮕
Batterie voll geladen.
Batterie demnächst ersetzen.
Blinkend! Keine weitere
Messung möglich.
Batterie ersetzen.
Wichtiger Hinweis zum Batterie-
wechsel:
Nach dem Batteriewechsel bitte Einstellungen für Datum und Uhrzeit überprüfen.
Leisten Sie einen Beitrag zum
Umweltschutz
Verbrauchte Batterien und Akkus
fen nicht in den Hausmüll.
Sie können diese bei einer Sammelstelle
für Altbatterien bzw. Sondermüll abgeben. Informieren Sie sich bitte bei Ihrer
Gemeinde.
dür-
Page 13
Uhrzeit und Datum einstellen
13
Ihr Gerät boso medilife PC3 besitzt eine
Uhrfunktion. Um Uhrzeit und Datum einzustellen, betätigen Sie die SET-Taste wie
folgt:
S
T
A
SETTaste
➨
Stunden Minuten
14:11
R
T
Wird die SET-Taste für ca. 30 Sekunden
nicht betätigt, erfolgt automatisch der
Wechsel in den Anzeigemodus Uhrzeit.
Anzeigemodus Uhrzeit
➜➜➜
<SET>-Taste kurz drücken, loslassen
Einstellmodus Datum (Jahr blinkt) . ..
➜ … mit <START>-Taste einstellen
<SET>-Taste kurz drücken, loslassen
Einstellmodus Datum (Monat blinkt) . . .
➜ … mit <START>-Taste einstellen
<SET>-Taste kurz drücken, loslassen
Einstellmodus Datum (Tag blinkt) . . .
쮕
Page 14

14
Uhrzeit und Datum einstellen
➜ … mit <START>-Taste einstellen
➜➜ ➜
쮕
<SET>-Taste kurz drücken, loslassen
Einstellmodus Uhrzeit (Stunde blinkt) . ..
➜ … mit <START>-Taste einstellen
<SET>-Taste kurz drücken, loslassen
Einstellmodus Uhrzeit
(Minute blinkt) . . .
➜ … mit <START>-Taste einstellen
<SET>-Taste kurz drücken, loslassen
Anzeigemodus Uhrzeit
Page 15

Allgemeine Hinweise zur Selbstmessung des Blutdrucks
15
1. Blutdruckschwankungen sind normal. Selbst bei einer Wiederholungsmessung können beachtliche Unterschiede auftreten. Einmalige oder
unregelmäßige Messungen liefern
keine zuverlässige Aussage über den
tatsächlichen Blutdruck. Eine zuverlässige Beurteilung ist nur möglich,
wenn Sie regelmäßig unter vergleichbaren Bedingungen messen.
Selbstmessung bedeutet noch
2.
keine Therapie. Verändern Sie auf
keinen Fall von sich aus die vom Arzt
vorgeschriebene Dosierung der Arzneimittel.
3. Herzrhythmusstörungen können die
Messgenauigkeit des Gerätes beeinträchtigen, bzw. zu Fehlmessungen
führen (siehe Seite 30).
4. Bei Patienten mit schwachem Puls
(möglich z.B. bei Trägern von Herzschrittmachern) kann es zu Fehlmessungen kommen. Das Blutdruckmessgerät hat keinen Einfluss auf
den Herzschrittmacher.
5. Schwangere befragen Ihren Arzt vor
der Verwendung des Gerätes.
쮕
Page 16

Allgemeine Hinweise zur Selbstmessung des Blutdrucks
16
6. Die Messung muss immer im Ruhezustand vorgenommen werden.
쮕
Es empfiehlt sich, den Blutdruck
zweimal täglich vor einer evtl. Medikamenteneinnahme zu kontrollieren
– morgens nach dem Aufstehen und
abends,wenn Sie sich nach der Arbeit
entspannt haben.
7. Der Blutdruck muss (wenn keine Einschränkungen (siehe Seite 19) vorliegen) immer an dem Handgelenk mit
den höheren Druckwerten gemessen
werden. Hierzu messen Sie den Blutdruck zuerst an beiden Handgelenken und danach immer an dem Hand-
gelenk dessen Blutdruckwert höher
ist.
Page 17
Vorbereitung zur Blutdruckmessung
17
Hinweis zur Manschettengröße:
Das Gerät darf nur mit der Manschette
CW 51 (Handgelenkumfang von 13,5 –
21,5 cm) verwendet werden.
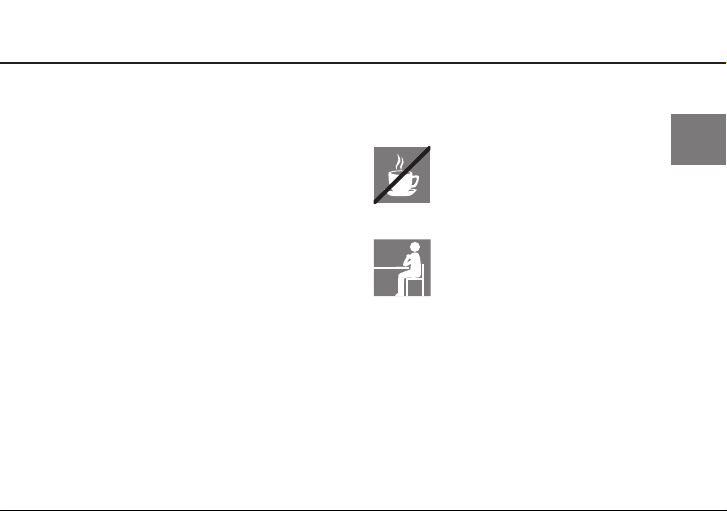
Folgendes muss bei der Blutdruckmessung beachtet werden:
Meiden Sie eine Stunde vor
der Blutdruckmessung Nikotin
und Kaffee.
Sitzen Sie zur Blutdruckmessung bequem. Lehnen Sie
Rücken und Arme an. Kreuzen
Sie die Beine nicht. Stellen Sie
die Füße flach auf den Boden.
Entspannen Sie sich 5 Minuten und messen Sie erst dann.
Bewegen Sie sich nicht während der Messung.
쮕
Page 18
18
korrekte Werte
zu niedrige Werte
zu hohe Werte
Vorbereitung zur Blutdruckmessung
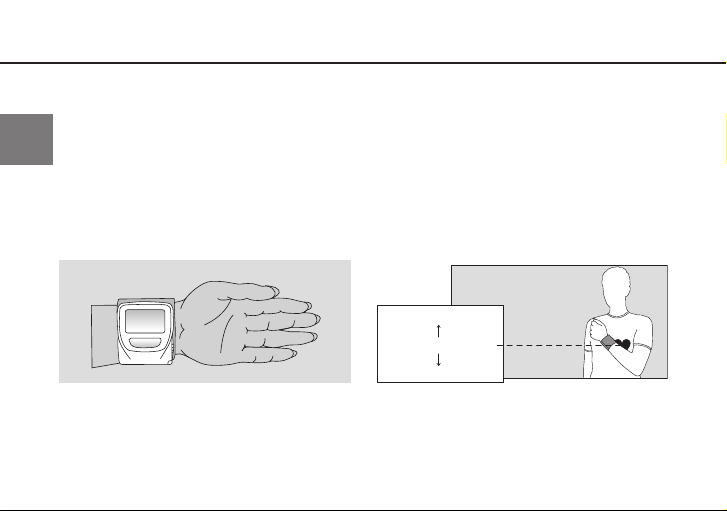
Anlegen des Gerätes
Die Messung ist am unbekleideten
Handgelenk durchzuführen.
쮕
Achten Sie darauf, dass sich die An-
zeige an der Armunterseite befindet
(siehe Bild 2).
Bild 2
➡ Schließen Sie die Manschette mit
dem Klettverschluss. Sie soll rundherum straff am Handgelenk anliegen. Halten Sie Ihren Arm entspannt
am Körper. In dieser Position befindet sich das Handgelenk mit dem
Messgerät auf Herzhöhe (siehe Bild
3).
Bild 3
Page 19

Vorbereitung zur Blutdruckmessung
19
Die Manschette darf nicht über
Wunden angelegt werden, da dies zu
weiteren Verletzungen führen kann.
Achten Sie darauf, dass die Man-
schette nicht an einem Arm angelegt
wird, dessen Arterien oder Venen in medizinischer Behandlung sind oder waren
(z.B.Shunt).
Bei Frauen mit Brutstamputation die
Manschette nicht am Handgelenk auf
der amputierten Körperseite anlegen.
Während der Messung können Fehl-
funktionen bei Medizingeräten auftreten, die zeitgleich am selben Arm verwendet werden.
In Einzelfällen können zwischen der
Blutdruckmessung am Handgelenk und
der Messung am Oberarm Differenzen
auftreten.
Daher sind gelegentliche Vergleichsmessungen am Oberarm empfehlenswert.
쮕
Page 20

20
Vorbereitung zur Blutdruckmessung
Bei Durchblutungsstörungen oder
starker Arteriosklerose ist die Blutdruckmessung am Handgelenk nicht geeignet.
쮕
Der Blutdruck sollte in diesen Fällen am
Oberarm gemessen werden.
druckmessung nicht unnötig lange (> 2
Minuten) unterbunden werden. Bei einer
Fehlfunktion des Gerätes nehmen Sie
das Gerät vom Handgelenk ab.
Der Blutfluss darf durch die Blut-
Das Handgelenk muß sich bei
der Messung auf Herzhöhe befinden!
Zu häufige Messungen können
durch Beeinträchtigung des Blutflusses
zu Verletzungen führen.
Page 21
Blutdruckmessung
21
Ihr Gerät hat einen Speicher für 280 Messungen.
➡ Starten Sie die Messung mit der
START-Taste
S
T
A
R
T
Jetzt den Arm vollkommen ruhig
halten und nicht sprechen.
Zur Funktionskontrolle erscheinen kurz
sämtliche Anzeigeelemente der LCDAnzeige (siehe Bild 4).
M
SYS.
DIA.
Bild 4
쮕
mm/Hg
mm/Hg
.
.
PUL/min
Page 22

22
Blutdruckmessung
Die Pumpe beginnt die Manschette aufzupumpen.
쮕
Der steigende Manschettendruck wird
digital angezeigt.
Das Gerät pumpt bis auf ca. 20 mmHg
auf, danach beginnt der Messvorgang.
Sobald das Gerät die ersten Pulsationen
registriert, blinkt das „ “-Symbol im
Pulsrhythmus.
Abbruch der Messung:
Eine Messung kann jederzeit abgebrochen werden, indem Sie während einer
laufenden Messung die START-Taste
drücken, wodurch die Manschette automatisch entlüftet wird.
Page 23
Messwertanzeige
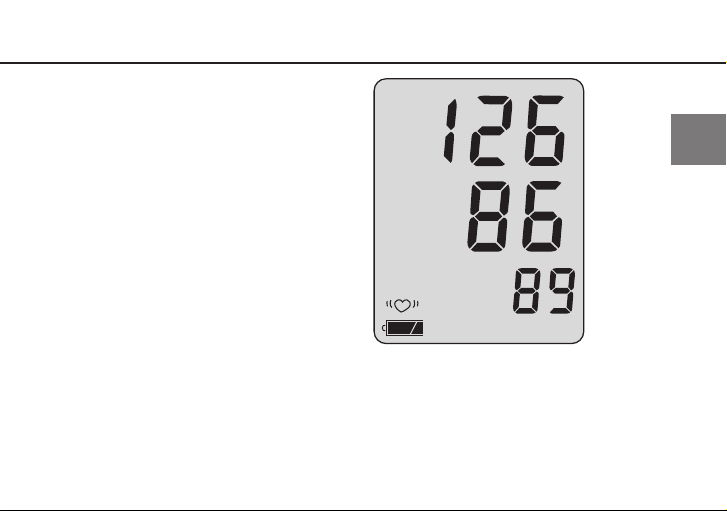
Nach Ende der Messung öffnet sich
automatisch das eingebaute Ventil zur
Schnellentlüftung der Manschette.
Die gemessenen Blutdruckwerte (Systole,Diastole,Puls) der Messung werden
angezeigt (siehe Bild 5).
SYS.
DIA.
23
쮕
mm/Hg
mm/Hg
PUL/min
Bild 5
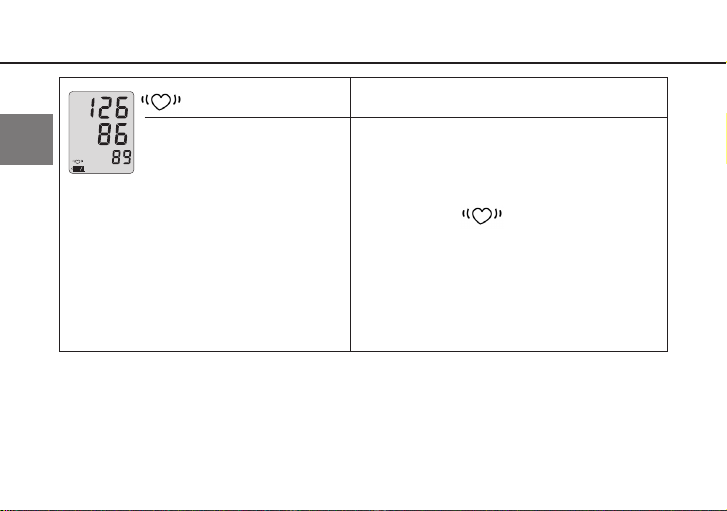
Die Messung wird automatisch gespeichert. Ist der Messwertspeicher voll (Sym-
M
im Uhrzeitmodus), so wird die äl-
bol
teste Messung gelöschtund die aktuelle
gespeichert.
Page 24
24
2
min
Messwertanzeige
Fehlmessungen mit Anzeige „Err“ (siehe
Seite 28) werden nicht gespeichert.
Erscheint nach der Messung das Symbol
쮕
„ “, wird eine Wiederholungsmessung empfohlen, dabei den Arm vollkommen ruhig halten. Die wiederholte
Anzeige des Symbols „ “ bei ruhig
gehaltenem Arm kann ein Hinweis auf
Herzrhythmusstörungen sein. Bitte besprechen Sie dies bei Ihrem nächsten
Arztbesuch.
Der Blutdruck ist eine dynamische Größe
und kann durch die Haltung des Patienten wie Sitzen, Stehen, Liegen, Bewegung vor oder während der Messung,
körperliche Verfassung (Stress, Krankheit...) beeinflusst werden.
➡ Bei offensichtlich falschem Mess-
ergebnis die Messung wiederholen.
Nach ca. 1 min. schaltet das Gerät automatisch ab.Um eine Wiederholungsmessung durchzuführen ist erneut die
START-Taste kurz zu drücken.
Lassen Sie zwischen zwei
Messungen mindestens zwei
Minuten vergehen.
➡ Wird keine weitere Messung ge-
wünscht, nehmen Sie das Gerät
vom Handgelenk ab.
Page 25

Abruf des Messwertspeichers
25
➡ Gespeicherte Messwerte rufen Sie
ab, indem Sie beim Einschalten des
Gerätes die START-Taste solange
gedrückt halten, bis die zuletzt
gespeicherte Messung im Display
M
erscheint (Symbol
Nun werden nacheinander alle
Messungen des Speichers für ca. 5
Sekunden angezeigt. (Befindet sich
keine Messung im Speicher,so erscheint
im Display bei Systole, Diastole und Puls
für ca. 3 Sekunden jeweils eine „0“).
➡ Durch erneutes Drücken der START-
Taste wird das Gerät ausgeschaltet.
).
Wird nach Durchlauf des gesamten
Speichers keine Taste gedrückt, schaltet
das Gerät nach 5 Sekunden automatisch ab.
Löschen des Messwertspeichers
➡ Drücken Sie die SET-Taste für ca. 5
Sekunden bis das Symbol
blinkt.
Der Messwertspeicher ist nun gelöscht.
M
쮕
Page 26

26
Installation boso-profilmanager
/ Datenübertragung
쮕
Eine ausführliche Gebrauchsanweisung zum boso-profilmanager finden Sie auf beiliegender CD.
Der Inhalt des Messwertspeichers kann
über den boso-profilmanager (beiliegende CD) und das beiliegende PC-Verbindungskabel zur ausführlichen Auswertung auf einen Computer übertragen
werden. Der Computer muss die europäische Sicherheits-Norm EN60601-1
erfüllen.
➡ Verbinden Sie Ihr Gerät boso medi-
life PC3 über das mitgelieferte PCVerbindungskabel mit der USBSchnittstelle an Ihrem PC.
Der Datenübertragungsmodus wird
durch Einstecken des Schnittstellenkabels in die Anschlussbuchse für PC-Ver-
Page 27
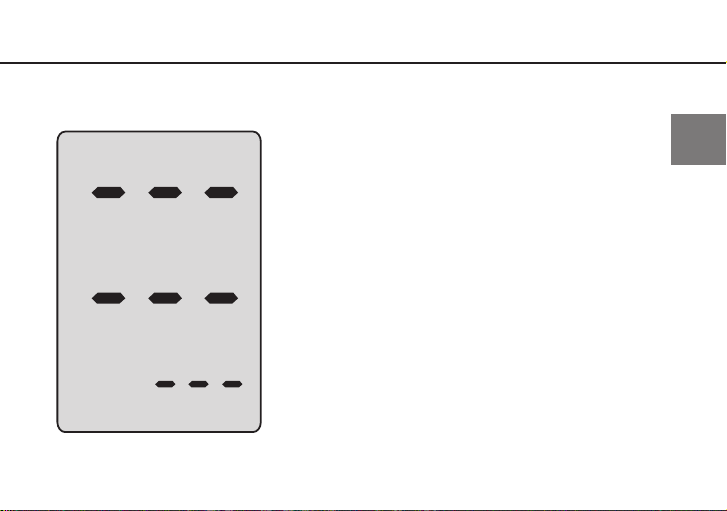
Datenübertragung
27
bindungskabel aktiviert. Im Display erscheinen 9 Striche (siehe Bild 6).
Bild 6
Achtung:
Im Datenübertragungsmodus ist keine
Blutdruckmessung möglich.
➡ Löschen Sie nach erfolgreicher
Datenübertragung den Messwertspeicher durch Drücken der SET-
M
Taste bis im Display
blinkt.
쮕
Page 28
28
Fehleranzeige
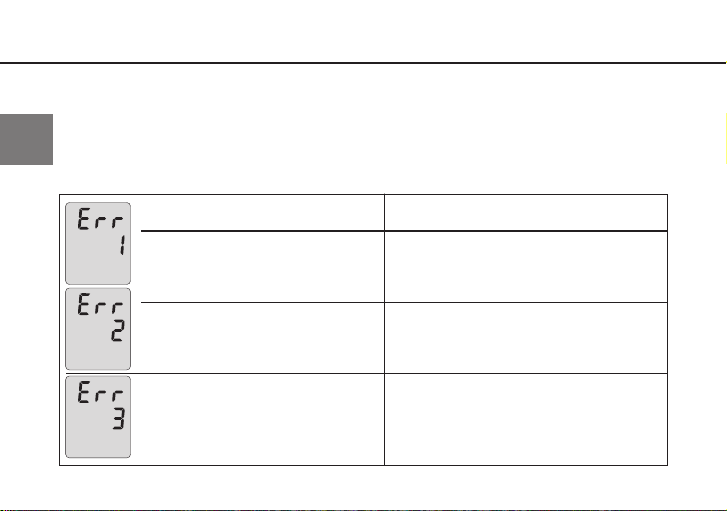
Treten während der Messung Probleme auf, so wird anstatt des Messergebnisses ein
Fehler angezeigt.
쮕
Bedeutung der Fehleranzeigen:
Fehlerursache für Err-Anzeige Fehlerbehebung
Manschettendruck schwankt Arm ruhig halten
während der Messung zu stark
keine auswertbaren Pulsationen Lage der Manschette überprüfen
(siehe Seite 18) und erneut messen
Fehler beim Aufpumpen Manschette eventuell zu locker
angelegt, Manschette fester anlegen
(siehe Seite 18)
Page 29

Fehleranzeige
Fehlerursache für Err-Anzeige Fehlerbehebung
29
Übertragungsfehler Übertragung wiederholen
Speicherfehler Senden Sie das Gerät zur Über-
prüfung an den Kundendienst
(siehe Seite 32)
Fehler beim Erfassen des Messung wiederholen
Pulswertes
쮕
Page 30
30
Fehleranzeige
-Anzeige Fehlerbehebung
쮕
unregelmäßiger Puls oder Wiederholungsmessung empfohlen:
Bewegung während dabei Arm vollkommen ruhig
der Messung halten. Die wiederholte Anzeige des
Symbols bei ruhig gehaltenem
Arm kann ein Hinweis auf
Herz-Rhythmus-Störungen sein.
Bitte besprechen Sie dies bei
Ihrem nächsten Arztbesuch.
Page 31

Reinigung und Desinfektion
Garantie
31
Gerät:
Zur Reinigung des Gerätes verwenden Sie ein
weiches, trockenes Tuch.
Manschette:
Kleine Flecken auf der Manschette können vorsichtig mit handelsüblichem Geschirrspülmittel
entfernt werden.
Desinfektion:
Zur Wischdesinfektion (Einwirkzeit mind. 5 Minuten) des Gerätes empfehlen wir das Desinfektionsmittel antifect liquid (Schülke & Mayr). Zur
Desinfektion des Klettverschlusses der Manschette empfehlen wir die Sprühdesinfektion.
Insbesondere wenn das Gerät von mehreren Anwendern verwendet wird, ist auf eine regelmäßige Reinigung und Desinfektion der Manschette zu achten.
Die Garantiebedingungen entnehmen Sie bitte der GarantieUrkunde.
Ein Garantieanspruch kann nur
anerkannt werden, wenn die
vom Händler ausgefüllte und abgestempelte Garantie-Urkunde
zusammen mit dem Gerät eingeschickt wird.
쮕
Page 32

32
Kundendienst Entsorgung
Garantie- und Reparaturarbeiten müssen durch geschultes und autorisiertes
Personal durchgeführt werden. Das Ge-
쮕
rät darf ohne Erlaubnis des Herstellers
nicht geändert werden. Senden Sie das
Gerät sorgfältig verpackt und ausreichend frankiert an Ihren autorisierten
Fachhändler oder direkt an:
BOSCH + SOHN GmbH u. Co. KG
Serviceabteilung
Bahnhofstraße 64, D-72417 Jungingen
T: +49(0)7477 / 92 75-0
Geräte und Batterien dürfen nicht
in den Hausmüll.
Am Ende der Nutzungsdauer muss das
Gerät einer Sammelstelle für ElektronikAltteile zugeführt werden.
Bitte beachten Sie, dass Batterien und
wiederaufladbare Batterien hierbei gesondert entsorgt werden müssen. (Sammelstelle Ihrer Gemeinde).
Zu erwartende Betriebs-Lebensdauer
des Gerätes: 10 Jahre
Zu erwartende Betriebs-Lebensdauer
der Manschette: 10.000 Messzyklen
Page 33

Technische Daten
Messprinzip: Oszillometrisch
33
Messbereich: 40 bis 255 mmHg, 40 bis 180 Puls/min.
Manschettendruck: 0 bis 320 mmHg
Anzahl Speicher: 280 Messungen
Anzeige: LCD
Betriebsbedingungen: Umgebungstemperatur +10°C bis +40°C
rel. Luftfeuchtigkeit 15 bis 85 %
Lagerbedingungen: Umgebungstemperatur -10°C bis +60°C
rel. Luftfeuchtigkeit 15 bis 85 %
쮕
Page 34

34
Technische Daten
Stromversorgung: DC 3 V (Batterien 2 x 1,5 V Micro IEC LR 03,
Alkali Mangan)
쮕
Typische Lebensdauer 500 Messzyklen (abhängig von Aufpumphöhe und
der Batterien: Nutzungsfrequenz)
Batteriekontrolle: Symbolanzeige im Anzeigefeld
Gewicht: 82 g ohne Batterien
Abmessungen (B xHxT): 70 mm x 55 mm x 70 mm
Klassifikation: Typ BF ( )
Schutz gegen Fremd- IP21
körper und Wasser:
Page 35

Technische Daten
Klinischer Test Die Messgenauigkeit entspricht den
(DIN 58130): Anforderungen der EN 1060 Teil 3
maximale Messabweichung ± 3 mmHg
des Manschettendrucks:
maximale Messabweichung ±5%
der Pulsanzeige:
Zutreffende Normen: EN 1060,Teil 1: „Nichtinvasive Blutdruckmess-
geräte – Allgemeine Anforderungen“ und Teil 3:
„Ergänzende Anforderungen für elektromechanische Blutdruckmesssysteme“
35
쮕
Page 36

36
Prüfanweisung für die messtechnische Kontrolle
(nur für geschultes Fachpersonal)
Die messtechnische Kontrolle ist spätestens alle 2 Jahre von folgenden Ein-
쮕
richtungen oder Personen durchzuführen:
– Hersteller
– für das Messwesen zuständige
Behörde
– Personen, welche die Voraussetzun-
gen der Medizinprodukte-Betreiberverordnung erfüllen.
A) Funktionsprüfung
Eine Funktionsprüfung des Gerätes
kann nur am Menschen oder mit
einem geeigneten Simulator durchgeführt werden.
B) Prüfung auf Dichtheit des
Druckkreises und Abweichung
der Druckanzeige
Hinweise:
a) Wenn der Druck im Messmodus über
320 mmHg gesteigert wird, spricht
das Schnellablassventil an und öffnet den Druckkreis. Übersteigt der
Druck im Prüfmodus 320 mmHg,
blinkt die Messwertanzeige.
b) Für die Prüfung ist die Manschette
vom Gerät abzunehmen. Seitlich der
Manschette (am Gerät oben und
unten) befinden sich zwei
Page 37

Prüfanweisung für die messtechnische Kontrolle
(nur für geschultes Fachpersonal)
Halterungen. Um die Manschette
abzunehmen, schieben Sie die
Halterungen mit einem spitzen
Gegenstand (z.B. Pinzette) heraus.
Nach Entfernen der Manschette werden die Luftanschlüsse sichtbar.
c) Für die Prüfung auf Dichtigkeit des
Druckkreises beide Luftanschlüsse
über zwei T-Stücke mit der zusammengerollten Manschette und einem
Druckball verbinden.
Prüfung
1. Prüfling am unteren Luftanschluss
mit Druckerzeuger (z.B. Pumpball)
verbinden.
2. Batteriefachdeckel mindestens 5
Sekunden öffnen. START-Taste
gedrückt halten und Batteriefachdeckel schließen.
3. START-Taste wieder loslassen.
4. Das Gerät befindet sich jetzt im
Prüfmodus; in den Feldern SYS und
DIA wird der aktuelle Druck angezeigt.
37
쮕
Page 38

38
Prüfanweisung für die messtechnische Kontrolle
(nur für geschultes Fachpersonal)
5. Prüfung auf Abweichung der
쮕
Druckanzeige in der üblichen Weise
durchführen.
6. Dichtigkeitsprüfung unter Beachtung
der Setzzeit von zwei Minuten in der
üblichen Weise durchführen.
7. Gerät ausschalten und Manschette
wieder mit dem Gerät verbinden.
C) Sicherung
Zur Sicherung kann das Gehäuseoberteil und -unterteil mit
einer Sicherungsmarke verbunden
werden; alternativ kann eine
Bohrung für die Gehäuseverbindungsschraube auf der Unterseite
des Gerätes verschließend gesichert
werden.
Page 39

Table of contents
Product features...........................................................................................................................................41
Contents of package
Quick guide
Introduction
.....................................................................................................................................................43
....................................................................................................................................................44
Blood pressure values
Systolic and diastolic blood pressure value
WHO blood pressure cut-off values
Starting up
.......................................................................................................................................................48
Inserting batteries
Battery status
Changing batteries
Setting the time and date
General instructions for self-measurement
Preparing to measure your blood pressure
..................................................................................................................................42
...............................................................................................................................46
...................................................................46
...................................................................................46
........................................................................................................................48
..................................................................................................................................49
......................................................................................................................49
.......................................................................................................................55
...................................................................................52
...................................................................................54
39
Page 40

40
Table of contents
Note on cuff sizes.........................................................................................................................54
How to wear the unit
Measuring your blood pressure
Interrupting a measurement
Measurement display
Recall of stored readings
.................................................................................................................55
...........................................................................................................58
..................................................................................................59
................................................................................................................................60
.........................................................................................................................62
Installation of the boso profile-manager / Data transfer
Error messages
Cleaning and Disinfection
Warranty
Customer service / Disposal
Technical data
..............................................................................................................................................65
.......................................................................................................................68
..........................................................................................................................................................68
...................................................................................................................69
................................................................................................................................................70
Calibration checks - Testing instructions
(for trained specialist staff only)
.........................................................................................................73
......................................................63
Page 41

Product features
connector jack for
PC-connecting
cable
SET button
Battery status display see page 49
Measurement in progress see page 59
Irregular heartbeat during measurement see page 61, 67
M
Stored value see page 62
Battery compartment
START button
LCD display
41
Page 42

42
BOSCH+SOHN GMBH U. CO. KG
FABRIK MEDIZINISCHER APPARATE
BAHNHOFSTR. 64 · D-72417 JUNGINGEN
Diese Garantie-Urkunde ist nur gültig in Verbindung
mit einem Kaufbeleg.
This warranty certificate is valid only in combination
with a proof of purchase (invoice).
Ce certificat de garantie est valable uniquement sur
présentation d'une preuve d'achat (facture)
Este certificado de garantía es válido sólo en
combinación con una prueba de compra (factura).
Questo certificato di garanzia è valido solo in
combinazione con una prova di acquisto (fattura).
GARANTIE-URKUNDE
CERTIFICATE OF WARRANTY
CERTIFICAT DE GARANTIE
CERTIFICADO DE GARANTIA
CERTIFICATO DI GARANZIA
medilife PC3
Gebrauchsanweisung
User
Instructions
Mode
d’emploi
Manuale
di istruzioni
Manual
del Usuario
2
39
76
113
150
Contents of package
1 Blood pressure
monitor
boso
medilife PC3
1 Case
1 CD boso-
profile-manager
1 PC connecting cable
1 Warranty
certificate
2 LR 03 (AAA)
1 User
instructions
Page 43

Quick guide
43
➡ Insert batteries, ensure correct posi-
tioning (page 48)
➡ Attach unit (page 55)
When measuring, the wrist must be
held at the same height as the heart!
➡ Start (and stop) a measurement by
pressing the 'START' button (page 58)
Measured systolic, diastolic and pulse
values are displayed after the measurement is completed (page 60)
➡ Retrieving values from memory
(page 62): with the instrument switched off, press the 'START' button
until the last measurement that has
been stored appears in the display
M
(symbol
measurement readings are shown
successively for five seconds. (If no
measurements are stored in memory,
the systolic, diastolic and pulse readings all show the value ‘0’ for three
seconds.) (page 62)
). Now all the stored
This quick guide does not replace
the detailed information on the use and
safety of the blood pressure monitor
featured in the user instructions.
Therefore, please ensure reading the user instructions!
Page 44

44
Introduction
Dear Customer,
We are delighted that you have decided
to purchase a boso blood pressure
monitor. The boso brand is synonymous
with optimal quality and precision and
is also number 1 among professionals:
77% of all German doctors currently
use boso blood pressure monitors
(GfK 1/2010).
The experience gained from decades of
use by professionals has also been
incorporated into all the patient monitors for home measurement.
This instrument has also passed our
strict quality control procedures and is
your reliable partner for monitoring
your blood pressure values.
Please read these user instructions
before using the instrument for the first
time, as correct blood pressure readings
can only be obtained if the instrument is
operated correctly.
In these user instructions, '➡' indicates
an action by the user.
To get help concerning usage or maintenance please contact your dealer or
the manufacturer (contact details can
be found on the back cover of this
manual).
Page 45

Introduction
45
An unexpected operating condition or
an incidence which has worsened the
health condition or could have worsened the health condition should be
reported to the manufacturer immediately.
If the instrument is to be sold, ensure
that these user instructions are enclosed.
If the monitor is used in medical practice (in accordance with the legislation
governing the operation of medical
devices), it should be calibrated at regular intervals (see page 73).
The boso medilife PC3 blood pressure
monitor is suitable for patients of all
ages with a wrist circumference of between 13,5 and 21,5 cm. The monitor is
not suitable for neonatals.
Wireless communication devices, such
as home networking devices, mobile
phones, cordless phones and their base
stations, walkie-talkies can affect this
blood pressure monitor. Therefore, a minimum distance of 11 feet should be kept
from such devices.
Page 46

46
Blood pressure values
To determine the blood pressure, two
values need to be measured:
● Systolic (upper) blood pressure:
This is produced when the heart mus-
cle contracts and blood is forced into
the blood vessels.
The World Health Organization (WHO, 1999) has defined the following cut-off
values for assessing blood pressure:
High blood pressure over 140 mmHg over 90 mmHg
Borderline normal blood pressure 130 to 139 mmHg 85 to 89 mmHg
Normal blood pressure 120 to 129 mmHg 80 to 84 mmHg
Optimum blood pressure up to 119 mmHg up to 79 mmHg
● Diastolic (lower) blood pressure:
This is present when the heart muscle
expands and fills with blood again.
Blood pressure measurement values are
expressed in mmHg (mm of mercury).
systolic diastolic
Page 47

Blood pressure values
47
Whether medical treatment is necessary
depends not only on the blood pressure,
but also on the patient’s risk profile.
Please contact your GP if one of the
values (systole, diastole) consistently
exceeds the cut-off point for high blood
pressure.
Self-measurement of blood pressure
often produces somewhat lower values
at home than at the doctor’s.
The German Hypertension League has
therefore defined lower cut-off values
for home measurements:
Home measurement: 135/85 mmHg
Measurement in the
doctor’s surgery: 140/90 mmHg
Page 48

48
Starting up
The device must be installed and put into
operation in accordance with the instructions in this manual.
➡ Use only high quality leak-proof bat-
teries of the correct specifications
(see 'Technical data' page 70).
Illustration 1
Never mix old and new batteries or
different makes.
If the batteries are not inserted
correctly, the monitor will not work and
this may cause the batteries to heat up
and leak, damaging the monitor.
➡ Inserting the batteries
The battery compartment is located
on the upper side of the monitor. Insert batteries in the battery compartment as shown in illustration 1.
➡ Remove the batteries if the monitor
is not to be used for any length of
time.
Page 49

Starting up
49
The monitor has a battery status display
(see page 41)
Battery fully charged.
Replace battery soon.
Flashing! No further
measurements possible.
Replace battery.
Important information on repla-
cing batteries:
After replacement of batteries, please
check date and clock settings.
Care for the environment
Do not dispose of used batteries and
charger units in domestic waste.
You can take these to collection sites
for used batteries or special waste.
Contact your local authority for information.
Page 50

50
Setting the time and date
Your boso medilife PC3 unit is equipped
with an internal time and date function.
To set the time and date, press the SET
button in the manner described below:
SET
button
➨
Hours : Minutes
14:11
If the SET button is not pressed for approximately 30 seconds, the display returns automatically to its usual time display mode.
Time display mode
➜➜
press <SET> button once and release immediately
S
T
A
R
T
Date set mode (year flashes)...
➜ … set the year with the <START>
button
press <SET> button once and release immediately
Date set mode (month flashes)...
Page 51

Setting the time and date
➜ … set the month with the <START>
button
➜➜
press <SET> button once and release immediately
Date set mode (day flashes)...
➜ … set the day with the <START>
button
press <SET> button once and release immediately
Time set mode (hour flashes)...
➜ … set the hour with the <START>
button
➜➜
press <SET> button once and release immediately
Time set mode (minute flashes)...
➜ … set the minute with the <START>
button
press <SET> button once and release immediately
Time display mode
51
Page 52

52
General instructions for self-measurement
1. Fluctuations in blood pressure are
quite normal. Even when measurements are repeated, there can be
marked differences. Single or irregular measurements do not provide re-
liable information about the actual
blood pressure.A reliable evaluation
is only possible if regular measurements are taken under comparable
conditions.
Self-testing does not mean self-
2.
treatment. Do not on any account
change the dose of medicine prescribed by your doctor of your own
accord.
3. Irregular heartbeats can affect the accuracy of the monitor or result in incorrect measurements (see page 67).
4. Incorrect measurements can also occur in patients with a weak pulse
(possibly in patients wearing a pacemaker, for example). The blood pressure monitor itself has no effect on
the pacemaker.
5. If you are pregnant, consult your
doctor before using the monitor.
Page 53

General instructions for self-measurement
6. Always take the measurement in a
calm and relaxed state.
You are recommended to check your
blood pressure twice a day – in the
morning on getting up and in the evening once you have relaxed after
work.
7. Always measure your blood pressure
from the wrist with the higher blood
pressure values (where not required
otherwise (see page 56)).
To do this, measure the blood
pressure first in both wrists and thereafter always from the wrist with
the higher blood pressure.
53
Page 54

54
Preparing to measure your blood pressure
Note on cuff sizes:
The unit must only be used in combination with the CW51 cuff (wrist circumference 13.5 to 21.5 cm).
Observe the following instructions
when measuring your blood pressure:
Avoid smoking or drinking
coffee for one hour before
measuring your blood pressure.
Sit comfortably for the blood
pressure measurement.
Support your back and arms.
Do not cross your legs. Place
your feet flat on the floor.
Relax for 5 minutes before
taking a measurement.
Do not move during the measurement.
Page 55

Preparing to measure your blood pressure
correct values
too low values
too high values
55
How to wear the unit
The measurement should be taken from
the bare wrist.
Please make sure the display is po-
sitioned at your inner wrist (see illustration 2).
Illustration 2
➡ Close the cuff with the velcro faste-
ner. The cuff should fit snugly
around the wrist. When relaxed,
place your elbow on your chest with
the wrist in the same height as your
heart (see illustration 3).
Illustration 3
Page 56

56
Preparing to measure your blood pressure
Do not attach the cuff over wounds
as this can cause further injuries.
Ensure that the cuff is not attached
to an arm where arteries or veins are undergoing or have undergone medical
treatment (e.g. shunt).
For women who have had a breast
amputated, do not attach the cuff to the
wrist on the amputated side of the body.
During the measurement, medical
apparatus that are being used on the
same arm at the same time, may malfunction.
It can occur that there are diffe-
rences between measurements at the
wrist and the upper arm. Therefore, it is
recommended on occasions to take comparative measurements at the upper
arm.
Page 57

Preparing to measure your blood pressure
In cases of poor blood circulation or
severe arteriosclerosis, it is not appropriate to take measurements at the
wrist. In these instances the blood pressure should be taken at the upper arm.
The blood pressure measurement
should not prevent the flow of blood for
an unnecessary length of time (> 2 minutes). If the monitor fails to function correctly, remove the unit from the wrist.
57
When measuring, the wrist must
be held at the same height as the
heart!
Excessively frequent measurements
can cause injury by restricting blood
flow.
Page 58

58
Measuring your blood pressure
Your monitor has a memory with a capacity of 280 measurements.
➡ Start the measurement with the
'START' button
S
T
A
R
T
Now hold the arm absolutely
still and do not talk.
All the items on the LCD display appear
briefly to indicate that the monitor is
now ready for use (see illustration 4).
M
SYS.
DIA.
Illustration 4
mm/Hg
mm/Hg
.
.
PUL/min
Page 59

Measuring your blood pressure
The pump starts to inflate the cuff.
The display indicates the pressure of the
cuff as it rises.
A measurement can be interrupted at
any stage by pressing the 'START' button; the cuff deflates automatically.
59
Interrupting a measurement:
The unit inflates to a pressure of about
20 mmHg and then starts the measuring process.
As soon as the unit registers the first
beats, the ' ' symbol blinks in time
with the pulse rhythm.
Page 60

60
Measurement display
After the end of the measurement, the
inbuilt valve opens automatically and
the cuff deflates rapidly.
The measured blood pressure values
(systole, diastole, pulse) are displayed
(see illustration 5).
SYS.
DIA.
mm/Hg
mm/Hg
PUL/min
Illustration 5
The measurement is stored automatically. If the memory store is full (symbol
M
on the time display mode), the ol-
dest measurement is deleted and the
current one stored.
Page 61

Measurement display
2
min
61
Invalid measurements with an 'Err'
message (see page 65) are not stored.
If the symbol ' ' appears after the
measurement, it is recommended that
the measurement is repeated, holding
the arm completely still.
If the ' ' symbol appears again
even with the arm held still, this may be
an indication of an irregular heartbeat.
Please discuss this with your doctor at
your next visit.
Blood pressure is a dynamic parameter
and can be affected by the patient’s position, e.g. sitting, standing, lying, moving, before or during the measurement
as well as by his physical condition
(stress, disease, etc.).
➡ If the measurement result is obvio-
usly wrong, repeat the measurement.
The unit switches itself off automatically
after about 1 min. To repeat a measurement, press the 'START' button again
briefly.
Allow at least two minutes
between measurements.
➡ If no further measurement is requi-
red, remove the unit from the wrist.
Page 62

62
Recall of stored readings
➡ You can recall stored readings by
switching on the unit and pressing
and holding down the START button until the last measurement that
has been stored appears in the dis-
M
play (symbol
).
Now all the stored measurement readings are shown successively for five seconds.(If no measurements are stored in
memory, the systolic, diastolic and pulse
readings all show the value ‘0’ for three
seconds.)
➡ The unit can be switched off by sim-
ply pressing the START-button.
If all measurements of the memory have
been displayed the unit switches off automatically after 5 seconds.
Erasing the memory
➡ Press the SET button for approxima-
M
tely five seconds until the
bol starts to flash.
The memory is now erased.
sym-
Page 63

Installation of the boso profile-manager / Data transfer
63
A comprehensive instruction
manual for the boso profilemanager is to be found on the
enclosed CD.
For a comprehensive assessment, the
content of the memory is to be transferred via the boso profile-manager (enclosed CD) and the enclosed PC-connection
cable to a computer. This computer has
to comply with the european standard
EN 60601-1.
➡ Connect the boso medilife PC3 with
the PC connection cable to the USB
port of your PC.
The data transfer mode is activated by inserting the interface cable into the sokket at the back of the unit.
Page 64

64
Data transfer
The display indicates nine horizontal lines (see illustration 6).
Illustration 6
Attention:
No blood pressure measurement is possible during the data transfer mode.
➡ After successful data transfer delete
the memory by pressing the SET-
M
button until
play.
flashes in the dis-
Page 65

Error messages
If any problems occur during the measurement, the display will show an error message instead of a blood pressure reading.
Meaning of error messages:
65
Cause of Err message Troubleshooting
Cuff-pressure varies too much keep arm absolutely still
whilst measurement is taken
No valid pulsations Check positioning of cuff (see page 55)
could be obtained and repeat measurement
Error during inflation Cuff is probably not tight enough,
attach cuff more firmly
(see page 55)
Page 66

66
Error messages
Cause of Err message Troubleshooting
Communication error Repeat transmission
ROM error Send unit for inspection to
the customer service
(see page 69)
Pulse measurement error Repeat measurement
Page 67

Error messages
Display Troubleshooting
Irregular pulse or Repeat measurement recommended,
movement of arm holding the arm absolutely still.
during measurement If the ' ' symbol appears again,
even with the arm held still, this may
be an indication of an irregular heartbeat.
Please discuss this with your doctor
at your next visit.
67
Page 68

68
Cleaning and Desinfection
Warranty
Cleaning Monitor:
Use a soft, dry cloth to clean your monitor.
Cleaning Cuff:
Small stains on the cuff can be removed
carefully with a proprietary washing-up liquid.
Desinfection:
For disinfectant wipes (at least 5 minutes exposure time) of the device and the cuff,we recommend the disinfectant antifect liquid (Schülke &
Mayr). To disinfect the velcro of the cuff, we recommend spray disinfection. In particular, if the
device is used on multiple users is to pay attention to regular cleaning and disinfections of the
cuff.
For details of the warranty conditions, please consult the warranty certificate supplied.
A claim under the warranty will
only be accepted if the warranty
certificate, completed and stamped by the dealer, is returned
with the monitor.
Page 69

Customer service Disposal
69
Warranty and repair work must be undertaken by trained and authorised personnel. Do not modify this equipment
without authorization of the manufacturer.
Send the monitor, carefully packaged
and with sufficient postage, to your authorised dealer or directly to:
BOSCH + SOHN GmbH u. Co. KG
Serviceabteilung
Bahnhofstraße 64, D-72417 Jungingen
T: +49(0)7477 / 92 75-0
Do not dispose of monitors and batteries in the domestic waste.
At the end of its lifespan, the monitor
must be taken to a collection site for obsolete electronic items.
Please note that batteries and rechargeable batteries must be disposed of separately (local authority collection site).
Expected operational lifetime of the
equipment: 10 years.
Expected operational lifetime of the cuff:
10.000 measurement cycles.
Page 70

70
Technical data
Measurement principle: oscillometric
Measurement range: 40 to 255 mmHg, 40 to 180 pulses/min.
Cuff pressure: 0 to 320 mmHg
Memory store: 280 measurements
Display: LCD
Operating conditions: environmental temperature +10°C to +40°C
relative humidity 15 to 85%
Storage conditions: environmental temperature -10°C to +60°C
relative humidity 15 to 85%
Page 71

Technical data
Power supply: DC 3 V (4 x 1.5 V Micro IEC LR 03 alkaline
manganese batteries)
Typical battery life: 500 measurement cycles
(depending on inflation pressure and frequency
of use).
Battery check: symbol display in LCD window
Weight: 82 g without batteries
Dimensions (WxHxD): 70 mm x 55 mm x 70 mm
Classification: type BF ( )
Protection against solid IP21
objects and water:
71
Page 72

72
Technical data
Clinical test accuracy complies with the requirements
(DIN 58130): of EN 1060 Part 3
Maximum deviation of cuff ± 3 mmHg
pressure measurement:
Maximum deviation of ±5%
pulse rate display:
Applicable standards: EN 1060, Part 1: 'Non-invasive sphygmomano-
meters – General requirements' and Part 3:
'Supplementary requirements for electromechanical blood pressure measuring systems'
Page 73

Calibration checks - Testing instructions
(for trained specialist staff only)
Calibration checks – every 2 years at
the latest – must be performed by the
following institutions or persons:
– Manufacturer
– Trade measurements authorities
– Persons who fulfil the requirements
of the legislation governing the operation of medical devices.
A) Function testing
Function testing of the monitor can
only be carried out on a person or
with a suitable simulator.
B) Testing of pressure circuit inte-
grity and deviation of pressure
display
Note:
a) When the pressure in measurement
mode increases above 320 mmHg,
the quick release valve is triggered
and the pressure circuit opens.
When the pressure in test mode
increases above 320 mmHg, the
measured value display flashes.
b) Prior to testing separate the cuff
from the unit. To do so, remove the
two connectors with a pointed
73
Page 74

74
Calibration checks - Testing instructions
(for trained specialist staff only)
instrument (i.e. tweezers). The two
connectors can be found on the
upper and lower side of the unit on
each side of the cuff. After removal
of the cuff, the air hoses become
visible.
c) To perform leak testing of the pres-
sure circuit, T-connectors must be
used to connect the rolled-up cuff
and a pump bulb to the pressure circuit.
Testing
1. Connect lower hose of the unit with
a pressure unit, i.e. pump ball.
2. Open battery compartment for
more than 5 seconds. Hold 'START'
button pressed down and insert
batteries.
3. Release 'START' button.
4. The unit is now ready for testing.
The displays of SYS and DIA now
show the actual pressure.
Page 75

Calibration checks - Testing instructions
(for trained specialist staff only)
5. Testing for divergence of pressure
indication and density of pressure
circuit (setting time for cuff at least
120 seconds) can now be carried
out in the usual manner.
6. Switch off unit and reconnect the
cuff to the unit.
C) Safety seal
As a safeguard, the upper and
lower parts of the housing can be
joined with a safety seal.
Alternatively, a hole drilled in the
bottom of the monitor for the connecting screw for the housing can
be sealed for safety.
75
Page 76

76
Table des matières
Présentation de l’appareil.......................................................................................................................78
Contenu de l'emballage
Guide rapide d’utilisation
Introduction
....................................................................................................................................................81
Valeurs de la tension artérielle
Tensions artérielles systolique et diastolique
...........................................................................................................................79
........................................................................................................................80
............................................................................................................83
...............................................................83
Valeurs limites de l’OMS pour l’analyse de la tension artérielle
Mise en service de l’appareil
Mise en place des piles
Témoin de charge des piles
Remplacement des piles
Réglage de l’heure et de la date
.................................................................................................................85
............................................................................................................................85
....................................................................................................86
...........................................................................................................86
.........................................................................................................87
Recommandations générales sur l’automesure de la tension artérielle
Préparation de la mesure de la tension artérielle
.....................................................................91
.......................83
.......................89
Page 77

Table des matières
Recommandations relatives aux dimensions du brassard.....................................91
Pose de l’appareil
Mesure de la tension artérielle
Interruption de la mesure
Visualiser les résultats enregistrés
Installation du boso-profilmanager / Transfert de données
Messages d’erreur
Nettoyage et désinfection
Garantie
........................................................................................................................................................105
Service après-vente / Élimination
Caractéristiques techniques
Instructions relatives au contrôle technique de l’appareil
(uniquement pour les techniciens formés)
.........................................................................................................................92
............................................................................................................95
........................................................................................................96
....................................................................................................99
..............................................100
....................................................................................................................................102
....................................................................................................................105
.....................................................................................................106
................................................................................................................107
..................................................................................110
77
Page 78

78
Présentation de l’appareil
connecteur pour PC
câble de raccordement
Touche SET
Couvercle du
compartiment
Touche
START
M
Afficheur LCD
Témoin de charge des piles voir page 86
Mesure en cours voir page 96
Trouble du rythme cardiaque pendant la mesure voir pages 98, 104
Valeur enregistrée voir page 99
Page 79

Contenu de l'emballage
BOSCH+SOHN GMBH U. CO. KG
FABRIK MEDIZINISCHER APPARATE
BAHNHOFSTR. 64 · D-72417 JUNGINGEN
Diese Garantie-Urkunde ist nur gültig in Verbindung
mit einem Kaufbeleg.
This warranty certificate is valid only in combination
with a proof of purchase (invoice).
Ce certificat de garantie est valable uniquement sur
présentation d'une preuve d'achat (facture)
Este certificado de garantía es válido sólo en
combinación con una prueba de compra (factura).
Questo certificato di garanzia è valido solo in
combinazione con una prova di acquisto (fattura).
GARANTIE-URKUNDE
CERTIFICATE OF WARRANTY
CERTIFICAT DE GARANTIE
CERTIFICADO DE GARANTIA
CERTIFICATO DI GARANZIA
medilife PC3
Gebrauchsanweisung
User
Instructions
Mode
d’emploi
Manuale
di istruzioni
Manual
del Usuario
2
39
76
113
150
79
1 tensiomètre
boso medilife PC3
1 étui
1 CD boso
profilmanager
1 câble de connexion PC
1 certificat
de garantie
2 piles
LR 03 (AAA)
1 mode d'emploi
Page 80

80
Guide rapide d’utilisation
➡ Insérez les piles en respectant la
polarité (page 85).
➡ Posez l’appareil (page 92).
Pendant la mesure, le poignet doit
se trouver à la hauteur du coeur!
➡ Appuyez sur la touche « START »
pour lancer/arrêter une mesure
(page 95).
Les valeurs de la systole, de la diastole
et du pouls sont affichées après la
mesure (page 97).
➡ Affichage de la mémoire (page 99) :
sur l’appareil éteint, appuyez sur la
touche « START » jusqu'à ce que les
derniers résultats enregistrés appa-
raissent à l'écran (symbole
Tous les autres résultats en mémoire vont ensuite s’afficher l’un après
l’autre pendant env. 5 secondes. (Si
la mémoire ne contient aucune donnée, un "0" s'afficher alors dans les
champs SYSTOLE, DIASTOLE et PULS
durant 3 secondes environ)
(page 99).
M
Ce guide rapide d’utilisation ne
remplace pas les informations détaillées
contenues dans le mode d’emploi et
relatives à l’utilisation et à la sécurité de
votre tensiomètre.
Veuillez lire attentivement le
mode d’emploi !
).
Page 81

Introduction
81
Cher client, chère cliente, félicitations
pour l’achat de ce tensiomètre boso. La
marque boso, synonyme de qualité et
précision, est aussi numéro 1 chez les
professionnels.
Aujourd’hui, le tensiomètre boso est
utilisé par 77 % des médecins allemands (GfK 1/2010). Chaque appareil
boso destiné à l’automesure profite
d’un savoir-faire de plusieurs décennies
dans le domaine professionnel.
Cet appareil qui a subi un contrôle-qualité rigoureux est un outil sûr de contrôle de la tension artérielle.
Veuillez lire attentivement le mode
d’emploi avant la première utilisation.
Une utilisation conforme de l'appareil
est indispensable pour garantir une
mesure correcte de la tension artérielle.
Dans ce mode d’emploi, le symbole
« ➡» indique une action de l’utilisateur.
Pour obtenir de l’aide relative à la mise
en service, l’utilisation ou la maintenance, veuillez vous adresser à votre revendeur ou au fabricant (les coordonnées
figurent sur la quatrième de couverture
de ce mode d’emploi).
Page 82

82
Introduction
En cas d’incident ou d’état de fonctionnement inattendu qui a altéré l’état de
santé ou qui aurait pu altérer l’état de
santé, le constructeur devra immédiatement être averti.
Ce mode d’emploi doit être joint en cas
de cession de l’appareil.
En cas d’utilisation de l’appareil dans le
cadre d’une thérapie (conformément à
la réglementation nationale en vigueur), des contrôles techniques réguliers
sont obligatoires (voir page 110).
Le tensiomètre boso medilife PC3 est
adapté aux patients de tout âge dont le
tour de poignet se situe entre 13,5 et
21,5 cm. L’appareil n’est pas conçu pour
les nouveau-nés.
Des appareils de communication sans fil,
tels que appareils réseau domestiques
sans fil, téléphones portables, téléphones sans fil et leurs stations de base,des
talkies-walkies peuvent affecter ce moniteur de pression artérielle. Par conséquent, une distance minimale de 3,3 mètres doit être maintenue pour de tels
dispositifs.
Page 83

Valeurs de la tension artérielle
83
Pour obtenir la tension artérielle, deux
valeurs doivent être mesurées :
● la tension artérielle systolique
(supérieure) :
Elle apparaît lors de la contraction du
muscle cardiaque qui entraîne l'éjection du sang dans les vaisseaux sanguins.
L’Organisation mondiale de la Santé (OMS, 1999) a défini les valeurs limites
suivantes pour la classification de la tension artérielle :
Tension trop haute > 140 mmHg > 90 mmHg
Tension normale - haute 130 à 139 mmHg 85 à 89 mmHg
Tension normale 120 à 129 mmHg 80 à 84 mmHg
Tension optimale jusqu’à 119 mmHg jusqu’à 79 mmHg
● Tension artérielle diastolique (inférieure) :
Elle apparaît lors de la dilatation du
muscle cardiaque qui se remplit de
nouveau de sang.
Les valeurs mesurées de la tension artérielle sont indiquées en mmHg (millimètres de mercure).
Systolique Diastolique
Page 84

84
Valeurs de la tension artérielle
Lorsqu’un traitement médicamenteux
est nécessaire, la tension artérielle n’est
pas le seul élément à prendre en compte ; il y a aussi le profil de risque du
patient. Veuillez consulter votre médecin si une seule des valeurs (systolique,
diastolique) est en permanence au-delà
des valeurs limites, signalant une haute
tension.
L’automesure de la tension fournit souvent des valeurs légèrement inférieures à
celles mesurées dans le cabinet médical
par le médecin. C’est pourquoi la Ligue
Allemande d’Hypertension a défini des
valeurs plus basses pour l’automesure :
Mesure au domicile : 135/85 mmHg
Mesure au cabinet
médical : 140/90 mmHg
Page 85

Mise en service de l’appareil
85
L'appareil doit être installé et mis en service selon les informations contenues
dans ce manuel.
Figure 1
➡ Utilisez uniquement des piles étan-
ches de qualité et conformes aux
spécifications (voir « Caractéristiques techniques », page 107).
Ne mélangez jamais d’anciennes
piles avec de nouvelles piles ou des piles
de types différents.
En cas de polarité incorrecte, l’appa-
reil ne fonctionne pas et un dégagement
de chaleur est possible ou alors les piles
fuient et entraînent la détérioration de
l'appareil.
➡ Mise en place des piles
Le compartiment à piles se trouve
sur le côté supérieur de l’appareil. Insérez les piles comme sur la figure 1
dans le compartiment à piles.
➡ Si l’appareil n’est pas utilisé pen-
dant une période prolongée, retirez
les piles.
Page 86

86
Mise en service de l’appareil
L’appareil est doté d’un témoin de charge des piles (voir page 78).
Piles totalement chargées.
Les piles doivent être
bientôt remplacées.
Clignotant ! Aucune
mesure n’est possible.
Remplacer les piles.
Recommandations importantes
pour le remplacement des piles (uniquement pour le medilife PC3) :
Après le remplacement des batteries vérifiez la date et heure.
Contribuez au respect de l’envi-
ronnement
Les piles et batteries usées ne sont pas
des ordures ménagères.
Il s’agit de déchets spéciaux qui doivent être rapportés aux points de collecte prévus.
Pour en savoir plus, adressez-vous à la
mairie de votre localité.
Page 87

Réglage de l’heure et de la date
87
Votre appareil boso medilife PC3 possède une fonction d'horodatage. Pour
modifier l'heure et la date,activez la touche SET comme indiqué ci-contre:
S
T
A
Touche
SET
➨
Heures : Minutes
14:11
R
T
Si la touche SET reste inactivée durant 30
secondes environ, l'appareil revient automatiquement en mode Affichage
Heure.
L'appareil étant en mode Affichage
Heure
➜
appuyez brièvement sur la touche
<SET> et relâchez.
L'année se met à clignoter en mode Réglage Date …
➜ … Sélectionnez la valeur voulue à
l'aide de la touche <START>.
➜
appuyez brièvement sur la touche
<SET> et relâchez.
Page 88

88
Réglage de l’heure et de la date
Le mois se met à clignoter en mode Réglage Date …
➜ … Sélectionnez la valeur voulue à
l'aide de la touche <START>.
➜
appuyez brièvement sur la touche
<SET> et relâchez.
Le jour se met à clignoter en mode Réglage Date …
➜ … Sélectionnez la valeur voulue à
l'aide de la touche <START>.
➜
appuyez brièvement sur la touche
<SET> et relâchez.
L'heure se met à clignoter en mode Réglage Heure …
➜ … Sélectionnez la valeur voulue à
l'aide de la touche <START>.
➜
appuyez brièvement sur la touche
<SET> et relâchez.
Les minutes se mettent à clignoter en
mode Réglage Heure …
➜ … Sélectionnez la valeur voulue à
l'aide de la touche <START>.
➜
appuyez brièvement sur la touche
<SET>et relâchez pour revenir au
mode Affichage Heure.
Page 89

Recommandations générales sur l’automesure
de la tension artérielle
89
1. Les variations de la tension artérielle
sont normales. D’importantes différences sont également possibles lors
de la répétition d’une même mesure.
Des mesures uniques ou irrégulières
fournissent des données peu fiables
sur la tension artérielle réelle. Une
appréciation fiable est possible uniquement lorsque vous réalisez les
mesures dans des conditions similaires.
L’automesure n’est pas syn-
2.
onyme de thérapie. Ne modifiez ja-
mais vous-même les posologies
prescrites par votre médecin.
3. Des troubles du rythme cardiaque
peuvent avoir un impact sur la précision de mesure de l’appareil, voire
entraîner des mesures erronées (voir
page 104).
4. Chez les patients présentant un faible pouls (notamment en cas de stimulateur cardiaque par exemple),
des erreurs de mesure sont possibles.
Le tensiomètre n’interfère pas sur le
fonctionnement du stimulateur cardiaque.
Page 90

90
Recommandations générales sur l’automesure
de la tension artérielle
5. En cas de grossesse, un avis médical
est indispensable avant l’utilisation
de l’appareil.
6. La mesure doit toujours avoir lieu au repos. Il est recommandé de contrôler la
tension artérielle deux fois par jour – le
matin au lever et le soir après s’être re-
posé des fatigues de la journée.
7. La tension artérielle (sauf contre-indication, voir page 93) se mesure toujours au de poignet présentant les valeurs les plus élevées. Mesurez la
tension artérielle d’abord aux deux
poignets,puis au bras dont la tension
est la plus élevée.
Page 91

Préparation de la mesure de la tension artérielle
91
Recommandations relatives aux dimensions du brassard :
L'appareil ne doit être utilisé qu'avec le
brassard CW51. Il correspond à un tour
de poignet de 13,5 à 21,5 cm.
Les instructions suivantes doivent
être respectées lors de la mesure de
la tension artérielle :
Évitez de consommer de la nicotine ou du café une heure
avant la mesure de la tension
artérielle.
Veillez à adopter une position
assise confortable. Adossezvous et posez les bras sur la table.Ne croisez pas vos jambes.
Posez les pieds à plat sur le sol.
Détendez-vous pendant 5 minutes avant de réaliser la mesure. Ne bougez pas pendant
la mesure.
Page 92

92
Valeurs correctes
Valeurs trop faibles
Valeurs trop élevées
Préparation de la mesure de la tension artérielle
Pose de l’appareil
La mesure doit être réalisée sur le poignet dénudé.
Assurez-vous que la zone d’affi-
chage se trouve du côté de la paume de
la main (voir figure 2).
Figure 2
➡ Fixer le brassard à l'aide du velcro,
de telle sorte que le poignet soit fermement maintenu.
Positionnez votre bras contre le
corps, de manière détendue, comme
indiqué sur le dessin. Le poignet sur
lequel l’appareil est fixé doit se
trouver au niveau du cœur (voir
figure 3).
Figure 3
Page 93

Préparation de la mesure de la tension artérielle
93
Le brassard ne doit pas être posé sur
des plaies, car il pourrait entraîner d’autres blessures.
Vérifiez que le bras sur lequel est
posé le brassard ne présente aucune artère ni veine en traitement médical présent ou passé (exemple : shunt).
Chez les femmes qui ont subi une
amputation de la poitrine,le brassard ne
doit pas être posé sur le côté amputé.
Pendant la mesure, des dysfonction-
nements peuvent apparaître sur les appareils médicaux utilisés simultanément
sur le même bras.
Il peut arriver, dans certains cas,
qu’il y ait des différences entre la tension
prise au niveau du poignet et celle prise
au niveau du bras.
C’est pourquoi, nous recommandons
d’effectuer, de temps en temps, des
mesures comparatives sur le bras.
Page 94

94
Préparation de la mesure de la tension artérielle
Dans certains cas en effet, les résul-
tats pourraient être inexacts, voire erronés. Dans le cas de troubles de l'irrigation sanguine ou de forte artériosclérose,
la tension ne peut pas être prise au poignet ; il convient alors de la prendre au niveau du bras.
Pendant la mesure, le poignet
doit se trouver à la hauteur du coeur !
Le flux sanguin ne doit pas être interrompu trop longtemps par la mesure
de la tension artérielle (> 2 minutes). En
cas de dysfonctionnement de l’appareil,
retirez l’appareil du poignet.
Des mesures trop fréquentes sont
mauvaises pour la circulation sanguine
et peuvent entraîner des lésions.
Page 95

Mesure de la tension artérielle
95
Votre appareil est doté d’une mémoire
de 280 mesures.
➡ Démarrez la mesure en appuyant sur
la touche « START »
S
T
A
R
T
Immobilisez totalement votre
bras et ne parlez pas.
Pour un essai de fonctionnement, tous
les organes de l’afficheur LCD s’affichent
brièvement (voir figure 4).
M
SYS.
DIA.
Figure 4
.
.
mm/Hg
mm/Hg
PUL/min
Page 96

96
Mesure de la tension artérielle
La pompe commence à remplir le bras-
sard.
La montée en pression s’affiche à
l’écran.
L’appareil gonfle à 20 mmHg, ensuite
commence la prise de tension.
Dès que les premières pulsations sont
enregistrées, le symbole « » clignote
au rythme cardiaque.
Interruption de la mesure :
Une mesure peut être interrompue à tout
moment lorsque vous appuyez sur la
touche « START » au cours d'une mesure.
Le brassard se dégonfle alors automatiquement.
Page 97

Affichage des valeurs mesurées
À la fin de la mesure, la valve intégrée
s’ouvre automatiquement pour un dégonflement rapide du brassard.
SYS.
Les valeurs mesurées (systole, diastole,
pouls) sont affichées (voir figure 5).
97
mm/Hg
DIA.
mm/Hg
PUL/min
Figure 5
La mesure est enregistrée automatiquement. Si la mémoire est pleine (symbole
M
s'affiche en mode Affichage Heure),
la mesure la plus ancienne est effacée
et remplacée par la plus récente.
Page 98

98
2
min
Affichage des valeurs mesurées
Les mesures erronées signalées par « Err »
(voir page 102) ne sont pas enregistrées.
Si après la mesure, le symbole « »
s'affiche,une répétition de la mesure est
recommandée. Pendant cette seconde
mesure, veillez à garder le bras totalement immobile. L'affichage répété du
symbole « » alors que le bras est
parfaitement immobile peut être le signe
d'une arythmie. Parlez-en à votre médecin lors de votre prochaine consultation.
La tension artérielle est une grandeur dynamique qui peut varier en fonction du
maintien du patient, notamment la position assise,debout ou allongée,un mou-
vement avant ou pendant la mesure,
l’état physique général du patient
(stress, maladie, etc.).
➡ Si le résultat est manifestement
faux, répétez la mesure.
Au bout d’une minute environ, l’appareil
s’éteint automatiquement. Pour répéter
une mesure, appuyez de nouveau briè-
vement sur la touche « START ».
Attendez au minimum 2 minutes entre deux mesures.
➡ Si aucune autre mesure n’est néces-
saire, retirez l’appareil de votre poignet.
Page 99

Visualiser les résultats enregistrés
99
➡ Pour visualiser les résultats enregi-
strés, maintenir, lors de la mise en
route de l'appareil, la touche START
enfoncée jusqu'à ce que les derniers
résultats enregis-trés apparaissent à
M
l'écran (symbole
Tous les autres résultats en mémoire
vont ensuite s’afficher l’un après l’autre
pendant env. 5 secondes. (Si la mémoire
ne contient aucune donnée,un "0" s'affichera alors dans les champs SYSTOLE,
DIASTOLE et PULS durant 3 secondes environ).
➡ L'appareil peut être désactivé par
simple appuyant sur le bouton
START.
).
Après l’affichage de toutes les valeurs
mesurées, si aucune touche n’est
enclenchée,l’appareil s’éteint automatiquement après 5 secondes.
Suppression des résultats en mémoire
➡ Appuyer sur la touche SET durant
env. 5 secondes jusqu'à ce que le
M
symbole
Les résultats en mémoire sont alors effacés.
clignote.
Page 100

100
Installation du boso-profilmanager / Transfert de données
Vous trouverez un mode
d'emploi complet du boso
profilmanager dans le CD cijoint.
Les résultats mémorisés peuvent être
transmis à un ordinateur pour analyse
détaillée via un câble d'interface et le logiciel boso-profilmanager (CD joint).
L'ordinateur doit correspondre aux normes EN 60601-1.
➡ Connecter votre appareil boso
medilife PC3 en insérant le câble
d'interface livré dans le port USB de
votre PC.
Le passage en mode Transfert de données est activé par le simple fait d'insérer le câble d'interface dans la prise située au dos de l'appareil.
 Loading...