

Page 1

FreeSpace® E4 Series II Business Music System
OWNER’S GUIDE
Page 2

DECLARATION OF CONFORMITY
We, the offerer: Bose Corporation
The Mountain
Framingham, MA 01701-9168 USA
acknowledge our sole responsibility, that the product,
Kind of equipment: Amplifier
Type designation: FreeSpace
in accordance with EMC Directive 89/336/EEC and Article 10(1) of the Directive,
is in compliance with the following norm(s) or document(s):
Technical Regulations: EN 55103-1(E2)/EN 55103-2(E2)
Report Number: EMC.N9C.02.170.1
Test laboratory: Bose Corporation
1 New York Avenue
Framingham, MA 01701 USA
and in accordance with the Low Voltage Directive 73/23/EEC, is in compliance
with the following norm(s) or document(s):
Technical Regulations: EN 60065/IEC 60065
Certificate/Report Number: S2171542/E2171622
Accredited test laboratory: TÜV Rheinland
®
E4 Series II business music system
Sicherheit und Umweltschutz GmbH
Am Grauen Stein, D-51101 Köln, Germany
07/10/2004
Bose B.V. Nic Merks
Nijverheidstraat 8, 1135 Vice President, Europe
The Netherlands Manufacturer’s authorized EU representative
©2004 Bose Corporation. No part of this work may be reproduced, modified, distributed or otherwise used
without prior written permission.
2 of 80
Page 3

Contents
1.0 E4 Introduction . . . . . . . . . . . . . . . . . . . . . . . . . . . . 13
1.1 The Bose
®
FreeSpace® E4 Series II business
music system . . . . . . . . . . . . . . . . . . . . . . . . 13
1.2 E4 system accessories . . . . . . . . . . . . . . . . . . . 13
1.3 FreeSpace Installer™ software . . . . . . . . . . . . . 14
2.0 Designing with the E4 System . . . . . . . . . . . . . . . . . 15
2.1 Introduction . . . . . . . . . . . . . . . . . . . . . . . . . . . . 15
2.2 Basic design steps . . . . . . . . . . . . . . . . . . . . . . 15
2.2.1 Step 1 – Determine source routing . . . . . . 15
2.2.2 Step 2 – Determine Auto Volume
requirements . . . . . . . . . . . . . . . . . . . . 15
2.2.3 Step 3 – Determine volume control
requirements . . . . . . . . . . . . . . . . . . . . 18
2.2.4 Step 4 – Determine the speaker
requirements . . . . . . . . . . . . . . . . . . . . 18
2.2.5 Step 5 – Determine the E4 requirements . 19
2.3 Auto Volume layout examples . . . . . . . . . . . . . . 20
3.0 E4 Hardware Description . . . . . . . . . . . . . . . . . . . . 23
3.1 Front panel . . . . . . . . . . . . . . . . . . . . . . . . . . . . 23
3.1.1 Controls . . . . . . . . . . . . . . . . . . . . . . . . . . 23
3.1.2 Indicators . . . . . . . . . . . . . . . . . . . . . . . . . 23
3.2 Rear panel . . . . . . . . . . . . . . . . . . . . . . . . . . . . . 24
3.2.1 System controls . . . . . . . . . . . . . . . . . . . . 24
3.2.2 Audio source inputs . . . . . . . . . . . . . . . . . 24
3.2.3 Amplifier outputs . . . . . . . . . . . . . . . . . . . 24
3.2.4 AC power . . . . . . . . . . . . . . . . . . . . . . . . . 24
4.0 Hardware Installation . . . . . . . . . . . . . . . . . . . . . . . . 25
4.1 Introduction . . . . . . . . . . . . . . . . . . . . . . . . . . . . 25
4.2 Included accessories . . . . . . . . . . . . . . . . . . . . 25
4.3 Placement guidelines . . . . . . . . . . . . . . . . . . . . 25
4.4 Shelf mounting the E4 unit . . . . . . . . . . . . . . . . 25
4.5 Rack mounting the E4 unit . . . . . . . . . . . . . . . . 26
4.6 Installing accessories . . . . . . . . . . . . . . . . . . . . 27
4.6.1 Sensing microphones . . . . . . . . . . . . . . . . 27
4.6.2 User interfaces . . . . . . . . . . . . . . . . . . . . . 27
4.7 System wiring . . . . . . . . . . . . . . . . . . . . . . . . . . 29
4.7.1 Auto volume microphone inputs . . . . . . . 29
4.7.2 Serial data communications . . . . . . . . . . . 29
4.7.3 User interface connections . . . . . . . . . . . . 29
4.7.4 Remote standby switch . . . . . . . . . . . . . . 29
4.7.5 LINE 1/LINE 2 source input . . . . . . . . . . . 30
4.7.6 AUX MIC/LINE 3 source input . . . . . . . . . 30
4.7.7 PAGE/MIC/LINE 4 source input . . . . . . . . 31
4.7.8 DIRECT IN/CONTROL source input . . . . . 31
4.7.9 Amplifier ZONE OUT outputs . . . . . . . . . . 32
4.7.10 Output voltage setting (70/100V) . . . . . . 32
4.7.11 ZONE 4 LINE OUT output . . . . . . . . . . . 33
4.8 AC power connections . . . . . . . . . . . . . . . . . . . 33
5.0 Using FreeSpace
®
Installer™ Software . . . . . . . . . . 34
5.1 Installing the software . . . . . . . . . . . . . . . . . . . . 34
5.2 Connecting to the E4 system . . . . . . . . . . . . . . 34
5.2.1 No hardware detected . . . . . . . . . . . . . . . 36
5.2.2 Incompatible microcontroller code . . . . . 36
5.2.3 Sample design files . . . . . . . . . . . . . . . . . 36
5.3 The Installer™ software user interface . . . . . . . 37
5.4 Set Up Hardware mode . . . . . . . . . . . . . . . . . . 39
5.5 Set Up Schedule mode . . . . . . . . . . . . . . . . . . . 40
5.5.1 Setting the clock . . . . . . . . . . . . . . . . . . . 41
5.5.2 Adding events . . . . . . . . . . . . . . . . . . . . . 41
5.5.3 Viewing and changing event settings . . . 42
5.5.4 Removing events from the list . . . . . . . . . 42
5.6 Service Hardware mode . . . . . . . . . . . . . . . . . . 43
6.0 E4 System Setup . . . . . . . . . . . . . . . . . . . . . . . . . . 44
6.1 Introduction . . . . . . . . . . . . . . . . . . . . . . . . . . . . 44
6.2 Connecting your PC to an E4 system . . . . . . . . 44
6.3 System setup procedure . . . . . . . . . . . . . . . . . 45
6.3.1 Output gain . . . . . . . . . . . . . . . . . . . . . . . 45
6.3.2 Zone setup . . . . . . . . . . . . . . . . . . . . . . . . 46
6.3.3 Input gain . . . . . . . . . . . . . . . . . . . . . . . . . 47
6.3.4 Source assign . . . . . . . . . . . . . . . . . . . . . 49
6.3.5 Source EQ . . . . . . . . . . . . . . . . . . . . . . . . 50
6.3.6 Page set up . . . . . . . . . . . . . . . . . . . . . . . 50
6.3.7 Zone EQ . . . . . . . . . . . . . . . . . . . . . . . . . . 52
6.3.8 Dynamic EQ . . . . . . . . . . . . . . . . . . . . . . . 53
6.3.9 Auto Volume . . . . . . . . . . . . . . . . . . . . . . . 53
7.0 User Interface Operation . . . . . . . . . . . . . . . . . . . . . 59
7.1 Enabling keypad operation . . . . . . . . . . . . . . . . 59
7.2 Turning the system on . . . . . . . . . . . . . . . . . . . 59
7.3 Standard user interface operation . . . . . . . . . . 59
7.4 Auto Volume user interface operation . . . . . . . 60
7.5 Multi-zone paging user interface operation . . . 61
8.0 E4 System Troubleshooting . . . . . . . . . . . . . . . . . . 62
8.1 Introduction . . . . . . . . . . . . . . . . . . . . . . . . . . . . 62
8.2 E4 hardware indicators . . . . . . . . . . . . . . . . . . . 62
8.2.1 Normal operation . . . . . . . . . . . . . . . . . . . 62
8.2.2 System fault . . . . . . . . . . . . . . . . . . . . . . . 62
8.2.3 Amplifier fault . . . . . . . . . . . . . . . . . . . . . . 63
8.2.4 Input clipping . . . . . . . . . . . . . . . . . . . . . . 64
8.2.5 Direct input is active . . . . . . . . . . . . . . . . 64
8.2.6 No STANDBY and SYSTEM indicators . . 64
8.3 FreeSpace
®
E4 system Error Log . . . . . . . . . . . 65
8.3.1 Contents of the Error Log . . . . . . . . . . . . 65
8.3.2 Hardware configuration . . . . . . . . . . . . . . 65
8.3.3 Power-on self-test results . . . . . . . . . . . . 65
8.3.4 Amplifier alarms . . . . . . . . . . . . . . . . . . . . 66
8.3.5 Solving faults reported in the Error Log . . 67
11 of 80
Page 4

Contents
8.4 Common problems . . . . . . . . . . . . . . . . . . . . . . 68
8.4.1 Communications port error . . . . . . . . . . . 68
8.4.2 No audio in zone . . . . . . . . . . . . . . . . . . . . 68
8.4.3 User interface keypads do not
operate correctly . . . . . . . . . . . . . . . . . 69
8.4.4 Bad sound in a zone . . . . . . . . . . . . . . . . . 69
8.4.5 Auto Volume does not calibrate . . . . . . . . 70
8.5 Customer support . . . . . . . . . . . . . . . . . . . . . . . 70
8.5.1 Technical assistance . . . . . . . . . . . . . . . . 70
8.5.2 Reporting software bugs and issues . . . . 70
9.0 Restoring E4 Microcontroller Code . . . . . . . . . . . . . 72
10.0 Technical Specifications . . . . . . . . . . . . . . . . . . . . 74
10.1 Power amplifier . . . . . . . . . . . . . . . . . . . . . . . . 74
10.2 Digital signal processing . . . . . . . . . . . . . . . . . 74
10.3 Front panel indicators and control
connections . . . . . . . . . . . . . . . . . . . . . . . . . . 74
10.4 Rear panel inputs, outputs, and controls . . . . 74
10.5 E4 system serial data commands . . . . . . . . . . 74
10.6 FreeSpace
Compatibility . . . . . . . . . . . . . . . . . . . . . . . . . 76
®
Installer™ Design File
12 of 80
Page 5
8.0 E4 System Troubleshooting
8.1 Introduction
This section provides troubleshooting guidelines to use for solving any problems you may encounter while installing and servicing E4 systems.
8.2 E4 hardware indicators
8.2.1 Normal operation
These are the indications of normal operation.
STANDBY
Unlit
SYSTEM STATUS
Green
AMP OUTPUTS
Unlit or Green
AUDIO SOURCES
Unlit, Amber, or Green
DIRECT INPUT
Unlit
8.2.2 System fault
A red SYSTEM STATUS LED indicates that the E4 received an
error from one of its many internal components. A red SYSTEM
STATUS LED after AC power is switched on may be caused by:
• A Power-On Self-Test failure
•A DSP error
•The DSP is offline
AMP OUTPUTS
1234
AUDIO SOURCES
1234
AMP OUTPUTS
1234
AUDIO SOURCES
1234
System logged an error – Check the
SYSTEM
STATUS
DIRECT
INPUT
Installer™ software Error Log.
STANDBY
SYSTEM
STATUS
DIRECT
INPUT
STANDBY
To determine the severity of the error, cycle the E4 unit power off
and back on again. If the SYSTEM STATUS indicator is now off,
the E4 system has logged an error, but is still operational.
®
When you check the error log using the FreeSpace
Installer™
software you can identify the cause of the error, and determine an
appropriate solution.
SYSTEM STATUS
Indicator is red
Switch the E4 unit to STANDBY and
then back to active again. If the
SYSTEM STATUS is green, the sys-
Have you cycled
the E4 in and out
of STANDBY?
Yes
Have you cycled
the E4 power
on and off?
Yes
Have you
disconnected all
input/output
cables?
Yes
No
tem may have logged an error.
Check the Installer™ software Error
Log.
1. Switch the E4 unit to STANDBY.
2. Set the POWER switch to OFF.
No
3. Wait for STANDBY indicator to
turn off.
4. Set the POWER switch to ON.
5. Press the STANDBY switch.
1. Switch the E4 unit to STANDBY.
2. Set the POWER switch to OFF.
No
3. Disconnect all input/output sig-
nal cables.
4. Set the POWER switch to ON.
5. Press the STANDBY switch.
6. Reconnect one cable at a time
and check the Error Log.
62 of 80
Contact Bose
Customer Service.
Page 6

8.0 E4 System Troubleshooting
8.2.3 Amplifier fault
The AMP OUTPUT LEDs work in pairs (1 and 2, 3 and 4) and indicate the operating status of the four amplifier output channels.
AMP OUTPUT
indicators are red
AMP OUTPUTS
1234
AUDIO SOURCES
1234
SYSTEM
STATUS
DIRECT
INPUT
STANDBY
Check for
• Shorted wiring
• Overdriven amplifier
(reduce output gain)
• Transformer saturation
• Entry in Installer™ software error log
When an amplifier fault occurs, the amplifier mutes its outputs
and indicates an error. After a short period of time the amplifier
will try to operate again. If the fault condition persists, the amplifier will attempt to restart six times, after which it will remain
muted.
Amplifier faults are typically caused by a shorted speaker line, an
overdriven amplifier, or a saturated output transformer.
• To check for a shorted speaker line, remove the speaker connection from the amplifier channel. If this resolves the problem,
locate and correct the shorted loudspeaker line.
• To make sure that you are not overdriving the E4 output,
change to a different source. If the problem no longer exists,
use the Installer™ software to reduce the input level of the original source that was overdriving the output.
• To make sure an output transformer is not being saturated,
check to see if the correct speaker EQ setting is selected.
If none of these actions solve the problem, read the instructions
in the following flow chart or check the error log using the
Installer™ software.
Has the E4 unit
shut down during
operation?
No
Is SYSTEM
STATUS indicator
green?
Yes
Does the Installer™
software Error Log list
any amplifier
faults?
No
Yes
No
Yes
• Check the number of loudspeakers connected to the E4 unit.
Verify that the total sum of loudspeaker taps connected to the
E4 unit does not exceed 400W.
• Verify that there are no shorts on
the speaker output lines.
• Switch POWER to OFF.
• Disconnect the load and switch
POWER to ON.
• Verify that there are no shorts on
the speaker output lines.
See amplifier fault troubleshooting
section for course of action.
Contact Bose
Customer Service.
63 of 80
Page 7

8.0 E4 System Troubleshooting
8.2.4 Input clipping
If clipping is occurring at the input of an amplifier channel, the
source LED will blink red.
AMP OUTPUTS
1234
AUDIO SOURCES
1234
SYSTEM
STATUS
STANDBY
DIRECT
INPUT
If this fault occurs:
• Reduce the output gain of the source, or
•Using the Installer™ software, reduce the input gain for the
channel that is clipping.
8.2.5 Direct input is active
If the DIRECT INPUT LED is red:
• Check that the DIRECT INPUT/CONTROL contact closure is in
the closed position.
• Check the device to which this input is connected.
AMP OUTPUTS
1234
AUDIO SOURCES
1234
SYSTEM
STATUS
STANDBY
DIRECT
INPUT
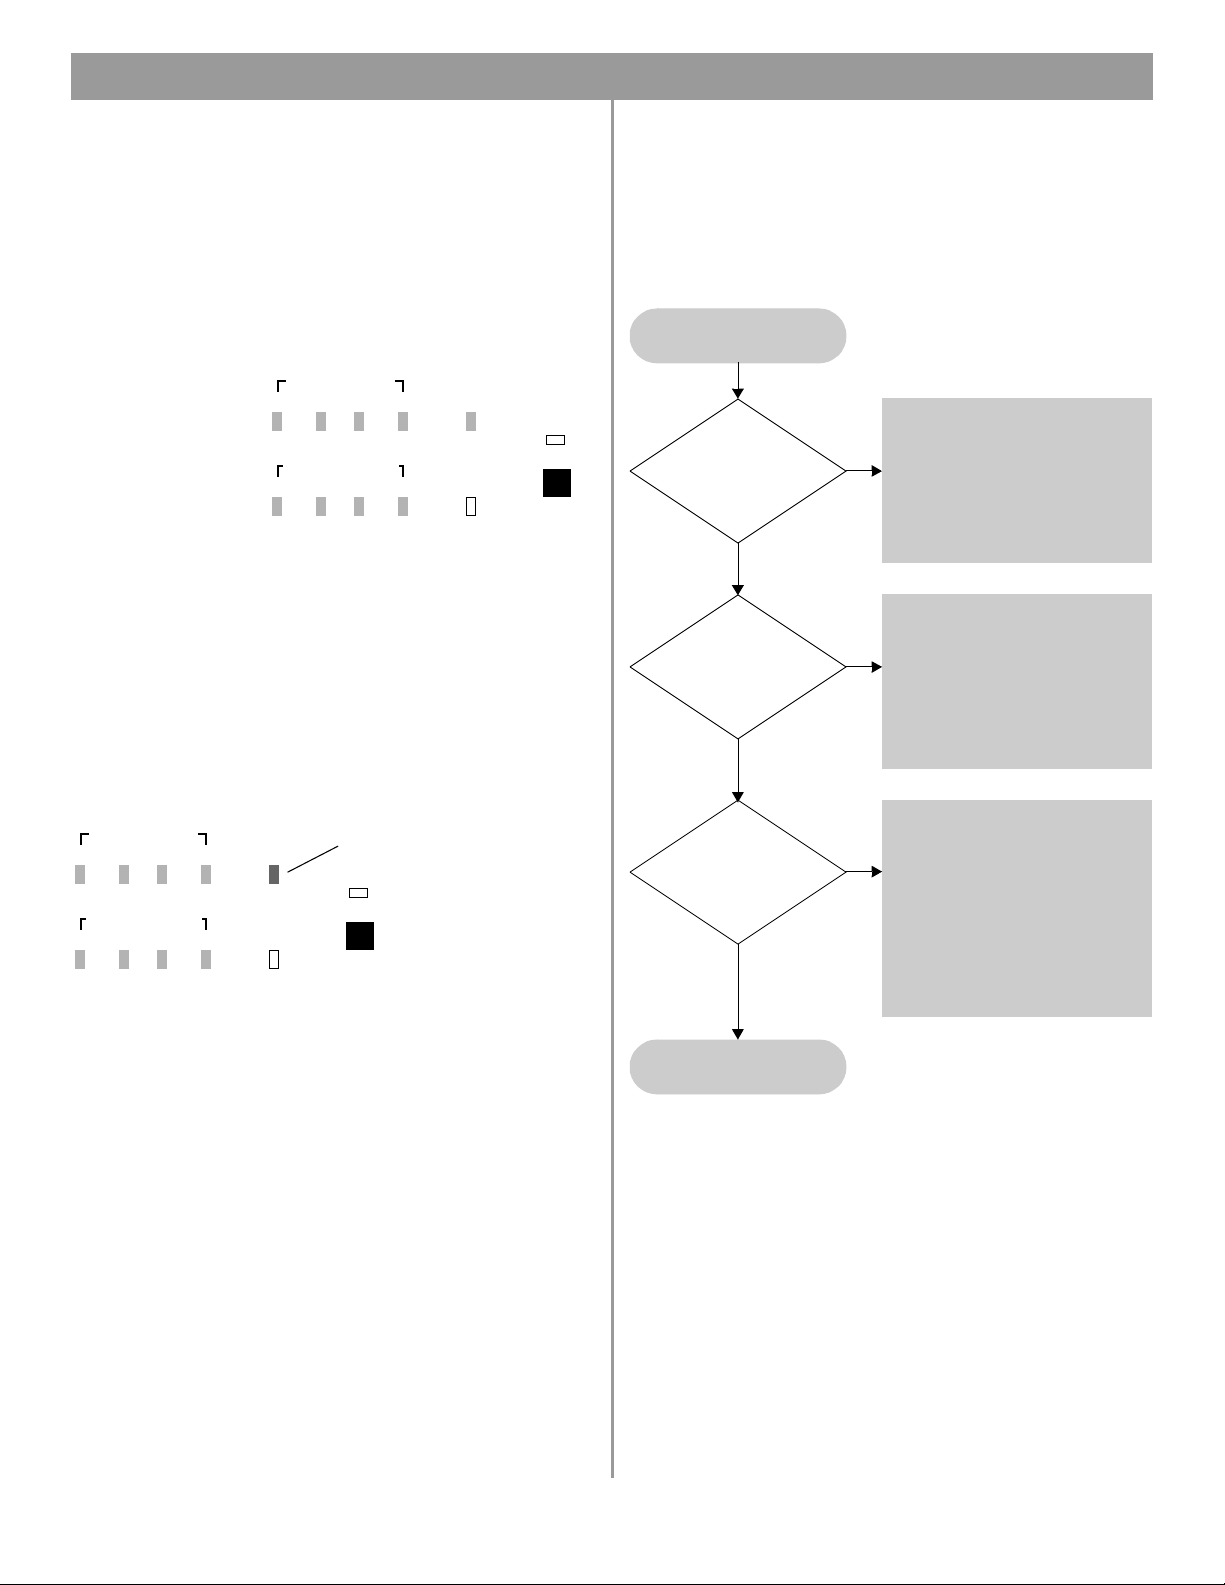
8.2.6 No STANDBY and SYSTEM indicators
STANDY & SYSTEM LEDs
are off - AC power is on
Is E4 unit
plugged into an
AC source?
Yes
Is the E4
POWER switch
set to ON?
Yes
Is STANDBY
indicator on?
No
No
Plug the E4 unit into an AC
receptacle.
No
Set E4 POWER switch to ON.
Yes
Press the STANDBY switch on the
E4 front panel.
Is SYSTEM STATUS
indicator red?
No
Is the unit properly
configured for the line
voltage?
Yes
Contact Bose
Customer Service.
• Connect your PC to the E4 unit
Yes
and read the Error Log.
• Check the results of the Power On
self test (POST).
• Use the POST troubleshooting
chart for course of action.
• Set E4 POWER switch to OFF.
• Verify that E4 unit is configured for
the correct AC line voltage.
No
• Verify that the fuse is good.
• Verify that the AC receptacle is
live.
• Set POWER switch to ON.
64 of 80
Page 8

8.0 E4 System Troubleshooting
8.3 FreeSpace® E4 system Error Log
The FreeSpace E4 system Error Log is displayed when the
Installer™ software is in the Service Hardware mode.
8.3.1 Contents of the Error Log
The Error Log displays E4 system hardware version numbers and
records all alarms and their causes as shown in the following
example.
Hardware
version
numbers
Type of alarm
Name of test
Test results
8.3.2 Hardware configuration
The E4 system hardware version numbers appear at the top of
the Error Log listing. These are the version numbers of the software installed in the E4 hardware at the time of manufacture.
These version numbers do not pertain to the FreeSpace
Installer™ software installed on your PC.
8.3.3 Power-on self-test results
The power-on-self test (POST) results are only displayed when an
error has occurred. The POST test checks the basic operation of
the E4 hardware to determine if it is capable of properly performing audio processing and amplification. During the POST test, six
major components of the hardware are tested.
Bose® FreeSpace E4 Series II Error Log
------------------------------------------------Microcontroller: v1.0.0.64
DSP: v1.0.71.0
Peripheral: v1.0.0.10
Lower Amplifier: v1.0.0.14
Upper Amplifier: v1.0.0.14
------------------------------------------------power-on self-test alarm (ok)
2002/12/31 23:59
host controller test:
[OK]
host controller flash test:
[OK]
peripheral controller test:
DSP test: 1
upper amplifier test:
[OK]
• Host controller – The host controller monitors and controls the
operation of the E4 hardware. A host controller failure will
cause the message, “Power-on self-test incomplete” to appear
in the host controller test section. The failure type for a host
controller is an SRAM address failure. If this occurs, contact
Bose Customer Service. See “Customer support” on page 70.
• Flash memory test – The flash memory contains the configuration, design file, and system event schedule. A flash failure
will cause the message, “Power-on sel-test incomplete” to
appear in the host controller flash test section. If this occurs,
contact Bose Customer Service. See “Customer support” on
page 70.
• Peripheral controller –
The peripheral controller monitors contact closures, front panel connections and user interface connections for incoming event messages. Any failures in these
areas will cause the message, “Power-on self-test incomplete”
to appear in the peripheral controller flash test section. If a 12C,
or code failure occurs, contact Bose Customer Service. See
“Customer support” on page 70. If a user interface failure
occurs, check the user interface wiring for shorts.
• DSP test – The DSP performs all signal processing and routing
functions. If a DSP error occurs, contact Bose Customer Service. See “Customer support” on page 70.
• Upper and lower amplifier test – The upper and lower amplifier test determines if the amplifiers are operating properly. An
amplifier failure will cause the message, “Power-on self-test
incomplete” to appear in the upper or lower amplifier section of
the POST test results. If a 12C, or code failure occurs, contact
Bose Customer Service. See “Customer support” on page 70.
Additional details on the exact cause of an amplifier failure can
be found in the amplifier section of the Error Log.
• Front panel board test – The front panel board test determines if the USB port is working properly. A USB failure will
cause the message, “Power-on self-test incomplete” to appear
in this section of the POST results. If a USB failure occurs, contact Bose Customer Service. See “Customer support” on
page 70.
Programmer’s Note: The USB port is not currently
used for communication with the E4. If a USB failure
occurs, the E4 will still function normally for audio processing and amplification.
65 of 80
Page 9

8.0 E4 System Troubleshooting
8.3.4 Amplifier alarms
Each amplifier section monitors its own operation and performance. If a fault condition occurs, it is reported in the Amplifier
Alarm section of the Error Log. Upper amplifier alarms affect
channels 1 and 2, and Lower amplifier alarms affect channels 3
and 4.
The amplifier section of the alarm log indicates the following:
• Alarm type – The generated alarm type is the first item.
• Amplifier status – When an alarm is generated, the amplifier
reports its current operating status for diagnostic purposes.
The following items are reported in the status:
Date & Time
Rail Voltage
Normally, the amplifier rail voltage should be between 100V
and 190V. Voltages outside this range will cause the amplifier
to shut down. In the 70V mode, a normal rail voltage is approximately 125V. In the 100V mode, a normal rail voltage is
approximately 165V.
Te mp e ra t ur e : The internal operating temperature of the amplifier.
Normally, this will be between 0 and 160 degrees Fahrenheit.
Output Voltage: The actual output voltage of the amplifier at
the time of the alarm.
Output Current: The actual output current of the amplifier at the
time of the alarm.
Input Status: The status of the input signal to the amplifier.
Possible status messages are DC sense fault, amplifier module
fault, AC power fault, sleep mode, high-frequency sense fault,
and retry fault.
Output Status: The status of the amplifier output at the time of
the alarm. Possible status messages are “amplifier module
muted,” and “speaker relay off.”
Fan Speed
Operating Mode
select switch, 70V or 100V.
: Date and time when alarm condition occurred.
: The amplifier positive and negative rail voltages.
: The fan speed at the time of the alarm.
: The current setting of the output voltage
Amplifier alarms – using output voltage and
current
Reviewing the output voltage and current can help to diagnose a
problem. Compare the output voltage and current for each of the
two amplifier outputs to determine the nature of the problem.
High Current
(>2A)
High Current
(<1A)
High Voltage
(>20V)
Driving an impedance <12Ω
• Reduce total speaker load
• Check for partial short of speaker line
Loudspeaker transformer saturation at
low frequency
• Check for proper
Speaker EQ setting
• Set Speaker EQ to
high-pass filter
Low Voltage
(<20V)
Short on speaker line
Amplifier alarms – using rail voltage
Normally, the amplifier rail voltage should be between 100V and
190V. In the 70V mode a normal rail voltage is approximately
125V. In the 100V mode a normal rail voltage is approximately
165V.
By comparing the + and – rail voltages, you can determine if you
are driving an impedance which is too low (<12Ω). In this case the
difference between the two rails will probably be greater than
20%.
If one of the rails shows a voltage, and the other does not, the
amplifier should be replaced.
As you review all alarm records you can compare the plus rail
voltage in each of the status sections. For example, a drop of
50% in one status could indicate a brownout condition occurred.
Amplifier alarms – input and output status
The Input and Output Status sections display the fault condition
which caused the alarm and the current status of the amplifier
output.
66 of 80
Page 10

8.0 E4 System Troubleshooting
A number of fault conditions can be displayed in the Input Status
section:
DC Sense Fault: A power supply fuse, output FET, amplifier module, or some combination of the above has blown. The unit
should be replaced.
Amplifier Module Fault
by itself it can be caused by any of the following:
• Shorted speaker line – Check the loudspeaker line for shorts.
• System power exceeds 400W – Check that system power
does not exceed 400W.
• Speaker transformer saturation – Check that proper speaker
EQ is being used or use a high-pass filter for speaker EQ.
• Line voltage too high (surge) – Check Error Log for a rail voltage that exceeds 150V, in 70V mode, or 190V, in 100V mode.
• Line voltage too low (brownout) – Check Error Log for a rail
voltage which is lower than normal by at least 20%.
• 70/100V mode switched with unit operating – Check that output voltage and AC input voltage selector are correct.
• Blown power supply fuse (as opposed to AC line fuse) –
Replace the E4 unit.
AC Power Fault
or simply AC power turned off without first placing the E4 in
standby mode. You can check that the power has been removed
from the E4, or that you experienced a power dropout.
Sleep Mode: The host microcontroller has told the amplifier and
power supply to turn off. This only occurs in conjunction with
another alarm (usually AC power fault), because it in itself is not
an alarm condition. When an AC power dropout occurs, the
amplifier immediately shuts the amplifier and speaker relay off,
then the other processing is shut down. This all happens fast
enough to prevent data loss or corruption, and to prevent loud
pops in the speakers. When this occurs you should check the
alarm history to determine what other faults occurred at this time.
High-Frequency Sense Fault
to prevent damage to the amplifier or speakers from excessive
high-frequency audio or ultrasonic energy. The amplifier is not
capable of sustained operation at full power in the 10kHZ to
20kHz (+) range.
: When the Amplifier Module fault occurs
: Might be an AC line dropout or severe brownout,
: This protection mode is designed
Generally, this fault results in a one-time 3-second dropout. If,
when the amplifier tries to restart after 3 seconds, the excess HF
is still present, the amp (and speaker relay) will remain off for
another 3 seconds and the loop repeats. Six of these in a row will
cause the amp to shut down, and will trigger a Retry Fault.
When this fault occurs you can check your program material for
excessive high-frequency content, or for a potential ground loop
which has created an oscillation internal to the E4 unit. You can
also reduce the output gain for this amplifier zone in an attempt
to reduce the high-frequency energy going to the amplifier.
Retry Fault
fault condition at least six times. When this occurs, you will need
to place the E4 unit in standby and then press the STANDBY button again to clear the fault, at which time the E4 unit will again try
to start up.
When this occurs you should check the alarm history section of
the Amplifier Alarm to determine the exact fault type that triggered the Retry Fault.
: The amplifier has tried to start up or recover from a
Input and output alarm history
This part of the Error Log displays the sequence of fault conditions where “0” is the initial fault reported followed by “1-6”.
These occur over a very short period of time.
8.3.5 Solving faults reported in the
Error Log
When errors are reported in the Error Log, you can try to solve the
problem by performing one of the following actions:
• On the E4 rear panel, turn the POWER switch to OFF. Wait a
few seconds and turn the POWER switch to ON. Then press
STANDBY on the front panel.
• On the E4 rear panel, turn the POWER switch to OFF. Discon-
nect all input/output signal cables. Wait a few seconds and
turn the POWER switch to ON. Then press STANDBY on the
front panel. Reconnect one cable at a time and check the Error
Log.
67 of 80
Page 11

8.0 E4 System Troubleshooting
8.4 Common problems
8.4.1 Communications port error
When you receive the communications port error dialog, the
FreeSpace
system on the COM 1 port.
This normally occurs due to one of three reasons:
• The PC and E4 are not connected via a “straight-wired” serial
cable.
• Another software application has control of the serial port.
Applications such as the Palm OS, or other audio applications
control the serial port while they are open. Close these applications and click the Tr y Aga in button.
• The E4 is connected to another communications port. If this is
the case you should select the appropriate COM port and click
the Try Ag ain button.
®
Installer™ software was not able to locate an E4
Programmer’s Note: Before dismissing the “Choose
COM port” dialog, select the COM 2 port and click Try
Again. Not doing this will cause the COM 1 port to be
locked.
8.4.2 No audio in zone
If the system is powered on and operational, but there is no
sound, check the following:
• Do the front panel LEDs indicate normal operation?
• Is the source operating?
•Is routing correct?
• Is output gain correct?
• Is the output gain muted?
• Is cabling correct?
No audio in zone.
• Make sure that the audio sources
are connected to the E4 LINE in-
Are the AUDIO
SOURCES indicators
green?
Yes
Is AMP OUTPUT
indicator red?
No
No
Yes
puts and that there is an input signal from the source.
• Using the Installer™ software,
check that the input gain is raised.
• Make sure the source is on.
The amplifier is in “protect” mode.
Disconnect the load and see if the
output indicator changes to green.
If so:
• Check for a short in the output
line,
• Make sure no small strands of
wire are touching other wires,
• Make sure speakers are functioning correctly, or
• Using a voltmeter, check for a
voltage drop in the power line
when amplifier is being driven excessively hard.
68 of 80
Are the
AMP OUTPUTS
indicators green?
Yes
Contact Bose
Customer Service.
No
See amplifier fault troubleshooting
section for course of action.
Page 12

8.0 E4 System Troubleshooting
8.4.3 User interface keypads do not
operate correctly
• Check wiring of RJ-45 connectors.
• Check for breaks/shorts in cable.
•Using the Installer™ software, check the Error Log for a periph-
eral controller error.
User interface keypads
exhibit strange behavior
Is keypad connected
to the correct ZONE
on the E4 unit?
Yes
Is the keypad
connector wiring
correct?
No
Connect the keypad to the correct
zone on the E4 unit.
No
Correct the keypad connector
wiring.
8.4.4 Bad sound in a zone
Bad sound
Verify that the correct Speaker EQ
is selected in the Installer™ soft-
Yes
Is the sound
unnatural?
No
Is the AMP OUTPUT
indicator flashing?
No
ware for that zone.
Verify that the speakers are wired in
phase. Check the rear panel markings.
Reduce the input gain using
Yes
Installer™ software until the
indicator is solid green.
Yes
Are all
sources to be
controlled assigned to
the ZONE? (Std. and
AV keypad)
Yes
Is the
page source
assigned to the ZONE?
(Paging keypad
only)
Yes
Does the Installer™
Error Log list any periph-
eral controller
faults?
No
No
Check source assignments
using Installer™ software.
No
Check source assignments
using Installer™ software.
Yes
See troubleshooting for the
peripheral controller.
Are input and
output indicators green
and sound is
distorted?
No
Is the input signal
clean at the E4 input?
No
Verify source
hardware settings
Verify that the input source signal
Yes
is clean. If source is from a mixer,
decrease the mixer gain.
Verify that the loudspeakers are
not being overdriven or are damaged.
Yes
Verify that the total load impedance presented to the E4 output
is within specified limits for the
selected mode of operation.
Contact Bose
Customer Service.
69 of 80
Page 13

8.0 E4 System Troubleshooting
8.4.5 Auto Volume does not calibrate
Auto Volume calibration may fail if the process cannot obtain an
adequate source level. This may be due to:
• Speakers are tapped too high
• Maximum output gain is less than -20 dB
• Source is not operating
• Source level is too low
Calibration could also fail if the calculated loop gain is not within
required limits. This may be due to:
• Broken microphone cable
• Speakers are not connected
• Sensing microphone is not connected, or is connected to the
wrong zone
8.5 Customer support
8.5.1 Technical assistance
If you need further technical assistance, contact your local Bose
representative, or send an email to the address for your area:
North America
InstallerSupportNA@bose.com
Europe
InstallerSupportEUR@bose.com
Asia, Australia, India and Middle East
InstallerSupportABDG@bose.com
8.5.2 Reporting software bugs and issues
Please email any problems, issues, or software bugs to your local
Bose representative. Please include the following information:
• Software version
• E4 Error Log file
• Computer make, model, and configuration (hard drive storage
capacity, processor speed, and amount of installed RAM)
• Description of the problem – Can it be reproduced? If so, what
steps can be taken within the application to make the problem
manifest itself?
If possible, attach the Installer™ software diagnostic files. The
Installer software creates three important diagnostic files (output,
error, and log) each time the software runs. These files are distinct
from the E4 Error Log file which refers to the hardware errors and
can be accessed using the Service tab within the Installer™ software.
The name of each Installer diagnostic file includes the date and
time that Installer software was run. For example:
FreeSpaceInstallerOutput-Oct 8, 2002 12_53_05 PM.txt
FreeSpaceInstallerErrors-Oct 8, 2002 12_53_05 PM.txt
FreeSpaceInstallerLog-Oct 8, 2002 12_53_05 PM.txt
These files are automatically written in the “temporary file” directory of your computer’s operating system. Use the standard Windows “Search” of “Find” feature to look for files named
FreeSpaceInstallerOutput,
FreeSpaceInstallerErrors, and
FreeSpaceInstallerLog
on all local hard drives. This feature can be found in the Start
menu of Windows 98, NT, 2000, or XP. Once the search is complete, sort the listing by date to show the diagnostic files most
recently created by the Installer™ software.
70 of 80
Page 14

8.0 E4 System Troubleshooting
To find the temporary file directory…
For Windows 2000, or Windows XP:
1. Right-click My Computer on the Windows desktop.
2. Select the Properties menu item.
3. Click the Advanced tab.
4. Click the Environment Variables... button.
5. Scroll down to the value of variable TEMP under “User vari-
ables”. If, and only if, it is not found there, look under System
variables instead.
For Windows NT:
1. Right-click My Computer on the Windows desktop.
2. Select the Properties menu item.
3. Click the Environment Variables tab.
4. Scroll down to the value of variable TEMP under User vari-
ables. If, and only if, it is not found there, look under System
variables instead.
For Windows 98
1. Click on the Start menu.
2. Select Run...
3. Type command and hit Enter.
4. Type echo %TEMP% and hit Enter.
5. Write down the displayed value of variable TEMP.
6. Type exit and hit Enter.
Typical values for TEMP are C:\WINNT\TEMP,
C:\windows\TEMP, C:\TMP, etc.
Programmer’s Note: You may not see these files if the
contents of the “tmp” file are not visible. Use the Show
all files option in the Windows Tools/Folder Options
menu.
71 of 80
Page 15

9.0 Restoring E4 Microcontroller Code
IMPORTANT!
DO NOT use this procedure to upgrade the firmware in your
FreeSpace
version running at the time that the design file was created.
The microcontroller code residing in the E4 system hardware can
be restored using the Installer™ software.
1. Using the E4 front panel STANDBY button, place the unit in
standby mode (the STANDBY indicator should be amber).
2. Press the STANDBY button again to place the unit in operat-
ing mode (the SYSTEM STATUS indicator should be green).
3. If not already done, connect your PC to the E4 unit using a
serial data cable.
4. Launch the version of Installer software that was last used to
configure the system. As the software activates the connection with the E4 unit, a status dialog window appears. Once
the connection is made, the E4 front panel (block diagram)
appears on your screen.
5. Click the (Save File) button and save the design file to
your PC. This ensures that all of your settings and events will
be available later.
®
E4 Series II system to any version other than the
6. Press and hold the Ctrl and Alt keys on your PC keyboard
and click the (Flash Configuration) button. The Upload
Microcontroller Code dialog appears:
7. Locate the appropriate microcontroller code file in the
installation directory on your computer. Typically, this file
is located in,
C:\Program Files\FreeSpace Installer 2.0\Firmware
If the OUTPUT VOLTAGE of your E4 system is set to 70V,
select,
BoseE4Uctlr70V-#.#.#.#
If the OUTPUT VOLTAGE of your E4 system is set to 100V,
select,
BoseE4Uctlr100V-#.#.#.#
(#.#.#.# represents the code version number.)
8. When you are asked to confirm that you are about to upload
new firmware, click Yes.
72 of 80
Page 16

9.0 Restoring E-4 Microcontroller Code
The firmware upgrade runs automatically and will notify you
when it is complete.
Once the upgrade is completed, select the Service Hardware
mode and verify that the microcontroller version number is
correct. For example:
------------------------------------------------Microcontroller: v1.0.0.64
DSP: v1.0.71.0
Peripheral: v1.0.0.10
Lower Amplifier: v1.0.0.14
Upper Amplifier: v1.0.0.14
-------------------------------------------------
If you do not see the correct microcontroller version
number, or if any of the other firmware version numbers
are less than the values shown in this example, please
contact your local Bose Customer Support representative.
9. Open the design file you saved in Step 6. Click the
(Flash Hardware Configuration) button to restore your
hardware configuration.
10. Perform an Auto Volume calibration for those zones in which
Auto Volume is used. Click the (Flash Configuration)
button to send your final settings to the E4 hardware.
11. Click the (Save File) button and save the design file to
your PC.
73 of 80
Page 17

Bose® Product Sales Conditions
Limited Warranty Policy
and
Conditions of Sale
Bose Corporation
The Mountain
Framingham, MA 01701
What is covered:
All parts defective in material and workmanship. This limited
warranty for the Bose Freespace
the functionality of the system for its normal, intended use as
specified in the Owner’s Guide and does not cover a malfunction
that has resulted from improper or unreasonable use or maintenance, accident, excess moisture, improper packing,
lightning, power surges, or unauthorized tampering, alteration or
modification while not under the control of Bose. Bose systems
are not designed to be used in every environment, so please
review your Owner’s Guide.
WHERE PERMITTED, THE PROVISIONS OF THIS LIMITED
WARRANTY ARE IN LIEU OF ANY OTHER WRITTEN
WARRANTY, WHETHER EXPRESS OR IMPLIED, WRITTEN OR
ORAL, INCLUDING ANY WARRANTY OF MERCHANTABILITY
OR FITNESS FOR A PARTICULAR PURPOSE.
For how long:
In countries where the duration of the warranty is not determined
by statute, the Bose Limited Warranty lasts five years from the
purchase date. For countries where minimum warranty terms are
determined by statute, the warranty term is the longer of the
statutory period or the term listed above.
What we will do:
We will repair or replace any defective parts within a reasonable
period of time and free of charge.
How you can obtain warranty service:
1. You can ship the system to either a Bose Service Agency or to
Bose directly with a proof of purchase from an authorized dealer.
Please:
A. Properly and carefully pack the product for shipping. If you
need a carton for shipping, contact Bose for a new carton.
B. Label and ship the product to the appropriate Bose
location.
C. Please contact Bose to get a return reference number.
Place this number prominently on the outside of the carton.
2. You can return the system with proof of purchase from an
authorized dealer to a Bose Service Agency or directly to
Bose. Proof of purchase is not required where it is excluded
by statute.
®
E4 system (“system”) covers
Other Rights:
EXCLUSIVE REMEDY:
THIS LIMITED WARRANTY IS FULLY TRANSFERABLE
PROVIDED THAT THE CURRENT OWNER FURNISHES THE
ORIGINAL PROOF OF PURCHASE FROM AN AUTHORIZED
BOSE DEALER. THE MAXIMUM LIABILITY OF BOSE SHALL
NOT EXCEED THE ACTUAL PURCHASE PRICE PAID BY YOU
FOR THE PRODUCT. IN NO EVENT SHALL BOSE BE LIABLE
FOR SPECIAL, INCIDENTAL, CONSEQUENTIAL OR INDIRECT
DAMAGES. SOME PLACES DO NOT ALLOW LIMITATIONS ON
THE EXCLUSION OR LIMITATION OF RELIEF, SPECIAL,
INCIDENTAL, CONSEQUENTIAL OR INDIRECT DAMAGES OF
THE LIMITATION OF LIABILITY TO SPECIFIED AMOUNTS, SO
THE ABOVE LIMITATIONS OR EXCLUSIONS MAY NOT APPLY
TO YOU.
OTHER CONDITIONS:
FOR YOUR BENEFIT, WE RECOMMEND THAT YOU RECORD
YOUR SERIAL NUMBERS(S), FOUND ON THE PRODUCT(S),
AND OTHER PURCHASE INFORMATION, AND KEEP IT WITH
YOUR PERSONAL RECORDS ALONG WITH PROOF OF
PURCHASE. IF NECESSARY, THIS INFORMATION WILL
ALLOW US TO BETTER SERVE YOUR NEEDS.
THIS LIMITED WARRANTY GIVES YOU SPECIFIC RIGHTS
SUBJECT TO SPECIFIED CONDITIONS. YOU MAY ALSO HAVE
OTHER LEGAL RIGHTS WHICH APPLY TO THE PRODUCT
YOU HAVE ACQUIRED. THESE LEGAL RIGHTS VARY FROM
STATE TO STATE OR COUNTRY TO COUNTRY. SOME PLACES
DO NOT ALLOW THE EXCLUSION, RESTRICTION OR MODIFICATION OF CERTAIN IMPLIED RIGHTS OR THEIR EFFECT. IN
THOSE SITUATIONS THIS LIMITED WARRANTY WILL ONLY
APPLY TO THE EXTENT THAT THE APPLICABLE LAW ALLOWS.
OTHER LAWS PROVIDE YOU WITH A STATUTORY CLAIM
AGAINST THE SELLER.
The laws of your state or country may provide you with legal
claims against the seller or manufacturer of this product. The
Limited Warranty does not affect those rights.
Remedies:
The provisions of this limited warranty are in lieu of any other
warranties or conditions, except those provided by law. This
Limited Warranty does not affect any legal rights provided to you
by law and does not preclude any legal remedy you may have
under the law.
This Limited Warranty is fully transferable provided that the
current owner furnishes the original proof of purchase from an
authorized Bose dealer.
This Limited Warranty is void if the label bearing the serial
number has been removed or defaced.
77 of 78
Page 18

78
©2004 Bose Corporation, The Mountain,
Framingham, MA 01701-9168 USA
279145 AM Rev.00 CCM-000922
 Loading...