

Page 1
Bose® FreeSpace® Model 8 And Model 32 Loudspeakers
Installer’s Guide
TM
May 6, 2002
AM177915_03_V.pdf
Bose Corporation
Page 2

2
Please read this guide
Bose® FreeSpace® Model 8 and Model 32 loudspeakers are significantly different
from conventional ceiling loudspeakers, both in operation and installation. We
recommend this guide be read carefully.
Safety Information
1.1 Read the instructions – Read and keep all safety and operating instructions.
1.2 Follow cautions – For safety, follow all cautions and warnings in this guide
and on the loudspeakers.
1.3 Avoid moisture – Do not install the loudspeakers near water or excessive
humidity. This includes installations near spas, swimming pools, dish washing and laundry equipment, and cooking areas. Avoid installing outdoors.
1.4 Avoid heat – Do not install the loudspeakers near excessive heat sources.
This includes installations near or above radiators, ranges, grills, fryers,
stoves, or other appliances.
1.5 Protect cables – Always route cables so heavy or sharp objects cannot
pinch or cut them.
1.6 If damage occurs – Service by a qualified service person if:
A. Water or other liquids leak into the loudspeakers;
B. The loudspeaker cone is dented or punctured before the grille is in-
stalled;
C. The loudspeakers do not operate normally even though the instructions
in this guide have been followed;
D. The loudspeakers exhibit a distinct change in performance.
1.0 Safety Information
WARNING
To reduce the risk of fire or electrical shock, do not expose these loudspeakers to
moisture.
WARNING
Bose Model 8 and Model 32 loudspeakers are electrical appliances. There are no
user-serviceable parts inside. As with all electrical appliances, dangerous
electrical shock may result if unqualified personnel attempt repair. Only qualified
personnel should perform service and installation.
AM177915_03_V.pdf • May 6, 2002
Page 3

3
1.0 Safety Information ....................................................................................... 2
2.0 Bose® FreeSpace® Model 8 And Model 32 Loudspeakers ......................... 4
2.1 Unpacking the loudspeakers ................................................................ 5
3.0 Before You Begin ........................................................................................ 6
3.1 Ceiling type ........................................................................................... 6
3.2 Clearance ............................................................................................. 7
3.3 Preparing wires ..................................................................................... 8
3.4 Junction box fittings ............................................................................. 8
3.5 Setting taps .......................................................................................... 9
3.6 Cutting mounting holes ........................................................................ 9
4.0 Installation ................................................................................................. 10
4.1 Ceiling pans ........................................................................................ 10
4.2 Loudspeaker enclosures .................................................................... 13
4.3 Electrical connections ........................................................................ 14
4.4 Loudspeaker grilles ............................................................................ 16
4.5 Removing installed loudspeakers....................................................... 16
Appendix A: FreeSpace Model 8 Loudspeaker Specifications ...................... 17
A.1 Acoustic specifications ...................................................................... 17
A.2 Mechanical specifications .................................................................. 17
Appendix B: FreeSpace Model 32 Loudspeaker Specifications .................... 18
B.1 Acoustic specifications ...................................................................... 18
B.2 Mechanical specifications .................................................................. 18
Appendix C: Safety Requirements .................................................................. 20
C.1 Safety agency listings ........................................................................ 20
C.2 Fire protective signaling ..................................................................... 20
Appendix D: Service ....................................................................................... 21
D.1 Warranty ............................................................................................. 21
D.2 Service ............................................................................................... 21
Bose Corporation ........................................................................ back cover
Contents
AM177915_03_V.pdf • May 6, 2002
Page 4

4
2.0 Bose® FreeSpace® Model 8 And Model 32 Loudspeakers
Bose designed the FreeSpace Model 8 and Model 32 loudspeakers to provide
high fidelity voice and music reinforcement in commercial settings. These Virtually Invisible® loudspeakers meet the aesthetic demands of most architectural
designs. The loudspeaker rim and grille can be painted to match the setting.
Bose has an information sheet explaining how to paint the rim and grille.
Call 1-800-996-BOSE and ask for a copy of 183073 Loudspeaker Painting.
FreeSpace Model 8 loudspeakers are available in two versions: 100V (Europe and
Japan only) and 70V (North America only). FreeSpace Model 32 loudspeakers are
available in three versions: 100V (Europe and Japan only), 70V (North America
only) and 4Ω (worldwide). All 70V and 100V versions require a Bose approved
equalizer, such as the Bose FreeSpace (Model 8/32) system controller. Using the
loudspeakers without an approved equalizer causes inferior acoustic performance and may damage the loudspeakers. The 4Ω version of the Model 32
loudspeaker does not require an approved equalizer. It is compatible with the
FreeSpace BMA-125 business music amplifier and other amplifiers.
Support rails
Figure 1
Contents of a
1-pack:
• 1 loudspeaker
• 1 loudspeaker
grille
• 1 ceiling pan
(support rails preinstalled)
• 2 springs
Ceiling pan
Contents of a
6-pack:
• 6 loudspeakers
• 6 loudspeaker
grilles
• 6 ceiling pans
(support rails preinstalled)
• 12 springs
Note: Figure 1 shows both the FreeSpace Model 8 and the Model 32 loudspeakers just to illustrate the differences in the two loudspeakers. These loudspeakers
will not be mixed in the same box. The other parts shown in the illustration are
common to both loudspeaker models.
Model 8
loudspeaker
Loudspeaker grille
Model 32
loudspeaker
Spring
AM177915_03_V.pdf • May 6, 2002
Page 5

5
2.0 Bose® FreeSpace® Model 8 And Model 32 Loudspeakers
All versions meet all regulatory standards for ceiling loudspeakers and are UL
listed as vandal resistant. A 70V fire safety version of each model, available only
by special order, is also UL listed as a fire protective signaling device. Complete
safety agency listings and special requirements for fire protective signaling and
warning systems are contained in Appendix C, “Safety Requirements.”
For seismic security, the loudspeaker enclosures and mounting pans have holes
for attaching security wires. Used with appropriate hardware, these attachment
points may qualify the loudspeakers as earthquake resistant. Check local building
codes.
In North American loudspeaker installations, both UL and CSA permit the use of
Class 2 wire (CL2, CL2P, or CL2R) for loudspeaker wire. If the wire passes through
a plenum, only CL2P is acceptable. Since most commercial ceiling spaces are
used as plenums, most installations will require CL2P. In risers such as vertical air
handling ducts or any through passage from floor to floor, CL2R is classified for
this use. To maintain compliance with plenum installations, use metallic electrical
connectors.
See Table 725-53 of the National Electric Code (NEC) for a list of acceptable wire
substitutes.
It is recommended that the fire marshall or building inspector be consulted before
installing these loudspeakers in air handling spaces (plenums) because some
areas require the use of metallic conduit or metallic tubing.
2.1 Unpacking the loudspeakers
Unpack the loudspeakers carefully (Figure 1). Save the carton and all packing
materials.
If any part appears damaged, do not install the loudspeakers. Repack them and
immediately notify Bose Service or your authorized Bose Professional Products
dealer.
For the most efficient installation, review this section and plan ahead before wiring
and installing Bose FreeSpace Model 8 or Model 32 loudspeakers.
AM177915_03_V.pdf • May 6, 2002
Page 6

6
3.0 Before You Begin
3.1 Ceiling type
Evaluate the ceiling construction BEFORE beginning installation. Ceiling type,
thickness, and strength determine the installation and connection methods as
well as the necessity of support rails. A qualified person, such as a building trade
professional, architect, or licensed professional engineer, should make these
determinations.
Bracket installation
This guide covers installation methods for both ceiling tile and structural ceilings.
Structural ceilings – Follow the instructions for structural ceilings.
Soft ceiling tiles – If the tiles are made of a “soft” material (like mineral wool or
glass fiber), follow the instructions for ceiling tiles. This will provide extra support.
Rigid ceiling tiles – If the tiles are made of particle board, plywood, gypsum board
or plaster, follow the instructions for ceiling tiles. Or, follow the instructions for
structural ceilings. However, the tiles must be strong enough to support the
loudspeaker without the help of the support rails. See “Support rails” below for
more information.
Support rails
Not all ceilings require the use of the support rails. Only a qualified person, such
as a building trade professional, architect, or licensed professional engineer,
should determine if a ceiling alone is strong enough to support the loudspeakers.
Ceiling tiles – Use the support rails with any ceiling tile made of mineral wool,
fiberglass, or other fibrous material. These tiles do not remain flat, may absorb
moisture, and may not always support the loudspeaker’s weight.
The support rails are 23 3/4" (603 mm) long and will support a loudspeaker in a 2'
x 4' or smaller tile. If the ceiling tiles are another size, the support rails will usually
provide adequate support if they meet the edge of the tile on at least two sides.
Follow these guidelines:
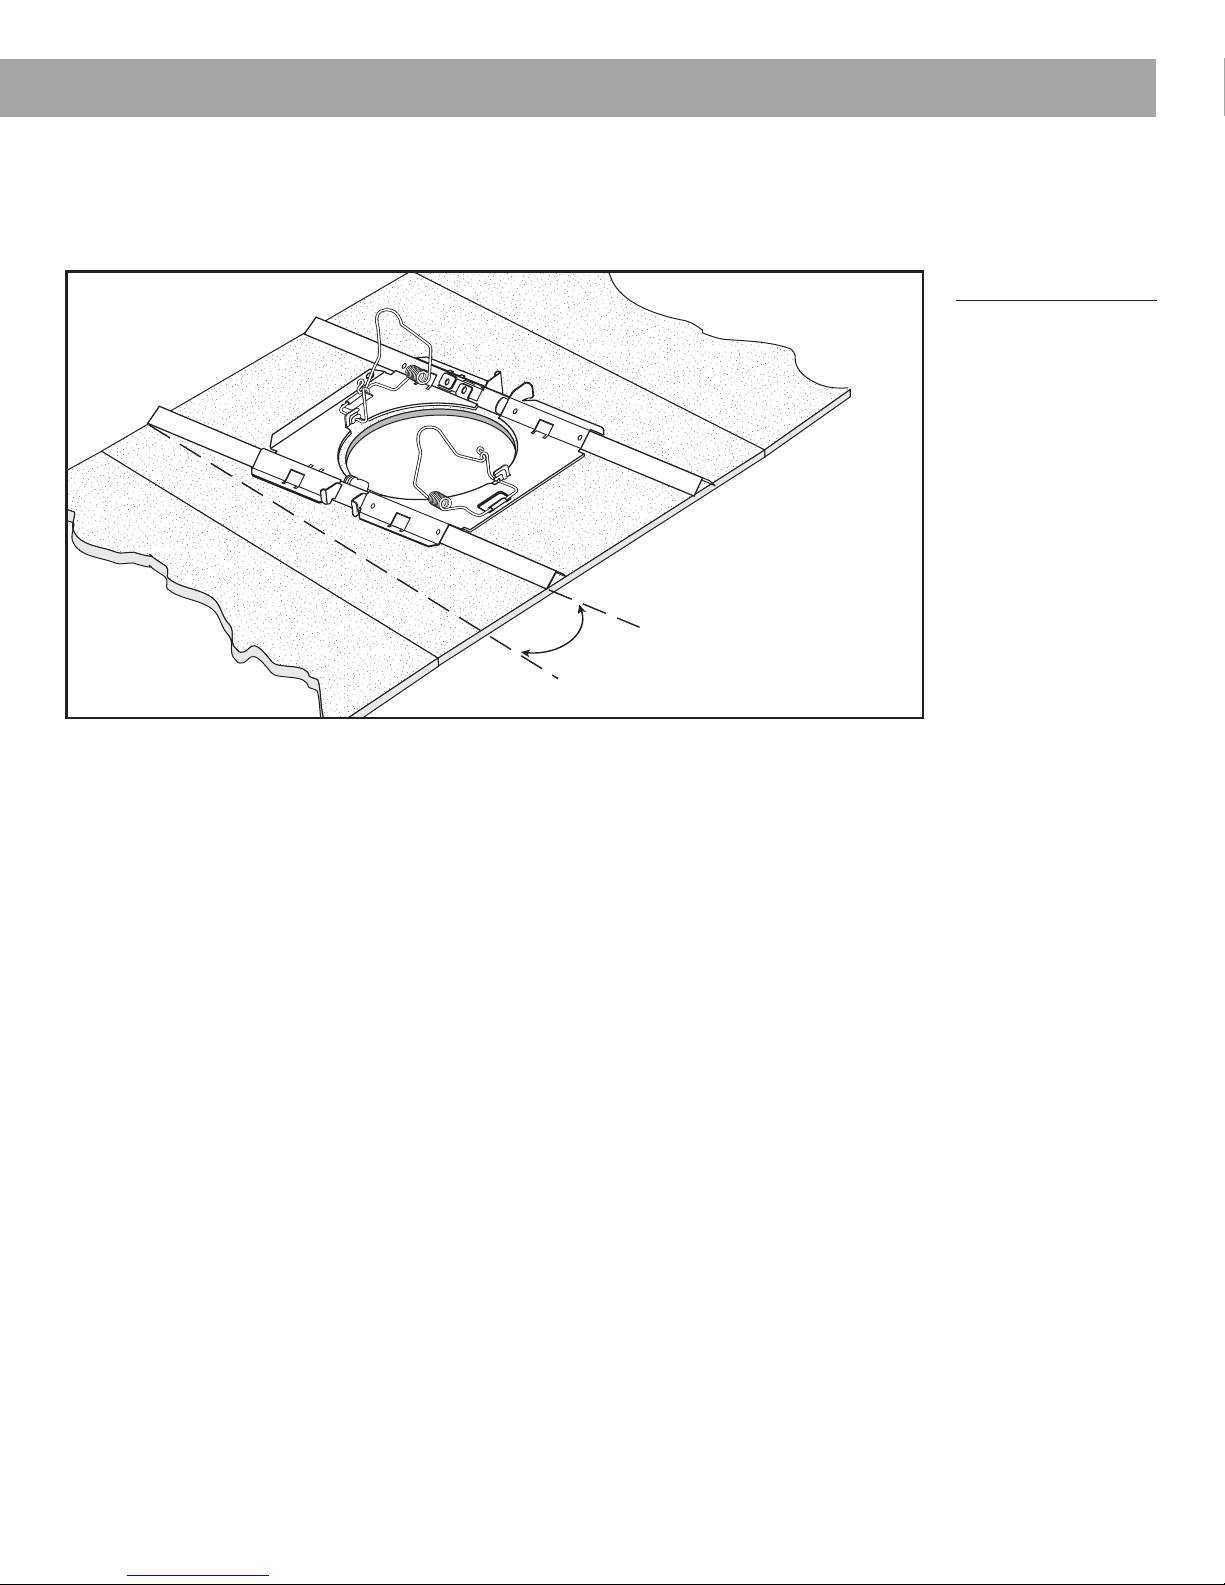
For 600 mm tiles, place the mounting pans and support rails at a 10°–15° angle
(Figure 2).
AM177915_03_V.pdf • May 6, 2002
Page 7
7
For 625 mm tiles, extend the rails in opposite directions until each rail reaches the
ceiling grid on one side of the mounting pan.
Ceiling tiles made of particle board, plywood, gypsum board, or plaster usually do
3.0 Before You Begin
10° – 15°
Figure 2
not require support rails. However the support rails may be needed if moisture or
other environmental conditions may weaken the ceiling.
Structural ceilings – The support rails and spacers must be removed from the
ceiling pans before using the structural ceiling installation method.
Rotation feature
FreeSpace® Model 8 and Model 32 loudspeakers can be rotated on their springs
to conveniently access the terminals after installation. The ceiling pan and springs
hold the speaker in place while the tap settings are changed or electrical connections are completed (see Figures 21 and 22 on page 15). Be careful not to damage
the mounting hole when turning or releasing the loudspeaker.
Do not use the rotation feature if the loudspeakers are installed in a very thick
ceiling. In general, the rotation feature works with FreeSpace Model 8 loudspeakers installed in ceilings up to 2" thick, and with FreeSpace Model 32 loudspeakers
installed in ceilings up to 1" thick. To be certain, install one loudspeaker and
attempt rotation as described in Section 4.3, “Electrical connections.”
3.2 Clearance
Allow enough clearance for both the depth of the loudspeaker and the wire from
the electrical fitting. To decrease this distance, use an angled electrical fitting with
flexible metallic conduit or flexible metallic tubing.
AM177915_03_V.pdf • May 6, 2002
Page 8

8
3.0 Before You Begin
3.3 Preparing wires
70V and 100V versions
The loudspeaker terminals will
accept either stripped wires or
crimp-on forked connectors.
Note: Using forked connectors for
multiple wires is not acceptable in
fire protective signaling and
warning systems due to the lack
of electrical supervision capability.
Prepare the wires as shown (Figure 3).
• For bare wire connections, strip the wires to 3/8" –
7
/16" (9 – 10 mm).
• For crimp-on connectors, strip the wires to 5/16" (8 mm). Use only insulated
barrel connectors. Uninsulated terminals can short circuit to the cover. Before
crimping, make sure the wire is fully inserted into the connector with no
uninsulated wire exposed.
4Ω version
Strip the wires to 5/16" (8 mm).
Note: Stranded wire is preferred.
DO NOT solder (tin) the wires.
3.4 Junction box
fittings
70V version
The junction box has a 7/8" diameter
hole.
Select and install a UL listed 1/2" trade
size wire fitting (Figure 4).
Note: To meet local electric codes,
fittings for 3/8" or 1/2" flexible metallic
tubing or flexible metallic conduit may
have to be used.
100V version
Both a plastic strain relief bushing and
a plastic bushing are supplied. Use
whichever is appropriate.
4Ω version
A plastic bushing is already installed.
Note: If local code requires flexible metallic tubing or flexible metallic conduit, be
sure it is well supported. Too much unsupported tubing or conduit can weigh the
loudspeaker down, pushing it away from the ceiling surface.
Figure 3
Figure 4
AM177915_03_V.pdf • May 6, 2002
Page 9

9
1
– +
2
70V
4
8
C
1
– +
2
70V
4
8
C
1
– +
2
70V
4
8
C
16
32
16
32
3.5 Setting taps
Set the transformer to the preferred wattage (Figure 5):
1. Locate the blue wire.
2. Disconnect the smaller tab from the shipped setting (8W on Model 8
loudspeakers, 32W on Model 32 loudspeakers).
3. Reconnect to the preferred tap setting.
3.6 Cutting mounting holes
Cut the mounting hole (Figure 6).
• The hole for a FreeSpace® Model 8 loudspeaker should be 5 3/4" (145 mm).
• The hole for a FreeSpace Model 32 loudspeaker should be 7 3/16" (182 mm).
Note: Check for electrical conduits and other hazards before cutting the mounting
hole. Also avoid glass fiber insulation. Insulation can interfere with the mounting
springs, making installation or changing tap settings difficult. It can also compress
and push the loudspeaker out of the mounting hole after installation.
Model 8
tap settings
Figure 6
5 3/4" (Model 8)
7 3/16" (Model 32)
3.0 Before You Begin
Model 32
tap settings
Figure 5
AM177915_03_V.pdf • May 6, 2002
Page 10

10
Figure 7
Review Section 3.0 “Before You Begin” before installing FreeSpace® Model 8 or
Model 32 loudspeakers. It contains important guidelines for choosing the correct
installation method and providing proper support for the loudspeakers.
4.1 Ceiling pans
Ceiling tile installation
Note: Do not unhook the springs. Wear safety glasses.
1a. For Model 8 loudspeakers, push both halves of the ceiling pan together
(Figure 7). Center
the support rails by
lining up the space
between the two
halves of the pan
with the center
marks on the rails.
1b. For Model 32
loudspeakers,
center the ceiling
pans approximately
1 5⁄16 inch around
the center marks
on the rails.
2. Place the spring under the spring retainer on the ceiling pan (Figure 8).
Position the spring as shown and snap under the retaining hook.
3. Repeat for the second spring.
CAUTION:
The springs
are preloaded
and ready to use.
Unhooking them,
except as described in
this guide, may cause
personal injury. Wear
safety glasses.
Spring
retainer
Retaining hook
4.0 Installation
Figure 8
AM177915_03_V.pdf • May 6, 2002
Page 11

11
Figure 9
4.0 Installation
4. Place the ceiling pan over the hole in the ceiling tile (Figure 9).
Note: For 2' x 4' ceiling tiles, place the rails parallel with the 2 foot side of the tile.
5. Pull the springs through the mounting hole and hook in the installation position
shown (Figure 10).
Note: Complete electrical connections now or use the rotation feature after
installing the loudspeakers. See Section 4.3, “Electrical connections.”
Figure 10
AM177915_03_V.pdf • May 6, 2002
Page 12

12
Structural ceiling installation
Before beginning this method of installation see Section 3.1, “Ceiling type” to be
sure the ceiling qualifies for installation as a structural ceiling.
Note: Do not unhook the springs. Wear safety glasses.
1. For both FreeSpace® 6 Model 8 and Model 32 loudspeakers, remove the rails
from the ceiling pans (Figure 11). The ceiling pan will not fit through the
mounting hole with the rails installed.
WARNING:
An accidentally released spring can cause personal injury. Wear safety
glasses. Keep hands and fingers clear of the spring.
2. Place the spring under the spring retainer on the ceiling pan (see Figure 8,
page 10). Position the spring as shown and snap under the retaining hook.
3. Repeat for the second spring.
4.0 Installation
Figure 12
Figure 11
Rails
4. Move the springs to the
installation position shown
(Figure 12).
5. Slide the ceiling pan
halves through the mounting hole (Figure 13). Place
one half on each side of
the mounting hole and
push to the outer edge of
the hole (Figure 14).
Note: If installing Model 8
loudspeakers, be sure the
halves do not overlap.
AM177915_03_V.pdf • May 6, 2002
Page 13

13
CLICK
CLICK
Figure 13
4.2 Loudspeaker enclosures
Note: If the electrical connections
have not been made yet, pull all
wires through the mounting hole
and clear of the springs.
Complete electrical connections before releasing the loudspeaker into the ceiling. Releasing
the loudspeaker with wires unconnected could
cause the loudspeaker to jam on the dangling
wires and could damage the mounting hole or
the loudspeaker rim.
If using the mounting springs to support the
loudspeaker while making electrical connections, only complete Step 1 now. Once the
loudspeaker is hooked on the springs, continue
with Section 4.3 “Electrical connections.” Then
return to Step 2 of this section.
If electrical connections have been completed,
install the loudspeaker as follows:
1. Push the loudspeaker past the springs and
wires into the hole in the ceiling tile.
Hook the springs to the sides of the
loudspeaker (Figure 15).
2. Pull down on the loudspeaker until you feel
the springs release (Figure 16).
3a. If making electrical connections now, rotate
the loudspeaker to the wiring position. See
Section 4.3, “Electrical connections.”
3b. If the electrical connections have been
completed, gently release the loudspeaker
(Figure 17).
Go to Section 4.4, “Loudspeaker grilles.”
Figure 14
Figure 15
Figure 16
Figure 17
4.0 Installation
AM177915_03_V.pdf • May 6, 2002
Page 14

14
Figures 18a
and 18b
4.0 Installation
Figure 18a
Figure 18b
4.3 Electrical connections
70V and 100V versions
1a. For stripped wire connections,
place one straight wire on each
side of the screw beneath the
screw plate. Tighten the screw
(Figure 18a).
1b. For crimp-on forked connectors,
slide the connector under the
screw plate. Tighten the screw
(Figure 18b).
2. Close the cover and tighten the
screw (Figure 19).
Note: If the screw is loose the cover
will make a vibrating noise.
4Ω version
1. Depress the terminal tab.
2. Insert the stripped end of wires
(Figure 20).
3. Close the loudspeaker cover and
tighten the screw (see Figure 19).
Figure 19
Figure 20
CAUTION
Using forked connectors for multiple
wires (as shown in Figure 18b) is not
allowed in fire protective signaling and
warning systems due to the lack
of electrical supervision capability.
CAUTION
For 70V loudspeakers, be sure the
appropriate UL listed 1/
2
"
trade size wire
fitting is installed. (See Section 3.4
“Junction box fittings”)
AM177915_03_V.pdf • May 6, 2002
Page 15

15
Rotation feature
The rotation feature provides access to the loudspeaker terminals during or after
installation. This feature can be used for extra support while completing electrical
connections or changing tap settings. The rotation feature is not an option if the
ceiling is very thick or the tiles are very soft. See the guidelines in Section 3.1,
“Ceiling type.” If the rotation feature is
used, be careful not to damage the
edge of the mounting hole or the
loudspeaker rim.
1. Pull the loudspeaker down until the
top clears the mounting hole (Figure
21).
Turn the loudspeaker until the
terminal cover is facing down and
can be opened.
Note: If the top of the loudspeaker
cannot easily clear the mounting hole,
the ceiling is too thick. Remove the
loudspeaker as described in Section 4.5
“Removing installed loudspeakers.”
Complete electrical connections and
reinstall.
2. Gently rest the loudspeaker against
the mounting hole (Figure 22).
3. Connect wires or change tap setting
as described earlier.
4. Pull the loudspeaker down and turn
until the terminal cover faces up.
5. Gently release the loudspeaker
back into the mounting hole.
Figure 21
Figure 22
4.0 Installation
AM177915_03_V.pdf • May 6, 2002
Page 16

16
®
Figure 23
Figure 24
4.0 Installation
4.4 Loudspeaker grilles
1. Pull down on the tab to remove the paint shield (Figure 23).
2. Push up on the grille until it is flush with the loudspeaker rim (Figure 24).
Note: If the ceiling tile lifts up as the
grille is installed, pull the loudspeaker
down slightly. Hold the loudspeaker rim
firmly with your fingers while pushing up
on the grille with your thumbs.
Note: It is not necessary to orient the
Bose® logo before installing the grille.
The logo can be turned in any direction
after installation.
4.5 Removing installed
loudspeakers
If the loudspeaker needs to be removed
after installation, first return the springs
to their locked position. If possible, pull
the loudspeaker down and rehook the
springs in the locked position. Then lift
the loudspeaker off the springs and
remove.
If the springs cannot be rehooked,
release them completely. Holding a
spring by its hook, carefully release as
much tension as possible. Then release
the spring.
Repeat for the second spring.
AM177915_03_V.pdf • May 6, 2002
Page 17

17
A.1 Acoustic specifications
Sensitivity: 70V & 100V – 81dB 1W 1m, maximum 90dB 8W 1m
Sound pressure level (SPL) sensitivity is measured in an anechoic
chamber as follows:
• Full bandwidth pink noise is applied through a Model 8 equalizer
and fed into a power amplifier.
Appendix A: FreeSpace® Model 8 Loudspeaker Specifications
FreeSpace Model 8
Wattage tap 1 Watt 2 Watt 4 Watt 8 Watt
SPL at 1 meter at wattage input indicated 81dBA 84dBA 87dBA 90dBA
When the operational bandwidth is limited to speech (paging) applications,
sensitivity is increased by 1dB at each tap setting.
Impedance: 625Ω (70.7V),
1250Ω (100V) @ 8W
Power handling: 8W maximum
Bandwidth: 80Hz – 16kHz
Beamwidth: 121° at -3dB,
150° at -6dB
A.2 Mechanical
specifications
Dimensions: 10.42" x 10.87" x 6.02"
Weight: 70V & 100V – 4.2 lb (1.9 kg)
installed
Finish:
Front baffle – Arctic white polymer
Rear enclosure – aluminum,
painted black
Grille – vandal resistant,
expanded metal mesh
®
10.87"
276.1 mm
10.42"
264.67 mm
Figure 25
T
.77"
19.6 mm
5.60"
142.2 mm
6.02"
152.9 mm
Minus “T”
6.27"
159.3 mm
AM177915_03_V.pdf • May 6, 2002
Page 18

18
B.1 Acoustic specifications
Sensitivity: 4 ohm – 87dB 1W 1m, maximum 102dB 32W 1m
Sound pressure level (SPL) sensitivity is measured as follows:
• Full bandwidth pink noise is applied directly to a low output
impedance amplifier with the output limited to the wattage specified.
Sensitivity: 70/100 Volt – 88dB 1W 1m, maximum 102dB 32W 1m
Sound pressure level (SPL) sensitivity is measured in an anechoic
chamber as follows:
• Full bandwidth pink noise is applied through a Model 32 equalizer
and fed into a power amplifier.
Appendix B: FreeSpace® Model 32 Loudspeaker Specifications
FreeSpace Model 32 Loudspeaker
Wattage tap 1 Watt 2 Watt 4 Watt 8 Watt 16 Watt 32 Watt
SPL at 1 meter
at wattage 87dBA 90dBA 93dBA 96dBA 99dBA 102dBA
input indicated
When the operational bandwidth is limited to speech (paging) applications,
sensitivity is increased by 1dB at each tap setting.
Impedance: 156Ω (70.7V), 31Ω (100V) @ 32W
Power handling: 32W maximum
Bandwidth: 80Hz – 16kHz
Beamwidth: 104° at -3dB, 132° at -6dB
B.2 Mechanical specifications
Dimensions: 10.87" x 11.75" x 7.45"
Weight: 4Ω – 5.13 lb (2.33 kg) installed
70V & 100V – 5.77 lb (2.62 kg) installed
Finish:
Front baffle – Arctic white polymer
Rear enclosure – aluminum, painted black
Grilles – vandal resistant, expanded metal mesh
AM177915_03_V.pdf • May 6, 2002
Page 19

19
7.04"
178.8 mm
.75"
19.1 mm
7.45"
189.2 mm
Minus “T”
T
7.72"
196.1 mm
Appendix B: FreeSpace® Model 32 Loudspeaker Specifications
Figure 26
®
11.75"
298.45 mm
33.3 mm
1.31"
10.87"
276.1 mm
AM177915_03_V.pdf • May 6, 2002
Page 20

20
C.1 Safety agency listings
FreeSpace® Model 8 and Model 32 (70V, 100V and 4Ω versions)
All models are UL 1480 listed:
• Vandal resistant (with grilles in place);
• General use - UL Category UEAY, Control number 3N89, File number S5591;
• Air handling spaces (ceiling plenums) - NFPA 70 NEC 1993 Article 300-22
(C) and UL 2043; NFPA 90A-1993 Installation of air conditioning and
ventilation systems, section 2-3.10.1 (a) exception 3.
FreeSpace Model 8 and Model 32 (70V fire safety models)
In addition to the above listings, fire safety models are UL listed for fire protective
signaling.
• Fire protective signaling use - UL Category UUMW, Control number 42S9,
File number S 3241).
C.2 Fire protective signaling
Bose® offers 70V fire safety models of both FreeSpace Model 8 and Model 32
loudspeakers listed with UL as fire protective signaling devices. These loudspeakers are available only by special order.
Signal processing equipment
The Bose FreeSpace® (Model 8/32) system controller is the only equalizer listed for
use with FreeSpace Model 8 and Model 32 loudspeakers in fire protective signaling
and warning systems. The FreeSpace system controller installer’s guide describes
the proper set up of fire protective signaling and warning systems using FreeSpace
Model 8 or Model 32 loudspeakers.
Wire preparation
Although the loudspeaker terminals will accept either stripped wires or crimp-on
forked connectors, using forked connectors as shown in Figure 18b for multiple
wires is not acceptable in fire protective signaling and warning systems due to the
lack of electrical supervision capability. Electrical supervision capability is maintained by connecting each wire individually to the terminals.
Sound Pressure Level (SPL) specifications
Loudspeaker sound pressure level is measured per UL-1480/ANSI-S1.12/ANSIS1.2 in the specified reverberant chamber. These SPLs will differ from the specification given in the tables contained in Appendix A and Appendix B.
FreeSpace Model 8 Fire safety model
Wattage tap 1 Watt 2 Watt 4 Watt 8 Watt
dB at 10 feet 75dBA 78dBA 81dBA 84dBA
FreeSpace Model 32 Fire safety model
Wattage tap 1 Watt 2 Watt 4 Watt 8 Watt 16 Watt 32 Watt
dB at 10 feet 81dBA 84dBA 87dBA *90dBA *90dBA 93dBA
* UL requires a step of
3dB (with a +/- .2dB
variable) with each
doubling of input power.
Because our transformer gives slightly
less than the required
3dB step between 8
watts and 16 watts, we
must show the last dB
rating. In this case,
there are two 90dB
ratings. For these
values, the actual UL
measured level for the
8W tap is 89.9dBA, for
the 16W tap is
92.5dBA, and for the
32W tap is 94.6dBA.
Appendix C: Safety Requirements
AM177915_03_V.pdf • May 6, 2002
Page 21

21
D.1 Warranty
Bose® covers FreeSpace® Model 8 and Model 32 loudspeakers with a 5 year,
transferable, limited warranty.
D.2 Service
If you have problems with your Bose FreeSpace Model 8 or Model 32 loudspeakers, contact your authorized Bose Professional Products Dealer. The dealer will
verify any defects and arrange for service by a factory authorized Bose service
agency, or by Bose Corporation.
Appendix D: Service
AM177915_03_V.pdf • May 6, 2002
Page 22

Appendix D: Service
Bose® Corporation
Italia
Bose S.p.A., Via Luigi Capucci, 12
00147 Roma
TEL 06-5127641 FAX 06-5115438
Japan
Bose K.K., Shibuya YT Building, 28-3
Maruyama-cho, Shibuya-ku, Tokyo 150
TEL 03-5489-1054 FAX 03-5489-0591
Nederland
Bose B.V., Nijverheidstraat 8, 1135 GE Edam
TEL 0299-366661 FAX 0299-368166
Norge
Bose A/S, Solheimsgate 11
N-2001, Lillestrøm
TEL 63-817380 FAX 63-810819
Österreich
Bose Ges.m.b.H.
Vienna Business Park
Wienerbergstrasse 7 (10.OG)
A-1100 Vienna
TEL 01-60404340 FAX 01-604043423
Schweiz
Bose AG, Rünenbergerstrasse 13
4460-Gelterkinden
TEL 061-9815544 FAX 061-9815502
Sverige
Bose A/S, Blandsädsgatan 2D
S-43146 Mölndal
TEL 31-878850 FAX 31-274891
United Kingdom
Bose Limited, Unit G2
Trinity Trading Estate
Sittingbourne, Kent ME10 2PD
TEL 01795-475341 FAX 01795-427227
Other locations
Bose Service, 1 New York Avenue
Framingham, MA 01701-9168 USA
USA
Bose Corporation, The Mountain
Framingham, MA 01701-9168
1-800-367-4008
Weekdays 9 a.m. to 8 p.m.
Saturdays 9 a.m. to 3 p.m. ET (eastern time)
Canada
Bose Ltd., 8-35 East Beaver Creek Road
Richmond Hill, Ontario L4B 1B3
1-800-444-BOSE (444-2673)
Weekdays 9 a.m. to 5 p.m. ET (eastern time)
European headquarters
Bose B.V., Nijverheidstraat 8
1135 GE Edam, Nederland
TEL 0299-371055 FAX 0299-368163
Australia
Bose Australia, Inc.,1 Sorrell Street
Parramatta, N.S.W. 2150
TEL 02 204-6111 FAX 02 204-6122
Belgique/België
Bose N.V., Limesweg 2
B-3700 Tongeren
TEL 012-390800 FAX 012-390840
Danmark
Bose A/S, Industrivej 7, 2605 Brøndby
TEL 43437777 FAX 43437818
Deutschland
Bose GmbH, Max-Planck-Straße 36d
D-61381 Friedrichsdorf
TEL 06172-71040 FAX 06172-710419
France
Bose S.A., 6, rue Saint Vincent
78100 Saint Germain en Laye
TEL 01-30616363 FAX 01- 30614105
India
PO Box 9301
New Delhi 110 092
TEL (011) 648 4462 FAX (011) 648 4463
Ireland
Bose Corporation
Carrickmacross, Co Monaghan
TEL 042-61988 FAX 042-61998
AM177915_03_V.pdf • May 6, 2002
Page 23

© 1996 Bose Corporation
Covered by patent rights issued and/or pending. JN96526 PN177915 Rev.
03 AM177915 Rev. 03 06/96
AM177915_03_V.pdf • May 6, 2002
 Loading...