

Page 1
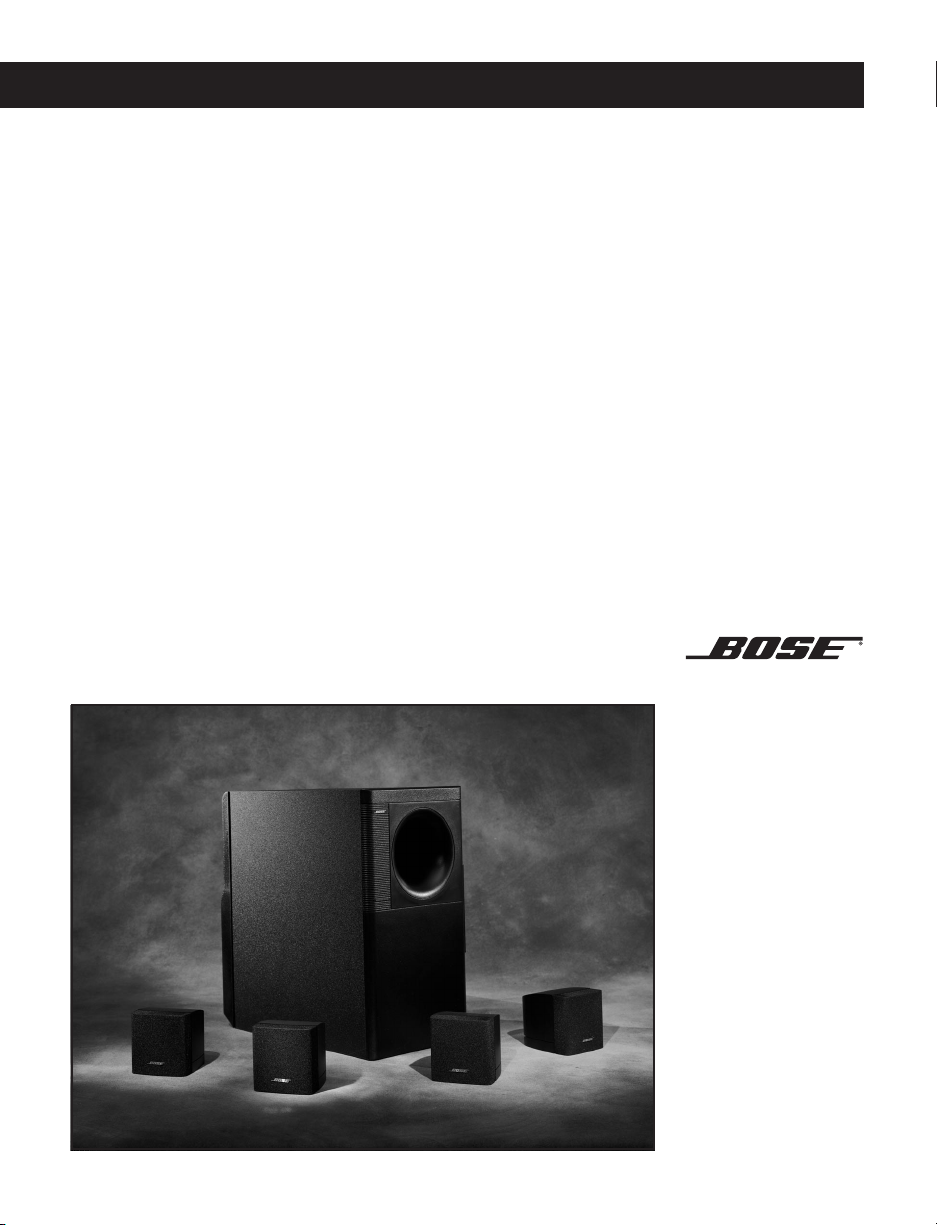
Bose® FreeSpace® 3 Loudspeaker System
Installer’s Guide
Installationsvejledning
Installateur-Anleitung
Guía de instalación
Notice d’installation
Guida all’installazione
Installateurs handleiding
Monteringsanvisningar
Page 2
Safety Information
Safety reminders
English
1.1 Read and keep all safety and operating instructions for future
reference.
1.2 For your safety, follow all cautions and warnings in the operating
instructions and on the speakers.
1.3 Follow the instructions in this guide carefully when installing this
product.
1.4 Do not install the loudspeakers near water or excessive
humidity. This includes installations near spas, swimming pools,
dish washing and laundry equipment, and cooking areas. Avoid
installing outdoors.
1.5 Do not install the loudspeakers near excessive heat sources.
This includes installations near or above radiators, ranges, grills,
fryers, stoves, or other appliances.
1.6 Always route cables so heavy or sharp objects cannot pinch or
cut them.
1.7 Service by a qualified service person if:
A. The loudspeaker cone is visibly damaged;
B. The loudspeakers do not operate normally even though the
instructions in this guide have been followed;
C. The loudspeakers exhibit a distinct change in performance.
DECLARATION OF CONFORMITY
We, the offerer:
Bose® Corporation, The Mountain, Framingham, MA 01701-9168 USA
acknowledge our sole responsibility, that the product:
Kind of equipment: Loudspeaker
Type designation: FreeSpace® 3 Acoustimass® module
In accordance with EMC Directive 89/336/EEC and Article 10(1) of the Directive,
is in compliance with the following norm(s) or document(s):
Technical regulations: EN50081-1, EN50082-1
Accredited by:
Bose Corporation, The Mountain, Framingham, MA 01701-9168 USA
15 April 2000
Bose Products B.V.
Nijverheidstraat 8, 1135 GE Edam
The Netherlands
2
Manufacturer’s authorized EU representative
Vice President Europe
Nic Merks
Page 3

1.0 Package contents
Installation
1.1 FreeSpace® 3 Acoustimass® module carton
(1) Rear connections cover
(1) Acoustimass module
with partial bracket attached
(1) Wall-mount bracket section
1.2 FreeSpace 3 satellite speaker carton
(2) Wall-mount brackets (2) Satellite speakers
English
3
Page 4
Installation
o
2.0 Loudspeaker installation
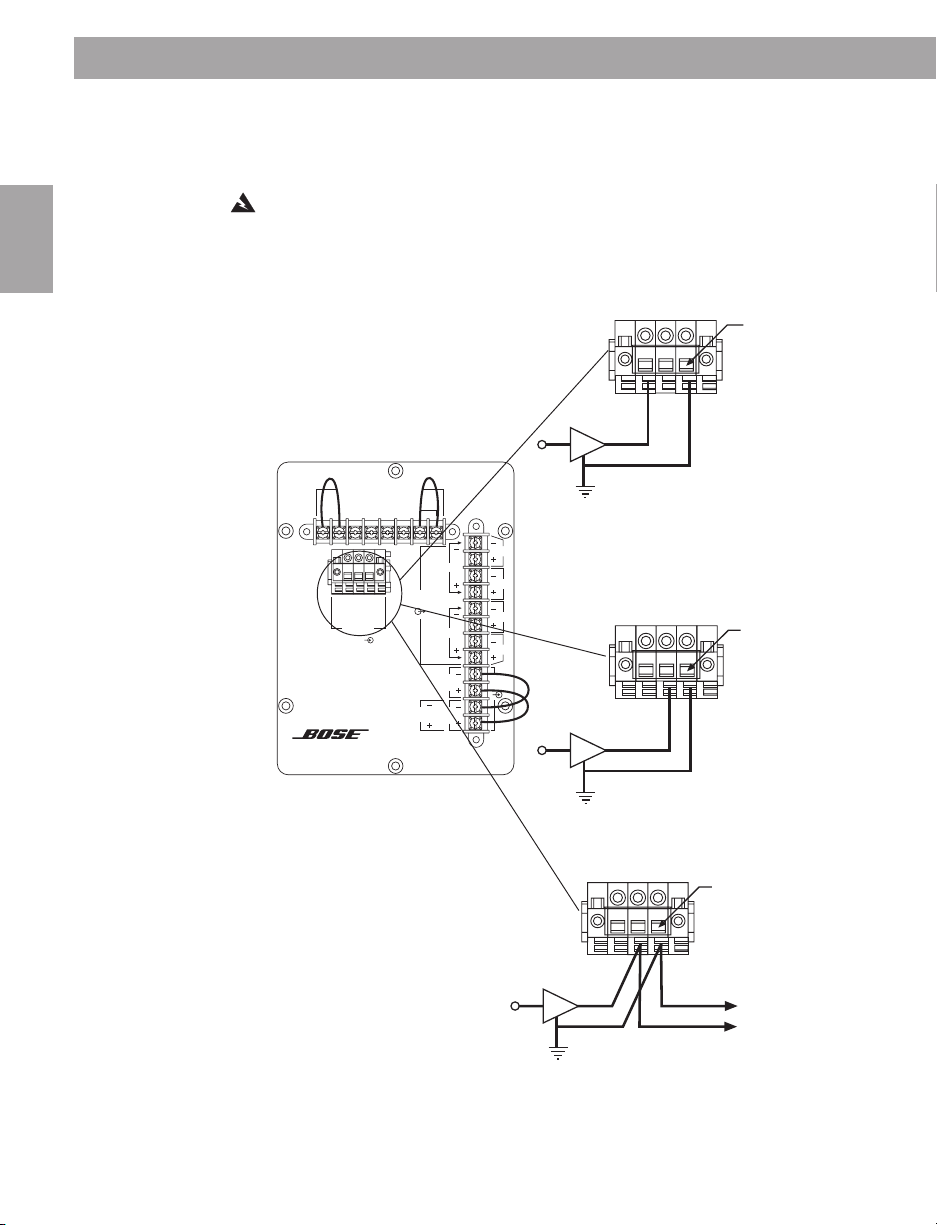
2.1 Amplifier output connection
WARNING:
the amplifier.
Complete all connections before you plug in and turn on
English
2.1.1 70V/100V transformer use
• Connecting an amplifier output
to a single module in a 100V
system using the transformer
PA
25W
NC
SATELLITE
CONNECTIONS
USE JUMPERS
MONO
Note: Jumpers required
for 70V/100V operation.
For transformer bypass,
remove jumpers from
transformer settings and
use 4-8Ω input.
SAT 2
SAT 1
STEREO
CH 2
STEREO
CH 1
• Connecting an amplifier output
4-8Ω
INPUT
SAT 4
SAT 3
SAT 2
SAT 1
to a single module in a 70V
system using the transformer
PA
TRANSFORMER SETTINGS
200W
100W
+
+70V
+100V
MONO
70V/100V
INPUT___
Refer to installation manual
PN254402 for proper installation
and operation instructions
®
FreeSpace 3
Acoustimass Module
50W
COMM
70V
100V
70V
100V
Press to open
each wire clamp
COM
Press to open
each wire clamp
COM
Press to open
• Connecting an amplifier
output to daisy-chained
Press t
each wi
each wire clamp
modules in a 70V (or 100V)
system using the transformer
70V
100V
PA
4
COM
To next
module
Page 5
Installation
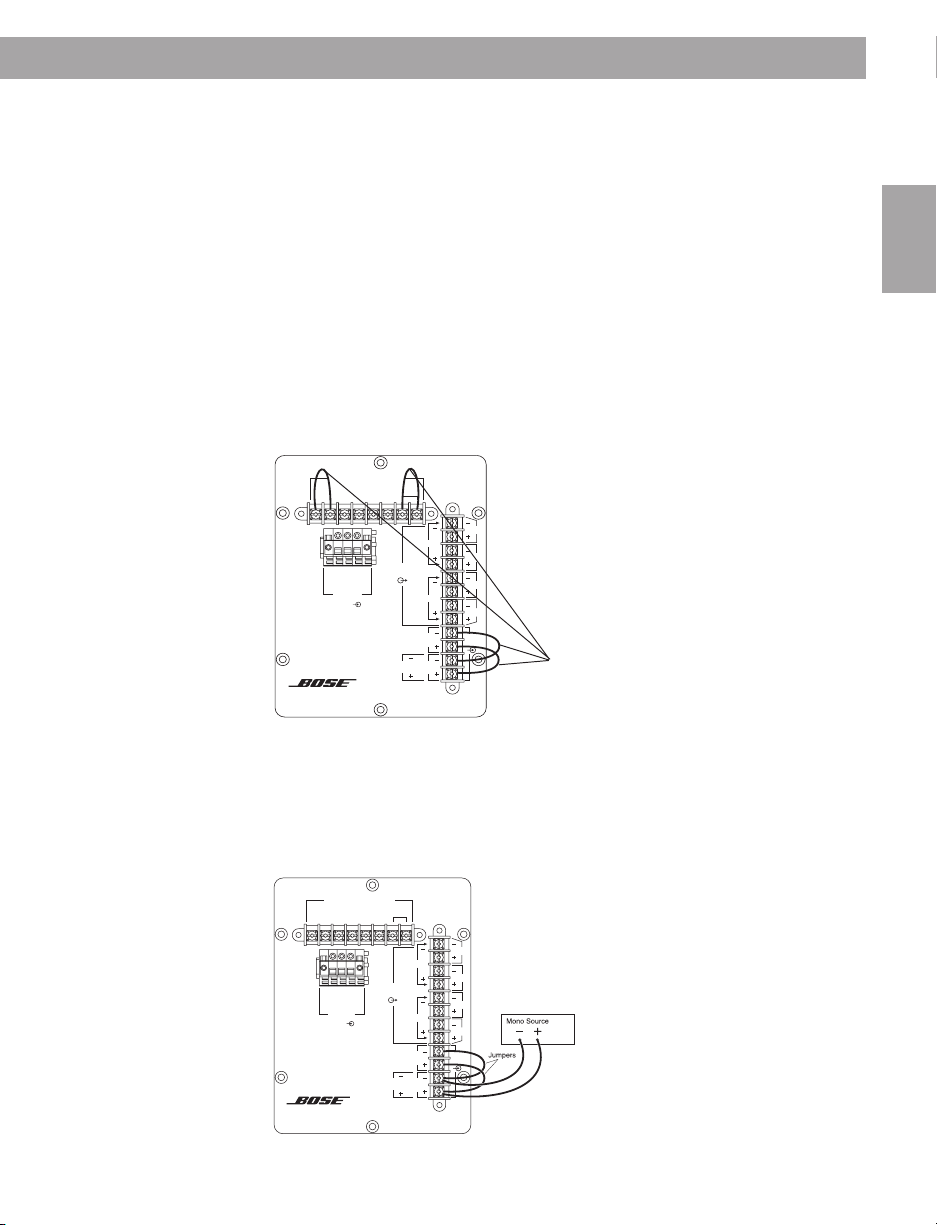
2.2 Transformer tap setting or bypass
• Lower Wattage: The transformer tap is set at the factory for
200W use. To set it for lower wattage, remove the end of the
+ jumper wire that is connected to 200W and reattach it to the
appropriate tap (100W, 50W, or 25W).
• Mono Direct: To bypass the transformer and prepare the
loudspeaker for 4Ω use and mono sound input, remove only
the two transformer jumper wires. Leave the CH1 and CH2
input jumpers as they are.
• Stereo Direct: To bypass the transformer and prepare the
loudspeaker for 4Ω use and stereo sound input, remove all
jumper wires.
Refer to page 7 for wiring details.
English
25W
SATELLITE
CONNECTIONS
USE JUMPERS
Note: Jumpers required
for 70V/100V operation.
For transformer bypass,
remove jumpers from
transformer settings and
NC
use 4-8Ω input.
SAT 4
SAT 2
SAT 3
SAT 2
SAT 1
SAT 1
STEREO
4-8Ω
CH 2
INPUT
MONO
STEREO
CH 1
Connection jumpers
as factory installed
TRANSFORMER SETTINGS
200W
+
+100V
MONO
70V/100V
INPUT___
Refer to installation manual
PN254402 for proper installation
and operation instructions
®
FreeSpace 3
Acoustimass Module
100W
50W
+70V
COMM
2.3 Direct (transformer bypass) use
• Connecting a mono source with the transformer bypassed
25W
NC
SATELLITE
CONNECTIONS
USE JUMPERS
MONO
Note: Jumpers required
for 70V/100V operation.
For transformer bypass,
remove jumpers from
transformer settings and
use 4-8Ω input.
SAT 2
SAT 1
STEREO
CH 2
STEREO
CH 1
SAT 4
SAT 3
SAT 2
SAT 1
4-8Ω
INPUT
TRANSFORMER SETTINGS
200W
100W
+
+100V
MONO
70V/100V
INPUT___
Refer to installation manual
PN254402 for proper installation
and operation instructions
®
FreeSpace 3
Acoustimass Module
50W
+70V
COMM
5
Page 6
Installation
• Connecting a stereo source with the transformer bypassed
English
25W
NC
SATELLITE
CONNECTIONS
USE JUMPERS
MONO
Note: Jumpers required
for 70V/100V operation.
For transformer bypass,
remove jumpers from
transformer settings and
use 4-8Ω input.
SAT 2
SAT 1
STEREO
CH 2
STEREO
CH 1
SAT 4
SAT 3
SAT 2
SAT 1
4-8Ω
INPUT
Stereo Source
L R
TRANSFORMER SETTINGS
200W
100W
+
+100V
MONO
70V/100V
INPUT___
Refer to installation manual
PN254402 for proper installation
and operation instructions
®
FreeSpace 3
Acoustimass Module
50W
+70V
COMM
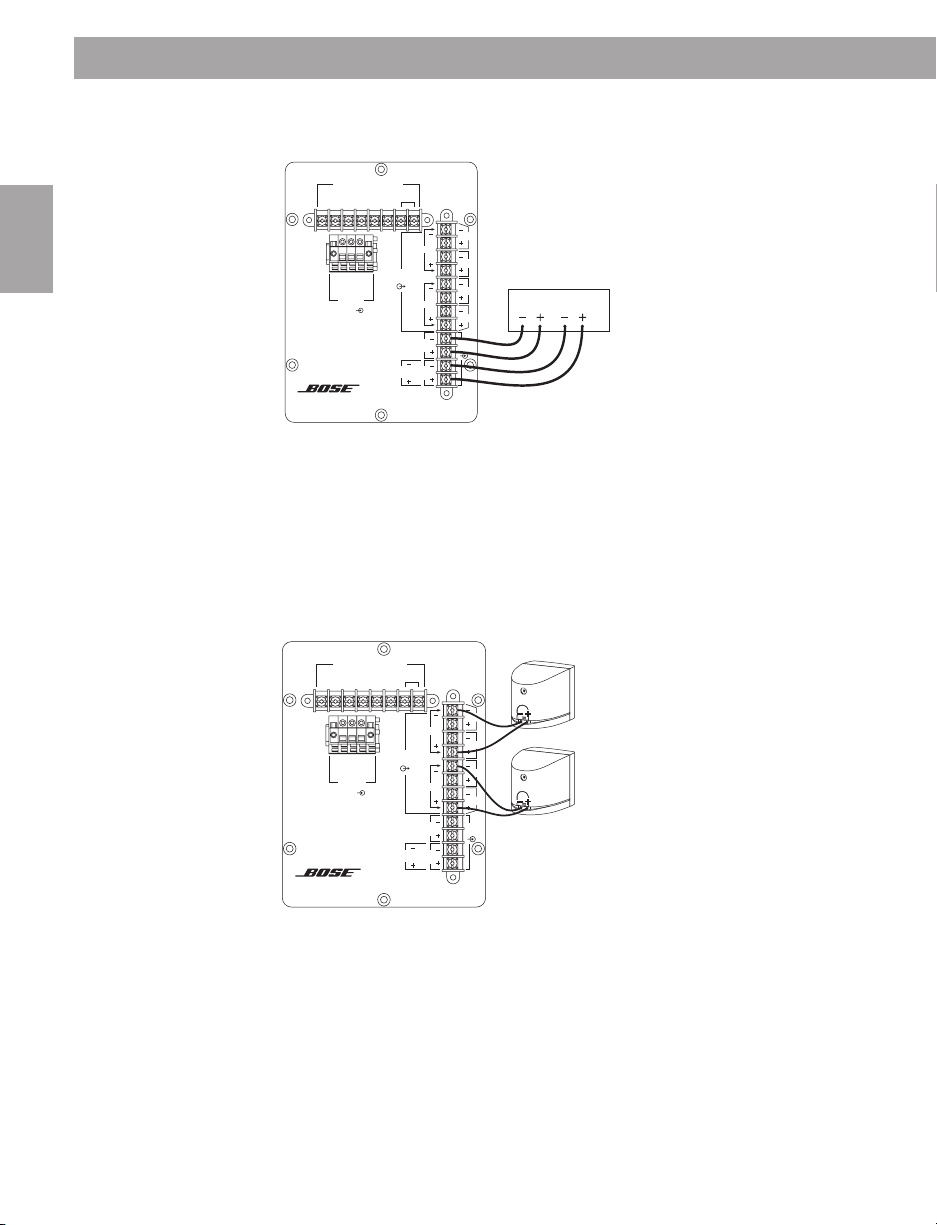
2.4 Satellite speaker connection
With or without use of the transformer, there are 3 options for
connecting the satellite speakers to the module:
• Using 2 satellite speakers
25W
SATELLITE
CONNECTIONS
USE JUMPERS
Note: Jumpers required
for 70V/100V operation.
For transformer bypass,
remove jumpers from
transformer settings and
NC
use 4-8Ω input.
SAT 4
SAT 2
SAT 3
SAT 2
SAT 1
SAT 1
STEREO
4-8Ω
CH 2
INPUT
MONO
STEREO
CH 1
Channel 2
in Stereo
Channel 1
in Stereo
TRANSFORMER SETTINGS
200W
100W
+
+100V
MONO
70V/100V
INPUT___
Refer to installation manual
PN254402 for proper installation
and operation instructions
®
FreeSpace 3
Acoustimass Module
50W
+70V
COMM
6
Page 7

Installation
• Using 4 satellite speakers with direct connections
25W
SATELLITE
CONNECTIONS
USE JUMPERS
Note: Jumpers required
for 70V/100V operation.
For transformer bypass,
remove jumpers from
transformer settings and
NC
use 4-8Ω input.
SAT 4
SAT 2
SAT 3
SAT 2
SAT 1
SAT 1
STEREO
4-8Ω
CH 2
INPUT
MONO
STEREO
CH 1
Channel 2
in Stereo
Channel 1
in Stereo
TRANSFORMER SETTINGS
200W
100W
+
+100V
MONO
70V/100V
INPUT___
Refer to installation manual
PN254402 for proper installation
and operation instructions
®
FreeSpace 3
Acoustimass Module
50W
+70V
COMM
• Using 4 satellite speakers with daisy-chained connections
25W
NC
SATELLITE
CONNECTIONS
USE JUMPERS
MONO
Note: Jumpers required
for 70V/100V operation.
For transformer bypass,
remove jumpers from
transformer settings and
use 4-8Ω input.
SAT 2
SAT 1
STEREO
CH 2
STEREO
CH 1
Channel 2
SAT 4
SAT 3
SAT 2
SAT 1
4-8Ω
INPUT
in Stereo
Channel 1
in Stereo
TRANSFORMER SETTINGS
200W
100W
+
+100V
MONO
70V/100V
INPUT___
Refer to installation manual
PN254402 for proper installation
and operation instructions
®
FreeSpace 3
Acoustimass Module
50W
+70V
COMM
English
2.4.1 Using other compatible Bose® speakers
You can use the FreeSpace® Acoustimass® module with other Bose
speakers, such as the FreeSpace Model 8, Model 32, Model 32SE,
Panaray® 302, or FreeSpace 6 speakers. Just be sure to connect
both the speakers and the module directly to the amplifier, using
separate channels.
Caution:
Do not connect any speakers, other than FreeSpace 3
satellite speakers, directly to the module.
7
Page 8
English
Installation
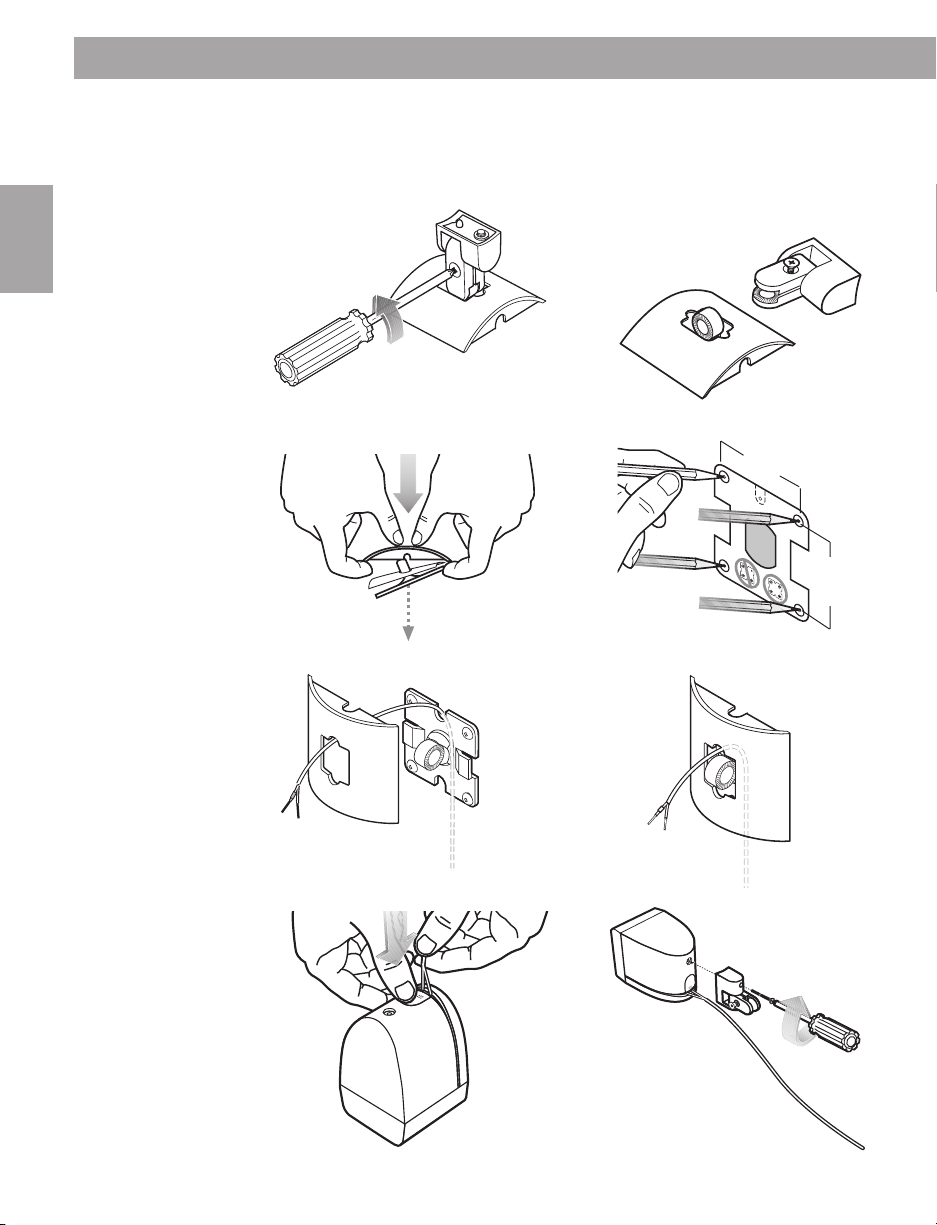
2.5 Mounting and wiring satellite speakers
Choose a position and mounting method consistent with local
building codes and regulations. Use four screws per bracket.
2.5.1 2.5.2
2.5.3 2.5.4
1.63"
(4.1 cm)
PN 181887
(4.1 cm)
1.63"
2.5.5 2.5.6
2.5.7 2.5.8
8
Page 9

Installation
2.5.9 2.5.10
2.5.11
5.88"
(14.9 cm)
2.6 Mounting and wiring the module
Choose a mounting position, method, and hardware consistent with
local building codes and regulations. Use at least three mounting
screws.
2.6.1
a. b.
8"
(20.3 cm)
English
4.4"
(11.08 cm)
9
Page 10

English
Installation
2.6.2
2.6.3
10
2.6.4
TRANSFORMER SETTINGS
Note: Jumpers required
for 70V/100V operation.
For transformer bypass,
remove jumpers from
+
100W
50W
25W
transformer settings and
12W
NC
use 4-8Ω input.
SAT 4
SAT 2
SAT 3
SATELLITE
CONNECTIONS
+70V
+100V
COMM
SAT 2
MONO
70V/100V
SAT 1
INPUT___
SAT 1
Refer to installation manual
PN254410 for proper installation
and operation instructions
STEREO
CH 2
4-8Ω
INPUT
MONO
STEREO
USE JUMPERS
CH 1
®
FreeSpace 3
Acoustimass Module
Page 11

3.0 Loudspeaker specifications
Specifications
System:
Frequency Range
50Hz to 16kHz (±3dB)
System Configurations
70V/100V (25W, 50W, 100W,
200W taps) monaural
Transformer bypass, mono
or stereo
Sensitivity
82dB-SPL @ 1W, 1m
(pink noise)
Maximum Acoustic
Output
93dB-SPL average
in a 45,000 ft3 room with
an RT60 of 1 second, ±3dB
Long-Term Power
Handling
100W continuous
200W peak
Note: This product is
equipped with a protection
circuit that reduces the
volume to a very low level
when over-powered. In the
event that the protection
circuit is activated, turn off
the signal source for 30
seconds for full recovery.
Nominal Impedance
4-cube system, direct: 6Ω
per channel
2-cube system, direct: 5Ω
per channel
Satellite:
Frequency Range
210Hz to 16kHz (±3dB)
Sensitivity
84dB-SPL @ 1W, 1m
(pink noise)
Maximum Acoustic
Output
95dB-SPL @ 1m
(pink noise)
92dB-SPL @ 1m
(IEC noise)
Dispersion
170o conical (–6dB point,
average, 1-4kHz)
Mechanical
Specifications
Dimensions: 3.1"H x
3.1"W x 3.2"D (7.9 cmH
x 7.9 cmW x 8.1 cmD)
Weight: 1.75 lb (.8 kg)
Connectors: Guillotine
Mounting Hardware
Included: Wall-mount
brackets
Bracket Angles: ±30˚
pitch; ±90˚ yaw
Module:
English
Frequency Range
50Hz to 210kHz (±3dB)
Sensitivity
76dB-SPL @ 1W, 1m
(pink noise) per channel
79dB-SPL @ 1W, 1m
(pink noise) mono
Maximum Acoustic Output
96dB-SPL @1m
(pink noise and IEC noise) per
channel
102 dB-SPL @ 1m
(pink noise and IEC noise) mono
Long-Term Power Handling
100W continuous
200W peak
Dispersion
Omnidirectional
Mechanical Specifications
Dimensions: 14"H
x 8.7"W (w/bracket)
x 13.6"D (35.6 cmH
x 22.1 cmW x 34.5 cmD)
Weight: 17.5 lb (7.9 kg)
Fuses/Protection: Internal
overpower protection
Connectors: Screw terminal
Mounting Hardware Included:
Bracket, attached to module
11
Page 12

Warranty
Limited Warranty Bose® Product
What is covered:
All parts defective in material and workmanship.
For how long:
Five years from the purchase date.
What we will do:
We will, at our sole option, repair or replace any defective parts free of charge.
What we will not do:
Pay shipping or transportation charges from you to us.
What you must do:
1. Return product personally with proof of purchase from an authorized Bose dealer to your authorized Bose
dealer, or
2. Return product personally with proof of purchase from an authorized Bose dealer to the nearest Bose
Service Agency, or
3. Return product personally with proof of purchase from an authorized Bose dealer directly to the Bose
organization in your country. If you elect to return the product directly to a Bose organization,
a) Contact the Bose organization in your country for specific return and shipping instructions;
b) Properly pack the product in the original carton for shipping. If you need a new carton, contact the
Bose organization in your country for a new carton available at a nominal charge;
c) Label and ship, freight prepaid, to the address provided by the Bose organization in your country,
and;
d) Place any necessary return authorization number prominently on the outside of the carton. (Cartons
not bearing a return authorization number, where required, will be refused.)
Other conditions:
This warranty is fully transferable provided that the current owner furnishes the original proof-of-purchase from an
authorized Bose dealer. The provisions of this warranty are in lieu of any other written warranty, whether express
or implied, written or oral, including any warranty of merchantability or fitness for a particular purpose. Bose’s
maximum liability shall not exceed the actual purchase price paid by you for the product. In no event shall Bose
be liable for special, incidental, consequential or indirect damages. This warranty does not cover a defect that has
resulted from improper or unreasonable use or maintenance, accident, improper packing, or unauthorized
tampering, alteration or modification as determined solely by us. This warranty is void if the label bearing the serial
number has been removed or defaced.
Other law rights:
This warranty gives you specific legal rights, and you may also have other rights which vary from country to
country or state to state. Some places do not allow limitations on implied warranties or the exclusion or limitation
of incidental or consequential damages, so the above limitations or exclusions may not apply to you.
Please keep this warranty information for your personal records.
Bose Corporation thanks you for your recent Bose product purchase. For your benefit, we recommend that you
record your serial number(s), found on the product(s), and other purchase information below and keep it with your
personal records along with proof-of-purchase. If necessary, this information will allow us to better serve your
needs.
Model Name or Number: _____________________________________________________________________________
Serial Number(s): ___________________________________________________________________________________
Date Purchased: ____________________________________________________________________________________
Dealer’s Name: _____________________________________________________________________________________
Dealer’s Address: ___________________________________________________________________________________
Page 13

Page 14

©2001 Bose Corporation
The Mountain
Framingham, MA
01701-9168 USA
263114 AM Rev.00
JN20493
 Loading...