

Page 1
®
PERSONAL
Owner’s Guide
Guía de usario
Notice d’utilisation
music center II
Page 2

INTRODUCTION
Thank you
EnglishFrançais Español
By choosing a Bose® PERSONAL® music center II, you have
opened the door to a variety of new options for playing your
LIFESTYLE
®
home entertainment system – in almost any area of
your home!
This new music center II provides you with:
• Easy access to system options, which appear right on the
remo
te control screen.
• Instant confirmation, because you not only hear, but also see
what you’ve selec
• Control of your LIFESTYLE
ted on the display screen.
®
home entertainment system from a
different room or floor of your house.
• On-screen information about your stored music and the
uMusic
(on LIFESTYLE
®
+ intelligent playback system choices for enjoying it
®
38 or 48 systems, only).
• Control of speakers set up in the same area as the remote, or a
local Bose sys
tem with other audio sources you can play.
Other equipment you can control
To enjoy the full benefit of your LIFESTYLE® system outside the
main room where the system is set up, you need to have speakers
or a local system that can reproduce the sound where you want it.
For that purpose, Bose offers a selection of expansion products
t
t work together seamlessly due to one common ingredient:
ha
®
Bose
link compatibility. These products include:
•LIFESTYLE
Bose passive speakers.
•LIFESTYLE
• Bose 3•2•1
•The Bose Wave
Instead, you can use a previously purchased Bose product, called
a legacy pr
ibility. Products by other manufacturers can also
expansion room setup. However, they allow varying degrees of
control when paired with your PERSONAL
®
SA-2 or SA-3 amplifiers that work with a variety of
®
Homewide powered speaker system.
®
DVD home entertainment systems.
®
music system.
oduct, which does not have built-in Bose
®
link compat-
be a part of your
®
music center II.
Note: Unauthorized modification of the receiver or radio remote
control could void the user’s authority to operate this equipment.
The remote control conforms to the RTTE Directive 99/5/EC (R+TTED).
The complete Declaration of Conformity can be found on <www.bose.com>
2
Page 3

English FrançaisEspañol
CONTENTS
Introduction . . . . . . . . . . . . . . . . . . . . . . . . . . . . . . . . . . . . . . . . . . . . . . . . . . . . . . . . 2
Thank you . . . . . . . . . . . . . . . . . . . . . . . . . . . . . . . . . . . . . . . . . . . . . . . . . . . . . . . 2
Other equipment you can control . . . . . . . . . . . . . . . . . . . . . . . . . . . . . . . . . . . . 2
Preparing for Use . . . . . . . . . . . . . . . . . . . . . . . . . . . . . . . . . . . . . . . . . . . . . . . . . . . 4
Where to begin . . . . . . . . . . . . . . . . . . . . . . . . . . . . . . . . . . . . . . . . . . . . . . . . . . . 4
Installing the batteries . . . . . . . . . . . . . . . . . . . . . . . . . . . . . . . . . . . . . . . . . . 4
Confirm that current settings are right . . . . . . . . . . . . . . . . . . . . . . . . . . . . . . 5
Change the settings, as needed . . . . . . . . . . . . . . . . . . . . . . . . . . . . . . . . . . 5
Basic controls . . . . . . . . . . . . . . . . . . . . . . . . . . . . . . . . . . . . . . . . . . . . . . . . . . . 6
Getting to what you want . . . . . . . . . . . . . . . . . . . . . . . . . . . . . . . . . . . . . . . 6
What appears on the display . . . . . . . . . . . . . . . . . . . . . . . . . . . . . . . . . . . . . 7
Buttons to use while you listen . . . . . . . . . . . . . . . . . . . . . . . . . . . . . . . . . . . 9
Listening to Your LIFESTYLE
Performance at your command . . . . . . . . . . . . . . . . . . . . . . . . . . . . . . . . . . . . . 10
Playing stored music . . . . . . . . . . . . . . . . . . . . . . . . . . . . . . . . . . . . . . . . . . . . . 10
Searching the library of stored music . . . . . . . . . . . . . . . . . . . . . . . . . . . . . . . . 13
Using the radio . . . . . . . . . . . . . . . . . . . . . . . . . . . . . . . . . . . . . . . . . . . . . . . . . . 14
Playing a CD . . . . . . . . . . . . . . . . . . . . . . . . . . . . . . . . . . . . . . . . . . . . . . . . . . . . 15
Playing a DVD or VCD . . . . . . . . . . . . . . . . . . . . . . . . . . . . . . . . . . . . . . . . . . . . 17
Listening to other sources . . . . . . . . . . . . . . . . . . . . . . . . . . . . . . . . . . . . . . . . . 18
Listening to Your Local Source . . . .
How a nearby sound source differs . . . . . . . . . . . . . . . . . . . . . . . . . . . . . . . . . . 19
Choosing and using your local source . . . . . . . . . . . . . . . . . . . . . . . . . . . . 19
Beyond the Basics . . . . . . . . . . . . . . . . . . . . . . . . . . . . . . . . . . . . . . . . . . . . . . . . . 21
Adjustable features of the PERSONAL
To change settings for a feature . . . . . . . . . . . . . . . . . . . . . . . . . . . . . . . . . 21
The importance of room codes . . . . . . . . . . . . . . . . . . . . . . . . . . . . . . . . . . 23
Why would you change the house code? . . . . . . . . . . . . . . . . . . . . . . . . . . 24
Audio streams multiply your options . . . . . . . . . . . . . . . . . . . . . . . . . . . . . . 24
To add more rooms of sound . . . . . . . . . . . . . . . . . . . . . . . . . . . . . . . . . . . . . . 25
®
Bose
link products for expansion . . . . . . . . . . . . . . . . . . . . . . . . . . . . . . . . 25
Connecting another Bose
Using other products for expansion . . . . . . . . . . . . . . . . . . . . . . . . . . . . . . 26
Reference . . . . . . . . . . . . . . . . . . . . . . . . . . . . . . . . . . . . . . . . . . . . . . . . . . . . . . . . 28
Troubleshooting . . . . . . . . . . . . . . . . . . . . . . . . . . . . . . . . . . . . . . . . . . . . . . . . . 28
Contacting customer service . . . . . . . . . . . . . . . . . . . . . . . . . . . . . . . . . . . . . . . 29
Limited warranty . . . . . . . . . . . . . . . . . . . . . . . . . . . . . . . . . . . . . . . . . . . . . . . . . 29
Technical information . . . . . . . . . . . . . . . . . . . . . . . . . . . . . . . . . . . . . . . . . . . . . 29
®
System . . . . . . . . . . . . . . . . . . . . . . . . . . . . . . . . . 10
. . . . . . . . . . . . . . . . . . . . . . . . . . . . . . . . . . 19
.
®
music center II . . . . . . . . . . . . . . . . . . 21
®
link system . . . . . . . . . . . . . . . . . . . . . . . . . . . . 25
3
Page 4
PREPARING FOR USE
+
+
+
+
Where to begin
Your expansion system or speakers must be set up and connected to the LIFESTYLE
the PERSONAL
If you have a Bose
add more rooms of sound” on page 25.
If you have an older (legacy) product to use with the remote, refer
to “Using
If you have already set up and connec
you can get your remote ready to use now.
Installing the batteries
Use your PERSONAL® music center II with the LIFESTYLE®
system after installing the supplied batteries, as follows:
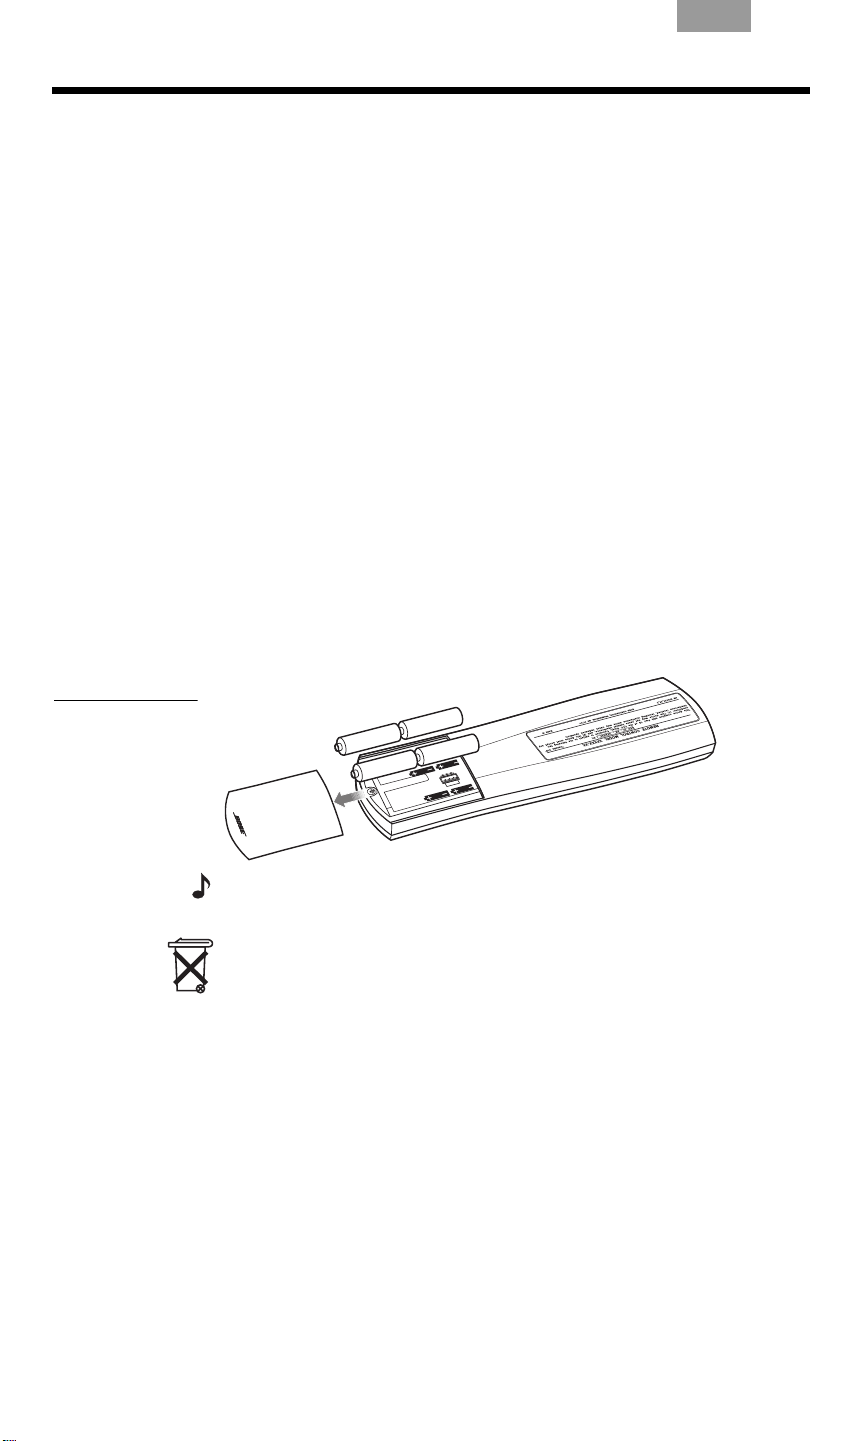
1.
On the back of the PERSONAL
battery compartment cover off.
2. Install the four AA (IEC LR6) batteries, matching the polarity
marking
partment (Figure 1).
3. Slide the battery cover back into place.
EnglishFrançais Español
®
®
music center II.
®
system before you can use them with
link product and still need to set it up, see “To
other products for expansion” on page 26.
ted your expansion system,
®
music center II, slide the
s (+ and –) to the markings inside the battery com-
Figure 1
Inserting the
batteries
Note: Change the batteries when you notice a marked decrease in
the range or response of the remote.
Please dispose of used batteries properly,
following any local
regulations. Do not incinerate.
4
Page 5

English FrançaisEspañol
Confirm that current settings are right
Your PERSONAL® music center II is pre-set at the factory for
compatibility, as follows:
• To control sound in a single expansion room – Room B – or area
• A house code identical to the one given every new LIFESTYLE
PREPARING FOR USE
®
(not in Room A, the location of your LIFESTYLE
media center).
system.
For details, see “Why would you change the house code?” on
page 24.
®
• To receive Audio stream 2, which is different from the stream
th
at deliv
ers sound in the main room where the LIFESTYLE
®
media center is located.
For details, see “Audio streams multiply your options” on
page 24.
• English as the language used for display text.
With a LIFESTYLE
another language, your PERSONAL
®
system previously set up and used with
®
music center II detects the
difference (only the first time you turn it on), and pauses operation to switch to that language.
Note:
To learn how to select a different text display language for
your system, refer to “Media center opti
ons” in the Operating Guide
that came with the system.
If the above settings are right, you can begin to use your remote
now.
Change the settings, as needed
• Language: to change display text to your preferred language,
press the Setup button.
For further information on how to make the change, see “Adjustable features of the PERSONAL
• Room codes: to choose a different code that will either be
ique to your PERSONAL
un
main room, see “The importance of room codes” on page 23.
• House codes: to learn how to match your PERSONAL
center II house code to one that has been changed in your
LIFESTYLE
®
primary remote, see “Why would you change the
house code?” on page 24.
®
music center II” on page 21.
®
music center II or the same as the
®
music
• Audio stream: for instructions on changing streams and an
exp
lanation of your choices, see “Audio streams multiply your
options” on page 24.
5
Page 6
PREPARING FOR USE
Basic controls
EnglishFrançais Español
Using just a few selection buttons and the display screen, you can
see, choose from, and enjoy a wide variety of LIFESTYLE
®
system
capabilities in your expansion room.
Remember that you can use the PERSONAL
®
music center II, with
no need to aim it, all around your home, even outside. Its radio
frequency (RF) signals can reach the system from as far away as
80 fe
et (24.4
meters).
Getting to what you want
The few buttons explained below will enable you to get started,
move around on the display screen, and make selections from
the display.
See how quickly you get a feel for what happens.
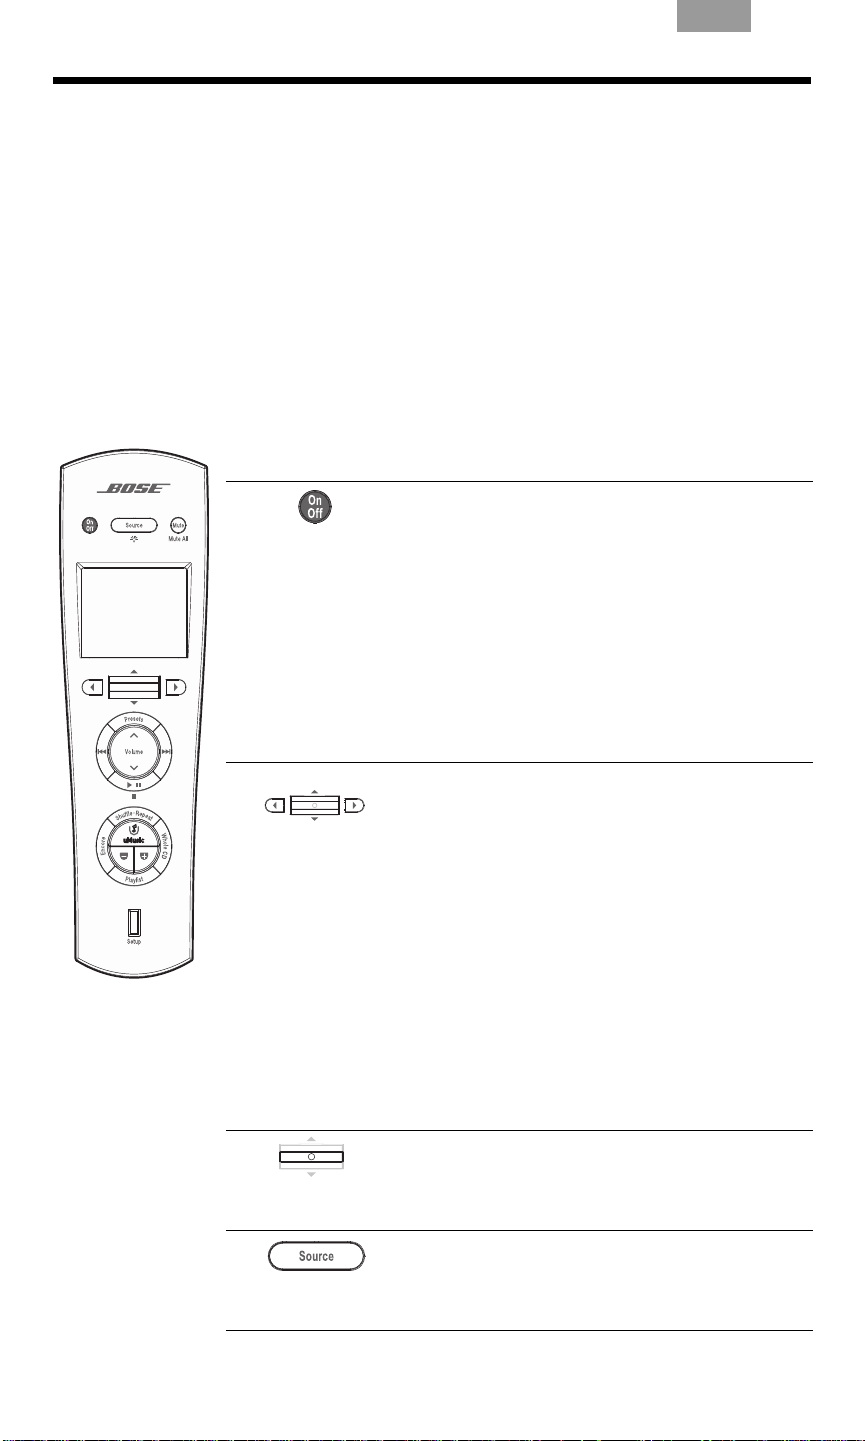
Turns on the amplifier and speakers or local
system that your PERSONAL
®
music center II
is assigned to control.
Alerts the LIFESTYLE
®
system media center
in the main room.
Activates the last used source, which is set to
its previous
volume and preset, if that applies.
Turns off the current source, the PERSONAL
music center II, and the amplifier and speakers (or system) in the same room.
Moves around on the display.
• Tipping the center bar up
or down moves
up or down.
• Pressing a le
ft or right arrow button moves
left or right.
Increases or decreases selection values.
• Tipping the center bar up
or down adds to
or subtracts from a value (for example, the
frequency of the FM stations).
There are guides at the bottom of the display
(Figure 2) showing which arrows to use for
other actions.
®
Confirms a selection.
Pressing in on the cent
er bar completes your
action and moves to the next choice
Shows the sources you can choose to hear.
Pressing and holding th
is button turns the
display backlight off and on.
6
Page 7
English FrançaisEspañol
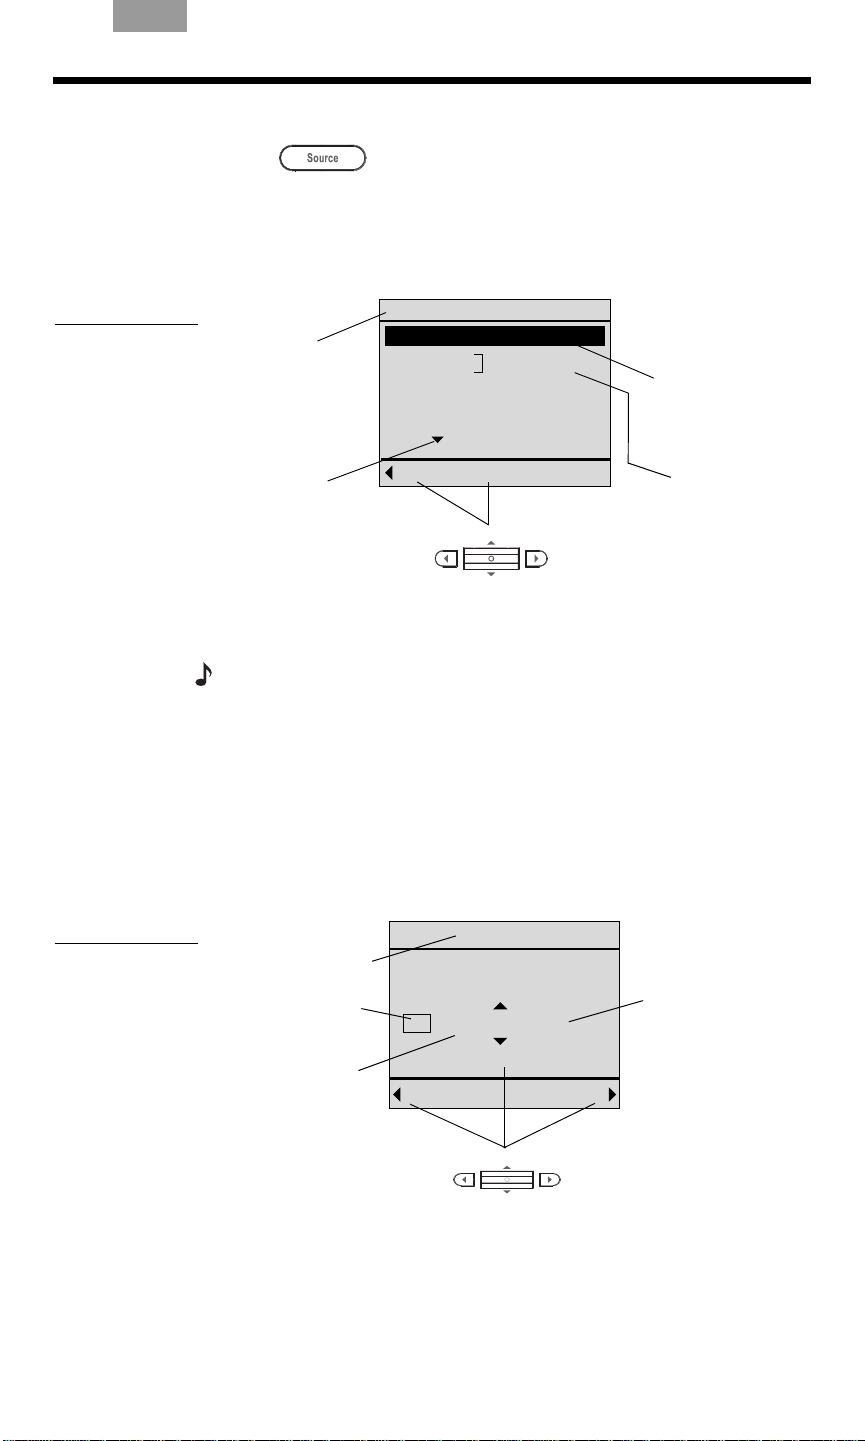
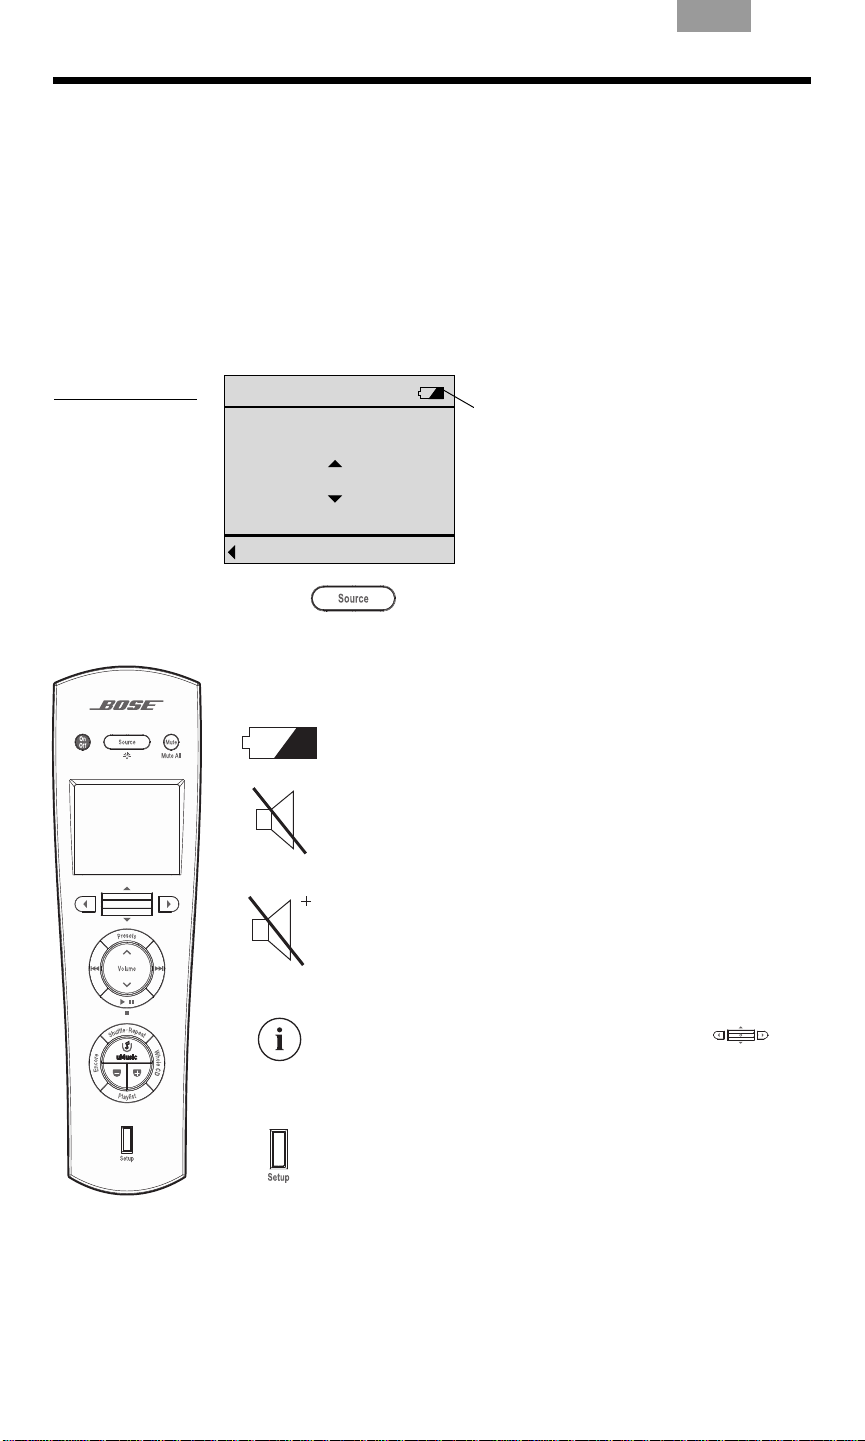
Other choices available using:
Indicates
more choices
Audio stream and
source in use
elsewhere
Audio steam and
source in use here
Room
label
Cancel [Ok]
Bedroom
Stored On Audio 2
FM Radio
AM Radio On Audio 1
CD/DVD
AUX
Local
Back Tune
FM Radio
Station
FM 103.3
Jump to preset
2
Other choices available using:
Selected source
What you can
change here
Selected preset
Current station
Figure 2
Source display
PREPARING FOR USE
What appears on the display
Press to see the list of the available sources (Figure 2).
Your list may look different, depending on the components you
onnected to your LIFESTYLE
have c
system it is. (For instance, Stored will appear only if you hav
LIFESTYLE
®
38 or 48, not on a LIFESTYLE® 18 or 28 system.)
®
system, and what type of
e a
Figure 3
FM radio display
Audio 2, the stream selected to deliver sound to the expansion
room speakers when the PERSONAL
to, appears briefly in the line for Room label, also.
Note:
To understand what Audio 1 and 2 mean, refer to “Audio
streams multiply your options” on page 24.
What you can do in the source display:
• Move up or down to highlight a preferred source.
• Confirm your new choice [OK].
• Move left to return to a previous display.
When you confirm or cancel a choice, the display changes to
mation about the source that is playing now (Figure 3).
infor
®
music system commands it
7
Page 8
PREPARING FOR USE
Back
FM Tune
Station
FM 103.3
Tune station
Battery
indicator
appears only
as explained
below.
Figure 4
Example of a radio
tuning screen
EnglishFrançais Español
When you see the radio display, you may:
• Change the station selected by using the up and down arrows,
which mo
ve forward or backward through the preset stations.
• Confirm a new selection by pressing in on the center bar.
Where you can go from here:
• Move up or down to another preset station.
• Move left to return to the source selection screen.
• Move right to see the station tuning screen (Figure 4).
Or, press to return to the list of the sources.
Symbols on the display
At times, you may notice that a symbol appears on the display.
These symbols indicate special cond
itions, as described below:
Battery indicator: Your PERSONAL® music center II
battery is depleted by 75% or more.
Speakers muted: The Mute button has been
pressed and the speakers in the room with your
PERSONAL
All speakers muted: The Mute button – on your
PERSONAL
®
music center II are silenced.
®
music center II or in another room –
has been pressed and held, silencing the speakers
in all expansion rooms.
Pressing Mute now
will unmute the sp
eakers in your
room only.
Information: Pressing in on the center bar will
provide further information about a track.
Setup button: use as needed
Pressing this button presents a list of the adjustable
features on your PERSONAL
®
music center II.
Display characteristics are among them.
8
Page 9
5.
6.
2.
1.
3.
4.
7.
8.
9.
10.
English FrançaisEspañol
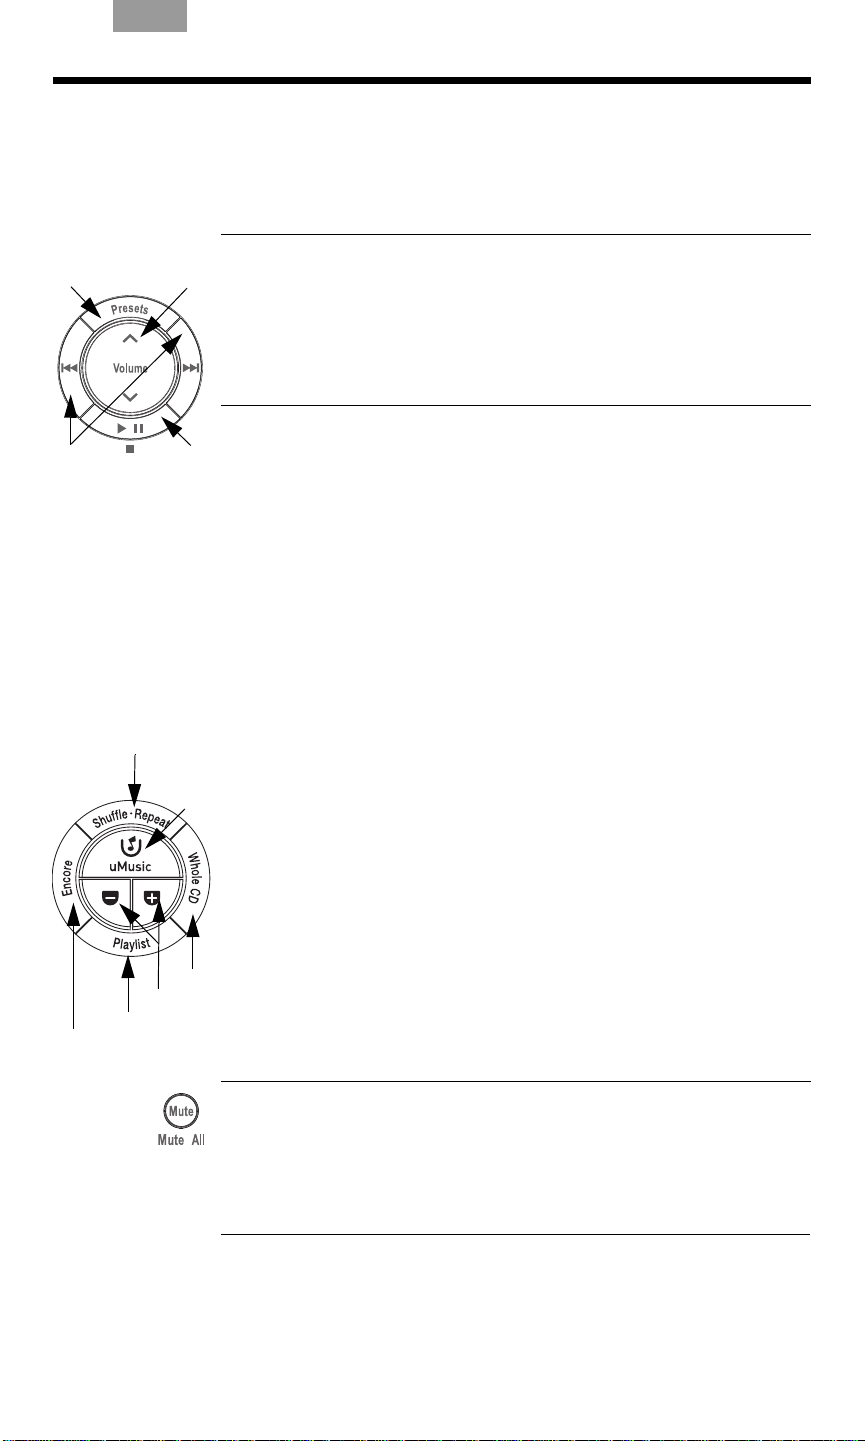
Buttons to use while you listen
There are two circular button sets for use while listening to a
source. For details on how each button works for a specific
source, refer to “Listening to Your LIFESTYLE
page 10.
Use this button set to:
1. Adjust the speaker volume up or down.
2. Select the preset for a radio station, uStation
3. Skip and scan forward and back.
4. Begin or pause play.
Use the second button set while listening to a music disc or
s
5. Each press of the top button moves from normal play to the
PREPARING FOR USE
®
System” on
TM
, or Playlist.
ed music (if available on your system).
tor
next
* play mode in the following order:
•Shuffle CD
•Repeat CD
•Shuffle and repeat CD
•Repeat track
•Normal
*Modes above apply to LIFESTYLE® system CD play; they may not
apply to another Bose
source.
®
system used as an expansion room local
Use the remaining buttons in this circular set only for stored
music on your LIFESTYLE
®
38 or 48 system.
Use these buttons with your stored music to:
®
6. Select the stored source and turn on the LIFESTYLE
system if it is off.
7. Hear all other tracks from the CD that provided the current
track.
8
. Rate the track that is playing, or multiple tracks or CDs
selected in
the Music Library.
9. Hear the tracks in a Playlist.
10. Hear music that is similar in mood and style to the track that
is
playing
Mutes and unmutes the speakers in the room where the
PERSONAL
When pressed and held, mutes all speakers connected to the
LIFESTYLE
.
®
music center II is used.
®
system.
When pressed and held again, unmutes them.
9
Page 10

LISTENING TO YOUR LIFESTYLE® SYSTEM
Press to Seek backward
or Play previous track
Press and hold to
Fast reverse
Press to Select or Press and hold to Set a preset
Press to: or Press and hold to:
Play/Pause Stop
Press to Seek forward
or Play next track
Press and hold to
Fast forward
Back
Stored
Album Name
Artist Name
4 Roberta
Library
i
Title and Artist playing
uStation preset number
and assigned name (if any)
Searchable catalog of stored music
Performance at your command
By pressing , you turn on your PERSONAL® music center II to
the last source selected.
Select a different source by pressing
down on the display to highlight the preferred source. Then press
he center bar (
in on t
Use sections of this circular button as you listen.
Your options will vary according to the source that is playing.
Playing stored music
To listen to your stored music, press the uMusic button on the
PERSONAL
system, if it is off, and begins to play stored tracks.
While listening in the uMusic
The display on your PERSONAL
mation about the stored music playing and the uStation
selected (Figure 5).
®
music center II. This turns on the LIFESTYLE®
) to confirm your selection.
®
+ play mode
®
music center II provides infor-
EnglishFrançais Español
and moving up or
TM
preset
Figure 5
Stored music
display
10
• Check to be sure that the uStation currently selected is the one
you want. uStations, for use by different people or for specific
themes, help the uMusic
®
+ intelligent playback system select
music that matches the preferences logged in that uStation.
Note:
Refer to your LIFESTYLE® system uMusic®+ booklet for details
on the importance of uStations.
• To select a different uStation preset:
1. Press the Presets butt
on on the PERSONAL® music
center.
2. Move up or down to highlight the preferred preset and press in
on the center bar
to confirm the new selection.
Page 11

English FrançaisEspañol
• To see more information on the current track:
LISTENING TO YOUR LIFESTYLE® SYSTEM
This returns to the original display screen.
Press in on the center bar
to select .
• To stop text from moving across the display:
Press in and hold the center bar
. Press again to resume
movement.
• To simply listen and enjoy
No particular action is required. You may
want to simply listen
and respond to the music as you normally do. For this, use the
circular button sets on the music center II.
In order to... Do this...
Tell the system your
strong r
eaction to a
track...
Press the minus (–) bu
not in the mood for or do not like this
song.
Press the plus (+) button
tton if you are
if you espe-
cially like this song.
Play more tracks like the
one playin
g now...
Play the whole CD that
this tra
ck came from...
Play the tracks in a
Press Encore.
Press Whole CD.
Press Playlist.
Playlist...
Let the system pick the
tr
acks fo
r you...
Press uMusic to exit the Encore,
Whole CD, or Playlist play mode.
Hear this track again... Press Repeat.
Hear th
a differen
e music playing in
t order...
Press Shuffle while in Whole CD,
Playlist, or Encore play mode.
Otherwise, it has no effect.
Pause the music... Press
Resume play where the
music paus
ed...
Scan forward through the
curren
t track...
Press .
Press and hold .
.
11
Page 12

LISTENING TO YOUR LIFESTYLE® SYSTEM
EnglishFrançais Español
Scan backward through
the curr
ent track...
Skip to the beginning of
this
track...
Skip to the beginning of
the pr
evious track...
Press and hold .
Press .
Or, tip down on the center bar
Press twice.
Or, tip down on center bar
twice.
Skip this track... Tip up on the center bar
.
Tip up and hold to skip more tracks.
Return to a previous
ck...
tra
See the list of other
source
s...
Tip down on the center bar .
Tip down and hold to skip more
cks.
tra
Press the left arrow button to
move left.
Or, press
.
Changing from uMusic® to Playlist mode
Press the Playlist button on the PERSONAL® music center II to
begin playing the tracks in the most recently selected Playlist.
There are 9 Playlists available for use in your LIFESTYLE
®
system.
.
In order to... Do this...
Choose another playlist... While listening to a Playlist, press the
Preset b
utton.
Move up or down the display to
high
light the preferred Playlist. Then
press in on the center bar
to
confirm your choice.
Delete a song from the
current
Playlist...
While the song is playing, press and
hold the Playlist button.
Hear this Playlist again... Press Repeat.
Hear this Playlist music in
a diff
erent order...
You can create new Playlists, add tracks to them, and name each
y using your LIFESTYLE
one b
Press Shuffle.
®
system on-screen menus.
12
Page 13

English FrançaisEspañol
Back Play
Music Library
Genre: - All genres -
Artist: - All artists-
Album: - All albums-
Track: - All tracks-
16 albums / 221 tracks
[Open]
Cancel Play
Select Artist
Genre: Rock / Pop
Artist: The Beatles
Album: - All albums -
Track: - All tracks -
16 albums / 221 tracks
- All artists ABBA
Beatles, The
Bee Gees, The
Big Audio Dynam...
Cure, The
[Ok]
Searching the library of stored music
You may want to locate other tracks in your collection, which is
easy to do using the display on your PERSONAL
While listening to the Stored source, press the right arrow button
he library search screen (Figure 6):
search
the library. The categories are:
• Genre: one of 19 music types that describe stored tracks.
• Artist: the primary performer or group
• Album: name of the disc
Figure 6
Music Library
display
to see t
To search and use what you find
1. Move up or down to highlight the category you want to use to
LISTENING TO YOUR LIFESTYLE® SYSTEM
®
music center II.
Figure 7
Results of the
search for artists
in all genres
• Track: title of the track
2. Press in on the center bar
to see the possible choices in
that category (Figure 7).
3. Move up or down to make a selection.
4. Press in on the center bar
to confirm the selection and
return to the category list.
• Or, move right to play your selection
and continue browsing
the choices for this category.
• Or, move left to cancel the selection.
5. Move down the categories and repeat steps 2 through 4 to
furth
er narrow your search.
6. Move right to play all tracks in the selected category.
7. When you are done searching, you can move left to return to
th
ed music display.
e Stor
13
Page 14

LISTENING TO YOUR LIFESTYLE® SYSTEM
Back Tune
FM Radio
Station
FM 103.3
Jump to preset
2
Using the radio
To listen to the radio, select AM or FM from your list of sources.
The LIFESTYLE
EnglishFrançais Español
®
system activates, as needed, and begins play.
Figure 8
Station information display
What appears on the display
The display on your PERSONAL
®
music center II provides
information about the radio station and preset (Figure 8).
While listening to a station, you have several options.
In order to... Do this...
Tune to a specific
station...
Tune to the next or
previous preset...
Tune to higher or lower
frequenc
ies...
Move right for FM tuning, then up or
down t
o the station you want.
Tip up on the center bar
Tip up and hold to tune more
y.
quickl
Move right into station tuning, then
tip up or down on the center bar
.
Tip and hold to tune more quickly.
.
14
Choose a specific
preset...
Tune forward to the next
strong station..
.
Tune backward to the
next st
rong station...
Press the Presets butt
on.
Or, tip up or down on the center bar
to select the next preset.
Press .
Press and hold to tune quickly and
e to stop at the next station.
releas
Press .
Press and hold to tune quickly and
e to stop at the next station.
releas
Page 15

English FrançaisEspañol
Back
CD
Track
3 of 14
[123... ]
Back
MP3-CD
Song, Title, Artist Name
Track 9 of 127
[123... ]
LISTENING TO YOUR LIFESTYLE® SYSTEM
Playing a CD
Using radio presets
Your LIFESTYLE
®
system can store up to 20 AM and 20 FM
stations as radio presets.
By assigning a preset number to the stations you like most, you
can get
to them quickly and easily. All of the presets can be used
in any of the expansion rooms.
To assign preset numbers:
Most simply, you can let the system assign the next available preset number to the station you have tuned in.
• Press and hold the Pr
esets butt
on until a preset number
appears on the display next to the station identity.
Or, assign a specific preset number to a station by following steps
1 thro
ugh 5:
1. Press the Preset
s button to see the list of established
presets for FM or AM.
2. Move up or down to highlight the preset you prefer.
3. Move right to select that preset number.
4. Tip up or down on the center bar
to tune in the
station you want assigned to the selected preset number.
5. Press in on the center bar
to confirm the assignment.
Make sure there is a CD in the disc tray. The player can then begin
play as soon as you select CD/DVD from the source list.
What appears on the display
The display on your PERSONAL
®
music center II provides information about the disc and track playing. The display indicates
whethe
r the disc is a regular or MP3 CD (Figure 9).
Figure 9
CD and MP3-CD
displays
• Move up or down to change tracks one by one.
15
Page 16

LISTENING TO YOUR LIFESTYLE® SYSTEM
Track
1 2 3
Erase Done[Add]
Enter number
• Press in on and hold the center bar to see the numeric
selection display, where you can choose the track directly by
number (Fig
Figure 10
Numeric selection
display
To select a specific track by number
When the numeric selection display appears:
• Move up or down to increase or decrease the highlighted
number.
EnglishFrançais Español
ure 10).
• Press in on the center bar
to confirm the digit and add
another.
• Move left to erase a number.
• Move right when you have set the number as you want it.
Or, simply listen and use the PERSONAL
®
music center II buttons
to choose from the full range of control options.
In order to... Do this...
Pause the music... Press
Resume play from where
the musi
c paused...
Stop and start again at the
beginn
ing of the CD...
Scan forward through
Press .
Press and hold .
Then press again.
Press and hold
.
.
the current track...
Scan backward through
the curr
ent track...
Skip to the next track... Press
Press and hold .
once.
Or, tip up on the center bar
16
Skip to the beginning of the
current track...
Skip to the beginning of the
previou
s track...
Press once.
Press twice.
Or, tip down on the center bar
.
Page 17

English FrançaisEspañol
Back
DVD
Chapter
5 of 36
[123... ]
Back
VCD
Track
5 of 36
[123... ]
LISTENING TO YOUR LIFESTYLE® SYSTEM
Skip quickly forward... Tip up on the center bar
Skip quickly backward... Tip down on the center bar
Select a track by
number...
See the list of other
source
s...
Playing a DVD or VCD
With a DVD or VCD loaded in the disc tray of the LIFESTYLE®
system in your main room, select CD/DVD from your list of
source
s. This turns on the player, if it is off, and begins video play.
What appears on the display
The display on your PERSONAL
mation about the DVD and indicates whether the disc is a DVD
or a VCD (Figure 11).
Figure 11
DVD or VCD
display
and
hold.
and hold.
Press in on the center bar
.
Move up or down to change to the
first d
igit of the track number.
Press in to confirm the number
an
e on to the next digit, etc.
d mov
Press the left arrow button
to move left.
®
music center II provides infor-
• You can move up or down to change chapters (or tracks) one by
one, or press the center bar
to see the screen that allows
you to select a chapter (track) by number.
• Or, just listen and use the PERSONAL
®
music center II buttons
to choose from the following control options.
In order to... Do this...
Begin play...
Press
. Repeat as needed.
(See Note above for an explanation.)
Pause the sound...
Resume sound at the
Press
Press
.
.
point of advanced
action.
..
17
Page 18

LISTENING TO YOUR LIFESTYLE® SYSTEM
EnglishFrançais Español
Stop and start again
at the beginning
Press and hold
Then press again.
.
of the DVD...
Skip to the next
chapter (track)...
Skip to the beginning of
the prev
ious chapter
(track)...
Scan forward...
(silences temporarily)
Scan backward...
(silences temporarily)
Select a chapter (track)
by numbe
r...
Tip up on the center bar
.
Tip and hold to skip more than one.
Tip down on the center bar
.
Tip and hold to skip more chapters.
Press
.
Press repeatedly to increase speed.
Press and hold
.
Press repeatedly to increase speed.
Press and hold the center bar .
Then move up or down to change a
number
and press the center bar to
confirm.
See the list of other
sour
ces..
.
Press the left arrow button to
move left.
Note: DVDs vary in their content presentation. After pressing Play
for the first time, you may see a menu of multiple options. Before the
main
attraction begins to play, you may need to press Play a second
or even third time.
Listening to other sources
Your LIFESTYLE® system has connection jacks for other components, like a TV, VCR, and cable or sa
and operate the additional source connected using these jacks.
Each one of these components also appears in the source list of
your PERSONAL
list has been turned on, you can select and listen to it.
Note:
Except for a TV, the PERSONAL® music center II will not turn
components connected to your LIFESTYLE
• For a video component, use the up and down arrows
your PERSONAL
Or use numeric entry as described on page 15. You can enter
up to 5 digits.
• For other components, you may also be able to seek, pause,
and r
esume play as you can for a CD or DVD playing on the
system. However, this depends on the type and brand of the
co
ted equipment.
nnec
tellite box, and can select
®
music center II. So, once a component in the
®
system on or off.
®
music center II to change channels.
on
18
Page 19

English FrançaisEspañol
Back Input
Local
— See Local Device —
Station/Folder/Disc
[123... ]
LISTENING TO YOUR LOCAL SOURCE
How a nearby sound source differs
Your PERSONAL® music center II is engineered for use with any
®
link enabled products in your expansion room.
Bose
For example, speakers connected to a Bose SA-2 or SA-3 amp
fier respond to on and off commands from the PERSONAL
center II, as well as muting and volume changes.
On the other hand, a Bose 3•2•1 Series II or 3•2•1 GS Series II
sy
stem or a Bose Wave
sion room gives you another full sound source. If an SA-3
in your expansion room has a TV or other audio component connected, that too qualifies as a local sound source.
®
music system connected in the expan-
li-
®
music
amplifier
Because this local source is within view, you can see how it
r
onds to commands from the PERSONAL
esp
®
music center II by
observing its display panel.
Choosing and using your local source
This additional sound source is identified as Local in the list of
sources on your PERSONAL
Note:
Local is not an available selection when your PERSONAL®
music center II is set for use in Room A.
To listen to your local source:
1. Press
to see the list of sources.
2. Move up or down to highlight Local and press in on the center
bar
to confirm the selection.
This turns on the nearby Bose link compatible system to the
volume, play medium (radio, CD, etc.), and preset (if that applies)
las
t selected.
What you ca
n do with it
If your local source has a display scr
see the results of actions you take using your PERSONAL
center II.
The PERSONAL
®
music center II display (Figure 12) offers a
generic guide to the actions you can take.
®
music center II display.
een, refer to this display to
®
music
Figure 12
Generic display for
the moves you
can make
19
Page 20

LISTENING TO YOUR LOCAL SOURCE
• Move up or down to scroll through local selections.
• Move right to change inputs (for audio on your local source or
connec
One example, with AM and FM radio and CD/DVD options
You can make the following choices:
• To switch from one to the other, move right. The change
appear
• To set presets in the numeric selection screen, press the center
bar
– Move up or down to increase or decrease the highlighted
number
– Press the center bar to move right for the next digit.
– Move left to erase a number.
– Move right when you have made all the changes.
• To begin disc play, inserting the disc may be all that is neces-
sary. Or you may need to press the play/pause button
the PERSONAL
depends on the disc and type of local source being used.
For other source selections
You can use the PERSONAL
to make these choices:
• Select external components connected to the local system.
(Turn them on using the local source remote or the remote
specific to that component.)
• Change channels or radio stations.
Using other PERSONAL
Use the other buttons as you do with the LIFESTYLE
the main room, to:
• Skip forward or backward (scan is not available).
• Pause, stop, and restart disc play.
ted to it).
s on the local source display.
:
.
®
music center II one or more times. This
®
music center II arrow buttons
®
music center II buttons
EnglishFrançais Español
on
®
system in
20
• Adjust or mute the volume.
• Turn the local system off or on (must have Local source
cted).
sele
• Switch back to one of the sources on your LIFESTYLE
®
system.
For access to settings and advanced options on your local
source, use the remote that came with it.
Page 21

English FrançaisEspañol
Back Open
Setup
Name: Bedroom
Room Code: B
Audio Stream: 2
Contrast: Default
Backlight Bright: 100%
Backlight: On
BEYOND THE BASICS
Adjustable features of the PERSONAL® music center II
You can change some factory default settings of the PERSONAL®
music center II to customize it as you like.
Figure 13
Music center II
features that
are adjustable
Press the Set
utton near the bottom of the PERSONAL®
up b
music center II to see a list of the feature settings you can change.
To learn more about house codes, room codes, and audio
Note:
streams, refer to the sections about these features.
To change settings for a feature
1. Tip the center bar down to move down the list in
the Setup menu, and highlight the feature you want to adjust
(Figure 13).
2. Press the right arrow button
setting options for the selected feature.
3. Tip the center bar
up or down to move through the
list and highlight the setting you want.
4. Press the center bar
to confirm your choice.
5. Or, if you decide no change is needed, press the left arrow
button
instead.
Following step 4 or 5 will exit the list of options and return to the
featur
es list.
to move right for the
Features Possible Settings
Name Default: Bedroom.
Designates where you use this PERSONAL
Choose from a list of possible rooms to label your music
center and distinguish it from any others.
®
music center II.
21
Page 22

BEYOND THE BASICS
Room Code Default: B.
Distinguishes each room (up to 15) connected to the system.
Choosing A will match the setting for the LIFESTYLE
the main room.
Choosing O allows the PERSONAL
older (legacy) products, such as Bose
speakers, a Wave
tionality.
For further information about room codes, refer to “The importance of room codes” on page 23.
Audio Stream Default: 2.
Delivers audio to the room where the PERSONAL
is used and possibly to other rooms.
For further information about audio streams, refer to “Audio
streams multiply your options” on page 24.
Contrast Default: Default
Visually distinguishes display te
Increase or reduce the display contrast as needed.
EnglishFrançais Español
®
remote in
®
music center II to work with
®
®
radio, or other amplifiers, with limited func-
Acoustimass® 5 powered
®
music center II
xt from background.
Backlight Bright Default: 100%
Varies the amount of light on the display.
Choose a lower % setting to
Backlight Default: On.
Choose Off to eliminate backlighting.
LCD Delay Default: 30 seconds.
Increase or decrease (in 10-second increments) the pause before
tup display turns off.
the Se
House Code
(Change ONLY
under
certain
Default: 0.
For further information about house codes, refer to “Why would
you change the house code?” on page 24.
conditions.)
Language
(Change ONLY
when
situation
underlined at
right occurs.)
Version
(not adjustable)
Default: Update
Matches the display text to language selected for use on the
LIFESTYLE
If it does not, select the new language that should appear on your
*
PERSONAL
®
system. This match should occur automatically.*
®
music center II display.
Indicates which version of the PERSONAL
software is installed cu
reduce intensity.
rrently.
®
music center II
22
Page 23

English FrançaisEspañol
Figure 14
Room Code B
setting, for one
expansion room
BEYOND THE BASICS
The importance of room codes
Your PERSONAL® music center II is set at the factory for use in an
expansion room, while the LIFESTYLE
primary remote are set for use in the main room. The use of unique
room codes lets your LIFESTYLE
that come to it originate, so it can respond in the appropriate
room.
With just one expansion room set up, the PERSONAL
center should remain set to Room Code B, as shown
(Figure 14).
However, to use more than one PERSONAL® music center II,
or with other LIFESTYLE
®
system remotes for use in other rooms,
leaving them all set for Room B will not work.
When to change the room code
• If you have set up other expansion rooms already. There are14
room co
des in addition to Room A.
• If you prefer to use your PERSONAL
room, in addition to the primary remote control, it must be set
for Room A.
• For use with an SA-2 or SA-3 amplifier the PERSONAL
center II must have an identical room code.
Like the PERSONAL
®
music center II, these Bose® link compatible amplifiers are set at the factory for Room B. If you change
this
setting, because you have more than one expansion room
set up, your PERSONAL
®
music center II room code must
change to match it.
To learn how to choose a different room code, see “To change settings for a feature” on page 21.
®
system media center and
®
system know where commands
®
music
®
music center II in the main
®
music
Note:
For more room code details, refer to the operating guide that
came with your LIFESTYLE
®
system.
23
Page 24

BEYOND THE BASICS
EnglishFrançais Español
Why would you change the house code?
Your PERSONAL® music center II is set at the factory with a house
code identical to the factory setting on other LIFESTYLE
and remote controls. If you have not changed the house code setting in your LIFESTYLE
code in your PERSONAL
A LIFESTYLE
®
system radio frequency (RF) remote has a long
®
system, there is no need to change that
®
music center II.
range and the ability to penetrate walls. Therefore, the signals
from a remote in one home can possibly reach and affect the
operation of a LIFESTYLE
®
system in another. Changing the house
code for the system and all the remotes used with it avoids the
conflict.
To learn how to choose a different house code, see “To change
settings for a feature” on page 21.
Note:
For more details on the system house code, refer to the
operating guide included with your system.
®
systems
Audio streams multiply your options
While the LIFESTYLE® system is playing in the main room, you can
use your PERSONAL
completely different choice from that same system.
The system provides this choice by employing two independent
audio
streams to deliver the sound. So, while the Audio 1 stream
fills the main room with spine-tingling DVD special effects, you
can move to another room and switch to FM radio on the other
stream.
While the PERSONAL
control the Audio 2 steam, you can easily change it to Audio 1 –
the
stream that delivers sound in the main room.
®
music center II in another room to play a
®
music center II is set at the factory to
24
For example, there may be times when you don’t want to hear
what
is playing in one of your multiple expansion rooms. Without
disturbing the person enjoying sound on the Audio 2 stream there,
you can switch to Audio 1, which may not otherwise be in use.
This option also allows people in different rooms to use the
uMusic
®
+ system with two different presets selected.
To learn how to choose a different audio stream, see “To change
settings for a feature” on page 21.
Page 25

English FrançaisEspañol
To add more rooms of sound
Your LIFESTYLE® system is capable of supplying up to 14 expansion rooms to fill your entire
There are numerous Bose products designed specifically for use
e expansion rooms, and some older Bose products can
in thes
serve this purpose as well. Products from other suppliers may also
fit into your whole-house solution. For each choice your approach
may differ.
Bose® link products for expansion
Bose® link-enabled products have compatibility built in, making
them easy to connect to your system and ready to respond to
commands from your PERSONAL
BEYOND THE BASICS
living space with Bose® sound.
®
music center II.
Examples Include the Bose SA-2 or SA-3 amplifie
to a variety of Bose indoor and outdoor speakers. You can even
use the Bose
multiple amplifiers togeth
®
link A cable supplied with each amplifier to connect
er in a daisy chain arrangement for all
rs that connect
14 expansion rooms.
For details on setting up one or more amplifiers, refer to the
owne
r’s guide provided with the amplifier.
Another example is the Bose
®
link 50-foot extension/expansion
cable that allows you to connect a mix of amplifiers and amplified
systems for sound in multiple expansion rooms. This cable connects at one end to the Bose
®
link jack on the LIFESTYLE® system
media center, while the other end features a 4-jack connector for
several amplifiers and one or more additional systems.
For the added systems, you can use a 3•2•1 Series II or 3•2•1 GS
Seri
es II system or the Wave
®
music system.
Connecting another Bose® link system
By choosing a Wave® music system, or a 3•2•1 Series II
or 3•2•1 GS Ser
expansion, you gain another set of sources to play, using your
PERSONAL
For either of these systems, you need to use the Bose
cable to make the connection.
ies II DVD home entertainment system for
®
music center II.
®
link B
25
Page 26

BEYOND THE BASICS
Bose® link B cable
LIFESTYLE
®
38 or 48 system media center
3•2•1 media center
Bose® link jack
Bose® link jack
Figure 15
Connecting
another system to
the Bose
on the LIFESTYLE
system media
center
®
link jack
EnglishFrançais Español
Insert one end of a Bose® link B cable into the Bose® link jack
on the rear panel of the additional system (Figure 15). Connect
the other end directly to the Bose
LIFESTYLE
®
system media center, or to an extension/expansion
®
link jack on the rear of the
cable (when adding products for more than one expansion room).
®
To purchase any of these Bos e® link products or cables, contact
your authorized Bose dealer.
•For the Bose
• For the Bose
®
link B cable, ask for Part Number 273619.
®
link extension/expansion cable, ask for Part
Number 275475-050.
Or
, to contact Bose directly, refer to the address list included in
carton with your system.
the
Using other products for expansion
There are other Bose products, which you may already own, that
can also connect to your LIFESTYLE
older, legacy product, which is not Bose
you to just one expansion room where the Audio 2 stream is the
only option.
How you make the connections depends on the type of product
use
d.
iderations specific to some
Cons
Some special settings and operational limitations apply to certain
legac
y Bose products that pre-date Bose
There may be other considerations for products from other
manufacturers.
®
system. However, adding an
®
link enabled, may limit
®
link compatibility.
26
Page 27

English FrançaisEspañol
BEYOND THE BASICS
When using a Bose® SA-1 amplifier – Use the cable that came
with the amplifier and connect the cable to the Bose
the LIFESTYLE
you change the LIFESTYLE
under Media Center) for Protocol to
Note:
Refer to your LIFESTYLE® operating guide for details on mak-
®
media center. Do not turn the amplifier on until
®
system setting (in the System menu,
Legacy
.
®
link jack on
ing System menu changes.
Be sure the PERSONAL
®
music center II is set for Room B, so it
will work with this amplifier. Using it, you can turn the amplifier on
or off, change the volume and mute or unmute the speakers.
When using LIFESTYLE
code for your Bose PERSONAL
®
powered speakers –
®
music center II for Room O.
Set the room
With Acoustimass® 5 powered speakers – Use a Bose variable speaker adapter (Part Number 278894-103) to connect to
your LIFESTYLE
Set the Bose PERSONAL
®
system media center.
®
music center II in that expansion room
for Room O and use it to turn these speakers on or off, change the
volume and mute the speakers.
With a Wave
your Bose PERSONAL
®
radio or Wave® radio/CD – Set the room code for
®
music center II for Room O. Use the
remote that came with it to turn either of these units on or off.
For a product with its own remote control – Set t
to the maximum volume you may want. Then use the Bose
PERSONAL
®
music center II to adjust the volume as needed.
For more information on compatibility and cables, please contact
Bose. Refe
r to the address list provided with your LIFESTYLE
he product
®
system.
27
Page 28

REFERENCE
Troubleshooting
Problem What to do
®
Your PERSONAL
music center II
doesn’t work as
expected
No sound
• It could be time to change batteries.
• In some buildings, you may experienc e “d ea d spots”
when the PERSONAL
effectively. If this happens, simply move it a foot or two
and try again.
• Make sure the cord that connects the power supply to the
LIFESTYLE
remote antenna) is vertically oriented, stretched to it s full
length, and separated from other power cords.
• Try moving the LIFESTYLE
see if this provides a better response.
• You may need an antenna extender, which is described
in the
• Make sure the house code setting for the PERSONAL
music center II matches the house code in the primary
remote. Unless you changed it, the house code setting in
both should be 0.
• Make sure the PERSONAL
setting is unique to the room.
• If you are using a Bose
sure:
- the room codes are the same in the amplifier and in
the PERSONAL
- the status indicator on the amplifier is lit to show it is
working.
®
music center II will not operate
®
system media center (which contains the
®
media center a few feet to
LIFESTYLE
®
installation guide.
®
music center II room code
®
SA-2 or SA-3 amplifier, make
®
music center II.
EnglishFrançais Español
®
Intermittent response
from the LIFE
STYLE
system to commands
from the PERSONAL
music center II
Your system turns
on or off unexpectedly or other tuning
ch
when no buttons on
the PERSONAL
ange
s occur
®
music center II have
been pressed
Audio 1 stream
doesn’t work
28
• It could be time to change batteries.
®
• Move the PERSONAL
lem is caused by “dead spots” in the building.
®
• You may need an antenna extender, which is described
LIFESTYLE
in the
®
music center II to see if the prob-
®
installation guide.
• Check to see if someone in the main room is using the
pr
y remote and is experiencing the same problem. If
imar
not, you may be experiencing a control conflict with
®
another nearby LIFESTYLE
system. Changing the
house code may solve the problem.
®
• Refer to your LIFESTYLE
operating guide for details on
when and how to change the house code.
If you are using an older Bose product, which is not
•
®
Bose
link compatible, you may be limited to the Audio 2
stream only.
Page 29

English FrançaisEspañol
Contacting customer service
For additional help in solving problems, contact Bose® Customer
Service. See the address and phone number list included with
your LIFESTYLE
®
system.
Limited warranty
Your PERSONAL® music center II is covered by a transferable
limited warranty. See your product registration card for details.
Please be s
ure to fill out the information section on the card
and mail it to Bose. Failure to do so w
warranty.
Technical information
Remote control range
80 ft (24.4 m)
Size
8¼ in. L x 1 in. H x 2½ in. W
(21 cm x 3 cm x 6 cm)
Weight with batteries installed
0.7 lb (.3 kg)
ill not af
REFERENCE
fect your limited
Battery type
1.5V AA (IEC LR6) batteries (4)
Frequency
U.S./Canada: 27.145 MHz
Euro: 40.685 MHz
RF Field Strength
Peak level: 88 dBμV/m @ 3
meters
29
Page 30

©2009 Bose Corporation, The Mountain,
Framingham, MA 01701-9168 USA
AM279725 Rev.01
 Loading...