

Page 1

LIFESTYLE® DVD Home Entertainment Systems
Operating
Guide
Page 2
Safety Information
Please read this owner’s guide
Please take the time to follow this guide carefully. It will help you set up and operate your system properly and enjoy
all of its advanc ed featu res . Sav e b o th th e Installation Guide and the Oper ation Gu ide for future reference.
WARNING: To reduce the risk of fire or electric shock, do not expose the system to rain or moisture
WARNING: This apparatus shall not be exposed to dripping or splashing, and o bjects filled with liquids, such as vases,
shall no t be placed on t he apparatu s . A s wi th any elec tr onic products, use care not to spill liquid s i n any part of the system. Liqui ds can cause a fai l ure and/or a fir e hazard.
These CAUTION marks are located on your LIFESTYLE® media cent er an d Ac ou st ima s s® module enclo s ures: .
CAUTION
RISK OF ELECTRICAL SHOCK
DO NOT OPEN
The exclamat ion point withi n an
equilateral triangle, as marked on
the syste m, is inte nd ed to ale rt t he
user to the presen ce o f imp o rtant
operating and maintenance instruc
tions in this owner’s guide.
RISQUE DE CHOC ÉLECTRIQUE
The lightning flash with arrowhead
symbol, within an equilateral triangle,
is intended to ale rt the use r to the
presence of unins u l ated dangerous
volt age within the system enclosure
that may be of su fficient ma gnitude
AVIS
NE PAS OUVRIR
to constitute a ris k of electric shock.
CAUTION: Use of controls or adjustments or performance of procedures oth er than those specified herein may result
in haz ardo us ra diat io n ex pos ur e. Th e co mpac t di sc pl ay er sh oul d no t be adj ust ed o r r epai red by a nyon e e xcept pr oper ly
qualified service personnel.
CAUTION: No naked flame sou rces, su ch as light ed candl es , s h o uld be pla ced on th e ap para tus .
Class 1 laser product
The DVD player contained within the media center is classified as a CLASS 1 LASER PRODUCT
according to EN 60825-1:1994 + A11. The CLASS 1 LASER PRODUCT label is located on the bottom of the media center.
CLASS 1 LASER PRODUCT
KLASSE 1 LASER PRODUKT
LUOKAN 1 LASER LAITE
KLASS 1 LASER APPARAT
Class B emissions limits
This Class B digital apparatus meets all requirements of the Canadian Interference-Causing
Equipment Regulations.
Batteries
Please dispose of used batteries properly, following any local regulations. Do not incinerate.
Batteries
Additional safety infor mation
See the additional instructions on the Important Safety Instructions sheet enclosed in the shipping carton.
©2004 Bose Corporation. No part of this work may be reproduced, modified, distributed or otherwise used without prior written permission.
Manufactured under license from Dolby Laboratories. “Dolby” and the double-D symbol are trademarks of Dolby Laboratories. Confidential
Unpublished Works. ©1992-1997 Dolby Laboratories . All rights reserved.
“DTS” and “DTS Digital Surround” are registered trademarks of Digital Theater Systems, Inc.
MPEG Layer-3 audio compr ession technology licensed by Fraunhofer IIS and THOMSON multimedia.
This product incorporates copyright protection technology that is protected by method claims of certain U.S. patents and other intellectual prop-
erty rights owned by Macrovision Corporation and other rights owners. Use of this copyright protection technology must be authorized by Macrovision Corporation, and is intended for home and other limited viewing uses only unless otherwise authorized by Macrovision Corporation.
Reverse engine eri ng or disasse mbly is prohibited.
This product incorporates copyright protected technology and other intellectual property rights owned by Cirrus Logic, Inc. and subject to the
copyright protection of the U.S. as well as other licensing restrictions and protections. Use of this copyright protected technology is limited solely
to use with the Cirrus Logic integrated circuits incorporated in this product. Reverse engineering or disassembly is prohibited.
2
Page 3

g
p
Where to fi nd...
Introduction . . . . . . . . . . . . . . . . . . . . . . . . . . . . . . . . . . . . . . . . . . . . . . . . . . . . . . . . . . . . . . . . . . . 5
Controls and Capabilities . . . . . . . . . . . . . . . . . . . . . . . . . . . . . . . . . . . . . . . . . . . . . . . . . . . . . . . . 7
Contents
Welcome . . . . . . . . . . . . . . . . . . . . . . . . . . . . . . . . . . . . . . . . . . . . . . . . . . . . . . . . . . . . . . . . . . 5
What discs you can play . . . . . . . . . . . . . . . . . . . . . . . . . . . . . . . . . . . . . . . . . . . . . . . . . . . . . 5
Check for region number compatibility . . . . . . . . . . . . . . . . . . . . . . . . . . . . . . . . . . . . . . . 5
Glossary of audio terms . . . . . . . . . . . . . . . . . . . . . . . . . . . . . . . . . . . . . . . . . . . . . . . . . . . . . . 5
The remote control . . . . . . . . . . . . . . . . . . . . . . . . . . . . . . . . . . . . . . . . . . . . . . . . . . . . . . . . . 7
Menu and program selection . . . . . . . . . . . . . . . . . . . . . . . . . . . . . . . . . . . . . . . . . . . . . . . 8
Play options . . . . . . . . . . . . . . . . . . . . . . . . . . . . . . . . . . . . . . . . . . . . . . . . . . . . . . . . . . . . 9
If the remote does not work as you expect . . . . . . . . . . . . . . . . . . . . . . . . . . . . . . . . . . . . 10
The media center . . . . . . . . . . . . . . . . . . . . . . . . . . . . . . . . . . . . . . . . . . . . . . . . . . . . . . . . . . . 10
Component or progressive scan: activating your selection . . . . . . . . . . . . . . . . . . . . . . . . . . . 12
What makes a LIFESTYLE® 38 or 48 system uniquely yours . . . . . . . . . . . . . . . . . . . . . . . . . . 12
Getting your music into the system . . . . . . . . . . . . . . . . . . . . . . . . . . . . . . . . . . . . . . . . . . 12
What you can listen to while storing CDs . . . . . . . . . . . . . . . . . . . . . . . . . . . . . . . . . . 13
How the uMusic™ intelligent playback system works for you . . . . . . . . . . . . . . . . . . . . . . 13
Using presets is very important . . . . . . . . . . . . . . . . . . . . . . . . . . . . . . . . . . . . . . . . . . 13
Take advantage of the music databases inside . . . . . . . . . . . . . . . . . . . . . . . . . . . . . . . . . 14
Tips for getting the most enjoyment from stored tracks . . . . . . . . . . . . . . . . . . . . . . . . . . . . . 14
Scheduling time to store it all . . . . . . . . . . . . . . . . . . . . . . . . . . . . . . . . . . . . . . . . . . . . . . 14
How much time to allow for storing CDs . . . . . . . . . . . . . . . . . . . . . . . . . . . . . . . . . . . 15
How many CDs you can store . . . . . . . . . . . . . . . . . . . . . . . . . . . . . . . . . . . . . . . . . . . 15
What to do with tracks you don’t like . . . . . . . . . . . . . . . . . . . . . . . . . . . . . . . . . . . . . 15
System Performance . . . . . . . . . . . . . . . . . . . . . . . . . . . . . . . . . . . . . . . . . . . . . . . . . . . . . . . . . . . 16
Some product pointers to ensure satisfaction . . . . . . . . . . . . . . . . . . . . . . . . . . . . . . . . . . . . . 16
To turn on other components . . . . . . . . . . . . . . . . . . . . . . . . . . . . . . . . . . . . . . . . . . . . . . 16
To watch video . . . . . . . . . . . . . . . . . . . . . . . . . . . . . . . . . . . . . . . . . . . . . . . . . . . . . . . . . . 16
To adjust what you see or hear . . . . . . . . . . . . . . . . . . . . . . . . . . . . . . . . . . . . . . . . . . . . . 17
To enjoy the remarkable LIFESTYLE® 38 or 48 system features . . . . . . . . . . . . . . . . . . . . 17
Listening to your stored music (avail ab le on LIFESTYLE® 38 and 48 systems, only) . . . . . . . 18
Control options . . . . . . . . . . . . . . . . . . . . . . . . . . . . . . . . . . . . . . . . . . . . . . . . . . . . . . . . . 18
Enjoy the added functionality provided by presets . . . . . . . . . . . . . . . . . . . . . . . . . . . . . . . . . 19
Why you should rely on them . . . . . . . . . . . . . . . . . . . . . . . . . . . . . . . . . . . . . . . . . . . . . . 19
Respond actively to speed up the learning process . . . . . . . . . . . . . . . . . . . . . . . . . . . . . 20
Choose Playlist when you want a lineup of tracks . . . . . . . . . . . . . . . . . . . . . . . . . . . . . . 20
How to delete tracks from the Playlist: . . . . . . . . . . . . . . . . . . . . . . . . . . . . . . . . . . . . 20
Use the Music Library to search, play, or browse your collection . . . . . . . . . . . . . . . . . . . . . . 20
No need to search if you just want info . . . . . . . . . . . . . . . . . . . . . . . . . . . . . . . . . . . . . . . 22
Playing a DVD . . . . . . . . . . . . . . . . . . . . . . . . . . . . . . . . . . . . . . . . . . . . . . . . . . . . . . . . . . . . . . 22
Control options . . . . . . . . . . . . . . . . . . . . . . . . . . . . . . . . . . . . . . . . . . . . . . . . . . . . . . . . . 22
Using parental controls . . . . . . . . . . . . . . . . . . . . . . . . . . . . . . . . . . . . . . . . . . . . . . . . . . . 23
Loading and playing a CD . . . . . . . . . . . . . . . . . . . . . . . . . . . . . . . . . . . . . . . . . . . . . . . . . . . . 23
Control options . . . . . . . . . . . . . . . . . . . . . . . . . . . . . . . . . . . . . . . . . . . . . . . . . . . . . . . . . 23
Using the radio . . . . . . . . . . . . . . . . . . . . . . . . . . . . . . . . . . . . . . . . . . . . . . . . . . . . . . . . . . . . . 24
Changing stations . . . . . . . . . . . . . . . . . . . . . . . . . . . . . . . . . . . . . . . . . . . . . . . . . . . . . . . 24
Setting a radio station preset . . . . . . . . . . . . . . . . . . . . . . . . . . . . . . . . . . . . . . . . . . . . . . . 24
Using the headphones jack . . . . . . . . . . . . . . . . . . . . . . . . . . . . . . . . . . . . . . . . . . . . . . . . . . . 25
Using the sleep timer . . . . . . . . . . . . . . . . . . . . . . . . . . . . . . . . . . . . . . . . . . . . . . . . . . . . . . . . 25
To set the sleep timer . . . . . . . . . . . . . . . . . . . . . . . . . . . . . . . . . . . . . . . . . . . . . . . . . . . . 25
Controiling External Sources . . . . . . . . . . . . . . . . . . . . . . . . . . . . . . . . . . . . . . . . . . . . . . . . . . . . . 26
Using your system remote with other components . . . . . . . . . . . . . . . . . . . . . . . . . . . . . . . . . 26
For TV control . . . . . . . . . . . . . . . . . . . . . . . . . . . . . . . . . . . . . . . . . . . . . . . . . . . . . . . . . . 26
For cable/s ate llite control . . . . . . . . . . . . . . . . . . . . . . . . . . . . . . . . . . . . . . . . . . . . . . . . . 29
For VCR (or DVR) control . . . . . . . . . . . . . . . . . . . . . . . . . . . . . . . . . . . . . . . . . . . . . . . . . . 30
For AUX control . . . . . . . . . . . . . . . . . . . . . . . . . . . . . . . . . . . . . . . . . . . . . . . . . . . . . . . . . 30
Designating one video tuner . . . . . . . . . . . . . . . . . . . . . . . . . . . . . . . . . . . . . . . . . . . . . . . . . . . 31
3
Page 4

Contents
Changing Source Settings . . . . . . . . . . . . . . . . . . . . . . . . . . . . . . . . . . . . . . . . . . . . . . . . . . . . . . . 32
Making adjustments to a particular source . . . . . . . . . . . . . . . . . . . . . . . . . . . . . . . . . . . . . . . 32
How to see your options . . . . . . . . . . . . . . . . . . . . . . . . . . . . . . . . . . . . . . . . . . . . . . . . . . 32
How to change the settings . . . . . . . . . . . . . . . . . . . . . . . . . . . . . . . . . . . . . . . . . . . . . . . . 33
Tuner setting options (FM or AM radio) . . . . . . . . . . . . . . . . . . . . . . . . . . . . . . . . . . . . . . . . . . 34
CD setting options . . . . . . . . . . . . . . . . . . . . . . . . . . . . . . . . . . . . . . . . . . . . . . . . . . . . . . . . . . 34
Stored CDs setting options . . . . . . . . . . . . . . . . . . . . . . . . . . . . . . . . . . . . . . . . . . . . . . . . . . . 35
DVD setting options . . . . . . . . . . . . . . . . . . . . . . . . . . . . . . . . . . . . . . . . . . . . . . . . . . . . . . . . . 3 6
TV setting options (for VCR, CBL-SAT, and AUX) . . . . . . . . . . . . . . . . . . . . . . . . . . . . . . . . . . 37
Using System Menus . . . . . . . . . . . . . . . . . . . . . . . . . . . . . . . . . . . . . . . . . . . . . . . . . . . . . . . . . . . 38
Making system adjustments . . . . . . . . . . . . . . . . . . . . . . . . . . . . . . . . . . . . . . . . . . . . . . . . . . . 38
How to see the System menu . . . . . . . . . . . . . . . . . . . . . . . . . . . . . . . . . . . . . . . . . . . . . . 38
. . . . . . . . . . . . . . . . . . . . . . . . . . . . . . . . . . . . . . . . . . . . . . . . . . . . . . . . . . . . . . . . . . . . . . 38
How to make changes . . . . . . . . . . . . . . . . . . . . . . . . . . . . . . . . . . . . . . . . . . . . . . . . . . . . 38
Audio options . . . . . . . . . . . . . . . . . . . . . . . . . . . . . . . . . . . . . . . . . . . . . . . . . . . . . . . . . . . . . . 39
Video options . . . . . . . . . . . . . . . . . . . . . . . . . . . . . . . . . . . . . . . . . . . . . . . . . . . . . . . . . . . . . . 41
Media center options . . . . . . . . . . . . . . . . . . . . . . . . . . . . . . . . . . . . . . . . . . . . . . . . . . . . . . . . 42
Remote control options . . . . . . . . . . . . . . . . . . . . . . . . . . . . . . . . . . . . . . . . . . . . . . . . . . . . . . 43
DVD lock options . . . . . . . . . . . . . . . . . . . . . . . . . . . . . . . . . . . . . . . . . . . . . . . . . . . . . . . . . . . 44
Applying parental control . . . . . . . . . . . . . . . . . . . . . . . . . . . . . . . . . . . . . . . . . . . . . . . . . . 44
To set the restriction level and passwords . . . . . . . . . . . . . . . . . . . . . . . . . . . . . . . . . 45
Stored CD data options . . . . . . . . . . . . . . . . . . . . . . . . . . . . . . . . . . . . . . . . . . . . . . . . . . . . . . 46
Using the Edit Screen . . . . . . . . . . . . . . . . . . . . . . . . . . . . . . . . . . . . . . . . . . . . . . . . . . . . 47
How to change the text . . . . . . . . . . . . . . . . . . . . . . . . . . . . . . . . . . . . . . . . . . . . . . . . 47
Reference . . . . . . . . . . . . . . . . . . . . . . . . . . . . . . . . . . . . . . . . . . . . . . . . . . . . . . . . . . . . . . . . . . . . 49
Remote control care . . . . . . . . . . . . . . . . . . . . . . . . . . . . . . . . . . . . . . . . . . . . . . . . . . . . . . . . . 49
Replacing the remote control batteries . . . . . . . . . . . . . . . . . . . . . . . . . . . . . . . . . . . . . . . 49
Changing house code settings . . . . . . . . . . . . . . . . . . . . . . . . . . . . . . . . . . . . . . . . . . . . . 49
Other switches . . . . . . . . . . . . . . . . . . . . . . . . . . . . . . . . . . . . . . . . . . . . . . . . . . . . . . . 50
For a Bose® link remote in another room . . . . . . . . . . . . . . . . . . . . . . . . . . . . . . . . . . . 50
Setting up a second room with sound . . . . . . . . . . . . . . . . . . . . . . . . . . . . . . . . . . . . . . . . . . . 50
Bose® link to assured co mpatibility . . . . . . . . . . . . . . . . . . . . . . . . . . . . . . . . . . . . . . . . . . 51
Bose link remote switch settings . . . . . . . . . . . . . . . . . . . . . . . . . . . . . . . . . . . . . . . . . 51
Taking care of your LIFESTYLE® system . . . . . . . . . . . . . . . . . . . . . . . . . . . . . . . . . . . . . . . . . 52
Troubleshooting . . . . . . . . . . . . . . . . . . . . . . . . . . . . . . . . . . . . . . . . . . . . . . . . . . . . . . . . . . . . 53
Contacting customer service . . . . . . . . . . . . . . . . . . . . . . . . . . . . . . . . . . . . . . . . . . . . . . . 54
Limited warranty . . . . . . . . . . . . . . . . . . . . . . . . . . . . . . . . . . . . . . . . . . . . . . . . . . . . . . . . . . . . 55
Technical information . . . . . . . . . . . . . . . . . . . . . . . . . . . . . . . . . . . . . . . . . . . . . . . . . . . . . . . . 55
Media center weight . . . . . . . . . . . . . . . . . . . . . . . . . . . . . . . . . . . . . . . . . . . . . . . . . . 55
Stored CDs Log . . . . . . . . . . . . . . . . . . . . . . . . . . . . . . . . . . . . . . . . . . . . . . . . . . . . . . . . . . . . 56
4
Page 5
Welcome
Introduction
Thank you for purchasing a Bose® LIFESTYLE® DVD home entertainment system. Through
proprietary Bose technologies and innovative LIFESTYLE
easy-to-use system delivers superior performance for both music and video programming.
What discs yo u ca n pl ay
The system can play the following types of discs having the corr esponding logos:
• Video DVDs
• DVD-Rs or DVD-R/Ws
• Video CDs (VCDs)
•Audio CDs
•CD-Rs or CD-R/Ws
•MP3 CDs
Check for region number compatibility
For any DVD play er an d DVD d isc to be compatible, th eir regi on nu mb er s mu s t mat ch .
These numbe r s are ass ign ed acc ordi n g to wh ere the play e r and d is c are sold .
Check the region number on the bottom of the media center included with your
system. Then be sure to choose only DVD disc s tha t show the same r eg ion
number on the disc label or packaging. For example, a Region 1 DVD and
correspond ing pla y er should display the mark shown on the right.
®
systems design, this elegant and
Gloss ar y of audio te r m s
Aspect ratio – The shape of the rectangular picture in a TV set expressed as the width of the
picture relative to the height. For example, if a TV picture has an aspect ratio of 4:3 (read as 4
by 3), the shape of that picture is 4 units wide by 3 units high. The two standard TV aspect
ratios are 4:3 and 16:9.
Chapter – A main division of contents in a DVD title.
Component video – A video signal split int o three parts: luminance and two color si gn als
(marked as YPbPr). It provides the highest resolution video, but cannot be processed by all
television sets.
Composite video – A video signal in whi ch th e b ri gh tnes s (b la ck and white) and co lo r info r -
mation are combined. Compatible with most televisions and other video components, com-
posite vide o cab les us e RC A jacks.
Dolby Digital – A perc e pt ual cod ing syst e m fo r audi o, de ve loped by Dolby Laboratories and
accepted as an international standard. Dolby Digital is the most common means of encoding
multi-chann el audio.
– The logo representing Dolby Digital.
5
Page 6

Introduction
DTS – A type of multi-channel surround sound format used on certain CDs and many DVDs.
– The logo representing DTS.
DVD – An abbreviation most commonl y know n to mean Digit al V ideo Disc or Digital V e rsatile
Disc. The audio/video/data storage system is based on 12-cm optical discs.
DVD video – A standard for storing and reproducing audio and video on DVD-ROM discs,
based on MPEG video, Dolby Digital audio, and other proprietary data formats.
IR – An abbreviation for infrared. Pertains to the type of remote that sends/receives com-
mands on an infr ared light beam .
Letterbox – A video format which has an aspect ratio wider than 4:3 and is shown with black
bars above and be lo w th e picture.
MP3 – MPEG-1 Layer I II aud io . Thi s is a co mp re ssed audio format that allows the rec o rding
of many hours of music on a single CD.
NTSC – An abbreviation for Nat io n al Television System Com mittee and a labe l fo r the video
form at standard establi s hed by the committee for televisions used in the U S and other co un-
tries.
PAL – An acronym for the Phase Alternate Line video prompt used extensively in Western
Europe.
FedX addition:
Pan & Scan – The technique of refram ing a pi cture to conform to a different asp ect r ati o b y
cropping parts o f the p icture. DVD-Video players can use the horizont al o ffse t enco d ed with
the video on certain D VDs to automatically pan & sc an wid e sc reen video to a 4 :3 rati o.
PCM – An abbreviation for Pulse Code Modulation. A common form of digital audio signal.
Progressive Scan – A video format which displays all lines of t he pi ctu re frame in a single
pass, and refres hes th e ima g e si xty times a second . T his fo rm a t is no t co mp atible with all
video displa ys.
RDS – A system that displays radio broadcast stati on and programming informa ti on.This fea-
ture is available on European systems only.
SACD – An ab b r e via ti on for Su pe r Aud io Co mpac t Di sc and a mu si c for mat f or CD aud io and
high-resolu t ion digital audio stor e d on a CD-si zed di sc . Th e new Bose
(with which this guide is included) play the CD-compatible portion of such discs, identified by
the CD disc logo on the front of the disc.
SCMS – A system for preventing second-generation digital copies of copyrighted audio
material. A digital recorder equipped with SCMS will record digitally from another source, but
that recording cannot then be use d as a sou rce fo r a se con d -g eneration recordin g .
S-video –Also called Y/C. A video signal that keeps the brightness and color information sep-
arate, and is significantly better than composite video. Requires the use of an S-video cable
and is compatible with many televisions and other video components.
uMusicTM intelligent playback system – A revolutionary Bose® play mode, which performs
like a veritable DJ by noting listener preferences and playing suitable stored CD tracks in
response.
®
LIFESTYLE® systems
Videostage® 5 – Bose® proprietary Videostage 5 decoding circuitry gives you a five-channel
surround sound experience from everything you listen to – VHS tapes, stereo CDs, even
mono TV programs.
YPbPr – A component analog video signal cont ai nin g o n e luminance and two ch rom inance
compone nts . Als o refe r red to as YU V o r Y, B-Y, R-Y.
6
Page 7
Controls and Capabilities
e
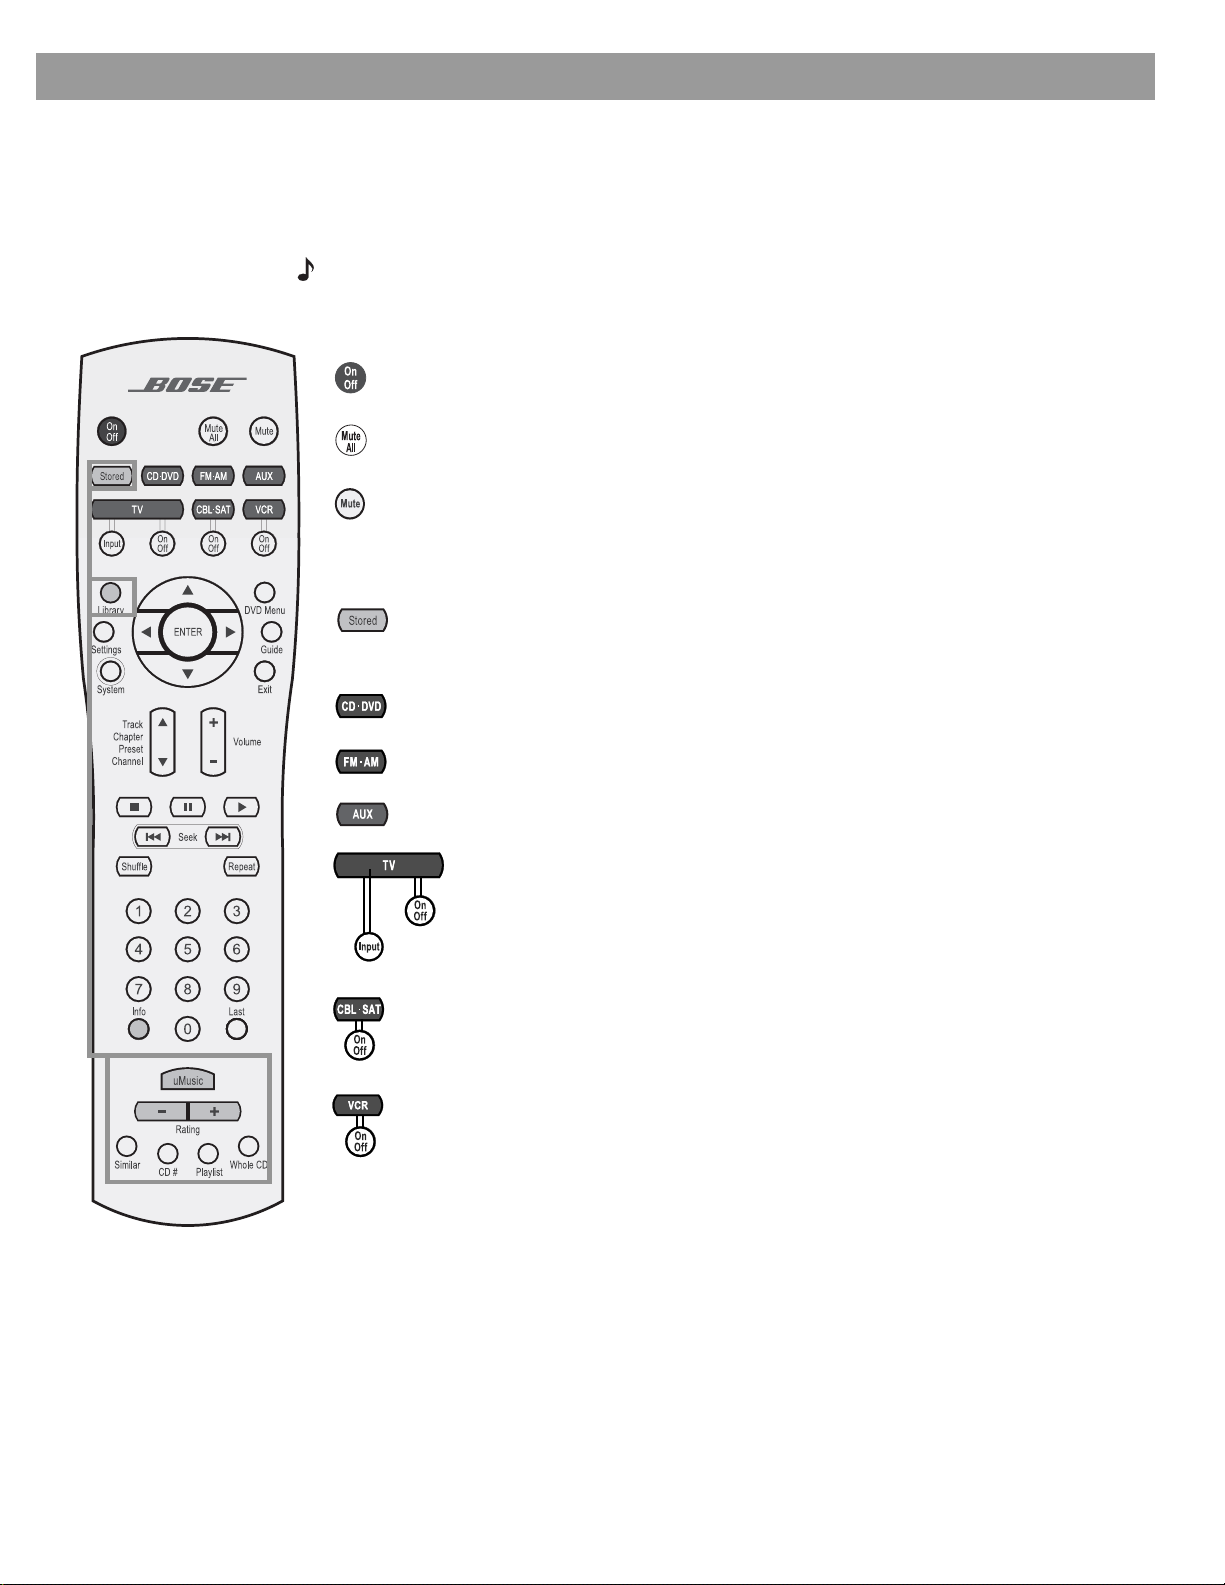
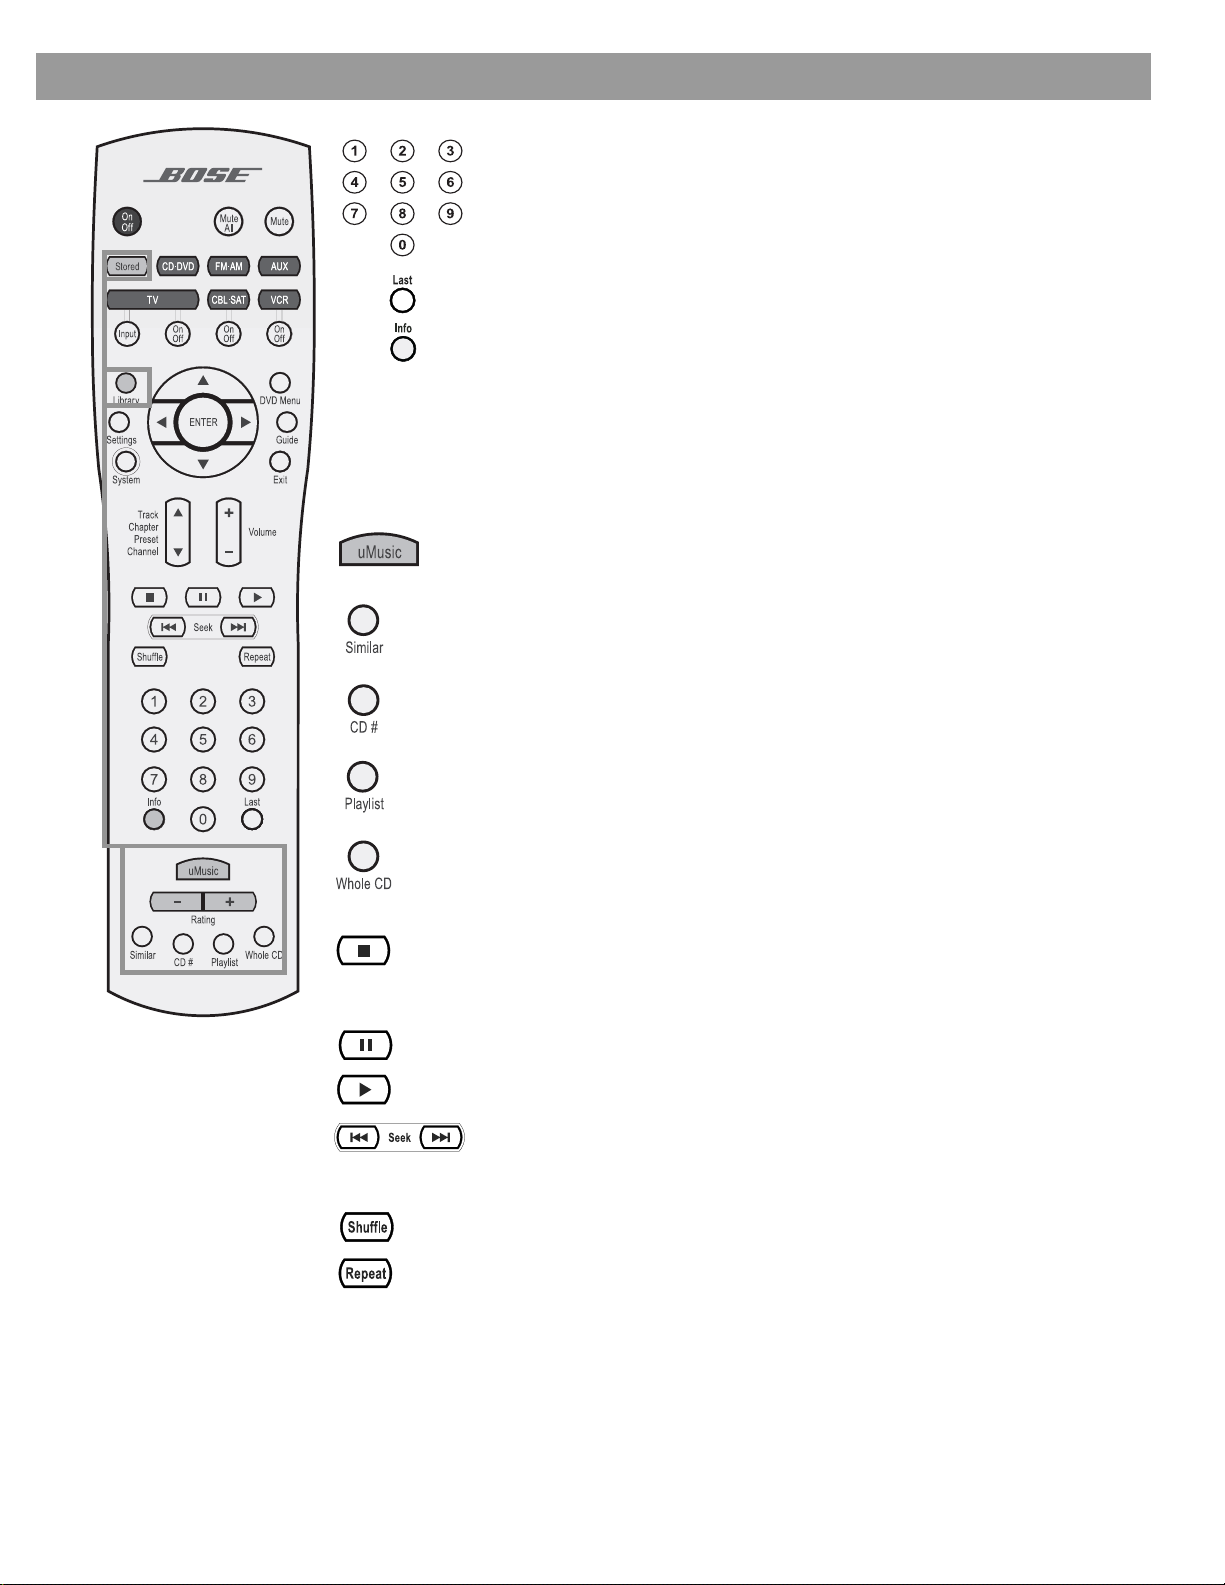
The remote control
pages 7 - 9 edited to reflect FedX remot
The advanc ed radio -f requ en cy remote control provided wi th th e LI F EST Y LE® system works
from almost anywhere inside your home. Sim ply press any button. There is no need to aim
the remote at the media center.
Note: No t all of the but tons shown on the remote at the left ar e needed for all systems. Several,
which are fo r use with a Lifestyle 38 or 48 syste m, o nly, our shown wi thin a gray outli n e.
Power and mute
Tur ns the system on and off. Selects the source last used.
Mutes the volume for all connected speakers (main and in other rooms).
Mutes or unm u tes the v olu m e in the cur ren t room.
Source and input selection.
Tur ns the system on and selects the uMusic
stored CD play. Overrides other stored CD modes.
Available with LIFESTYLE 38 and 48 systems only.
Turns the system on and selects the built-in disc player as sour ce.
™
intelligent playback system mode of
Tur ns the system on and selects the built-in FM/AM radio tuner set to the station
last select ed . Switches betw een FM and AM when the radio is on .
Turns the s yste m on and sel ects an A UX s o urce con nected to the media center.
Turns the sys te m o n an d selects the T V co nnected to the me di a center as
source.
When the remote has been s et to do s o*, turn s the T V on and off.
When the remote has b een set to do s o, scrolls the T V inp uts to select one.
The input that connects to the media center is one choice.
Turns the s ystem on and selects a ca ble bo x or satellite receiver con nected to the
media cen ter.
When the remote has been set to do so*, turns your cable or satellite box on and off.
Turns your s ystem on and elec ts the VCR co nnected to the me di a center as the
sound source.
When the remote has been set to do so*, turns yo ur VC R on and off.
*You can choose to set the LIFESTYLE® remote to control you r TV, cable or satellite box, o r
VCR so it will turn those devices on or off. To do that, refer to
other components” on page 26. Until then, however, simply turn on the TV or component
using its power button or remote control.
“Using your system remote wit h
7
Page 8
Controls and C apabilities
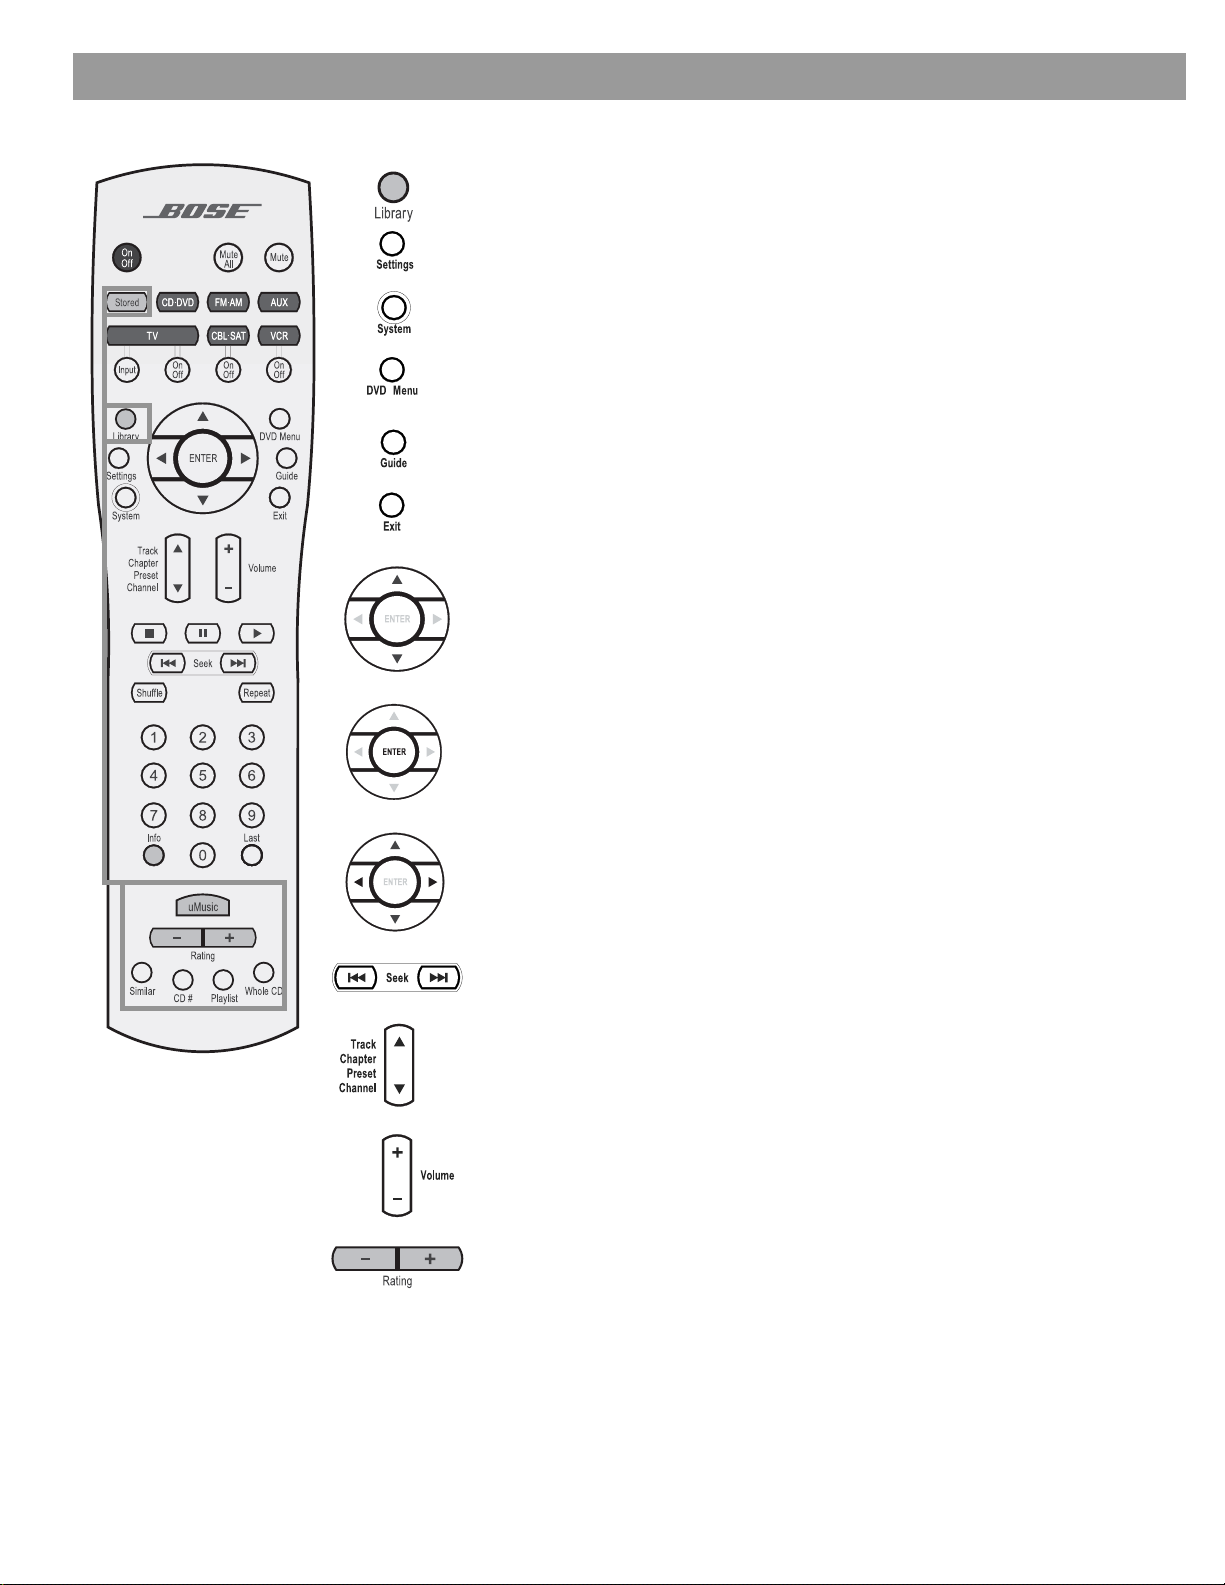
Menu and program selection
Enters the library of stored CDs on LIFESTYLE® 38 & 48 systems only.
Enters or exits the Settings me nu fo r the cur ren t sourc e.
Enters or exits the System men u.
Enters or exits the menu of the DVD disc that is currently loaded.
Enters the main menu of a cabl e o r sate llite box.
Displays an electronic TV lis ting s g uide.*
Exits the Settings and Syste m menus.
Exits the electr on ic TV lis tings.*
Tune the FM/AM radio up or down to the next frequency.
Selects the previous or next item in a menu list.
Enters submenus or conf ir ms th e s ele ctio n of a menu item.
Move up, down, left, or right in a menu or screen.
Seek backward or forward to the next st rong radio s tati on .
Ski p bac kw a rd or for w ar d t o t he n ex t CD tr ac k, DV D c hapt e r, radi o p r es et
(NOT stored CD prese t), o r TV cha n nel.
Raise or lower the volume of the cur ren t sourc e.
Pressing + unmutes the current source in the cu rre nt roo m on ly, if it was
muted.
Pressing – lowers the volume.
Apply a negative (–) or positive (+) rating to th e stored CD* track playing.
Immedia tely mo v es o n t o a different tra ck whenever a negati v e ra ting is
applied.
*Available o n L IFE S T Y LE® 38 & 48 systems only .
*If the TV, cable, or satellite provides that option.
8
Page 9
Controls and Capabilities
Select a DVD chapter, CD track, radio station or stored CD preset,* or TV
channel that co r respo n d s to the numbers pressed. Use to make changes
to some items in the System and Settings menus, when numbers apply .
*Stored CD p resets are ava ila bl e on LIF EST Y LE® 38 and 48 systems only.
Skips to the previo u s TV ch annel.*
Displays o r exit s the cable or sate lli te in for mation window, if available.
*If the TV, cab le, o r sate llite provides that op tio n.
Play options
All of the buttons sho w n be lo w, except Shu ffle and Repeat, ca n be used with your VCR or
DVR after the remote has been set to control it.
Selects the uMu s ic™ intelligent playback system mode of stored CD play. Overrides other stor ed CD modes. Av ail ab le wit h LIFE STYLE 38 and 48 systems only.
Queues up and plays stored CD mus ic of a style similar to the cur ren t track .
Plays the tracks from a specific CD when it is pressed just before pressing the
number keys for that stored CD.
Plays all the tracks assigned to the p lay li st . Can b e u sed in conjunct ion with other
play mode o pt ion s , such as si milar.
Skips from the tr ack mo s t recen tly pl ay ing to the firs t tra ck on the CD of origin and
plays that CD from beginning to end.
Stops the disc player.
Note: For DVDs and VCDs only, the system remembers the point where the disc was
stopped. Pre s s i n g again c le ars that m e mory.
Paus es the disc player.
Starts the disc player.
Skip back or forward to the start of a track or chapter.
Or, when press ed and held, scans ba ck or for ward through the
current CD or MP3 disc, or enter DVD motion control.
Plays CD tracks in random order. Press Shuffle again to cancel this mode.
Repeats a wh ol e C D o r trac k, DVD chapter, or DVD title. Press Repeat again
to cancel the repeat mode.
9
Page 10
Controls and C apabilities
k
If the remote does not work as you expect
If your system does not respond when you press a button on the remote, it could be time to
change batterie s. Fo r info rmation on the type of batterie s to use and ho w to change them,
refer to
In some buildings, you may experience “dead spots” where the remote control will not
operate effectiv ely. If this hap pe ns , mov e th e remote a foot or two and try ag ain. Also make
sure the cord that connects the p o wer supply to the me di a center (and cont ains the rem ote
antenna) is stretched to its full length. If these efforts do not wor k , mov e the med ia ce nter a
few feet to a loca tio n where it provides a bette r respons e.
“Replacing the remote control batteries” on page 49
The media center
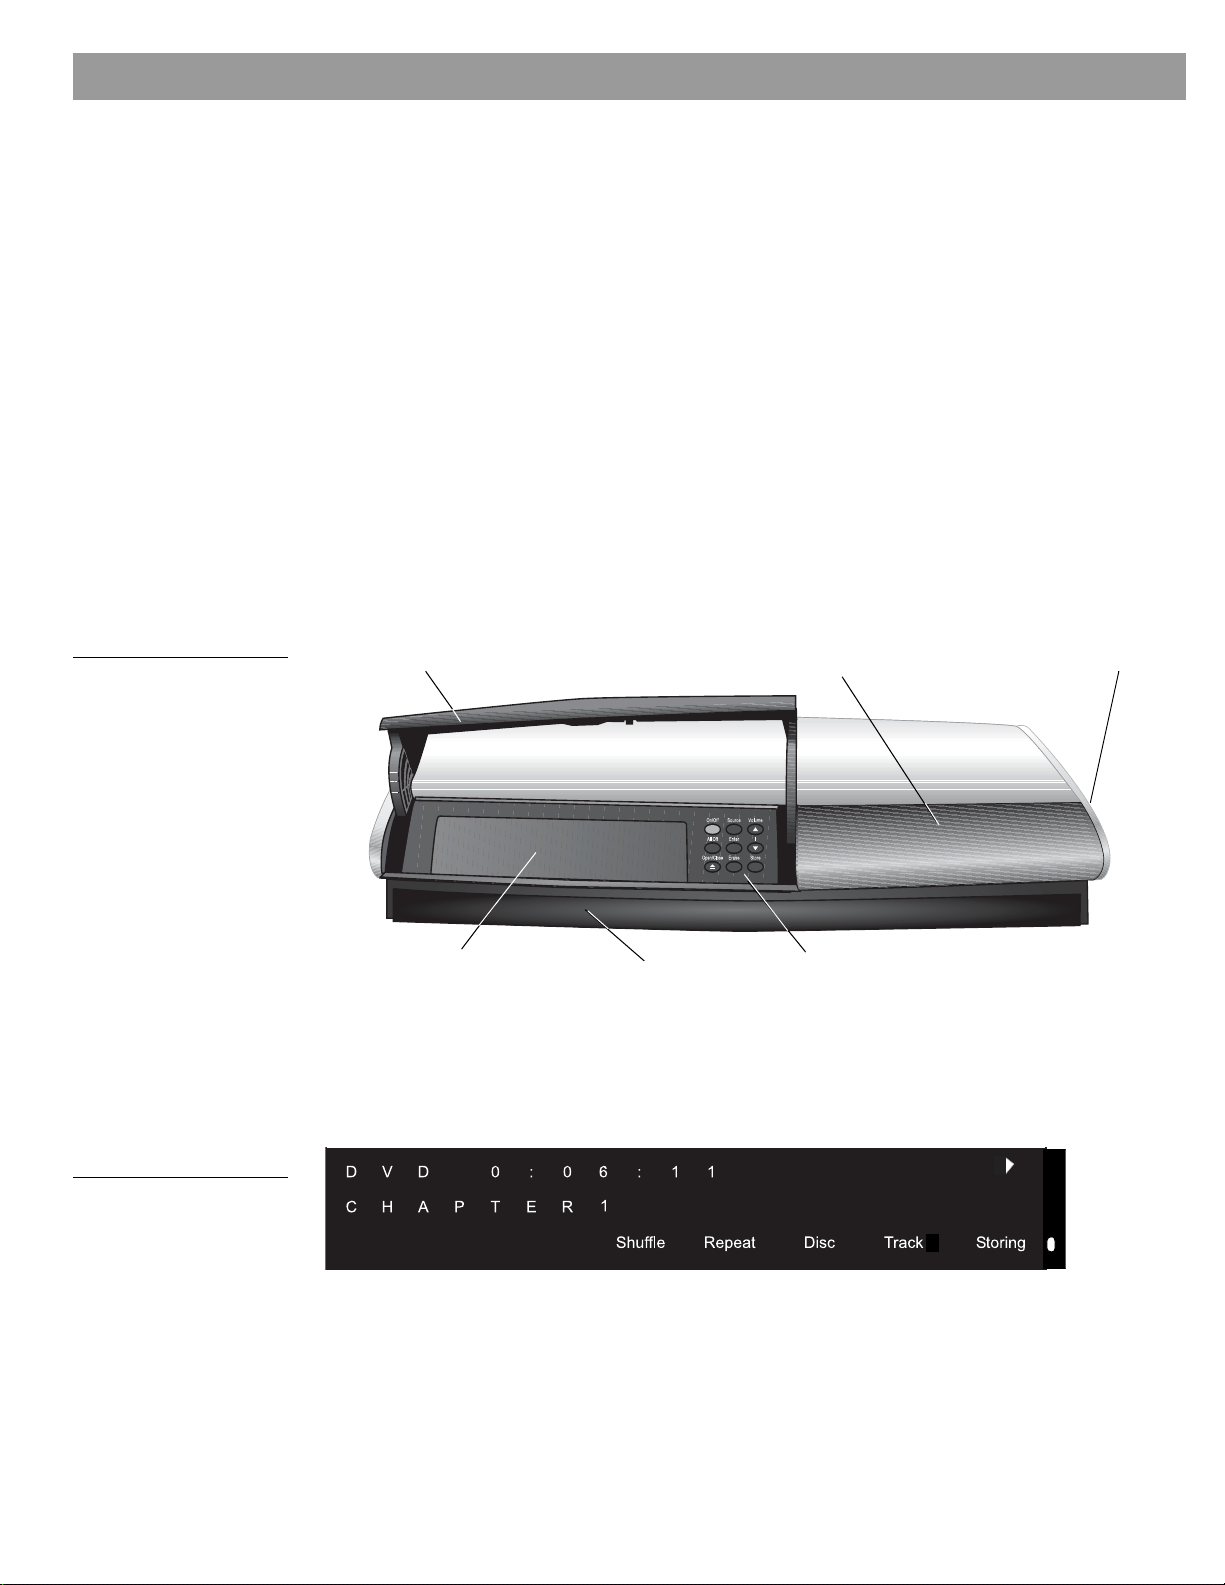
Figure 1
Front view of the media
center
If the batte ries ar e fine an d the sugg estion s concerning “dead spots,” abov e d o no t work,
you may need an an te n na ex tender. To contact Bos e
®
customer serv ice to request o ne, re fer
to the address list included with the system.
The CD/DVD tray and system controls are located under the front panel door of the media
center. To the right of that is the display window (
Figure 1).
An IR signal emitter, located under the CD/DVD tray, enables you to control other components using the LIFESTYLE® remote. Avoid blocking that emitter , so its signal will have a clear
path to other compo nents or reflective surfa ces in the room.
Front panel door – lifts up
Display window
Headphone jac
®
Figure 2
Sample of information that
appears on th e med i a
center display
10
Disc tray
IR emitter
Controls
Display window
The media center display window indicates the state of the system, including what source is
playing, detai ls of that program, and what option, i f any, is selected (
When Settings menu items or messages appear in t he di splay, they may scroll to reveal infor mation that does not fit in the two lines available.
Figure 2).
Page 11
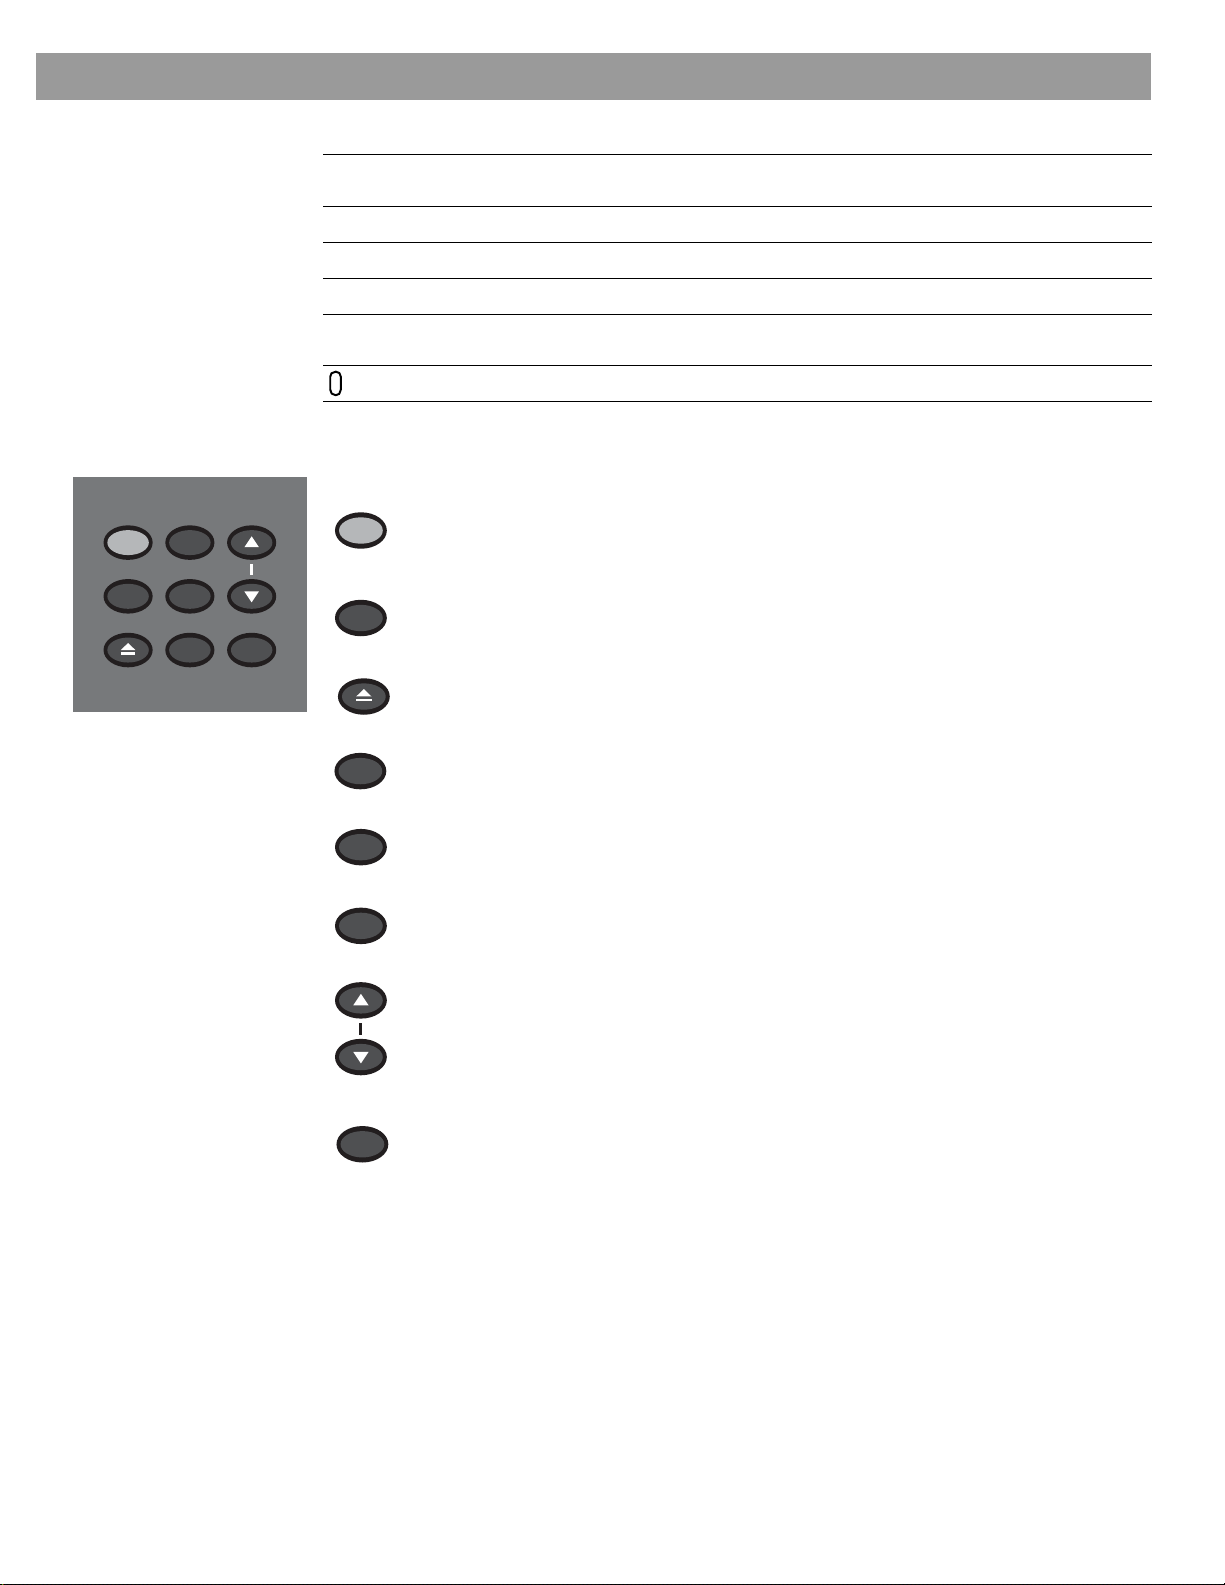
Light i nd icators
Shuffle
Shows when a CD, MP-3 disc, or contents of an MP-3 folder contents are playing in
random order.
Controls and Capabilities
On/Off Source Volume
All Off
Open/Close
Enter
Erase
Store
Repeat
Disc
Track
Storing
Shows when the track or disc playing is set to repeat.
Shows when a disc in the CD/DVD tray is playing.
Shows when a track is playing.
Shows when CD tracks are being copied to the harddisk on a LIFESTYLE® 38 or 48
systems only.
Lights briefly when a remote control command is received.
Controls
The nine control buttons work as described below.
On/Off
All Off
Open/Close
Source
Tur ns the system on or off in the main room only. Selects the source
last used when it turns the system on.
Tur ns off the system and all connected speakers (in all rooms).
Opens/clo s es the d is c tray.
Steps through the available source selections.
Enter
Erase
Volume
Store
Begins DVD pla y when tha t optio n ap p ear s se lected on screen.
Works with the Store button to scan through the system settings
options on the media center display.
Remove s a radio s tatio n p reset.
Raises the vol ume of t he syst em and unmutes the speaker s if they were
muted.
Lowers the volume of the system but does not unmute the source.
Copies the tracks from an audio CD to the intern al hard driv e o n the
LIFESTYLE
®
38 and 48 systems only.
When the system is off, r e sets the remote control house code.
11
Page 12

Controls and C apabilities
added pgs 13 – 15 for FedX
Compone nt or progressive scan: activating you r selection
If you have used a co m po nent video con nection betwe en the media center and th e TV, you
need to make the activation settings as explained below.
With the media center turned o ff, use the co ntrols on its front panel to foll ow thes e s tep s :
1. Press and hold the Store button on the media center.
2. While holding the Sto re butto n d own, press the Enter button.
Selection s wi ll ap p ear o n the media cente r dis p lay eac h time you pres s Enter.
Move up and down using the Volume up and down buttons on the media center console.
3. When Video appears as the selection on the display, release the Store and Enter buttons.
4. Use the Volume up and down buttons to scroll through the Video options.
5. Stop scrolling at the prope r sel ecti o n.
• For a component connection on ly, select:
-NTSC COMPONENT (in N. America)
-PAL COMPONENT (outside North America)
• For a co mponent conne ction and progressive scan, select NTSC PROGRESSIVE.
Note: The system does not support PAL Progressive video.
6. With the proper selection made, press Enter to confirm the selection and leave the Video
options.
The system is now ready to deliver the DVD video signal you prefer.
What makes a LIFESTY LE® 38 or 48 syste m uniquely yours
Your LIFESTYLE® 38 or 48 system includes a breakthrough new feature: the uMusic
intelligent playback system. Enabled thr ough p r oprietar y Bose® technology , it tra nsforms your
system into a virtual DJ, capable of playing a conti nuous st ream of the music you most enjoy.
Underlying th is new feature is the system capacity t o sto re all of the tra ck s from h undreds of
CDs in your personal collection. (The actual limit depends on the number and length of the
tracks on each CD.) Used as a personal music bank, this feature saves you the wear and tear
on discs and the time and effort of organizing and searching through them.
Far more than stor age, howev er, the uMusic intelli g ent pl ayback system als o provid es a
revolution a ry li st e n ing expe rience. With effortless access and the option for uninterrupted
play, you get to hear much more of your mu sic collection , even the tr ac ks y ou ’ve fo rgotten
you own. And, as if it is listen ing al on g with you, the system also learns to play more and
more of what you prefer...for custom -de s ign ed lis tening pleasure .
Getting your music into the system
Before you can enjoy these benefits, some preparation is required. It involves use of the
media center and a simple 3-step procedure for storing your music.
Note: Your system is designed to store the tracks of regular CDs only. It will not store MP3
tracks or th e c o ntents o f DV Ds. If an in a p propri ate disc type is in the CD/DVD tray whe n the
Store button is pressed, the media center displays an error message to indicate that storage is
not possible.
™
12
Page 13

Controls and Capabilities
With the system turned on or off, here’s how to begin:
1. Choose one or more CDs you would like to store.
2. Place the first CD into the disc tray of the media center and close the tray.
3. Press the button, located on the med ia center control pan el.
During this process, the media center displays the messa ge CD STORING and shows what
percentage of the task is completed. Whe n it reaches 100% , you can remove that dis c and
repeat steps 1-3 for each additional CD you want to store now.
Storing takes about 5 minutes per disc. For more detail, see “Scheduling time to store it all”
on page 14.
Store
To inter ru p t o r stop the stor ing activity at any time, simply open the disc tray. To resume
Store
storing that same disc, clo s e the tray and press the button again.
What you can listen to while storing CDs
• You can listen to the AM or FM radio tuner, other CD tracks that are already stored, or other
sources connected to the system (an anal og conn ect i on is re qu i red), like the TV.
• You cannot listen to the CD that is being stored, or watch a DVD using the media center
disc tray.
• As soon as the media center displays 100%, you can listen to the CD you have just stored,
(using the CD playe r, or Stored as the source), or you can replace that CD with a DVD and
watch a v ideo.
• If your setup includes a Bose® link network, you can continue to listen to the system in
other rooms, too.
• Any digital per for mance in oth er room s may be in terr up t ed . This is a temporary co nd itio n ,
imposed only while the dig ita l proc es s ing cap abilities of the s y st em are fully eng aged in
storing. Bu t, if you have the source connected using bo th digital and analog cables, y ou
can still en jo y li ste n ing to it.
How the uMusic™ intelligent playback system works for you
The CDs in your collection are one expression of your taste in music. Which CDs you play on
a regular basis is another. And what music you like to hear when you are tired, exuberant,
reminiscent, social, or somb er is an oth er.
But making the selections that suit those preferences is no longer your job alone. Finding and
playing wh at you most want to h ear is jus t wh at the uMusic
™
system can do for you.
Using pr esets is very important
The uMusic system also provides you with 9 Presets, numbered 1 to 9, for your stored liste ning preferences.
Using one or more prese ts enables this inte llig e n t sys tem to distingu is h yo ur reac tio ns to
what it plays. You might choose a preset for:
• Different members of your family, different roommate s, different gener ations. Besides its
number, you can assign a name to each preset. The name appears on the media center dis
play whenever the numb er fo r that pres et is pressed.
• Different listeni n g time s: wakeup, befo re wor k , we ek ends, late night, etc. ( You might con-
sider them moods.)
13
-
Page 14

Controls and C apabilities
To se lect your personal preset:
1. Press the
2. P ress the nu m be r bu tton that represents your preset.
3. As you listen, do what you normally do:
• Skip anything you don’t want to hear right now.
• Repeat an y tra ck s yo u’d lik e to hear o ve r, etc.
• Or use the + and – buttons to rate tr ack s you react to strongl y.
Stored
button on the remote control.
Take advantage of the music databases inside
Though it stores the track s from your CD s, the system draws in for mation for each track from
internal mu sic databases . This da ta in c ludes the name and len g th o f ea ch tr ack , perfo rming
artist, style of music (genre), and other meaningful information that helps characterize music
you enjoy.
As a further benefit, Bose provides free update CDs to keep the music databases current. So
even your newest CD acquisitions will have this information available.
Note: Sending in your product registration card, included with the system, is very important if
you want to receive database updates. Be sure to fill out the card and return it to Bose.
Beyond just storing this data for your use, however, the system also allows you to edit it to
better reflect your as s o ciations with the mus ic. For ins tance, if the embe d ded data class ifie s
a track as “World” music, an d you co ns ider it part of your Latin collectio n, you can simply
change the genre of that track. For any CDs not covered by the database (created at home or
non-commercially produc ed ) , the sy st em allows you to ad d info r ma t ion ab o ut that mu s ic to
make sure it is fi led and displays as you like.
For details on what in f o rm ati o n can be added or changed and h ow to mak e th o se ch a n g es,
refer to
“Stored CD data opti ons” o n page 46.
Tips for getting the mos t enjoyment from stored tracks
• Begin storing you r favorite CDs first, for the bes t introducto ry tas te o f wha t the uMus ic™
system can do.
• It is not necessar y to s tore them alp habeti cally.
• Allow the syst em a li ttle learning time bef o re it make s the cho ice s yo u would make. But
don’t worry, this novice DJ is a fas t learner.
• If several family members stor e th eir CD tracks on the system , be sure each one has an
assigned preset and uses that preset when listening.
• It is not necessary to press the p osi tive o r nega tive r ati ng buttons mo re than on ce. One
press tells the syste m you feel strongly about a track.
Scheduling time to stor e it all
During the storing process, the system holding area may become temporarily full and no
mor e s torag e is possible for a whi le. As an indicator, the media cen ter displays t he message:
BUSY PROCESSING CDS.
If you turn the system of f, this pr oc essin g goes faster. If you choose to use the sys tem while it
is processing, the stor ing activity continu es but it takes a littl e lo ng er.
If your CD collection is extensive, it may take several sessions to store all the tracks. Consider the guidelines below for scheduling those sessions.
14
Page 15

Controls and Capabilities
How muc h time to allow for stor ing CDs
For copying 10 discs: 1 hour
(about 5 minutes per disc, with allowance to insert and eject each disc)
For system to complete the processing of 10 discs: 6 hours, while the system is turned off.
How many CDs you can store
Using a LIFESTYLE® 38 system: approximately 200 hours of music or well over 200 CDs
Using a LIFESTYLE® 48 system: approximately 350 hours of music pr well over 350 CDs
What to do with tracks you don’t like
The system s to res all v alid tracks from each CD. Ho wever, after it is stored, any track can be
deleted. You ca n do that in the System menu, und er Stored CDs.
Note: For information on how to use the System menu, refer to “Making system adjustments” on
page 38. For details o n how to elim in at e tr a cks, refer to “Stored CD data options” on page 46.
15
Page 16

System Perf ormance
Some product pointers to ensure sa tisfaction
To turn your system on:
•Press the
• Press the On/Off control on the media center. Or...
• Press the re m ote
This turns the system on and selects the source at the same time.
To use your system with the TV and other comp onent s, review the reminders below. They are
provided to help ensure that it all works together smoothly.
Note: For information on how to set the remote to operate other components, refer to “Using
your system remote with other components” on page 26.
On/Off
button on the remote control. O r...
CD/DVD, FM/AM, TV, CBL/SAT
, or
AUX
butto n .
To turn on other compon en ts
You nee d to:
1. Turn on the system.
2. Sele ct th e so u rce.
3. Turn the source on (if it is an exte rn a l co mp o nent).
You can use your LIFESTYLE® remote control to do all of that, once you have set it to operate
the TV and other co mp on e n ts.
To watch video
Your installation choices may r eq uire some activation setti n gs, as indicated below.
• Getting the image to the TV screen:
- Be sure to select the proper Video Input on your TV (consistent with the video input that
the med ia cent er connects to on t he back of the TV). U s e the
LIFESTYLE
• Using the component video connection option:
®
remote control (if the remote is alread y set to co ntrol the TV) .
TV Input
button on the
- If you have a comp o nent video conn ection betwee n the T V and t he me di a cen te r, be
sure to make that selection on the display of the media center. Until you do, you may
see no thing on your screen wh en you select DV D as the sou rce.
• Using the progressive scan capability of your TV:
- Make sure there is a component vide o con nection betwe en the T V and the media
center.
- Be sure to make the Progressive selection on the display of the media center. Until you
do, you may s ee no thing on your screen when you select DV D as th e source.
- For ot her vi de o co mp on ent s con n ect e d t o the med ia ce nt er, make su r e t he component
is also conne cted using a compo n e n t vide o ad ap te r.
Note: For information on selecting component video or progressive scan on the media center,
refer to “Component or progressive scan: activating your s el ection” on pag e 12.S
16
Page 17

To ad just what you see or hear
• For chan ges to a par ticular source:
System Perf ormance
FedX addition
- Press the
- To see your choices on the TV, be sure you have the TV on a n d i t s Video Input is set for
the med ia cent er.
- For details on the changes you can make, refer to “Making system adjustments” on
page 38.
• For changes to system operation:
- Press the
- Be sure you have the TV on and its Video Input is set for the media center.
- For details on the changes you can make, refer to “Making system adjustments” on
page 38.
Settings
menu button on the LIFESTY LE® remote contr o l.
System
button on the LIFEST Y LE® remote control.
To enjoy the rem ar kab le LIFESTYL E® 38 or 48 system features
You can use many features of your LIFESTYLE® system as soon as it is installed and the
setup is verified by the two discs that are included with it.
But the most innovative feature, the uMusic™ intelligen t pla y ba ck system, is dependent on
CD tracks that are st ored in the system. So you n eed to st ore at least one CD fi rst . To get the
most impact while listening to your stored music, you really need 20 or more discs stored.
Storing one disc is very simple:
• Place the firs t CD into th e disc tra y of the m ed ia center and close th e tray.
•Press the
Store
button, located on the media ce nt er co ntr ol pane l.
To store additional CDs, you may want some guidelines and more details. Refer to “Getting
your music into the system” on page 12.
To further understand your opt ions for identifyi n g and playing the tracks you st ore, be sure t o
“Take advantage of the music databases inside” on page 14.
read
17
Page 18
System Perf ormance
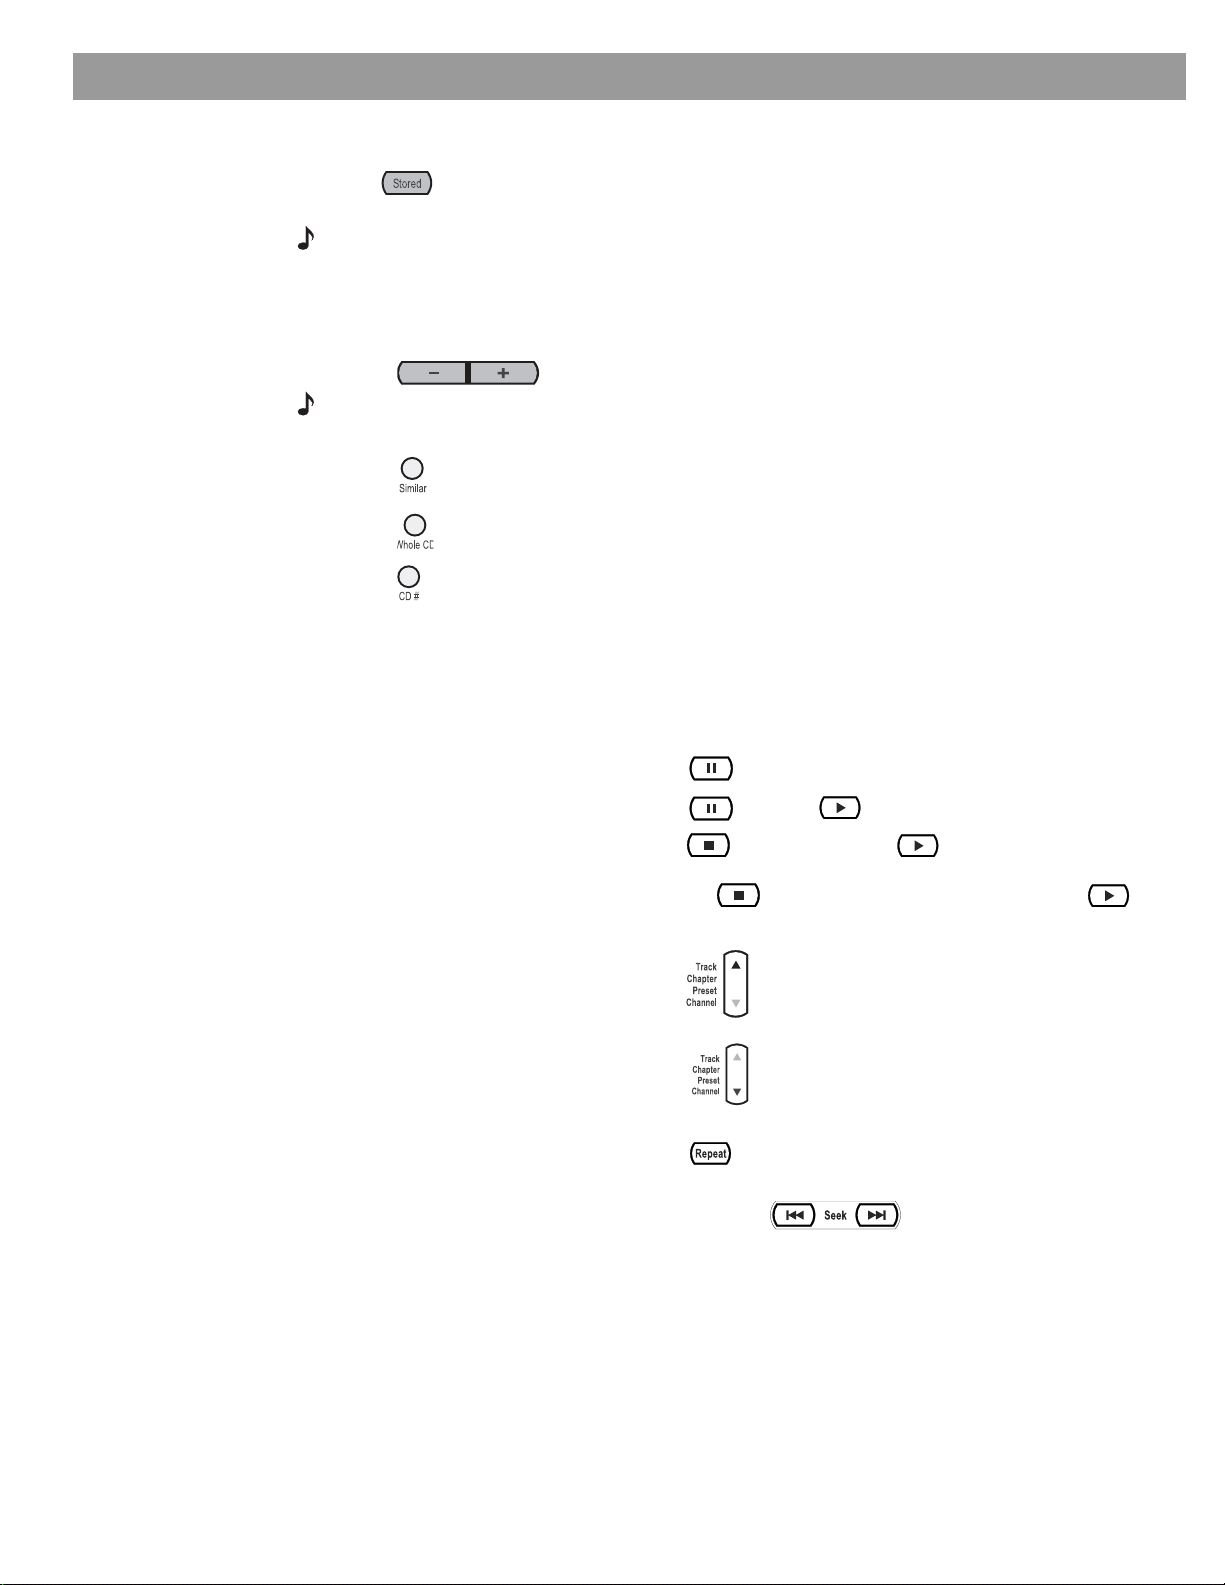
Liste ning to your stored musi c (available on LIFESTYL E
Added page for FedX
Press to select the stored music source. If the system is off, this will turn it on to the
uMusic™ system mode. It begins wit h the las t-u se d preset and play mode selec t ed .
Note: This feature is functional only after CDs have been stored on the system. For details on
how to store CDs, refer to“Gettin g yo ur music into the system” on pag e 12.
Now you can simply sit back and listen,or make other choice s:
• Press any
•Press to let the system know that you like or dislike the selection playing.
Note: Pressing – tells th e syst em to imme diat el y mov e on to th e n ext pi ece. Pressing + gives the
system a strong mess ag e that you like th e p i ece playi ng, and yo u w ant it to con tinue pl aying.
•Press to hear more music like the piece play ing.
•Press to hear the ot her tr ack s from the s am e C D as the tra ck th at is pla y in g.
•Press , followed by its reference number, to hear a specific CD.
If you have us ed the space provided ins id e the back cover of th is gui de to log the list of
CDs you have sto red, refer to that log to identi fy the numb er o f a CD you w ant to hear.
number
button, 1 to 9, to choose a different preset, as preferred.
Control options
®
38 and 48 systems, only)
If you want to: Do this:
Pause the s election playing… Press .
Resume play… Press again or .
Stop a selection… Press once. Then p ress to contin ue playi n g
from where the track stopped.
Or, press twice to st o p and reset. Then press
to restart at the beginnin g of the tr ack or whole CD.
Skip to ano t her se lec t ion … Press up.
Skip to a previous selection…
Repeat a selection… Press whil e the trac k o r whole CD y o u want to
Sear ch backward or f o rward… Press and hold the arrows, accor d ing to
Press down twice, or once only, if the track you
want to skip has barely begun to play.
repeat is playing.
the direction you want to search
18
Page 19
System Perf ormance
added this and next page for FedX
Search for a par ticular CD… Press and choose to se arch by:
Genre, Album, Artist...
as it applies to th e CD you wa n t to hear.
Hear music of one type or by
one performer…
Add a selection to the Playlist... Press and hold while the s election is pla y in g .
Hear your Playlist selections... Press .
Note: For informati o n on the quick adj ustments you ca n mak e to Stored CD set tings, refer
to“Stored CDs setting options” on page 35. I nst r uc ti ons on how to e nter t he menu t o ma ke th os e
changes ar e availabl e i n “How to see your options” on page 32.
Press and choose to se arch by:
Genre, Artist...
as it applies to th e type o f music
you want to hear.
Enjoy the added functionality provided by presets
Enjoying the broa d arr ay o f your pri va te music colle ctio n in powerful, lifel ike multi-sp eak er
performance is the primary benefit of your uMusic
But to get the very most from this s ophisticated, mul ti-f aceted feature, you nee d to set u p
and use the stored CD presets reserved just for that.
Why you should rely on them
A stored music preset is where your listening preferences get recorded over time. Consider
each one as a diffe rent “st atio n” that y o u t une to so the s y st em can “listen” and learn about
your taste.
™
intelligent playback system.
Figure 3
Preset 1 as indicated on the
music cen ter dis play
When you first select Stored as your source, the system automatical ly takes you to Preset 1
Figu re 3).
(
S T O R E D
2 : 0 6
1 P R E S E T CD : 1 2 5
If you have previously stored CDs, you can use this preset for now:
1. Press the
2. Check the media ce nter di splay to see what pl ay mode is selected.
• If it says UM US I C you are read y to lis ten and enjoy.
• If it says SIMILAR CD#, PLA YLIST, or WHOLE CD, press the
3. Just listen fo r a while.
Notice there’s no identifiable order to what plays: not by CDs that were stored first, nor by
common artist or genre. It’s more like a freewheeling stream of tracks you may or may not
have heard recently.
Stored
button on your LIFESTYLE® remote.
uMusic
button on the remote.
19
Page 20

System Perf ormance
4. While in Stored source, you can press a numbered button, from 2 to 9, to move to a dif-
ferent preset.
Note: You can also name each preset for the person using it. For details on on how to do that,
refer to “Stored CDs setting options” on page 35.
Respond actively to speed up the learning process
If you hear a piece you don’t like or are not in the mood for , you have seve ral choi ces:
• Skip the piec e by pressing the button.
The system moves to the next track, notes your negtive response, and gets r eady to learn
more.
• Press the – rating button.
The system logs your strongl y negative response and moves to another tr ack immediately.
If one track stands ou t as a favor ite:
• Press the + rating button.
The system logs your r espon se as posi tive an d contin ues playi ng the tra ck. You are lik ely to
hear that sam e tr ack again, sooner than som e o ther s.
Choose Playlist when you want a lineup of tracks
The system includes a ready-to-use playlist, for your selection of specific tracks to play on
command. The playlist can be useful in a variety of situations.
For examp le:
• During a dinner party wh en th e m u sic should set an amia bl e to n e.
• When an old frie nd and avi d blues devotee will be spending the weekend.
• For parent-mandated study sessions, to satisfy your teen’s required inspiration.
• To deliver a continuous stream of the show tunes sung only by your favorite tenor.
How to add music to the Playlist provided:
While listening to a track in Stored source, press and hold the
Locate selections using the Music Library, then press and hold the
to a Playlist one by o ne.
Or, you can press the Settings menu and compile the entire list without listening.
How to delete tracks from the Playlist:
Info to come. Not included for Home Eval.
Playlist
button on the remote.
Playlist
Use the Music Library to sea r ch, play, or browse your coll ection
Imagine: While using your LIFESTYLE® 38 or 48 system, you hear music — on FM, or perhaps
the score of a movie — and sud d enly y o u thin k of an ot her cu t you want to hear. You know
you own it, though the name eludes you. But it won’t stop running through your head.
This is a perfect s cen a r io for using the Music Librar y. If your system is tur ned on and the
Stored source is se lected
1. Press the
• The inital libra r y inf o rmation appea rs on the media center dis p la y (Figure 4).
Library
button on the remote to see yo ur cho ice s for locating a track.
button to add them
20
• If your TV is on an d the Vide o Inp ut t hat co nnects the medi a center to the TV is
selected , the lib r ary sc reen appears there (
• Genre is selected and ready to browse the genre options.
Figure 5).
Page 21

System Perf ormance
Figure 4
Music Libr ary as it appe ar s
on the m edia center displ ay
LIBRARY
1 PRESET
• Information on the display and the TV screen changes as you move around and
make selections.
GENRE:
ALL GENRES
Figure 5
Music Libr ary on screen
Figure 6
Track locat e d by s ea r chi ng
for by genre, th en artist
Selection
Items list
Summary
of
selections
2. P ress the r igh t arrow b utto n to brow se th e opti on s for the s ele cted item.
3. Press the down or up arrows to sel ect a d iffere nt item.
4. Watch the screen change with ea ch s ele ctio n ( Figure 6.
21
5. When you find what you want, you can use the remote control as follows:
•Press the
•Press the
•Press the
•Press
*This appears on the TV screen only.
Play
button to play your selection(s.
Info
button to see more data for the selection.*
System
button to s ee data fo r that selection and edit it as yo u like.*
Exit
to leave the Music Library.
Page 22

Playing a DVD
System Perf ormance
No need to search if you just want info
Whenever you want a reminder of what’s playing, simply press the
The media center display will show you what is playing, the time elapsed, and what volume it
is set for.
You can use this button whenever you are in the uM usic syste m, re gar dless of the pla y mode:
Whole CD, CD #, Play li s t, and S imi lar.
The symbo ls below represent buttons o n the LI FE ST Y LE® remote control unless otherwise
indicated.
1. Turn on your television.
2. Press to select the DVD p lay er. If the system is off, this will al so tu rn it on.
Open/Close
3. Lift up the media center front door and press on its control pane l.
4. Insert the DVD disc int o the tray (lab el side up).
Open/Close
5. Press again to close th e di sc tra y.
Info
button on the remote.
*For the TV to turn
off automatically, the
system must sense
6. Press to begin pl a y.
You may need to press the play button more than once. Most DVD videos present on-screen
selections before the movie begins.
Note: No t al l DVDs offer the same feat ures. For ex ample, you can choose to displ ay subtitles
while watching a movie onl y if that particular disc p r ovides subti tle information.
Control options
If you want to: Do this:
Pause a DVD mo v ie… Press .
Resume play… Press again or .
Stop a DVD mov ie… Press once . Then p ress to continue playing
from where the movie stopped.
Or, press twice to st o p and reset. Then press
to restart at the beginning of the DVD.
Skip to the next chapter… Press up.
Skip to the previous chapter…
Press down twice.
Repeat a chapte r… Press while the chapter you want to repeat plays.
Sear ch backward or f o rward… Press and hold or .
Note: For infor mation on the quick adjustments you can make to DVD settings refer to “Stored
CDs setting options” on page 35. Instructions on h ow to enter the menu to make those chan ges
are avai lable in “How to see your options” on page 32.
22
Page 23

System Perf ormance
Using parental controls
The parental control feature of your LIFESTYLE® system allows you to restrict access to DVD
movies with ratings you find inappropriate for members of your family.
Before you can use this feature, you choose a password and a level of restriction in the
System men u. To learn more about parent al con trol s, refe r to “To set the restriction l evel and
passwords” on page 45.
Note: Refer to“Troubleshooting” on page 53 if you have trouble with a password.
Loading and playin g a CD
The symbo ls below represent buttons o n the LI FE ST Y LE® remote control unless otherwise
indicated.
Press to select the CD player and begin playing the CD loaded in the disc tray . This
also turns the system on if it is off. Then, to load a disc:
1. Lift up the media center front door and press on its control panel.
2. Insert the audio CD into the tr ay.
3. Press to close the disc tr ay. Play begins aut om ati cally.
Open/Close
Open/Close
Control options
If you want to: Do this:
Pause a CD … Press .
Resume play of paused CD … Press or .
Stop a CD … Press . Press to restart at the beg inni ng
of the CD.
Go to next track … Press up.
Go to beginning of cur rent trac k … After track has played for several seconds, press
down.
Go to a previous tr ack … Press down:
once if no mus ic is playing.
twice if the music has beg u n.
Scan a CD ba ck ward/forward … Press and h old or .
On MP3 discs, this jumps to the beginni ng of a track.
23
Randomly play CD tracks … Press .
Cancel random play … Press again.
Repeat a track … Press .
Repeat a CD … Press twice.
Cancel repeat... Press three times.
Page 24

System Perf ormance
Using the radio
Note: For information on the quick adjustments you can make to CD settings, refer to
“CD setting options” on page 34. In s tr uctions on ho w to enter the menu to make thos e changes
are avai lable in “How to see your options” on page 32.
The symbo ls below represent buttons o n the LI FE ST Y LE® remote control.
Press to select the radio tuner and turn it on if the system was off. This tunes to the
FM or AM station that was last selected.
Changing stations
If you want to: Do this:
Switch betwee n FM and AM … Press .
Seek the next strong station … Press .
Manually tune to a station … Press .
Select a preset stat ion … Press or for the p reset number.
Note: For information on the quick adjustments you can make to the radio tuner settings, refer to
“Tuner setting options (FM or AM radio)” on page 34. Instructions on how to enter the menu to
make tho se chan g es a r e available in “How to see your options” on page 32.
Setting a radi o station preset
Using your LIFESTYLE® remote control, you can establish a preset for up to 20 AM and 20 FM
stations. This enables you to tune in a favorite station quickly.
For each stati on you want to assign to a prese t:
1. Tune to that station.
2. To assig n the st atio n a preset number, press and hold that numb er button.
• For numbers 1-9, press a single number and hold it.
• For numbers 10 through 20, press the first number, then quickly press the second number and hold it. For 20, be sure to hold the 0 button down.
The newly as s ign ed prese t n umber appears briefly on the med ia center display.
Note: Assigning a preset number to a station will replace any previous assignment of that preset.
To remove a radio station preset
You can use one of the three methods below.
• Press the preset numb er you want to remove and p ress on the media center.
• Tune to anoth er s tatio n. Th en pres s and hold that preset numbe r, which reassigns it to the
new station.
Erase
24
• Press the preset nu mb er you w ant to remov e . Th en mute the system and pres s an d ho ld
that preset num be r aga in.
Page 25

Using the headphones jack
For private listening, you can connect headphones to the jack that is located on the right side
of the media center as you face it.
Note: Connecting headphones causes all main room speakers to be muted.
Using the sleep timer
You can set the sleep timer to turn off the LIFESTYLE® system automati cally in 10 to 90 minutes, depending on the time you select. You can do this in the Settings menu for any source
that is selected.
Note: If you are unfamiliar with us e of th e Se ttings menu, ref e r to “ Making system adjustments”
on page 38
In the Settings menu on the media
center display or on the TV screen,
move around and make changes
by using the sele ctio n buttons:
To set the sleep timer
On both the medi a cen ter display and the T V o n-s creen me n u, the sa me actions appl y:
System Perf ormance
Figure 7
Sleep timer symbol in the
source Settings menu
1. Press the
2. Mo ve down to the Sleep Time r symb ol, the las t fea ture in the menu ( Figure 7).
Note: If you see a cont in uat ion a rro w at th e bot tom of t he men u, mo ve to that in or de r to se e the
other menu items that are not currently shown.
3. Move right into the options list and up to the time you want as the delay, from 10 to 90
minutes.
Note: Pressing the up arrow when you reach the 90 minute option turns the sleep timer off.
4. Press
5. Press
When the time you set elapses, t he system, the TV (if it is on*), and the sleep t imer will all t u rn
off automatically.
Settings
button on the LIFESTYLE® remote to enter the source Setting s menu.
Enter
to confirm you r selection.
Exit
or Settings on the LIFESTYLE® remote control to le av e the menu.
25
Page 26

Controiling External Sources
Using your system remote with other components
You can control most brands of external components, such as TVs, VCRs, and cable/satellite
boxes, using your LIFESTYLE
nents as the video tuner (channel selector) for all, to further simplify operation.
Your LIFESTYLE® system includes an infrared (IR) emitter that sends out signals from the front
of the music center to any component that your LIFESTYLE
allows you to tu rn on other sou rces in the roo m and make basic se lections from them ,
whether they are co nn ec ted to the media center or to the T V.
Note: I f a component is loc ated where it cann ot receive t hos e IR signals, yo u ca n use the
supplied IR emitter cable with that component. For tips on getting the IR signals where they need
to go, or using the optional emitter, see “Connecting the optional IR emitter cable” in your Ins tal
lation Guide.
®
remo te control. You can also des ignate one of those compo-
®
remote is set to control. This
For TV control
Note: For general guidelines on using the LIFESTYLE® Syst e m menu, refer to “Making system
adjustments” on page 38.
Use the TV remote to turn on the TV . Be sure to select the Video Input on the TV for the media
center.
Then, using the LIFESTYLE® remote control:
1. Press the TV button to select the TV source.
2. Press the
3. Move across the catego ries to
(Figure 8).
4. Press the
System
button. The Syste m menu will appe ar on the TV screen.
Down
arrow or
Remote Control
Enter
to move into that menu.
and a preview of those menu options
-
Figure 8
Preview of Remote features
in the System men u
Audi
Audio
Video
Video
Media
Media
Cen-
Remote
Remote
Control
Control
DVD
DVD
Lock
Lock
Select Remote Control to adjust th ese system o ptions:
Teach IR Commands:
Teach IR Commands
Receive IR Com-
Receive IR Com-
mands:
mands
TV Tuner
TV Tuner:
TV Brand
TV Brand:
TV Device Code
TV Device Code:
VCR Brand
VCR Brand:
Philco
CBL/SAT Device
Philex
CBL/SAT Brand
Philharmonic
CBL/SAT Device Code
TV Brand
Philips
TV Device Code
Phoenix
AUX Device
Phonola
AUX Brand
Select your TV brand.
navigate
navigate
select
select
26
Page 27

Contro ll in g Ex te r n al Sources
5. I dentify the TV brand :
•From the
• Move right into the list of brands and up or down to locate the brand for your TV.
Remote Control
options in the System menu, select TV Brand (Figure 9).
Figure 9
TV brand selection
•Press
Enter
Audio
to select that brand.
Video
Teach IR Commands:
Receive IR Co mmands:
TV Tuner:
TV Brand:
TV Device Code:
VCR Brand:
Select your TV brand.
Media
Cen-
Remote
Control
Philco
Philex
Philharmonic
Philips
Phoenix
Phonola
DVD
Lock
navigate
6. Choose the device code:
• In the menu options on the left, sel ect TV Devi ce Code.
• Move right to selec t the firs t co d e.
•Press the
If the TV turns off and on ag ain, you have chosen th e rig ht co d e.
If the TV does not turn off, select another code, and press the
times.*
• When you have chosen the right code, press the
• To have the TV come on auto matically, whenever you press a vid eo sourc e bu tto n , fol low Step 7 on page 28. To skip that s tep, i nstead, press
menu.
*Some manufacturers use a number of similar de vice codes. After selecti ng one, you may fi nd
you can tur n your T V on and o ff, but are una bl e to ch ang e channels or se lec t Pl ay or Pau s e.
In that case, select a different device code that provides more control.
TV On/Off
button on your LIFESTYLE® remote. Press that button ag ain.
select
Enter
button.
System
TV On/Off
button two more
or
Exit
to leave the System
27
Page 28

Controlling External Sources
7. S et the TV to tur n o n automatically*, as ne ed ed :
• Move up to the S y s tem menu catego r ies and ov er to
Video
.
Figure 10
Changi ng the TV Po wer
•From the
• Move right into the list of choices and up or down to select one of the two below:
-Automatic (for TV mod els that do not use a Europe an s ty le S CA RT connector))
-
Euro Connector (for T V mo d els that us e a S CA RT con nector)
•Press the
Audio
TV Power:
TV Power Status:
TV Aspect Ratio:
Widescreen DVDs:
Vide o Connector:
Video Black Level:
Video
options, select TV Power (Figure 10).
Enter
button.
Video
Media
Center
Manual
TV Not Detected
- -
- Component
Normal
Remote
Control
DVD
Lock
The Media Center can turn your TV on automatically whenever
you select a video source.
navigate
*For the Autom atic feature to work effec tiv ely with North Am er ic an TV mo d els , th e opti onal
TV sensor must be installed and positioned to detect if the TV is on or off. In Europe, a
SCART connector serves this purpose. If you do not use a SCART connector, or the TV sen
sor is not positioned properly, the automatic fe ature is not an o pti o n. In t hat cas e , lea v e th e
TV power set to Manual. That means you m us t t urn your TV on using its power button or with
the LIFESTYLE
8. Notice the TV Power Status:
• TV Detected means the installed TV senso r is working.
• TV Not Detected means the TV sensor (if installed) is not positioned properly, or a
SCART conn e cto r is ins talled.
•Press
Note: For information and on usi ng the TV senso r, refer to “Installing the TV on/ of f senso r” in
your Installation Guide.To check for positioning of the sensor, refer See “The m ed i a cente r” o n
page 10.
®
remote (when it is set to do so).
System
or
Exit
select
to leave the System menu.
-
28
Page 29

Contro ll in g Ex te r n al Sources
For cable/satellite control
While you can set the LIFESTYLE® remote to control both cable and satellite boxes, you must
designate one or the other, not both in the steps below.
The one conne cted to the CBL- S AT input on your media ce n ter is th e on e you s h ou ld de si g nate. So when you press the
ating that device.
You can designate the other under AUX Device. Do that only if that device is connected to the
AUX input on the me dia cente r, or the AUX input is not being used .
Note: For general guidelines on using the LIFESTYLE® System menu, refer to “ Making system
adjustments” on page 38.
Follow the pr oces s be lo w:
T urn on the cable or satellite box, whichever you are setting the remote to control. Turn on the
TV and make sure to select the Video Input o n the TV for the med ia center. Then, usi ng the
LIFESTYLE
®
remote control, press the
1. Identify the device:
•From the
Remote Control
•Move right and select either Cable or Satellite by pressing
2. I dentify the brand :
• In the menu options on the left, sel ect CBL/SAT Bra nd.
CBL-SAT
source button and the
CBL-SAT
source butto n and follow the steps bel o w:
On/Off
button below it, you are oper-
options in the System menu, select CBL/SAT Device.
Enter.
• Move to the right and up or down in the alphabetical list to locate your brand.
•Press
Enter
to select that brand.
3. Select the device co de :
• From the menu options on the left, select CBL/SA T Device Code.
• Move right to selec t the firs t co d e.
•Press the
CBL/SAT On/Off
button on your LIFESTYLE® remote. Press that button agai n.
If the Cable or Satellite box turn s off an d on ag ain, you have cho s en the r igh t co d e.
If it does not turn off, select another code, and press the
CBL/SAT On/Off
button two more
times*.
• When you have chosen the right code, press the
•Press the
When you complete these settings , you can use the
or Satellite source and other LIFESTYLE
System
or
Exit
button to leave the System menu.
®
remote buttons to oper ate it.
Enter
button.
CBL-SAT On/Off
button to turn on your Cable
*Some manufacturers use a number of similar de vice codes. After selecti ng one, you may fi nd
you can turn your Cable or Satellite box on and off, but are unable to change channels or
select Play o r Paus e . In that cas e, select a different dev ic e co de th at provi des more control.
29
Page 30

Controlling External Sources
For VCR (or DVR) control
The list of VCR bran d s and VC R co d es in cl ude selectio ns fo r DVRs as well. By following the
instructions bel ow, you can set the remote to control one o r the ot her, but not both.
If you have both a VC R an d a DV R, se tting y ou r remote to co nt rol the D VR w ill p rovi de mo re
control options . Whether yours is a stan d-a lo ne DVR or is couple d wi th the VC R or C ab le/
Satellite box makes no difference.
Note: For general guidelines on using the LIFESTYLE® System menu, refer to “ Making system
adjustments” on page 38.
Follow the pr oces s be lo w:
Tur n on your VCR or DVR. Turn on the TV and make sure to select the Video Input on the TV
for the media center. Then, using the LIFESTYLE
and follow the steps below.
1. I dentify the brand .
•From the
• Move right into the list of brands and up or down to locate your brand (of VCR or DVR).
Remote Control
®
remote control, press the
VCR
options in the System menu, select VCR Brand.
source button
•Press
Enter
to select that brand.
2. Choose a device cod e:
• In the menu options on the left, sel ect VCR Device Code.
• Move right to selec t the firs t co d e.
•Press the
VCR On/Off
button on your LIFESTYLE® remote. Press that button ag ai n .
If the VCR or DVR turns off and on again, you have chosen the right code.
If the VC R or DVR doe s not turn off and, select another code, and pre s s the
VCR On/Off
button two more times *.
• When you have chosen the right code, press the
•Press the
When you complete these settings and select
button and press
System
Play, Pause
or
Exit
button to leave the System menu.
VCR
, or
Stop
to control your VCR.
If you have made th e remo te s etti n gs for a DVR , you can al so u se
LIFESTYLE® remote. On some DVRs, pressing
Shuffle
Enter
button.
as the source, you can now use the
Seek
button on the
and
Repeat
buttons will allow you to skip
VCR On/Off
backward or forward quickly.
For AUX control
If you have a component connected to the AUX input on your media center, you can set your
LIFESTYLE
If you do not have a component connected to AUX, you can still control another device by
selecting it from th e list of AUX dev i ce ch o i ces : Cha n ger, Satellite, Cab le, DVR , TV o r VCR.
®
remote to control it, although o n an d off control is not an optio n.
30
To exercise this control, you must press the
AUX
source button first.
Note: For general guidelines on using the LIFESTYLE® System menu, refer to “ Making system
adjustments” on page 38.
*Some manufacturers use a number of similar de vice codes. After selecti ng one, you may fi nd
you can turn your VCR or DVR on and off, but are unable to change channels or select Play or
Paus e. In that case, s elect a different de v ice cod e that provides more co ntro l.
Page 31

Contro ll in g Ex te r n al Sources
Follow the pr oces s be lo w:
Tur n on your component. Turn on the TV and make sure to select the Video Input on the TV
for the media center. Then using the LIFESTYLE
and contin ue :
1. Identify the device:
•From the
• Move to the right an d up or dow n in the lis t to select a co mponent by p ressing Enter.
2. I dentify the brand :
• In the menu options on the left, sel ect AUX Brand.
• Move to the right and up or down in the alphabetical list to locate your brand.
Remote Control
options in the System menu, select AUX Devi ce.
®
remote control, press the
AUX
source button
•Press
3. Select the device co de :
• From the menu options on the left, select AUX Device Code.
• Move right to selec t the firs t co d e.
•Press the
If the component respon d s, press othe r buttons to make su re impor tan t functi o ns on the
componen t al so work.
If the compo nent d o es not respo nd , select a different code and tr y ag ain.
• When you h ave ch os en the best code fo r you r co mponent, press th e
•Press the
Enter
Play
Designa ting one video tuner
If the LIFESTYLE® remote controls sev eral video compon e n ts , yo u can ch oo s e o ne o f them
as primary ch annel selecto r. This gets your chann e l tu ning co mmands to you r cable box,
even when TV, VCR is sel ected. You don’t need to switch to CBL/S AT to change channels.
Note: For general guidelines on using the LIFESTYLE® System menu, refer to “ Making system
adjustments” on page 38.
Make that selection from the
select one of your co m po nents (
the menu.
Figure 11
Designatin g the TV as v ideo
tuner
Audio
Choose the one you want to control.
to select that brand.
or
Channel/Track up
System
or
Video
button on the LIFESTY LE® remote control
Exit
button to leave the System menu.
Remote Control
Media
ter
Cen
options in the System menu. In the TV Tuner list,
Figure 11). Then press the
Remote
t
rol
Con
DVD
Lock
System
Enter
button.
or
Exit
button to move out of
Teach IR Commands:
Receive IR Commands:
TV Tuner:
TV Brand:
navigate
select
TV
VCR
CBL/SAT
31
Page 32

Making adjustments to a particular source
While watching a video or liste ning to music on your system, you can make quick adjustments that will increase your enjoyment of the program. For example, you may want to hear
mor e o r fewer of the system speakers playing, or boost the center chan nel volume slig htly.
Changed for FedX
Figure 12
Setti ngs m enu as i t ap pear s
on the m edia center displ ay
For that purpose, each audio source you use with this system has its own Settings menu,
with features appropriate to that source. For video sources, the TV Settings menu applies.
With a little experience, moving about and selecting options in the Settings menu for each
source becomes second nature. Just try it and see.
How to see your options
To seethe settings, you must first select the source. Then, on the LIFESTYLE® remote control,
Settings
press the
You can view the Settings menu for each source on your TV screen or, for audio sources only,
on the display panel of your media center.
If your source is the FM r ad io tuner, the setting options app ea r on the m ed ia center displa y
Figu re 12). The choices scroll into view as you press the
(
button to enter the menu.
Changing Source Sett ings
down
button on the remote.
Figure 13
Setti ngs m enu as i t ap pear s
on the TV screen, with
identifying tags
To se e the Setti ng s menu o n the T V screen (Figure 13) as well, turn on the T V and s elect the
TV input for the med ia center. If the list of elements in a menu is lon ger th an can be seen, a
small down or up arrow indicates where to move to see the others.
Title bar – Sourc e
or AM
Menu Items – Features
of this s ource
Item name – Feature defined
Selection box –
Option chosen
FM
2
Navigation cue –
Which buttons to use
Description – What to do or to expect
Note: When the Settings menu appears on the TV screen, any change you make to settings will
be visible there, as well as on the media center display.
32
Page 33

Changing Source Settings
How to change the setti ngs
In the Settings menu on the media
center display or on the TV screen,
move around and make changes
by using the selection buttons shown:
On the display or the scre e n, the same act ions ap ply:
Figure 14
Changing the number of
speakers playing
•Press the
•Press
left, right, up
Enter
or the
or
down
arrows to get to the option you want.
left
arrow to confirm y o ur sel ection and move bac k to th e fea tu res column.
• Repeat those steps for each change you want to make.
•Press the
Exit
button on the remote control to leave the Settings menu.
The progression below shows how to change the number of speakers used in FM
(Figure 14 A, B & C). The FM Settings menu first appears on the TV screen with 5 speakers as
the default setting.
A.
Arrow
buttons move right and up or down to change the number of speakers playing.
B.
Ente
r or
left
arrow to confirm the n ew se tting and mo v e b ack to the lis t of Tuner attributes.
A.
FM
B.
FM
C.
FM
3
33
You can use the actions abov e to chang e bac k to the ori gin al settings, too. Do that if you do
not like the effect of a chan g e you hav e made, or accide n tal ly mad e a ch ange you did not
intend.
The original (default) settings for each source are shown as the first option for each feature on
the pages that follow.
Note: You ca n re s tore al l de faul t setti ngs by choosing Restore Settings in the Sys tems menu,
under Media Center. This reverses all changes you have made in both the Settings or System
menus. Instead of making this overall change, you can note the default setting listed on the
pages th at follow, then re-select that setting in any of the sources.
Page 34

Tuner setting options (FM or AM radio)
There are different settin g s m enus for AM and FM. You can adjust the sett ing s diffe rentl y for
each. Two of the attibutes below are avai lab le only when the tuner is set to FM.
Changing Source Sett ings
.
CD sett in g op t i o ns
FM
(or AM)
To ge t into the C D Setti ng s me nu, you mus t ha ve a CD disc in the CD/ D VD tr ay. Then select
the source.
Features
2-3-5 Speakers 5
Surround 0
Center Channel 0
Output Mode
(FM-only feature)
RDS Info
(FM-only feature
on some sys
tems)
Sleep TImer Off
Default Setting;
Options Effect of this Setting
-5 to +5
-5 to +5
Mono or Stereo
-
10-90 minutes
Determines the number of speakers playing.
2, 3
Establishes re lative surround soun d vol u me.
Establishes relative center volume.
Auto
Sets channel di stribution of radi o s i g n als.
Off OnDisplays station and program information
(as avail a b l e from R adio D ata System .)
Sets system to turn off when the selected
time elapses.
CD Features
2,3,5 speakers 5
Surround 0
Center Channel 0
Time 0:00
Audio Track DTS
Sleep Time r Off
Default Setting;
Options
2 3
-5 to +5
-5 to +5
_:__
Dolby Digital
10 - 90
Effect of this Setting
Determines the number of speakers playing.
Establish es r el a t ive surround sound volume.
Establishes relative center speaker volume.
Displays ela psed time.
Advances or reverses the film to the new time.
Play s audio tracks in the format specified.
Sets system to turn off when the selected
time elapses.
34
Page 35

Changing Source Settings
added this page for FedX
Stored CDs setting options
To ge t into the S to red CD Setting s me nu, you mus t have C D tracks stored in the system.
Then select S to red as th e sour ce. .
Stored
CDs
Features
uMusic Preset 1 (or last selected)
Play mode
(Indicator)
2-3-5 Speakers 0
Surround 0
Center Channel 0
Sleep Time r Off
Default Setting;
Options
1 – 9, or names
uMusic
Library, Similar,
CD#, Playlist,
Whole CD,
Shuffle, Repeat
-5 to +5
-5 to +5
-5 to +5
10 - 90
Effect of this Setting
Varies with selection of a di fferent prese t
number, using the remote control.
Adjusts automatically as play mode or preset
selections change.
Not adjustable in the Se tting s menu.
Determines the number of speakers playing.
Displays elapsed time.
Advances or reverses the film to the new
time.
Establishes re l ati ve center speaker volume.
Sets system to turn off when the selected
time elapses.
35
Page 36

DVD setting options
To get into the DVD settings men u, you must h a ve a D VD disc in the CD/DVD tray be fore you
select the sou rce.
Three attributes (shown in italic type b elo w ) app ear in the DVD menu on ly if you hav e set
Audio Processing to User Adjustable in the
DVD Features
Default Setting;
Options
Changing Source Sett ings
Audio
options of the System menu.
Effect of this Setti ng
2,3,5 speakers 5
2 3
Surround 0
-5 to +5
Center
Channel
Movie EQ On
Range
Compression
Mono
Decoding
Time 0:00
Title
Chapter
Audio Track DTS
Dolby Digital
0
-5 to +5
Off
On
Off
On
Off
_:__
_ of __
___
Determines the n umber of speak ers pl ay ing .
Establishes relative surround sound volume.
Establishes relative center speaker volume.
Adjusts ba ss-to -treble relation sh ip for proper
movie soundtrack reproduction.
Adjusts volume to maintain dialog intelligibility.
Keeps some sounds from overwhelming others.
Engages Videosta ge® 5 mono decoding circuitry
to process mono programs (one channel audio)
into 5-speaker sound.
Displays el ap se d tim e.
Advances or reverses the fil m to the new time.
Advan ces or reverses the fi lm to anothe r sectio n
of the DVD, according to the number set.
Advances or reverses the film to a new scene,
according to the n umb er set.
Plays audio tracks in the form a t sp ecified.
Subtitle
Language
Camera
Angle
A B Repeat
Sleep Timer Off
English
Other
1 of __ Deter mines the angl e us ed for a mov ie scene
A, B
10 - 90
Determines the language used for DVD subtitles
(of the lang uag es available on that d isc) .
(of the camera angles avail ab le o n th e d isc) .
Repeats a seg me nt o f the DVD after the start
and end poin ts are de fined. To begin:
1. Mo ve b ack ward or forward to the point in
the DVD where you wan t the se gment to
start.
2. Press Enter.
3. Mo ve to the poi nt whe re you want it to end .
4. Press Enter.
Repeats until you press the
Sets system to tur n off when the selected time
elapses.
Exit
or
Settings
butto n .
36
Page 37

Changing Source Settings
TV sett in g op t i o n s (fo r VCR, C BL -S AT, a n d AU X)
The setting s belo w affect p rogra ms on the TV, even when the source of the program is VCR ,
CBL/SAT or AUX. There are no separate sett ing men us for those sou rces.
Four attributes (shown in italic type below ) appear in the TV me nu o nly if you have set Audio
Processing
TV Features
to User Adjustable in the
Default Setting;
Video
Options
options of the System menu.
Effect of this Setting
2,3,5 speakers 5
2, 3
Surround 0
-5 to +5
Center Channel 0
-5 to +5
Movie EQ On
Off
Range
Compression
Mono Decoding On
Dolby Digital
1+1
On
Off
Off
2, Both
Controls the number of speak ers pl ay in g.
Soften or Focus the surround (rear) speakers
Soften or Focus the center speaker .
Adjusts bass-to-treble relationship for proper
movie soundtrack reproduction.
Adjusts volume by frequency band to moderate the diffe ren c e between dia lo g and special
effects. Keeps some sounds from overwhelm
ing others.
Engages Vid eos ta ge® 5 mono decoding circuitry wh en the program is mona ur a l. Pr ocesses mono TV shows and movies (one
channel programs) into five-speaker sound.
Mono decoding is off.
1
Plays audio content of selected soundtrack(s).
The content of the second soundtrack may be
a second language, for example.
-
37
Sleep Timer Off
10 - 90
Sets system to turn off when the selecte d time
elapses.
Page 38

Making syste m adj us tme nt s
Adjustmen ts to system properties are ones y ou typically make onl y once or not at all. If your
system ope rates as you want it to, there may be no ne ed for any changes. In som e cases,
last sentence
FedX change
however, changes are required to make the sy st e m fu ll y compatible with the ins tallation
options you hav e cho s en. M ak ing y ou r remote control other comp o nents is one examp le .
How to see the System menu
The System me n u ap pe ar s on the TV scre en o nly, not on the media center display. To see
the menu, you must have the TV turne d on and the Video inp ut o n the TV s et for the med ia
center.
Using System Menus
Figure 15
System menu and preview
of the audio fe atur e
Then, press the
System
button on the LIFESTYLE® remote control. The menu appears with
selected, sho wing a preview of the audio features .
Note: Ente ri n g the Syst em menu causes any DV D or VCD that is playin g to p ause.
Categories – Elements of the system
Media
Center
Remote
Control
Features – Submenus
under each category
Audio
Select Audio to adjust these system options:
Video
Bass Compensation
Treble Compensation
Audio Processing
input Leve l s
AdaptiQ
Expansion Prot ocol
Preview screen –
Inactive display
Navigation cue –
Which remote control buttons to use
navigate
select
Guide – Action to take
.
DVD
Lock
Audio
How to make changes
Making system adjustments in this menu is similar to changing the settings for a source.
• Move around and make choices b y using the selection butto ns s ho wn:
• Move right ac ross the categorie s to se e the p review o f the features.
•Press the
Note: When you move int o the displa y o f fe atures , i t changes from previe w to an activ e screen
with a sli ghtly different appearance.
•Press the
•Press
column.
• Repeat thos e steps for each cha ng e y ou want to ma ke.
•Press
down
arrow or
left, right, up
Enter
or the
Exit
to leave the Settings menu.
Enter
button to select
or
down
arrows to get to the option you wa nt.
left
arrow button to con firm your selectio n and mo v e b ack to the features
Audio
for change s.
38
Page 39

Using Syste m Menu s
Audi o op t i on s
Press the
System
button on the LIFESTYLE® remote control. Move right to see a preview of
audio features. Press the
Figure 16
Audio preview
Audio
Select Audio to adjust these system options
Bass Compensation
Treble Compensation
Audio Processing
input Levels
AdaptiQ
Expansion Protoco l
Video
Media
Center
selectnavigate
Note: Listening to an audio source while you make these adjustments can be helpful. Some
changes will be immedi ately notic eable and therefore useful in fine tun i ng your selections.
Default Settings;
Active Display Item
Options
Bass Compe n sat ion 0
–14 to +14
(–9 to +6)
Enter
button to move into an active displ ay of submenus.
Remote
Control
DVD
Lock
Effect of this Setti ng
Normal low-frequency reproduction
Decreased (–) or incr eased (+) low-frequency reproducti on
Range available following ADAPTiQ system calibration.
Treble Compensation 0
–14 to +14:
(–9 to +6)
Audi o Proces sing
(Movie EQ, Range, Compression,
Automatic
User A d justable
Mono Decoding)
TV Analo g In pu t L e vel
TV Digital Input Level
Normal
–6, –3, +3, +6
VCR Analog Input Level
VCR Digital Input Level
CBL/SAT Analog Input Level
CBL/SAT Digital Input Level
AUX Anal og Input L e v e l
AUX Digital Input Level
Normal high-frequency reproduction
Decreased (–) or increas ed ( + ) high-frequency reprodu ctio n
Range available following ADAPTiQ system calibration.
Standard Bose® processing applied
Processing options available in Source Settings me nus
Standard signal level (loudness)
Decreases or increases signal level
(adjustable to m atch the levels of other comp o nents)
Note: You may want to adjust the inputs of ex ternal components
so they match the system’s internal FM and CD levels.
39
Page 40

Active Display Item
Default Settings;
Options
Using Syst e m Menu s
Effect of this Setti ng
ADAPTiQ Off
On
Erase
Expansion protocol
Change th is only if instructed in
the owner’s guide supplied with
your Bose
®
link remote control.
Bose link
Legacy
*The Off option for ADA PTiQ syste m is not a reversible selection.
To restore the ADAPTiQ system adjustments requires re-use of the Setup disc 2 and the
ADAPTiQ headset su ppli ed with the system. For informa tion on how to u se this pr oce ss, r efer
to “Finishing the in st al lation” in your L IFE S T YL E
This advanced feature of t he LIFESTYLE® system makes adjustments to the audio
processing to compensate for the furnishings, the speaker placement, and listening position
to provide the most id ea l sou nd in y ou r room .
No ADAPTiQ® audio calibration performed.
Uses ADAPTiQ system adjustments established using Disc 2.
Eliminates the ADAPTiQ syst e m adjustm ent s* when this selec-
tion is follow ed, within 5 seco nd s , by a press of the
Erase
button
on the media center controls.
Communicates only with Bose® link networked products.
Communicates only with older Bose products.
®
Installation Guide.
40
Page 41

Using Syste m Menu s
Video optio ns
Press the
System
button on the LIFESTYLE® remote control. Move right to see a preview of
video features. Press the
Figure 17
Video previ ew
Audio
Select Video to adjust these system options
TV Power
TV Power Status
TV Aspect Ratio
Widescreen DVDs
Video
Media
Center
selectnavigate
Default Settings;
Active Display Item
Options Effect of this Setting
TV Power Automatic
Manual
Euro
Enter
button to move into an active display of submenus.
Important No te:
DO NOT change settings for Compo-
Remote
Control
DVD
Lock
nent video or Progressive scan in the
System menu. Doing so can cause
your TV screen to go blank, making
Video Connector
Video Black Level
Video Format
Progressive Scan
completion of the process difficult.
Instead refer to “Compo nen t or pro-
gressive scan: activating your selection” on page 12.
TV turns on au tomaticall y wh en a v ide o sourc e is sel ect ed.*
TV does not come on automatical ly.
TV response to SCART connector input.
TV Power Status
(not a setting)
TV Not Detected
TV On
TV Aspect Ratio Normal
Widescreen
Widescreen DVDs Modified
Unmodified
Video Conn e c to r
(See Important Note above.)
Composite, S-VIDEO
Component
Video Black Level Normal
Extended
Video Forma t NTSC
PAL
Progressive Scan
OffOnScreen image repaints in standard style.
(See Important Note above.)
*With most TV mo d el s , the T V sen s or mus t be installed an d pos it io ned to detect if the TV is
on or off. In Europe, a SCART connector c o mmunic ate s with t he TV. If your system setup is
different from either of these, the automatic feature is not an option.
Note: For information and on usi ng the TV senso r, refer to “Installing the TV on/ of f senso r” in
your Installation Guide.
Indicates: TV Sens or not insta lled or not positioned cor rectly.
Indicates: TV Se n so r installed and fun c tio n ing properly.
4:3 ratio screen display.
16:9 ratio widescreen disp la y.
DVD video reformats , as need ed , to fit a 4 :3 TV screen.
DVD video does not refo rmat automatica lly.
System works with composit e and/or S- v ideo TV co nnection.
System works with component TV connection.
Screen black level generally appropriate for TVs.
Reduces screen black level, appropriate for certain TVs.
Correct for NTSC (US standard) monitors.
Correct for PAL (European standard) monitors.
Scr een image repaints in advance d s tyle (if available on the TV).
41
Page 42

Media center options
Using Syst e m Menu s
Press the
System
button on the LIFESTYLE® remote control. Move right to see a preview of
media center features. Press the
Figure 18
Media Center preview
Audio
Select Media Center to adjust these system options
Display Brightness
Display Language
Optical Source
Digital Audio Format Widescreen DVDs
T uner Spacing
Restore Settings
Video
navigate
Default Settings;
Active Display Item
Options
Display Brightness 4
1 to 7
Displ a y Langua ge English
Dansk, Deutsch,
Espanol, Francais,
Italiano, Nederlands,
Svenska
Enter
button to move into an active display of submenus.
Media
Center
select
Remote
Control
DVD
Lock
Effect of this Setting
Media cen ter disp lay lights with a mid -r a n g e brig htness.
Darkens or li g htens t h e media center di s play (7 = bright es t).
On-screen d ispl ay men us appear in the sel ected language.
Optical Source None
TV, VCR, CBL/SA T, AUX
Digital Audio Format Original
No digital signal received via optical cable.
Digital signal received via optical cable for selected source.
No processing applied for signals sent to rear panel digital audio
jacks.
PCM
Increases digital audio compatibility with other devices.
Tuner Spacing US, European Channel spaci ng fo r AM/F M r ad io statio n s s et to selected region
standard.
Restore Settin gs No
User settings, if any, modify system operation.
Yes
Overwrites user settings and adjustments with the original settings
establish ed at the factory.
42
Page 43

Using Syste m Menu s
Remote control options
Press the
remote control. Press th e
System
button on the LIFESTYLE® remote control. Move right to see a preview of
Enter
button to move into an active display of subm enus.
Figure 19
Remote Control preview
Audio
Select Remote Control to adjust these system
T e ach /R ece ive
IR Commands
Display Language
TV Tuner
TV Brand
TV Device Cod e
VCR Brand
VCR D evice C ode
Video
Media
Remote
Center
Control
CBL/SA T Device
CBL/SA T Brand
CBL/SAT Device Code
AUX Device
V CBL/AUX Brand
AUX Device C ode
selectnavigate
DVD
Lock
Default Settings;
Active Display Item
Options Effect of this Setting
Teach IR Commands OffOnSystem does no t se nd out IR comma nds fo r use by ano th e r remo te.
System se nd s ou t IR co mmands, in respon se to wh e n th e LIFE S T Y LE®
remote RF signals, to teach another remote to operate the system.
Receive IR Commands OffOnSystem does no t accept IR comm and s from anot he r remote .
System receives IR commands from another remote that has been taught
to operate the system.
TV Tuner CBL/SAT
Selected device serves as channel tuner for TV and other video devices.
TV, VCR
TV Brand Brand name Identifies the TV brand for the LIFESTYLE® remote control to operate.
TV Device Code Code number Identifies the IR code for the sy ste m to se nd to the TV.
VCR Bra nd Brand name Identifies the VCR or DVR brand for the remote.
VCR Device Code Code number Identi fie s the IR code for the s y stem to se nd to the VCR .
CBL/SAT Device Cable
Identifies which of two devices for LIFESTYLE® remote control to operate.
Satellite
CBL/SAT Brand Brand nam e Identifies the cable or satellite brand for the remote co ntrol .
CBL/SAT Device Code Code number Identifie s the IR code fo r the s yste m to se nd to the ca bl e or s ate llite box.
AUX Devi c e Changer
Identifie s w hich ty p e o f de vi ce for LI FE S TY LE® remote to operate.
Satellite, Cab le,
DVR, TV, VCR
AUX Bran d Brand name Ide ntifi es the AUX device brand for the remote.
AUX Device Code Code number Identi fie s the IR code fo r the s yste m to send to the AUX d ev ic e.
43
Page 44

DVD lock options
Using Syst e m Menu s
Press the
Lock features. Press the
System
button on the LIFESTYLE® remote control. Move right to see a preview of DVD
Enter
button to move into an active display of submenus.
Figure 20
DVD Lock M e nu
Media
Remote
Control
Audio
Select Remote Control to adjust these system
Create/Change Password
Confirm Pa ssw ord
Lock Unrated Discs
Lock Discs R ated A bo ve
navigate
Video
Center
select
DVD
Lock
Default Setting;
Active Display Item
Options Effect of this Setting
Change Password _ _ _ _ Establishes a new four-number code to restrict access to movies
with certain r atings.
Create Password
(appea r s only if n o
_ _ _ _ Establishes a four-number code to restrict access to movies with
certain ratings.
password has been set)
Confirm Password _ _ _ _ Re-enter the four-number password.
Lock Unrated Discs Off
No restriction ap pl ies to unra ted DVD movies.
On
Restrict s view ing access to unra ted titles when passw o rd is set.
Lock Disc s R a ted Above 1 to 8 P re ve nts vi ewi n g of discs ab o ve th e selected numb er when a
password is created.
Applying parental control
The parental control feature of the LIFESTYLE® system lets you r est rict v iewing of D VD videos
with certain ratings. To activate this feature, you need to set a level of restriction and establish
a password in the DVD Lock section of the System menu.
Your password will prevent unauthorized viewing of DVD videos that have a higher rating than
your restriction level. There are 8 levels to choose from, matched to movie ratings set by the
Motion Picture Association of America (MPAA), on the next page.
44
Page 45

Using Syste m Menu s
Parental
Control
Setting
8 None
7 NC-17 Adult aud iences
6 R Mature audie nces
5 Mature teenage au d ie n ce s
4 PG-13 Teenage audiences
3 PG Mature young audiences
2 Most audien ces
1 G General
For ex ample, b y choosing a Parental Co ntro l Setting of 4, yo u rest r ict acce ss to videos
rated above PG -13. Videos with ratings ab o v e that may be viewed onl y after en te r ing the
password.
Your password also prevents others from changing the parental control setting without
permission.
To set the restriction level and passwords
With the TV turned on, select the proper TV video input for the media center.
Press the
MPAA
Rating
System
button on the LIFESTYLE® remote control.
Audience
Restriction
When the Syst em menu appears on the TV sc reen:
1. Mov e right to
2. Press the
looks different from the p revie w s cree n.
3. Use the
blanks.
4. Press
5. Enter the same four dig its in the new blanks and pres s
6. Sele ct Lock Discs Rated Above.
7. Move right and up or dow n to se le ct th e restri ctio n level you want .
8. Press
Enter
Enter
DVD Lock
Down
arrow or
number
buttons on your LIFESTYLE® remote to enter four digits into the password
to register your choi ce.
or the
for a preview of the selections (Figure 20 on page 44).
Enter
or button to move into an active display of submenus, which
Enter
to register the m.
left
arrow to confirm your selecti on and move out of the selec tion li st .
45
Page 46

Using Syst e m Menu s
Stored CD dat a options
Press the
Stored CD features. Press the
Note: This choice i s available fro m the System men u o nly when music f r om at least one CD has
been stored in the system. For information on storing your music, refer to “Getting your music
into the sy s te m” on pag e 12.
Figure 21
Stored CD preview
Audio
CD #
CD Action
CD Playback
Genre
Album
Track
Track Action
Active displa y ite ms shown in light italic type, be lo w left, do not appear in every me nu.
System
Video
navigate
added pages 43-46 for FedX
button on the LIFESTYLE® remote control. Move right to see a preview of
Enter
button to move into an active disp la y of submenus.
Media
Center
Stored
select
CDs
Remote
Control
DVD
Lock
Active Displa y
Item
CD#
Number 1 or selected CD number Shows the settings for the CD with that number in the system.
Indicator only
CD Action Reload C D information
Default Settings;
Options
Delete CD
Effect of this Setting
Changes wh en the C D s election chang es ; cannot be edite d.
Replaces us er ed its with database in for mation.
Requires confirmation. Then removes all information related to
this CD and displays infor m atio n fo r an ot her CD#.
CD Playback Automatic
Tracks play in o rder, randomly, or individually, as determined by
the style of play selected (e.g. Shuffle, uMusic, Wh o le CD) .
Link all tracks
Don’t link all tracks
Genre Rock/Pop, Classical, Jazz,
Electronica, World, Latin, Country,
Tracks play together and in order only.
Tracks never play in order and together .
Identifies the type of music on the CD
Reclassif ies th e CD for the ty pe of mus ic g enre se lect ed.
Rap, Vocal Music,
Gospel/R eligious , Bl ues ,
Soundtrack, Folk/Bluegrass,
New Age, Reggae, Easy Listening,
Children, Spoken/Comed y,
Holiday, Other, Unlabeled
Album no default; specific to the CD Sele ctio n of th is item br ing s up an edi tin g sc ree n .
Artist no default; specific to the CD
Selection o f this item br ing s up an editing sc ree n.
(Not shown if genre is Classical)
File Artist As no default; specific to the CD
(Not shown if genre is Classical)
Composer no default; specific to the CD
(Shown only if genre is Classical)
Selection o f this item br ing s up an editing sc ree n.
Editing will o v erwr ite artist-by -tr ac k data.
May reflect any edits made to artist.
Selection o f this item br ing s up an editing sc ree n
May require confirmation of genre
46
Page 47

Using Syste m Menu s
File composer As no default; specific to the CD
(Shown only if genre is Classical)
Selection o f this item br ing s up an editing sc ree n
Editing will o v erwr i t e va ried co mp o s er da ta
May require confirmation of genre
May reflect any edits made to compo ser
Performers no default; specific to the CD
(Shown only if genre is Classical)
Ensemble no default; specific to the CD
(Shown only if genre is Classical)
Conductor no default; specific to the CD
(Shown only if genre is Classical)
Selection o f this item br ing s up an editing sc ree n
May require confirmation of genre
Selection o f this item br ing s up an editing sc ree n
May require confirmation of genre
Selection o f this item br ing s up an editing sc ree n
May require confirmation of genre
Track no default; specific to the CD Selection of this items bring up an editing screen
Track Action Edit
Delete Track
May require pressing
Selection o f this item s br ing up an editing sc ree n
Requires confirmation. Then removes all information related to
Enter
to see the options
this track.
Using the Edit Screen
To see the Edit Screen, select one of the Active Display Items that allows editing. Album is the
Enter
button to make that selection.
Exit/Done
Figure 22
Edit Screen as i t first
appears
first such ite m in the lis t ab o v e. Press the
Text line
Alphabetic
screen
Other
character
screens
How to change the text
The Edit Screen ena bl es you to alter or replace the music data b as e tex t
provided by the system. That text appears at the top of the screen
.
You do no t nee d to mo ve into the tex t line to ma ke changes. Instead, you
can add to it or enter new text by selecting characters from the alphabetic,
numeric, or special character tables (Levels 1, 2 or 3 available at the left of
the screen).
47
Page 48

Using Syst e m Menu s
Use the remote control up,
select it. Each time you press
you are finished, move to the Done box at the top right and press
or the
Exit
button on the LIFESTYLE® remote control to leave the System menu.
To eliminate existing letters from the text line:
Letters disappear beginni ng at the far rig ht an d progressing to the lef t .
1. Mo ve dow n to the Eras e b ar.
2. Press
3. Press
To enter new text or add to existing text:
Letters appea r to the right o f ex is ting text.
1. Move to a character and press
2. Move the next character and press
To place a space between words:
Spaces appear to the r ight of the las t character in the text li ne.
1. Move to Space bar and p ress
2. Move to a character and press
To capitalize a letter:
The first letter of a new line of text is auto matically ca pi tali z ed .
1. Before typing the character, move to the Shift bar and pres s
2. Move to the character and pres s
3. Mo ve ba ck to the Shi ft bar an d press
Enter
Enter
capitalize.
to erase the last letter in the tex t line.
as often as needed to remove additional characters in that line.
down, left
Enter
and
right
arrows to get to a character and the
the new char acter selected app ea r s in the text line. When
Enter
to leave the Edit Screen
Enter
.
Enter
.
Enter
.
Enter
to begin the next word.
Enter
.
Enter
.
Enter
before selecting a le tter you do not want to
Enter
button to
To enter a number or symbol:
1. M o ve to the n umb er 2 at the lef t of the sc reen and press
2. Sele ct the numb er(s) you want in the same way you select chara cters.
3. M o ve to the n umb er 1 at the lef t of the sc reen and press
table.
To enter a non-English special character:
1. M o ve to the n umb er 3 at the lef t of the sc reen and press
2. Select the special ch a ra cte r (s) you w an t in th e s am e way you selec t othe r char ac ter s .
3. Mo v e to the numb er 1 at the lef t of the sc reen an d press Ente r to return to the alp hab et
table.
To save the text:
1. Mo ve to the Do ne b ar at the top righ t of the screen.
2. Press
To undo what you’ve just done:
To u nd o changes you hav e mad e to in for mation about a C D, sel ect CD Action from the
System men u. You can replace your changes with the orig inal database in for mation by
selecting
Enter
to confirm completion and leave the Edit Screen. Or , to leave the System menu
altogether, press the
Reload CD information.
Exit
button on the LIFESTYLE® remote cont rol.
Enter
.
Enter
to return to the alphabet
Enter
.
48
Page 49

Remote control care
Changing the ba tter ie s as needed is the only regula r maintenance required. Howev er, the
switches inside the remote battery case may be changed as needed, too. Additional remotes
for use in other rooms may need their switches changes, t oo. For tha t , re fer to
remote switch setting s” on page 51.
Replacing the remote control batteries
Replace all fo u r ba tter ie s wh en the remote control stop s oper ating or its rang e s eem s
reduced. Alkaline batterie s are recom mended.
1. S lid e o pe n the b attery co m pa rt ment on the back of the remote (Figu re 2 3).
2. Insert four AAA or IEC-LR3 1.5V batteries, or the equivalent, as shown. Match the + and
3. Slide the battery com p ar tme n t cov er ba ck into plac e.
Figure 23
Installing the remote
control batteri es
Reference
“Bose link
– symbols on the ba tter ie s w ith the + and – ma rkings ins id e the compartment.
AAA batteries (4)
+
+
+
+
Battery
compartment
Battery
compartment
cover
Changing house code s ettings
Each LIFESTYLE® remote control uses a house code that corresponds to the house code set
in t he media center, ena b ling the two to communicat e. If an o ther LIFESTYLE
creates a conflict with your system, you can easily set a new house code in your media center
and its remote control(s) with steps th at follow.
Using the remote control:
1. Open the remote control battery cover and locate the miniature switches (Figure 24 on
page 5 0 ).
2. Mov e one or more of switches 1, 2, 3, or 4 in the opposite direction from its current
setting. Us e a pap e r cl ip , ba ll p oi nt pe n , or sim ila r object.
Note: DO NOT change any other switch settings. Moving other switches may disable your
remote contro l.
3. Replace the battery cover.
®
system nearby
49
Page 50

Reference
123456789
Using the me di a center:
1. Lift the media center door and p ress the All Off button.
2. Press and hold the Store button. Y our current house code will appear in the media center
display wind o w in th e form of four rectangl es , w h ich re pres ent the positions of sw itches
1 through 4:
HOUSE CODE:
Switches 1 - 4 down = 0 0 0 0 (current house code)
3. While holding the Store button, press any button on the remote control.
The media center displays the n ew h ou s e code, which conf ir ms its recognition of the
new code:
NEW HOUSE CODE:
(Switch 1 up, 2 down, 3 up, and 4 down = 1 0 1 0 (new house code)
4. Release the Sto re butto n. Th e s y st em remains off.
5. If you have additional remote controls, change the switches to match those of the first
remote control by following steps 1 - 3 above. You do not need to repeat steps 4-8.
Note: To verify your system’s house code, press Store while the system is off. The display confirms the settings of switches 1-4.
Figure 24
Miniature house code
switches on the Main room
(A) remote
Switches (1-4)
As set at the factory:
all switches down.
123456789
Setting up a second room with sound
Your LIFESTYLE® DVD home entertainment system can direct sound from more than one
sound source (such as CD, AM/FM tuner, TAPE , or AUX) to more than one room at the same
time. That is the adv an t age o f two separate program circu its, ca lled streams.
The first stream, wh ic h serves the Main room where the media ce nter is located, can also b e
selected in other rooms with speakers. For one or more rooms, you can choose another
stream from an entirely different source, for true independence.
Other switc hes
Switch 5 determines what “stream”
or program you hear.
For more information on streams,
refer to the next section on this
page.
Switches 6-9 represent the room
where the remote will be used.
In the main room, the remote is set
as Room A with all switches down.
For a B ose
®
link rem ote
in another room
Switches 1-4 need to match those
switch settings in your main remote.
Set switches 5-9 for the room where
you will use the Bose link remo te .
50
Capable of suppl ying u p to 15 r ooms with Bose® sound, one LIFESTYLE® system c a n re-style
your entire living space with music.
Page 51

Reference
Bose® link to assured compatibility
One option is using a Bose product you already own, if you want the sound in just one additional room.
For bigger plans, the Bose link network connects all the pieces. It offers a variety of Bose systems, powere d an d un p o we red sp eakers and am pl ifiers of consis tent quality fo r you r o th er
rooms. The proper cables and adapters are part of the network, too. And when you purchase
a Bose link remote control for each additional room, you get detailed instructions on using the
network.
A Bose link symbol on the ca rt on s for th es e p rodu cts si mp lifies your sele ctio ns.
Following the in s tr ucti o n s prov id ed , yo u can ea si ly set up on e grou p of roo ms that s hare the
Main room program stream, and another room or group of rooms using the alternate
stream.Then simply set the switches in each Bose link remote and you can be confident of its
accuracy.
For more inform atio n on your cho i ces , or to purch ase additiona l equ ip ment, contact yo u r
local Bose dealer. Or, to reach Bose directly, refer to the address list included with
the system.
Bose link remote switch settings
These settings are for use only with remote controls
that have switches inside the battery compartment.*
Make sure the house code switches
(1, 2, 3, and 4) match those on your main remote.
For switch 5, determine if you want the room grouped
with the main room (A), so it rece ives the same program
heard there.
• If you do not change switch 5, the room will receive
the same progr am stream as is heard in the ma in
room (A).
• If you set switch 5 up ( ), the room will receive a
different stream than the main room (A).
For
Room
B
C
D
E
F
G
H
I
J
K
L
M
N
O
Switches
6789
*For Bose lin k remo tes that d o not h ave s witches 5-9 in the bat t ery co mp artment, there is a
Settings menu on the di splay screen of that remote where room settings are ma de .
51
Page 52

Reference
Taking care of your LIFESTYLE® system
Caring for your system may include:
• Cleaning the sys tem’s enclosures
• Cleaning your co mp a ct di sc s and DV Ds
• Replacing th e remo te co ntr ol batteries
Cleaning the media center
• Use only a soft, dry cloth to clean the outside of the media center.
• Do not use any sol ve nts , ch emi cals, or cleanin g solutions con tai n ing alc ohol, ammoni a, or
abrasives.
• Do not allo w liq u id s to sp ill in to any o pe n ing s .
• Do not use any sprays near the system.
Cleaning the speakers
• Clean the surfa ce of your speaker s with a soft, damp clo th. You can use an ammonia-f ree
window cl eaner on a soft cloth to mai n tai n th e finish.
• Do not use any sprays near the system. Do not use any solvents, chemicals, or cleaning
solu tions containing alcohol, ammonia, or abrasives.
Figure 25
Handling and
cleaning a disc
• Do not allo w liq u id s to sp ill in to any o pe n ing s .
• The speaker grille panels require no special care, although you may vacuum them carefully,
if necessary.
Cleaning discs
• Handle discs by their edges to prevent fingerprints and scratches (Figure 25).
• To remove stains o r fin ger p r ints from the surface of a di sc, us e a s o ft, lint-free, dry cloth.
Wipe in straig ht mov ements from the center of the disc to the o uts id e. Do not use an y
chemica l produ ct s; they can d amage the disc.
• Do not write on or attach labels to the s urface of the disc.
• To minimize exposure to dust and dirt, repla c e di scs in their cases after use. Store each
disc in its case , o ut of direct su nlig ht, high temp eratu res , and h umi di t y.
52
Page 53

Troubleshooting
Problem What to do
Reference
System doesn’t
do anything
• Make sure the power connector is inserted securely into the media center, t he power cord
is inserted securely into the Acoustimass
are fully plugged into operating AC wall outlets.
• Be sure to press a source button (CD/DVD, AM/FM, etc.) on the LIFESTYLE®
remote control.
• Unplug the media cente r power supply for 60 seconds, then reconnect it.
This allows the unit to reset itself after a power surge or power interruption.
No sound • Increase t he volume.
• Check to see if MUTE is lit on the display. If it is, press the
to unmute the sound.
• Make sure that the power switch on the Acoustimass module is set to ON (I).
• Make sure that the audio input cable:
- connector is firmly seated in the media center Main Speaker jack
- multi-pin connector at the other end is firmly sea ted in the A co us timass modu le
AUDIO INPUT jack.
• Check connections between the cube speakers and the module.
• Turn the media center off for 60 seconds, then on again,
to restore communication between the media center and the speakers.
• Chec k the connect ions for any external componen ts. Make sure that you have pressed
the correct remote button for the source you want to hear.
• For CD or DVD play, be sure the disc is placed correctly, label-side up, in the disc tray.
• Connec t the FM and AM ant ennas.
• Make sure that the power switch on the Acoustimass module is set to ON (I).
No sound from
center speaker
• Make sure the center speaker cable is connected at both ends.
• Se lect 3- or 5-speaker mode.
®
module, and the power pack and power cord
Mute
button on the remote control
Too much sound
from center s pe ak er
No sound
from surround speakers
Surround sp eakers
are too loud
Remote control
behaves erratically
or it does not work
System turns on by i tself,
or behaves erratical ly
• Dec rease the Center Channel setting.
• Se lect 5-speaker mode.
• Increase the Surroun d setting for the source being played.
• Make sure the video sound source is stereo and surround-encoded,
and the component used (TV, VCR, DVR, etc.) is stereo.
• Decrease the Surround setting for the source being played.
• Ma ke sure that the left and right front speakers are connected to the front speaker jacks
(blue) and the left and right surround speakers are connected to the surround speaker
jacks (orange).
• Chec k batteries and their polarity (+ and –).
• Mo ve the remote (or the media center) a few feet to avoid an area of “dead spots”.
• Ma ke sure the power cable betwee n the media center and its power source is firmly
seated, uncoiled, and extended to its full length.
• Make sure the remote control and media center house codes match.
• Install a remote control extender.
• Change the house code setting to prevent signals from conflicting with another nearby
®
LIFESTYLE
system.
53
Page 54

Reference
Problem What to do
Radio does not work • Make sure antennas are connected properly.
• Mo ve AM antenna at least 20 inches (50 cm) from the media center.
• Adjust antenna position to improve reception.
• Ma ke sure the AM antenn a is in an upright position.
• Mo ve antenna s farther from media cent er, TV, or other electronic equipme nt.
• Se lect another station. You may be in an area of weak signal coverage for some stations.
The disc does not play • After pressing the CD/DVD button, wait a few seconds before pressing
• Make sure the disc is properly inserted (label side up).
• Ejec t the disc and try loading it again.
• The CD may be dirty. See “Cleaning discs” on page 52.
• Try another CD. The CD may be defective or not compatible. See “Wha t discs you can
play” on page 5.
FM sound is distorted • Adjust antenna position to reduce interference.
FM sound is noisy
in surround mod e
Sound is dist o r t ed • Ma ke sure speaker cab les are not damaged and the connec tions are secure.
No sound from
TV or CD/DVD or VCR
or AUX
LIFESTYLE® remote
does not co ntrol
your TV, VCR,
cable/satellite box,
or other external
component
• Weak FM stations will produce static in the surround speakers. Select the 2-speaker mode
in the Settings menu to minimize noise. See
page 34.
• Reduc e the output level from any external componen ts connected to the media center.
• Check the connections.
• Ma ke sure that component is turned on.
• Refer to the component owner’s manual.
• Ma ke sure correct codes are set.
See “For TV control” on page 26.
• Make sure that the front of the media center is not obstructed.
The IR emitter that sends commands to your external components is below the disc tray.
• If you still cannot control your external components successfully, you may need to connect
the external IR emitter, included with your system, to the IR EMITTER jack on the rear
panel of the media center. See “Connecting the optional IR emitter cable” in your
LIFESTYLE® system Installation Guide.
“Tuner setting options (FM or AM radio)” on
Play
.
Your TV turns
on and off unexp e ctedly
TV screen goes dark
or image flips repeated ly
after making a change
to a Video fea ture in
System settings
You forgot
your password
54
• Reposition the TV on/off sensor on the back of your TV. Or check the SCART connector is
you use one.
• Verify that the TV on/off sensor is working properly by choosing TV Power Status under
Video in the System menu.
• Use the media center to check the Video Format and Progressive Scan settings, following
instructio ns in
- Video Format should be set to NTSC (US standard) or PAL (European standard).
- Make sure the Progressive Scan setting is Off, unless you have used a component
video connection and progre s si ve sc an is a feature of the TV.
• En ter a the numbers 2673 as temporary password to access the parental controls. Then
create a new password.
“Component or progressive scan: activating your selection” on page 12.
Contacting customer service
For additional help in solving problems, contact Bose® customer se rvice. See the add ress
and phone number list included with your system.
Page 55

Limited warranty
Your LIFESTYLE® home theater system is covered by a transferable limited warranty.
See your product registration card for details. Please be sure to fill out the information section
on the card and mai l it to Bose.
Technical information
Media center power pack power rating
USA/Canada: 120V 0.55A 50/60 Hz 33VDC 1.1A
International: 220-240V 0.30A 50/60 Hz 33VDC 1.1A
Dual voltage: 115/230V 0.55A 50/60 Hz 33VDC 1.1A
Speaker system power rating
USA/Canada: 100-120V 50/60 Hz 350W
International: 220-240V 50/60 Hz 350W
Dual voltage: 100-120/220-2 40V 50/60 Hz 350W
Media center inputs
AUX: 2Vrms, maximum
CBL-SAT: 2Vrms, maximum
VCR: 2Vrms, maximum
TV: 2Vrms, maximum
DIGITAL: SPDIF (1 each for TV, VCR, TAPE, and AUX)
COMPO S IT E VI DE O: NTSC or PAL format 1V
S-VIDEO: Luminance 1V
Component video: NTSC or PAL 1V
OPTICAL INPUT: SPDIF digital, mapped to input
FM antenna: 75 Ω
AM antenna: 12µH
TV SENSOR: Scan frequency sensing
Chrominance 0.3V
p-p
with sync on Y
p-p
with sync 75 Ω
p-p
p-p
Reference
Media center outputs
SPEAKE R ZO N ES 1 and 2: Variable audio, use r sel ectable
AUDIO OUT: L and R: Fixed audio
DIGITAL AUDIO OUT: SPDIF
OPTICAL OUTPUT: SPDIF, –15 to –21 dbm
COMPO S IT E VI DE O: NTS C o r PAL 1V
S-VIDEO: Luminance 1V
Chrominance 0.3V
p-p
Component video: NTSC or PAL 1V
with sync 75 Ω
p-p
p-p
with sync on Y
p-p
Media center dimensions
15.8"W x 11.0"D x 3.5"H
(40.1 cm x 27.9 cm x 8.9 cm)
Media center weight
8.2 lb (3.7 kg)
Media center finish
Aluminum
Remote control range
65 ft (20 m)
55
Page 56

Reference
Stored CDs Log
CD# Album Title Artist/Composer Optional Notes
Note: Using a pencil to enter data below makes it easy to replace titles as you add or remove CDs.
56
Page 57

CD# Album Title Artist/Composer Optional Notes
57
Page 58

Reference
58
Page 59

59
Page 60

60
Page 61

©2004 B ose Corporation, The Mountain,
Framingham, MA 01701-9168 USA
274397 AM Rev.00 JN000393
 Loading...