

Page 1

Acoustic Wave
Owner’s Guide
Guía de usario
Notice d’utilitsation
®
II CD Changer
Page 2

Français Español English
Safety Information
Please read this owner’s guide
Please take the time to follow the instructions in this owner’s guide carefully. It will help you set up and operate your system
properly and enjoy all of its advanced features. Please save this owner’s guide for future reference.
WARNING: To reduce the risk of fire or electrical shock, do not expose the product to rain or moisture.
WARNING: The apparatus shall not be exposed to dripping or splashing, and objects filled with liquids, such as vases, shall not
be placed on the apparatus. As with any electronic products, use care not to spill liquids into any part of the system. Liquids can
cause a failure and/or a fire hazard.
CAUTION: To reduce the risk of electric shock, do not disassemble this product unless you are qualified. Refer servicing to quali-
fied service personnel.
The lightning flash with arrowhead symbol within an equilateral triangle alerts the user to the presence of uninsulated,
dangerous voltage within the system enclosure that may be of sufficient magnitude to constitute a risk of electrical
shock.
The exclamation point within an equilateral triangle, as marked on the system, is intended to alert the user to the presence of important operating and maintenance instructions i n this owner’s guide.
Class B emissions
This Class B digital apparatus meets all requirements of the Canadian Interference-Causing Equipment Regulations (Canada only).
CAUTION: To
fully.
CAUTION: Us
radiation exposure. The compact disc player should not be adjusted or repaired by anyone except properly qualified service personnel.
CAUTION: Make no modifications to the system or accessories. Unauthorized alterations may compromise safety, regulatory
compliance, and system performance.
Class 1 laser product
This CD player is classified as a CLASS 1 LASER PRODUCT according to
EN 60825-1:1994+A1+A2, IEC 60825-1:1993+A1+A2.
WARNING:
disassemble, heat above 100ºC (212ºF), or incinerate. Dispose of used batteries promptly. Replace only with a battery of the correct type
and model number.
WARNING: Danger of explosion if battery is incorrectly replaced. Replace only with Duracell, Eveready, Energizer, Ma xell, Toshiba ,
or Shun Wo CR2032 or DL2032 3-volt lithium battery.
Please dispose of used batteries properly,
WARNING: No naked flame sources, such as lighted candles, should be placed on the apparatus.
Note: Where the mains plug or appliance coupler is used as the disconnect device, such disconnect device shall remain readily
operable.
This product conforms to the EMC Directive 89/336/EEC and to the Low Voltage Directive 73/23/EEC. The complete Declaration of Conformity can be found at www.bose.com/static/compliance/index.html.
prevent electric shock, match the wide blade of the line cord plug to the wide slot of the AC (mains) receptacle. Insert
e of controls or adjustments or performance of procedures other than those specified herein may result in hazardous
CLASS 1 LASER PRODUCT
KLASSE 1 LASER PRODUKT
LUOKAN 1 LASER LAITE
KLASS 1 LASER APPARAT
K
eep the remote control battery away from children. It may cause a fire or c hemical burn if mishandled. Do not recharge,
following any local regulations. Do not incinerate.
©2006 Bose Corporation. No part of this work may be reproduced, modifie d, distribute d, or otherwise used wit hout prior writt en permission. All trademarks
referenced herein are property of Bose Corporation. The Acoustic Wave
®
music system II design is a registered trademark of Bose Corporation.
2
Page 3

Important Safety Instructions
1. Read these instructions – for all components
before using this product.
2. Keep these instructions – for future reference.
3. Heed all warnings – on the product and in the
owner’s guide.
4. Follow all instructions.
5. Do not use this apparatus near water or
moisture – Do not use this product near a bathtub,
washbowl, kitchen sink, laundry tub, in a wet base
ment, near a swimming pool, or anywhere else that
water or moisture are present.
6. Clean only with a dry cloth – and as directed by
Bose Corporation. Unplug this product from the wall
outlet before cleaning.
7. Do not block any ventilation openings. Install in
accordance with the manufacturer’s instruc
tions – T o ensur e reliable operation of the product and
to protect it from overheating, put the product in a
position and location that will not interfere with its
proper ventilation. For example, do not place the
product on a bed, sofa, or similar surface that may
block the ventilation openings. Do not put it in a builtin system, such as a bookcase or a cabinet that may
keep air from flowing through its ventilation openings.
8. Do not install near any heat sources, such as
radiators, heat registers, stoves or other appa
ratus (including amplifiers) that produce heat.
9. Do not defeat the safety purpose of the polarized or grounding-type plug. A polarized plug
has two blades with one wider than the other. A
grounding-type plug has two blades and a third
grounding prong. The wider blade or th ird pr ong
are provided for your safety. If the provided plug
does not fit in your outlet, consult an electrician
for replacement of the obsolete outlet.
10. Protect the power cord fr om bein g walked on or
pinched, particularly at plugs, convenience
receptacles, and the point where they exit from
the apparatus.
11. Only use attachments/accessories specified by
the manufacturer.
12. Use only with the cart, stand, tripod,
bracket or table specified by the
manufacturer or sold with the apparatus. When a cart is used, use caution when moving the cart/apparatus
combination to avoid injury from tip-over.
13. Unplug this apparatus during lightning storms
or when unused for long periods of time – to
prevent damage to this product.
-
-
-
14. Refer all servicing to qualified service personnel. Servicing is required when the apparatus
has been damaged in any way: such as powersupply cord or plug is damaged; liquid has been
spilled or objects have fallen into the apparatus;
the apparatus has been exposed to rain or mois
ture, does not operate normally, or has been
dropped – Do not attempt to service this product
yourself. Opening or removing covers may expose you
to dangerous voltages or other hazards. Please call
Bose to be referred to an authorized service center
near you.
15. To prevent risk of fire or electric shock, avoid
overloading wall outlets, extension cords, or
integral convenience receptacles.
16. Do not let objects or liquids enter the product –
as they may touch dangerous voltage points or shortout parts that could result in a fire or electric shock.
17. See product enclosure bottom for safety r elated
markings.
Information about products that generate
electrical noise
If applicable, this equipment has been tested and found to
comply with the limits for a Class B digital device, pursu
ant to Part 15 of the FCC rules. These limits are designed
to provide reasonable protection against harmful interfer
ence in a residential installation. This equipment generates, uses, and can radiate radio frequency energy and, if
not installed and used in accord ance with the in struct ions,
may cause harmful interference to radio communications.
However, this is no guarantee that interference will not
occur in a particular installation. If this equipment does
cause harmful interference to ra dio or te levision r e ceptio n,
which can be determined by turning the equipment off and
on, you are encouraged to try to correct the interference
by one or more of the following measures:
• Reorient or relocate the receiving antenna.
• Increase the separation between the equipment and
receiver.
• Connect the equipment to an outlet on a different circuit
than the one to which the receiver is connected.
• Consult the dealer or an experienced radio/TV techni-
cian for help.
Note: Unauthorized modification of the rece iver or radio
remote control could void the user’s authority to operate this
equipment.
This product complies with the Canadian ICES-003 Class
B specifications.
-
-
English FrançaisEspañol
-
Page 4
Important Safety Instructions
18. Use Proper Power Sources – Plug the product into
a proper power source, as described in the operating
instructions or as marked on the product.
19. Avoid Power Lines – Use extreme care when installing an outside antenna system to keep from touching
power lines or circuits, as contact with them may be
fatal. Do not install external antennas near overhead
power lines or other electric light or power cir cuits, nor
where an antenna can fall into such circuits or power
lines.
20. Ground All Outdoor Antennas – If an external
antenna or cable system is connected to this product,
be sure the antenna or cable system is grounded. This
will provide some protection against voltage surges
and built-up static charges.
Section 810 of the National Electrical Code ANSI/
NFPA No. 70 provides information with respect to
proper grounding of the mast and supporting struc
Français Español English
ture, grounding of the lead-in wire to an antenna discharge unit, size of grounding conductors, location of
antenna-discharge unit, connection to grounding elec
trodes, and requirements for the ground electrode.
Refer to the antenna grounding illustration on this
page.
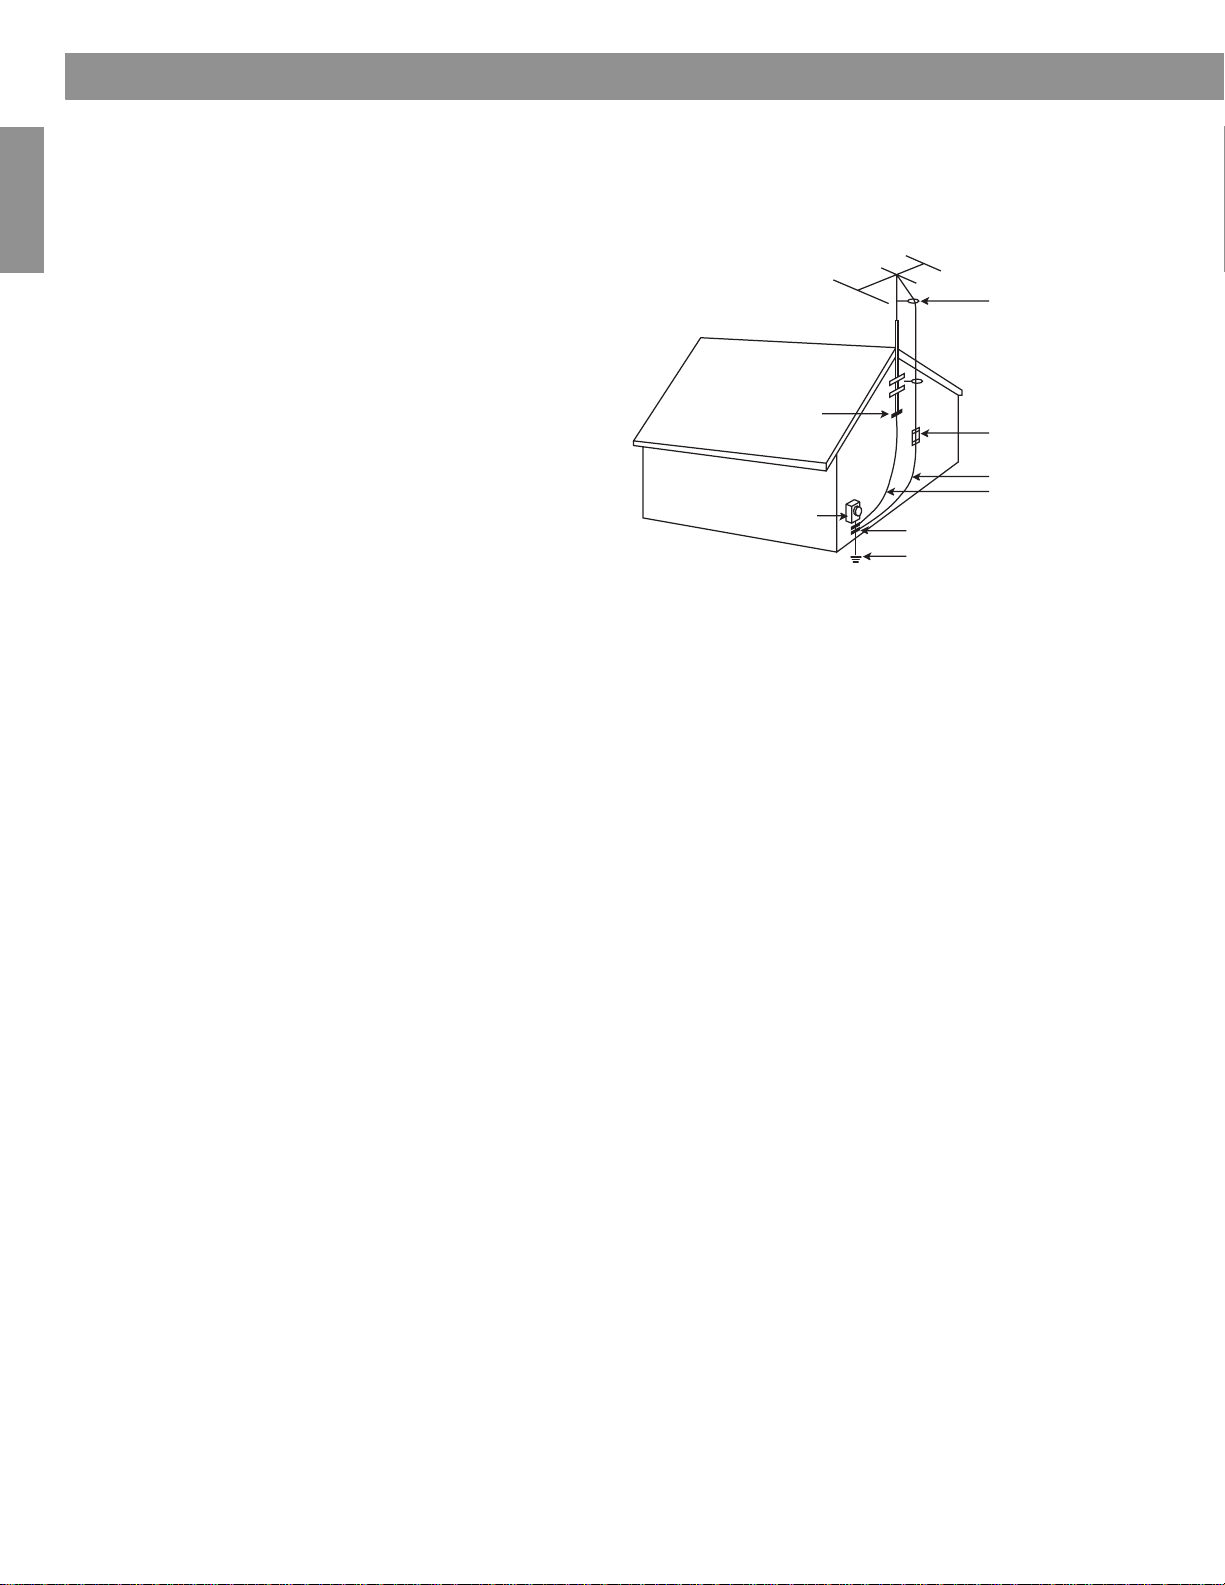
Antenna grounding
Example of antenna grounding as per National Electrical
Code, ANSI/NFPA 70.
Antenna lead-in wire
Ground clamp
Electric service
equipment
-
Ground clamps
Power service grounding electrode
system (NEC ART 250, Part H)
Antenna discharge unit
(NEC Section 810-20)
Grounding conductors
(NEC Section 810-21)
-
Note to CATV system installer
This reminder is provided to call the CATV system
installer’s attention to Article 820-40 of the NEC (of USA)
that provides guidelines for p roper gr ounding. In par ticular,
it specifies that the cable gr ound shall b e connected to t he
grounding system of the building, as close to the point of
cable entry as is practical.
Page 5

Contents
Setting Up Your Acoustic Wave® II CD Changer . . . . . . . . . . . . . . . . . . . . . . . . . . . . . . 4
Features and benefits of the Acoustic Wave® II CD changer . . . . . . . . . . . . . . . . . . . . . . . . . . 4
Unpacking the carton . . . . . . . . . . . . . . . . . . . . . . . . . . . . . . . . . . . . . . . . . . . . . . . . . . . . . . . . 4
Selecting a location for your music system and changer . . . . . . . . . . . . . . . . . . . . . . . . . . . . 5
Seating your Acoustic Wave® music system II on the CD changer . . . . . . . . . . . . . . . . . . . . . 5
Making the connections . . . . . . . . . . . . . . . . . . . . . . . . . . . . . . . . . . . . . . . . . . . . . . . . . . . . . . 6
Operating Your System . . . . . . . . . . . . . . . . . . . . . . . . . . . . . . . . . . . . . . . . . . . . . . . . . 7
Using the remote control . . . . . . . . . . . . . . . . . . . . . . . . . . . . . . . . . . . . . . . . . . . . . . . . . . . . . 7
Using the Acoustic Wave® II CD changer control panel . . . . . . . . . . . . . . . . . . . . . . . . . . . . . . 8
Turning your system on or off . . . . . . . . . . . . . . . . . . . . . . . . . . . . . . . . . . . . . . . . . . . . . . . . . 8
Loading/unloading discs into the CD changer . . . . . . . . . . . . . . . . . . . . . . . . . . . . . . . . . . . . . 9
Selecting the CD player or CD changer . . . . . . . . . . . . . . . . . . . . . . . . . . . . . . . . . . . . . . . . . . 9
Playing CDs in the CD changer . . . . . . . . . . . . . . . . . . . . . . . . . . . . . . . . . . . . . . . . . . . . . . . . 10
Listening to an External Audio Source . . . . . . . . . . . . . . . . . . . . . . . . . . . . . . . . . . . . . 11
Connecting an external audio source . . . . . . . . . . . . . . . . . . . . . . . . . . . . . . . . . . . . . . . . . . . . 11
Playing a connected audio source . . . . . . . . . . . . . . . . . . . . . . . . . . . . . . . . . . . . . . . . . . . . . . 12
Care and Maintenance . . . . . . . . . . . . . . . . . . . . . . . . . . . . . . . . . . . . . . . . . . . . . . . . . 13
Replacing the remote control battery . . . . . . . . . . . . . . . . . . . . . . . . . . . . . . . . . . . . . . . . . . . . 13
Troubleshooting . . . . . . . . . . . . . . . . . . . . . . . . . . . . . . . . . . . . . . . . . . . . . . . . . . . . . . . . . . . . 14
Customer Service . . . . . . . . . . . . . . . . . . . . . . . . . . . . . . . . . . . . . . . . . . . . . . . . . . . . . . . . . . . 14
Limited warranty . . . . . . . . . . . . . . . . . . . . . . . . . . . . . . . . . . . . . . . . . . . . . . . . . . . . . . . . . . . . 15
Technical Information . . . . . . . . . . . . . . . . . . . . . . . . . . . . . . . . . . . . . . . . . . . . . . . . . . . . . . . . 15
English FrançaisEspañol
3
Page 6
Setting Up Your Acoustic Wave® II CD Changer
Features and benefits of the Acoustic Wave® II CD changer
Unpacking the carton
Français Español English
Thank you for selecting the Bose® Acoustic Wave® II CD changer accessory. Combining this
product with your Acoustic Wave
• A six-disc music system – One disc player in the Acoustic Wave® music system II plus
five additional disc slots in the Acoustic Wave
®
music system II provides you with some valuable benefits:
®
II CD changer allows you to load and play
up to six audio CDs, providing hours of uninterrupted CD music.
• Elegant integrated pedestal design – Using the same table-top space as the Acoustic
®
Wave
music system II, the CD changer complements the elegance and simplicity of the
system.
• One integrated remote control – Provides the simplicity of using one remote control
and one-touch selection of all built-in sources.
• Multiple source switching – Using the rear-panel auxiliary (AUX) input jacks, you can
enjoy listening to one or two other audio sources in your home through the Acoustic Wave
music system II.
Carefully unpack your Acoustic Wave® II CD changer. Save all packing materials for possible
future use. The original packing materials provide the safest way to transport your new multidisc changer.
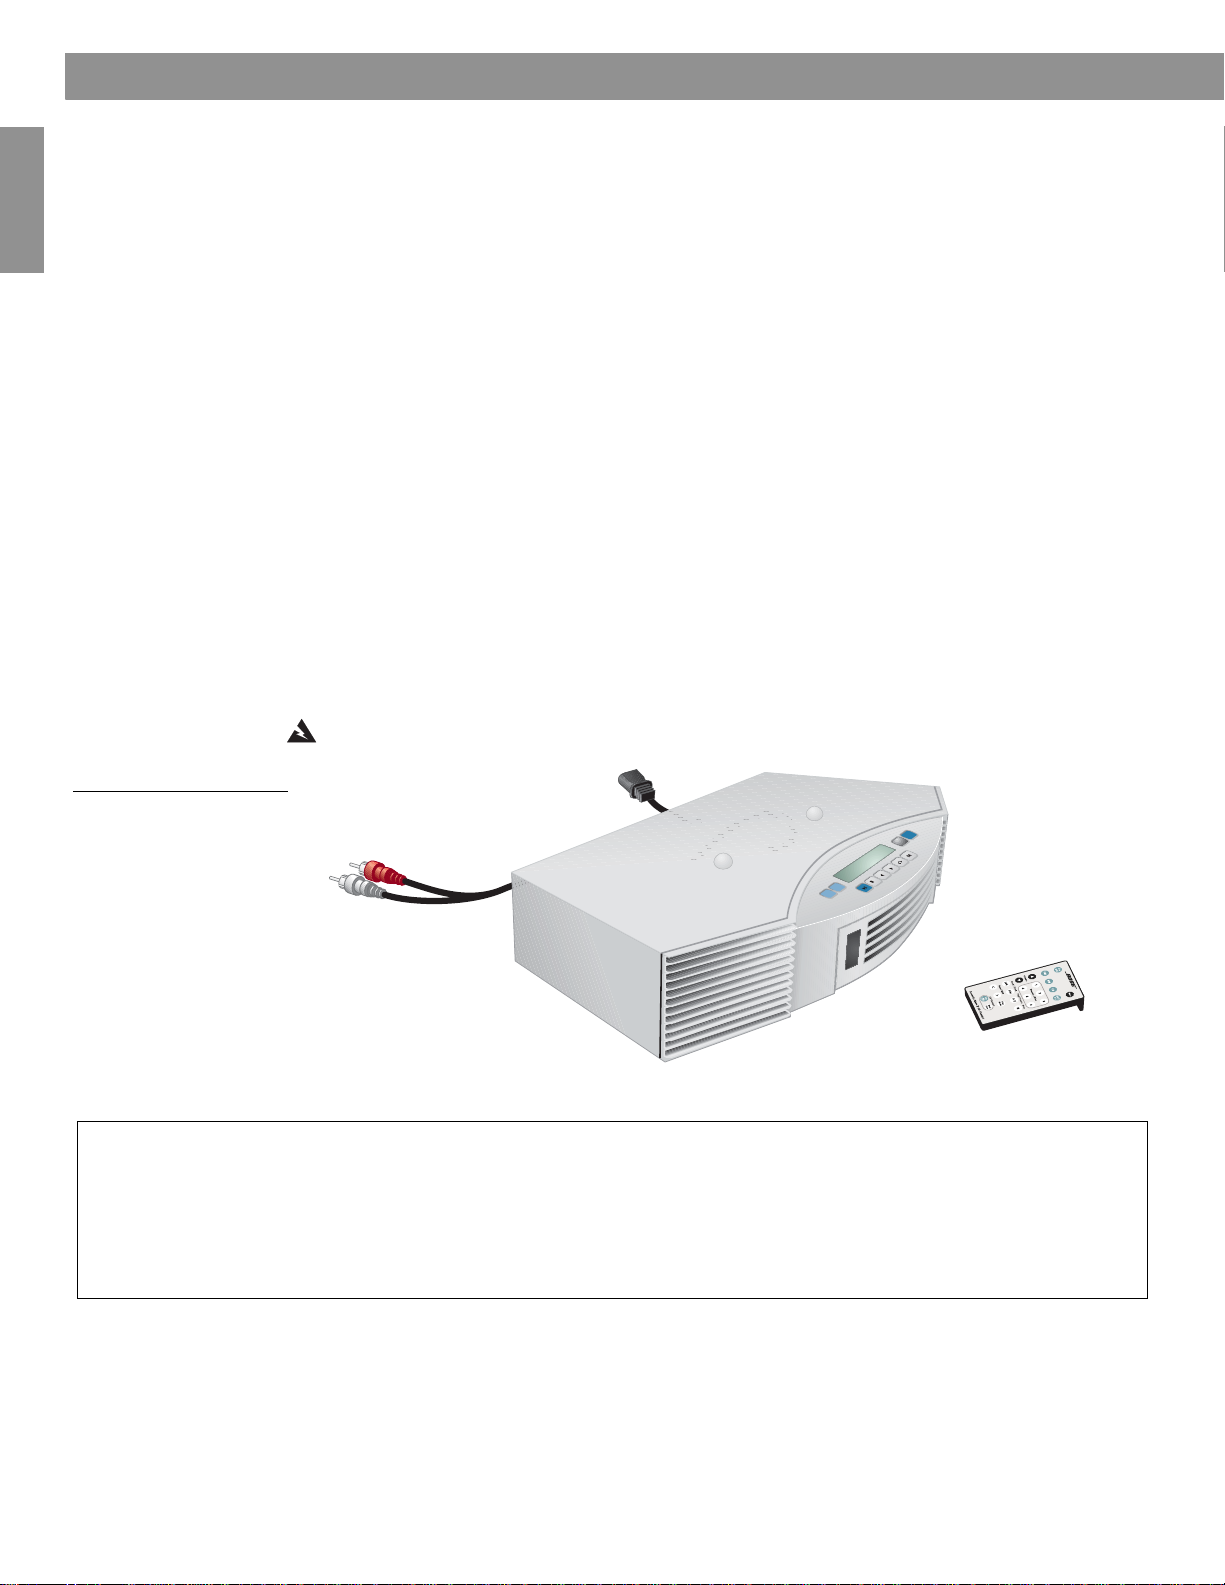
Check to be sure you received both parts identified in Figure 1. If either part appears to be
damaged, do not attempt to use it. Notify Bose Customer Service immediately (see phone
numbers on the inside back cover).
WARNING: To avoid danger of suffocation, keep the plastic bags out of the reach of children.
®
Figure 1
Carton contents
F
F
O
/
N
O
m
o
d
an
R
c
s
i
D
t
x
e
N
p
o
t
S
2
X
U
A
se
u
a
P
/
y
la
P
1
X
AU
Acoustic Wave
CD changer
®
II
Remote control
For your records
Now is a good time to record the serial number of your Acoustic Wave® II CD changer here and on your product
registration card. The serial number is located on the back panel.
Serial number: _____________________________ Purchase date: _________________________________________
We suggest you keep your sales receipt and a copy of your product registration card together with this owner’s guide.
4
Page 7

Setting Up Your Acoustic Wave® II CD Changer
Selecting a location for your music system and changer
The Acoustic Wave® II CD changer is designed to fit under your Acoustic Wave® music system II. Before you connect the two, however, select a good location for the stacked units.
When choosing the location, remember that the tonal quality of your Acoustic Wave® music
system II, as with any high-performance sound system, will vary with room placement.
Feel free to try different locations, but keep the following guidelines in mind:
• The Acoustic Wave® music system II is designed to sound best when placed on a shelf,
counter, desk, or table top, 30 to 48 inches (75 to 120 cm) from the floor.
• The CD player in the Acoustic W ave® music system II needs an allowance of several inches
for the CD cover on top of the music system to open.
• The Acoustic Wave® music system II should be near the center of a wall and 6 inches (15
cm), or less, away from the wall.
• To increase the bass response, move the unit toward any corner of the room; to decrease
bass response, move it away from the corner.
Seating your Acoustic Wave® music system II on the CD changer
With the CD changer in your chosen location, carefully set your Acoustic Wave® music
system II on top of the CD changer (Figure 2a).
• Make sure the Acoustic Wave® music system II fits onto the raised guides on t op of t he CD
changer.
English FrançaisEspañol
Figure 2
Seating the Acoustic Wave®
music system on the CD
changer
• Make sure the Acoustic W ave® music system II sits flat and the side edges of both units are
aligned.
• Make sure there is a clear optical path in front of the unit to allow the infrared emitters and
receivers to communicate (
(a)
Figure 2b).
Raised
guides
TM
(b)
TM
IR signal
receivers
IR signal
emitters
5
Page 8

Setting Up Your Acoustic Wave® II CD Changer
Making the connections
Figure 3
Français Español English
Connecting cables and
power cords
Before you start this setup procedure, disconnect the AC power cord on your
Acoustic Wave
®
music system II and set it aside. You will need to use it again in
Step 3.
On the back of the CD changer there are two cables that connect to your Acoustic Wave®
music system II.
1. Insert the two connectors of the AUX input cable into AUX IN jacks on the back of the
music system (
Figure 3). Be sure to mat ch the c olors of the con nectors a nd jacks: red to
red, and white to white.
2. Plug the attached CD changer power cord into the AC power jack on the back of the
music system.
3. Plug the small end of the power cord into the power jack on the back of the CD changer.
4. Plug the other end of the power cord into an AC (mains) wall outlet.
After applying power, “PLEASE WAIT” appears on the display for about 30
seconds while the system prepares itself for operation. DO NOT insert any
discs until this message disappears.
AUX IN jacks
TM
1
Acoustic Wave® music
system II power jack
CD changer power jack
2
3
AUX input
cable
4
Acoustic Wave®
music system II
AC power cable
6
Page 9

Using the remote control
The remote control included with your Acoustic Wave® II CD changer allows you to control
functions of both the CD changer and your Acoustic Wave
only need this remote to control your system.
buttons. The remote normally works within 20 feet of the front panel.
If the remote stops operating or its range seems reduced, it may be time to replace the
battery. For instructions, refer to “Replacing the remote control battery” on page 13.
The information in Figure 4 describes the buttons used for playing CDs and selecting auxiliary
inputs. For controlling other functions of the Acoustic W ave® music system II, see the owner’s
guide that came with it.
Notes:
• Press-and-hold operations require holding the button down for at least one second.
• Pressing FM, AM, CD, or AUX automatically turns on the system to the source selected.
• The remote can select an external audio source that is connected to the changer, but cannot
turn the source on or off or change its settings.
Figure 4
Acoustic Wave® II CD
changer remote control
Operating Your System
®
music system II. Therefore, you
Just aim the remote at the system and press the
English FrançaisEspañol
On/Off
Turns the system on or off (page 8).
CD
Selects the CD source in the Acoustic
®
music system II (page 9).
Wave
Seek/Track
Skips to next/previous CD track
(page 10).
Tune/MP3
Scans forward/backward through a CD
track (page 10).
CD Changer
Selects the CD changer and turns
it on if it is off (page 9).
Next Disc
Moves to next CD in the changer (page 10).
AUX 1-2
Selects the AUX 1 or AUX 2 input jack
on the rear panel of the CD changer
(page 12).
Presets/Discs
Selects CD changer slots 1-5 (page 10).
Stop
Stops a playing CD (page 10).
Play/Pause
Plays a CD or pauses a playing
CD (page 10).
Play Mode
Selects repeat and random CD play
modes (page 10).
Throughout this owner’s guide, you will see button icons to the left of the operating instructions.
These icons refer to buttons located on the remote control.
7
Page 10

Operating Your System
Using the Acoustic Wave® II CD changer control panel
The Acoustic Wave® II CD changer control panel provides playback control buttons and a
display for operating the changer only. It cannot control any functions of the Acoustic Wave®
Figure 5
CD changer control buttons
and display functions
AUX 1/AUX 2
Selects the AUX 1/2 source,
and automatically turns on
the system if it is off.
Français Español English
Play/Pause
Plays or pauses the
selected CD.
music system II.
Selected disc slot
AUX 1 AUX 2
Stop
Stops the currently
playing CD.
Figure 5 describes the control buttons and display window.
Track number Play/pause indicator
DISC TRACK
CHANGER
Play/Pause Stop Next Disc CD Mode
Seek/Track
• Press: Skips to next/pr evious CD track.
• Press and hold: Scans forward/backward
through a CD track.
Elapsed time
On/Off
Turns CD changer
on or off.
ON/OFF
CD Mode
Selects repeat and
random CD play
modes.
Next Disc
Moves to the next CD in
the changer.
Turning your system on or off
To turn on the complete system, press On/Off on the CD changer control panel or press
the changer select button CD on the remote. For other power on/o ff controls, see
Figure 6
Power on/off controls of the
complete system
• Turns on only the Acoustic
®
music system II.
Wave
• Turns off the complete system.
• Selects and turns on the CD
changer.
• Turns on the Acoustic Wave
music system II if it is off.
®
Turns on the complete
system and plays a CD
in the changer.
Figure 6.
T urns only the Acoustic
Wave® music system II
on or off.
TM
• Turns on the complete system and switches the Acoustic
Wave® music system II to the AUX source.
• Only turns off the CD changer .
8
Page 11

Loading/unloading discs into the CD changer
The Acoustic Wave® II CD changer holds up to five CDs. When a CD is inserted into a slot in
the changer and it is on, the changer’s display window indicates the number of the CD slot
selected, the track number playing, and the elapsed time (see
To load a CD into the changer , insert one edge of the disc into an empty slot and push the
Figure 7
Loading discs
disc all the way in (
AU
X 1
AU
X
2
P
l
a
y
/
P
a
u
s
e
S
t
o
p
Figure 7). The LED indicator to the right of each slot indicates the status.
TM
S
k
i
p
/S
c
a
n
N
e
x
t
D
i
s
c
R
a
n
d
O
o
m
N
/OF
F
Operating Your System
Figure 5).
Disc slot status indicator s
•
Off...........Empty disc slot.
•
Amber....The slot contains a CD,
•
Green .....The current disc slot.
Disc slot eject buttons
but it is not currently
selected. The amber
light flashes while a slot
is ejecting a disc.
The green light flashes
while the changer
switches to this slot.
English FrançaisEspañol
To remove a CD from a changer slot, press the Eject button to th e right of the status
indicator for that slot. Allow a few seconds for the mechanism to respond.
CAUTION:
• DO NOT INSERT mini CDs or non-circular CDs into any disc slot. The CD changer may not
properly play or eject them.
• DO NOT INSERT more than one disc at a time into any disc slot.
• Doing either of the above can cause damage to the disc and/or the CD changer.
Selecting the CD player or CD changer
Using the Acoustic Wave® II CD changer provides access to up to six CDs, one in the
Acoustic Wave® music system II and five in the CD changer.
To use the Acoustic Wave® music system II CD player:
Press CD on the remote control or on the Acoustic Wave® music system II control panel to
turn on (if off) the Acoustic Wave® music system II and select the CD player.
For complete instructions on operating the CD player, refer to your Acoustic Wave® Music
System II Owner’s Guide.
9
Page 12

Operating Your System
To use the Acoustic Wave® II CD changer:
Press CD changer on the remote control, or press On/Off on the CD changer control panel
to turn on (if off) the complete system and select the CD changer.
TRACK
CHANGER
Stop Next Disc CD Mode
ON/OFF
Playing CDs in the CD changer
• Press Play/Pause to start playing the selected CD. Press again to pause it. While a CD is
playing, the display tells you the disc slot number, track number, and elapsed time.
• Press Seek/Track once to skip to the beginning of the current track. Press again
within three seconds to skip to the beginning of the previous track.
• Press Seek/Track once to skip to the next track.
• Pr ess and hold Tune/MP3 < or T une/MP3 > to quickly sc an backwar d or forwar d throu gh
a track.
Français Español English
• Press Stop to stop the currently playing CD.
• Press Next Disc to move to the next disc slot. The disc slot number on the display tells
you which slot is currently selected.
OR
• Press Preset/Disc 1-5 to move to a specific disc slot.
Press Play Mode repeatedly until the play mode you want is displayed.
Displayed mode Description
REPEAT ALL Repeats all tracks and discs in numerical order.
REPEAT ALL RANDOM Repeats all tracks and discs in random order.
REPEAT DISC Repeats all tracks on selected disc in numerical order.
REPEAT DISC RANDOM Repeats all tracks on selected disc in random order.
10
Page 13

Connecting an external audio source
The Acoustic Wave® II CD changer provides two rear-panel inputs (AUX 1 and AUX 2) for
connecting external audio devices such as a TV, VCR, DVD player, cassette player, or MP3
player . This gives you the advantage of hearing Acoustic Wave
range of sources.
To make the connection, use an appropriate stereo cable (not included).
1. Connect one end of the cable to the audio output jacks of the device and the other end to
one set of AUX input jacks on the changer (
plugs on the cable to the red (R) and white (L) AUX jacks on the changer.
2. Repeat Step 1 to connect another device.
3. Plug the device into an AC outlet.
Figure 8
External audio device
connections
Listening to an External Audio Source
®
music system II sound from a
Figure 8). Be sure to mat ch the r e d and white
Audio device
English FrançaisEspañol
AUX 1 INPUT
AUX 2 INPUT
11
Page 14

Listening to an External Audio Source
Playing a connected audio source
To listen to a connected source:
1. Turn on the external audio device.
2. Press AUX 1-2 on the Acoustic Wave® II CD changer remote control. Press AUX 1-2
again to switch between the AUX 1 and AUX 2 inputs. AUX 1 or AUX 2 appears on the
display to confirm your selection (
3. Adjust the volume using the remote control.
Note: The Acoustic Wave® II CD changer remote control cannot turn a connected AUX device
on or off, or change its settings or selections.
Figure 9
Acoustic Wave® II CD
changer sample AUX
display
Français Español English
AUX 1 AUX 2
Figure 9).
AUX
ON/OFF
Play/Pause Stop Next Disc Random
12
Page 15

Replacing the remote control battery
If your remote contro l does not work pr operly, or its range of operation is reduced, it is time to
replace the battery. Follow the instructions below:
1. Place the remote control face down on a flat surface.
2. Using your finger, push the tab lock to the side as shown and hold (Figure 10a). Slide the
battery compartment open.
3. Keeping the remote control face down, insert th e n ew ba tter y into th e compa rt men t wit h
the + symbol facing up (
4. Gently slide the battery compartment closed. It locks automatically.
Care and Maintenance
English FrançaisEspañol
Figure 10b).
Figure 10
Remote control battery
replacement
(a)
See operating
battery to be used
instructions for types of
Tab
(b)
See operating
battery to be used
instructions for types of
Positive
symbol
WARNING: Danger of explosion if battery is incorrectly replaced. Replace only with the same or
equivalent type. Replace only with a lithium CR2032 or DL2032 3-volt battery by Duracell,
Eveready, Energizer, Maxell, New Sun, or Toshiba (available from most electronics stores).
WARNING: Mishandling the remote control battery may cause a fire or chemical burn. Keep
the battery away from children. Do not recharge, disassemble, heat above 212 °F (100 °C), or
incinerate the battery. Dispose of the used battery promptly and responsibly.
For more information, call Bose® Customer Service. Refer to the phone numbers on the inside
back cover of this guide.
13
Page 16

Care and Maintenance
Troubleshooting
Problem What to do
No system operation
• Make sure the power cord for the Acoustic Wave® II CD changer is completely plugged in
both at the changer jack and at the wall outlet.
No sound or
sound is muffled
• If the Acoustic Wave® II CD changer or an audio device connected to it is playing, make
sure that the “AUX” source indicator appears on the Acoustic Wave
®
music system II dis-
play.
• If the source is AUX 1 or AUX 2, make sure that the connected audio device is plugged in
and turned on, and make sure the stereo cable is properly connec ted between the two
units.
• Make sure that both the Acoustic Wave® II CD changer and the Acoustic Wave® music
system II are plugged into functioning power outlets, and are turned on.
• Check the connection of the Acoustic Wave® music system II to the changer. Make sure
Français Español English
the two RCA connectors ar e firmly insert ed, red to r ed, and white t o white, into the AUX I N
jacks on the Acoustic Wave
page 6.
• Make sure nothing is blocking or preventing the IR signals emitted by the CD changer
from reaching the receiver on the front of the Acoustic Wave
®
music system II. Refer to “Making the connections” on
®
music system II. Refer to
“Selecting a location for your music system and changer” on page 5.
CD skips • Make sure the system is in a location where it cannot get bumped. If so, move it to a more
protected location.
• Check the CD for smudges or dirt. Wipe the CD (NOT in a circular pattern, but straight out
from the center) to it clean off.
CD does not play • Make sure you have selected the CD changer.
• If you have selected the CD changer, make sure the AUX indicator appears on the
Acoustic Wave® music system II display. If not, press the AUX button on the music
system console.
• Make sure there is a CD in the selected CD changer slot.
A CD is playing, but none
of the CD changer LEDs is
• Check to see if the CD player in the Acoustic Wave® music system II is on and playing,
instead of the CD changer.
lit
CD changer does not
eject a disc
• Disconnect the system power cord from the AC outlet, wait a few seconds, and plug it in
again.
Customer Service
For additional help in solving problems, contact Bose® Customer Service. Refer to the
address list on the inside back cover of this guide.
14
Page 17

Limited warranty
Care and Maintenance
English FrançaisEspañol
What is covered:
All parts defective in material or workmanship.
For how long:
One year (two years, Europe) from the purchase date.
What we will do:
We will, at our sole option, repair or replace any defective parts free of charge.
What you must do:
A. Call Bose® Customer Service and ask for shipping instructions.
B. Properly pack the unit, if possible, in the original carton for shipping.
Other conditions:
This limited warranty is fully transferable for the one-year period following purchase.
THE PROVISIONS OF THIS LIMITED WARRANTY ARE IN LIEU OF ANY OTHER WARRANTY,
WHETHER EXPRESS OR IMPLIED, WRITTEN OR ORAL, INCLUDING ANY WARRANTY OF
MERCHANTABILITY OR FITNESS FOR A PARTICULAR PURPOSE. BOSE CORPORATION’S
MAXIMUM LIABILITY SHALL NOT EXCEED THE ACTUAL PURCHASE PRICE PAID BY YOU
FOR THE PRODUCT. IN NO EVENT SHALL BOSE BE LIABLE FOR SPECIAL, INCIDENTAL,
CONSEQUENTIAL, OR INDIRECT DAMAGES.
This limited warranty does not cover a defect that has resulted from improper or unreasonable use or maintenance, accident, improper packing, or unauthorized tampering, alteration,
or modification as determined solely by us. This limited warranty is void if the label bearing
the serial number has been removed or defaced.
Other Legal Rights:
This limited warranty gives you specific legal rights, and you also may have other rights that
vary from state to state or country to country . Some places do not allow limitations on implied
warranties or the exclusion or limitation of incidental or consequential damages, so the above
limitations or exclusions may not apply to you.
Technical Information
Multi-disc changer power rating
120V~ 50/60 Hz 80W (80W max., combined with the Acoustic Wave® music system II)
Dimensions
31/4"H x 18"W x 83/8"D (8.7 cm x 45.7 cm x 21.1 cm)
Weight
6.7 lb (3.1 kg)
Color
Graphite Gray or Platinum White
15
Page 18

Bose Corporation
USA Customer Support
Bose Corporation, The Mountain
Framingham, MA 01701-9168
1-800-367-4008
Canada Customer Support
Bose Ltd., 1-35 East Beaver Creek Rd.
Richmond Hill, Ontario L4B 1B3
1-800-465-2673
European Office
Bose Products B.V., Nijverheidstraat 8
1135 GE Edam, Nederland
TEL 0299-390111
FAX 0299-390114
Australia
Bose Pty Limited,
Unit 3, 2 Holker Street,
Newington NSW, 2127
TEL +61 (0)2 8737 9999
FAX +61 (0)2 8737 9924
Deutschland
Postfach 1468
48504 Nordhorn
TEL 05921 3030 123
FAX 059 21-724250
United Kingdom
Customer Support
Freepost EX 151
Exeter EX1 1ZY
TEL 0800 614 293
FAX 0870 240 2013
Poland
Bose Sp. z o.o.
ul. Woloska 12
02-675 Warszawa, Poland
TEL (48-22) 852-2928
FAX (48-22) 852-2927
Nederland
Bose B.V., Nijverheidstraat 8
1135 GE Edam, Nederland
TEL 0299-390111
FAX 0299-390114
Bose China
Bose Electronics (Shanghai Co., Ltd)
2203-2205 22F, West Gate Tower
1038 We st Nanjing Road
MeiLongzhen Plaza
Shanghai 200041,
Peoples Republic of China
TEL 86 21 62713800
Atlas Hi-Fi Pte. Ltd.
68 Orchard Road
#03-19/21 Plaza Singapura
Singapore 238839,
Republic of Singapore
TEL 65-6-339-0966
The Asavasopon Co. Ltd.
50-52 Siphya Road
Mahaprudtharam, Bangrak
Bangkok 10500,
Thailand
TEL 66-2-234-6467
PT Audio Pratama
JL. Lodan Raya No. 1
Block CO/CN
Jakarta 14430,
Indonesia
TEL 62-21-659-8719
CSI Corporation
Seki Building
23, 2-Ga Namsan-Dong
Joong-Gu
Seoul 100-042,
South Korea
TEL 82-2-344-635-114
English Deutsch FrançaisDansk Español Italiano SvenskaNederlandsDansk Italiano SvenskaDeutsch NederlandsEnglish FrançaisEspañol
Bose AG
Hauptstraße 134
CH-4450 Sissach
TEL 061 975 77 33
FAX 061 975 77 44
Bose Ges.m.b.H
Wienerbergstraße 7
A-1100 Wien
TEL 01 604 043 40
FAX 01 6 04 043 423
France
Bose S.A.S
12 rue de Témara
F-78100 ST. GERMAIN-EN-LAYE
France
TEL 0820 820 995
FAX 01 3 0 61 63 88
Bose Hong Kong
Bose Limited
Suite 2410-11 Shell Tower
Times Square
1 Matheson Street
Causeway Bay, Hong Kong
TEL 852 2110 3330
Bose Taiwan
Worldwide House
Room 905, Floor 9
131 Min Sheng East Road
Section 3
Taipei, Taiwan
TEL 886 2 2514 7676
Bose India
Bose Corporation India Private Limited
4th Floor, Shriram Bhartiya Kala Kendra
1 Copernicus Marg
New Delhi 110 001, India
TEL 91 11 2307 3825 / 26 /27
India Toll Free: 1600 11 2673
Website: www.boseindia.com
Eleksis Marketing
Corporation
269 Connecticut Street
Greenhills East
Mandaluyong City
Metro Manila 1550,
Philippines
TEL 63-2-724-9566
G&M International LLC
P.O. Box 1229
Dubai, United Arab Emirates
TEL 971-4-2669-000
Sound Imports
Shop 40
The Mall of Rosebank
Cradock Avenue
Rosebank 2196,
South Africa
TEL 27-11-880-1933
World Wide Web
www.Bose.com
Page 19

©2007 Bose Corporation, The Mountain,
Framingham, MA 01701-9168 USA
AM299365 Rev.01
 Loading...