

Page 1

Industrial PC
IPC / IPC300
Connectivity Manual
Antriebs- und Steuerungstechnik
Edition
104
Page 2

Industrial PC
IPC / IPC300
Connectivity Manual
1070 073 822-104 (02.06) GB
E 1999 – 2002
by Bosch Rexroth AG, Erbach / Germany
All rights reserved, including applications for protective rights.
Reproduction or distribution by any means subject to our prior written permission.
Discretionary charge 6.–
Page 3

Contents
Contents
1 Safety Instructions 1–1 . . . . . . . . . . . . . . . . . . . . . . . . . . . .
1.1 Standard operation 1–1 . . . . . . . . . . . . . . . . . . . . . . . . . . . . . . . . . . . . . .
1.2 Qualified personnel 1–2 . . . . . . . . . . . . . . . . . . . . . . . . . . . . . . . . . . . . . .
1.3 Safety markings on components 1–3 . . . . . . . . . . . . . . . . . . . . . . . . . .
1.4 Safety instructions in this manual 1–4 . . . . . . . . . . . . . . . . . . . . . . . . . .
1.5 Safety instructions concerning the described product 1–5 . . . . . . . .
1.6 Documentation, software release and trademarks 1–7 . . . . . . . . . . .
2 IPC System Overview 2–1 . . . . . . . . . . . . . . . . . . . . . . . . .
2.1 Versions 2–1 . . . . . . . . . . . . . . . . . . . . . . . . . . . . . . . . . . . . . . . . . . . . . . .
2.2 Specifications 2–2 . . . . . . . . . . . . . . . . . . . . . . . . . . . . . . . . . . . . . . . . . . .
2.3 Expansion slots 2–3 . . . . . . . . . . . . . . . . . . . . . . . . . . . . . . . . . . . . . . . . .
2.4 Rechargeable battery pack 2–3 . . . . . . . . . . . . . . . . . . . . . . . . . . . . . . .
2.5 Operating conditions 2–4 . . . . . . . . . . . . . . . . . . . . . . . . . . . . . . . . . . . . .
2.6 Standards compatibility 2–5 . . . . . . . . . . . . . . . . . . . . . . . . . . . . . . . . . .
V
Page
3 Security Functions 3–1 . . . . . . . . . . . . . . . . . . . . . . . . . . . .
3.1 Temperature monitoring function 3–1 . . . . . . . . . . . . . . . . . . . . . . . . . .
3.2 Uninterruptible power supply (UPS) 3–2 . . . . . . . . . . . . . . . . . . . . . . . .
3.3 UPS program 3–4 . . . . . . . . . . . . . . . . . . . . . . . . . . . . . . . . . . . . . . . . . . .
3.3.1 Functions 3–4 . . . . . . . . . . . . . . . . . . . . . . . . . . . . . . . . . . . . . . . . . . . . . .
3.3.2 Operating and configuring UPSplus (Windows95) 3–5 . . . . . . . . . . .
3.3.3 Operating and configuring UPSNT (WindowsNT) 3–9 . . . . . . . . . . . .
4 Installation 4–1 . . . . . . . . . . . . . . . . . . . . . . . . . . . . . . . . . . .
4.1 Installed positions and clearances 4–2 . . . . . . . . . . . . . . . . . . . . . . . . .
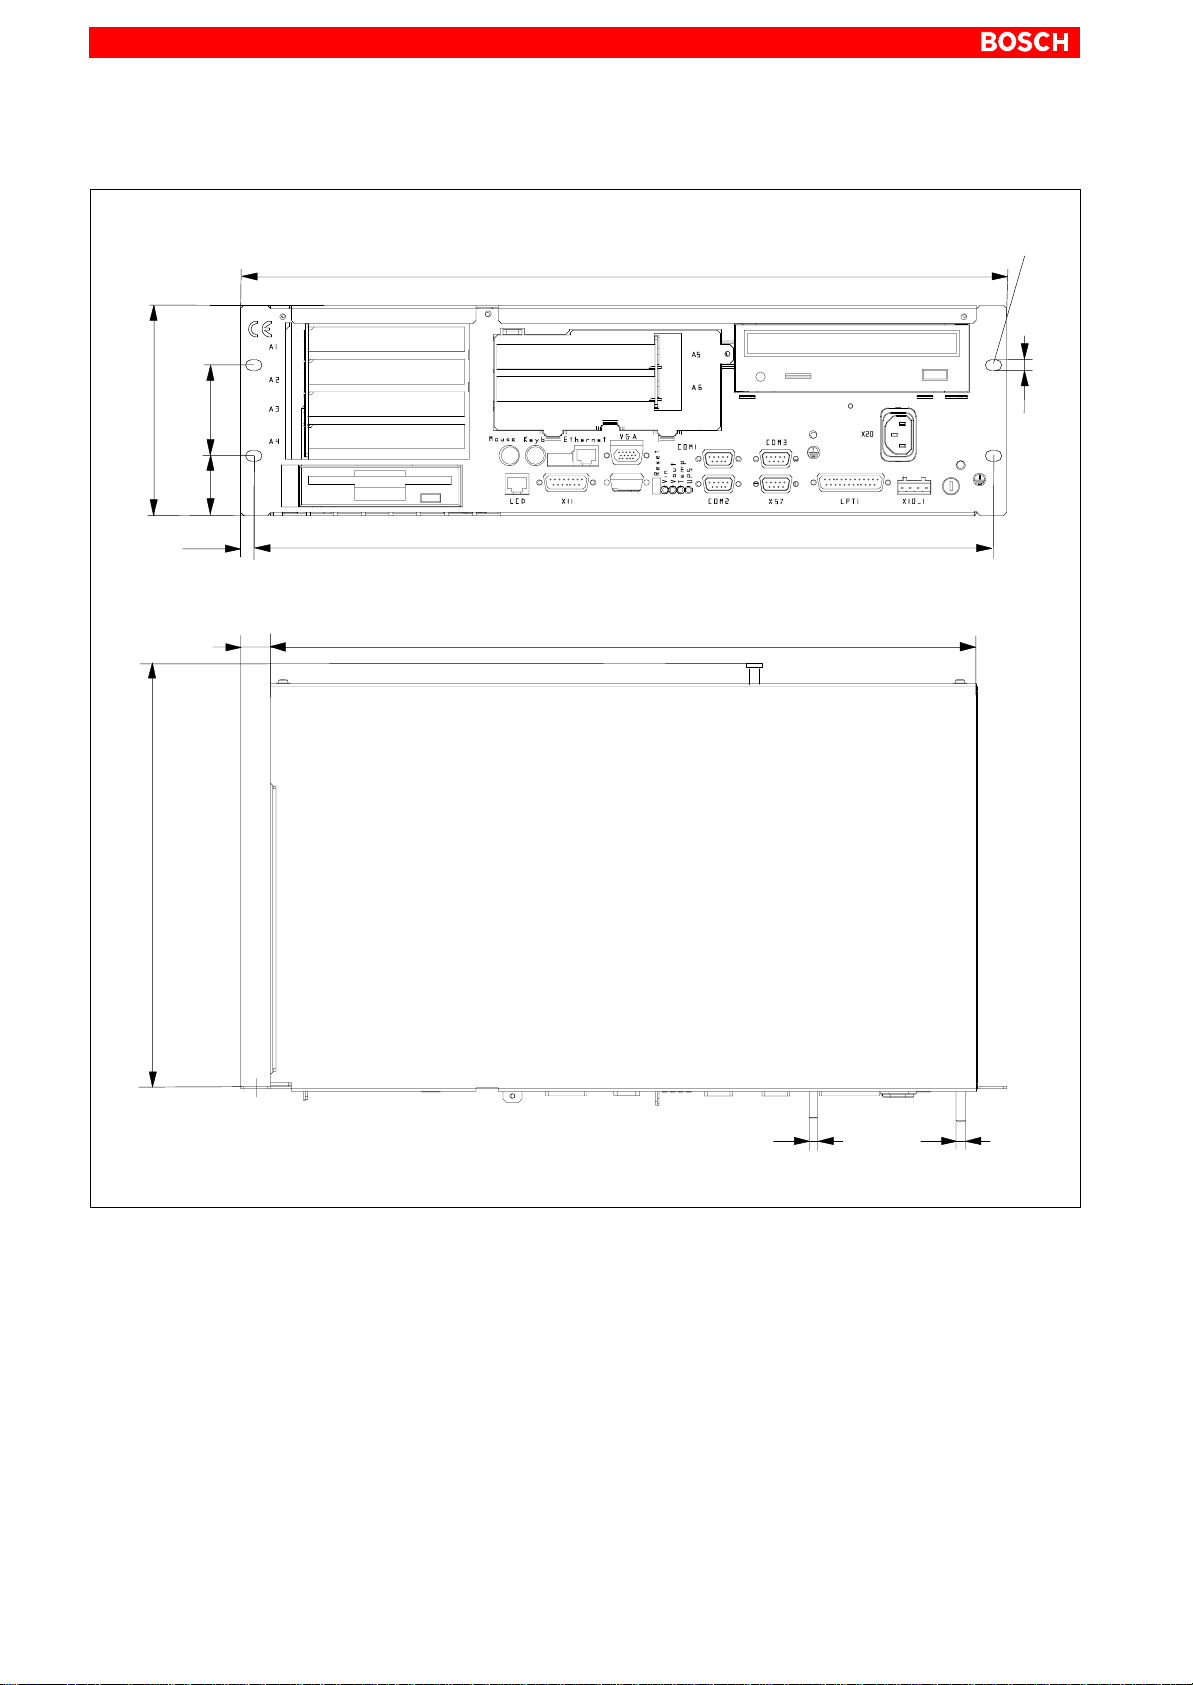
4.2 IPC / IPC300 dimensioned drawings 4–3 . . . . . . . . . . . . . . . . . . . . . . .
4.3 Installing IPC / IPC300 in mounting frame 4–4 . . . . . . . . . . . . . . . . . .
5 Electrical Connections 5–1 . . . . . . . . . . . . . . . . . . . . . . . .
5.1 Protective Earth conductor (PE) & screening information 5–2 . . . . .
5.2 Interference suppression information 5–3 . . . . . . . . . . . . . . . . . . . . . .
5.3 Power supplies 5–5 . . . . . . . . . . . . . . . . . . . . . . . . . . . . . . . . . . . . . . . . .
5.3.1 24VDC power supply 5–5 . . . . . . . . . . . . . . . . . . . . . . . . . . . . . . . . . . . .
5.3.2 230/115 VAC power supply 5–8 . . . . . . . . . . . . . . . . . . . . . . . . . . . . . . .
1070 073 822-104 (02.06) GB
Page 4

VI
Contents
6 Interfaces, Ports & Connectors 6–1 . . . . . . . . . . . . . . . .
6.1 Overview 6–1 . . . . . . . . . . . . . . . . . . . . . . . . . . . . . . . . . . . . . . . . . . . . . . .
6.2 COM1 through COM4 serial ports 6–3 . . . . . . . . . . . . . . . . . . . . . . . . .
6.2.1 Pin assignments 6–3 . . . . . . . . . . . . . . . . . . . . . . . . . . . . . . . . . . . . . . . .
6.2.2 COM1 through COM4 settings 6–8 . . . . . . . . . . . . . . . . . . . . . . . . . . . .
6.3 LPT1 parallel port 6–9 . . . . . . . . . . . . . . . . . . . . . . . . . . . . . . . . . . . . . . .
6.4 Ethernet connection 6–10 . . . . . . . . . . . . . . . . . . . . . . . . . . . . . . . . . . . . .
6.5 Display interfaces 6–11 . . . . . . . . . . . . . . . . . . . . . . . . . . . . . . . . . . . . . . .
6.5.1 BF2xxT for IPC 6–11 . . . . . . . . . . . . . . . . . . . . . . . . . . . . . . . . . . . . . . . . .
6.5.2 BF3xxT for IPC300 6–13 . . . . . . . . . . . . . . . . . . . . . . . . . . . . . . . . . . . . . .
6.5.3 External CRT monitor for IPC / IPC300 6–16 . . . . . . . . . . . . . . . . . . . . .
6.6 X11 power supply connection 6–18 . . . . . . . . . . . . . . . . . . . . . . . . . . . . .
6.7 Keyboard connector 6–19 . . . . . . . . . . . . . . . . . . . . . . . . . . . . . . . . . . . . .
6.8 Mouse port 6–21 . . . . . . . . . . . . . . . . . . . . . . . . . . . . . . . . . . . . . . . . . . . . .
7 LED Display 7–1 . . . . . . . . . . . . . . . . . . . . . . . . . . . . . . . . . .
8 Maintenance and Replacement 8–1 . . . . . . . . . . . . . . . .
8.1 Fuse protection 8–2 . . . . . . . . . . . . . . . . . . . . . . . . . . . . . . . . . . . . . . . . .
8.2 Replacing the hard disk 8–4 . . . . . . . . . . . . . . . . . . . . . . . . . . . . . . . . . .
8.2.1 Replacing the CD-ROM drive 8–6 . . . . . . . . . . . . . . . . . . . . . . . . . . . . .
8.2.2 Replacing the 3.5” floppy disk 8–7 . . . . . . . . . . . . . . . . . . . . . . . . . . . . .
8.2.3 Replacing the battery pack 8–9 . . . . . . . . . . . . . . . . . . . . . . . . . . . . . . .
8.3 Expansion cards 8–12 . . . . . . . . . . . . . . . . . . . . . . . . . . . . . . . . . . . . . . . .
8.3.1 Installing an expansion card 8–12 . . . . . . . . . . . . . . . . . . . . . . . . . . . . . .
8.3.2 BIOS settings for IPC 8–14 . . . . . . . . . . . . . . . . . . . . . . . . . . . . . . . . . . . .
8.3.3 BIOS settings for IPC300 8–14 . . . . . . . . . . . . . . . . . . . . . . . . . . . . . . . . .
9 Software 9–1 . . . . . . . . . . . . . . . . . . . . . . . . . . . . . . . . . . . . .
9.1 BIOS software 9–1 . . . . . . . . . . . . . . . . . . . . . . . . . . . . . . . . . . . . . . . . . .
9.2 Operating system and utilities 9–1 . . . . . . . . . . . . . . . . . . . . . . . . . . . . .
9.3 Application software 9–2 . . . . . . . . . . . . . . . . . . . . . . . . . . . . . . . . . . . . .
9.3.1 Bosch PCL (software PLC) 9–2 . . . . . . . . . . . . . . . . . . . . . . . . . . . . . . .
9.3.2 Typ3 osa (CNC operating software) 9–3 . . . . . . . . . . . . . . . . . . . . . . .
9.3.3 MADAP Studio (automatic system diagnostics) 9–4 . . . . . . . . . . . . .
10 Order numbers 10–1 . . . . . . . . . . . . . . . . . . . . . . . . . . . . . . .
10.1 IPC / IPC300 10–1 . . . . . . . . . . . . . . . . . . . . . . . . . . . . . . . . . . . . . . . . . . .
10.2 Accessories 10–1 . . . . . . . . . . . . . . . . . . . . . . . . . . . . . . . . . . . . . . . . . . . .
10.3 Spare Parts 10–2 . . . . . . . . . . . . . . . . . . . . . . . . . . . . . . . . . . . . . . . . . . . .
A Appendix A–1 . . . . . . . . . . . . . . . . . . . . . . . . . . . . . . . . . . . . .
A.1 Abbreviations A–1 . . . . . . . . . . . . . . . . . . . . . . . . . . . . . . . . . . . . . . . . . . .
A.2 Index A–2 . . . . . . . . . . . . . . . . . . . . . . . . . . . . . . . . . . . . . . . . . . . . . . . . . .
1070 073 822-104 (02.06) GB
Page 5

1 Safety Instructions
Before you start working with the Bosch Rexroth IPC / IPC300 Industrial PC,
we recommend that you thoroughly familiarize yourself with the contents of
this manual. Keep this manual in a place where it is always accessible to all
users.
1.1 Standard operation
This manual contains information required for the proper use of this product.
However, for reasons of structural clarity, the manual cannot provide exhaustive details regarding all available combinations of functional options.
Similarly, it is not feasible to consider every conceivable integration or operating scenario within the confines of this manual.
The described industrial PCs serve as operating and visualization units
for Bosch Rexroth proprietary application software running on Microsoft
Windows NT 4.0 operating systems. They are intended as control platforms
for testing, adjustment and assembly station applications.
While it is possible in principle to operate other proprietary operating systems or application software on the industrial PCs, the occurrence of unexpected effects, even with Bosch Rexroth applications, cannot be entirely
ruled out. With this type of nonstandard operation, Bosch Rexroth shall not
assume any liability for either hardware and/or software.
Safety Instructions
1–1
The products described hereunder
D were developed, manufactured, tested and documented in accordance
with the relevant safety standards. In standard operation, and provided
that the specifications and safety instructions relating to the project
phase, installation and correct operation of the product are followed,
there should arise no risk of danger to personnel or property.
D are certified to be in full compliance with the requirements of the
D COUNCIL DIRECTIVE 89/336/EEC of May 3rd 1989 on the approx-
imation of the laws of the Member States relating to electromagnetic
compatibility, 93/68/EEC (amendments of Directives), and
93/44/EEC (relating to machinery)
D COUNCIL DIRECTIVE 73/23/EEC (electrical equipment designed for
use within certain voltage limits)
D Harmonized standards EN 50081-2 and EN 50082-2
D are designed for operation in an industrial environment (Class A
emissions). The following restrictions apply:
D Direct connection to the public low-voltage power supply is prohibited.
D Connection to the medium and/or high-voltage system must be pro-
vided via transformer.
The operation of Class A devices in private residences, in business or
small-industry settings is permitted only if their operation does not produce undue interference with other devices.
1070 073 822-104 (02.06) GB
. This is a Class A device. In a residential area, this device may cause
radio interference. In such case, the user may be required to introduce
suitable countermeasures, and to bear the cost of the same.
The prerequisites for trouble-free service and and safe operation of the
described products are proper transport, handling and storage, placement,
installation, plus careful operation of the equipment.
Page 6

1–2
Safety Instructions
1.2 Qualified personnel
This instruction manual is designed for specially trained personnel. The relevant requirements are based on the job specifications as outlined by the
ZVEI and VDMA professional associations in Germany. Please refer to the
following German-Language publication:
Weiterbildung in der Automatisierungstechnik
Publishers: ZVEI and VDMA Maschinenbau Verlag
Postfach 71 08 64
60498 Frankfurt/Germany
This instruction manual is designed specifically for system planners and PC
specialists. They require special knowledge of configuration and start-up of
electrical equipment.
Interventions in the hardware and software of our products not described in
this instruction manual may only be performed by our skilled personnel.
Unqualified interventions in the hardware or software or non-compliance
with the warnings listed in this instruction manual or indicated on the product
may result in serious personal injury or damage to property.
Installation and maintenance of the products described hereunder are the
exclusive domain of trained electricians as per IEV 826-09-01 (modified)
who are familiar with the contents of this manual.
Trained electricians are persons of whom the following is true:
D They are capable, due to their professional training, skills and expertise,
and based upon their knowledge of and familiarity with applicable technical standards, of assessing the work to be carried out, and of recognizing
possible hazards.
D They possess, subsequent to several years’ experience in a comparable
field of endeavour, a level of knowledge and skills that may be deemed
commensurate with that attainable in the course of a formal professional
education.
With regard to the foregoing, please read the information about our comprehensive training program.
You find the latest information on training courses, teachware and training
systems on our website http://www.boschrexroth.de. The professional staff
at our Didactic Center Erbach will be pleased to provide detailed information.
You may contact the center by telephone at (+49) 6062 78-600.
1070 073 822-104 (02.06) GB
Page 7
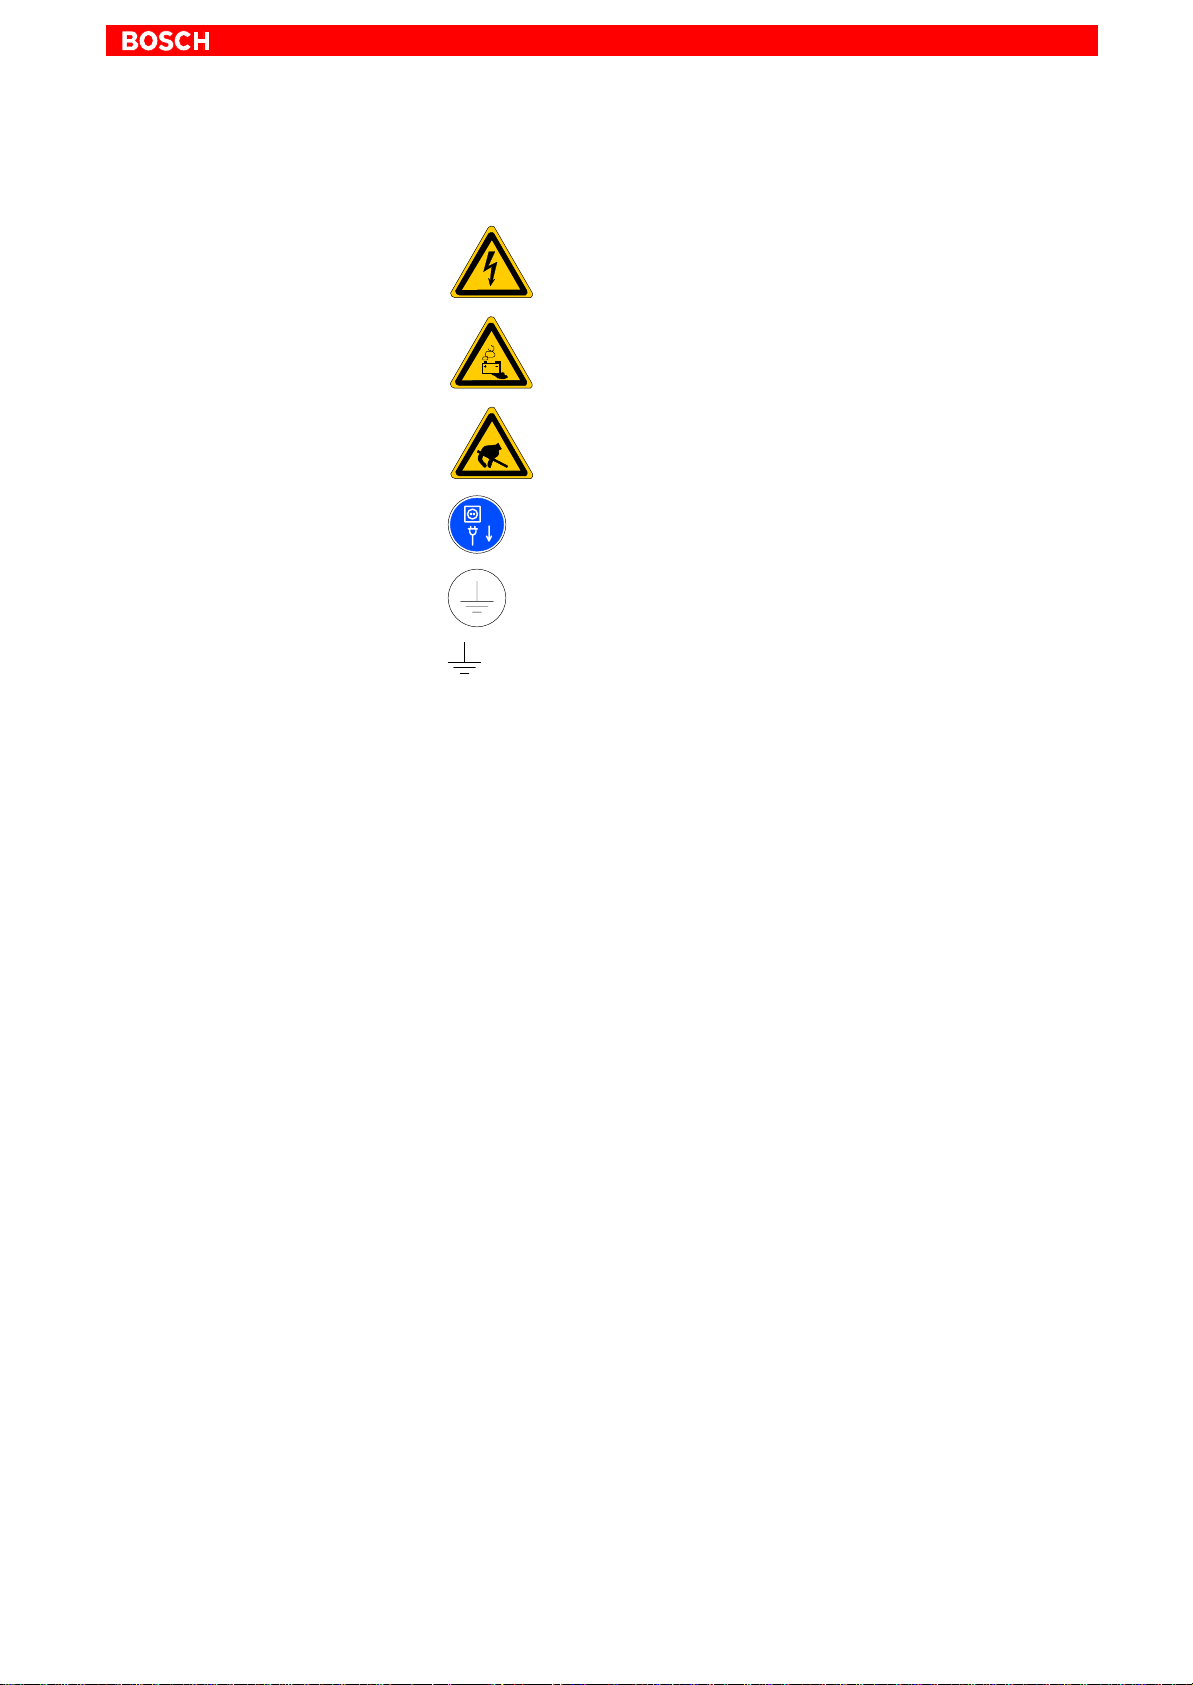
1.3 Safety markings on components
DANGER! High voltage!
DANGER! Corrosive battery acid!
CAUTION! Electrostatically sensitive devices (ESD)!
Disconnect mains power before opening!
Safety Instructions
1–3
Lug for connecting PE conductor only!
Screened conductor only!
1070 073 822-104 (02.06) GB
Page 8
1–4
Safety Instructions
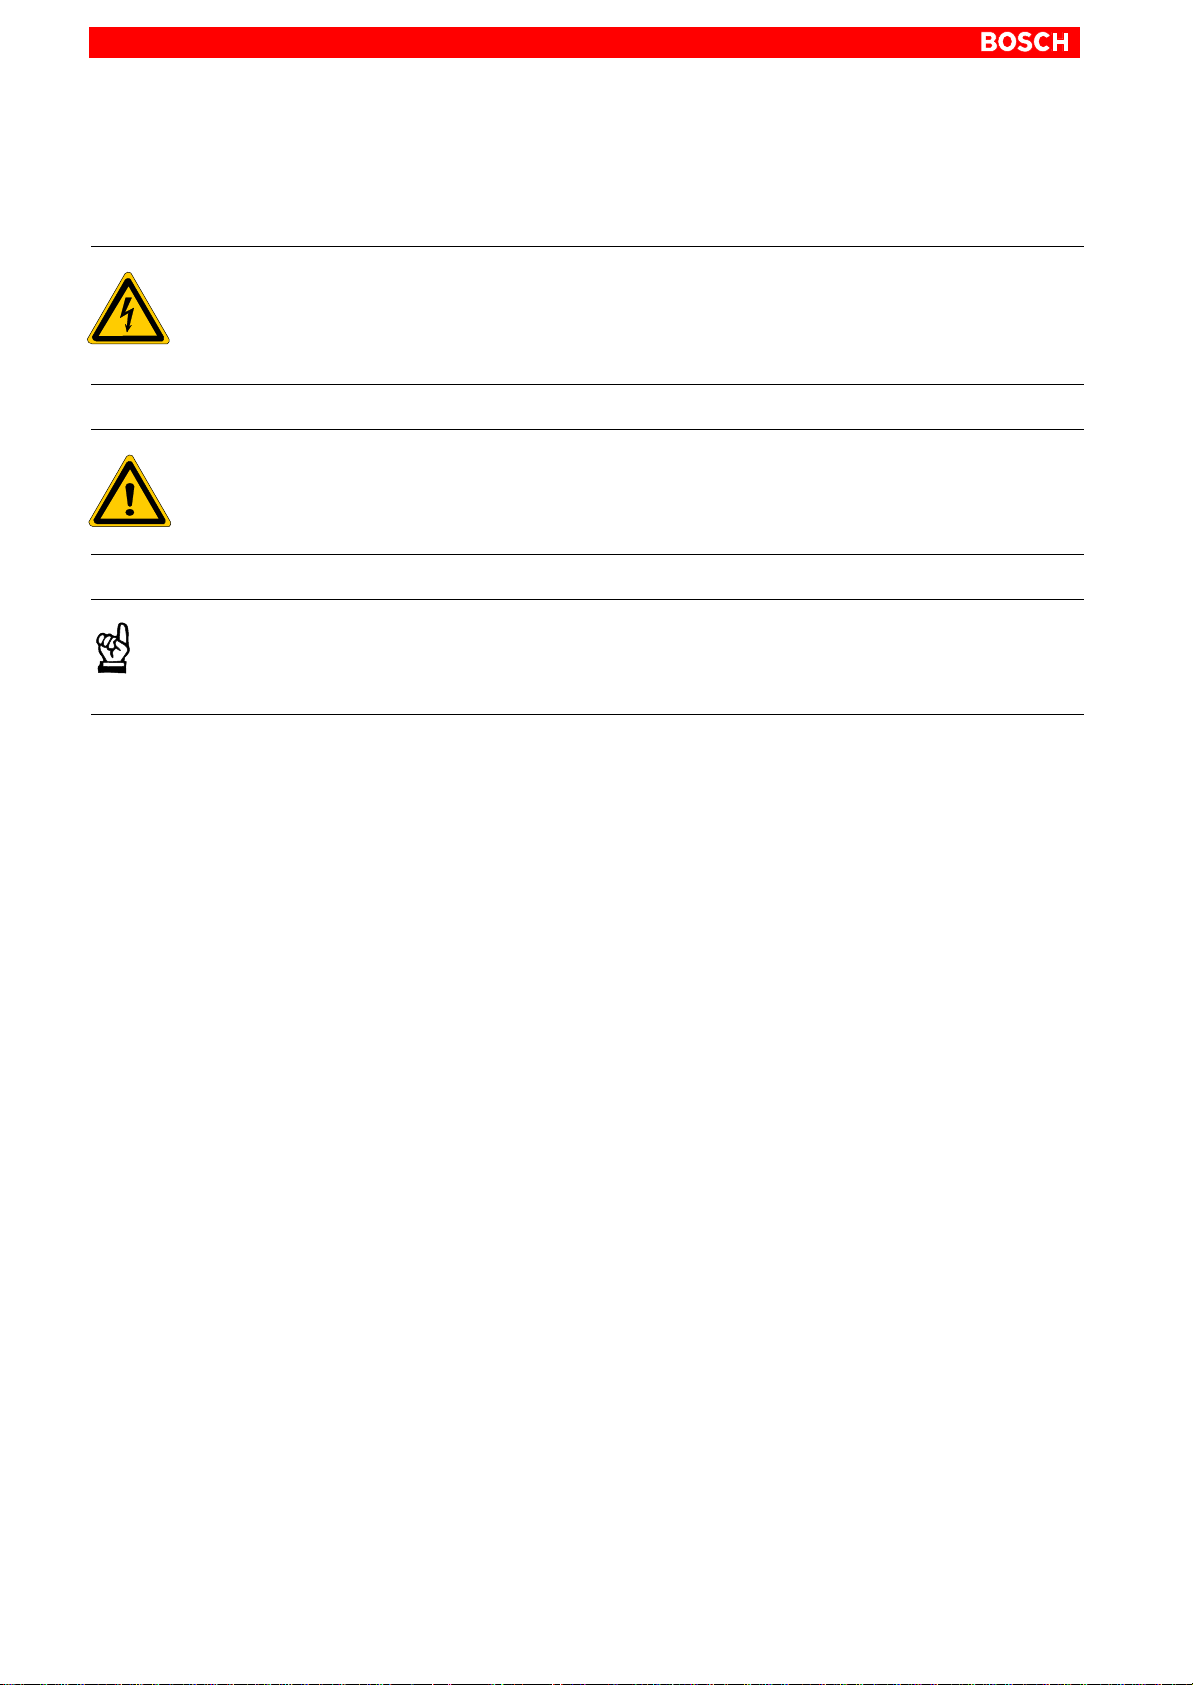
1.4 Safety instructions in this manual
DANGEROUS ELECTRICAL VOLTAGE
This sym b o l warns of the presence of a dangerous electrical voltage. In-
sufficient or lacking compliance with this warning can result in personal
injury.
DANGER
This symbol i s u s e d w h e r ever insufficient or lacking observance of this instruction can result in personal injury.
CAUTION
This symbol is used wherever insufficient or lacking observance of instructions can result in damage to equipment or data files.
. This symbol is used to alert the user to an item of special interest.
L This asterisk symbol indicates that the manual is describing an activity which
the user will be required to perform.
1070 073 822-104 (02.06) GB
Page 9
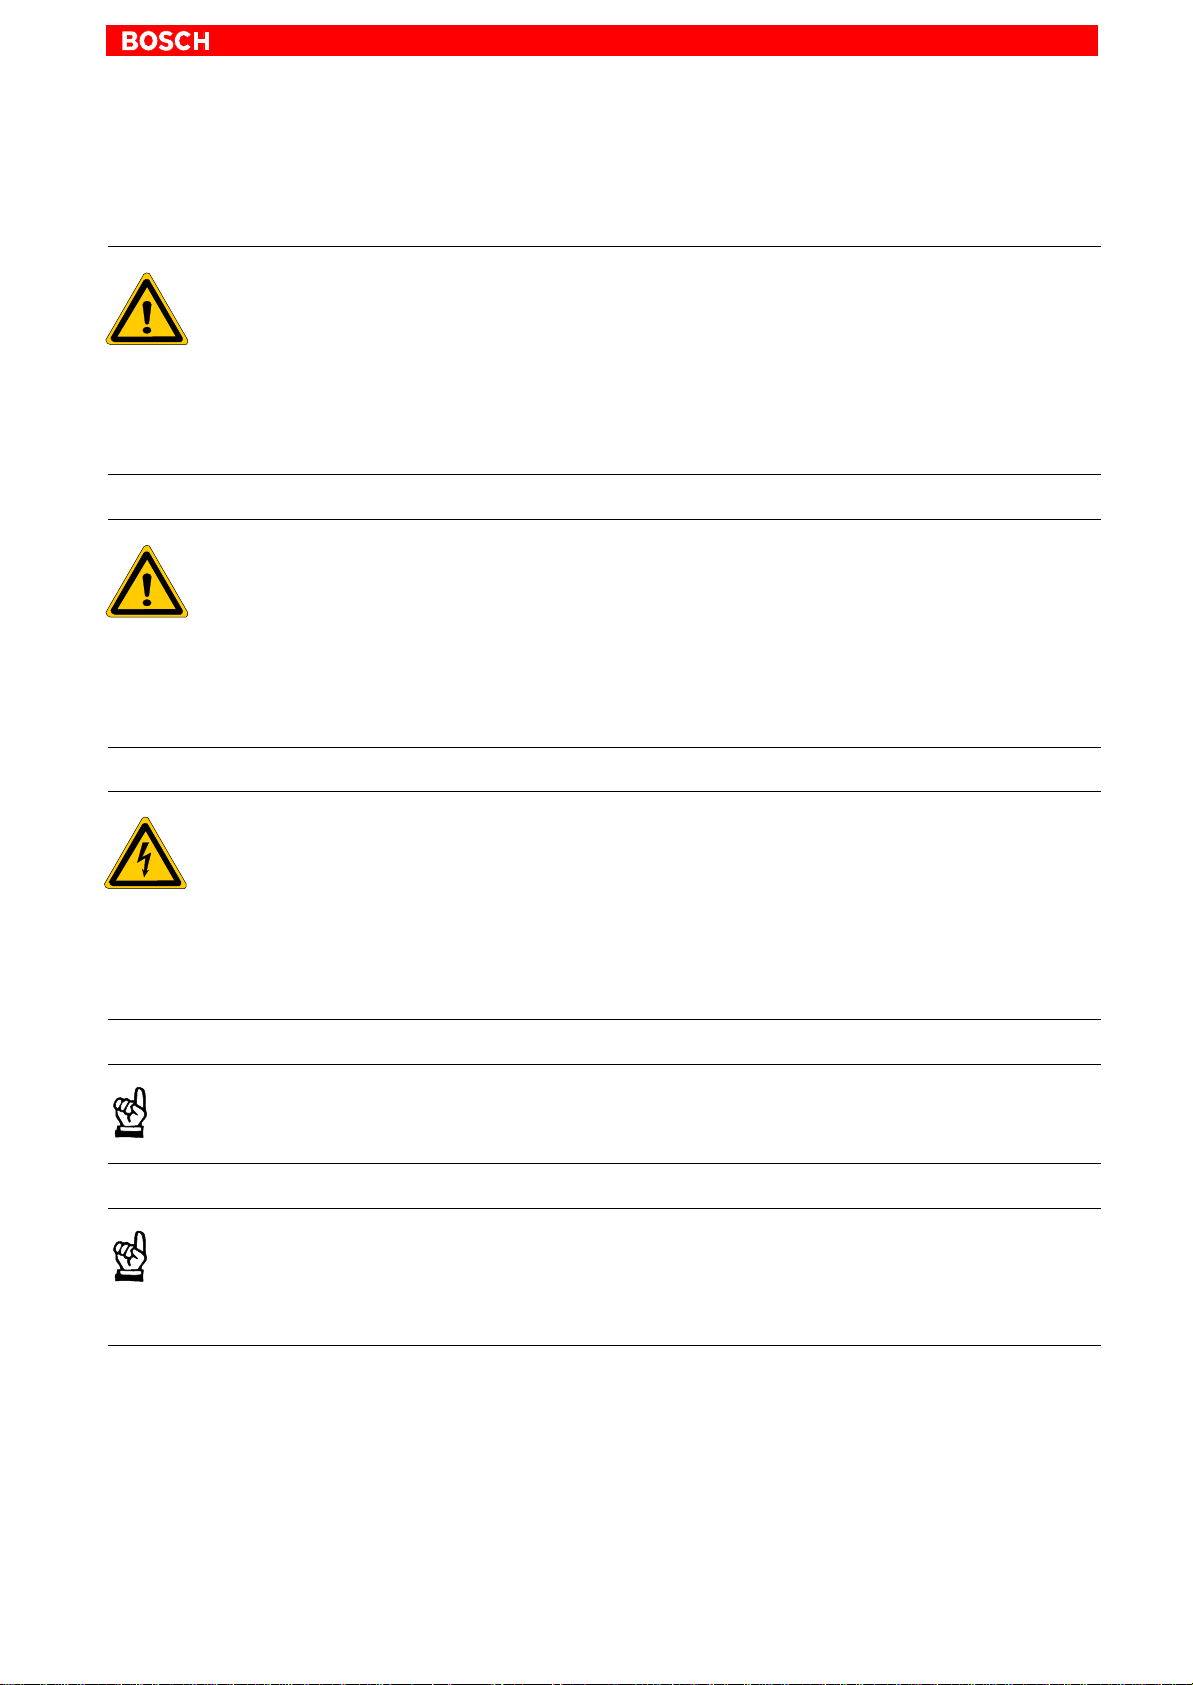
1.5 Safety instructions concerning the described product
DANGER
Fatal injury hazard through ineffective Emergency-STOP devices!
Emergency-STOP safety devices must remain effective and accessible during all operating modes of the system. The release of functional locks imposed by Emergency-STOP devices must never be allowed to cause an uncontrolled system restart!
Before restoring power to the system, test the Emergency-STOP sequence!
DANGER
Retrofits or modifications may interfere with the safety of the products described hereunder!
Safety Instructions
1–5
The consequences may be severe personal injury or damage to
equipment or the environment. Therefore, any system retrofitting or
modification utilizing equipment components from other manufacturers shall require express approval by Bosch Rexroth.
DANGEROUS ELECTRICAL VOLTAGE
Unless described otherwise, maintenance procedures must always
be carried out only while the system is isolated from the power supply. During this process, the system must be blocked to prevent an
unauthorized or inadvertent restart.
If measuring or testing procedures must be performed on active systems, these must be carried out by trained electricians.
CAUTION
Only Bosch Rexroth-approved spare parts may be used!
1070 073 822-104 (02.06) GB
CAUTION
Danger to the module!
All ESD protection measures must be observed when using the module! Prevent electrostatic discharges!
Page 10

1–6
Safety Instructions
Observe the following protective measures for electrostatically sensitive devices (ESD)!
D The personnel responsible for storage, transport and handling must be
trained in ESD protection.
D ESDs must be stored and transported in dedicated protective packaging.
D Out of principle, ESDs may be handled only at special ESD work stations
equipped for this particular purpose.
D Personnel, work surfaces and all devices and tools that could might come
into contact with ESDs must be on the same potential (e.g., earthed).
D An approved earthing wrist strap must be worn. It must be connected to
the work surface via a cable with integrated 1 MW resistor.
D ESDs may under no circumstances come into contact with objects sus-
ceptible to accumulating an electrostatic charge. Most items made of
plastic belong to this category.
D When installing ESDs in or removing them from an electronic device, the
power supply of the device must be switched OFF.
1070 073 822-104 (02.06) GB
Page 11

1.6 Documentation, software release and trademarks
Documentation
The present manual provides the user with comprehensive information
about operation and configuration of the IPC / IPC300 Industrial PC.
Overview of available documentation Part no.
IPC, IPC300 Connectivity Manual 1070 073 812 1070 073 822
Safety Instructions
German English
1–7
Release
Trademarks
BF2xxT / BF3xxT Control Panel
Connectivity Manual
1070 073 814 1070 073 824
. In this manual the floppy disk drive always uses drive letter A:, and the
hard disk drive always uses drive letter C:.
Special keys or key combinations are shown enclosed in pointed brackets:
D Named keys: e.g., <Enter>, <PgUp>, <Del>
D Key combinations (pressed simultaneously): e.g., <Ctrl> + <PgUp>
Information on the software version for Windows95 or WindowsNT can be
obtained by:
1. Clicking with the right mouse button on the “My Computer” icon
(”Workplace”) on the desktop
2. Select “Properties” menu option
All trademarks referring to software that is installed on Bosch Rexroth products when shipped from the factory represent the property of their respective
owners.
1070 073 822-104 (02.06) GB
At the time of shipment from the factory, all installed software is protected by
copyright. Software may therefore be duplicated only with the prior permission of the respective manufacturer or copyright owner.
MS-DOSr and Windowst are registered trademarks of Microsoft Corporation.
PROFIBUSr
is a registered trademark of the PROFIBUS Nutzerorganisa-
tion e.V. (user organization).
Page 12

1–8
Notes:
Safety Instructions
1070 073 822-104 (02.06) GB
Page 13
2 IPC System Overview
The Bosch IPC and IPC300 each comprise a powerful industrial PC with
additional components (e.g., UPS, temperature monitoring unit, safe shutdown of the operating system, up to 6 expansion cards with PCI and ISA
slot), all of which exceed the standard of an industrial PC.
The physical contruction is very compact and service-friendly, providing t h e
suitability for industrial applications:
D High degree of failure resistance (e.g., shock and vibration-proof
cushioned hard disk, UPS uninterruptible power supply), and
D Simple maintenance
In accordance with requirements, the IPC / IPC300 is supplied with installed
Microsoft Windows 95B or Windows NT4.0 operating system and appropriate Bosch Rexroth application software (refer to Section 9.3).
2.1 Versions
IPC System Overview
2–1
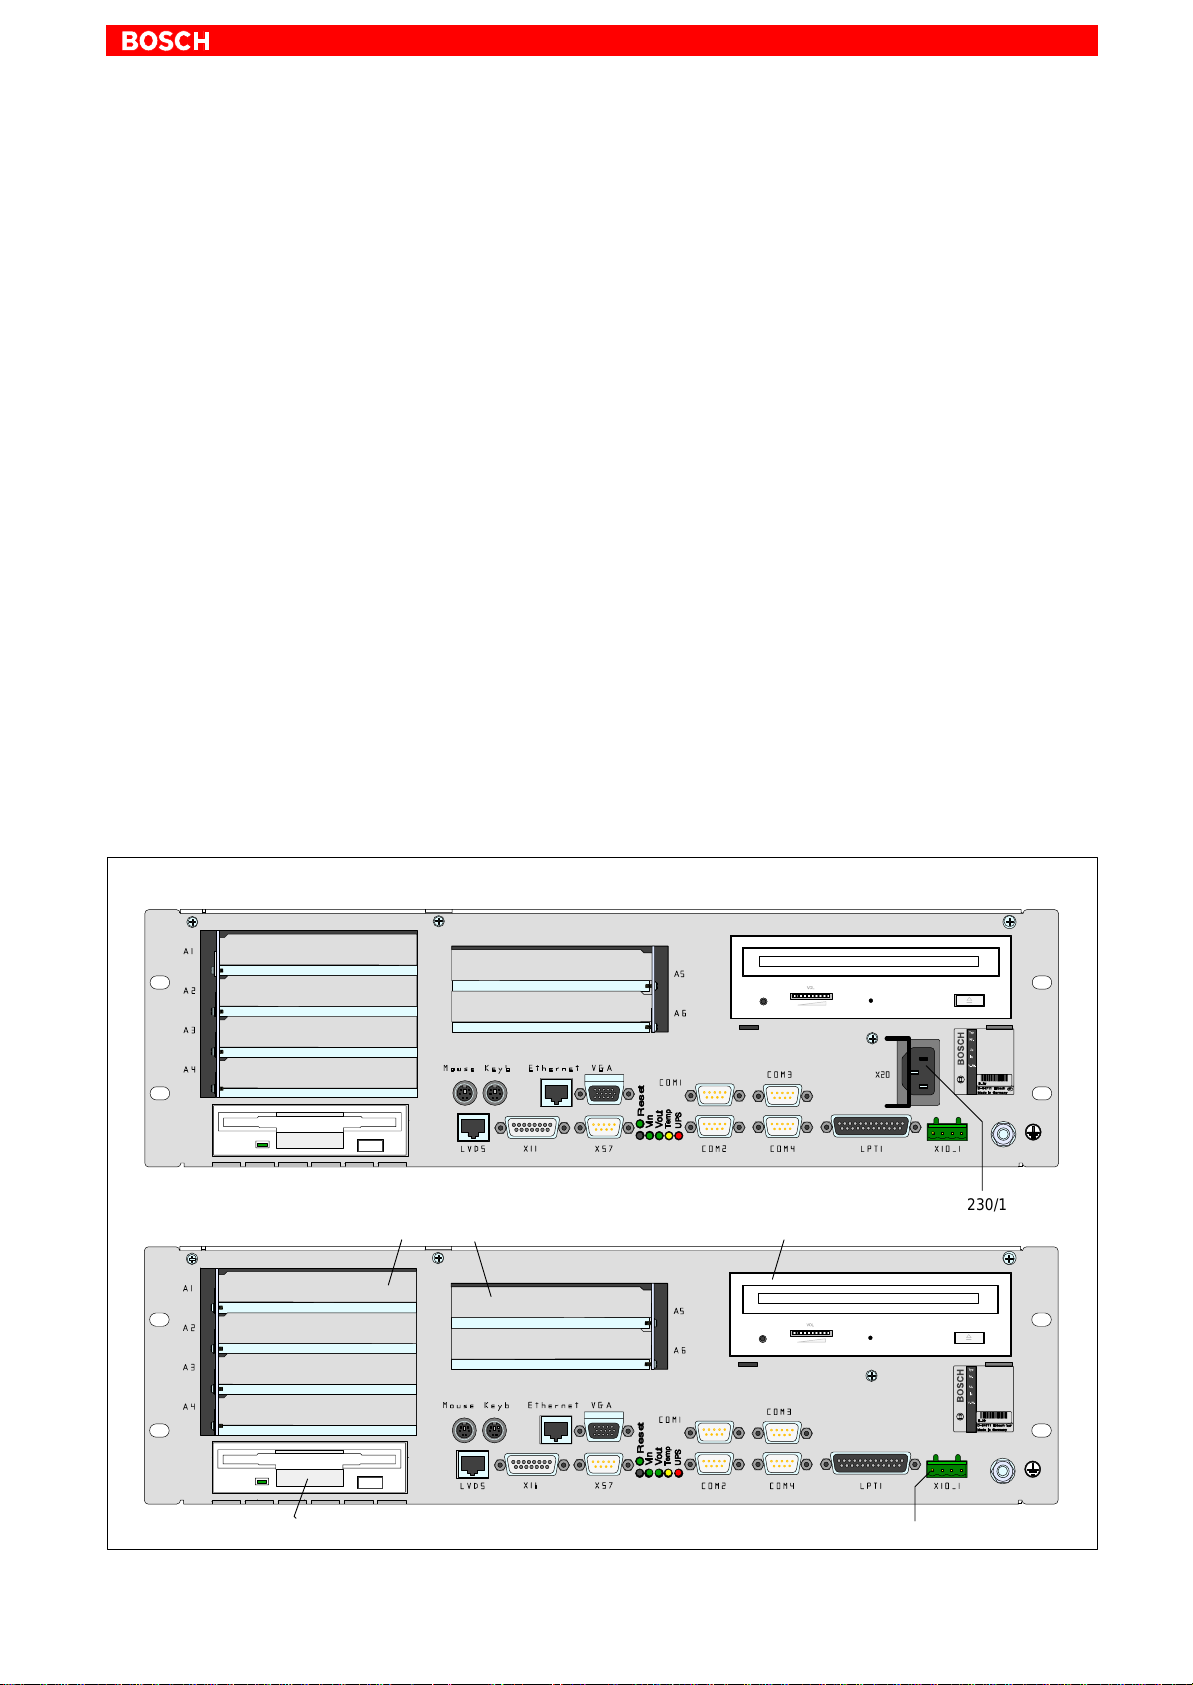
The IPC and IPC300 are available in two equipment versions accommodating different power supplies:
D 230/115 V
D 24 V
DC
. The 230/115 V
version
AC
version
version also has a 24 VDC input (X10_1) which is not
AC
functional, however.
230/115 V
24 V
version
AC
version CD-ROM drive
DC
Expansion slots
230/115 V
AC
3.5” Floppy disk
1070 073 822-104 (02.06) GB
24 V
+ –
DC
Page 14

2–2
IPC System Overview
2.2 Specifications
PC feature IPC IPC300
Interl Pentium processor
or compatible CPU (socket 7)
with Intel MMXT
Second level cache 512 kB 512 kB
RAM MIN 64 MB
Hard disk > 2.1 GB IDE (spring-cushion mount,
CD-ROM drive 32 X (or higher) 32-fach (min.)
Floppy Disk High-density 3.5 in./1.44 MB High-density 3.5 in./1.44 MB
Free expansion slots 4x PCI / 2x ISA or
Power supply
(2 versions)
UPS
(Uninterruptible Power Supply)
Temperature monitoring unit With warning function & safe shutdown With warning function & safe shutdown
4 LEDs Display of essential operating statuses Display of essential operating statuses
Standard interfaces 4x serial (RS-232,
technology
y 200 MHz or y 266 MHz* y 266 MHz
optional 400 MHz PentiumT III
min 64 MB
MAX 128 MB or 256 MB*
w/ Autopark function)
3x PCI / 3x ISA
230/115 VAC (at 50/60 Hz) or
24 VDC
Via internal battery Via internal battery
of which 1x optional RS-485/422),
1x parallel,
PS/2 keyboard, PS/2 mouse, VGA
max. 256 MB
> 2.1 GB IDE (federnd gelagert,
mit Autopark-Funktionalität)
4x PCI / 2x ISA or
3x PCI / 3x ISA
230/115 VAC (at 50/60 Hz) or
24 VDC
4x serial (RS-232,
of which 1x optional RS-485/422),
1x parallel,
PS/2 keyboard, PS/2 mouse, VGA
Enhanced interfaces Ethernet,
LVDS video transmission (touch screen
signals via COM2),
power supply for control panel.
Weight Approx. 8 kg Approx. 8 kg
IPC dimensions 19 in. housing:
448 x 132 x 256 mm
(19 in. x 3U x 256 mm)
Operating system Microsoft Windows 95B / Windows NT4.0 Microsoft Windows NT 4.0
* Due to processor phase-out, the IPC subject to concurrent modification to 266 MHz / MAX 256 MB.
Ethernet,
Gigabit video transmission including touch
screen signals,
power supply for control panel.
19”-Gehäuse:
448 x 132 x 256 mm
(19 in. x 3U x 256 mm)
. All specifications are subject to change as a result of technological de-
velopments. This also means that components providing higher than
the specified performance (e.g., a faster processor) may be integrated
in the devices without explicit reference in this documentation.
1070 073 822-104 (02.06) GB
Page 15

2.3 Expansion slots
IPC System Overview
Six expansion slots are provided for expansion cards:
D 3 PCI bus slots
D 2 ISA bus slots
D 1 PCI or ISA bus slot (combination slot)
CAUTION
Possible damage to or application software PC through the use of
non-approved expansion cards.
Use only approved expansion cards which have been installed by
authorized specialists.
For more information on installing expansion cards, refer to Section 8.3.
2–3
2.4 Rechargeable battery pack
The IPC and IPC300 feature an integrated rechargeable battery pack (2
series-connected 6V batteries).
In the presence of a power failure, the battery pack facilitates a controlled
and safe shutdown of the PC operating system, as described in Section 3.2,
“UPS Functions”. Loss of data held in PC RAM is thus prevented.
The rechargeable battery pack must be replaced if it no longer accumulates
a sufficient charge.
Refer also to Section 8.2.3.
1070 073 822-104 (02.06) GB
Page 16
2–4
IPC System Overview
2.5 Operating conditions
Temperature
The IPC and IPC300 are designed for continuous (24 hours/day) operation.
The display backlight can be switched off.
Unless stated otherwise in specific sections, these specifications apply:
Storage temperature
D –20°C to +60°C
Ambient temperature
D +5°C to +45°C
Ambient temperatures apply to installation described in Section 4.
Temperature fluctuations of up to 3°C per minute are permitted.
Relative humidity
Atmospheric pressure
Protection Category ratings
CAUTION
Excessive operating temperature!
Do not expose the PC to direct sunlight or other sources of heat radiation!
Climate class 3K3, as per EN 60529; condensation not permitted.
To DIN 60204, when operating at altitudes up to 2000 m above sea level.
IP00
Control cabinets and installation compartments for the control panels must
conform to IP 54 rating (dust filters upstream of air intake and exhaust):
CAUTION
Conditions hazardous to the product!
The ambient air must be free of electrically conductive pollutants
(e.g., acids, alkali, corrosives, salts, metallic vapours, etc.).
Air intake and exhaust filters must be serviced at regular intervals.
Vibration resistance, operating
Impact resistance
Frequency range: 10 to 150 Hz
Amplitude: 0.075 mm at 10 to 57 Hz
Acceleration: 1 g at 57 to 150 Hz
to EN 60068-2-6
15 g as per DIN IEC 68-2-27, no functional impediment.
1070 073 822-104 (02.06) GB
Page 17

2.6 Standards compatibility
The IPC and IPC300 system components are certified to comply with the
following standards:
D EN 60 204–1 Electrical systems on machines
D EN 50 081–2 Basic specification for interference emission
D EN 50 082–2 Basic technical standard, interference resistance
D EN 60 742 Tranformer for 24 V power supply, protective se-
D EN 60 950 Overvoltage category II
D EN 61 131 Requirements w/ respect to 24 V outputs
D EN 61 131–2 Requirements w/ respect to 24 V power supply
D EN 418 Machine safety, Emergency-STOP devices
D EN 60 529 Protection categories (incl. housings and instal-
D EN 60 068–2–6 Vibration test
D EN 60 068–2–27 Impact test
D .IS.114 “X-ray Radiation” Directive, as per Official Fede-
IPC System Overview
(industrial environment)
(industrial environment)
paration
lation compartments)
ral Gazette
2–5
. The CE licensing requirements have been fulfilled for all IPC and
IPC300 shipped from the factory.
However, the subsequent insertion of additional expansion cards will
necessitate a supplementary CE certification.
1070 073 822-104 (02.06) GB
Page 18

2–6
Notes:
IPC System Overview
1070 073 822-104 (02.06) GB
Page 19

3 Security Functions
Each PC is equipped with a temperature monitoring function and an uninterruptible power supply (UPS). The UPS only works in conjunction with a battery pack.
3.1 Temperature monitoring function
The ambient air of the IPC must not exceed +45°C (see Section 2.5). To ensure operational reliability , a temperature monitoring function measures the
internal housing temperature.
A temperature warning, occurring at internal housing temperatures exceed-
ing 50°C, manifests itself as follows:
D via the flashing “Temp” LED at the front panel of the housing.
D via a message window displayed by the operating system.
This message must also be interpreted by all PC applications, and by I/O
processes in particular. Bosch Rexroth application programs are in full
compliance with this requirement.
Security Functions
3–1
The descibed temperature monitor can be disabled by means of the following program:
D UPS
D UPS
See also Section 3.3.
If temperatures in the housing exceed 65°C, the IPC will be shut down and
switched off via the UPS logic circuit (see Section 3.2).
DANGER
Inadvertent machine movements.
Always ensure that temperatures remain within the noncritical
range. In the case of application-sensitive procedures, ensure that
machine movements are terminated in a controlled fashion in the
event that the temperature monitoring function disables the operator
terminal.
for Windows 95
plus
for Windows NT 4.0
NT
1070 073 822-104 (02.06) GB
Page 20
3–2
Security Functions
3.2 Uninterruptible power supply (UPS)
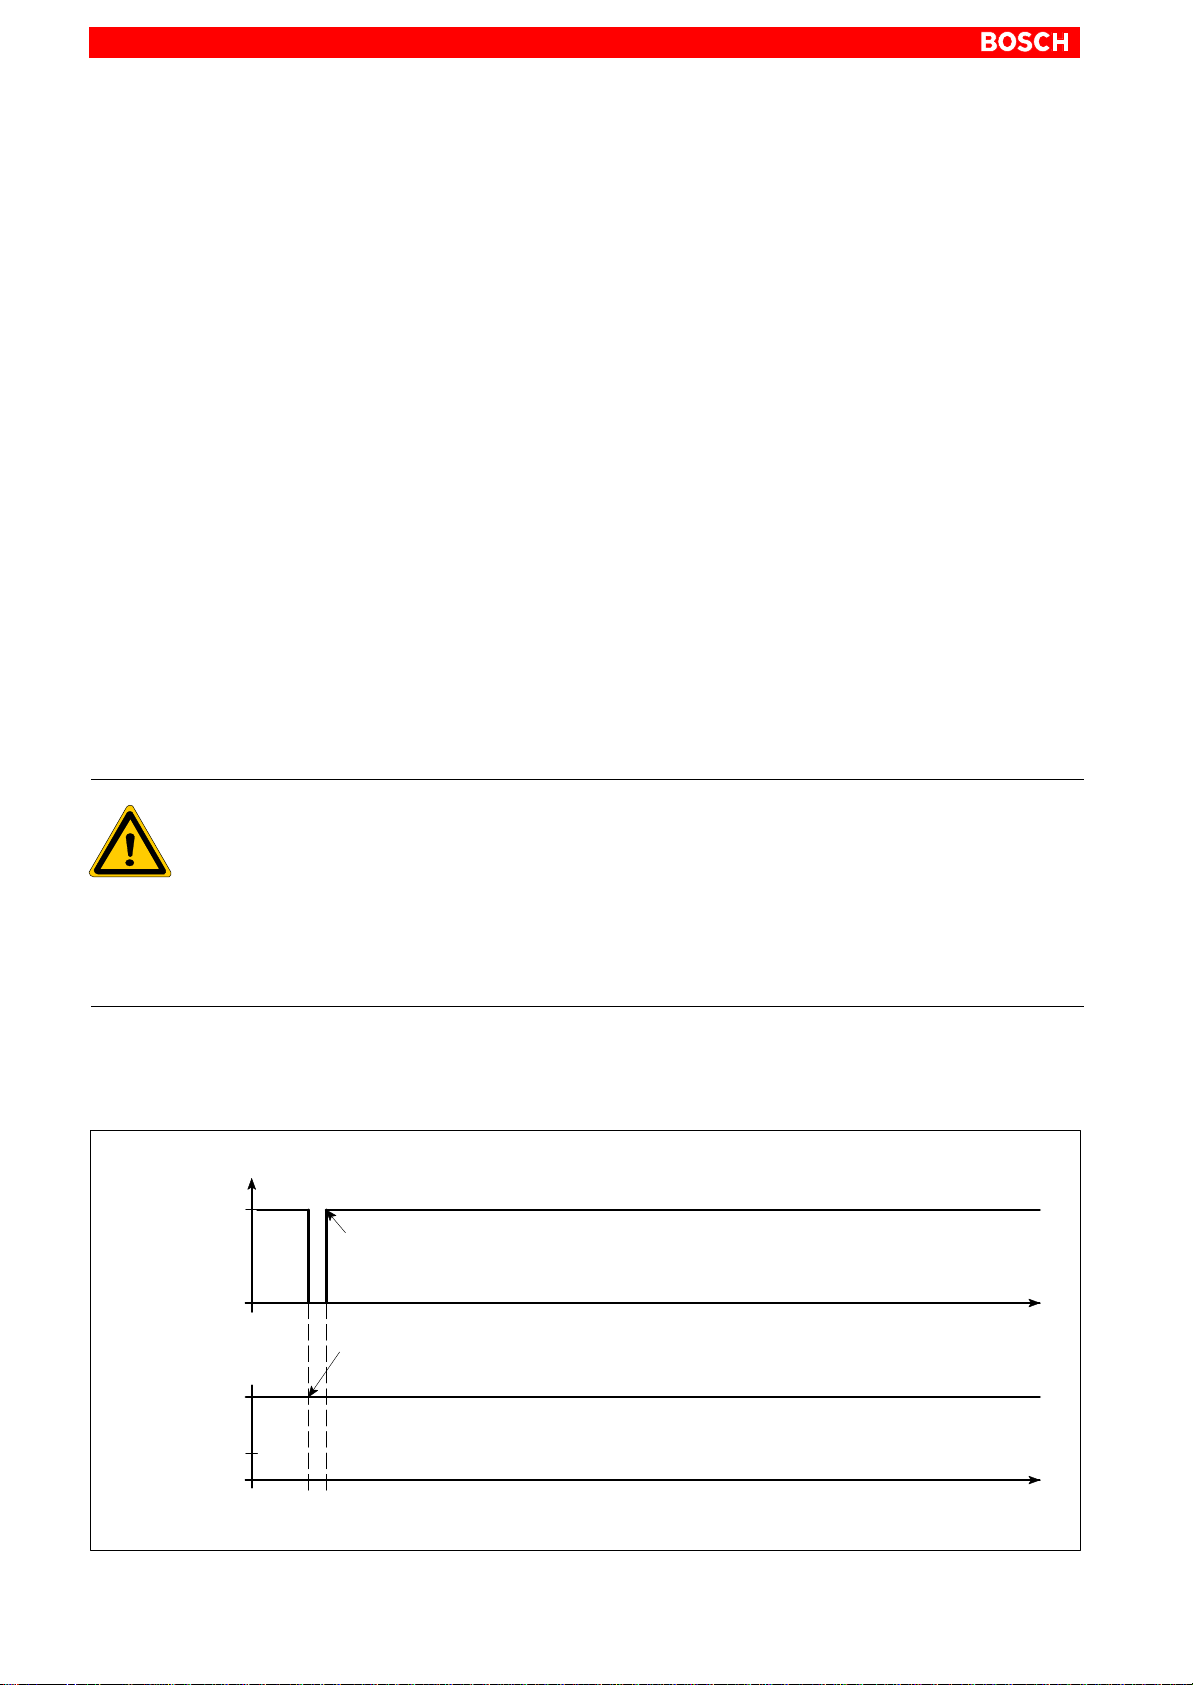
In the event of a power failure exceeding 800 ms in duration, or of an internal
housing temperature in excess of 65°C (refer to Section 3.1, above), the
UPS logic integrated in the power supply is activated, effecting a safe operating system shutdown procedure backed up by the internal rechargeable battery (”battery pack”).
Power interruptions of shorter durations are bridged by the battery pack. For
an IPC300 running with the Windows NT operating system, power interruptions of up t o 5 seconds in length may be permitted before the USP logic circuit activates.
Please note:
D To allow the rechargeable battery pack to attain its full charge capacity,
the IPC must remain powered up for a minimum of 5 hours subsequent to
initial start-up. Sufficient USP protection cannot be ensured during this
charging period.
D IPC only:
Frequent On/Off cycling of power tends to cause rapid discharge of the
battery pack. You should never cycle the power more often than 4 times in
succession. The battery pack must again be fully recharged thereafter.
D The UPS locgic function requires hard disk capacity for intermediate
datza storage. Ensure that the hard disk never fills up completely.
D Check and verify whether or not the preset Delay Time of 30 seconds
selected in the UPS Dialog window will allow the safe shutdown of all application programs, or whether the interval must be increased.
Voltage drops below 800 ms duration
V
Operating voltage
Operating voltage
restored within 800 ms
IPC is not shut down,
Operating
system
loaded
(standard
operation)
not loaded
as operating voltage interruption < 800 ms
DANGER
If there are no batteries in the unit, or if the batteries are defective or
discharged, the IPC will RESET without warning after a voltage dip
in excess of 20 ms! Possible consequences are uncontrolled machine movements or loss of data.
Each time the PC is booted up, observe UPS program messages indicating that the battery pack may be discharged. This test is run during each PC boot phase.
Voltage drops below 800 ms duration are bridged by the battery pack, and
do not trigger the UPS logic circuit.
t
t0 t1 < 800 ms
t
1070 073 822-104 (02.06) GB
Page 21
Voltage drops between 800 ms and 60 s duration
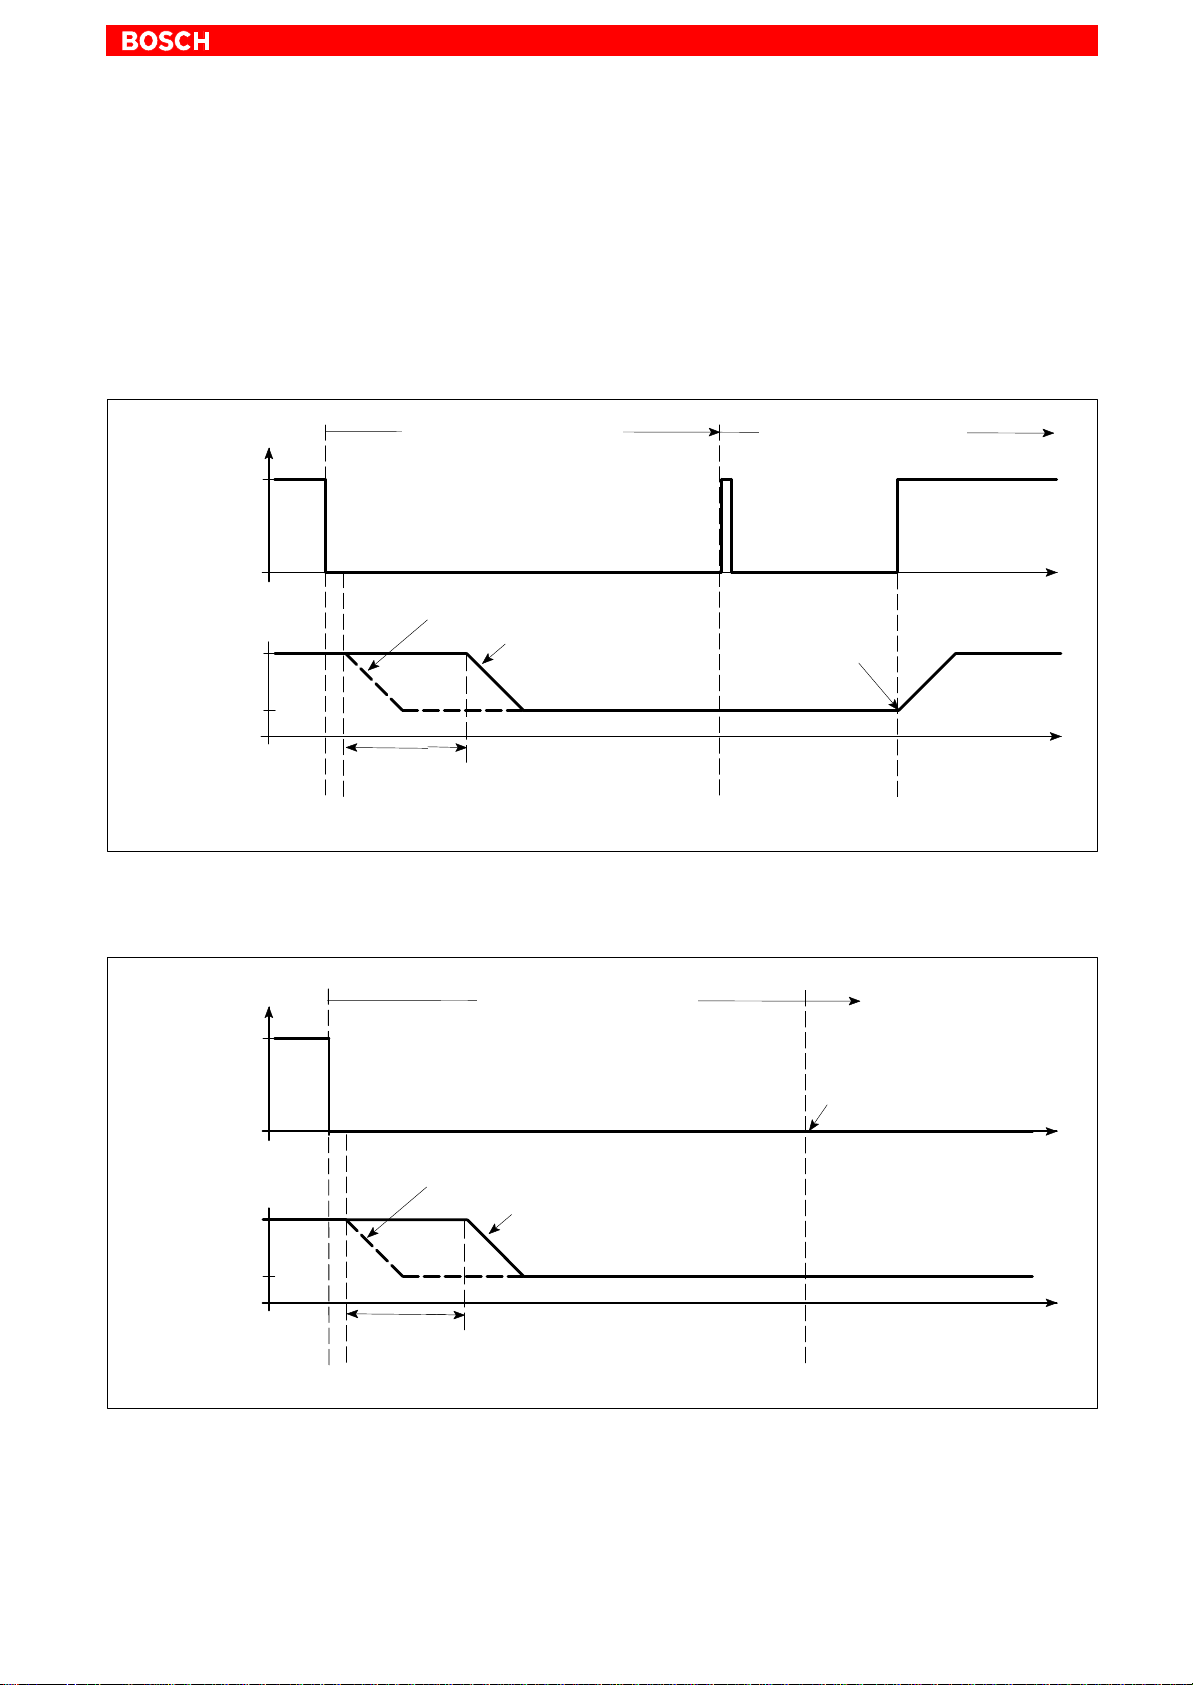
In the event of a voltage drop in excess of 800 ms, the operating system will
initiate a safe shutdown of the operating system after a preselected delay
time.
D If the mains power is restored within a 5-second interval (short break), the
USP will remain disabled (IPC300 only with appropriate settings).
D If the mains power is restored within the next 60 seconds, the USP will
interrupt the operating voltage for another 8 seconds (up to t3), and then
again restart the operating system.
Security Functions
3–3
V
Operating voltage
Operating
system
loaded
(standard
operation)
not loaded
t0t1 = 800 ms
Mains voltage failure Mains voltage available
Shutdown of the
application program
Delay Time,
adjustable
Voltage interruption in excess of 60 seconds
After approx. 60 sec the UPS internally switches off the power supply.
V
Mains voltage failure
Operating system
shutdown
Operating voltage interrupted
for 8 seconds
Operating
system startup
< 60 sec
t
2
t
= t2 + 8 sec
3
t
t
Operating voltage
Operating
system
loaded
(standard
operation)
not loaded
1070 073 822-104 (02.06) GB
UPS deenergizes power supply
Shutdown of the
application program
Operating system
shutdown
Delay Time,
adjustable
t0t1 = 800 ms t4 = t1 + 60 sec
. For the procedures required to adjust the Delay Time with the
“UPS
also “UPS
” supplementary software, see page LEERER MERKER. See
plus
for IPC” (page 3–10), or “UPSNT for IPC300” (page 3–13).
NT
t
t
Page 22

3–4
Security Functions
3.3 UPS program
3.3.1 Functions
The “UPS
” or “UPSNT” uninterruptible power supply program controls
plus
and monitors the integrated uninterruptible power supply (UPS). The
program also checks the function of the battery pack, and controls
temperature monitoring of the system.
In the case of the IPC300, the program also monitors fan functions and internal operating voltages.
Depending on the type of IPC and its operating system, one of the following
is installed:
D UPS
D UPS
D UPS
for IPC with Windows 95
plus
for IPC with Windows NT
NT
for IPC300 with Windows NT
NT
The UPS program is always connected to the UPS via the COM4 serial port.
The occurrence of a voltage drop/interruption causes the UPS program to
respond as follows:
D By sending, within a preselected interval (Delay Time = max. 50
seconds), a signal to all active applications, facilitating their safe
shutdown by the user / operator or via special application routines.
D By following the expiration of the Delay Time by shutting down the operat-
ing system.
Once the UPS power monitoring function has been triggered, aborting
the system shutdown routine is no longer possible.
Closing all active applications prevents data loss in the event of a sudden
voltage interruption.
If the mains voltage has not been restored, the UPS switches off the IPC
power supply after a maximum 60 seconds (see disconnect conditions in
Section 3.2).
CAUTION
Loss of data through manual restart!
Note that the USP switches off the operator terminal in any case. For
thus reason, once the operating system has been shut down, the
“Restart” dialog button must not be selected.
In the case of voltage interruptions below 60 seconds, the operating
system is restarted automatically.
The operator cannot access the UPS
or UPSNT program during standard
plus
operation. Operation and settings are not possible without special access
rights (as User or Administrator), and not until the operating system has
been restarted.
. Parameter values set in UPS
or UPSNT may not be changed without
plus
prior consultation with Bosch Rexroth AG.
1070 073 822-104 (02.06) GB
Page 23
Security Functions
3–5
3.3.2 Operating and configuring UPS
. The full complement of the procedural steps described below is avail-
able only during the initial installation, or in the event that the program
was started by a user with special access privileges.
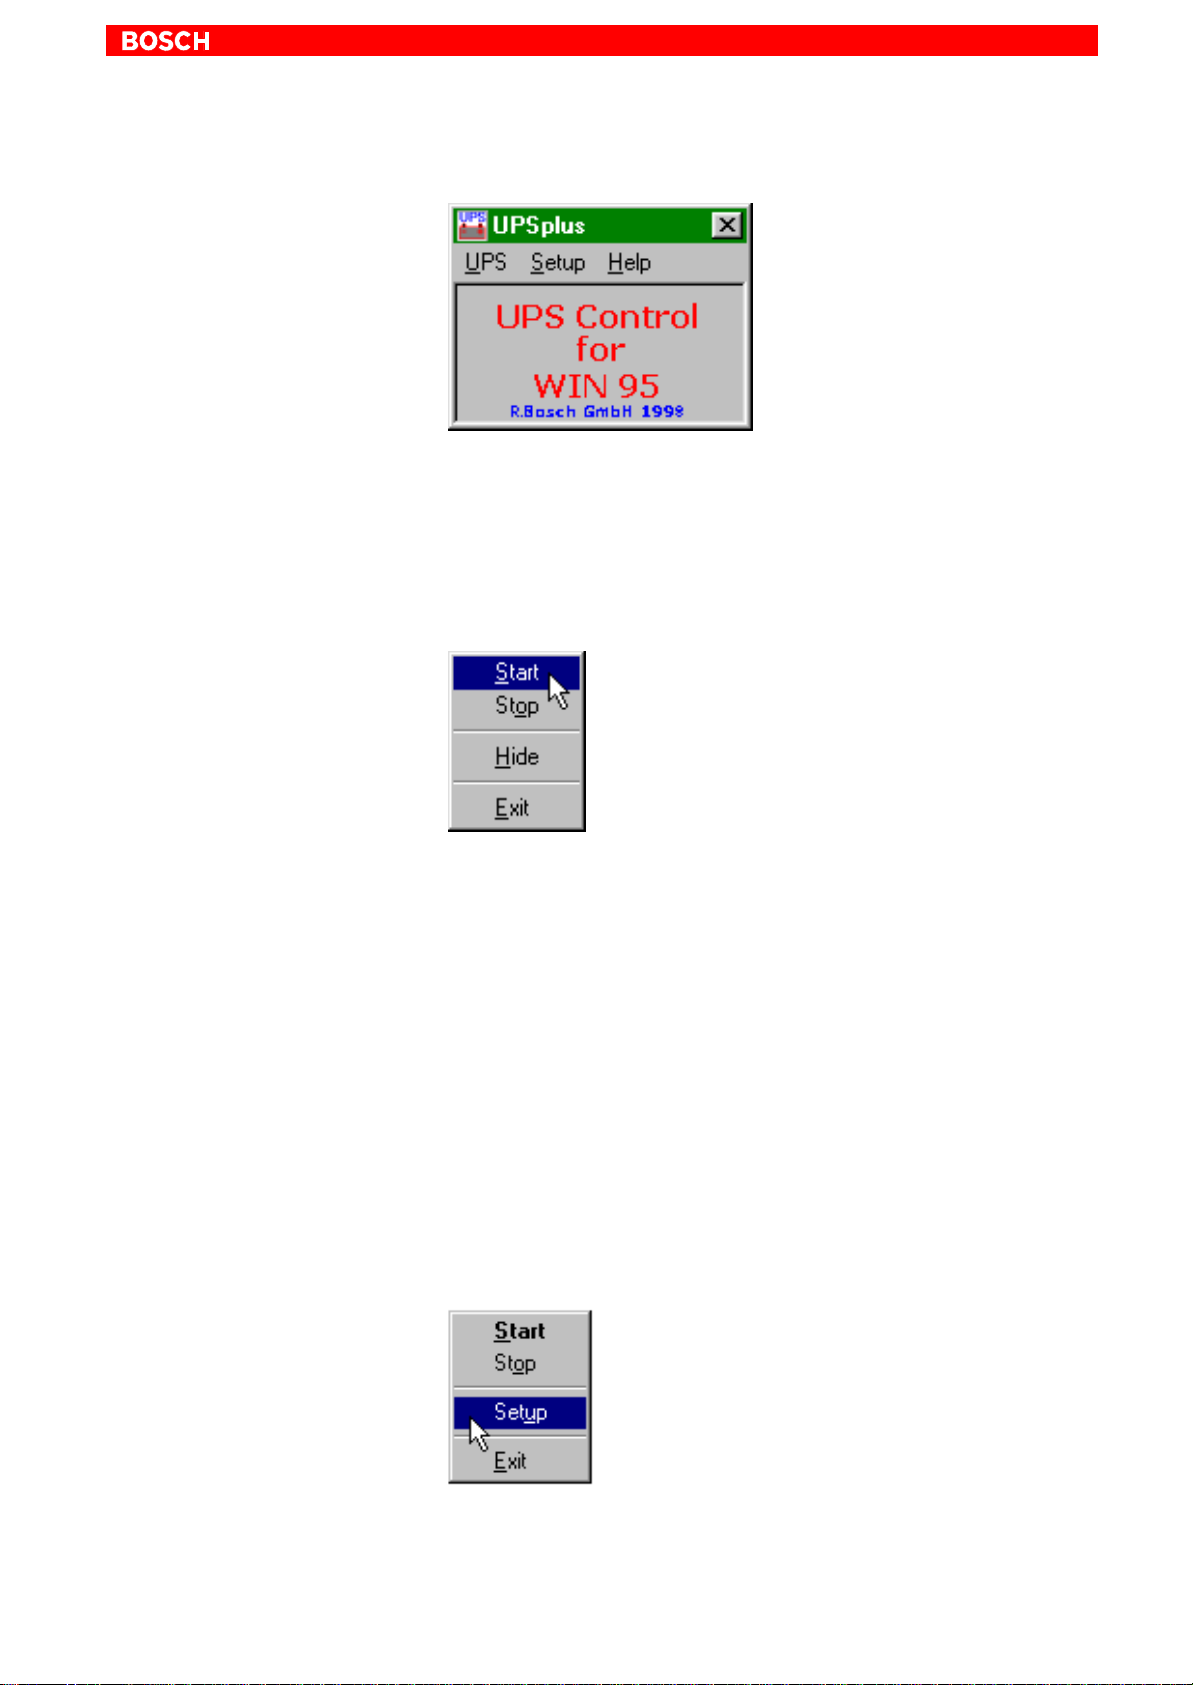
Start / Stop
Select the UPS menu option in the main window, and double-click Start.
(Windows95)
plus
Hide
Exit
Simple operating menu
Subsequent to the initial installation or after a Stop command, the program is
again started with this command. Once the start has been successful, the
main window disappears after approx. 2 seconds, and a symbol is added to
the task bar.
The USP program is exited by selecting the Stop menu command.
Hides the main window of the program, and adds a symbol to the task bar.
The command is not available while the program is stopped.
Exits the entire program, and terminates an ongoing monitoring event.
Click the right mouse button to open a simple operating menu listing the
important functions of the program.
1070 073 822-104 (02.06) GB
Page 24
3–6
Security Functions
Configuration
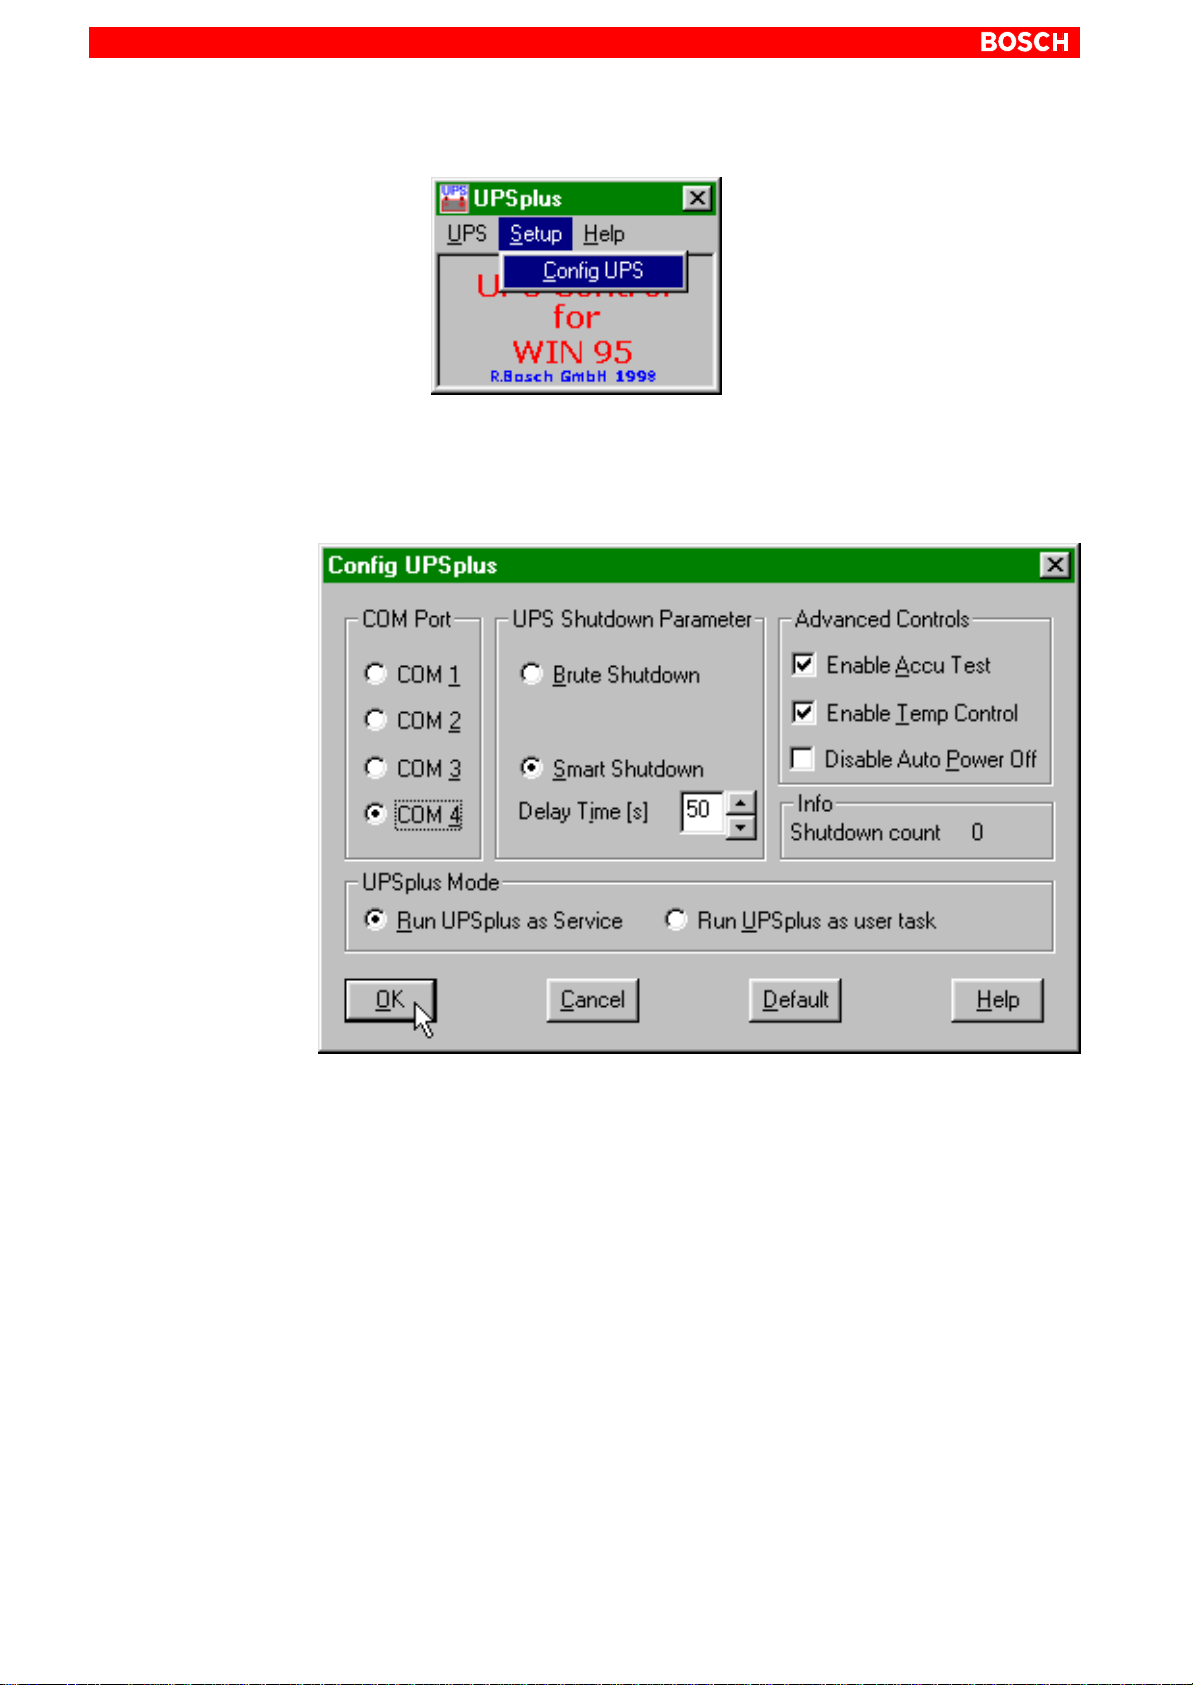
This dialogue defines the start and runtime characteristics of UPS
monitoring.
To allow possible changes to take effect, the UPS program must be stopped
and restarted.
COM Port
UPS Shutdown Parameter
The UPS program is always connected to the UPS via the COM4 serial port.
Brute Shutdown
Upon receipt of the shutdown signal from the UPS, the shutdown command
for the Windows operating system is issued without delay. This causes the
immediate termination of all active aplications, followed by the shutdown of
Windows.
Smart Shutdown
Upon receipt of the shutdown signal from the UPS, the preset Delay Time
starts to elapse.
1070 073 822-104 (02.06) GB
Page 25
Security Functions
3–7
Delay Time
This interval is defined as a value between 0 and 50 seconds, by which the
shutdown of Windows will be delayed. The intervening period is used to
dispatch a Request To Close message to all active windows. The user can
avail himself of this time for the purpose of saving his data. Upon expiry of the
Delay T ime, all application programs will be terminated without prior security
query!
When setting the Delay Time, observe that there must be sufficient time to
effect a safe shutdown of the operating system (closing and backing up Windows system files), i.e., between the end of the Delay Time and the expiry of
the 60 seconds after the shutdown signal. If the interval is too short, the shutdown process will be interrupted because the UPS disrupts the mains power .
This may cause loss of data in some circumstances.
CAUTION
Upon expiry of the Delay Time, the operating system is shut down
without prior security query . Unsecured data belonging to open applications will be lost.
Advanced Controls
Enable Accu Test
When this check box is checked, the system performs a test of the battery
pack during each restart.
In the case of a faulty battery pack (e.g., defective battery pack, cable break,
plug not connected), battery monitoring is disabled. The UPS program continues only with its temperature monitoring function.
If temperature monitoring has not been enabled, the UPS program will be
terminated.
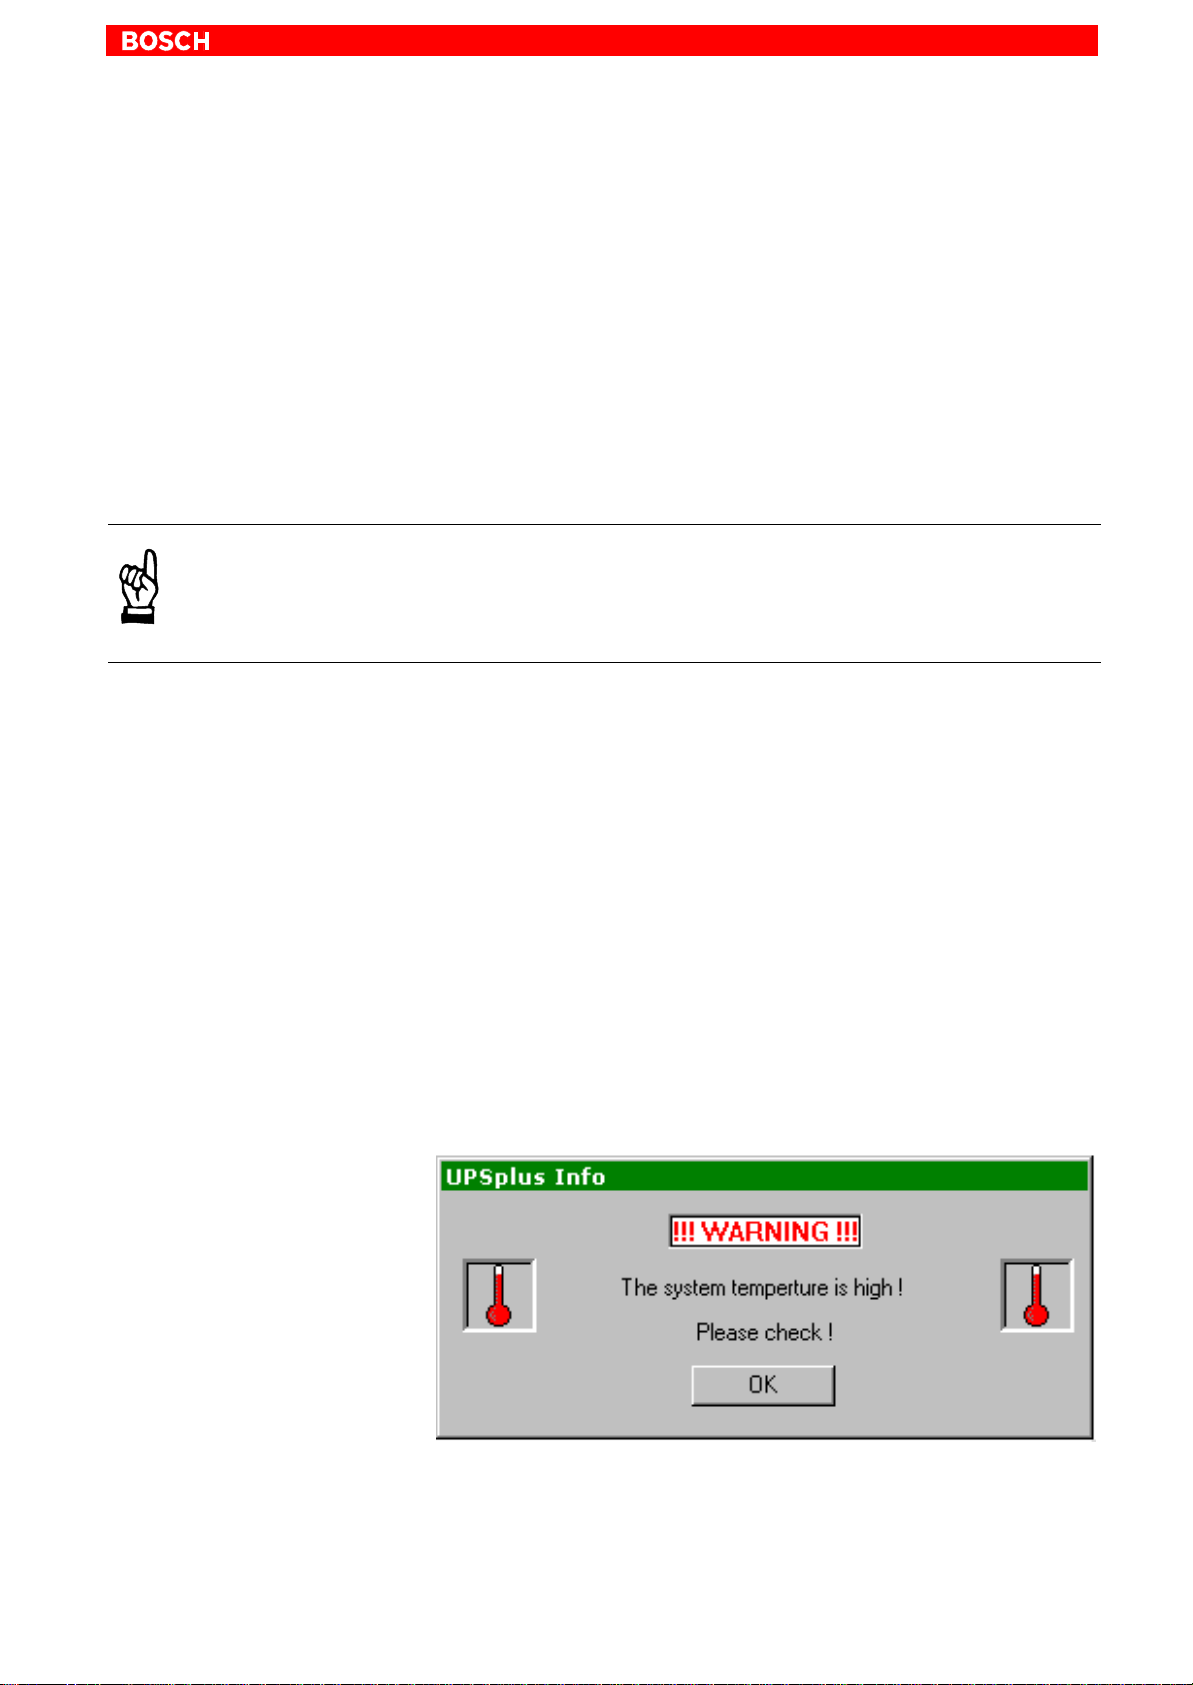
Enable Temp Control
When this checkbox is checked, the ambient temperature is monitored on a
continuous basis. Excessive temperatures will produce the following warning message:
1070 073 822-104 (02.06) GB
Subsequent to a temperature warning, the UPS program is again enabled.
During the reactivation interval of approx. 2 seconds, no power monitoring
takes place although the battery pack is fully functional.
Page 26

3–8
Info
Security Functions
Disable Auto Power Off
This option disables both the USP monitoring function and the power-off
delay for the power supply:
D A voltage interruption will cause the PC to shut down immediately.
D After a normal shutdown, the wait interval of approx. 60 seconds prior to
the shutdown of the power supply is omitted.
Although this function reduces the wait times during startups and software
installations, it must always be disabled during standard operation!
CAUTION
Loss of data!
Activation of this checkbox no longer makes a safe shutdown possible in the event of a power failure. The device switches off instantly!
Shutdown Count
The displayed value shows how often the system was shut down by UPS, i.e.
how many charging cycles the battery has been subjected to. More details
regarding after how many charging cycles it is necessaary to replace the rechargebale batteries is contained in section 8.2.3.
plus
Mode
UPS
Default button
There are two operating modes for the UPS
program:
plus
Run as Service
The program is started as part of the Windows 95 startup, and remains active
until Windows 95 is again terminated. Changing user logins have no influence on the program’s characteristics.
The user in unable to stop the program or terminate monitoring. Although he
would be able to access the active program via the Setup dialog and change
parameter values, these changes would not take effect until Windows 95 has
been restarted.
Run as User Task
The program is started as part of a user login routine, and is terminated upon
logout. The user has full control over all UPS program functions.
Selecting this button returns all settings to their default values.
These are:
D COM port: COM4
D Smart Shutdown, Delay Time: 50 sec
D Enable Accu Test: enabled
D Enable Temp Control: enabled
D Disable Auto Power Off: disabled
D Run UPS
as Service: enabled
plus
1070 073 822-104 (02.06) GB
Page 27
3.3.3 Operating and configuring UPSNT (WindowsNT)
. Operation requires Administrator privileges!
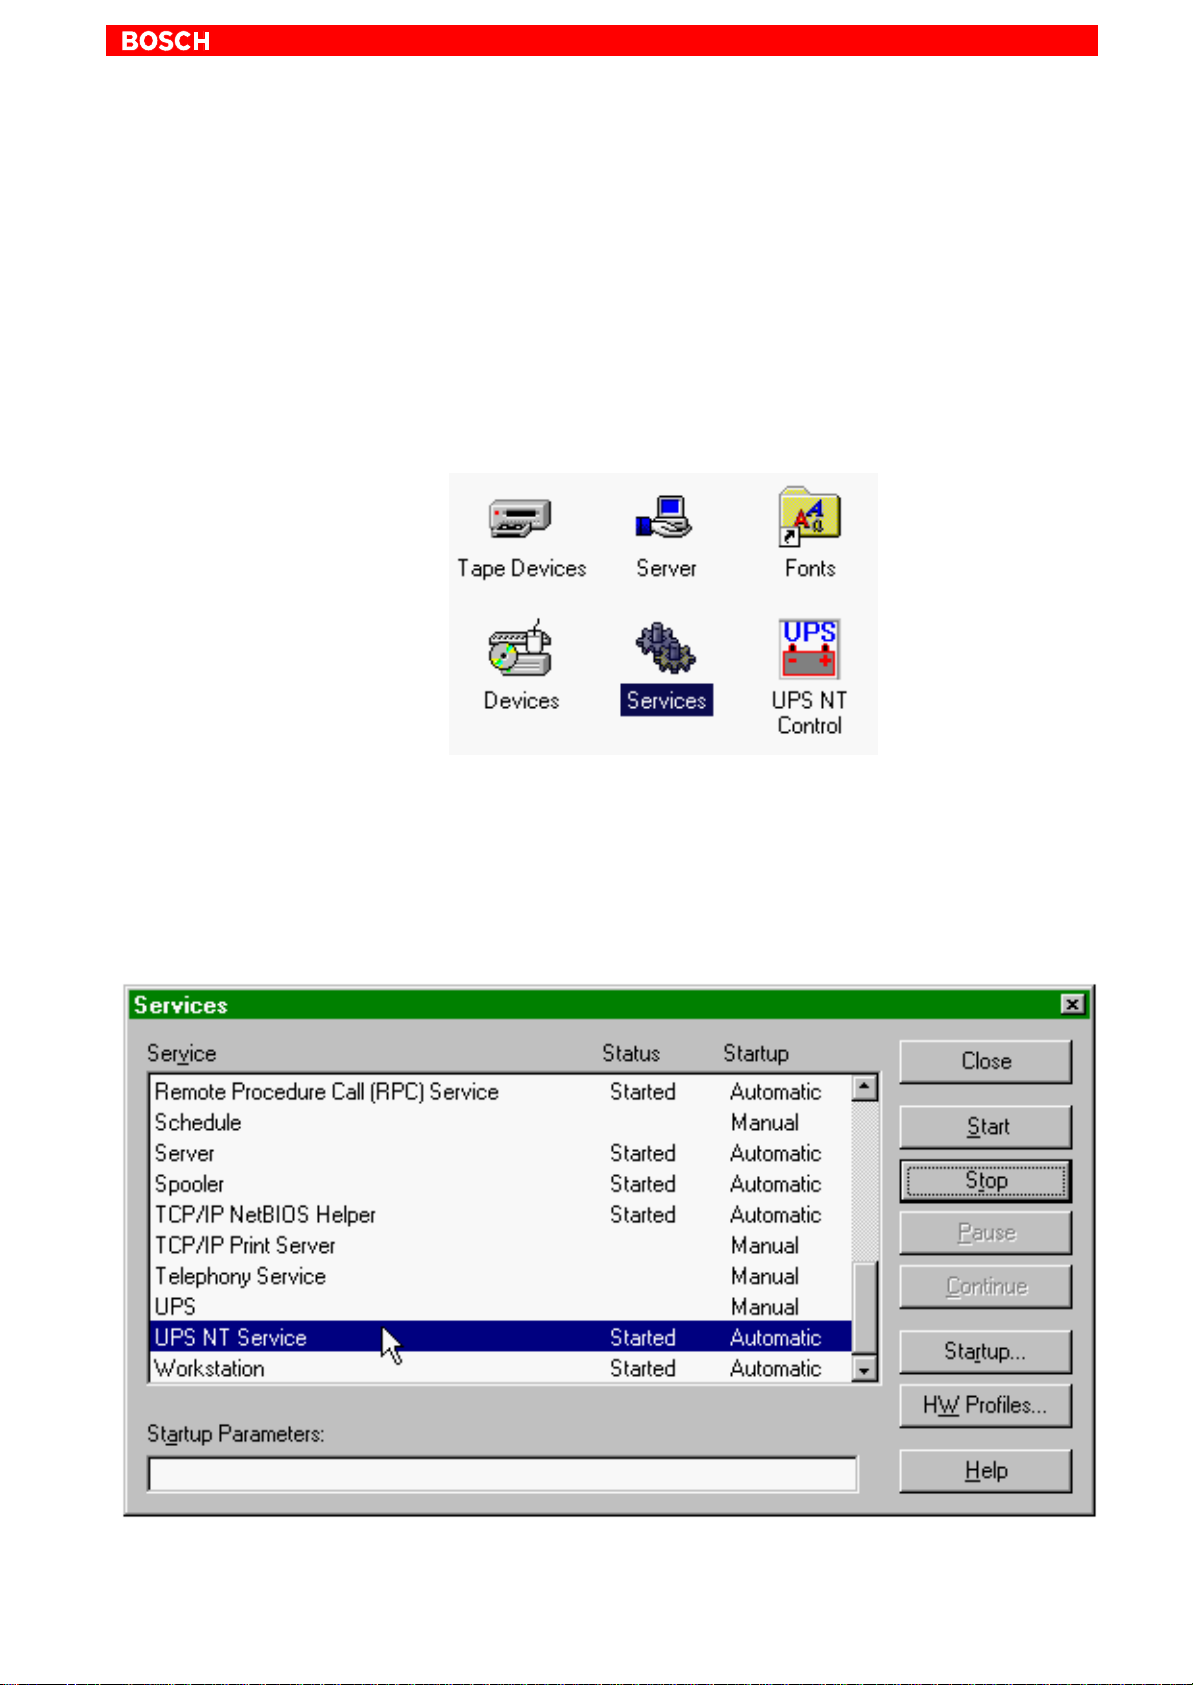
Start / Stop
The UPS
If the service is to be stopped, ended or restarted (e.g., during a reinstallation
or update procedure), select Services Manager in the system control (see
icon below, to the left of UPS
program is automatically started with WindowsNT.
NT
Control).
NT
Security Functions
3–9
The status of the UPSNT service is displayed in the Services Manager of
WindowsNT:
D UPS
D UPS
The marked entry of the UPS
stopped: No entry in Status column
NT
started: Started entry in Status column
NT
service is started and stopped via the Start
NT
and Stop buttons, respectively.
1070 073 822-104 (02.06) GB
Page 28
3–10
Security Functions
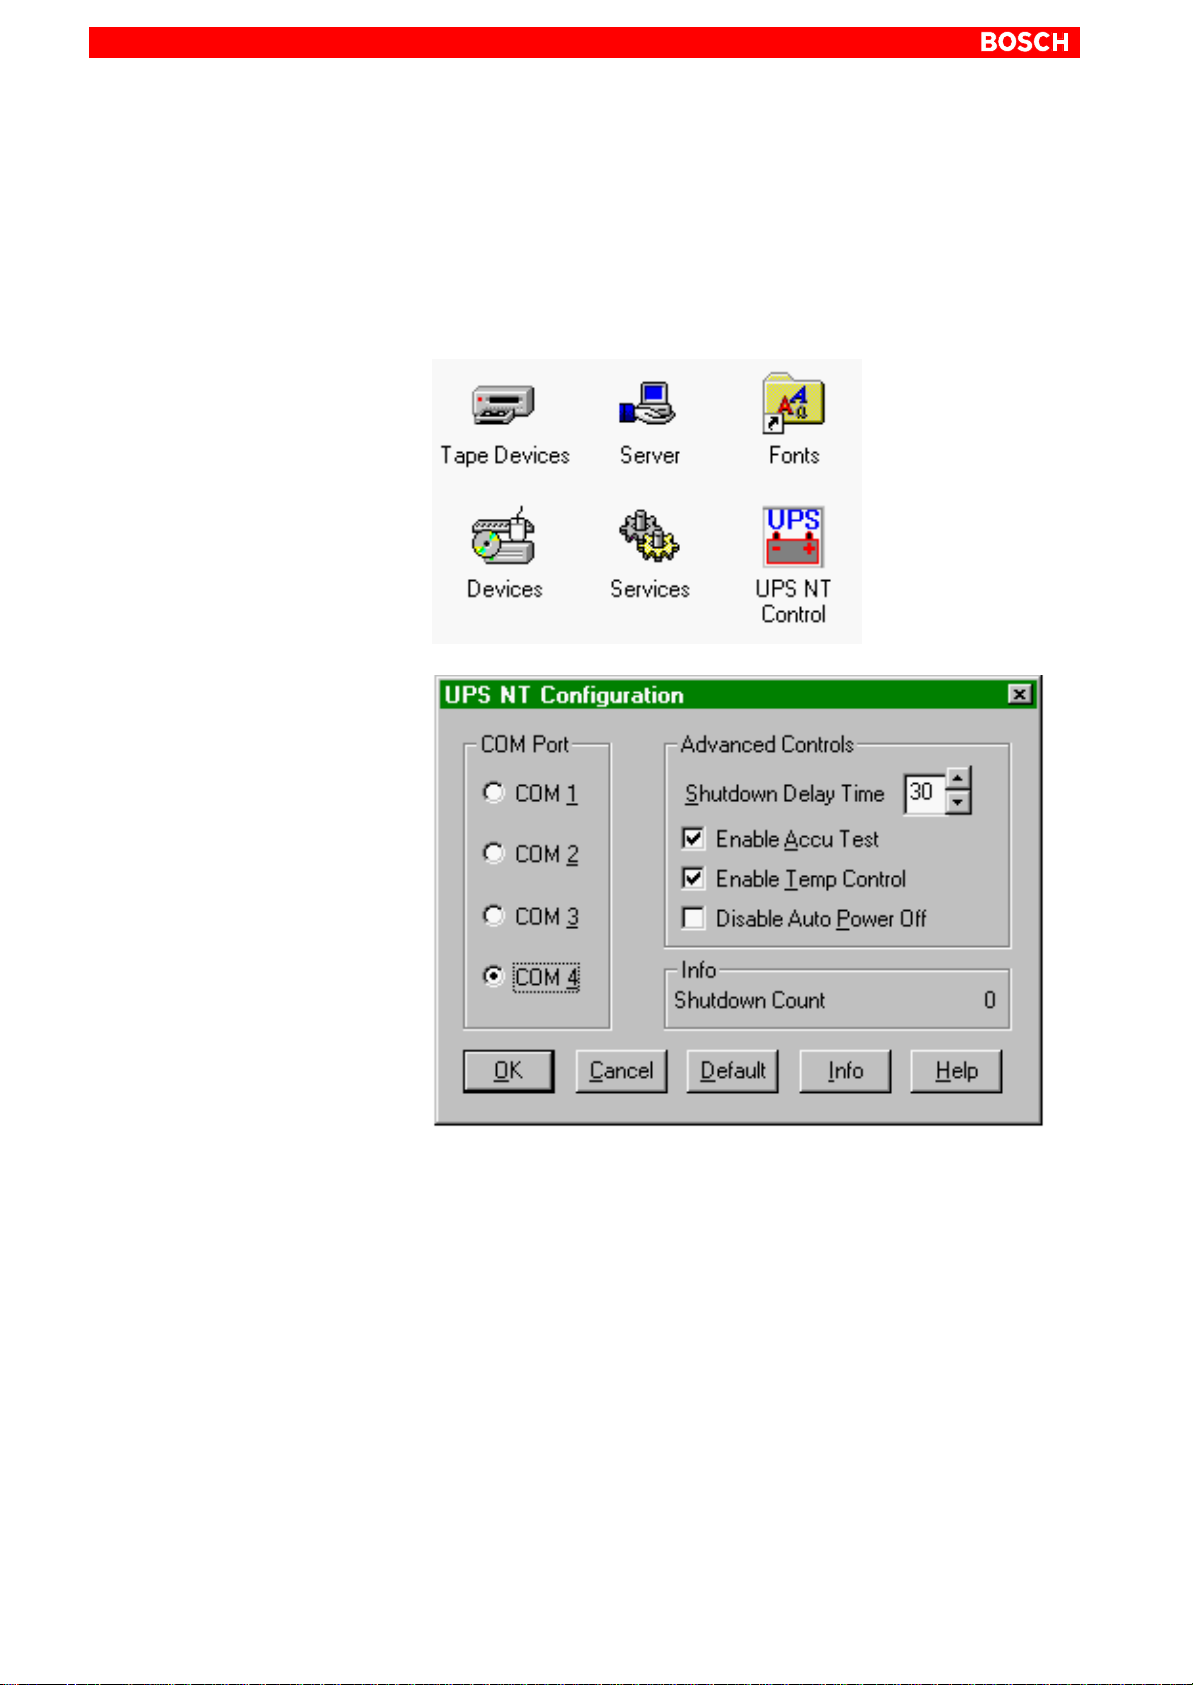
Configuration – UPSNT for IPC
To configure the UPS
program, select UPS NT Control in the control
NT
panel (see illustration below).
. The UPS
program always runs as a Windows NT service. Changing
NT
user logins have no influence on this characteristic. A user without Administrator privileges is neither able to terminate the program nor stop
the monitoring function.
COM Port
. To allow new parameter values to take effect subsequent to their
modification, the UPS program must be stopped and restarted.
This may be accomplished by restarting the computer, or with the aid
of the Services Manager.
The UPS program is always connected to the UPS via the COM4 serial port.
1070 073 822-104 (02.06) GB
Page 29

Advanced Controls
Security Functions
3–11
Shutdown Delay Time
This interval is defined as a value between 0 and 45 seconds, by which the
shutdown of Windows will be delayed. The intervening period is used to
dispatch a Request To Close message to all active windows. The user can
avail himself of this time for the purpose of saving his data. Upon expiry of the
Delay T ime, all application programs will be terminated without prior security
query!
When setting the Delay Time, observe that there must be sufficient time to
effect a safe shutdown of the operating system (closing and backing up Windows system files), i.e., between the end of the Delay Time and the expiry of
the 60 seconds after the shutdown signal. If the interval is too short, the shutdown process will be interrupted because the UPS disrupts the mains power .
This may cause loss of data in some circumstances.
CAUTION
Upon expiry of the Delay Time, the operating system is shut down
without prior security query . Unsecured data belonging to open applications will be lost.
Enable Accu Test
When this check box is checked, the system performs a test of the battery
pack during each restart.
In the case of a faulty battery pack (e.g., defective battery pack, cable break,
plug not connected), battery monitoring is disabled. The UPS program continues only with its temperature monitoring function.
If temperature monitoring has not been enabled, the UPS program will be
terminated.
Enable Temp Control
When this checkbox is checked, the ambient temperature is monitored on a
continuous basis. Excessive temperatures will produce a temperature warning message.
Subsequent to a temperature warning, the UPS program is again enabled.
During the reactivation interval of approx. 2 seconds, no power monitoring
takes place although the battery pack is fully functional.
1070 073 822-104 (02.06) GB
Page 30

3–12
Info
Security Functions
Disable Auto Power Off
This option disables both the USP monitoring function and the power-off
delay for the power supply:
D A voltage interruption will cause the PC to shut down immediately.
D After a normal shutdown, the wait interval of approx. 60 seconds prior to
the shutdown of the power supply is omitted.
Although this function reduces the wait times during startups and software
installations, it must always be disabled during standard operation!
CAUTION
Loss of data!
Activation of this checkbox no longer makes a safe shutdown possible in the event of a power failure. The device switches off instantly!
Shutdown Count
The displayed value shows how often the system was shut down by UPS, i.e.
how many charging cycles the battery has been subjected to. More details
regarding after how many charging cycles it is necessaary to replace the rechargebale batteries is contained in section 8.2.3.
Default button
Selecting this button returns all settings to their default values.
These are:
D COM port: COM4
D Shutdown Delay Time: 30 sek
D Enable Accu Test: enabled
D Enable Temp Control: enabled
D Disable Auto Power Off: disabled
1070 073 822-104 (02.06) GB
Page 31
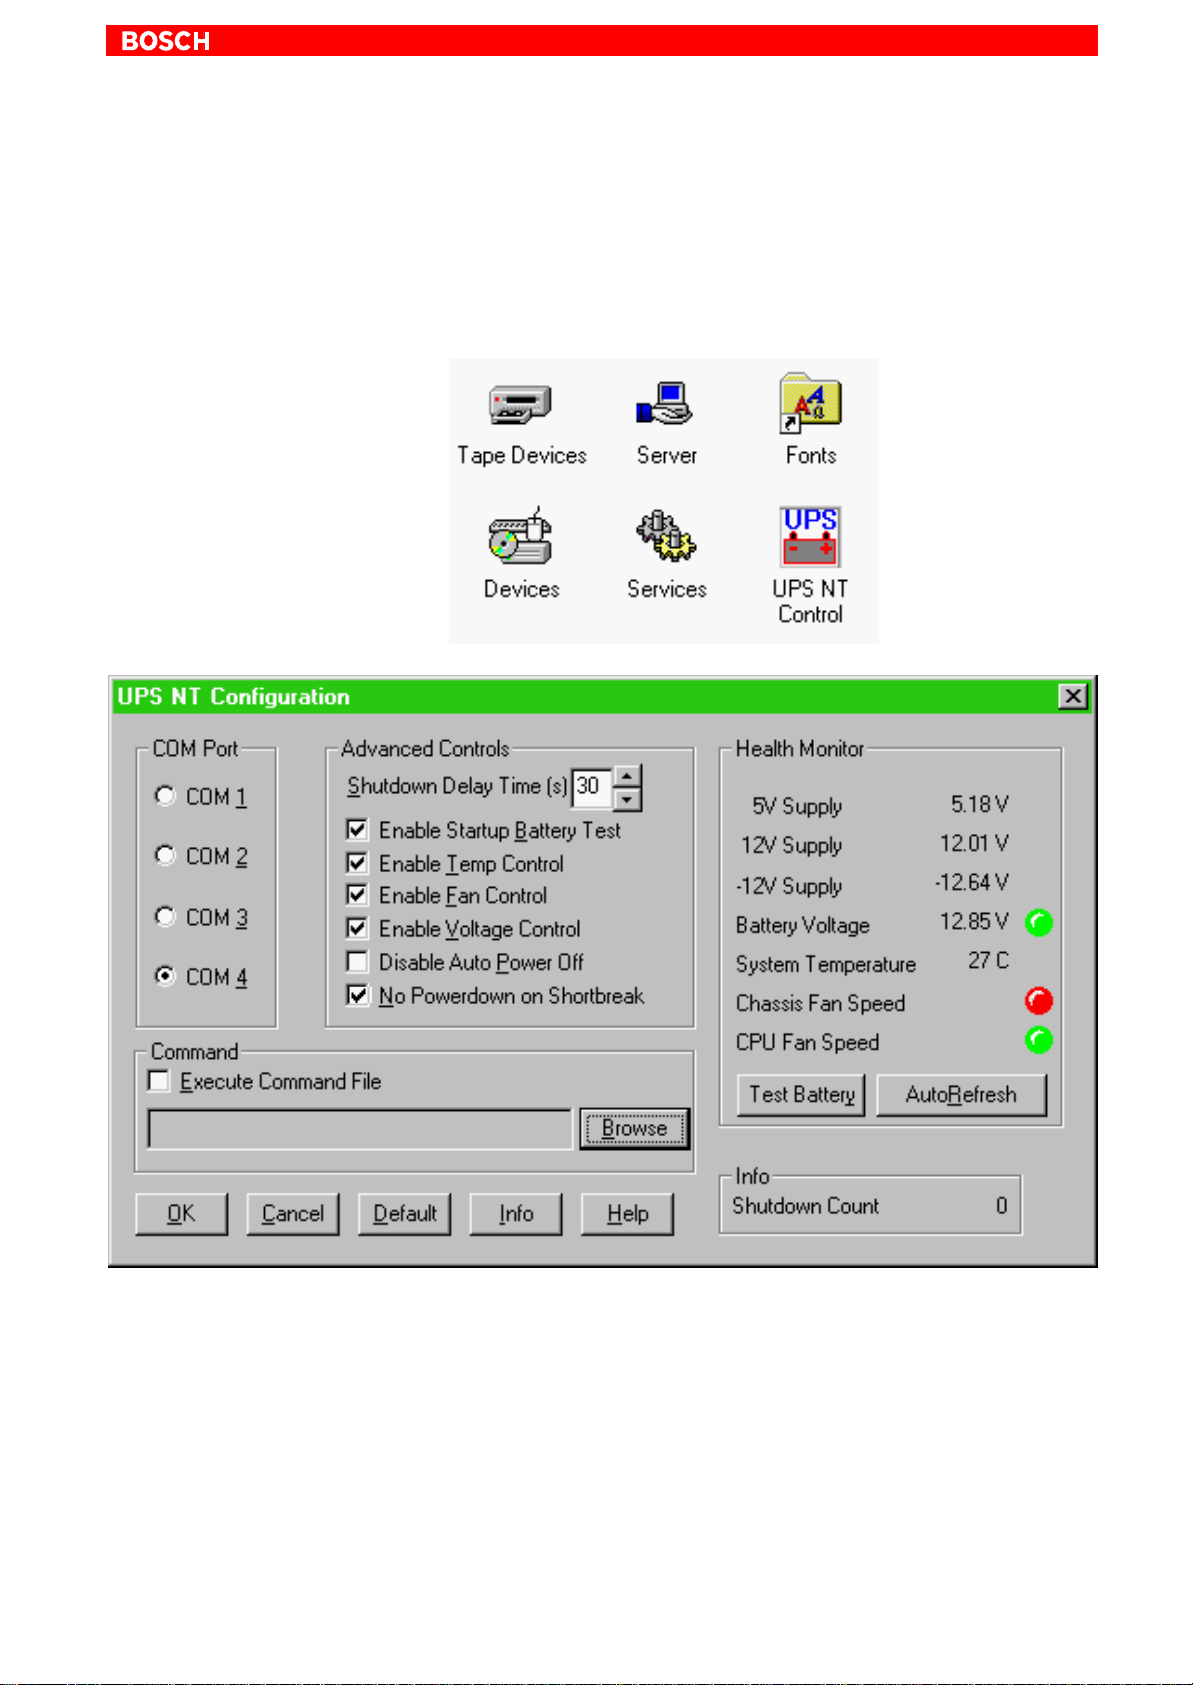
Configuration – UPSNT for IPC300
To configure the UPS
program, select UPS NT Control in the control
NT
panel (see illustration below).
Security Functions
3–13
. The UPS
program always runs as a Windows NT service. Changing
NT
user logins have no influence on this characteristic. A user without Administrator privileges is neither able to terminate the program nor stop
the monitoring function.
COM Port
1070 073 822-104 (02.06) GB
. To allow new parameter values to take effect subsequent to their
modification, the UPS is automatically stopped and restarted.
No monitoring function is enabled during this interval (5 to 10 sec).
The UPS program is always connected to the UPS via the COM4 serial port.
Page 32
3–14
Security Functions
Advanced Controls
Shutdown Delay Time
This interval is defined as a value between 0 and 45 seconds, by which the
shutdown of Windows will be delayed. The intervening period is used to
dispatch a Request To Close message to all active windows. The user can
avail himself of this time for the purpose of saving his data. Upon expiry of the
Delay T ime, all application programs will be terminated without prior security
query!
When setting the Delay Time, observe that there must be sufficient time to
effect a safe shutdown of the operating system (closing and backing up Windows system files), i.e., between the end of the Delay Time and the expiry of
the 60 seconds after the shutdown signal. If the interval is too short, the shutdown process will be interrupted because the UPS disrupts the mains power .
This may cause loss of data in some circumstances.
CAUTION
Upon expiry of the Delay Time, the operating system is shut down
without prior security query . Unsecured data belonging to open applications will be lost.
Enable Startup Battery Test
When this check box is checked, the system performs a test of the battery
pack during each restart. Upon detection of an error, the red LED “UPS”
flashes and an error message is generated (”Accu Test failed! The Accu is
not installed or empty!”) and distributed throughout the system. The UPS
program continues to operate.
The battery test is automatically repeated after 12 hours:
D If no error is found, automatic test repetition in 12-hour intervals ensues.
D Upon detection of an error, the red LED “UPS” flashes and an error mess-
age is generated and distributed throughout the system, and no further
battery test is performed.
Error messages from the battery test are also stored in the Windows NT Application Event Log.
Enable Temp Control
When this checkbox is checked, the ambient temperature is monitored on a
continuous basis. Excessive temperatures will produce the temperature
warning message “Board Temperature high! Check System!”.
The power monitoring function is retained even after a temperature warning.
Upon detection of an error, the red LED “Temp” flashes.
Temperature warning messages are also stored in the Windows NT Application Event Log.
Enable Fan Control
When this checkbox is activated, the integrated housing fans are monitored
in the IPC300 with Pentium I (266 MHz) and the housing and processor fans
are monitored in the IPC300 with Pentium III (400 MHz). In the event of an
error, the red LED “Temp” flashes and the following message is generated
and distributed throughout the system: “FAN failure! Check System!”
1070 073 822-104 (02.06) GB
Page 33

Security Functions
Enable Voltage Control
When this checkbox is activated, internal supply voltages are monitored. In
the event of an error, the green LED “Vout” extinguishes and the following
message is generated and distributed throughout the system: “Board Voltage failure! Check System!”.
Disable Auto Power Off
CAUTION
Loss of data!
Activation of this checkbox no longer makes a safe shutdown possible in the event of a power failure. The device switches off instantly!
This option disables both the USP monitoring function and the power-off
delay for the power supply:
D A voltage interruption will cause the PC to shut down immediately.
D After a normal shutdown, the wait interval of approx. 60 seconds prior to
the shutdown of the power supply is omitted.
Although this function reduces the wait times during startups and software
installations, it must always be disabled during standard operation!
3–15
Command
No Powerdown on Shortbreak
When this checkbox has been activated, interruptions in the power supply of
up to 5 seconds are permitted without affecting ongoing operations. Only in
the case of power interruptions lasting in excess of 5 seconds will the UPS
logic be started and the safe shutdown of the system initiated.
This dialog box provides for the linking and activation of an executable program (*.exe; *.bat) which is to be started and executed after the initilaization
of the shutdown. This is helpful in situations where applications failing to respond to the systemwide messagesmust be backed up and terminated. To
this end, appropriate housekeeping and termination programs can be entered and activated in this dialog. If there are several programs, or if the programs require transfer parameters, they must be combined in a batch file
and then entered.
. The entry itself may not contain any invocation parameters, and the de-
clared program itself must not initiate a shutdown!
1070 073 822-104 (02.06) GB
Page 34

3–16
Default button
Health Monitor
Security Functions
Selecting this button returns all settings to their default values.
These are:
D COM port: COM4
D Shutdown Delay Time: 30 sec
D Enable Startup Battery Test: enabled
D Enable Temp Control: enabled
D Enable Fan Control: enabled
D Enable Voltage Control: enabled
D Disable Auto Power Off: disabled
D No Powerdown on Shortbreak: enabled
D Execute Command File: disabled
This dialog section indicates the current readings for internal voltages, battery voltage, system temperature and fan functions.
The Battery Voltage reading is updated only after a battery test. The battery
test occurs automatically after a system start, and in 12-hour intervals thereafter; it can also be initiated by pressing the Test Battery button.
D The LED illuminates red when the voltage reading of the battery voltage
measured under load is low.
D The LED illuminated green when the battery pack is fully functional.
Info
. Excessive repetitions of the battery test will discharge the battery
pack. Never perform more than 5 battery tests within a 24-hour period.
The following applies to Fan Speed monitoring:
D Red LED: Fan at standstill, or fan speed is too low or too high.
D Green LED: Fan is working properly.
Pressing the StopAutoRefresh button disables the automatic updating of
measured readings, and the legend on the button changes to AutoRefresh.
Pressing the AutoRefresh button again enables automatic measurement
updating, again changing the legend on the button to StopAutoRefresh.
Shutdown Count
The displayed value shows how often the system was shut down by UPS, i.e.
how many charging cycles the battery has been subjected to. More details
regarding after how many charging cycles it is necessaary to replace the rechargebale batteries is contained in section 8.2.3.
. Windows NT stores all important events under the following:
VERWALTUNG " EREIGNISANZEIGE " PROTOKOLL/ANWENDUNG
1070 073 822-104 (02.06) GB
Page 35

4 Installation
Installation
When installing the Bosch IPC / IPC300, refer to the information on standards compatibility and operating conditions in Sections 2.6 and 2.5.
CAUTION
Conditions hazardous to the product!
The ambient air must be free of electrically conductive pollutants
(e.g., acids, alkali, corrosives, salts, metallic vapours, etc.).
Air intake and exhaust filters must be serviced in regular intervals.
DANGER
The operational reliability of components designed to be installed in
housings or control cabinets will be severely impeded if they are
used or operated without having first been installed.
Therefore, do not use or operate the IPC until it has been installed.
4–1
. Note
D The use of silicon-based sealing compounds, adhesives and insu-
lating agents is prohibited.
D Ensure that the installation is maintenance-friendly, i.e., that it
provides unrestricted access to connections, cables and fuses.
D Precede all installation procedures by writing down the information
on equipment rating plates. In the event that rating plates are
hidden from view as a result of the installation, you will still have
quick access to this information whenever required.
1070 073 822-104 (02.06) GB
Page 36
4–2
Installation
4.1 Installed positions and clearances
Housing: 19 in. rack module, protection category IP00 (EN 60529)
Weight: Approx. 8 kg (w/o expansion cards)
Installed pos.: Horizontal
Installation
type:
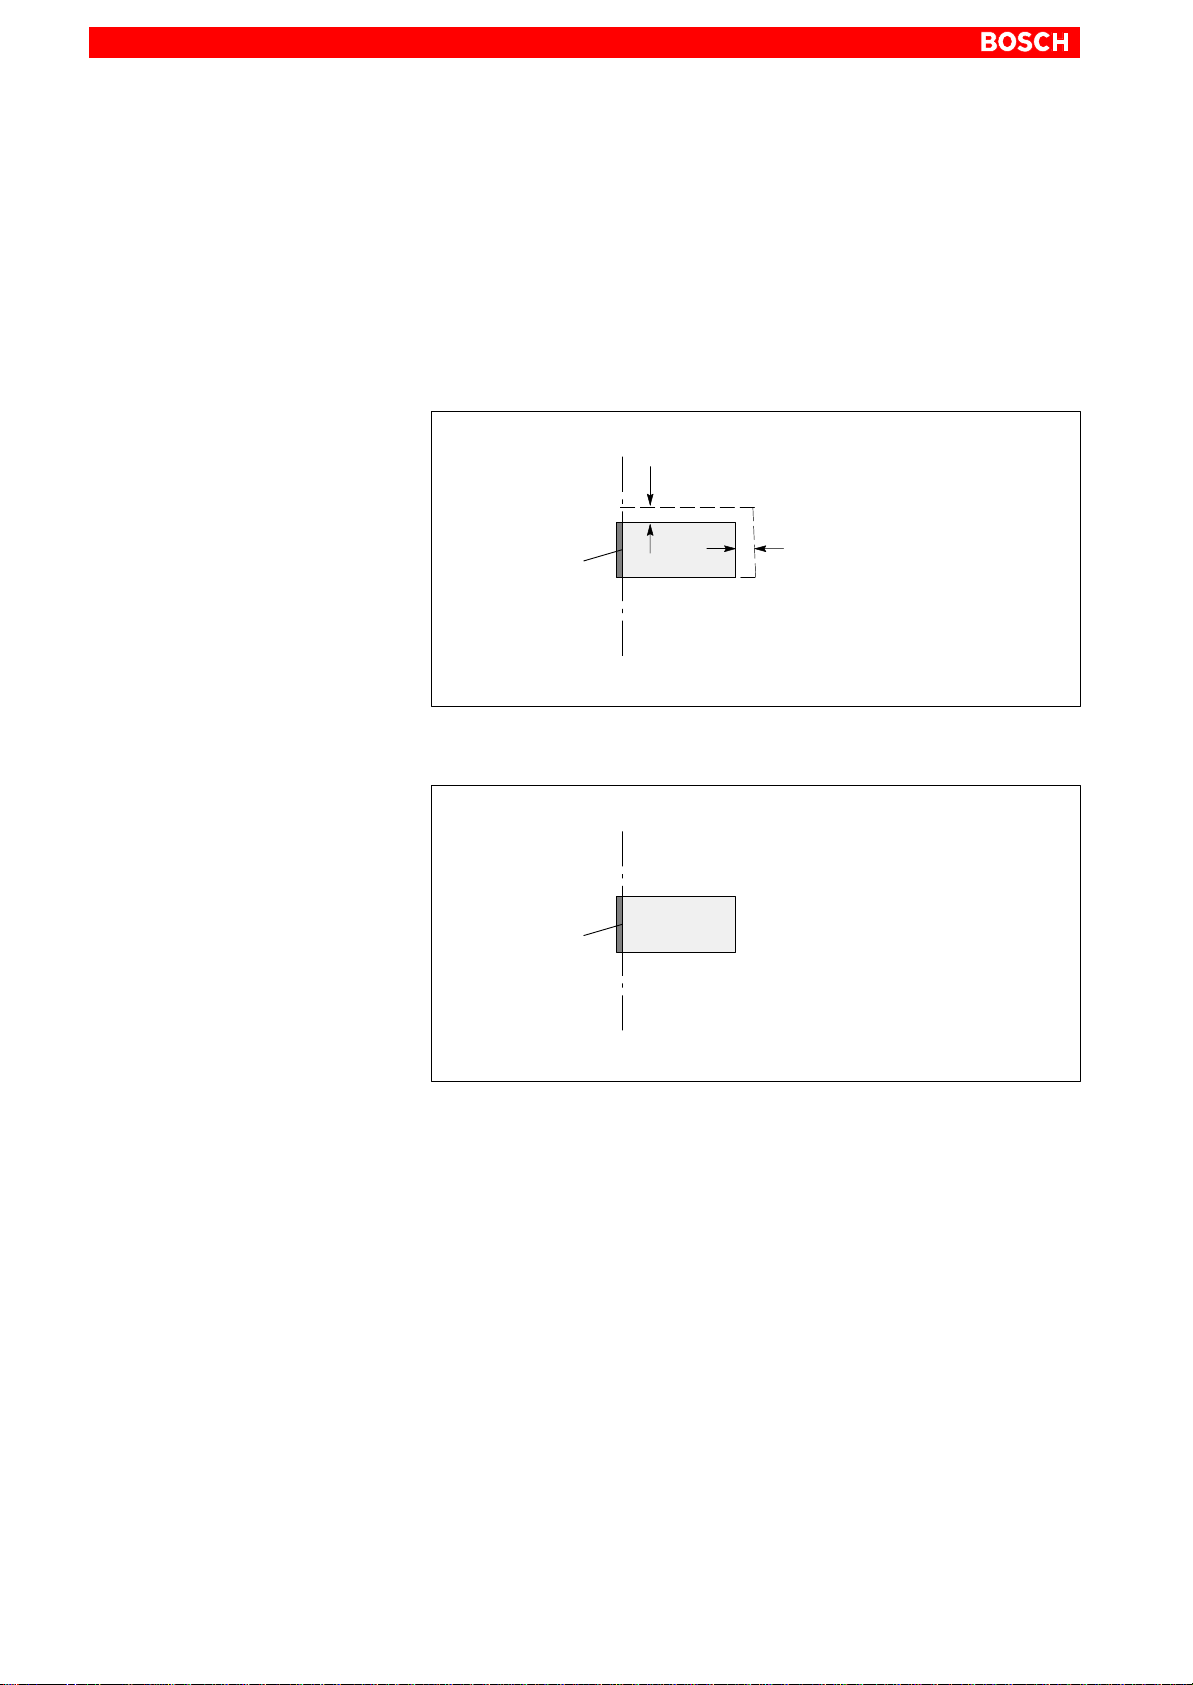
IPC installation clearances
Installation premises to provide a min. of IP54 rating.
50 mm, Top
Front =
Connection side
Side clearance = 50 mm
IPC300 installation clearances
Front =
Connection side
Side clearance = 50 mm
50 mm, Rear
. Please note that the integrated CD-ROM drive may be operated in a
horizontal position only. For this reason the IPC must be installed in a
horizontal position.
D When installing the IPC / IPC300, ensure that the connection side of the
respective unit remains easily accessible.
D Because it must be possible to verify the operating status of the unit at
any time, the LED displays must not be concealed in any way.
D Provide adequate ventilation, and ensure that cables are routed with a
minimum clearance of 50 mm (top, bottom and rear).
D Allow for connecting loops in all cable routings; provide strain relief for all
cables.
D Maintain suitably large distances from sources of interference.
1070 073 822-104 (02.06) GB
Page 37
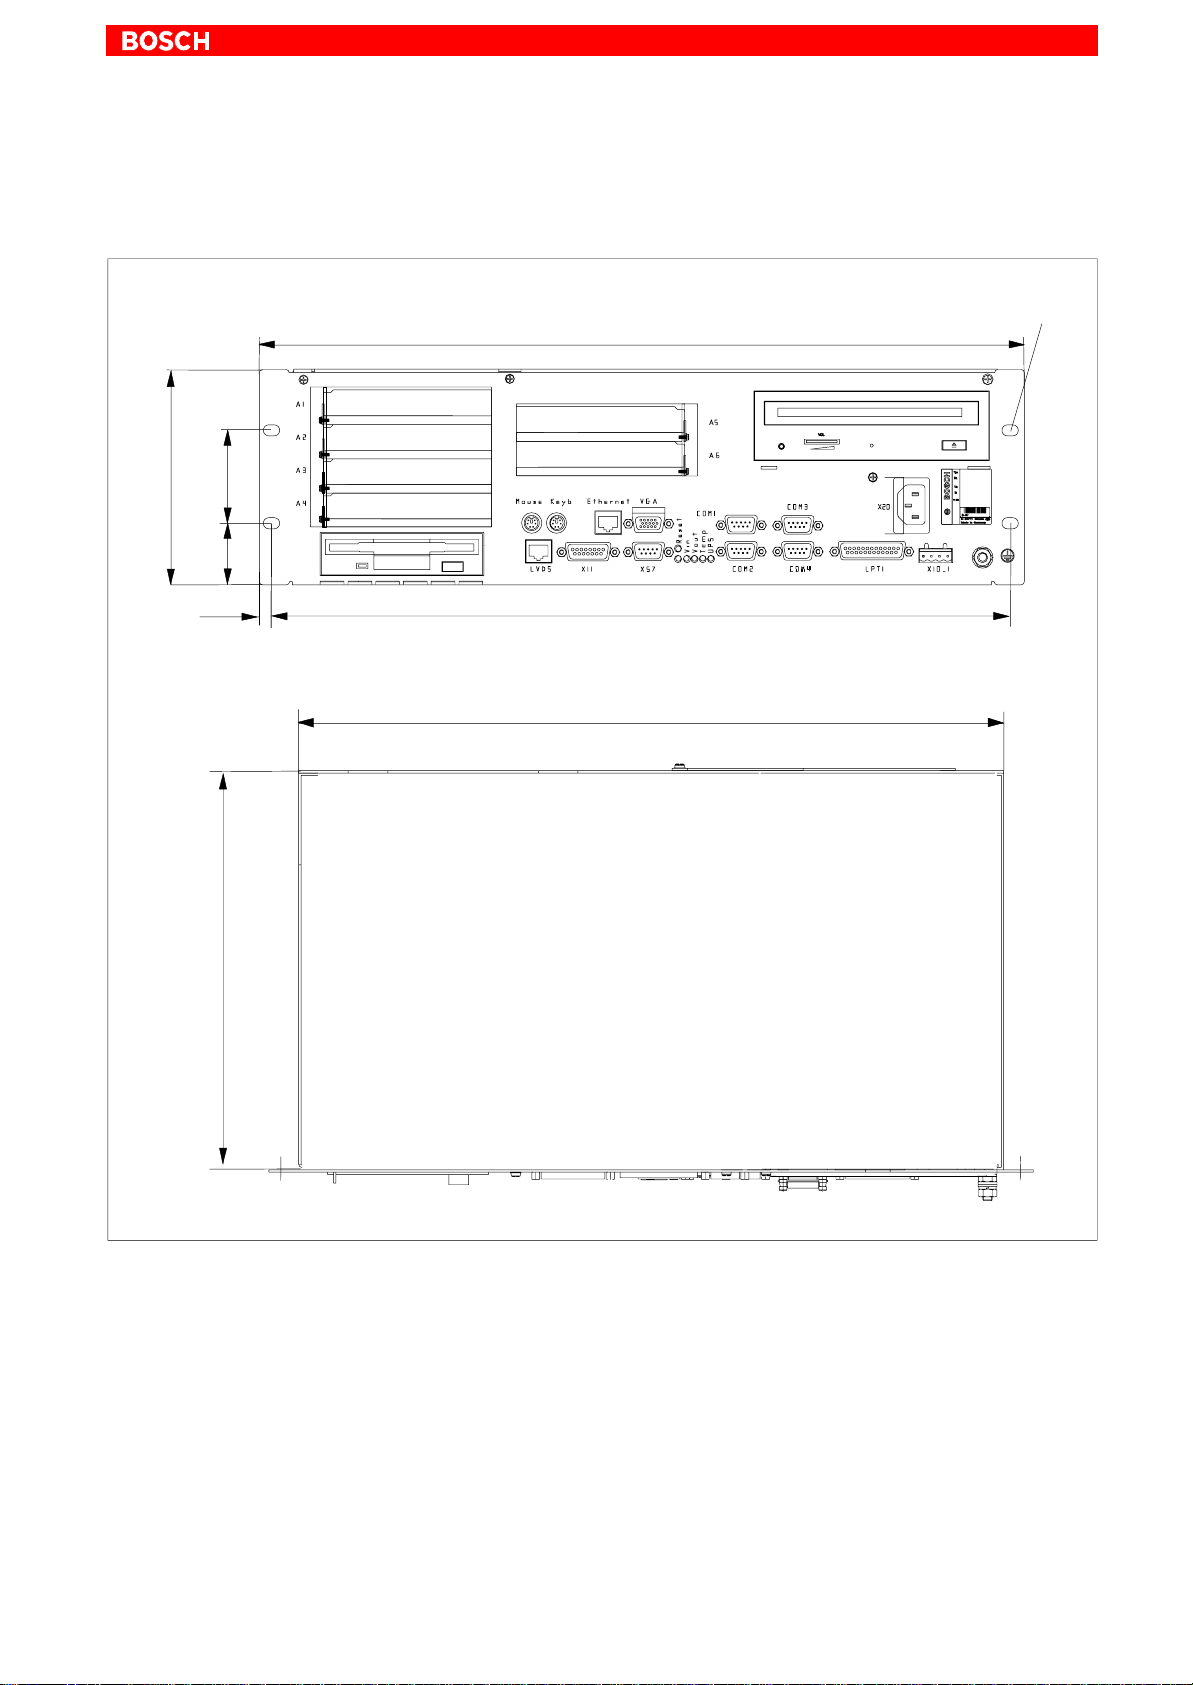
4.2 IPC / IPC300 dimensioned drawings
IPC
482.6 (= 19”)
Installation
Mounting hole
4–3
132.5
57.2
37.7
256.2
8.4
465.9
445
1070 073 822-104 (02.06) GB
Page 38
4–4
IPC300
Installation
Mounting hole
482.6 (= 19”)
132.5
265.5
57.2
37.7
8.4
18.8
6.8
465.9
445
4.3 Installing IPC / IPC300 in mounting frame
L Construct a 19 in. mounting frame with fasteners for the 4 holes in the front
panel of the IPC or IPC300.
L Insert the IPC or IPC300 into the mounting frame from the front.
L Using 4 suitable mounting screws, attach the unit to the mounting frame.
5 6
1070 073 822-104 (02.06) GB
Page 39

5 Electrical Connections
Please note that, with respect to all electrical connections, the terminal connection plans and work instructions provided by the machine manufacturer
shall always be binding!
The system planner is also charged with providing and planning for the integration and implementation of required components, such as
Emergency-STOP circuits, mains switches, etc., in accordance with the current state of the art and at the highest level of safety attainable.
CAUTION
Risk of damage to system components through by insertion or removal of plug connectors on energized circuits!
Connections must be made only while the system is switched off.
Observe the following to prevent functional failures:
D Provide for isolated 24 VDC and 0 V terminal bars inside the control cabi-
net. With regard to cable routing, maintain a minimum distance of 10 cm
(4 in.) from all power cables.
D Design the overall system power circuits in a manner ensuring the simul-
taneous startup of operating terminals and other industrial components,
such as CNC and PLC.
Electrical Connections
5–1
1070 073 822-104 (02.06) GB
Page 40
5–2
Electrical Connections
5.1 Protective Earth conductor (PE) & screening information
DANGER
Dangerous conditions, functional failures and equipment damage
on machine plant caused by substandard potential equalization or
screening properties between system components!
Potential equalization currents may not flow across the screening of
interface cables.
L The protective earthing conductors (earthing connections) of the system
must be arranged in a tightly meshed grid. All components, control cabinet
housings and doors, including the mounting plate, must be earthed.
L The potential equalization lines / PE lines of all system components shall be
kept as short as possible, thus providing low-resistance connections.
L Install the PE lines, preferably electroconductively, on the mounting plate in
the control cabinet. Both sides of the insulated installed PE rails must be connected to the mounting plate with max. 20 cm long, adequately dimensioned
copper bands.
Position the PE lines so that the length of the outgoing protective earth conductor connections to the individual modules in the control cabinet does not
exceed 1 m.
L When specifying the PE wiring, ensure sufficiently dimensioned cross-sec-
tion. In this regard, also observe EN 60204, Part 1 (max. electrical resistance
and testing PE wiring installations).
L If at all possible, apply screening connections on both ends of a cable.
L Ensure that equipotential equalization currents do not flow across the inter-
face signal lines via the shielded conductors. Therefore, before switching on
the IPC for the first time , ensure that the potential equalization between devices which are to be connected is correct. Do not forget the interfaces which
connect devices to each other at different locations (irrespective of distance
or power supply).
DANGER
Dangerous shock currents due to poor PE connections!
The effectiveness of PE connections must not be impeded by mechanical, chemical or electrochemical influences.
Connections must be permanent and tight.
1070 073 822-104 (02.06) GB
Page 41
5.2 Interference suppression information
When designing t he m achine p lant, o bserve a nd c omply w ith g overning r egulations and statutory law with regard to interference suppression on individual
components. This will increase the operational safety of the entire system.
DANGER
Dangerous conditions, functional failures and equipment damage
on the machine plant caused by substandard EMC measures or line
transient interference!
Install signal voltage cables only at a sufficient distance from highvoltage cables (e.g., motor power cables). If this is not possible, separate metallic cable channels must be used.
The following sections are designed to provide you with a brief overview of
possible interference suppression measures in the control cabinet. Among
these are, for example:
D Filters
D Spark quenching circuits
D Damping of inductive switching peaks
D Limitation of switching voltage of high-speed semiconductors
D Screening
Electrical Connections
5–3
To ensure optimum suppress interference, all of these components should
be taken into consideration because they are most effective when working in
combination. In principle, interference suppression should be implemented
as follows:
D Apply suppression measures as close to the source of interference as
possible.
D Use only components that are identified as interference suppressors.
D Limit leakage currents in accordance with safety regulations.
D Provide touch guards.
D Prevent vibration fatigue breakage by providing secure mechanical
support for interference suppressors.
To ensure that interference suppression measures are successful, electrical
symmetry or asymmetry must also be taken into consideration.
Besides symmetrical interference voltage components which occur
between mains connection cables, there are also asymmetrical interference
voltages caused, for example, by capacitive coupling of the source of
interference to the mains.
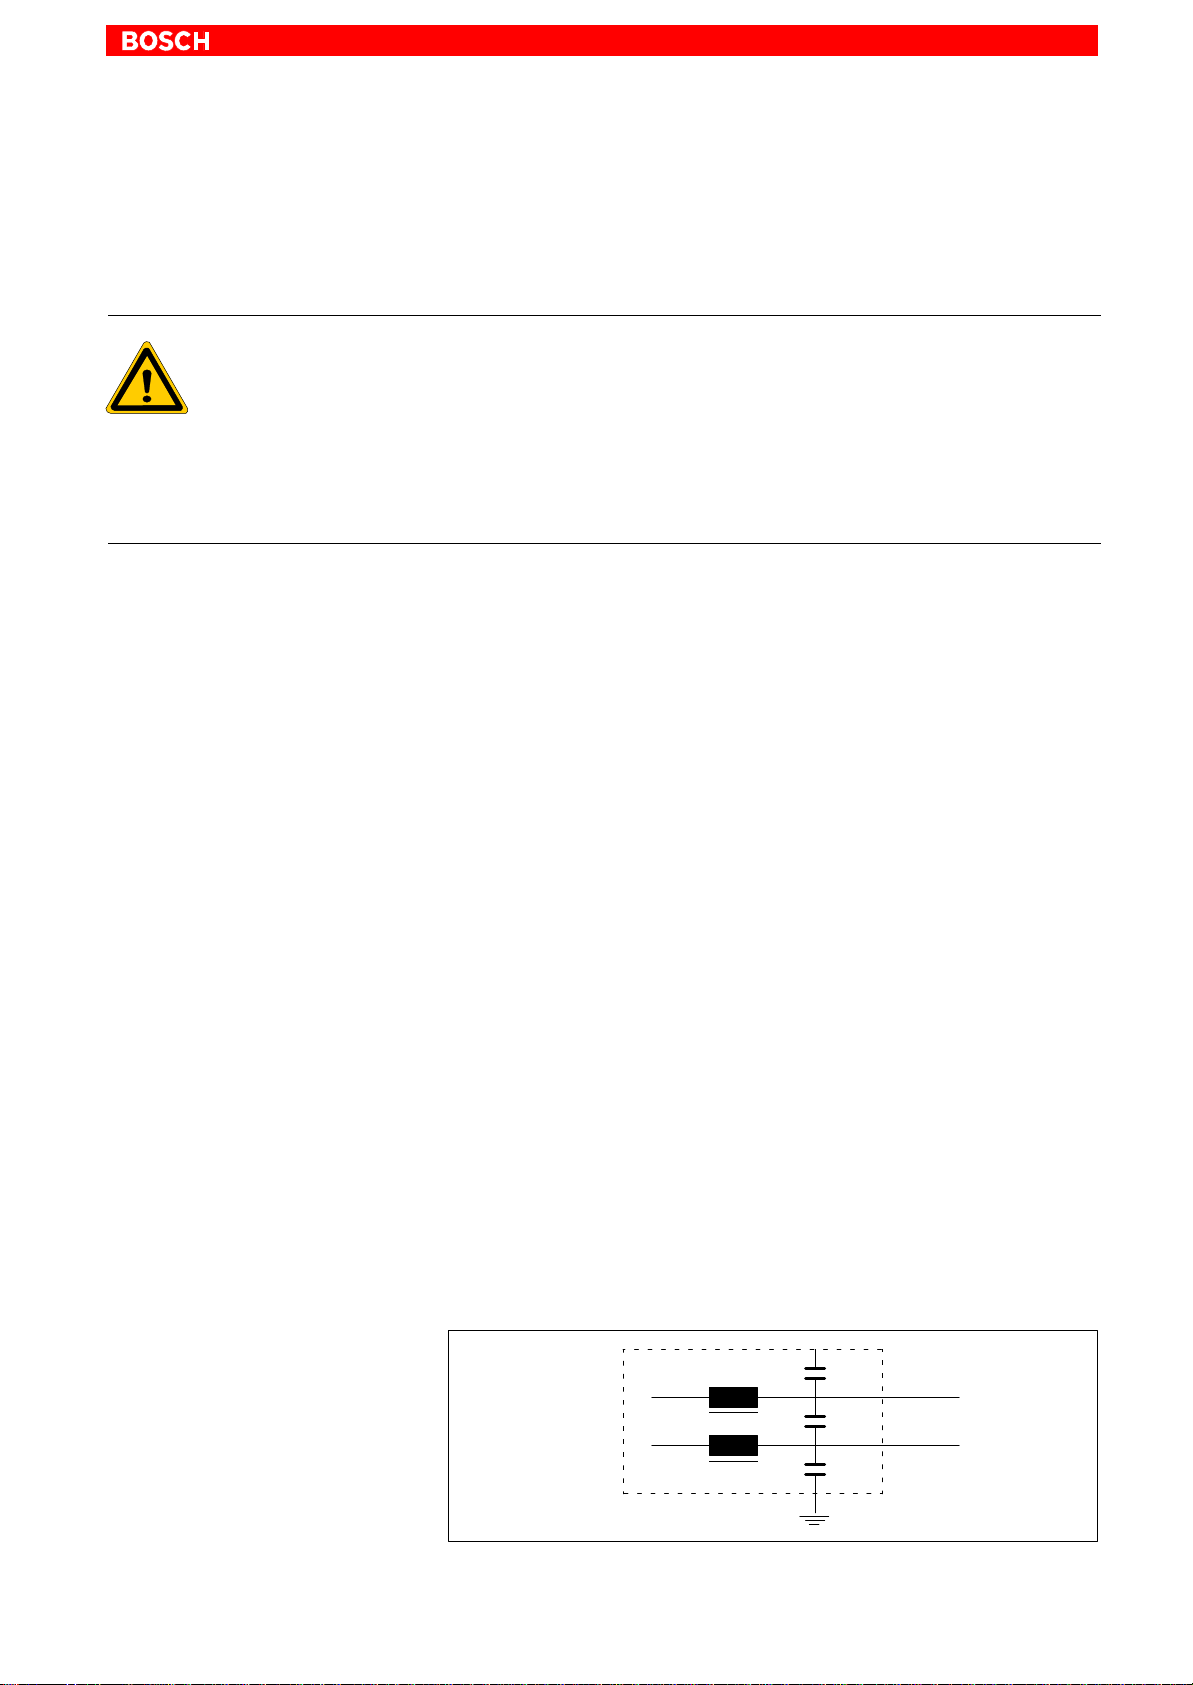
The following diagram shows a standard interference suppression circuit.
The asymmetrical interference voltages are discharged to the housing via
. C
damps the symmetrical interference.
C
y
x
C
L
y
1070 073 822-104 (02.06) GB
C
L
x
C
y
Mains
Page 42
5–4
Electrical Connections
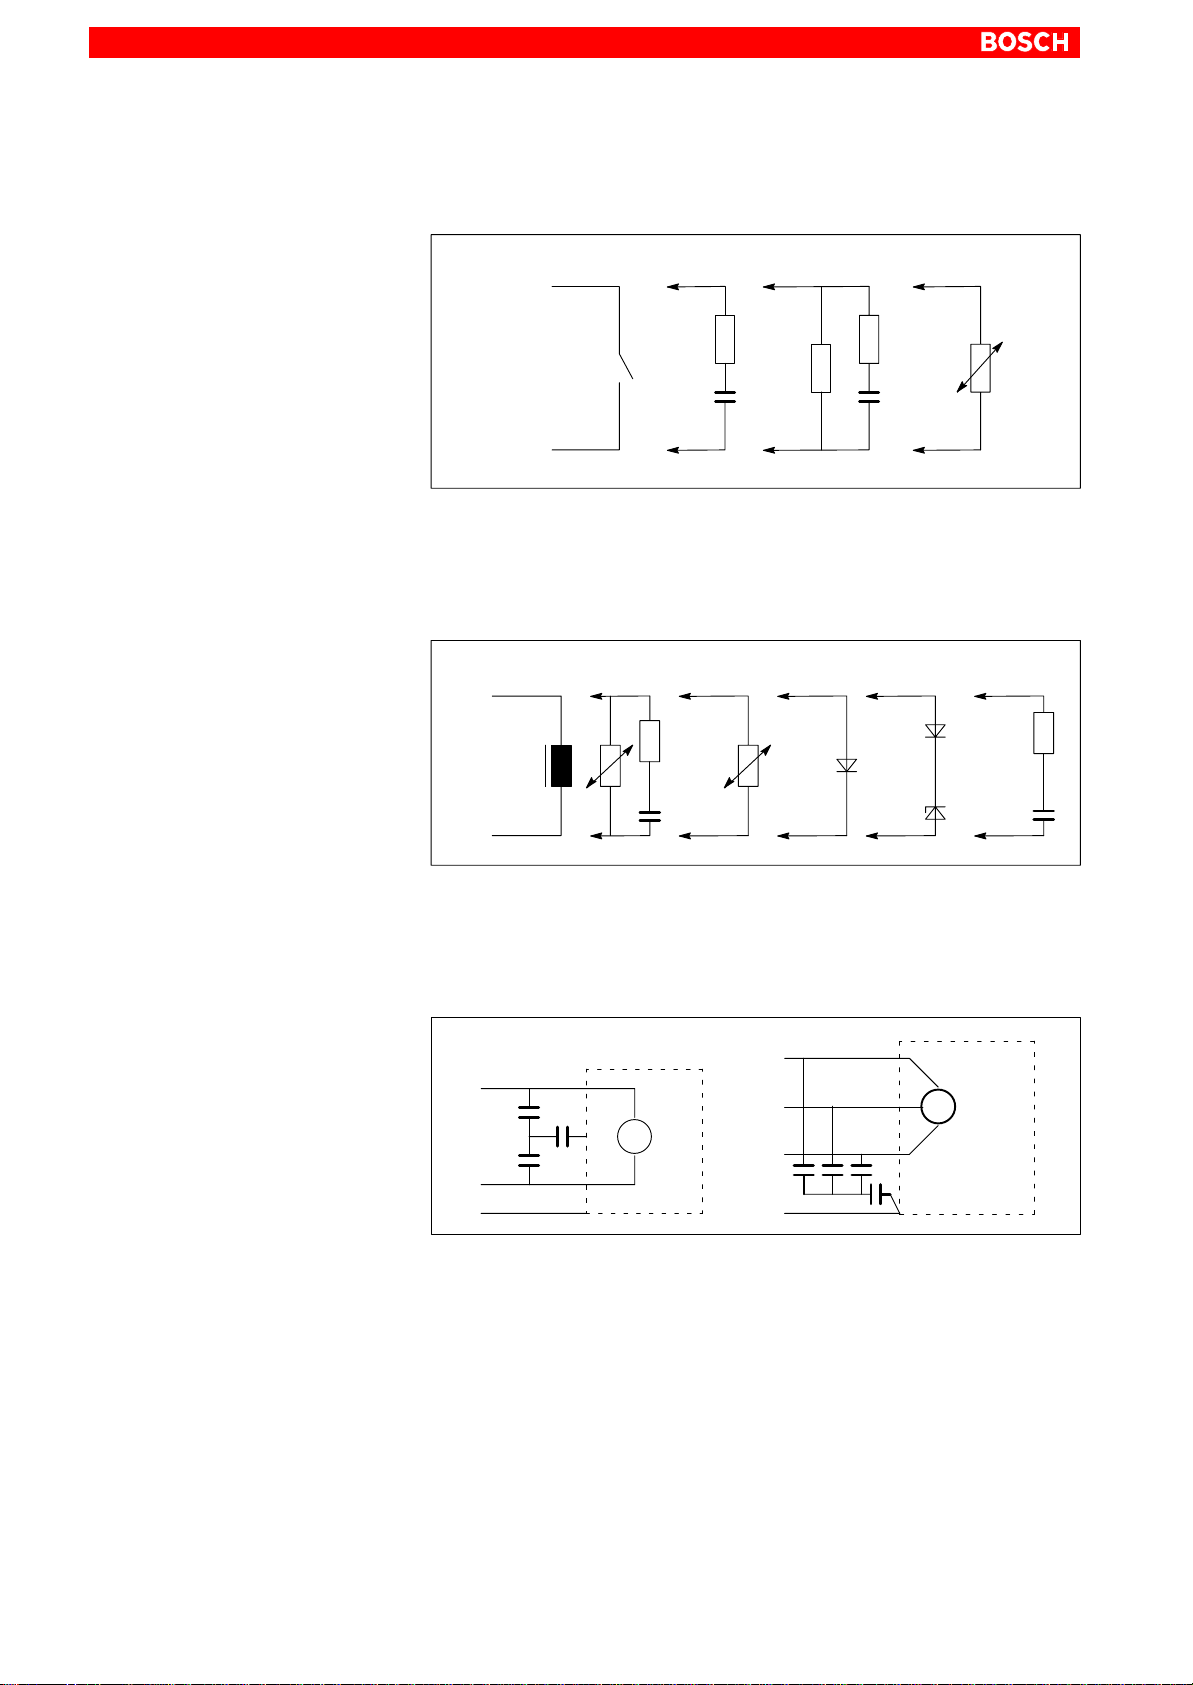
Interference suppression examples
Suppression of contacts:
(Alternating current, direct current, offset DC current)
a) b) c)
R
C
R
Rp
C
VDR
U
to b) For sensitive contacts, residual current when contact open!
to c) Voltage-dependent resistance, residual current when contact open!
Suppression of an inductive load:
(Motors, solenoid, relay and contactor coils)
a) b) c) d)
e)
−
R
VDR
U
VDR
+
C
to c) For relay, drop-off delay.
to d) For relay , defined drop-off delay.
to e) Must be optimized for inductance!
D
D
ZD
R
C
Suppression example – mains input:
L
1
C
x
C
y
M
C
x
N
SL
~
L
1
L
2
L
3
C
C
SL
C
x
x
x
M
3
~
C
y
1070 073 822-104 (02.06) GB
Page 43
5.3 Power supplies
Electrical Connections
5–5
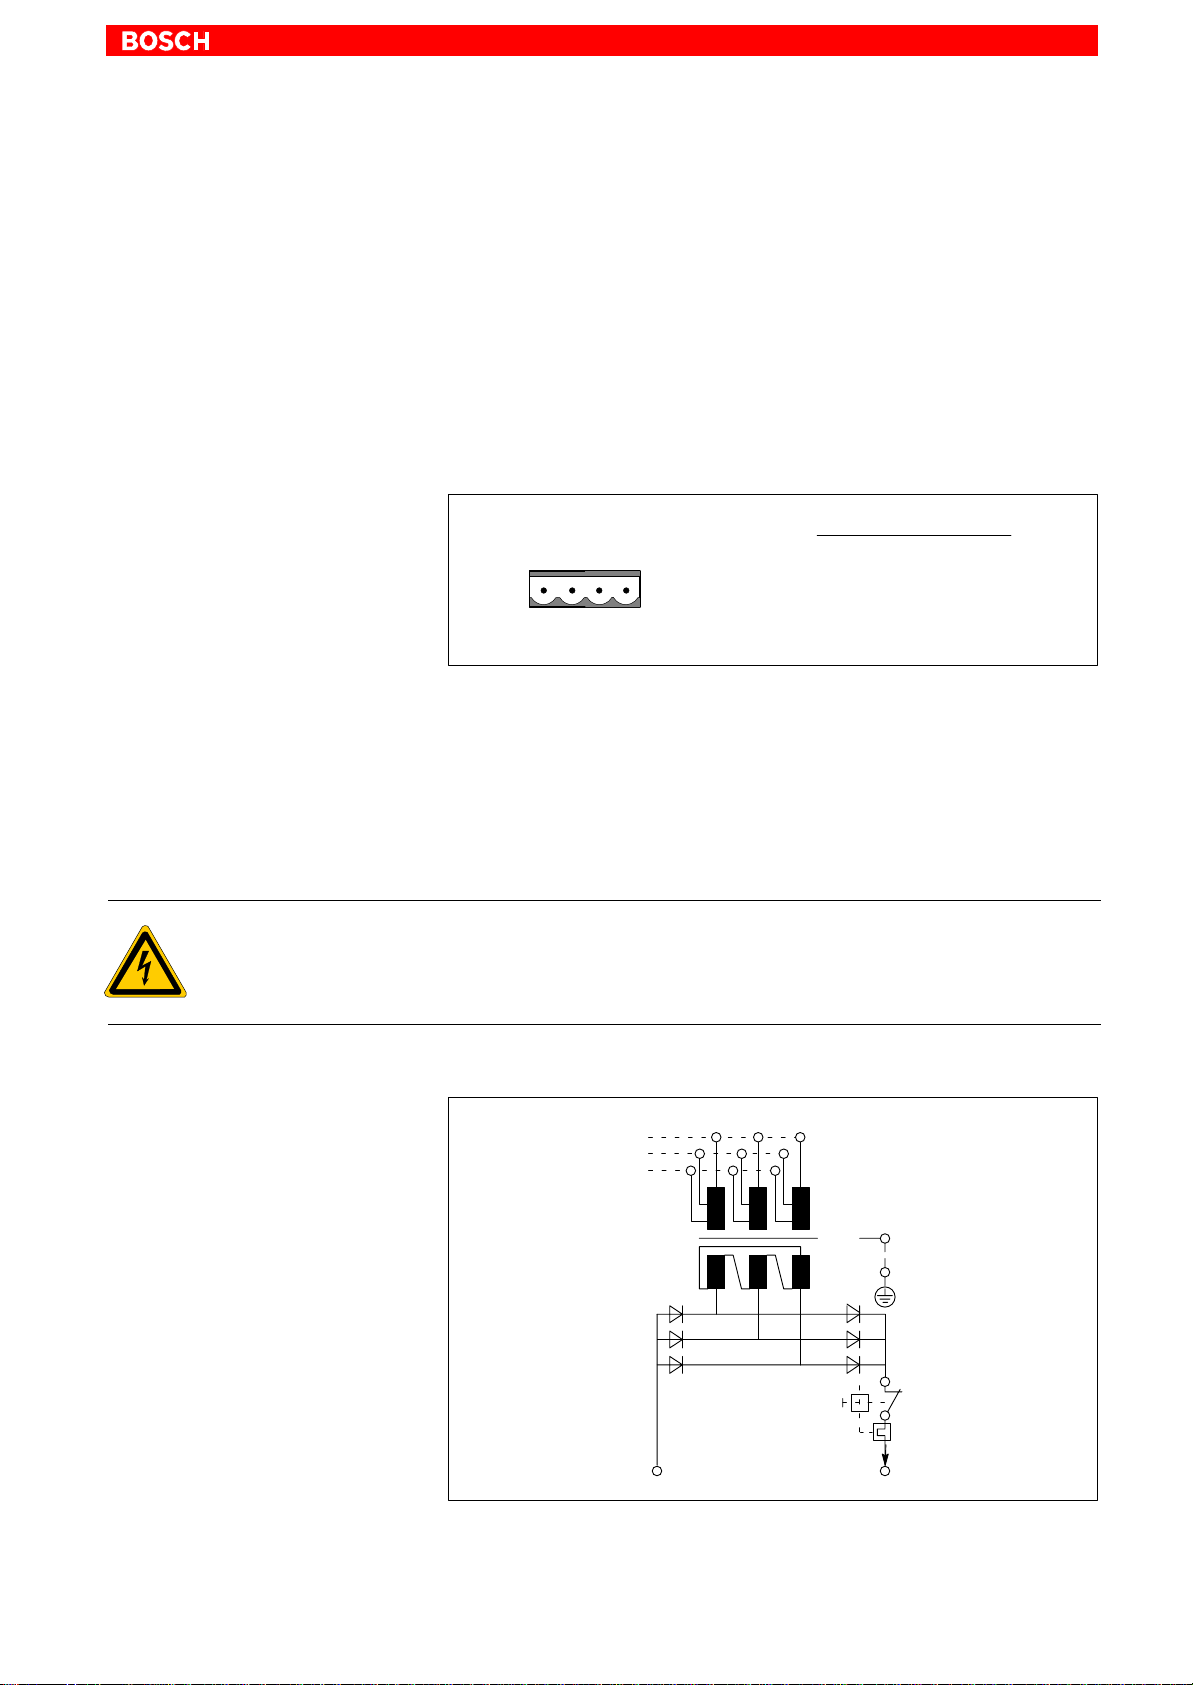
5.3.1 24V
power supply
DC
X10_1 24 VDC power connection (w/ integrated 24 VDC power supply)
Alternative to 230/115 VAC power connection. All internally required voltages are provided by a DC/DC converter.
Weidmüller push-lock terminal, MSTB 1.5, 4-pin
2
Max. conductor cross-sect.: 1.5 mm
X10_1
++––
21 3 4
Rated voltage UN: 24 VDC ; +20%, –15%
Residual ripple at UN: See diagram below
Interference / surge immunity: U
Current draw at UN: max. 5 A
Input fuse: 6.3 A (5x20) medium time-lag
Reverse polarity protection: Via decoupling diode. Polarity reversal will blow
input fuse.
(see next page)
Pin Signal
1 24V
2
3
4
= 35 V (at t < 100 ms)
max
24V
0V
0V
DANGEROUS ELECTRICAL VOLTAGE
The 24 VDC input voltage must satisfy the requirements of ”protec-
tive separation”!
Safety transformer, as per EN 60742
0V
L1 L2 L3
PE
+ 24V
400V +5%
400V
400V −5%
1070 073 822-104 (02.06) GB
Page 44
5–6
Electrical Connections
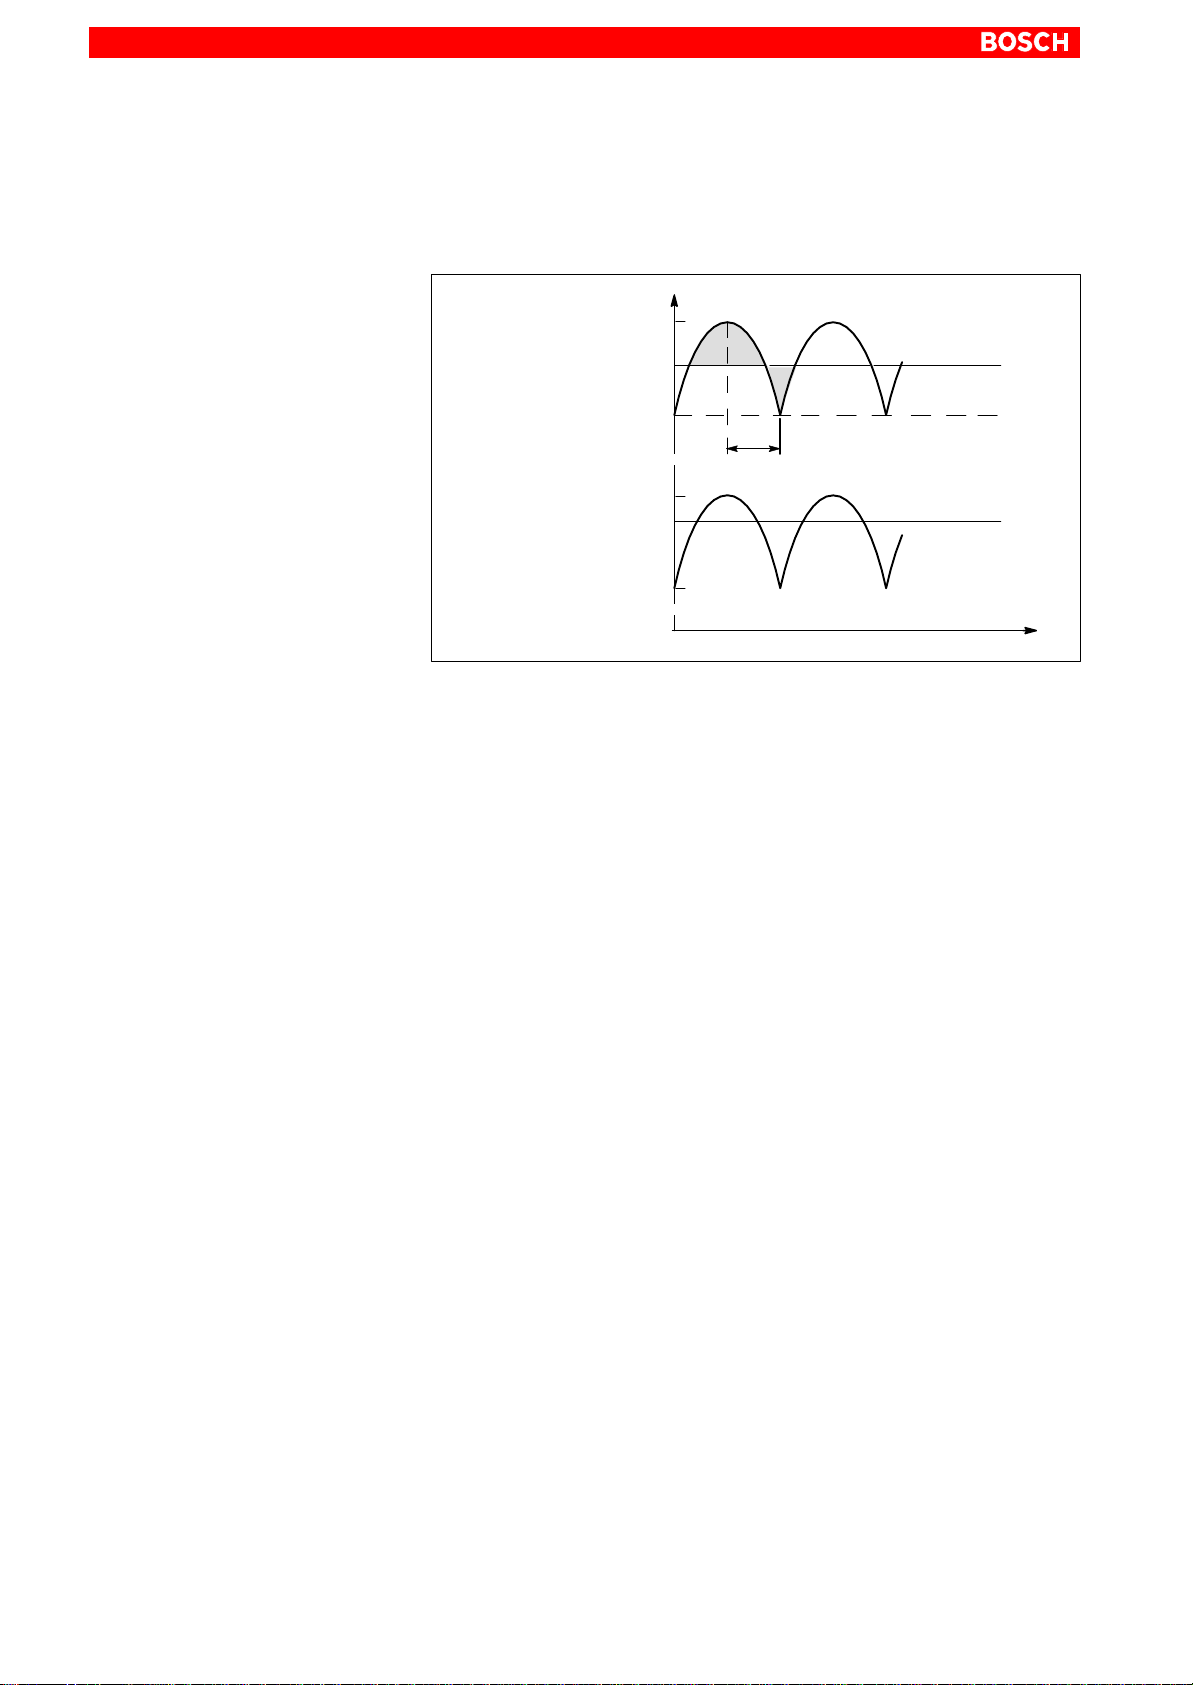
Offset AC components of the type produced by an unregulated rotary current
bridge circuit without smoothing, with a ripple factor of 5% (refer to DIN
40110/10.75, Section 1.2), are permissible.
As an upper voltage limit, this produces a maximum absolute value of 30.2 V
and, as a minimum voltage limit, the minimum absolute value of 18.5 V.
U
1.05.28.8 V = 30.2 V
Upper limit 28.8 V
0.866.30.2 V = 26.1 V
1.05.20.4 V = 21.4 V
Lower limit
0.866.21.4 V = 18.5 V
20.4 V
cos (30 ) = 0.866
0
0
30 el
0
t
1070 073 822-104 (02.06) GB
Page 45
Electrical Connections
5–7
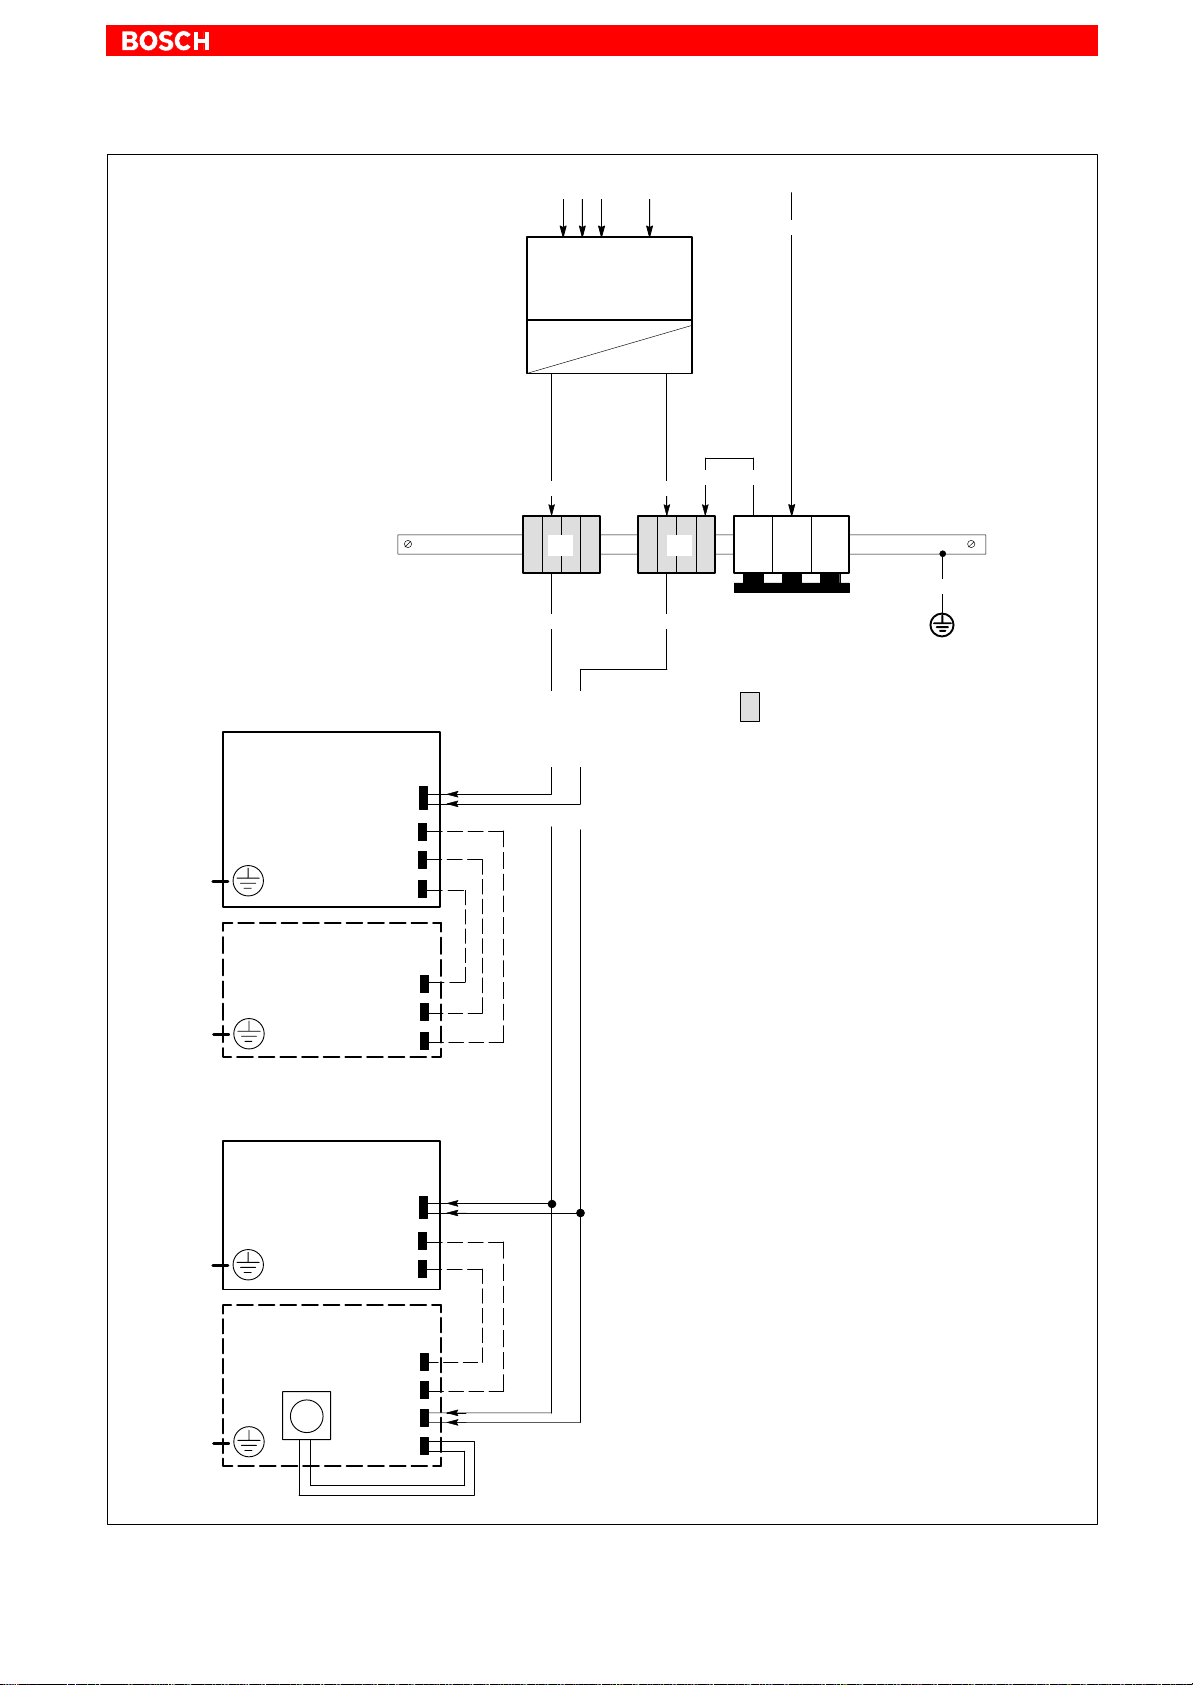
Cross-sections
dependent on current
draw, but MIN 4
At greater current
draw, use 2 x 4 mm
IPC
(24 VDC version)
Power supply
L1L2L3
Power supply with
safety transformer,
as per EN 60742
2
mm
.
2
Max. length 4 m
A
Cross-sections
dependent on current
draw, but MIN 0.5
24 VDC
2
mm
PE
2
6
(1)
A B
0 V Load24 V Load
(3)
PE
102 (green/yellow)
(blue)
102 (green/yellow)
Earth bar
A
= Terminal block 4
B = Terminal block 10
2
2
: Terminals in isolated arrangement
(2)
PE
PE
PE
PE
X10_1
X11
LVDS
COM2
BF2xxT
Control Panel
X34
LVDS
X33
IPC300
(24 VDC version)
Power supply
X10_1
X11
LCD
BF3xxT
Control Panel
Fan
LCD
X33
X10_1
X10_2
Fan power
(1) Easily removable and visible.
(2) Preferred installation of PE terminal bars, i.e., electrically
conductive on the mounting plate. Both ends of PE terminal bars
must be connected to mounting plate by means of copper straps
of a length not exceeding 200 mm.
At minimum, the cross-section of the copper straps must be
equal to that of the supply cable.
(3) 0.5 mm
0.75 mm
1.5 mm
2
, up to 4 m
2
, up to 6 m
2
, up to 10 m
Distances in excess of 10 m necessitate
a separate power supply at the machine!
1070 073 822-104 (02.06) GB
Page 46

5–8
Electrical Connections
5.3.2 230/115 VAC power supply
X20 230/115 VACpower connection (w/ integrated AC power supply)
Alternative to 24 VDC power connection.
All internally required voltages are produced by the integrated power supply.
CAUTION
The supply voltage must satisfy the requirements of Overvoltage
Category II. Otherwise, the integrated power supply may be destroyed.
Use a separation transformer to generate the 230/115 VAC (refer to
next page).
Coupler for non-heating apparatus, 3-pin
Max. conductor crosssection: 1.5 mm
2
X20
Assignment
PE
N1
PE
U2
Rated voltage: 85VAC to 264VAC;
Extended-range input
Current draw at U
Current draw at U
= 230 VAC: 0.6 A
N
= 115 VAC: 1.2 A
N
Inrush current at 230 VAC: 30 A, cold start 25_C
at 115 VAC: 15 A, cold start, 25_C
Input fuse: 1.25 A (5x20) medium time-lag
1070 073 822-104 (02.06) GB
Page 47
Electrical Connections
5–9
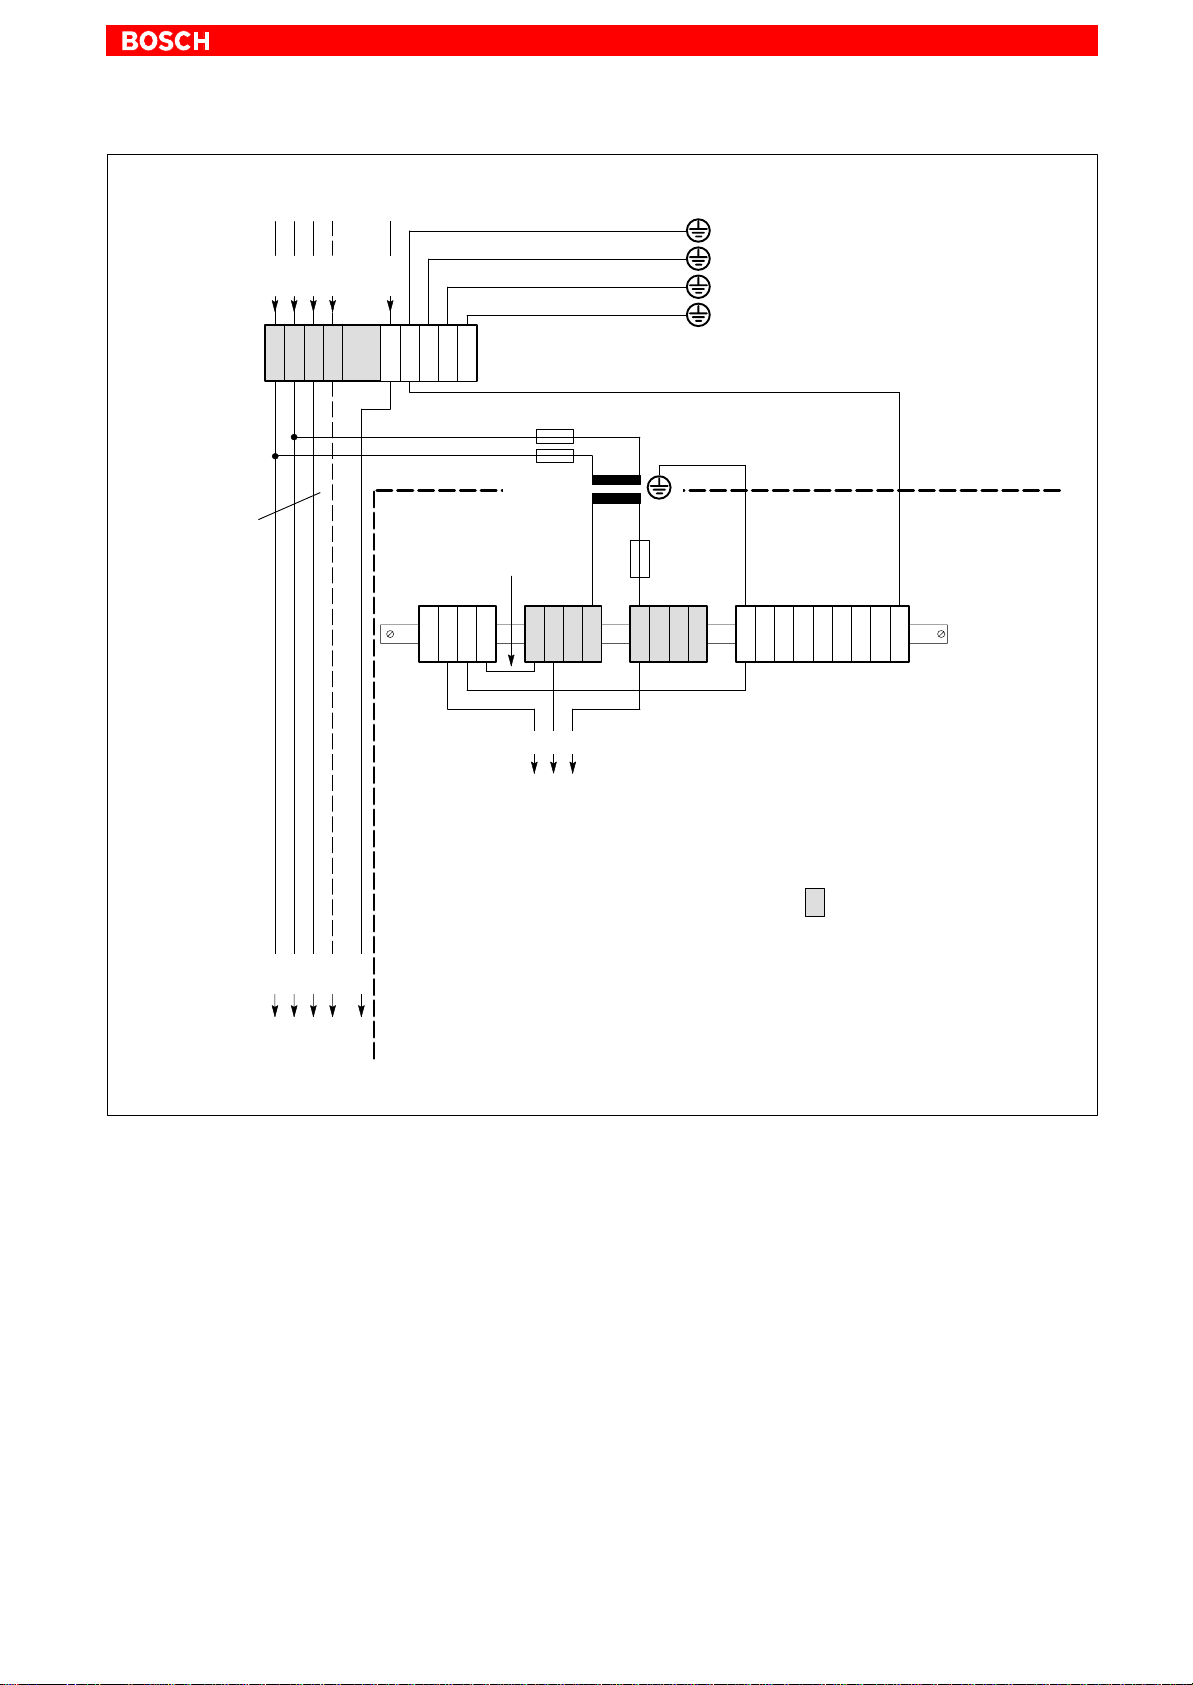
To utilize neutral
conductor ”N”,
operator
permission is
required!
Incoming mains
N
L1L2L3
V1
U1
N
W1
PE
PEPEPEPEPE
42 (green/yellow)
min.162 (green/yellow)
162 (green/yellow)
62 (green/yellow)
102 (green/yellow)
PE star-point connection
to control cabinet housing
to machine
all housing components (PE lug)
PE terminal bar for = V wiring
(see Fig. 2)
162 (green/yellow)
Fuses; motor protection switch preferred
400 V
42 (green/yellow)
Transform
er, as per
EN 60742
230 V
U2
42 (green/yellow)
PE
N1
U2
PEPE N1
IPC (see Fig. 3)
possibly. 230 V fan
Service sockets
L3.1
PE
N
L1.1
L2.1
e.g., drives
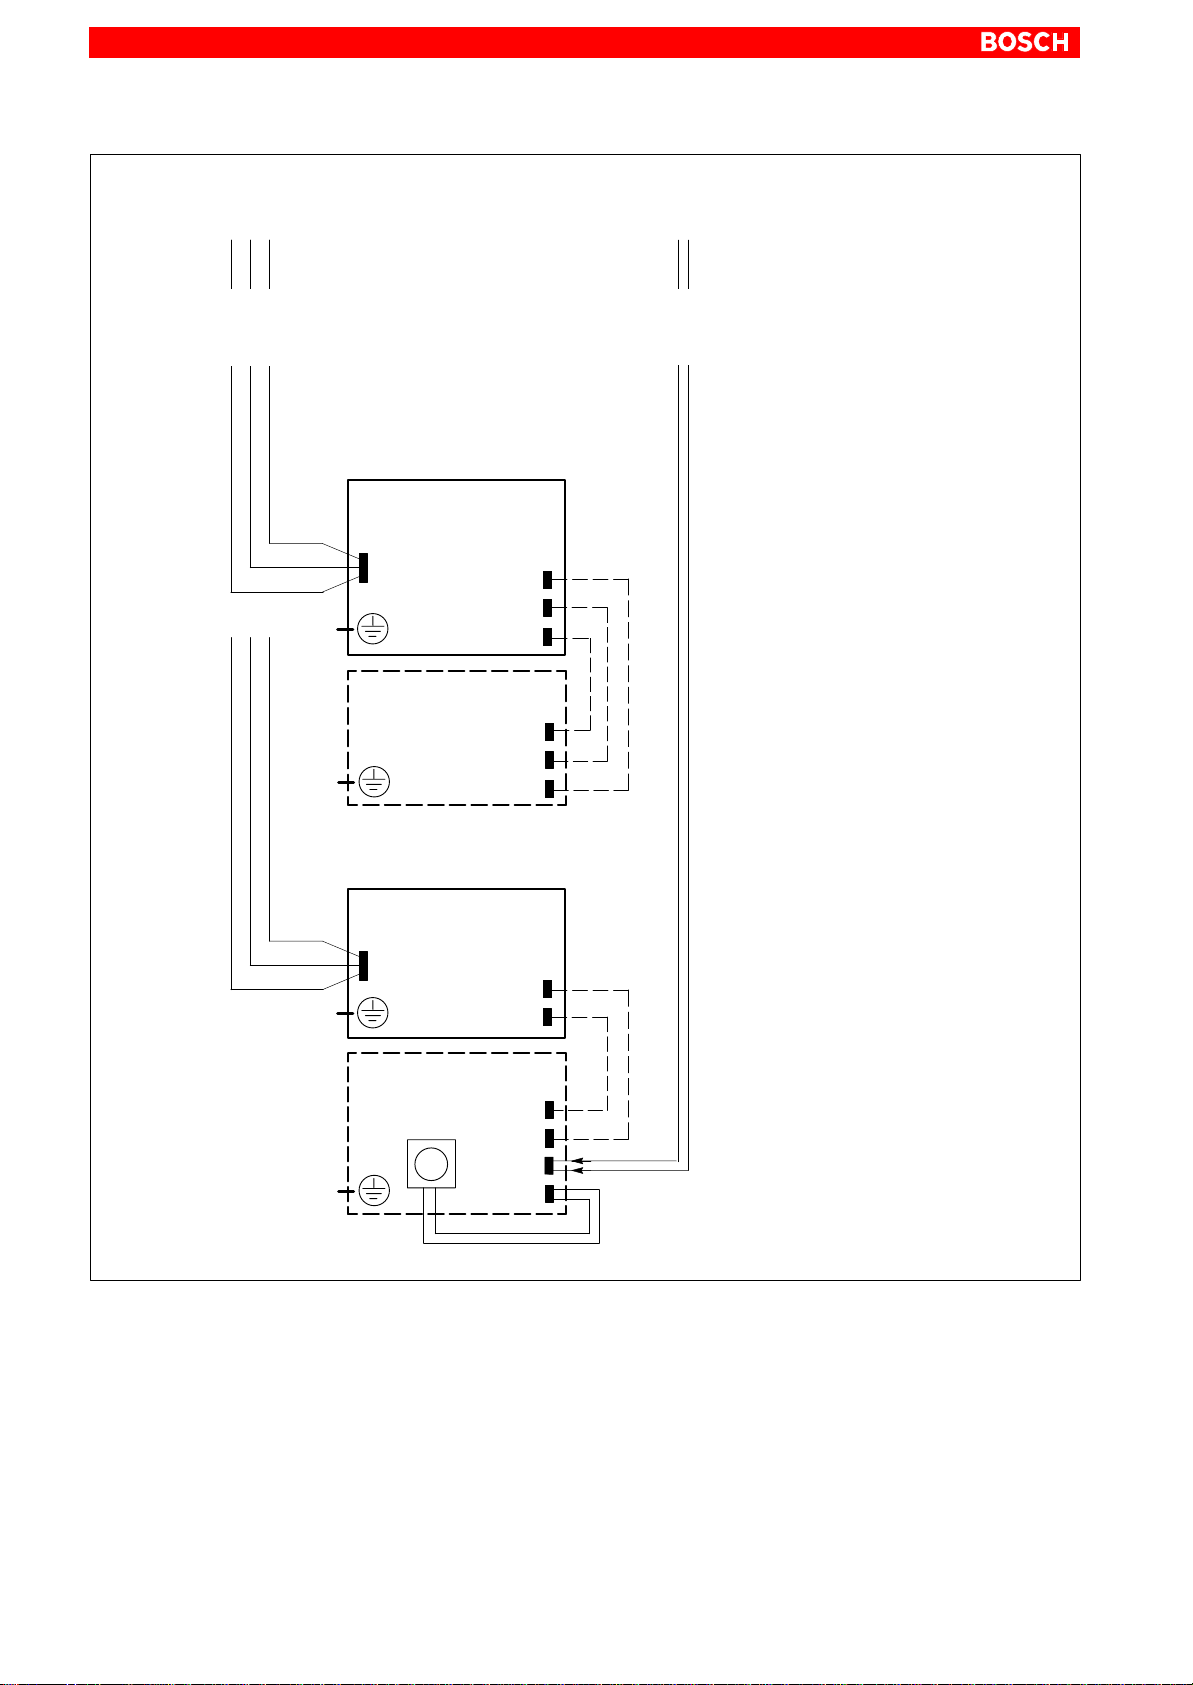
230 VAC power connection via separation transformer
230 V supply
= Terminals in
isolated arrangement
1070 073 822-104 (02.06) GB
Page 48
5–10
Electrical Connections
230 VAC
(see previous page)
Cross-sections dependent
on current draw, but MIN
of 0.75
mm
2
U2
PE
N1
PE
PE
IPC
(230/115 VAC version)
Power supply (protective
separation to EN 60950)
X20
BF2xxT
Control Panel
X11
LVDS
COM2
X34
LVDS
X33
24 VDC
Cross-sections dependent
on current draw, but MIN
of 0.5
mm
2
(*)
0.5 mm2, up to 4 m
(*)
0.75 mm2, up to 6 m
2
, up to 10 m
1.5 mm
Distances in excess of
10 m necessitate a separate
power supply at the machine!
U2
PE
N1
IPC300
(230/115 VAC version)
Power supply (protective
separation to EN 60950)
X20
PE
BF3xxT
Control Panel
Fan
PE
X11
LCD
LCD
X33
X10_1
X10_2
Fan power
1070 073 822-104 (02.06) GB
Page 49

6 Interfaces, Ports & Connectors
6.1 Overview
The following table specifies the installed IPC connector types, as well as
their mating connectors.
Interfaces, Ports & Connectors
6–1
Label
on housing
IPC IPC300
COM1 Serial port:
COM2 Serial port:
X57 Serial port:
COM3 Serial port:
COM4 – Serial port:
LPT1 Parallel port:
Ethernet Ethernet 10 Base T
USB USB interface Female USB
LVDS – for BF2xxT:
– LCD Gigabit for BF3xxT:
VGA VGA connection for
X11 BF2xxT, BF3xxT:
Keyb PS/2 mini DIN keyboard Female PS/2
Mouse PS/2 mini DIN mouse Female PS/2
As described in Section 5.3:
X20 PC power supply:
X10_1 PC power supply:
Interface service Physical
RS-232,
IPC: free assignment
IPC300:
alternative, X57
RS-232 for touch screen.
Without touch screen:
IPC: alternative to X57
IPC300: free assignment
RS-485/422:
IPC: alternative, COM2
IPC300: alternative to
COM1
RS-232, free assignment
RS-232 for UPS logic
Supports SPP, EPP,
ECO mode
Network connection
Video transmission
Video transmission and
RS-422 for touch screen
controller (COM2)
external CRT monitor
Power supply, mouse &
keyboard
230/1 15 VAC,
alternative to X10_1
24 VDC, alternative to
X20
connector
Male DB-9
connector
Male DB-9
connector
Male DB-9
connector
Male DB-9
connector
Male DB-9
connector
Female DB-25
connector
Female RJ45,
8-pin
connector, 4-pin
Female RJ45,
8-pin
Female RJ45,
8-pin
Female VGA HD
connector, 15-pin
Female DB-15
connector
mini DIN, 6-pin
mini DIN, 6-pin
Non-heating
appliance
connector, male
Male Weidmüller
push-lock terminal, MSTB 1.5,
4-pin
Mating connector
or cable
Female DB-9 connector
Female DB-9 connector
Female DB-9 connector
Female DB-9 connector
Female DB-9 connector
Male DB-25 connector
(e.g., printer cable)
Male RJ45 connector,
8-conductor, twisted prs.
Male USB, 4-conductor
Male RJ45 connector,
8-conductor, twisted prs.
Male RJ45 connector,
8-conductor, twisted
prs., CAT7
Monitor cable w/ male
VGA HD connect.,15-pin
Male DB-15 connctor
Keyboard cable w/ male
PS/2 mini DIN, 6-pin
Male PS/2 mini DIN,
6-pin
Power cord w/ female
non-heating appliance
connector
Female Weidmüller
push-lock terminal,
MSTB 1.5, 4-pin
1070 073 822-104 (02.06) GB
Page 50
6–2
Interfaces, Ports & Connectors
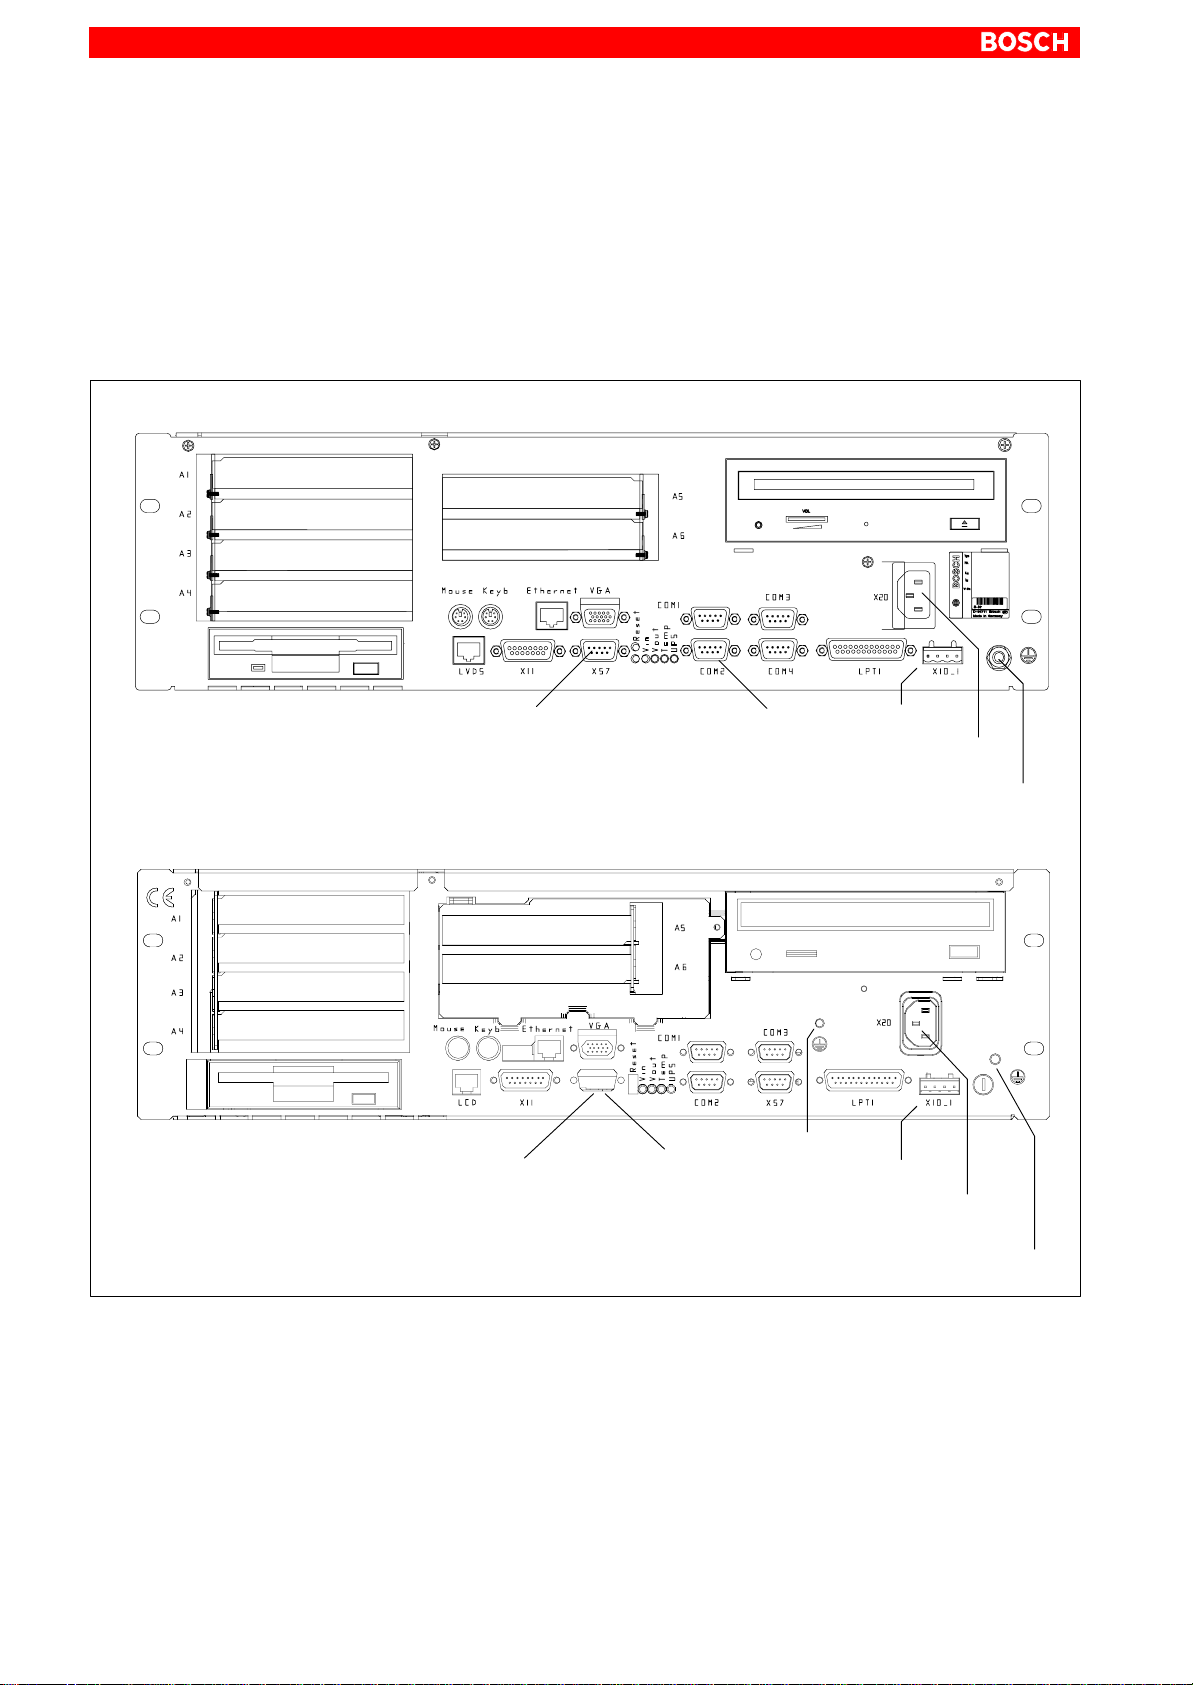
Port and connector layout
IPC
. Mouse and keyboard may be connected only if there is neither mouse
nor keyboard connected to the BF2xxT/BF3xxT control panel.
All externally accessed connectors are located on the front panel. All connectors are clearly labelled.
In addition, in the IPC300 DIP switches S1 and S3 provide external access.
IPC300
X57 (COM2 RS-485/422) COM2 (RS-232)
S1 S3
DIP switch for
display resolution
(see page 6–14)
COM1 / X57 switchover, and connecting
COM3 with X11
(see page 6–18)
PE lug (M5)
24 VDC
230/1 15 VAC
(on 230/115 V version)
PE lug
24 VDC
230/1 15 VAC
(on 230/115 V version)
PE lug (M6)
1070 073 822-104 (02.06) GB
Page 51
6.2 COM1 through COM4 serial ports
6.2.1 Pin assignments
CAUTION
Functional failures caused by poor screening!
Use only metallic or conductive connector/coupling shells providing
large-area screen contact.
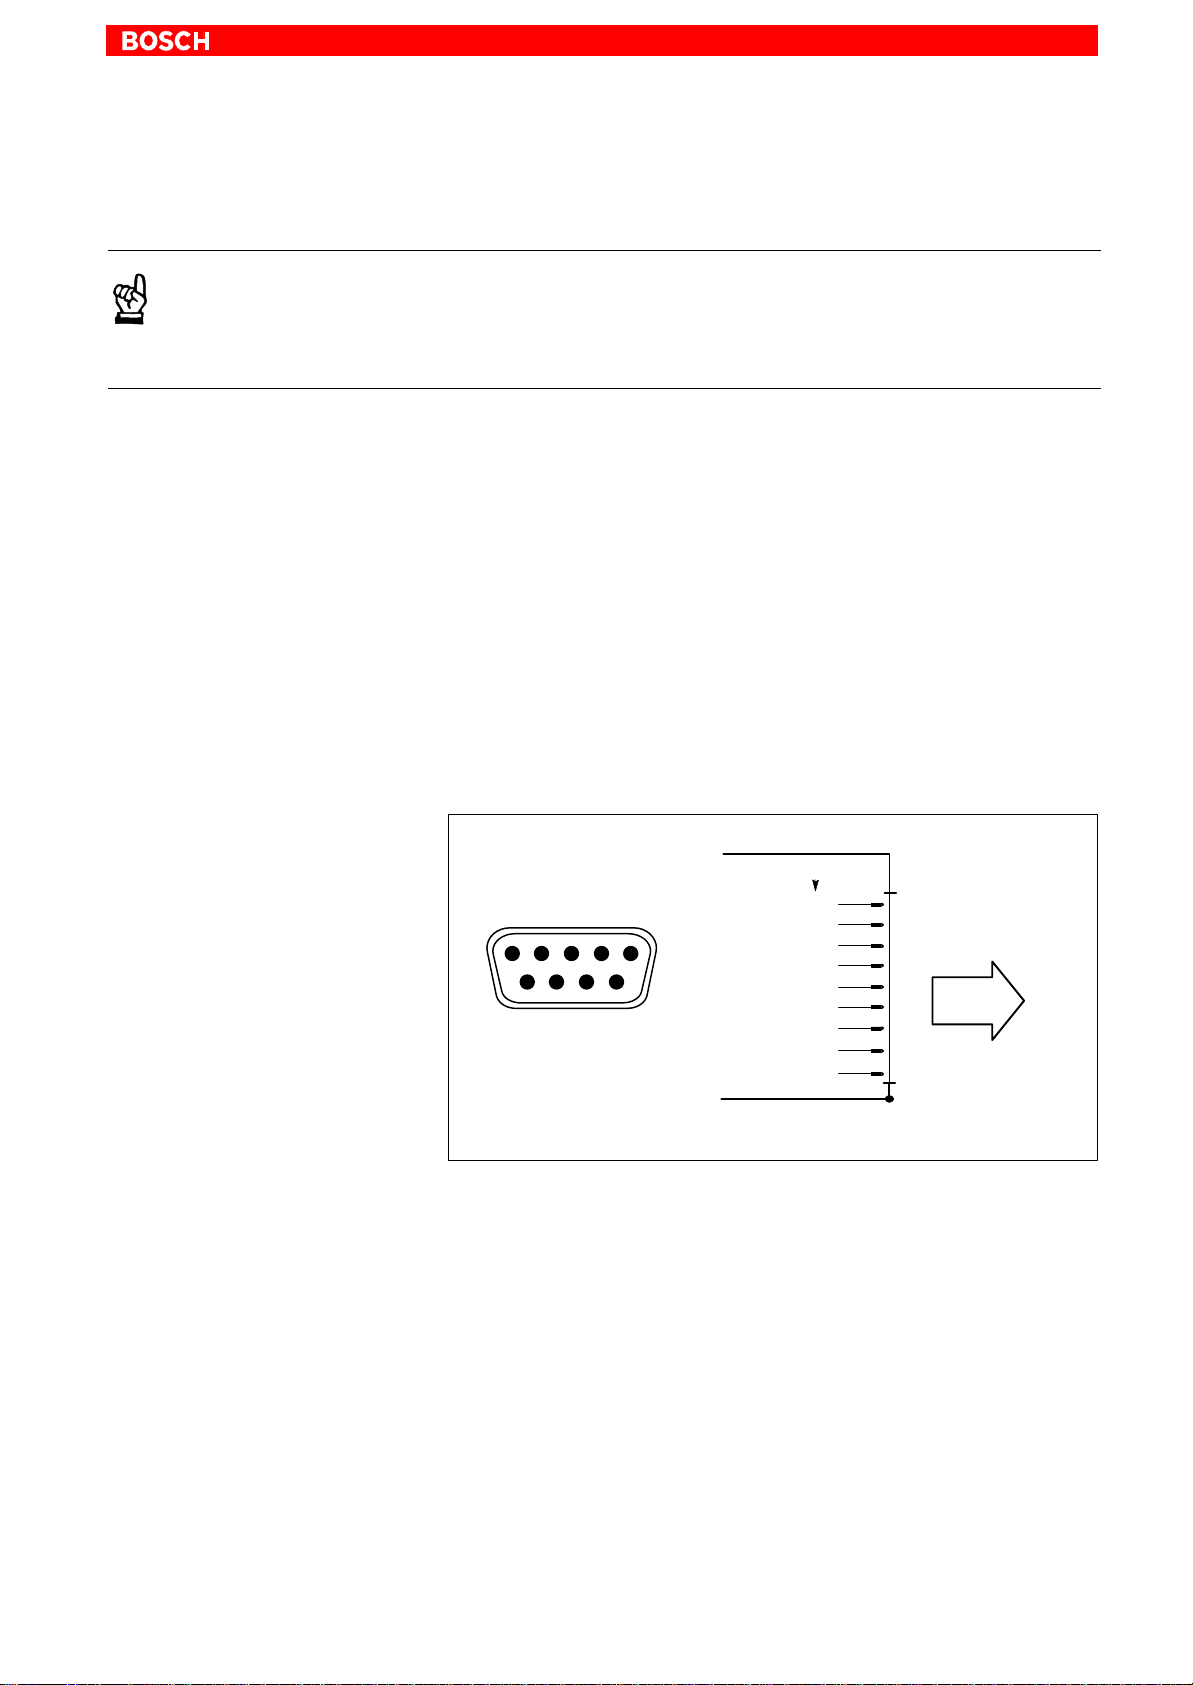
COM1 Serial port, freely assignable
Male DB-9 connector
Type: RS-232
Cable length: Max. 15 m
Cable type: Screened, min. cross-section 0.14 mm
Transmission rate: Max. 115200 bps
Handshake: Hardware and software handshake (XON, XOFF)
Interrupt (IRQ): 4
I/O address: 3F8H or AUTO (recommended)
BIOS preset: IPC: Onboard Serial Port1: Auto
Interfaces, Ports & Connectors
IPC300: alternative to X57
IPC300: COM1 is also applied to X57 as an
RS-422/485. Parallel operation is not possible.
IPC300: Serial Port A: Enabled
6–3
2
COM1
RS232
1
DCD
RX
1
69
5
TX
DTR
GND
DSR
RTS
CTS
RI
Screen applied to
metal shell of connector
2
3
4
5
6
7
8
9
To peripheral
devices
Assignment as an RS-232:
DCD Data Carrier Detect. RCV channel used, for example, by a
connected modem to inform the PC that it is receiving a carrier
signal (active connection).
RX Receive Data. Line on which data is received.
TX Transmit Data. Line on which data is transmitted to a
peripheral device.
DTR Data Terminal Ready. XMIT channel used by the PC to signal
to a connected peripheral device that its interface is switched
on and initialized.
DSR Data Set Ready. RCV channel used by the connected periph-
eral device to inform the PC that it is switched on and inilital-
ized.
GND Signal Ground
1070 073 822-104 (02.06) GB
Page 52
6–4
Interfaces, Ports & Connectors
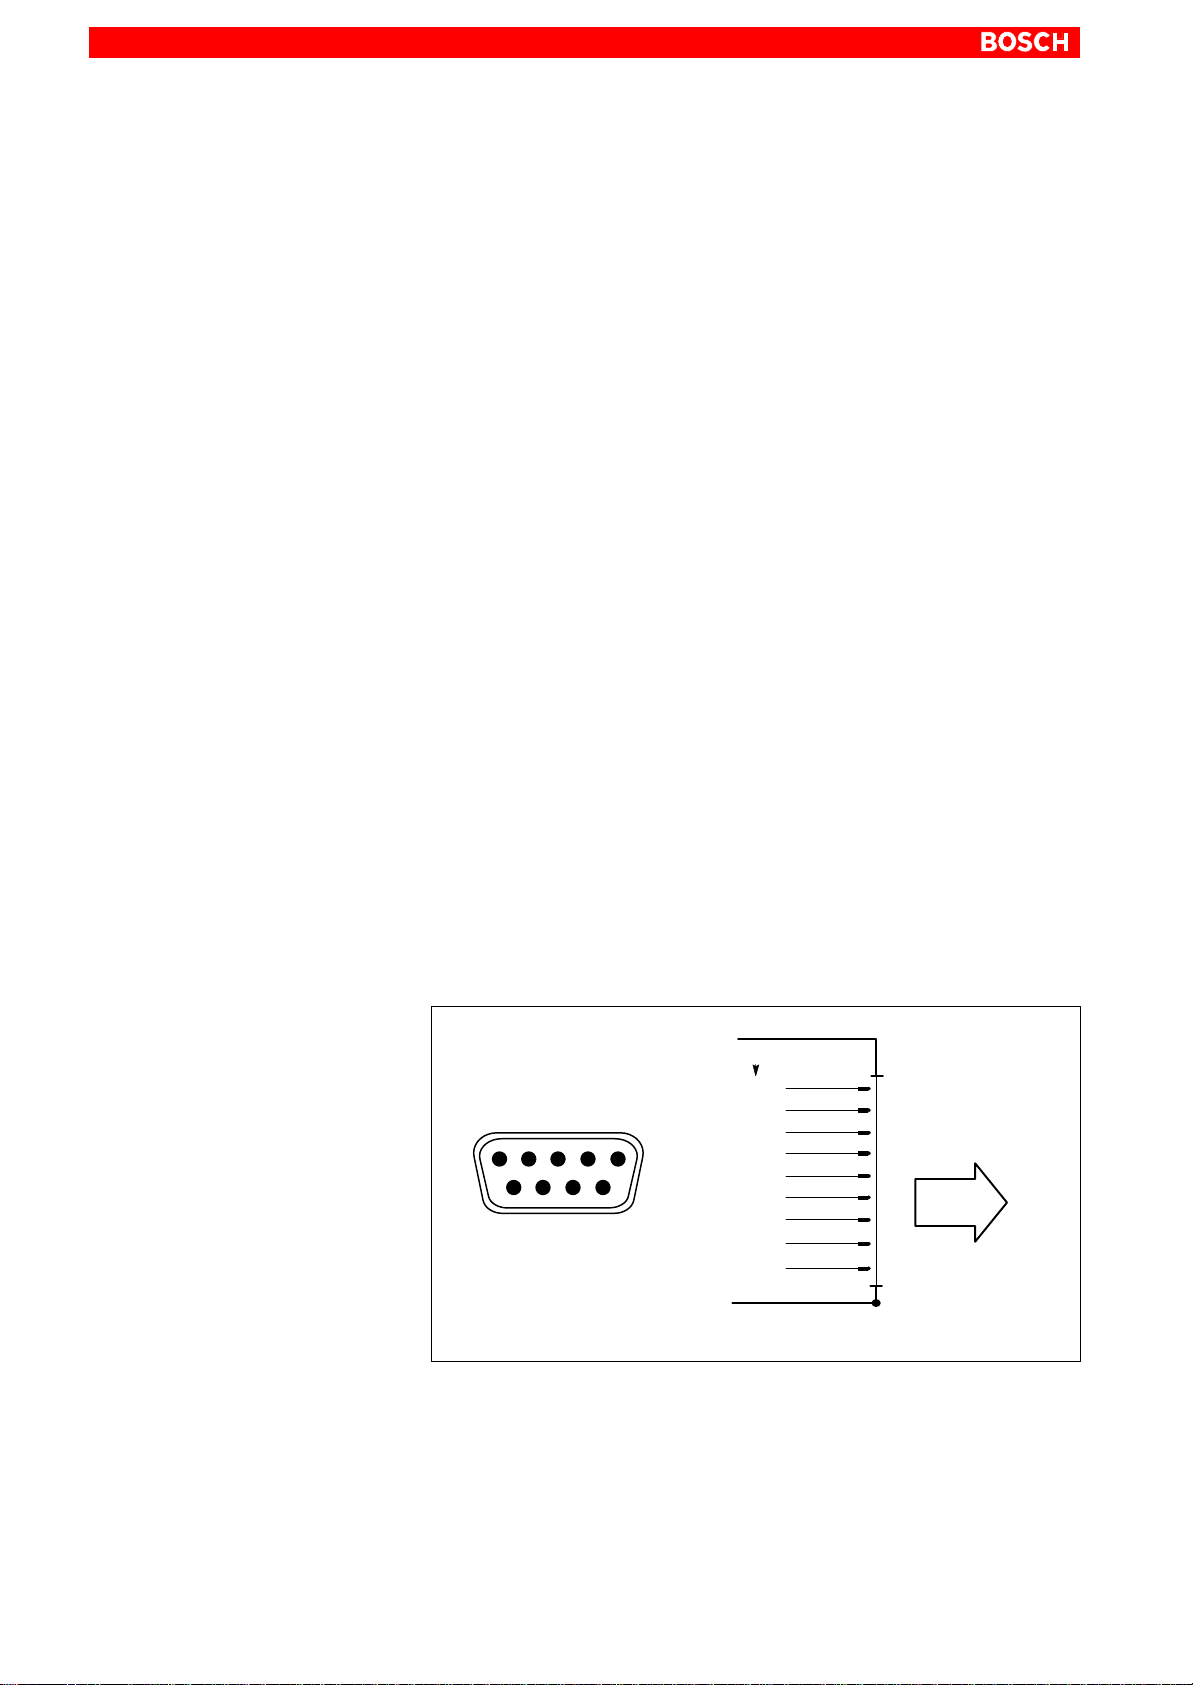
RTS Request to Send. RCV channel used by the connected periph-
eral device to signal to the PC that is wishes to transmit data.
CTS Clear to Send. XMIT channel used by the PC to signal to the
connected peripheral device that it is permitted to transmit
data.
RI Ring Indicator. Receive line on which a connected modem in-
forms the PC of the presence of an active call.
Screen Contact with housing frame via metallic shell of the D-Sub
connector.
COM2 Serial port, assigned to touch screen
On the IPC, the COM2 port must be connected to the touch screen. On the
IPC300, the COM2 is transmitted via the Gigabit bus, making a special data
line unnecessary.
In exceptional cases the IPC also permits the use of the COM1 or COM3 port
for the touch screen, provided that the BIOS settings are changed to suit.
On the IPC the COM2 is also applied to X57 to provide RS-422/485 service.
Parallel operation is not possible, however.
Male DB-9 connector
Type: RS-232
Cable length: Max. 15 m
Cable type: Screened, min. cross-section 0.14 mm
Transmission rate: Max. 115200 bps
Handshake: Hardware and software handhsake (XON, XOFF)
Interrupt (IRQ): 3
I/O address: 2F8H or AUTO (recommended)
BIOS preset: IPC: Onboard Serial Port2: Auto
IPC300: Serial Port B: Enabled
COM2
RS232
DCD
RX
TX
1
69
5
DTR
GND
DSR
RTS
CTS
RI
1
2
3
4
5
6
7
8
9
2
IPC: to BF2xxT
(separate line)
IPC300: internally to
BF3xxT via LCD
Screen applied to
metal shell of connector
Refer to page 6–3 for explanations on pin assignments.
1070 073 822-104 (02.06) GB
Page 53
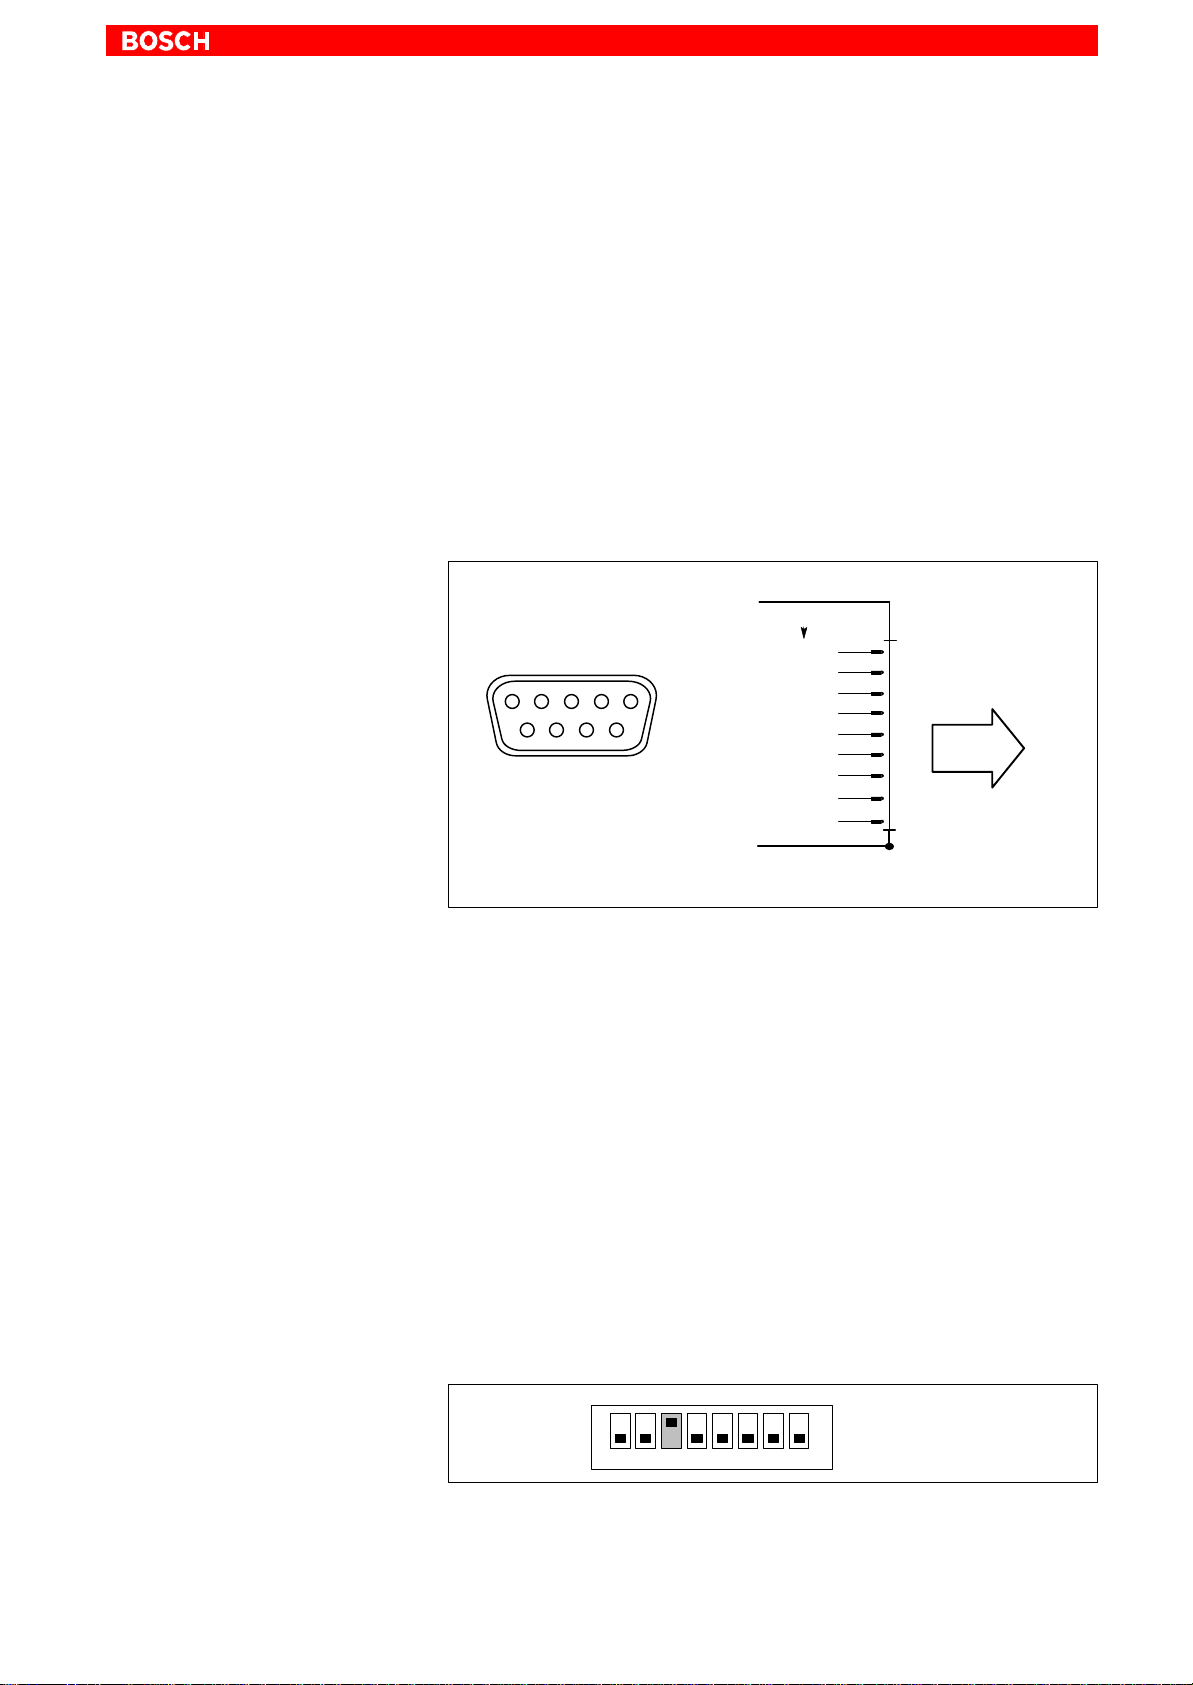
Interfaces, Ports & Connectors
6–5
X57 Serial port used as an RS-485/422, IPC: alternative to COM2
IPC300: alternative to COM1
This port can be assigned only in the event that the COM2 port (IPC) or
COM1 port (IPC300) is not used. Parallel operation is not possible.
The X57 interface is not suitable as a connection for the touch screen controller of a connected control panel.
Male DB-9 connector
Type: RS-485/422
Cable length: Max. 15 m
Cable type: Screened, min. cross-section 0.14 mm
Transmission rate: Max. 115200 bps
Handshake: Hardware and software handshake (X
Interrupt (IRQ): 3 (IPC), 4 (IPC300)
I/O address: 2F8H (IPC), 3F8H (IPC300), AUTO (recommended)
BIOS preset: IPC: Onboard Serial Port 2: AUTO
IPC300: Serial Port A: Enabled
X57
RS485/422
DCD
RXD−
1
69
5
TXD−
DTR
GND
DSR
RXD+
TXD+
RI
1
2
3
4
5
6
7
8
9
2
, X
ON
To peripheral
devices
OFF
)
Settings
Screen applied to metal
shell of connector
Assignment as an RS-485/422:
(For more information on pin assignment, see Page 6–3)
DCD as for RS-232
RXD–, RXD+ Receive Data. Line on which data is received.
TXD–, TXD+ Transmit Data. Line on which data is transmitted to peripheral.
DTR as for RS-232
DSR as for RS-232
GND as for RS-232
RI as for RS-232
Screen as for RS-232
The S3 DIP switch can be used to configure the X57 interface as an RS-485
or RS-422:
D X57 = RS-485 Switch 3 set to ON = TXD is controlled via RTS.
Also, for 2-wire operation, TXD+ must be bridged
with RXD+, and TXD– with RXD–.
D X57 = RS-422 Switch 3 set to OFF = TXD always enabled.
S3
ON
OFF
1 2345678
1070 073 822-104 (02.06) GB
Location of S3: IPC300 = externally accessed, see diagram on page 6–2
IPC = see diagram on page 6–12.
Page 54
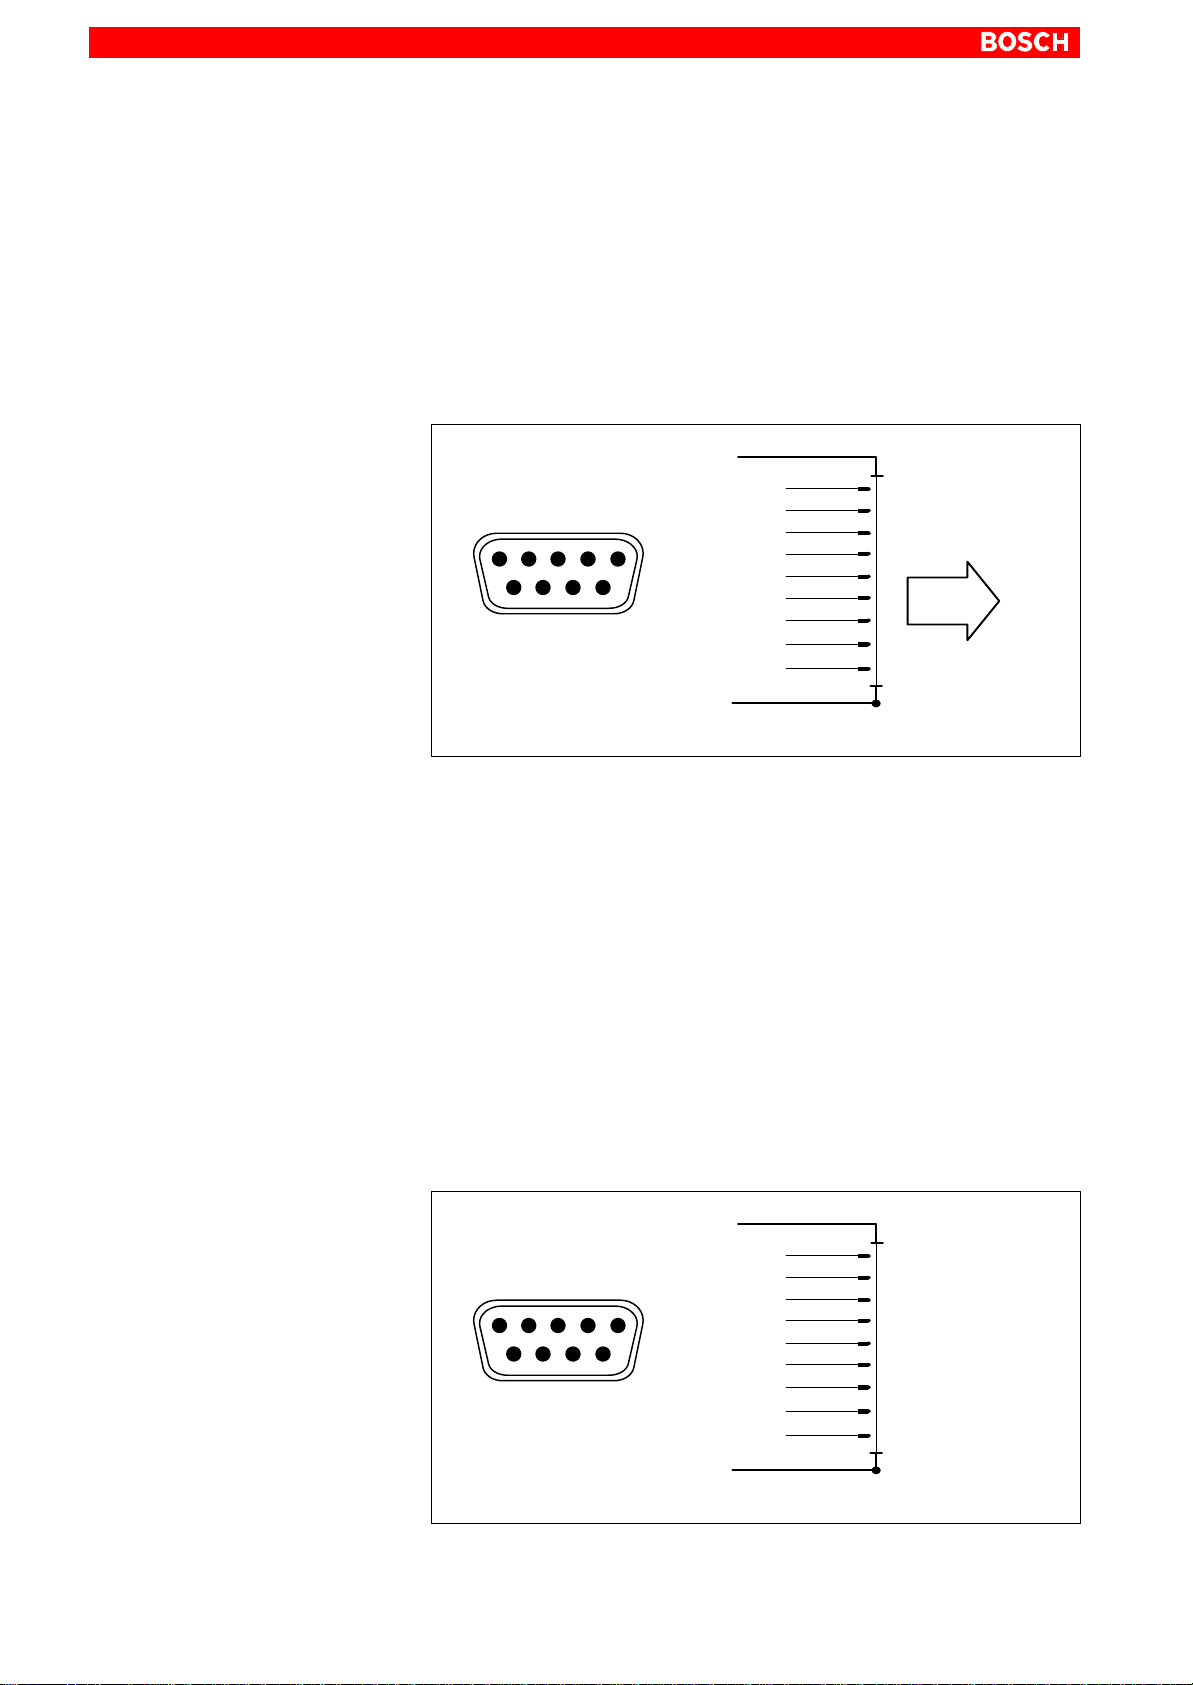
6–6
Interfaces, Ports & Connectors
COM3 Serial port, freely assignable
Male DB-9 connector
Type: RS-232
Cable length: Max. 15 m
Cable type: Screened, min. cross-section 0.14 mm
Transmission rate: Max. 115200 bps
Handshake: Hardware and software handshake (XON, XOFF)
Interrupt (IRQ): 10
I/O address: 3E8H
BIOS preset: IPC: Onboard Serial Port3: 3E8h
2
IPC300: Serial Port C: Enabled
COM3
1
69
5
Refer to page 6–3 for explanations on pin assignments.
COM4 Serial port, assigned to UPS logic
(refer to Section 3.2)
COM4 is internally assigned to the uninteruptible power supply (UPS).
On the IPC, COM4 can be used for external applications if the UPS ios not
required. On the IPC300, the COM4 is not externally accessible.
Male DB-9 connector
Type: RS-232
Cable length: Max. 15 m
Cable type: Screened, min. cross-section 0.14 mm
Transmission rate: Max. 115200 bps
Handshake: Hardware and software handshake (XON, XOFF)
Interrupt (IRQ): 11
I/O address: 2E8H (if equipped for free assignment)
BIOS preset: IPC: Onboard Serial Port4: 2E8h
IPC300: Serial Port D: Enabled
DCD
RX
TX
DTR
GND
DSR
RTS
CTS
RI
1
2
3
4
5
6
7
8
9
Screen applied to metal
shell of connector
To peripheral
devices
2
COM4
DCD
RX
TX
1
69
5
DTR
GND
DSR
RTS
CTS
RI
1
2
3
4
5
6
7
8
9
Screen applied to metal
shell of connector
Refer to page 6–3 for explanations on pin assignments.
1070 073 822-104 (02.06) GB
Page 55
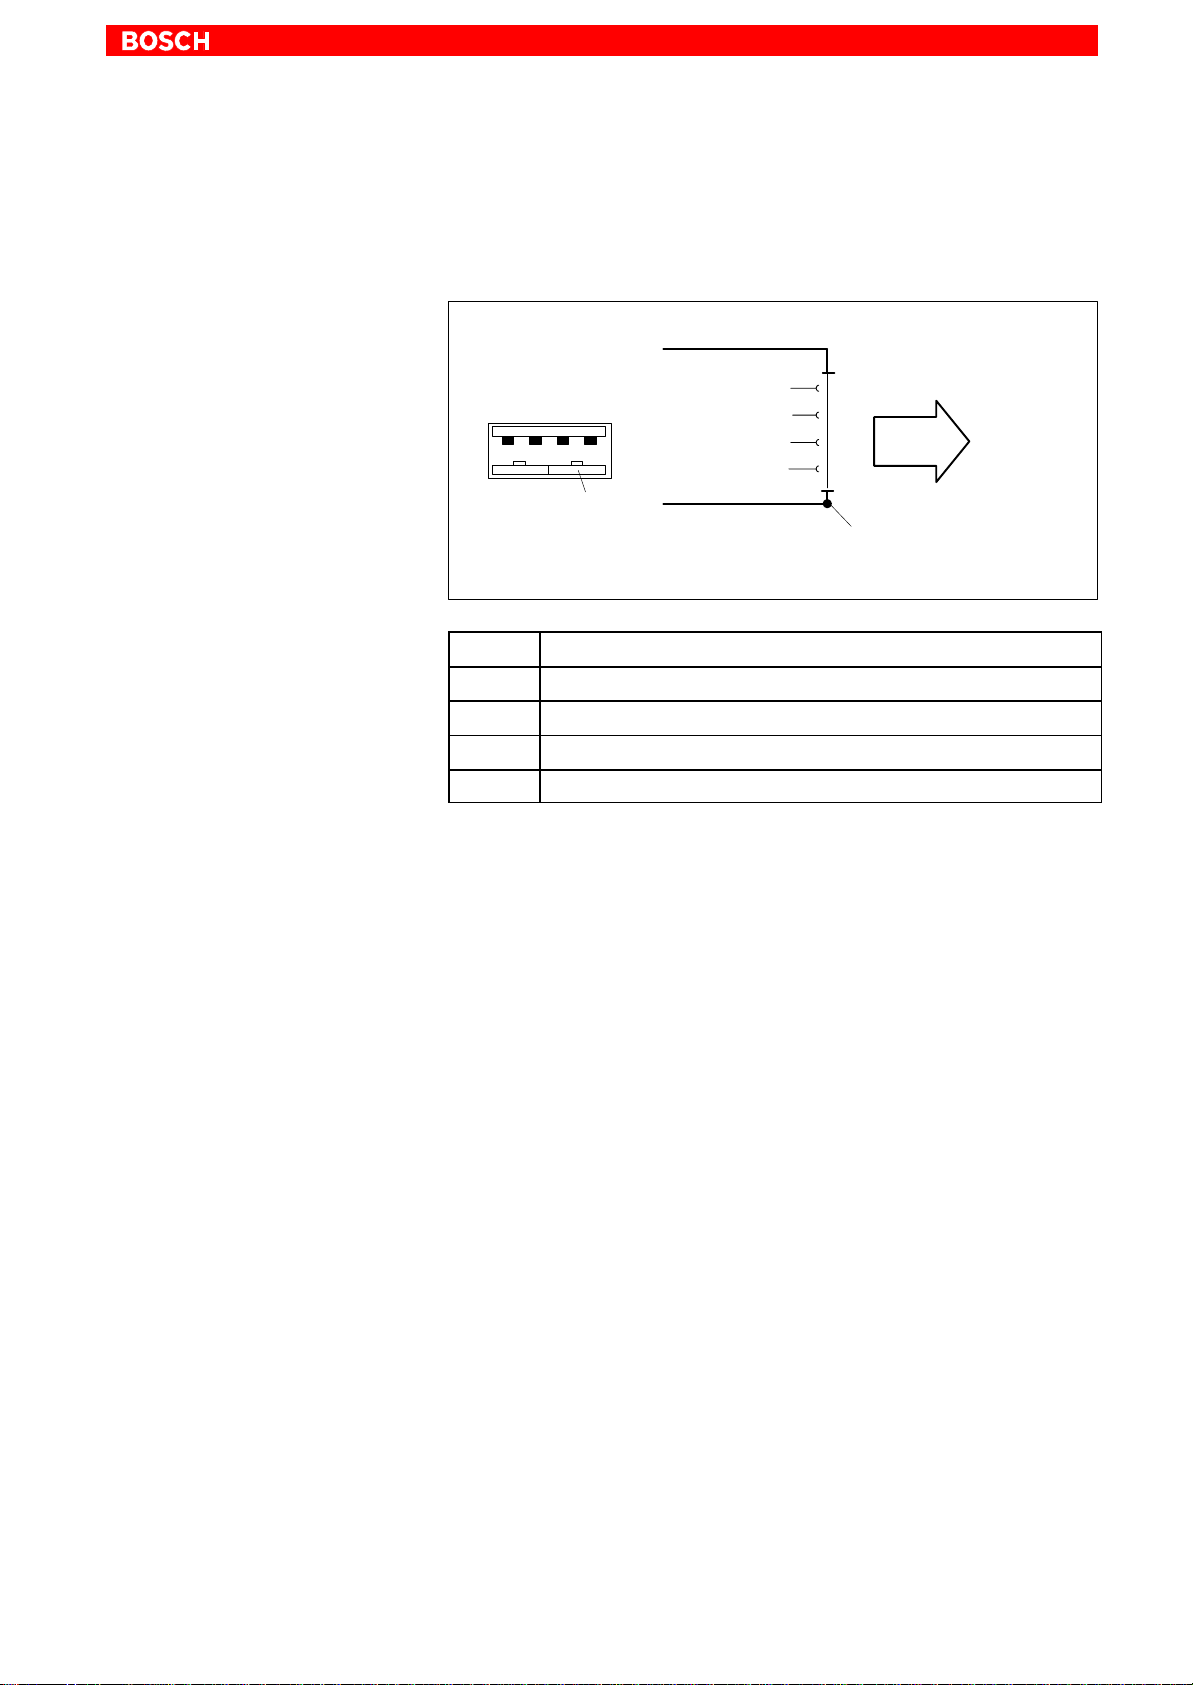
Interfaces, Ports & Connectors
USB Serial interface (Universal Serial Bus), currently not supported
The USB interface provides for the connection of up to 128 devices equipped
with USB functions.
USB socket, 4-pin
USB
6–7
USB
2143
USB_P
USB1
USB2
USB_M
1
2
3
4
Screen
PIN Signal
1 USB power supply (max. 500 mA)
2 Data –
3 Data +
4 USB Ground
USB device
Screen applied to
metal shell of connector
1070 073 822-104 (02.06) GB
Page 56

6–8
Interfaces, Ports & Connectors
6.2.2 COM1 through COM4 settings
Control Panel
For information about setting the communication parameters for serial interfaces, refer to the manual supplied with the installed operating system.
Windows 95/NT: Go to Start / Settings / Control Panel, etc.
BIOS
The factory-shipped BIOS settings for COM1 through COM4 have been set
to Present.
CAUTION
Interrupt (IRQ) and I/O address must correspond to BIOS settings.
In the case of address conflicts regarding COM3/4, e.g., if IRQ 10 or
11 are already in use by other PC expansion cards, free IRQs must be
used instead.
1070 073 822-104 (02.06) GB
Page 57
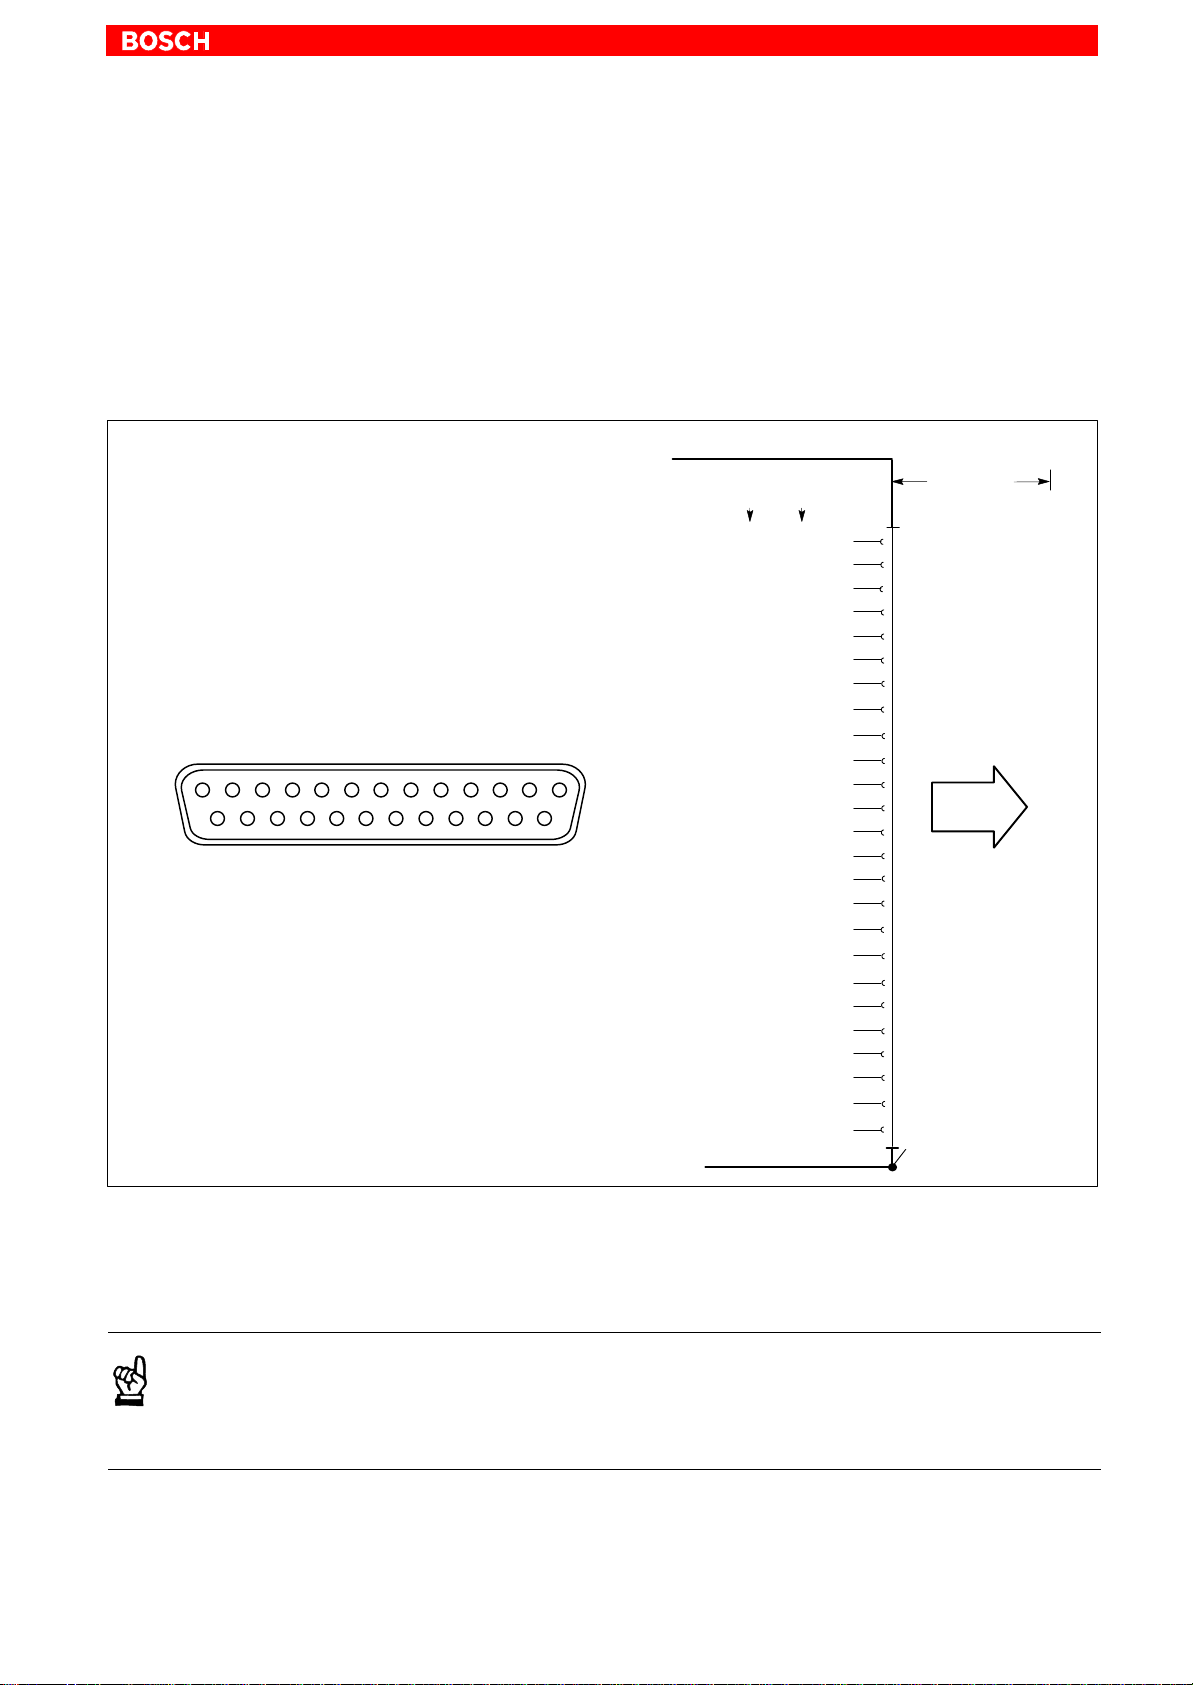
6.3 LPT1 parallel port
LPT1 Parallel port for printer, scanner, etc.
Interfaces, Ports & Connectors
Male DB-25 connector
Type: SPP (ex works), EPP, ECP
Cable length: Max. 3 m
Cable type: Screened, min. cross-section 0.14 mm
Interrupt (IRQ): 7
I/O address: AUTO or 378H (recommended)
LPT1
6–9
2
1
14 25
Interface mode
EPP
SPP
Write
STROBE
Data0
Data0
Data1
Data1
Data2
Data2
Data3
Data3
Data4
Data4
Data5
Data5
Data6
Data6
Data7
Data7
Intr
ACK
Wait
13
n.u.
n.u.
Datastb
n.u.
n.u.
Addrstrb
GND
GND
GND
GND
GND
GND
GND
GND
BUSY
PAPER out
SEL out
AUTOFD
ERROR
INIT
SEL in
GND
GND
GND
GND
GND
GND
GND
GND
1
2
3
4
5
6
7
8
9
10
11
12
13
14
15
16
17
18
19
20
21
22
23
24
25
max. 3 m
To peripheral
device
Screen applied to
metal shell of connector
1070 073 822-104 (02.06) GB
The parallel port normally runs in the default SPP mode. Provided that suitable peripheral devices are present, it can also be operated in EPP (Enhanced Parallel Port) or ECP (Extended Capabilities Port) mode. The mode
is changed in the BIOS settings.
CAUTION
Functional failures caused by poor screening!
Use only metallic or conductive connector/coupling shells providing
large-area screen contact.
Page 58
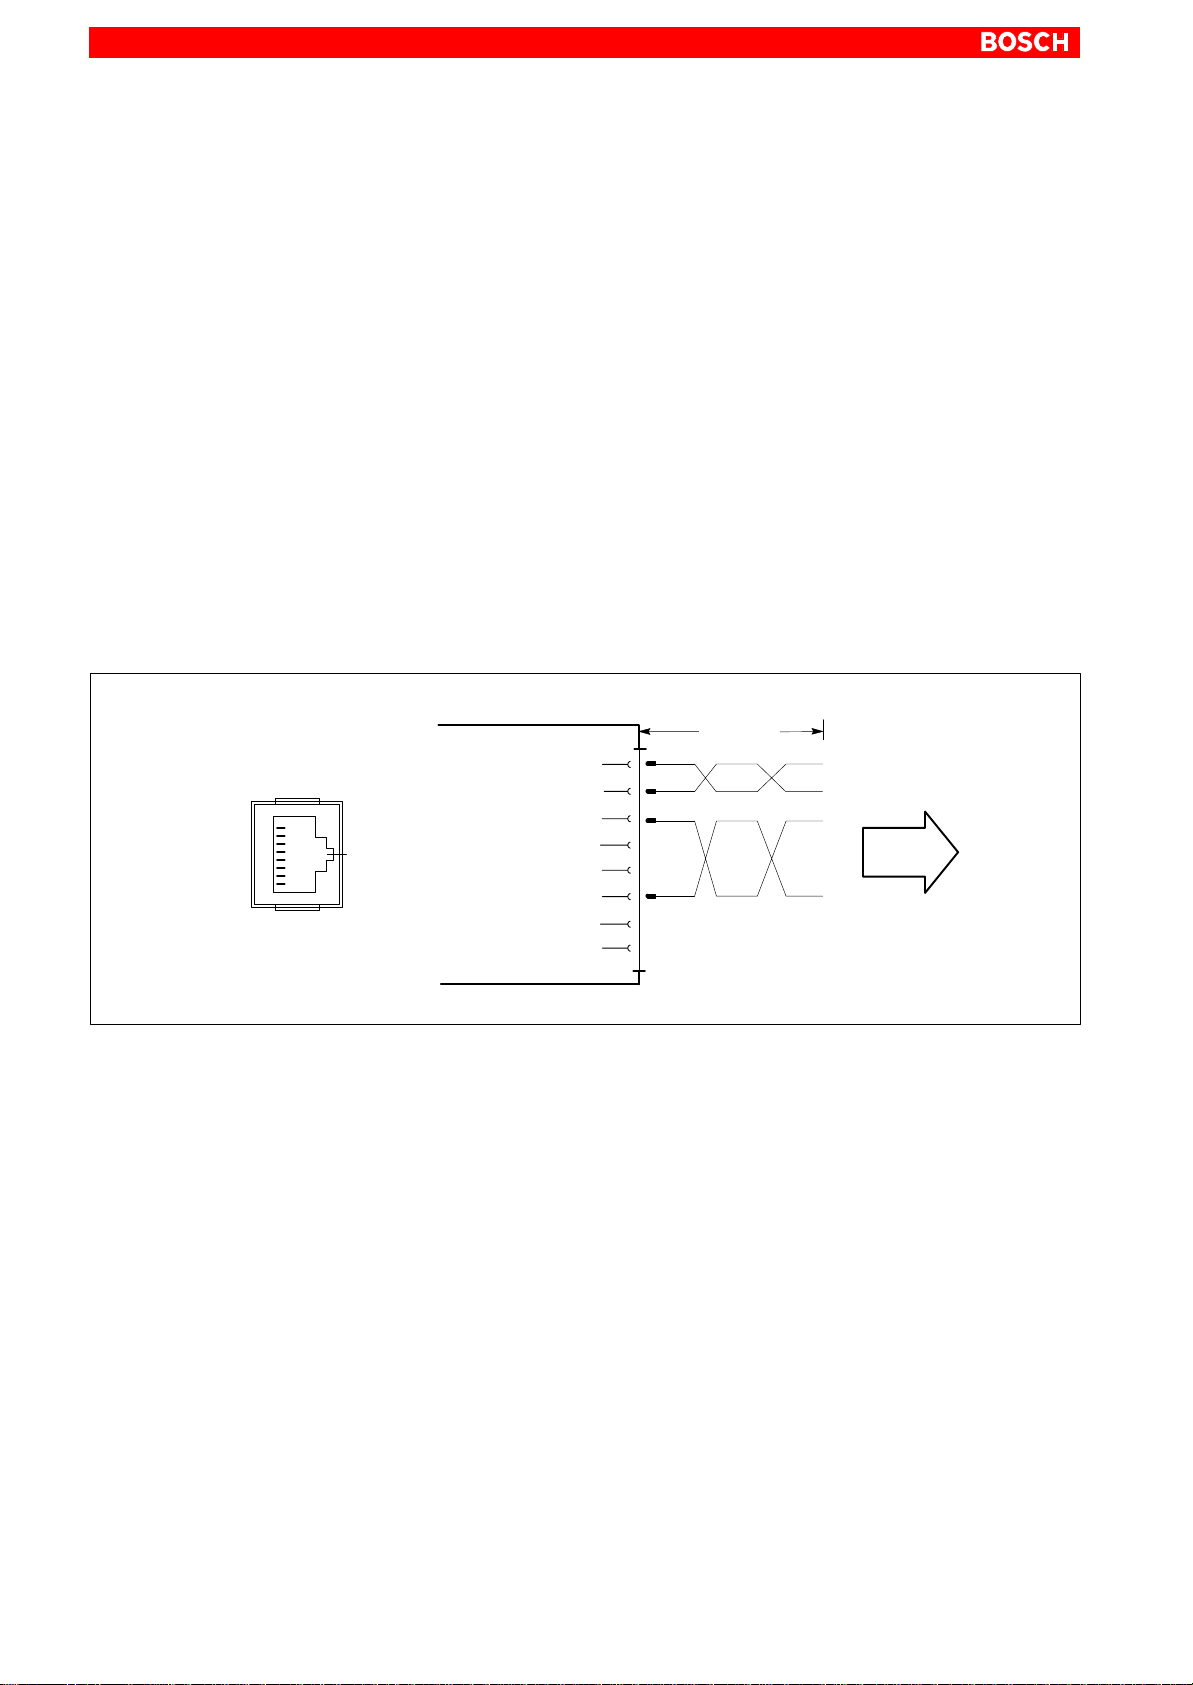
6–10
Interfaces, Ports & Connectors
6.4 Ethernet connection
Ethernet Network connection
The Ethernet connection allows the PC to communicate on an Ethernet network. To facilitate data communications, the required network protocols
(e.g., TCP/IP) must be recognized by the operating system and the network
application programs running on the PC.
Female RJ45, 8-pin
Type: IPC: Ethernet 10-Base-T
IPC300: Ethernet 10/100BaseTX
Cable length: Max. 100 m
Cable type: Screened, twisted pair
Transmission rate: 10 Mbit/s and/or 100 Mbit/s
Interrupt (IRQ): 5
I/O address: 340H
Ethernet RJ45
8
1
Ethernet
max. 100 m
TXD+
TXD−
RXD+
RXD−
1
2
3
4
5
6
7
8
To network
The driver configuration functions for the network connection can be accessed in the task bar or in the Control Panel under the Network Card symbol. A dialog box provides selections of data transmission speed, e.g.,
10 Mbit/s or 100 MBit/s.
. Note that the network card of the remote communication partner must
be able to handle the same data transfer rate.
1070 073 822-104 (02.06) GB
Page 59
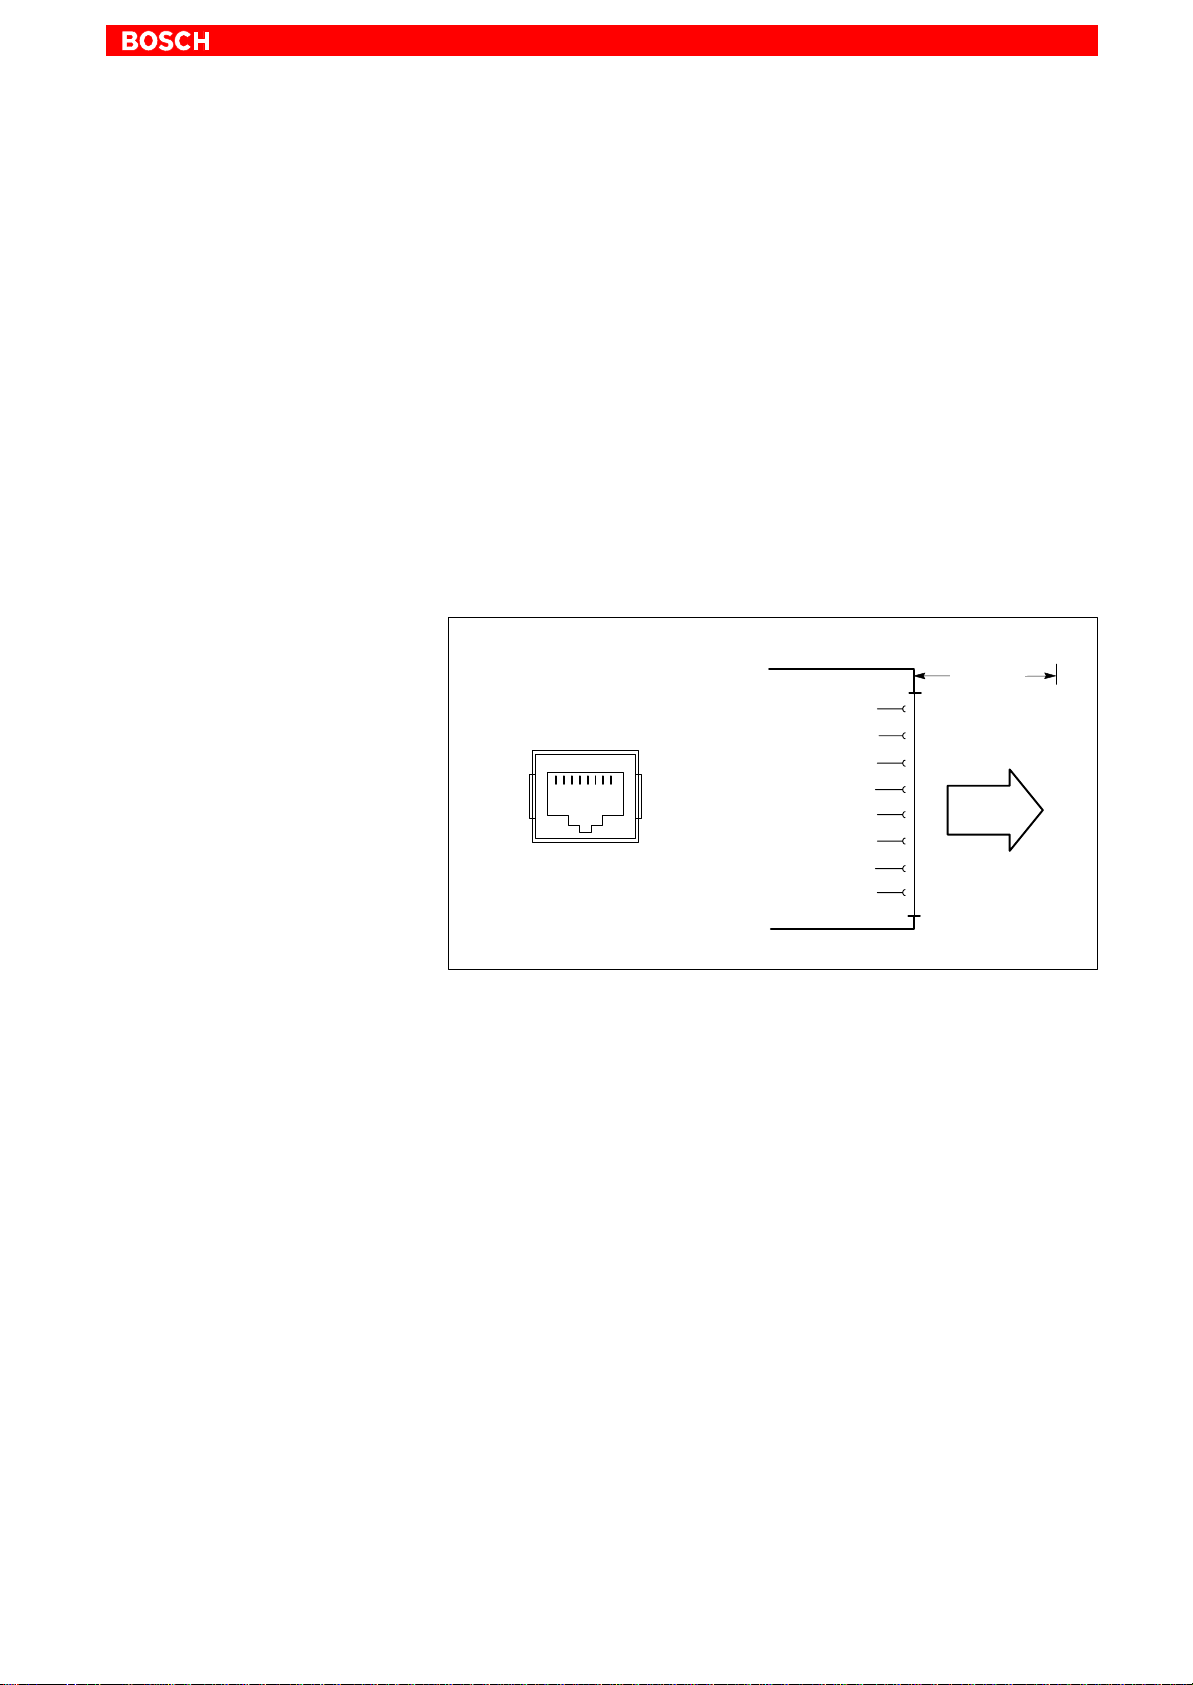
6.5 Display interfaces
6.5.1 BF2xxT for IPC
LVDS Video transmission
Interfaces, Ports & Connectors
6–11
The video signals are transmitted via the LVDS port. The port has been
specifically designed for longer transmission routes and interference-free
transmission, and can only be connected to the LVDS port of the BF200T
and BF212T control panels.
Female RJ45, 8-pin
Cable length: Max. 10 m
Cable type: Twisted pair, 8-conductor, screened
Refer to information on premanufactured connecting cables in Section 10.2.
Selecting the display resolution
LVD S
max. 10 m
1
2
3
4
5
6
7
8
To BF200T
or BF212T
(LVDS)
LVDS
18
TXCLKOUTP
TXCLKOUTN
TXOUT1P
TXOUT2P
TXOUT2N
TXOUT1N
TXOUT0P
TXOUT0N
The display resolutions must be selected in the connected IPC or rho4 via
the S3 DIP switch (see diagram below):
D BF200T (10.4 in. colour display): 640 x 480 pixels, 256000 colours
D BF212T (12.1 in. colour display): 800 x 600 pixels, 256000 colours
(factory setting)
To change the factory setting, the mousing cover of the IPC is removed (4
mounting screws), and the settings of segments 7 and 8 on the S3 DIP
switch are changed (see diagram below).
1070 073 822-104 (02.06) GB
Page 60
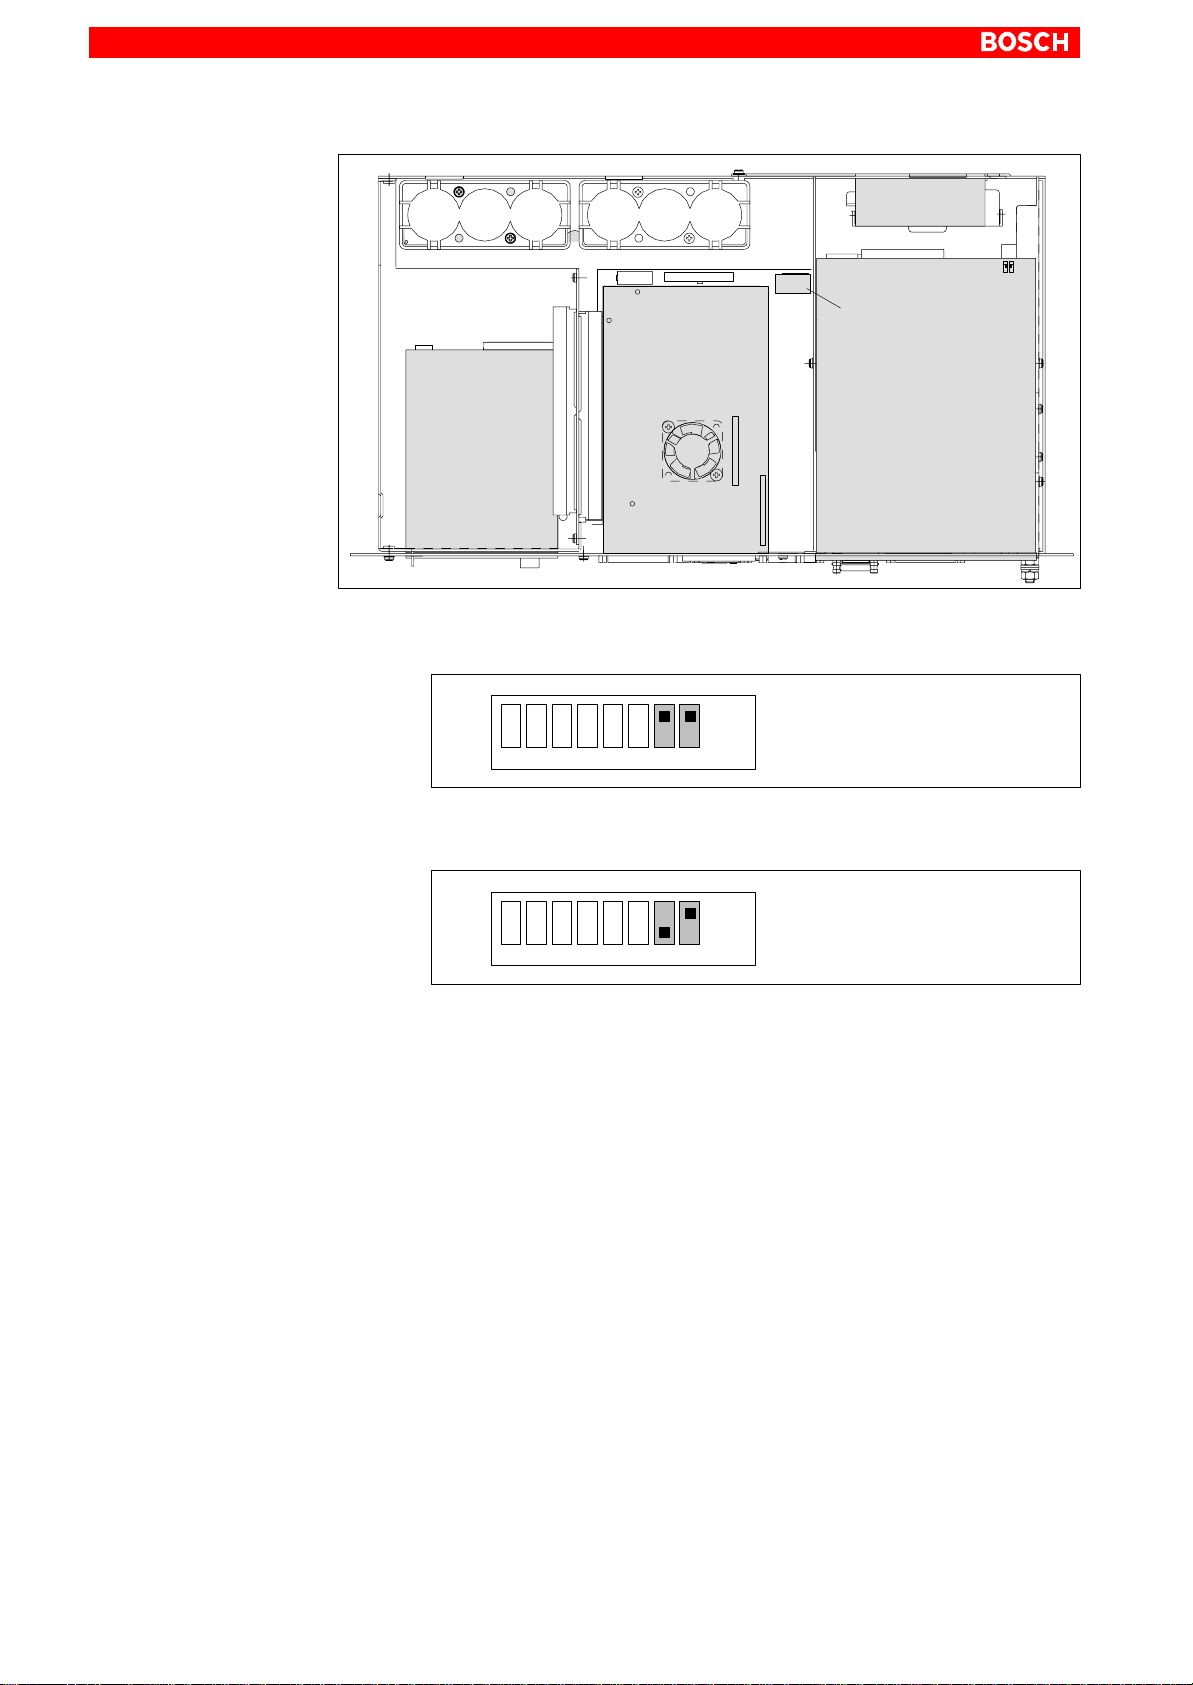
6–12
Interfaces, Ports & Connectors
Battery
Floppy disk CD-ROM drive
Battery
S3
Main board
Hard disk
S3 DIP switch
D 640 x 480 pixels Switches 7,8: ON
S3
1 2345678
ON
OFF
D 800 x 600 pixels Switch 7 : OFF
Switch 8 : ON
S3
1 2345678
ON
OFF
(Factory setting)
1070 073 822-104 (02.06) GB
Page 61
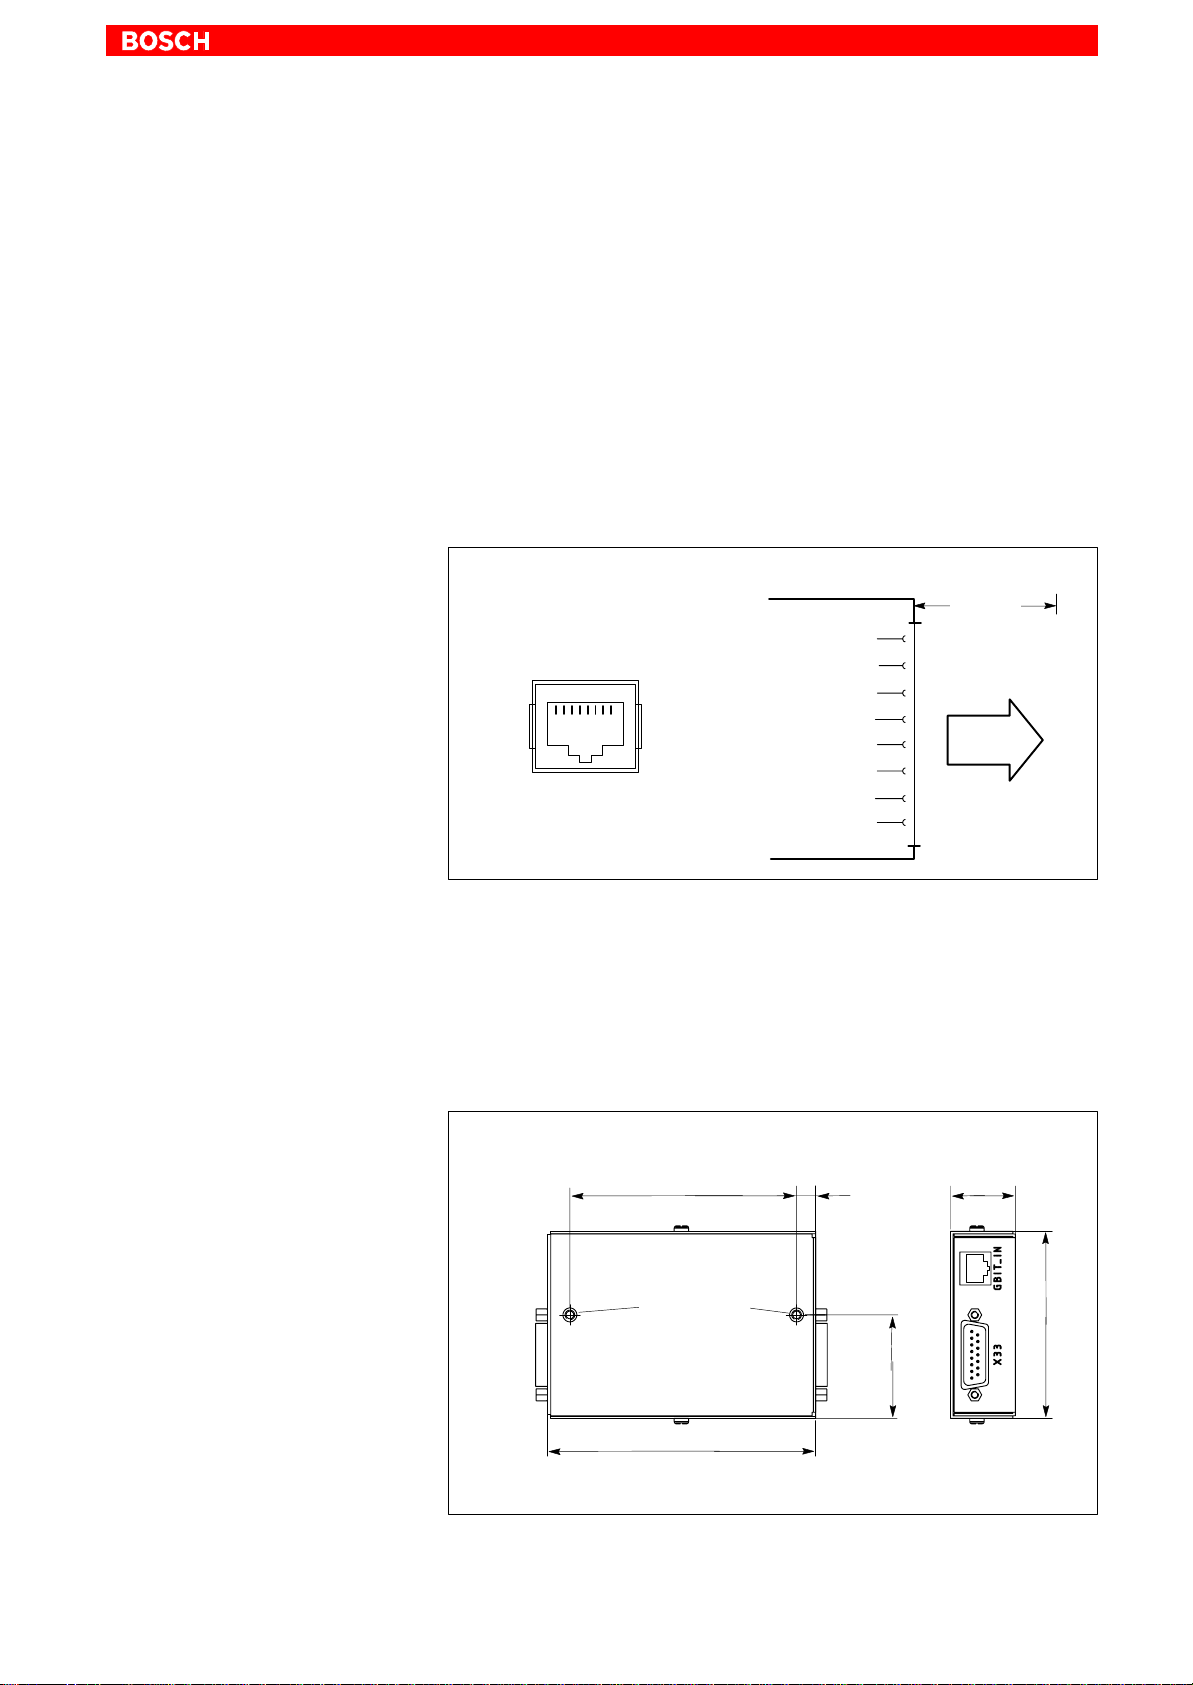
6.5.2 BF3xxT for IPC300
LCD Gigabit interface
Interfaces, Ports & Connectors
6–13
(video transmission and RS-422 for touch screen controller)
The Gigabit interface simultaneously handles the transfer of video signals
and and control communications for the touch screen controller (RS-422).
On the IPC300 the controller signals are internally connected to COM2.
The Gigabit interface has been specifically designed for longer transmission
routes and interference-free transmission, and can only be connected to the
Gigabit interface on the BF312T and B315T control panel.
Female RJ45, 8-pin
Cable length: Max. 15 m, max. 75 m with repeaters
Cable type: Twisted pair, 8-pin, screened
Refer to information on premanufactured connecting cables in Section 10.2.
Gigabit
max. 15 m
1
2
3
4
5
6
7
8
To BF312T
or BF315T
(Gigabit)
LCD
18
Gigabit data+ (video data+)
Gigabit data− (video data−)
COM Touch: Control signal
COM Touch: TX+
COM Touch: TX−
Control signal, Gigabit receiver
COM Touch: RX+
COM Touch: RX−
GBIT repeater
The use of the Gigabit repeater extends the reach of required connections
between the IPC300 and BF3xxT (LCD and X33) by 15 metres per repeater ,
to a maximum of 75 metres achieved with 4 repeaters. Installs via M4
press-in nuts. Using standard mounting clamps, snap-on installation on a
standard DIN rail is also possible. Information on screen resolution settings
can be found on page 6-15.
Refer to ordering information in Section 10.2.
94.5 27
GBIT_IN
Press-in nut
M4 (2x)
X33
112
8
GBIT_OUT
78
X11
43.15
1070 073 822-104 (02.06) GB
Page 62
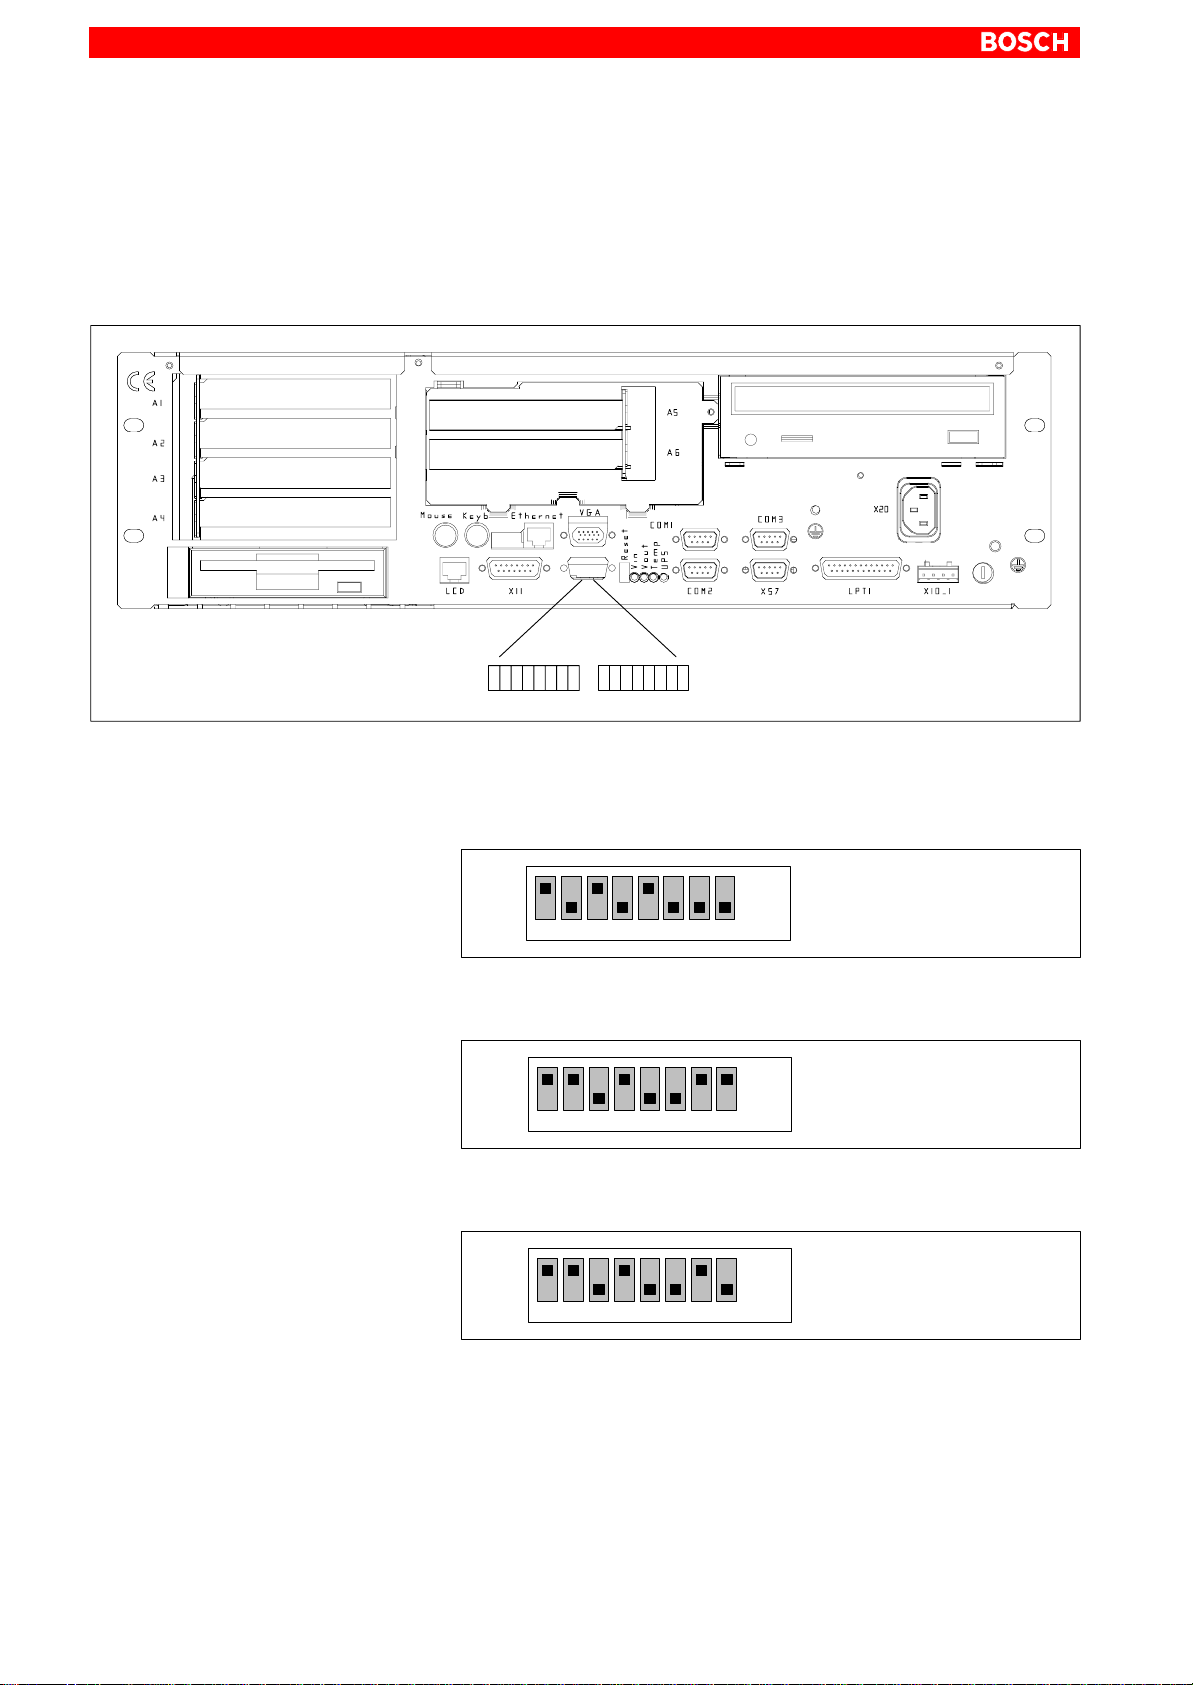
6–14
Interfaces, Ports & Connectors
Setting screen resolution
The display resolution must be selected on the S1 DIP switch (refer to diagram below):
D BF312T (12.1 in. colour display): 800 x 600 pixels
D BF315T (15 in. colour display): 1024 x 768 pixels
(factory presets)
S1 S3
Changes are made on the externally accessible switch segments 1 though 8
of the S1 DIP switch:
D 800 x 600 pixels
S1
1 2345678
ON
OFF
D 1024 x 768 pixels
(IPC300 with Pentium I / 266 MHz)
S1
1 2345678
ON
OFF
(factory setting)
D 1024 x 768 pixels
(IPC300 with Pentium III / 400 MHz)
S1
1 2345678
ON
OFF
(factory setting)
1070 073 822-104 (02.06) GB
Page 63
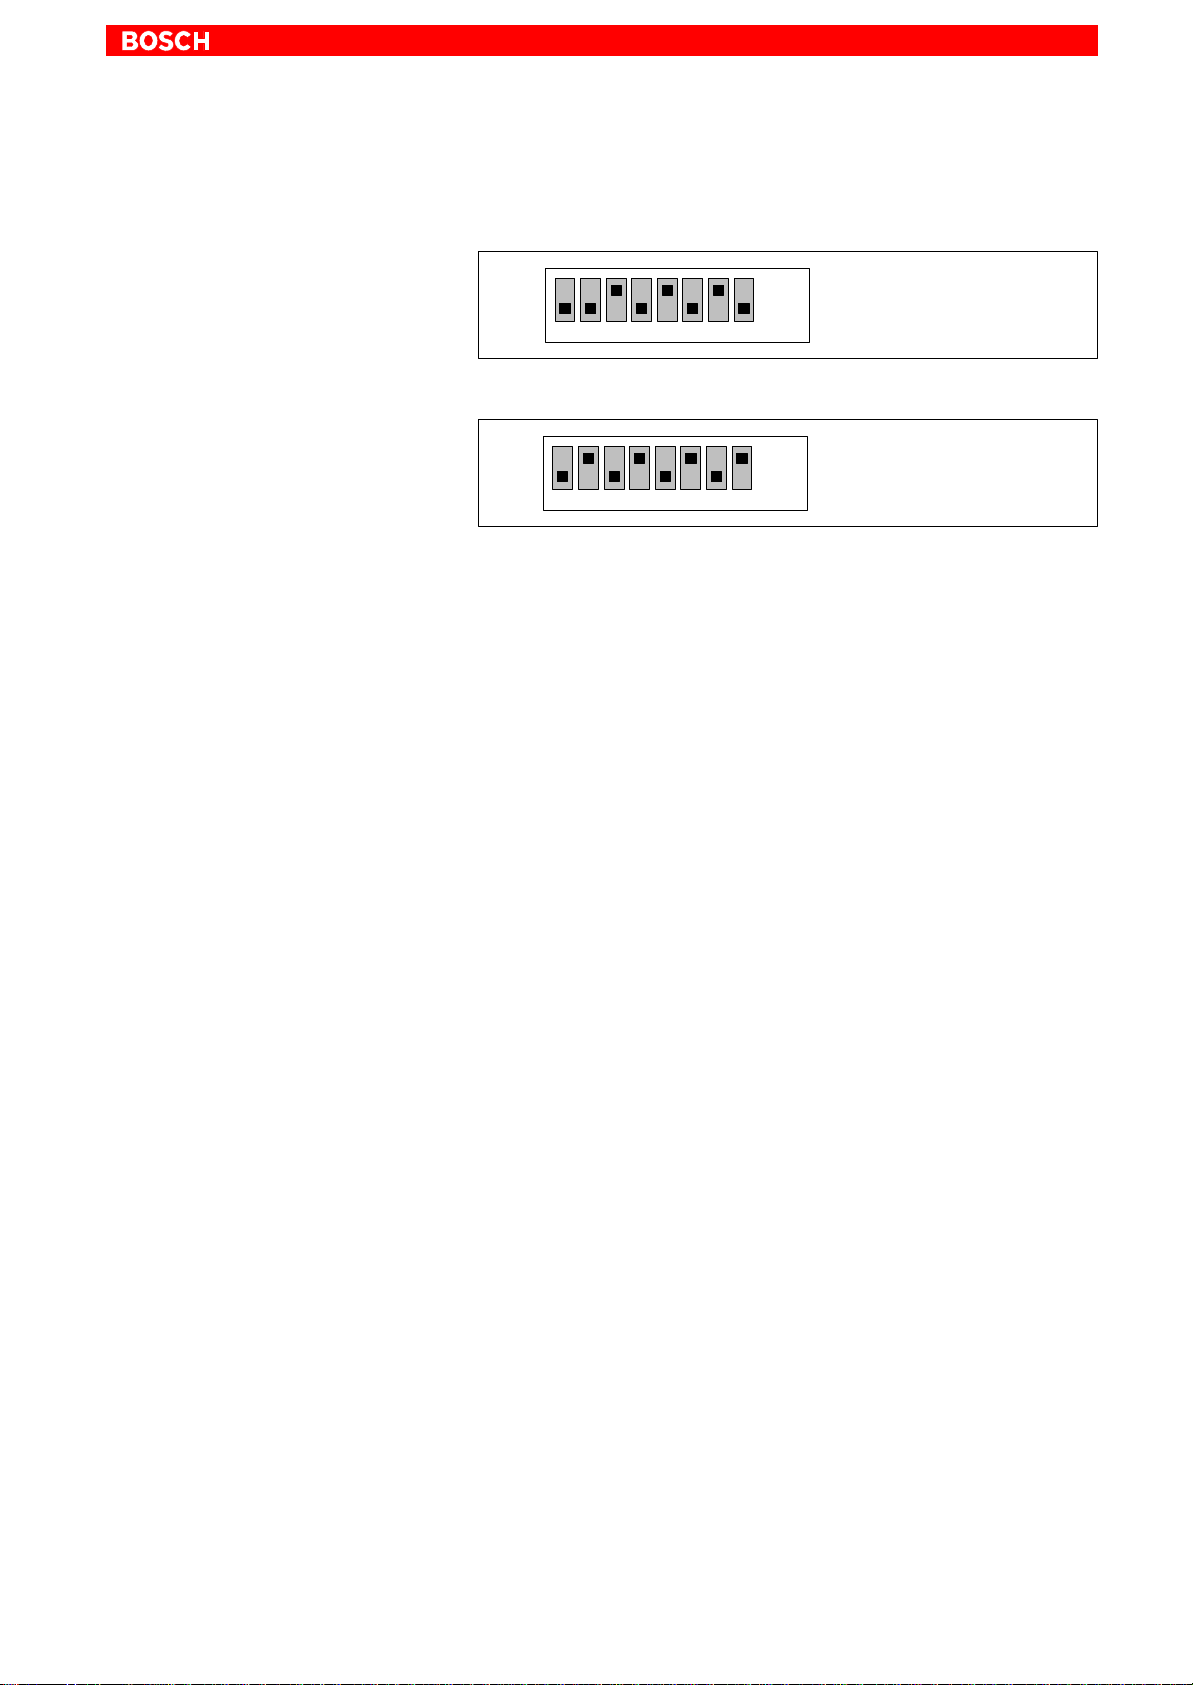
Interfaces, Ports & Connectors
6–15
If a Gigabit Repeater is used, the DIP switch has to be configured as follows
depending on the connected control panels:
D 800 x 600 Pixel (BF312T)
S1
1 2345678
D 1024 x 768 Pixel (BF315T)
S1
1 2345678
ON
OFF
ON
OFF
(Einstellung ab Werk)
1070 073 822-104 (02.06) GB
Page 64
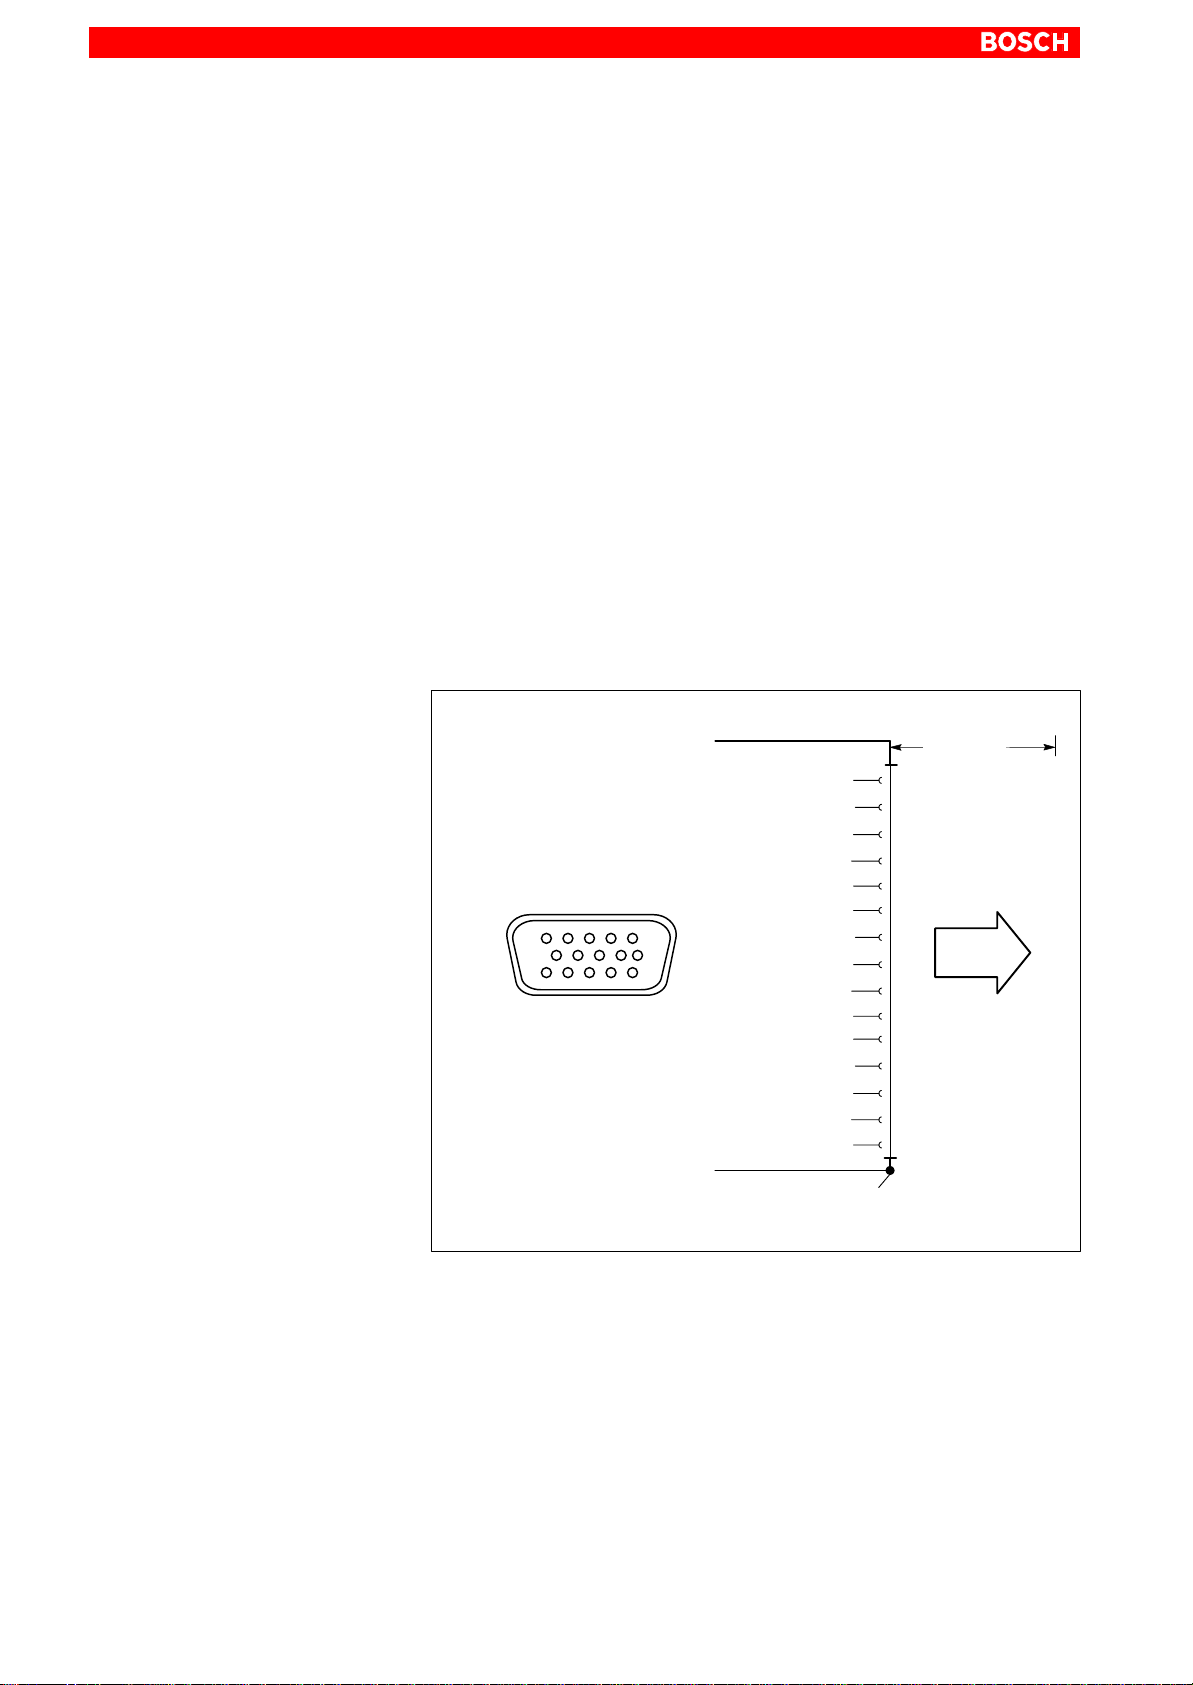
6–16
Interfaces, Ports & Connectors
6.5.3 External CRT monitor for IPC / IPC300
VGA External monitor port
The VGA port accepts an external monitor (CRT) for operation via the built-in
video adapter. The external monitor can be operated in parallel with the operator panel.
D Video RAM: 2 MB
. Note that the external monitor must already be connected at the time
the control terminal is booted up. If this is not the case, the VGA port
will not be initialized by the BIOS.
. Inserting a graphics card will disable the integrated video adapter.
Also, on the IPC300, the BIOS setting must be changed.
Female VGA HD, 15-pin
Cable length: Max. 1.5 m
Cable type: Screened, min. cross-section 0.14 mm
Max. resolution: 1280 x 1024 pixels, max. 16 million colours
2
VGA
max. 1.5 m
RED
GREEN
BLUE
ID2
VGA
1
15
GND
RED GND
GREEN GND
BLUE GND
KEY
Digital GND
ID0
ID1
Hsync
Vsync
ID3
1
2
3
4
5
6
7
8
9
10
11
12
13
14
15
Display
Screen applied to
metal shell of connector
CRT monitor resolution
After a system restart, the screen resolution of the VGA port always corresponds to the setting of the LVDS or LCD interface. Refer to page 6–11
(LVDS) or page 6–14 (LCD).
1070 073 822-104 (02.06) GB
Page 65
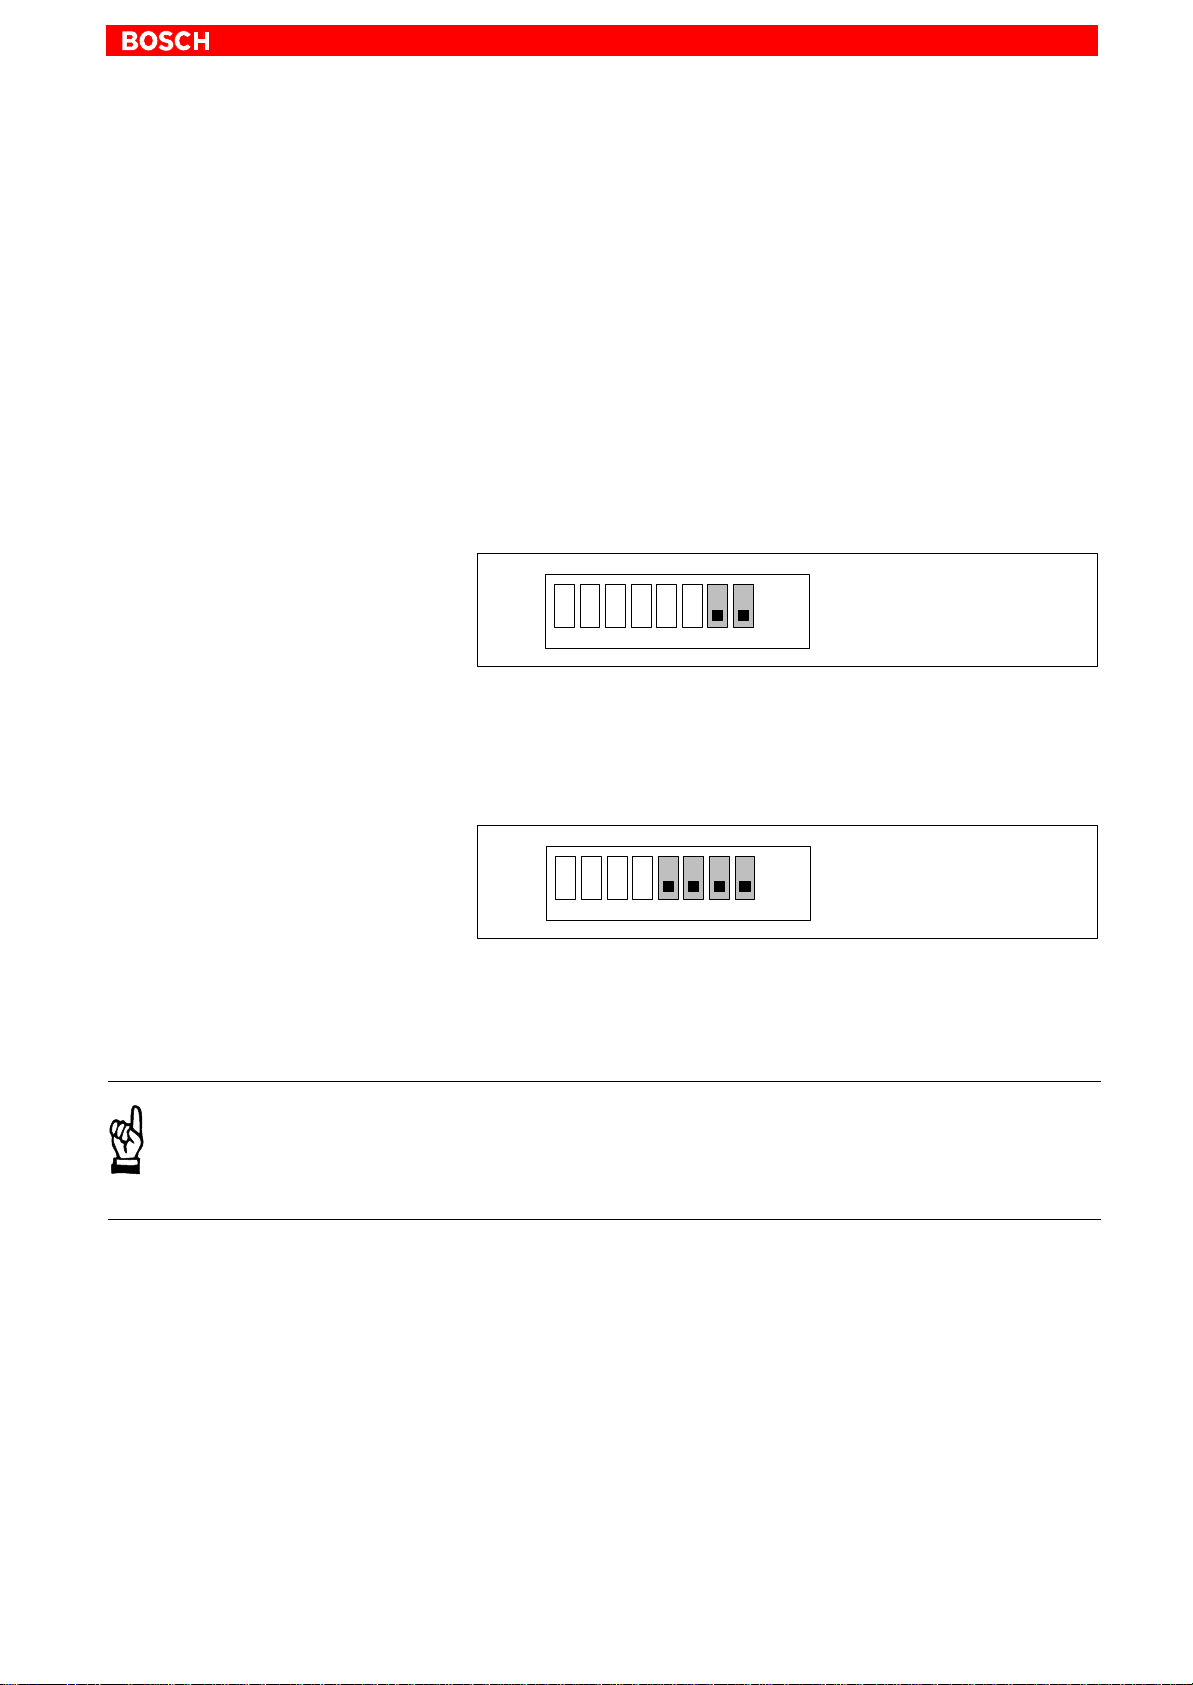
Interfaces, Ports & Connectors
6–17
It should be noted that it is technically possible to bypass the stated resolution and colour settings by changing them in the Control Panel while the
IPC or IPC300 is running. However, such changes would again be overwritten during a subsequent system start:
D VGA mode: 640 x 480 pixels, 72 Hz, 24 bit colours
D SVGA mode: 800 x 600 pixels, 72 Hz, 24 bit colours
D XGA mode:
D SXGA:
1024 x 768 pixels, 72 Hz, 16 bit colours
1280 x 1024 pixels, 72 Hz, 8 bit colours
If the VGA port must be permanently set to a resolution which fails to correspond to the selections possible on the LVDS or LCD interface, the connection between LVDS and/or LCD and VGA must be interrupted:
D IPC with S3 DIP switch:
VGA resolution
as per BIOS:
Segment 7 : “OFF”
Segment 8 : “OFF”
S3
1 2345678
ON
OFF
D IPC300 with S1 DIP switch:
VGA resolution
as per BIOS:
Segment 5 : OFF
Segment 6 : OFF
Segment 7 : OFF
Segment 8 : OFF
S1
1 2345678
ON
OFF
. With these settings, connecting a control panel is no longer possible!
CAUTION
Setting incorrect resolutions and colours can destroy your monitor!
Observe the specifications applying to your CRT or LCD monitor,
and adapt the operating system parameters accordingly.
1070 073 822-104 (02.06) GB
Recommended monitors for external use are low-radiation models to
TCO95. In addition, you should achieve the desired display resolution at a
refresh rate of no less than 72 Hz.
Page 66
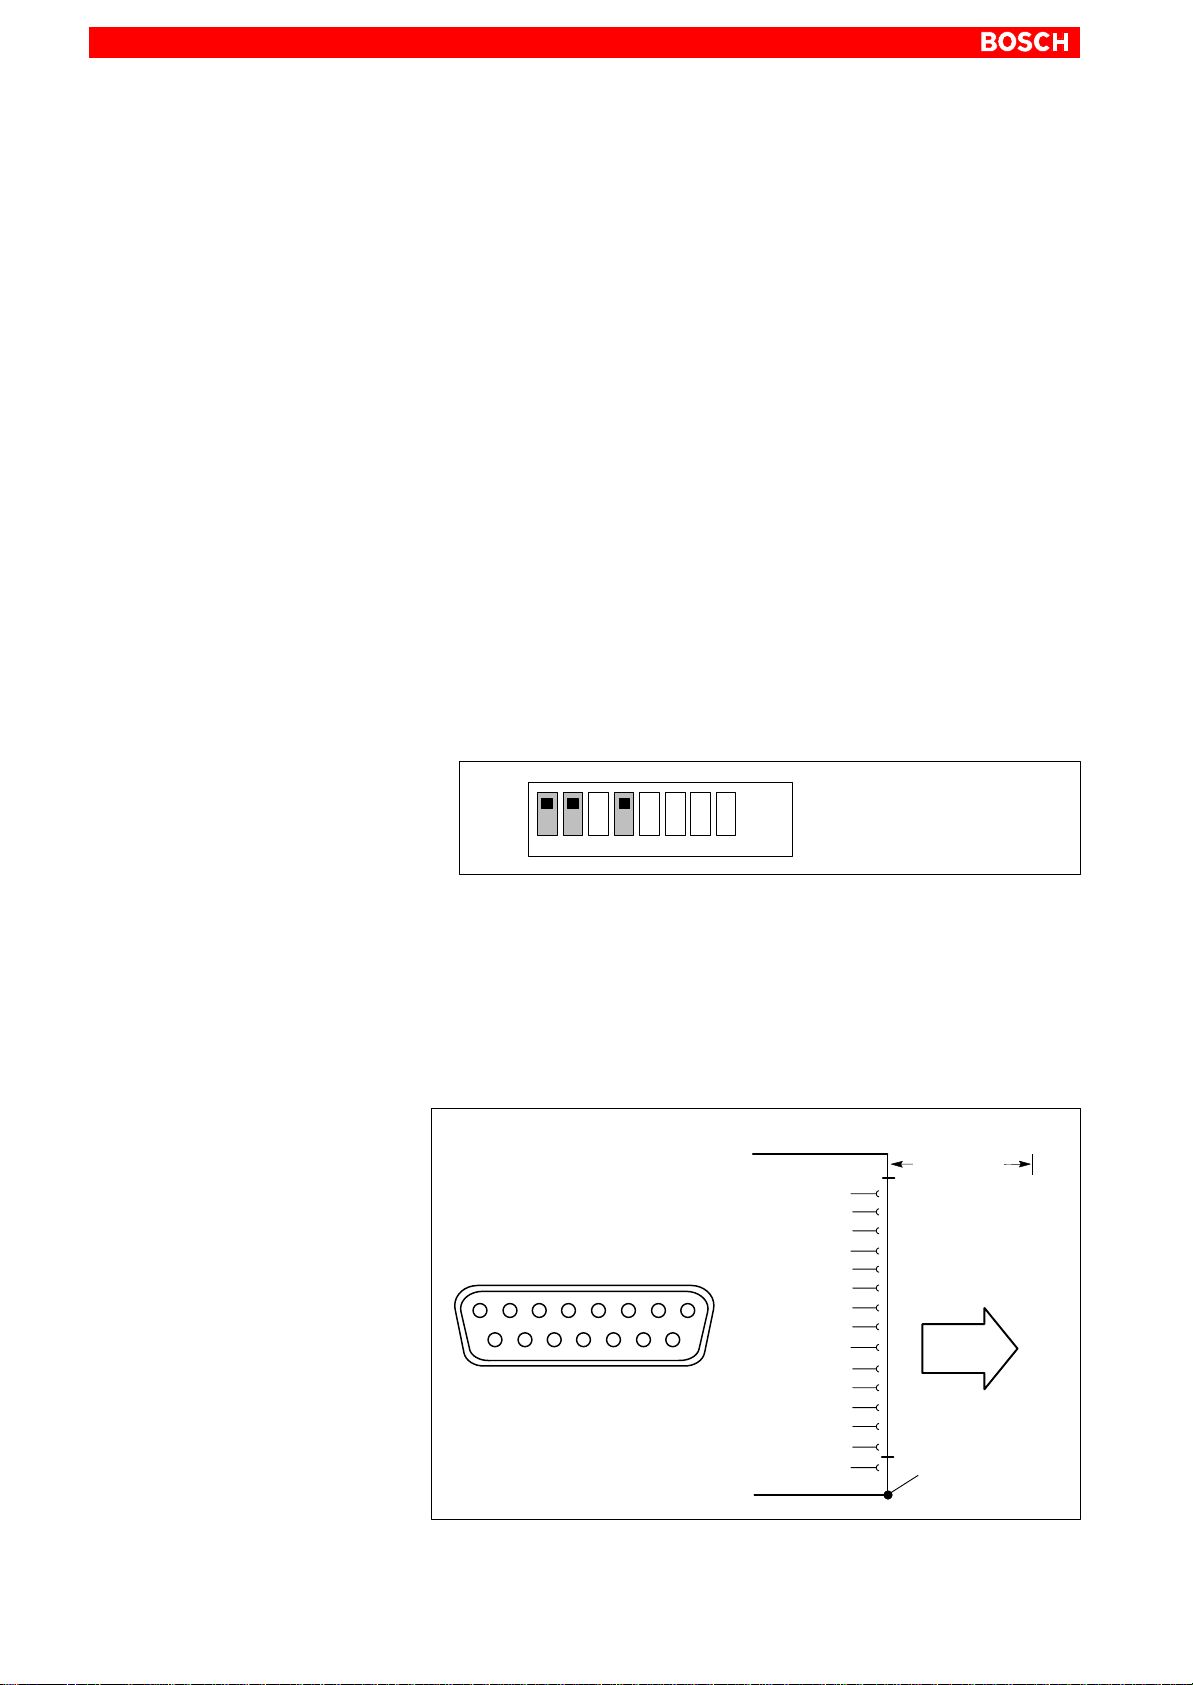
6–18
Interfaces, Ports & Connectors
6.6 X11 power supply connection
X11 Power supply, backlight power, mouse and keyboard signals from
control panel
The X11 power supply connection ensures reliable service of the control
panel and other components even over extended physical distances.
For distances below 1.5 m, mouse and keyboard can also be directly connected to the PC.
The X11 connection provides the following services:
D Operating power to the control panel. IPC: 12 VDC
D Power required for backlight source.
D Communication of mouse and keyboard signals
(refer also to Sections 6.7 and 6.8)
D Connection between COM3 and control panel as required. The connec-
tion is configured with the use of the S3 DIP switch and is identical for IPC
and IPC300.
COM3 interconnected with X11: S3 switch segments 1 and 2: ON
. IPC300 with Pentium III / 400 MHz only:
Always make sure that segment 4 of the DIP switch S3 is closed
(ON) in order to activate the backlight “sleep” function of the BF3xx.
IPC300: 24 VDC
S3
1 2345678
ON
OFF
Female DB-15 connector
Cable length: IPC: Max. 10 m
IPC300: Max. 15 m, can be extended to 75 m
via repeaters in conjunction with Gigabit
interface (refer to page 6–13)
Cable type: Screened, min. cross-section 0.14 mm
2
Refer to information on premanufactured connecting cables in Section 10.2.
X11
max. 10/15 m
PCC_H
PCC_L
PCD_H
X11
1
915
+12V (IPC) / +24V (IPC300)
PCD_L
MSC_H
MSC_L
8
MSD_H
MSD_L
GND
TXD 3
GND
RXD 3
SW_Back
1
2
3
4
5
6
7
8
9
10
11
12
13
14
15
To control panel
(X33)
Screen applied to
metal shell of
connector
1070 073 822-104 (02.06) GB
Page 67
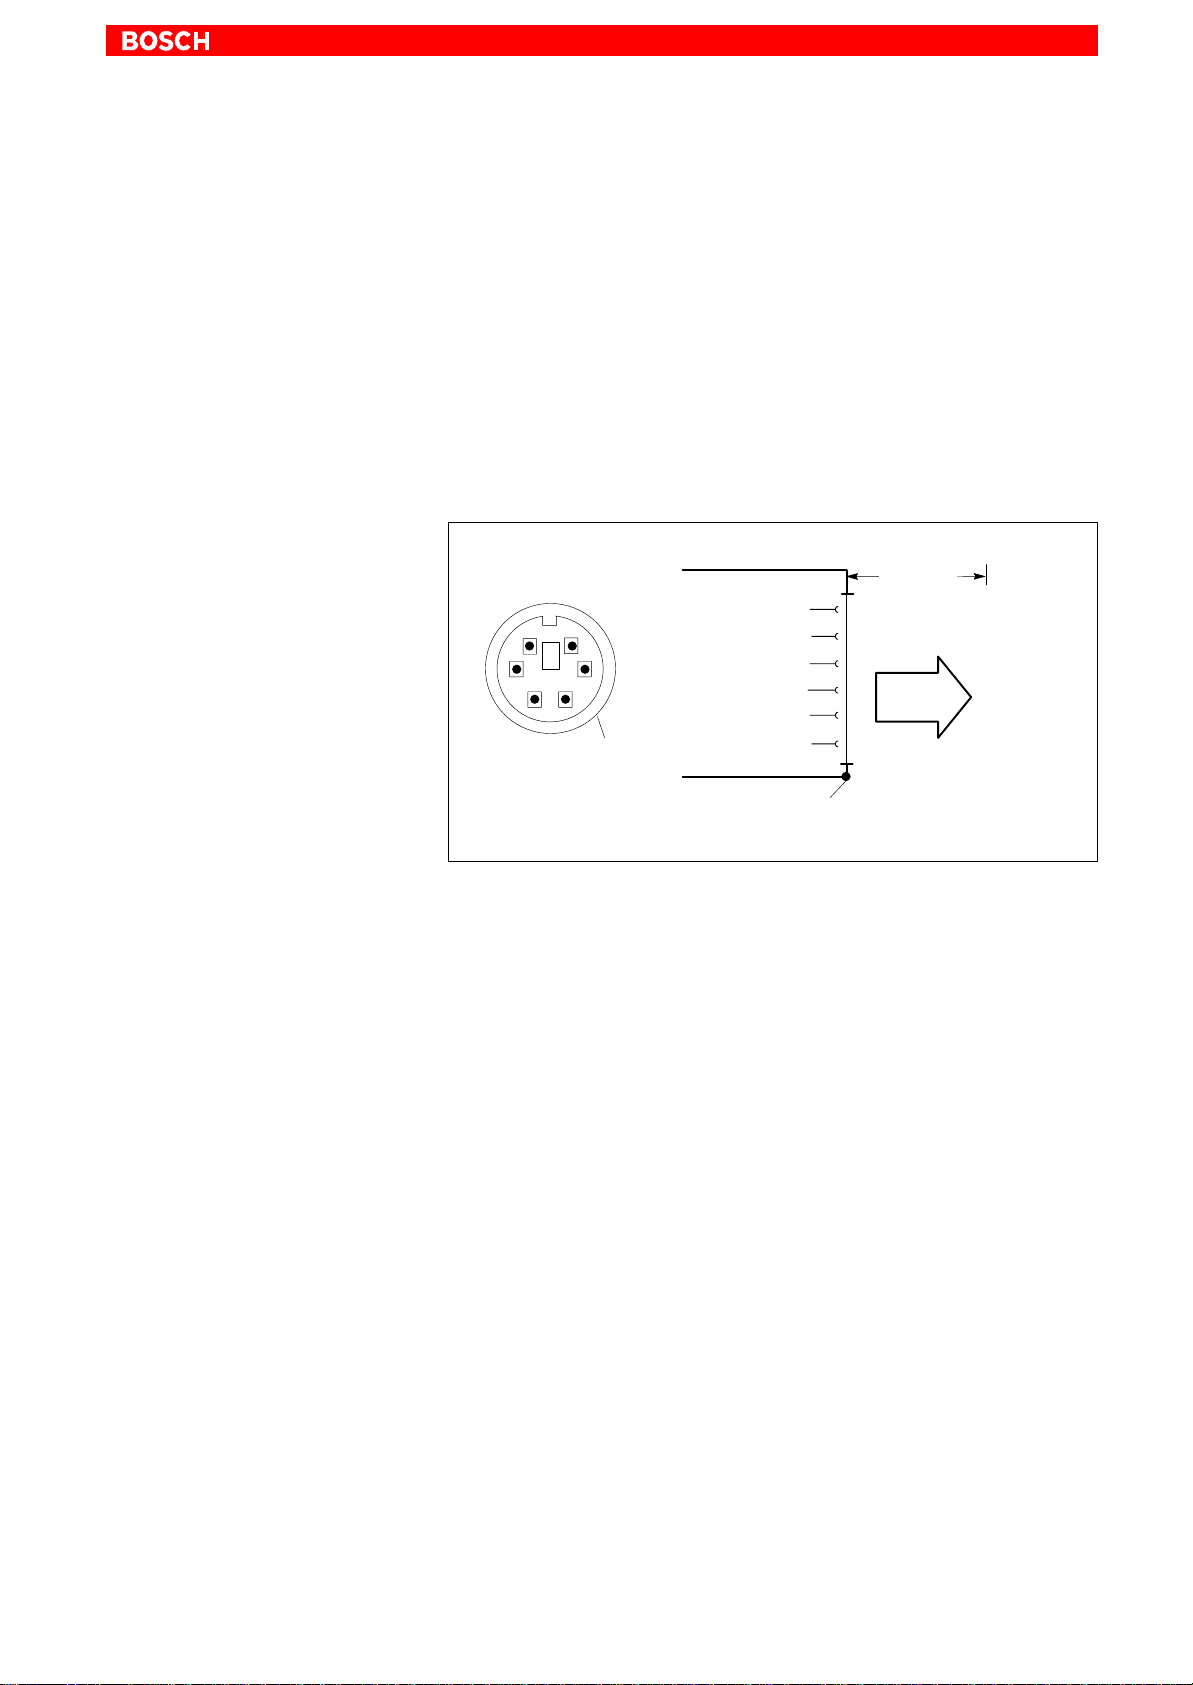
6.7 Keyboard connector
Keyb PS/2 mini DIN keyboard connector
. Use this connection only if no keyboard is connected to the “KBD” port
Interfaces, Ports & Connectors
6–19
of the control panel. Otherwise, faulty keyboard operation may occur.
Female PS/2 mini DIN, 6-pin
Cable length: Max. 1.5 m
Cable type: Screened, min. cross-section 0.14 mm
BIOS preset:
System Keyboard: Present (IPC only)
(for “Keyb” or “KBD”)
KBD
KBD
6
5
3
4
21
Screen
Keyboard Data
GND
+5 V
Keyboard Clock
1
2
3
4
5
6
max. 1.5 m
Keyboard
2
Keyboard adapter
Screen applied to metal shell of
DIN plug connector
If the system fails to recognize the keyboard, the interface in the BIOS may
have been set to “Absent”, i.e., “Not Connected”. Change the BIOS setting to
“Present” (IPC only).
In the event that the MF2 keyboard is equipped with a standard 5-pin DIN
plug, you will require a keyboard plug adapter to a female PS/2 Mini DIN connector.
A suitable adapter is approx. 20 cm in length with a DIN connector and a mini
DIN coupling on the ends. Connector assignment as per diagram below.
These premanufactured adapters are available from computer stores.
1070 073 822-104 (02.06) GB
Page 68
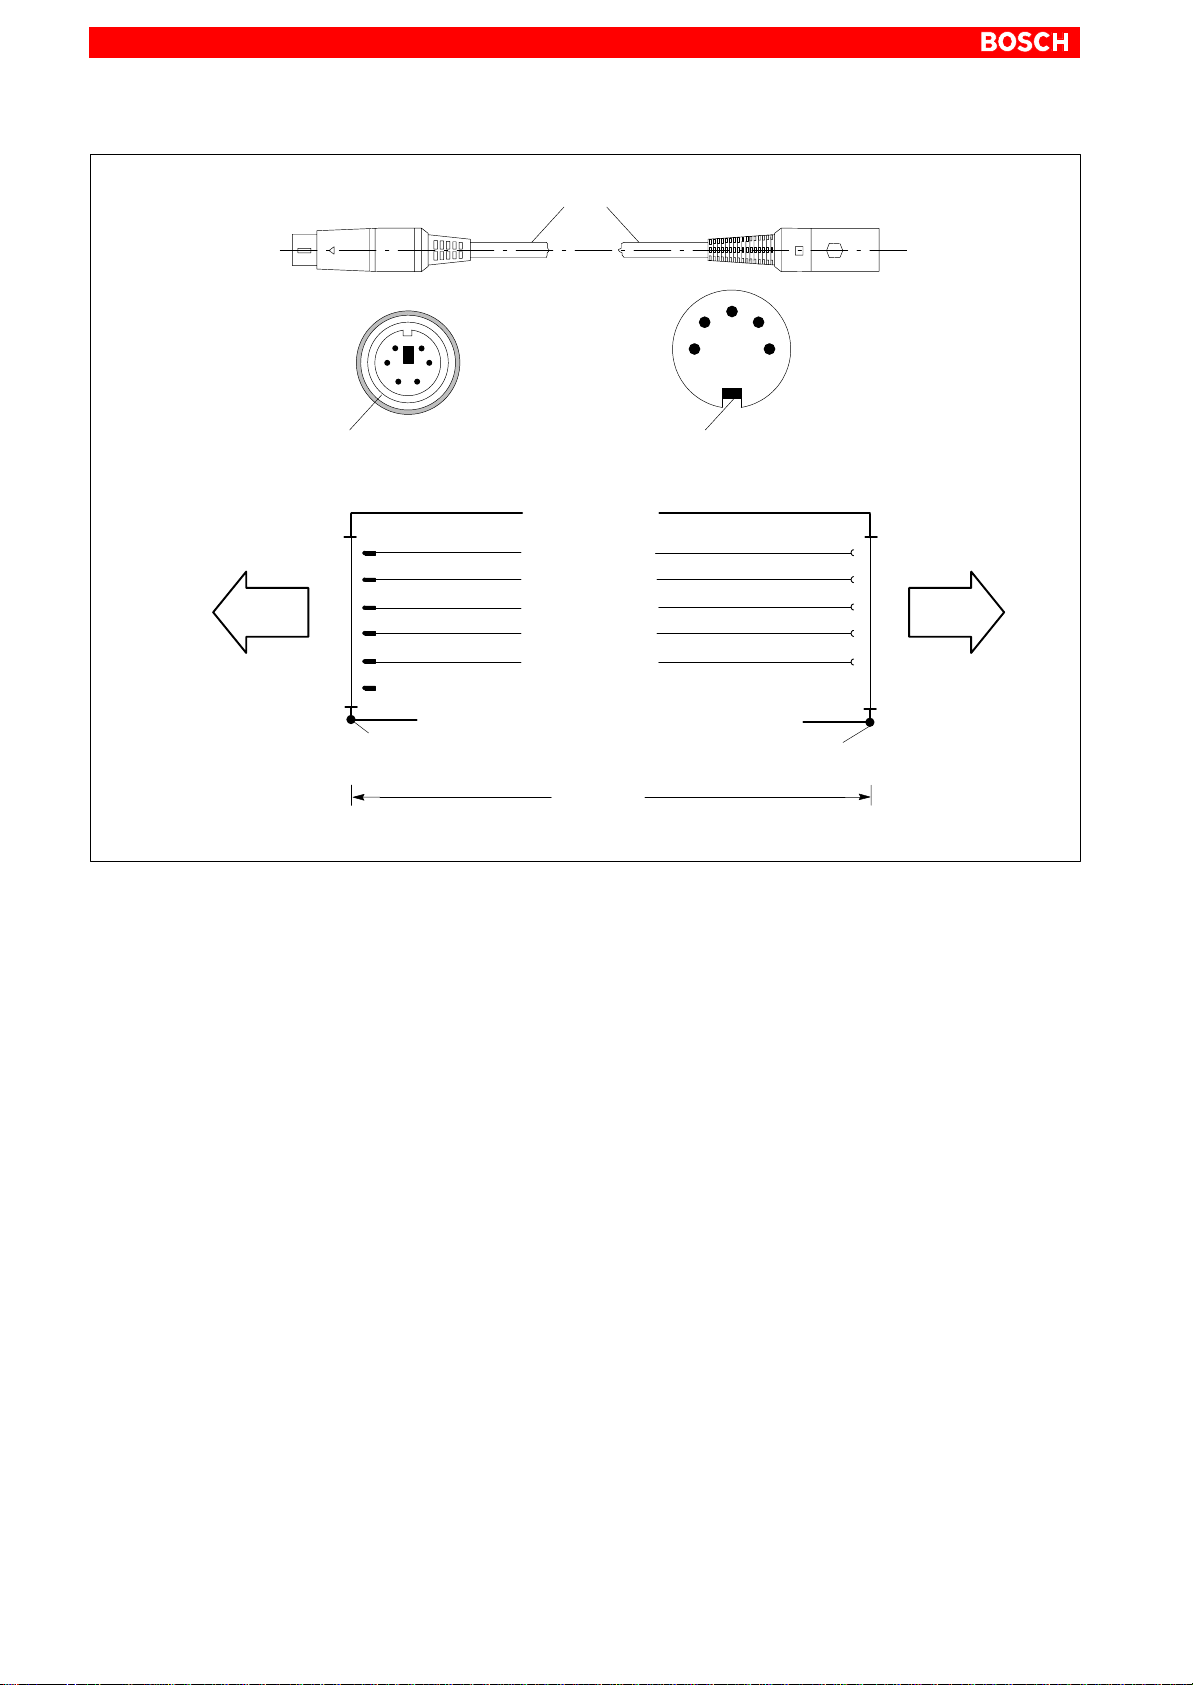
6–20
Interfaces, Ports & Connectors
6
5
3
4
21
Adapter für PS/2 connector
1
ScreenScreen
2
4
5
3
Mini DIN keyboard
connection
PS/2 mini
DIN connector (male)
1
2
3
4
5
6
Keyboard Data
GND
+5V
Keyboard Clock
Screen applied to metal shell of
DIN plug connector
max. 0.2 m
Standard
DIN connector (female)
2
3
4
5
1
Screen applied to metal shell of
DIN plug connector
MF2
keyboard port
1070 073 822-104 (02.06) GB
Page 69
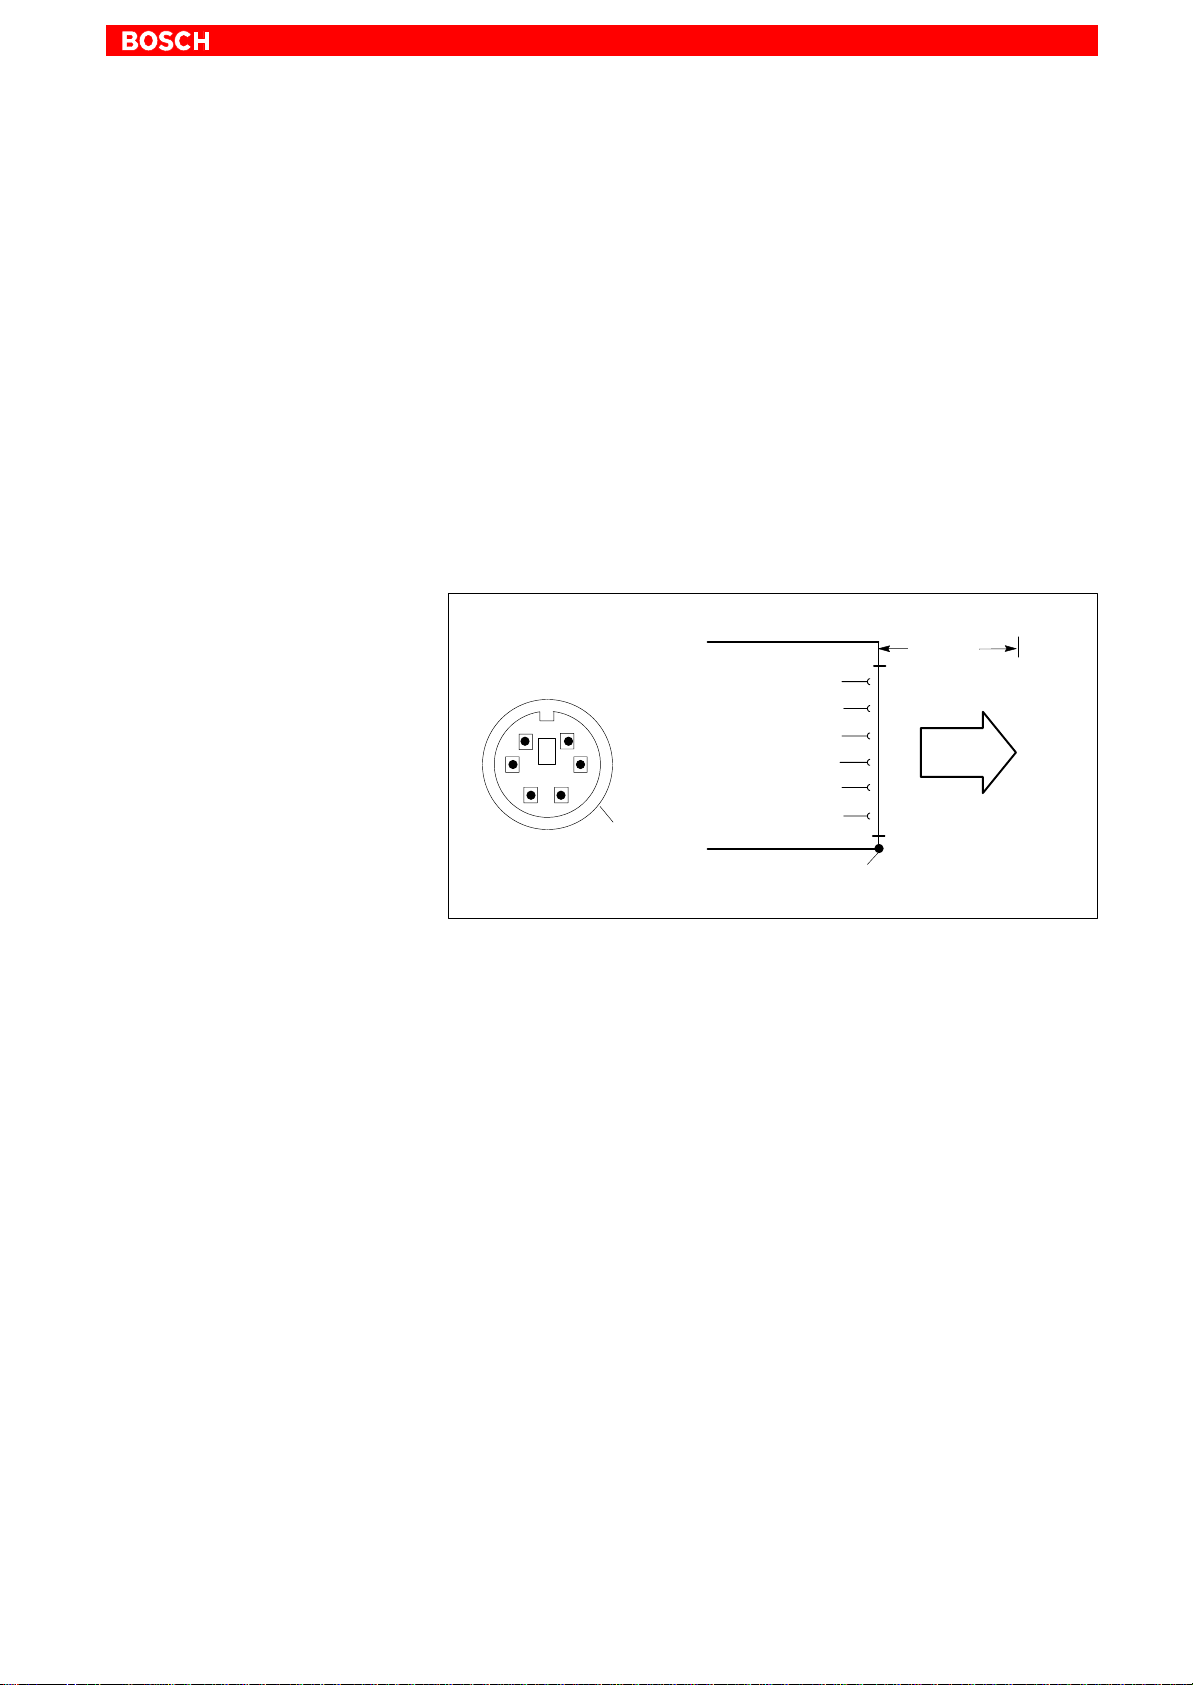
6.8 Mouse port
Interfaces, Ports & Connectors
Mouse PS/2 mouse port
. Use this connection only if no mouse is connected to the “Mouse” port
of the IPC.
Otherwise, faulty mouse operation may occur.
Female PS/2 mini DIN, 6-pin
Cable length: Max. 1.5 m
Cable type: Screened, min. cross-section 0.14 mm
Interrupt (IRQ): 12
BIOS preset: IPC: PS/2 Mouse Support: Enabled
6–21
2
Mouse
max. 1.5 m
Mouse
665
3
4
21
Screen
Mouse Data
GND
+5 V
Mouse Clock
Screen applied to metal shell of
DB9 plug connector
1
2
3
4
5
Mouse
If the system fails to recognize the PS/2 mouse, the interface in the BIOS
may have set to “Disabled”, i.e., “Not Available”. Change the BIOS setting to
“Enabled” (IPC only).
The operating system will not recognize the insertion of an external mouse
after completed startup because the mouse initialization occurs during the
boot phase.
. The connected mouse must be PS/2-compatible.
The BIOS normally reserves IRQ12 for the PS/2 mouse.
If there are address conflicts, e.g., if IRQ 12 has already been occupied
by another PC expansion card, you should change the IRQ of the
expansion card to one that is still free.
1070 073 822-104 (02.06) GB
Page 70

6–22
Notes:
Interfaces, Ports & Connectors
1070 073 822-104 (02.06) GB
Page 71
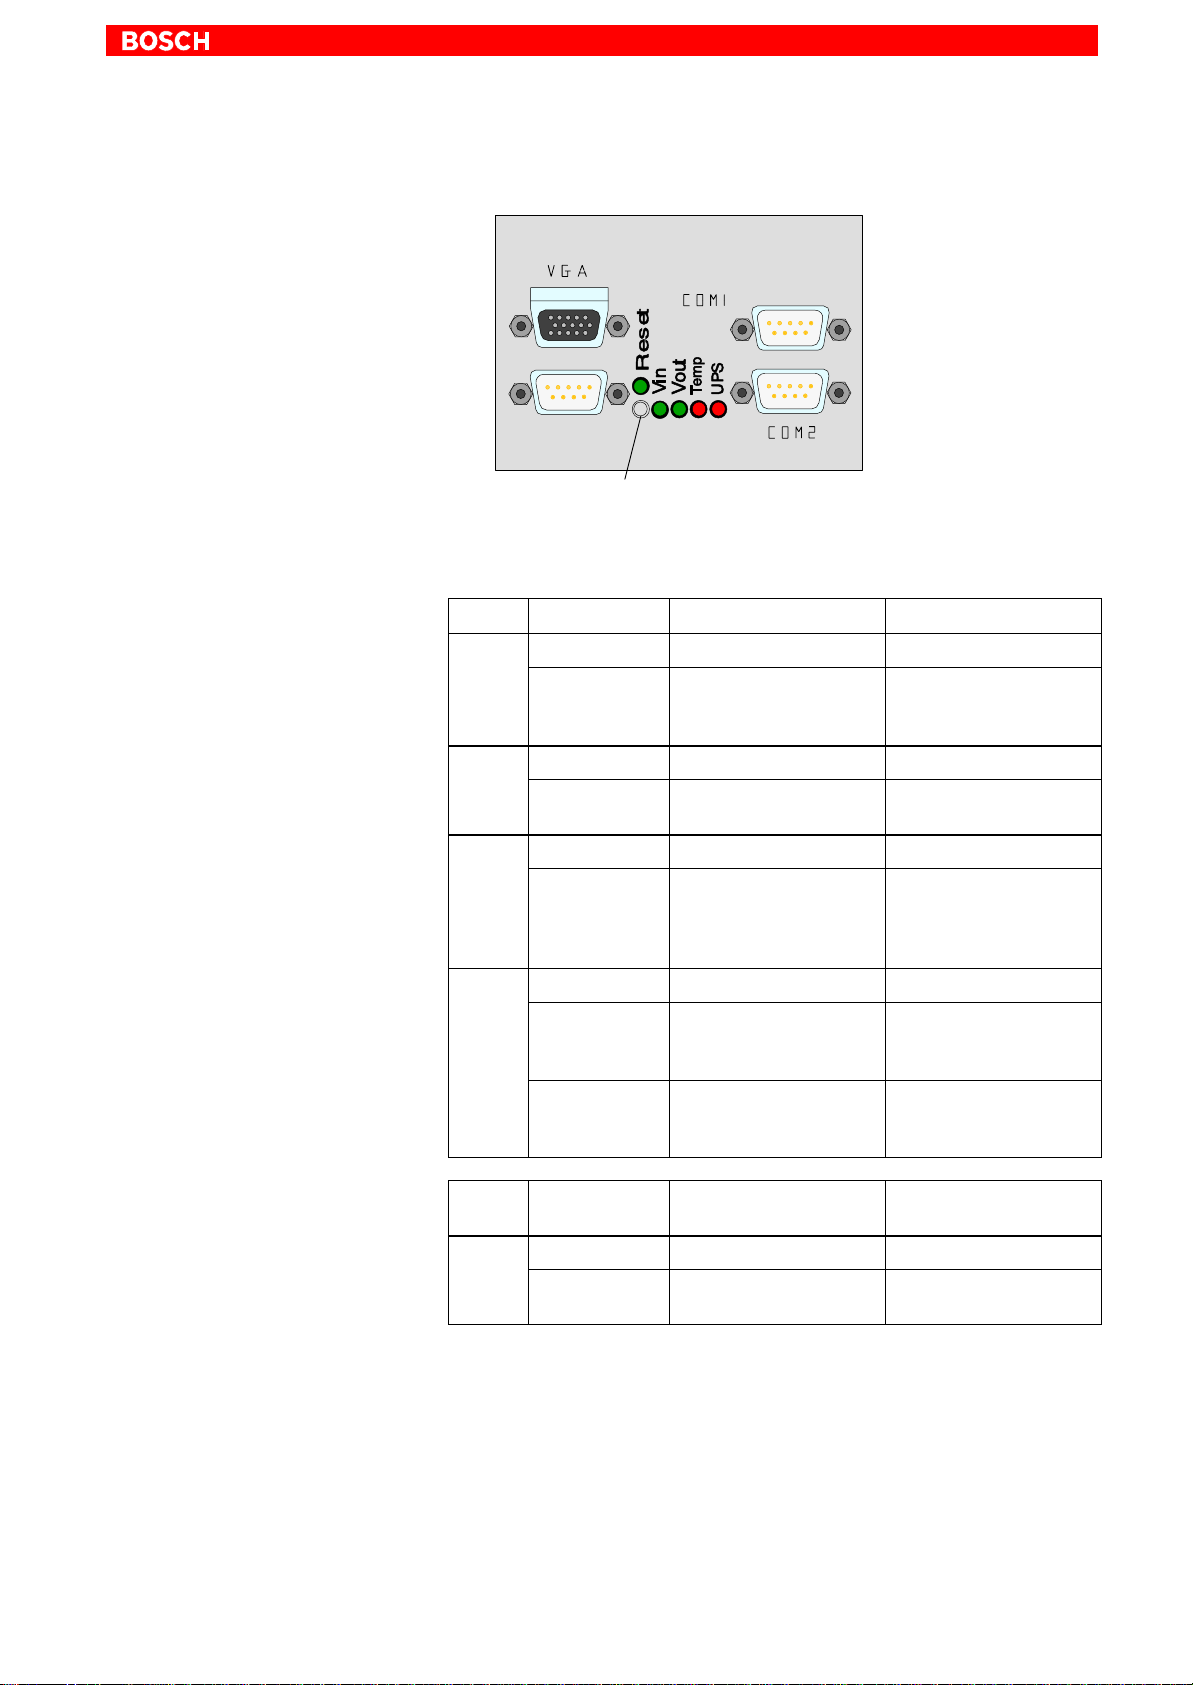
7 LED Display
LED Display
7–1
RESET pushbutton
A RESET pushbutton and a horizontal array of 5 LEDs are located on the
backside. They have the following functions:
LED Display Meaning Remedial measure
V
in
VOut LED green Standard operation –
Temp LED off Standard operation –
UPS LED off Standard operation –
RESET pushbutton Initiates reboot of the PC –
LED green Standard operation –
LED off No 230/115VAC mains
power or 24 V
sent at power supply
LED off Internal +5 V and +12 V
voltages are not present
LED
flashes red
LED red IPC currently in battery
LED
flashes red
Control/
Display
Internal housing temp.
above 50 °C, shutdown
will occur if temperature
continues to rise
mode, i.e., no mains
power present!
Battery pack discharged,
defective or not connected
Meaning Remedial measure
DC
is pre-
Check IPC power supply
for power.
Check IPC power supply
for power.
Reduce internal IPC
housing temperature.
Check/verify fan functions.
Restore mains power to
IPC. Initiate controlled
IPC restart.
Check battery charge.
Maintain 5-hour charging
cycle!
1070 073 822-104 (02.06) GB
LED red RESET pushbutton has
been pressed
–
Page 72

7–2
Notes:
LED Display
1070 073 822-104 (02.06) GB
Page 73
8 Maintenance and Replacement
The IPC and IPC300 are maintenance-free. However, some components
are subject to wear and must be replaced.
Maintenance schedule
Include the following tasks in your maintenance schedule:
D At least once a year check that all plug-and-socket and terminal
connections of the components are correctly seated and not damaged.
Check that cables are not broken or crushed. Replace damaged parts
immediately.
D Check fan and fan filter mats at least once a year.
Clogged and contaminated filter mats reduce the air volumes required for
proper ventilation and cooling. Therefore, wash dirty filter mats in soapy
water or replace with new mats. Allow washed filter mats to dry thoroughly before reinstalling.
Maintenance and Replacement
8–1
DANGER
Risk of injury through rotating fan impeller!
Keep hands a n d fingers clear, and do not insert any items into the fan
impeller.
D Ensure that the rechargeable batteries (battery pack) are fully functional.
To enesure that the battery pack is tested during each system startup
(and afterwards in 12-hour intervals), enable the Battery Test option of
the UPS control program.
CAUTION
Loss of data!
Back up the data from the hard disk at regular intervals .
D Depending on temperature, vibration and daily operating hours, the ser-
vice life of the hard disk may last anywhere between 2.5 and 10 vears.
To safeguard application data, and to avoid the necessity of time-intensive new installation of operating system (OS) and application programs
following a hard disk replacement, the functional program and OS data
on the hard disk should be backed up at regular intervals with the use of
the Bosch-supplied “Backup Package for Industrial PC”. This process
writes an image of the hard disk to the medium in the Iomega ”Jaz” drive
supplied with the package; if a hard disk replacement is required, this
image must simply be copied back to the newly installed hard disk.
Refer to Section 10.3 for ordering information.
1070 073 822-104 (02.06) GB
Page 74
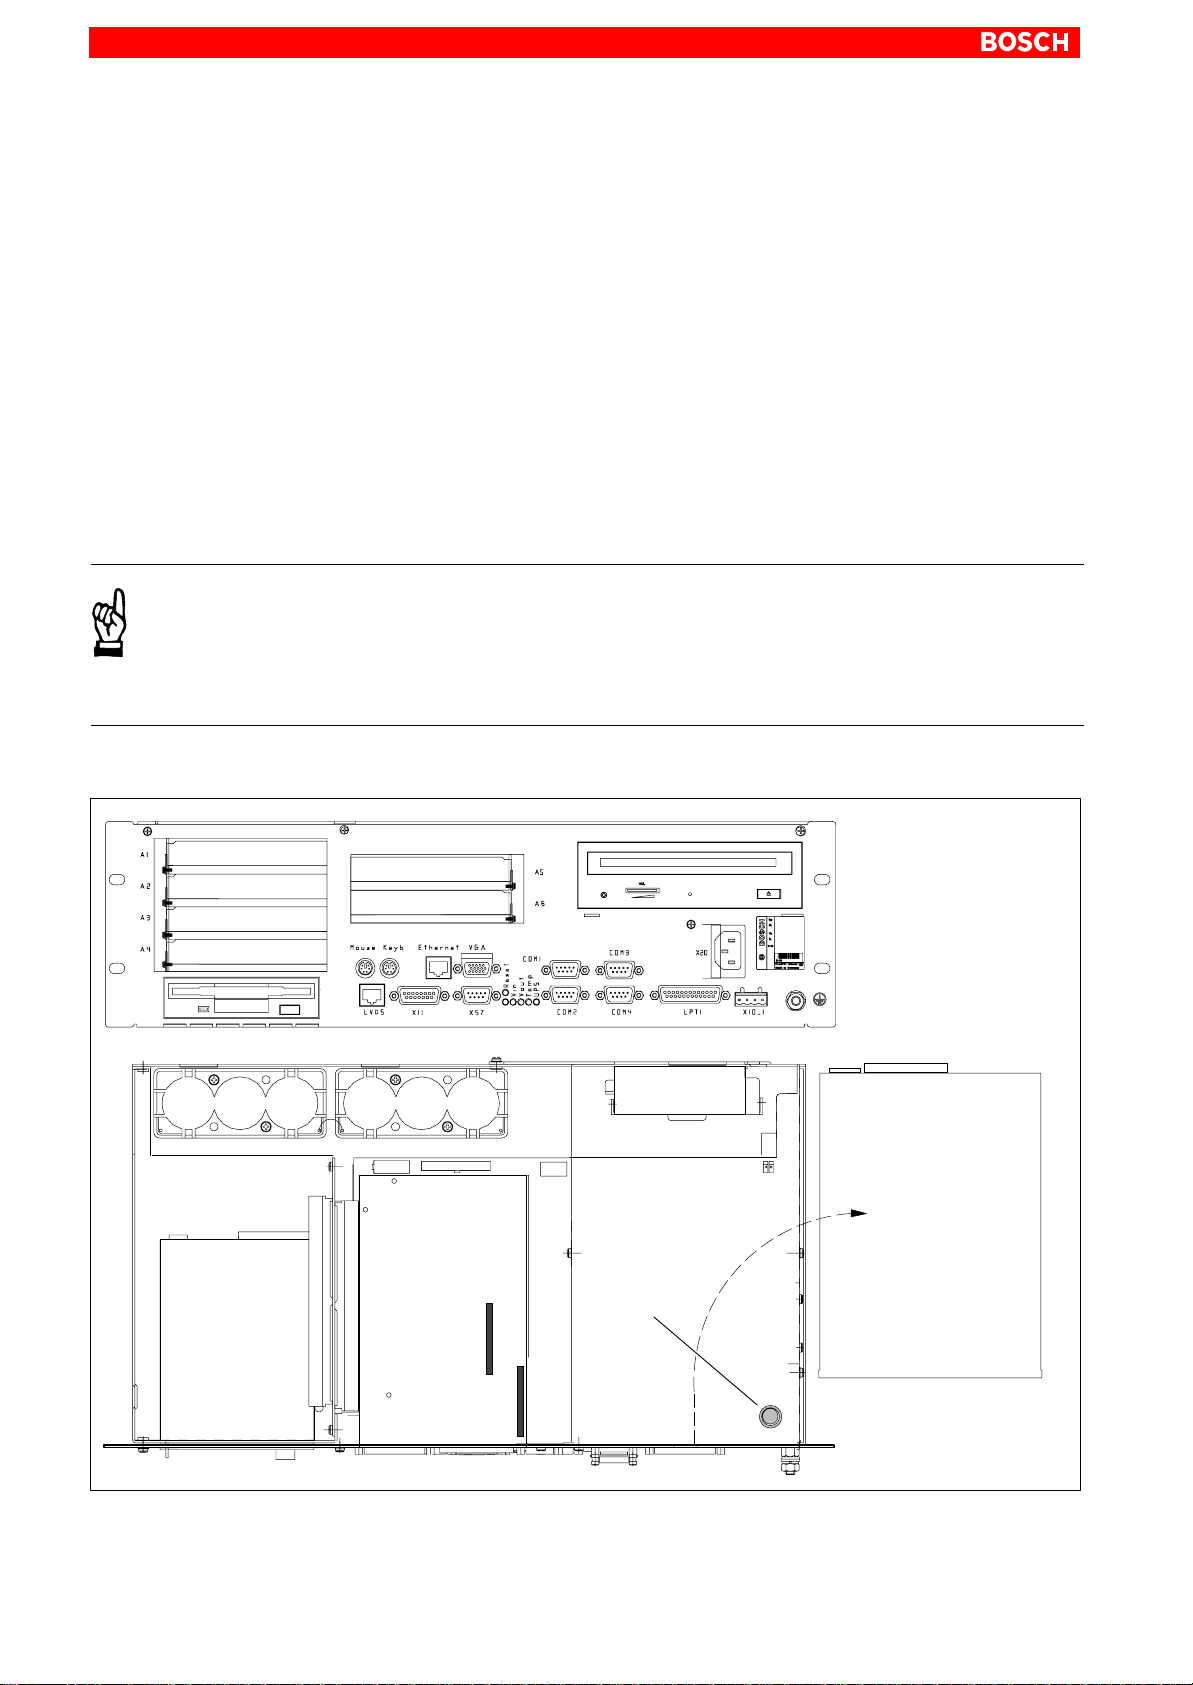
8–2
Maintenance and Replacement
8.1 Fuse protection
The IPC and IPC300 are equipped with a replaceable power supply fuse:
D 6.3 A (5x20), medium time-lag for 24 VDC power supply
D 1.25 A (5x20), medium time-lag for 230 VAC power
D IPC: accessible after removal of the CD-ROM drive.
(refer to procedures in Section 8.2.1)
D IPC300: accessible externally at the front panel.
Refer to fuse ordering information in Section 10.3.
. In the event that the power supply remains faulty after replacing the
power supply fuse, please contact Bosch Rexroth Service:
Telephone: (+49) (0 60 62) 78-888.
CAUTION
Loss of data!
Service repairs of devices returned by customers do not entail backups of user data. Repaired units are returned with formatted hard
disk and newly installed software.
IPC
Mother board
deinstalled
CD-ROM drive
Fuse
1070 073 822-104 (02.06) GB
Page 75
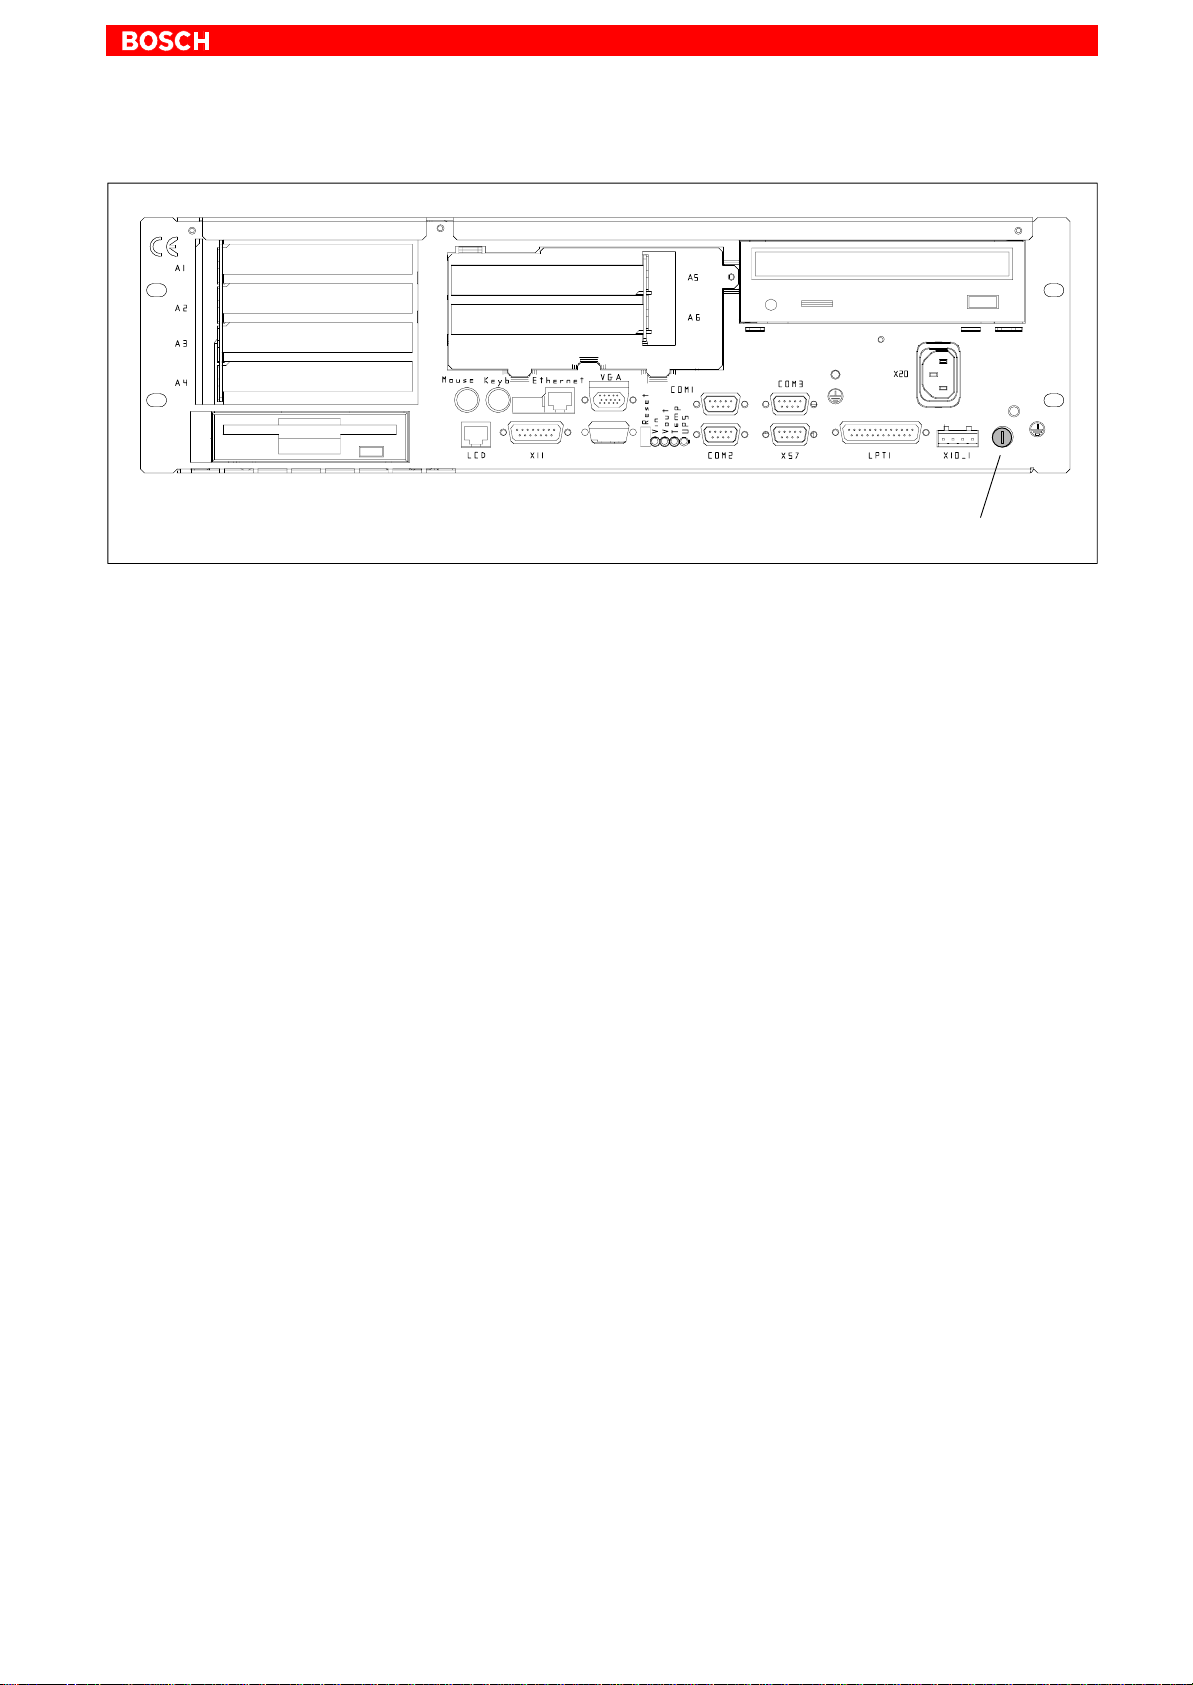
IPC300
Maintenance and Replacement
Fuse
8–3
1070 073 822-104 (02.06) GB
Page 76
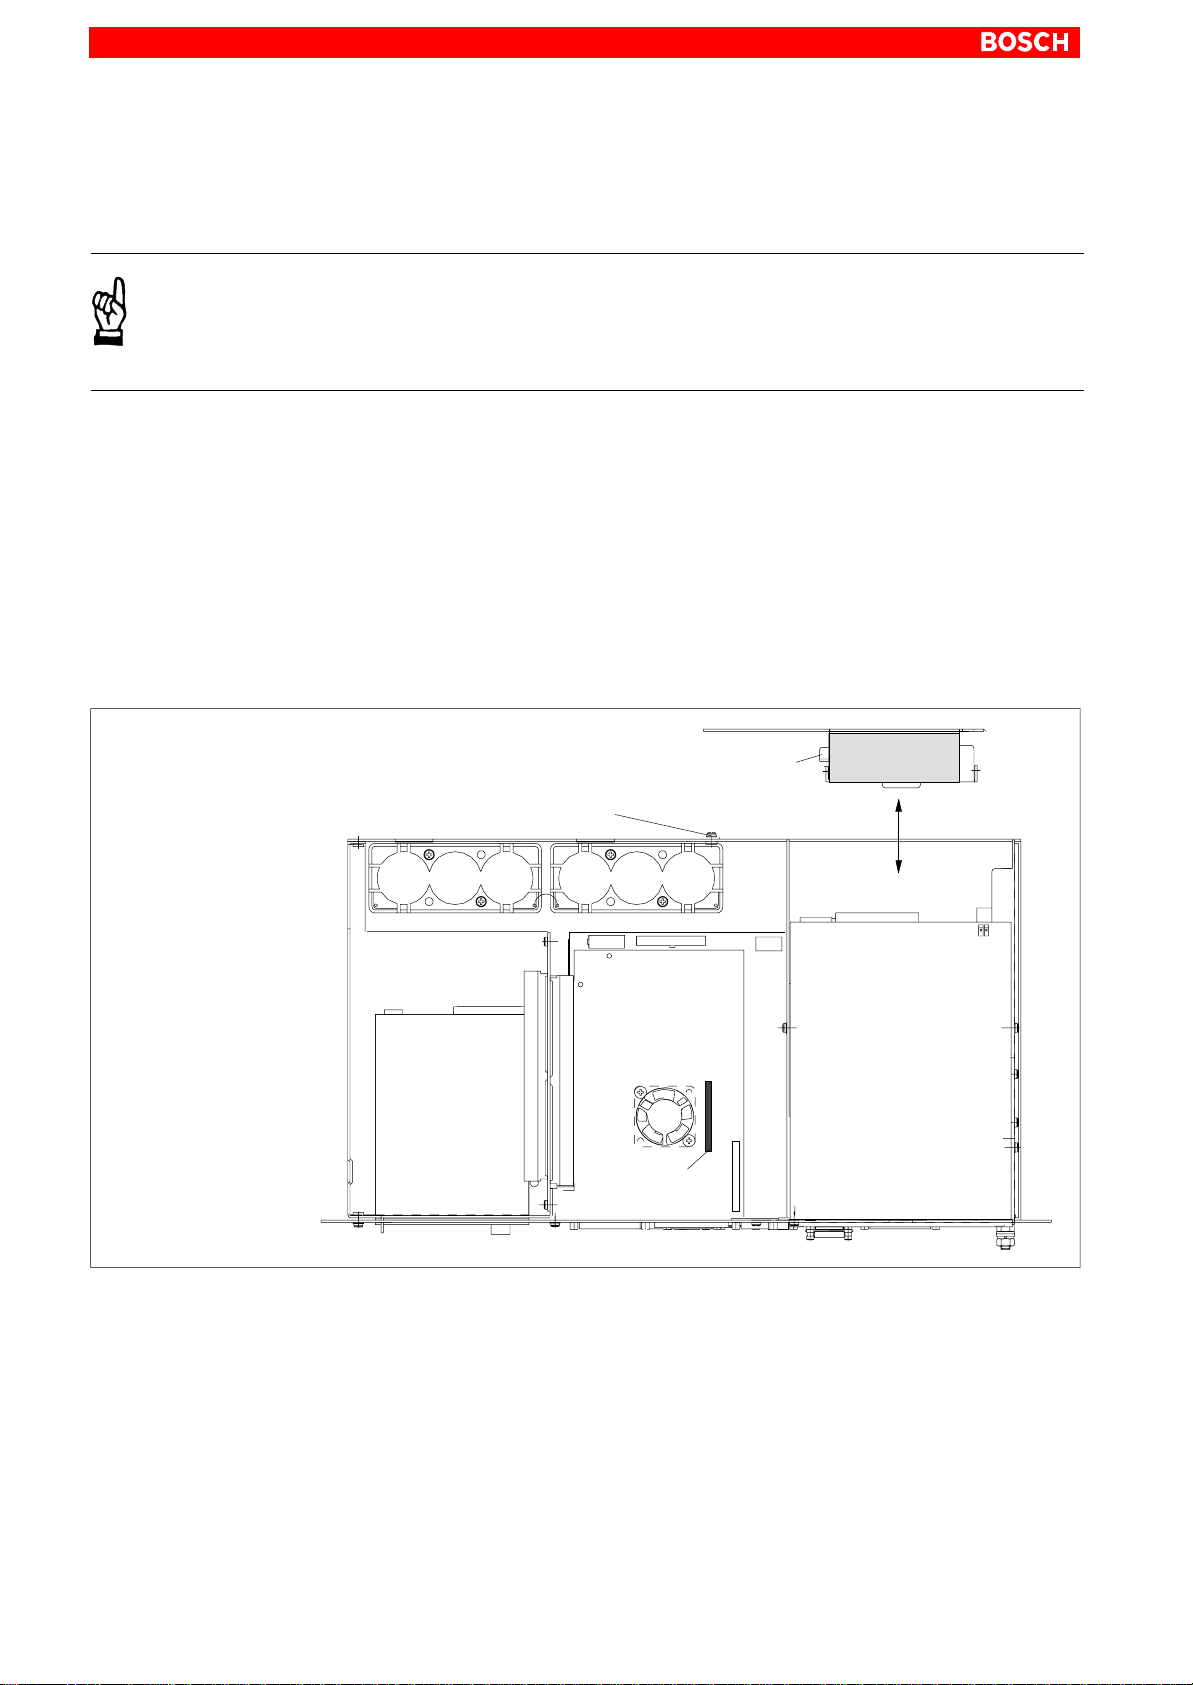
8–4
Maintenance and Replacement
8.2 Replacing the hard disk
The hard disk is replaced complete with installation frame.
CAUTION
Loss of data!
Back up all required application data and operating system settings
to an external storage medium!
. To safeguard application data, and to avoid the necessity of time–
intensive new installation of operating system (OS) and application
programs following a hard disk replacement, the functional program
and OS data on the hard disk should be backed up at regular intervals
with the use of the Bosch-supplied “Backup Package for Industrial
PC” This process writes an image of the hard disk to the medium in the
Iomega ”Jaz” drive supplied with the package; if a hard disk replacement is required, this image must simply be copied back to the newly
installed hard disk.
Please refer to Section 10.3 for ordering information.
Hard disk with
holder
Mounting screw for
hard disk holder
Data/voltage
connection
Motherboard
Hard disk
data/voltage
connection
1. Switch off the power supply to the unit. If required, unplug all connectors
from the unit.
2. Wait until the UPS has switched off the power supply (the UPS LED on
the front illuminates red until the UPS switches off the IPC power supply).
3. Open the housing.
4. The ribbon cable is secured by a spot of hot glue which must be broken
(cut) for deinstallation. Disconnect the IDE ribbon cable from the hard
disk. Unless this cable is defective, disconnecting it from the mainboard
will not be required.On the IPC300, this ribbon cable also connects the
CD-ROM drive.
1070 073 822-104 (02.06) GB
Page 77

Maintenance and Replacement
5. Loosen the mounting screw on the rear of the housing and remove the
hard disk holder complete with hard disk.
6. The new hard disk is always installed with installation frame, and in
reverse sequence to that described above.
8–5
. Again, secure the hard disk connector by applying a spot of “hot
glue”.
7. The new hard disk must be declared to the BIOS of the PC. T o access the
BIOS menu, press the following keys while the system is booting up:
D IPC: Press <del>.
D IPC300: Press the <F2> function key.
IPC: Select the Auto-Detect Hard Disks menu option so that the new
hard disk parameters can be recognized by the system. In the
Standard-CMOS-Setup menu select PIO-Mode 3 for the hard disk. Exit
the BIOS via the Save Settings and Exit option (save hard disk
parameters).
To do this, press the <Y> button (= Yes).
IPC300: To enable recognition of the new hard disk parameters by the
system, go to the main menu, select the Primary Master menu option,
followed by the Type = AUTO option. Select Exit Saving Changes (sav-
ing new parameter settings) to exit the BIOS menu.
Restart the operating system, and again access the BIOS menu. In the
Primary Master option, set the Type option to User, and the Transfer
Mode option to Fast PIO 3.
Select Exit Saving Changes (saving new parameter settings) to exit the
BIOS menu.
8. If the IPC operating system fails to start up, interrupt the power supply
again for min.10 seconds, and then restart the operating system.
9. If the system still does not start up, check for:
D Proper connection between controller cable and hard disk.
D Proper connection of all port connectors and cables.
D Presence of operating power.
10.Once the PC has started up properly, the user data and operating system
settings for standard operation must be restored.
1070 073 822-104 (02.06) GB
Page 78
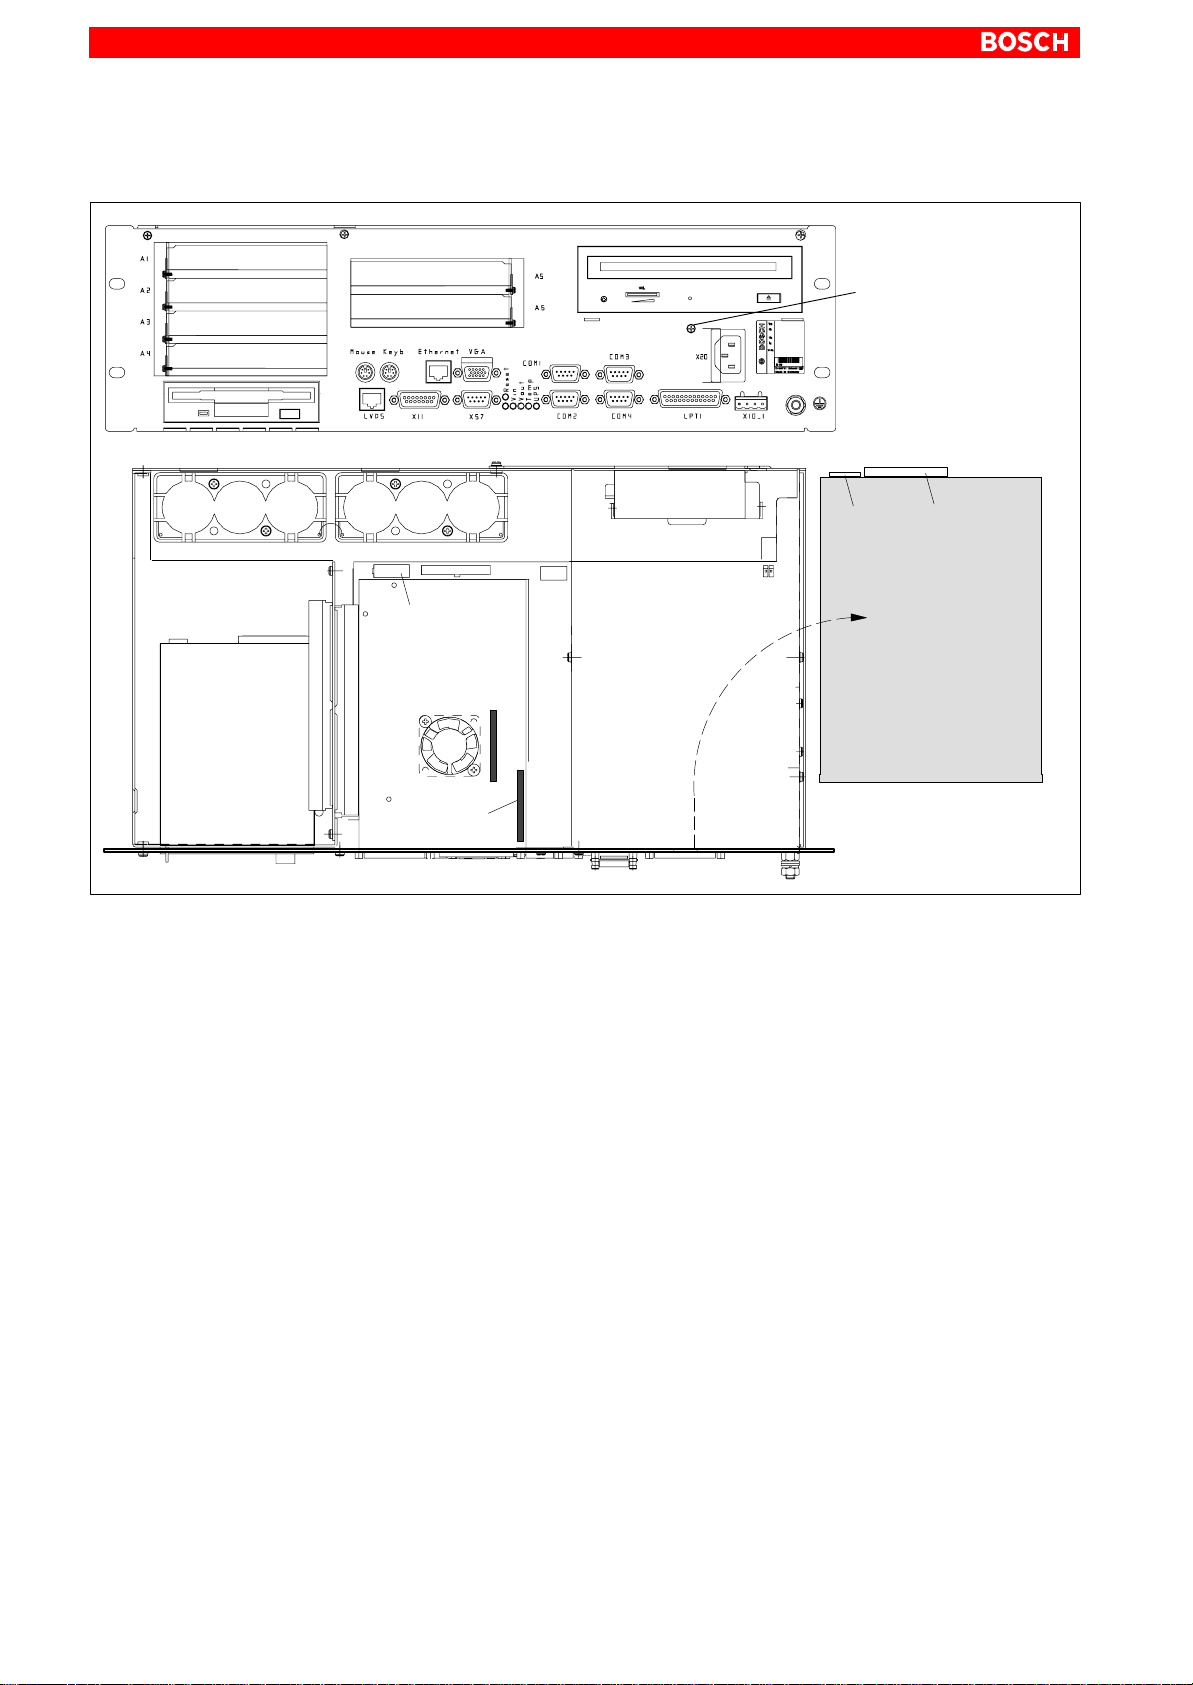
8–6
Maintenance and Replacement
8.2.1 Replacing the CD-ROM drive
Mounting screw
for CD-ROM
Power connection:
– CD-ROM
– Floppy disk
Motherboard
CD-ROM
data connection
1. Switch of f the supply voltage to the unit. If required, unplug all connectors.
2. Wait until the UPS has switched off the power supply (the UPS LED on
the front illuminates red until the UPS switches off the IPC power supply).
3. Open the housing.
4. Unplug the female connector together with the controller ribbon cable
and the female connector for the power supply from the CD-ROM drive.
Only a defective cable must be disconnected from the motherboard.
5. Loosen the mounting screw on the front panel.
6. Remove the CD-ROM drive including the carrier plate.
7. Loosen the mounting screws and replace the drive.
8. Installation is in reverse sequence to that described above.
9. When the IPC has started, the CD-ROM drive should be recognized
again by the operating system if the drive is of the same type. If another
type is installed, the relevant driver software should also be installed. In
this case follow the installation instructions of the CD-ROM manufacturer
and the Windows95 or WindowsNT 4.0 installation routine.
10.If the CD-ROM drive still cannot be accessed, check for:
D Proper connection between controller cable and CD-ROM drive.
D Proper seating of all cables and connectors.
D Presence of operating power.
CD-ROM
power
connection
deinstalled
CD-ROM drive
CD-ROM
data
connection
1070 073 822-104 (02.06) GB
Page 79
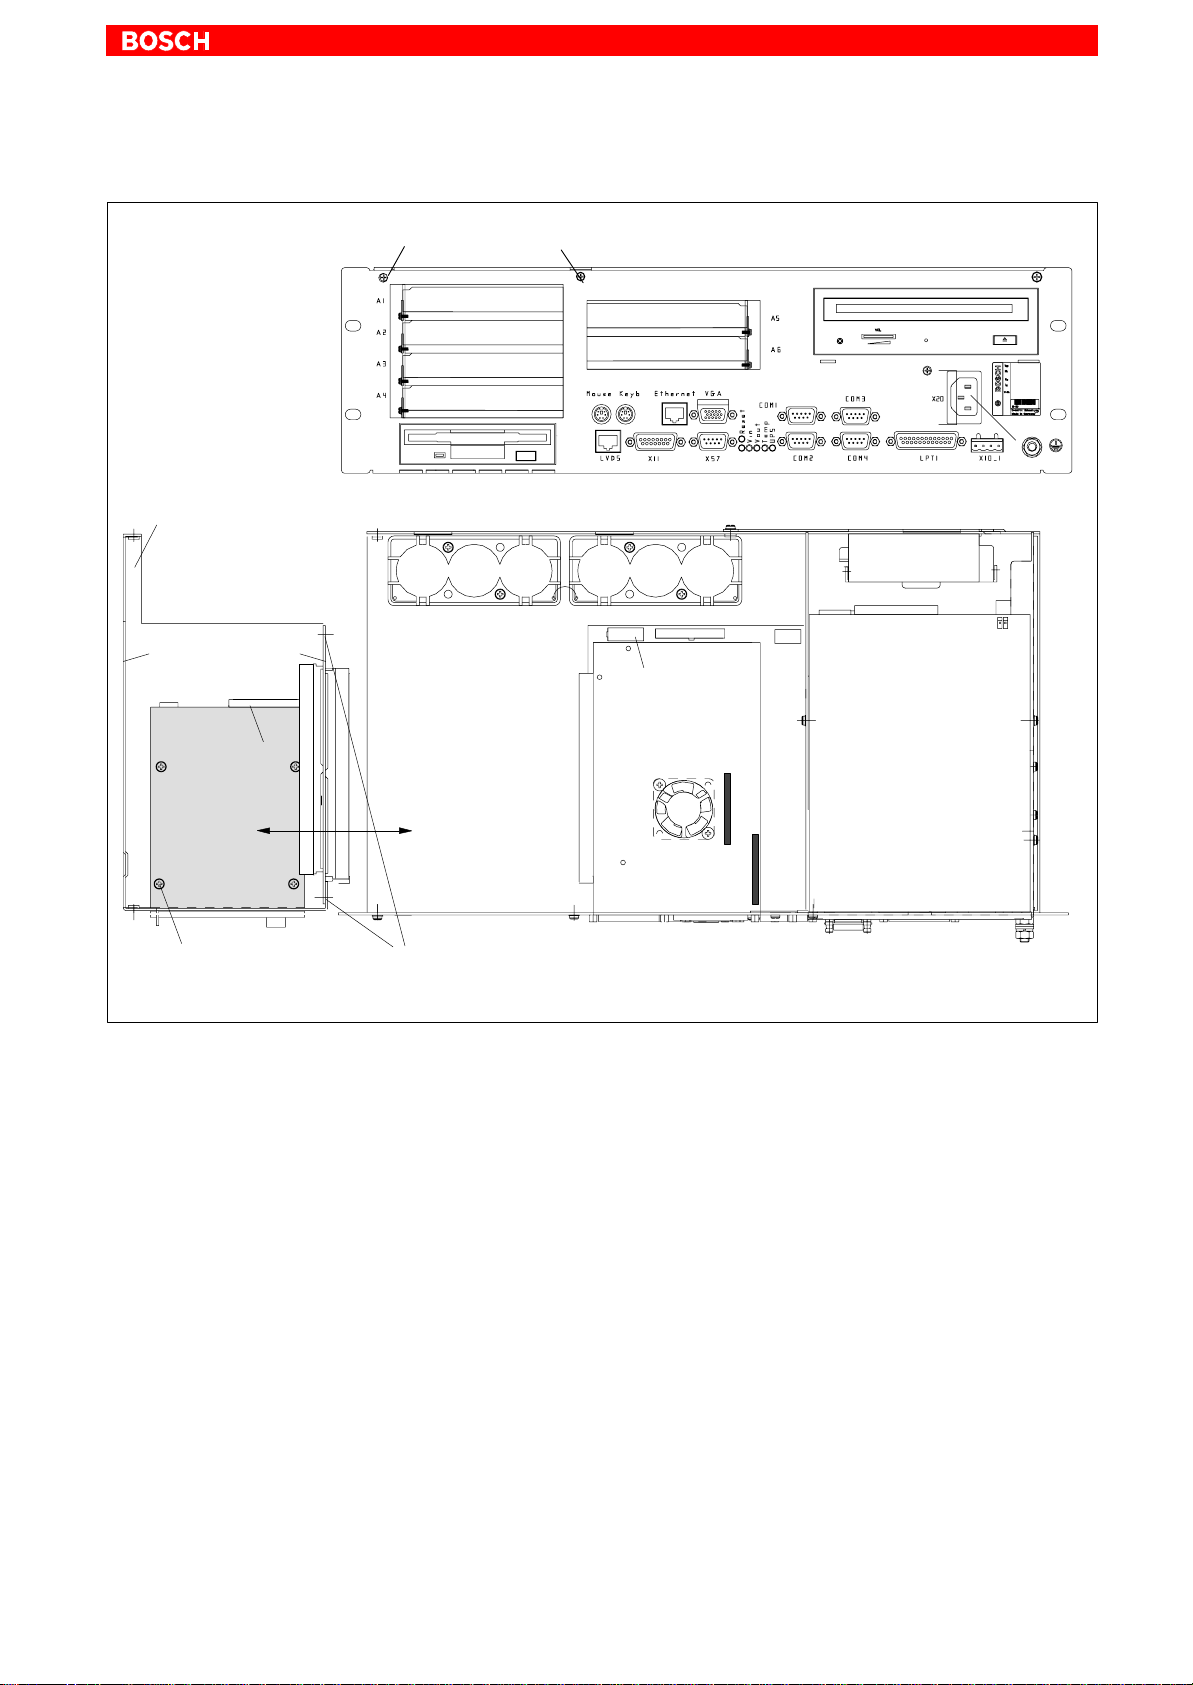
8.2.2 Replacing the 3.5” floppy disk
Backplane/Floppy
Mounting screws
deinstalled support
plate with floppy disk,
side panel and
backplane
Maintenance and Replacement
8–7
Side panel
Floppy
Power
connection
Floppy disk
Floppy disk
Mounting screws
(from below)
Backplane
Floppy
Data
connection
Power connection:
– CD-ROM
– Floppy disk
Motherboard
Backplane/Floppy
Mounting screws
1. Switch of f the supply voltage to the unit. If required, unplug all connectors.
2. Wait until the UPS has switched off the power supply (the UPS LED on
the front illuminates red until the UPS switches off the IPC power supply).
3. Open the housing.
4. If applicable, remove all expansion cards and all cables connected to
these cards.
5. Unplug the female connector together with the controller ribbon cable
and the female connector for the power supply from the floppy disk. Only
a defective cable must be disconnected from the motherboard.
6. Loosen the two mounting screws on the front panel. Loosen the 4
mounting screws on the backplane and remove the floppy disk together
with the side panel, backplane and holder from the side of the housing (as
the motherboard is plugged into one of the backplane slots, the
backplane must be moved carefully in order to loosen this connection).
7. Loosen the 4 mounting screws on the underside of the floppy disk holder
and insert a new drive.
8. Installation is in reverse sequence to that described above.
1070 073 822-104 (02.06) GB
Page 80

8–8
Maintenance and Replacement
9. If you have installed another type (e.g. 3.5” HD 2.88 MB), this must be
declared to th e IPC BIOS. To access the BIOS menu, press the following
keys while the system is booting up::
D IPC: Press <del> .
D IPC300: Press the <F2> function key.
IPC: Go to the Standard SETUP menu option, and select the new floppy
disk type. Exit the BIOS via the Save Settings and Exit option (save hard
disk parameters).
To do this, press the <Y> button (= Yes).
IPC300: Go to the main menu, and select Diskette 1. Select the new
floppy disk type. Select Exit Saving Changes (saving new parameter
settings) to exit the BIOS menu.
10.If the floppy disk drive cannot be accessed, check for:
D Proper connection between controller cable and flopps disk drive.
D Proper seating of all cables and connectors.
D Presence of operating power.
1070 073 822-104 (02.06) GB
Page 81
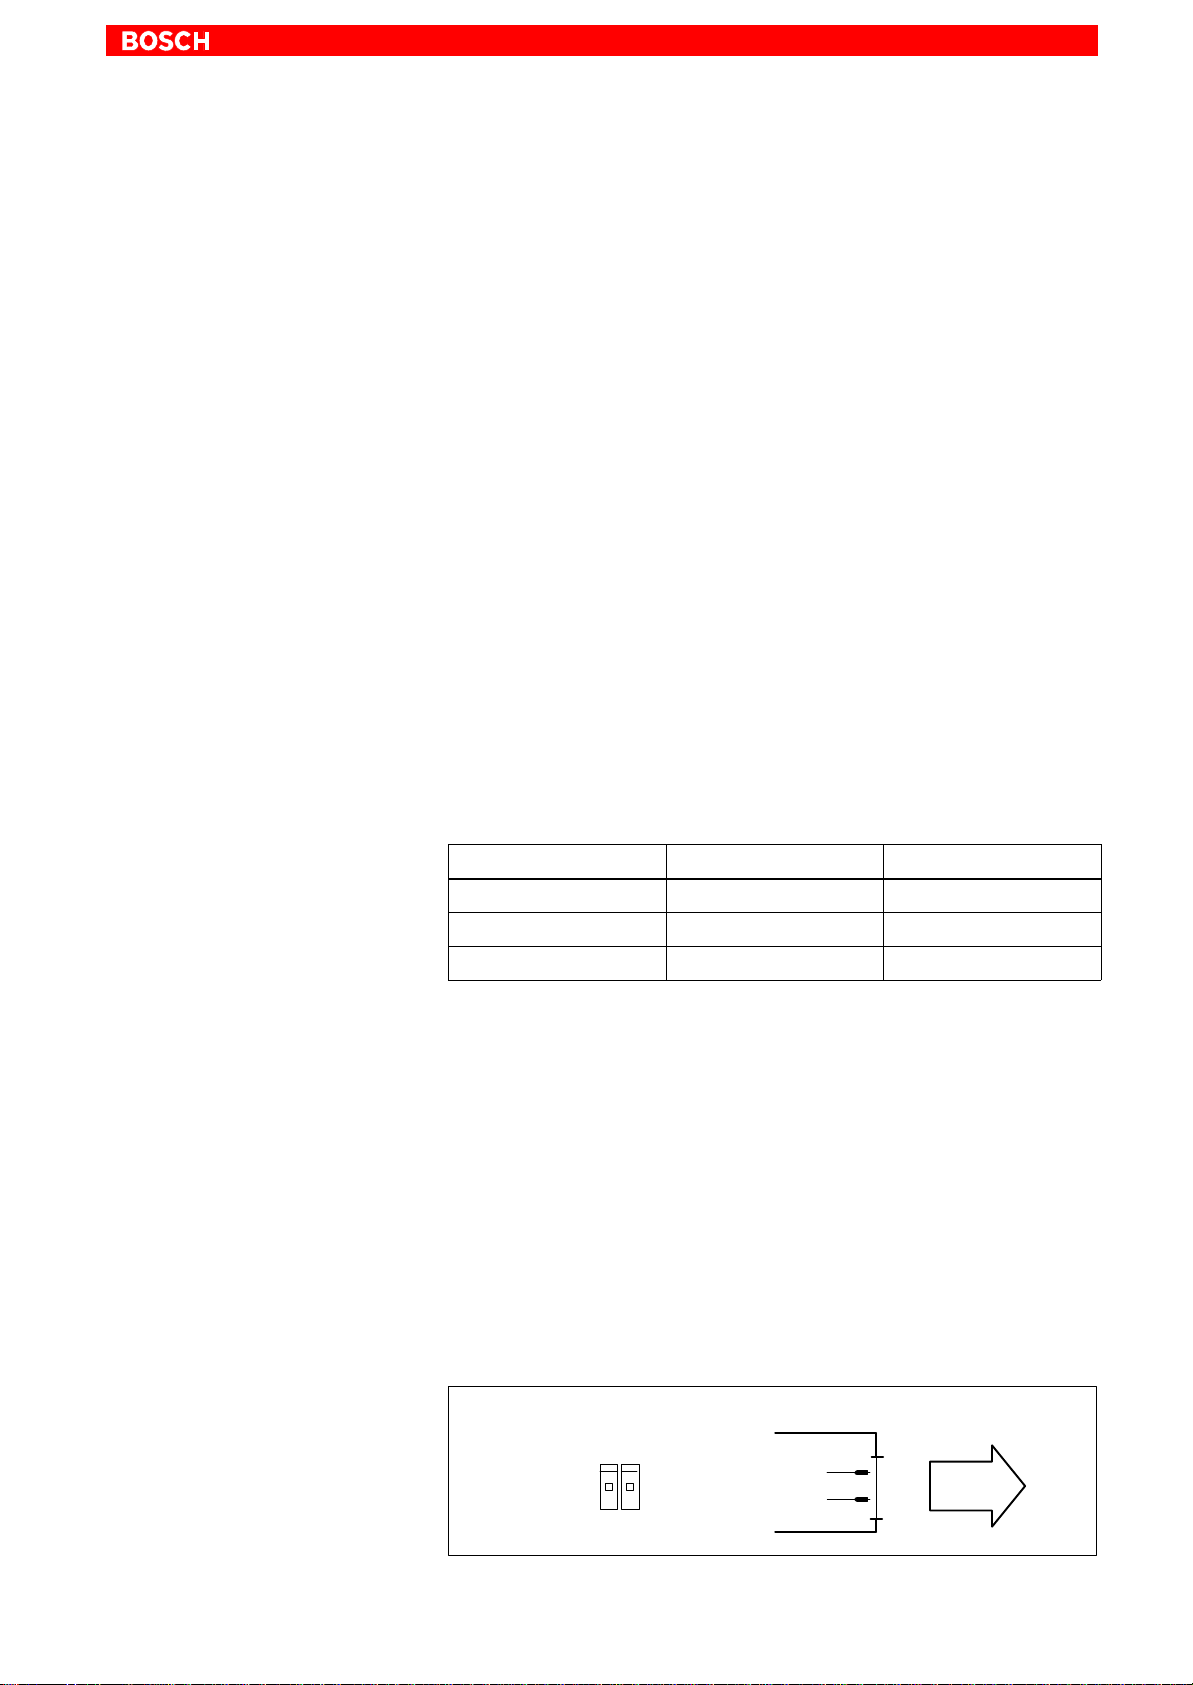
8.2.3 Replacing the battery pack
The rechargeable battery pack must be replaced in the following cases:
D The battery test has failed.
D The total number of charging cycles is above the value which depends on
the ambient temperature shown below (refer to the Shutdown Count option in UPS program, Sections 3.3.2 and 3.3.3).
D The red “USV” LED on the front panel is flashing for more than 8 hours
(refer to page 7–1).
Different prerequisites must be met by the IPC and IPC300 to start the
charge cycle. That is, whether or not the respective power supply is backed
by the rechargeable battery pack after Power-Off.
D IPC: Always after Power-Off
D IPC300: After Power-Off only if a controlled shutdown of still-active soft-
A harmful deep-discharge of the battery pack is prevented as long as the IPC
or IPC300 is not connected to mains power.
ware is required.
Maintenance and Replacement
8–9
The number of charging cycles that the rechargeable battery pack can withstand and therefore its useful life, depends on the ambient temperature in
which the battery pack is used. Ambient temperature here is defined as the
one in which the operating terminal is situated, e.g. the temperature in the
control cabinet or in the operating housing.
The following table can be used as a guideline:
Ambient temperature Charging cycles Maintenance interval
+ 25 °C 4000 cycles 6 years
+ 35 °C 2000 cycles 3 years
+ 45 °C 1000 cycles 1.5 years
. The battery packs used in the IPC/IPC300 are recyclable, and can be
retunred to Bosch Rexroth upon replacement. They must not be disposed of in standard residential refuse.
X19 Battery terminal
Battery connection terminal. The connection may be removed only for the
purpose of replacing the battery packs.
1070 073 822-104 (02.06) GB
Terminal strip, 2-oin
Cable length: Max. 0.5 m
Cable type: Unscreened, min. cross-section 1.5 mm
X19
X19
1
1
+
GND
2
2
Battery
2
Page 82
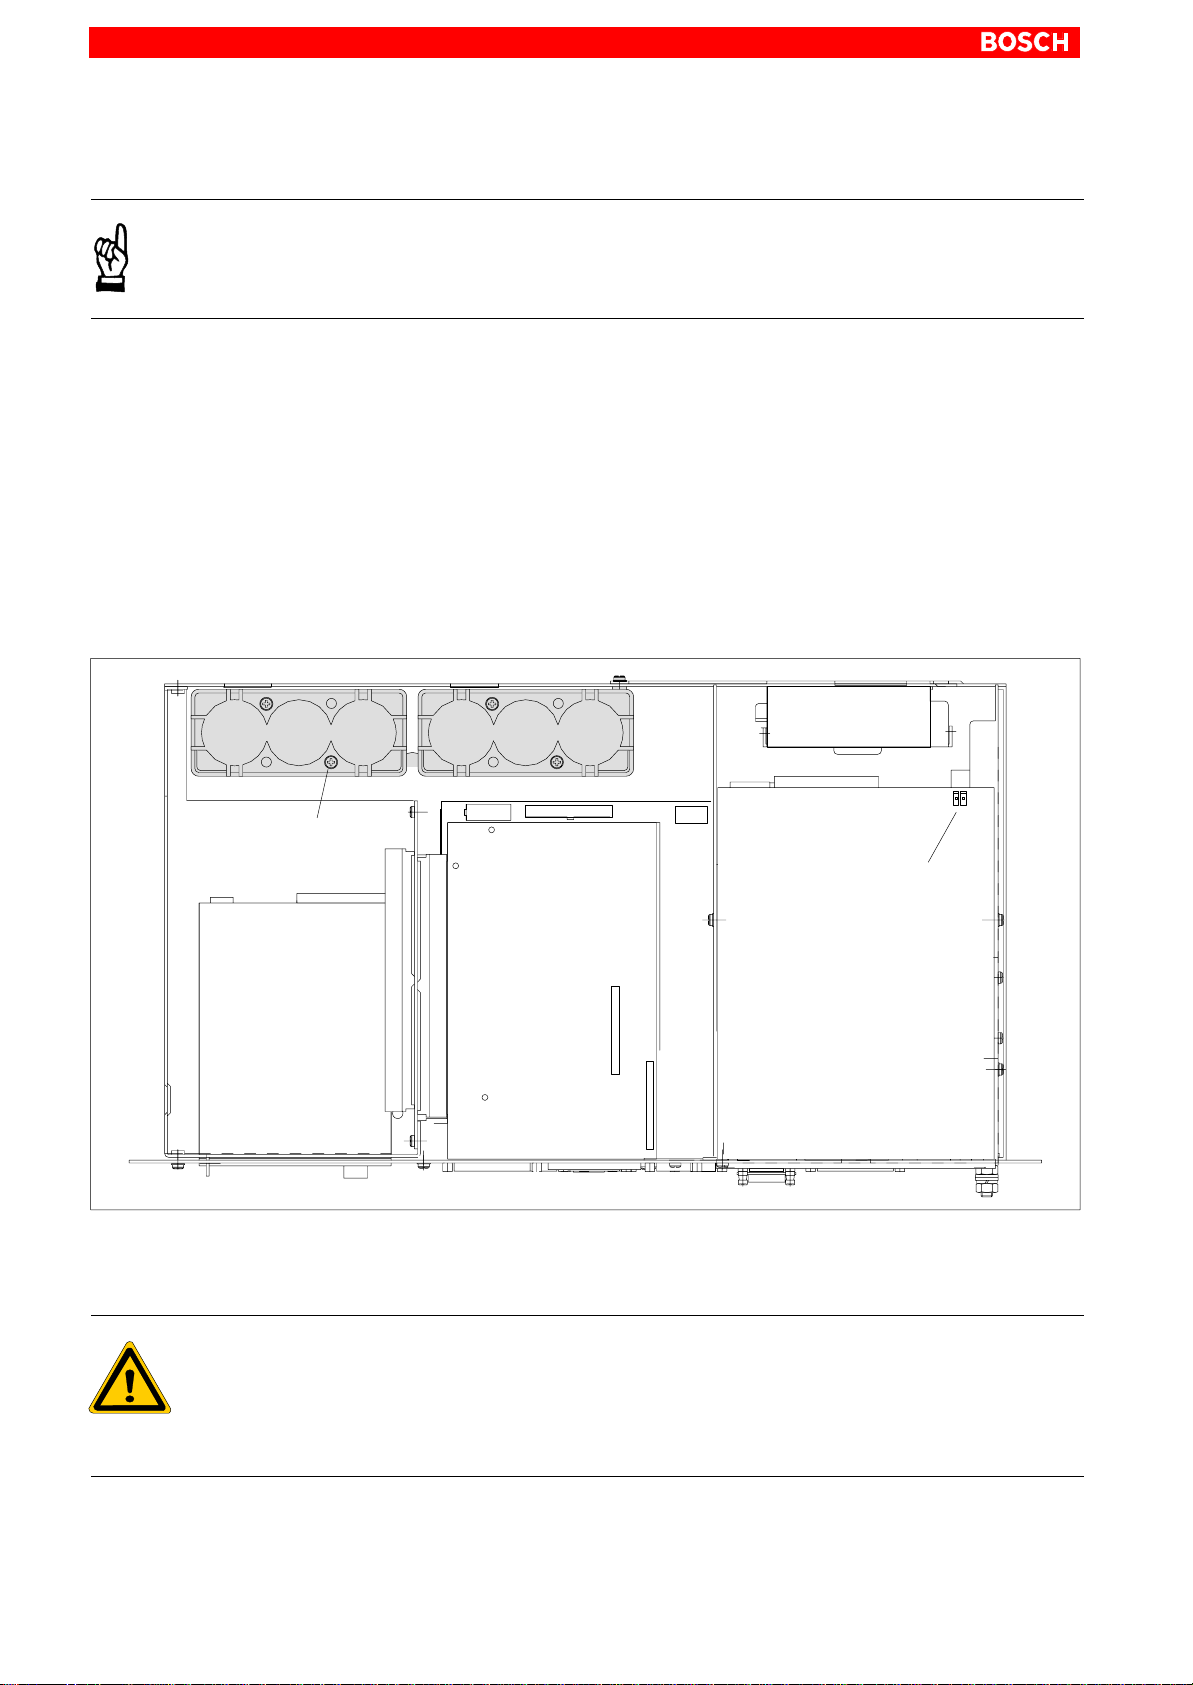
8–10
Replacing the batteries
Maintenance and Replacement
WARNING
Before replacing the battery , back up important data because during
the battery replacement procedure, power supply is removed.
1. Before replacing the batteries, switch off the PC and remove the mains
plug (230/115 VAC and 24 VDC plug).
2. Open the housing cover
3. Remove the connector with the bipolar cable from battery terminal X19
below the CD-ROM.
4. The battery packs can be replaced when the 4 mounting screws have
been removed (cf. figure below).
. Insert the two new battery packs as shown in the figure below. Please
also observe the installation instructions delivered together with the
packs.
Battery
+
Battery retaining screws
Battery
+––
12
+–
Battery pack
connector
(X19)
CD-ROM drive
5. Plug the connector with the bipolar cable back onto terminal X19. Ensure
correct polarity of the batteries.
DANGER
Polarity reversal of the rechargeable battery packs will result in an
F10A (5x20) fuse being triggered on the power supply module.
Further damages might occur. The UPS operating cycle will then no
longer be possible.
6. Close the housing cover.
1070 073 822-104 (02.06) GB
Page 83

Maintenance and Replacement
7. Restore power to the system.
Observe the “UPS” LED display on the front panel:
D Battery pack already charged: UPS LED Off
D Battery pack discharged: UPS LED flashes red
Wait approx. 5 hours until the battery pack is fully charged, and the
UPS LED extinguishes.
8–11
. If the new rechargeable battery pack has not been charged, there will
not be sufficient UPS protection to effect a controlled shutdown of the
PC. Therefore, install fully charged batteries if at all possible.
1070 073 822-104 (02.06) GB
Page 84

8–12
Maintenance and Replacement
8.3 Expansion cards
The unit provides 6 slots for PCI bus and ISA bus expansion cards :
D 3 PCI bus slots (max. length 180 mm)
D 2 ISA bus slots (max. length 175 mm)
D 1 combination slot (PCI or ISA bus) (max. length 180 mm)
CAUTION
Damage to PC or application software through unauthorized expansion cards.
Use only approved expansion cards, and have them installed by a
specialist.
8.3.1 Installing an expansion card
1. Switch off the supply voltage. If required, unplug all connectors.
2. Wait until the UPS has switched off the power supply (the UPS LED on
the front illuminates red until the UPS switches off the IPC power supply).
3. Open the housing.
4. Remove the mounting screw holding the slot cover.
5. Insert the expansion card, and secure it with the mounting screw.
CAUTION
Destruction of expansion card or main board
The ISA/PCI combination slot must never be populated with an ISA
card and PCI card at the same time!
1070 073 822-104 (02.06) GB
Page 85
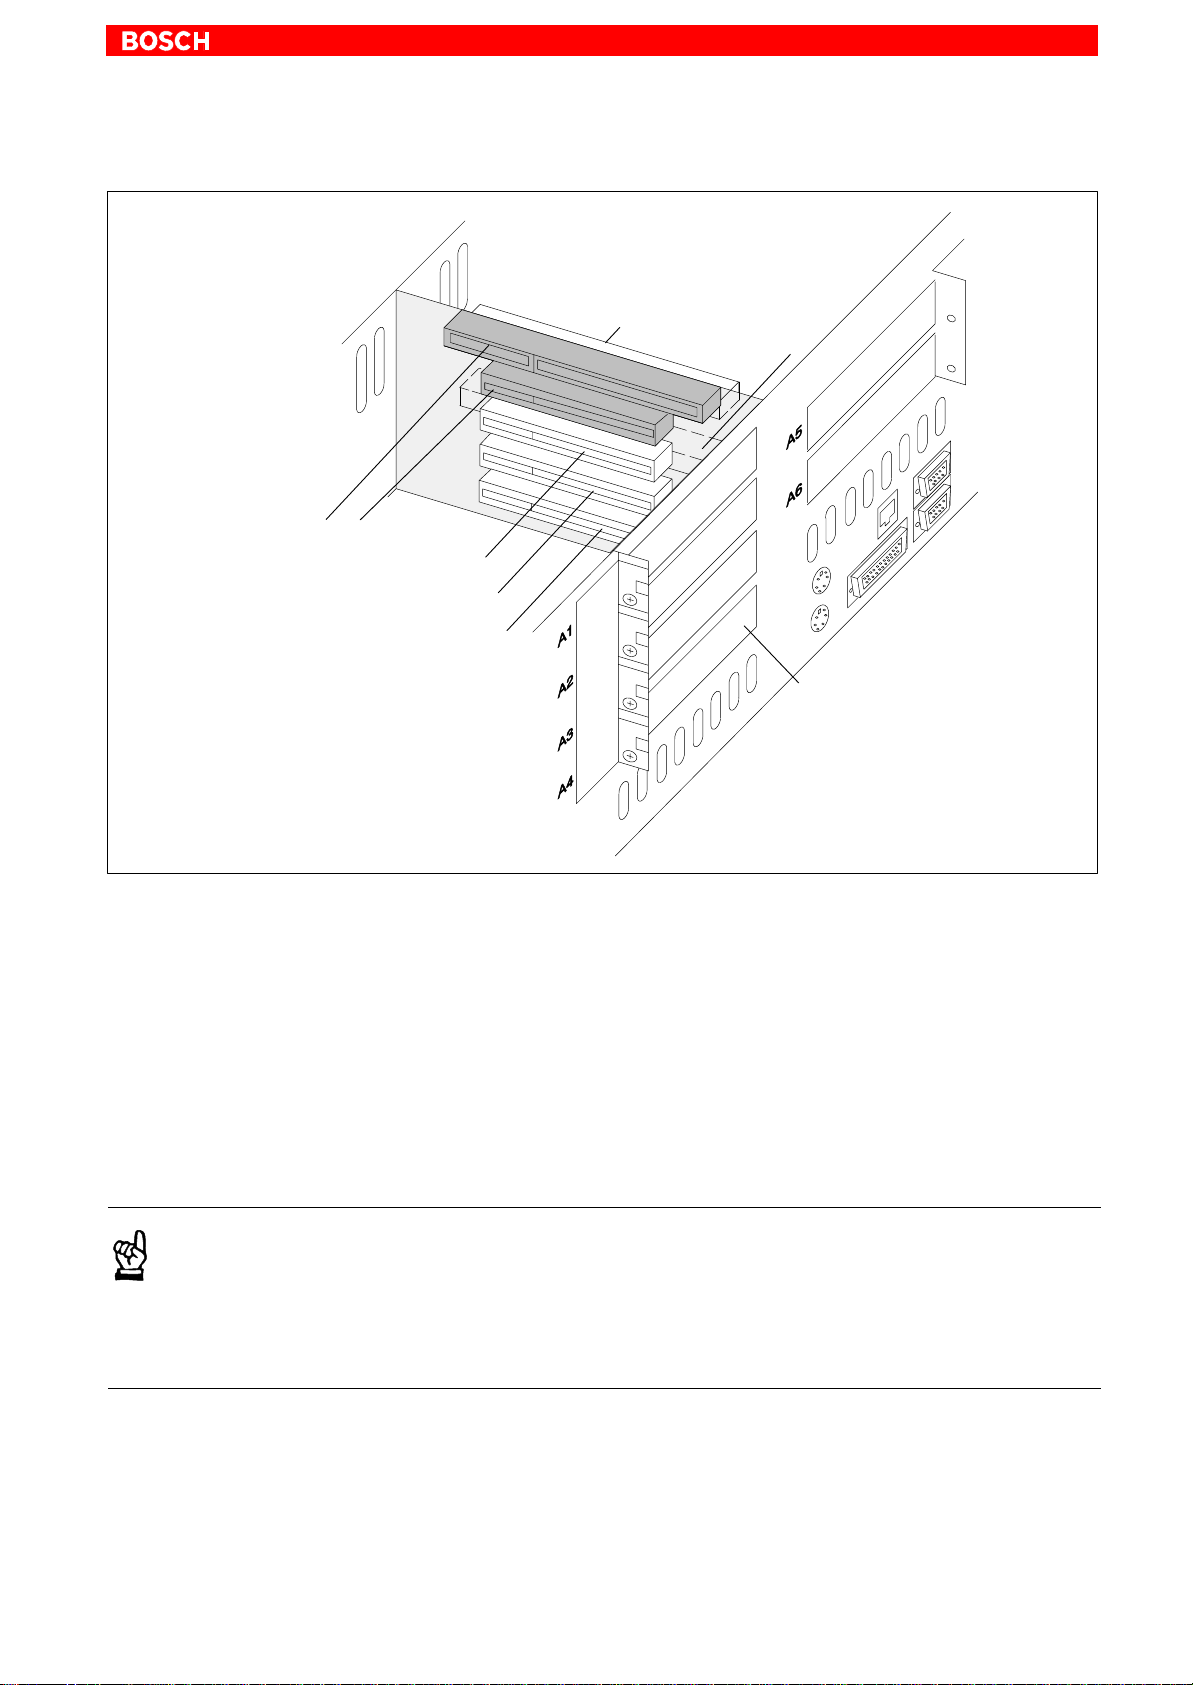
Arrangement of expansion slots in the housing
ISA/PCI slot A1
PCI slot A2
PCI slot A3
ISA slot A5
ISA slot A6
Maintenance and Replacement
8–13
PCI slot A4
Slot cover
If the card is Plug-and-Play (PnP) compatible, it is automatically recognized
and integrated in the system, provided this creates no hardware conflicts
(IRQ, etc.) with other expamnsion cards or connected devices.
In the event that subsequent to a system reboot the functions based on the
newly aded card are not available, there may be several reasons for this:
D The card is not properly seated in the PCI or ISA slot contacts.
D The software driver for the card has not been installed or its installation is
faulty.
D IRQ (interrupt) conflict with other PC hardware components.
D The software for the card has not been installed.
1070 073 822-104 (02.06) GB
CAUTION
Destruction of main board or ISA cards through address conflicts
(IRQ, memory access, I/O address)!
Observe the information provided by the card manufacturer. You
may have try out new configuration settings in both BIOS and operating system.
Page 86

8–14
Maintenance and Replacement
8.3.2 BIOS settings for IPC
. IRQ 3, 4, 5, 7, 10, 11, 14 are already occupied, and are therefore no
longer available for PCI and ISA expansion cards!
PCI slot
In the PCI/Plug and Play Setup BIOS menu you can assign an IRQ address
to each PCI expansion slot. The number of the IRQ address also defines the
priority.
If only PnP cards are used, the AUTO setting must be selected.
BIOS selection: PCI Slot1 IRQ Priority, PCI Slot2 IRQ Priority, PCI Slot3
IRQ Priority, PCI Slot4 IRQ Priority: AUTO, 3, 4, 5, 7, 9, 10, 11, 12
Default: AUTO
ISA slot (IRQ)
The IRQ address for non-PnP compatible ISA bus cards (so-called legacy
ISA cards) must be permanently set in the PCI/Plug and Play Setup BIOS
menu.
BIOS selection: IRQ3, IRQ4, IRQ5, IRQ7, IRQ9, IRQ10, IRQ11, IRQ14,
IRQ15: PCI/PnP, ISA/EISA
Default: PCI/PnP
ISA slot (DMA)
The PCI/Plug and Play Setup BIOS menu provides for the permanent
selection of a DMA channel for Legacy ISA cards.
BIOS selection: DMA Channel 0, DMA Channel 1, DMA Channel 2 , DMA
Channel 3, DMA Channel 4, DMA Channel 5, DMA Channel 6, DMA Channel 7: PnP, ISA/EISA
Default: PnP
. When using the PCL Software PLC, the use of DMA channels may pre-
vent real-time generation.
8.3.3 BIOS settings for IPC300
. IRQ 3, 4, 5, 7, 10, 11, 14 are already occupied, and are therefore no
longer available for PCI and ISA expansion cards!
PCI slot
You can use the The Advanced Menu / PCI Configuration sub menu
BIOS submenu to assign an IRQ address to each PCI slot. At the same time,
the number of the IRQ also defines a priority.
If only PnP cards are used, the AUTO setting must be selected.
BIOS select.: PCI
Option: Disabled, Auto, IRQ: 3, 4, 5, 7, 9, 10, 11, 12, 14, 15,
Default: AUTO
IRQ line 1, PCI IRQ line 2, PCI IRQ line 3, PCI IRQ line 4
1070 073 822-104 (02.06) GB
Page 87

ISA slot (IRQ)
ISA slot (UMB)
Maintenance and Replacement
8–15
In the The Advanced Menu / PCI Configuration sub menu /
PCI/PNP ISA IRQ Resource Exclusion / IRQx BIOS menu the IRQ ad-
dress for for non-PnP compatible ISA bus cards (so-called legacy ISA cards)
must be permanently set.
BIOS selection: IRQ:3, 4, 5, 7, 9, 10, 11, 15
Option: Available, Reserved
Default: Available
You can use the The Advanced Menu / PCI Configuration sub menu /
PCI/PNP ISA UMB Region Exclusion BIOS submenu to reserve a specific
block in upper memory for ISA legacy cards.
BIOS selection: C800 - CBFF, CC00 - CFFF, D000 - D3FF, D400 - D7FF,
D800 - DBFF, DC00 - DFFF
Option: Available, Reserved
Default: Available
1070 073 822-104 (02.06) GB
Page 88

8–16
Notes:
Maintenance and Replacement
1070 073 822-104 (02.06) GB
Page 89

9 Software
9.1 BIOS software
Software
9–1
The IPC / IPC300 features a CD-ROM drive, a 3.5” floppy disk drive and an
Ethernet network connection for software installation and backup.
Please refer to the documentation of the particular operating system for restoring backup files.
Depending on the intended application, a variety of software programs are
installed on the IPC as shipped from the factory:
D BIOS
D Operating system
D Utility programs
D Application software
The IPC requires the BIOS software for its initial boot process to enable it to
find and start an operating system which provides a more user-friendly and
comfortable platform for running the application software.
The PCs are equipped with the following licensed BIOS software:
D IPC (200 MHz): AMIBIOS by American Megatrends,
IPC (266 MHz): PhoenixBios by Phoenix
D IPC300: PhoenixBios by Phoenix
9.2 Operating system and utilities
Operating system Microsoft Windows 95B
UPS utility program UPS
version LEU1R129 (or higher)
Software
IPC IPC300
or
Microsoft Windows NT4.0
(for Windows 95)
plus
or
(for Windows NT)
UPS
NT
Microsoft Windows NT4.0
UPS
NTC4
1070 073 822-104 (02.06) GB
Page 90
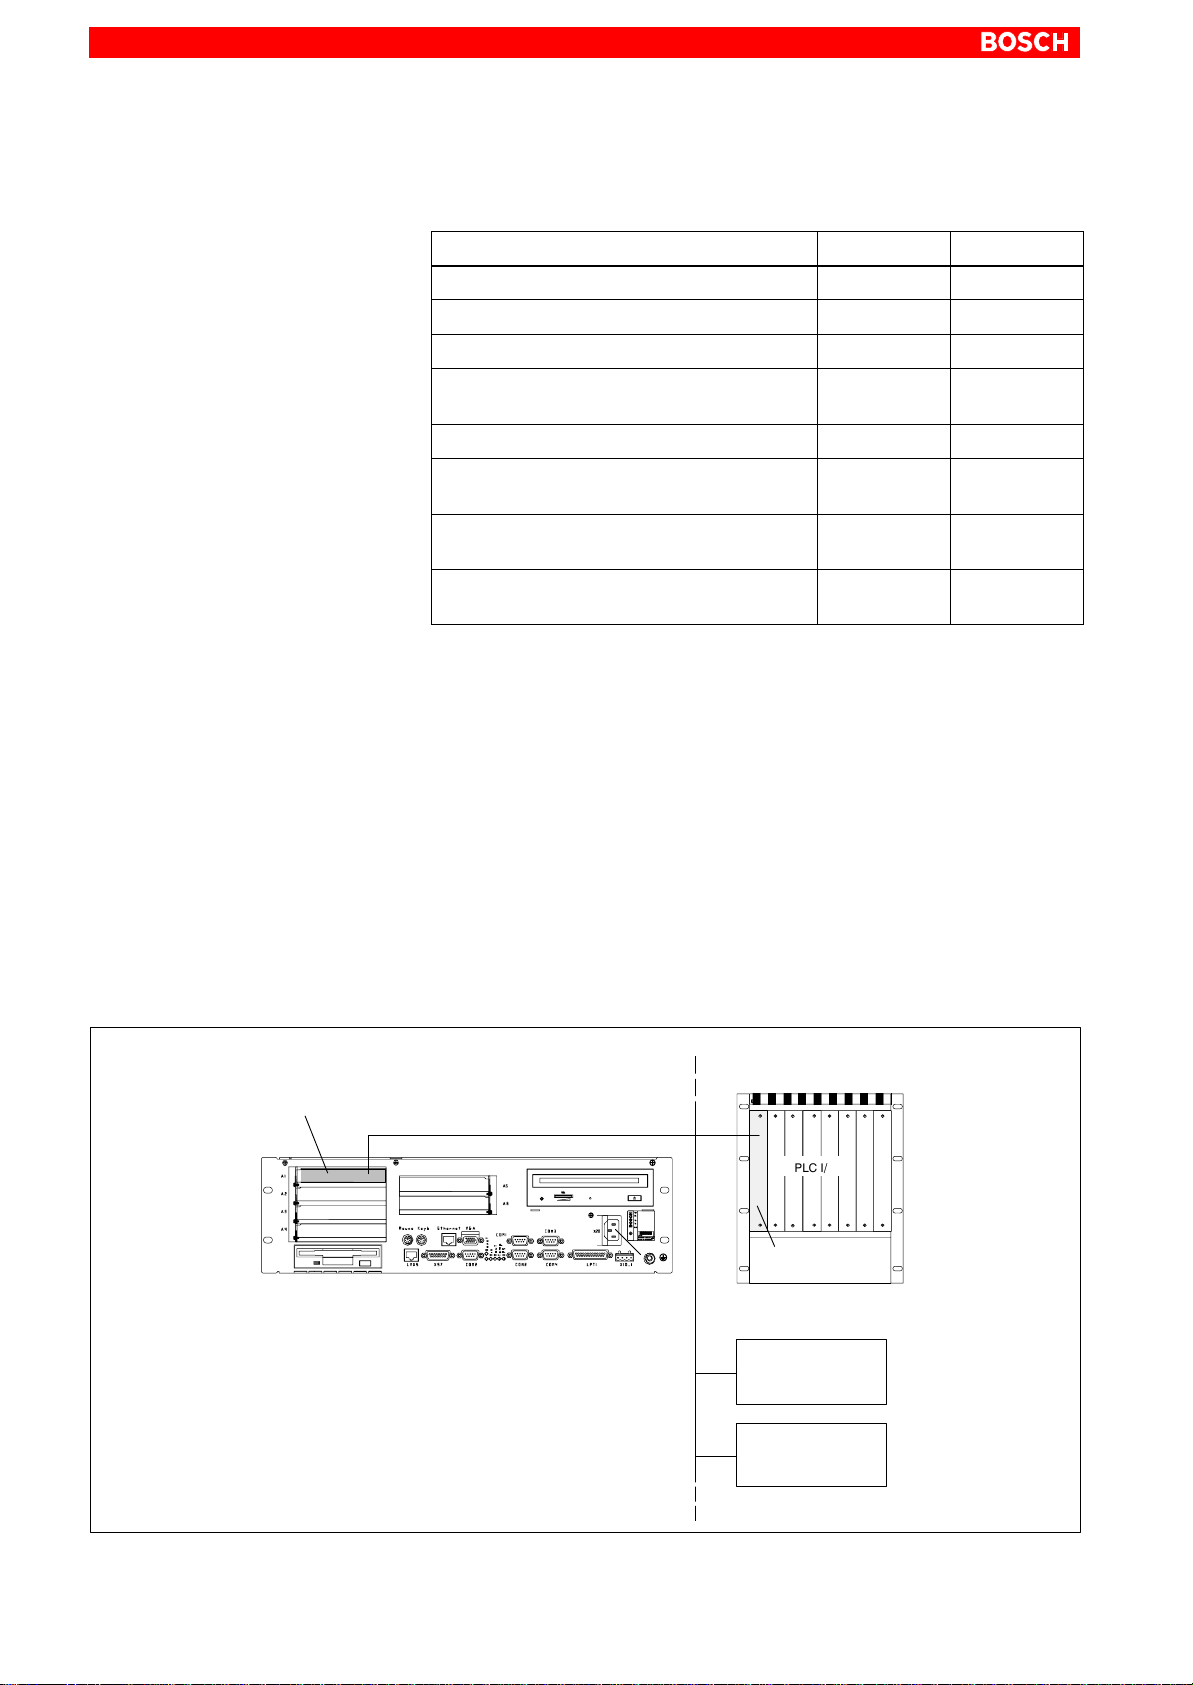
9–2
Software
9.3 Application software
The following Bosch application software options are available:
Application IPC IPC300
PCL Software PLC D D
rho4 Robot controller software D D
Typ3 osa CNC operating software D D
MADAP Systems operating and
Studio diagnostic software
WinSPS PLC programming software D D
WinDP Field bus parameterization for
WinCan Field bus parameterization for
CAN bus
TSWIN Programming interface for
operating terminals
D = provided
9.3.1 Bosch PCL (software PLC)
The installation of the Bosch PCL Software PLC adds the capabilities of a
programmable logic controller to the IPC / IPC300. The Bosch PCL Software
PLC encompasses the following components:
D PCL expansion card for PCI bus
D Installation diskette with PCL application program
Interconnection
When connected to other PLC components (e.g., I/O rack) via a field bus
(PROFIBUS-DP, CAN, InterBus-S), the control panel/IPC becomes a fullfeatured PLC controller.
D D
D D
PROFIBUS-DP
D D
D D
Example:
PCL expansion card
Profibus-DP
PROFIBUS-DP
PROFIBUS-DP
e.g.,
EG2/K expansion module for PLC
PLC I/O
RM4-DP or
RM2-DP
other PROFIBUS I/O devices:
D Decentr. I/O
RM65M-16DP
D B ~ IO
K-DP16DO
1070 073 822-104 (02.06) GB
Page 91
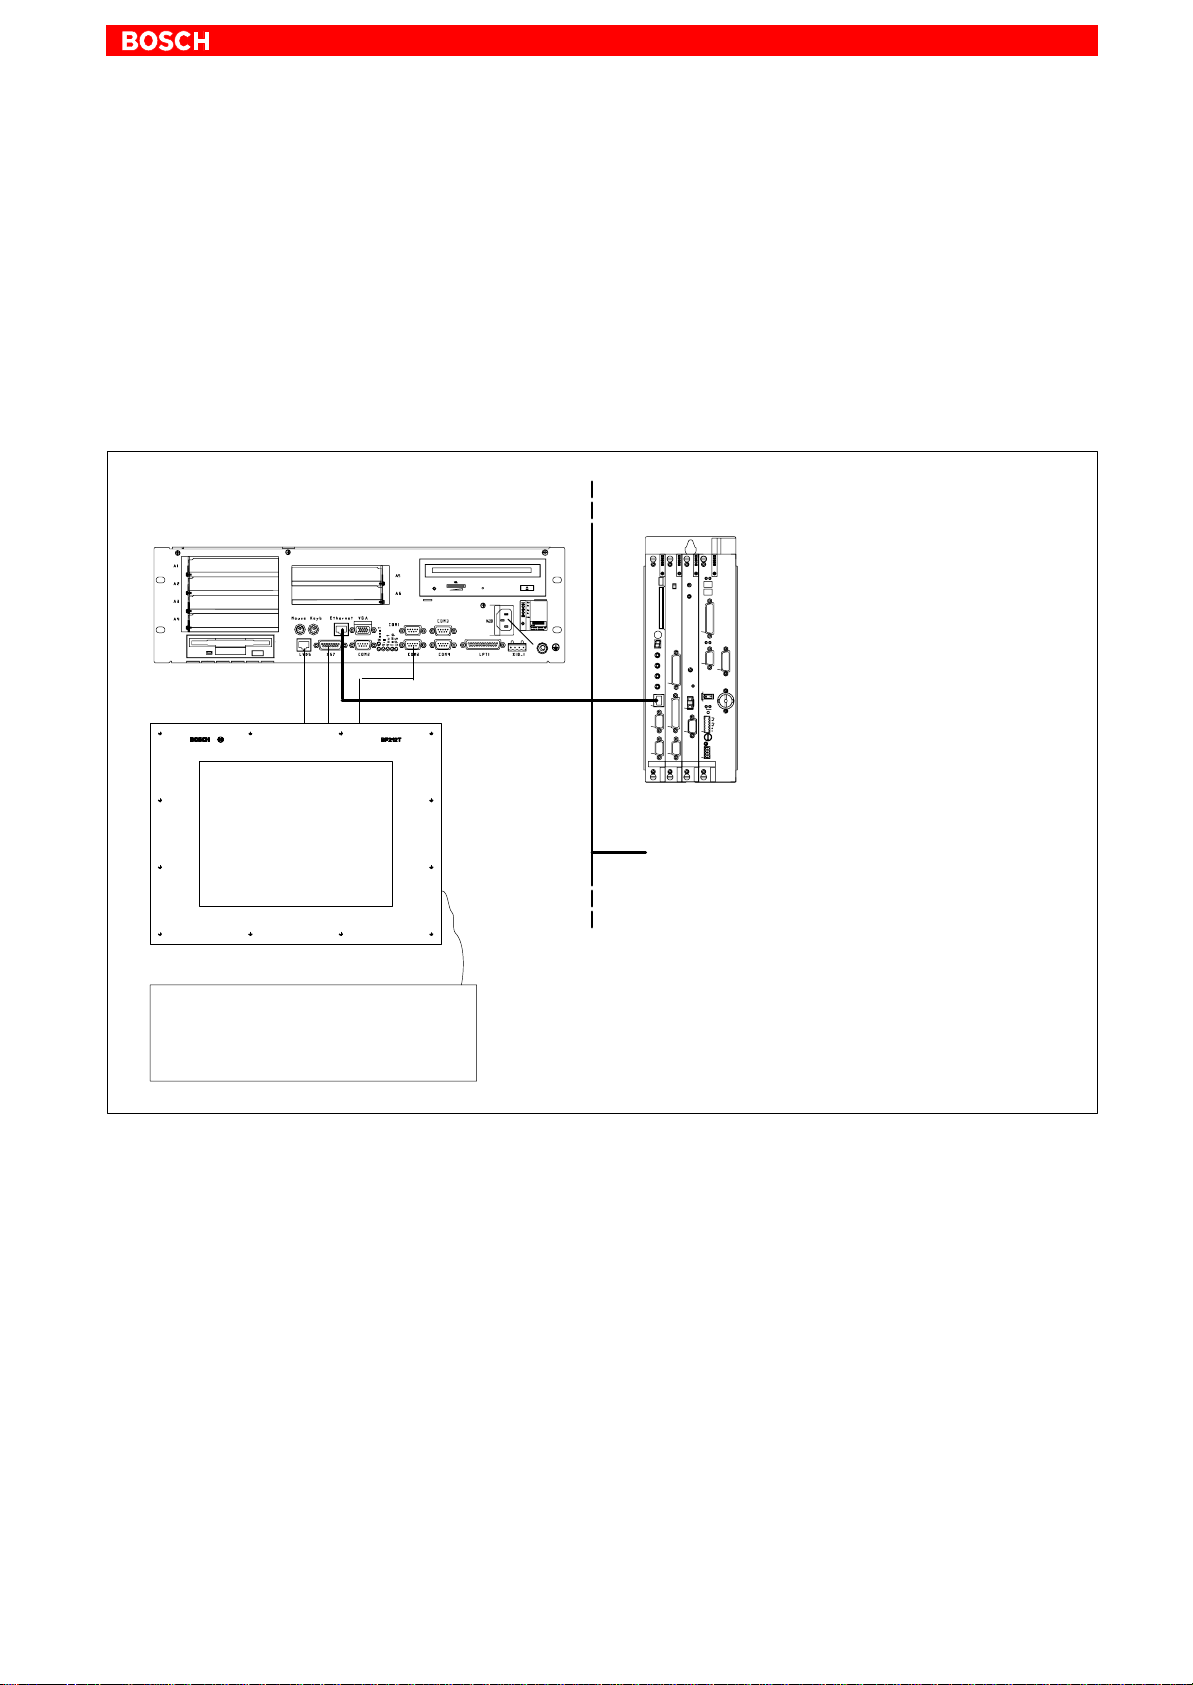
9.3.2 Typ3 osa (CNC operating software)
The IPC / IPC300 can be used in conjunction with Bosch BF2xxT, BF3xxT
control panels as an operating terminal computer for the Bosch Typ3 osa
controller series.
Interconnection
Communications between the operator interface and the T yp3 osa controller
utilize the TCP/IP protocol via the Ethernet connection between the IPC /
IPC300 and the osa master module of the controller.
Software
9–3
IPC / IPC300 with Typ3 osa operating
software
BF2xxT or
BF3xxT
Keyboard
Ethernet
Ethernet
Typ3 osa controller
possibly other devices in
the Ethernet network
Ethernet network
e.g.,
osa rack 4, containing
D
osa master L (w/ Ethernet connection)
D osa plc
D osa fms
D osa dc I/O
1070 073 822-104 (02.06) GB
Page 92
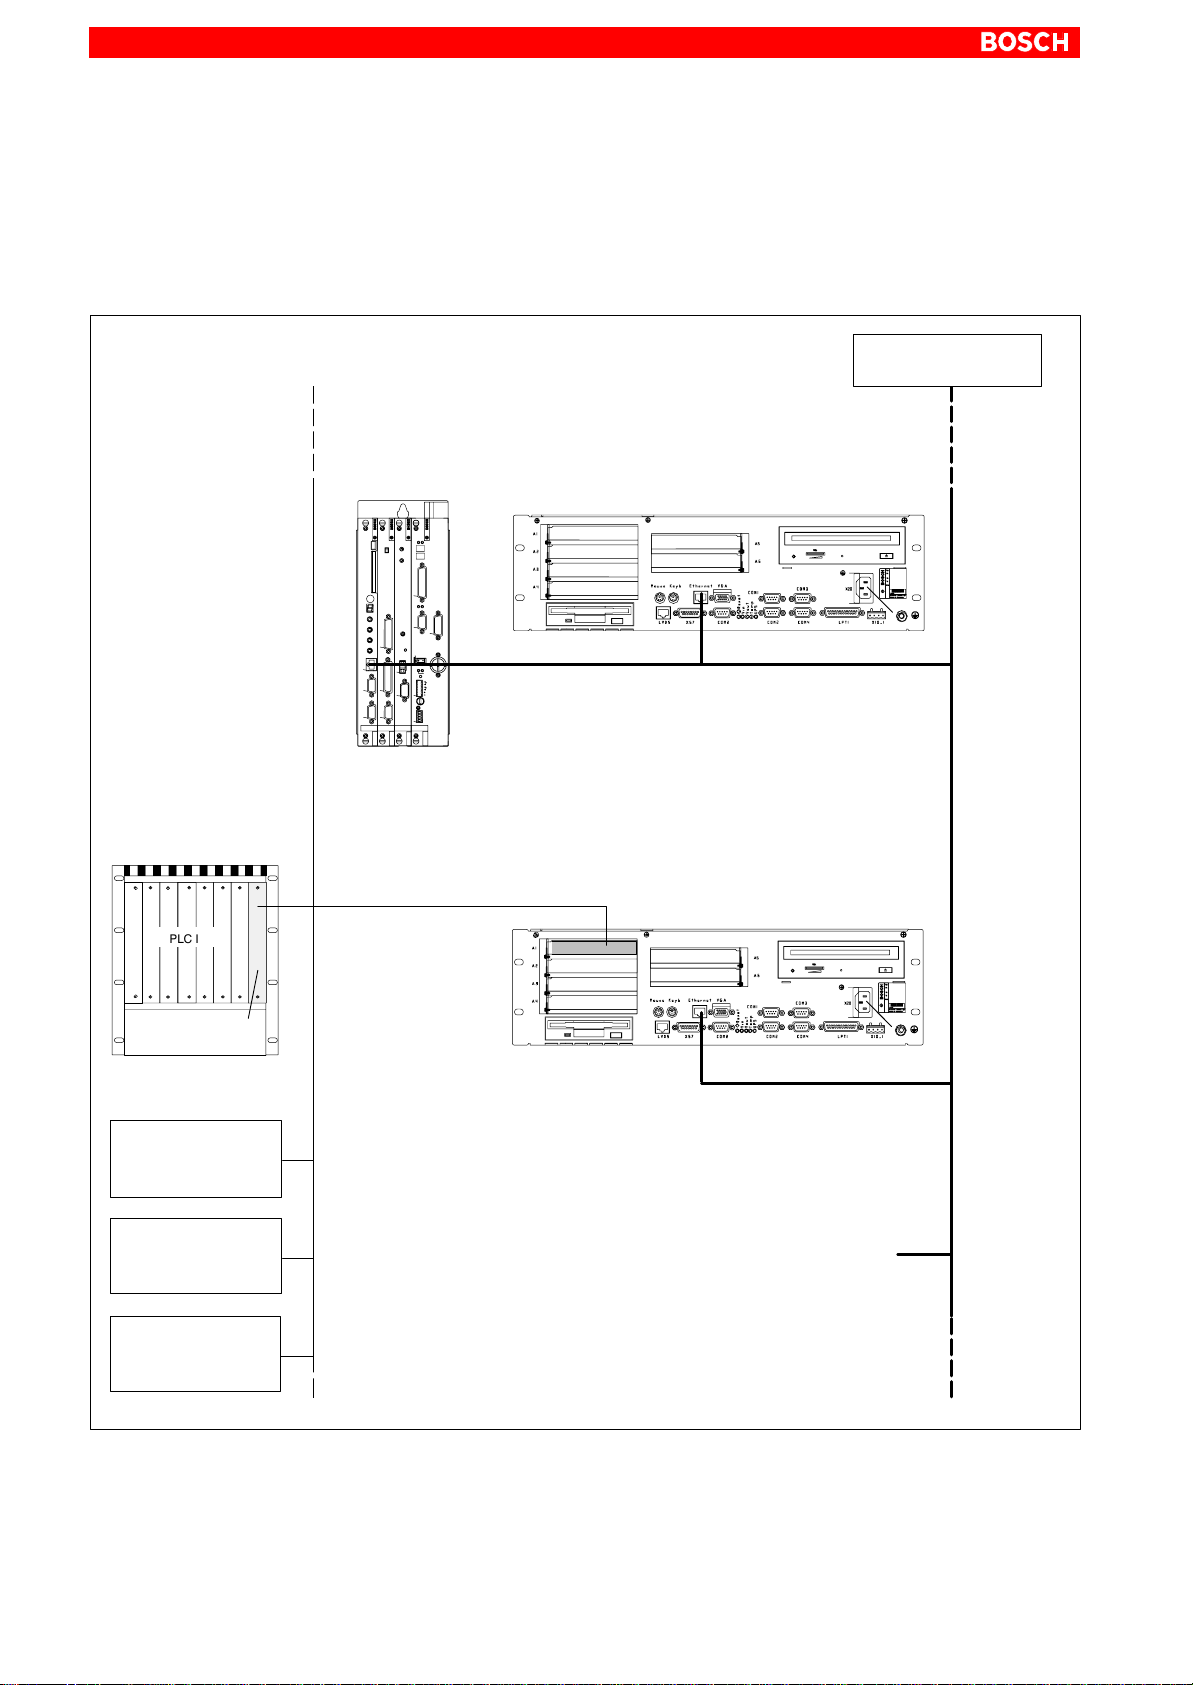
9–4
Software
9.3.3 MADAP Studio (automatic system diagnostics)
The IPC / IPC300 is also used as a visual display terminal for automatic
system diagnostics. From any operator station, the system operator can
thus receive statistical information (MDA/PDA) about the entire system.
Main computer
EG2/K
PLC expansion module
PLC I/O
RM4-DP or
RM2-DP
Typ3 osa
PROFIBUS-DP
IPC / IPC300 with Typ3 osa operating
software
Ethernet
IPC / IPC300 with PLC and MADAP Studio
Ethernet
network
Ethernet
other
PROFIBUS I/O devices:
D Decentr. I/O
RM65M-16DP
D B ~ IO
K-DP16DO
D B ~ IO
M-DP
PROFIBUS-DP
PROFIBUS-DP
PROFIBUS-DP
Additional devices in
Ethernet network, as
required
1070 073 822-104 (02.06) GB
Ethernet
Ethernet
Page 93

10 Order numbers
10.1 IPC / IPC300
For order numbers with extensions for basic unit, operating system and
additional components, refer to the “Control Technology Price List”:
D 1070 072 134 (English)
10.2 Accessories
Designation Order no.
Order numbers
10–1
Connecting cables
IPC
Connecting cables
IPC300 with Pentium I
to BF312T
COM2 (touch screen controller),length 2.5 m
5 m
10 m
LVDS, length 2.5 m
5 m
10 m
LVDS, hi-flex cable
length 2.5 m
5 m
10 m
X11, length 2.5 m
5 m
10 m
LCD, rigid cable
length 2,5 m
5 m
10 m
15 m
X11, length 2,5 m
5 m
10 m
15 m
1070 083 117
1070 083 116
1070 080 771
1070 918 793
1070 919 258
1070 918 794
1070 920 456
1070 920 457
1070 920 271
1070 083 120
1070 083 119
1070 080 744
1070 920 456
1070 921 385
1070 921 384
1070 921 070
1070 083 120
1070 083 119
1070 080 744
1070 079 383
1070 073 822-104 (02.06) GB
Connecting cables
IPC300 with Pentium I
to BF315T TA
LCD, rigid cable
length 2,5 m
5 m
10 m
X11, length 2,5 m
5 m
10 m
1070 920 456
1070 921 385
1070 921 384
1070 083 120
1070 083 119
1070 080 744
Page 94

10–2
Order numbers
Designation Order no.
10.3 Spare Parts
Connecting cables
IPC300 with Pentium III to
– BF315T P3
– BF315T P3 TA
– BF315T P3 OTA
Repeater for IPC300 Cable extension 15 m, for
Backup Package for Industrial PC
LCD, rigid cable
length 2,5 m
5 m
10 m
LCD, hi-flex cable
length 2,5 m
5 m
10 m
X11, length 2,5 m
5 m
10 m
LCD and X11
with 2 GB Iomega ”Jaz”
drive
1070 920 456
1070 921 385
1070 921 384
1070 922 022
1070 922 021
1070 921 891
1070 083 120
1070 083 119
1070 080 744
1070 079 423
1070 084 267
Designation Order no.
Fuses 6.3 A (5x20), medium time-
lag, for 24 VDC power
1.25 A (5x20), medium time-lag, for 230 VAC power
10 A (5x20), quick-blow,
for battery pack
Battery pack for USP
Connecting cable for battery pack
Hard disk 6,4 GB,
w/ spring suspension
CD-ROM drive 1070 919 420
3,5” Floppy disk drive 1070 920 192
Power supply for 220 VAC power
for 24 VDC power
RAM modules IPC: 16 MB
32 MB
64 MB
IPC300: 128 MB
1070 900 850
1070 900 839
1070 904 575
in preparation
1070 080 517
1070 920 880
1070 080 219
1070 080 220
1070 918 970
1070 919 081
1070 920 267
1070 920 459
1070 073 822-104 (02.06) GB
Page 95

A Appendix
A.1 Abbreviations
BIOS Basic Initial Operations System
CD–ROM Optical storage medium
COM x Serial port x
CRT Monitor w/ cathode ray tube
EPP Enhanced Parallel Port (bidirectional)
FD Floppy Disk
GB Gigabyte
HD Hard Disk
IDE Interface for Hard Disk Drive, CD-ROM
Drive, etc.
Appendix
A–1
ISA ”Industrial Standard Architecture” , bus
system for PCs
KBD Keyboard
LCD Liquid Crystal Display
LPT Line Printer
MB Megabyte
MTB Machine control panel
PCI Peripheral Component Interconnect, bus
system for PCs
RAM Random Access Memory
SPP Standard Parallel Port
TFT Thin-Film Transistor
UPS Uninterruptible Power Supply
VGA Video Graphics Array (graphics standard)
1070 073 822-104 (02.06) GB
Page 96

A–2
Appendix
A.2 Index
Numbers
230/115 VAC power connection, 5–8
24 VDC power connection, 5–5
A
adapter, MF2 to PS/2 mini DIN (keyboard), 6–19
ambient temperature, 2–4
application software, 9–2
MADAP Studio, 9–4
PCL (software PLC), 9–2
Typ3 osa, 9–3
assembly, 4–4
B
backing up the hard disk, 8–1, 8–4, 10–2
backlight ”sleep” function, 6–18
battery, terminal, 8–10
battery pack, terminal, 8–9
BIOS, A–1
BIOS settings, external CRT monitor, 6–16
BIOS software, 9–1
Brute Shutdown, option, 3–6
C
CD–ROM, A–1
COM1, 6–3
COM1–4, settings, operating system, 6–8
COM2, 6–4
COM3, 6–6
COM4, 6–6
connecting cables, 10–1
CRT, A–1
D
data backup, 8–1
Delay Time, 3–7, 3–14
display
BF2xxT, resolution, 6–11
resolution, BF3xxT, 6–14
documentation, related, 1–7
E
EEC Council Directive
relating to electromagnetic compatibility, 1–1
relating to electrical equipment for limited voltages, 1–1
electrical connections
230/115 VAC power supply, 5–8
24 V power supply, 5–5
electrostatically sensitive devices (ESD), 1–6
Emergency–STOP devices, 1–5
EPP, A–1
ESD (electrostatically sensitive devices), 1–6
ESD earthing wrist strap, 1–6
ESD protection, 1–6
ESD work station, 1–6
Ethernet connection, 6–10
expansion slots, 8–12
BIOS settings, 8–14
layout, 8–13
External CRT monitor, BIOS settings, 6–16
external monitor, 6–16
F
floppy disk drive, 1–7
G
GB, A–1
GBIT repeater, 6–13
Gigabit interface, 6–13
H
hard disk, replacement, 8–4
hard disk drive, 1–7
hardware, versions, 2–1
I
IDE, A–1
impact resistance, 2–4
installation, 4–4
dimensions, 4–3
installed positions, clearances, 4–2
interfaces
battery connector, 8–9
COM1, 6–3
COM2, 6–4
COM3, 6–6
COM4, 6–6
Ethernet, 6–10
Gigabit (IPC300), 6–13
LCD (IPC300), 6–13
LPT1, 6–9
LVDS (IPC), 6–11
PS/2 keyboard, 6–19
PS/2 mouse port, 6–21
USB, 6–7
VGA port, 6–16
X57, 6–5
interference suppression, 5–3
ISA, A–1
ISA slot, 8–12
K
KBD, A–1
L
LCD, A–1
LCD interface, 6–13
LED displays, 7–1
LPT, A–1
LPT1 parallel port, 6–9
LVSD interface, 6–11
M
maintenance schedule, 8–1
1070 073 822-104 (02.06) GB
Page 97

Appendix
A–3
MB, A–1
mouse port, 6–21
MTB, A–1
O
operating conditions, 2–4
operating power, 230/115 VAC, 5–8
operating status, LED display, 7–1
OS software, 9–1
P
PCI, A–1
PCI slot, 8–12
PE conductor system, 5–2
PE connections, 5–2
pin assignment
COM1 through COM4, 6–3
LPT1, 6–9
ports / connectors, overview, 6–1
ports and connectors, battery terminal, 8–10
power supplies, 5–5
power supply connection, X11, 6–18
Protection Category, 2–4
PS/2 keyboard port, 6–19
PS/2 mini DIN to MF2 keyboard adapter , 6–19
PS/2 mouse port, 6–21
Q
qualified personnel, 1–2
R
RAM, A–1
rechargeable battery pack, 2–3
relative humidity, 2–4
release information, 1–7
replacing
battery pack, 8–9
CD–ROM drive, 8–6
floppy disk, 8–7
hard disk, 8–4
RESET button, 7–1
RS–232 interface, COM1, 6–3
RS–422/485 interface, COM1, 6–3
S
safety instructions, 1–4
safety instructions, specific, 1–5
approved spare parts, 1–5
Emergency–OFF safety devices, 1–5
maintenance procedures, 1–5
measuring / testing procedures, 1–5
retrofits / modifications, 1–5
safety markings, 1–3
safety transformer, 5–5
screening information, 5–2
Shutdown Delay Time, 3–11
software, 9–1
spare parts, 1–5
specifications, 2–2
SPP, A–1
standard operation, 1–1
standards compatibility, 2–5
storage temperature, 2–4
system overview, 2–1
T
temperature, 2–4
temperature monitoring, 3–1
TFT, A–1
TFT display, resolution, 6–11
trademarks, 1–7
U
uninterruptible power supply, 3–2
UPS program, 3–4
UPS, A–1
UPS functionality, 3–2
UPS program
configuration, UPSnt for IPC300 (Windows NT), 3–13
default settings, 3–8
Functionality, 3–4
UPSnt for IPC (Windows NT), configuration, 3–10
UPSnt for IPC, default settings, 3–12
UPSnt for IPC300, default settings, 3–16
UPSnt, operating, 3–9
UPSplus Mode, command, 3–8
UPSplus, operating, 3–5
UPSnt for IPC300, program, 3–15
COM port, 3–13
Command, dialog, 3–15
configuration, 3–13
Default, button, 3–16
Enable Fan Control, 3–14
Enable Temp Control, option, 3–14
Enable Voltage Control, option, 3–15
Health Monitor, dialog section, 3–16
No Powerdown on Shortbreak, option, 3–15
Shutdown Count, option, 3–16
Shutdown Delay Time, 3–14
Startup Battery Test, 3–14
UPSnt, program, 3–9
COM port, 3–10
configuration, 3–10
Default, button, 3–12
Disable Auto Power Off, option, 3–12
Enable Accu Test, option, 3–11
Enable Temp Control, option, 3–11
operation, 3–9
Shutdown Count, option, 3–12
Shutdown Delay Time, 3–11
1070 073 822-104 (02.06) GB
Page 98

A–4
UPSplus, program
USB, 6–7
utilities, 9–1
Appendix
Brute shutdown, command, 3–6
COM port, 3–6
configuration, 3–6
Default, button, 3–8
Delay Time, parameter, 3–7
Disable Auto Power Off, option, 3–8
Enable Accu Test, option, 3–7
Enable Temp Control, option, 3–7
Exit, command, 3–5
Hide, command, 3–5
Run as Service, option, 3–8
Run as User Task, 3–8
Shutdown Count, option, 3–8
Smart Shutdown, command, 3–6
Start, command, 3–5
Stop, command, 3–5
UPSplus Mode, command, 3–8
V
Versions, 2–1
VGA, A–1
VGA port, 6–16
vibration resistance, 2–4
video adapter
CRT, 6–16
setting resolution on IPC, 6–11
setting resolution on IPC300, 6–14
X
X11, power supply connection, 6–18
X57, 6–5
1070 073 822-104 (02.06) GB
Page 99

Bosch Automation Technology
A–1
Australia
Robert Bosch (Australia) Pty. Ltd.
Head Office
Cnr. Centre - McNaughton Roads
P.O. Box 66
AUS-3168 Clayton, Victoria
Fax (03) 95 41 77 03
Great Britain
Robert Bosch Limited
Automation Technology Division
Meridian South Meridian Business Park
GB-LE3 2WY Braunstone
Leicestershire
Fax (01 16) 28-9 28 78
Canada
Robert Bosch Corporation
Automation Technology Division
6811 Century Avenue
CAN-Mississauga, Ontario L5N 1R1
Fax (905) 5 42-42 81
USA
Robert Bosch Corporation
Automation Technology Division
Fluid Power Products
7505 Durand Avenue
USA-Racine, Wisconsin 53406
Fax (414) 5 54-81 03
Robert Bosch Corporation
Automation Technology Division
Factory Automation Products
816 East Third Street
USA-Buchanan, MI 49107
Fax (616) 6 95-53 63
Robert Bosch Corporation
Automation Technology Division
Industrial Electronic Products
40 Darling Drive
USA-Avon, CT 0 60 01-42 17
Fax (860) 4 09-70 80
We reserve the right to make technical alterations
Your concessionary
1070 073 822-104 (02.06) GB · HB PC · BRC/EPY · Printed in Germany
1070 073 822-104 (02.06) GB
Robert Bosch GmbH
Geschäftsbereich
Automationstechnik
Antriebs- und Steuerungstechnik
Postfach 11 62
D-64701 Erbach
Fax +49 (0) 60 62 78-4 28
 Loading...