

Page 1
osch Vision _ 300/500/800 Series
Electric Clothes Dryers
Page 2
Features and Benefits of Your New Dryer
ActiveDry TM Technology
Moisture and temperature levels are constantly monitored to
ensure precise drying results for a wide array of fabrics.
Everything from T shirts to baby blankets comes out warm
and soft every time.
Constant monitoring ensures the lowest energy usage
possible, cutting consumption by up to 50% per year.
EcoSmart TI_4
EcoSmart Tt_4 technology utilizes a network of sensors in the
Bosch Vision dryer for cycles that conserve the most energy
possible while maintaining superior drying performance. By
adjusting to how wet the load is and regulating temperature
to never over heat, it is no wonder that Bosch offers some of
the most efficient dryers in the market.
EcoAction TM
This option gives you the ability to reduce energy usage by
up to 10%. By selecting this option, temperature is reduced
to save resources while the cycle time is slightly extended to
ensure proper drying.
DynamicAir TI_4
The Bosch Vision DynamicAir TM system features gentle heat
and high air volume inthe most gentle dryer drum. Only
Bosch Vision can offer a one-piece dryer drum with a
backshield full of holes to properly distribute air over your
laundry, giving you the most gentle and effective drying
possible.
Wrinkle Block®
Sometimes you can't get your laundry right when the buzzer
rings. Wrinkle Block® gives you one hour of intermittent
tumbling, preventing creases from setting in and, ultimately,
reducing ironing time.
Stainless Steel Drum
Bosch dryers feature smooth, stainless steel drums for the
gentlest of care.
160 ° Door Hinge
The dryer door opens up to 160° - making it easier to load
and unload laundry. Washer and dryer doors also open in
opposite directions, so when set up side by side,
transferring your damp laundry to the dryer becomes an
effortless task.
Quiet Performance
Bosch laundry appliances use brushless motors,
suspended pump systems, and special sound-deadening
material to keep them exceptionally quiet while in operation.
Quiet operation means they can be installed virtually
anywhere in the home without causing a disturbance.
Dryer Rack
The dryer rack protects the most delicate fabrics or a pair of
tennis shoes, allowing either to drywithout tumbling. It is
standard on the Premium model and is available as an
accessory on all models.
Lint Filter
The dryer lint filter is conveniently located in the appliance
housing below the dryer door for easy access. The lint
filter's fine mesh filter captures even the smallest lint
particles. And to increase drying efficiency, there's also a
lint filter LED on the control panel that illuminates should the
filter need immediate cleaning.
Steam Cycles
Steam Cycles offered on select models utilize added
moisture to help relax fabric, ease wrinkling, and freshen
cotton blend laundry items to reduce odor.
Page 3
Table of Contents
Definitions ..........................................................................................
IMPORTANT SAFETY INSTRUCTIONS .................................................................
GROUNDING INSTRUCTIONS .......................................................................
INSTALLATION INSTRUCTIONS .......................................................................
Introduction .......................................................................................
Information concerning waste disposal ................................................................
Before installing the dryer ............................................................................
Checklist for Installation .............................................................................
Installation Location ................................................................................
Dryer Dimensions ..................................................................................
Door Hinge Reversal ................................................................................
Installation Types ...................................................................................
Electrical connection ...............................................................................
Exhaust air connection ..............................................................................
Accessories .......................................................................................
Preparing to transport the dryer - step by step ..........................................................
OPERATING INSTRUCTIONS .........................................................................
Panel ............................................................................................
Additional Safety information .........................................................................
Protection of the environment .........................................................................
Laundry ............................................................................................
Identification of fabrics ..............................................................................
Drying tips ........................................................................................
Cycle Selection ......................................................................................
Options (Delicates, ECO Action) ......................................................................
LED indicators of cycle sequence .....................................................................
Cycle Selection Table ...............................................................................
Automatic cycles ...................................................................................
Steam cycles ......................................................................................
Special cycles .....................................................................................
Time cycles .......................................................................................
Additional Options on LCD Menu .....................................................................
Operation ...........................................................................................
Using the dryer ....................................................................................
Cleaning the lint filter ................................................................................
Using the dryer rack (Option) .........................................................................
Cleaning and care ...................................................................................
Cleaning the dryer ..................................................................................
Cleaning the exhaust duct ...........................................................................
Cleaning the moisture sensor ........................................................................
Cleaning the lint filter housing ........................................................................
Cleaning the Steam nozzle ..........................................................................
Change the light bulb ...............................................................................
Troubleshooting .....................................................................................
SERVICE and REPAIR ..............................................................................
STATEMENT OF LIMITED PRODUCT WARRANTY ......................................................
4
5
6
7
7
7
7
8
8
8
9
11
14
17
19
19
20
20
21
21
21
21
21
22
22
23
24
24
24
24
24
24
26
26
27
28
29
29
29
29
29
29
29
30
32
33
3
Page 4
Congratulations!
Your new clothes dryer is a modern,
high quality domestic appliance.
This dryer complies with:
UL 2158/CAN/CSA-C22.2 No.
112 97 Clothes Dryers
A distinctive feature of your dryer is low
energy consumption.
An easy operation philosophy, a variety
of customized drying programs, and a
solid touch and feel make this
appliance a user-friendly assistant in
your household.
Bosch dryers offer the following
standard features:
High efficiency precision drying
system
Large stainless steel drum with a
capacity of up to 17.6 Ibs (8 kg)
Large port hole (16"/406 mm), and
door interlock with automatic drum
stop function
Exceptionally quiet operation
Sensor-controlled auto cycles
Timed cycles
300 and 500 Series Dryer: 20, 40
and 60 minute cycles
800 Series Dryer: 10 to
150 minutes (in increments of 10
minutes)
Wrinkle Block® feature tumbles
clothes periodically for up to one
hour following drying to help
decrease wrinkling
Each dryer which leaves our factory
has undergone a thorough
performance test and is in fullworking
condition. If you have any questions,
especially concerning installation of the
dryer - our customer service team will
be happy to assist you.
Further information and a selection of
our products can be found on our web
site:
www.boschappliances.com
Information
Models Covered by this User
Manual
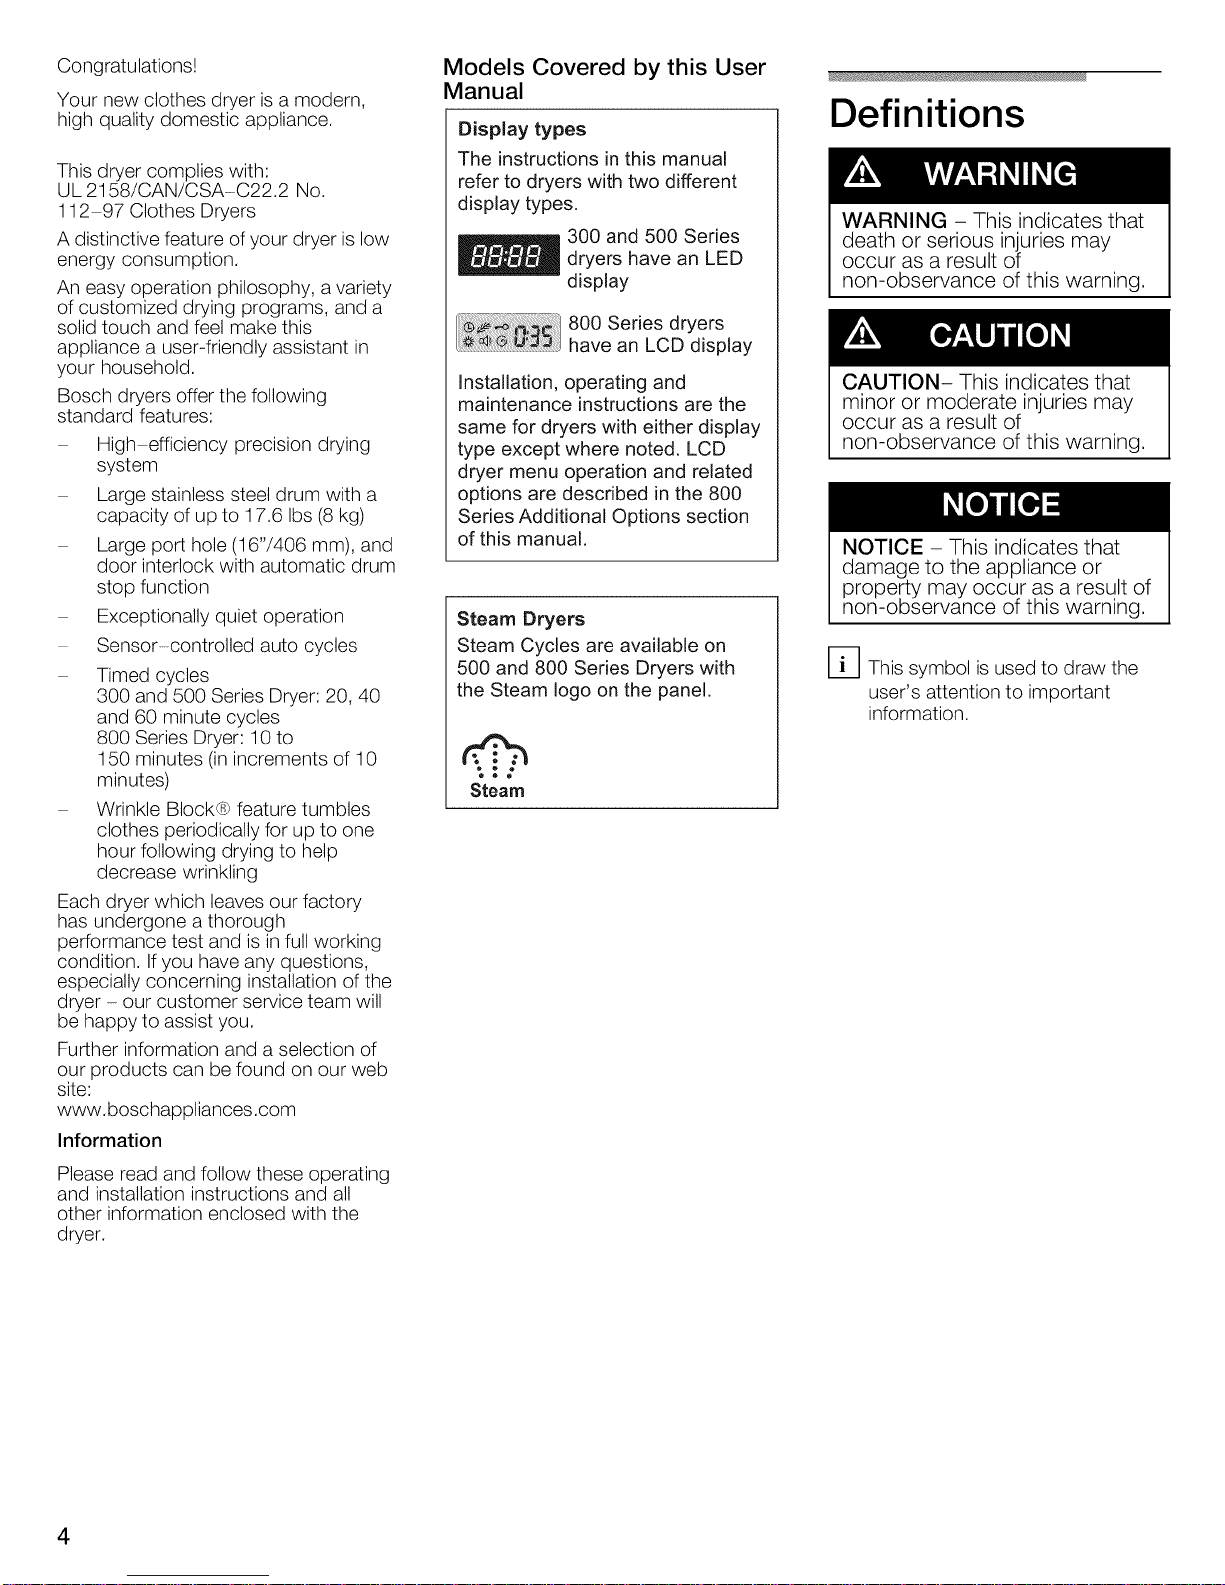
Display types
The instructions in this manual
refer to dryers with two different
display types.
300 and 500 Series
dryers have an LED
display
800 Series dryers
................. have an LCD display
Installation, operating and
maintenance instructions are the
same for dryers with either display
type except where noted. LCD
dryer menu operation and related
options are described in the 800
Series Additional Options section
of this manual.
Steam Dryers
Steam Cycles are available on
500 and 800 Series Dryers with
the Steam logo on the panel.
Steam
Definitions
WARNING - This indicates that
death or serious injuries may
occur as a result of
non-observance of this warning.
CAUTION- This indicates that
minor or moderate injuries may
occur as a result of
non-observance of this warning.
NOTICE - This indicates that
damage to the appliance or
property may occur as a result of
non-observance of this warning.
D This symbol is used to draw the
user's attention to important
information.
Please read and follow these operating
and installation instructions and all
other information enclosed with the
dryer.
4
Page 5
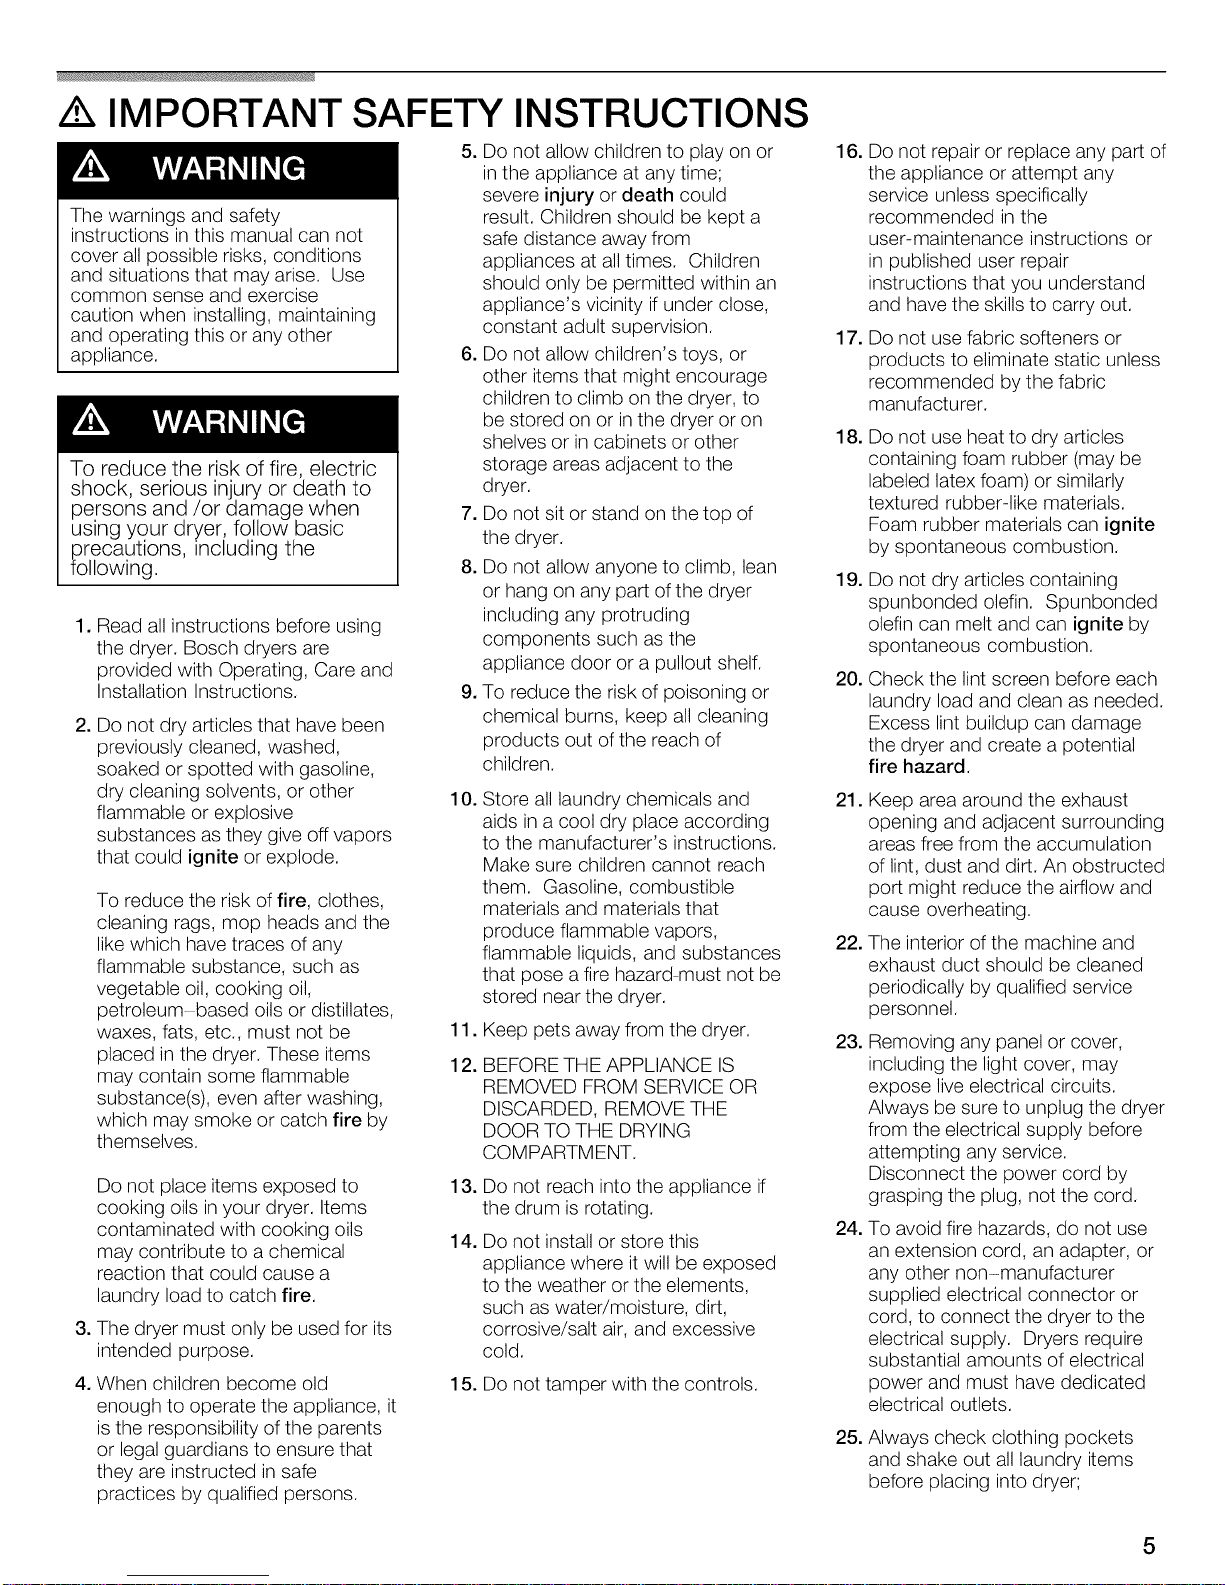
,/k IMPORTANT SAFETY INSTRUCTIONS
The warnings and safety
instructions in this manual can not
cover all possible risks, conditions
and situations that may arise. Use
common sense and exercise
caution when installing, maintaining
and operating this or any other
appliance.
To reduce the risk of fire, electric
shock, serious injury or death to
persons and/or damage when
using your dryer, follow basic
precautions, _ncluding the
following.
1. Read all instructions before using
the dryer. Bosch dryers are
provided with Operating, Care and
Installation Instructions.
2. Do not dry articles that have been
previously cleaned, washed,
soaked or spotted with gasoline,
dry cleaning solvents, or other
flammable or explosive
substances as they give off vapors
that could ignite or explode.
To reduce the risk of fire, clothes,
cleaning rags, mop heads and the
like which have traces of any
flammable substance, such as
vegetable oil, cooking oil,
petroleum-based oils or distillates,
waxes, fats, etc., must not be
placed in the dryer. These items
may contain some flammable
substance(s), even after washing,
which may smoke or catch fire by
themselves.
Do not place items exposed to
cooking oils in your dryer. Items
contaminated with cooking oils
may contribute to a chemical
reaction that could cause a
laundry load to catch fire.
3. The dryer must only be used for its
intended purpose.
4. When children become old
enough to operate the appliance, it
is the responsibility of the parents
or legal guardians to ensure that
they are instructed in safe
practices by qualified persons.
5. Do not allow children to play on or
in the appliance at any time;
severe injury or death could
result. Children should be kept a
safe distance away from
appliances at all times. Children
should only be permitted within an
appliance's vicinity if under close,
constant adult supervision.
6. Do not allow children's toys, or
other items that might encourage
children to climb on the dryer, to
be stored on or inthe dryer or on
shelves or in cabinets or other
storage areas adjacent to the
dryer.
7. Do not sit or stand on the top of
the dryer.
8. Do not allow anyone to climb, lean
or hang on any part of the dryer
including any protruding
components such as the
appliance door or a pullout shelf.
9. To reduce the risk of poisoning or
chemical burns, keep all cleaning
products out of the reach of
children.
10.
Store all laundry chemicals and
aids in a cool dry place according
to the manufacturer's instructions.
Make sure children cannot reach
them. Gasoline, combustible
materials and materials that
produce flammable vapors,
flammable liquids, and substances
that pose a fire hazard must not be
stored near the dryer.
11.
Keep pets away from the dryer.
12.
BEFORE THE APPLIANCE IS
REMOVED FROM SERVICE OR
DISCARDED, REMOVE THE
DOOR TO THE DRYING
COMPARTMENT.
Do not reach into the appliance if
the drum is rotating.
Do not install or store this
appliance where it will be exposed
to the weather or the elements,
such as water/moisture, dirt,
corrosive/salt air, and excessive
cold.
15. Do not tamper with the controls.
16. Do not repair or replace any part of
the appliance or attempt any
service unless specifically
recommended in the
user-maintenance instructions or
in published user repair
instructions that you understand
and have the skills to carry out.
17.
Do not use fabric softeners or
products to eliminate static unless
recommended by the fabric
manufacturer.
18.
Do not use heat to dry articles
containing foam rubber (may be
labeled latex foam) or similarly
textured rubber-like materials.
Foam rubber materials can ignite
by spontaneous combustion.
19.
Do not dry articles containing
spunbonded olefin. Spunbonded
olefin can melt and can ignite by
spontaneous combustion.
20. Check the lint screen before each
laundry load and clean as needed.
Excess lint buildup can damage
the dryer and create a potential
fire hazard.
21.
Keep area around the exhaust
opening and adjacent surrounding
areas free from the accumulation
of lint, dust and dirt. An obstructed
port might reduce the airflow and
cause overheating.
22. The interior of the machine and
exhaust duct should be cleaned
periodically by qualified service
personnel.
23. Removing any panel or cover,
including the light cover, may
expose live electrical circuits.
Always be sure to unplug the dryer
from the electrical supply before
attempting any service.
Disconnect the power cord by
grasping the plug, not the cord.
24. To avoid fire hazards, do not use
an extension cord, an adapter, or
any other non-manufacturer
supplied electrical connector or
cord, to connect the dryer to the
electrical supply. Dryers require
substantial amounts of electrical
power and must have dedicated
electrical outlets.
25. Always check clothing pockets
and shake out all laundry items
before placing into dryer;
5
Page 6
inappropriate objects can damage
the dryer and certain items like
cigarette lighters can pose a fire
hazard.
26. To reduce the risk of fire and
electrical shock hazards, do not
use the dryer ifthe power cord is
frayed or damaged, or ifthe plugs
are loose.
27. Do not operate the dryer if any
guards and/or panels have been
removed or if any parts are missing
or broken.
28. Do not bypass any safety devices.
29. Do not use a plastic or non-metal
flexible duct with this dryer. Plastic
or non-metal flexible duct is a
potential fire hazard.
30. Do not operate this dryer until you
are sure that the dryer has been
installed according to the
INSTALLATION INSTRUCTIONS
and that installation and electrical
grounding are in compliance with
all local regulations and/or other
applicable regulations and
requirements.
31. Failure to install, maintain and/or
operate the dryer according to
the manufacturer's instructions
may result in injury and/or
damage.
32. To avoid floor damage and mold
growth, do not let spills or
splashout to cause standing water
around or under the appliance.
33. Make sure that all water
connections to the dryer have a
shut off valve that is readily
accessible. Close the appliance
water shut-off valve(s) at the end
of each day of use.
34. Check the fill hose connections on
a regular basis to ensure that they
are tight and not leaking.
Notes:
A
The IMPORTANT
SAFEGUARDS and
WARNINGS presented in this
manual do not cover all
possible conditions that may
OCCUr.
Common sense, caution and
care must be exercised when
installing, maintaining or
operating the dryer.
B
Always contact your dealer,
distributor, service agent or
the manufacturer about any
problems or conditions that
you do not understand.
C
Follow the Safety Information
provided in the
INSTALLATION
INSTRUCTIONS and the
OPERATING
INSTRUCTIONS.
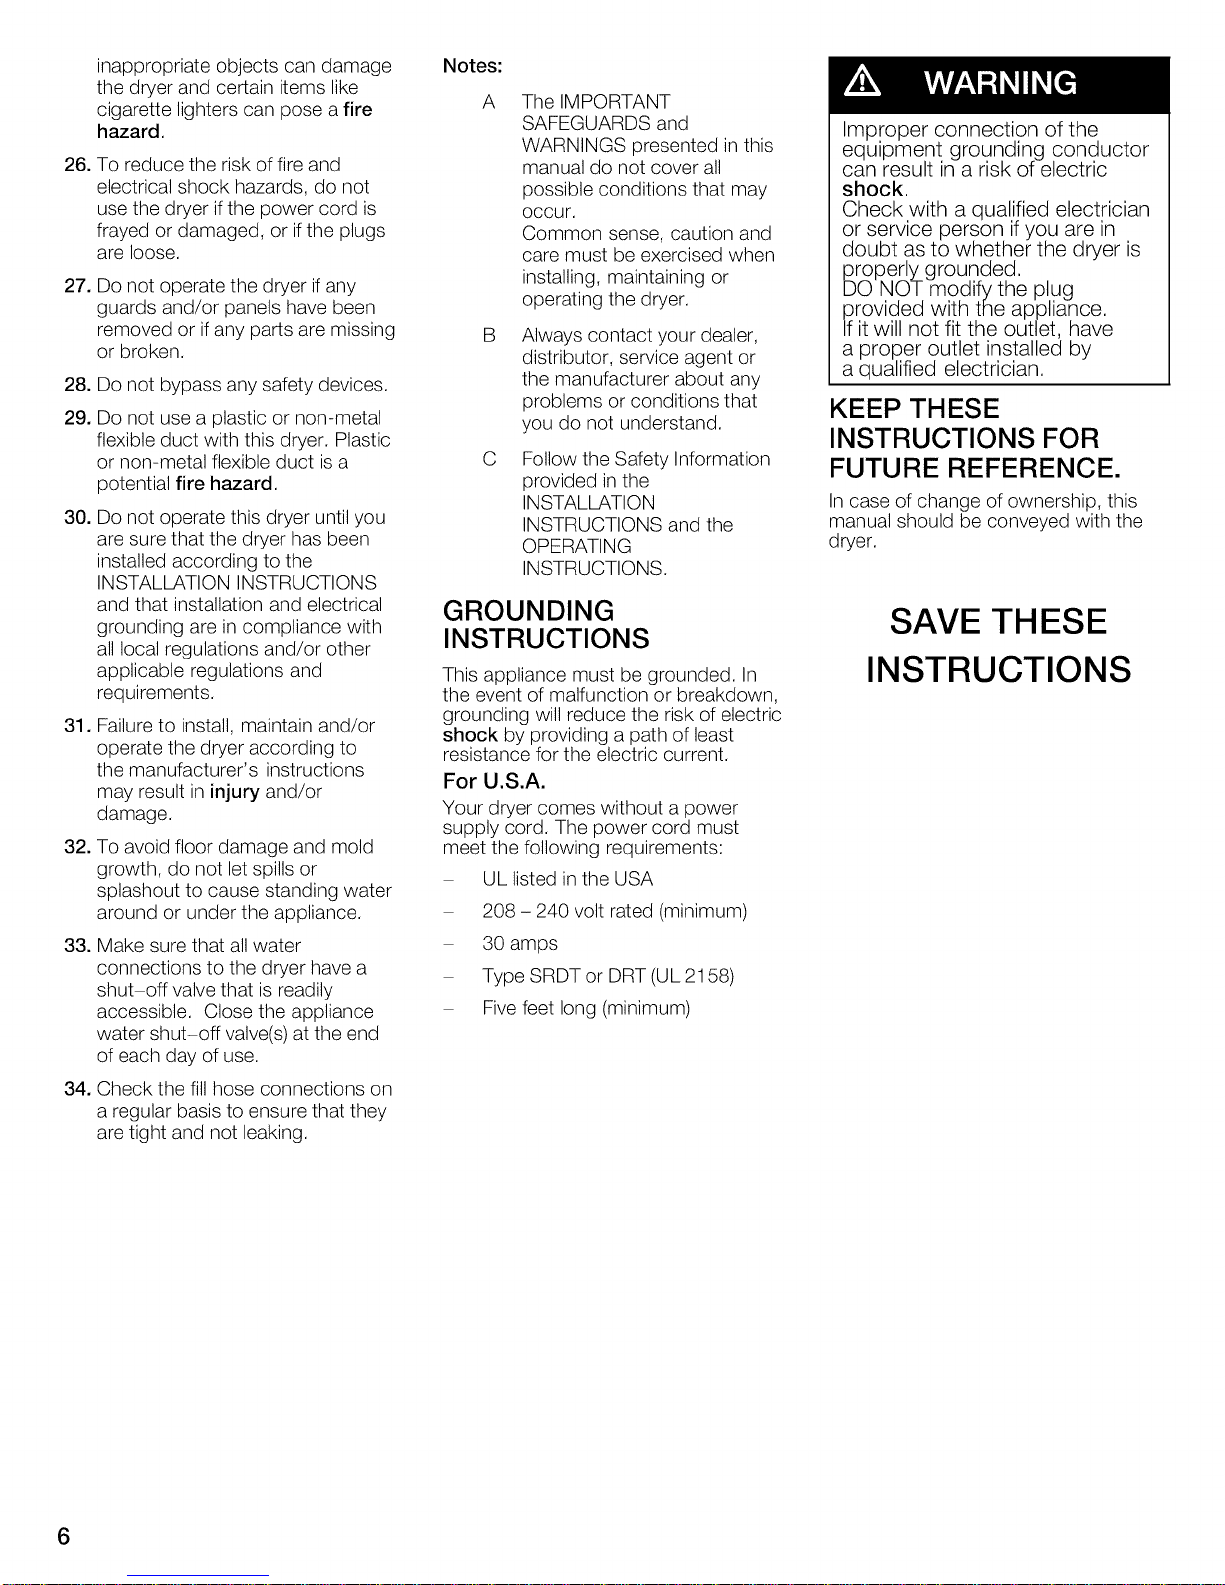
GROUNDING
INSTRUCTIONS
This appliance must be grounded. In
the event of malfunction or breakdown,
grounding will reduce the risk of electric
shock by providing a path of least
resistance for the electric current.
For U.S.A.
Your dryer comes without a power
supply cord. The power cord must
meet the following requirements:
UL listed in the USA
208 - 240 volt rated (minimum)
30 amps
Type SRDT or DRT (UL 2158)
Five feet long (minimum)
Improper connection of the
equipment grounding conductor
can result in a risk of electric
shock.
Check with a qualified electrician
or service person if you are in
doubt as to whether the dryer is
_Doperlygrounded.
NOT modify the plug
provided with the appliance.
If itwill not fit the outlet, have
a proper outlet installed by
a qualified electrician.
KEEP THESE
INSTRUCTIONS FOR
FUTURE REFERENCE.
In case of change of ownership, this
manual should be conveyed with the
dryer.
SAVE THESE
INSTRUCTIONS
Page 7
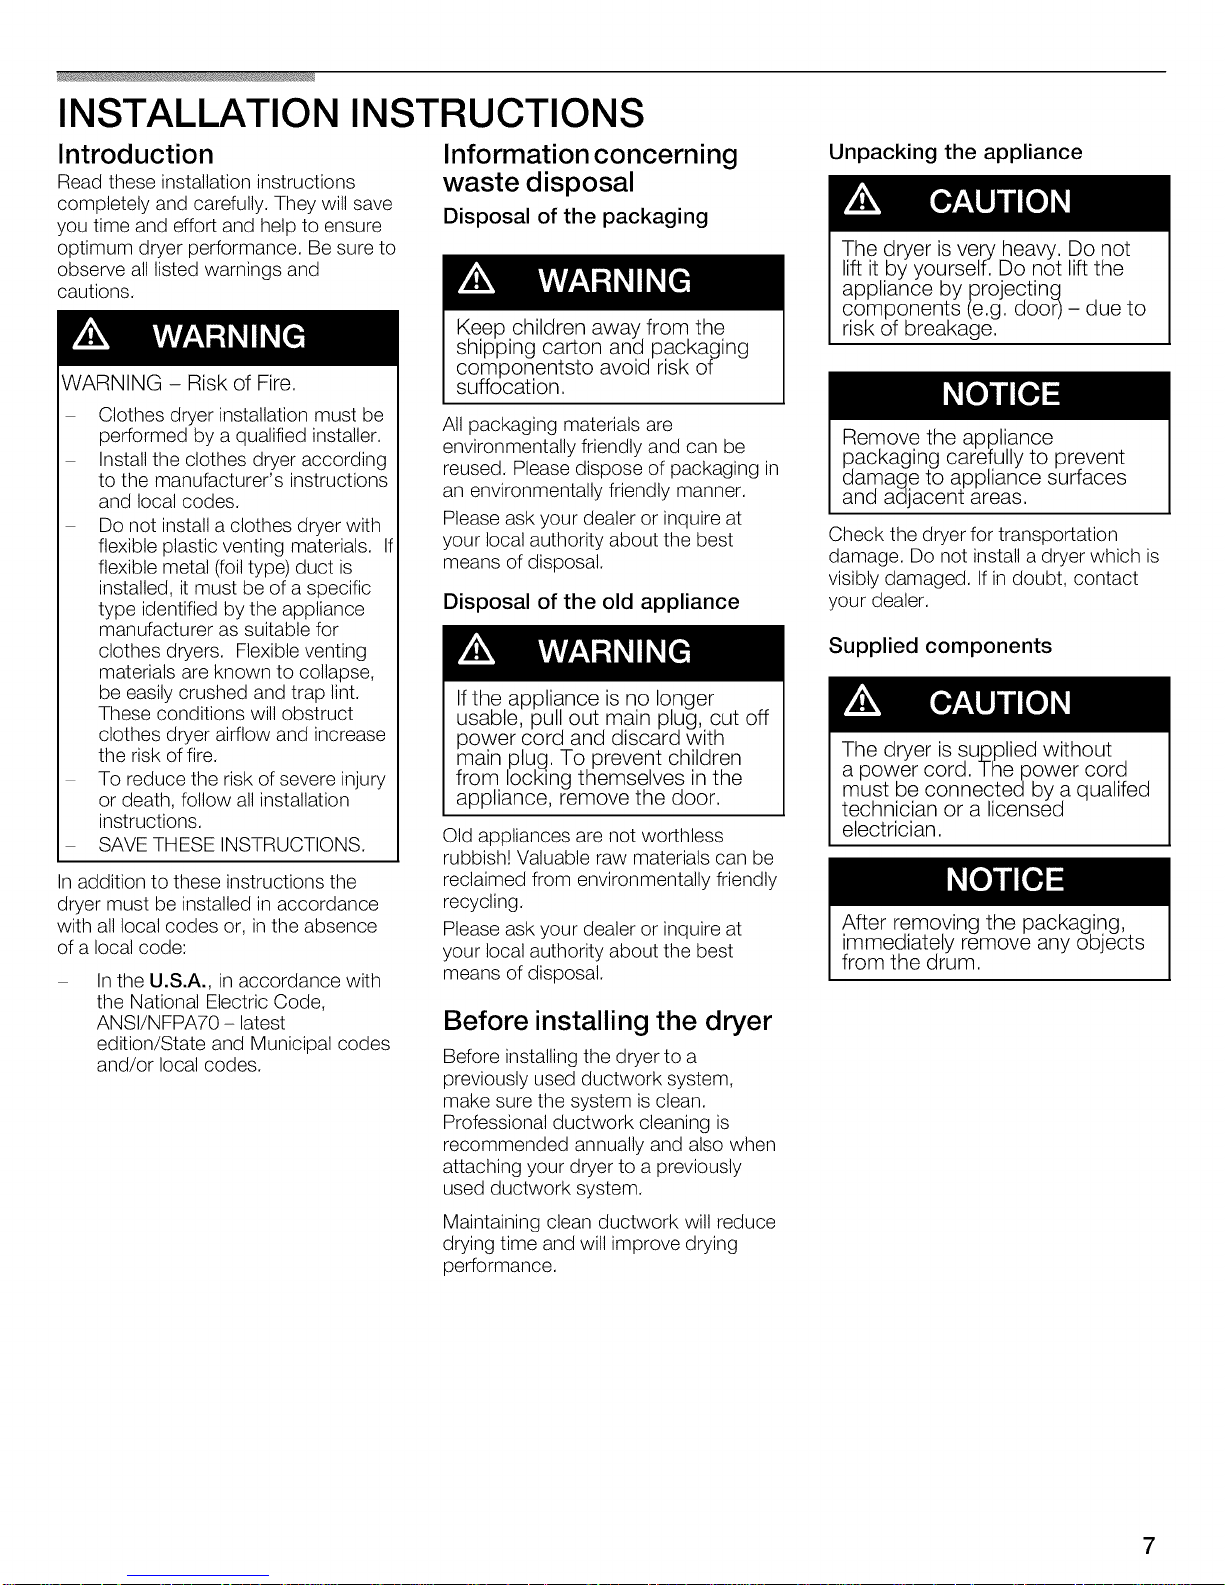
INSTALLATION INSTRUCTIONS
Introduction
Read these installation instructions
completely and carefully. They will save
you time and effort and help to ensure
optimum dryer performance. Be sure to
observe all listed warnings and
cautions.
WARNING - Risk of Fire.
Clothes dryer installation must be
performed by a qualified installer.
Install the clothes dryer according
to the manufacturer's instructions
and local codes.
Do not install a clothes dryer with
flexible plastic venting materials. If
flexible metal (foiltype) duct is
installed, it must be of a specific
type identified by the appliance
manufacturer as suitable for
clothes dryers. Flexible venting
materials are known to collapse,
be easily crushed and trap lint.
These conditions will obstruct
clothes dryer airflow and increase
the risk of fire.
To reduce the risk of severe injury
or death, follow all installation
instructions.
SAVE THESE INSTRUCTIONS.
Inaddition to these instructions the
dryer must be installed in accordance
with all local codes or, in the absence
of a local code:
In the U.S.A., in accordance with
the National Electric Code,
ANSI/NFPA70 -latest
edition/State and Municipal codes
and/or local codes.
Information concerning
waste disposal
Disposal of the packaging
Keep children away from the
shipping carton and packaging
componentsto avoid risk of
suffocation.
All packaging materials are
environmentally friendly and can be
reused. Please dispose of packaging in
an environmentally friendly manner.
Please ask your dealer or inquire at
your local authority about the best
means of disposal.
Disposal of the old appliance
If the appliance is no longer
usable, pull out main plug, cut off
power cord and discard with
main plug. To prevent children
from locking themselves in the
appliance, remove the door.
Old appliances are not worthless
rubbish! Valuable raw materials can be
reclaimed from environmentally friendly
recycling.
Please ask your dealer or inquire at
your local authority about the best
means of disposal.
Before installing the dryer
Before installing the dryer to a
previously used ductwork system,
make sure the system is clean.
Professional ductwork cleaning is
recommended annually and also when
attaching your dryer to a previously
used ductwork system.
Maintaining clean ductwork will reduce
drying time and will improve drying
performance.
Unpacking the appliance
The dryer is very heavy, Do not
lift it by yourself. Do not lift the
appliance by projecting
components (e.g. door) - due to
risk of breakage.
Remove the appliance
packaging carefully to prevent
damage to appliance surfaces
and adjacent areas.
Check the dryer for transportation
damage. Do not install a dryer which is
visibly damaged. If indoubt, contact
your dealer.
Supplied components
The dryer is supplied without
a power cord. Thepower cord
must be connectedby a qualifed
technician or a licensed
electrician.
After removing the packaging,
immediately remove any objects
from the drum.
7
Page 8
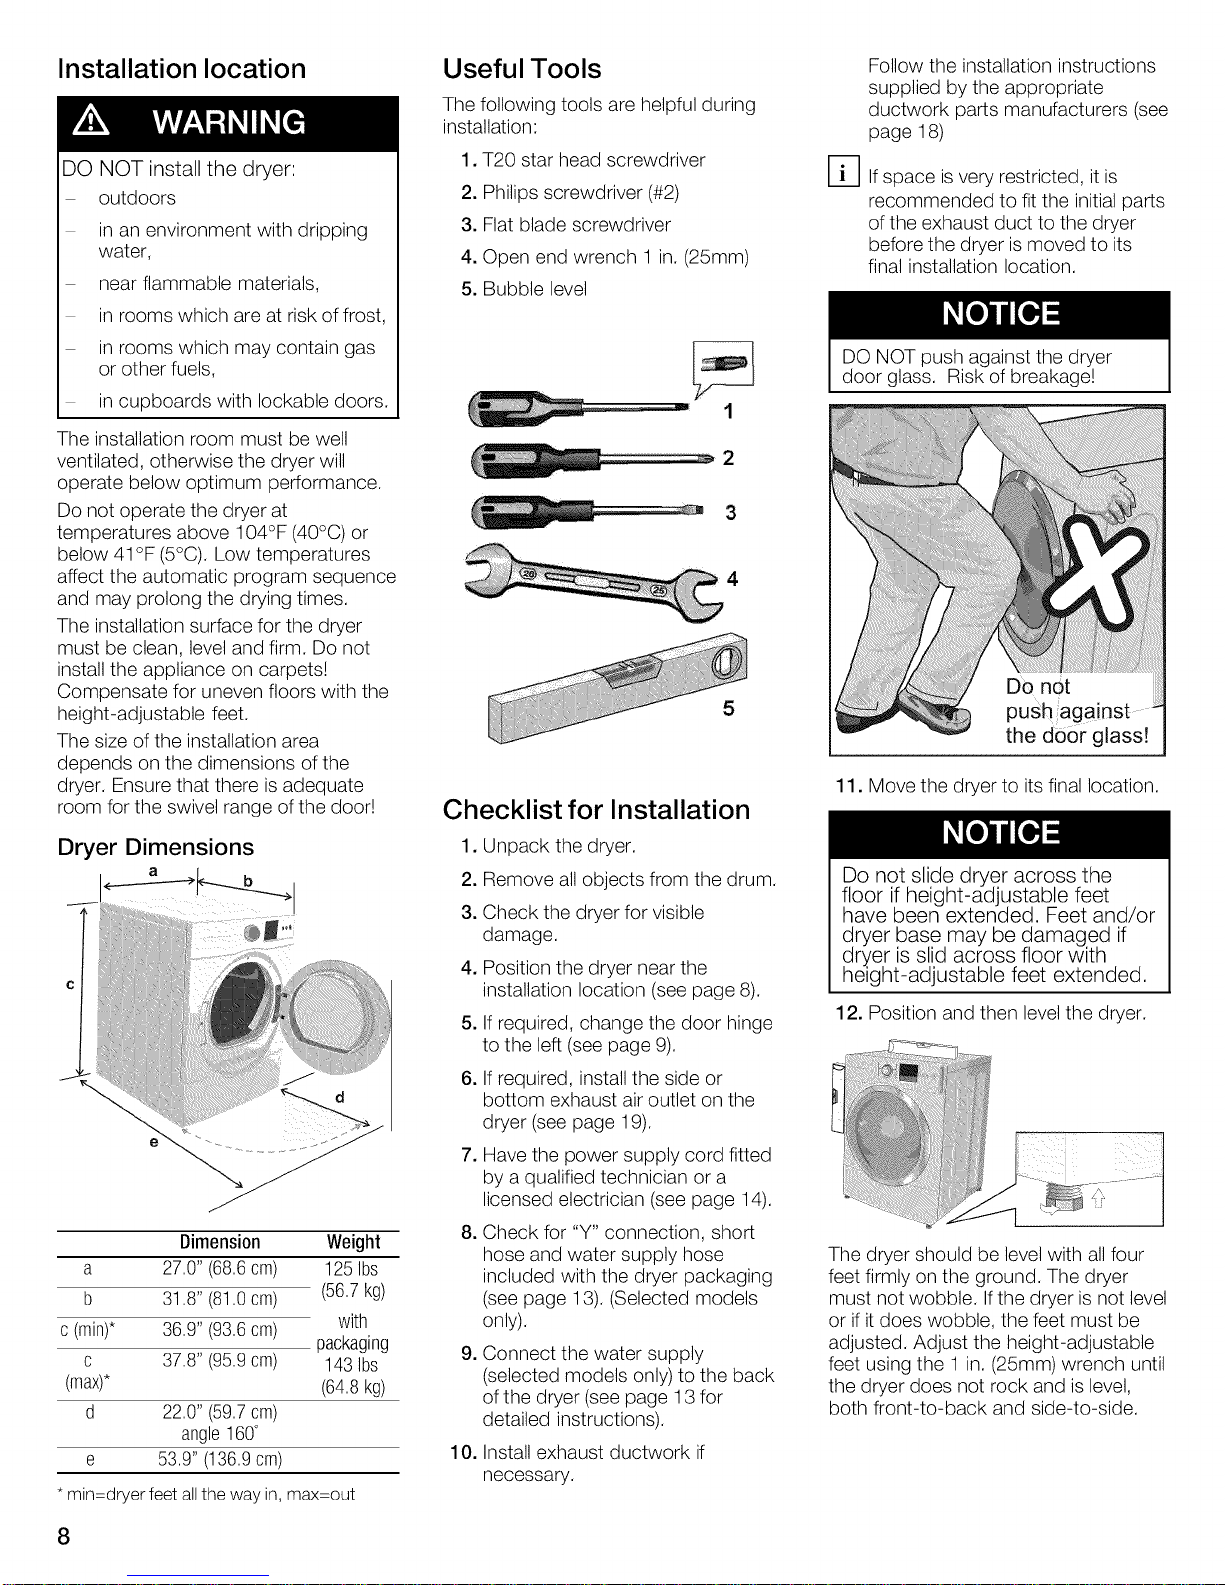
Installation location
DO NOT install the dryer:
outdoors
in an environment with dripping
water,
near flammable materials,
in rooms which are at risk of frost,
in rooms which may contain gas
or other fuels,
in cupboards with Iockable doors.
The installation room must be well
ventilated, otherwise the dryer will
operate below optimum performance.
Do not operate the dryer at
temperatures above 104°F (40°C) or
below 41°F (5°C). Low temperatures
affect the automatic program sequence
and may prolong the drying times.
The installation surface for the dryer
must be clean, level and firm. Do not
install the appliance on carpets!
Compensate for uneven floors with the
height-adjustable feet.
The size of the installation area
depends on the dimensions of the
dryer. Ensure that there is adequate
room for the swivel range of the door!
Useful Tools
The following tools are helpful during
installation:
1. T20 star head screwdriver
2. Philips screwdriver (#2)
3. Flat blade screwdriver
4. Open end wrench 1 in. (25mm)
5. Bubble level
1
3
Checklist for Installation
Follow the installation instructions
supplied by the appropriate
ductwork parts manufacturers (see
page 18)
%
If space is very restricted, it is
recommended to fit the initial parts
of the exhaust duct to the dryer
before the dryer is moved to its
final installation location.
DO NOT push against the dryer
door glass. Risk of breakage!
Do not
push against
the do6r glass!
11. Move the dryer to its final location.
Dryer Dimensions
Dimension Weight
a 27,0" (68,6cm) 125Ibs
b 31,8" (81,0cm) (56,7kg)
c (min)* 36,9" (93,6cm) with
c 37,8" (95,9cm) 143 Ibs
(max)* (64,8kg)
d 22,0" (59,7cm)
angle160°
e 53,9" (136,9cm)
* min=dryer feet allthe way in, max=out
packaging
1. Unpack the dryer.
2. Remove all objects from the drum.
3. Check the dryer for visible
damage.
4. Position the dryer near the
installation location (see page 8).
5. Ifrequired, change the door hinge
to the left (see page 9).
6. Ifrequired, install the side or
bottom exhaust air outlet on the
dryer (see page 19).
7. Have the power supply cord fitted
by a qualified technician or a
licensed electrician (see page 14).
,
Check for "Y" connection, short
hose and water supply hose
included with the dryer packaging
(see page 13). (Selected models
only).
,
Connect the water supply
(selected models only) to the back
of the dryer (see page 13 for
detailed instructions).
10. Install exhaust ductwork if
necessary.
Do not slide dryer across the
floor if height-adjustable feet
have been extended. Feet and/or
dryer base may be damaged if
dryer is slid across floor with
height-adjustable feet extended.
12. Position and then level the dryer.
-i!iiiiii!i_!ii_!_i!i_>_ ¸ ii!_!__ii_ii_
LJ
The dryer should be level with all four
feet firmly on the ground. The dryer
must not wobble. If the dryer is not level
or if it does wobble, the feet must be
adjusted. Adjust the height-adjustable
feet using the 1 in. (25mm) wrench until
the dryer does not rock and is level,
both front-to-back and side-to-side.
J
/
Page 9
Aftermakingpreliminary
adjustments,pressdownoneach
cornerofthedryertomakesure
theunitdoesnotwobble.If
pressingdownona cornercauses
thedryertowobble,lowerthe
dryerfootonthatcorneruntilthe
foottouchesthefloorfirmly.
Installthedryerandlevelitfromsideto
sideandfronttoback.Useabubble
level.Neverremovethe
height-adjustablefeet!
13.Connecttheexhaustducttothe
exhaustairoutletonthedryer(see
page17).
14.Insertthedryerelectricalpluginto
thewallreceptacle(seepage14).
15.Readtheoperatinginstructionsto
understandhowyourdryer
operates.(seepage20).
16.Conductanappliancetest:
Checkthatthedrumisempty.
Closethedryerdoor.
Switchthedryerto"ExtraDry"
andthenpressthe
"Start/Pause"button.
After3 5minutespressthe
"Start/Pause"buttonandopen
thedoor.
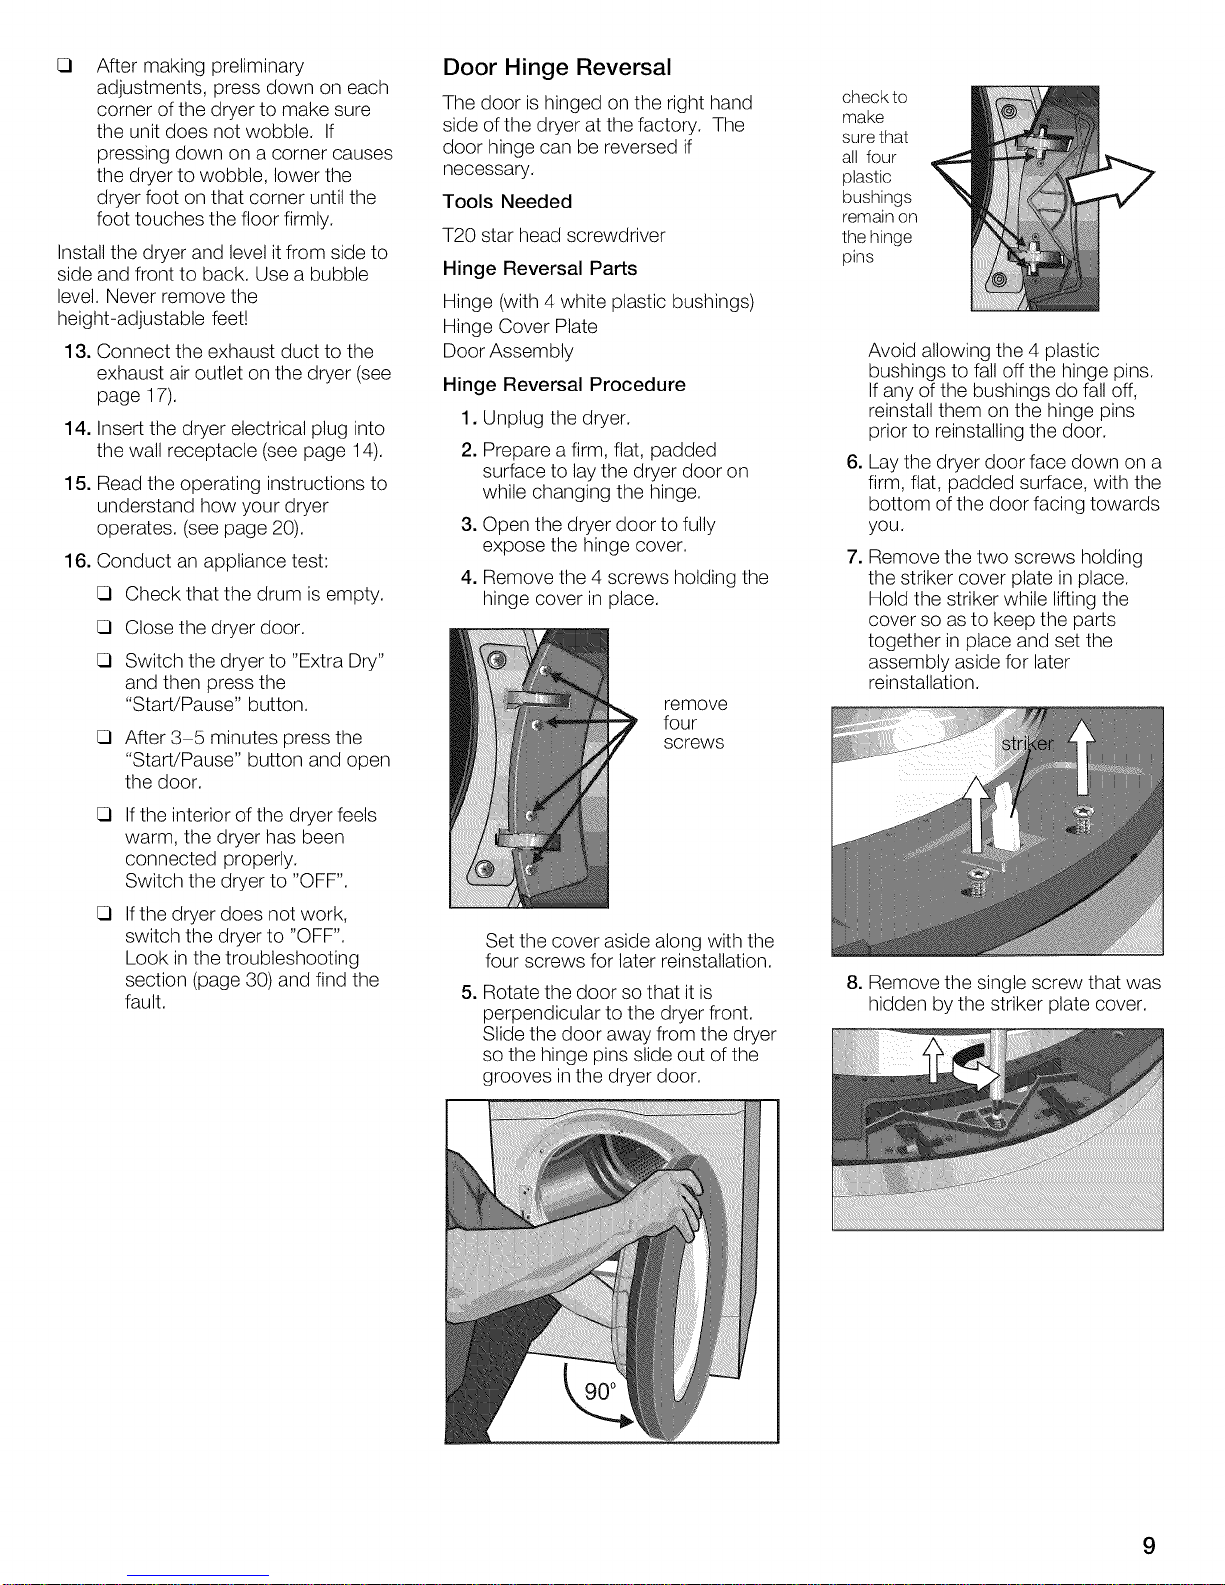
Door Hinge Reversal
The door is hinged on the right hand
side of the dryer at the factory. The
door hinge can be reversed if
necessary.
Tools Needed
T20 star head screwdriver
Hinge Reversal Parts
Hinge (with 4 white plastic bushings)
Hinge Cover Plate
Door Assembly
Hinge Reversal Procedure
1. Unplug the dryer.
2. Prepare a firm, flat, padded
surface to lay the dryer door on
while changing the hinge.
3. Open the dryer door to fully
expose the hinge cover.
4. Remove the 4 screws holding the
hinge cover in place.
remove
four
screws
check to
make
sure that
all four
plastic
bushings
remain on
the hinge
pins
Avoid allowing the 4 plastic
bushings to fall off the hinge pins.
If any of the bushings do fall off,
reinstall them on the hinge pins
prior to reinstalling the door.
6. Lay the dryer door face down on a
firm, flat, padded surface, with the
bottom of the door facing towards
you.
7. Remove the two screws holding
the striker cover plate in place.
Hold the striker while lifting the
cover so as to keep the parts
together in place and set the
assembly aside for later
reinstallation.
Iftheinteriorofthedryerfeels
warm,thedryerhasbeen
connectedproperly.
Switchthedryerto"OFF".
Ifthedryerdoesnotwork,
switchthedryerto"OFF".
Lookinthetroubleshooting
section(page30)andfindthe
fault.
Set the cover aside along with the
four screws for later reinstallation.
5. Rotate the door so that it is
perpendicular to the dryer front.
Slide the door away from the dryer
so the hinge pins slide out of the
grooves in the dryer door.
8. Remove the single screw that was
hidden by the striker plate cover.
9
Page 10
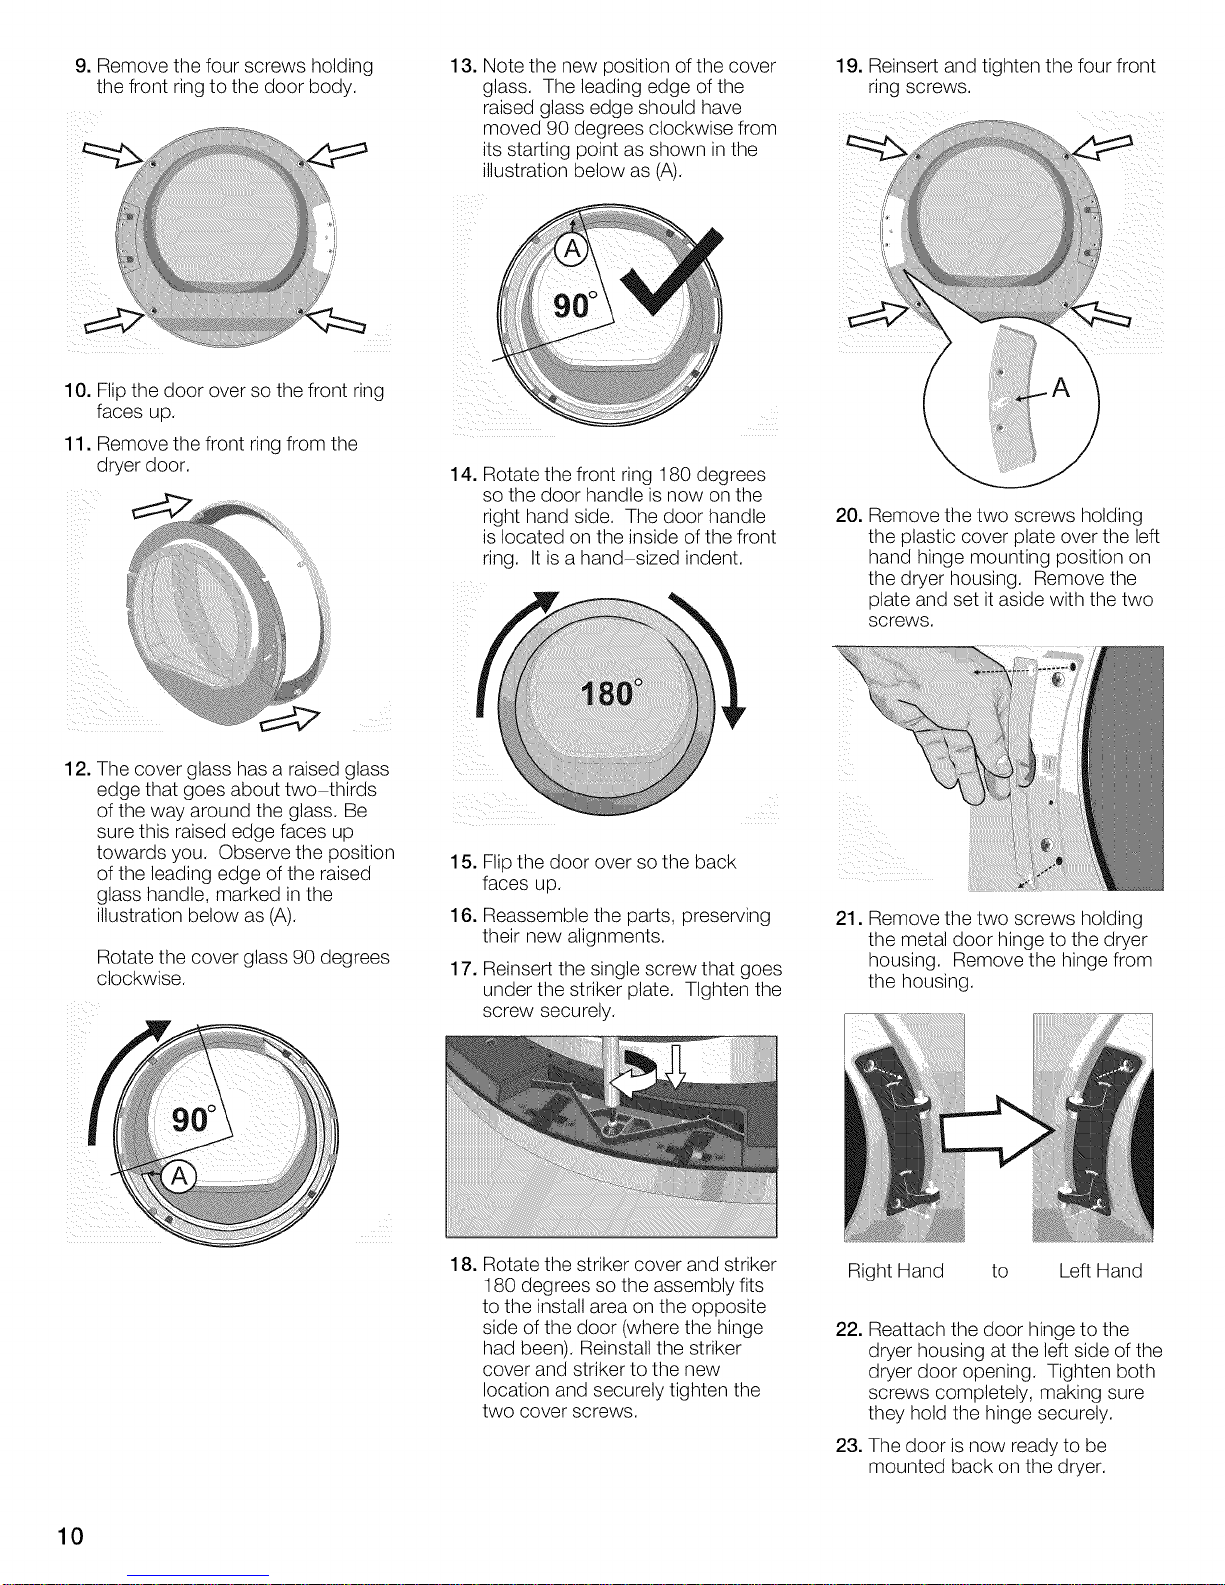
9. Remove the four screws holding
the front ring to the door body.
10. Flip the door over so the front ring
faces up.
11. Remove the front ring from the
dryer door.
13. Note the new position of the cover
glass. The leading edge of the
raised glass edge should have
moved 90 degrees clockwise from
its starting point as shown in the
illustration below as (A).
14. Rotate the front ring 180 degrees
so the door handle is now on the
right hand side. The door handle
is located on the inside of the front
ring. It is a hand-sized indent.
19. Reinsert and tighten the four front
ring screws.
20. Remove the two screws holding
the plastic cover plate over the left
hand hinge mounting position on
the dryer housing. Remove the
plate and set itaside with the two
screws.
12. The cover glass has a raised glass
edge that goes about two thirds
of the way around the glass. Be
sure this raised edge faces up
towards you. Observe the position
of the leading edge of the raised
glass handle, marked in the
illustration below as (A).
Rotate the cover glass 90 degrees
clockwise.
15. Flip the door over so the back
faces up.
16. Reassemble the parts, preserving
their new alignments.
17. Reinsert the single screw that goes
under the striker plate. Tighten the
screw securely.
18. Rotate the striker cover and striker
180 degrees so the assembly fits
to the install area on the opposite
side of the door (where the hinge
had been). Reinstall the striker
cover and striker to the new
location and securely tighten the
two cover screws.
21. Remove the two screws holding
the metal door hinge to the dryer
housing. Remove the hinge from
the housing.
Right Hand to Left Hand
22. Reattach the door hinge to the
dryer housing at the left side of the
dryer door opening. Tighten both
screws completely, making sure
they hold the hinge securely.
23. The door is now ready to be
mounted back on the dryer.
10
Page 11
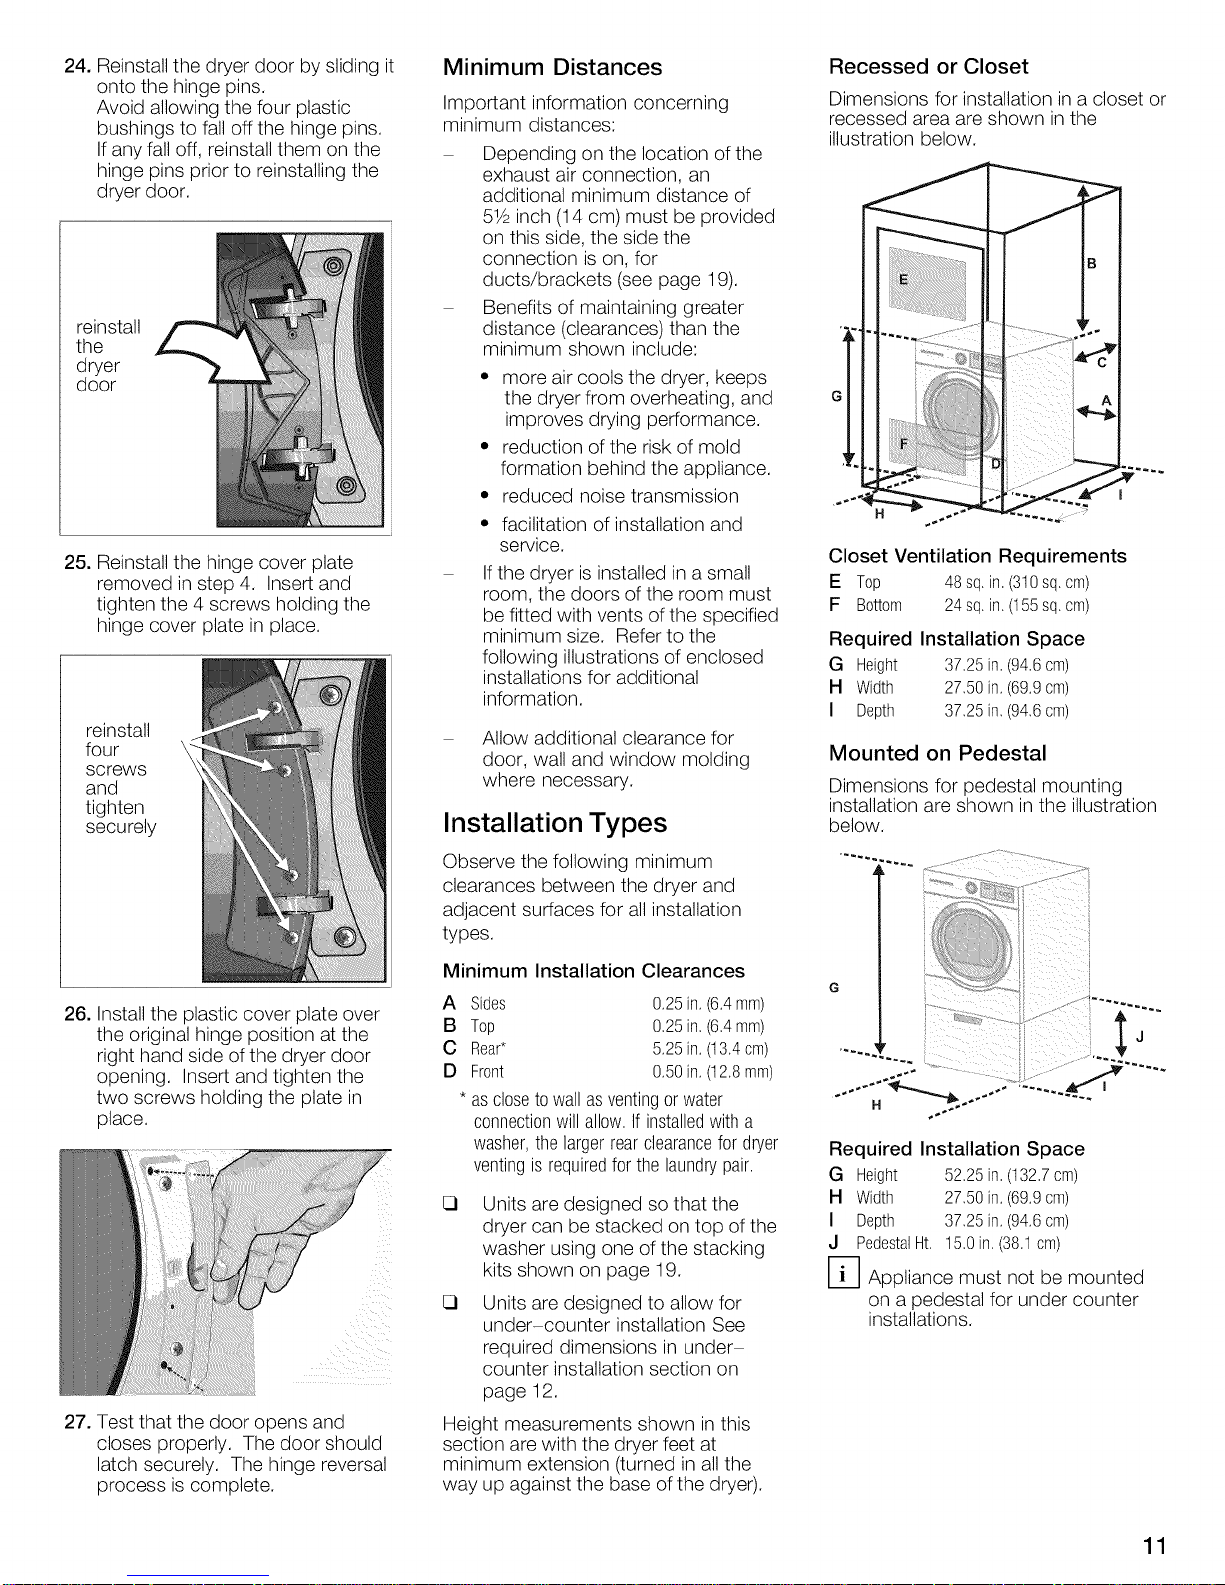
24. Reinstall the dryer door by sliding it
onto the hinge pins.
Avoid allowing the four plastic
bushings to fall off the hinge pins.
If any fall off, reinstall them on the
hinge pins prior to reinstalling the
dryer door.
reinstall
the
dryer
door
25. Reinstall the hinge cover plate
removed in step 4. Insert and
tighten the 4 screws holding the
hinge cover plate in place.
reinstall
four
screws
and
tighten
securely
Minimum Distances
Important information concerning
minimum distances:
Depending on the location of the
exhaust air connection, an
additional minimum distance of
51/2inch (14 cm) must be provided
on this side, the side the
connection is on, for
ducts/brackets (see page 19).
Benefits of maintaining greater
distance (clearances) than the
minimum shown include:
• more air cools the dryer, keeps
the dryer from overheating, and
improves drying performance.
• reduction of the risk of mold
formation behind the appliance.
• reduced noise transmission
• facilitation of installation and
service.
If the dryer is installed in a small
room, the doors of the room must
be fitted with vents of the specified
minimum size. Refer to the
following illustrations of enclosed
installations for additional
information.
Allow additional clearance for
door, wall and window molding
where necessary.
Installation Types
Recessed or Closet
Dimensions for installation in a closet or
recessed area are shown in the
illustration below.
Closet Ventilation Requirements
E Top 48sq.in. (310sq. cm)
F Bottom 24sq,in,(155sq,cm)
Required Installation Space
G Height 37.25in. (94.6cm)
H Width 27.50in,(69.9cm)
I Depth 37.25in. (94.6cm)
Mounted on Pedestal
Dimensions for pedestal mounting
installation are shown in the illustration
below.
26. Install the plastic cover plate over
the original hinge position at the
right hand side of the dryer door
opening. Insert and tighten the
two screws holding the plate in
place.
27. Test that the door opens and
closes properly. The door should
latch securely. The hinge reversal
process is complete.
Observe the following minimum
clearances between the dryer and
adjacent surfaces for all installation
types.
Minimum Installation Clearances
A Sides 0.25in.(6.4mm)
B Top 0.25in.(6.4mm)
C Rear* 5.25in.(13.4cm)
D Front 0,50in,(12,8mm)
* asclosetowallasventingor water
connectionwillallow If installedwith a
washer,thelargerrearclearancefor dryer
ventingis requiredfor thelaundrypair
Units are designed so that the
dryer can be stacked on top of the
washer using one of the stacking
kits shown on page 19.
Units are designed to allow for
under-counter installation See
required dimensions in under
counter installation section on
page 12.
Height measurements shown in this
section are with the dryer feet at
minimum extension (turned in all the
way up against the base of the dryer).
Required Installation Space
G Height 52.25in.(132.7cm)
H Width 27.50in.(69.9cm)
I Depth 37.25in,(94,6cm)
J PedestalHt, 15,0in.(38.1cm)
D Appliance must not be mounted
on a pedestal for under counter
installations.
11
Page 12
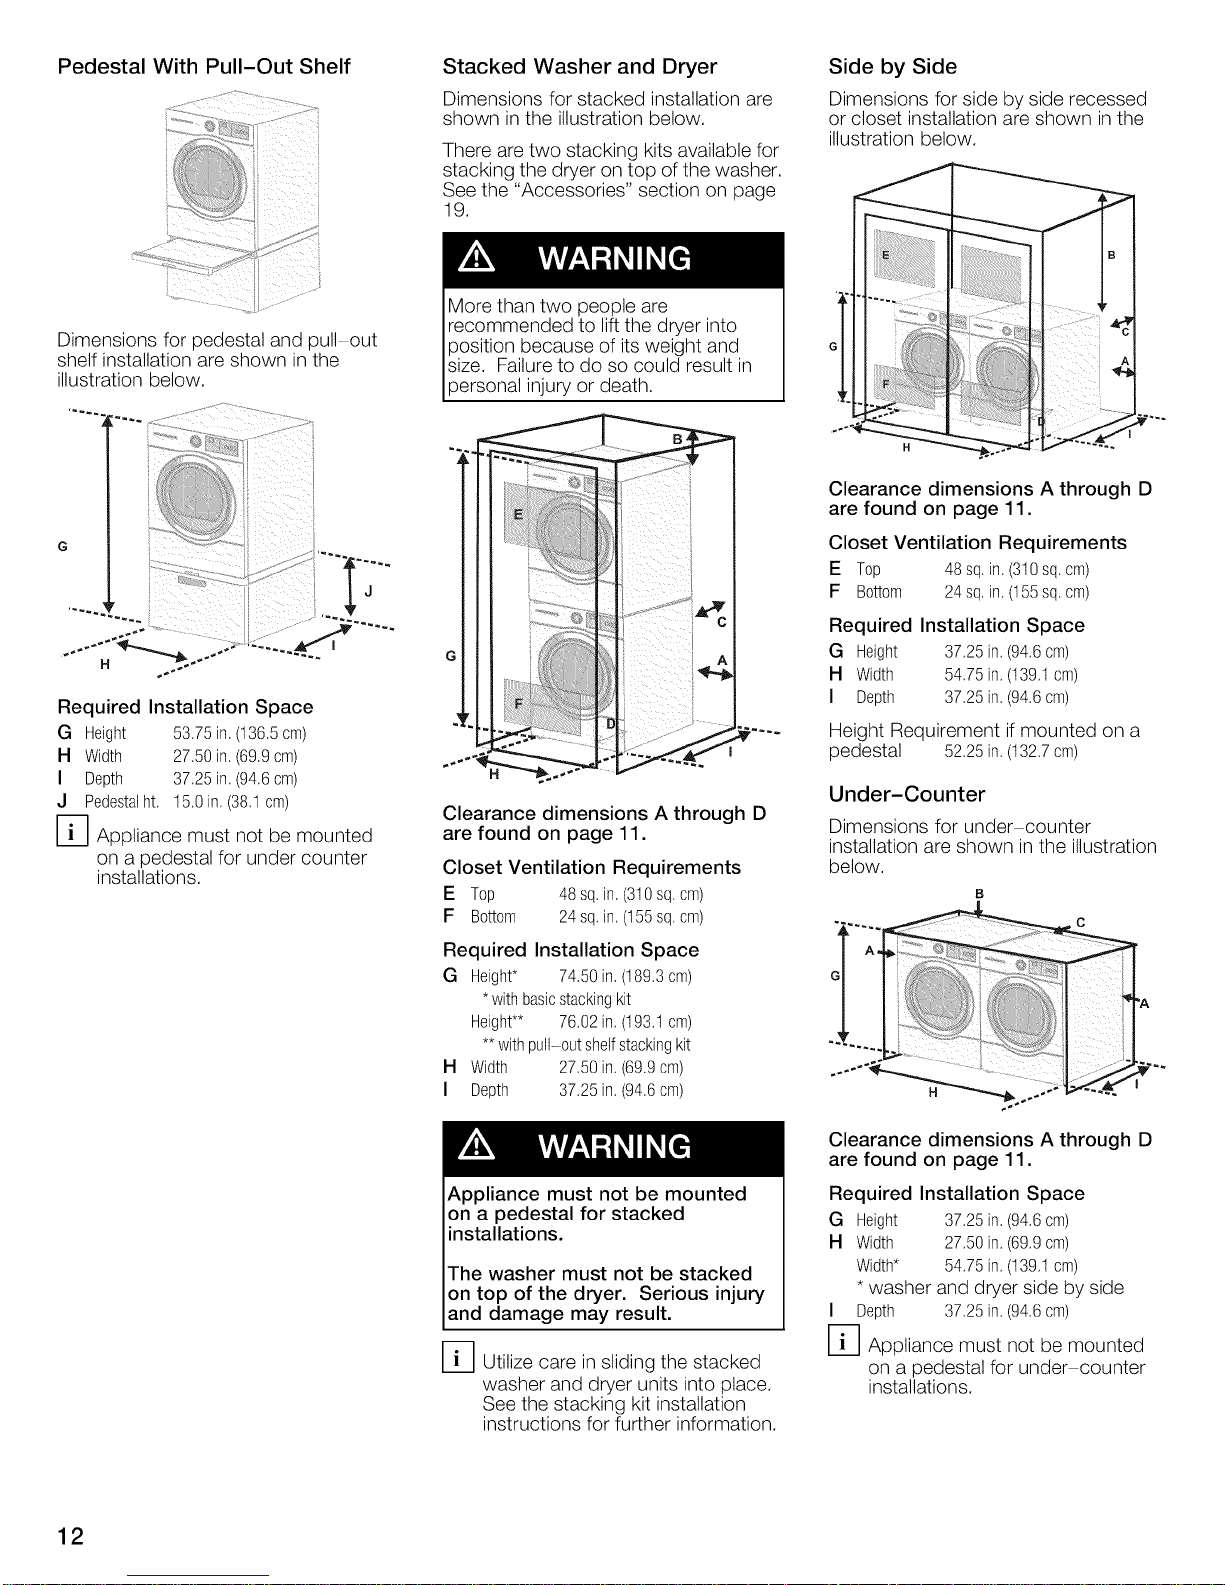
Pedestal With Pull-Out Shelf
Stacked Washer and Dryer
Dimensions for stacked installation are
shown in the illustration below.
There are two stacking kits available for
stacking the dryer on top of the washer.
See the "Accessories" section on page
19.
Side by Side
Dimensions for side by side recessed
or closet installation are shown in the
illustration below.
iii
Dimensions for pedestal and pull-out
shelf installation are shown in the
illustration below.
Required Installation Space
G Height 53.75in.(136.5cm)
H Width 27.50in,(69.9cm)
I Depth 37.25in.(94.6cm)
J Pedestalht 15,0in.(38.1cm)
D Appliance must not be mounted
on a pedestal for under counter
installations.
More than two people are
recommended to lift the dryer into
position because of its weight and
size. Failure to do so could result in
persona njury or death.
H
Clearance dimensions A through D
are found on page 11.
Closet Ventilation Requirements
E Top 48sq,in. (310sq, cm)
J
F Bottom 24sq,in,(155sq,cm)
Required Installation Space
G Height 37.25in, (94.6cm)
H Width 54.75in,(t39,t cm)
I Depth 37.25in. (94.6cm)
Height Requirement if mounted on a
pedestal 52.25in.(132.7cm)
Under-Counter
Clearance dimensions A through D
are found on page 11.
Closet Ventilation Requirements
E Top 48sq,in. (310sq,cm)
F Bottom 24sq,in,(155sq,cm)
Required Installation Space
G Height* 74.50in, (189,3cm)
*with basicstackingkit
Height** 76.02in,(t93,1 cm)
**with pull-out shelfstackingkit
H Width 27.50in,(69.9cm)
I Depth 37.25in. (94.6cm)
Dimensions for under counter
installation are shown in the illustration
below.
B
12
Appliance must not be mounted
on a pedestal for stacked
installations.
The washer must not be stacked
on top of the dryer. Serious injury
and damage may result.
D Utilize care in sliding the stacked
washer and dryer units into place.
See the stacking kit installation
instructions for further information.
Clearance dimensions A through D
are found on page 11.
Required Installation Space
G Height 37.25in.(94.6cm)
H Width 27.50in,(69.9cm)
Width* 54.75in,(139,tcm)
* washer and dryer side by side
I Depth 37.25in.(94.6cm)
D Appliance must not be mounted
on a pedestal for under counter
installations.
Page 13
Water Connection
This section applies only to dryers
with a water connection. The
connection is found at the top
back of 500 and 800 Series
Dryers with the Steam logo on the
panel.
%;;
Steam
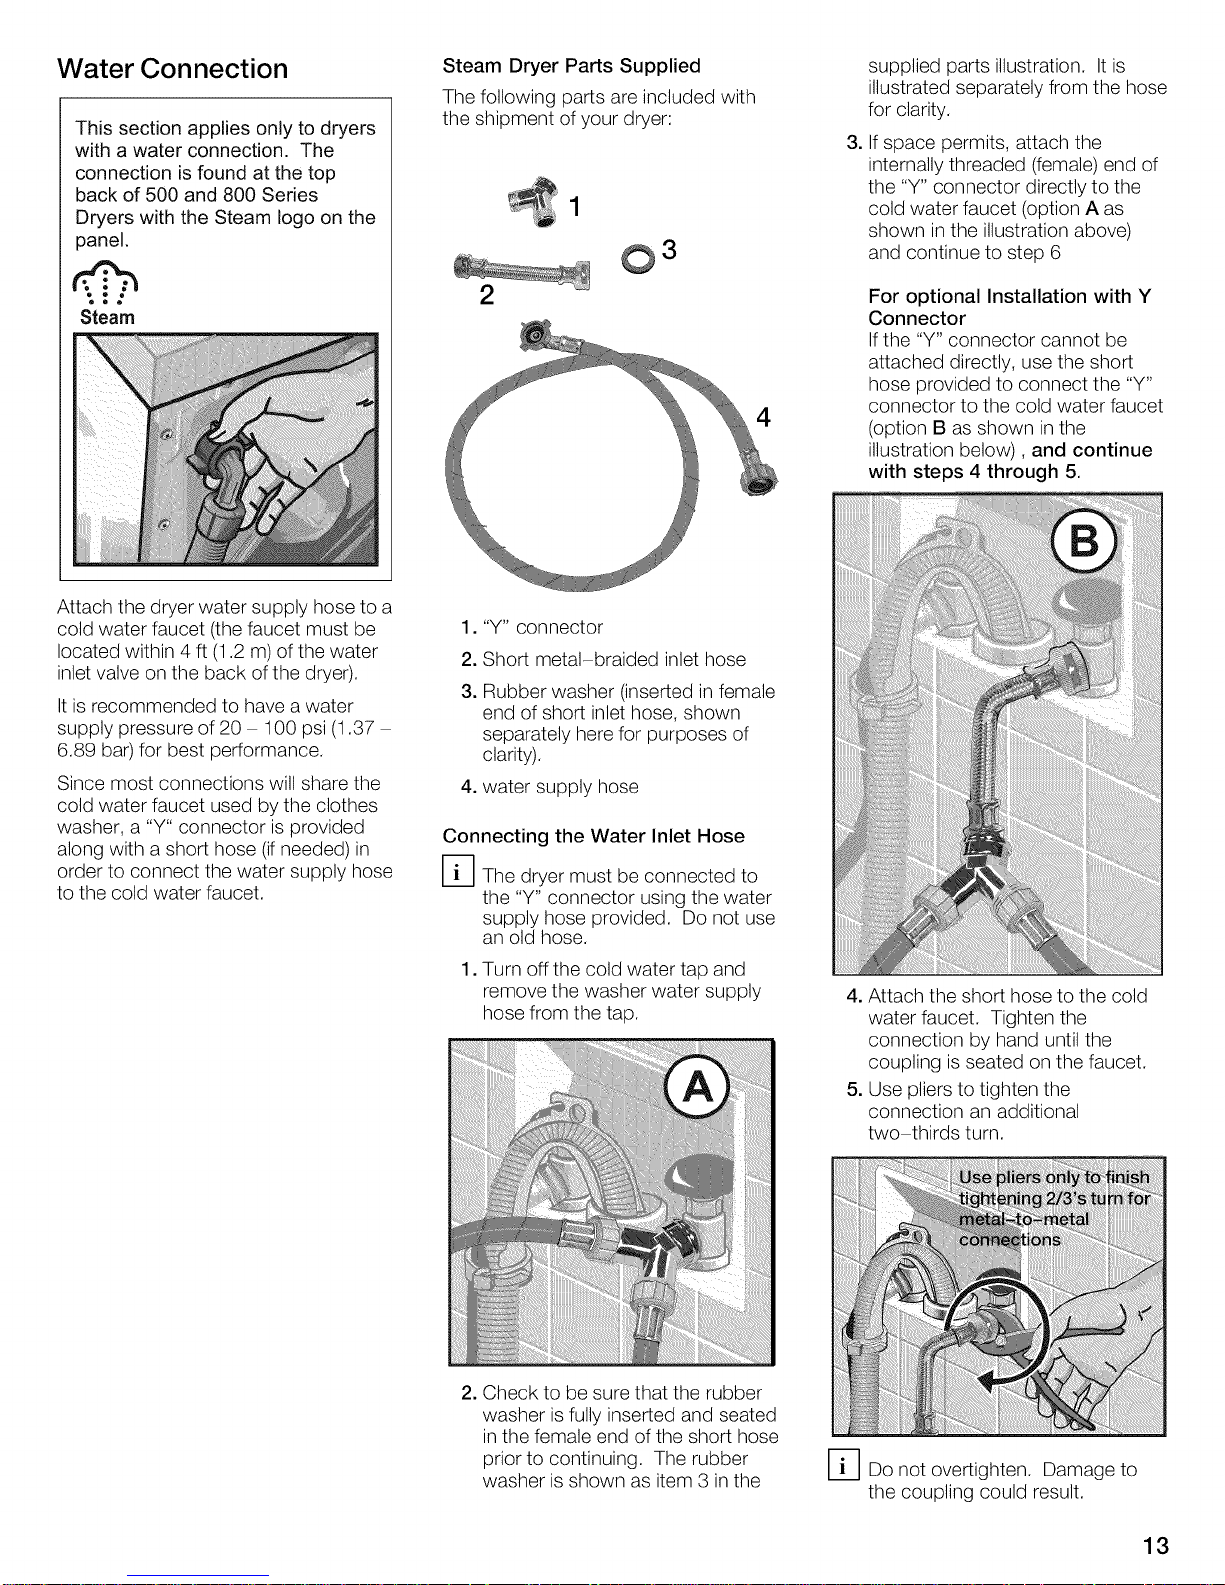
Steam Dryer Parts Supplied
The following parts are included with
the shipment of your dryer:
0 3
2
supplied parts illustration. It is
illustrated separately from the hose
for clarity.
3. Ifspace permits, attach the
internally threaded (female) end of
the "Y" connector directly to the
cold water faucet (option A as
shown in the illustration above)
and continue to step 6
For optional Installation with Y
Connector
If the "Y" connector cannot be
attached directly, use the short
hose provided to connect the "Y"
4
connector to the cold water faucet
(option B as shown in the
illustration below), and continue
with steps 4 through 5.
Attach the dryer water supply hose to a
cold water faucet (the faucet must be
located within 4 ft (1.2 m) of the water
inlet valve on the back of the dryer).
It is recommended to have a water
supply pressure of 20 100 psi (1.37
6.89 bar) for best performance.
Since most connections will share the
cold water faucet used by the clothes
washer, a "Y" connector is provided
along with a short hose (ifneeded) in
order to connect the water supply hose
to the cold water faucet.
1. "Y" connector
2. Short metal-braided inlet hose
3. Rubber washer (inserted in female
end of short inlet hose, shown
separately here for purposes of
clarity).
4. water supply hose
Connecting the Water Inlet Hose
D The dryer must be connected to
the "Y" connector using the water
supply hose provided. Do not use
an old hose.
1. Turn off the cold water tap and
remove the washer water supply
hose from the tap.
4. Attach the short hose to the cold
water faucet. Tighten the
connection by hand until the
coupling is seated on the faucet.
5. Use pliers to tighten the
connection an additional
two thirds turn.
2. Check to be sure that the rubber
washer is fully inserted and seated
in the female end of the short hose
prior to continuing. The rubber
washer is shown as item 3 in the
D Do not overtighten. Damage to
the coupling could result.
13
Page 14
6. Attach the "Y" adapter to the short
hose. Tighten the coupling (by
hand) until it is firmly seated on the
hose.
D Do not use pliers to tighten plastic
threaded fittings onto plastic or
metal threaded connections.
7. Attach the washer cold water
supply hose to the "Y" connector.
Hand tighten only.
8. Attach the dryer water supply hose
to the other coupling of the "Y"
connector. Hand tighten only.
9. Tighten only metal-to metal
couplings on the "Y" connector
and short hose an additional
two thirds turn using pliers.
D Do not overtighten. Damage to
the coupling could result.
Electrical Connection
Power cord must be connected
by a qualified technician or a
licensed electrician only.
Connect to individual branch
circuit.
Do not use an adapter.
Do not use an extension cord.
Do not remove ground prong.
Your dryer comes without a power
supply cord. The power cord must
meet the following requirements:
UL listed in the USA
208 - 240 volt rated (minimum)
30 amps
Type SRDT or DRT (UL 2158)
Five feet long (minimum)
Additional grounding procedure
Some local regulations may
require a separate ground. In such
cases, the required accessory
ground wire, clamp and screw
must be purchased separately.
Contact your local dealer or
customer service for additional
details (see page 32).
Never ground the dryer to plastic
plumbing lines, gas lines or water
pipes.
Grounding instruction
This appliance must be grounded. In
the event of a malfunction or
breakdown, grounding will reduce the
risk of electric shock by providing a
path of least resistance for the electric
current.
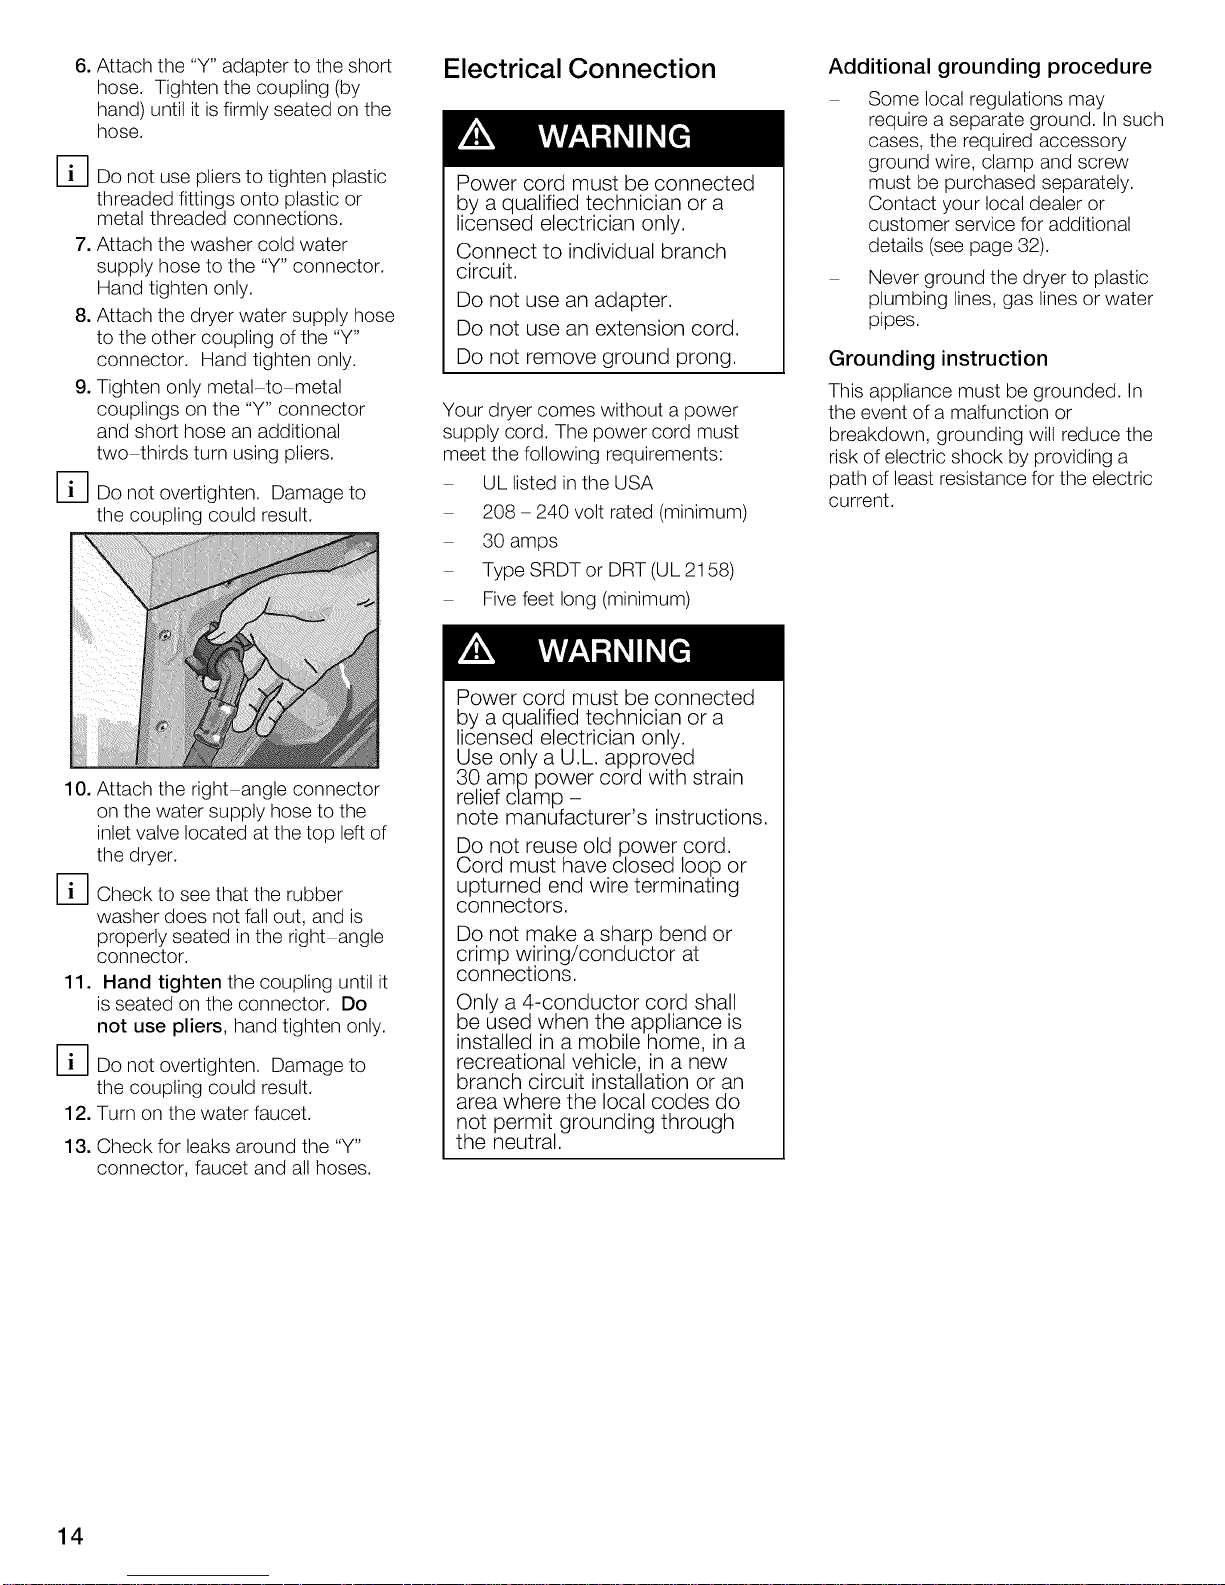
10. Attach the right angle connector
on the water supply hose to the
inlet valve located at the top left of
the dryer.
D Check to see that the rubber
washer does not fall out, and is
properly seated in the right angle
connector.
11. Hand tighten the coupling until it
is seated on the connector. Do
not use pliers, hand tighten only.
D Do not overtighten. Damage to
the coupling could result.
12. Turn on the water faucet.
13. Check for leaks around the "Y"
connector, faucet and all hoses.
Power cord must be connected
by a qualified technician or a
licensed electrician only.
Use only a U.L. approved
30 amp power cord with strain
relief clamp -
note manufacturer's instructions.
Do not reuse old power cord.
Cord must have closed loop or
upturned end wire terminating
connectors.
Do not make a sharp bend or
crimp wiring/conductor at
connections.
Only a 4-conductor cord shall
be used when the appliance is
installed in a mobile home, in a
recreational vehicle, in a new
branch circuit installation or an
area where the local codes do
not permit grounding through
the neutral.
14
Page 15
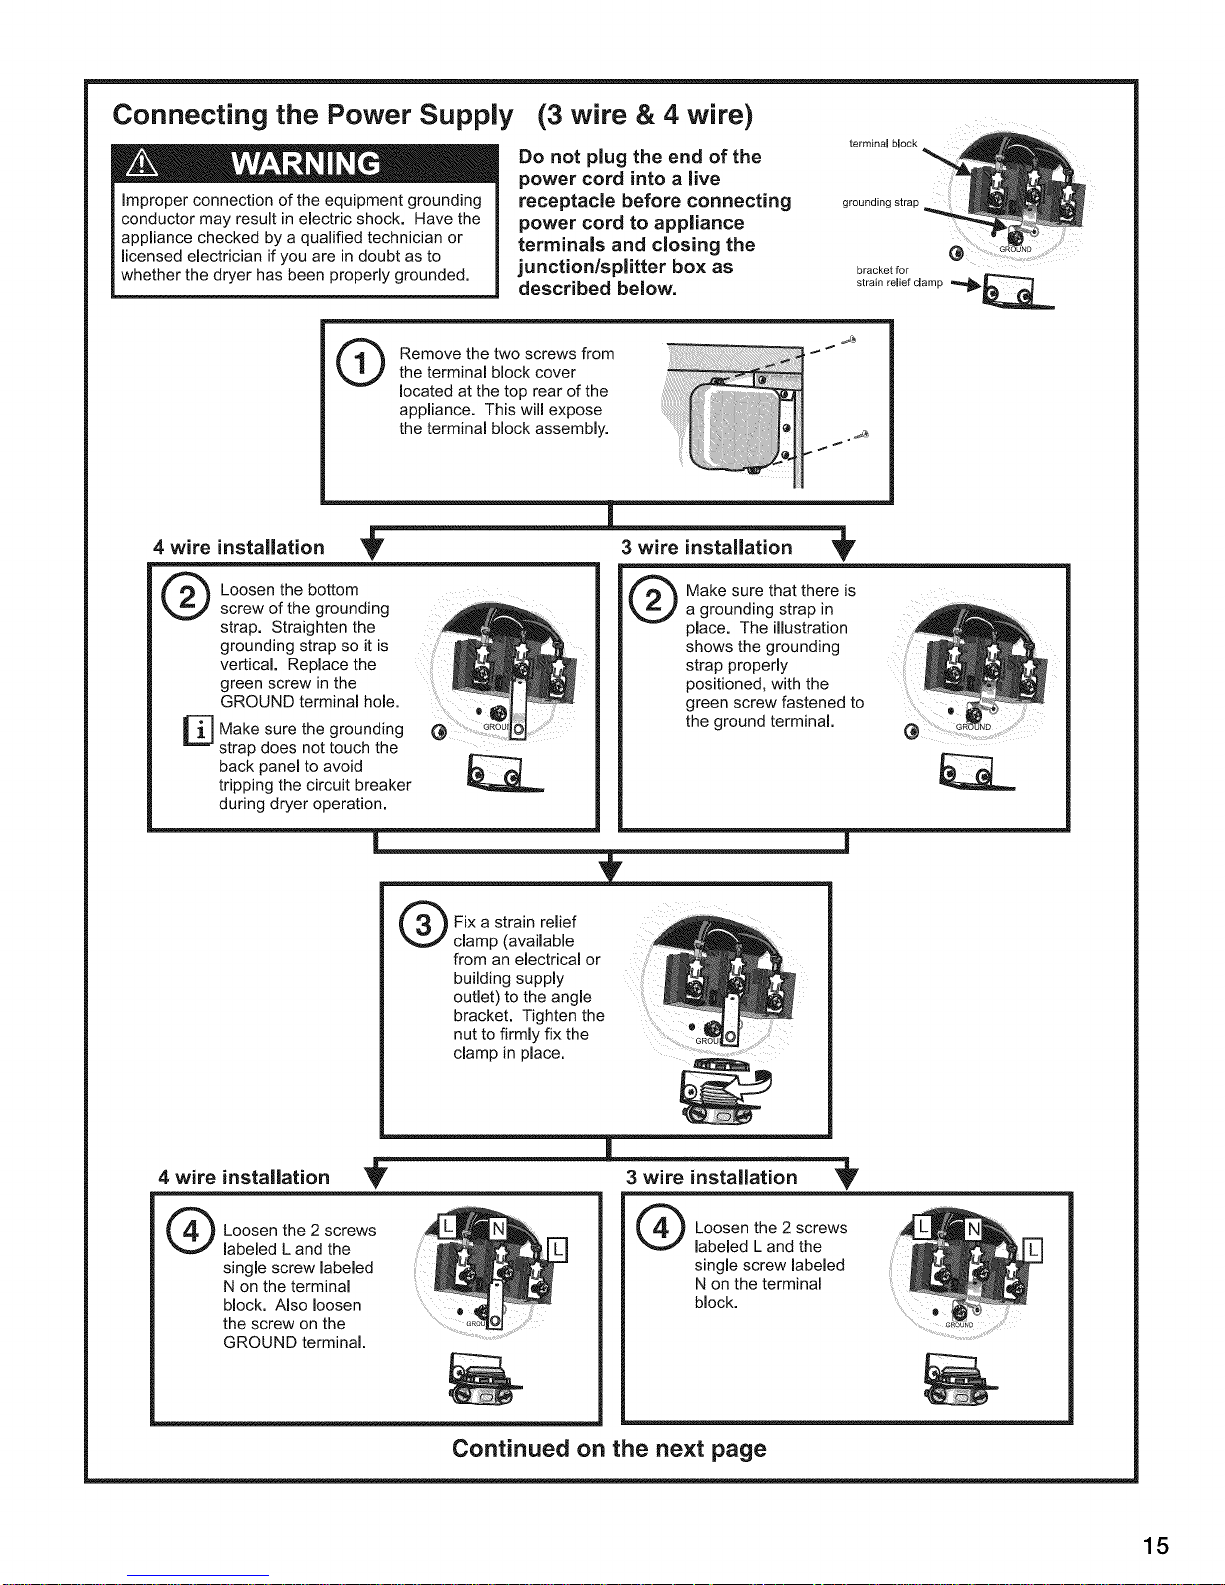
Connecting the Power Supply
Improper connection of the equipment grounding
conductor may result in electric shock. Have the
appliance checked by a qualified technician or
licensed electrician if you are in doubt as to
whether the dryer has been properly grounded,
Q emove the two screws fromthe terminal block cover
located at the top rear of the
appliance. This will expose
the terminal block assembly.
(3 wire & 4 wire)
Do not plug the end of the
power cord into a live
receptacle before connecting
power cord to appliance
terminals and closing the
junction/splitter box as
described below.
__!_!ii_i_i_]i_i_i_i_i_ii_!i!:_!_!i_!i_!i_!_!i!i_i_ii!_!i!_i!i_!_i!i_iiiiiii_iii!_!iii_iii_ii_ii_ii_i_!i!_i!_!_!i_i!!_iiiiii!!!i_ii!!iH_iiii!_iiiiii_iii!iiiiiiiii!ii]ii!!_iilo ._
terminal bmock
grounding strap
strain relief clamp
bracket for _1__
4 wire
®
installation
Loosen the bottom
screw of the grounding
strap. Straighten the
grounding strap so it is
vertical. Replace the
green screw in the
GROUND terminal hole.
Make sure the grounding
strap does not touch the
back panel to avoid
tripping the circuit breaker
during dryer operation,
_r 3 wire installation
Q ake sure that there is
Fix a strain relief
clamp (available
from an electrical or
building supply
outlet) to the angle
bracket. Tighten the
nut to firmly fix the •
clamp in place,
a grounding strap in
place. The illustration
shows the grounding
strap properly
positioned, with the
green screw fastened to 0
the ground terminal.
4 wire installation
Q Loosen the 2
labeled L and the
single screw labeled
N on the terminal
block. Also loosen
the screw on the
GROUND terminal.
screws
3 wire installation
Q oosen the 2 screws
labeled L and the
single screw labeled
N on the terminal
block.
Continued on the next page
15
Page 16
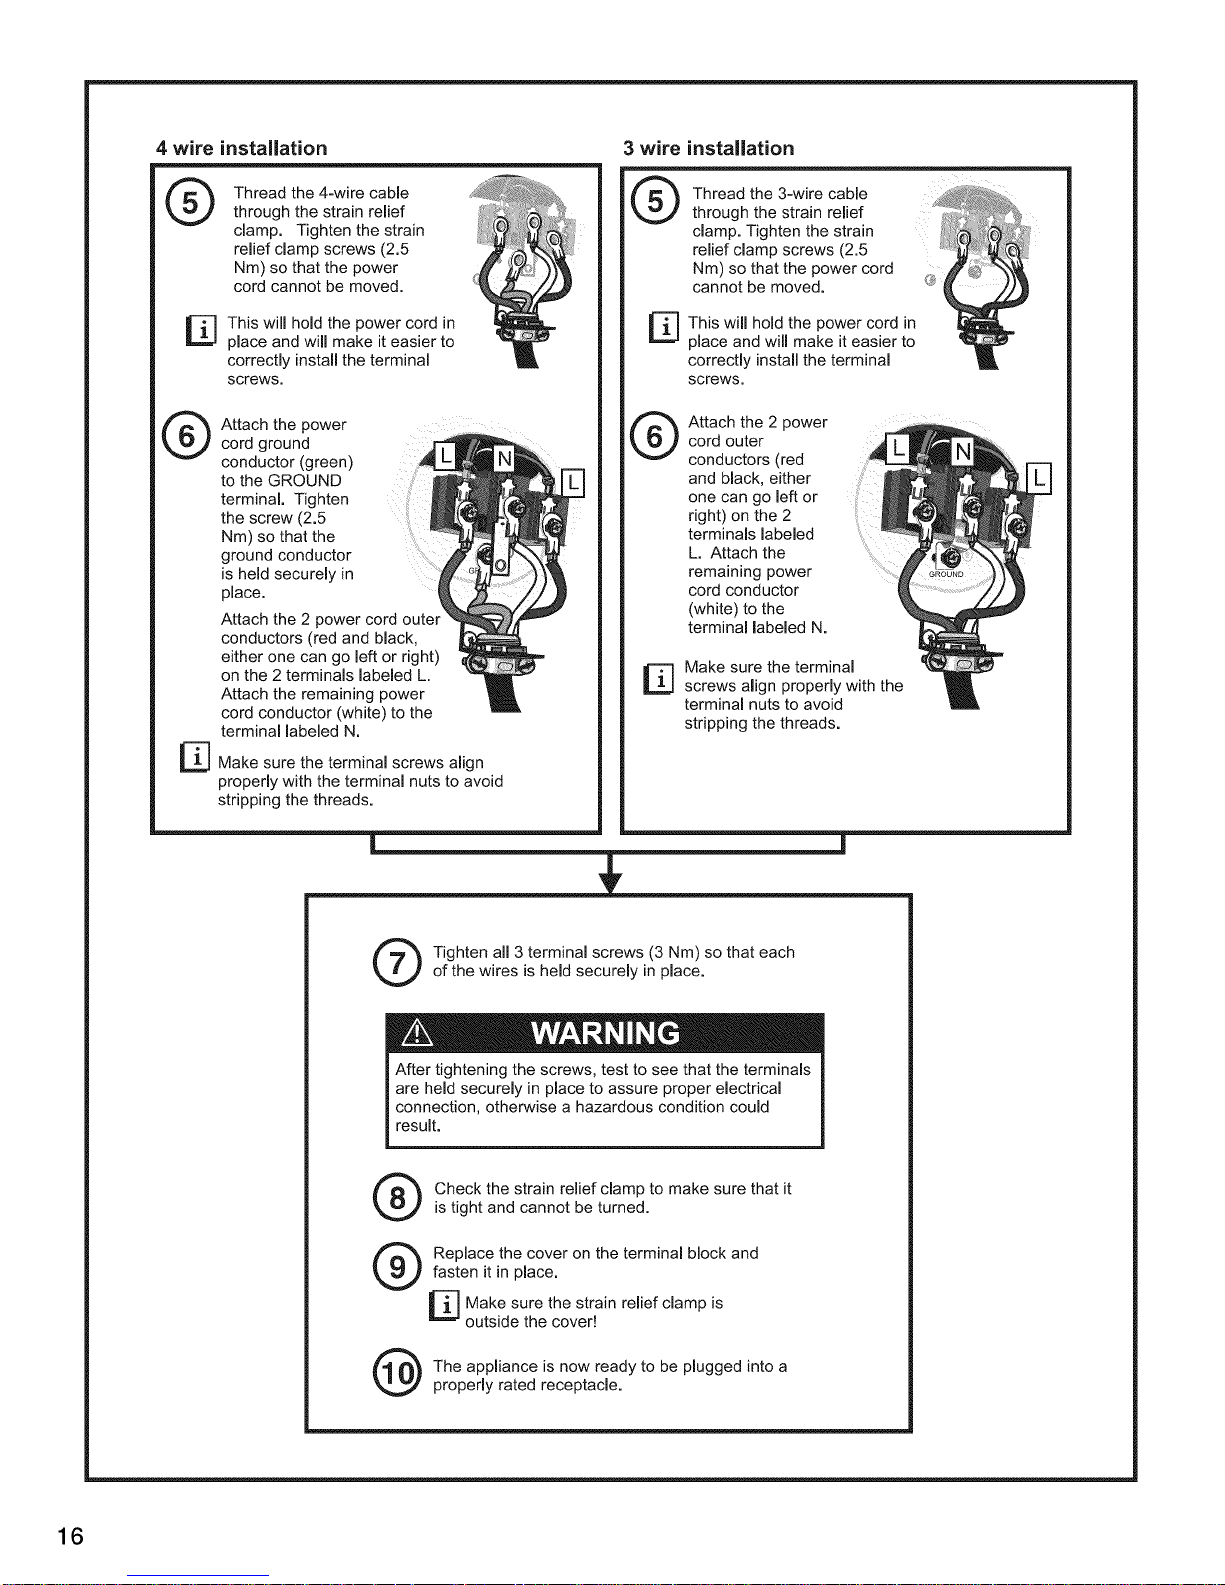
4 wire installation 3 wire installation
Q Thread the 4-wire cable
®
through the strain relief
clamp. Tighten the strain
relief clamp screws (2.5
Nm) so that the power
cord cannot be moved.
I_] his will hold the power cord in
place and will make it easier to
correctly install the terminal
screws.
Attach the power
cord ground
conductor (green)
to the GROUND
terminal. Tighten
the screw (2.5
Nm) so that the
ground conductor
is held securely in
place.
Attach the 2 power cord outer
conductors (red and black,
either one can go left or right)
on the 2 terminals labeled L.
Attach the remaining power
cord conductor (white) to the
terminal labeled N.
D
Make sure the terminal screws align
properly with the terminal nuts to avoid
stripping the threads.
®
®
Thread the 3-wire cable
through the strain relief
clamp. Tighten the strain
relief clamp screws (2.5
Nm) so that the power cord f_3 _'_,
cannot be moved. _Ji!__ _
This will hold the power cord in
place and will make it easier to
correctly install the terminal
screws,
Attach the 2 power
cord outer
conductors (red
and black, either
one can go left or
right) on the 2
terminals labeled
L. Attach the
remaining power
cord conductor
(white) to the
terminal labeled N.
Make sure the terminal
D
screws align properly with the
terminal nuts to avoid
stripping the threads,
m
Q ighten all 3 terminal screws (3 Nm) so that each
of the wires is held securely in place.
After tightening the screws, test to see that the terminals
are held securely in place to assure proper electrical
connection, otherwise a hazardous condition could
result.
Q heck the strain relief clamp to make sure that it
Q eplace the cover on the terminal block and
Q he appliance is now ready to be plugged into a
is tight and cannot be turned.
fasten it in place.
Make sure the strain relief clamp is
outside the cover!
properly rated receptacle,
16
Page 17
Exhaust air connection
The following warnings must be
adhered to without exception.
1. To reduce the risk of fire, this dryer
MUST BE EXHAUSTED
OUTDOORS.
2. To reduce the risk of fire, do not
use ductwork longer than
recommended. Refer to the
maximum ductwork length table
(see page 18).
3. DO NOT use a plastic, metal foil,
or any other non-metal duct with
this dryer. Only rigid or flexible
metal duct shall be used for
exhausting. Metal foil and flexible
metal ducting are NOT the same.
4. DO NOT use more than 2.4 m of
flexible metal ducting.
5. DO NOT use a duct smaller than 4
inches (101.6mm) in diameter.
6. DO NOT exhaust the dryer into: a
chimney, wall, ceiling, concealed
space of a building, furnace cold
air duct, attic, crawl space, or any
other ductwork used for venting.
7. DO NOT install a flexible duct in an
enclosed wall, ceiling or floor.
8. DO NOT crush or kink the duct.
9. Do clean and inspect the exhaust
system on a regular basis; at least
once a year.
10. The exhaust duct must terminate
with an approved exhaust vent
hood to prevent back drafts or
entry of birds or other wildlife.
11. DO NOT use exhaust hoods with
magnetic latches.
12. DO NOT assemble the duct work
with screws or fasteners that
extend into the duct. They serve
as an accumulation point for lint.
Joints should be secured with
aluminum tape.
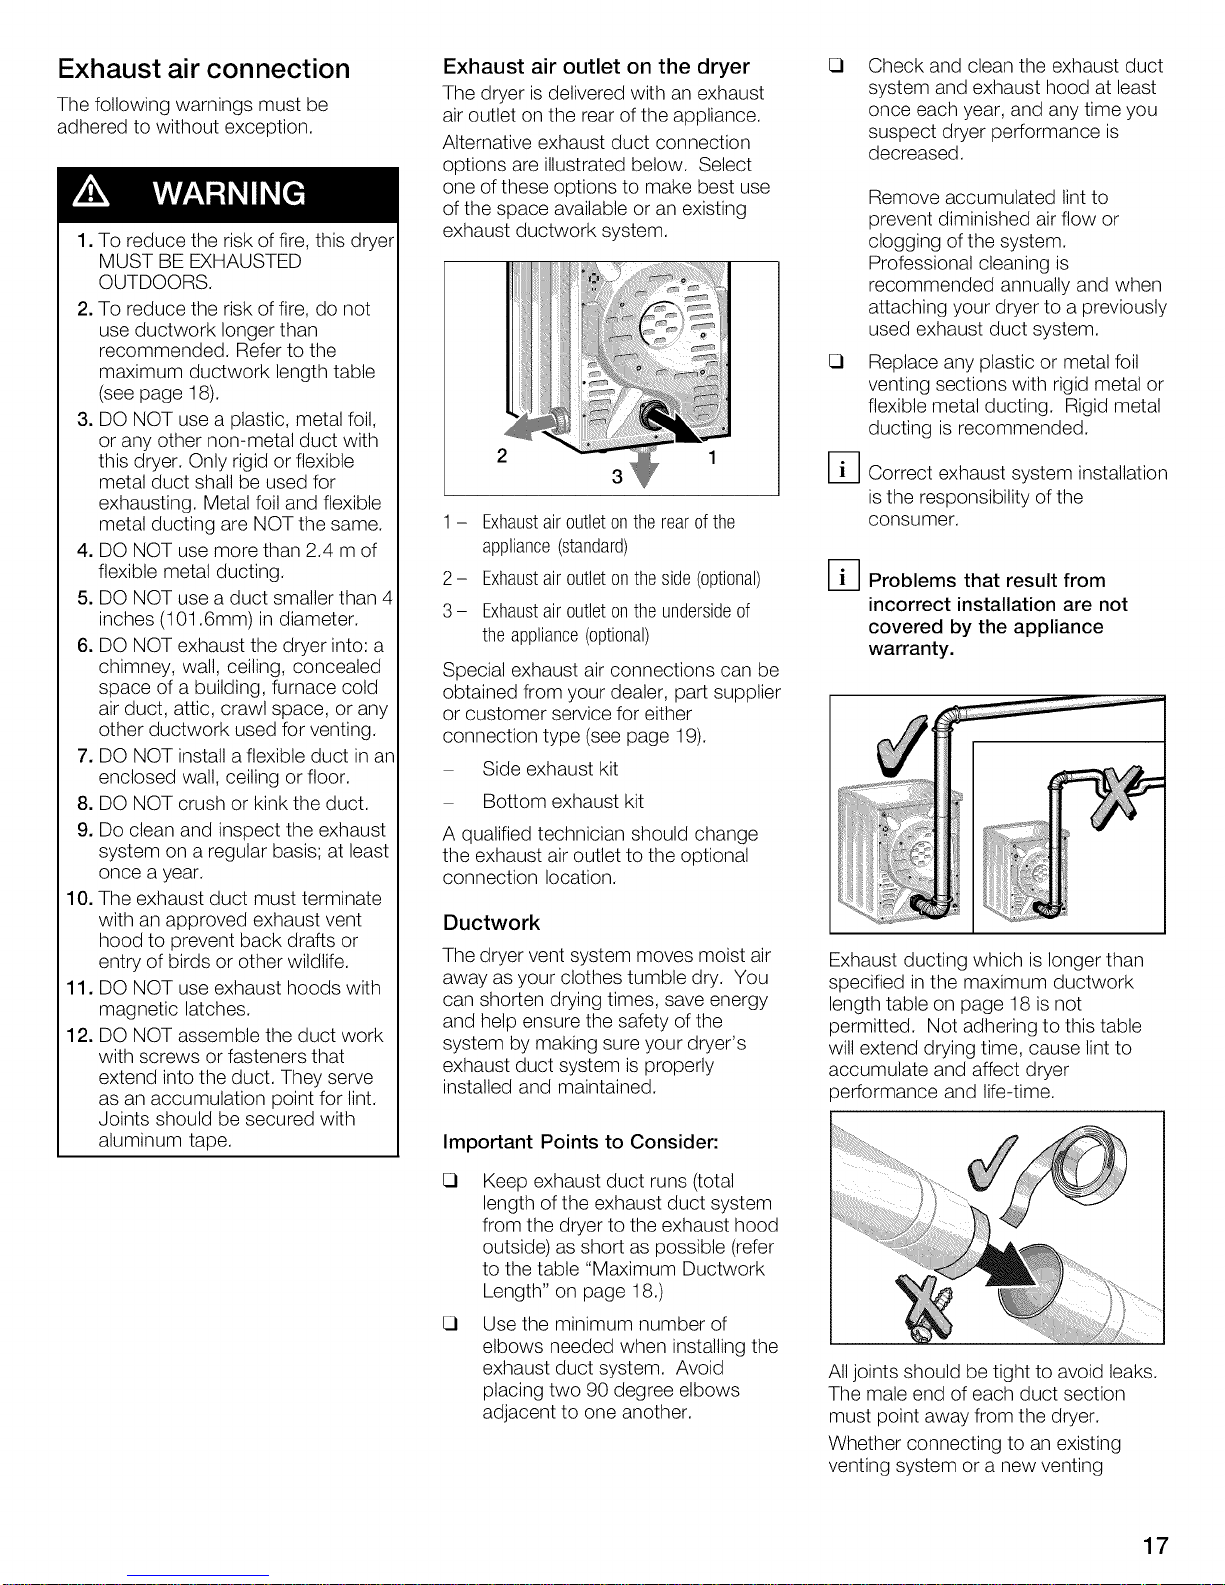
Exhaust air outlet on the dryer
The dryer is delivered with an exhaust
air outlet on the rear of the appliance.
Alternative exhaust duct connection
options are illustrated below. Select
one of these options to make best use
of the space available or an existing
exhaust ductwork system.
1 - Exhaustairoutletontherearofthe
appliance(standard)
2 - Exhaustair outletonthe side(optional)
3 - Exhaustair outletonthe undersideof
the appliance(optional)
Special exhaust air connections can be
obtained from your dealer, part supplier
or customer service for either
connection type (see page 19).
Side exhaust kit
Bottom exhaust kit
A qualified technician should change
the exhaust air outlet to the optional
connection location.
Ductwork
The dryer vent system moves moist air
away as your clothes tumble dry. You
can shorten drying times, save energy
and help ensure the safety of the
system by making sure your dryer's
exhaust duct system is properly
installed and maintained.
Important Points to Consider:
Check and clean the exhaust duct
system and exhaust hood at least
once each year, and any time you
suspect dryer performance is
decreased.
Remove accumulated lint to
prevent diminished air flow or
clogging of the system.
Professional cleaning is
recommended annually and when
attaching your dryer to a previously
used exhaust duct system.
Replace any plastic or metal foil
venting sections with rigid metal or
flexible metal ducting. Rigid metal
ducting is recommended.
%
Correct exhaust system installation
isthe responsibility of the
consumer.
D Problems that result from
incorrect installation are not
covered by the appliance
warranty.
Exhaust ducting which is longer than
specified in the maximum ductwork
length table on page 18 is not
permitted. Not adhering to this table
will extend drying time, cause lint to
accumulate and affect dryer
performance and life-time.
Keep exhaust duct runs (total
length of the exhaust duct system
from the dryer to the exhaust hood
outside) as short as possible (refer
to the table "Maximum Ductwork
Length" on page 18.)
Use the minimum number of
elbows needed when installing the
exhaust duct system. Avoid
placing two 90 degree elbows
adjacent to one another.
All joints should be tight to avoid leaks.
The male end of each duct section
must point away from the dryer.
Whether connecting to an existing
venting system or a new venting
17
Page 18
system, make sure that all ducting is
clean and free of lint.
The maximum permitted length for
rigid duct and for rigid duct used with
flexible metal duct is shown in the table
below. If using flexible metal ducting to
connect the appliance to the ductwork
system, the total length of flexible
metal duct used shall not exceed 2.4 m
and can only be used to connect the
dryer to the ductwork system. As the
table below shows, the maximum
overall ductwork length is reduced if
flexible ducting is used.
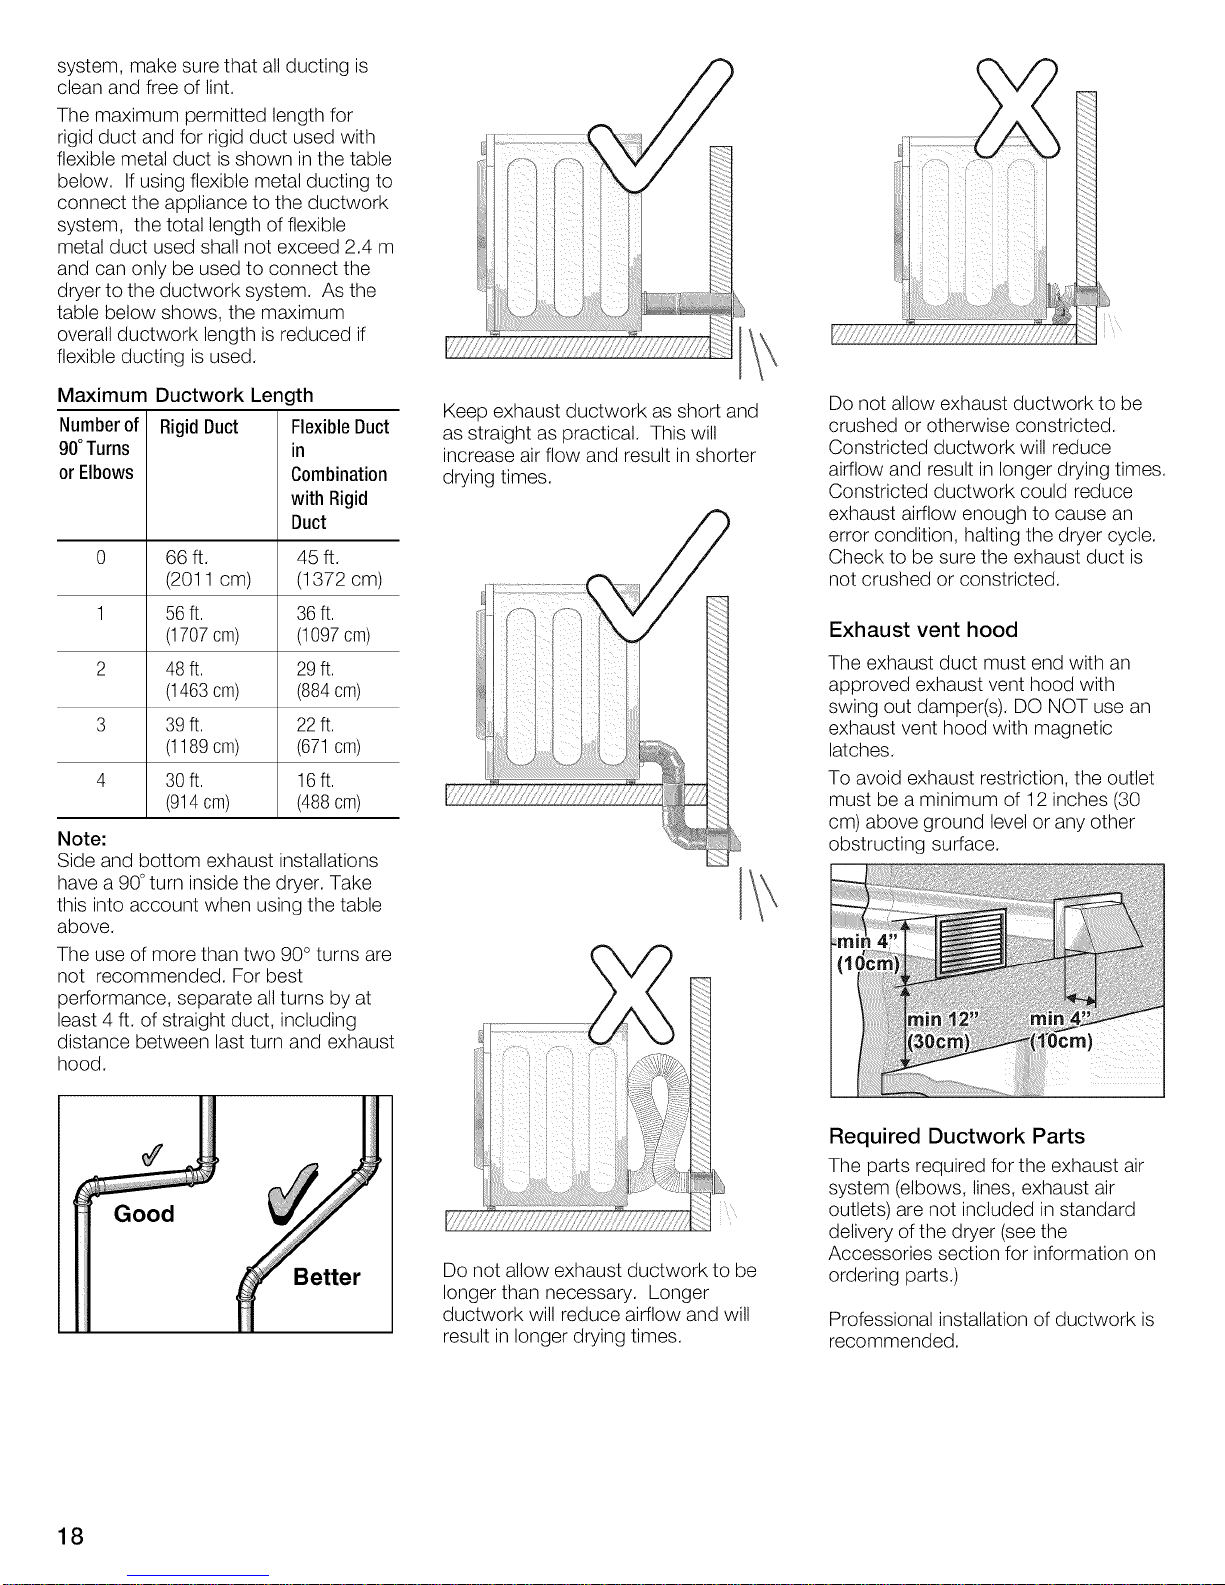
Maximum Ductwork Length
Numberof
90°Turns
or Elbows
RigidDuct
FlexibleDuct
in
Combination
with Rigid
Duct
0 66 ft. 45 ft.
(2011 cm) (1372 cm)
1 56ft. 36 ft.
(1707cm) (1097cm)
2 48 ft. 29ft.
(1463cm) (884cm)
3 39ft. 22 ft.
(1189cm) (671cm)
4 30ft. 16ft.
(914cm) (488cm)
Note:
Side and bottom exhaust installations
have a 90°turn inside the dryer. Take
this into account when using the table
above.
The use of more than two 90° turns are
not recommended. For best
performance, separate all turns by at
least 4 ft. of straight duct, including
distance between last turn and exhaust
hood.
Keep exhaust ductwork as short and
as straight as practical. This will
increase air flow and result in shorter
drying times.
_ii/iiidiiii
Do not allow exhaust ductwork to be
crushed or otherwise constricted.
Constricted ductwork will reduce
airflow and result in longer drying times.
Constricted ductwork could reduce
exhaust airflow enough to cause an
error condition, halting the dryer cycle.
Check to be sure the exhaust duct is
not crushed or constricted.
Exhaustventhood
The exhaust duct must end with an
approved exhaust vent hood with
swing out damper(s). DO NOT use an
exhaust vent hood with magnetic
latches.
To avoid exhaust restriction, the outlet
must be a minimum of 12 inches (30
cm) above ground level or any other
obstructing surface.
Good
Better
18
i \
Do not allow exhaust ductwork to be
longer than necessary. Longer
ductwork will reduce airflow and will
result in longer drying times.
Required Ductwork Parts
The parts required for the exhaust air
system (elbows, lines, exhaust air
outlets) are not included in standard
delivery of the dryer (see the
Accessories section for information on
ordering parts.)
Professional installation of ductwork is
recommended.
Page 19

Accessories
The following optional accessories for
your dryer may be obtained from
customer service (see page 32) or from
your local dealer. Please follow the
installation instructions supplied by the
appropriate manufacturer.
Side exhaust kit
i
o
part no. WTZ 1265
Note:
See notes on maximum number of
elbows on page 18.
Bottom exhaust kit
part no. WTZ 1270
Note:
See notes on maximum number of
elbows on page 18.
D The bottom exhaust kit cannot be
used with a pedestal installed on
the dryer or if the dryer is stacked
with the washer.
Dryer rack
part no. WTZ1620
Use the dryer rack to dry washable
woolen textiles (e.g. sweaters) and
shoes.
Pedestal Mounting Kit
A storage pedestal with a pull-out
drawer is available as an accessory for
your dryer. The pedestal adds
approximately 15 inches to the height
of the dryer. See page 11 for
dimensions.
Appliance must not be mounted
on a pedestal in stacked
installations.
part no. WTZ 1610 isfor a solid white
color pedestal.
Other color pedestals may be
available.
Reference part no. WTZ 1610"X" in
which the X designates an available
color (eg: A for Anthracite, Sfor silver).
Please inquire at your dealer for color
choices available.
You may also consult a current product
catalog or visit our website at:
www.boschappliances.com
If mounting the dryer on a pedestal,
follow the instructions supplied with the
pedestal.
Stacking Kits
There are two stacking kits available.
Basic Stacking Kit
This kit anchors the dryer on top of the
washer and adds approximately 0.63
inches (16 mm) to the stacked height.
See page 12 for dimensions.
part no. WTZ 1601 is for the basic
mechanical stacking kit.
Pull-Out Shelf Stacking Kit
This kit serves to stack the dryer on top
of the washer and also provides a pull-
out shelf. This kit adds approximately
1.52 inches (38.6 mm) to the stacked
washer/dryer height. See page 12 for
dimensions.
This kit may also be combined with the
pedestal mounting kit to provide a
pull-out shelf as well as a combined
increase in height of the dryer of
approximately 16.5 inches.
D The pedestal can not be combined
with the pull-out shelf stacking kit
in stacked washer/dryer
installations.
part no. WTZ 1600 isfor the solid
white pull-out shelf stacking kit.
Other color pull-out shelf stacking
kits may be available.
Reference part no. WTZ 1600"X" in
which the X designates an available
color (eg: A for Anthracite, Sfor silver).
Please inquire at your dealer for color
choices available.
Preparing to transport the
dryer - step by step
D These procedures should only be
performed by a qualified person.
1. Rotate the program selector
to "OFF".
2. Disconnect the power supply (turn
the circuit breaker off, unplug the
appliance)
3. Turn off the water faucet
connected to the water supply
hose (Steam models only).
Disconnect the water supply hose.
4. Disconnect the exhaust duct from
the exhaust air outlet on the dryer.
5. Collect any accessories and
package them for shipment with
the appliance.
6. Close the door and secure with
adhesive tape.
7. Screw the height-adjustable feet of
the dryer into the housing to
prevent them from being damaged
during transportation.
.
Reinstallation of the Dryer at the
New Location refer to the
Installation Instructions in this
manual (see page 7).
19
Page 20
OPERATING INSTRUCTIONS
Before using
To reduce the risk of fire, electric
shock, or injury to persons, read the
IMPORTANT SAFETY
INSTRUCTIONS before operating
this appliance.
Panel
Cycle Se_ectc-
n
Pe_m Pie58
Time D_
Before using your dryer, read and
follow all installation and operating
instructions.
LED's
D
Cotton
Display
n
Option
Buttons
O
Delicates £L©
O0
Start/Pau se
Button
bl
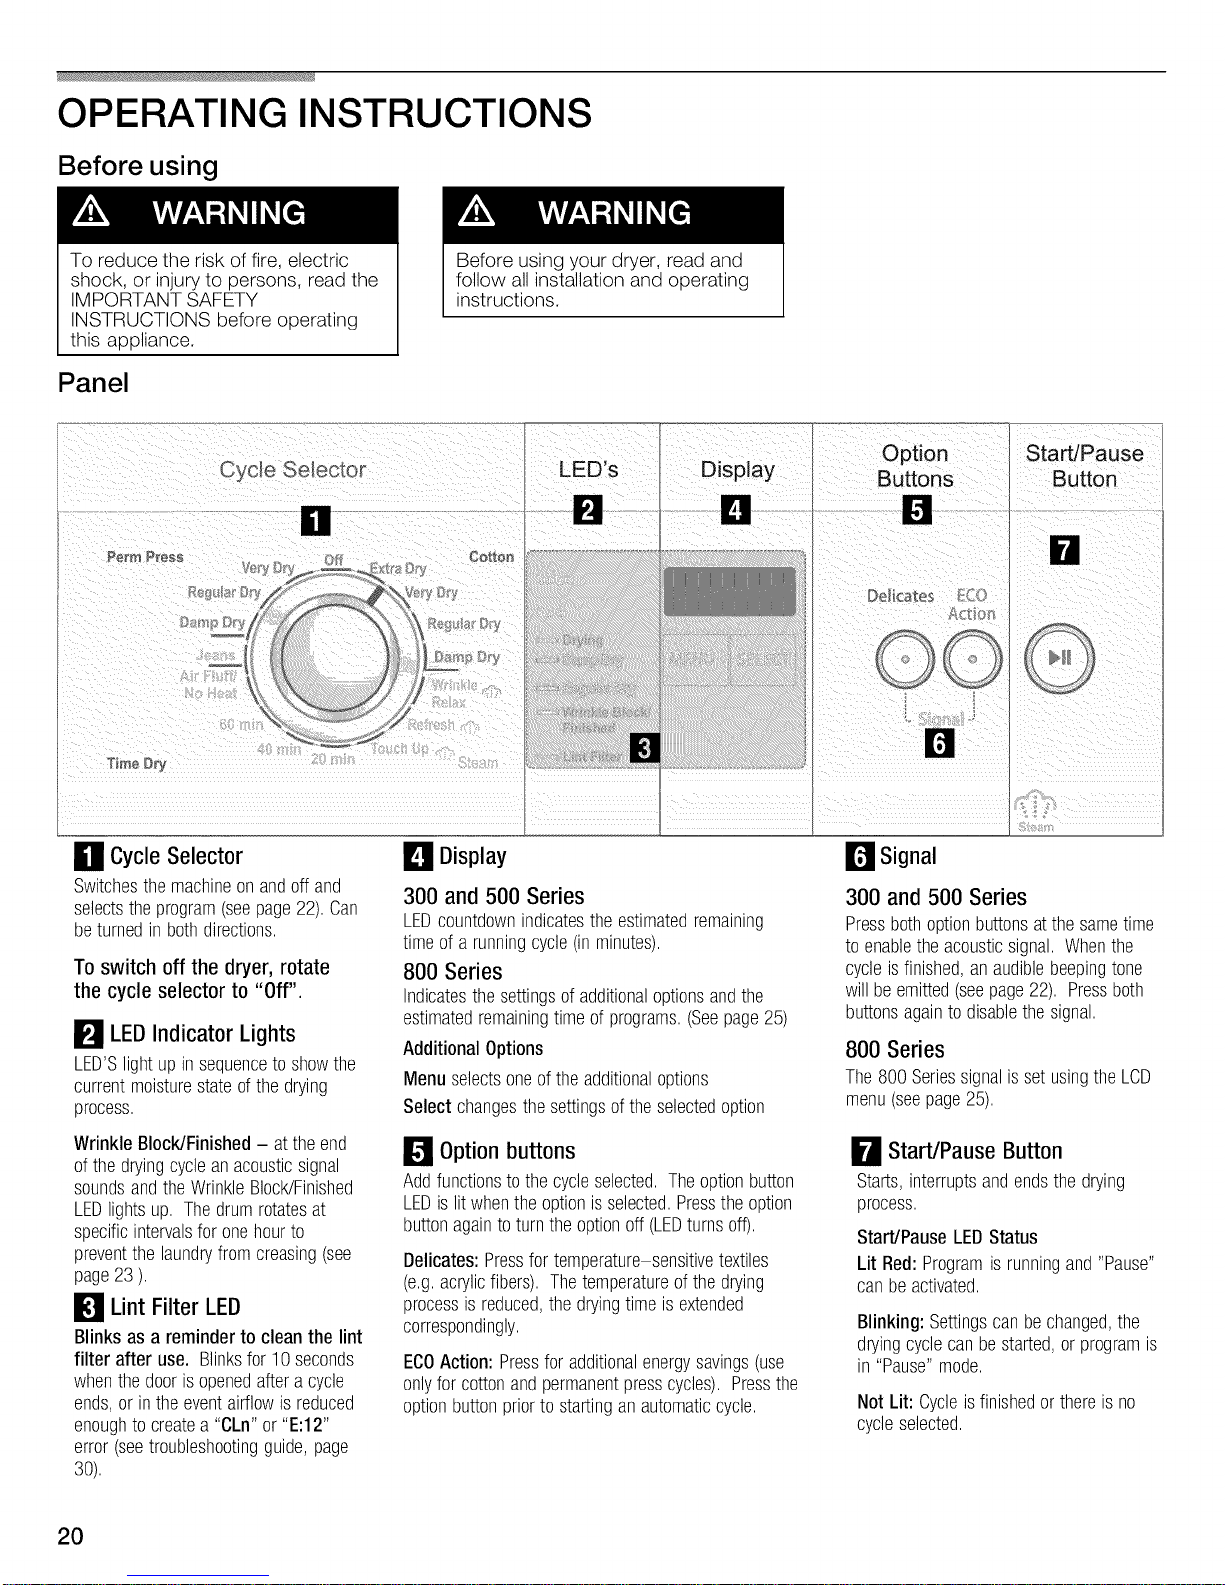
Cycle Selector
Switchesthe machineonandoff and
selectstheprogram(seepage22). Can
beturnedin bothdirections.
To switch off the dryer, rotate
the cycle selector to "Off".
LEDIndicator
LED'Slightupin sequencetoshowthe
currentmoisturestateofthe drying
process.
Wrinkle Block/Finished- atthe end
ofthe dryingcycleanacousticsignal
soundsandthe WrinkleBlock/Finished
LEDlightsup, The drumrotatesat
specificintervalsfor onehourto
preventthelaundryfrom creasing(see
page23 ),
Lights
_1 Lint Filter LED
Blinks as a reminderto cleanthe lint
filter after use. Blinksfor 10seconds
whenthedoorisopenedaftera cycle
ends,or inthe eventairflowis reduced
enoughtocreatea "CLn"or "E:12"
error(seetroubleshootingguide,page
30),
Display
300 and 500 Series
LEDcountdownindicatesthe estimatedremaining
timeof a runningcycle(in minutes).
800 Series
Indicatesthe settingsofadditionaloptionsandthe
estimatedremainingtimeof programs.(Seepage25)
AdditionalOptions
Menuselectsoneof theadditionaloptions
Select changesthesettingsoftheselectedoption
Option buttons
Addfunctionsto thecycleselected.Theoptionbutton
LEDis lit whentheoptionisselected.Presstheoption
buttonagaintoturn the optionoff (LEDturnsoff).
Delicates:Pressfortemperaturesensitivetextiles
(e.g.acrylicfibers).Thetemperatureof thedrying
processisreduced,the dryingtimeisextended
correspondingly.
ECOAction: Pressfor additionalenergysavings(use
onlyfor cottonandpermanentpresscycles),Pressthe
optionbuttonpriorto startingan automaticcycle,
r_ Signal
300 and 500 Series
Pressbothoptionbuttonsatthesametime
to enabletheacousticsignal, Whenthe
cycleis finished,anaudiblebeepingtone
willbe emitted(seepage22), Pressboth
buttonsagainto disablethesignal,
800 Series
The800 Seriessignalis set usingtheLCD
menu(seepage25).
Start/Pause Button
Starts,interruptsandendsthe drying
process,
Start/PauseLEOStatus
Lit Red:Programis runningand"Pause"
canbeactivated,
Blinking: Settingscanbechanged,the
dryingcyclecanbestarted,or programis
in "Pause"mode.
Not Lit: Cycleis finishedorthereis no
cycleselected.
2O
Page 21
Additional Safety
Information
Always follow the IMPORTANT
SAFETY INSTRUCTIONS
(see page 5).
Protection of the
environment
Tips on saving energy
To save energy, money and time,
Bosch recommends the following:
Drain the laundry thoroughly!
Before drying, spin the laundry
thoroughly in the washing
machine. Use the highest possible
spin speed for the type of laundry!
Higher washer spin speeds reduce
residual moisture and decrease
drying time and energy
consumption.
Use optimum load!
Use larger loads, up to the
maximum recommended loads for
the cycle and laundry type.
However, do not exceed
maximum recommended load
capacity.
Clean the lint filter!
Check the lint filter before using
the dryer each time and clean the
filter as needed. Making sure the
lint filter is clean before beginning
each drying load results in
improved airflow and reduced
drying time. (see page 27).
Ventilate the room!
Provide an adequate supply
of fresh air during the drying
process.
Do not dry unsuitable materials!
Do not dry rubberized or air-tight
items.
Temporary
disconnection of
the dryer
Operate your dryer only when you are
at home. If you plan to go on vacation
or are not using your dryer for an
extended period of time, you should:
1. Turn off the circuit breaker.
2. Unplug the power supply plug if
possible.
3. Clean the lint filter.
4. Turn off the water supply (applies
only to Steam dryers).
Laundry
Identification of fabrics
Observe the treatment symbols on the
textile labels. They provide valuable
information as well as limitations about
the drying process.
Do not dry the following textiles in the
dryer:
Air-tight textiles (e.g. rubberized)
Delicate fabrics (silk, synthetic
curtains)
%
Dry woolen or wool-rich textiles
with the dryer rack only!
%
Use the time program "Air fluff/No
heat" to dry articles containing
foam rubber or similarly textured
rubber-like materials.
Drying tips
In principle, the following applies to all
drying programs:
To ensure a uniform drying result,
sort the laundry according to fabric
type and drying cycle selected.
Fasten zippers, hooks and eyes,
loose belts, apron strings, etc.
Do not overdry easy-care laundry
to reduce the risk of wrinkling!
Hang laundry up promptly to dry in
the air.
Do not iron laundry immediately
after drying. Place the laundry in a
pile for a short while. Residual
moisture will then be distributed
uniformly.
Knit textiles (e.g. T-shirts,
sweatshirts, and other similar
types of laundry) often shrink when
dried for the first time. Do not use
the "Very dry/Extra dry" cycles the
first time you dry these types of
laundry to reduce potential
shrinkage.
Some items such as these can
also shrink during later laundering.
Use caution in cycle selection to
avoid shrinkage.
Clean and inspect the exhaust
system on a regular basis!
Blockages may extend drying time
or may cause the dryer to
malfunction.
21
Page 22

Cycle selection
Foroptimumdryingresultsyourdryeroffersseveralcyclegroupsand
additionaloptions.
Automatic cycles includeRegular/CottonandPermanentpress.Cycleselectionis basedin
partonthe laundryfabrictype.Thesecyclesarecontrolledvia moisturesensors. Cycletime
isdeterminedbythe measureddegreeof moistureinthe laundryandonthedegreeof
drynessselected(e.g.Dampdry,RegularDry,ExtraDry).
Time cycles runfora lengthoftimespecifiedbythe user. TheAir fluff/Noheattimedcycle
usesambientair (roomtemperature)withoutaddingheatandrunsfor approximately20
minutes,dependingon thespecificdryermodel.
Specialcycles arecustomdesignedfor specifictypesoffabricsuchaswoolor jeans.
Woolor woolen products should only bedried using the dryer rack.
Steam cyclesarebestsuited for smoothingout wrinklesandreducingodors.Thesecyclesshouldbeusedwithloadsconsistingofthreeto four
itemsmadeofwrinklefreecotton,cotton/polyesterblend,cottonknit pulloversor synthetics.Steamprogramsareavailableonlyon selectmodels.
DuringSteamcyclesasmallamountofwaterissprayedintothedrumwhiletumblingthelaundryloadwithheat. Thisprocessis repeated,followed
by additionaltumblinganda brief cooldownperiod.The heatlevelandtimearepresetfor thesecycles.
Note:Resultsmayvarywithfabrictype. Garmentsthatare100%cottonandhavewrinkle resistantfinishmaygivebetterresults.
Ifthe nozzlestopssprayingduringoneof theSteamcycles(symptomswouldbe wateris notseensprayingintodrum,clothesarelesswrinkle free
thantheycustomarilyarewiththis function)checkto besurethe nozzleis notclogged. Lintmayaccumulateto blockthe nozzletip or hardwatermay
causebuilduponthe nozzle(seepage29).
Perm Press Off Cotton
Time
Dry
Cycles
AutomaticCycles
Steam
Option Buttons
Delicates :
©©
i
Delicates
Press the "Delicates" button for
temperature sensitive textiles. Observe
the care information or symbols on the
textiles. The temperature of the drying
process is reduced and the drying time
is extended by using this option.
ECO Action
Your dryer has an "energy savings"
ECO option. This option is used only
with cotton and permanent press
automatic cycles. Less heat is applied,
and drying time is extended. Press the
option button prior to starting an
automatic program.
D The length of the ECO cycle is
affected by the load size, textile
type and climatic conditions.
D Combining with the "Delicates"
button can produce even more
savings.
Signal
300 and 500 Series Dryers
Your dryer outputs an audible beeping
signal to alert the user of certain events.
Enable the signal by pressing the
"Delicates" and the "ECO Action"
option buttons simultaneously.
To disable the signal, press both option
buttons (again pressing both at the
same time). Each press of the two
option buttons together toggles the
Signal on or off.
It is not necessary to hold the buttons in
after pressing them.
The signal emitted will vary according
to the following table.
Signal Type
Start Shorttone
End
Incorrect
Selection
Sequenceofshort
tones
Sequenceof longtones
22
Warningof
malfunction
D The signal
"Warning of malfunction" is active
regardless of whether or not the
signal has been disabled.
Sequenceof longtones
Page 23

LED Indicators of Cycle
Sequence
The dryer uses an electronic scanning
system for all cycles except the time
cycles. A moisture sensor continuously
checks the moisture in the laundry.
Drying ends automatically as soon as
the selected degree of dryness has
been reached.
LED Indicators Vary by Model
300 Series Dryer LED's
Drying
The current degree of drying is
represented by usiAg-LED indicator
lights. Each light is illuminated in
succession as drying progresses.
The LED to the left of "Drying"
illuminates when the selected drying
cycle begins. On select models, LED
lights for "Damp Dry" and "Regular Dry"
indicate as each stage is reached.
When the load is finished the LED
beside "Wrinkle BlocWFinished" is
illuminated.
500 Series Dryer LED's
"Wrinkle Block/Finished"
The drum continues to rotate at
specific intervals to help decrease
wrinkling of the laundry load. Remove
the laundry when the cycle is finished,
or within the Wrinkle Block® period for
best results.
Wrinkle Block® begins when the drying
phase ends for every cycle except the
wool cycle. Following the end of a
drying cycle, Wrinkle Block® turns the
drum for about 16 seconds every two
minutes for the first 10 minutes, then
about 16 seconds every 5 minutes for
the next 50 minutes.
800 Series Dryer LED's
WrinkleBlock/
Finished
il _i i iii
Lnt ter
D If any LED or button is illuminated
on the panel when the cycle
selector is turned to the "Off"
position, please turn off the circuit
breaker and call customer service.
23
Page 24

Cycle Selection Table
Cotton
ForCottonsandcoloredsmadeofcottonorlinen,Pressthe"Delicates"optionbuttonfortemperature-sensitivetextiles,
Bedlinen,tablelinen,towels
Dampdry Bedlinenandtablelinen,towels,T-shirts,sportsshirts,overalls
T-shirts,sportsshirts,dresses,trousers,overalls,underwear
Terrytowels,kitchentowels,handtowels,bedlinen, underwear,cotton notto beironed
Regulardry socks
Terrytowels,kitchentowels,handtowels,bedlinen, underwear,cotton notto beironed,thickmulti-ply
Verydry socks
Extradry Terrybathrobesandterrybedlinen, particularlythickor multi-ply
Permanent Press
Easy-care(drip-dry)laundrymadeofsyntheticandblendedfabric(e,g,cotton/polyester),Pressthe "Delicates"buttonfor verytemperature-sensitive
textiles,
Trousers,dresses,skirts,shirts,blouses,leggings,sportsclothingwith tobe ironedor onlylightlyironed
Dampdry synthetic-richfibers, lingerie
Regulardry Shirts,blouses,sportsclothing notto beironed
Verydry Bedlinenandtable linen,tracksuits,comforters,blankets notto beironed,thickmulti-ply
to beironed
Cotton, cotton polyesterblends, commonknits and synthetic shirts, cotton blend pants, skirts, t shirts and pullovers,
Steam Refresh
Wrinklefreefabricsgivebestresults,
Helpssmoothoutwrinklesandreduceodors,Usewitha lightload,suchas oneconsistingof 3 to4 shirts, Program
time is about16 minutes,
Steam Wrinkle relax Helpssmoothoutwrinkles,Usewitha light load,suchasoneconsistingof 3to 4 shirts, Programtime isabout12
minutes,
Thisprogramisusedto refresha cottontextileloadthat hasbeendriedandhasbeenleftin the drumofthedryerat
Steam Touch up the endof the cycleovernight,This20 minuteprogramrefreshesthe loadto helpsmoothoutthewrinklescausedby
the loadpressingdownunderitsownweight,
Clothingcontainingfoam,rubber,orplasticmustbe refreshedona clothes lineor byusingtheAir fluff/Noheat
cycleasthesearticlesmayignitedueto theheatofthe Steamprogram,
_a_:i ........,. :....................................................................................................................................................................................................................................................................................................................................................................................................................................................................................................................................................................................................................................................................................................................................................................................................................................................................................................................................
Wool
Washablewoolentextiles(e,g,sweaters,woolenpullover,skirts)
Dry woolen or wool-rich textiles with dryer rack only!
Jeans (5ooSeries) Heavyjeanfabric
DarkColor(8ooSeries) Darkcoloredtextiles(e,g, heavy,darkclothes(cotton))
Active Wear(8ooSeries) Smallloads,loadsthatneedashortdryingtime(e,g,sportsshirts,work outclothes(polyester,nylon,synthetic))
20, 40 min.,60 min.(3oo/5oo
Series)
Pre-driedtextileswith lowmoisturecontent,individualsmallitems,e,g,bathtowels,bathingsuits,dishcloths,
Forthe smallestloadingconditionfrom 0,22Ib - 0,44Ib(i,e,onesmalltowel),forthis atime dryprogramshouldbe
selected,
Medium + requireddryingtime
(800Series)
(800 Series) if you choose a
program with variable time (e.g. time
programs, wool care) the display
starts to flash. You have to set the
time,
Air fluff / No heat(3oo/5ooSeries)
Air fluff / No heat + required
time(80oSeries)
Pressthe"Delicates"buttonfor temperature-sensitivetextilesoption,
Cottonsandcoloredsmadeof cottonorlinen,
Fresheningor airinglittle-worn itemsofclothinganddryingof extremelysensitivetextiles,
Forall textiletypesincludingfoamrubber(e,g,pillows,stuffedtoys),plastic(e,g,showercurtains,tableclothes),
rubber(e,g,backedrugs),sheernylon,olefin,
24
Page 25

Additional options
800 Series
D Additional options can only be set
after a drying cycle has been
selected. Turn the cycle selector
to the desired drying cycle, then
select desired options from the
LCD menu.
Select the option to be changed with
the "Menu" button. Press the button to
move to the next option on the display.
The active symbol flashes.
The setting for the selected option is
displayed on the right hand side of the
LCD display.
When actively displayed, a setting can
be changed with the "Select" button.
Press the "Select" button to display_he
next possible setting.
D Pressing the "Menu" button while
an option is displayed saves the
new setting.
D If you don't press any button for 10
seconds, the settings are saved
automatically.
Symbol
(9
SignalBehaviorattheEndof the SelectedCycle
Thesignalwill soundwhenthe cycleisfinishedto notify
theuserthatthe cyclehasended. WrinkleBlockwill
tumblethe loadperiodicallyfor approximatelyonehour
afterthecycleends. Thesignalwillsoundatintervals
duringWrinkleBlockasa remindertheloadisfinished.
Function
Setsthedelaystarttime
ofthe dryer
(Startin .. hours!)
Child-prooflock(only
effectivewhilethe
programis running)
Volumeofthe endsignal
andthedampdry signal
Settings
0-12h
(0,5 h steps)
0n/0ff
Off,
medium,
maximum
Explanation
This additional option allows you to lock your settings to prevent
unintended use of the dryer. To start the dryer when the Safety
guard is active: Press and hold the "Start/Pause" button for 4
seconds. To unlock this additional option when the dryer is running:
Press and hold the "Start/Pause" button for 4 seconds.
Your dryer outputs different signals for certain events as listed
below.
Event
EnableSignal
DisableSignal
Startof Cycle
EndofCycle(orduringWrinkleBlock)
Mal Operation
Warningof Malfunction
Signal
Shorttone
Twoshorttones
Shorttone
Sequenceofshorttones
Sequenceof longtones
Sequenceof longtones(maximum
volume)
'G
25
Page 26

Operation
Using the dryer
1. Open the door.
2. Check lint filter.
The filter should be cleaned before
drying each laundry load.
Cleaning the filter reduces the
drying time and saves energy.
(See page 27 for lint filter cleaning
instructions).
D Bleach may cause discoloration of
the dryer's colored surface.
Therefore, it is important to keep
bleach away from the colored
surface of your dryer. If any bleach
spills on the surface, immediately
use a moist paper towel to
thoroughly clean it.
3. Rotate the cycle selector to the
desired drying cycle.
Select the program which
corresponds to the laundry in the
dryer from the cycle selection table
(see page 24).
The dryer light turns on inside the
drum when a cycle is selected.
D The "Start/Pause" indicator light
starts flashing.
.
Place laundry in the empty drum.
Put each piece of laundry into the
machine separately to reduce
clumping together.
For best results, the laundry to be
dried must be sorted according to
type of laundry and desired degree
of drying. For further information,
see page 21.
%
Observe clothing and fabric
manufacturers' laundering
instructions. If drying woolen
clothing and shoes, see the
information on page 28.
%
Ensure that there is only laundry
in the drum. Check that all
items are completely in the
drum and that none are caught
between the door and the dryer
housing or door seal.
6. Close the door.
The "Start/Pause" indicator light
continues flashing.
,
Press the "Start/Pause" button.
The selected cycle begins and the
"Start/Pause" indicator light stops
blinking and stays lit.
%
If the door has not been closed
properly, the dryer will not start.
%
The cycle starts with an acoustic
signal (if set). See page 22 for how
to set the signal for dryers with an
LED display, and page 25 for how
to set and adjust the signal for
dryers with an LCD display.
Cycle Progress LED Indicators
If a standard drying cycle (not a time dry
cycle) has been selected, the indicator
lights indicate the progress of the cycle
sequence. The LED sequence shown
below is for the 500 and 800 Series
dryers. The 300 Series dryer has LED's
for "Drying" and "Wrinkle
BlocWFinished".
LintFilter
%
At the end of the cycle, an
acoustic signal is emitted (if set)
and the LED "Wrinkle
BlocWFinished" illuminates.
The acoustic signal will continue to
sound intermittently during Wrinkle
Block.
%
When the drying process is
complete (cycle or selected time
ended), the drum rotates at
specific intervals for 1 hour due to
the Wrinkle Block feature.
This prevents the laundry from
creasing. The laundry remains
loose and fluffy until it is removed.
The laundry should be removed
before this time has elapsed.
8. Open the door.
9. Take the laundry out of the dryer.
4. If required, select an available
option ("Delicates" or "ECO
Action") by pressing the
corresponding button (see figure
above).
The effect of each option button is
explained on page 22.
D The estimated remaining time will
be displayed.
26
Page 27

10. Rotate the program selector
to "Off".
The dryer light goes out.
11. Clean the filter.
The filter should be cleaned after
each drying process. Cleaning the
filter reduces the drying time and
saves energy.
12. Close the door.
Cleaning the lint filter
A dirty filter extends the drying time and
increases energy consumption.
The filter should be cleaned before
each laundry load.
If a warning signal and a "CLn" or
"E:I 2" warning message are emitted
durinc a drying program, clean the filter
immediately and check the exhaust
duct.
D The program interrupts
automatically.
Do not rinse or wash the screen to
remove lint. Wet lint is harder to
remove. Roll the dry lint off with your
fingers. You can moisten your fingers
lightly for better results.
To clean the lint filter follow these steps:
1. Switch off the dryer by turning the
program selector to "Off".
4. Remove lint by stroking your hand
over the filter.
5. Insert the filter.
6. Close the door.
D Do not operate the dryer
without the lint filter in place!
Removing Residue Buildup
Laundry detergent and fabric softener
can build up on the lint filter screen.
This buildup can cause longer drying
times. Use of dryer sheets is not
recommended. If you choose to use
dryer sheets, please clean the lint filter
periodically to remove residue.
D If lint falls off the screen while it is in
the dryer, residue buildup probably
needs to be removed.
The filter should be lightly scrubbed at
least twice a year with warm soapy
water. A filter with residue buildup will
tend to hold water even though the
mesh is lint free. The filter is clean
when it no longer holds water. The
filter must be dried thoroughly before
being inserted back into the dryer.
To remove residue, follow these steps:
1. Clean all lint from the lint filter.
2. Wet both sides of the filter mesh
with hot water.
3. Wet a soft nylon brush with hot
water and liquid detergent.
4. Lightly scrub the lint screen with
the brush to remove residue
buildup. Be careful not to damage
the screen.
5. Rinse the screen with hot water.
6. Thoroughly dry the lint screen with
a clean towel.
The inside of the door heats up
during the drying process. Avoid
touching any heated surface until it
has time to cool.
2. Open the door.
3. Remove the lint filter.
7. Replace the lint filter back into the
dryer.
D Do not operate the dryer
without the lint filter in place!
27
Page 28

Using the dryer rack
(Option, see page 19)
Use the dryer rack to dry washable
woolen textiles (e.g. sweaters) and
shoes. The dryer rack remains
stationary while the drum rotates.
Damp wool should not be tumbled dry
in the drum, as it has a tendency to
matt and shrink. Drying shoes without a
rack could damage the drum.
D The dryer rack must be used for
drying with the wool cycle. Ifthe
rack is not used, the sensor will
shut the dryer off after
approximately 3 minutes and the
display will show ....
Dry only one item of clothing or one
pair of shoes - maximum dry load
2.2 Ibs (1kg)! The laundry must
have been spun! Only dry
prewashed shoes! The laundry must
not touch the drum! It could jam and
be damaged. After using the dryer
rack, take it out of the dryer
immediately.
Inserting the dryer rack
1. Open the dryer door.
2. Check that the drum is empty.
4. With the forward ends engaged in
the holes, lower the back of the
rack so that it sits in place, braced
against the inner surface of the
dryer housing.
Drying laundry items on the dryer
rack
,
Fold your laundry so it fits on the
dryer rack.
2.
Laundry items should be placed
so they lay loosely on the dryer
rack. Do not stack laundry so that
it is compressed on the rack. Do
not allow the laundry items to
touch the drum. Laundry items
must only touch the rack and
should not hang over the edges of
the rack.
,
Close the door, making sure no
laundry is caught between the
door and the housing or door seal.
,
For wool items, select the Wool
cycle, if available. For other items,
select one of the time cycles.
Select the drying time according to
the laundry type.
Drying shoes on the dryer rack:
1. Prepare shoes.
Clean shoes to prevent the drum
from becoming soiled.
If preparing sports shoes for
drying, extend the tongue.
Loosen or remove shoe-laces.
Remove insoles and heel pads.
2. Place shoes on the rack.
Directly on the dryer rack
or
Roll up a towel and place the
heels of the shoes on the towel.
This will ensure a more uniform
drying result.
3. Close the door.
4. Press the "Start/Pause" button.
The "Start/Pause" indicator light
illuminates.
5. Ifthe shoes still contain residual
moisture after the indicated drying
time:
Reorient the shoes on the drying
rack.
Restart the program and reduce
the drying duration depending
on the degree of residual
moisture.
6. After drying air the shoes at room
temperature for approximately
30 minutes.
7. Take the dryer rack out of the
drum.
3. Hold the dryer rack by the center
section as shown below and insert
it horizontally all the way into the
drum. Then bring it back towards
the front and align the forward
ends with the two holes beside the
lint filter.
28
Page 29

Cleaning and care
Cleaning the dryer
TO AVOID
RISK OF EXPLOSION!
Never use solvents or highly
flammable liquids for cleaning.
Incorrect cleaning may damage the
dryer. Do not spray with a pressure
washer. Do not use scouring agents
or all-purpose cleaners. Do not use
steam cleaners.
Wipe the housing and the control panel
with a soft cloth and soapy water only.
Wipe the drum, door seal and inside of
the door with a damp cloth only.
Cleaning the exhaust duct
Inspect and clean the exhaust ducting
at least once a year to prevent
clogging. A partially clogged exhaust
will lengthen the drying time and will
result in poor performance of the dryer.
Turn off the circuit breaker
Unplug the dryer from the power
supply.
Disconnect the duct from the
dryer.
Vacuum the inside of the duct to
remove any accumulation of lint or
debris.
Reconnect the duct.
Professional duct cleaning is
recommended. See page 18.
Cleaning the moisture
sensor
The moisture sensor has to be cleaned
periodically because a fine layer of
transparent buildup is deposited on the
sensors.
This deposit can easily be removed by
wiping the sensors (the two bars next
to the lint filter) with a cloth and a little
white vinegar.
Use white vinegar only!
Clean the moisture sensor once a
month.
Cleaning the lint filter
housing
Lint and small debris may accumulate
in the lower portion of the lint filter
opening. With the lint filter removed,
accumulated lint can be seen and
easily removed with a vaccum cleaner
using a narrow crevice cleaning tool.
If you do not have a crevice cleaning
tool that will reach to the bottom of the
opening, you may contact Customer
Service for a listof sources and
recommended attachments.
Cleaning the Steam
nozzle
Once a year, inspect the nozzle outlet.
If you suspect blockage, wipe the
outside of the nozzle with a cloth
moistened with vinegar. Ifthe nozzle is
completely blocked, consult the
troubleshooting guide (see page 31) for
removal and cleaning instructions. If
the nozzle remains blocked, call
customer service (see page 32).
Change the light bulb
The dryer light turns on inside the drum
when you open the door and stays on
for for about 5 minutes or until the door
is closed. The light turns off about 4
seconds after the door is closed.
To change the light bulb:
Set program selector to "Off".
Turn off the circuit breaker.
Unplug the dryer from the power
supply.
Open the door and locate the
dryer light on the upper left side of
the seal.
Loosen the screw and open the
dryer light cover.
Turn bulb counterclockwise.
Replace the bulb with a new
appliance bulb only (obtainable
through parts department).
Any accumulation of lint or debris
should be removed at least once a
month using your vacuum cleaner.
%
Parts are available at
www.boschappliances.com
or by calling 1 800 944-2904.
Replace the cover and secure with
the screw.
Plug the dryer back into the power
supply.
Turn on the circuit breaker.
29
Page 30

Troubleshooting
TO AVOID RISK OF
ELECTRICAL SHOCK!
Repairs or replacement of parts
shall be carried out by qualified
technicians or licensed
electricians only_
Before calling Customer Service, check
whether you can rectify the fault
yourself by means of the following
table.
If a fault cannot be rectified or a repair
is required:
1. Set program selector to "Off".
2. Turn off the circuit breaker.
3. Pullthe main plug out of the
socket.
4. Call customer service
(see page 32).
Troubleshooting items listed below may
not be covered by warranty service
Please rule out any of these issues
before calling for service.
Problem
Dryerdoesnotstart,
"Start!Pause"indicatorlight doesnot
illuminate,
Cyclehasbeeninterrupted.A warning
signalis emittedandthe displayshows
"CLn",
Cyclehasbeeninterrupted.A warning
signalis emittedandthe displayshows
"E:12",
Degreeof dryinghasnotbeenreached
or the dryingtimeistoo long,
Displaymayindicate"E:03",
Drumlightdoesnotfunction,
Possiblecause
Mainplugnot insertedat allor notinsertedcorrectly,
A fuseor circuitbreakerhastripped,
"Start/Pause"buttonnotpressed,
Noprogramselected,
Doornotclosed,
Ambienttemperaturebelow41°F(5°C,)
Lintfilter dirty,
Exhaustairduct is blockedortoo long,
Faultin programsequenceor malfunction,
Theroom/cabinetisnot adequatelyventilated,
Moisturesensordirty,
Exhaustair ductis blockedoristoo long,
Lintfilter dirty,
Laundrywastoowet,
Unsuitableprogramselected,
Maximumdryingtime wasexceeded,
Motorlimittemperaturewasexceeded,
Degreeof drynessnotcorrectlyset
Noprogramselected,
Lightbulbdefective,light bulbburnedout,
Nopowersupply,
Lightbulbis loose,
Remedialaction
Insertmainplugcorrectly,
Replacefuseor resetcircuitbreaker,
Press"Start/Pause"button,
Selectprogram,
Closedoor,
Increaseroomtemperature,
Cleanthe lintfilter asdescribedonpage27,
Switchthedryeroff/switchonagain,Ifthis doesnot
clearthe errorcode,callCustomerService(pg,32),
Cleanexhaustair duct,Reduceexhaustair ductto
maximumlengthasdescribedonpage18,
Switchthedryeroff/switchon again,
Switchoffdryer,leavetocooldownfor30 min,
switchon again,
Restartprogram,
Provideanadequatesupplyoffreshair,
Switchoff/switchonagain,
Cleanmoisturesensoras describedon page29,
Switchthedryeroff/switchon again,
Cleanexhaustair duct,Reduceexhaustair ductto
maximumlengthasdescribedonpage18,
Switchthedryeroff/switchon again,
Cleanfilterasdescribedonpage27,
Switchthedryeroff/switchon again,
Spinlaundryat higherspeedinthe washing
machine,Switchthe dryeroff/switchonagain,
Selectprogramwithaid oftheprogramselection
table(seepage22),Switchthedryeroff/switchon
again,
Cleanlintfilter (seepage27),
Checkexhaustair duct,
Spinlaundryata higherspeedin yourwasher,
Switchoffdryer,leavetocooldownfor30 min,
Switchonagain,Startprogram,
800 Series,Changesettingsfor degreeof dryness,
seepage25
Selectprogram,
Replaceburnedout bulbandreinstallthecoveras
directedon page29,
Checkpowersupply,
Removethebulbcoverandif bulbis loose,tighten
bulb,Reinstallthe coveras directedon page29,
3O
Page 31

Troubleshooting (continued)
Problem Possiblecause Remedialaction
"Start/Pause"indicatorlight doesnot Faultin programsequenceor malfunction. Switchoffdryer,leavetocooldownfor30 min,
illuminate."WrinkleBlock/Finished" switchon again.
indicatorlights. Restartprogram.
Thedisplayshows"000".
LintfilterLEDis blinkingafterthe lint Noactionrequired.Lightwillstopblinking.
filter hasbeencleaned
Displayshows.... Placelaundryondryerrack. Restartprogram.
Unusualnoise:thumpingsound
rockingofthe dryer
Unusualnoise:Rhythmicvibration
Waterisnot sprayedintotheunit
duringSteamcycles
LEDorbuttonilluminatedoncontrol Faultcondition
panelwhenCycleSelectoristurnedto
"Off"position
Blinkingoflint filter LEDisnotanindicationof a
problem.It is usedonlyasa reminder.
Laundrydetectedindrumduringwoolprogram
(laundrynoton rack)
Drumsuspensionrollersneedtimeto warmup.
Dryeris not level.Unusualnoise:Steadyvibrationd,
Laundryballedupcausingloadto bounce.
Watertap(s)notturnedon.
Nozzledoesnot spraywateradequately.
Blockednozzle
Noactionrequired.Assuspensionsystemrollers
warmupthumpingwill decreaseandshouldstop
within2 to 3 minutesof dryeruse
Levelthedryer(seeusermanualsection"Installation
Instructons"
Stopdryer,separateloaditems,restartdryer.
Turnonwatertap.
Wipetheoutsideof the nozzlewitha clothmoistened
withvinegar.If thisdoesnotrestorethenozzleto
spraying,see"Blockednozzle"remedialaction
below.
Removethenozzleusinga7/16 inch(11 mm)socket
wrench. Placethe nozzleintoa containerfilledwith
enoughwhitevinegartocoverthe nozzle.Allowthe
nozzleto soakforfive minuntes,thenscrubthe
nozzletip gentlywitha toothbrushto removeresidue.
Rinsethenozzleandreinsertit backintothedryer
andhandtighten,thentighten1 additionalturnwith
thewrench.
Turnoffthe circuitbreakerandcallCustomerService
(pg.32).
31
Page 32

SERVICE and REPAIR
WARNING - Label all wires prior
to disconnection when servicing
controls. Wiring errors can cause
improper operation that could
cause senous damage to the
appliance or personal injury.
Verify .proper operation after
servicing.
Bosch dryers require no special care
other than the care and cleaning noted
in the Cleaning and Care section.
D If you are having a problem with
your dryer, please refer to the
troubleshooting table on page 30,
before calling for service.
If service becomes necessary, contact
your dealer or installer or an authorized
service center. Do not attempt to repair
the appliance yourself. Any work
performed by unauthorized personnel
may void the warranty.
If you are having a problem with your
Bosch dryer and are not pleased with
the service you have received:
First, please contact your installer
or the Bosch Authorized Service
Contractor in your area and
explain to them why you are not
satisfied. This will usually correct
the problem.
If, after working with your installer
or service person, the problem still
has not been resolved to your
satisfaction, please let us know by
either writing to us at,
BSH Home Appliances Corporation
5551 McFadden Avenue
Huntington Beach, CA 92649
or, calling us at
1-800-944-2904.
Please be sure to include (if writing) or
have available (ifcalling) the following
information:
Model Number
Serial Number
Date of Original Purchase
Date Problem Originated
Explanation of Problem
Also, if writing, please be sure to
include a daytime telephone number
and a copy of the sales invoice.
You will find the model number and
serial number information on the rating
plate located on the inside of the front
panel.
The image below shows the
approximate location of the rating plate.
The model number has a rectangle
around it. The serial number is located
below the model number.
An example is shown below.
Serial-No. (N°SERIE): 9999xxxxxxxxxxxxxx j
.... Type WAT1
= V/AC ~ 60 HZ I 22A - ....
.j /j
The manufacturer reserves the right to
make changes in the product or
manual without notification.
32
Page 33

STATEMENT OF LIMITED PRODUCT WARRANTY
Bosch VisionTMClothes Dryer
What this Warranty Covers & Who it Applies to: The limited warranty provided by BSH Home Appliances Corporation (Bosch)
in this Statement of Limited Product Warranty applies only to the Bosch Vision TMClothes Dryer ("Product") sold to you, the first
using purchaser, but strictly conditioned on the Product having been purchased: (1)for your normal, household (non commercial)
use, and has infact at all times only been used for normal household purposes (any commercial use or setting of the Product
automatically voids the warrant_y);(2) new at retail (not a display, "as is", or previously returned model) purchased directly by the
end-user consumer, and not for resale, or commercial use; and (3) within the United States or Canada, and has at all times
remained within the country of original purchase. The warranties stated herein apply only to the first purchaser of the Product and
are not transferable. Bosch reserves the right to request proof of purchase at the time any warranty claim is submitted to confirm
that the Product falls within the scope of this limited product warranty. The warranty is automatically void ifthe Product was a
display model, sold "as is", tampered with, a damaged or "scratch and dent" model, or a previously returned model, a free
give away, charitable donation or contest prize.
• Please make sure to return your registration card; while not necessary to effectuate warranty coverage, it is the best way for
Bosch to notify you in the unlikely event of a safety notice or product recall.
How Long the Warranty Lasts: Bosch warrants that the Product is free from defects in materials and workmanship for a period
of three hundred sixty five days (365) days from the date of purchase. The foregoing timeline begins to run upon the date of
purchase, and shall not be stalled, tolled, extended, or suspended, for any reason whatsoever.
Repair/Replace as Your Exclusive Remedy: During this warranty period, Bosch or one of its authorized service providers will
repair your Product without charge to you (subject to certain limitations stated herein) if your Product proves to have been
manufactured with a defect in materials or workmanship. If reasonable attempts to repair the Product have been made without
success, then Bosch will replace your Product (upgraded models may be available to you, in Bosch's sole discretion, for an
additional charge). All removed parts and components shall become the property of Bosch at its sole option. All replaced and/or
repaired parts shall assume the identity of the original part for purposes of this warranty and this warranty shall not be extended
with respect to such parts. Bosch's sole liability and responsibility hereunder is to repair manufacturer-defective Product only,
using a Bosch authorized service provider during normal business hours. For safety and property damage concerns, Bosch
highly recommends that you do not attempt to repair the Product yourself, or use an un authorized servicer; Bosch will have no
responsibility or liability for repairs or work performed by a non authorized servicer. If you choose to have someone other than an
authorized service provider work on your Product, THIS WARRANTY WILL AUTOMATICALLY BECOME NULL AND VOID.
Authorized service providers are those persons or companies that have been specially trained on Bosch products, and who
possess, in Bosch's opinion, a superior reputation for customer service and technical ability (note that they are independent
entities and are not agents, partners, affiliates or representatives of Bosch). Notwithstanding the foregoing, Bosch will not incur
any liability, or have responsibility, for the Product if it is located in a remote area (more than 100 miles from an authorized service
provider) or is reasonably inaccessible, hazardous, threatening, or treacherous locale, surroundings, or environment; in any such
event, if you request, Bosch would still pay for labor and parts and ship the parts to the nearest authorized service provider, but
you would still be fully liable and responsible for any travel time or other special charges by the service company, assuming they
agree to make the service call.
Extended Limited Warranty:
LENGTHOFWARRANTY
2 YearLimitedWarranty
FromDateof Purchase
2 YearLimitedWarrantyonElectronics
FromDateof Purchase
2 YearLimitedWarrantyon Motor
FromDateof Purchase
Out of Warranty Product: Bosch is under no obligation, at law or otherwise, to provide you with any concessions, including
repairs, pro rates, or Product replacement, once this warranty has expired.
Warranty Exclusions: The warranty coverage described herein excludes all defects or damage that are not the direct fault of
Bosch, including without limitation, one or more of the following: (1) use of the Product in anything other than its normal,
customary and intended manner (including without limitation, any form of commercial use, use or storage of an indoor product
SCOPEOFWARRANTY
Boschwillprovidereplacementparts,freeofcharge,for anycomponent
partthat provesdefectiveunderconditionsof normalhomeuseduring
thefirst two yearsfromthedateof purchase,normal(non expedited)
shippingcostsincluded,laborchargesexcluded.
Boschwillrepairor replace,freeof charge,anymicroprocessoror printed
circuitboardthatprovesdefectiveunderconditionsof normalhomeuse
duringthefirst two yearsfromthedateof purchase,laborcharges
excluded.
Boschwillrepairor replace,freeof charge,anymotororcomponentpart
ofthe motorthatprovesdefectiveunderconditionsof normalhomeuse
duringthefirst two yearsfromthedateof purchase,laborcharges
excluded.
33
Page 34

outdoors, use of the Product in conjunction with air or water going vessels); (2)any party's willful misconduct, negligence,
misuse, abuse, accidents, neglect, improper operation, failure to maintain, improper or negligent installation, tampering, failure to
follow operating instructions, mishandling, unauthorized service (including self-performed "fixing" or exploration of the
appliance's internal workings); (3) adjustment, alteration or modification of any kind; (4) a failure to comply with any applicable
state, local, city, or county electrical, plumbing and/or building codes, regulations, or laws, including failure to install the product in
strict conformity with local fire and building codes and regulations; (5) ordinary wear and tear, spills of food, liquid, grease
accumulations, or other substances that accumulate on, in, or around the Product; and (6) any external, elemental and/or
environmental forces and factors, including without limitation, rain, wind, sand, floods, fires, mud slides, freezing temperatures,
excessive moisture or extended exposure to humidity, lightning, power surges, structural failures surrounding the appliance, and
acts of God. In no event shall Bosch have any liability or responsibility whatsoever for damage to surrounding property, including
cabinetry, floors, ceilings, and other structures or objects around the Product. Also excluded from this warranty are scratches,
nicks, minor dents, and cosmetic damages on external surfaces and exposed parts; Products on which the serial numbers have
been altered, defaced, or removed; service visits to teach you how to use the Product, or visits where there is nothing wrong with
the Product; correction of installation problems (you are solely responsible for any structure and setting for the Product, including
all electrical, plumbing or other connecting facilities, for proper foundation/flooring, and for any alterations including without
limitation cabinetry, walls, floors, shelving, etc.); and resetting of breakers or fuses. TO THE EXTENT ALLOWED BY LAW, THIS
WARRANTY SETS OUT YOUR EXCLUSIVE REMEDIES WITH RESPECT TO PRODUCT, WHETHER THE CLAIM ARISES IN
CONTRACT OR TORT (INCLUDING STRICT LIABILITY, OR NEGLIGENCE) OR OTHERWISE. THIS WARRANTY IS IN LIEU OF
ALL OTHER WARRANTIES, WHETHER EXPRESS OR IMPLIED. ANY WARRANTY IMPLIED BY LAW, WHETHER FOR
MERCHANTABILITY OR FITNESS FOR A PARTICULAR PURPOSE, OR OTHERWISE, SHALL BE EFFECTIVEONLY FOR THE
PERIOD THAT THIS EXPRESS LIMITED WARRANTY IS EFFECTIVE. INNO EVENT WILL THE MANUFACTURER BE LIABLE FOR
CONSEQUENTIAL, SPECIAL, INCIDENTAL, INDIRECT, "BUSINESS LOSS", AND/OR PUNITIVE DAMAGES, LOSSES, OR
EXPENSES, INCLUDING WITHOUT LIMITATION TIME AWAY FROM WORK, HOTELS AND/OR RESTAURANT MEALS,
REMODELLING EXPENSES IN EXCESS OF DIRECT DAMAGES WHICH ARE DEFINITIVELY CAUSED EXCLUSIVELY BY Bosch,
OR OTHERWISE. SOME STATES DO NOT ALLOW THE EXCLUSION OR LIMITATION OF INCIDENTAL OR CONSEQUENTIAL
DAMAGES, AND SOME STATES DO NOT ALLOW LIMITATIONS ON HOW LONG IMPLIED WARRANTY LASTS, SO THE ABOVE
LIMITATIONS MAY NOT APPLY TO YOU. THIS WARRANTY GIVES YOU SPECIFIC LEGAL RIGHTS, AND YOU MAY ALSO
HAVE OTHER RIGHTS, WHICH VARY FROM STATE TO STATE. No attempt to alter, modify or amend this warranty shall be
effective unless authorized in writing by an officer of BSH.
How to Obtain Warranty Service: To obtain warranty service for your Product, you should contact the nearest Bosch
authorized service center.
BSH Home Appliances Corporation 5551 McFadden Avenue, Huntington Beach, CA 92649 / 800 944 2904
34
Page 35

Carateristicas y ventajas de los neuva secadora
Tecnologia ActiveDry TI_4
La humedad y los niveles de temperatura se controlan
continuamente, a fin de Iograr resultados de secado
precisos para una paleta amplia de tejidos diferentes.
Cualquier cosa desde camisetas, hasta las sabanas del
bebe, salen tibias y suaves en todo momento.
El monitoreo constante garantiza el uso de energia mas
bajo posible y reduce hasta un 50% del consumo por a_o.
EcoSmart TI_4
La tecnolog[a EcoSmart TM utiliza una red de sensores en la
secadora Bosch Vision para ciclos que conservan la mayor
cantidad de energia posible, a lavez que mantienen un
rendimiento de secado superior. AI ajustar cuan mojada
esta la carga y al regular la temperatura para que nunca se
produzca un exceso de calor, es evidente que Bosch ofrece
algunas de las secadoras mas eficientes del mercado.
EcoAction TM
Esta opcion le brinda la capacidad de reducir el consumo
de energia en hasta un 10%. AI seleccionar esta opcion, la
temperatura se reduce para ahorrar recursos, a lavez que
se extiende levemente el ciclo para asegurar un secado
adecuado.
DynamicAir TI_4
El sistema DynamicAir TMde Bosch Vision brinda calor suave
y un gran volumen de aire en eltambor de secadora mas
delicado que existe. Unicamente Bosch Vision puede
ofrecer un tambor de secadora de una sola pieza con una
proteccion trasera cubierta de orificios para distribuir
adecuadamente el aire sobre su ropa y, de esta form&
brindarle el secado mas suave y efectivo posible.
Wrinkle Block '_
A veces no es posible quitar la ropa apenas suena el
zumbldo. Wrinkle Block (Protecc_on contra arrugado)
provee una hora de giro intermitente del tambor y evita la
formacion de arrugas y, en definitiva, reduce el tiempo de
planchado.
Tambores de acero inoxidable
El tambor de lavado Nexxt TM tiene centenas de orificios de
bordes redoblados, que permiten a sus prendas rodar
suavmente sin presentar enganches.
Bisagra de la puerta de 160 °
La puerta de lasecadora se abre hasta 160°, Io que hace
mas facil cargar y descargar la ropa. Las puertas de la
lavadora y de la secadora tambien se abren en direcciones
opuestas, de modo que si se las instala una al lado de la
otra, transferir su ropa h0meda hacia la secadora se
convierte en una tarea sin esfuerzo.
Funcionamiento silenciosos
Los electrodomesticos de lavado Bosch usan motores sin
escobillas, sistemas de bomba suspendidos y materiales de
insonorizacion especiales para hacerlas excepcionalmente
silenciosas mientras estan funcionando. Un
funcionamiento silencioso significa que pueden instalarse
practicamente en cualquier lugar del hogar sin causar
bullicio.
Estante de secado
La rejilla de la secadora protege los tejidos mas delicados o
un par de tenis, Io que permite que se sequen sin girar. Es
una pieza estandar del modelo Premium y esta disponible
como accesorio para todos los modelos.
Dispositivo atrapapelusa
El dispositivo atrapapelusa de la secadora esta ubicado
comodamente en la carcasa del electrodomestico debajo
de la puerta de la secadora para permitir el facil acceso. El
filtro de malla fina del dispositivo atrapapelusa captura
incluso las partfculas de pelusa mas peque_as. Ademas,
para aumentar la eficiencia de secado, existe una luz de
LED en el filtro atrapapelusa en el panel de control que se
ilumina cuando el filtro necesita una limpieza inmediata.
Ciclos de vapor
Los ciclos Steam que se ofrecen en modelos selectos
utilizan humedad adicional para ayudar a distender el tejido,
aflojar las arrugas y refrescar las prendas de mezcla de
algodon para reducir los olores.
35
Page 36

indice
Definiciones .........................................................................................
INSTRUCCIONES IMPORTANTES DE SEGURIDAD .....................................................
INSTRUCCIONES PARA LA PUESTA A TIERRA .........................................................
INSTRUCCIONES PARA LA INSTALACION .............................................................
Introduccion ......................................................................................
Informacion sobre eliminacion de residuos .............................................................
Antes de instalar el secador ..........................................................................
Lista de comprobacion para la instalacion ..............................................................
Emplazamiento ....................................................................................
Dimensiones ......................................................................................
Como invertir la bisagra de la puerta ...................................................................
Tipos de instalacion ................................................................................
Conexion electrica .................................................................................
Conexion del tubo de aire de salida ...................................................................
Accesorios ........................................................................................
Preparar el secador para eltransporte, paso a paso .....................................................
INSTRUCCIONES DE FUNCIONAMIENTO ..............................................................
Panel de manejo ...................................................................................
Informaciones para su seguridad ......................................................................
Proteccion del medio ambiente .......................................................................
Ropa ...............................................................................................
Identificacion de prendas ............................................................................
Consejos para el secado ............................................................................
Seleccion del ciclo ...................................................................................
Opciones (Delicates [Ropa fina], ECO Action [Accion ecologica]) ...........................................
Indicadores de LED de la secuencia del ciclo ...........................................................
Tabla de seleccion de ciclos .........................................................................
Programas automaticos .............................................................................
Steam ciclos ......................................................................................
Programas temporizados ............................................................................
Opciones adicionales Serie 800 ......................................................................
Funcionamiento .....................................................................................
Uso del secador ...................................................................................
Limpiar el filtro para pelusas .........................................................................
Uso de la canastilla (opciones) .......................................................................
Limpieza y cuidado ..................................................................................
Limpieza del secador ...............................................................................
Limpiar el tubo de aire de salida ......................................................................
Limpiar el sensor de humedad .......................................................................
Como limpiar la carcasa del filtro atrapapelusa ..........................................................
Como limpiar la boquilla Steam .......................................................................
Cambiar la lamparilla ...............................................................................
Localizacion de fallos ................................................................................
SERVICIO y REPARACIONES ........................................................................
DECLARACION DE GARANTiA LIMITADA DEL PRODUCTO ..............................................
37
38
39
4O
4O
4O
4O
41
41
41
42
45
47
5O
52
53
54
54
55
55
55
55
55
56
56
57
57
58
58
58
59
60
6O
61
61
63
63
63
63
63
63
63
64
66
67
36
Page 37

iFelicitaciones!
El secador cumple con la norma
UL 2158/CAN/CSA C22.2 No.
112 97 Secadores de ropa.
Uno de las caracteristicas
fundamentales de su secador es el
bajo consumo de energia.
Una filosofia facil en el manejo,
una gran variedad de programas de
lavado y una sensacion de solidez,
hacen de este secador un asistente
sumamente Otilen su hogar.
El secador Bosch presenta las
siguientes caracter[sticas estandar:
un sistema de secado de alto
rendimiento
un tambor de acero inoxidable
grande con una capacidad hasta
17.6 Ibs (8 kg)
Gran abertura de carga con un
sistema de traba para la puerta
con funcion de detencion
automatica de tambor
funcionamiento excepcionalmente
sereno
ciclos automaticos controlados
por sensor
Ciclos programados Secadoras de
las Series
300 y 500: ciclos de 20, 40 y 60
minutos
Secadoras de la Serie 800:10 a
150 minutos (en incrementos de
10 minutos)
La funcion Wrinkle Block ©
(Proteccion contra arrugado) hace
girar la ropa periodicamente
durante hasta una hora despues
de secarla para ayudar a disminuir
la cantidad de arrugas
Todo secador que deja nuestra planta,
ha aprobado un control de rendimiento
realistico y esta en perfectas
condiciones de funcionamiento.
Si tiene cualquier pregunta respecto de
la instalacion de nuestros secadores,
nuestro grupo de servicio a clientes,
gustosamente le respondera.
En nuestra pagina de web, encontrara
mas informacion referida a nuestros
productos y su seleccion:
www.boschappliances.com
Informacion
Modelos que abarca este
manual del usuario
La presentacion
escribe a ma.quina
Las instrucciones en este manual se
refieren a secadores con dos tipos '
diferentes de presentacion.
300 y 500 secadores
de laSene tienen una
presentaciOn DIRIGIDA
800 Secadores de la
Sene tienen una
presentacion de VCL
La instaladon, operando e instrucdones
de mantenimiento son el mismo para
secadores con cualquier de tipo
presentacion menos donde noto.
La operadon del menO del secador de VCL
y opdones relacionadas son descntos en
la 800 Sede secciOn Adidonal de Opdones
de este manual.
Los Cidos del vapor estb.n disponibles
en 500 y 800 Secadores de laSerie
con el logo de Vapor en el panel.
Steam
Definiciones
ADVERTENClA - Esto significa que
puede resultar la muerte o lesiones
graves debido a la inobservancia de
esta advertencia.
CUIDADO - Esto significa que
pueden resultar lesiones leves o
moderadas debido a la
inobservancia de esta
advertencia.
AVlSO - Esto significa que se
pueden producir da_os en et
etectrodomestico o en los bienes
debido a la inobservancia de
esta advertencia.
D Este simbolo se utiliza para Ilamar
la atencion del usuario respecto de
algo en particular.
Rogamos leer y seguir estas
instrucciones de funcionamiento
e instalacion conjuntamente con todas
aquellas informaciones entregadas con
nuestra maquina de lavar.
37
Page 38

,/k INSTRUCCIONES IMPORTANTES DE SEGURIDAD
Las advertencias e instrucciones de
seguridad de este manual no
pueden cubrir todos los riesgos,
condiciones y situaciones posibles
que puedan surgir. Aplique el
sentido com0n y tenga cuidado
durante la instalacion, el
mantenimiento y la operacion de
este o cualquier otro
electrodomestico.
ADVERTENCIA: Para reducir el
riesgo de incendio, descargas
electricas, lesiones de gravedad o
muerte y/o da_os al emplear su
secador, tome las siguientes
precauciones basicas.
1. Lea todas las instrucciones antes
de utilizar el secador.
Los secadores Bosch se entregan
con instrucciones de manejo,
cuidado e instalaci0n.
2. No seque prendas que
anteriormente hayan sido
limpiadas, lavadas, remojadas, o
se le hayan quitado las manchas
con gasolina, limpiadores en seco,
solventes, otros productos
inflamables o explosivas de las
cuales puedan desprenderse
vapores que puedan encenderse
o explotar.
Para reducir el riesgo de incendio,
no ponga ropa, pa_os para la
limpieza, estropajos o
cosas similares en el secador, si
contienen sustancias infiamables
como aceites vegetales, aceite de
cocina, aceites a base de petroleo
o destilados de estos, ceras,
grasas, etc. Estas prendas pueden
contener sustancias infiamables
que pueden producir humo o
causar un incendio
espontaneamente aun despues
de haberlas lavado.
No coloque articulos expuestos a
aceites de cocina en la secadora.
Las prendas contaminadas con
aceites de cocina pueden
contribuir a reacciones quimicas
que pueden causar que la carga
de ropa se prenda fuego.
, 3El secador debe usarse
0nicamente para Io que fue
dise_ado.
4.5Cuando los ni_os Ilegan a una
edad adecuada para operar
equipos electrodomesticos, es
responsabilidad legal de los
padres o reponsables legales,
hacerlos instruir por personal
adecuadamente califacado
respecto de las medidas de
seguridad correspondientes
5. No permita que los ni_os jueguen
sobre el electrodomestico ni con el
en ning0n momento; esto puede
provocar lesiones graves o la
muerte. Los ni_os deben
permanecer a una distancia
segura de los electrodomesticos
en todo momento. Se debe
permitir a los ni_os estar cerca de
un electrodomestico solamente si
estan supervisados estrictamente
yen forma constante por un
adulto.
6. No permita que los juguetes u
otros objetos de los ni_os que
puedan alentar a que los ni_os se
suban a la secadora se guarden
encima de la secadora, dentro de
ella, en los estantes ni en
gabinetes u otras areas de
almacenamiento adyacentes a la
secadora.
7. No permita que los juguetes u
otros objetos de los ni_os que
puedan alentar a que los ni_os se
suban a la secadora se guarden
encima de la secadora, dentro de
ella, en los estantes ni en
gabinetes u otras areas de
almacenamiento adyacentes a la
secadora.
8. No permita que nadie se suba,
incline o cuelgue de ninguna parte
de la secadora, incluidos los
componentes que sobresalgan,
como la puerta del
electrodomestico o un estante
extra[ble.
9. Para reducir el riesgo de
intoxicacion o quemaduras
qu[micas, mantenga todos los
productos de limpieza fuera del
alcance de los ni_os.
10. AImacene todos los productos
quimicos y aditivos en un lugar
fresco y seco de acuerdo con las
instrucciones del fabricante.
Aseg0rese de que los ni_os no
tengan acceso a ellos. No debe
colocar gasolina, materiales
combustibles, materiales que
produzcan vapores inflamables,
liquidos infiamables ni sustancias
que representen un riesgo de
incendio
cerca de la secadora.
11. Mantenga alejadas alas mascotas
de la secadora.
12. ANTES DE SACAR EL
ELECTRODOMESTICO DE
SERVICIO, QUITE LA PUERTA DE
ACCESSO AL COMPARTIMIENTO
DE SECADO.
13. No introduzca las manos en el
electrodomestico mientras el
tambor esta girando.
14. No instale ni deje este
electrodomestico a la intemperie o
expuesto a elementos como
agua/humedad, suciedad, aire
corrosivo/salado y frio excesivo.
15. No juegue con los controles.
16. No reparar o reemplazar ninguna
parte del secador ni intentar
cualquier tipo de servicio a menos
que haya sido recomendado en
las instrucciones de
mantenimiento o en instrucciones
de reparacion para usuarios, que
se hayan comprendido
plenamente y para las que se
disponga de habilidad.
17. No utilice suavizadores para
prendas u otros productos para
eliminar las cargas estaticas, salvo
que esten recomendados por el
fabricante de las prendas.
18. No seque con calor, articulos que
contengan espuma de goma
(puede denominarse espuma de
latex) u otros materiales que se
parezcan a los mencionados.
Las espumas de goma pueden
encenderse por autoignicion
cuando se los calienta bajo ciertas
circunstancias.
19. No seque prendas que contengan
olefina spunbonded. Laolefina
spunbonded puede derretirse y
encenderse por combustion
espontanea.
20. Verifique la pantalla atrapapelusa
antes de cada carga de ropa y
limpiela seg0n sea necesario. El
exceso de pelusa acumulada
38
Page 39

puede da_ar la secadora y crear
un posible riesgo de incendio.
21. Mantenga el area alrededor de la
salida de aire y las zonas
adyacentes libres de pelusas,
suciedad y polvo. La obstruccion
de la abertura puede reducir el
flujo de aire y producir un
sobrecalentamiento.
22. El interior de la maquina y de la
salida de aire debe limpiarse
periodicamente por personal
calificado.
23. Aseg0rese siempre que el secador
ha sido desconectado de la
alimentacion electrica, antes de
intentar cualquier trabajo de
mantenimiento. Desconecte el
cable de alimentacion, tomandolo
del tomacorriente y no del cable.
24. Para evitar un riesgo de incendio,
no utilice un cable de
prolongacion, un adaptador ni
ning0n otro conector o cable
electrico no suministrado por el
fabricante para conectar el
secador a laalimentacion de
energia electrica. Los secadores
son maquinas potentes y deben
tener tomas de corriente electrica
exclusivas.
25. Siempre verifique que los bolsillos
de la ropa esten vacios y quite
todos los articulos de la ropa antes
de ponerla en el secador; los
objetos inadecuados pueden
da_ar el secador, y ciertos
artfculos como los encendedores
pueden presentar un riesgo de
incendio.
26. Para reducir el riesgo de incendio y
descargas electricas, no use el
secador si el cable de
alimentacion esta deshilachado o
da_ado, o si los enchufes estan
sueltos.
27. No utilice el secador si se quitaron
las protecciones y/o los paneles, si
faltan piezas o si estan rotas.
28. No elimine lafuncion de los
dispositivos de seguridad.
29. No utilice conductos de material
plastico o materiales flexibles no
metalicos con este
secador. Los conductos fiexibles
de material plastico o materiales
no metalicos pueden
representar un posible riesgo de
incendio.
30. No haga funcionar el secador
antes de asegurarse que fue
instalado de acuerdo con las
INSTRUCCIONES DE
FUNCIONAIENTO y que la
instalacion y puesta a tierra
cumplen con todos los
reglamentos locales y/u otras
reglas y requerimientos de
aplicacion.
31. Fallos en la instalacion, el
mantenimiento y/o operacion del
secador respecto de la
instrucciones del fabricante,
pueden ser causa de lesiones
o da_os.
32. Para evitar da_os en el piso y
tambien en el crecimiento de
moho, no permita que
salpicaduras o derramamientos de
agua se acumulen alrededor o
debajo del secador.
33. Aseg0rese de que todas las
conexiones de agua del secador
tengan una valvula de paso y de
que se encuentren en un lugar
facilmente accesible. Cierre la(s)
valvula(s) de paso del
electrodomestico al final de cada
dia de uso.
34. Verifique las conexiones de la
manguera de Ilenado con
frecuencia para asegurarse de que
esten apretadas y de que no haya
perdidas.
Notas:
A.
Las INSTRUCCIONES
IMPORTANTES DE
SEGURIDAD y los
LLAMADOS DE ATENCION
que se presentan en este
manual no cubren todas las
situaciones posibles que
pueden tener lugar. Deben
aplicarse el sentido comun,
precaucion y cuidado al
instalar, mantener o hacer
funcionar el secador.
B.
Consultar siempre con el
comerciante, distribuidor,
agente de servicio
o fabricante cualquier
problema o bien condiciones
que no se han comprendido
completamente.
C.
Tenga en cuenta tambien las
informaciones de seguridad
que se incluyen en las
INSTRUCCIONES DE
INSTALACION y las
INSTRUCCIONES DE
FUNCIONAMIENTO.
INSTRUCCIONES PARA
LA PUESTA A TIERRA
Este electrodomestico debe
conectarselo a tierra. En caso de fallos
en el funcionamiento o roturas, la
conexion a tierra reduce el riesgo de
descargas electricas, presentando una
via de baja resistencia por la que puede
fluir la corriente.
Su secador se provee sin elcable de
alimentacion. El cable a conec- tar
debe presentar las siguientes
caracteristicas:
Aprobacion UL en USA
208 a 240 volts de valor eficaz
(minimo)
30 amperes
Tipo SRDT o DRT (UL 2158)
Cinco pie de Iongitud (minimo)
La conexion inadecuada de la
puesta a tierra de este equipo
puede conducir a un riesgo elevado
de descargas electricas.
Haga controlar la instalacion por un
electricista calificado si tiene dudas,
a fin de determinar que el secador
este correctamente conectada a
tierra.
NO modifique el enchufe
suministrado con el secador.
Si no es adecuado al tomacorriente,
haga instalar un tomacorriente
adecuado por un electricista
calificado o cambie el cable por uno
que sea adecuado al secador.
CONSERVE ESTAS
INSTRUCCIONES PARA
CONSULTAS
POSTERIORES.
En caso de un cambio de propietario,
este manual debe entregarse
conjuntamente con el secador.
CONSERVE
ESTAS
INSTRUCCIONES
39
Page 40

INSTRUCCIONES PARA LA INSTALACION
IntroducciOn
Lea estas instrucciones completa-
mente y con cuidado. Esto va a evitar
que pierda tiempo y esfuerzo,
permitiendo Iograr un funcionamiento
optimo del secador. AsegOrese de
tener en cuenta todas las advertencias
y precauciones.
ADVERTENCIA Riesgo de
incendio.
La instalacion del secador de ropa
debe ser realizada por un
instalador calificado.
Instale el secador de ropa segOn
las instrucciones del fabricante y
los codigos locales.
No instale un secador de ropa con
materiales de ventilacion de
plastico fiexibles. Si se instala un
conducto de metal flexible (tipo
hoja metalica), debe set de un tipo
especifico identificado por el
fabricante del electrodomestico
como apto para un secador de
ropa. Se sabe que los materiales
de ventilacion fiexibles se hunden,
se aplastan facilmente y atrapan
pelusa. Estas condiciones
obstruyen el flujo de aire del
secador de ropa y aumentan el
riesgo de incendio.
Para reducir el riesgo de lesiones
graves o de muerte, siga todas las
instrucciones de instalacion.
CONSERVE ESTAS
INSTRUCCIONES.
Estas instrucciones para la instala-
cion estan destinadas para ser usadas
por personal calificado. Adicionalmente
a estas instruc-
clones, el secador debe instalarse de
acuerdo con todas las reglas locales o
bien, en su ausencia, con:
en los Estados Unidos,
el National Electric Code,
ANSI/NFPA70 en su Oltima edicion
y las reglas municipales y/o locales
vigentes.
Informaci6n sobre
eliminaci6n de residuos
Eliminacion del embalaje
Mantenga alejados a los ni_os de la
caja de carton y de los
componentes del embalaje. Existe
peligro de asfixia con el plastico y
las cajas plegables.
Ninguno de los materiales del embalaje
es daSino para el medio ambiente y
pueden reciclarse. Rogamos
eliminarlos segOn las normas de
proteccion del mismo.
Rogamos ponerse en contacto con su
vendedor o la autoridad competente
respecto de las disposiciones vigentes.
Desecho de electrodomesticos
viejos
Si el electrodomestico ya no se
encuentra en condiciones de uso,
desconecte el enchufe principal,
corte el cable de alimentacion y
elimine el cable junto con el enchufe
principal. Para evitar que los niSos
queden encerrados dentro del
electrodomestico, retire la puerta.
Para evitar que los niSos al jugar se
pongan en peligro al quedar atrapados,
asegurarse de que el mecanismo de
cierre de la puerta este desactivado o
desmonte la puerta.
iLos electrodomesticos viejos no son
basura! Pueden utilizarse materias
primas valiosas en un reciclado
adecuado al medio ambiente.
Consulte a su distribuidor o autoridad
local acerca de los mejores medios de
eliminacion.
Antes de instalar el
secador
Antes de instalar el secador a un
sistema de conductos utilizado
previamente, asegOrese de que el
sistema este limpio. Se recomienda
realizar una limpieza profesional del
sistema de conductos en forma anual y
al conectar el secador a un sistema de
conductos utilizado previamente.
Mantener limpio el sistema de
conductos reducira el tiempo de
secado y mejorara el rendimiento del
secado.
Desembalaje del
electrodomestico
No levante el electro- domestico
personalmente. Tampoco debe
levantarselo de partes
protuberantes debido al riesgo de
quebraduras.
Retire el embalaje del
electrodomestico con cuidado para
no da_ar las superficies ni las Areas
adyacentes al electrodomestico.
Controle si el secador se ha da_ado
durante el transporte. No conecte un
secador visiblemente da_ado. En caso
de duda, consulte con su vendedor.
Volumen de entrega
El secador se provee sin el cable de
alimentacion. El cable de
alimentacion debe conectarlo un
tecnico calificado o un electricista
con licencia.
Una vez eliminado el embalaje, quite
inmediatamente todos los objetos
contenidos en el tambor.
Emplazamiento
No instale et secador:
en elexterior,
en ambientes donde gotea el
agua,
ceca de materiales inflamables,
en ambientes con riesgo de
congelamiento,
en ambientes donde puede haber
gas u otros combustibles,
en armarios con puertas con traba
El ambiente de emplazamiento debe
poseer una buena ventilacion, de otro
modo el secador trabajara con
rendimiento reducido.
4O
Page 41

No opere el secador a temperaturas
superiores a los 104 °F (40 °C)
o debajo de 41 °F (5 °C). Las tem-
peraturas bajas pueden afectar la
secuencia el programa automatico y
pueden prolongar los tiempos del
secado.
La superficie donde se vaya a instalar el
secador deben estar limpias, parejas y
firmes, iNo instale el secador sobre
alfombras! Compense las
irregularidades en el piso mediante los
pies ajustables en altura.
Instale elsecador y nivelelo un lado
respecto del otro y laparte anterior
respecto de la parte posterior.
Utilice un nivel de alcohol.
iNunca desenrosque totalmente los
pies ajustables!
Eltama_o del area de instalaci0n
depende de las medidas del secador.
iAsegOrese que exista espacio
suficiente para el area de giro de la
puerta!
Dimensiones
Herramientas Otiles
Las siguientes herramientas son 0tiles
para la instalaci0n:
1. Destornillador de cabeza Torx
(T20)
2. Destornillador Phillips (Num. 2)
3. Destornillador de hoja plana (Num.
2)
4. Uave fija (1 pulg./25 mm)
5. Nivel de burbuja
1
3
,
Conecte el suministro de agua
(modelos selectos 0nicamente) a
la parte trasera de la secadora
(consulte la pagina 46 para
obtener instrucciones detalladas).
10.
Instale los conductos del escape si
es necesario.
Siga las instrucciones de
instalaci0n provistas pot el
fabricante de piezas de conductos
apropiado (vet pagina 50)
%
Si las condiciones de espacio son
muy reducidas, se recomienda
montar las primeras partes de la
tuberia antes de ubicar el secador
en su sitio de emplazamiento
definitivo.
NO empuje contra el vidrio de la
puerta del secador, iRiesgo de
rotura!
Medidas Peso
a 27,0" (68,6cm) 125Ibs
b 31,8" (81,0cm) (56,7kg)
c (min)* 36,9" (93,6cm) with
packaging
c 37,8" (95,9cm) 143Ibs
(max)* (64,8kg)
d 22,0" (59,7cm)
angulo160°
e 53,9" (136,9cm)
* min (min.)= patas de la secadora
insertadas completamente, max
(max.)= salidas
Lista de comprobaciOn
para la instalaciOn
1. Quite elsecador de su embalaje.
2. Quite todos los objetos del
tambor.
3. Controle si el secador presenta
da_os visibles.
,
Ubique el secador cerca del sitio
de emplazamiento (consulte la
pagina 40 ).
,
Si hace falta, cambie las bisagras
de la puerta a la izquierda (ver
pagina 42).
,
Si hace falta, instale la salida de
aire del escape lateral o inferior en
el secador (vet pagina 50).
,
Haga colocar el cable de
alimentacion de energia por un
tecnico autorizado
(vet pagina 47).
,
El cheque para la conex_0n "Y",
manga corta de manga y
abastecimiento de agua incluyo
con el secador que embala (ve
pagina 46). (Selecciono modelos
s01o).
NO empuje
el vidrio de la
peurta del secador
11. Ubique el secador en su sitio de
emplazamiento definitivo.
No arrastre el secador pot et
suelo, si los pies ajustabtes
fueron extendidos. En este caso
se da_arian tanto los pies
ajustabtes, como la parte inferior
del secador.
12. Posicione y nivele luego el
secador.
41
Page 42

Si el secador no funciona,
conmOtelo a _Off_.
Consulte en laIocalizacion de
• i!iiiii!illi ti!¸
_i_!_!_i_i!%!ii!ii!ii!ii!ii!ii!ii!_!_!_i_iiiiiiiiii_iiii_iiiii_iii_i_iiii_iii_iiii!i!_!!iii
fallos (verpagina 30) de las
INSTRUCCIONES DE
FUNCIONAMIENTO y
determine el fallo.
retirela de la secadora para que los
pasadores de la bisagra se
deslicen fuera de las ranuras de la
puerta de la secadora.
La secadora debe estar nivelada con
las cuatro patas firmemente apoyadas
en el suelo. La secadora no debe
tambalearse. Si la secadora no esta
nivelada o si se tambalea, deben
ajustarse las patas. Ajuste las patas de
altura ajustable usando la Ilave de 1
pulg. (25 mm) hasta que la secadora no
se balancee y este nivelada, tanto de
adelante hacia atras como de lado a
lado.
Despues de realizar los ajustes
preliminares, presione hacia abajo
cada esquina de la secadora para
asegurarse de que la unidad no se
tambalea. Sial presionar hacia
abajo en una esquina esto causa
que la secadora se tambalee, baje
la pata de la secadora de esa
esquina hasta que la pata se
apoye firmemente en el piso.
Instale lasecadora y nivelela de lado a
lado y de adelante hacia atras. Use un
nivel de burbuja, iNunca retire las patas
de altura ajustable!
13. Conecte el tubo de ventilacion a la
salida de aire del secador
(consulte la pagina 50).
14. Conecte el tomacorriente en el
enchufe correspondiente (consulte
la pagina 47).
15. Lea Is instrucciones de
funcionamiento, para enterarse
como funciona su secador
(consulte la pagina 54).
16. EfectOe un control del
electrodomestico:
Controle que el tambor este
vacio.
Cierre la puerta del secador.
Coloque la secadora en Extra
Dry (Secado extra) y luego
presione el boton Start/Pause
(Inicio/Pausa).
Despues de entre 3 y 5
minutos, presione el boton
Start/Pause (Inicio/Pausa) y
abra la puerta.
Si el interior del secador esta
tibio, significa que esta
correctamente conectado.
Apague el secador.
C6mo invertir la
bisagra de la
puerta
La secadora viene de fabrica con la
bisagra del lado derecho de la puerta.
De ser necesario, se puede invertir la
bisagra de la puerta.
Herramientas necesarias
Destornillador con cabeza de estrella
T20
Piezas para invertir la bisagra
Bisagra (con 4 manguitos de plastico
blanco)
Placa de cubierta de la bisagra
Conjunto de la puerta
Procedimiento para invertir la
bisagra
1. Desenchufe la secadora.
2. Prepare una superficie firme, plana
y acolchada para colocar la puerta
de la secadora mientras cambia la
bisagra.
3. Abra la puerta de la secadora para
exponer la cubierta de la bisagra
completamente.
4. Retire los 4 tornillos que
mantienen a la cubierta de la
bisagra en su lugar.
retire
los
4 tornillos
Deje a un lado la cubierta junto
con los cuatro tornillos para volver
a instalarlos mas tarde.
5. Gire la puerta de modo que quede
perpendicular a la parte delantera
de la lavadora. Deslice la puerta y
AsegOrese
de que los
cuatro
manguitos
de plb.stico
permanez
can sobre
los
pasadores
de la
bisagra.
No deje que los 4 manguitos de
plastico se caigan de los
pasadores de la bisagra. Si
alguno de los manguito se cae,
vuelva a instalarlo en los
pasadores de la bisagra antes de
volver a instalar la puerta.
6. Apoye la puerta de la secadora
boca abajo sobre una superficie
firme, plana y acolchada, con la
parte inferior de la puerta mirando
hacia usted.
7. Retire los dos tornillos que
sostienen la placa de cubierta del
empujador en su lugar. Sostenga
el empujador mientras levanta la
cubierta para mantener las piezas
juntas en su lugar y deje a un lado
el conjunto para volver a instalarlo
mas tarde.
42
Page 43

8. Retire el tornillo que estaba oculto
por la cubierta de la placa del
empujador.
9. Retire los cuatro tornilios que
sostienen el anillo delantero al
cuerpo de la puerta.
I
/
13. Ffjese en la nueva posicion del
vidrio de la cubierta. El borde
anterior del mango de vidrio debe
haberse movido 90 grados hacia
la derecha desde el punto inicial,
como se muestra en la siguiente
ilustracion, con la letra (A).
18. Gire lacubierta del empujador y el
empujador 180 grados para que el
conjunto calce en el area de
instalacion en el lado opuesto de
la puerta (donde se encontraba la
bisagra). Vuelva a instalar la
cubierta del empujador y el
empujador en la nueva ubicacion,
y apriete firmemente los dos
tornillos de la cubierta.
19. Vuelva a insertar los cuatro
tornillos del anillo delantero y
aprietelos.
10. Voltee lapuerta para que el anillo
delantero apunte hacia arriba.
11. Retire el anillo delantero de la
puecta de la secadora.
12. Elvidrio de lacubierta tiene un
borde de vidrio levantado que se
extiende por, aproximadamente,
dos tercios de la circunferencia del
vidrio. Aseg0rese de que este
borde levantado apunte hacia
arriba, mirando hacia usted.
Respete la posicion del borde
anterior del mango de vidrio
levantado, marcado con la letra (A)
en la siguiente ilustracion.
Gire el vidrio de la cubierta 90
grados hacia la derecha.
14.
Gire elanillo delantero 180 grados
para que, ahora, el mango de la
puerta quede del lado derecho. El
mango de la puerta esta ubicado
en el interior del anillo delantero.
Es una hendidura del tama_o de la
mano.
15.
Voltee la puerta para que la parte
trasera apunte hacia arriba.
16.
Vuelva a colocar las piezas,
manteniendo su nueva alineacion.
17.
Vuelva a insertar eltornilio que se
encuentra debajo de la placa del
empujador. Apriete firmemente el
tornillo.
20. Retire los dos tornillos que
sostienen la placa de la cubierta
de plastico en la posicion de
montaje de la bisagra del lado
izquierdo, en la carcasa de la
secadora. Retire la placa y dejela
a un lado con los dos tornillos.
43
Page 44

21. Retire los dos tornillos que sujetan
la bisagra de metal de la puerta a
la carcasa de la secadora. Retire
la bisagra de lacarcasa.
del lado derecho al lado izquierdc
22. Vuelva a sujetar la bisagra de la
puerta a la carcasa de la secadora
en el lado izquierdo de la apertura
de la puerta de la secadora.
Apriete ambos tornillos
completamente, y aseg0rese de
que sujeten la bisagra firmemente.
23. Ahora, la puerta esta lista para
volver a montarla en la secadora.
24. Vuelva a instalar la puerta de la
secadora deslizandola sobre los
pasadores de la bisagra.
No deje que los cuatro manguitos
de plastico se caigan de los
pasadores de la bisagra. Si
alguno se cae, vuelva a instalarlo
en los pasadores de la bisagra
antes de volver a instalar la puerta
de la secadora.
Vuelva a
instalar
cuatro
tornillos
y apriete
firmemente
26. Instale el plato plastico de
cobertura sobre la posicion original
de bisagra en el lado del mano
derecho de laapertura de puerta
de secador. La adicion y aprieta el
dos tener de tornillos el plato en el
lugar.
27. Pruebe que lapuerta abre y cierra
apropiadamente. El proceso de la
reversion de la bisagra es ahora
completo.
Distancias minimas
Informacion importante sobre
distancias minimas:
Seg0n la ubicacion de la conexion
de aire del escape, se debe sumar
a este lado, ellado donde se
encuentra la conexion, una
distancia minima adicional de 5 1/2
pulgadas (14 cm) para
conductos/soportes (consulte la
pagina 52).
Los beneficios de mantener una
distancia superior (espacios libres)
a la minima que se muestra
incluyen los siguientes:
• hay mas circulacion de aire que
enfria la secadora, evita que la
secadora se caliente en exceso
y mejora el rendimiento del
secado.
° reduccion del riesgo de que se
produzca moho detras de los
electrodomesticos.
° reduccion de la transmision de
ruidos.
° facilitacion de la instalacion y del
servicio tecnico.
Si se instala la secadora en una
habitacion peque_a, las puertas
de la habitacion deben estar
equipadas con ventilaciones de
dimensiones minimas
establecidas. Consulte las
siguientes ilustraciones de
instalaciones cerradas para
obtener informacion adicional.
Deje un espacio libre adicional
para la puerta, la pared y la
moldura de la ventana cuando sea
necesario.
Vuelva a
instalar
la puerta
de secador
25. Vuelva a instalar el plato de
cobertura de bisagra quitado en el
paso 4. La adicion y aprieta el 4
tener de tornillos el plato de
cobertura de bisagra en el lugar.
44
Page 45

Tipos de
instalaciOn
Respete los siguientes espacios libres
minimos entre la secadora y las
superficies adyacentes para todos los
tipos de instalacion.
Espacios libres minimos de
instalacion
A Laterales
B Parte superior
C Parte trasera*
D Parte delantera
* tan cerca de la pared como Io
permita la ventilacion o la conexion
de agua. Si se instala con una
lavadora, se requiere el mayor
espacio libre en la parte trasera
para la ventilacion de la secadora
para ambos electrodomesticos.
Las unidades estan diseSadas de
manera que la secadora pueda
apilarse encima de la lavadora
usando uno de los kits para apilar
que se muestran en la pagina 52.
Las unidades estan diseSadas
para permitir la instalacion debajo
de la superficie de trabajo;
consulte las dimensiones que se
requieren en la seccion
"lnstalacion debajo de la superficie
de trabajo" en la pagina 46.
Las mediciones de altura que se
muestran en esta seccion se toman
con las patas de la lavadora en la
extension minima (insertadas
completamente contra la base de la
lavadora).
0.25in.(6.4mm)
0.25in.(6.4mm)
2.55in.(64.8mm)
0.50in.(12.8mm)
Espacio de instalacion requerido
G AItura 53.75in,(136.5cm)
H Ancho 27.50in,(69.9cm)
I Pr0fundidad 33.50in.(85.1cm)
J AIturadelpedestal. 15,0in,(38.tcm)
D EI electrodomestico no debe
montarse sobre un pedestal para
instalaciones debajo de la
superficie de trabajo.
Lavadora y secadora apiladas
En la siguiente ilustracion, se muestran
las dimensiones para la instalacion
apilada.
Hay dos kits para apilar disponibles
para apilar lasecadora encima de la
lavadora; consulte la seccion
"Accesorios" en la pagina 52.
Por su peso y tama_o, se
recomienda que mas de dos
personas levanten la secadora para
colocarla en su posicion. No
hacerlo puede ocasionar lesiones
personales o la muerte.
Requisitos de ventilacion del
armario
E Partesuperior 48sq,in,(310sq.cm)
F Parteinferior 24sq,in,(155sq,cm)
Espacio de instalacion requerido
G AItura 74.50in,(189,3cm)
* con etkit para apilar basico
Altura 76.02 in.(t93,t cm)
** conelkit paraapilarconestanteextra[ble
H Ancho 27.50in,(69.9cm)
I Pr0fundidad 33.50in. (85.1cm)
El electrodomestico no debe
montarse sobre un pedestal en las
instalaciones apiladas. La lavadora
no debe apilarse encima de la
secadora. Esto puede provocar
lesiones y/o da_os graves.
D Tenga cuidado al deslizar la
lavadora y secadora apiladas en
su lugar. Consulte las
instrucciones de instalacion del kit
para apilar para obtener mas
informacion.
Una al lado de la otra
En la siguiente ilustracion, se muestran
las dimensiones para la instalacion una
al lado de la otra empotradas o dentro
de un armario.
Pedestal con estante extraible
En lasiguiente ilustracion, se muestran
las dimensiones para la instalacion del
pedestal y el estante extraible.
Las dimensiones de los espacios
libres desde A hasta D se
encuentran en la pagina 45.
H
Las dimensiones de los espacios
libres desde A hasta D se
encuentran en la pagina 45.
Requisitos de ventilacion del
armario
E Partesuperior 48sq,in,(310sq.cm)
F Parteinferior 24sq,in,(155sq,cm)
Espacio de instalacion requerido
G AItura 37.25in.(94.6cm)
H Ancho 54.75in,(t39.1 cm)
I Pr0fundidad 33.50in. (85.1cm)
La altura requerida si se monta sobre
un pedestal es de 52.25 pulg. (132.7
cm)
45
Page 46

Baja Mostrador
Las dimensiones para la instalacion de
undercounter son mostradas en la
ilustracion abajo.
B
Las dimensiones de los espacios
libres desde A hasta D se
encuentran en la pagina 45.
Espacio de instalacion requerido
G Altura 37.25 in. (94.6cm)
H Ancho 27,50 in, (69,9cm)
Ancho* 54,75 in, (t39,t cm)
* lavad0ray secad0ra una al lad0de la0tra
I Pr0fundidad 33.50 in. (85.1cm)
D EI electrodomestico no debe
montarse sobre un pedestal para
instalaciones debajo de la
superficie de trabajo.
Conexi6n de agua
Se recomienda tener una presion de
suministro de agua de 20 100 psi
(1.37 - 6.89 bar) para un mejor
rendimiento.
Dado que la mayoria de las conexiones
comparten el grifo de agua frfa que se
utiliza con la lavadora, se proporciona
un conector con forma de "Y" junto
con un manguera corta (si es
necesaria) a fin de conectar la
manguera de suministro al grifo de
agua fria.
Piezas de la secadora a vapor
incluidas
Las siguientes piezas estan incluidas
con el envfo de su secador.
0 3
2
4
2. Verifique que la arandela de hule
este completamente insertada y
asentada en el extremo hembra de
la manguera corta antes de
continuar. La arandela de hule
aparece como item 3 en la
ilustracion de las piezas
suministradas. Se ilustra separada
de la manguera para mayor
claridad.
,
Si el espacio Io permite, conecte el
extremo roscado internamente
(hembra) del conector "Y"
directamente al grifo de agua fria
(opcion A como se muestra en la
ilustracion anterior) y siga con el
paso 6
Esta seccion se aplica Onicamente a
secadoras con conexion de agua.
La conexion se encuentra en la
parte superior de la parte trasera de
las secadores de las series 500 y
800 con el Iogotipo SteamCare en el
panel.
%;;
Steam
Conecte la manguera de suministro de
agua del secador a un grifo de agua fria
(el grifo debe estar ubicado dentro de
los 4 pies (1.2 m) de la valvula de
entrada de agua en la parte posterior
del secador).
,
Conector "Y"
2.
Manguera de entrada de metal
trenzado corta
,
Arandela de hule (insertada en la
parte hembra de la manguera de
entrada corta, que se muestra
separada para mayor claridad).
4. manguera de suministro de agua
Para conectar la manguera de
entrada
D ELa secadora debe conectarse al
conector en forma de "Y" usando
la manguera de suministro de
agua proporcionada. No use un
manguera vieja.
1. Cierre la Ilave de agua fria y retire
de la Ilave lamanguera de
suministro de agua de la lavadora.
Para instalacion opcional con el
conector Y
Si el conector "Y" no se puede
sujetar directamente, use la
manguera corta suministrada para
conectar el conector "Y" al grifo de
agua fria (opcion B como se
muestra en la ilustracion), y
continue con los pasos 4 a 5.
46
Page 47

4. Conecte la manguera corta al grifo
de agua fria, Apriete la conexion a
mano hasta que el acople este
asentado en el grifo,
5. Use pinzas para apretar la
conexion con un giro adicional de
dos tercios de vuelta,
6. Conecte el adaptador "Y" a la
manguera corta, Apriete el acople
a mano hasta que quede
firmemente asentado en la
manguera,
D No utilice alicates para apretar
plastico accesorios enhebrados en
plastico ni metal conexiones
enhebradas,
7. Conecte la manga de suministro
de agua fria de arandela al
conector "Y", La mano aprieta
s01o,
8. Conecte la manga de
abastecimiento de agua de
secador al otto emparejar del
conector "Y", La mano aprieta
s01o,
9. Apriete soIo metalico a parejas
metalicas en el conector "Y" y
manga corta una adicional dos
tercios vuelta que utiliza alicates,
D Haga no overtighten, El dafio al
emparejar podria resultar,
10.
Conecte el conector en angulo
recto de la manguera a lavalvula
de entrada ubicada en la parte
superior izquierda del secador,
%
Verifique que laarandela de hule
no se caiga y que este bien
asentada en el conector en angulo
recto,
11.
Apriete a mano el acople hasta
que quede asentado en el
conector, No use pinzas, apriete
a mano 0nicamente,
D No apriete en exceso, Se puede
dafiar el acople,
12. Abra el grifo de agua,
13. Verifique que no haya perdidas
alrededor del conector "Y", del
grifo y de ninguna manguera,
ConexiOn electrica
El cable de alimentacion debe
set conectado pot un tecnico
calificado o un etectricista con
licencia 0nicamente. Conecte et
secador a un ramal individual del
circuito.
No utilice adaptadores.
No utilice cables prolongadores.
No quite la clavija de puesta
a tierra.
Su secador se provee sin el cable de
alimentacion, El cable a conec- tar
debe presentar las siguientes
caracteristicas:
Aprobacion UL en USA
208 a 240 volts de valor eficaz
(minimo)
30 amperes
Tipo SRDT o DRT (UL 21 58)
Cinco pie de Iongitud (minimo)
El cable de alimentacion debe
set conectado pot un tecnico
calificado o un etectricista con
licencia 0nicamente.
Utilice 0nicamente cables UL
de 30 Am_s con descarga de
traccion. Tenga en cuenta las
instrucciones det fabricante.
No conecte et cable de
alimentacion a un enchufe bajo
tension, antes de conectarlo
a los terminales det
etectrodomestico y que este
cerrada la caja de conexion
o derivacion seg0n se describe
abajo.
No utilice cables de alimentacion
usados. El cable debera estar
provisto de terminales cerrados
o bien doblados hacia arriba.
No tuerza los cable en un angulo
cerrado en las conexiones.
Debe utilizarse 0nicamente un
cable de 4 conductores si et
equipo se instala en una casa
rodante, en un vehiculo
recreacional, en una nueva rama
det circuito de instalacion u otto
lugar donde las reglas locales no
permiten una puesta a tierra a
traves det conductor neutro.
Procedimientos de puesta
a tierra adicionales
AIgunas reglamentaciones locales
pueden exigir una conexion a
tierra adicional, En este caso
deben adquirirse por separado, los
accesorios requeridos, como el
cable de conexion, abrazaderas
y tornillos,
Nunca conecte el
electrodomestico a tuberias de
agua de material plastico, tuberias
de gas o de agua,
Instrucciones para la conexion
a tierra
Este electrodomestico debe
conectarselo a tierra, En caso de fallos
en el funcionamiento o roturas, la
conexion a tierra reduce el riesgo de
descargas electricas, presentando una
via de baja resistencia por la que puede
fiuir la corriente,
47
Page 48

Para conectar la alimentaci6n el ctrica (cable de 3 conductores y cable de 4 conductores)
No enchufe el extremo del cable
de alimentaci6n en un recept_culo
La conexi6n incorrecta del conductor de conexi6n a
tierra del equipo puede causar un riesgo de descarga
electrica. Haga verificar el electrodom6stico por un
tecnico calificado o por un electricista con licencia si
tiene alguna duda respecto de si el secador esta
correctamente conectado a tierra,
®
Retire los dos tornillos de la
cubierta de la bomera
ubicada en la parte superior
trasera del electrodom6stico,
Esto dejar_ expuesto el
conjunto de la bornera.
Instalacibn con cable ..................................................................1..............................................................
de 4 conductores _ -_
Q Afloje el tornillo inferior de la _ AsegOrese de que la
correa de conexi6n a tierra. _ correa de conexi6n a tierra
Enderece la correa de conexi6n
a tierra para que quede vertical.
Vuelva a colocar el tomillo verde
en el odficio del borne GROUND
(Conexi6n a tierra),
AsegQrese de que la correa de
conexi6n a tierra no toque el
m
panel posterior para evitar
desconectar el disyuntor durante
el funcionamiento del secador.
con corriente antes de conectar el
cable de alimentaci6n a los bornes
del electrodom_stico y de cerrar la
caja de empalmelbifurcaci6n,
como se describe a continuaci6n.
i
est6 en su lugar. La
ilustraci6n muestra la
correa de conexi6n a tierra
bien ubicada, con el
*@
tornillo verde ajustado al
borne de conexi6n a tierra,
oorrea de
soporte para
abrazadera de ...........................
descarga de tracci6n _,__
bomera
Instalacibn con cable
de 3 conductores
Instalaci6n con cable
de 4 conductores
G floje los 2 tomillos
rotulados con la L y
el [3nico tornillo
rotulado con la N en
la bomera. Tambi6n
afloje el tomillo en el
borne GROUND
(Conexi6n a tierra).
Q ije una abrazadera de descarga de
tracci6n (disponible a trav6s de un
proveedor de artfculos de
electricidad o para la construcci6n)
al soporte del Angulo, Apriete la ....
tuerca para sujetar la abrazadera ...........•
firmemente en su lugar,
Continuado en la p_gina siguiente
Q floje los 2 tornillos
rotulados con la L y
el _nico tornillo
rotulado con la N en
la bornera,
Instalaci6n con cable
de 3 conductores
48
Page 49

Instalaci6n con cable
de 4 conductores
Instalaci6n con cable
de 3 conductores
®
®
Enhebre eJ cable de 4 conductores
a traves de la abrazadera de
descarga de tracci6n. Apriete los
tornillos de la abrazadera de
descarga de tracci6n (2.5 Nm) de
modo que el cable de alimentaci6n
no se mueva.
Esto mantendr& el cable de
D
alimentaci6n en su lugar y facilJtar& la
correcta instalaci6n de los tornillos de
los bornes.
Conecte el conductor de
conexi6n a tierra del cable
de alimentaci6n (verde) al
borne GROUND
(Conexi6n a tierra).
Apriete el tornillo (2.5 Nm)
de manera que el
conductor de conexi6n a
tierra quede firme en su
lugar.
Conecte los 2 conductores externos del
cable de alJmentaci6n (rojo y negro,
cualquiera de los dos puede ir a la izquierda
o a la derecha) a los 2 bomes rotulados con
la L. Conecte el conductor del cable de
alimentaci6n sobrante (blanco) en el borne
marcado con la letra N.
AsegOrese de que los tornillos de los bornes queden
alineados correctamente con las tuercas de los bornes
para evitar forzar las roscas.
Enhebre el cable de 3 conductores a
trav6s de la abrazadera de descarga
de tracci6n. Apriete los tornillos de
la abrazadera de descarga de
traccidn (2.5 Nm) de modo que el
cable de alimentaci6n no se mueva.
alimentaci6n en su lugar y facilitara la
E_] Esto mantendrfi el cable de
correcta instalaci6n de los tornillos de
los bornes.
Conecte los 2 conductores
®
externos del cable de
alimentaci6n (rojo y negro,
cualquiera de los dos
puede ira Ja izquierda o a
la derecha) a los 2 bornes
rotulados con la L. Conecte
el conductor del cable de
alimentaci6n sobrante
(blanco) en el borne
marcado con la letra N.
Asegt]rese de que los tornillos
D
de los bornes queden
alineados correctamente con
las tuercas de los bornes para
evitar forzar las rescas.
m
Q priete los 3 tornillos de los bornes (3 Nm) de
modo que los conductores queden firmemente
sujetos.
Despues de apretar los tornillos, verifique que los
bornes est6n firmemente sujetos en el lugar para
asegurar una conexi6n electrica adecuada; de Io
contrado, podria producirse una condici6n pelJgrosa.
Verifique la abrazadera de descarga de tracci6n
®
®
@
para asegurarse de que este apretada y de que
no se pueda girar.
VueJva a colocar la cubierta en la bornera y
ajOstela en su lugar.
_ iAsegQrese de la abrazadera de descarga
de tracci6n est6 fuera de la cubierta7
El electrodomestico ya esta listo para enchufar en
un receptaculo con la capacidad nominal correcta.
que
49
Page 50

ConexiOn del tubo de aire
de salida
1. A fin de reducir el peligro de
incendio, el aire de salida de este
electrodomestico DEBE
CONDUCIRSE AL EXTERIOR.
2. Para reducir el riesgo de incendio,
no utilice sistemas de conductos
mas largos que los
recomendados. Consulte la tabla
de Longitud maxima del sistema
de conductos (ver pagina 51).
3. No use un conducto de plastico u
hojas metalicas, ni ning0n otro
conducto no metalico con este
secador. S01ose deben usar
conductos de metal rigido o
flexible para la extraccion. Los
conductos de hojas metalicas y
de metal flexible NO son Io
mismo.
4. NO use mas de 2.4 m de
conductos de metal flexible.
5. NO use un conducto de menos
de 4 pulgadas de diametro.
6. NO descargue el aire del secador
en: chimeneas, paredes, techos,
lugares cerrados de un edificio,
conductos de aire frio de un
homo, Micos, huecos sanitarios ni
otro sistema de conductos para
ventilacion.
7. No instale un tubo flexible
empotrado en lapared, un
cielorraso o piso.
8. NO retuerza ni doble el tubo.
9. Controle y limpie la tuberia
regularmente. Como minimo una
vez al afio.
10. Eltubo de salida de aire debe
terminar de modo de evitar la
circulacion inversa, la entrada de
pajaros u otros animales.
11. NO arme el sistema de conductos
con tornillos ni sujetadores que
queden introducidos en el.
12. NO arme el sistema de conductos
con tornillos ni sujetadores que
queden introducidos en el. Sirven
como punto de acumulacion de
pelusa. Las uniones se deben
sujetar con cinta de aluminio.
Salida de aire del secador
El secador se provee con una salida de
aire ubicada en la parte posterior del
mismo.
A continuacion, se ilustran opciones
alternativas de conexion de conductos
de escape. Seleccione una de estas
opciones para hacer un buen uso del
espacio disponible o de un sistema de
conductos de escape existente.
1 - Salidadeaireen laparteposteriordel
electr0d0mestic0(estandar)
2 - Salidadeaireen elc0stad0del
electr0d0mestic0(0pciOn)
3 - Salidadeaireen laparte inferiordel
electr0d0mestic0(0pciOn)
Las conexiones especiales para el aire
de salida, se las provee su vendedor al
igual que parte requeridas para cada
opcion (vet lapagina 52).
Juego para salida lateral
Juego de salida inferior
El cambio de la salida de aire y una
conexion opcional, debe efectuarla un
tecnico calificado.
Tuberia
Puntos importantes a considerar:
El sistema de respiradero del secador
separa el aire h0medo mientras la ropa
se seca. Usted puede acortar tiempos
de secado, salvar energia y ayudar a
asegurar la seguridad del sistema
cerciorandose que el sistema del
conducto de escape de secador sea
instalado apropiadamente yes
mantenido.
Mantenga los tramos de conducto
(latotalidad del sistema de
conductos del escape, desde la
secadora hasta la parte externa de
la campana del escape) Io mas
cortos posible (consulte la tabla
"Longitud maxima del sistema de
conductos" de la pagina 51 .)
Use la cantidad minima de codos
necesaria para instalar el sistema
de conductos del escape. Evite
colocar dos codos de 90 grados
uno al lado del otro.
Verifique y limpie el sistema de
conductos del escape y la
campana del escape, por Io
menos, dos veces por afio, y
siempre que sospeche que el
funcionamiento de la secadora ha
empeorado.
Retire la pelusa acumulada para
evitar la disminucion del fiujo de
aire o las obstrucciones del
sistema. Se recomienda realizar
una limpieza profesional en forma
anual y al conectar la secadora a
un sistema de conductos de
escape utiNzado previamente.
Reemplace cualquier tramo de
ventilacion de plastico u hojas
metalicas con conductos de metal
rigido o metal flexible. Se
recomienda el uso de conductos
de metal figido.
%
La correcta instalacion del sistema
del escape es responsabilidad del
consumidor.
Los problemas que se
produzcan debido a la
instalacion incorrecta no estan
cubiertos por la garantia del
electrodomestico.
No se permiten los conductos de
escape que no tengan el largo
especificado en latabla sobre Iongitud
m_xima de conductos, en la pagina 51.
No seguir las indicaciones de esta tabla
prolongara el tiempo de secado,
provocara que se acumule pelusa y
afectara el rendimiento y la vida 0til de
la secadora.
5O
Page 51

conducto recto, incluida la distancia
entre el 01timo codo y la campana de
escape.
Good
Todas las junturas de los tubos deben
sellarse para que no presenten
perdidas. El extremo del tubo de menor
diametro, debera se_alar en el sentido
de circulacion del aire.
Independientemente de conectar
latuberia a un sistema existente
o nuevo, asegure que este libre
de pelusas.
En la siguiente tabla, se incluye la
Iongitud m&xima permitida tanto para
conductos rigidos como para
conductos rigidos usados con
conductos de metal flexible. Sise usan
conductos de metal flexible para
conectar el electrodomestico al
sistema de conductos, laIongitud total
del conducto de metal flexible utilizado
no excedera los 2.4 m y puede
utilizarse 0nicamente para conectar el
secador al sistema de conductos.
Como se muestra en la siguiente tabla,
la Iongitud maxima del sistema de
conductos se reduce si se utilizan
conductos flexibles.
Longitud maxima del sistema de
conductos
Numerode
codosde
90 °
Tubo Conductos
rigido flexiblesen
combinaci6n
con
conductos
rigidos
66ft. 45ft.
(2011cm) (1372cm)
1
56ft. 36ft.
(1707cm) (1097cm)
2
48 ft. 29 ft.
(1463cm) (884cm)
3
39ft. 22ft.
(1189cm) (671cm)
4
30ft. 16ft.
(914cm) (488cm)
Nota:
Las instalaciones del escape lateral e
inferior tienen un giro de 90°dentro del
secador. Tome esto en cuenta al usar
la tabla anterior.
No se recomienda el uso de mas de
dos codos de 90?. Para un mejor
rendimiento, separe los codos a una
distancia de, al menos, 4 pies de
Better
Mantenga los conductos de escape
tan cortos y tan rectos como sea
posible desde el punto de vista
practico. Esto aumentara el flujo de
aire ytendra como resultado tiempos
de secado mas cortos.
_ii/iiidiiii
No permita que los conductos de
escape sean mas largos de Io
necesario. Los conductos mas largos
reducen el fiujo de aire y tienen como
resultado tiempos de secado mas
largos.
No deje que los conductos de escape
se aplasten ni queden restringidos de
ning0n otro modo. Los conductos
restringidos reducen el fiujo de aire y
tienen como resultado tiempos de
secado mas largos. Los conductos
restringidos pueden reducir el fiujo de
aire de escape hasta causar una
condicion de error e incluso detener el
ciclo de la secadora. Verifique que el
conducto del escape no este aplastado
ni restringido.
Sombrerete de ventilacion
El tubo de ventilacion debe terminar en
un sombrerete de ventilacion aprobado
con laminillas de cierre amortiguado.
NO utilice un sombrerete con seguros
magneticos.
Para evitar restricciones en laventi-
lacion, la salida debe presentar un
distancia minima de 12 pulgadas (30
cm) sobre el suelo u otra superficie de
obstruccion.
51
Page 52

Piezas necesarias para el sistema
de conductos
Las piezas necesarias para el sistema
de aire del escape (codos, Ifneas,
salidas de aire del escape) no se
incluyen en la entrega estandar de la
secadora (consulte la seccion
Accesorios para obtener informacion
sobre como solicitar las piezas). Siga
las instrucciones suministradas con las
piezas.
Se recomienda la instalacion
profesional del sistema de conductos.
Accesorios
Los siguientes accesorios opcionales
para su secadora pueden solicitarse al
servicio tecnico (consulte la pagina 66)
o a su distribuidor local, iRogamos
tener en cuenta las instrucciones de
instalacion que provee el fabricante!
Juego para salida lateral
i
o
N°de parte: WTZ1265
Nota:
Consulte las notas sobre la cantidad
maxima de codos en la pagina 51.
D Se necesita una herramienta
especial para calar el orificio del
escape en el panel lateral de la
secadora.
Para obtener mas informacion,
comunfquese con su distribuidor
local.
Juego de salida inferior
N°de parte: WTZ1270
Nota:
Consulte las notas sobre la cantidad
maxima de codos en la pagina 51.
D EI kit de escape de la parte inferior
no puede usarse con un pedestal
instalado en la secadora ni si la
secadora esta apilada con la
lavadora.
Canastilla para secar
N°de parte: WTZ1620
Utilice la canastilla para secar prendas
de lana lavables (p. ej. sueteres) y
calzados.
Montje sobre pedestal
Se encuentra disponible como
accesorio para su secadora un
pedestal de almacenamiento con un
cajon extra[ble. El pedestal agrega
aproximadamente 15 pulgadas a la
altura de la secadora. Consulte la
pagina 11 para obtener las
dimensiones.
El electrodomestico no debe
montarse sobre un pedestal en
instalaciones apiladas.
La pieza n.° WTZ 1610 es para un
pedestal blanco liso.
Puede haber otros colores de
pedestales disponibles.
Identifique la pieza n.° WT7 1610 "X"
en la que la X designa un color
disponible (p. ej., A para antracita, P
para plata). Consulte a su distribuidor
sobre las opciones de colores
disponibles.
Tambien puede consultar un catalogo
de productos actual o visitar nuestra
pagina web:
www.boschappliances.com
Si monta la secadora sobre un
pedestal, siga las instrucciones
suministradas con el pedestal.
Kits para apilar
Hay dos kits para apilar disponibles.
Kit para apilar ba.sico
Este kit permite anclar la secadora
encima de la lavadora y agrega,
aproximadamente, 0.63 pulgadas (16
mm) a la altura de los
electrodomesticos apilados. Consulte
la pagina 52 para obtener las
dimensiones.
La pieza n.° WTZ 1601 es para elkit
para apilar mecanico basico.
Kit para apilar con estante extraible
Este kit sirve para apilar la secadora
encima de la lavadora y tambien
proporciona un estante extraible. Este
kit agrega aproximadamente 1.52
pulgadas (38.6 mm) a la altura de la
lavadora/secadora apiladas. Consulte
la pagina 52 para obtener las
dimensiones.
Este kit tambien puede combinarse
con el kit para montaje sobre pedestal
para proporcionar un estante extraible,
asi como tambien un aumento
combinado de altura de la secadora
de, aproximadamente, 16.5 pulgadas.
D EI pedestal no puede combinarse
con el kit para apilar con estante
extraible en instalaciones de
lavadora/secadora.
La pieza n.° WTZ 1600 es para elkit
para apilar con estante extraible blanco
liso.
Puede haber otros colores de kits
para apilar con estante extraible.
Identifique la pieza n.° WT7 1600 "X"
en la que la X designa un color
disponible (p. ej., A para antracita, P
para plata). Consulte a su distribuidor
sobre las opciones de colores
disponibles.
52
Page 53

Preparar el secador para
el transporte, paso a paso
D Estos procedimientos deben ser
realizados por personal calificado
Onicamente.
1. Gire el selector de programas a la
posicion _Off_,.
2. Desconecte la alimentacion
(apague el disyuntor, desenchufe
el electrodomestico).
3. Cierre el grifo de agua conectado
a la manguera de suministro de
agua. Desconecte la manguera
de suministro de agua.
4. Desconecte el tubo de ventilacion
de la salida correspondiente en el
secador.
5. Recoja todos los accesorios y
embalelos para enviarlos con el
electrodomestico.
6. Cierre la puerta y asegOrela con
cinta adhesiva.
7. Atornille los pies ajustables en
altura hasta que queden dentro de
la carcasa para evitar que se
da_en durante el transporte.
8. Reinstalacion del secador en
una nueva ubicacion Consulte
las Instrucciones de
Instalacion en este manual (ver
pagina 40).
53
Page 54

INSTRUCCIONES DE FUNCIONAMIENTO
Antes de usar
Para reducir el riesgo de incendio,
descargas electricas o lesiones alas
personas, lea las INSTRUCCIONES
DE SEGURIDAD IMPORTANTES
antes de operar este
electrodomestico.
Panel de manejo
Selector de
programa
L1
Petm P _.<_
Antes de usar su secadora, lea y
siga todas las instrucciones de la
instalacion y funcionamiento.
LED's Indica
Cotlo_1
t/,
Boton
0pcione
m
D
..................n
Start/Pause
bl
_1 Selector de programa
Seleccionaelprograma.Verpagina
56.
Puedegirarseloenambas
direcciones.
Paraapagarel secador,conmutar
el selectorde programaa ,,0ff,_.
D Luces indicadoras (LED)
Losindicadoresluminososse
enciendenensecuenciaparamostrar
elestadodehumedadactualdel
procesodesecado.
Protecci6ncontraarrugado- alfinal
delprogramadesecado,suenauna
serialacOsticay seenciendeel
indicadorluminosoWrinkleblock
(Proteccioncontraarrugado).El
tamborrotaaintervalosespecificos
duranteunahoraparaevitarquela
ropasearrugue(verpagina57).
_IEI LEDdel filtro atrapapelusas
Titilapararecordarlequedebelimpiar
elfiltroatrapapelusasantesy despues
deusarlo.
Tambientitilacuandoseabrela puerta
duranteunprograma.
Display
Series 300 y 500
Lacuenta regresivade LEDindicael tiempo
restanteestimadode un ciclo queesta
funcionando(en minutos).
Serie 800
Indicalosajustesdelasopcionesadicionalesy
eltiemporestanteestimadodelosprogramas.
(Verpagina25)
0pciones adicionales
Menu(Men_) seleccionaunadelasopciones
adicionales
Select(Seleccionar)cambialosajustesdela
opcionseleccionada
Lt Boton 0pcione
Agreguefuncionesal programaseleccionado. El
indicadorluminosoesta encendidocuandoel
bot0nde opcionesestaseleccionado.Presioneel
bot0nde opcionesnuevamenteparaapagar la
opcion(el indicadorluminososeapaga).
Delicates (Ropa fina): Presioneel boton
Delicateslow temp, (Ropafina bajatemperatura)
paratratar prendassensiblesa latemperatura (p,
ej,,fibras de acrilico), Sereduce latemperatura
y se prolongael tiempo que durael procesode
secado,enla mismaproporcion,
EC0 Action (Acci6n ecol6gica): Presioneesteboton
para unahorro adicionalde energia(OseloOnicamente
para los cicloscotton (Algodon)y permanentpress
(Planchadopermanente), Presioneel boron deopcion
antesde comenzarun ciclo automatico,
Signal
Series 300 y 500
Presioneambosbotonesde opcional mismotiempo para
activarla serialac_stica. Cuandoterminael ciclo, se
emitir_,un sonidode bip deforma audible(consultela
p_.gina56). Presioneambosbotonesnuevamentepara
desactivarla serial.
800 Series
La serialde la serie 800 seprograma usandoel LCDMenu
(MenOLCD)(consultela p_.gina59).
Boton Start/Pause
Arranquey parada)
Arranca,interrumpey parael procesodesecado.
Estado del indicador luminoso Start/Pause
(Arranque/Pausa)
Luz titilante: Puedencambiarselos ajustes, puede
arrancarseel ciclo desecado,o el programaesta.en
modo"Pause" (Pausa).
Luz titilante: Puedencambiarselos ajustes, puede
arrancarseel ciclo desecado,o el programaesta en
modo"Pause" (Pausa).
No encendida: El programafinalizo, o nose ha
seleccionadoning0nprograma.
54
Page 55

Informaci6n
adicional de
seguridad
Tenga siempre en cuenta las
INSTRUCCIONES DE SEGURIDAD
IMPORTANTES (Vet pagina 38).
Protecci6n
del medio ambiente
Consejos para la racionalizacion de
energia
Bosch recomiendo Io siguiente, para
racionalizar energia, dinero y tiempo:
iEscurra la ropa prolijamente!
Antes del secado, centrifugue bien
la ropa en la lavadora, iUse la
velocidad de centrifugado mas alta
posible para el tipo de ropa que
este lavando! Las velocidades de
centrifugado mas altas de la
lavadora reducen la humedad
residual y disminuyen el tiempo de
secado y el consumo de energia.
iUtilice la carga 6ptima!
Use cargas mas grandes, hasta
las cargas maximas
recomendadas para el ciclo y el
tipo de ropa. Pero no exceda la
capacidad de carga maxima
recomendada.
iLimpie el filtro atrapapelusa!
Verifique el filtro atrapapelusa
antes de cada uso de la secadora
y, si es necesario, limpie el filtro.
Asegurarse de que elfiltro
atrapapelusa este limpio antes de
comenzar cada carga de secado
genera un mejor flujo de aire y un
menor tiempo de secado. 27).
iVentile el ambiente de
emplazamiento!
Proporcione un suministro de aire
fresco adecuado durante el
proceso de secado.
iNo seque materiales
inadecuados!
No seque prendas engomadas o
impermeables.
iLimpie e inspeccione el
sistema de escape en forma
regular!
Las obstrucciones pueden
prolongar el tiempo de secado o
hacer que el secador funcione
mal.
Desconexi6n
temporal del
secador
Opere su secadora 0nicamente
cuando este en el hogar. Si planea irse
de vacaciones o no esta usando su
secadora durante un periodo
prolongado, debe:
1. Corte el conmutador de
alimentacion.
2. Desenchufar la fuente de
alimentacion, si es posible.
3. Limpie el filtro de pelusas.
4. Apagar el suministro de agua (se
aplica 0nicamente alas secadoras
Steam).
Ropa
Identificaci6n de prendas
Observe el simbolo que determina el
tratamiento en las etiquetas de las
prendas. Estas proveen informacion
importante respecto de eventuales
limitaciones concernientes al proceso
de secado.
No seque textiles de los siguientes
tipos:
Impermeables
(p. ejengomadas)
Ropa fina (seda, cortinas
sinteticas)
%
iSeque prendas de lana o con alto
contenido de lana, 0nicamente
sobre la cesta!
%
Utilice le programa ,<Airfluff/no
heat>_(Suavizado a aire/ning0n
calor) para secar materiales de
espuma de goma o similares.
Consejos para el secado
En principio, Io siguiente encuentra
aplicacion en todos los programas:
- Para Iograr un secado uniforme,
seleccione la ropa de acuerdo al
tipo de prenda y al programa a
utilizar.
- Cierre los zfpers, los cierres de
gancho y ojal, los cinturones
sueltos, las cuerdas de los
delantales, etcetera.
- No seque demasiado prendas de
facil cuidado, iExisteel peligro que
se arruguen! Deje que estas
prendas se sequen al aire libre.
- No planche la ropa inmediatamente
despues de secarla. Deje la ropa
apilada por un momento. Deesta
manera se distribuye de modo
parejo lahumedad.
- Las telas tejidas (p. ej., camisetas,
sudaderas y otros tipos de ropa
similares) con frecuencia se
encogen cuando se lavan por
primera vez. No use los ciclos
"Very dry/Extra dry" (Muy
seco/Secado extra) la primera vez
que seca estos tipos de ropa para
evitar un posible encogimiento.
AIgunas prendas, como las
mencionadas, tambien pueden
encogerse durante un ciclo
posterior. Tenga cuidado cuando
seleccione el ciclo para evitar
encogimientos.
55
Page 56
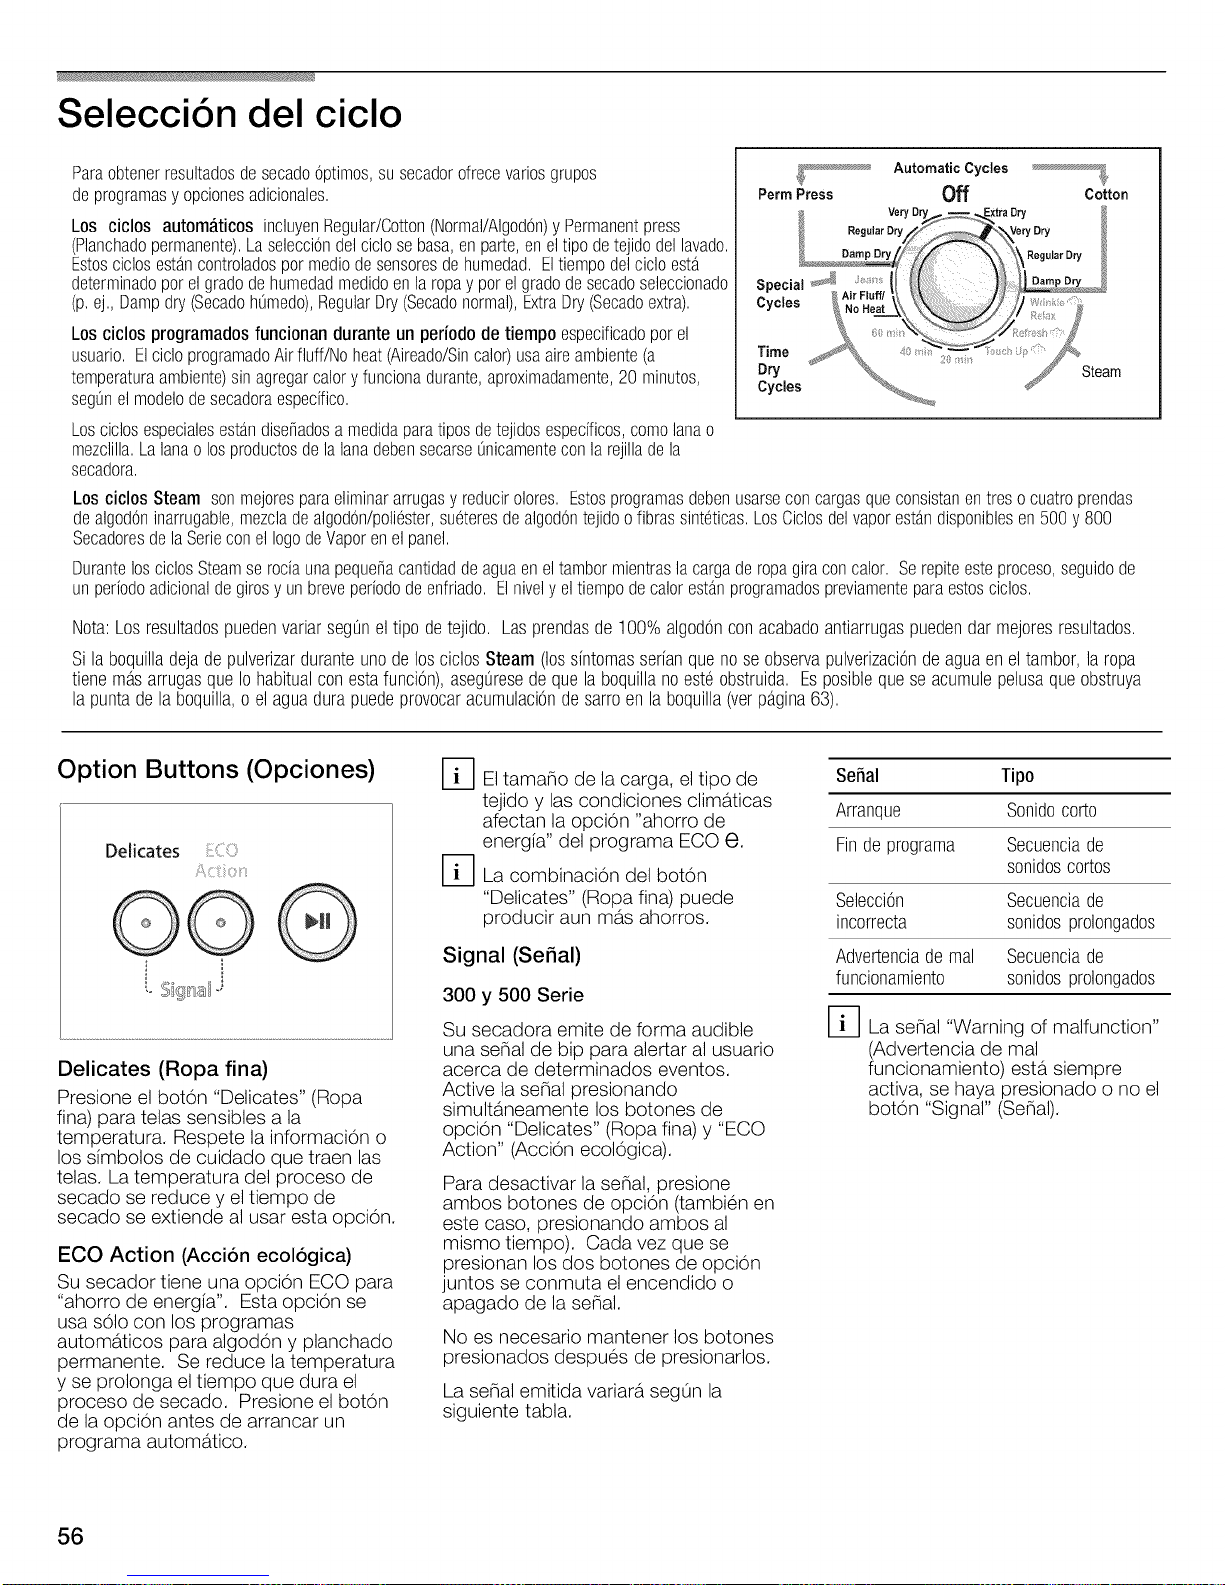
SelecciOn del ciclo
Paraobtenerresultadosdesecadooptimos,susecadorofrecevariosgrupos
deprogramasy opcionesadicionales.
Los ciclos automaticos incluyenRegular/Cotton(Normal/Algodon)y Permanentpress
(Planchadopermanente).Laselecciondel ciclo sebasa,en parte, en el tipo detejido del lavado.
Estosciclos esta.ncontroladospor mediode sensoresde humedad. Eltiempo delciclo esta.
determinadopor el grado de humedadmedidoen la ropa y porel grado de secadoseleccionado
(p.ej., Dampdry (Secadoh0medo),RegularDry(Secadonormal),ExtraDry (Secadoextra).
Losciclos programadosfuncionanduranteun periodode tiempoespecificadoporel
usuario.ElcicloprogramadoAirfluff/Noheat(Aireado/Sincalor)usaaireambiente(a
temperaturaambiente)sinagregarcaloryfuncionadurante,aproximadamente,20 minutos,
segOnelmodelodesecadoraespecifico.
Losciclosespecialesesta.ndisedadosa medidaparatiposdetejidosespecificos,comolanao
mezclilla.Lalanao losproductosdelalanadebensecarse0nicamenteconlarejilladela
secadora.
Losciclos Steam sonmejoresparaeliminararrugasy reducirolores.Estosprogramasdebenusarseconcargasqueconsistanentresocuatroprendas
dealgodoninarrugable,mezcladealgodon/polioster,sueteresdealgodontejidoofibrassinteticas.LosCiclosdelvaporestandisponiblesen500y 800
SecadoresdelaSerieconel logodeVaporenelpanel.
DurantelosciclosSteamserociaunapequedacantidaddeaguaeneltambormientrasla cargaderopagiraconcalor. Serepiteesteproceso,seguidode
unperiodoadicionaldegirosyunbreveperiododeenfriado.Elnivelyeltiempodecaloresta.nprogramadospreviamenteparaestosciclos.
Nota:Losresultadospuedenvariarseg0neltipodetejido. Lasprendasde100%algodOncon acabadoantiarrugaspuedendarmejoresresultados.
Si laboquilladejadepulverizarduranteunodelosciclosSteam (lossintomasserfanquenoseobservapulverizaciOndeaguaen eltambor,laropa
tienemb.sarrugasqueIohabitualconestafunciOn),aseg0resede quelaboquillanoesteobstruida. Esposiblequeseacumulepelusaqueobstruya
la puntadela boquilla,o el aguadurapuedeprovocaracumulaciOnde sarroenla boquilla(verpb.gina63).
Perm Press Off Cotton
Time
Dry
Cycles
AutomaticCycles
Steam
Option Buttons (Opciones)
Delicates _:
©©
i
Delicates (Ropa fina)
Presione el boton "Delicates" (Ropa
fina) para telas sensibles a la
temperatura. Respete la informacion o
los dmbolos de cuidado que traen las
telas. La temperatura del proceso de
secado se reduce y el tiempo de
secado se extiende al usar esta opcion.
ECO Action (Accion ecologica)
Su secador tiene una opcion ECO para
"ahorro de energia". Esta opcion se
usa solo con los programas
automaticos para algodon y planchado
permanente. Se reduce la temperatura
y se prolonga el tiempo que dura el
proceso de secado. Presione el boton
de la opcion antes de arrancar un
programa automatico.
D Ei tama_o de la carga, eltipo de
tejido y las condiciones climaticas
afectan la opcion "ahorro de
energia" del programa ECO e.
D La combinacion del boton
"Delicates" (Ropa fina) puede
producir aun mas ahorros.
Signal (Serial)
300 y 500 Serie
Su secadora emite de forma audible
una seSal de bip para alertar al usuario
acerca de determinados eventos.
Active la seSalpresionando
simultaneamente los botones de
opcion "Delicates" (Ropa fina) y "ECO
Action" (Accion ecologica).
Para desactivar la seSal, presione
ambos botones de opcion (tambien en
este caso, presionando ambos al
mismo tiempo). Cada vez que se
presionan los dos botones de opcion
juntos se conmuta el encendido o
apagado de la seSal.
No es necesario mantener los botones
presionados despues de presionarlos.
La seSalemitida variara segOn la
siguiente tabla.
Serial Tipo
Arranque Sonidocorto
Finde programa Secuenciade
sonidoscortos
SelecciOn Secuenciade
incorrecta sonidosprolongados
Advertenciade mal Secuenciade
funcionamiento sonidosprolongados
D La seSal "Warning of malfunction"
(Advertencia de mal
funcionamiento) esta siempre
activa, se haya presionado o no el
boton "Signal" (SeSal).
56
Page 57

Indicadores de LED de la
secuencia del ciclo
La secadora usa un sistema de
escaner electronico en todos los ciclos,
excepto los ciclos programados. Un
sensor de humedad verifica
continuamente la humedad en la ropa.
El secado finaliza automaticamente tan
pronto como se alcanza el grado de
secado seleccionado.
Los indicadores de LED vafian seg0n el modelo
Luces de LED de las secadoras de la Luces de LED de las secadoras de la
serie 300 serie 500
El grado de secado actual esta
representado por ]as luces indicadoras
de LED. Cada luz se ilumina en
sucesion a medida que avanza el
secado.
La luz de LED a la izquierda de "Drying"
(Secado) se ilumina cuando comienza
el ciclo de secado seleccionado. En
los modelos selectos, las luces de LED
de "Damp Dry" (Secado h0medo) y
"Regular Dry" (Secado normal), indican
cuando se liega a cada etapa.
Cuando la carga esta lista, la luz de
LED al lado de "Wrinkle
BlocWFinished" (Proteccion contra
arrugado/Terminado) se ilumina.
"Wrinkle Block/Finished"
El tambor continOa girando a intervalos
especificos durante una hora para
ayudar a disminuir la cantidad de
arrugas de la carga de ropa. Retire la
ropa cuando termine el cic]o, o dentro
del periodo "Wrinkle Block®"
(Proteccion contra arrugado) a fin de
obtener los mejores resultados.
La funcion Wrinkle Block® (Proteccion
contra arrugado) comienza cuando
termina la fase de secado para todos
los ciclos, excepto para el ciclo de lana.
Despues de la finalizacion de un ciclo
de secado, la funcion Wrinkle BlockR
(Proteccion contra arrugado) hace girar
el tambor durante, aproximadamente,
16 segundos cada dos minutos
durante los primeros 10 minutos.
Luego, aproximadamente, 16
segundos cada 5 minutos durante los
siguientes 50 minutos.
Luces de LED de las secadoras de la
serie 800
........................Dryin9
WrinkleBlock/
Finished
iii _i i iii
Lnt ter
D Si alg0n LED o boton se ilumina en
el panel cuando el selector de
ciclo se coloca en la posicion "Off"
(Apagado), apague el disyuntor y
liame a servicio a clientes.
57
Page 58

Tabla de selecci6n de ciclos
Cotton (Algod6n)
Paraalgod6no ropadecolorhechadealgodOno lino.Presioneelbot6ndeopci6n"Delicates"(Ropafina)paratelassensiblesa latemperatura.
S_.banas,mantelesytoallas
Dampdry (HOmedoseco) Sb.banas,mantelesy toallas,camisas,camisasdeportivas,ropadetrabajo debeplancharse
Camisas,camisasdeportivas,trajes,pantalones,ropadetrabajoe interior
Regulardry (Medianemente Toallasde rizo,repasadores,y toallasde mano,sb.banas,ropainterior, que nodebeplancharse
seco) soquetesde algod6n
Verydry (Muyseco) Toallasderizo,repasadores,ytoallasde mano,sb.banas,ropainterior, que nodebeplancharsegruesos
soquetesdealgod6n multicapa
Extradry (Extraseco) Salidasdebanode rizoy sb.banasde rizo, particularmentegruesasomulticapa
Permanent Press (Planchado permanente) Ropadefb.cilcuidado(sincentrifugar)defibrasinteticao mezcla,algod6ncon poliester.
Presioneelbot6n,<Delicates,_paraprendasextremadamentesensiblesaaltastemperaturas.
Dampdry (HOmedoseco) Pantalones,trajes,faldas,camisas,blusas,jeans,ropadeportivacon quenodebeplancharseo solo
abundantefibrasintetica,lenceria ligeramente
Regulardry (Medianemente Camisas,blusas,ropadeportiva que nodebeplancharse
seco)
Verydry (Muyseco) Sb.banasy manteles,equiposdegimnasia,anoraks,frazadas que nodebeplancharsegruesos
multicapa
Algod6n,mezclasdealgod6n/poli_ster,tejidoscomunesycamisassint_ticas,pantalones,faldas,camisetasy pul6veresdemezclade
Steam Refresh
algod6n.Lostejidosinarrugablesdanlosmejoresresultados.
Ayudaaalisarlasarrugasyreducirlosolores.Useloconunacargaligera,porejemplo,364camisas.Elprogramadura
aproximadamente16minutos.
Steam Wrinkle relax Ayudaa alisarlasarrugas.Oselocon unacargaligera,porejemplo,36 4 camisas. Elprogramadura
aproximadamente12 minutos.
Esteprogramaseusapararetocarunacargadetejidosde algod6nquese hasecadoy haquedadoeneltambordel
Steam Touch up secadordurantetoda la noche,al finalizarel ciclo. Esteprogramade 20 minutosretocalacargaparaayudaraalisar
lasarrugascausadasporel propiopesodelacarga.
La ropaquecontieneespuma,huleo plb.sticodebedejarsesecarenuntendederoo usandoelcicloAirfluff/Noheat
(Suavizadoa aire/NingOncalor)yaqueestosarticulospuedenprendersefuegodebidoalcalor queemiteel programa
Steam.
Wool Tejidosdelanalavables(p.ej.,sueteres,pul6veresde lana,faldas)
iLostejidos de lana secoso conalto contenido de lana deben secarses61ocon la canastilla del secador!
Jeans(Mezclilla) Telade mezclillagruesa
DarkColor(Serie800) La oscuridadcolor6textiles(ropapor ejemplopesaday oscura(algod6n))
Cargaspeque_as,cargasque necesitanuntiempode secadocorto(p. ej.,camisetasdeportivas,prendasparahacer
Active Wear(800Series) ejercicio(telasde poliester,nylon,sinteticas)
20,40 min., 60 min.(Serie
3oo/5oo)
Medium + requireddryingtime
(800Series)
Prendascentrifugadasconbajocontenidode humedad,peque_osarticulosindividuales,p. ej.,toallasdebano,trajes
de bano,repasadores.
Parala condici6ndecargamaspeque_a,de0.22 Ib a 0.44 Ib(esdecir,unatoallapeque_a)debeseleccionarseun
programadesecadoportiempo.
Presioneelbot6n"Delicates"(Ropafina) paralaopci6ndetelassensiblesa latemperatura.
(Serie800) Si selecciona un
programa de duraci6n variable (p.
ej., programas de tiempo, para lana)
la pantalla comienza a centellear.
Debe ajustar el tiempO,
Air fluff/No heat (Suavizadoa
aire/NingOncalor)(5ooSeries)
Air fluff / No heat + required
Paraalgod6ny ropadecolorhechadealgod6no lino.
Textilessensiblesa altastemperaturas.
Refrescao aireaprendasconpocousoysecatelasextremadamentesensibles.
Paratodotipo detelas,incluidalagomaespuma(p.ej.,almohadas,mu_ecosdepeluche),elplb.stico(p.ej.,cortinas
de bano,manteles),hule(p. ej.,alfombrasconcubiertadehule),nylonmuyfino, olefinas.
time(800Series)
58
Page 59

Opciones adicionales
Serie 800
D Las opciones adicionales solo se
pueden programar despues de
seleccionar el ciclo de secado.
Gire el Selector de ciclo hasta el
ciclo de secado deseado, luego
seleccione las opciones deseadas
en el LCD Menu (MenOLCD).
Seleccione la opcion que desea
cambiar con el boton "Menu" (MenO).
Presione el boton para moverse hasta
la siguiente opcion de la pantalla. El
simbolo activo titila.
Se muestra la programacion para la
opcion seleccionada en el lado
derecho de la pantalla de LCD.
Cuando se muestra activamente, se
puede cambiar una programacion con
el boton "Select" (Seleccionar).
Presione el boton "Select" (Seleccionar)
para mostrar la proxima programacion
posible.
D Presionar el boton "Menu" (MenO)
mientras se muestra una opcion
guarda la nueva programacion.
D Si usted no aprieta ningOn boton
por 10 segundos, los ajustes son
guardados automaticamente.
Simbolo Ajustesposibles Explanacion
(_) (pasosde0,5 hs)
!-O
d],)
Comportamientod_I_asseSal_esatfinaldetcictoseteccionado
Lasenalsonar_cuandoel cidotermineparaavisarleal usuario
queelciclohafinalizado."WrinkleBlock"(Proteccioncontra
arrugado)giraralacargaperi0dicamentedurante,
aproximadamente,unahoradespuesdecuefinaticeet cicto.La
seSatsonaraaintervatosdurante"WrinkleBlock"(Proteccion
contraarrugado)comorecordatododequelacargaestalista,
'G
Funci6n
Ajustael retrazodel
tiempode iniciaciOndel
secador(Arranqueen...
horas!)
Cuidadointensivo(mas
cuidadosoque
<<Delicates/Iowheat>_
(Ropafina/baja
temperatura))
Bloqueode datos
(efectivosolamente
mientrasel programa
estaencurso)
ExtraDryingTime
Gradodesecado
seleccionableporel
usuario
Volumendelaserialde
finalizaci6ndeprograma
y desecado
Eltiempode secado
optimizadoparala
velocidadde centrifugado
coordinaeltiempo
restantemostradoparael
secadorconla velocidad
decentrifugadoa lacual
se centrifug6previamente
la ropaen la lavadora
0al2h
On/Off
On/Off
0,1,2,3
(0--default,1-dryer,
3-dryest)
Off,
Continuo,
Maximo
4OO
6OO
8OO
1000
120
Si ustedhaelegidolaopci6nadicional"Extracare"(Cuidadoextra),la luz
indicadora"Delicates"(Ropafina)se ilumina. Presionarel bot6n"Delicates"
(Ropafina)cancelala opci6nadicional"Extracare"(Cuidadoextra).
Estaopci6nadicionalpermiteque ustedtrabesusajustesparaprevenirel uso
involuntariodelsecador.Paraencenderelsecadorcuandoelprotectorde
seguridadesteactivo:Presioneysostengael bot6n"prendery parar"por4
segundos.Paraabrirestaopci6nadicionalcuandoelsecadorestafuncionando:
Presioney sostengael bot6n"prendery parar"por4 segundos.
Si ustedhaelegidolospasos1 a 3 de laopci6nadicional"gradodela
sequedad"se exhibeelsimboloZ. 0 esel estandarquefija 0 simbolosnose
exhibeZ.
Susecadorhacesalirdiversasse_alesparaciertosacontecimientos.Usted
puedepermitiro inhabilitarlasepalsimultaneamentepresionandolos botones
demostrados.
Event
Permitala sepal
Inhabilite la serial
Inicio del Ciclo
Finalizaci0ndeiciclo[odurante"Wrinkle
Block"(Protecci0ncontraarrugado)]
Mal Operacio'n
Cuidadodel malfuncionamiento
Paraoptimizarlapantalladetiemporestante,lavelocidaddecentrifugadoa la
cualse centrifug6previamentela ropaen la lavadorapuedeser ingresadaporel
usuario.
Signal (serial)
Tonocorto
Dostonoscortos
Tono corto
Secuenciadetonoscortos
Secuenciadetonoscortos
Ordrede Ionguestonalites(volumen
maximos)
59
Page 60

Funcionamiento
Uso del secador
1. Abra la puerta.
2. Verifique elfiltro atrapapelusa
El filtro debe limpiarse antes del
secado de cada carga de ropa.
Limpiar el filtro reduce eltiempo de
secado y ahorra energ[a.
(consulte la pagina 61 para
obtener instrucciones de limpieza
para el filtro atrapapelusa).
D Bleach may cause discoloration of
the dryer's colored surface.
Therefore, it is important to keep
bleach away from the colored
surface of your dryer. If any bleach
spills on the surface, immediately
use a moist paper towel to
thoroughly clean it.
3. Gire el Selector de ciclo hasta el
ciclo de secado deseado.
Seleccione de la tabla de
seleccion de ciclos el programa
que corresponda a la ropa que se
encuentre en la secadora
(consulte la pagina 58).
La luz de la secadora se enciende
dentro del tambor cuando se
selecciona un ciclo.
D La luz indicadora Start/Pause
(Inicio/Pausa) empieza a titilar.
4. Si es necesario, seleccione un
opcion disponible ["Delicates"
(Ropa fina) o "ECO Action" (Accion
ecologica)] presionando el boton
correspondiente (consulte la figura
anterior).
D Se mostrara el tiempo restante
estimado.
,
Coloque la ropa en eltambor
vacio. Ponga cada prenda dentro
de la maquina por separado para
reducir el amontonamiento.
Para un resultado optimo, debe
separarse la ropa en funcion de su
tipo y el grado de humedad
residual deseado. Para mas
informacion, consulte la
pagina 59.
%
Respete las instrucciones del
fabricante sobre lavado y secado,
seg0n la ropa y eltejido. Si
necesita secar ropa de lana y
calzado, consulte la informacion
de la pagina 62.
%
Aseg0rese de que solo haya ropa
en el tambor. Verifique que todas
las prendas esten completamente
dentro del tambor y que ninguna
este atrapada entre la puerta y la
carcasa de la secadora o elsello
de la puerta.
,
Cierre la puerta.
La luz indicadora <,Start/Stops>
contin0a a centellear.
,
Presione el boton "Start/Pause
(Inicio/Pausa). El ciclo
seleccionado comienza y la luz
indicadora Start/Pause
(Inicio/Pausa) deja de iluminarse
en forma intermitente y permanece
encendida.
%
Si lapuerta no fue cerrada
correctamente, el secador no
arrancara.
%
TEl ciclo se inicia con una sepal
ac0stica (si esta programada).
Consulte la pagina 56 para
obtener informacion sobre como
programar la sepal en secadoras
con panta/a de LED, y lapagina
59 para obtener informacion sobre
como programar y ajustar la sepal
en secadoras con pantalla de
LCD.
Indicadores de LED del progreso
del ciclo
Si ha sido seleccionado un ciclo de
secado estandar (no un ciclo de
secado programado)las luces
indicadoras indican el progreso de la
secuencia del ciclo. La secuencia de
LED que se muestra a continuacion es
para las secadoras de las series 500 y
800. La secadora de la serie 300 tiene
luces de LED para "Drying" (Secado) y
"Wrinkle BlocWFinished" (Proteccion
contra arrugado/Terminado).
LintFilter
%
Cuando finaliza el ciclo, se emite
una seSalac0stica (siesta
programada) y la luz de LED
"Wrinkle BlocWFinished"
(Proteccion contra
arrugado/Terminado) se ilumina.
La seSalac0stica continuara
sonando intermitentemente
durante "Wrinkle Block"
(Proteccion contra arrugado).
%
Cuando el proceso de secado
esta completo (cuando finaliza el
ciclo o el tiempo seleccionado), el
tambor gira a intervalos
especificos durante 1 hora debido
a la caracteristica "Wrinkle Block"
(Proteccion contra arrugado).
Esto evita laformacion de arrugas
en la ropa. La ropa permanece
suelta y aireada hasta que se la
retira.
La ropa debe retirarse antes de
que transcurra este tiempo.
8. Abra la puerta.
9. Saque la ropa del secador.
El efecto de cada boton de opcion
se explica en la pagina 22.
6O
Page 61

10. Gire el selector de programas a la
posicion _<Off_.
La luz del secador se apaga.
11. Limpie el filtro.
El filtro debe limpiarse despues de
cada proceso de secado. Un filtro
limpio reduce el tiempo de secado
y ahorra energia.
12. Cierre la puerta.
Limpiar el filtro para
pelusas
Un filtro sucio extiende el tiempo de
secado y aumenta el consumo de
energfa. Elfiltro debe limpiarse antes
de cada carga de ropa.
Si se emite una se_al de advertencia y
un mensaje de advertencia "CLn" o
"E:I 2" durante un programa de
secado, limpie el filtro inmediatamente
y verifique el conducto del escape.
D EI programa se interrumpe
automaticamente.
No enjuague ni lave el filtro para retirar
la pelusa. La pelusa mojada es mas
dificil de retirar. Remueva la pelusa
seca para retirarla con los dedos.
Puede humedecerse los dedos
ligeramente para obtener mejores
resultados.
Para limpiar el filtro atrapapelusas siga
estos pasos:
1. Apague el secador. Coloque el
selector de programas en "Off"
(Apagado).
El interior de la puerta se calienta
durante el proceso de secado.
Evite tocar cualquier superficie
caliente hasta se haya enfriado.
2. Abra la puerta.
3. Quite el fiitro.
4. Quite las pelusas pasando la
mano sobre el filtro.
5. Coloque el filtro.
6. Cierre la puerta.
D iNo opere la secadora sin el
filtro atrapapelusa en su lugar!
Retirar la acumulacion de residuos
El detergente para ropa y el suavizante
de tejidos pueden acumularse en la
pantalla del filtro atrapapelusa. Esta
acumulacion puede provocar tiempos
de secado mas largos. No se
recomienda el uso de toallitas para
secadora. Si usted decide usar
toallitas para secadora, limpie el filtro
atrapapelusa periodicamente para
retirar los residuos.
D Si cae pelusa de la pantalla
mientras esta en la secadora, es
probable que se necesite retirar la
acumulacion de residuos.
El filtro debe cepillarse levemente al
menos dos veces al afio con agua tibia
con jabon. Un filtro con acumulacion
de residuos tiende a impedir el paso
del agua incluso cuando la malla se
encuentra sin pelusas. Elfiltro esta
limpio cuando deja de impedir el paso
del agua. Elfiltro debe secarse bien
antes de insertarlo nuevamente en la
secadora.
Para retirar los residuos, siga estos
pasos:
.
Limpie toda la pelusa del filtro
atrapapelusas.
2.
Humedezca ambos lados de la
malla del filtro con agua caliente.
.
Moje un cepillo de nylon suave con
agua caliente y detergente liquido.
.
Frote ligeramente el filtro
atrapapelusas con el cepillo para
retirar la acumulacion de residuos.
Tenga cuidado de no dafiar el
filtro.
5. Enjuague el filtro con agua
caliente.
6. Seque bien elfiltro atrapapelusas
con una toalla limpia.
7. Vuelva a colocar el filtro
atrapapelusas en el secador.
D iNo opere la secadora sin el
filtro atrapapelusa en su lugar!
Uso de la canastilla
(Accesorio, ver pa.gina 52)
Utilice la canastilla para secar prendas
de lana lavables (p. ej. sueteres) y
calzados. La canastilla para secar
permanece quieta mientras el tambor
gira.
La lana hOmeda no debe secarse
girando en eltambor, ya que tiende a
apelmazarse y encogerse. Secar
calzado sin la rejilla puede da_ar el
tambor.
61
Page 62

D Utilice la canastilla del secador
para secar con el ciclo para
prendas de lana. Sino se usa la
canastilla, el sensor apagara el
secador despues de 3 minutos
aproximadamente, y la pantalla
mostrara ....
iSeque solamente una prenda o un
par de zapatos por vez! iLa carga
m&xima para secar es de 2,2 Ibs (1
kg)! iLa ropa debe haberse
centrifugado! iEI calzado a secar
debe presentar solamente la
humedad residual despues de un
lavado! iLa ropa no debe tocar el
tambor! Puede engancharse en este
y da_arse. Una vez utilizada la
canastilla para secar, saquela
inmediatamente del secador.
Colocar la canastilla para secar
1. Abra la puerta del secador.
2. Controle que el tambor este
vacio..
4. Con los extremos delanteros
enganchados en los orificios, baje
la parte trasera de la rejilla de
modo tal que se asiente en su
lugar, afirmada contra la superficie
interna de la carcasa de la
secadora.
Secar prendas de ropa sobre
la canastilla
,
Doble su ropa de modo tal que
quepa en la rejilla de la secadora.
2.
Las prendas deben colocarse de
modo tal que queden sueltas
sobre la rejillade la secadora. No
apile ropa de modo que quede
comprimida sobre la rejilla. No
permita que las prendas toquen el
tambor. Las prendas deben tocar
Onicamente la rejillay no deben
colgar por encima de los bordes
de la rejilla.
,
Cierre la puerta y asegOrese de
que no quede ropa atrapada entre
la puerta y la carcasa o el sello de
la puerta.
,
Para las prendas de lana,
seleccione el ciclo Wool (Lana), si
esta disponible. Para otras
prendas, seleccione uno de los
ciclos programados.
Seleccione el tiempo de secado
de acuerdo con el tipo de ropa.
4. Presione el boton "Start/Pause"
(Inicio/Pausa). La luz indicadora
Start/Pause (Inicio/Pausa) se
ilumina.
5. Siel calzado aOn contiene
humedad residual despues del
tiempo de secado indicado:
Cambie la orientacion del
calzado sobre la rejilla secadora.
vuelva a hacer arrancar
el proceso de secado
y selecciones un tiempo de
secado menor, segOn el grado
de humedad residual.
6. Despues del secado, airee el
calzado a temperatura ambiente
durante, aproximadamente,
30 minutos.
7. Quite elfiltro.
3. Sostenga la rejilla de lasecadora
por la seccion central como se
muestra a continuacion e insertela
completamente dentro del tambor,
en sentido horizontal. Luego,
vuelva a traerla hacia adelante y
alinee los extremos delanteros con
los dos orificios al lado del filtro
atrapapelusa.
Secar calzado sobre la canstilla:
1. Prepare el calzado.
Limpie el calzado para evitar que
el tambor se ensucie.
Siesta preparando calzado
deportivo para secarlo, extienda
la leng(Jeta
Afioje o quite los cordones.
Extraiga partes adicionales
como plantillas.
2. Coloque el calzado sobre la
canastilla.
Directamente sobre la canastilla
o bien
Coloque una toalla y, sobre esta,
los tacos del calzado.
Esto conducira a un resultado
mas uniforme del secado.
3. Cierre la puerta.
62
Page 63

Limpieza y cuidado
Limpieza del secador
PARA EVITAR
iPELIGRO DE EXPLOSIONES!
Nunca utilice solventes o liquidos
altamente infiamables para la
limpieza.
La limpieza incorrecta puede da_ar
la secadora. No rocie con una
lavadora a presion. No use agentes
de limpieza abrasivos ni limpiadores
multiuso. No use limpiadores a
vapor.
Limpie la carcasa y el panel de control
con un paso suave y agua con jabon
Onicamente.
Friegue eltambor, la junta de la puerta
y el interior del mismo solamente con
un pa_o hOmedo.
Limpiar el tubo de aire de
salida
Inspeccione y limpie los conductos del
escape, por Io menos, una vez al a_o
para prevenir obstrucciones. Un
conducto de escape parcialmente
obstruido prolonga el tiempo de
secado y tiene como consecuencia un
bajo rendimiento del secador.
Corte el conmutador de
alimentacion
Desenchufe la secadora de la
fuente de alimentacion.
Desconecte el tubo del secador.
Pase una aspiradora en el interior
del conducto para retirar cualquier
acumulacion de pelusa o
desechos.
Vade el tubo y vuelvalo
a conectar.
Limpiar profesional de conducto
es recomendado. Vea pagina 52.
Limpiar el sensor de
humedad
Ocasionalmente debe limpiarse el
sensor de humedad, ya que se genera
una capa fina de depositos sobre la
superficie del mismo.
El deposito puede eliminarse
facilmente, fregando el sensor (las dos
barras proximas al filtro para pelusas)
mediante un pa_o y un poco de
vinagre blanco.
iUtilice solamente vinagre blanco!
Limpie el sensor de humedad una vez
al mes.
C6mo limpiar la carcasa
del filtro atrapapelusa
A traves del tiempo, se junta pelusa
resultante de los sucesivos procesos
de secado en la proteccion del
rodamiento.
Esta pelusa puede eliminarse
facilmente utilizando la aspiradora, por
Io menos una vez al mes.
C6mo limpiar la boquilla
Steam
Una vex al aSo examine el enchufe del
inyector. Si usted sospecha la
obstruccion, limpie el exterior del
inyector con un pa_o humedecido con
vinagre. Si la boquilla esta
completamente obstruida, consulte la
gu[a de Iocalizacion de fallos (vet
pagina 65) para conocer las
instrucciones de remocion y limpieza.
Si la boquilla permanece obstruida,
Ilame a servicio al cliente (ver pagina
65).
Cambiar la lamparilla
La luz de la secadora se enciende
dentro del tambor cuando se abre la
puerta y permanece encendida
durante, aproximadamente, 5 minutos
o hasta que se cierra la puerta. La luz
se apaga, aproximadamente, 4
segundos despues de que se cierra la
puerta.
Para cambiar la lamparilla:
Fijeel selector del programa a
"Off."
Corte el conmutador de
alimentacion.
Desconecte el enchufe
de alimentacion.
Abra la puerta y ubique la luz de la
secadora en el lado superior
izquierdo del sello.
Afloje el tornillo y abra la cubierta
de la luz de la secadora.
Gire la lamparilla en el sentido
opuesto alas agujas del reloj.
Reemplace la lamparilla
Onicamente por una del tipo para
electrodomesticos (seadquiere en
el servicio a clientes).
%
Piezas disponibles en
www.boschappliances.com o
Ilamando al 1 800 944 2904.
Vuelva a colocar la cubierta
y sujetela mediante el tornillo.
Enchufe la parte trasera de la
secadora en la fuente de
alimentacion.
Encienda el disyuntor.
63
Page 64

Localizaci6n de fallos
ARA EVITAR RIESGO DE
SCARGAS ELECTRICAS!
Eventuales reparaciones o
reemptazos de piezas deben
efectuarlos exclusivamente
tecnicos calificados o
electricistas con licencia.
Problema
Elsecadornoarranca,
_Start/Stop,>la luzdeindicadorano
ilumina,
Elcicloseha interrumpido,Seemite
unase_aldeadvertenciay lapantalla
muestra"CLn",
Elcicloseha interrumpido,Seemite
unase_aldeadvertenciay lapantalla
muestra"E:12",
Nose haIogradoel gradode humedad
deseadoo eltiempodesecadoes
demasiadolargo.
Eldisplayindica,_E:03,_,
Antes de Ilamar a Servicio a Clientes,
verifique si puede rectificar la falla usted
mismo siguiendo esta tabla.
Si es necesario efectuar reparaciones y
usted no puede eliminar el fallo
mediante la tabla siguiente:
1. Gire el selector de programas
a _<Off_.
2. Quite elfusible.
3. Desconecte el enchufe del
tomacorriente.
4. Llame al servicio para clientes
(consulte la pagina 32).
Causaposible
Elenchufenoestaconectadoo incorrectamente
conectado.
Se hadesconectadounfusibleo el disyuntor. Reemplaceel fusibleo reinicieel disyuntor.
Nofue pulsadoel botOn,<Start/Stop,_. Presioneel botOn,<Start/Stop,_.
Nofue seleccionadoprogramaalguno. Seleccioneunprograma.
Lapuertanoestacerrada. Cierrela puerta.
Latemperaturaambienteestadebajo Aumentelatemperaturadelambiente.
delos41 °F/5 °C.
Elfiltro parapelusasestasucio. Limpieelfiltroatrapapelusa,comose describeenla
Eltubodeairedesalidaestaobstruidoo es Limpieeltubo deairedesalida.Reduzcala Iongitud
demasiadolargo, deltubodeairedesalidaasu Iongitudmaxima
Hayonfallo en eldesarrollodelprogramao falloen Apagueelsecador,dejeloenfriarpor30 minutos
lamaquina, yvuelvaa encenderlo.
Elambienteo gabinetenoposeelaventilaciOn Proveaunaccesodeairefrescosuficiente.
suficiente. Apagueyvuelvaa encenderequipo.
Estasucioelsensordehumedad. Limpieel sensordehumedadseg0nsedescribeen
Eltubodeairedesalidaestaobstruidoo es Limpieelconductodelescapedeaire.Reduzcael
demasiadolargo, conductodelescapedeairehastala Iongitud
Elfiltro parapelusasestasucio. Limpieelfiltrocomose describeenlapagina61.
Laropaestademasiadomojada. Centrifuguela ropaa mayorvelocidadenla maquina
Se haseleccionadoun programanoadmisible. Seleccioneel programaconayudadelatabla
Seexcedeel tiempodesecadomaximo. Limpieelfiltroatrapapelusa(consultela pagina61).
Remedio
Conecteelenchufecorrectamente,
pagina61.
Apaguelasecadoray vuelvaa encenderla.Si estono
borraelcOdigode error,IlameaServicioa Clientes
(pkg.66).
seg0nsedescribeenpagina51.
Apagueyvuelvaa encenderequipo.
Hagaarrancarnuevamenteel programa.
la pagina29.Apaguey vuelvaaencenderelequipo.
maximacomosedescribeenlapagina51.
Apaguela secadoray vuelvaaencenderla.
Apaguela secadoray vuelvaaencenderla.
de lavar.Apaguey vuelvaaencenderelequipo.
correspondiente(verpagina59. Apaguey vuelva
a encenderel equipo.
Verifiqueelconductodelescapedeaire.
Centrifuguela ropaa mayorvelocidadensu
lavadora.
iEs posible que los puntos sobre
resolucion de problemas que se
enumeran a continuacion no esten
cubiertos por el servicio tecnico de la
garantia!
Descarte uno por uno cualquiera de
estos problemas antes de Ilamar al
servicio tecnico.
64
Page 65

Problema
Nose haIogradoel gradode humedad
deseadoo eltiempodesecadoes
demasiadolargo,
Eldisplayindica,_E:03,_,
Causaposible
Elmotorha excedidolatemperaturamaxima,
Elgradode humedadhonestacorrectamente
ajustado
Remedio
Apagueelsecador,dejeloenfriarpor30 minutos
yvuelvaa encenderlo,Hagaarrancarelprograma,
800 Serie,Cambiaajustesparaelgradodela
sequedad,veaseenlapagina59,
Nofuncionalaluzen eltambor,
Nose enciendela luzindicadora
,_Start/Stop,_,Laluz indicadora"Wrinkle
block"(ProtecciOncontraarrugado),
ELdisplayindica,_000_,
Laluzde LEDdelfiltro atrapapelusase
iluminaenformaintermitentedespues
dela limpiezadelfiltroatrapapelusa
Lapantallamuestra....
Ruidoinusual ruidosordo
Ruidoinusuah VibraciOncontinua,
balanceode la secadora
Ruidoinusual VibraciOnritmica
Nose pulverizaaguaenla unidad
durantelosciclosSteam
LEDorbuttonilluminatedoncontrol CondiciOndefalla
panelwhenCycleSelectoristurnedto
"Off"position
Nofue seleccionadoprogramaalguno, Seleccioneunprograma,
Lalamparillaestadefectuosao quemada, Reemplaceel focoquemadoy vuelvaainstalarla
NohayalimentaciOnde energia, ControlequelaalimentaciOnde energiafuncione
Labombillaesfloja,
Erroren el desarrollodelprogramaofalloenla
maquina,
Laintermitenciadelfiltro dela pelusaLEDnoes
indicaciOndequehayunproblema,Soloes usado
comoun recordatorioparalimpiarelfiltro de la
pelusa,
SedetectOropaeneltamborduranteelprograma
paralana(la ropanoestaenla canastilla)
Losrodillosdesuspensiondeltambornecesitan
tiempoparacalentarse,
Elsecadornoestanivelado,
Lacargarebotaporquela ropaseagrup6formando
unabola,
La(s)Ilave(s)deaguano esta(n)abierta(s),
Laboquillanorociaaguacorrectamente,
Boquillaobstruida
cubiertacomoseindicaenlapagina 76,
correctamente,
Retirelacubiertadelfocoy,si elfocoestaflojo,
aj_stelo,Vuelvaa instalarlacubiertacomoseindica
en lapagina76,
Apagueelsecador,dejeloenfriarpor30 minutos
yvuelvaa encenderlo,
Hagaarrancarnuevamenteel programa,
Norequierede ningunaacciOn,LEDdejaradeestar
intermitente,
Coloquelaropaen lacanastilladelsecador,Reinicie
el programa,
Nose requierehacernada, Cuandolosrodillosdel
sistemadesuspensionse calienten,el ruidosordo
disminuiray deberadetenersea los2-3 minutosde
empezara usarel secador,
Niveleel secador(consultelasecciOn"lnstrucciones
de InstalaciOn"delmanualdelusuario),
Detengael secador,separelasprendas,vuelvaa
encenderelsecador,
AbralaIlavedeagua,
Limpieelexteriordela boquillaconunpano
humedecidoconvinagre,Siestonorestaurael
rociadodelaboquilla,consultela acciOncorrectiva
"Blockednozzle"(Boquillabloqueada)queaparecea
continuaciOn,
Retirelaboquillacon unaIlavedecubode7/16
pulgada,Coloquela boquillaen un recipienteIleno
convinagreblancoencantidadsuficienteparacubrir
la boquilla,Dejela boquillaenremojodurantecinco
minutosy luegofrieguelapuntadela boquilla
suavementeconuncepillodentalparaeliminarlos
residuos,Enjuaguela boquillay vuelvaa insertarla
en elsecador,Aprietelaa manoy luegoaprieteuna
vueltamasconla Ilave,
pagueel disyuntory IlameaServicioaClientes(pkg,
32),
65
Page 66

SERVICIO y REPARACIONES
Si tiene problemas y no esta conforma
con el servicio recibido:
Primero rogamos ponerse en
ADVERTENCIA: Identifique
todos los cables antes de
desconectarlos al realizar et
servicio tecnico de los controles.
Los errores de cabteado pueden
causar una operaci0n incorrecta
_ue podria provocar graves
aSos al etectrodomestico o
lesiones personales. Verifique la
correcta operacion despues de
realizar el servicio tecnico.
Las secadoras Bosch no requieren
mas cuidados especiales que la
limpieza y los cuidados especificados
en la seccion Cuidado y limpieza.
D Si tiene un problema con su
secador, antes de Ilamar el
servicio a clientes, consulte la
tabla en pagina 30.
Si se hace necesario un servicio,
pongase en contacto con su vendedor,
instalador u otro centro de servicios
autorizado. No intente repara el
electrodomestico usted mismo.
Cualquier trabajo realizado por
personal no autorizado, hara caducar
la garantia.
contacto con su instalador o bien
el servicio autorizado y contratado
Bosch de su zona, explicando
porque no esta conforme.
explicando a que se debe su
disconformidad.
Si despues del trabajo realizado
por su instalador o tecnico de
servicio el problema no ha sido
solucionado a su satisfaccion,
haganoslo saber, o bien
escribiendo a:
BSH Home Appliances Corporation
5551 McFadden Ave.
Huntington Beach, CA 92649
O bien Ilamenos a
1-800-944-2904.
Tanto en caso de escribir o de Ilamar,
aseg0rese de incluir o tener a mano la
siguiente informacion:
Numero de modelo
Numero de serie
Fecha de compra original
Fecha en la cual ha ocurrido el
problema
Explicacion del problema
En caso que nos escriba, rogamos
incluir tambien un n0mero telefonico
diumo y una copia de lafactura de
compra.
Encontrara la informacion respecto del
n0mero de modelo y de serie sobre la
chapa de caracteristicas ubicada en el
interior del panel frontal.
La imagen a continuacion muestra la
ubicacion aproximada de la placa de
valores nominales. El n0mero de
modelo tiene un rectangulo alrededor.
El n0mero de serie esta ubicado debajo
del n0mero de modelo.
Un ejemplo se demuestra abajo.
Serial-No. (N°SERIE): 9999xxxxxxxxxxxxxx /
.... Type WATI
v/AC~60HZI22A _- -
El fabricante se reserva el derecho de
realizar modificaciones al producto o al
manual sin notificacion.
66
Page 67

DECLARACION DE GARANTiA LIMITADA DEL PRODUCTO
Secador de ropa Bosch Vision TM
Cobertura de esta garantia y a quienes se aplica: La garantia limitada otorgada por BSH Home Appliances Corporation
(Bosch) en esta Declaracion de Garantia Limitada del Producto se aplica Onicamente al secador de ropa ("Producto") Bosch
Vision TMvendido a usted, el primer comprador usuario, pero estrictamente condicionada a que elproducto haya sido comprado:
(1) para uso domestico (no comercial) normal y haya sido utilizado en todo momento Onicamente para fines domesticos normales
(cualquier uso o programacion comercial del producto anula automaticamente la garantfa); (2) nuevo en una tienda minorista
(que no sea un producto de exhibicion, ni un producto vendido "en las condiciones en que se encuentra", ni un modelo devuelto
anteriormente) comprado directamente por el consumidor final, y no este destinado para reventa ni uso comercial; y (3) dentro de
los Estados Unidos o CanadA, y permanezca en todo momento dentro del pais de compra original. Las garantias incluidas en el
presente se aplican Onicamente al primer comprador del Producto y no son transferibles. Bosch se reserva el derecho de solicitar
un comprobante de compra en el momento en que se presente cualquier reclamacion de la garantia afin de confirmar que el
producto este dentro del alcance de la presente garantia limitada del producto. La garantia se anula automaticamente si el
Producto fue un modelo de exhibicion, un producto vendido "en las condiciones en las que se encuentra", forzado, un modelo
dafiado o "con ralladuras y abolladuras", o un modelo devuelto anteriormente, un obsequio, donacion caritativa o premio de un
concurso.
• AsegOrese de devolver su tarjeta de registro; si bien no es necesario para hacer efectiva la cobertura de la garantia, es la mejor
manera para que Bosch le notifique en el caso poco probable de que se emita un aviso de seguridad o se retire del mercado
un producto.
Duracion de la garantia: Bosch garantiza que el Producto no tiene defectos en los materiales ni en la mano de obra durante un
periodo de trescientos sesenta y cinco (365) dias a partir de la fecha de compra. El periodo precedente comienza a regir a partir
de la fecha de compra y no se interrumpira, dejara sin efecto, extendera ni suspendera por ningOnmotivo.
Reparacion/reemplazo como Qnico recurso: Durante el periodo de esta garantfa, Bosch o uno de sus proveedores de
servicio tecnico autorizados reparara su Producto sin cargo para usted (con sujecion a determinadas limitaciones especificadas
en el presente) si se prueba que su Producto ha sido fabricado con un defecto en los materiales o en la mano de obra. Si se ha
intentado de manera razonable reparar el Producto sin exito, Bosch reemplazara su Producto (es posible que usted tenga
disponibles modelos mejorados, a entera discrecion de Bosch, por un cargo adicional). Todas las piezas y los componentes
extraidos seran propiedad de Bosch, a su entera discrecion. Todas las piezas reemplazadas y/o reparadas se consideraran
como la pieza original a los fines de esta garantia, y esta garantia no se extendera con respecto a dichas piezas. En virtud del
presente, la Onicay exclusiva responsabilidad y obligacion de Bosch es Onicamente reparar el Producto defectuoso de fabrica, a
traves de un proveedor de servicio tecnico autorizado por Bosch durante el horario normal de oficina. Por cuestiones de
seguridad y dafios materiales, Bosch recomienda categoricamente que no intente reparar el Producto usted mismo ni use un
centro de servicio tecnico no autorizado; Bosch no tendra responsabilidad ni obligacion alguna por las reparaciones o trabajos
realizados por un centro de servicio tecnico no autorizado. Si usted prefiere que u0a persona que no es un proveedor de este
servicio tecnico autorizado trabaje en su Producto, ESTA GARANTiA SE ANULARA AUTOMATICAMENTE. Los proveedores de
servicio tecnico autorizados son aquellas personas o compa_ias que han sido especialmente capacitadas para manejar los
productos Bosch y que tienen, segOn el criterio de Bosch, una reputacion superior de servicio al cliente y capacidad tecnica
(debe tener en cuenta que son entidades independientes y no son agentes, socios, afiliados ni representantes de Bosch). Sin
perjuicio de Ioque antecede, Bosch no tendra responsabilidad ni obligacion alguna por el Producto que se encuentre en un Area
remota (a mas de 100 millas de un proveedor de servicio tecnico autorizado) o en un lugar, Area circundante o entorno que no
sea accesible por medios razonables o que sea peligroso, hostil o arriesgado; en cualquier caso, a su solicitud, Bosch de todas
maneras pagara por la mano de obra y las piezas, y enviara las piezas al proveedor de servicio tecnico autorizado mas cercano,
pero usted seguira siendo totalmente responsable por eltiempo de viaje y demas cargos especiales de la compa_fa de servicio
tecnico, suponiendo que acepte hacer la visita de servicio tecnico.
Garantia limitada extendida:
DURACIONDELAGARANTIA
2 afi0sdegarantialimitada
a partirdelafechadec0mpra
ALCANCEDELAGARANT_
Boschpr0veerarepuest0s,sincargo,de 10sc0mp0nentesquese
encuentrendefectu0s0senc0ndici0nesde us0d0mestic0normaldurante
10sdosprimer0safi0sa partirdelafechadec0mpra,incluid0s10sc0st0s
n0rmales(noacelerad0s)deenvi0ysin incluir10sgast0sp0rman0de
0bra.
67
Page 68

2 anosdegarantialimitadaparasistemaselectr6nicos
a partirdelafechadecompra
2 anosdegarantialimitadaparael motor
a partirdelafechadecompra
Producto fuera de garantia: Bosch no tiene obligacion alguna, en virtud de la ley o por otro motivo, de otorgarle ninguna
concesion, incluidos reparaciones, prorrateos o reemplazo del Producto, con posterioridad al vencimiento de la garantia.
Exclusiones de la garantia: La cobertura de garantfa descrita en elpresente excluye todos los defectos o da_os que no fueron
provocados directamente por Bosch, incluidos, entre otros, alguno de los siguientes: (1) uso del Producto de maneras distintas
del uso normal, habitual y previsto (incluidos, entre otros, cualquier forma de uso comercial, uso o almacenamiento en exteriores
de un producto dise_ado para interiores, uso del Producto en aeronaves o embarcaciones); (2)conducta indebida, negligencia,
uso indebido, abuso, accidentes, descuido, operacion inadecuada, omision de mantener, instalacion inadecuada o negligente,
adulteracion, omision de seguir las instrucciones de operacion, manipulacion inadecuada, servicio tecnico no autorizado
(incluidos "arreglos" o exploracion de los mecanismos internos del electrodomestico realizados por uno mismo) por parte de
cualquier persona; (3) ajuste, alteracion o modificacion de cualquier tipo; (4) incumplimiento de los codigos, reglamentaciones o
leyes de electricidad, plomeria y/o construccion locales, municipales o de condado, incluida la omision de instalar el producto
cumpliendo estrictamente con los codigos y reglamentaciones locales de construccion y proteccion contra incendios; (5)
desgaste habitual, derrames de alimentos, liquidos, acumulaciones de grasa u otras sustancias que se acumulen sobre, dentro o
alrededor del Producto; y (6) cualquier fuerza y factor externo, elemental y/o ambiental, incluidos, entre otros, Iluvia, viento, arena,
inundaciones, incendios, aludes de Iodo, temperaturas bajas extremas, humedad excesiva o exposicion prolongada a la
humedad, rayos, sobrecargas electricas, fallas estructurales alrededor del electrodomestico y caso fortuito. En ningOncaso,
Bosch tendra responsabilidad ni obligacion alguna por los da_os ocasionados a los bienes circundantes, incluidos los gabinetes,
pisos, techos y demas estructuras u objetos que se encuentren alrededor del producto. Tambien se excluyen de esta garantfa
las rayas, hendiduras, abolladuras menores y da_os esteticos en superficies externas y piezas expuestas; productos en los
cuales los n0meros de serie hayan sido alterados, modificados o eliminados; visitas del servicio tecnico para ense_arle a usar el
Producto o visitas en las que se determine que no hay ningOn problema con el Producto; correccion de los problemas de
instalacion (usted es el Onico responsable de cualquier estructura y soporte del Producto, incluidas las instalaciones de
electricidad y plomeria o demas instalaciones de conexion, de la correcta instalacion en bases/pisos y de cualquier alteracion,
incluidos, entre otros, gabinetes, paredes, pisos, repisas, etc.); y el restablecimiento de disyuntores o fusibles. EN LA MEDIDA
PERMITIDA POR LA LEY, ESTA GARANTIA ESTABLECE SUS RECURSOS EXCLUSIVOS CON RESPECTO AL PRODUCTO,
INDEPENDIENTEMENTE DE QUE LA RECLAMACION SEA CONTRACTUAL O EXTRACONTRACTUAL (INCLUIDA LA
RESPONSABILIDAD OBJETIVA O LA NEGLIGENCIA), O DE CUALQUIER OTRO MODO. ESTA GARANTfA REEMPLAZA TODAS
LAS DEMAS GARANTiAS EXPRESAS O IMPLiCITAS. LAS GARANTiAS IMPLiCITAS POR LEY, YA SEA DE COMERCIABILIDAD
O APTITUD PARA UN FIN ESPECiFICO, O DE CUALQUIER OTRO TIPO, TENDRAN VIGENCIA UNICAMENTE POR EL PERiODO
DEVIGENCIA DE LA PRESENTE GARANTiA LIMITADA EXPRESA. EN NINGON CASO, EL FABRICANTE SERA RESPONSABLE
POR LOS DANOS CONSECUENTES, ESPECIALES, INCIDENTALES, INDIRECTOS, POR "PERDIDAS COMERCIALES" Y/O
DANOS PUNITIVOS, PERDIDAS O GASTOS, INCLUIDOS, ENTRE OTROS, TIEMPO FUERA DEL TRABAJO, HOTELES Y/O
COMIDAS EN RESTAURANTES, GASTOS DE REMODELACION QUE SUPEREN LOS DANOS DIRECTOS, QUE
DEFINITIVAMENTE HAYAN SIDO CAUSADOS DE MANERA EXCLUSIVA POR BOSCH O DE OTRO MODO. ALGUNOS
ESTADOS NO PERMITEN LA EXCLUSION O LIMITACION DE DAiqOS INCIDENTALES O CONSECUENTES, Y ALGUNOS
ESTADOS NO PERMITEN LIMITACIONES CON RESPECTO AL PLAZO DEVIGENCIA DE UNA GARANTfA IMPLiCITA; POR LO
TANTO, ES POSIBLE QUE LAS LIMITACIONES PRECEDENTES NO SE APLIQUEN. ESTA GARANTfA LE OTORGA DERECHOS
LEGALES ESPECiFICOS, Y TAMBIEN PUEDEN CORRESPONDERLE OTROS DERECHOS QUE PUEDEN VARIAR SEGON EL
ESTADO. NingOn intento de alterar, modificar o enmendar la presente garantia entrara en vigencia, a menos que fuera
autorizado por escrito por un ejecutivo de BSH.
Boschrepararb,o reemplazara,sin cargo,cualquiermicroprocesador0
tablerodecircuit0simpres0quese encuentredefectuosoencondiciones
de usodome@conormaldurantelosdosprimer0san0sa partirdela
fechadecompra,sin incluirloscargospormanodeobra.
Boschrepararao reemplazar&sincargo,cualquiermotorocomponente
de un motorqueseencuentredefectu0soencondicionesde uso
dome@conormaldurantelosdosprimer0sa_0sa partirde lafechade
compra,sinincluirlos cargospormanodeobra.
Como obtener el servicio tecnico de la garantia: Para obtener el servicio tecnico de la garantia de su Producto, debe
comunicarse con el centro de servicio autorizado de Bosch mas cercano.
BSH Home Appliances Corporation 5551 McFadden Avenue, Huntington Beach, CA 92649 / 800 944 2904
68
06/2009
9000407521
 Loading...