

Bosch WTV76100CN Owner's Manual

Dryer
V20-UL
en Operating Care and
Installation Instruction
Household Appliances

Table of Contents
Definitions ...................................................................................................................................................................3
IMPORTANT SAFETY INSTRUCTIONS .....................................................................................................................4
GROUNDING INSTRUCTIONS ........................................................................................................ .................................. 5
INSTALLATION INSTRUCTIONS ...............................................................................................................................6
Introduction ................................................................................................................... ......................................................... 6
Information concerning waste disposal.......................................................................................... .................................. 6
Before installing the dryer .................................................................................................... ............................................... 6
Installation location.......................................................................................................... ..................................................... 7
Washer-dryer connecting set.................................................................................................... .......................................... 7
Built under Installation....................................................................................................... ................................................... 7
Electrical connection .......................................................................................................... .................................................. 8
Integrated socket .............................................................................................................. .................................................... 9
Exhaust air connection ......................................................................................................... .............................................10
Installation -step by step..................................................................................................... ...............................................12
Check list before using the dryer .............................................................................................. ......................................12
Preparing to transport the dryer............................................................................................... ........................................12
OPERATING INSTRUCTIONS ..................................................................................................................................13
Your new dryer ................................................................................................................. ...................................................13
Panel .......................................................................................................................... ...........................................................14
Safety information ....................................................................................................................................................15
Intended Use ................................................................................................................... ....................................................15
Before switching on the dryer .................................................................................................. ........................................15
Using the dryer................................................................................................................ ....................................................15
Protecting the dryer........................................................................................................... .................................................15
Before using the dryer for the first time...................................................................................... ....................................15
Temporary disconnection of the dryer........................................................................................... .................................15
Laundry......................................................................................................................................................................16
Identification of fabrics...................................................................................................... .................................................16
Drying tips .................................................................................................................... ........................................................16
Protection of environment ...................................................................................................... ........................................... 16
Program selection ....................................................................................................................................................17
Automatic programs............................................................................................................. ..............................................17
Time programs .................................................................................................................. ..................................................17
Option ......................................................................................................................... ..........................................................17
Indicator of program sequence.................................................................................................. ......................................17
Operation...................................................................................................................................................................18
Using the dryer................................................................................................................ ....................................................18
Cleaning and care.....................................................................................................................................................19
Cleaning the dryer ............................................................................................................. ................................................. 19
Cleaning the lint filter ....................................................................................................... ..................................................19
Cleaning the exhaust duct ...................................................................................................... ..........................................20
Cleaning the moisture sensor ................................................................................................... .......................................20
Cleaning the bearing shield.................................................................................................... .......................................... 20
Troubleshooting .......................................................................................................................................................21
SERVICE and REPAIR ............................................................................................................. ..........................................22
STATEMENT OF LIMITED PRODUCT WARRANTY................................................................................................23
Warranty Exclusions
Program selection table ...........................................................................................................................................26
Summary of instructions .........................................................................................................................................27
2

Congratulations on having selected
a Bosch clothes dryer, the choice of
those that demand exceptional performance from their clothes dryer.
This dryer complies with
UL 2158 A Electric Clothes Dryers.
A distinctive feature of your dryer is
low energy consumption.
An easy operation philosophy, a
variety of customized drying
programs and a solid touch and
feel make this appliance a userfriendly assistant in your household.
The Bosch dryer offers the following
standard features:
– High efficiency precision drying
system.
– Exceptionally quiet operation.
Each dryer which leaves our factory
has undergone a thorough
performance test and is in full
working condition. If you have any
questions especially concerning
installation of the dryer - our
customer service team will be
happy to advise you.
Further information and a selection
of our products can be found on our
web site:
www.boschappliances.com
Information
Please read and follow these
operating and installation
instructions and all other
information enclosed with the dryer.
Definitions
WARNING
WARNING – This indicates that
death or serious injuries may
occur as a result of not
observing this warning.
CAUTION
CAUTION – This indicates that
injuries or significant damage
may occur as a result of not
observing this warning.
– Sensor controlled auto cycles.
– Timed cycles for
20 and 40 minutes.
CAUTION
CAUTION – This indicates that
minor injuries or damage may
occur as a result of not
observing this warning.
This symbol is used to draw
the user's attention to
something in particular.
3

IMPORTANT SAFETY INSTRUCTIONS
WARNING
To reduce the risk of fire, electric
shock, serious injury or death to
persons and /or damage when
using your dryer, follow basic
precautions, including the
following.
1. Read all instructions before
using the dryer. Bosch dryers
are provided with Operating,
Care and Installation
Instructions.
2. Do not dry articles that have
been previously cleaned,
washed, soaked, or spotted
with gasoline, dry cleaning
solvents, other flammable, or
explosive substances as they
give off vapors that could ignite
or explode.
3. Do not allow children to play on
or in the appliance at any time;
severe injury or death could
result. Children should be kept
a safe distance away from
appliances at all times. Children
should only be permitted within
an appliance's vicinity if under
close, constant adult
supervision.
4. When children become old
enough to operate the
appliance, it is the legal
responsibility of the parents or
legal guardians to ensure that
they are instructed in safe
practices by qualified persons.
5. Before the appliance is
removed from service or
discarded, remove the door to
the drying compartment.
6. Do not reach into the appliance
if the drum is rotating.
7. Do not install or store this
appliance where it will be
exposed to the weather.
8. Do not tamper with the controls.
9. Do not repair or replace any
part of the appliance or attempt
any service unless specifically
recommended in the usermaintenance instructions or in
published user repair
instructions that you understand
and have the skills to carry out.
10. Do not use fabric softeners or
products to eliminate static
unless recommended by the
fabric manufacturer.
11. Do not use heat to dry articles
containing foam rubber (may
be labeled latex foam) or
similarly textured rubber-like
materials. Foam rubber
materials can ignite by
spontaneous combustion.
12. Keep area around the exhaust
opening and adjacent
surrounding areas free from the
accumulation of lint, dust and
dirt. An obstructed port might
reduce the airflow.
13. Clean lint screen before or after
each load.
14. The interior of the machine
should be cleaned periodically
by qualified service personnel.
15. Always be sure to unplug the
dryer from the electrical supply
before attempting any service.
Disconnect the power cord by
grasping the plug, not the cord.
16. Store all laundry chemicals and
aids in a cool dry place
according to the manufacturer's
instructions in an area where
children cannot reach them.
17. To reduce the risk of fire,
clothes, cleaning rags, mop
heads and the like which have
traces of any flammable
substance, such as vegetable
oil, cooking oil, petroleum
based oils or distillates, waxes,
fats, etc., must not be placed in
the dryer. These items may
contain some flammable
substance(s) even after
washing, which may smoke or
catch fire by itself.
18. Do not place items exposed to
cooking oils in your dryer. Items
contaminated with cooking oils
may contribute to a chemical
reaction that could cause a
load to catch fire.
19. Do not sit on top of the dryer.
20. To reduce the risk of fire or
electrical shock, DO NOT use
an extension cord or an
adapter to connect the dryer to
the electrical power supply.
21. The dryer must only be used for
its intended purpose.
22. Use the integrated socket only
for listed appliances.
23. Always check pockets and
remove any objects. Cigarette
lighters are particularly
hazardous.
24. Replace worn out power cords
and/or loose plugs.
25. Do not operate the dryer if any
guards and/or panels have
been removed.
26. Do not operate the dryer if any
parts are missing or broken.
27. Do not bypass any safety
devices.
28. Do not use a plastic or non-
metal flexible duct with this
dryer. Plastic or non-metal
flexible duct are a potential fire
hazard.
4

Do not operate this dryer until
29.
you are sure that the dryer has
been installed according tothe
INSTALLATION INSTRUCTIONS
and that installation and
grounding are in compliance
with all local regulations and/or
other applicable regulations
and requirements.
30. Failure to install, maintain and/
or operate the dryer according
to the manufacturer's
instructions may result in injury
and/or damage.
31. To avoid floor damage and
mold growth, do not let spills or
splashout cause standing water
around or under the appliance.
Notes:
A The IMPORTANT
SAFEGUARDS and
WARNINGS presented in
this manual do not cover
all possible conditions that
may occur.
Common sense, caution
and care must be
exercised when installing,
maintaining or operating
the dryer.
B Always contact your
dealer, distributor, service
agent or the manufacturer
about any problems or
conditions that you do not
understand.
C Follow also the Safety
Information in the
INSTALLATION
INSTRUCTIONS and the
OPERATING
INSTRUCTIONS.
GROUNDING
INSTRUCTIONS
This appliance must be grounded.
In the event of malfunction or
breakdown, grounding will reduce
the risk of electric shock by
providing a path of least resistance
for the electric current.
This appliance is equipped with a
cord having an equipmentgrounding conductor and a
grounding plug.
The plug must be plugged into an
appropriate outlet that is properly
installed and grounded in
accordance with all local codes and
ordinances.
WARNING
Improper connection of the
equipment grounding conductor
can result in a risk of electric
shock.
WARNING
State of California Proposition 65
warnings:
This product contains chemicals
known to the State of California to
cause cancer, birth defects or
other reproductive harm.
Check with a qualified electrician
or service person if you are in
doubt as to whether the dryer is
properly grounded.
DO NOT modify the plug
provided with the appliance. If it
does not fit the outlet, have a
proper outlet installed by a
qualified electrician.
KEEP THESE
INSTRUCTIONS FOR
FUTURE REFERENCE.
In case of change of ownership,
manual should be conveyed with
the dryer.
SAVE THESE INSTRUCTIONS
5

INSTALLATION INSTRUCTIONS
Introduction
Read these installation instructions
completely and carefully. They will
save you time and effort and help to
ensure optimum dryer
performance. Be sure to observe all
listed warnings and cautions.
WARNING
WARNING – Risk of Fire.
– Clothes dryer installation must
be performed by a qualified
installer.
– Install the clothes dryer
according to the
manufacturer's instructions
and local codes.
– Do not install a clothes dryer
with flexible plastic venting
materials. If flexible metal (foil
type) duct is installed, it must
be of a specific type identified
by the appliance manufacturer
as suitable for clothes dryers.
Flexible venting materials are
known to collapse, be easily
crushed and trap lint. These
conditions will obstruct clothes
dryer airflow and increase the
risk of fire.
– To reduce the risk of severe
injury or death, follow all
installation instructions.
– SAVE THESE INSTRUCTIONS
In addition to these instructions the
dryer must be installed in
accordance with all local codes or,
in the absence of a local code:
– In the U.S.A., in accordance
with the National Electric Code,
ANSI/NFPA70-latest edition/
State and Municipal codes
and/or local codes.
–In Canada, in accordance wit the
Canadian Electric Code
C22.1 – latest edition/Provincial
and Municipal codes and/or local
codes.
Information
concerning waste
disposal
Disposal of the packaging
WARNING
Keep children away from
shipping carton and packaging
components. Danger of
suffocation from plastic foil and
folding cartons.
All packaging materials are
environmentally friendly and can be
reused. Please dispose of
packaging in an environmentally
friendly manner.
Please ask your dealer or inquire at
your local authority about the
current means of disposal.
Disposal of the old appliance
WARNING
If appliance is no longer usable,
pull out main plug, cut off power
cord and discard with main plug.
To prevent children from locking
themselves in the appliance,
remove the door.
Old appliances are not worthless
rubbish! Valuable raw materials can
be reclaimed from environmentally
friendly recycling.
Please ask your dealer or inquire at
your local authority about the
current means of disposal.
Before installing
the dryer
Unpacking the appliance
CAUTION
The dryer is very heavy. Do not
lift it by yourself. Do not lift the
appliance by projecting
components (e.g. door) – due to
risk of breakage.
CAUTION
Remove the appliance
packaging carefully to prevent
damage to the surfaces.
Check the dryer for transportation
damage. Do not connect a dryer
which is visibly damaged. If in
doubt, contact your dealer.
Supplied components
The dryer is delivered as a
complete unit. The operating
instructions and supplied
accessories can be found in the
drum.
CAUTION
After removing the packaging,
immediately remove any objects
from the drum.
6
Installation location
CAUTION
Do not install the dryer:
– outdoors,
– in an environment with
dripping water,
– near flammable materials,
– in rooms which are at risk of
frost,
– in rooms which may contain
gas or other fuels,
– in cupboards or closets with
lockable doors.
The installation room must be well
ventilated, otherwise the dryer will
operate below optimum
performance.
Do not operate the dryer at
temperatures above 104°F (40°C)
and below 41 °F (5°C). Low
temperatures affect the automatic
program sequence and may
prolong the drying times.
The installation surface for the dryer
must be clean, level and firm. Do
not install the appliance on carpets!
Compensate for uneven floors with
the height-adjustable feet.
Install the dryer and level side to
side and front to back. Use a
bubble level. Never remove the
height-adjustable feet!
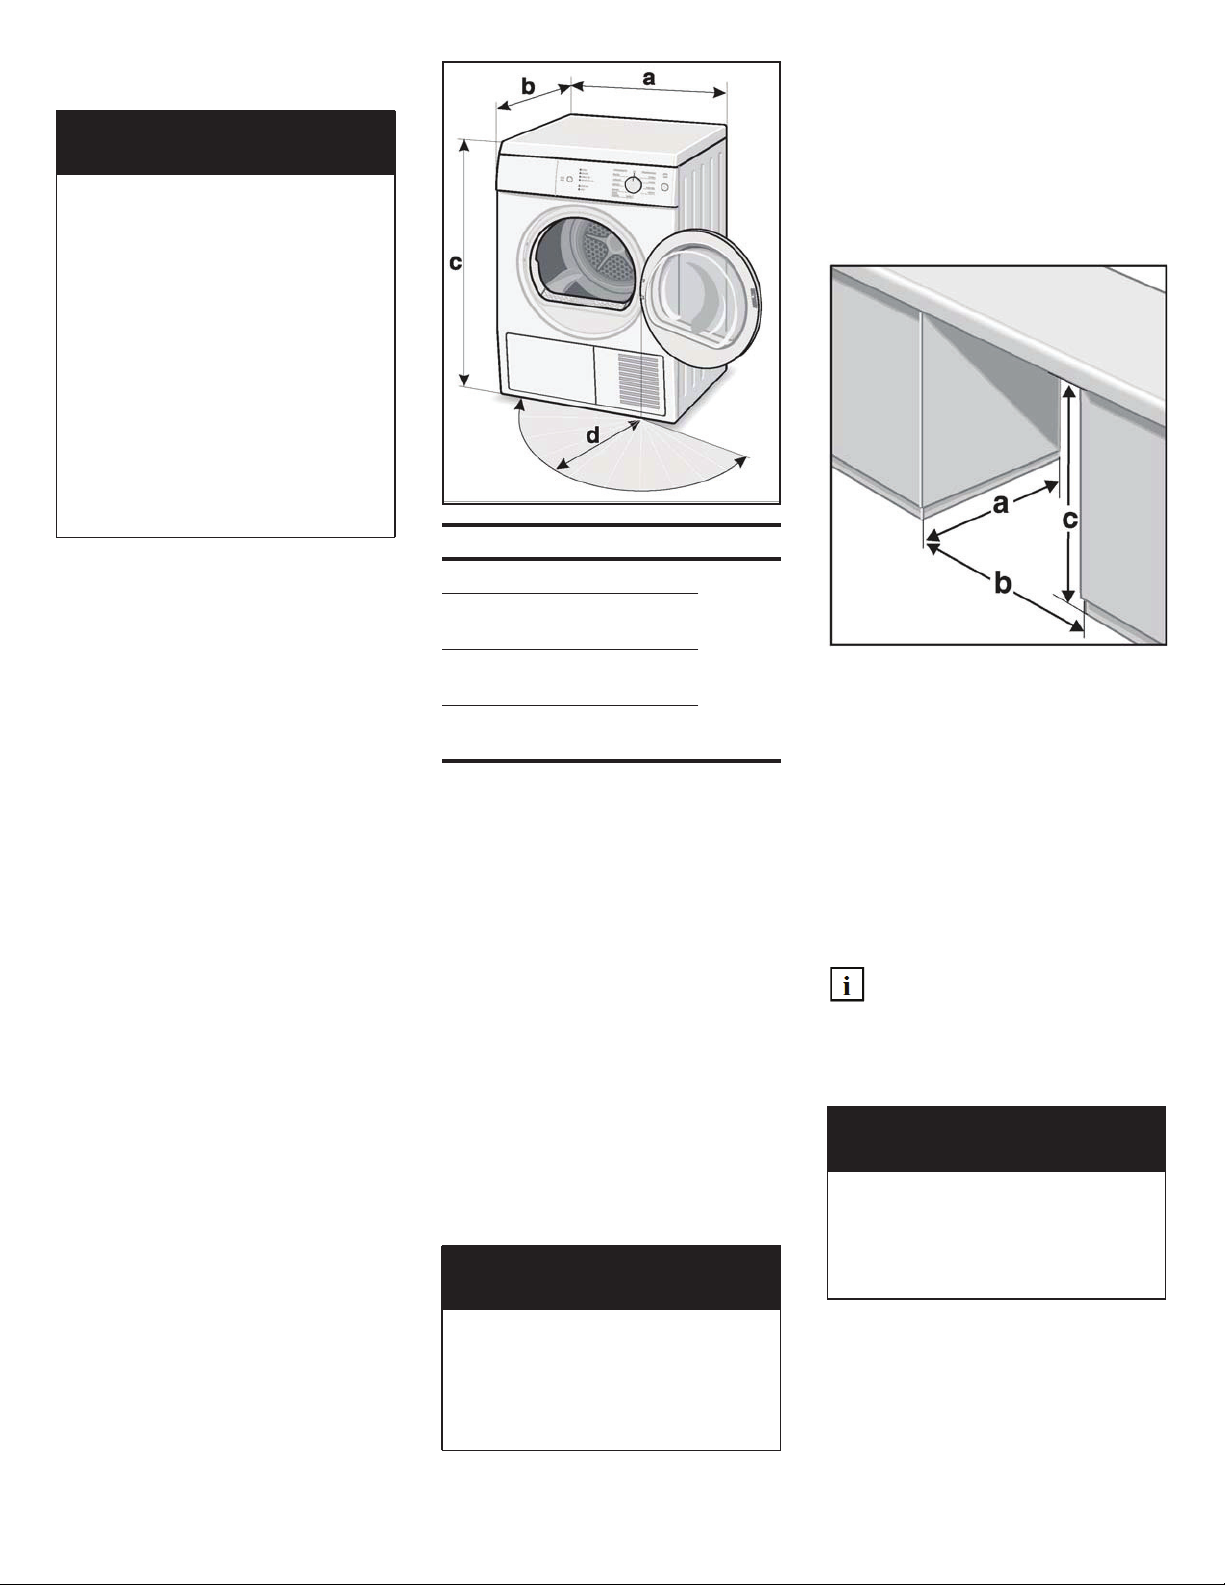
The size of the installation area
depends on the dimensions of the
dryer. Ensure that there is adequate
space to fully open the door.
Note:
Follow MINIMUM CLEARENCES
and OPEN AREA shown on front on
appliance for closet installation.
Dimension Weight
a 23.6" (600 mm) 85.8 lbs
b 23.0...24.2"
(585...615 mm)
c 33.1... 34.2"
(840...868 mm)
d
angle
17.7" (450 mm)/
170-180°
(39kg)
with
packaging
90.2 lbs
(41 kg)
Washer-dryer
connecting set
The dryer can be placed on top of a
Bosch washer of the same
dimensions to save space.
Use the special washer-dryer sets
which can be obtained from
customer service or your local
dealer.
– WTZ11310
washer-dryer connection set
(standard)
– WTZ11300
washer-dryer connection set
with removable worktop
CAUTION
For reasons of safety, the dryer
must be installed by an expert.
Always use the connection set to
secure the dryer to the washer –
risk of injury.
Built under Installation
The appliance can be built under;
that is, you can install the dryer
under-counter in a kitchen cabinet
opening. The cabinet opening
should be square and have
dimensions as shown in the figure.
a. 600 mm minimum // 23
(additionally approx. 150 mm
//5.9" for exhaust air
connection - rear)
b. 600 mm minimum // 23
(additionally approx. 150 mm
//5.9" for exhaust air
connection - left-hand side)
c. 850 mm minimum // 33
If installed under a countertop,
the countertop must be
continuous and securely
attached to neighboring
cabinets.
ȿ"
ȿ"
A"
CAUTION
BUILT UNDER INSTALLATION
The area in front of the appliance
must be fully open. No doors or
coverings are allowed.
You can use the cover for appliance
underneath worktop which can be
obtained from customer service or
your local dealer (WTZ10290).
7
Electrical connection
CAUTION
Power cord must be connected
by a qualified person only.
Connect to individual Brunch
Circuit.
Do not use an adapter.
Do not use an extension cord.
Do not remove ground prong.
For CANADA
Your dryer comes with a power
supply cord, CSA listed in Canada.
The Bosch dryer requires a 4-wire
receptacle.
CAUTION
Power cord must be connected
by a licensed electrician only.
Use only a U.L. approved
30 amp power cord with strain
relief clamp –
note manufacturer's instructions.
Do not plug end of power cord
into a live receptacle before connecting power cord to appliance
terminals and closing junction/
splitter box as described below.
Do not reuse old power cord.
Cord must have closed loop or
upturned end wire terminating
connectors.
Do not make a sharp bend or
crimp wiring/conductor at
connections.
2. Push the cover plate from the
front to the rear side and lift
up.
3. Open the splitting box in the
right corner (20 Torx).
4. Loosen the strain relief in the
appliance.
5. Thread the power cord
through the U.L. strain relief
clamp.
6. Tighten the screws (2.5 Nm)
of the U.L. strain relief clamp
so that the power cord cannot
be moved.
7. Connect the power cord as
described below.
8. After connecting the power
cord close the splitting box
and replace the cover plate
fasten in place with reverse
handling.
When installing the receptacle for
the dryer cord, ensure that the
power supply cord is accessible
when the dryer is in the installed
position.
The power cord should only be
replaced by a qualified person.
Use a 4-wire power supply cord
(see electrical connection U.S.A.
below).
For U.S.A.
Your dryer comes without a 3- or
4-wire power supply cord. The
power cord kit must meet the
following requirements:
– UL listed in the USA
– 208 - 240 volt rated (minimum)
– 30 amps
– Type SRDT or DRT (UL 2158 A)
– Five feet long (minimum)
– Marked suitable for dryer
Only a 4-conductor cord shall
be used when the appliance is
installed in a mobile home, in a
recreational vehicle, in a new
branch circuit installation or an
area where the local codes do
not permit grounding through
the neutral.
The splitting box is located at the
top rear of the appliance.
To connect the power cord you
have to remove the cover plate.
1. Remove the screws of the
cover plate on the rear side of
the appliance.
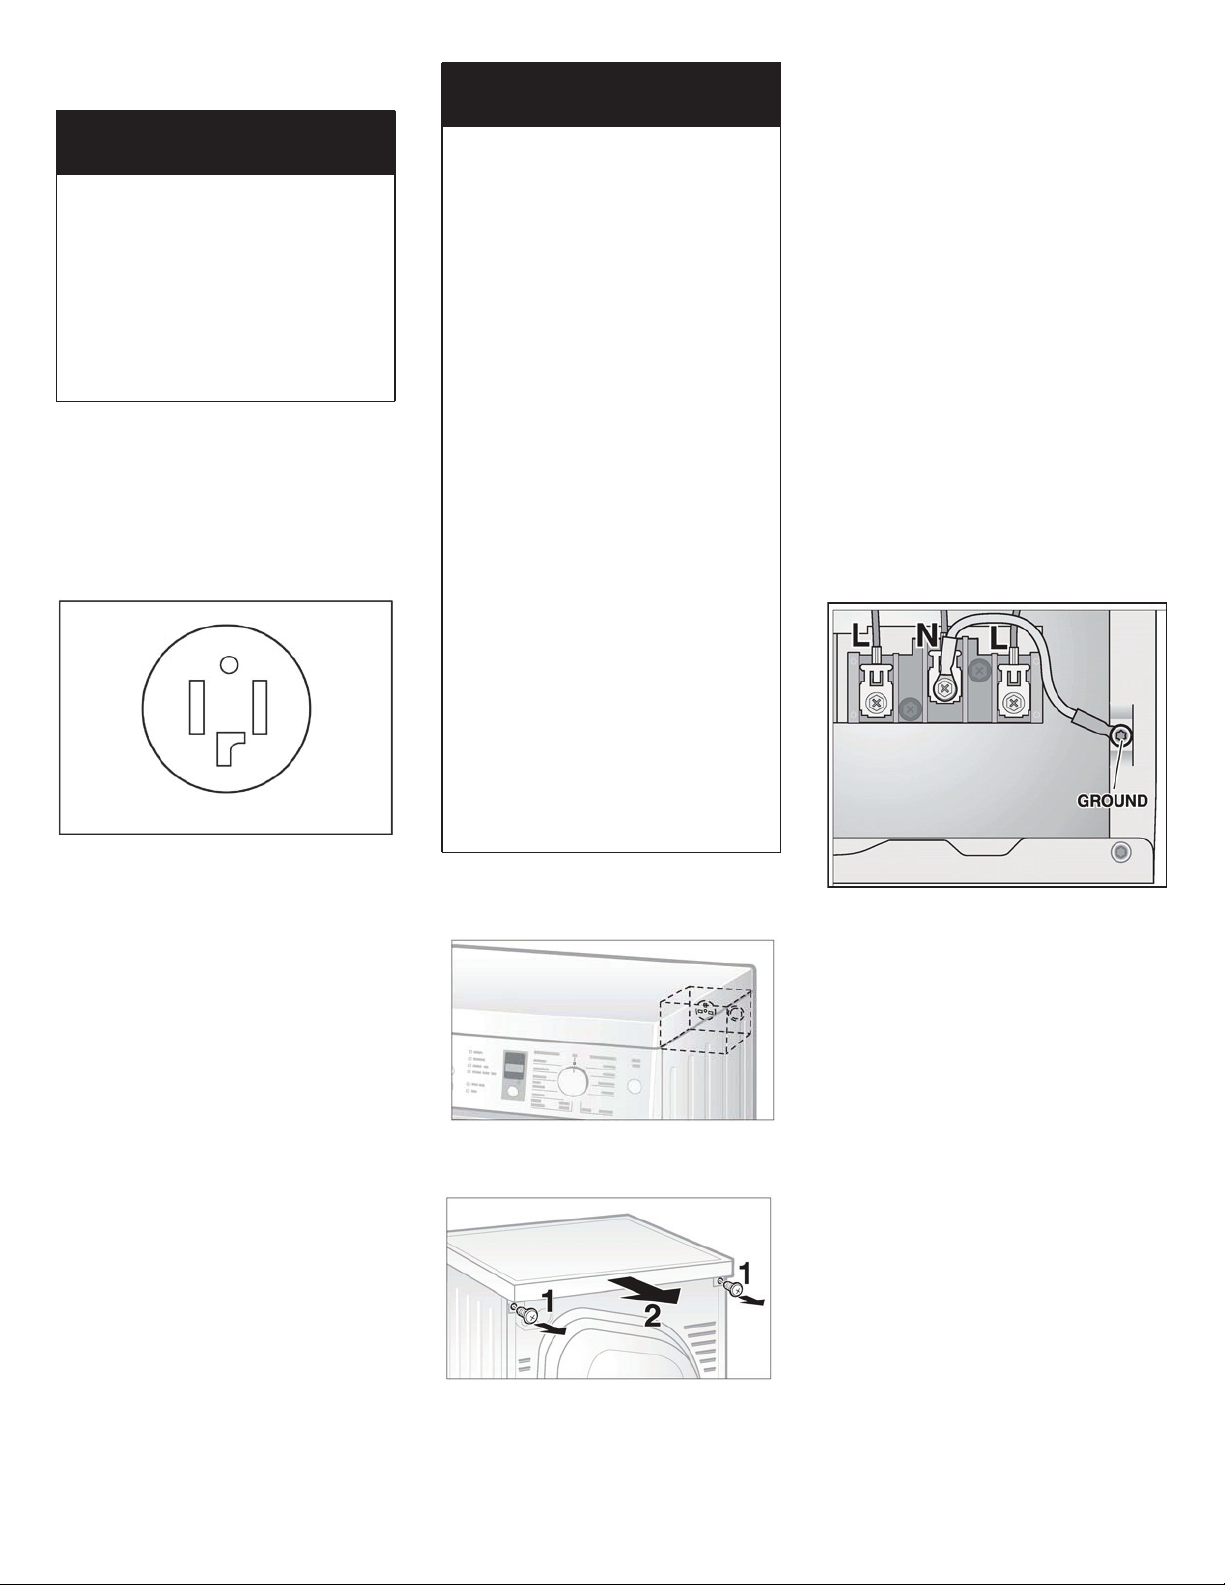
Dryer supplied to customer
Connecting 4-wire power supply
cord
1. Remove the screws from the
cover of the terminal block.
2. Remove the screws from the
grounding cable.
3. Remove the grounding cable.
4. Loosen the 2 screws labeled L
in the terminal block.
5. Attach the power cord ground
conductor (green) to the
GROUND point. Tighten the
screw (2.5 Nm) so that the
ground conductor is held
securely in place.
6. Attach the 2 power cord outer
conductors (red and black) to
the 2 terminals labeled L and
the remaining power cord
conductor (white) to the
terminal labeled N.
8
Tighten all 3 screws (3 Nm) so
7.
that the power conductors are
held securely in place.
8. Check the U.L. strain relief
clamp to make sure that it is
tight and cannot be turned.
9. Replace the cover on the
terminal block and fasten in
place.
Integrated socket
This appliance is equipped with a
socket for connecting a washer
without fuses. Only the listed
washer may be connected. For all
other connections Bosch will
assume no liability.
Make sure that the U.L. strain
relief clamp is outside the
cover!
The appliance is now ready to be
plugged into the 4-wire receptacle
of the power rating.
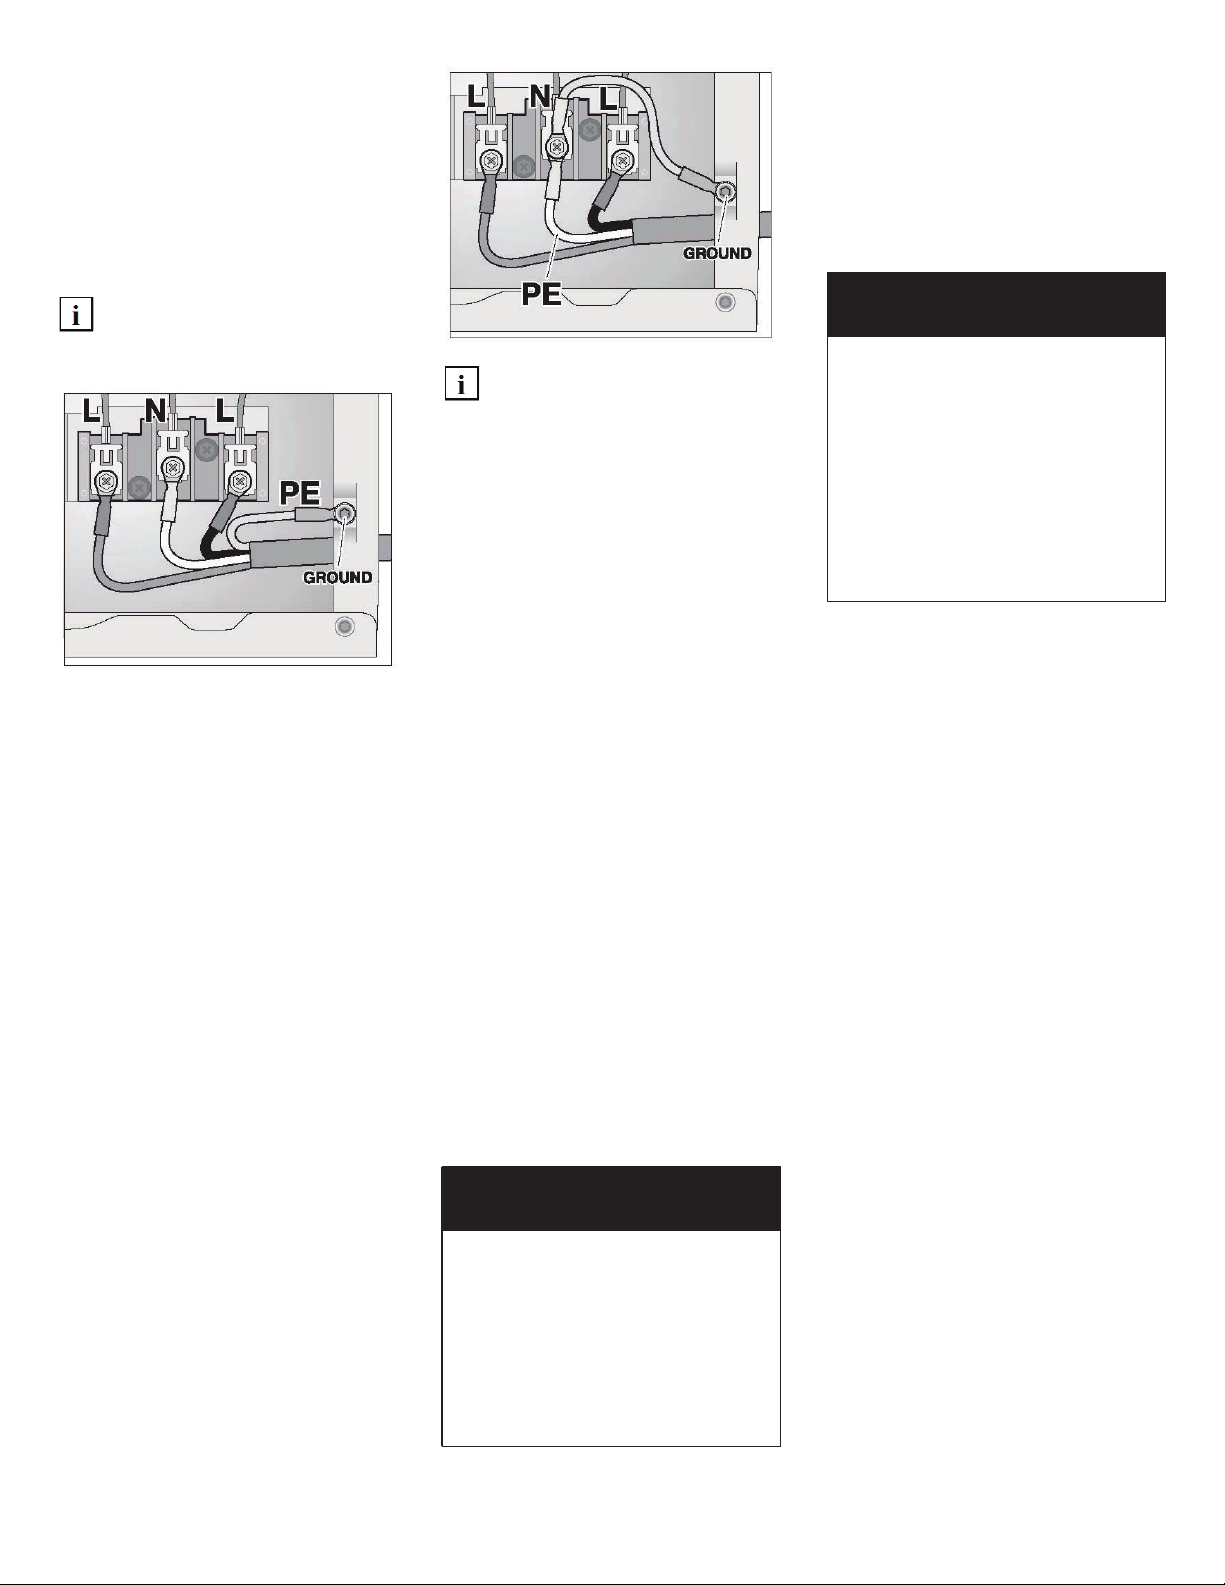
Connecting 3-wire power supply
cord
1. Remove the screws from the
cover of the terminal block
located at the top rear of the
appliance.
2. Make sure that there is a
grounding cable.
3. Loosen the 2 screws labeled L
and the screw labeled N in the
terminal block.
4. Attach the 2 power cord outer
conductors (red and black) to
the 2 terminals labeled L and
the remaining power cord
conductor (white) to the
terminal labeled N.
5. Tighten all 3 screws (3 Nm) so
that the power conductors are
held in place securely.
6. Check the U.L. strain relief
clamp to make sure that it is
tight and cannot be turned.
7. Replace the cover on the
terminal block and fasten in
place.
Make sure that the U.L. strain
relief clamp is outside the
cover!
Additional grounding procedure
– Some local regulations may
require a separate ground. In
such cases, the required
accessory ground wire, clamp
and screw must be purchased
separately.
– Never ground the dryer to
plastic plumbing lines,
gas lines or water pipes.
Grounding instruction
This appliance must be grounded.
In the event of a malfunction or
breakdown, grounding will reduce
the risk of electric shock by
providing a path of least resistance
for the electric current.
For Canada the dryer comes with a
cord which has an equipment
grounding conductor and a
grounding plug. The plug must be
plugged into an appropriate outlet
which has been properly installed
and grounded in accordance with
all local regulations and
ordinances.
CAUTION
Improper connection of the
equipment grounding conductor
may result in electric shock.
Have the appliance checked by
a qualified electrician or service
technician if you are in doubt as
to whether the dryer has been
properly grounded.
CAUTION
Use copper conductors only.
Connect to a 30 A minimum
individual branch circuit, fused at
30 A maximum.
Use receptable only for:
208 – 240 VAC 60 Hz 11 A
washer: WFR2460UC,
WFL2060UC, WAE20060UC,
WAS20160UC, WAS24460UC.
9
 Loading...