

Bosch WFMC8440UC/13 Owner’s Manual
BOSCH
Invented for life
Features and Benefits of Your New Washer
SENSOTRONIC ® Technology
The Bosch SENSOTRONIC ®technology optimizes the
wash process at every stage of the cycle by sensing load
size, water level and temperature needs for superior results.
Digital sensors care for all fabrics including wool, mohair
and silk. This machine virtually operates at the touch of a
button.
Exclusive Hinge and Gasket System
A reinforced hinge and a new, revolutionary gasket design
help seal in the heat, allowing your laundry to reach the
optimum temperature, which eliminates even the toughest
stains.
3-Part Detergent Dispenser
A 3-part dispenser automatically distributes detergent,
bleach and softener at exactly the right times.
XXTRASANITARY TM Cycle
With this innovative cycle, a thermostat-controlled,
intelligent sensor heats up the water to 170° F.The clothes
are thoroughly cleaned and sanitized while killing 99.99% of
most common household bacteria.
KIDSCARE TM Cycle
The littlest people in the house usually account for the
toughest stains. This cycle heats the wash water up to
150° F to remove even the most stubborn stains with ease.
Archie Paddles
As your wash gently tumbles, Archie paddles cascade water
from high above, rinsing away suds and giving your laundry
a complete, even clean. An inclined drum optimizes
performance to ensure not a single shirt goes unturned.
Stainless Steel Drum
The Nexxt ® washer drum has hundreds of smooth double
punched holes, which allow your garments to gently tumble
completely snag-free.
Internal Water Heater
An internal heating element heats the water to up to 170° F
while a digital temperature sensorr._continuallymonitors the
water temperature. Bosch Nexxt@washers deliver the
most efficient and accurate water heating method for each
selected fabric type.
Quiet Performance
Bosch washers use suspended brushless motors, isolated
pump systems and special sound-deadening material to
keep them exceptionally quiet while in operation. This
means they can be installed virtually anywhere in the home
without causing a disturbance. Bosch's special unbalance
control software eliminates noisy unbalance conditions.
AQUASTOP ®
AQUASTOP ® is an internal containment safety system
designed to protect against flood-type leakage to decrease
the chance of water damage when the washer isturned on
and operating.
AQUASTOP ® Hose
The AQUAST_,OP Hose stops water flow in the event the
AQUASTOP Hose experiences flood-type leakage.
®
@
Table of Contents
Definitions ..........................................................................................
IMPORTANT SAFETY INSTRUCTIONS .................................................................
Grounding Instructions ..............................................................................
INSTALLATION INSTRUCTION ........................................................................
Introduction .......................................................................................
Information concerning waste disposal ................................................................
Intended use ......................................................................................
Environmental Protection / Conservation Issues .........................................................
Factory-supplied equipment .........................................................................
Dimensions .......................................................................................
Installation area ....................................................................................
Removing the transport bolts .........................................................................
Water connection ..................................................................................
Electrical connection ...............................................................................
Leveling procedure .................................................................................
Transport, such as when moving out ..................................................................
OPERATING INSTRUCTION ..........................................................................
Panel ............................................................................................
Before Using For the First Time .......................................................................
Using For the First Time ..............................................................................
Setting the time ....................................................................................
Selecting the Language .............................................................................
First washing cycle (without laundry) ...................................................................
Preparing the laundry ...............................................................................
Sorting the laundry .................................................................................
Degrees of soiling ..................................................................................
Loading the laundry ................................................................................
Laundry Detergents and Additives .....................................................................
Dispensing the correct amount of detergent ............................................................
Filling laundry detergent and/or additives ...............................................................
Decolorizing .......................................................................................
Programs and Functions .............................................................................
Option buttons ....................................................................................
Washing with Individual Settings ......................................................................
Quick Overview ....................................................................................
Special features ....................................................................................
Child lock .........................................................................................
During Washing .....................................................................................
Re-selecting a program .............................................................................
Add a garment / Interrupting the program ..............................................................
Canceling the active program ........................................................................
After Washing .......................................................................................
User Maintenance Instructions ........................................................................
Cleaning and Care .................................................................................
Cleaning the applicance housing and control panel ......................................................
Cleaning the drum .................................................................................
Cleaning the detergent dispenser .....................................................................
Cleaning water inlet strainers .........................................................................
Descaling the washing machine ......................................................................
Troubleshooting of Minor Faults ......................................................................
Customer Service ....................................................................................
STATEMENT OF LIMITED PRODUCT WARRANTY ......................................................
Program Selection Table .............................................................................
4
4
5
6
6
6
6
6
6
7
7
8
9
10
10
11
12
12
13
13
13
13
13
14
14
14
15
16
16
16
16
18
17
19
19
2O
2O
21
21
21
21
21
22
22
22
22
22
22
23
24
27
28
96
3
Congratulations!
The new washing machine you just
purchased is a modern, high quality
domestic appliance.
This modern washing machine cleans
your laundry using the most
sophisticated washing processes
to obtain superior cleaning results.
Excellent engineering and reliability
reduces operating costs significantly.
An easy operation philosophy, a variety
of customized washing programs and a
solid touch and feel makes this
appliance a user-friendly assistant in
your household.
It offers the following standard features:
- Low noise level for washing
and spinning.
- High door with magnetic door
lock.
Door opening 16 inches (41 cm),
quality sturdy hinge, opening angle
- 180°.
Drum capacity 22 Ibs (10 kg) for
regular cotton.
Each washing machine which leaves
our factory has undergone athorough
performance test and is in full working
condition. The appliance may contain
residual water due to the testing
procedures. If you have any questions
concerning installation of the washing
machine, our customer service will be
happy to advise you.
Further information and a selection of
our products can be found on our Web
site: www.boschappliances.com
Please read and follow these operating
and installation instructions along with
all other information enclosed with the
washing machine.
These operating and installation
instructions describe various models.
Differences are indicated in the
appropriate places.
The illustrations may show different
details than your washer.
Definitions
WARNING - This indicates that
death or serious injuries may
occur as a result of
non-observance of this warning.
CAUTION- This indicates that
minor or moderate injuries may
occur as a result of
non-observance of this warning.
NOTICE - This indicates that
damage to the appliance or
property may occur as a result of
non-observance of this warning.
/k IMPORTANT SAFETY INSTRUCTIONS
4. Under certain conditions hydrogen
gas may be produced in a hot
To reduce the risk of fire, electric
shock, serious injury or death when
using your washing machine, follow
basic precautions, including the
following:
1. BOSCH washers are provided with
an Operating, Care and Installation
Instructions Manual. Read and
understand all instructions before
using the washing machine.
2. Do not wash articles that have
been previously cleaned, washed,
soaked, or spotted with gasoline,
dry cleaning solvents, other
flammable or explosive
substances as they give off vapors
that could ignite or explode.
3. Do not add gasoline, dry cleaning
solvents, or other flammable or
explosive substances to the wash
water. These substances give off
vapors that could ignite or
explode.
water system that has not been
used for 2 weeks or more.
HYDROGEN GAS IS EXPLOSIVE.
If the hot water system has not
been used for this length of time,
turn on all hot water faucets and
let the water flow out of each
faucet for several minutes before
using the washing machine. This
will release any accumulated
hydrogen gas. As the gas is
flammable, do not smoke or use
an open flame while carrying out
this procedure.
5. Before the appliance is removed
from service or discarded, remove
the door and the power cord/plug.
6. Do not reach into the appliance if
the wash drum is moving.
7. Do not install or store this
appliance where it will be exposed
to the weather.
8. Do not tamper with the controls.
D This symbol is used to draw the
user's attention to important
matters.
9. Do not repair or replace any part of
the appliance or attempt any
service unless specifically
recommended in the user
maintenance instructions or in
published user repair instructions
that you understand and have the
skills to carry out.
10. Always unplug the washing
machine from the power supply
before attempting any service.
Disconnect the power cord by
grasping the plug, not the cord.
11. To reduce the risk of fire, clothes,
cleaning rags, mop heads and the
like which have been soiled with
any flammable substance, such as
vegetable oil, cooking oil,
petroleum based oils or distillates,
waxes, fats, etc., must be kept
away from any source of ignition,
including a clothes dryer. These
items may contain flammable
substances which, even after
washing, may smoke or catch fire.
4
12. Do not machine wash fiberglass
materials (such as curtains and
window coverings that use
fiberglass materials). Small
particles may remain inthe
washing machine and stick to
fabrics in subsequent wash loads
causing skin irritation.
13. When children become old
enough to operate the appliance, it
is the legal responsibility of the
parents or legal guardians to
ensure that they are instructed in
safe practices by qualified
persons.
14. Do not allow children to play on or
with the appliance. Close
supervision of children is
necessary when the appliance is
used near children.
15. Keep pets away from the washing
machine.
16. Do not insert/pull out the power
plug with wet hands.
17. Do not touch the door ifwashing
at high temperatures.
18. Use caution when draining hot
water.
19. Do not climb onto the washing
machine and/or lean on the open
door.
20. Do not sit or stand on the top of
the washing machine.
21. To reduce the risk of fire or
electrical shock, DO NOT use an
extension cord or an adapter to
connect the washing machine to
the power supply.
22. The washing machine must only
be used for its intended purpose.
23. Always follow the fabric care
instructions recommended by the
clothing manufacturer.
24. Do not use the washing machine if
it has a worn power cord or loose
plug. If this is the case, contact an
authorized service agent.
25. Make sure that all water
connections to the washing
machine have shut-off valve(s) that
are readily accessible. Close the
washing machine water shut-off
valve(s) at the end of each wash
day.
26. Check the fill hose connections on
a regular basis to ensure that they
are tight and not leaking.
27. Always read and follow the
instructions of the manufacturer of
the detergent(s), cleaning aid(s),
fabric softener(s) and static
eliminator(s) which you are using.
Heed all warnings and
precautions.
28. Store all laundry chemicals and
aids in a cool dry place according
to the manufacturers' instructions.
29. To reduce the risk of poisoning or
chemical burns, keep all cleaning
products out of the reach of
children.
30. Do not operate the washing
machine if any guards, panels
and/or fasteners except transport
fixing bolts have been removed.
31. Do not operate the washing
machine if parts are missing
or broken.
32. Do not bypass any safety devices.
33. To avoid floor damage and mold
growth, do not let spills or
splashes cause standing water
around or under the appliance.
34. Do not operate this washing
machine until you are sure that:
a. the washing machine has
been installed according to
the INSTALLATION
INSTRUCTIONS.
b. all water, drain, power and
grounding connections are in
compliance with all local
regulations and/or other
applicable regulations and
requirements.
35. Failure to install, maintain and/or
operate the washing machine
according to the manufacturer's
instructions may result in injury
and/or damage.
36. Removing any panel, including the
round service panel in the front
can expose sharp edges and
points, electrical connections and
hot surfaces.
37. To avoid damage to the door, do
not push against the door when
moving the unit. Precautions
should be taken to avoid damage
to the floor.
38. The water connections should be
made and tested before electrical
power is applied to the machine.
Notes:
A.
The IMPORTANT SAFE-
GUARDS and WARNINGS in-
dicated in this manual do not
cover all possible conditions
which may occur. Common
sense, caution and care must
be exercised when installing,
maintaining or operating the
washing machine.
B.
Always contact your dealer,
distributor, service agent or
the manufacturer about any
problems or conditions that
you do not understand.
GROUNDING
INSTRUCTIONS
This appliance must be grounded. In
the event of a malfunction or
breakdown, grounding will reduce the
risk of electric shock by providing a
path of least resistance for the electric
current. This appliance is equipped
with a cord that has an
equipment-grounding conductor and a
grounding plug. The plug must be
plugged into an appropriate outlet that
is properly installed and grounded in
accordance with all local codes and
ordinances.
Improper connection of the
equipment grounding conductor
can result in electric shock.
Connect to an individual branch
circuit.
Check with a qualified electrician or
serviceman if you are in doubt as to
whether the washer is properly
grounded.
DO NOT modify the plug provided
with the appliance - ifit will not fit
the outlet have a proper outlet
installed by a qualified electrician.
KEEP THESE
INSTRUCTIONS FOR
FUTURE REFERENCE.
In case of change of ownership,
manual should be conveyed with the
washer.
SAVE THESE
INSTRUCTIONS
INSTALLATION INSTRUCTION
Introduction
TO AVOID RISK OF INJURY
The washing machine is heavy. Lift
with caution.
Be sure to observe all listed warnings
and cautions.
Frozen hoses can tear/burst. Do not
install the washing machine outdoors
or in an area exposed to freezing
conditions. Ifthe washing machine is
located in a room which will be
exposed to temperatures below
freezing, or if it is located in a cabin
that is being shut down for the
winter, any residual water in the
pump or water inlet hose(s) must be
drained.
These installation instructions are
intended for use by qualified installers.
Inaddition to these instructions, if
installing the washing machine:
- In the United States comply with
the National Electric Code,
ANSI/NFPA70 -latest
edition/State and municipal and/or
local regulations.
- In Canada comply with the
Canadian Electric Code C22.1 -
latest edition/Provincial and
Municipal and/or local regulations.
Take care not to damage the washing
machine. Do not hold on to protruding
parts (e.g. door) when lifting.
Inaddition to the safety information
listed here, the local water and
electricity supplier may have special
requirements.
If in doubt, have the appliance
connected by an authorized technician.
Information concerning
waste disposal
Disposing of the packaging
The shipping package has protected
your new appliance on its way to your
home. All packaging materials are
non-polluting and recyclable. Please
contribute to a better environment by
disposing of packaging materials in an
environmentally friendly manner.
Please ask your dealer or local
authority about the best means of
disposal.
Keep children away from shipping
carton and packaging components
to avoid risk of suffocation from
plastic wrap and folding cartons.
Disposing of your old appliance
Old appliances are not worthless
rubbish! Valuable raw materials can be
reclaimed from environmentally friendly
recycling.
If appliance is no longer usable, pull
out the main plug, cut off the power
cord and discard.
Also remove the washer door to
prevent children from locking
themselves in the appliance
Intended Use
Your washing machine is intended:
- For domestic use only.
- For cleaning machine-washable
fabrics in tap water.
For operation using cold and hot
(140 °F/60 °C) tap water and
conventional additives that are
suitable for use in residential
washing machines.
Environmental
Protection/Conservation
Issues
Your washing machine uses water,
energy and detergent efficiently,
thereby protecting the environment and
reducing your household costs.
To use your washing machine in an
efficient and non polluting manner:
- Avoid using too much detergent.
- Use detergent bearing HE symbol
for high efficiency and front loading
washers.
Add detergent according to the
degree of soiling, amount of
laundry and water hardness, and
follow the detergent
manufacturer's instructions.
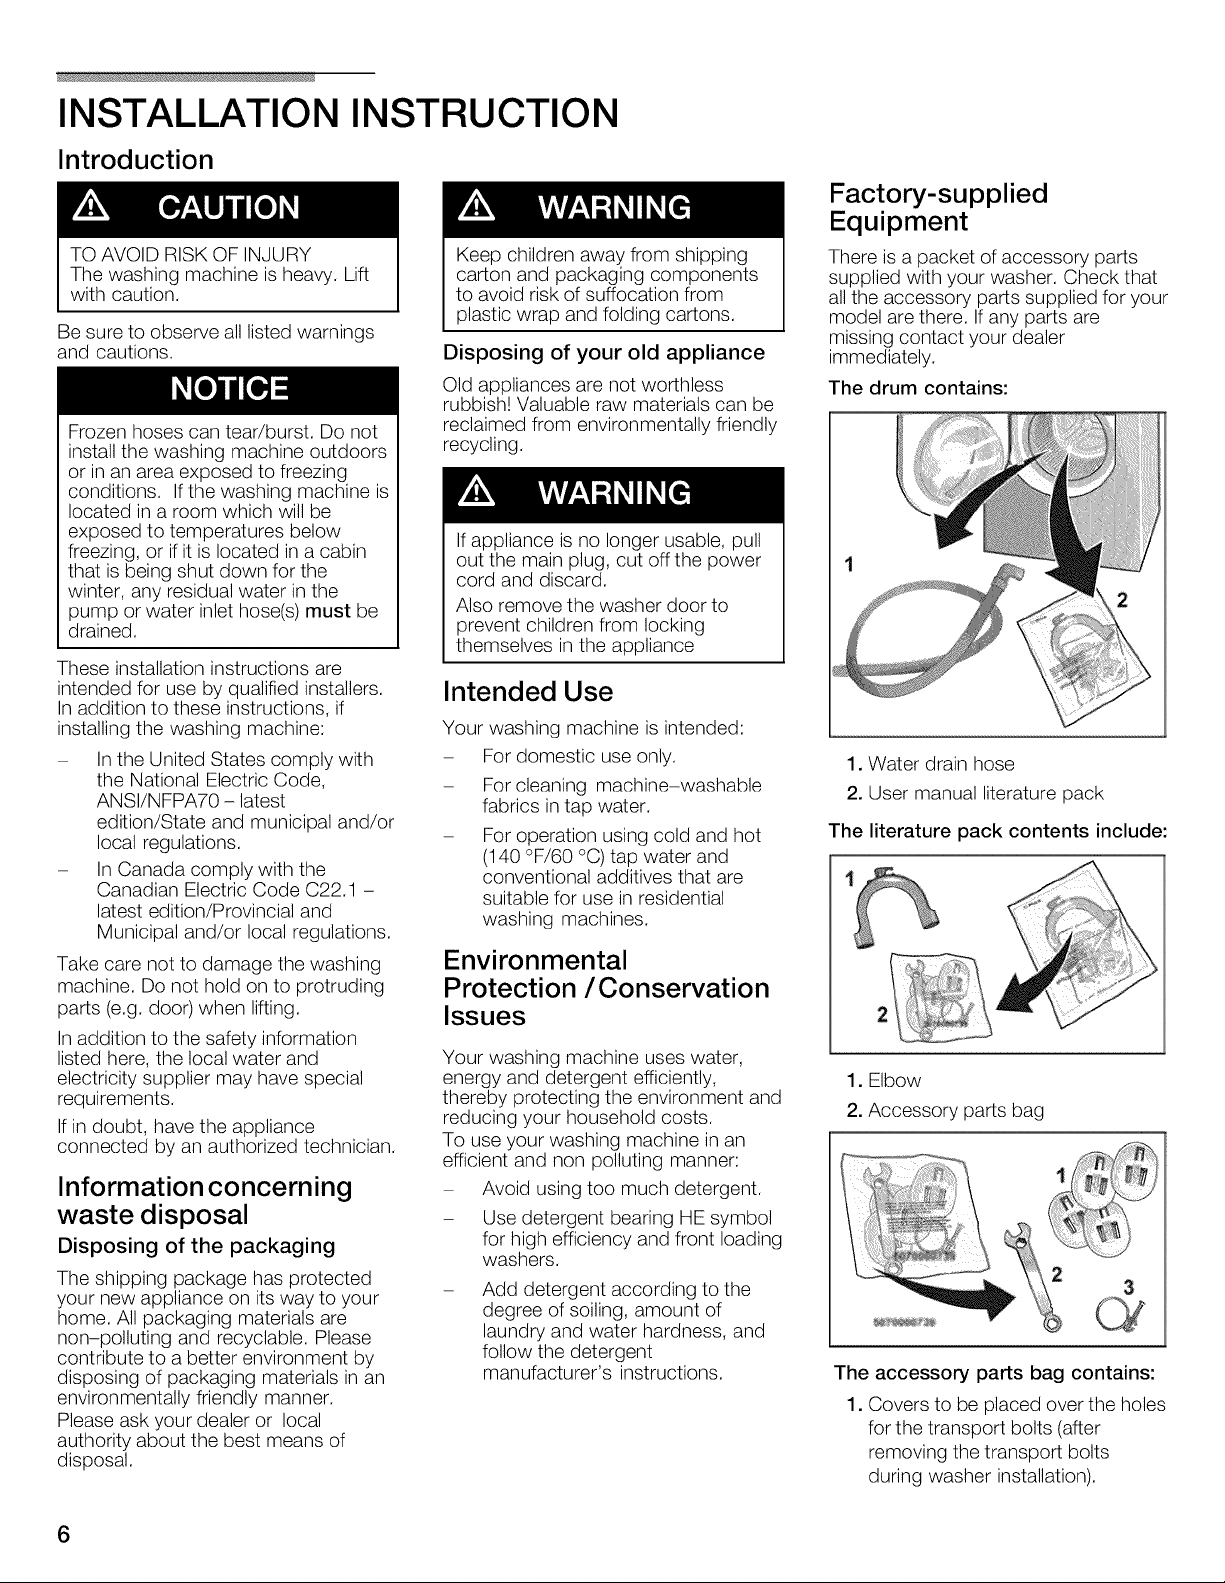
Factory-supplied
Equipment
There is a packet of accessory parts
supplied with your washer. Check that
all the accessory parts supplied for your
model are there. If any parts are
missing contact your dealer
immediately.
The drum contains:
1. Water drain hose
2. User manual literature pack
The literature pack contents include:
1. Elbow
2. Accessory parts bag
The accessory parts bag contains:
1. Covers to be placed over the holes
for the transport bolts (after
removing the transport bolts
during washer installation).
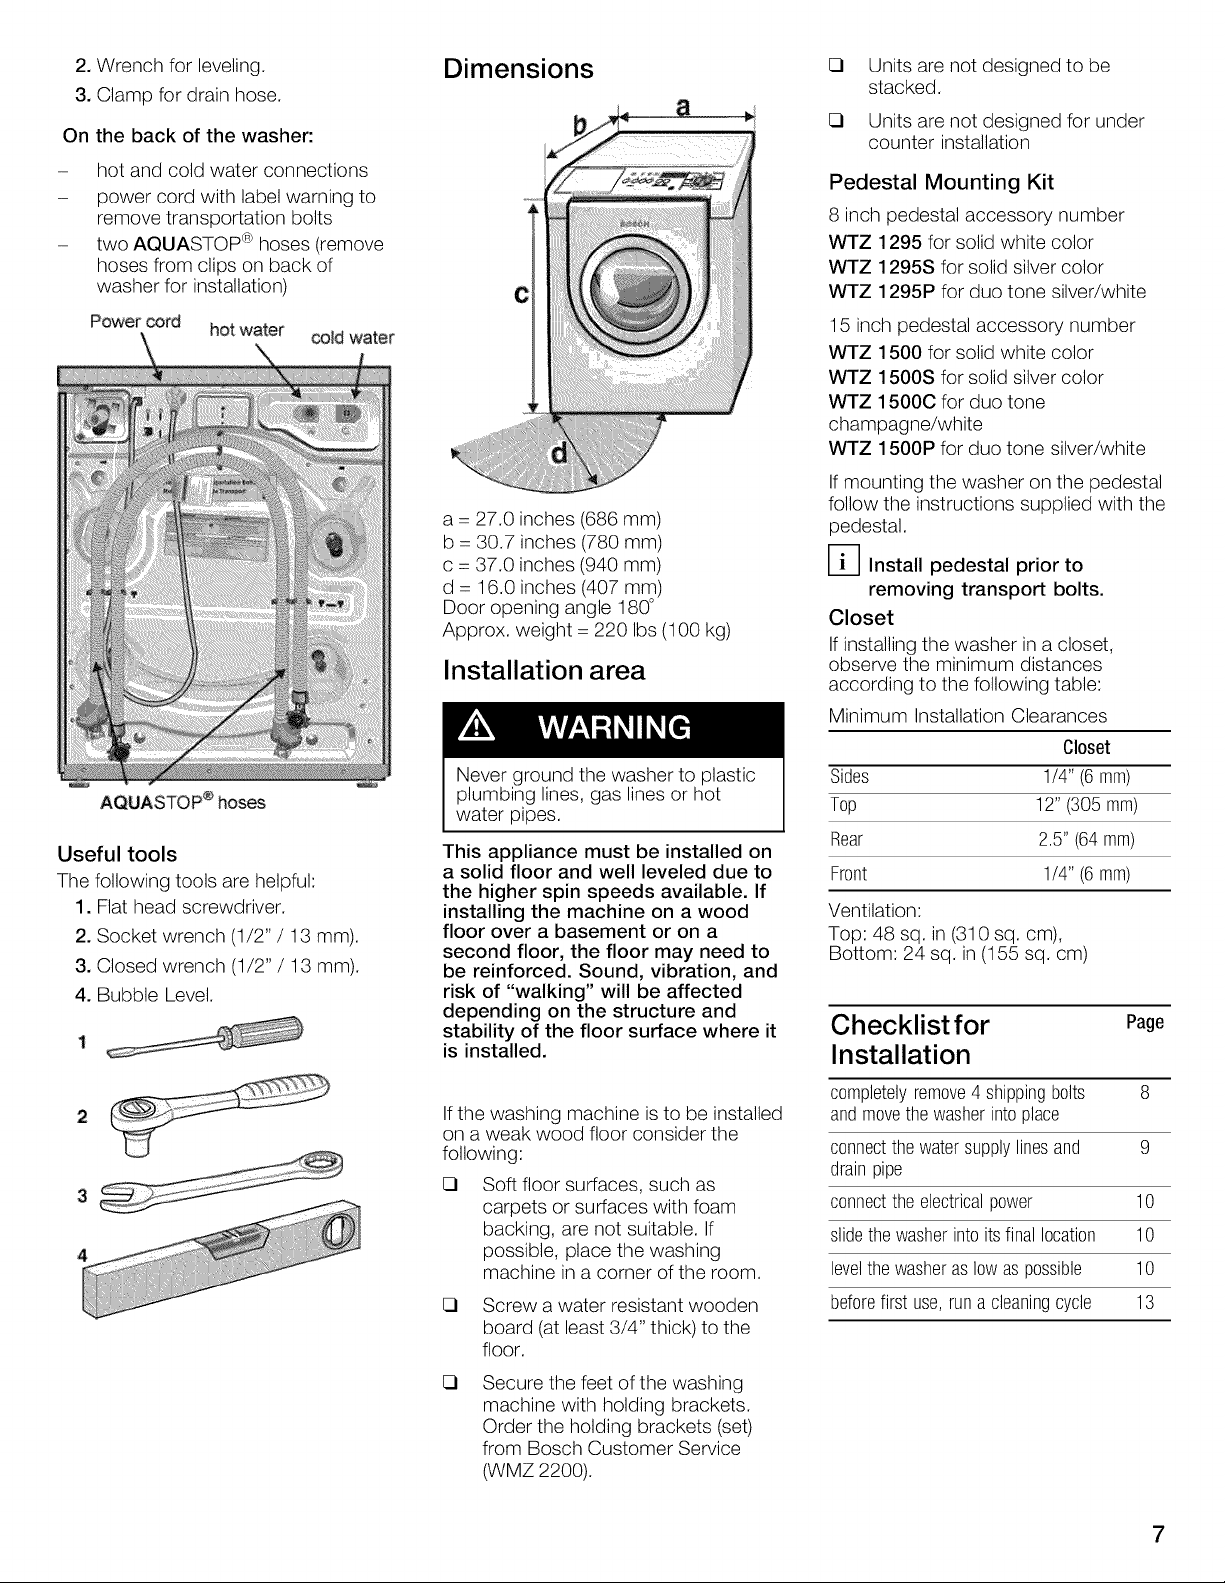
2.Wrenchforleveling.
3.Clampfordrainhose.
Onthebackofthewasher:
hotandcoldwaterconnections
powercordwithlabelwarningto
removetransportationbolts
twoAQUASTOP®hoses(remove
hosesfromclipsonbackof
washerforinstallation)
Power _rd hot water _Jd water
AQUASTOP _}hoses
Useful tools
The following tools are helpful:
1. Flat head screwdriver.
2. Socket wrench (1/2" / 13 mm).
3. Closed wrench (1/2" / 13 mm).
4. Bubble Level.
Dimensions
C
a = 27.0 inches (686 mm)
b = 30.7 inches (780 mm)
c = 37.0 inches (940 mm)
d = 16.0 inches (407 mm)
Door opening angle 180°
Approx. weight = 220 Ibs (1O0 kg)
Installation area
Never ground the washer to plastic
plumbing lines, gas lines or hot
water pipes.
This appliance must be installed on
a solid floor and well leveled due to
the higher spin speeds available. If
installing the machine on a wood
floor over a basement or on a
second floor, the floor may need to
be reinforced. Sound, vibration, and
risk of "walking" will be affected
depending on the structure and
stability of the floor surface where it
is installed.
CI Units are not designed to be
stacked.
CI Units are not designed for under
counter installation
Pedestal Mounting Kit
8 inch pedestal accessory number
WTZ 1295 for solid white color
WTZ 1295S for solid silver color
WTZ 1295P for duo tone silver/white
15 inch pedestal accessory number
WTZ 1500 for solid white color
WTZ 1500S for solid silver color
WTZ 15000 for duo tone
champagne/white
WTZ 1500P for duo tone silver/white
If mounting the washer on the pedestal
follow the instructions supplied with the
pedestal.
D Install pedestal prior to
removing transport bolts.
Closet
If installing the washer in a closet,
observe the minimum distances
according to the following table:
Minimum Installation Clearances
Closet
Sides 1/4" (6 mm)
Top 12" (305 mm)
Rear 25" (64mm)
Front 1/4" (6 mm)
Ventilation:
Top: 48 sq. in (310 sq. cm),
Bottom: 24 sq. in (155 sq. cm)
Checklistfor Page
Installation
completelyremove4shippingbolts 8
2
3
If the washing machine is to be installed
on a weak wood floor consider the
following:
CI Soft floor surfaces, such as
carpets or surfaces with foam
backing, are not suitable. If
possible, place the washing
machine in a corner of the room.
CI Screw a water resistant wooden
board (at least 3/4" thick) to the
floor.
CI
Secure the feet of the washing
machine with holding brackets.
Order the holding brackets (set)
from Bosch Customer Service
(WMZ 2200).
and movethewasherintoplace
connectthewatersupplylinesand 9
drainpipe
connectthe electricalpower 10
slidethe washerintoitsfinallocation 10
levelthewasheras10was possible 10
beforefirst use,runa cleaningcycle 13
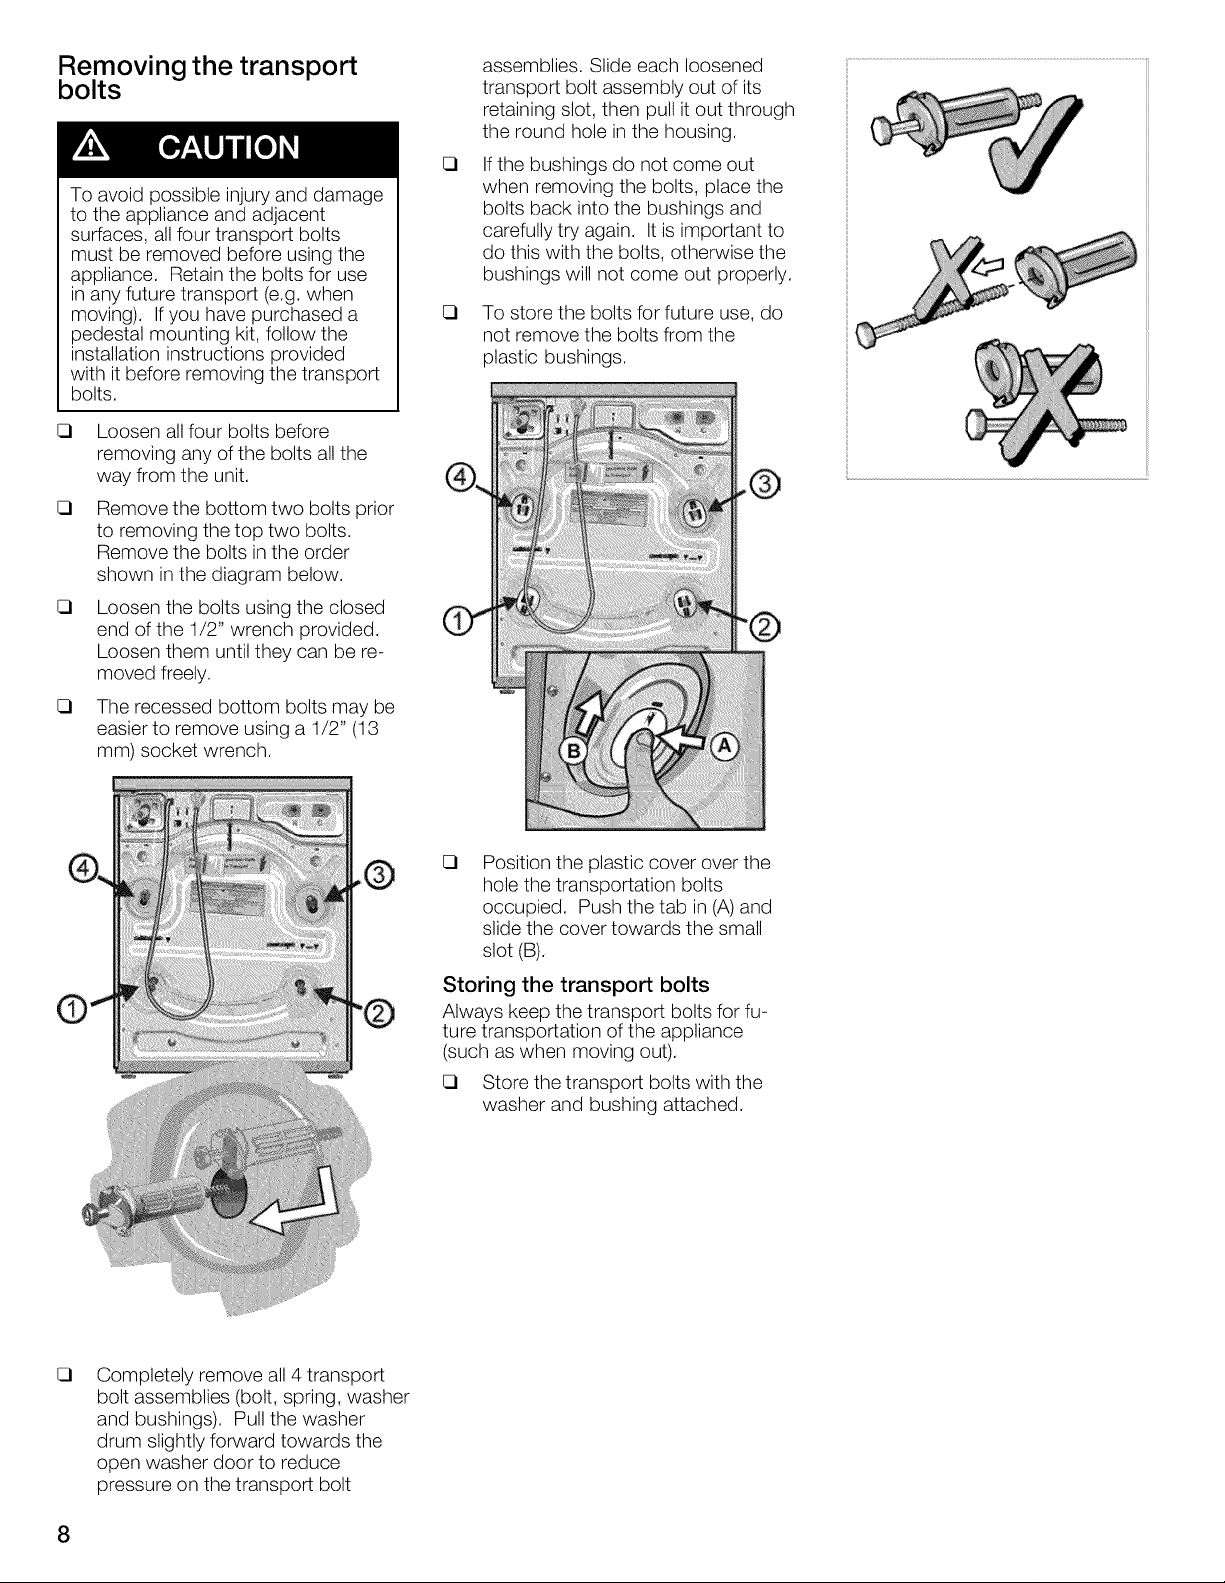
Removing the transport
bolts
To avoid possible injury and damage
to the appliance and adjacent
surfaces, all four transport bolts
must be removed before using the
appliance. Retain the bolts for use
in any future transport (e.g. when
moving). If you have purchased a
pedestal mounting kit, follow the
installation instructions provided
with it before removing the transport
bolts.
E3
Loosen all four bolts before
removing any of the bolts all the
way from the unit.
E3
Remove the bottom two bolts prior
to removing the top two bolts.
Remove the bolts in the order
shown in the diagram below.
E3
Loosen the bolts using the closed
end of the 1/2" wrench provided.
Loosen them until they can be re-
moved freely.
E3
The recessed bottom bolts may be
easier to remove using a 1/2" (13
mm) socket wrench.
assemblies. Slide each loosened
transport bolt assembly out of its
retaining slot, then pull it out through
the round hole in the housing.
CI
If the bushings do not come out
when removing the bolts, place the
bolts back into the bushings and
carefully try again. It is important to
do this with the bolts, otherwise the
bushings will not come out properly.
CI
To store the bolts for future use, do
not remove the bolts from the
plastic bushings.
CI
Completely remove all 4 transport
bolt assemblies (bolt, spring, washer
and bushings). Pull the washer
drum slightly forward towards the
open washer door to reduce
pressure on the transport bolt
CI
Position the plastic cover over the
hole the transportation bolts
occupied. Push the tab in (A)and
slide the cover towards the small
slot (B).
Storing the transport bolts
Always keep the transport bolts for fu-
ture transportation of the appliance
(such as when moving out).
[::3 Store the transport bolts with the
washer and bushing attached.
Water connection
Water supply
The washing machine must only be
operated with hot (max. 140 °F/ 60
°C)and cold tap water. Do not
connect the appliance to the mixer
tap of an unpressurized hot-water
boiler.
If in doubt, have the water connection
installed by an authorized technician.
The water supply hoses must not be:
- Bent or flattened.
- Modified or cut (integrity can
no longer be guaranteed).
Properly secured EXTERNAL hose
connections are the sole
responsibility of the customer. The
manufacturer assumes no
responsibility or liability for
improperly installed EXTERNAL
hose or other connections.
Observe the water pressure in the
supply network:
The water pressure should be
between 20 and 120 p.s.i.
(1.37 and 8.3 bars) when the tap
is turned on and at least 2.2 U. S.
gallons (8 liters) of water should be
discharged per minute.
- A pressure regulator valve must be
installed ifthe maximum water
pressure is exceeded.
To prevent water damage, the hot
and cold water valves should be
accessible when the washing
machine is in place and should
always be turned off when the
washing machine is not in use.
If installing the washing machine in a
new building or a building in which
the plumbing system was recently
installed or upgraded, flush the lines
before installing the washing
machine to remove any sand, dirt or
residue.
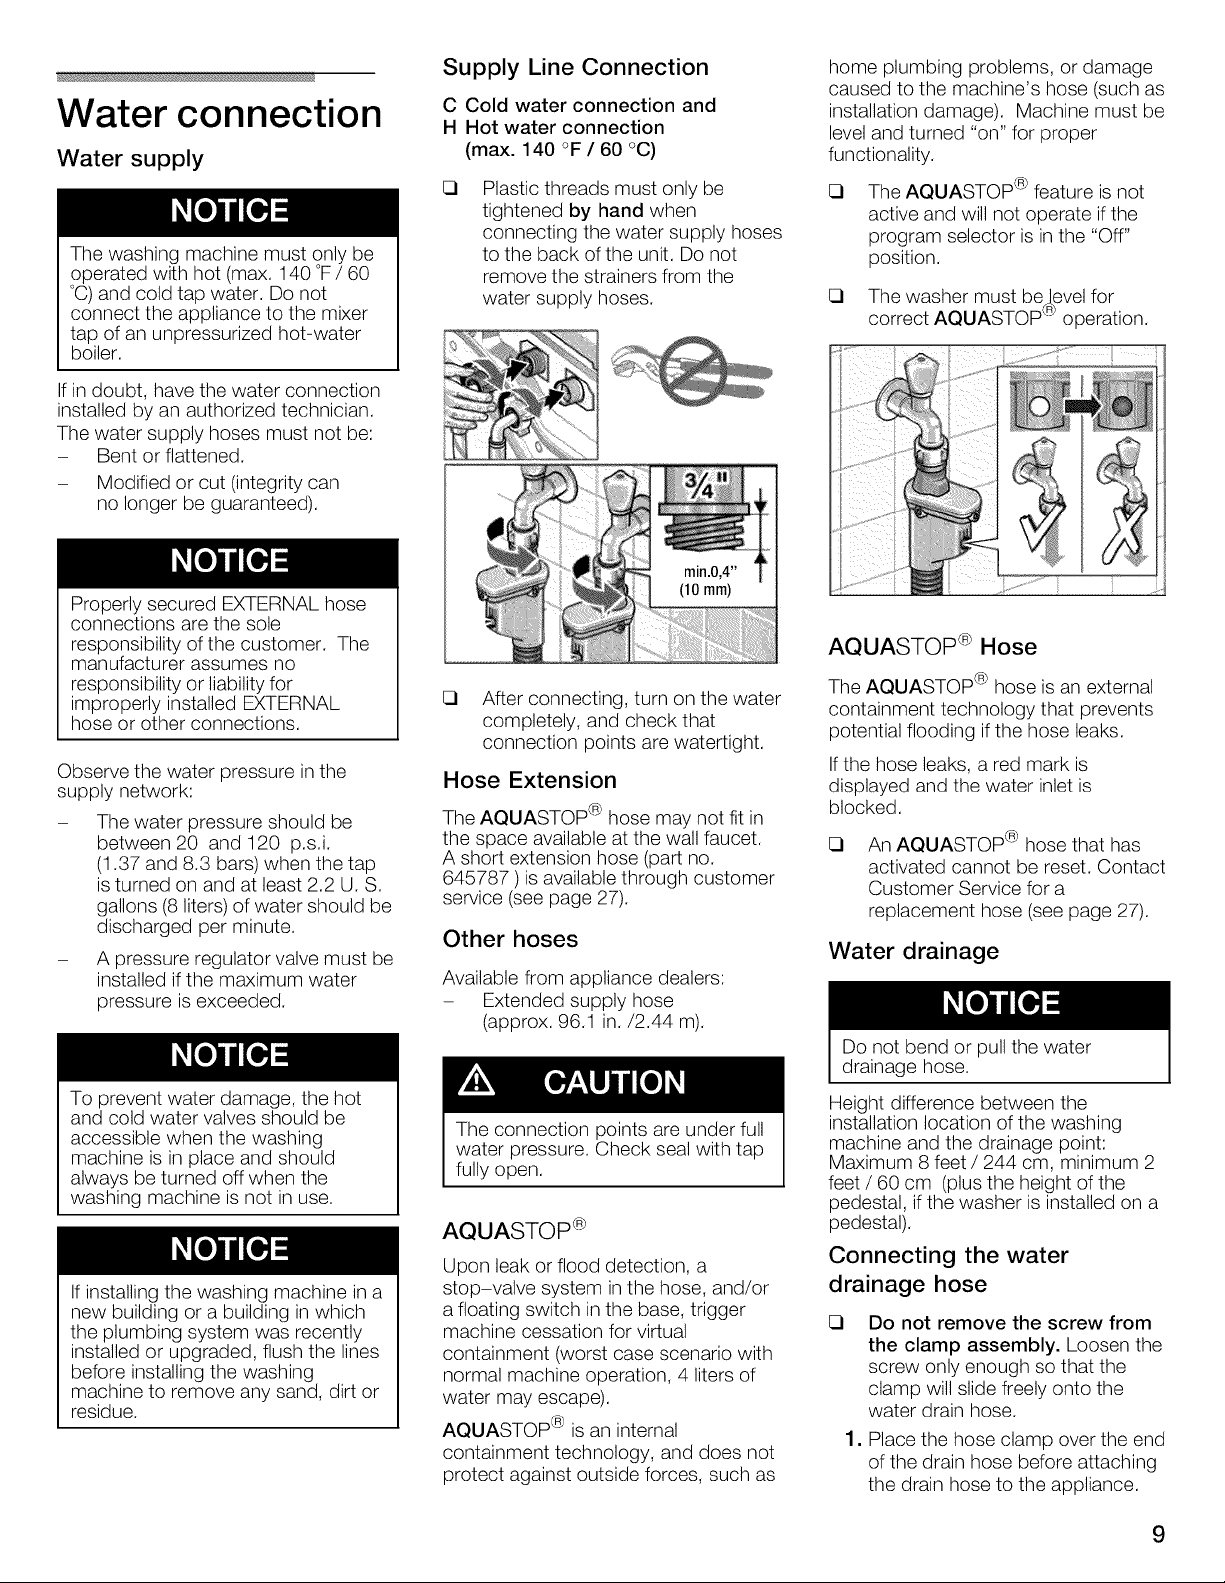
Supply Line Connection
C Cold water connection and
H Hot water connection
(max. 140 °F / 60 °C)
E3
Plastic threads must only be
tightened by hand when
connecting the water supply hoses
to the back of the unit. Do not
remove the strainers from the
water supply hoses.
CI After connecting, turn on the water
completely, and check that
connection points are watertight.
Hose Extension
The AQUASTOP ® hose may not fit in
the space available at the wall faucet.
A short extension hose (part no.
645787 ) is available through customer
service (see page 27).
Other hoses
Available from appliance dealers:
- Extended supply hose
(approx. 96.1 in./2.44 m).
The connection points are under full
water pressure. Check seal with tap
fully open.
AQUASTOP ®
Upon leak or flood detection, a
stop-valve system in the hose, and/or
a floating switch in the base, trigger
machine cessation for virtual
containment (worst case scenario with
normal machine operation, 4 liters of
water may escape).
AQUASTOP ® is an internal
containment technology, and does not
protect against outside forces, such as
home plumbing problems, or damage
caused to the machine's hose (such as
installation damage). Machine must be
level and turned "on" for proper
functionality.
CI The AQUASTOP ® feature is not
active and will not operate if the
program selector is in the "Off"
position.
CI The washer must be level for
correct AQUASTOP ® operation.
AQUASTOP ® Hose
The AQUASTOP ® hose is an external
containment technology that prevents
potential flooding if the hose leaks.
If the hose leaks, a red mark is
displayed and the water inlet is
blocked.
An AQUASTOP ® hose that has
E3
activated cannot be reset. Contact
Customer Service for a
replacement hose (see page 27).
Water drainage
Do not bend or pull the water
drainage hose.
Height difference between the
installation location of the washing
machine and the drainage point:
Maximum 8 feet / 244 cm, minimum 2
feet / 60 cm (plus the height of the
pedestal, if the washer is installed on a
pedestal).
Connecting the water
drainage hose
E3,Do not remove the screw from
the clamp assembly. Loosen the
screw only enough so that the
clamp will slide freely onto the
water drain hose.
Place the hose clamp over the end
of the drain hose before attaching
the drain hose to the appliance.
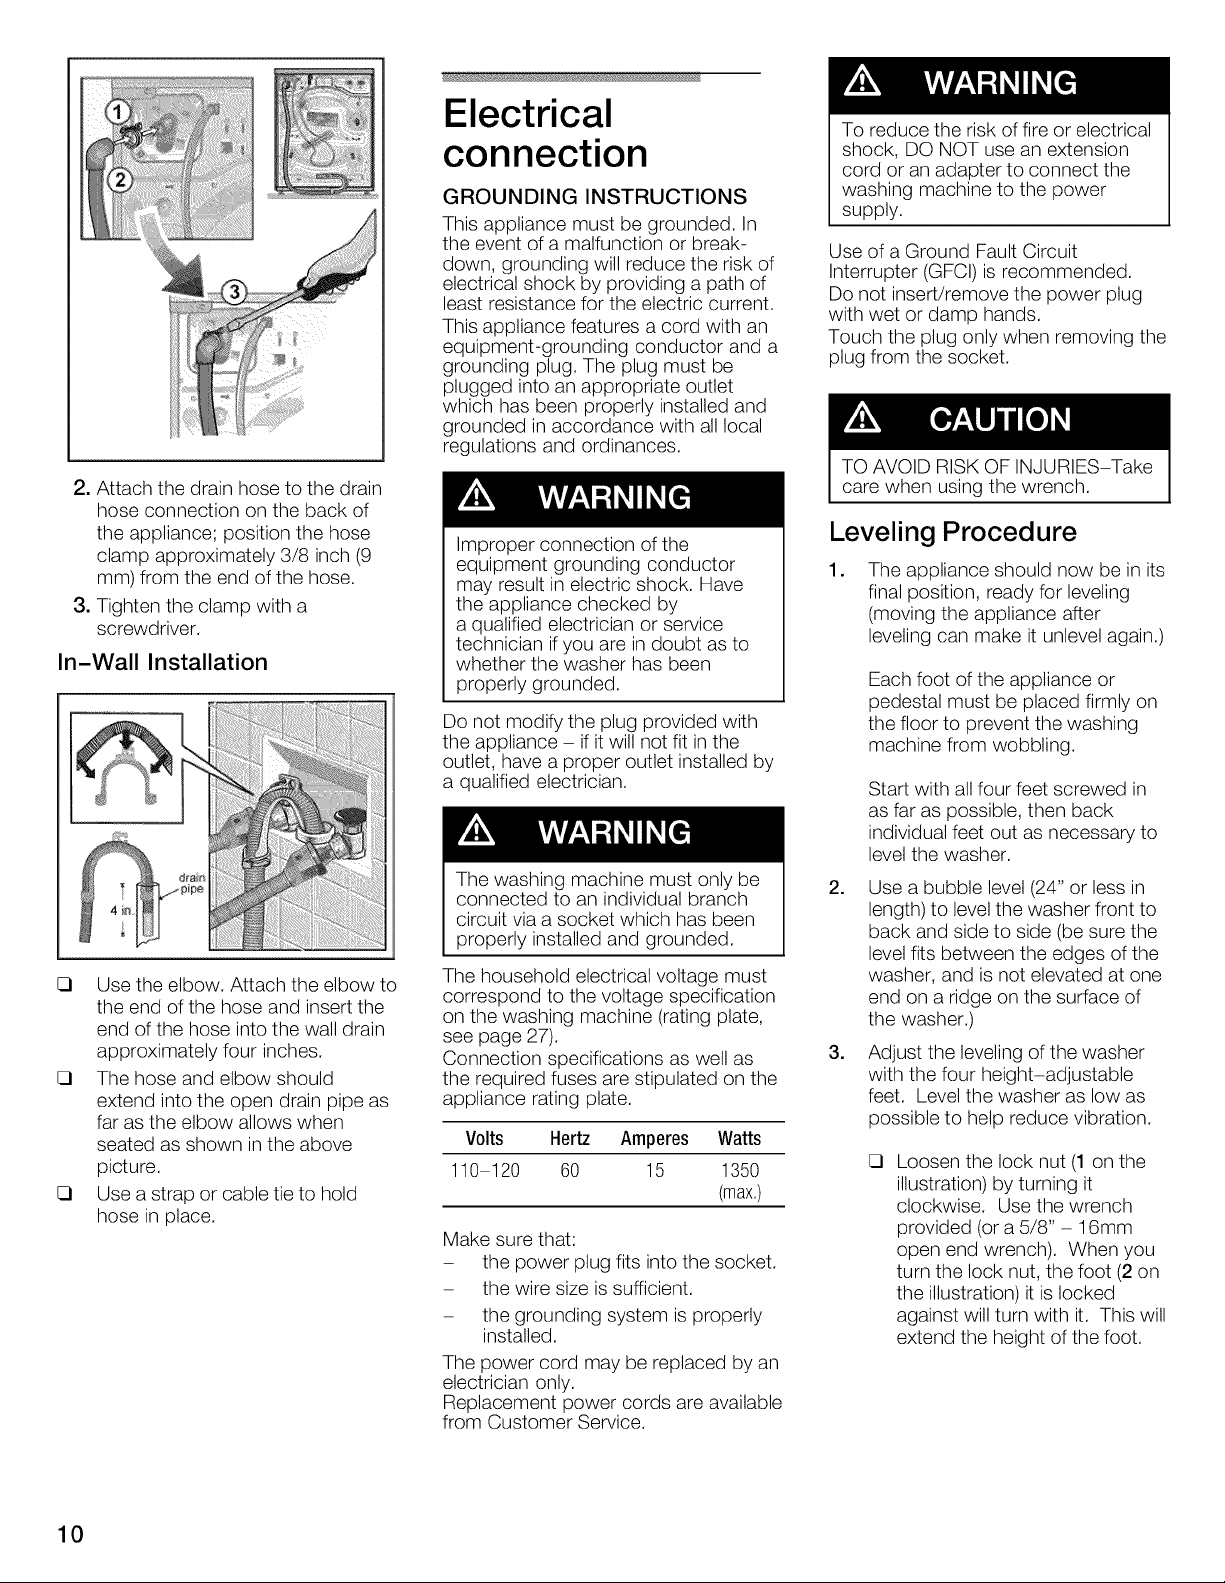
2.Attachthedrainhosetothedrain
hoseconnectiononthebackof
theappliance;positionthehose
clampapproximately3/8inch(9
mm)fromtheendofthehose.
3.Tightentheclampwitha
screwdriver.
In-Wall Installation
Use the elbow. Attach the elbow to
the end of the hose and insert the
end of the hose into the wall drain
approximately four inches.
The hose and elbow should
extend into the open drain pipe as
far as the elbow allows when
seated as shown in the above
picture.
Use a strap or cable tie to hold
hose in place.
Electrical
connection
GROUNDING INSTRUCTIONS
This appliance must be grounded. In
the event of a malfunction or break-
down, grounding will reduce the risk of
electrical shock by providing a path of
least resistance for the electric current.
This appliance features a cord with an
equipment-grounding conductor and a
grounding plug. The plug must be
plugged into an appropriate outlet
which has been properly installed and
grounded in accordance with all local
regulations and ordinances.
Improper connection of the
equipment grounding conductor
may result in electric shock. Have
the appliance checked by
a qualified electrician or service
technician if you are in doubt as to
whether the washer has been
properly grounded.
Do not modify the plug provided with
the appliance - if it will not fit in the
outlet, have a proper outlet installed by
a qualified electrician.
The washing machine must only be
connected to an individual branch
circuit via a socket which has been
properly installed and grounded.
The household electrical voltage must
correspond to the voltage specification
on the washing machine (rating plate,
see page 27).
Connection specifications as well as
the required fuses are stipulated on the
appliance rating plate.
Volts Hertz Amperes Watts
110 120 60 15 1350
(max.)
Make sure that:
- the power plug fits into the socket.
- the wire size is sufficient.
- the grounding system is properly
installed.
The power cord may be replaced by an
electrician only.
Replacement power cords are available
from Customer Service.
To reduce the risk of fire or electrical
shock, DO NOT use an extension
cord or an adapter to connect the
washing machine to the power
supply.
Use of a Ground Fault Circuit
Interrupter (GFCI) is recommended.
Do not insert/remove the power plug
with wet or damp hands.
Touch the plug only when removing the
plug from the socket.
TO AVOID RISK OF INJURIES-Take
care when using the wrench.
Leveling Procedure
.
The appliance should now be in its
final position, ready for leveling
(moving the appliance after
leveling can make it unlevel again.)
Each foot of the appliance or
pedestal must be placed firmly on
the floor to prevent the washing
machine from wobbling.
Start with all four feet screwed in
as far as possible, then back
individual feet out as necessary to
level the washer.
.
Use a bubble level (24" or less in
length) to level the washer front to
back and side to side (be sure the
level fits between the edges of the
washer, and is not elevated at one
end on a ridge on the surface of
the washer.)
.
Adjust the leveling of the washer
with the four height-adjustable
feet. Level the washer as low as
possible to help reduce vibration.
Loosen the lock nut (1 on the
illustration) by turning it
clockwise. Use the wrench
provided (or a 5/8" - 16mm
open end wrench). When you
turn the lock nut, the foot (2 on
the illustration)it islocked
against will turn with it. This will
extend the height of the foot.
10
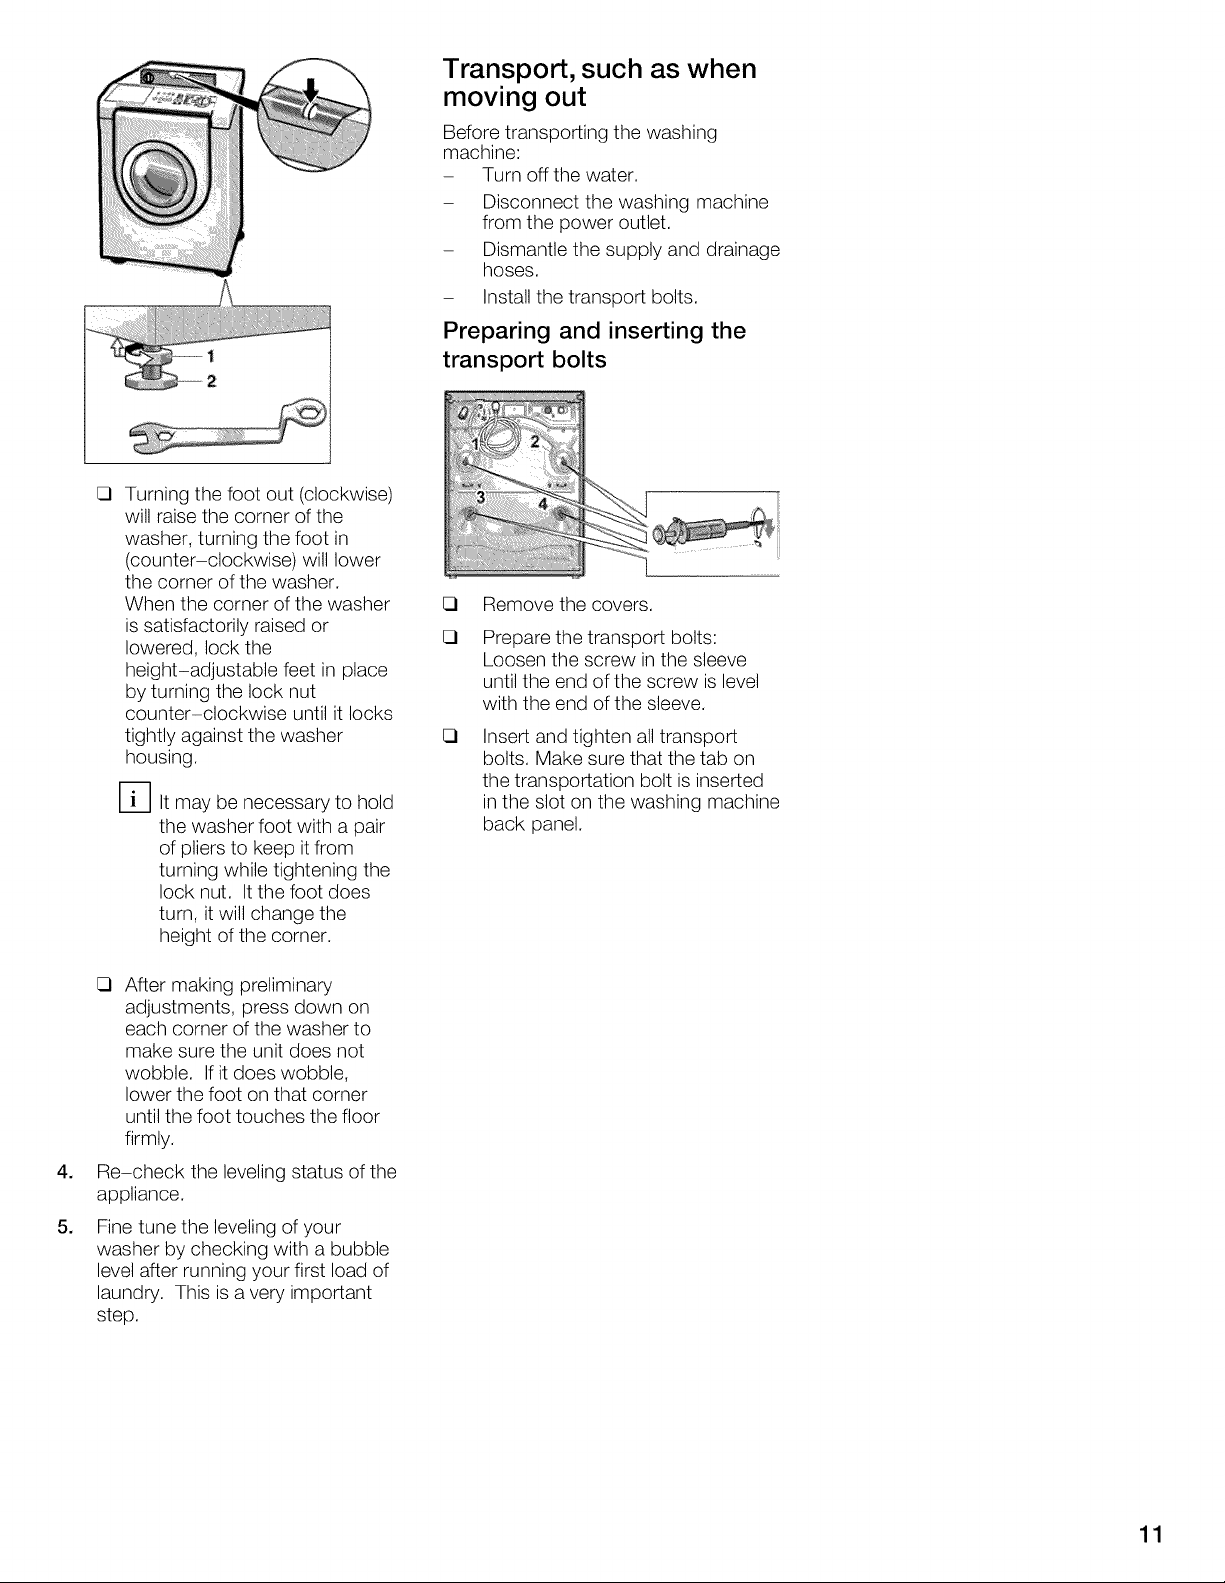
E3
Turning the foot out (clockwise)
will raise the corner of the
washer, turning the foot in
(counter-clockwise) will lower
the corner of the washer.
When the corner of the washer
is satisfactorily raised or
lowered, lock the
height-adjustable feet in place
by turning the lock nut
counter-clockwise until it locks
tightly against the washer
housing.
D It may be necessary to hold
the washer foot with a pair
of pliers to keep itfrom
turning while tightening the
lock nut. It the foot does
turn, it will change the
height of the corner.
Transport, such as when
moving out
Before transporting the washing
machine:
- Turn off the water.
- Disconnect the washing machine
from the power outlet.
- Dismantle the supply and drainage
hoses.
- Install the transport bolts.
Preparing and inserting the
transport bolts
E_
Remove the covers.
E_
Prepare the transport bolts:
Loosen the screw in the sleeve
until the end of the screw is level
with the end of the sleeve.
E_
Insert and tighten all transport
bolts. Make sure that the tab on
the transportation bolt is inserted
in the slot on the washing machine
back panel.
E_
After making preliminary
adjustments, press down on
each corner of the washer to
make sure the unit does not
wobble. If it does wobble,
lower the foot on that corner
until the foot touches the floor
firmly.
4,
Re-check the leveling status of the
appliance.
5.
Fine tune the leveling of your
washer by checking with a bubble
level after running your first load of
laundry. This is a very important
step.
11
OPERATING INSTRUCTION
Before using your washing machine,
read and follow all installation and
operating instructions.
Panel
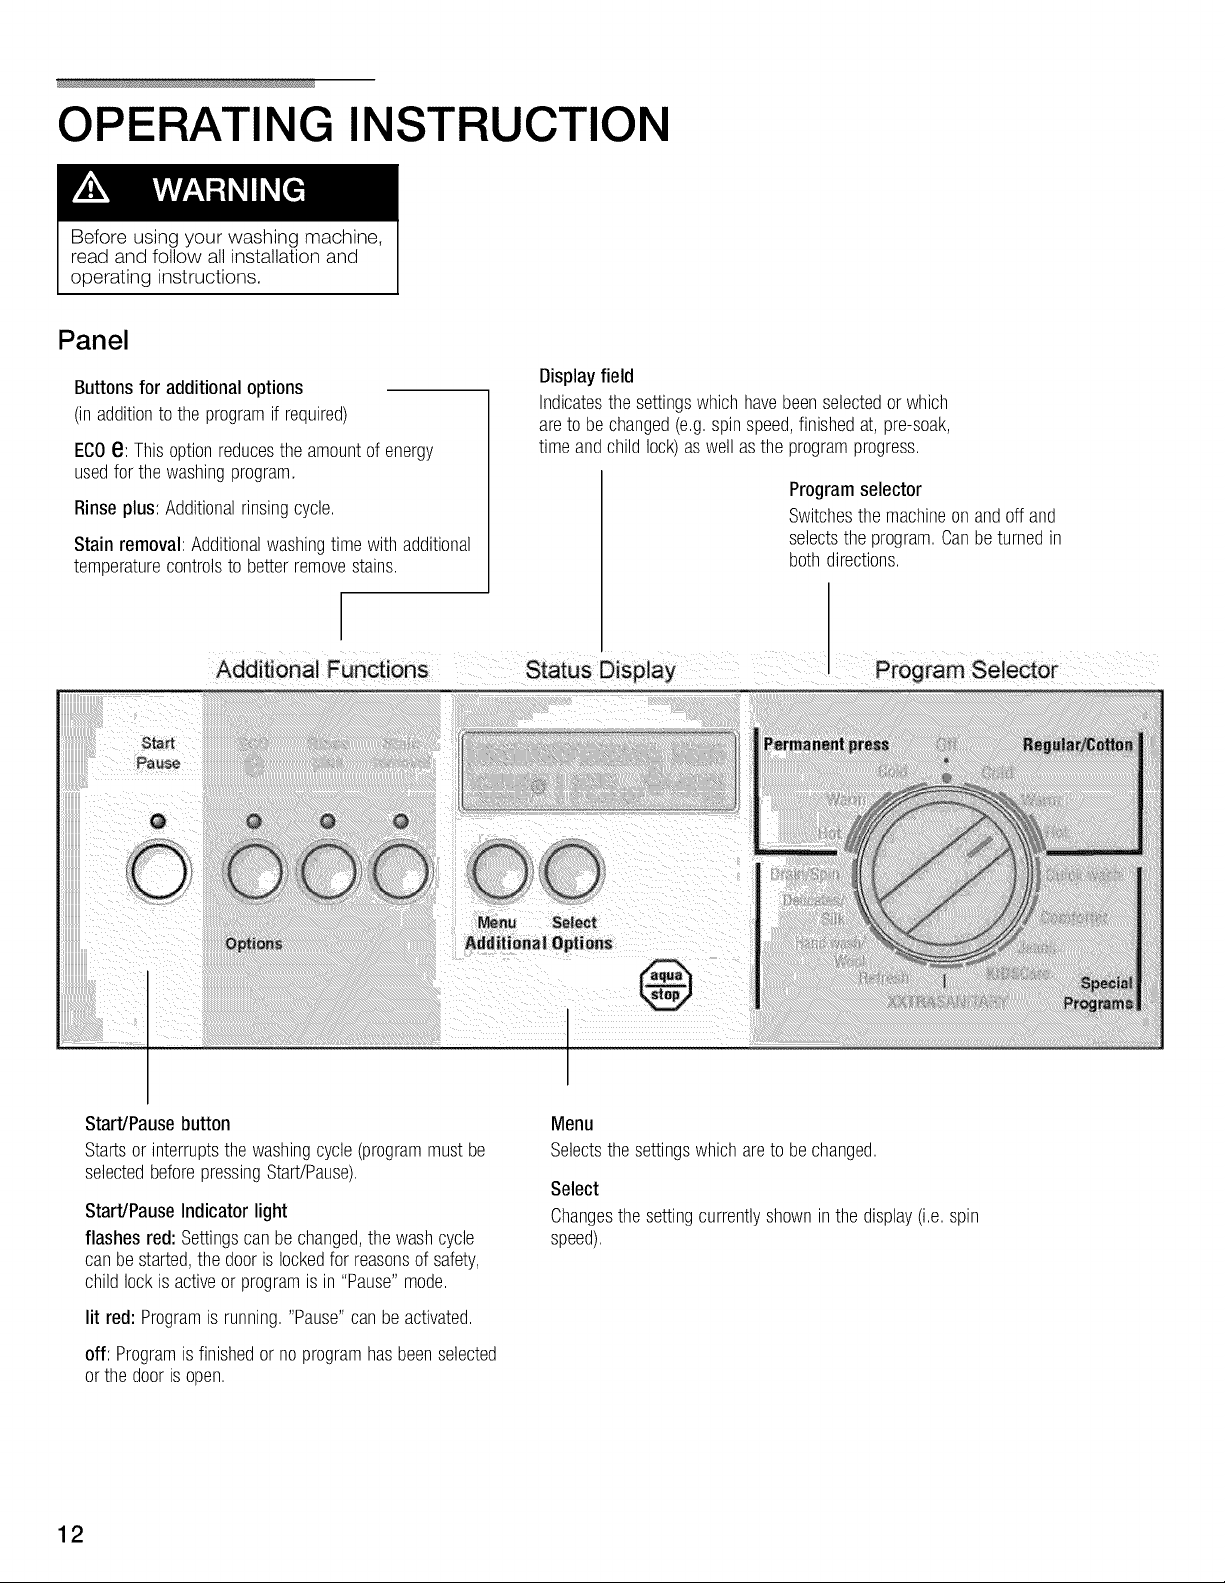
Buttonsfor additional options
(inadditiontotheprogramif required)
ECOe: Thisoptionreducesthe amountofenergy
usedfor thewashingprogram.
Rinseplus: Additionalrinsingcycle.
Stainremoval: Additionalwashingtimewith additional
temperaturecontrolsto betterremovestains.
Displayfield
Indicatesthe settingswhichhavebeenselectedor which
areto bechanged(e.g.spinspeed,finishedat,pre-soak,
timeandchildlock)aswellasthe programprogress.
Programselector
Switchesthemachineonandoff and
selectstheprogram.Canbeturnedin
bothdirections.
Programselector
Start/Pausebutton
Startsor interruptsthewashingcycle(programmustbe
selectedbeforepressingStart/Pause).
Start/PauseIndicator light
flashes red:Settingscanbechanged,the washcycle
canbestarted,thedoorislockedfor reasonsofsafety,
childlockis activeorprogramisin "Pause"mode.
lit red:Programis running."Pause"canbeactivated.
off: Programis finishedor no programhasbeenselected
or thedoorisopen.
12
Menu
Selectsthe settingswhichareto bechanged.
Select
Changesthesettingcurrentlyshowninthedisplay(i.e.spin
speed).
Before Using For
the First Time
The washing machine must be installed
and connected properly (refer to Page
6).
ilili
Admite_ 0ptie_
Before using your washing machine,
read and follow all installation and
operating instructions.
Using For the First
Time
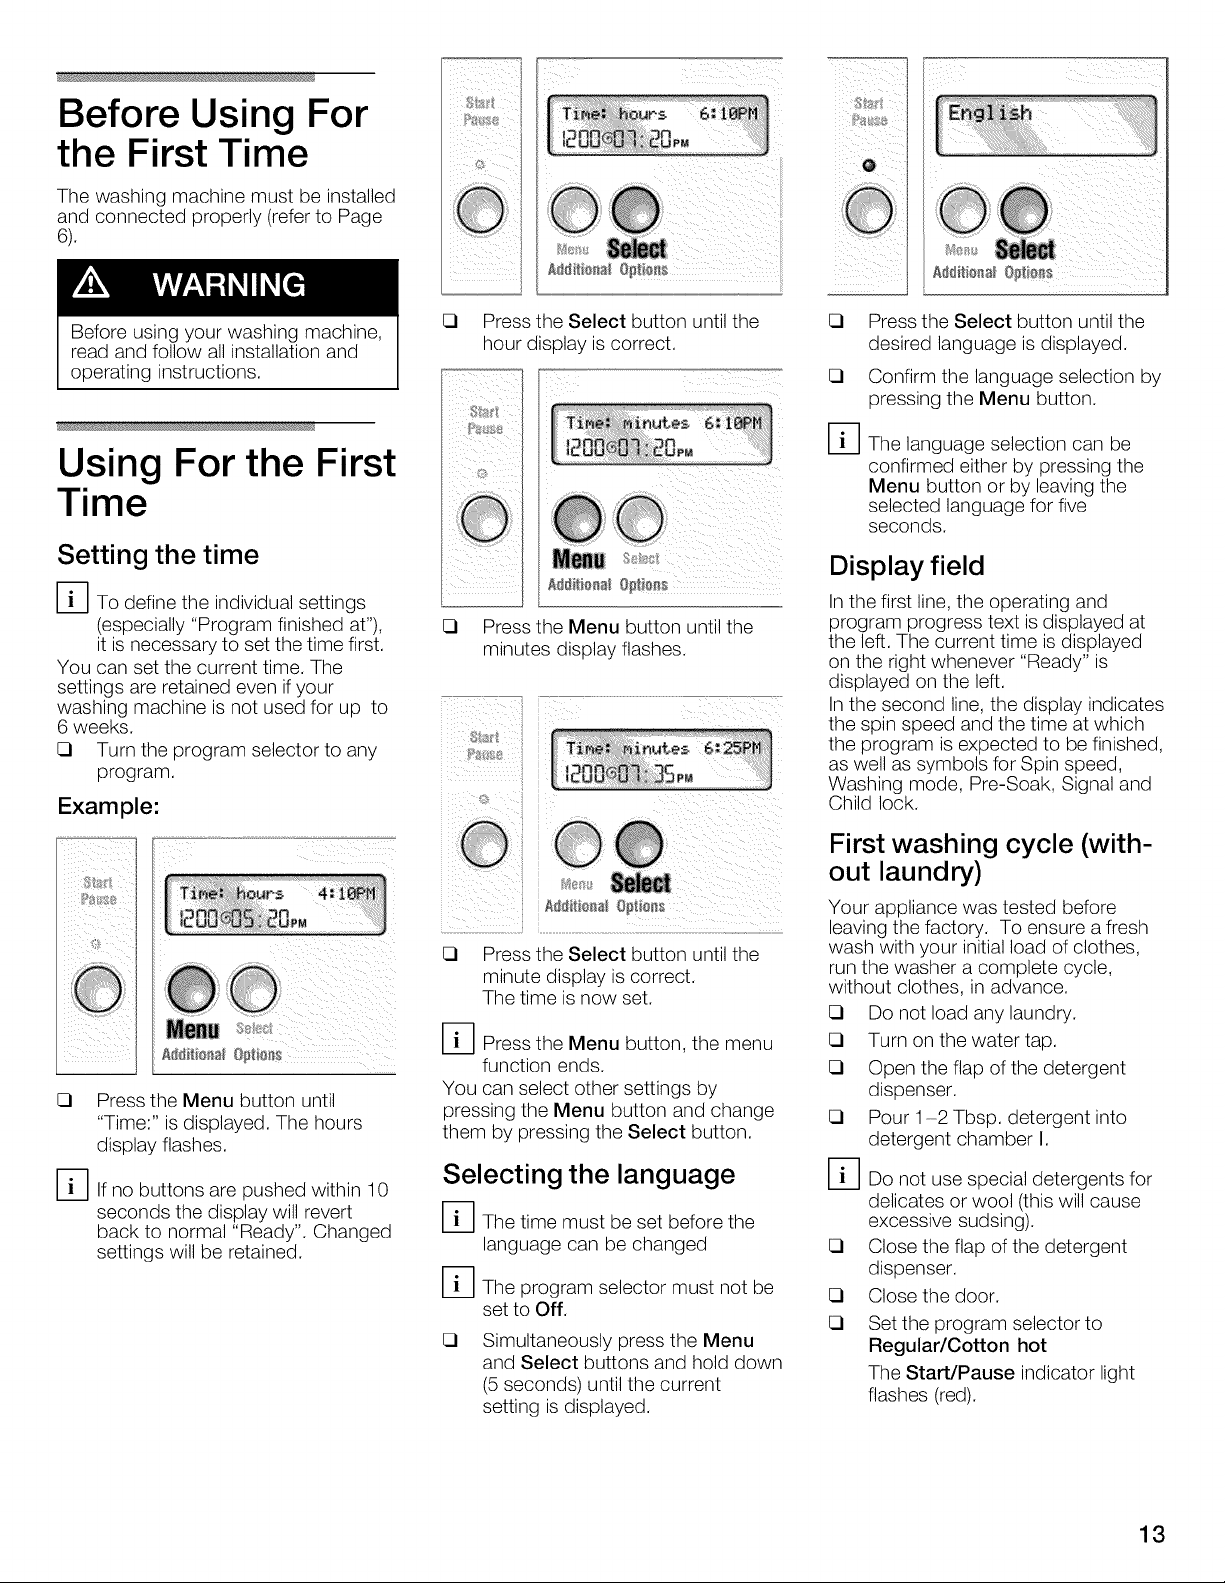
Setting the time
D To define the individual settings
(especially "Program finished at"),
it is necessary to set the time first.
You can set the current time. The
settings are retained even if your
washing machine is not used for up to
6 weeks.
<3 Turn the program selector to any
program.
Example:
<3 Pressthe Menu button until
"Time:" is displayed. The hours
display flashes.
D If no buttons are pushed within 10
seconds the display will revert
back to normal "Ready". Changed
settings will be retained.
<3 Pressthe Select button until the
hour display is correct.
iOil i i
Mm
<3
Press the Menu button until the
minutes display flashes.
ii!!_iliiiiiiii_!_............'iiii iii_iii!iiiiill_I
<3 Pressthe Select button until the
minute display is correct.
The time is now set.
D Press the Menu button, the menu
function ends.
You can select other settings by
pressing the Menu button and change
them by pressing the Select button.
Selecting the language
%
The time must be set before the
language can be changed
%
The program selector must not be
set to Off.
<3
Simultaneously press the Menu
and Select buttons and hold down
(5 seconds) until the current
setting is displayed.
iiillill,fill_i_!i_iiiii°
[3
Press the Select button until the
desired language is displayed.
<3
Confirm the language selection by
pressing the Menu button.
%
The language selection can be
confirmed either by pressing the
Menu button or by leaving the
selected language for five
seconds.
Display field
In the first line, the operating and
program progress text is displayed at
the left. The current time is displayed
on the right whenever "Ready" is
displayed on the left.
In the second line, the display indicates
the spin speed and the time at which
the program is expected to be finished,
as well as symbols for Spin speed,
Washing mode, Pre-Soak, Signal and
Child lock.
First washing cycle (with-
out laundry)
Your appliance was tested before
leaving the factory. To ensure a fresh
wash with your initial load of clothes,
run the washer a complete cycle,
without clothes, in advance.
<3 Do not load any laundry.
<3 Turn on the water tap.
<3 Open the flap of the detergent
dispenser.
<3 Pour 1-2 Tbsp. detergent into
detergent chamber I.
%
Do not use special detergents for
delicates or wool (this will cause
excessive sudsing).
<3
Close the flap of the detergent
dispenser.
<3
Close the door.
<3
Set the program selector to
Regular/Cotton hot
The Start/Pause indicator light
flashes (red).
13
CI Pressthe Start/Pause button.
The program starts.
The indicator light is on (red).
D The individual program steps are
indicated in the display field.
When "Remove laundry" is displayed:
CI Open the door.
CI Turn the program selector to Off.
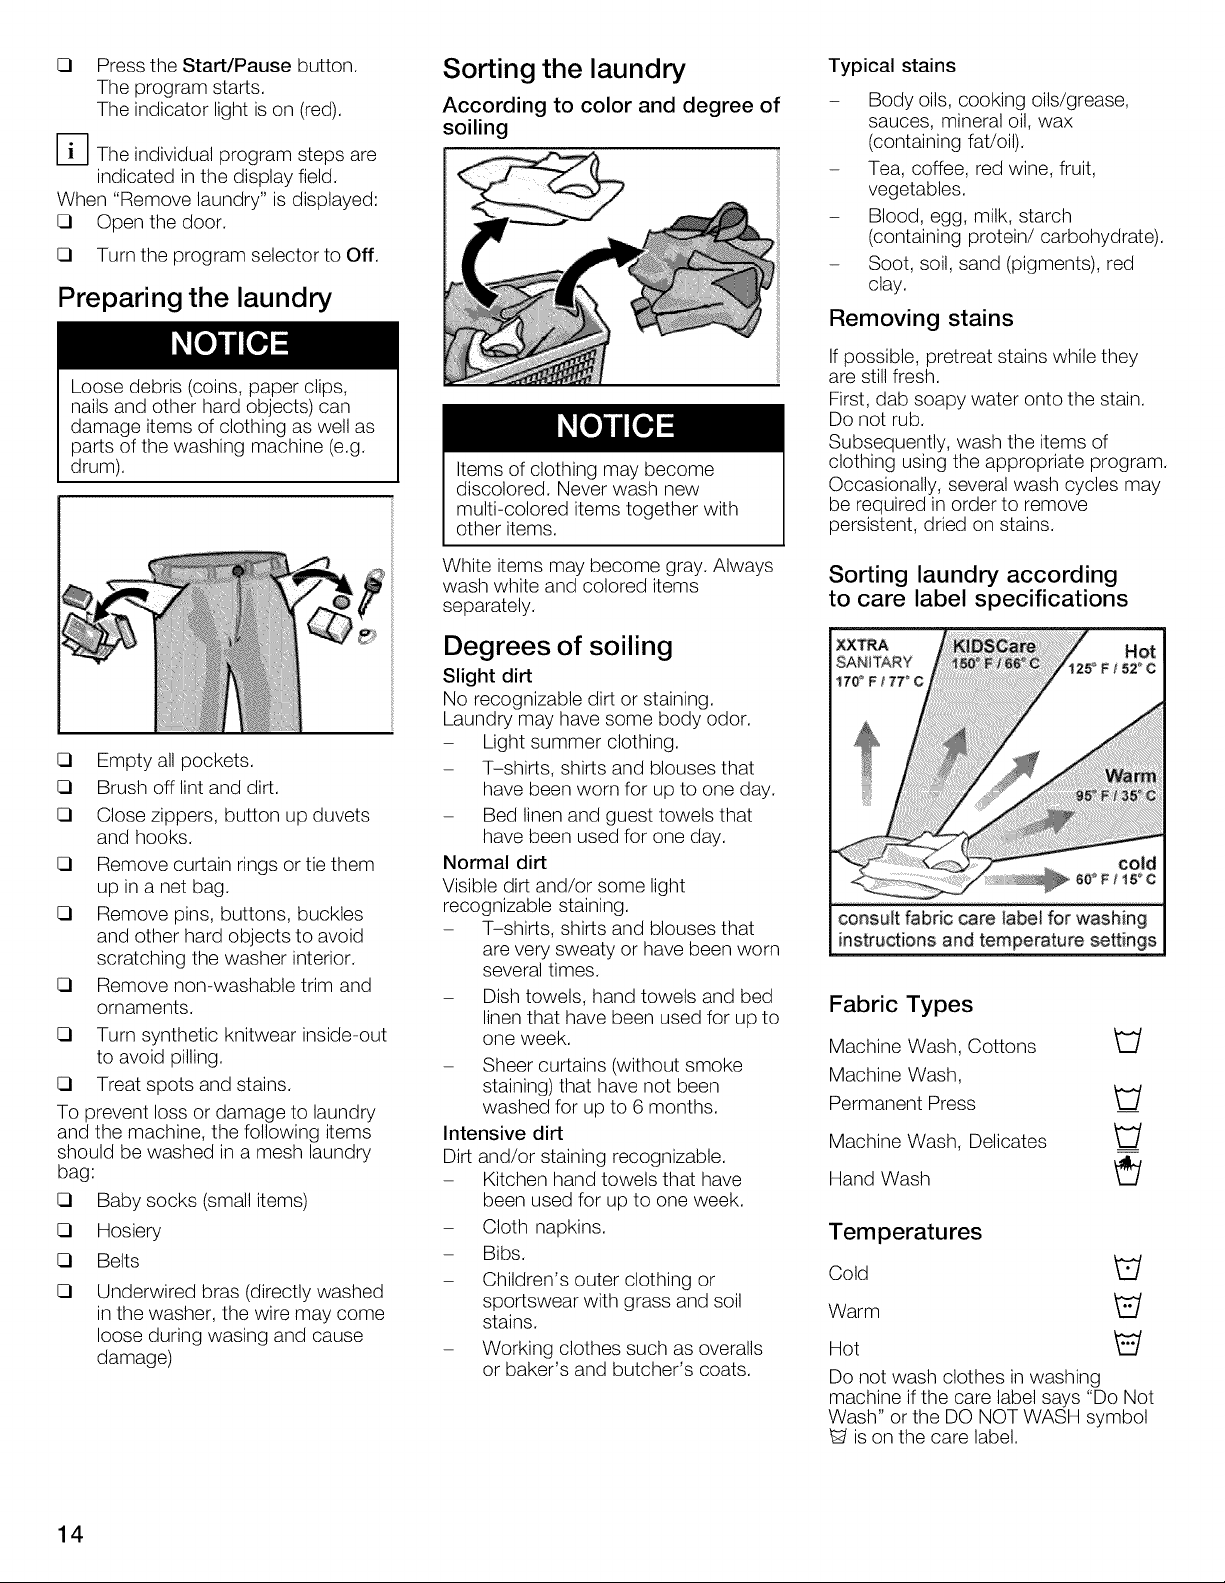
Preparing the laundry
Loose debris (coins, paper clips,
nails and other hard objects) can
damage items of clothing as well as
parts of the washing machine (e.g.
drum).
Sorting the laundry
According to color and degree of
soiling
Items of clothing may become
discolored. Never wash new
multi-colored items together with
other items.
Typical stains
- Body oils, cooking oils/grease,
sauces, mineral oil, wax
(containing fat/oil).
- Tea, coffee, red wine, fruit,
vegetables.
- Blood, egg, milk, starch
(containing protein/carbohydrate).
- Soot, soil, sand (pigments), red
clay.
Removing stains
If possible, pretreat stains while they
are still fresh.
First, dab soapy water onto the stain.
Do not rub.
Subsequently, wash the items of
clothing using the appropriate program.
Occasionally, several wash cycles may
be required in order to remove
persistent, dried on stains.
CI Emptyall pockets.
CI Brush off lint and dirt.
CI Close zippers, button up duvets
and hooks.
CI Remove curtain rings or tie them
up in a net bag.
CI Remove pins, buttons, buckles
and other hard objects to avoid
scratching the washer interior.
CI Remove non-washable trim and
ornaments.
CI Turn synthetic knitwear inside-out
to avoid pilling.
CI Treat spots and stains.
To prevent loss or damage to laundry
and the machine, the following items
should be washed in a mesh laundry
bag:
CI Baby socks (small items)
CI Hosiery
CI Belts
E3
Underwired bras (directly washed
in the washer, the wire may come
loose during wasing and cause
damage)
White items may become gray. Always
wash white and colored items
separately.
Degrees of soiling
Slight dirt
No recognizable dirt or staining.
Laundry may have some body odor.
- Light summer clothing.
- T-shirts, shirts and blouses that
have been worn for up to one day.
- Bed linen and guest towels that
have been used for one day.
Normal dirt
Visible dirt and/or some light
recognizable staining.
- T-shirts, shirts and blouses that
are very sweaty or have been worn
several times.
- Dish towels, hand towels and bed
linen that have been used for up to
one week.
- Sheer curtains (without smoke
staining) that have not been
washed for up to 6 months.
Intensive dirt
Dirt and/or staining recognizable.
- Kitchen hand towels that have
been used for up to one week.
- Cloth napkins.
- Bibs.
- Children's outer clothing or
sportswear with grass and soil
stains.
- Working clothes such as overalls
or baker's and butcher's coats.
Sorting laundry according
to care label specifications
XXTRA
SANITARY
170 ° F / 77" C
consult fabric care label for washing
instructions and temperature settings
.or
125_ Fi52° C
cold
SO° F t 15° C
Fabric Types
Machine Wash, Cottons _/
Machine Wash,
Permanent Press
Machine Wash, Delicates
Hand Wash _/
Temperatures
Cold _/
Warm "_
Hot "_
Do not wash clothes in washing
machine if the care label says "Do Not
Wash" or the DO NOT WASH symbol
is on the care label.
14
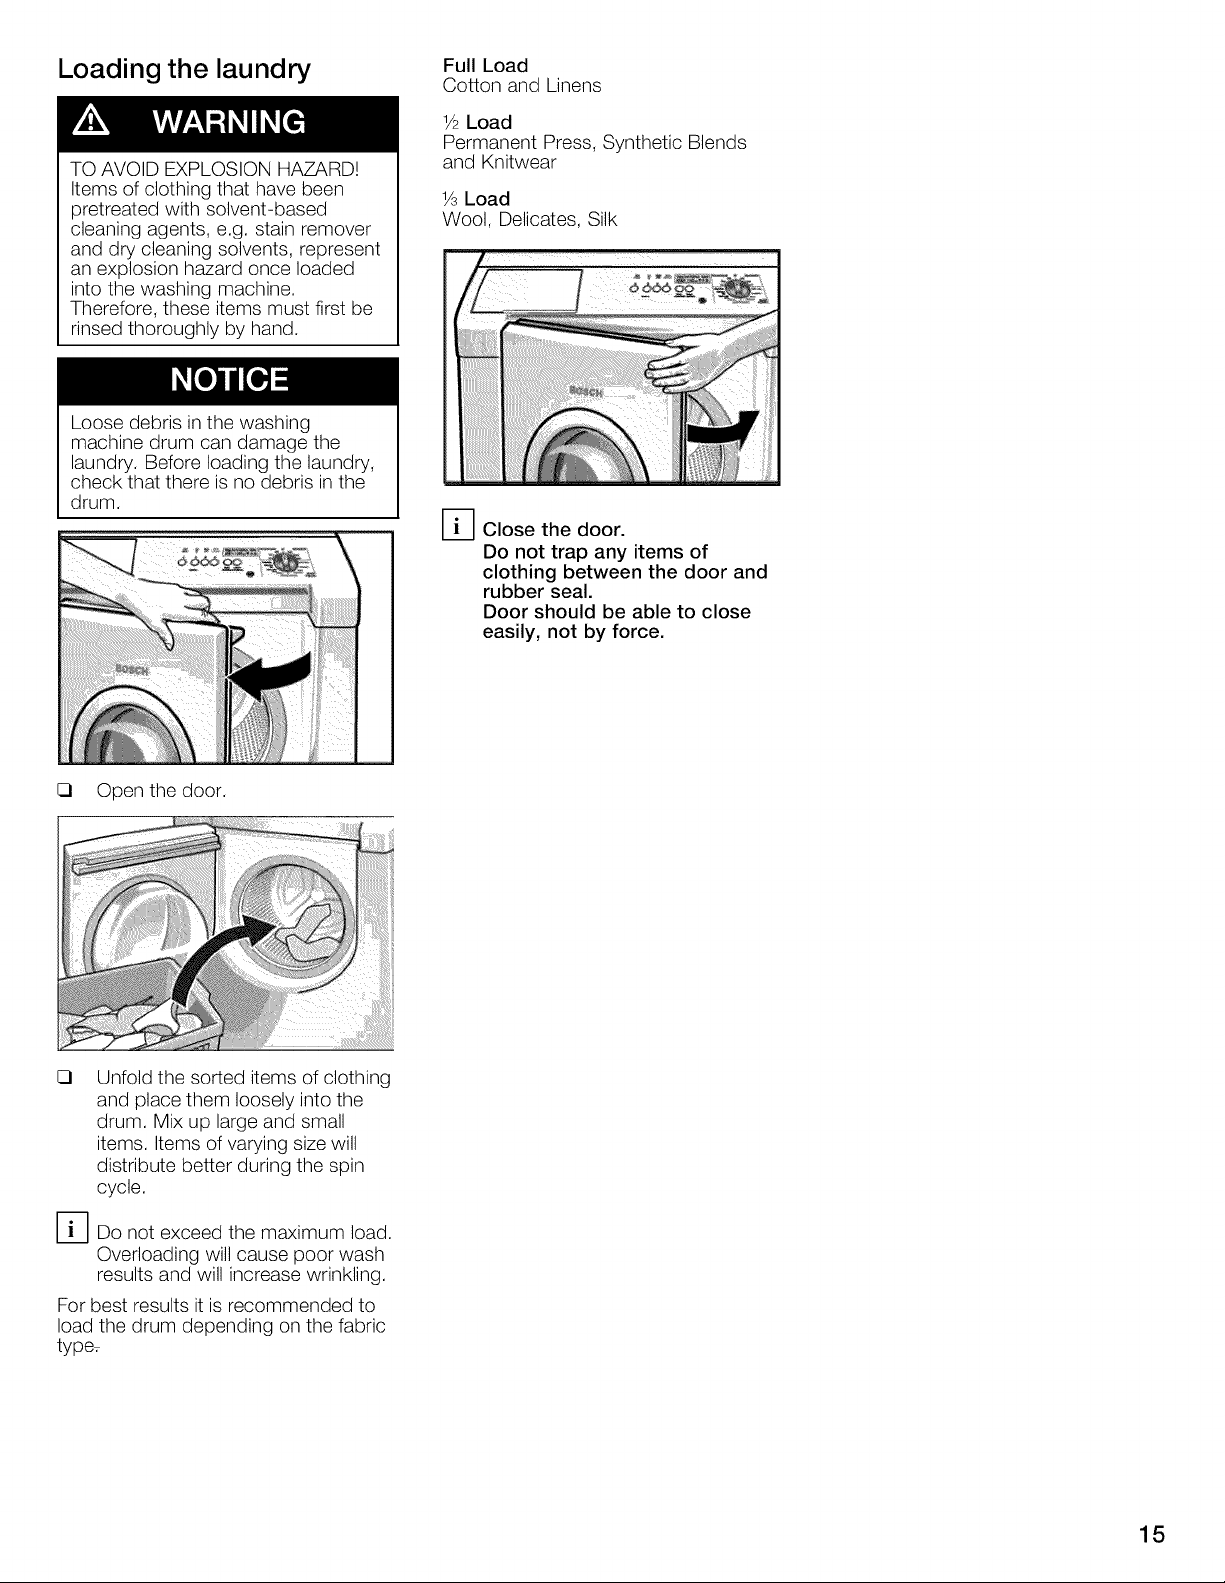
Loading the laundry
TO AVOID EXPLOSION HAZARD!
Items of clothing that have been
pretreated with solvent-based
cleaning agents, e.g. stain remover
and dry cleaning solvents, represent
an explosion hazard once loaded
into the washing machine.
Therefore, these items must first be
rinsed thoroughly by hand.
Loose debris in the washing
machine drum can damage the
laundry. Before loading the laundry,
check that there is no debris in the
drum.
Full Load
Cotton and Linens
1/2Load
Permanent Press, Synthetic Blends
and Knitwear
_/3Load
Wool, Delicates, Silk
D Close the door.
Do not trap any items of
clothing between the door and
rubber seal.
Door should be able to close
easily, not by force.
E3 Open the door.
E::::l Unfold the sorted items of clothing
and place them loosely into the
drum. Mix up large and small
items. Items of varying size will
distribute better during the spin
cycle.
D Do not exceed the maximum load.
Overloading will cause poor wash
results and will increase wrinkling.
For best results it is recommended to
load the drum depending on the fabric
type_
15
Laundry
Detergents and
Additives
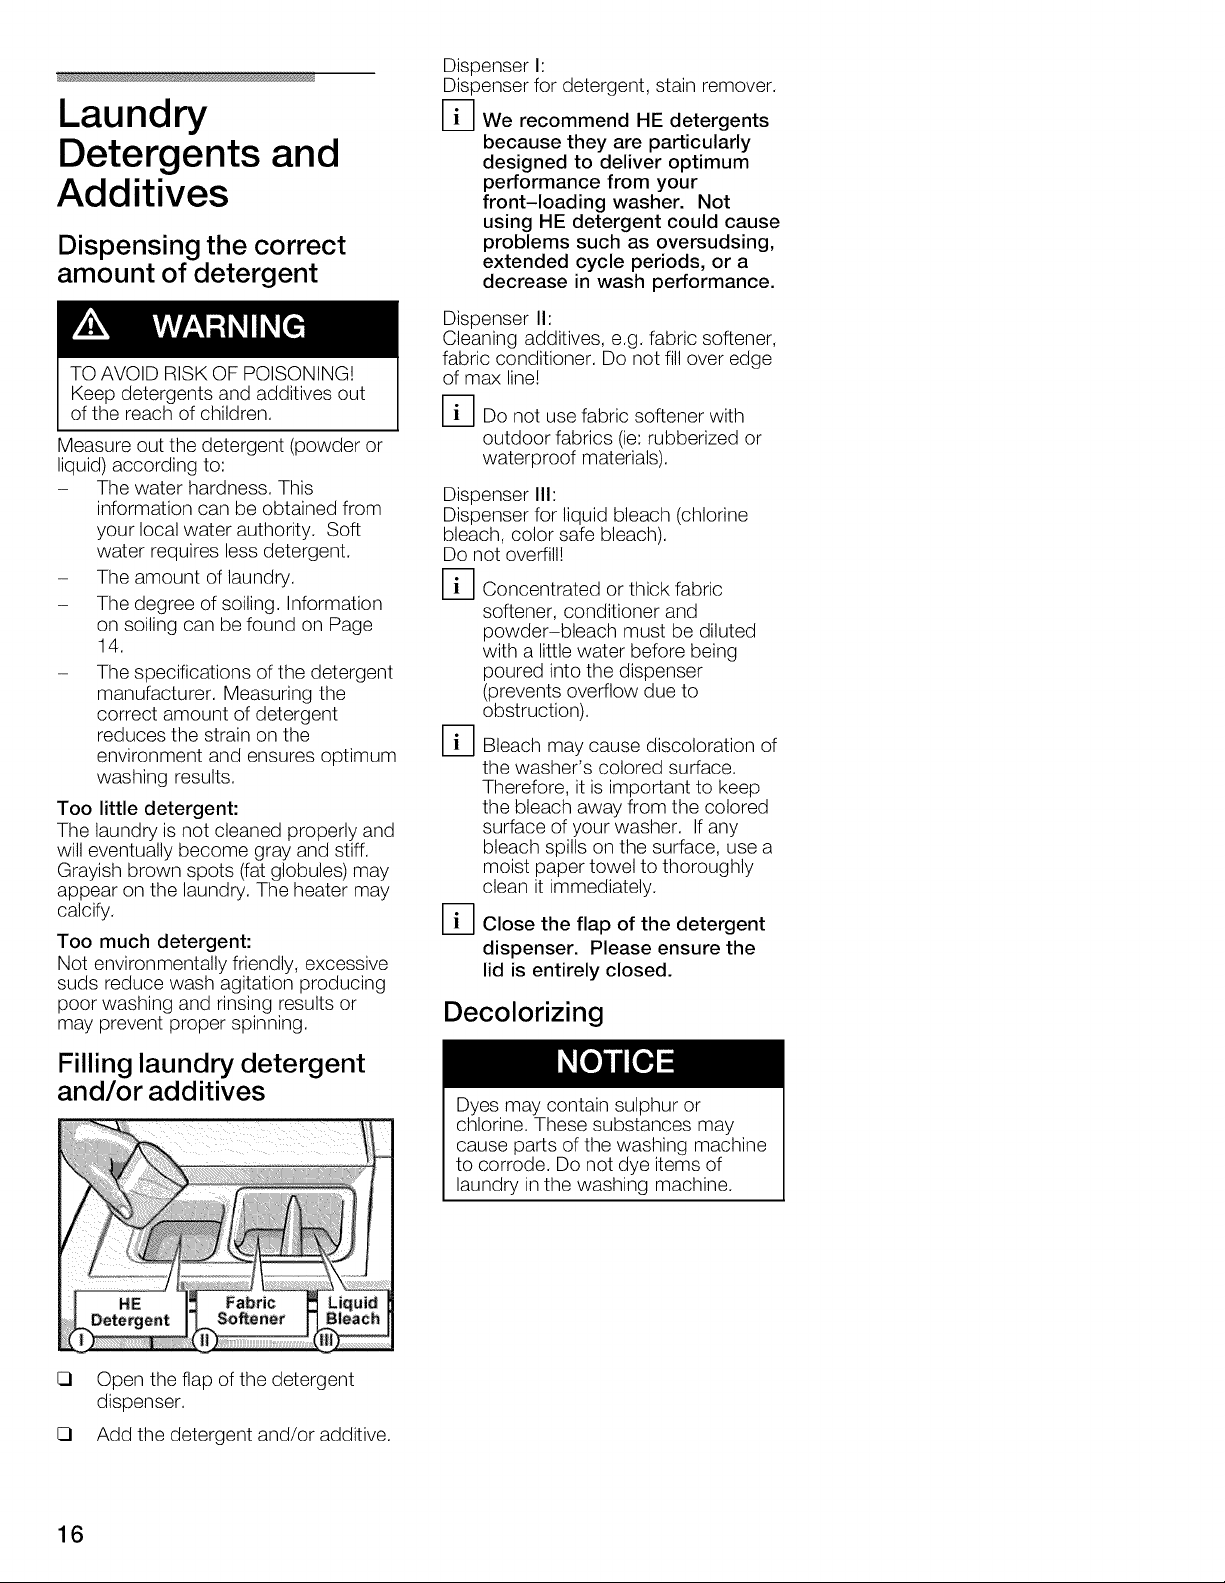
Dispensing the correct
amount of detergent
TO AVOID RISK OF POISONING!
Keep detergents and additives out
of the reach of children.
Measure out the detergent (powder or
liquid) according to:
- The water hardness. This
information can be obtained from
your local water authority. Soft
water requires less detergent.
- The amount of laundry.
- The degree of soiling. Information
on soiling can be found on Page
14.
The specifications of the detergent
manufacturer. Measuring the
correct amount of detergent
reduces the strain on the
environment and ensures optimum
washing results.
Too little detergent:
The laundry is not cleaned properly and
will eventually become gray and stiff.
Grayish brown spots (fat globules) may
appear on the laundry. The heater may
calcify.
Too much detergent:
Not environmentally friendly, excessive
suds reduce wash agitation producing
poor washing and rinsing results or
may prevent proper spinning.
Dispenser I:
Dispenser for detergent, stain remover.
D We recommend HE detergents
because they are particularly
designed to deliver optimum
performance from your
front-loading washer. Not
using HE detergent could cause
problems such as oversudsing,
extended cycle periods, or a
decrease in wash performance.
Dispenser I1:
Cleaning additives, e.g. fabric softener,
fabric conditioner. Do not fill over edge
of max line!
D Do not use fabric softener with
outdoor fabrics (ie:rubberized or
waterproof materials).
Dispenser II1:
Dispenser for liquid bleach (chlorine
bleach, color safe bleach).
Do not overfill!
D Concentrated or thick fabric
softener, conditioner and
powder-bleach must be diluted
with a little water before being
poured into the dispenser
(prevents overflow due to
obstruction).
rs
Bleach may cause discoloration of
the washer's colored surface.
Therefore, it is important to keep
the bleach away from the colored
surface of your washer. If any
bleach spills on the surface, use a
moist paper towel to thoroughly
clean it immediately.
rs
Close the flap of the detergent
dispenser. Please ensure the
lid is entirely closed.
Decolorizing
Filling laundry detergent
and/or additives
Detergent
El Open the flap of the detergent
dispenser.
El Add the detergent and/or additive.
16
Dyes may contain sulphur or
chlorine. These substances may
cause parts of the washing machine
to corrode. Do not dye items of
laundry in the washing machine.
Programs and Functions
Foroptimumwashingresultsyourwasheroffersseveralprogramgroups
andadditionaloptions.
Basic programsincludeRegular/Cott0nandPermanentpress.Program
selectionis basedinpartonthe laundryfabrictype.
Cycletimes will vary dependingoncycle selected,temperatureand
pressureof incoming water, water hardness,sizeof load and type
of fabrics.
Specialprogramsarecustomdesignedfor specialwashneedsorspecific
typesof fabric.
Additional optionsmaybeselectedbypressingoneof thepaneloption
buttons.
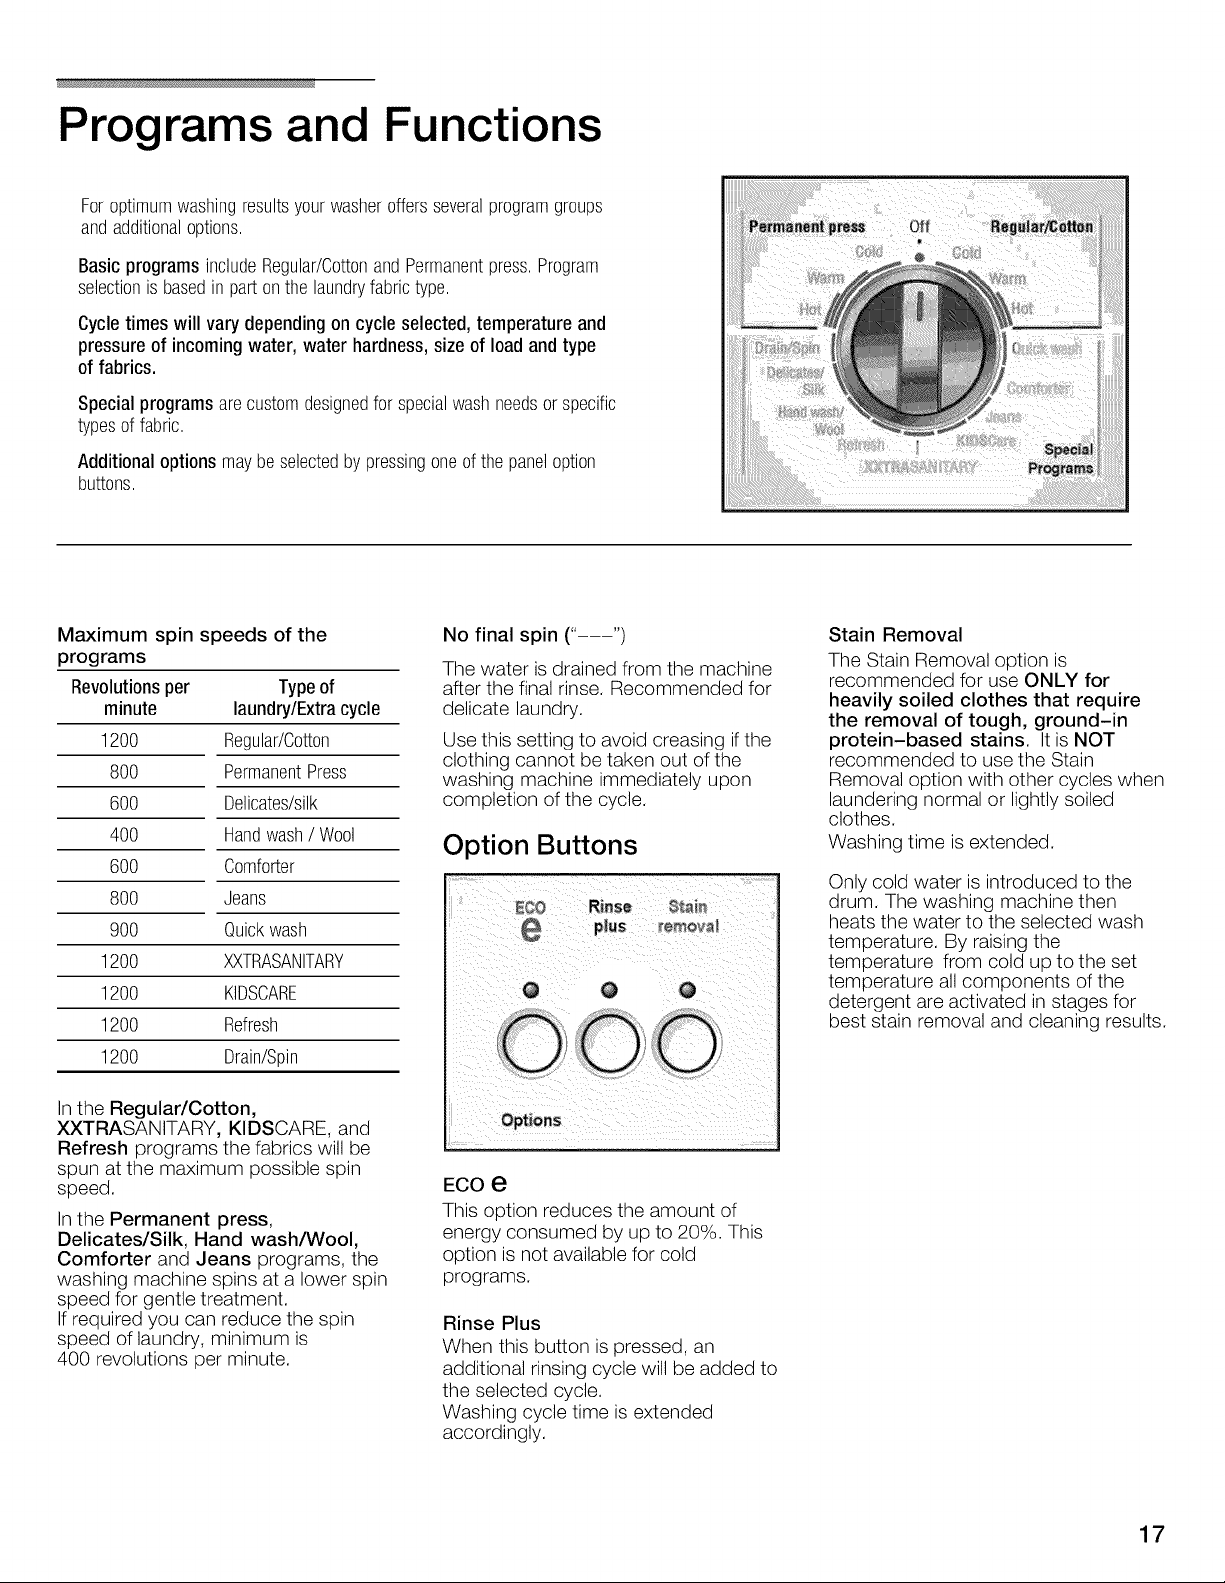
Maximum spin speeds of the
programs
Revolutionsper Typeof
minute laundry/Extracycle
1200 Regular/Cotton
800 PermanentPress
600 Delicates/silk
400 Handwash/ Wool
600 Comforter
800 Jeans
900 Quickwash
1200 XXTRASANITARY
1200 KIDSCARE
1200 Refresh
1200 Drain/Spin
Inthe Regular/Cotton,
XXTRASANITARY, KIDSCARE, and
Refresh programs the fabrics will be
spun at the maximum possible spin
speed.
Inthe Permanent press,
Delicates/Silk, Hand wash/Wool,
Comforter and Jeans programs, the
washing machine spins at a lower spin
speed for gentle treatment.
If required you can reduce the spin
speed of laundry, minimum is
400 revolutions per minute.
No final spin ("---")
The water is drained from the machine
after the final rinse. Recommended for
delicate laundry.
Use this setting to avoid creasing ifthe
clothing cannot be taken out of the
washing machine immediately upon
completion of the cycle.
Option Buttons
ECO e
This option reduces the amount of
energy consumed by up to 20%. This
option is not available for cold
programs.
Rinse Plus
When this button is pressed, an
additional rinsing cycle will be added to
the selected cycle.
Washing cycle time is extended
accordingly.
Stain Removal
The Stain Removal option is
recommended for use ONLY for
heavily soiled clothes that require
the removal of tough, ground-in
protein-based stains. It is NOT
recommended to use the Stain
Removal option with other cycles when
laundering normal or lightly soiled
clothes.
Washing time is extended.
Only cold water is introduced to the
drum. The washing machine then
heats the water to the selected wash
temperature. By raising the
temperature from cold up to the set
temperature all components of the
detergent are activated in stages for
best stain removal and cleaning results.
17
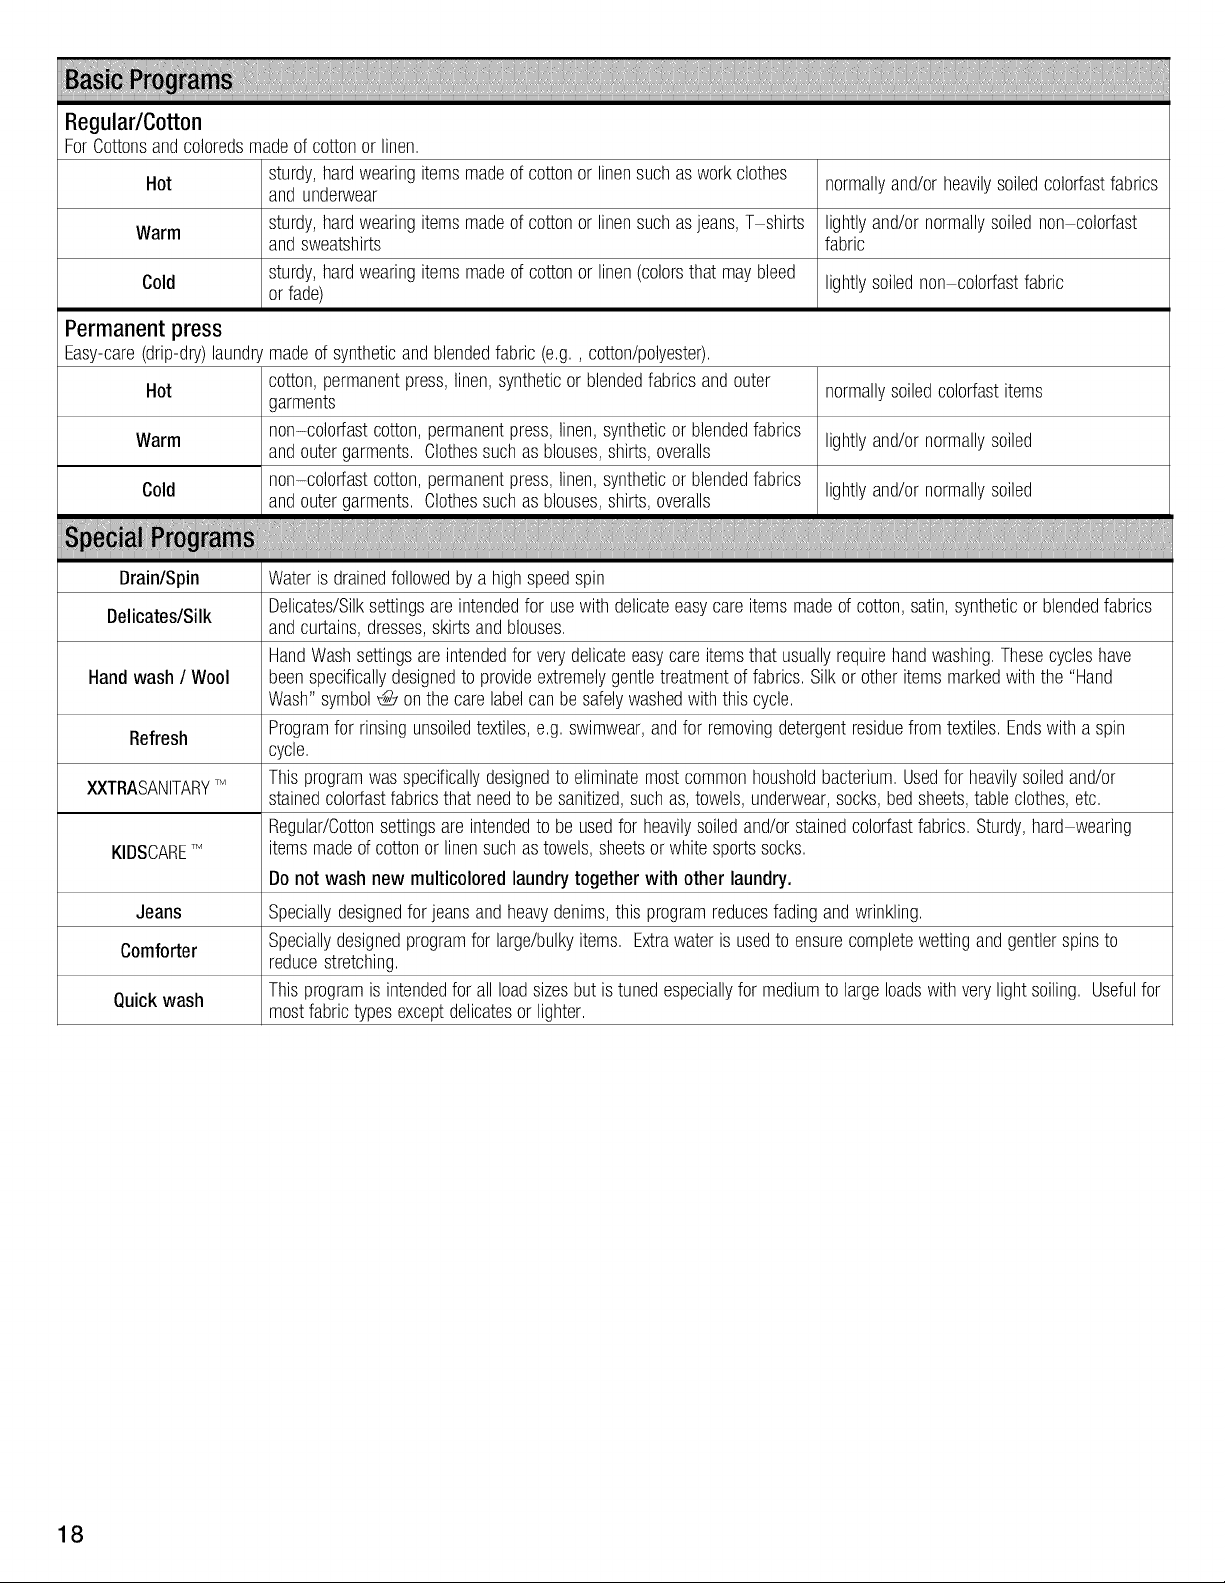
Regular/Cotton
ForCottonsandcoloredsmadeof cottonor linen,
Hot sturdy,hardwearingitemsmadeof cottonor linensuchasworkclothes normallyand/orheavilysoiledcolorfastfabrics
Warm sturdy,hardwearingitemsmadeof cottonor linensuchasjeans,T shirts lightlyand/ornormallysoilednon colorfast
Cold or fade) lightlysoilednon colorfastfabric
and underwear
andsweatshirts fabric
sturdy,hardwearingitemsmadeofcottonor linen(colorsthatmaybleed
Permanent press
Easy-care(drip-dry)laundrymadeofsyntheticandblendedfabric(e,g,, cotton/polyester),
Hot cotton,permanentpress,linen,syntheticorblendedfabricsandouter normallysoiledcolorfastitems
Warm non-colorfastcotton,permanentpress,linen,syntheticorblendedfabrics lightlyand/ornormallysoiled
Cold non-colorfastcotton,permanentpress,linen,syntheticorblendedfabrics lightlyand/ornormallysoiled
Drain/Spin Wateris drainedfollowedbya highspeedspin
Delicates/Silk
Handwash / Wool beenspecificallydesignedto provideextremelygentletreatmentof fabrics,Silkorotheritemsmarkedwiththe "Hand
Refresh Programfor rinsingunsoiledtextiles,e,g,swimwear,andfor removingdetergentresiduefrom textiles,Endswith a spin
XXTRASANITARYTM
KIDSCARETM itemsmadeofcottonor linensuchastowels,sheetsor whitesportssocks,
Jeans Speciallydesignedfor jeansandheavydenims,thisprogramreducesfadingandwrinkling,
Comforter Speciallydesignedprogramfor large/bulkyitems, Extrawateris usedto ensurecompletewettingandgentlerspinsto
Quickwash
garments
andoutergarments,Clothessuchasblouses,shirts,overalls
andoutergarments,Clothessuchasblouses,shirts,overalls
Delicates/Silksettingsareintendedfor usewithdelicateeasycareitemsmadeof cotton,satin,syntheticor blendedfabrics
andcurtains,dresses,skirtsandblouses,
HandWashsettingsareintendedfor verydelicateeasycareitemsthat usuallyrequirehandwashing,Thesecycleshave
Wash"symbol@ onthe carelabelcanbe safelywashedwiththis cycle,
cycle,
Thisprogramwasspecificallydesignedto eliminatemostcommonhousholdbacterium,Usedfor heavilysoiledand/or
stainedcolorfastfabricsthatneedto besanitized,suchas,towels,underwear,socks,bedsheets,tableclothes,etc,
Regular/Cottonsettingsareintendedto be usedfor heavilysoiledand/orstainedcolorfastfabrics,Sturdy,hard wearing
Donot wash new multicolored laundrytogether with other laundry.
reducestretching,
Thisprogramisintendedfor allloadsizesbutistunedespeciallyfor mediumtolargeloadswithverylightsoiling, Usefulfor
mostfabrictypesexceptdelicatesor lighter,
18
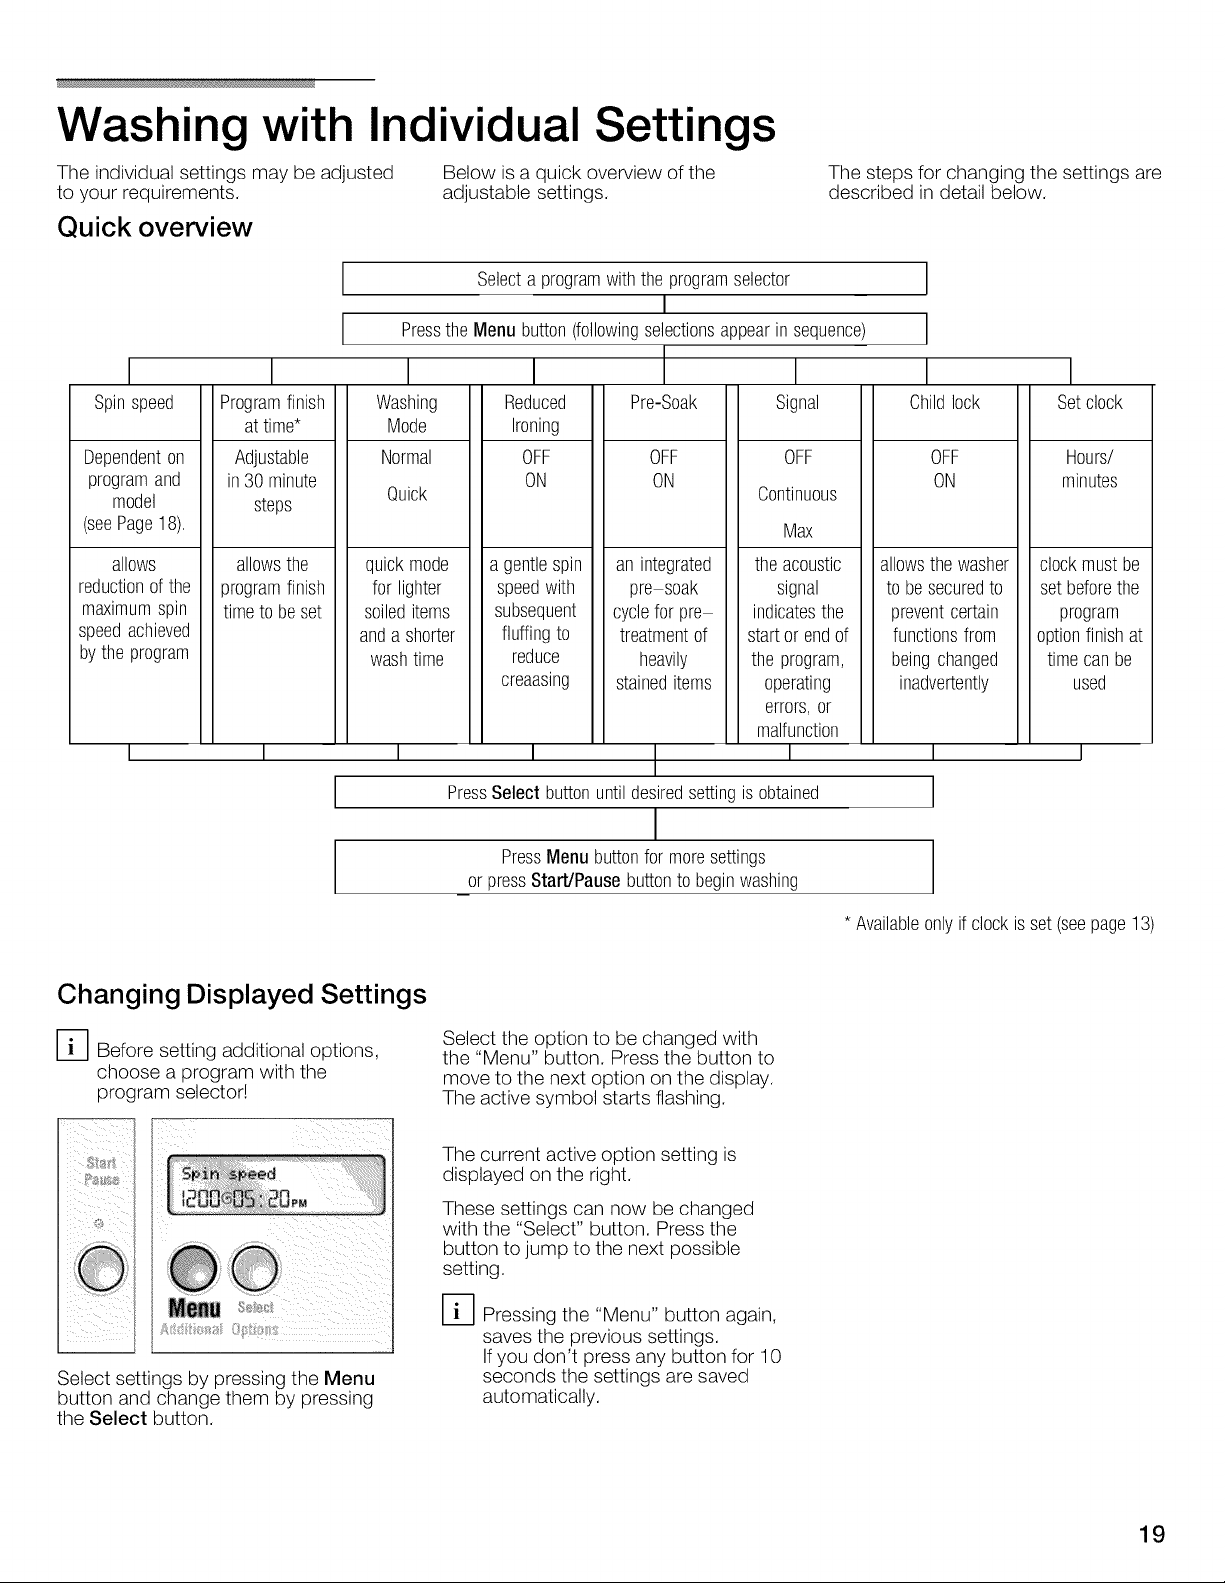
Washing with Individual Settings
The individual settings may be adjusted Below is a quick overview of the
to your requirements, adjustable settings.
Quick overview
Selecta programwiththeprogramselector
I
PresstheMenubutton(followingselectionsappearinsequence)
I
Spinspeed
Dependenton
programand
model
(seePage18).
allows
reductionof the
maximumspin
speedachieved
bythe program
I
Programfinish
attime*
Adjustable
in30 minute
steps
allowsthe
programfinish
timeto beset
1
I
Washing
Mode
Normal
Quick
quickmode
for lighter
soileditems
anda shorter
washtime
1
I
Reduced
Ironing
OFF
ON
a gentlespin
speedwith
subsequent
fluffingto
reduce
creaasing
l
PressSelectbuttonuntildesiredsettingisobtained
Pre-Soak
OFF
ON
an integrated
pre soak
cyclefor pre
treatmentof
heavily
staineditems
t
I
PressMenubuttonfor moresettings
orpressStart/Pausebuttontobeginwashing
The steps for changing the settings are
described in detail below.
I
Signal
OFF
Continuous
Max
theacoustic
signal
indicatesthe
startor endof
the program,
operating
errors,or
malfunction
[
I
Childlock
OFF
ON
allowsthewasher
to besecuredto
preventcertain
functionsfrom
beingchanged
inadvertently
J
I
Setclock
Hours/
minutes
clockmust be
set beforethe
program
optionfinishat
timecanbe
used
I
Changing Displayed Settings
D Before setting additional options,
choose a program with the
program selector!
o
Select settings by pressing the Menu
button and change them by pressing
the Select button.
* Availableonlyifclockisset (seepage13)
Select the option to be changed with
the "Menu" button. Press the button to
move to the next option on the display.
The active symbol starts flashing.
The current active option setting is
displayed on the right.
These settings can now be changed
with the "Select" button. Press the
button to jump to the next possible
setting.
D Pressing the "Menu" button again,
saves the previous settings.
If you don't press any button for 10
seconds the settings are saved
automatically.
19
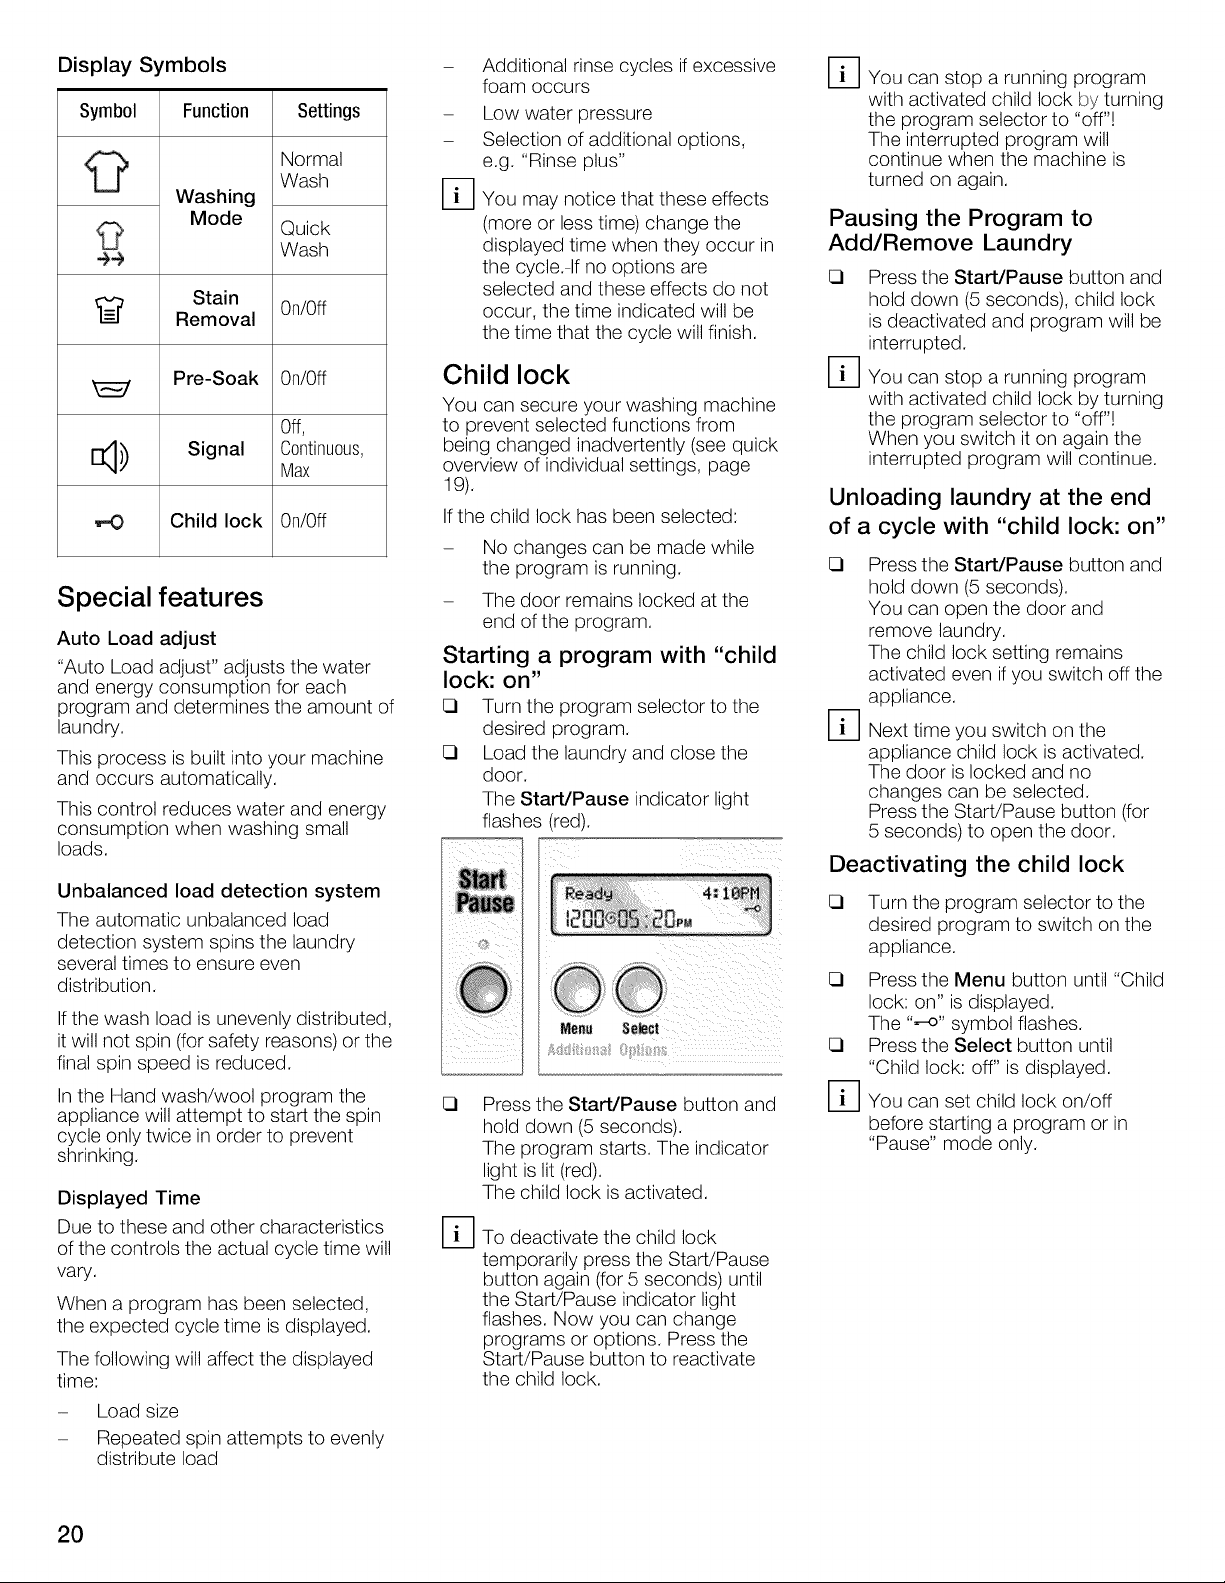
Display Symbols
Symbol
÷÷
%
[]_)) Signal Continuous,
•-0 Child lock 0n/0ff
Function
Washing
Mode
Stain
Removal
Pre-Soak 0n/0ff
Settings
Normal
Wash
Quick
Wash
0n/0ff
Off,
Max
Special features
Auto Load adjust
"Auto Load adjust" adjusts the water
and energy consumption for each
program and determines the amount of
laundry.
This process is built into your machine
and occurs automatically.
This control reduces water and energy
consumption when washing small
loads.
Unbalanced load detection system
The automatic unbalanced load
detection system spins the laundry
several times to ensure even
distribution.
Ifthe wash load is unevenly distributed,
itwill not spin (for safety reasons) or the
final spin speed is reduced.
Inthe Hand wash/wool program the
appliance will attempt to start the spin
cycle only twice in order to prevent
shrinking.
Displayed Time
Due to these and other characteristics
of the controls the actual cycle time will
vary.
When a program has been selected,
the expected cycle time is displayed.
The following will affect the displayed
time:
- Load size
- Repeated spin attempts to evenly
distribute load
Additional rinse cycles if excessive
foam occurs
Low water pressure
Selection of additional options,
e.g. "Rinse plus"
%
You may notice that these effects
(more or less time) change the
displayed time when they occur in
the cycle. If no options are
selected and these effects do not
occur, the time indicated will be
the time that the cycle will finish.
Child lock
You can secure your washing machine
to prevent selected functions from
being changed inadvertently (see quick
overview of individual settings, page
19).
If the child lock has been selected:
- No changes can be made while
the program is running.
- The door remains locked at the
end of the program.
Starting a program with "child
lock: on"
E3 Turn the program selector to the
desired program.
E3 Load the laundry and close the
door.
The Start/Pause indicator light
flashe_ (red).
Menu
Press the Start/Pause button and
hold down (5 seconds).
The program starts. The indicator
light is lit (red).
The child lock is activated.
%
To deactivate the child lock
temporarily press the Start/Pause
button again (for 5 seconds) until
the Start/Pause indicator light
flashes. Now you can change
programs or options. Press the
Start/Pause button to reactivate
the child lock.
D You can stop a running program
with activated child lock by turning
the program selector to "off'!!
The interrupted program will
continue when the machine is
turned on again.
Pausing the Program to
Add/Remove Laundry
Cl%Press the Start/Pause button and
hold down (5 seconds), child lock
is deactivated and program will be
interrupted.
You can stop a running program
with activated child lock by turning
the program selector to "off'!!
When you switch it on again the
interrupted program will continue.
Unloading laundry at
of a cycle with "child
Cl
Press the Start/Pause button and
hold down (5 seconds).
You can open the door and
remove laundry.
The child lock setting remains
activated even if you switch off the
appliance.
%
Next time you switch on the
appliance child lock is activated.
The door is locked and no
changes can be selected.
Press the Start/Pause button (for
5 seconds) to open the door.
the end
lock: on"
Deactivating the child lock
Cl
Turn the program selector to the
desired program to switch on the
appliance.
Cl
Press the Menu button until "Child
lock: on" is displayed.
The ".-o" symbol flashes.
Press the Select button until
"Child lock: off" is displayed.
You can set child lock on/off
before starting a program or in
"Pause" mode only.
2O
During Washing
D Due to the highly engineered
suspension of this appliance, it
may experience a shudder or
shake when progressing from
lower to higher spin speeds.
This behavior is normal due to
shifting of the drum system and
should not cause concern.
Re-selecting a program
E::::l If the child lock is active, tempo-
rarily deactivate it (see page 20).
E::::l Turn the program selector to Off.
E::::l Turn the program selector to a
newly selected program.
The Start/Pause indicator light
flashes.
E::::l If the child lock is active,
deactivate again temporarily.
E::::l If required, change the settings.
(see Page 20).
E::::l Press the Start/Pause button.
The program starts.
Add a garment /
Interrupting the program
You can put laundry in the drum after
washing begins, take laundry out of the
drum early or interrupt the program at
any time.
D It is not recommended to add
laundry after the washing phase is
complete.
Without child lock
D You can add or reduce laundry as
long as the Start/Pause indicator
light flashes (red).
E::::l Press the Start/Pause button.
The following displays are
indicated in succession:
"Pause",
"Door can be opened".
E::::l Open the door.
E::::l Add/remove the laundry.
E::::l Close the door.
E::::l Press the Start/Pause button.
The program continues.
The indicator light is lit (red).
%
When the Start/Pause indicator
light is lit (red), the program can be
interrupted, however the door
cannot be opened for safety
reasons (water level, temperature
or drum speed too high).
%
If the speed istoo high, the
Start/Pause indicator light is lit
(red). Laundry can be added in
"Pause" mode when the drum is at
a standstill.
Child lock activated
D Refer to the Child Lock section,
(see page 20).
Canceling the active
program
If you would like to terminate a program
and remove the laundry:
E::::l Press the Start/Pause button
E::::l If Child Lock is active, it is
necessary to press and hold down
the Start/Pause button for five
seconds
If the load is too wet, turn the
program selector to Drain/Spin.
If a program is interrupted at a high
temperature, the door may remain
locked until the appliance has
cooled down.
%
If the program is terminated by
switching off the appliance, the
door may remain locked.
After Washing
The Start/Pause indicator light goes
out.
Display field: "Remove laundry".
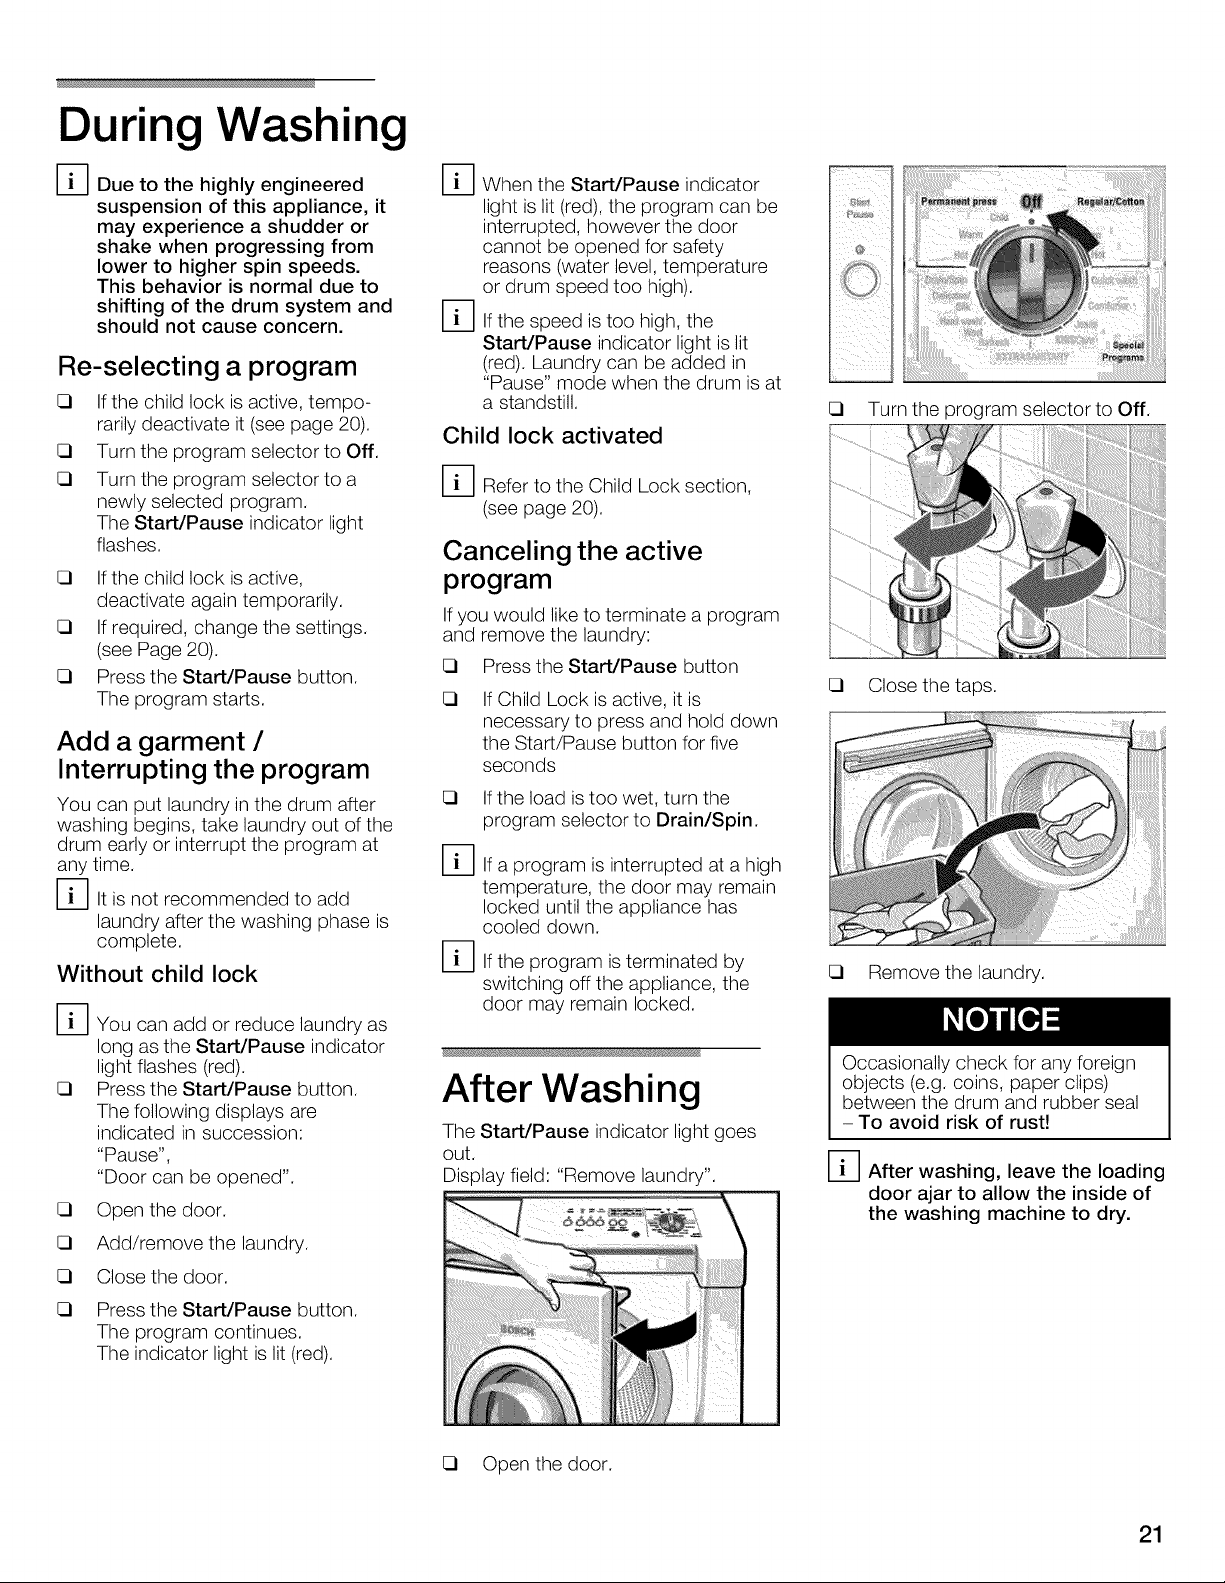
Turn the program selector to Off.
Close the taps.
E::::l Remove the laundry.
Occasionally check for any foreign
objects (e.g. coins, paper clips)
between the drum and rubber seal
-To avoid risk of rust!
DAfter washing, leave the loading
door ajar to allow the inside of
the washing machine to dry.
E::::l Open the door.
21
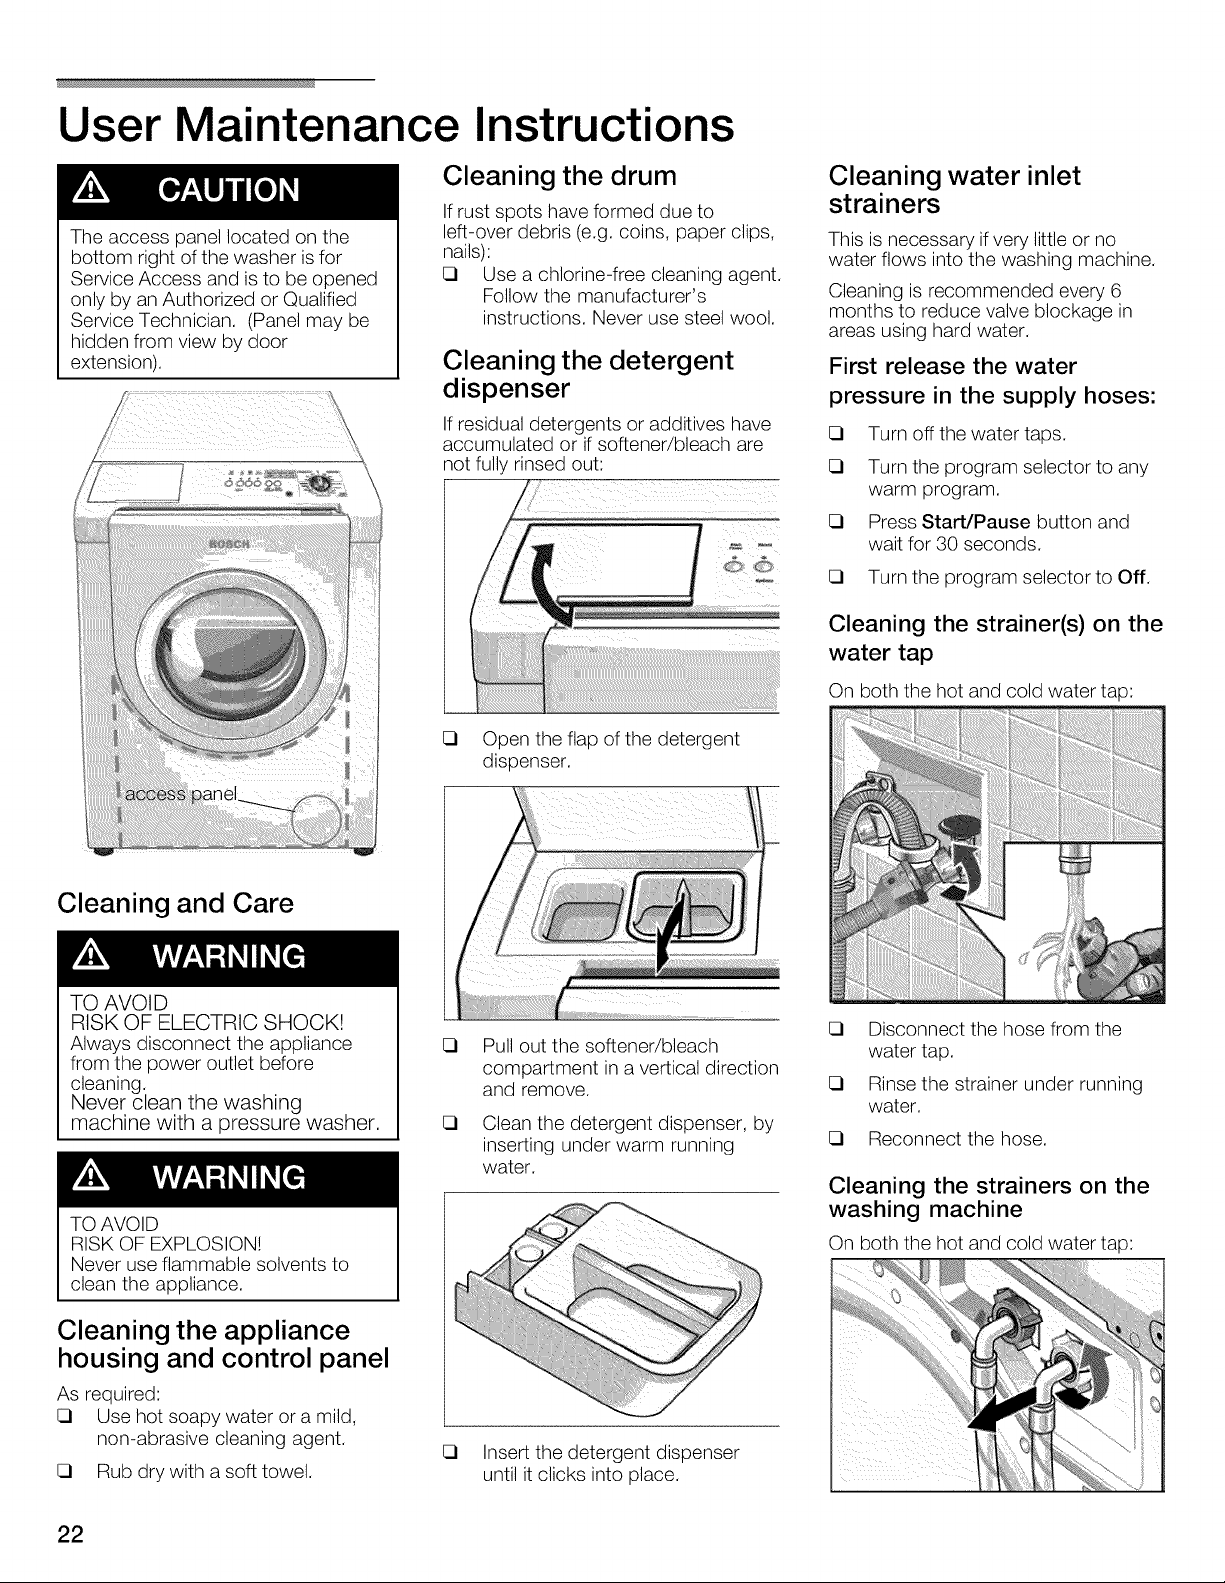
User Maintenance Instructions
The access panel located on the
bottom right of the washer is for
Service Access and is to be opened
only by an Authorized or Qualified
Service Technician. (Panel may be
hidden from view by door
extension).
Cleaning the drum
If rust spots have formed due to
left-over debris (e.g. coins, paper clips,
nails):
CI Use a chlorine-free cleaning agent.
Follow the manufacturer's
instructions. Never use steel wool.
Cleaning the detergent
dispenser
If residual detergents or additives nave
accumulated or if softener/bleach are
not fully nnsea out:
CI Open the flap of the detergent
dispenser.
Cleaning water inlet
strainers
This is necessary if very little or no
water flows into the washing machine.
Cleaning is recommended every 6
months to reduce valve blockage in
areas using hard water.
First release the water
pressure in the supply hoses:
[3 Turn off the water taps.
[3 Turn the program selector to any
warm program.
[3 Press Start/Pause button and
wait for 30 seconds.
CI Turn the program selector to Off.
Cleaning the strainer(s) on the
water tap
On both the hot and cold water tap:
Cleaning and Care
TO AVOID
RISK OF ELECTRIC SHOCK!
Always disconnect the appliance
from the power outlet before
cleaning.
Never clean the washing
machine with a pressure washer.
TO AVOID
RISK OF EXPLOSION!
Never use flammable solvents to
clean the appliance.
Cleaning the appliance
housing and control panel
As required:
CI Use hot soapy water or a mild,
non-abrasive cleaning agent.
CI Rub dry with a soft towel.
C_
Pull out the softener/bleach
compartment ina vertical direction
and remove.
C_
Clean the detergent dispenser, by
inserting under warm running
water.
C_
Insert the detergent dispenser
until it clicks into place.
CI Disconnect the hose from the
water tap.
CI Rinse the strainer under running
water.
CI Reconnect the hose.
Cleaning the strainers on the
washing machine
On both the hot and cold water tap:
22
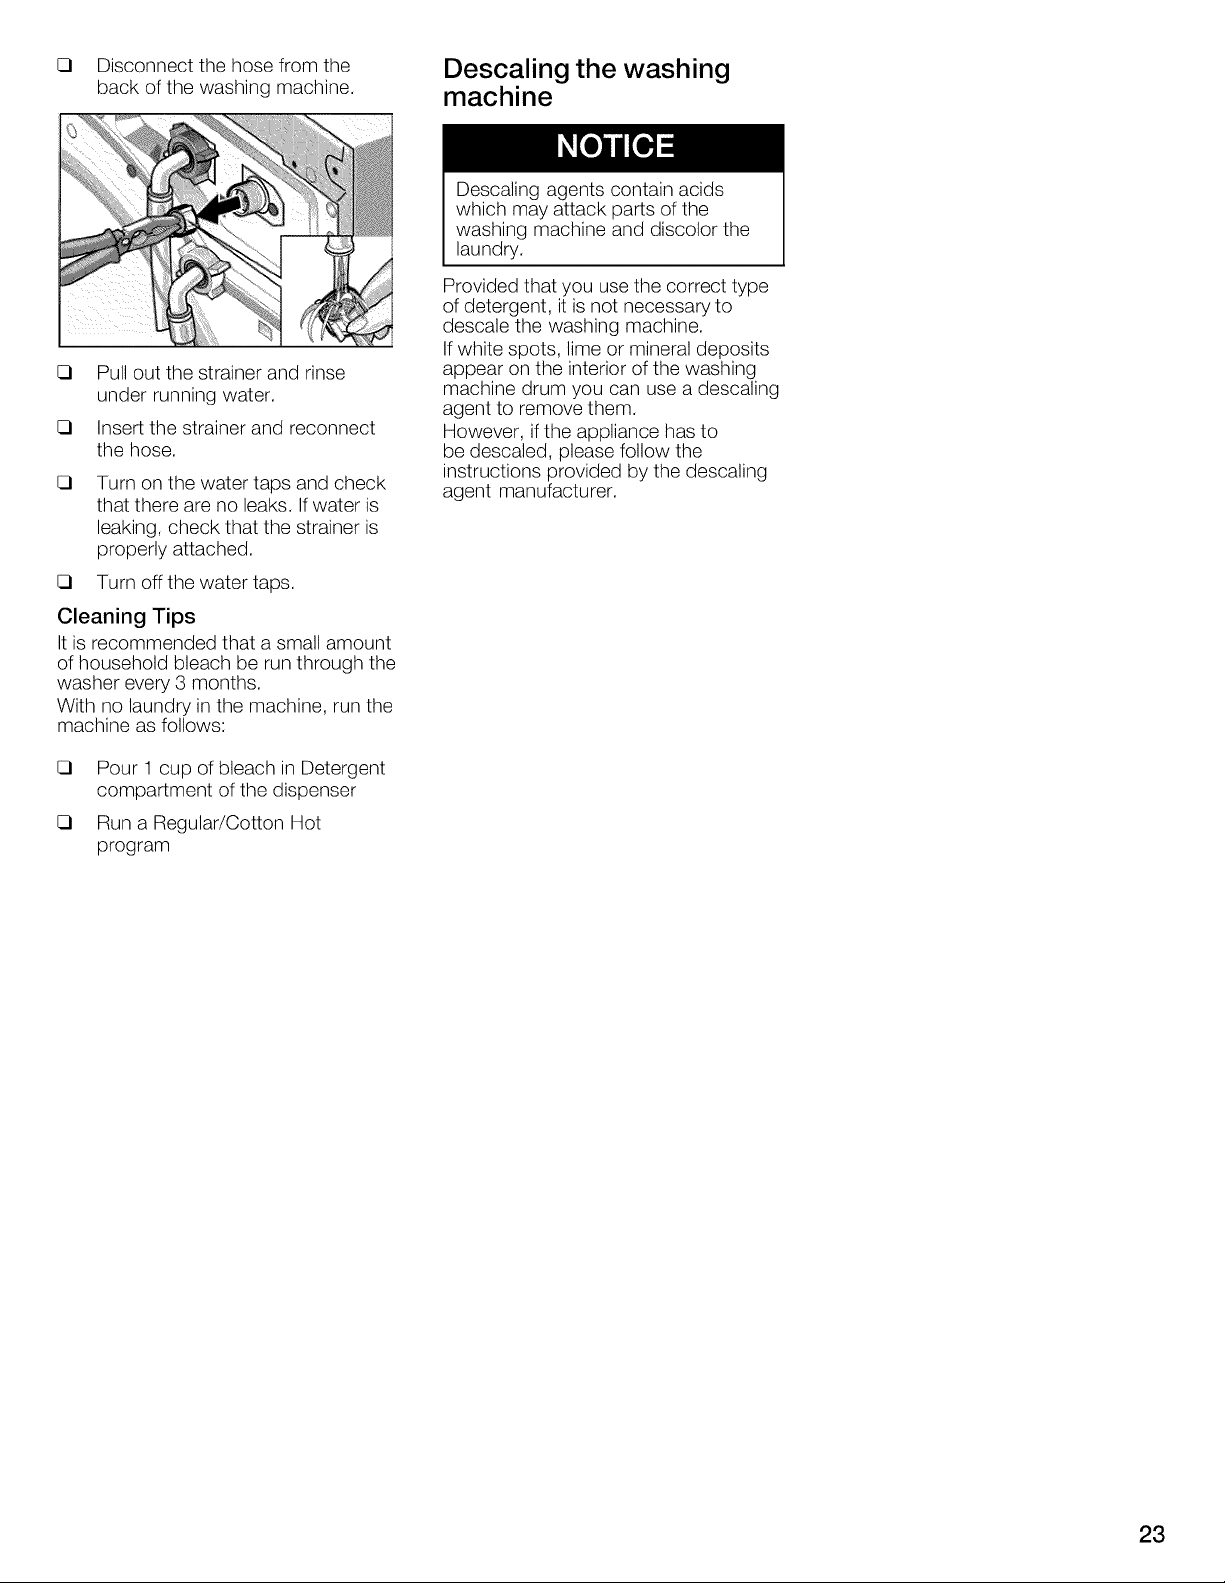
Disconnect the hose from the
back of the washing machine.
C_
Pull out the strainer and rinse
under running water.
C_
Insert the strainer and reconnect
the hose.
C_
Turn on the water taps and check
that there are no leaks. If water is
leaking, check that the strainer is
properly attached.
Turn off the water taps.
Cleaning Tips
It is recommended that a small amount
of household bleach be run through the
washer every 3 months.
With no laundry in the machine, run the
machine as follows:
Descaling the washing
machine
Descaling agents contain acids
which may attack parts of the
washing machine and discolor the
laundry.
Provided that you use the correct type
of detergent, it is not necessary to
descale the washing machine.
If white spots, lime or mineral deposits
appear on the interior of the washing
machine drum you can use a descaling
agent to remove them.
However, ifthe appliance has to
be descaled, please follow the
instructions provided by the descaling
agent manufacturer.
Pour 1 cup of bleach in Detergent
compartment of the dispenser
Run a Regular/Cotton Hot
program
23

Troubleshootin
TO AVOID
RISK OF ELECTRIC SHOCK!
Repairs should only be carried out
by an authorized technician.
of Minor Faults
If repairs are necessary, and you
cannot eliminate the fault yourself with
the aid of the following table:
E:::I Turn the program selector to Off.
E:::I Disconnect the washing machine
from the power outlet.
E:::I Turn off the water taps.
E:::I Call Customer Service
(referto Page 27).
Fault
Thedoorcannotbe
opened.
Doorcannotbeopened,
eventhoughtheappliance
hasbeenswitchedoff and
on again.
Programcontinuesrunning,
eventhoughtheappliance
hasbeenswitchedoff and
on again.
Appliancecannotbe
operated."Childlock
activated"asindicatedin
thedisplayfield.
Controllightsdonot light
up,
Programdoesnotstart.
Start/Pauseindicatorlight
flashes.
Programdoesnotstart.
"CheckDoor!" indicatedin
thedisplayfield.
Programdoesnotstart.
"RealTimedelay"is
indicatedinthe display
field.
Clockcannotbeset. Programhasalreadystarted;whenaprogramhas Waituntilprogramends.
"Setclock:"textremainsin Thesettinghasswitchedfrom hoursto minutes;both None.
thedisplayfieldeven selectionpointshavethesametext.
thoughtheMenubutton
hasbeenpressed.
Possible cause Action
Childlockactivated.
Powerfailure.
Programis runningand/orthe doorislockedforsafety
reasons.
Plugis looseor notinserted.
Programselectorturnedto Off beforeendof program.
Childlockactivated.
Forsafetyreasonsthe doorhasbeenlockedbecausethe
waterlevel,temperatureor drumspeedistoohigh.
Childlockactivated.
Childlockactivated.
A fusehasblown.
Powerfailure.
Start/Pausebuttonnotpressed.
Doornotclosedproperly.
Endtimeselectedandactivated.
started,theclockcannotbeset.
Deactivatechildlock;(seePage20)
An interruptedprogramwill beresumedwhenpoweris
restored.If the laundryisto be removedduringapower
failure,call CustomerService(referto Page27).
Waituntilthe programends(seePage21).
Eliminatethecause.
Selecta program.
Deactivatechildlock(seePage20).
See"Addingto the laundry/Interruptingthe program",
Page21 .
Deactivatechildlock(seePage20).
Deactivatechildlock(seePage20).
Resetcircuitbreaker.
CallCustomerServiceif thisfault recurs.
An interruptedprogramwill beresumedwhenpoweris
restored.If the laundryisto beremovedduringa power
failure,call CustomerService(seepage27).
PresstheStart/Pausebutton.
Checkwhetherlaundryistrappedin door.
Closethedoor(aclickshouldbe heard).
Programcontinues.
None.Appliancestartsautomatically.
24
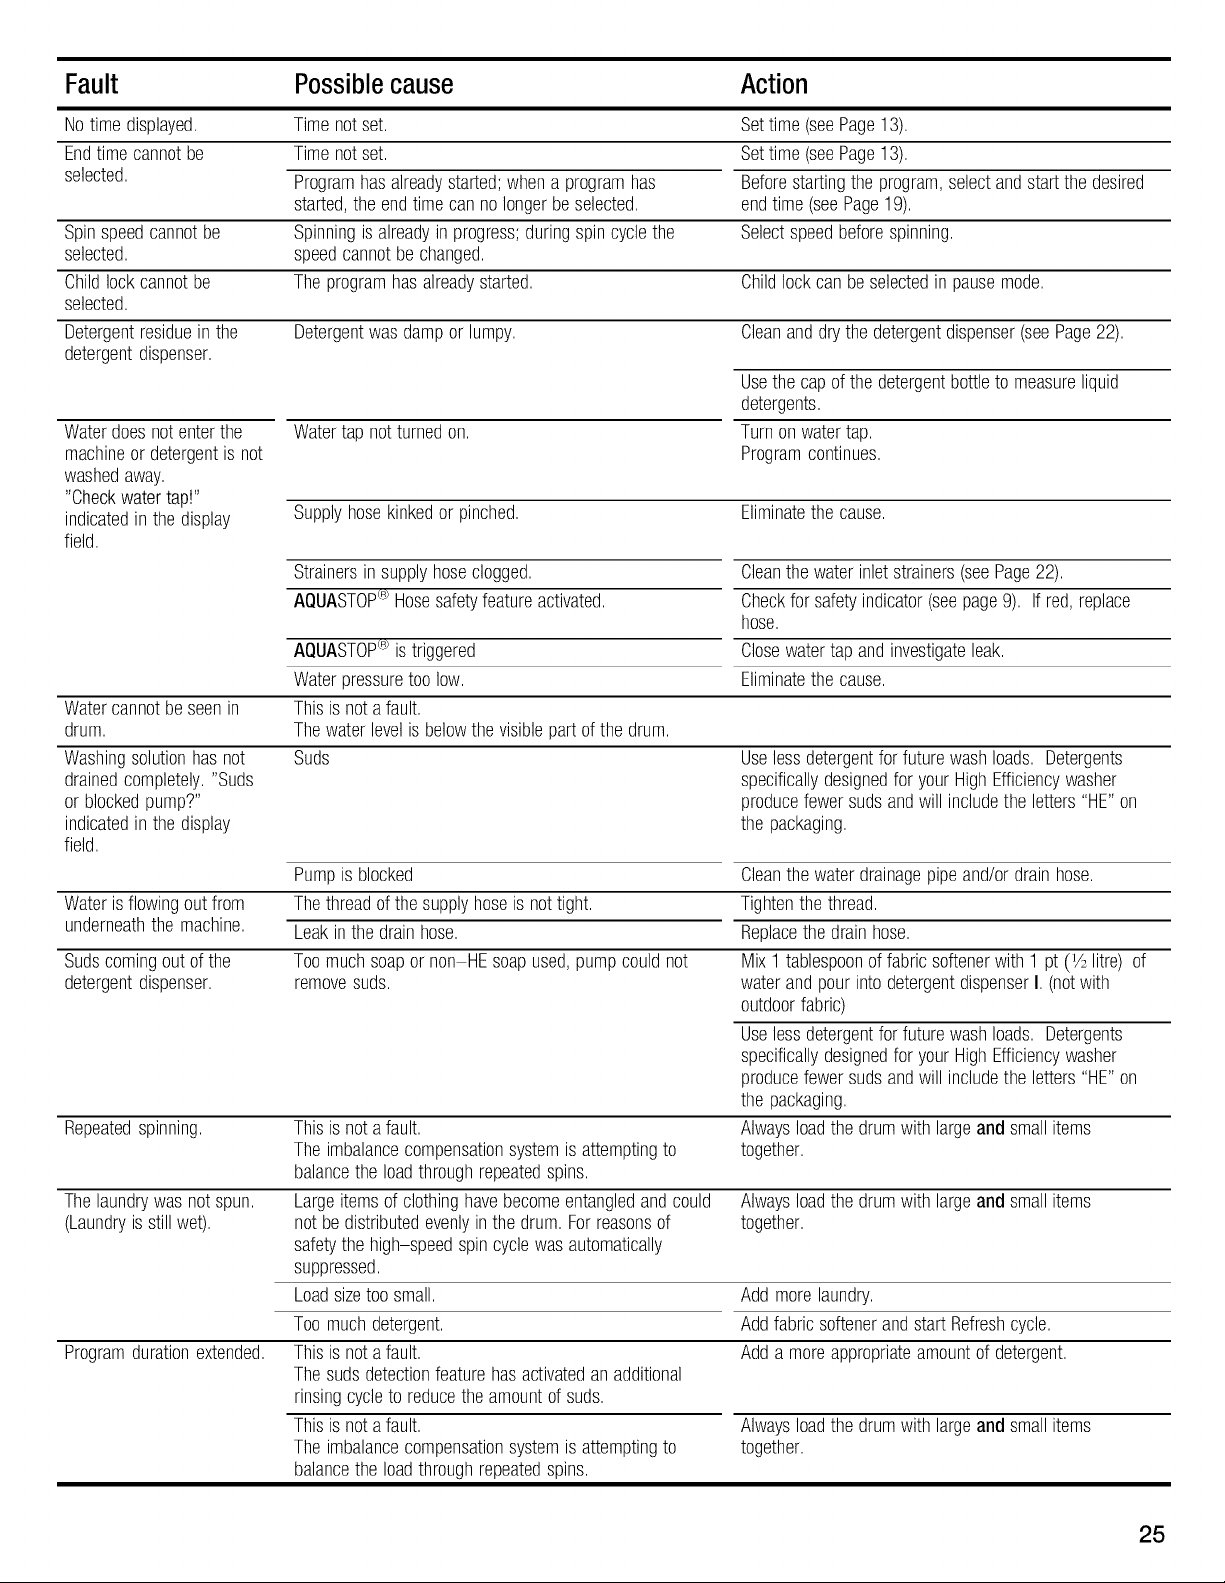
Fault
Possible cause Action
Notime displayed,
Endtimecannotbe
selected,
Spinspeedcannotbe
selected,
Childlockcannotbe
selected,
Detergentresidueinthe
detergentdispenser,
Waterdoesnotenterthe
machineordetergentisnot
washedaway,
"Checkwatertap!"
indicatedinthe display
field,
Watercannotbeseenin
drum,
Washingsolutionhasnot
drainedcompletely,"Suds
or blockedpump?"
indicatedinthe display
field,
Waterisflowingoutfrom
underneaththe machine,
Sudscomingoutofthe
detergentdispenser,
Repeatedspinning,
Thelaundrywasnotspun,
(Laundryis stillwet),
Programdurationextended,
Timenotset,
Timenotset,
Programhasalreadystarted;whenaprogramhas
started,theendtimecannolongerbeselected,
Spinningis alreadyinprogress;duringspincyclethe
speedcannotbechanged,
Theprogramhasalreadystarted, Childlockcan beselectedinpausemode,
Detergentwasdampor lumpy, Cleananddrythedetergentdispenser(seePage22),
Watertap notturnedon,
Supplyhosekinkedorpinched,
Strainersin supplyhoseclogged,
AQUASTOPe Hosesafetyfeatureactivated,
AQUASTOP_ istriggered
Waterpressuretoolow,
Thisisnot afault,
Thewaterlevelisbelowthevisiblepartofthe drum,
Suds
Pumpis blocked
Thethreadofthesupplyhoseis nottight,
Leakinthe drainhose,
Toomuchsoapor non HEsoapused,pumpcouldnot
removesuds,
Thisisnot afault,
Theimbalancecompensationsystemisattemptingto
balancethe loadthroughrepeatedspins,
Largeitemsof clothinghavebecomeentangledandcould
notbedistributedevenlyin thedrum,Forreasonsof
safetythe high-speedspincyclewasautomatically
suppressed,
Loadsizetoosmall,
Toomuchdetergent,
Thisis notafault,
Thesudsdetectionfeaturehasactivatedanadditional
rinsingcycleto reducetheamountofsuds,
Thisisnot afault,
Theimbalancecompensationsystemisattemptingto
balancethe loadthroughrepeatedspins,
Settime(seePage13),
Settime(seePage13),
Beforestartingtheprogram,selectandstartthe desired
endtime (seePage19),
Selectspeedbeforespinning,
Usethe capofthedetergentbottletomeasureliquid
detergents,
Turnonwatertap,
Programcontinues,
Eliminatethecause,
Cleanthe waterinletstrainers(seePage22),
Checkfor safetyindicator(seepage9), Ifred,replace
hose,
Closewatertapandinvestigateleak,
Eliminatethecause,
Uselessdetergentfor futurewashloads, Detergents
specificallydesignedfor yourHighEfficiencywasher
producefewersudsandwill includetheletters"HE"on
thepackaging,
Cleanthe waterdrainagepipeand/ordrainhose,
Tightenthethread,
Replacethedrainhose,
Mix1 tablespoonof fabricsoftenerwith1 pt(1/2litre)of
waterandpourintodetergentdispenserI, (notwith
outdoorfabric)
Uselessdetergentfor futurewashloads, Detergents
specificallydesignedfor yourHighEfficiencywasher
producefewersudsandwill includetheletters"HE"on
thepackaging,
Alwaysloadthe drumwithlargeandsmallitems
together,
Alwaysloadthe drumwithlargeandsmallitems
together,
Addmorelaundry,
AddfabricsoftenerandstartRefreshcycle,
Adda moreappropriateamountof detergent,
Alwaysloadthe drumwithlargeandsmallitems
together,
25
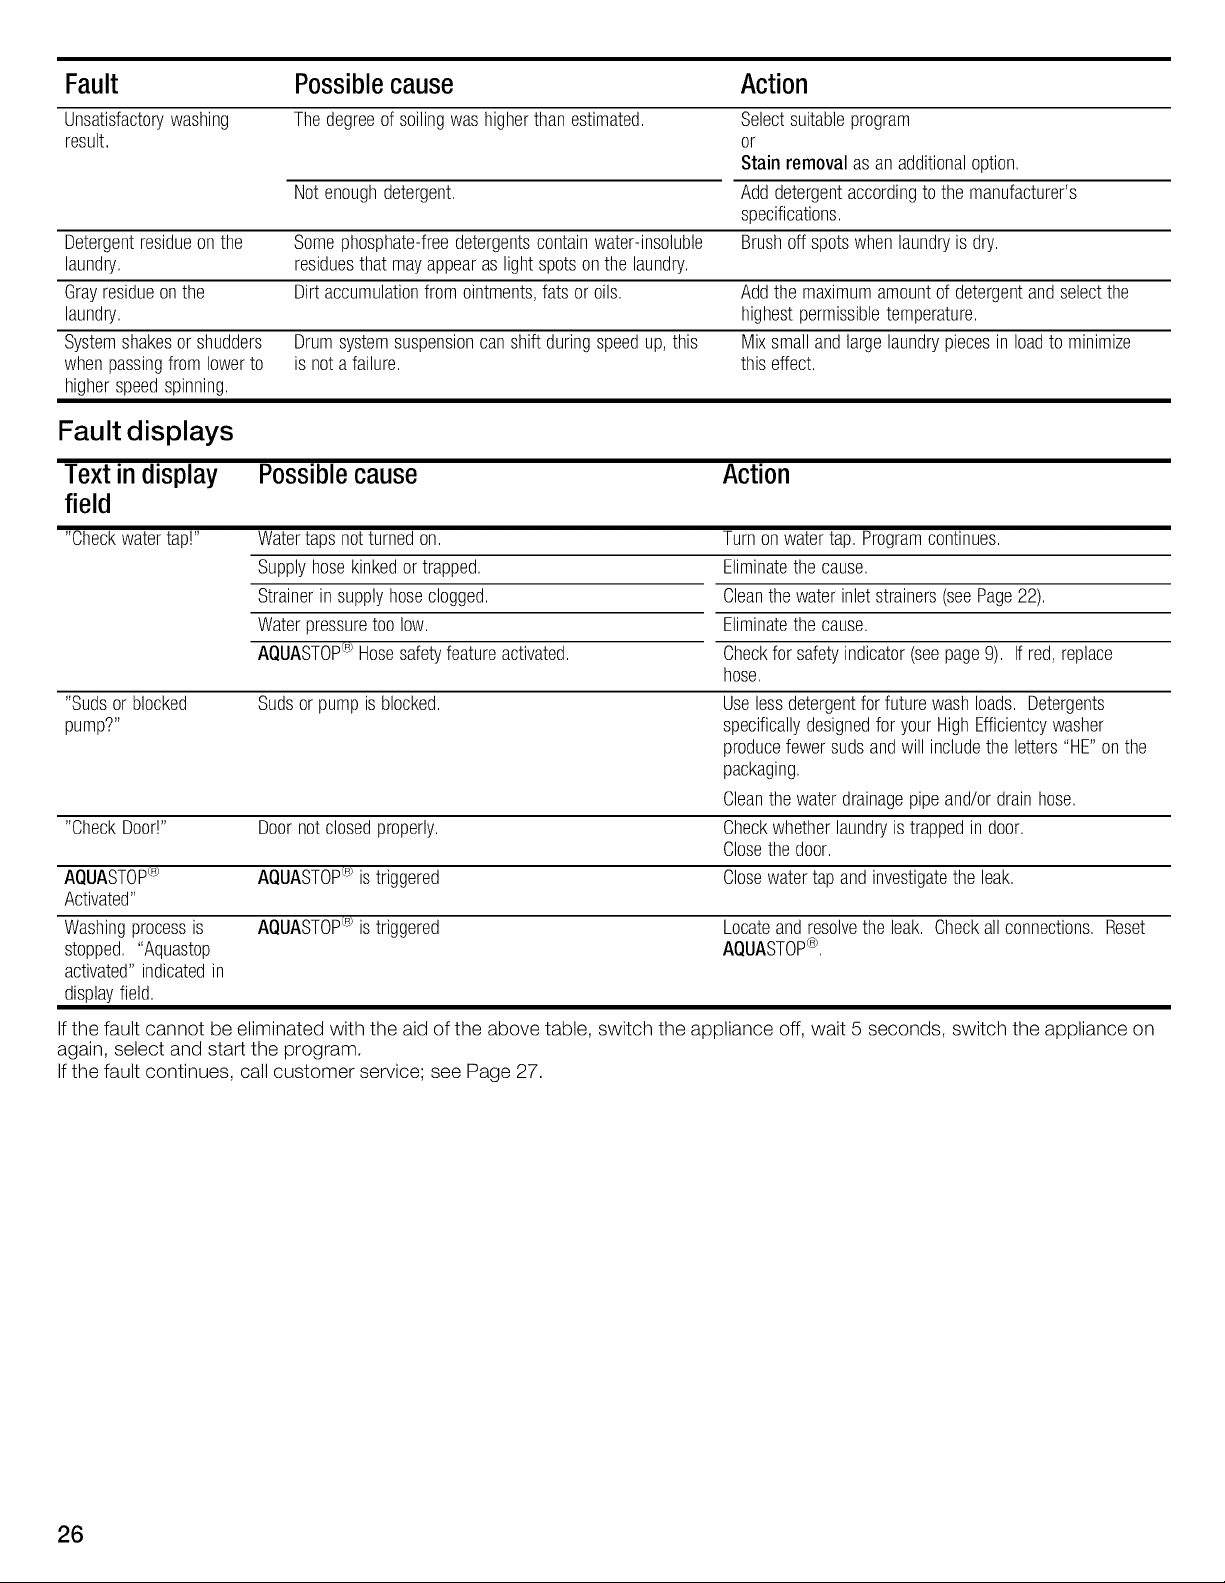
Fault
Possible cause Action
Unsatisfactorywashing
result.
Detergentresidueonthe Somephosphate-freedetergentscontainwater-insoluble Brushoffspotswhenlaundryis dry.
laundry, residuesthat mayappearaslightspotsonthe laundry.
Grayresidueonthe Dirtaccumulationfrom ointments,fats oroils. Addthe maximumamountof detergentandselectthe
laundry, highestpermissibletemperature.
Systemshakesorshudders Drumsystemsuspensioncanshiftduringspeedup,this Mixsmallandlargelaundrypiecesinloadto minimize
whenpassingfromlowerto is notafailure, thiseffect.
higherspeedspinning.
Thedegreeofsoilingwashigherthanestimated. Selectsuitableprogram
or
Stainremoval asanadditionaloption.
Notenoughdetergent. Adddetergentaccordingto themanufacturer's
specifications.
Fault displays
Text in display Possible cause Action
field
"Checkwatertap!" Watertapsnotturnedon. Turnonwatertap. Programcontinues.
Supplyhosekinkedortrapped. Eliminatethecause.
Strainerinsupplyhoseclogged. Cleanthe waterinletstrainers(seePage22).
Waterpressuretoolow. Eliminatethecause.
AQUASTOP_ Hosesafetyfeatureactivated. Checkfor safetyindicator(seepage9). If red,replace
hose.
"Sudsor blocked
pump?"
"CheckDoor!"
AQUASTOP_
Activated"
Washingprocessis
stopped. "Aquastop
activated"indicatedin
displayfield.
Sudsorpumpisblocked.
Doornotclosedproperly.
AQUASTOP_ istriggered
AQUASTOP_ istriggered
Uselessdetergentforfuturewashloads. Detergents
specificallydesignedfor yourHighEfficientcywasher
producefewersudsandwill includetheletters"HE"onthe
packaging.
Cleanthewaterdrainagepipeand/ordrainhose.
Checkwhetherlaundryis trappedin door.
Closethedoor.
Closewatertapand investigatethe leak.
Locateandresolvetheleak. Checkallconnections.Reset
AQUASTOP®,
Ifthe fault cannot be eliminated with the aid of the above table, switch the appliance off, wait 5 seconds, switch the appliance on
again, select and start the program.
Ifthe fault continues, call customer service; see Page 27.
26
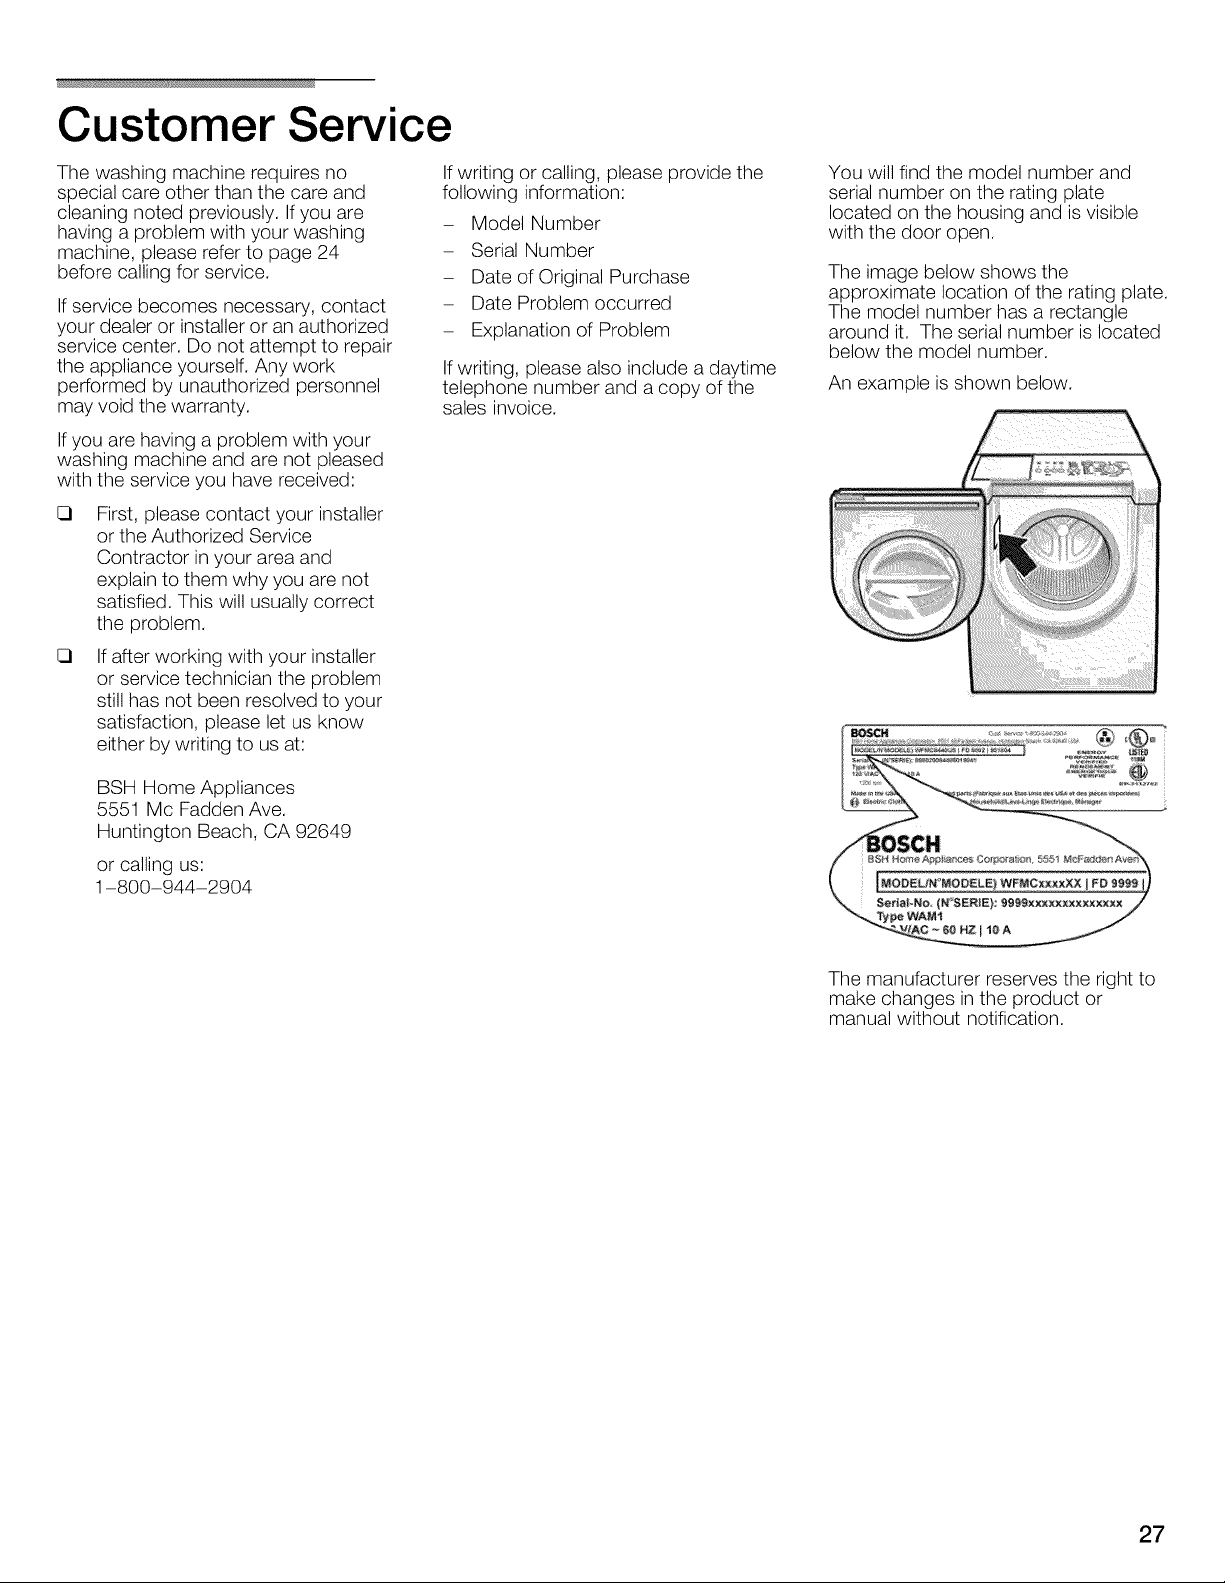
Customer Service
The washing machine requires no
special care other than the care and
cleaning noted previously. If you are
having a problem with your washing
machine, please refer to page 24
before calling for service.
If service becomes necessary, contact
your dealer or installer or an authorized
service center. Do not attempt to repair
the appliance yourself. Any work
performed by unauthorized personnel
may void the warranty.
If you are having a problem with your
washing machine and are not pleased
with the service you have received:
First, please contact your installer
or the Authorized Service
Contractor in your area and
explain to them why you are not
satisfied. This will usually correct
the problem.
If after working with your installer
or service technician the problem
still has not been resolved to your
satisfaction, please let us know
either by writing to us at:
If writing or calling, please provide the
following information:
- Model Number
- Serial Number
- Date of Original Purchase
- Date Problem occurred
- Explanation of Problem
If writing, please also include a daytime
telephone number and a copy of the
sales invoice.
You will find the model number and
serial number on the rating plate
located on the housing and is visible
with the door open.
The image below shows the
approximate location of the rating plate.
The model number has a rectangle
around it. The serial number is located
below the model number.
An example is shown below.
BSH Home Appliances
5551 Mc Fadden Ave.
Huntington Beach, CA 92649
or calling us:
1-800-944-2904
The manufacturer reserves the right to
make changes in the product or
manual without notification.
27
STATEMENT OF LIMITED PRODUCT WARRANTY
Bosch Nexxt ® Clothes Washer
What this Warranty Covers & Who it Applies to: The limited warranty provided by BSH Home Appliances Corporation (Bosch)
in this Statement of Limited Product Warranty applies only to the Bosch Nexxt Clothes Washer ('Product) sold to you, the first
using purchaser, but strictly conditioned on the Product having been purchased: (1)for your normal, household (non-commercial)
use, and has in fact at all times only been used for normal household purposes (any commercial use or setting of the Product
automatically voids the warranty); (2) new at retail (not a display, "as is", or previously returned model) purchased directly by the
end-user consumer, and not for resale, or commercial use; and (3) within the United States or Canada, and has at all times
remained within the country of original purchase. The warranties stated herein apply only to the first purchaser of the Product and
are not transferable. The warranty is automatically void ifthe Product was a display model, sold "as is", tampered with, a
damaged or "scratch and dent" model, or a previously returned model, a free give-away, charitable donation or contest prize.
• Please make sure to return your registration card; while not necessary to effectuate warranty coverage, it is the best way for
Bosch to notify you in the unlikely event of a safety notice or product recall.
How Long the Warranty Lasts: Bosch warrants that the Product is free from defects in materials and workmanship for a period
of three hundred sixty-five days (365) days from the date of purchase. The foregoing timeline begins to run upon the date of
purchase, and shall not be stalled, tolled, extended, or suspended, for any reason whatsoever.
Repair/Replace as Your Exclusive Remedy: During this warranty period, Bosch or one of its authorized service providers will
repair your Product without charge to you (subject to certain limitations stated herein) if your Product proves to have been
manufactured with a defect in materials or workmanship. If reasonable attempts to repair the Product have been made without
success, then Bosch will replace your Product (upgraded models may be available to you, in Bosch's sole discretion, for an
additional charge). All removed parts and components shall become the property of Bosch at its sole option. All replaced and/or
repaired parts shall assume the identity of the original part for purposes of this warranty and this warranty shall not be extended
with respect to such parts. Bosch's sole liability and responsibility hereunder is to repair manufacturer-defective Product only,
using a Bosch-authorized service provider during normal business hours. For safety and property damage concerns, Bosch
highly recommends that you do not attempt to repair the Product yourself, or use an un-authorized servicer; Bosch will have no
responsibility or liability for repairs or work performed by a non-authorized servicer. If you choose to have someone other than an
authorized service provider work on your Product, THIS WARRANTY WILL AUTOMATICALLY BECOME NULL AND VOID.
Authorized service providers are those persons or companies that have been specially trained on Bosch products, and who
possess, in Bosch's opinion, a superior reputation for customer service and technical ability (note that they are independent
entities and are not agents, partners, affiliates or representatives of Bosch). Notwithstanding the foregoing, Bosch will not incur
any liability, or have responsibility, for the Product if it islocated in a remote area (more than 100 miles from an authorized service
provider) or is reasonably inaccessible, hazardous, threatening, or treacherous locale, surroundings, or environment; in any such
event, if you request, Bosch would still pay for labor and parts and ship the parts to the nearest authorized service provider, but
you would still be fully liable and responsible for any travel time or other special charges by the service company, assuming they
agree to make the service call.
® _ _
Extended Limited Warranty:
LENGTHOFWARRANTY
2 YearLimitedWarranty
FromDateof Purchase
2 YearLimitedWarrantyonElectronics
FromDateof Purchase
2 YearLimitedWarrantyon Motor
FromDateof Purchase
Out of Warranty Product: Bosch is under no obligation, at law or otherwise, to provide you with any concessions, including
repairs, pro-rates, or Product replacement, once this warranty has expired.
Warranty Exclusions: The warranty coverage described herein excludes all defects or damage that are not the direct fault of
Bosch, including without limitation, one or more of the following: (1) use of the Product in anything other than its normal,
customary and intended manner (including without limitation, any form of commercial use, use or storage of an indoor product
outdoors, use of the Product in conjunction with air or water-going vessels); (2)any party's willful misconduct, negligence,
misuse, abuse, accidents, neglect, improper operation, failure to maintain, improper or negligent installation, tampering, failure to
SCOPEOFWARRANTY
Boschwillprovidereplacementparts,free ofcharge,for anycomponent
partthat provesdefectiveunderconditionsof normalhomeuseduring
thefirst two yearsfromthe dateof purchase,normal(non expedited)
shippingcostsincluded,laborchargesexcluded.
Boschwillrepairor replace,freeof charge,anymicroprocessoror printed
circuitboardthatprovesdefectiveunderconditionsof normalhomeuse
duringthefirst two yearsfromthe dateof purchase,laborcharges
excluded.
Boschwillrepairor replace,freeof charge,anymotororcomponentpart
ofthe motorthatprovesdefectiveunderconditionsof normalhomeuse
duringthefirst two yearsfromthe dateof purchase,laborcharges
excluded.
28
follow operating instructions, mishandling, unauthorized service (including self-performed "fixing" or exploration of the
appliance's internal workings); (3) adjustment, alteration or modification of any kind; (4) a failure to comply with any applicable
state, local, city, or county electrical, plumbing and/or building codes, regulations, or laws, including failure to install the product in
strict conformity with local fire and building codes and regulations; (5)ordinary wear and tear, spills of food, liquid, grease
accumulations, or other substances that accumulate on, in, or around the Product; and (6) any external, elemental and/or
environmental forces and factors, including without limitation, rain, wind, sand, floods, fires, mud slides, freezing temperatures,
excessive moisture or extended exposure to humidity, lightning, power surges, structural failures surrounding the appliance, and
acts of God. In no event shall Bosch have any liability or responsibility whatsoever for damage to surrounding property, including
cabinetry, floors, ceilings, and other structures or objects around the Product. Also excluded from this warranty are scratches,
nicks, minor dents, and cosmetic damages on external surfaces and exposed parts; Products on which the serial numbers have
been altered, defaced, or removed; service visits to teach you how to use the Product, or visits where there is nothing wrong with
the Product; correction of installation problems (you are solely responsible for any structure and setting for the Product, including
all electrical, plumbing or other connecting facilities, for proper foundation/flooring, and for any alterations including without
limitation cabinetry, walls, floors, shelving, etc.); and resetting of breakers or fuses. TO THE EXTENT ALLOWED BY LAW, THIS
WARRANTY SETS OUT YOUR EXCLUSIVE REMEDIES WITH RESPECT TO PRODUCT, WHETHER THE CLAIM ARISES IN
CONTRACT OR TORT (INCLUDING STRICT LIABILITY, OR NEGLIGENCE) OR OTHERWISE. THIS WARRANTY IS IN LIEU OF
ALL OTHER WARRANTIES, WHETHER EXPRESS OR IMPLIED. ANY WARRANTY IMPLIED BY LAW, WHETHER FOR
MERCHANTABILITY OR FITNESS FOR A PARTICULAR PURPOSE, OR OTHERWISE, SHALL BE EFFECTIVE ONLY FOR THE
PERIOD THAT THIS EXPRESS LIMITED WARRANTY IS EFFECTIVE. IN NO EVENT WILL THE MANUFACTURER BE LIABLE FOR
CONSEQUENTIAL, SPECIAL, INCIDENTAL, INDIRECT, "BUSINESS LOSS", AND/OR PUNITIVE DAMAGES, LOSSES, OR
EXPENSES, INCLUDING WITHOUT LIMITATION TIME AWAY FROM WORK, HOTELS AND/OR RESTAURANT MEALS,
REMODELLING EXPENSES IN EXCESS OF DIRECT DAMAGES WHICH ARE DEFINITIVELY CAUSED EXCLUSIVELY BY Bosch,
OR OTHERWISE. SOME STATES DO NOT ALLOW THE EXCLUSION OR LIMITATION OF INCIDENTAL OR CONSEQUENTIAL
DAMAGES, AND SOME STATES DO NOT ALLOW LIMITATIONS ON HOW LONG IMPLIED WARRANTY LASTS, SO THE ABOVE
LIMITATIONS MAY NOT APPLY TO YOU. THIS WARRANTY GIVES YOU SPECIFIC LEGAL RIGHTS, AND YOU MAY ALSO
HAVE OTHER RIGHTS, WHICH VARY FROM STATE TO STATE. No attempt to alter, modify or amend this warranty shall be
effective unless authorized in writing by an officer of BSH.
How to Obtain Warranty Service: To obtain warranty service for your Product, you should contact the nearest Bosch
authorized service center.
BSH Home Appliances Corporation - 5551 McFadden Avenue, Huntington Beach, CA 92649 / 800-944-2904
29

Dispositifs et avantages de votre nouveau
lava-linge
Technologie SENSOTRONIC <R_
La technologie Bosch SENSOTRONIC _ optimise le
processus de lavage a tous les stades du cycle, et ceci au
moyen de sondes detectant la charge de linge, le niveau
d'eau et la temperature, et donne d'excellents resultats. Les
sondes numeriques protegent tousles textiles, la laine, le
mohair et la sole. Cette machine fonctionne de facto par
simple effleurement d'un bouton.
Systeme exclusif de charniere & joint
Une charniere renforcee et un nouveau joint de conception
revolutionnaire contribuent a retenir la chaleur, ce qui
permet a votre linge d'atteindre une temperature optimale,
et d'eliminer ce faisant, m_me les taches les plus tenaces.
Bac & produit lessiviel & 3 compartiments
Un distributeur de lessive a trois compartiments distribue
automatiquement laquantite necessaire de lessive, d'eau
de Javel et de produit d'assouplissement au bon moment.
Cycle XXTRASANITARY TM
Pendant ce cycle innovant, une sonde intelligente
commandee par thermostat fait chauffer I'eau a 170° F. Les
v_tements sont soigneusement laves et desinfectes et
99,99 % des bacteries domestiques les plus courantes sont
eliminees.
Cycle KIDSCARE TM
Ce sont habituellement les plus jeunes occupants de la
maison qui sont a I'origine des taches les plus tenaces. Ce
cycle porte I'eau jusqu'a 150° F pour enlever facilement les
tAches m_me les plus rebelles.
Pales de brassage
Tandis que votre linge est brasse en douceur, les palettes
delivrent I'eau en cascade depuis une hauteur importante,
evacuant ainsi la mousse et conferant a I'ensemble du linge
une proprete uniforme et absolument parfaite. Un tambour
incline optimise les performances pour faire en sorte que
pas une seule chemise n'echappe au processus de
ringage.
Tambours en acier inoxydable
Le tambour du lave-linge Nexxt TM presente des centaines
de trous double perforation a bords arrondis permettant
vos v_tement d'etre malaxes en douceur sans risque de
s'accrocher.
Chauffe-eau interne
Une resistance chauffante interne porte I'eau a 170° F
tandis qu'une sonde thermometrique numerique surveille
en permanence la temperature. Les lave-linge Bosch
Nexxt _ offrent la methode de chauffage la plus efficace et la
plus precise, pour chaque type de textile selectionn&
Fonctionnement silencieux
Les laves-linge Bosch font appel a des moteurs suspendus
sans balais, a des systemes de pompage isoles et a des
materiaux insonorisants pour un fonctionnement
exceptionnellement silencieux. Celai signifie qu'ils peuvent
_tre installes pratiquement n'importe ou dans I'habitation
sans g_ner qui que ce soit. Le Iogiciel special de contr61e
du desequilibre de Bosch elimine les bruits provoques par le
desequilibre du linge.
AQUASTOP ®
AQUASTOP ® est un systeme interne de confinement de
securite congu pour vous proteger contre le danger
d'inondation du a une fuite et diminuer les chances de
degAts causes par I'eau Iorsque le lave-linge est sous
tension et en fonctionnement.
Tuyau AQUASTOP ®
Tuyau AQUASTOP_._Arr_t de Iecoulement de Ieau si le
tuyau AQUASTOP detecte une fuite pouvant provoquer
une inondation.
® _
®
30
 Loading...