

Bosch WFMC6401UC/02 Owner’s Manual
• •2:
Model / ModUle / Modelo:
WFMC6401UC
_ BOSCH
Invented for life
en
fr
es
Operating,
Secheqinge: Notice d'utilsati6n
Secador: Operacion, cuidado

Table of Contents
Definitions ..........................................................................................
IMPORTANT SAFETY INSTRUCTIONS .................................................................
GROUNDING INSTRUCTIONS .......................................................................
INSTALLATION INSTRUCTION ........................................................................
Introduction .......................................................................................
Information concerning waste disposal ................................................................
Intended use ......................................................................................
Environmental Protection / Conservation Issues .........................................................
Factory-supplied equipment .........................................................................
Dimensions .......................................................................................
Installation area ....................................................................................
Removing the transport bolts .........................................................................
Levelling procedure ................................................................................
Electrical connection ...............................................................................
Hose and cable lengths .............................................................................
Water connection ..................................................................................
Transport, such as when moving out ..................................................................
OPERATING INSTRUCTION ..........................................................................
Your new washer ..................................................................................
Panel ............................................................................................
Summary of Instructions ............................................................................
Before Using For the First Time .......................................................................
Using For the First Time ..............................................................................
Setting the time ....................................................................................
Selecting the Language .............................................................................
First washing cycle (without laundry) ...................................................................
Preparing the laundry ...............................................................................
Sorting the laundry .................................................................................
Degrees of soiling ..................................................................................
Loading the laundry ................................................................................
Laundry Detergents and Additives .....................................................................
Dispensing the correct amount of detergent ............................................................
Filling laundry detergent and/or additives ...............................................................
Decolorizing .......................................................................................
Programs and Functions .............................................................................
Basic programs ....................................................................................
Special programs ..................................................................................
Display Field ......................................................................................
Option buttons ....................................................................................
Indicator light above the "Start/Pause" button ...........................................................
Special features ....................................................................................
Washing with Standard Settings ......................................................................
Washing with Individual Settings ......................................................................
Quick Overview ....................................................................................
Spin Speed .......................................................................................
Program finished at .................................................................................
Washing Mode ....................................................................................
Pre-Soak .........................................................................................
Child lock .........................................................................................
During Washing .....................................................................................
Re-selecting a program .............................................................................
Add a garment / Interrupting the program ..............................................................
Canceling the active program ........................................................................
After Washing .......................................................................................
User Maintenance Instructions ........................................................................
Cleaning and Care .................................................................................
Cleaning the applicance housing and control panel ......................................................
Cleaning the drum .................................................................................
Cleaning the detergent dispenser .....................................................................
Cleaning water inlet strainers .........................................................................
Descaling the washing machine ......................................................................
Troubleshooting of Minor Faults ......................................................................
Customer Service ....................................................................................
STATEMENT OF LIMITED PRODUCT WARRANTY ......................................................
STATEMENT OF WARRANTIES FOR BOSCH CLOTHES WASHERS ......................................
Exclusions ........................................................................................
3
3
4
5
5
5
5
5
5
6
6
6
7
7
8
9
10
11
11
12
13
14
14
14
14
14
15
15
15
16
16
16
16
16
17
17
17
18
18
18
18
19
19
2O
21
21
21
22
23
24
24
24
24
25
26
26
26
26
26
26
27
28
31
32
34
34
Congratulations!
Thenewwashingmachineyoujust
purchasedisamodern,highquality
domesticappliance.
Thismodernwashingmachinecleans
yourlaundryusingthemost
sophisticatedwashingprocesses
toobtainsuperiorcleaningresults.
Excellentengineeringandreliability
reducesoperatingcostssignificantly.
Aneasyoperationphilosophy,avariety
ofcustomizedwashingprogramsanda
solidtouchandfeelmakesthis
applianceauser-friendlyassistantin
yourhousehold.
Itoffersthefollowingstandardfeatures:
- Lownoiselevelforwashing
andspinning.
- HighdoorwithpuDIock(magnetic
doorlock).
- Dooropening16inches(41cm),
qualitysturdyhinge,openingangle
-180°.
- Drum capacity 17.6 Ibs (8kg) for
regular cotton.
Each washing machine which leaves
our factory has undergone a thorough
performance test and is in full working
condition. The appliance may contain
residual water due to the testing
procedures. If you have any questions
concerning installation of the washing
machine, our customer service will be
happy to advise you.
Further information and a selection of
our products can be found on our Web
site: www. boschappliances.com
Please read and follow these operating
and installation instructions along with
all other information enclosed with the
washing machine.
These operating and installation
instructions describe various models.
Differences are indicated in the
appropriate places.
The illustrations may show different
details than your washer.
Definitions
WARNING - This indicates that
death or serious injuries may occur
as a result of non-observance of this
warning.
CAUTION- This indicates that
injuries may occur as a result of
non-observance of this warning.
CAUTION - This indicates that
damage may occur as a result of
non-observance of this warning.
[_ This symbol is used to draw the
IMPORTANT SAFETY INSTRUCTIONS
HYDROGEN GAS IS EXPLOSIVE.
If the hot water system has not
been used for this length of time,
To reduce the risk of fire, electric
shock, serious injury or death when
using your washing machine, follow
basic precautions, including the
following:
1. BOSCH washers are provided with
an Operating, Care and Installation
Instructions Manual. Read and
understand all instructions before
using the washing machine.
2. Do not wash articles that have
been previously cleaned, washed,
soaked, or spotted with gasoline,
dry cleaning solvents, other
flammable or explosive
substances as they give off vapors
that could ignite or explode.
3. Do not add gasoline, dry cleaning
solvents, or other flammable or
explosive substances to the wash
water. These substances give off
vapors that could ignite or
explode.
4. Under certain conditions hydrogen
gas may be produced in a hot
water system that has not been
used for 2 weeks or more.
turn on allhot water faucets and
let the water flow out of each
faucet for several minutes before
using the washing machine. This
will release any accumulated
hydrogen gas. As the gas is
flammable, do not smoke or use
an open flame while carrying out
this procedure.
5. Before the appliance is removed
from service or discarded, remove
the door and the power cord/plug.
6. Do not reach into the appliance if
the wash drum is moving.
7. Do not install or store this
appliance where it will be exposed
to the weather.
8. Do not tamper with the controls.
9. Do not repair or replace any part of
the appliance or attempt any
service unless specifically
recommended in the user
maintenance instructions or in
published user repair instructions
that you understand and have the
skills to carry out.
user's attention to important
matters.
10. Always unplug the washing
machine from the power supply
before attempting any service.
Disconnect the power cord by
grasping the plug, not the cord.
11. To reduce the risk of fire, clothes,
cleaning rags, mop heads and the
like which have traces of any
flammable substance, such as
vegetable oil, cooking oil,
petroleum based oils or distillates,
waxes, fats, etc., must not be
placed in the washing machine.
These items may contain
flammable substances which,
even affer washing, may smoke or
catch fire.
12. Do not machine wash fiberglass
materials (such as curtains and
window coverings that use
fiberglass materials). Small
particles may remain in the
washing machine and stick to
fabrics in subsequent wash loads
causing skin irritation.
13. When children become old
enough to operate the appliance, it
isthe legal responsibility of the
parents or legal guardians to
ensure that they are instructed in
safepracticesbyqualified
persons.
14.Donotallowchildrentoplayonor
withtheappliance.Close
supervisionofchildrenis
necessarywhentheapplianceis
usednearchildren.
15.Keeppetsawayfromthewashing
machine.
16.Donotinsert/pulloutthepower
plugwithwethands.
17.Donottouchthedoorifwashing
athightemperatures.
18.Usecautionwhendraininghot
water.
19.Donotclimbontothewashing
machineand/orleanontheopen
door.
20.Donotsitorstandonthetopof
thewashingmachine.
21.Toreducetheriskoffireor
electricalshock,DONOTusean
extensioncordoranadapterto
connectthewashingmachineto
thepowersupply.
22.Thewashingmachinemustonly
beusedforitsintendedpurpose.
23.Alwaysfollowthefabriccare
instructionsrecommendedbythe
clothingmanufacturer.
24.Donotusethewashingmachineif
ithasawornpowercordorloose
plug.Contactanauthorized
serviceagent.
25.Makesurethatallwater
connectionstothewashing
machinehaveshut-offvalve(s)and
thatarereadilyaccessible.Close
thewashingmachinewater
shut_offvalve(s)attheendofeach
washday.
26.Checkthefillhoseconnectionson
aregularbasistoensurethatthey
aretightandnotleaking.
27.Alwaysreadandfollowthe
instructionsofthemanufacturerof
thedetergent(s),cleaningaid(s),
fabricsoftener(s)andstatic
eliminator(s)whichyouareusing.
Heedallwarningsand
precautions.
28.Storealllaundrychemicalsand
aidsinacooldryplaceaccording
tothemanufacturers'instructions.
29.Toreducetheriskofpoisoningor
chemicalburns,keepallcleaning
productsoutofthereachof
children.
30.Donotoperatethewashing
machineifanyguards,panels
and/orfastenersexcepttransport
fixingboltshavebeenremoved.
31.Donotoperatethewashing
machineifpartsaremissing
orbroken.
32.Donotbypassanysafetydevices.
33.Toavoidfloordamageandmold
growth,donotletspillsor
splashescausestandingwater
aroundorundertheappliance.
34.Donotoperatethiswashing
machineuntilyouaresurethat:
a. thewashingmachinehas
beeninstalledaccordingto
theINSTALLATION
INSTRUCTIONS.
b. allwater,drain,powerand
groundingconnectionsarein
compliancewithalllocal
regulationsand/orother
applicableregulationsand
requirements.
35.Failuretoinstall,maintainand/or
operatethewashingmachine
accordingtothemanufacturer's
instructionsmayresultininjury
and/ordamage.
36.Removinganypanel,includingthe
roundservicepanelinthefront,
canexposesharpedgesand
points,electricalconnectionsand
hotsurfaces.
Notes:
A.
The IMPORTANT SAFE-
GUARDS and WARNINGS in-
dicated in this manual do not
cover all possible conditions
which may occur. Common
sense, caution and care must
be exercised when installing,
maintaining or operating the
washing machine.
B.
Always contact your dealer,
distributor, service agent or
the manufacturer about any
problems or conditions that
you do not understand.
GROUNDING
INSTRUCTIONS
This appliance must be grounded. In
the event of a malfunction or
breakdown, grounding will reduce the
risk of electric shock by providing a
path of least resistance for the electric
current. This appliance is equipped
with a cord that has an
equipment-grounding conductor and a
grounding plug. The plug must be
plugged into an appropriate outlet that
is properly installed and grounded in
accordance with all local codes and
ordinances.
Improper connection of the
equipment grounding conductor
can result in electric shock.
Connect to an individual branch
circuit.
Check with a qualified electrician or
serviceman if you are in doubt as to
whether the washer is properly
grounded.
DO NOT modify the plug provided
with the appliance ifit will not fit
the outlet have a proper outlet
installed by a qualified electrician.
KEEP THESE
INSTRUCTIONS FOR
FUTURE REFERENCE.
In case of change of ownership,
manual should be conveyed with the
washer.
SAVE THESE
INSTRUCTIONS
4

INSTALLATION INSTRUCTION
Introduction
TO AVOID RISK OF INJURY
The washing machine is heavy. Lift
with caution.
Be sure to observe all listed warnings
and cautions.
Frozen hoses can tear/burst. Do not
install the washing machine outdoors
or in an area exposed to freezing
conditions.
These installation instructions are
intended for use by qualified installers.
Inaddition to these instructions, if
installing the washing machine:
- In the United States comply with
the National Electric Code,
ANSI/NFPA70 - latest
edition/State and municipal and/or
local regulations.
- In Canada comply with the
Canadian Electric Code C22.1 -
latest edition/Provincial and
Municipal and/or local regulations.
Ifthe washing machine is located in a
room which will be exposed to
temperatures below freezing, or if it is
located in a cabin that is being shut
down for the winter, any residual water
in the pump or water inlet hose(s) must
be drained.
Take care not to damage the washing
machine. Do not hold on to protruding
parts (e.g. door) when lifting.
Inaddition to the safety information
listed here, the local water and
electricity supplier may have special
requirements.
If in doubt, have the appliance
connected by an authorized technician.
Information concerning
waste disposal
Disposing of the packaging
The shipping package has protected
your new appliance on its way to your
home. All packaging materials are
non-polluting and recyclable. Please
contribute to a better environment by
disposing of packaging materials in an
environmentally friendly manner.
Please ask your dealer or local
authority about the best means of
disposal.
Keep children away from shipping
carton and packaging components.
Danger of suffocation from plastic
foil and folding cartons.
Disposing of your old appliance
Old appliances are not worthless
rubbish! Valuable raw materials can be
reclaimed from environmentally friendly
recycling.
If appliance is no longer usable, pull
out main plug, cut off power cord
and discard.
To prevent children from locking
themselves in the appliance, disable
the door lock or remove the door.
Intended Use
Your washing machine is intended:
- For domestic use only.
- For washing machine washable
fabrics in washing water.
- For operation using cold and hot
(140 °F/60 °C) tap water and
conventional additives that are
suitable for use in residential
washing machines.
Environmental
Protection/Conservation
Issues
Your washing machine uses water,
energy and detergent efficiently,
thereby protecting the environment and
reducing your household costs.
To use your washing machine in an
efficient and non polluting manner:
- Avoid using too much detergent.
- Use detergent bearing HE symbol
for high efficiency and front loading
washers.
- Add detergent according to the
degree of soiling, amount of
laundry and water hardness, and
follow the detergent
manufacturer's instructions.
Factory-supplied equip-
ment
There is a packet of accessory parts
supplied with your washer. Check that
all the accessory parts supplied for your
model are there. Ifany parts are
missing contact your dealer
immediately.
Inside the drum:
i
- Water supply hose for cold water
(blue marking).
- Water supply hose for hot water
(red marking).
- Water drain hose.
- A bag which contains:
- Covers to be placed over the holes
for the transport bolts (after
removing them),
- Clamp for drain hose,
- Wrench for levelling,
- Elbow for attaching the drain hose,
e,g, to a sink,
Depending on the type of connection,
the following may also be required:
- Y-connector (can be obtained
from any hardware store) in case
there is only a cold water
connection available,
Any residual moisture inside the drum
is due to the final testing which every
washing machine undergoes before
leaving the factory.
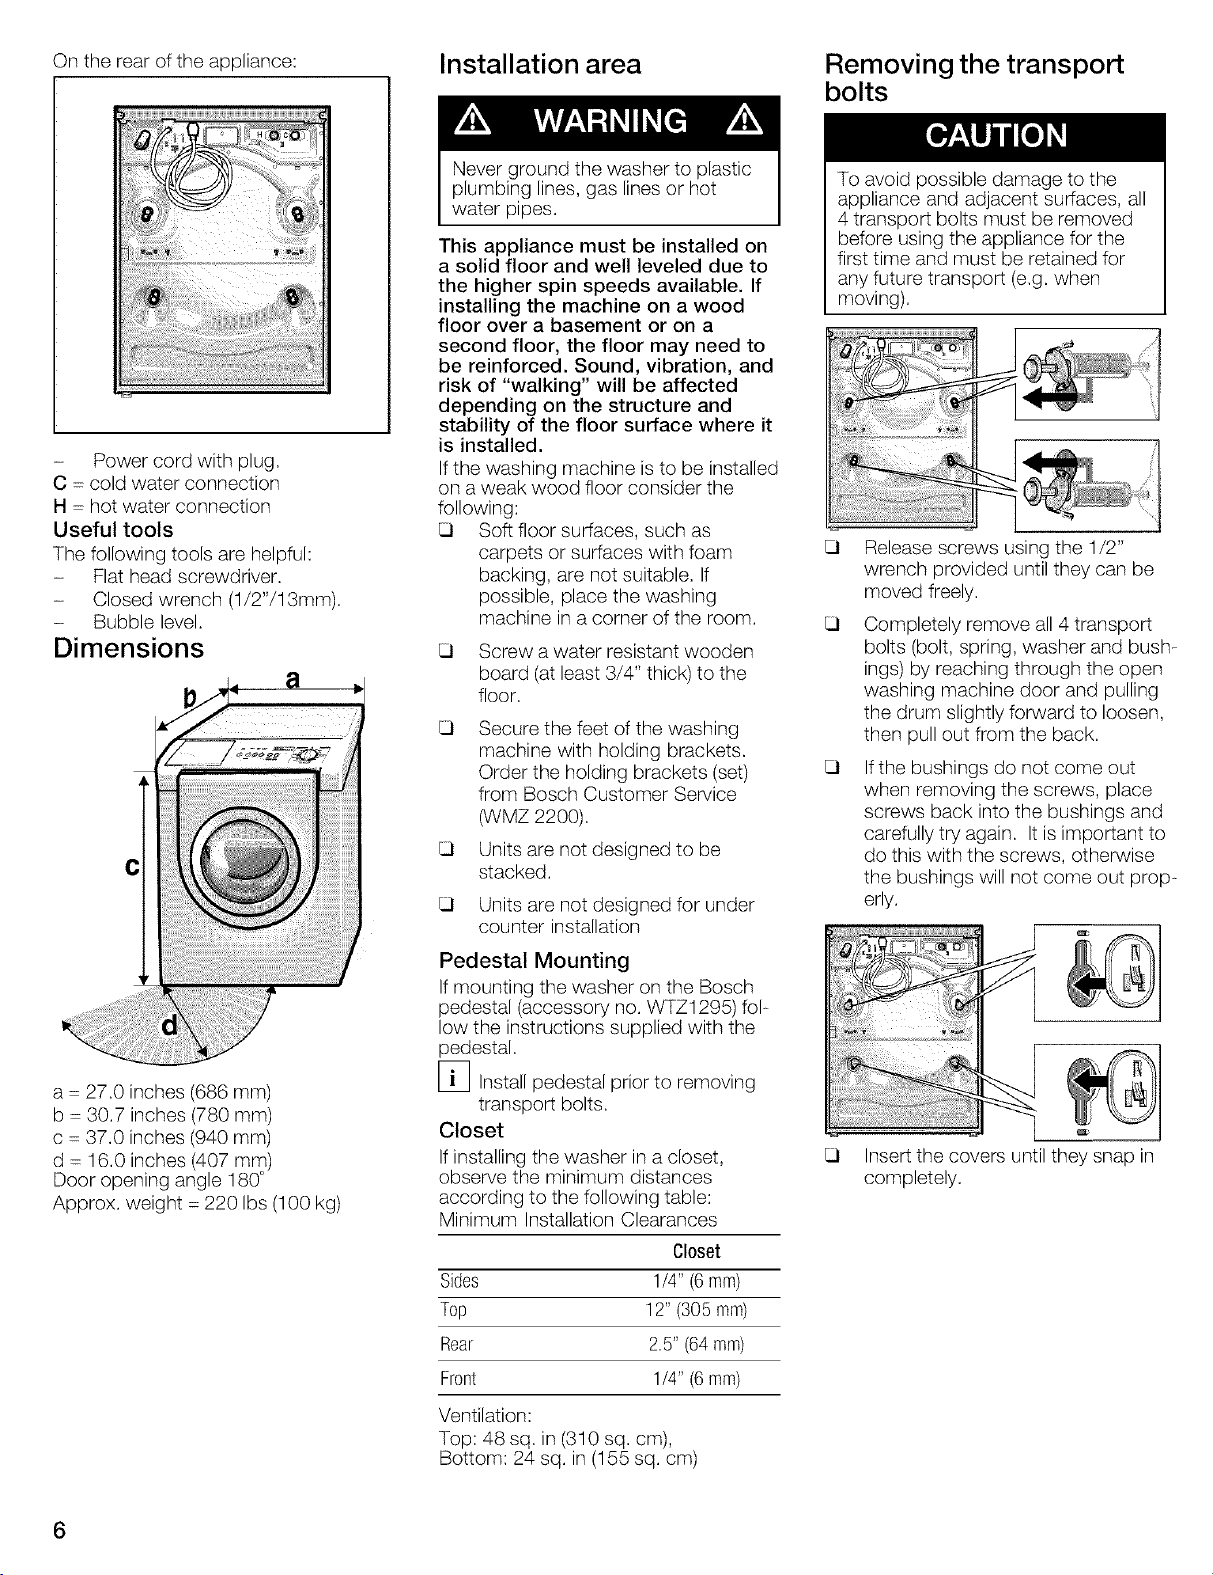
Ontherearoftheappliance:
Installation area
Removing the transport
bolts
- Powercordwithplug.
C=coldwaterconnection
H- hotwaterconnection
Usefultools
Thefollowingtoolsarehelpful:
- Flatheadscrewdriver.
- Closedwrench(1/2"/13mm).
- Bubblelevel.
Dimensions
a
Never ground the washer to plastic
plumbing lines, gas lines or hot
water pipes.
This appliance must be installed on
a solid floor and well leveled due to
the higher spin speeds available. If
installing the machine on a wood
floor over a basement or on a
second floor, the floor may need to
be reinforced. Sound, vibration, and
risk of "walking" will be affected
depending on the structure and
stability of the floor surface where it
is installed.
If the washing machine is to be installed
on a weak wood floor consider the
following:
Soft floor surfaces, such as
carpets or surfaces with foam
backing, are not suitable. If
possible, place the washing
machine in a corner of the room.
Screw a water resistant wooden
board (at least 3/4" thick) to the
floor.
Secure the feet of the washing
machine with holding brackets.
Order the holding brackets (set)
from Bosch Customer Service
(WMZ 2200).
Units are not designed to be
stacked.
Units are not designed for under
counter installation
To avoid possible damage to the
appliance and adjacent surfaces, all
4 transport bolts must be removed
before using the appliance for the
first time and must be retained for
any future transport (e.g. when
moving).
Release screws using the 1/2"
wrench provided until they can be
moved freely.
Completely remove all 4 transport
bolts (bolt, spring, washer and bush-
ings) by reaching through the open
washing machine door and pulling
the drum slightly forward to loosen,
then pull out from the back.
Ifthe bushings do not come out
when removing the screws, place
screws back into the bushings and
carefully try again. It is important to
do this with the screws, otherwise
the bushings will not come out prop-
erly.
a - 27.0 inches (686 mm)
b - 30.7 inches (780 mm)
c --37.0 inches (940 mm)
d -- 16.0 inches (407 mm)
Door opening angle 180°
Approx. weight = 220 Ibs (100 kg)
6
Pedestal Mounting
Ifmounting the washer on the Bosch
pedestal (accessory no. WTZ1295) fol-
low the instructions supplied with the
pedestal.
[_ Install pedestal prior to removing
transport bolts.
Closet
Ifinstalling the washer in acloset,
observe the minimum distances
according to the following table:
Minimum Installation Clearances
Closet
Sides 1/4" (6mm)
Top 12" (305 mm)
Rear 2.5" (64mm)
Front 1/4" (6mm)
Ventilation:
Top: 48 sq. in (310 sq. cm),
Bottom: 24 sq. in (155 sq. cm)
Insert the covers until they snap in
completely.
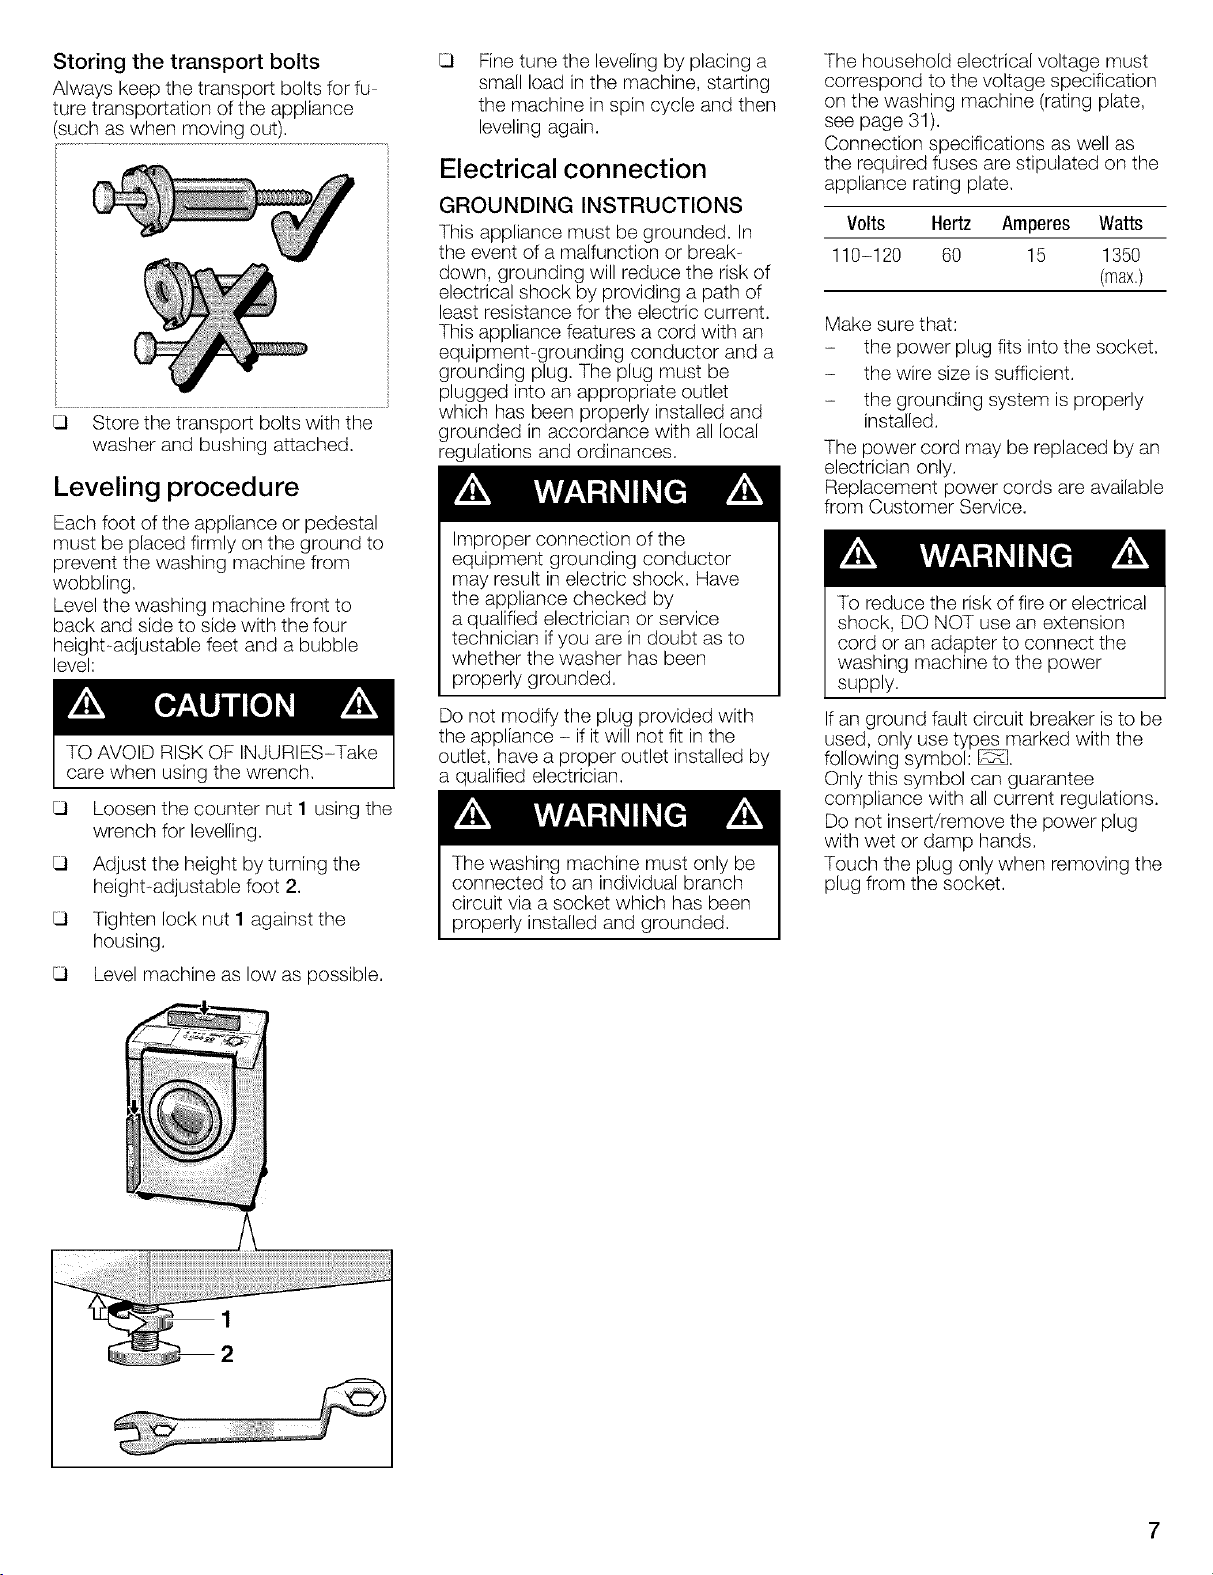
Storing the transport bolts
Always keep the transport bolts for fu
ture transportation of the appliance
such as when moving out).
Store the transport bolts with the
washer and bushing attached.
Leveling procedure
Each foot of the appliance or pedestal
must be placed firmly on the ground to
prevent the washing machine from
wobbling.
Level the washing machine front to
back and side to side with the four
height-adjustable feet and a bubble
level:
TO AVOID RISK OF INJURIES-Take
care when using the wrench.
Loosen the counter nut 1 using the
wrench for levelling.
Adjust the height by turning the
height-adjustable foot 2.
Tighten lock nut 1 against the
housing.
Level machine as low as possible.
Fine tune the leveling by placing a
small load in the machine, starting
the machine in spin cycle and then
leveling again.
Electrical connection
GROUNDING INSTRUCTIONS
This appliance must be grounded. In
the event of a malfunction or break-
down, grounding will reduce the risk of
electrical shock by providing a path of
least resistance for the electric current.
This appliance features a cord with an
equipment-grounding conductor and a
grounding plug. The plug must be
plugged into an appropriate outlet
which has been properly installed and
grounded in accordance with all local
regulations and ordinances.
Improper connection of the
equipment grounding conductor
may result in electric shock. Have
the appliance checked by
a qualified electrician or service
technician ifyou are in doubt as to
whether the washer has been
properly grounded.
Do not modify the plug provided with
the appliance - if it will not fit inthe
outlet, have a proper outlet installed by
a qualified electrician.
The washing machine must only be
connected to an individual branch
circuit via a socket which has been
properly installed and grounded.
The household electrical voltage must
correspond to the voltage specification
on the washing machine (rating plate,
see page 31).
Connection specifications as well as
the required fuses are stipulated on the
appliance rating plate.
Volts Hertz Amperes Watts
110-120 60 15 1350
(max.)
Make sure that:
- the power plug fits into the socket.
- the wire size is sufficient.
- the grounding system is properly
installed.
The power cord may be replaced by an
electrician only.
Replacement power cords are available
from Customer Service.
To reduce the risk of fire or electrical
shock, DO NOT use an extension
cord or an adapter to connect the
washing machine to the power
supply.
If an ground fault circuit breaker isto be
used, only use types marked with the
following symbol: _.
Only this symbol can guarantee
compliance with all current regulations.
Do not insert/remove the power plug
with wet or damp hands.
Touch the plug only when removing the
plug from the socket.
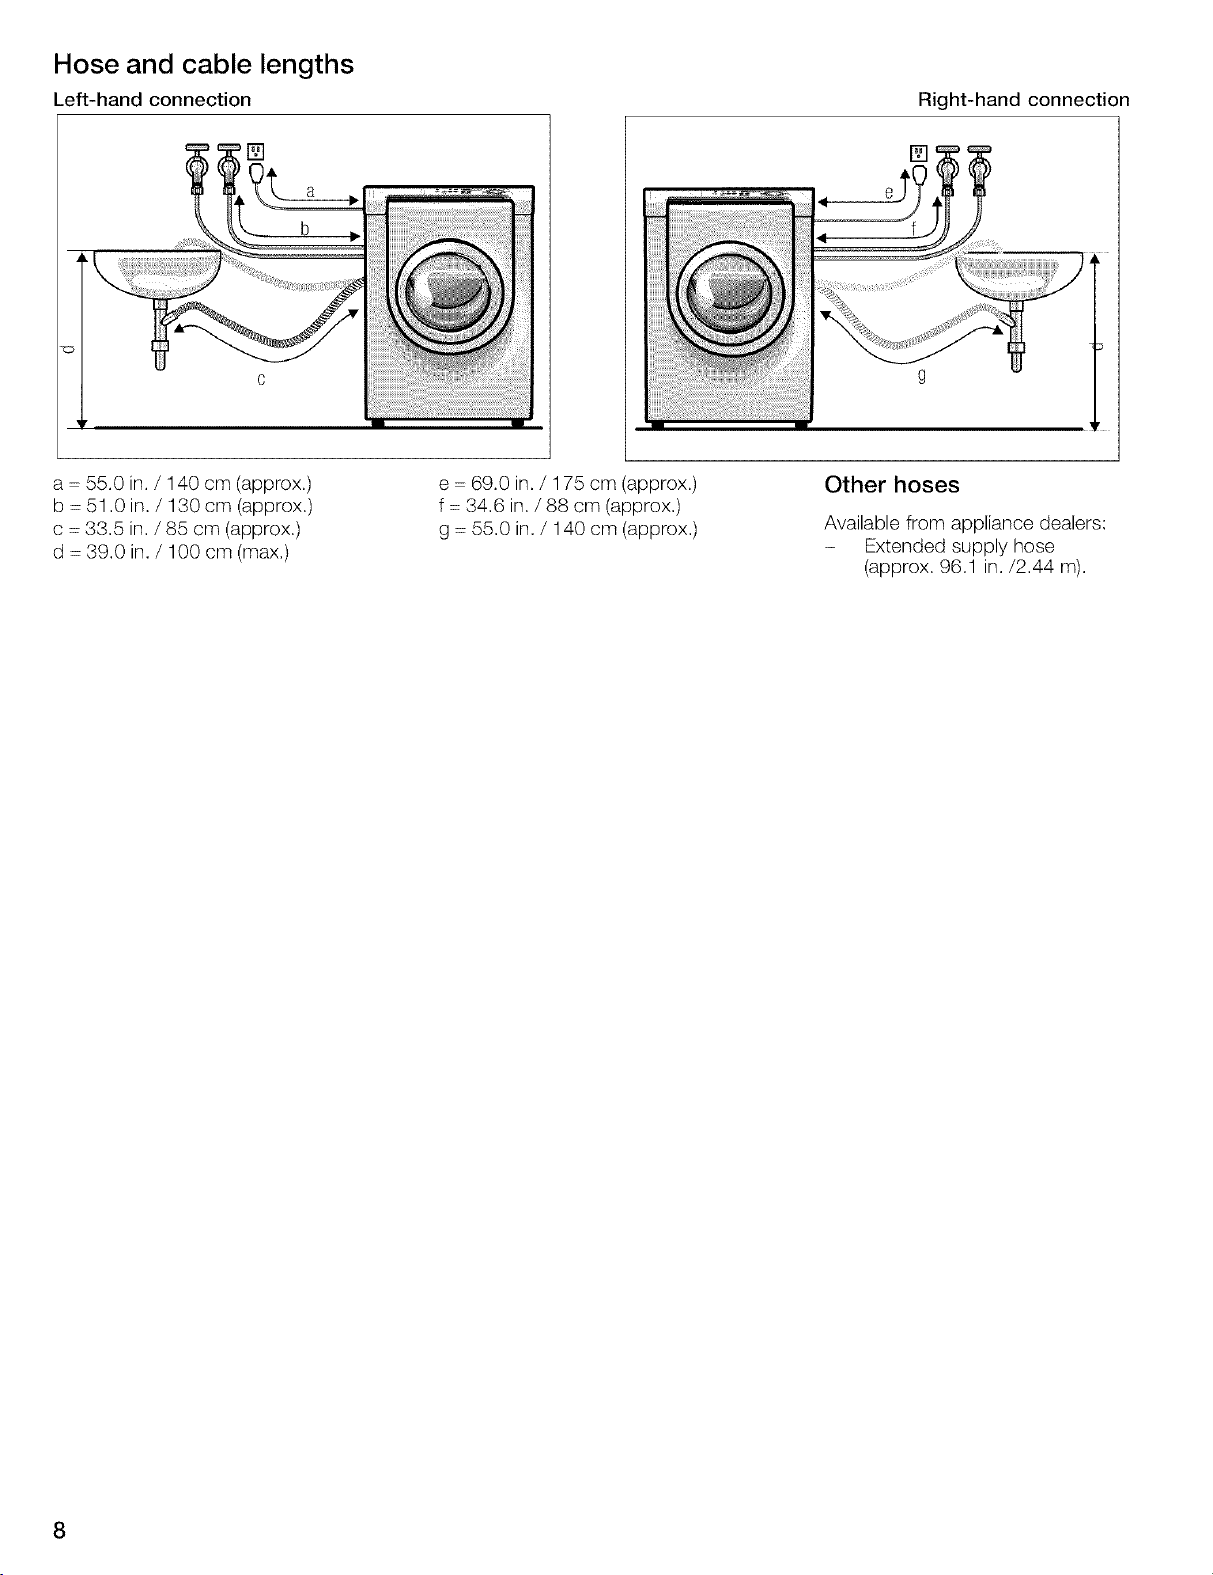
Hose and cable lengths
Left-hand connection
Right-hand connection
[]
i c
a - 55.0 in. / 140 cm (approx.)
b = 51.0 in. / 130 cm (approx.)
c = 33.5 in./ 85 cm (approx.)
d = 39.0 in. / 100 cm (max.}
e = 69.0 in. / 175 cm (approx.)
f = 34.6 in. / 88 cm (approx.)
g = 55.0 in. / 140 cm (approx.)
g
Other hoses
Available from appliance dealers:
- Extended supply hose
(approx. 96.1 in./2.44 m).

Water connection
Water supply
The washing machine must only be
operated with cold and hot (max.
140 °F/ 60 °C)tap water. Do not
connect the appliance to the mixer
tap of an unpressurized hot-water
boiler.
If in doubt, have the water connection
installed by an authorized technician.
The water supply hoses must not be:
- Bent or flattened.
- Modified or cut (integrity can
no longer be guaranteed).
Plastic threads must only be tightened
by hand. Do not remove the strainers
from the water supply hoses.
Observe the water pressure in the
supply network:
- The water pressure should be
between 14.5 and 145 p.s.i.
(1 and 10 bars) when the tap
is turned on, at least 2.2 U. S.
gallons (8 liters) of water should be
discharged per minute.
- A pressure regulator valve must be
installed if the maximum water
pressure is exceeded.
To prevent water damage, the hot
and cold water valves should be
accessible when the washing
machine is in place and should
always be turned off when the
washing machine is not in use.
If installing the washing machine in a
new building or a building in which
the plumbing system was recently
installed or upgraded, flush the lines
before installing the washing
machine to remove any sand, dirt or
residue.
Connection
C Cold water connection and
H Hot water connection
(max. 140 °F / 60 °C)
After connecting, turn on the water
completely, and check that
connection points are watertight.
The connection points are under full
water pressure. Check seal with tap
fully open.
Water drainage
Do not bend or pull the water
drainage hose.
Height difference between the
installation location of the washing
machine and the drainage point:
Maximum 8feet / 244 cm.
Connecting the water
drainage hose
ii_ii_!_iii_iiiiii!iiii_iiiiiiiiii!ii!iii_!ii!ii!ii!iiiii_iii!i!!!i!!!_i!i!_!!i_i_i_i!_ii
o:
Attach the drain hose to the end of
the drain connection.
Secure the connection point with
the clamp and tighten.
Standpipe Installation
Use the elbow. Attach the elbow to
the end of the hose and insert end
of hose into standpipe.
Use a strap or cable tie to hold
hose in place.
In-Wall Installation
i> i!
Use the elbow. Attach the elbow to
the end of the hose and insert end
of hose into wall drain.
Use a strap or cable tie to hold
hose in place.
Drainage into a siphon
Secure the connection point with a
hose clip(not included in
factory-supplied equipment).
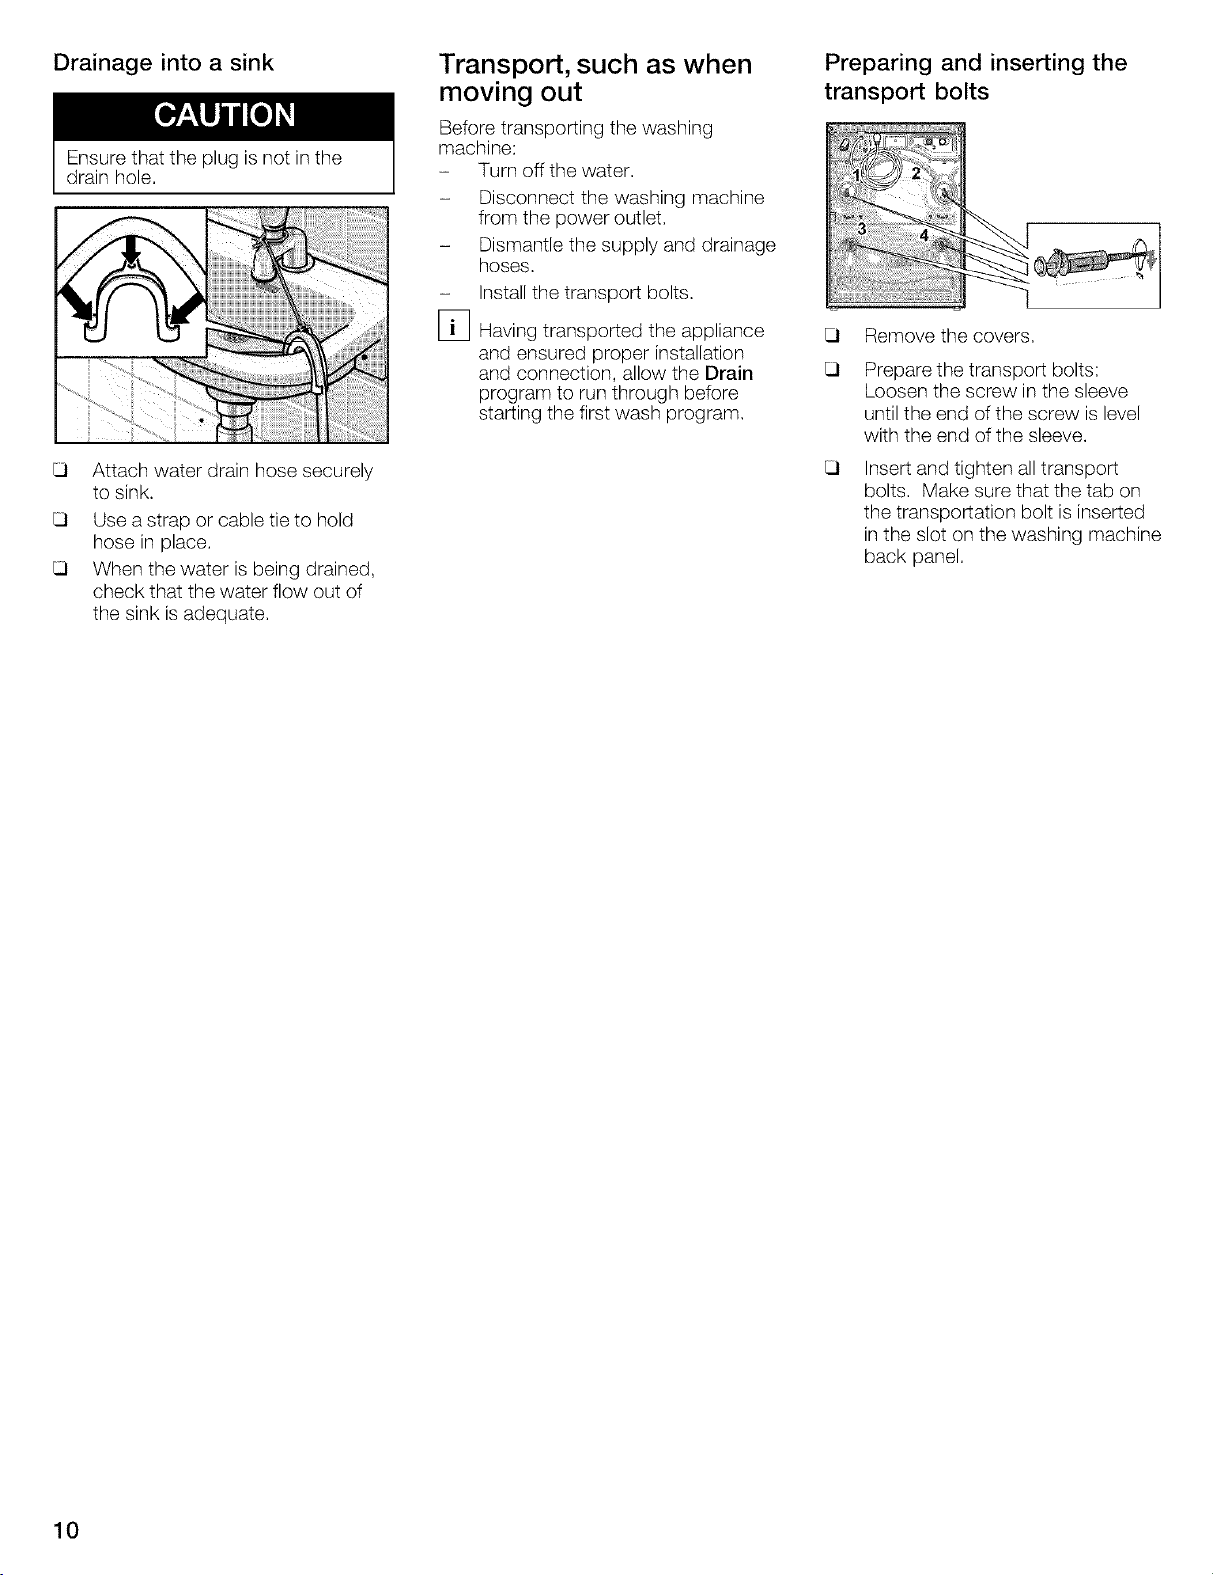
Drainage into a sink
Ensure that the plug is not in the
drain hole.
Transport, such as when
moving out
Before transporting the washing
machine:
- Turn off the water.
- Disconnect the washing machine
from the power outlet.
- Dismantle the supply and drainage
hoses.
- Install the transport bolts.
Preparing and inserting the
transport bolts
Attach water drain hose securely
to sink.
Use a strap or cable tie to hold
hose in place.
When the water is being drained,
check that the water flow out of
the sink is adequate.
[_ Having transported the appliance
and ensured proper installation
and connection, allow the Drain
program to run through before
starting the first wash program.
Remove the covers.
Prepare the transport bolts:
Loosen the screw in the sleeve
until the end of the screw is level
with the end of the sleeve.
Insert and tighten all transport
bolts. Make sure that the tab on
the transportation bolt is inserted
in the slot on the washing machine
back panel.
10
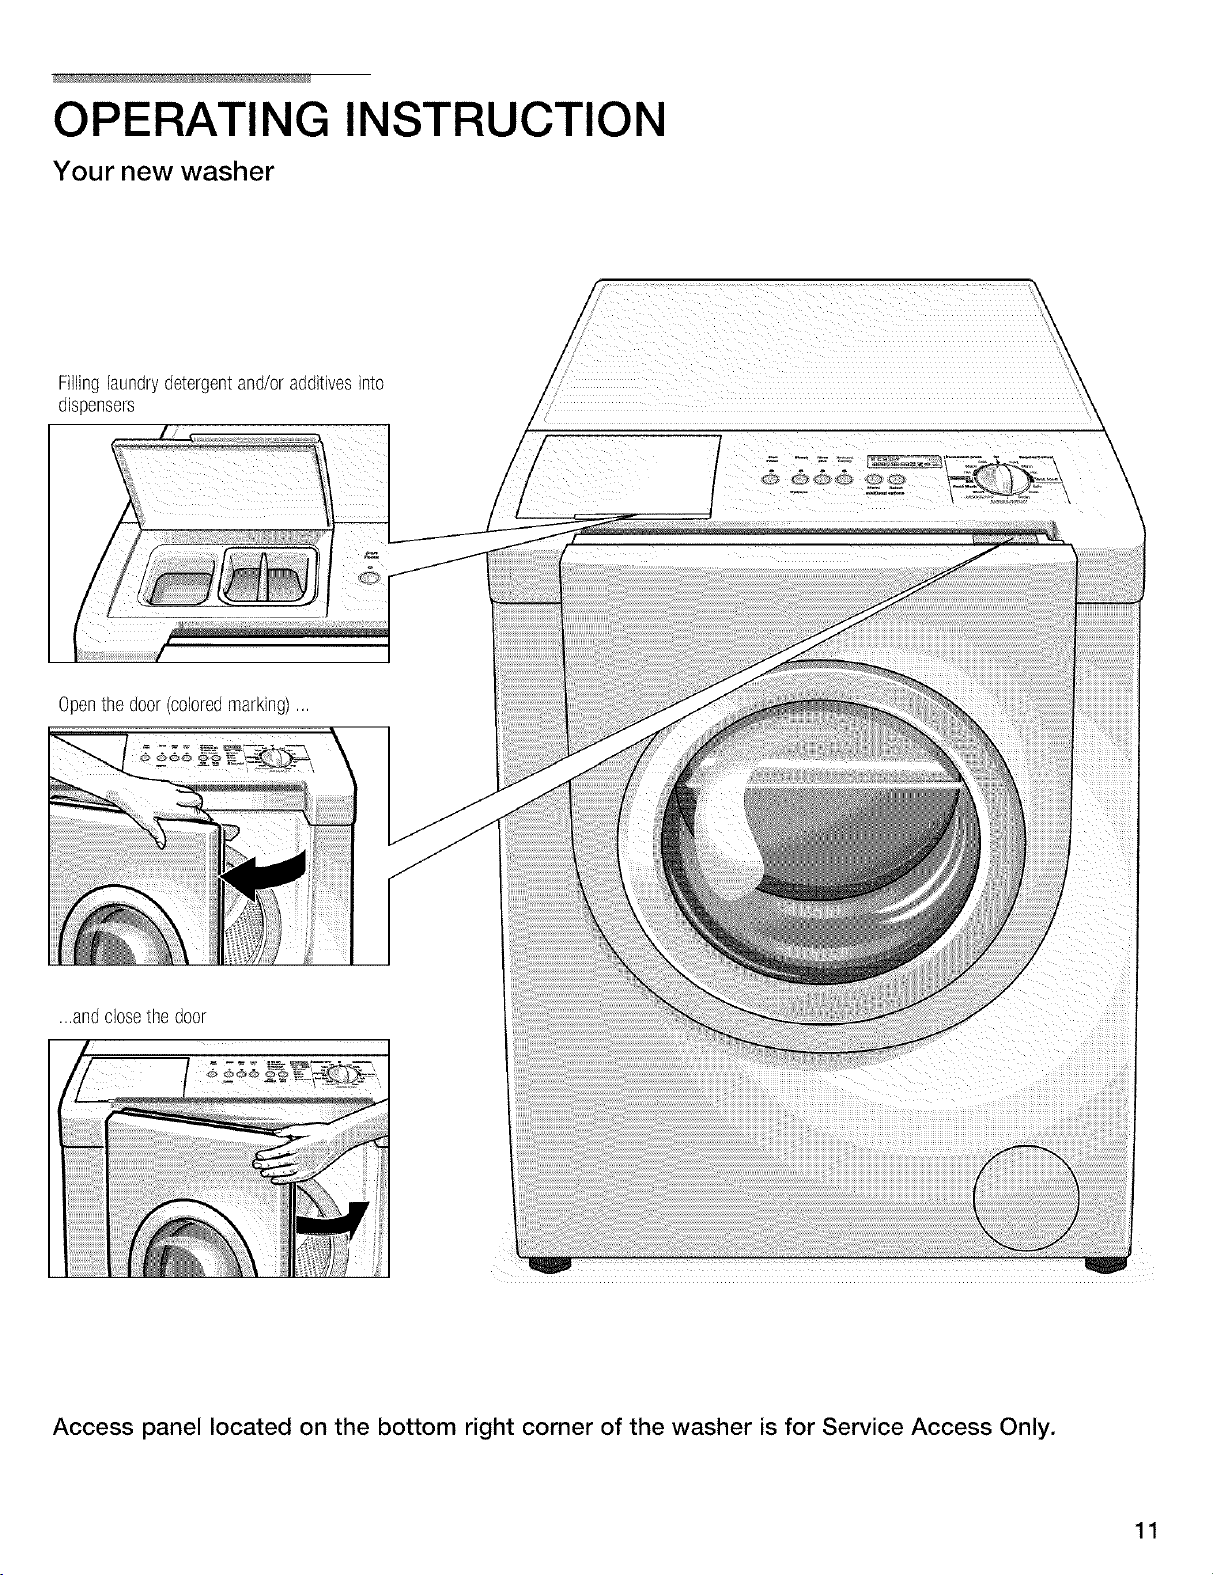
OPERATING INSTRUCTION
Your new washer
Fillinglaundrydetergentand/oradditivesinto
dispensers
Openthe door(coloredmarking),,,
/ \
i \
/ \
/ \
/ \
/ \
, \
\\\
...andclosethe door
Access panel located on the bottom right corner of the washer is for Service Access Only.
11

Panel
Buttonsfor additional options
(inadditiontothe programif required)
Bleach:A bleachcyclewill beaddedto theselected
program.
RinsePlus:Additionalrinsingcycle.
ReducedIroning:A gentlerspinspeedwith
subsequentfluffingto reducecreasing,
Additional optionselected:
Indicatorlightis litred.
Switch off additional option:
Pressbuttonagain.Indicatorlightturnsoff.
Displayfield
Indicatesthe settingswhichhavebeenselectedor which
areto bechanged(e.g.spinspeed,finishedat, pre-soak,
timeandchildlock)aswellasthe programprogress.
Programselector
Switchesthe machineon andoffandselectstheprogram.
Canbeturnedin bothdirections.
Theprogramselectordoesnotturnwhiletheprogramis
running- the programsequenceis electronically
controlled.
I
i
Start/Pausebutton
Stairsor interruptsthe washingcycle(program
mustfirst beselected).
Indicator light
Indicatorlightflashesred:Settingscanbe
changed,the washcyclecanbestarted,door
is lockedfor safetyreasons,child lockisactive
or programisin "Pause"mode,
Indicatorlightis lit red:Programis runningand
"Pause"canbe activated.
Theindicatorlightisoff: Programisfinishedel
no programselected,
Menu
SelectsthesettingswNchareto bechanged.
Select button
Changesallthe settingsinthe displayfield.
12
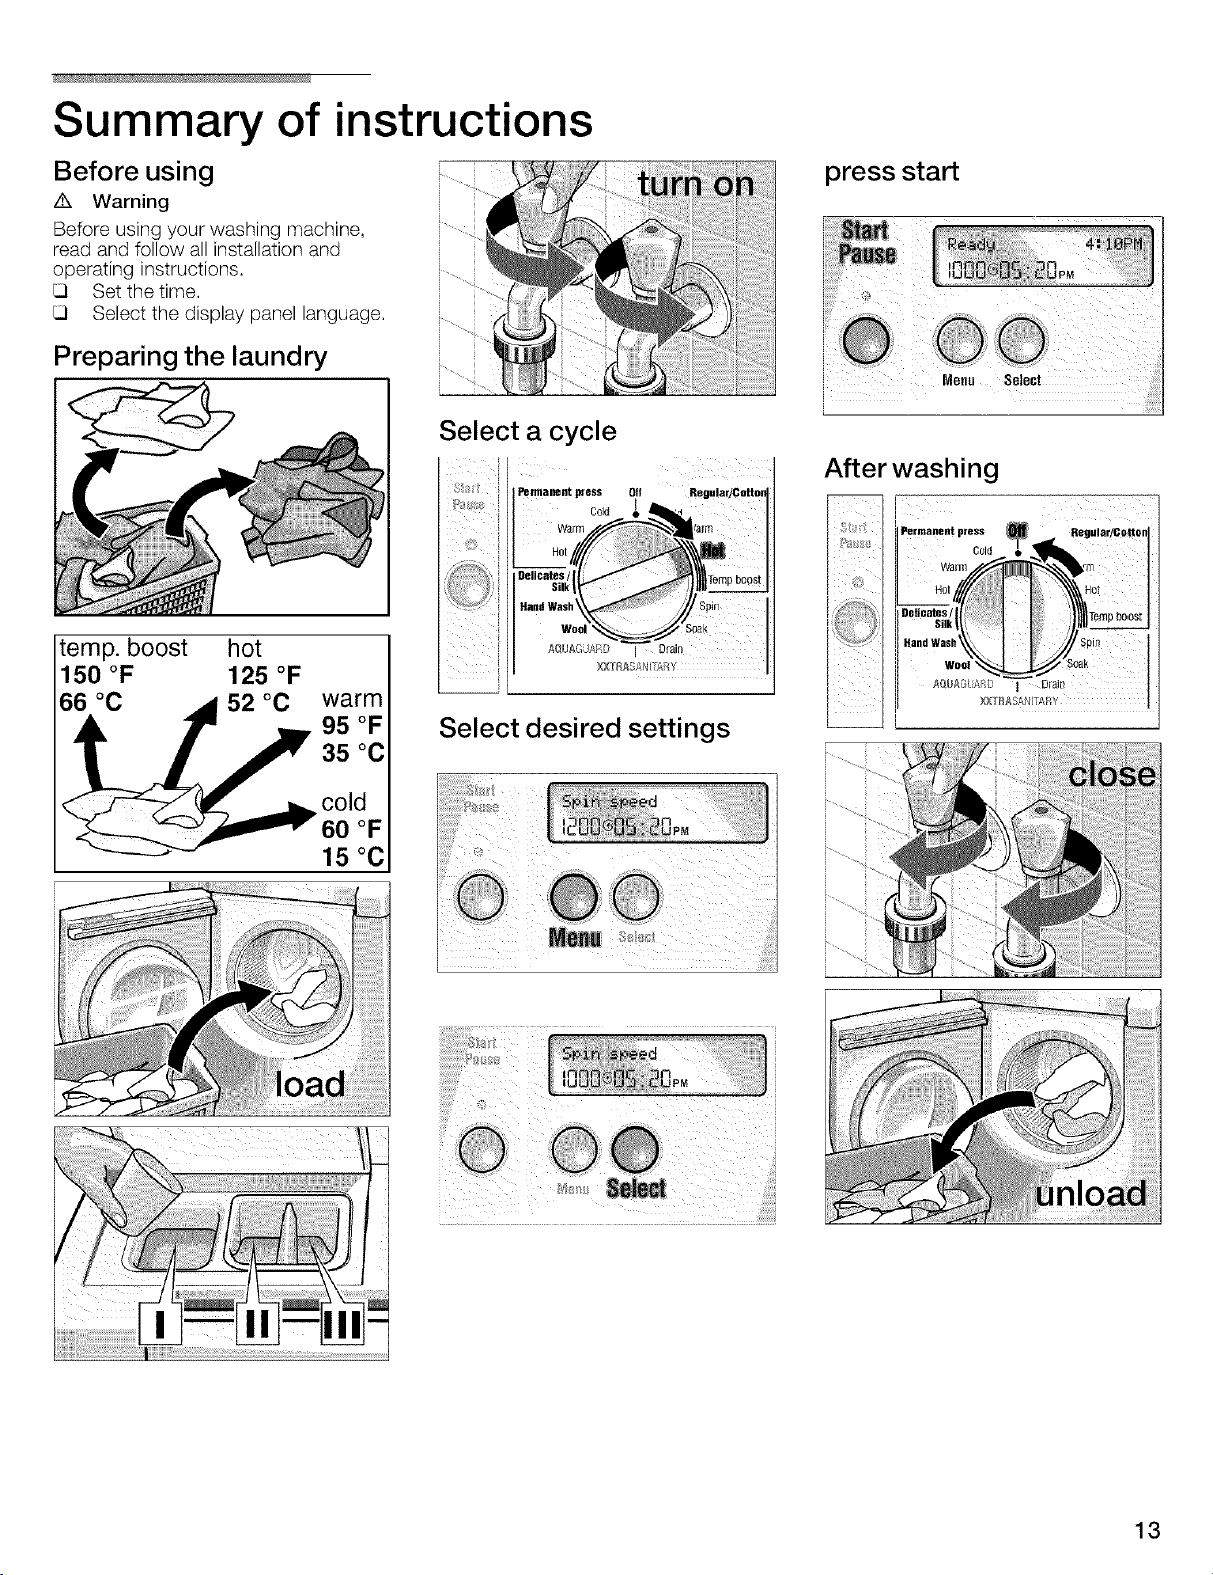
Summary of instructions
Before using
/k Warning
Before using your washing machine,
read and follow all installation and
operating instructions.
Set the time.
Select the display panel language.
Preparing the laundry
temp. boost hot
150 °F 125 °F
66 °C _1 52 °C warm
_, _ _ 95 °F
i
Select a cycle
Permanent p_ress Off Regular/Cotton
HandWash Spin
Select desired settings
war /a_m
HoI_ ' [i
_fJ .......
Silk| )l_ln '
wo__.._ soak
AQIJM" AI_D j Drain
XXYRASANI[7,/_Y
press start
After washing
i Fermaeent press _ Regular/C_ttonl
Wat]_q <m
Roi
_/I Temnboost ]
Silk |
Hand Wash Spin 1
AQUAGUA}_D l Drai[_
[
[__
]
0o,d°_.°_"gi_ I
t
_TRASA _Y
TkZ/"
cold
__-__ 60 °F
""------_-"-_ 15 °C
o£
13
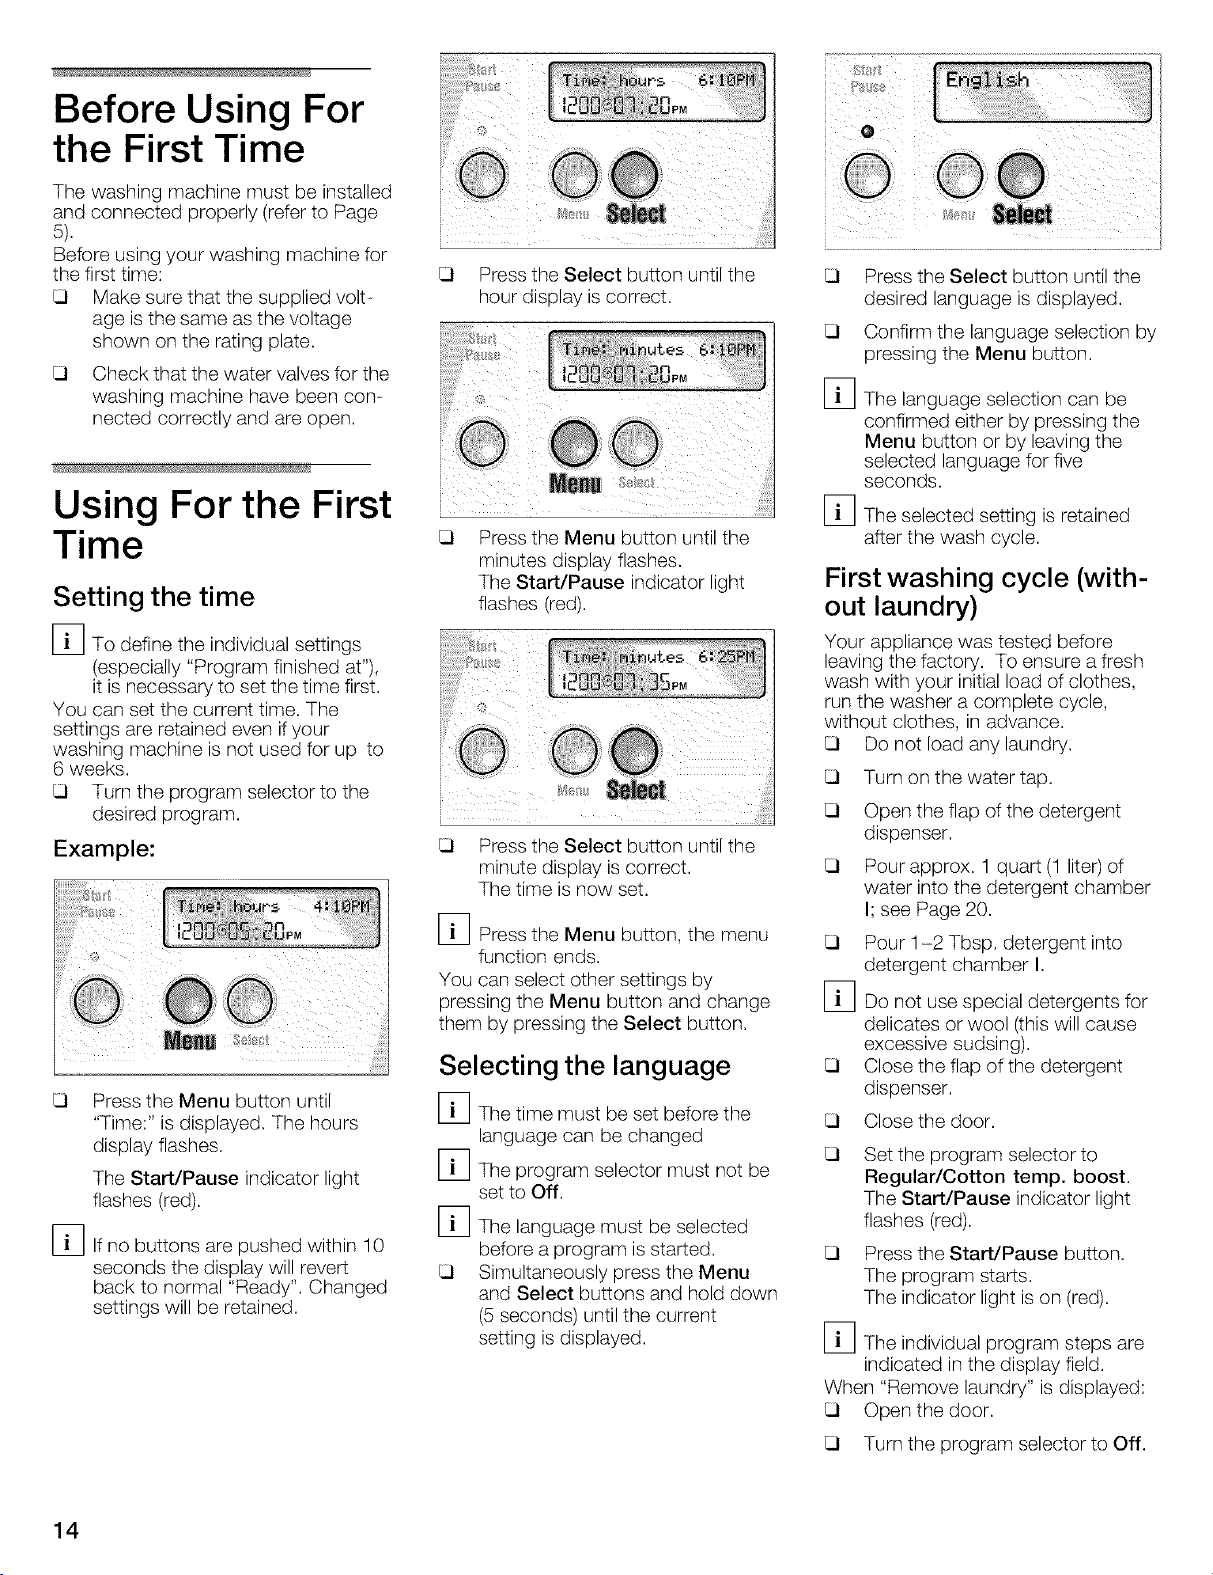
Before Using For
the First Time
The washing machine must be installed
and connected properly (refer to Page
5).
Before using your washing machine for
the first time:
Make sure that the supplied volt-
age is the same as the voltage
shown on the rating plate.
Check that the water valves for the
washing machine have been con-
nected correctly and are open.
Using For the First
Time
Setting the time
[_To define the individual settings
(especially "Program finished at"),
it is necessary to set the time first.
You can set the current time. The
settings are retained even ifyour
washing machine is not used for up to
6 weeks.
Turn the program selector to the
desired program.
Example:
Press the Menu button until
"Time:" is displayed. The hours
display flashes.
The Start/Pause indicator light
flashes (red).
[_lf no buttons are pushed within 10
seconds the display will revert
back to normal "Ready". Changed
settings will be retained.
Press the Select button until the
hour display is correct.
Press the Menu button until the
minutes display flashes.
The Start/Pause indicator light
flashes (red).
Press the Select button until the
minute display is correct.
The time is now set.
[_ Press the Menu button, the menu
function ends.
You can select other settings by
pressing the Menu button and change
them by pressing the Select button.
Selecting the language
[_The time must be set before the
language can be changed
The program selector must not be
set to Off.
The language must be selected
before a program is started.
Simultaneously press the Menu
and Select buttons and hold down
(5 seconds) until the current
setting isdisplayed.
Press the Select button until the
desired language is displayed.
Confirm the language selection by
pressing the Menu button.
The language selection can be
confirmed either by pressing the
Menu button or by leaving the
selected language for five
seconds.
The selected setting is retained
after the wash cycle.
First washing cycle (with-
out laundry)
Your appliance was tested before
leaving the factory. To ensure a fresh
wash with your initial load of clothes,
run the washer a complete cycle,
without clothes, in advance.
Do not load any laundry.
Turn on the water tap.
Open the flap of the detergent
dispenser,
Pour approx. 1 quart (1 liter) of
water into the detergent chamber
I; see Page 20.
Pour 1-2 Tbsp. detergent into
detergent chamber I,
Do not use special detergents for
delicates or wool (this will cause
excessive sudsing),
Close the flap of the detergent
dispenser,
Close the door,
Set the program selector to
Regular/Cotton temp. boost.
The Start/Pause indicator light
flashes (red).
Press the Start/Pause button.
The program starts.
The indicator light is on (red).
The individual program steps are
indicated in the display field.
When "Remove laundry" is displayed:
Open the door.
Turn the program selector to Off.
14
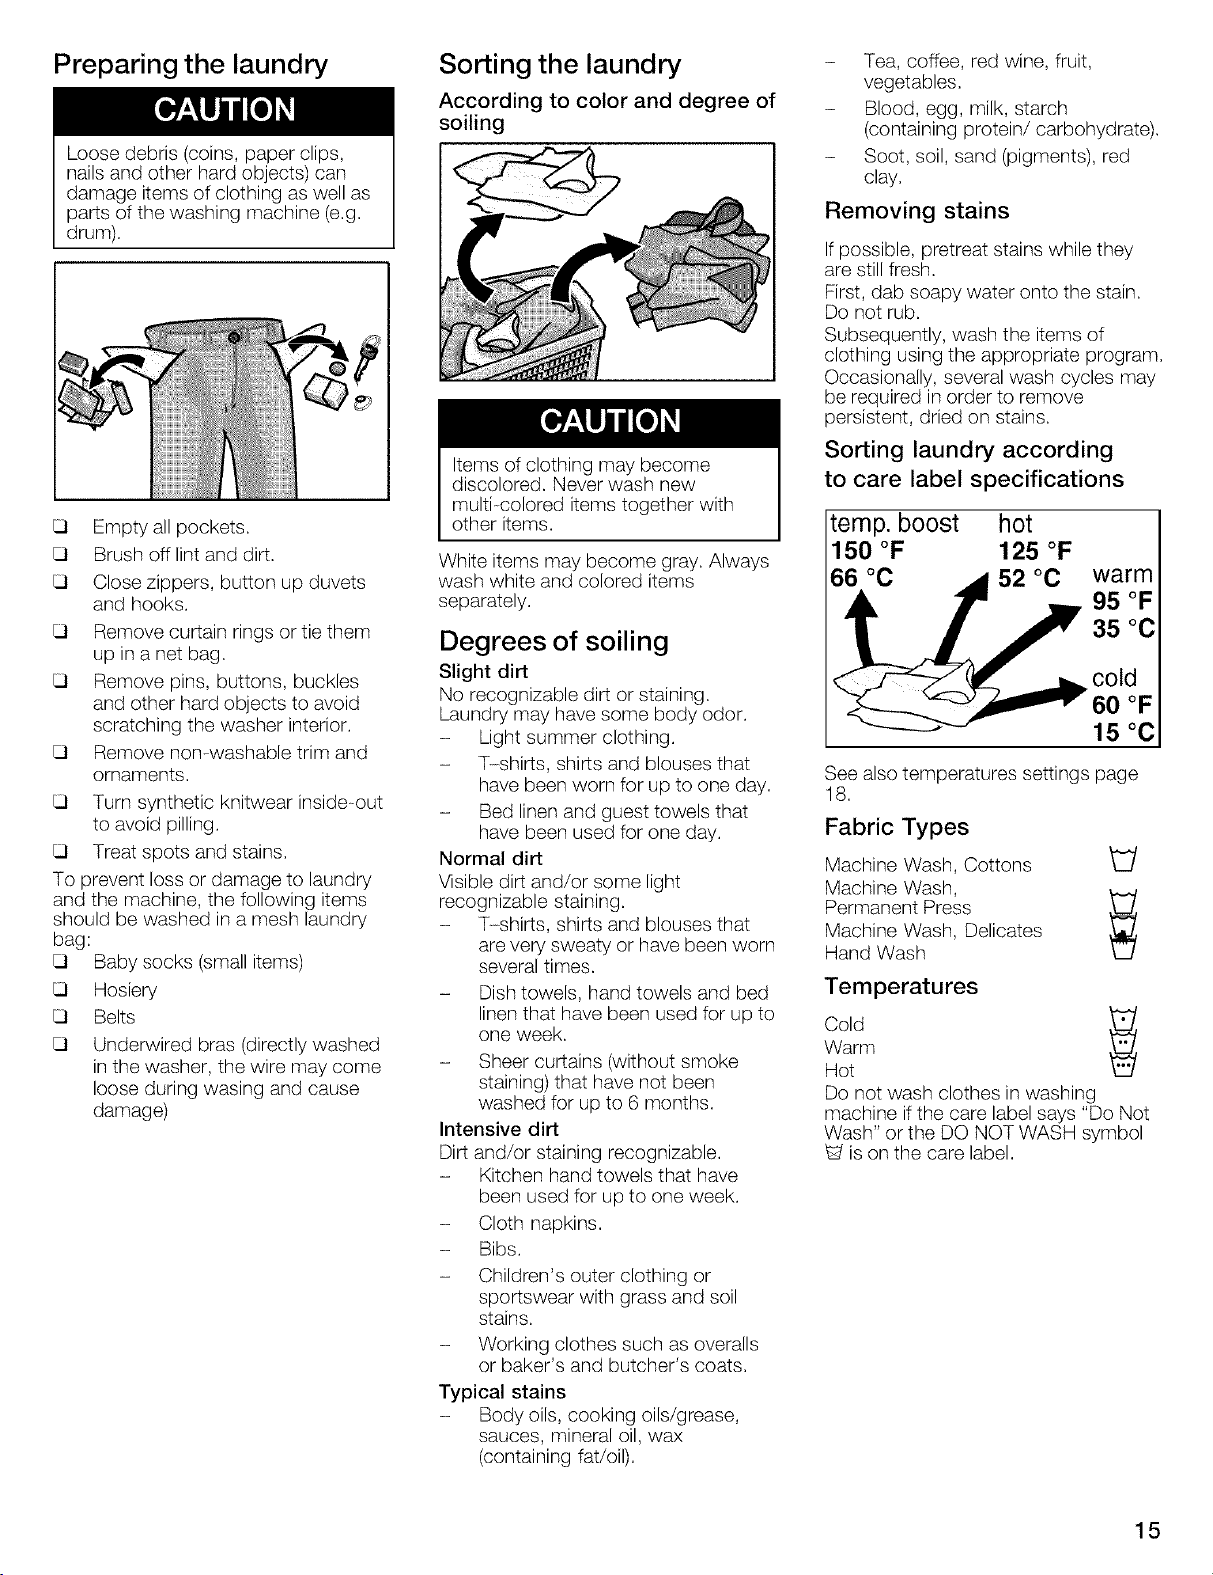
Preparing the laundry
Loose debris (coins, paper clips,
nails and other hard objects) can
damage items of clothing as well as
parts of the washing machine (e.g.
drum).
Empty all pockets.
Brush off lint and dirt.
Close zippers, button up duvets
and hooks.
Remove curtain rings or tie them
up in a net bag.
Remove pins, buttons, buckles
and other hard objects to avoid
scratching the washer interior.
Remove non-washable trim and
ornaments.
Turn synthetic knitwear inside-out
to avoid pilling.
Treat spots and stains.
To prevent loss or damage to laundry
and the machine, the following items
should be washed in a mesh laundry
bag:
Baby socks (small items)
Hosiery
Belts
Underwired bras (directly washed
in the washer, the wire may come
loose during wasing and cause
damage)
Sorting the laundry
According to color and degree of
soiling
Items of clothing may become
discolored. Never wash new
multi-colored items together with
other items.
White items may become gray. Always
wash white and colored items
separately.
Degrees of soiling
Slight dirt
No recognizable dirt or staining.
Laundry may have some body odor.
- Light summer clothing.
- T-shirts, shirts and blouses that
have been worn for up to one day.
- Bed linen and guest towels that
have been used for one day.
Normal dirt
Visible dirt and/or some light
recognizable staining.
- T-shirts, shirts and blouses that
are very sweaty or have been worn
several times.
- Dish towels, hand towels and bed
linen that have been used for up to
one week.
- Sheer curtains (without smoke
staining) that have not been
washed for up to 6 months.
Intensive dirt
Dirt and/or staining recognizable.
- Kitchen hand towels that have
been used for up to one week.
- Cloth napkins.
- Bibs.
- Children's outer clothing or
sportswear with grass and soil
stains.
- Working clothes such as overalls
or baker's and butcher's coats.
Typical stains
- Body oils, cooking oils/grease,
sauces, mineral oil, wax
(containing fat/oil).
- Tea, coffee, red wine, fruit,
vegetables.
- Blood, egg, milk, starch
(containing protein/carbohydrate).
- Soot, soil, sand (pigments), red
clay.
Removing stains
If possible, pretreat stains while they
are still fresh.
First, dab soapy water onto the stain.
Do not rub.
Subsequently, wash the items of
clothing using the appropriate program.
Occasionally, several wash cycles may
be required in order to remove
persistent, dried on stains.
Sorting laundry according
to care label specifications
temp. boost hot
150 °F 125 °F
66 °C 52 °C
warm
95 °F
35 °C
cold
60 °F
15 °C
See also temperatures settings page
18.
Fabric Types
Machine Wash, Cottons
Machine Wash,
Machine Wash, Delicates
Permanent Press _/
Hand Wash
Temperatures
Warm
Cold ,,_
Hot
Do not wash clothes in washing
machine if the care label says "Do Not
Wash" or the DO NOT WASH symbol
_d is on the care label.
H
15

Loading the laundry
TO AVOID
EXPLOSION HAZARD!
Items of clothing that have been
pretreated with solvent-based
cleaning agents, e.g. stain remover
and dry cleaning solvents, represent
an explosion hazard once loaded
into the washing machine.
Therefore, these items must first be
rinsed thoroughly by hand.
Loose debris in the washing
machine drum can damage the
laundry. Before loading the laundry,
check that there is no debris in the
drum.
Open the door.
Unfold the sorted items of clothing
and place them loosely into the
drum. Mix up large and small
items. Items of varying size will
distribute better during the spin
cycle.
[_Do not exceed the maximum load.
Overloading will cause poor wash
results and will increase wrinkling.
For best results it is recommended to
load the drum depending on the fabric
type, see special programs Page 17 for
information on bulky items, e.g.
comforters.
Full Load
Cotton and Linens
1½Load
Permanent Press, Synthetic Blends
and Knitwear
_sLoad
Wool, Delicates, Silk
___J
[_ Close the door.
Do not trap any items of
clothing between the door and
rubber seal.
Door should be able to close
easily, not by force.
Laundry
Detergents and
Additives
Dispensing the correct
amount of detergent
TO AVOID RISKOF POISONING!
Keep detergents and additives out
of the reach of children.
Measure out the detergent (powder or
liquid) according to:
- The water hardness. This
information can be obtained from
your local water authority. Soft
water requires less detergent.
- The amount of laundry.
- The degree of soiling. Information
on soiling can be found on Page
15.
- The specifications of the detergent
manufacturer. Measuring the
correct amount of detergent
reduces the strain on the
environment and ensures optimum
washing results.
Too little detergent:
The laundry is not cleaned properly and
will eventually become gray and stiff.
Grayish brown spots (fat globules) may
appear on the laundry. The heater may
calcify.
Too much detergent:
Not environmentally friendly, excessive
suds reduce wash agitation producing
)oor washing and rinsing results or
may prevent proper spinning.
Filling laundry detergent
and/or additives
Open the flap of the detergent
dispenser.
Add the detergent and/or additive.
Dispenser I:
Dispenser for detergent, stain remover.
[_We recommend HE detergents
because they are particularly
designed to deliver optimum
performance from your
front-loading washer. Not
using HE detergent could cause
problems such as oversudsing,
extended cycle periods, or a
decrease in wash performance.
Dispenser I1:
Cleaning additives, e.g. fabric softener,
fabric conditioner. Do not fill over edge
of max line!
Dispenser II1:
Dispenser for liquid bleach (chlorine
bleach, color safe bleach).
Do not overfill!
[_ Concentrated or thick fabric
softener, conditioner and
powder-bleach must be diluted
with a littlewater before being
poured into the dispenser
(prevents overflow due to
obstruction).
[_ Close the flap of the detergent
dispenser. Please ensure the
lid is entirely closed.
Decolorizing
Dyes may contain sulphur or
chlorine. These substances may
cause parts of the washing machine
to corrode. Do not dye items of
laundry in the washing machine.
16

Programs
and Functions
Cycle time will vary depending on cycle
selected, temperature and pressure of
incoming water, water hardness, size
of load, type of fabrics and distance of
unit from the drain.
The maximum spin speeds of the
programs are dependent upon the
cycle. For adjusting the spin speed, see
page 21.
Basic programs
Regular/Cotton Temp boost
Regular/Cotton settings are intended to
be used for heavily soiled and/or
stained colorfast fabrics. Sturdy,
hard-wearing items made of cotton or
linen such as towels, sheets or white
sports socks.
Regular/Cotton Hot
Normally and/or heavily soiled colorfast
fabrics. Sturdy, hard wearing items
made of cotton or linen such as work
clothes and underwear.
Regular/Cotton Warm
Lightly and/or normally soiled
non-colorfast fabric. Sturdy, hard
wearing items made of cotton or linen
such as jeans, T-shirts and sweatshirts.
Regular/Cotton Cold
Lightly soiled non-colorfast fabric.
Sturdy, hard wearing items made
of cotton or linen (colors that may bleed
or fade).
Permanent Press Hot
Items consisting of normally soiled
colorfast cotton, permanent press,
linen, synthetic or blended fabrics and
outer garments. Clothes requiring a
special tumble sequence and spin
speed to minimize creasing.
Permanent Press Warm
Items consisting of lightly and/or
normally soiled non-colorfast cotton,
permanent press, linen, synthetic or
blended fabrics and outer garments.
Clothes requiring a special tumble
sequence and spin speed to minimize
creasing, such as blouses, shirts and
overalls.
Permanent Press Cold
Items consisting of lightly and/or
normally soiled non-colorfast cotton,
permanent press, linen, synthetic or
blended fabrics and outer garments.
Clothes requiring a special tumble
sequence and spin speed to minimize
creasing.
Special programs
Delicates/Silk
Delicates/Silk settings are intended for
use with delicate easy care items made
of cotton, satin, synthetic or blended
fabrics and curtains, dresses, skirts
and blouses.
Bulky items, e.g. comforters, can be
washed with this cycle because of
gentle action and additional rinse
(automatically added).
No spinning between rinse cycles.
Hand Wash
Hand Wash settings are intended for
very delicate easy care items that
usually require hand washing.
These cycles have been specifically
designed to provide extremely gentle
treatment of fabrics.
Silk or other items marJ;_d with the
"Hand Wash" symbol _] on the care
label can be safely washed with this
cycle.
Wool
Woolens (machine wash and hand
wash),
XXTRA SANITARY
This program was specifically designed
to eliminate most common houshold
bacterium while providing gentle
treatment of fabrics, At the beginning
of the washing phase, hot water is
introduced and then the internal
heating element heats the water to
167°F-174°F for a minimum of three
minutes, Clothes will be saturated in
the hot water long enough to kill most
common household bacterium, yet
without causing additional wear and
tear to the clothes,
Used for heavily soiled and/or stained
colorfast fabrics that need to be
sanitized, such as, towels, underware,
socks, bed sheets, table clothes, etc,
During the washing phase, the drum
rotates in opposite directions at 40 rpm
repeatedly, Spin speed reaches 1200
rpm for both intermediate and final spin
to reduce the remaining moisture
content and chemical residues
contained in the loads as well as
optimize the rinsing efficiency,
Additional options can be selected for
this program such as "Rinse plus",
"Bleach", and "Power wash", All these
options can be selected individually or
simultaneously,
Selecting "Rinse plus" will add an
additional rinse to the program to better
remove chemical residue,
Selecting "Bleach" option will ensure
bleach dispensation at the right time.
The dynamic load sensor will add
enough water to dilute the bleach,
preventing bleach marks on the
clothes.
"Power wash" option will extend the
wash phase to a longer period of time
to achieve optimum wash performance
(see detailed explanation of Power
wash on page 21).
AquaGuard
AquaGuard is designed to work in
conjunction with specially designed
chemicals to rejuventate the
water-resistant qualities of sports- and
outer-wear, The textiles are first
cleaned with special detergents and
then treated with water-proofing
agents which are available at most
department and sporting-goods
stores,
Additional options which can be
selected include "Rinse plus",
"Reduced ironing", and "Power Wash"
Maximum load is 3 Ibs,
]]Use special detergent! Pour into
detergent (left) compartment,
]]Water-proofing agents must be
added via the softener (middle)
compartment,
]]Do not use fabric softener when
washing water-resistant clothing!
Textiles treated with fabric softener
may lose their water-resistant
properties,
Following application, some
water-proofing agents require the
textiles to be heat-treated in the
tumble dryer or by ironing the textiles
after they have been dried in air, The
manufacturer's instructions should be
followed carefully to ensure proper
treatment,
Some residual water-proofing agent
may be seen in the washing machine
as afine film, This film will be removed
in the next full wash cycle
(Regular/Cotton with detergent) and will
not harm the items of clothing washed
in subsequent programs, Alternatively,
start a seperate wash cycle, Wipe any
film off the washing machine door with
a damp cloth and household cleaner.
Spins
Spin cycle for spinning wet, hand
washed laundry,
Water is drained before and during the
spin cycle,
Soak
A cycle for pre-treatment of heavily
stained items, The soak cycle lasts 2
hours and ends with a short spin cycle.
All the water is pumped out,
Drain
Can be used to drain water without a
spin cycle.
17

Temperature Settings
The following wash temperatures are
available:
XXTRASANITARY:170 °F (77 °C)
Temp. boost: 150 °F (66 °C)
(only Regular/Cotton)
hot: 125 °F (52 °C)
warm: 95 °F (35 °C)
cold: 60 °F (15 °C)
Maximum spin speeds of the
programs
Revolutionsper Typeof
minute laundry/Extra
cycle
1200 Regular/C0tt0n
800 PermanentPress
600 Delicates
400 HandWash
800 Wool
600 AquaGuard
1200 XXTRASANITARY
1200 Spin
400 soak
Inthe Regular/Cotton,
XXTRASANITARY and Spin
programs the fabrics will be spun at the
maximum possible spin speed.
Inthe Permanent press, Wool, Soak,
Delicates/Silk, Hand Wash and
AquaGuard programs, the washing
machine spins at a lower spin speed for
gentle treatment.
If required you can reduce the spin
speed of laundry, minimum is
400 revolutions per minute.
Display field
Inthe first line, the operating and
program progress text is displayed at
the left. The current time is displayed
on the right whenever "Ready" is
displayed on the left.
Inthe second line, the display indicates
the spin speed and the time at which
the program is expected to be finished,
as well as symbols for Spin speed,
Washing mode, Pre-Soak, Signal and
Child lock.
Spin speed or No final spin
The maximum spin speed of the
program is displayed. During the Drain
program "---" will be displayed.
The speeds can be changed. No final
spin can also be selected.
No final spin ("---")
The water remains in the machine after
the final rinse. Recommended for
delicate laundry.
Use this setting to avoid creasing if the
clothing cannot be taken out of the
washing machine immediately upon
completion of the cycle.
Before unloading you must drain
the remaining water by selecting
Drain or Spin and starting the
machine.
Program finished at
Indicates when the program will end.
Symbol for "Mode: Normal
Wash"
This symbol is displayed if"Mode:
Normal Wash" was selected.
-_-_t2Symbol for "Mode: Quick Wash"
This symbol is displayed if"Mode:
Quick Wash" was selected.
% Symbol for "Mode: Power Wash"
This symbol is displayed if"Mode:
Power Wash" was selected.
Symbol for Pre-Soak
This symbol is displayed if Pre-Soak:
on was selected in the menu.
cq_)Symbol for signal
This symbol is displayed ifthe signal
volume was not set to off.
,-o Symbol for child lock
This symbol is displayed if Child lock:
on was selected in the menu.
Option buttons
Bleach
When this button is pressed, a bleach
cycle will be added to the selected
cycle.
The washing cycle time is extended
accordingly.
Rinse Plus
e <
When this button is pressed, an
additional rinsing cycle will be added to
the selected cycle.
Washing cycle time is extended
accordingly.
Reduced Ironing
o be
When this button is pressed, agentler
spin speed with subsequent fluffing is
used. After the spin cycle the laundry is
arranged loosely in the drum -
wrinkling is reduced. Washing cycle
time is extended accordingly.
[_ Remove the laundry as soon as
the spin cycle is complete.
Indicator light above the
"Start/Pause" button
The indicator light conveys the
following information:
- Indicator light flashing red:
Program can be started.
Adding laundry is possible
- Indicator light is lit red: Program is
running.
Adding laundry is not possible
because the door is locked for
safety reasons.
Laundry may be added after pressing
the Start/Pause button.
[_ Exception: Ifthe child lock was
selected, the indicator light is off.
At the end of the program, the
door is locked[
Special features
Auto Load adjust
"Auto Load adjust" adjusts the water
and energy consumption for each
program and determines the amount of
laundry and type of fabrics.
This process is built into your machine
and occurs automatically.
This control reduces water and energy
consumption when washing small
loads.
A flow sensor measures the water flow
rate and meters the exact volume of
water required for the load.
This sensor ensures the water level is
correct for washing your laundry - from
our economical "Regular/Cotton" and
"Permanent Press" programs to the
"Delicates/Silk", "Hand wash", "Wool",
"AquaGuard" and "XXTRASanitary"
cycles.
18
Unbalanced load detection system
The automatic unbalanced load
detection system spins the laundry
several times to ensure even
distribution.
Ifthe wash load is unevenly distributed,
it will not spin (for safety reasons) or the
final spin speed is reduced.
Inthe wool program the appliance will
attempt to start the spin cycle only
twice in order to prevent shrinking.
Displayed Time
Due to these and other characteristics
of the controls the actual cycle time will
vary.
When a program has been selected,
the expected cycle time is displayed.
The following will effect the displayed
time:
- Load size
- Repeated spin attempts to evenly
distributed load
- Additional rinse cycles if excessive
foam occurs
- Water pressure is too low
- Selection of additional options,
e.g. "Rinse plus"
[_You may notice these effects
(more or lesstime) changing the
displayed time when they occur in
the cycle. If no options are
selected and these effects do not
occur, the time indicated will be
time that the cycle will finish.
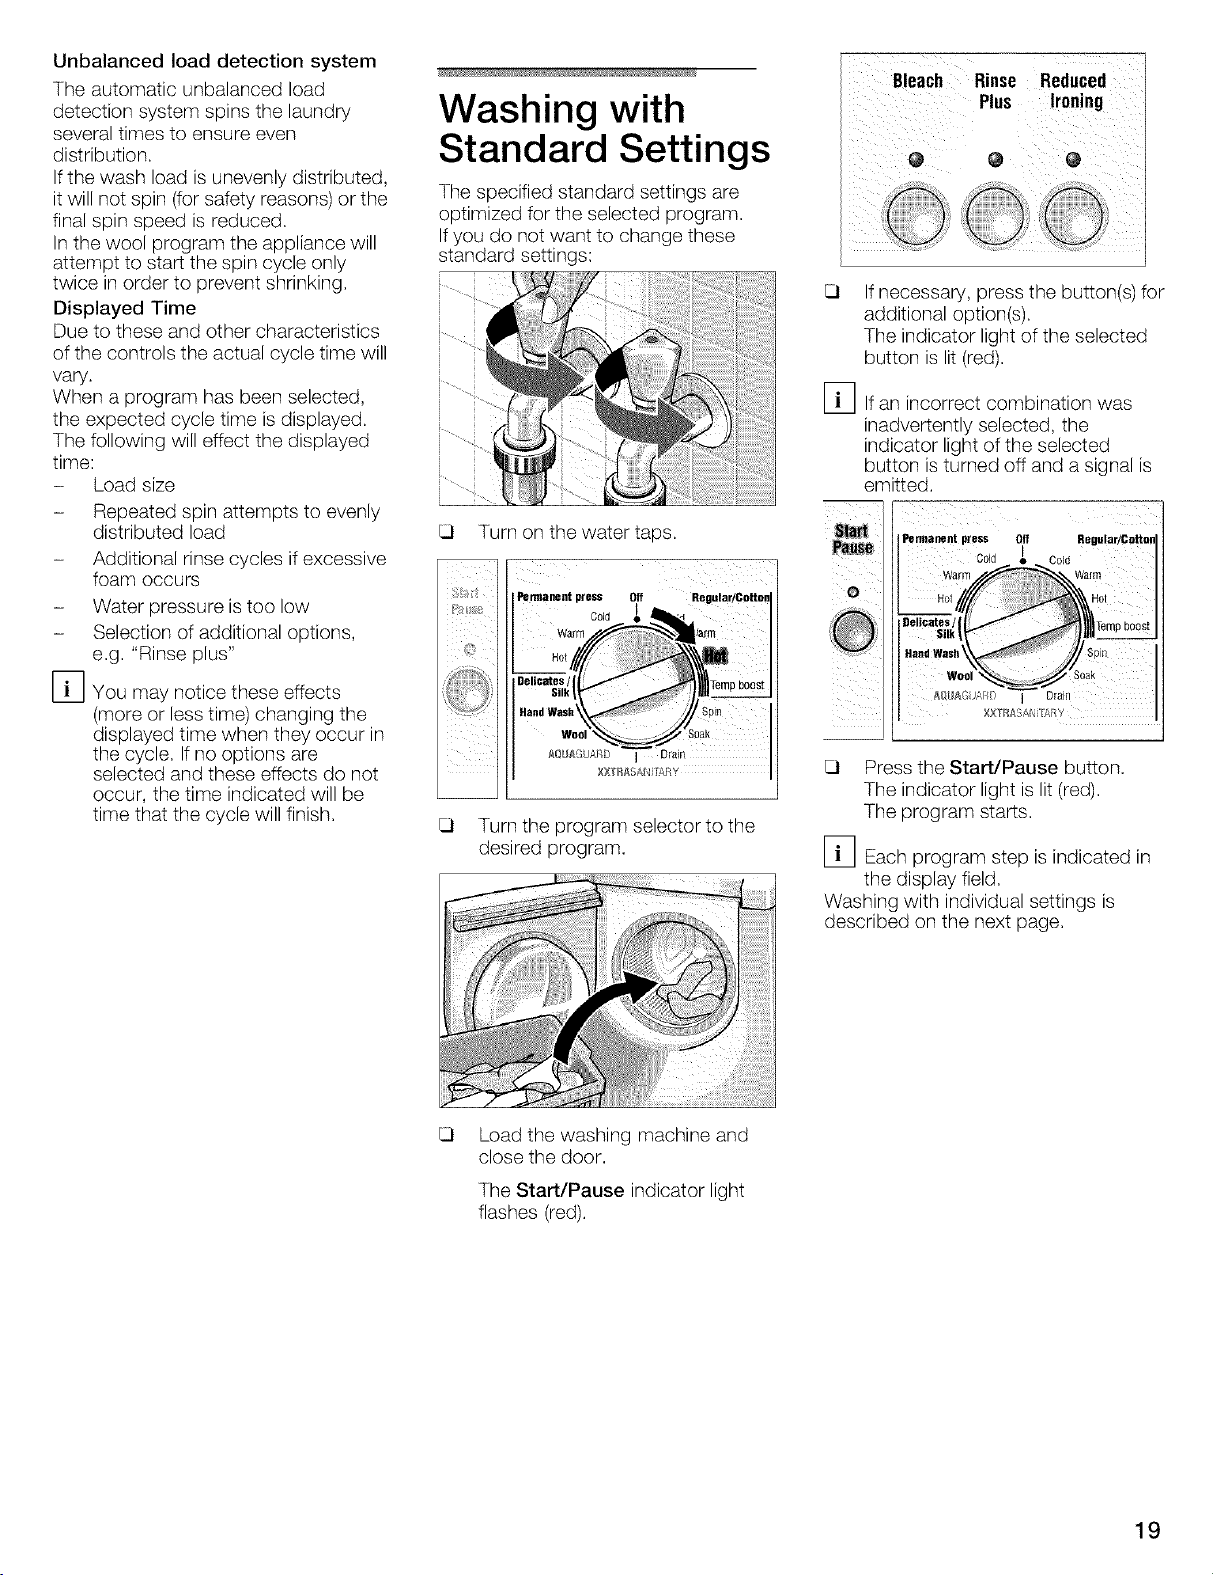
Washing with
Standard Settings
The specified standard settings are
optimized for the selected program.
If you do not want to change these
standard settings:
Turn on the water taps.
Permanent press Oil Regular/CoLLon
War /aim
,"% le!icat.e.s,.!I p boost
4,_S HandWash Spin
*oo__-_ so_k
Turn the program selector to the
desired program.
@ @ @
e
If necessary, press the button(s) for
additional option(s).
The indicator light of the selected
button is lit (red).
Fq
If an incorrect combination was
inadvertently selected, the
indicator light of the selected
button is turned off and a signal is
emitted.
Permanent press Off Regular/Cottm
i_ O ii
®
[_ Each program step is indicated in
Washing with individual settings is
described on the next page.
_l| Temp boost
Hand Wash Spin
Press the Start/Pause button.
The indicator light is lit (red).
The program starts.
the display field.
C01d / C01d
Warr;f Wa[m
wo ak
_°_AGU;,RI/ _ Drain
Load the washing machine and
close the door.
The Start/Pause indicator light
flashes (red).
19
Washing with Individual Settings
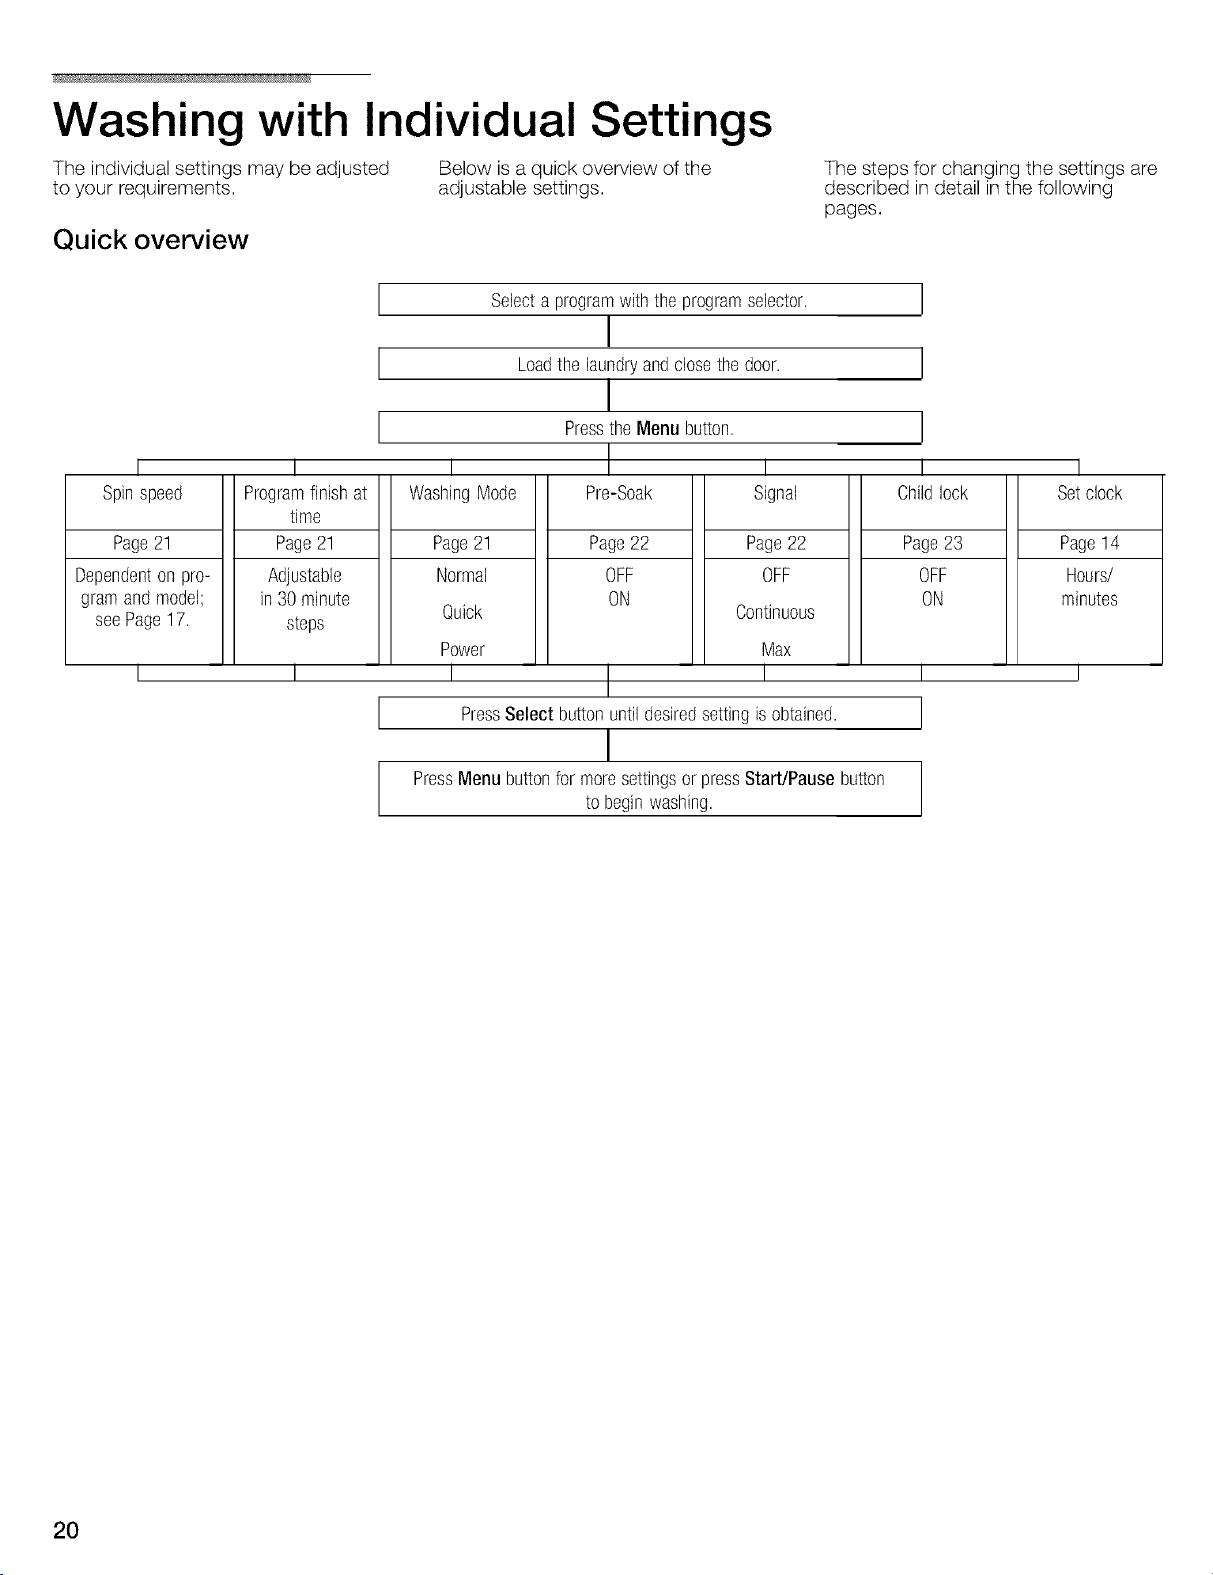
The individual settings may be adjusted Below is a quick overview of the
to your requirements, adjustable settings.
The steps for changing the settings are
described in detail in the following
pages.
Quick overview
Selecta programwiththe programsebctor.
Loadthe laundryandclosethedoor.
PresstheMenubutton.
I I I I i
Spinspeed Programfinishat WashingMode Re-Soak Signal Chi lock Setclock
time
Page21 Page21 Page21 Page22 Page22 Pale 23 Page14
Dependenton pro- Adjustable Normal OFF OFF OFF Hours/
gramand model; in30minute ON ON minutes
seePage17. steps
1 ] I I ]
Quick Continuous
Power Max
PressSelectbuttonuntildesiredsettingisobtained.
PressMenubuttonfor moresettingsor pressStart/Pausebutton
to beginwashing.
2O
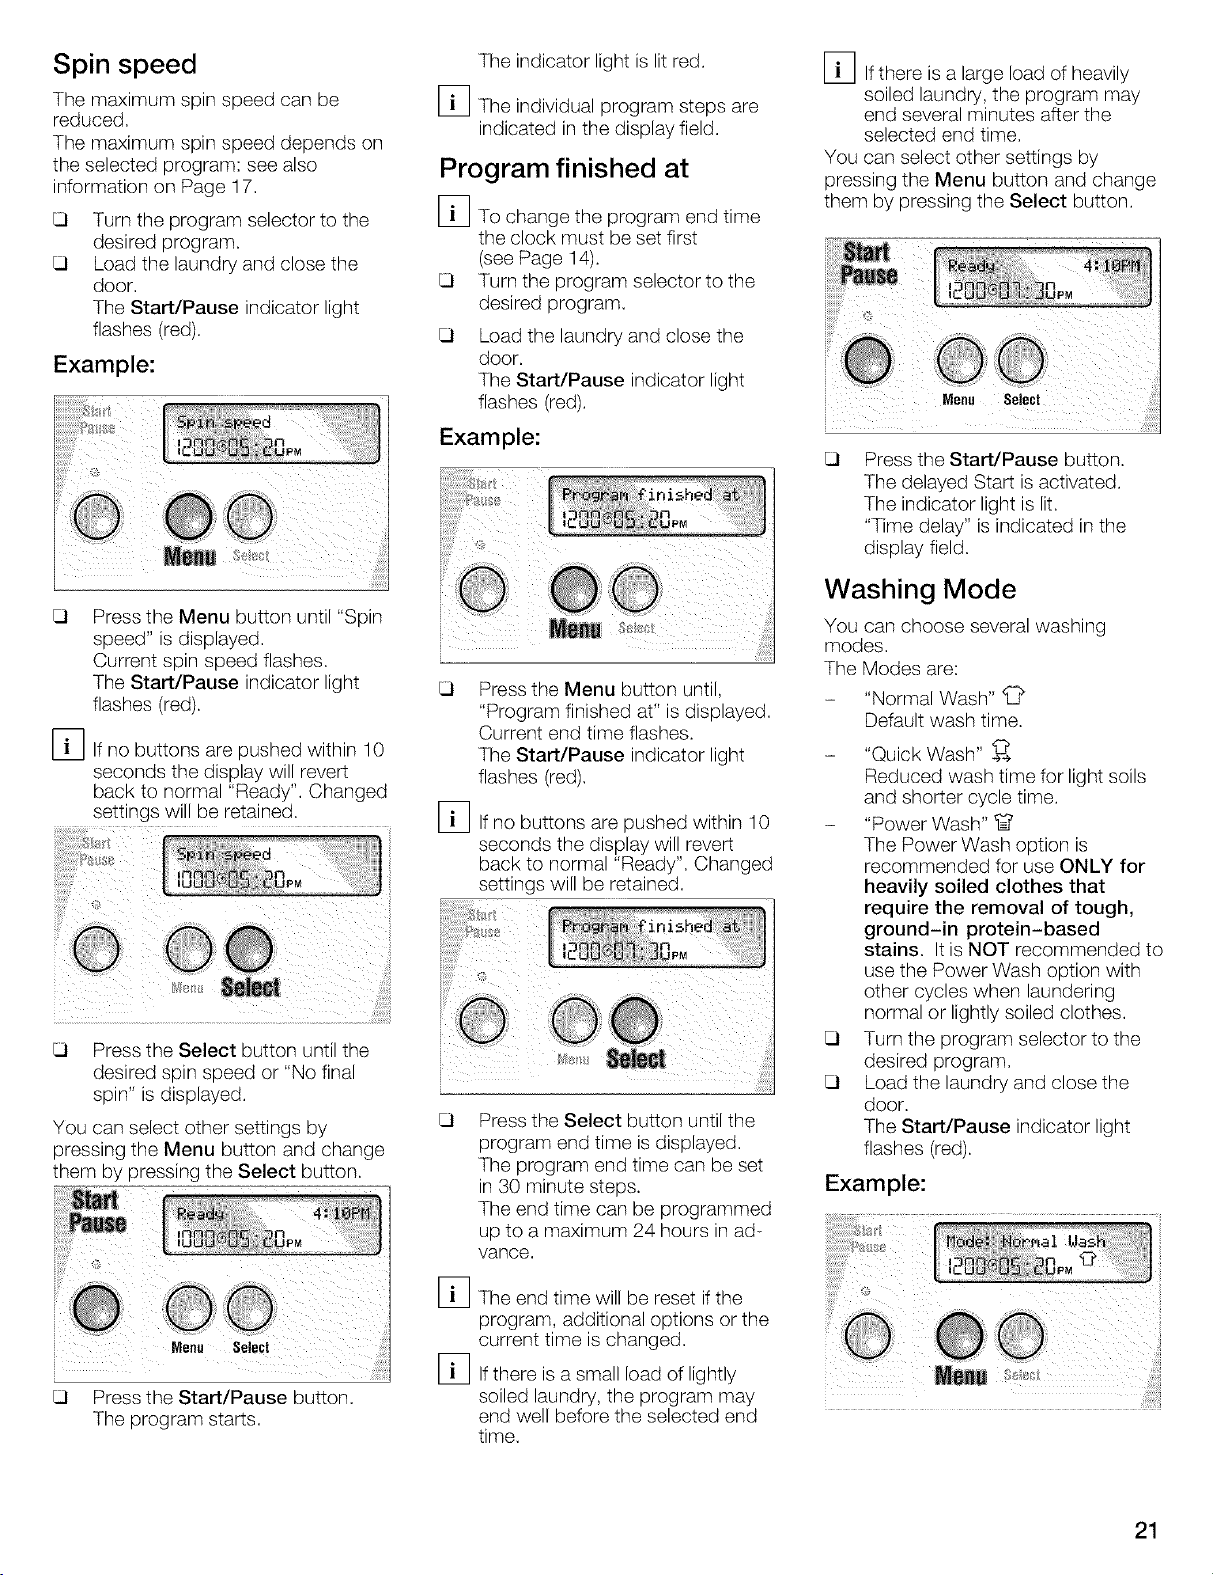
Spin speed
The maximum spin speed can be
reduced.
The maximum spin speed depends on
the selected program: see also
information on Page 17.
Turn the program selector to the
desired program.
Load the laundry and close the
door.
The Start/Pause indicator light
flashes (red).
Example:
[_lf no buttons are pushed within 10
seconds the display will revert
back to normal "Ready". Changed
settings will be retained.
Press the Select button until the
desired spin speed or "No final
spin" is displayed.
You can select other settings by
pressing the Menu button and change
them by pressing the Select button.
The indicator light is lit red.
[_The individual program steps are
indicated in the display field.
Program finished at
[_To change the program end time
the clock must be set first
(see Page 14).
Turn the program selector to the
desired program.
Load the laundry and close the
door.
The Start/Pause indicator light
flashes (red).
Example:
Press the Menu button until,
"Program finished at" is displayed.
Current end time flashes.
The Start/Pause indicator light
flashes (red).
[_lf no buttons are pushed within 10
seconds the display will revert
back to normal "Ready". Changed
settings will be retained.
i
Press the Select button until the
program end time is displayed.
The program end time can be set
in 30 minute steps.
The end time can be programmed
up to a maximum 24 hours in ad-
vance.
[_lf there is a large load of heavily
soiled laundry, the program may
end several minutes after the
selected end time.
You can select other settings by
pressing the Menu button and change
them by pressing the Select button.
iiiiiiiiiiii_i(7_
iiiiiiii:
,,,,,,,÷g,g
i i___ ii _ ii_iii!_!i!!i!!i!ii
Press the Start/Pause button.
The delayed Start is activated.
The indicator light is lit.
"Time delay" is indicated in the
display field.
Washing Mode
You can choose several washing
modes.
The Modes are:
- "Normal Wash" I[}
Default wash time.
"Quick Wash" i_
Reduced wash time for light soils
and shorter cycle time.
- "Power Wash" %
The Power Wash option is
recommended for use ONLY for
heavily soiled clothes that
require the removal of tough,
ground-in protein-based
stains. Itis NOT recommended to
use the Power Wash option with
other cycles when laundering
normal or lightly soiled clothes.
Turn the program selector to the
desired program.
Load the laundry and close the
door.
The Start/Pause indicator light
flashes (red).
Example:
Me..
Press the Start/Pause button.
The program starts.
Select
The end time will be reset ifthe
program, additional options or the
current time is changed.
If there is a small load of lightly
soiled laundry, the program may
end well before the selected end
time.
21

Press the Menu button until,
"Mode: Normal Wash" is
displayed.
The "_" symbol flashes.
The Start/Pause indicator light
flashes (red).
Example:
Signal
The acoustic signal indicates the start
or end of the program, operating errors
or malfunctions.
You can specify the volume of the
acoustic signal.
[_lf no buttons are pushed within 10
seconds the display will revert
back to normal "Ready". Changed
settings will be retained.
Press the Select button until the
desired washing mode is
displayed.
[_lf "Power Wash: on" or "Quick
Wash: on" were selected, the
"%"or" _ " symbol are
permanently displayed when the
menu is left.
You can select other settings by
pressing the Menu button and change
them by pressing the Select button.
Press the Menu button until
"Pre-Soak: off" is displayed.
The "_" symbol flashes.
The Start/Pause indicator light
flashes (red).
Fq
If no buttons are pushed within 10
seconds the display will revert
back to normal "Ready". Changed
settings will be retained.
Press the Select button until
"Pre-Soak: off" or "Pre-Soak: on"
is displayed.
[_lf "Pre-Soak: on" was selected,
the "_" symbol is permanently
displayed when the menu is left.
You can select other settings by
pressing the Menu button and change
them by pressing the Select button.
Activating, specifying the
signal volume and
deactivating the signal
Turn the program selector to the
desired program.
Load the laundry and close the
door.
The Start/Pause indicator light
flashes (red).
Example:
Press the Menu button until
"Signal: off" is displayed.
The "u_,)"symbol flashes.
The Start/Pause indicator light
flashes (red).
Fq
If no buttons are pushed within 10
seconds the display will revert
back to normal "Ready". Changed
settings will be retained.
Press the Start/Pause button.
The program starts.
The indicator light is lit.
[_The individual program steps are
indicated in the display field.
Pre-Soak
An integrated pre-soak cycle for
pre treatment of heavily stained items.
Turn the program selector to the
desired program.
Load the laundry and close the
door. The Start/Pause indicator
light flashes (red).
22
Press the Start/Pause button.
The program starts.
The indicator light is lit red.
[_The individual program steps are
indicated in the display field.
Press the Select button until
"Signal: continuous" is displayed.
While holding down the Select
button the volume of the acoustic
signal will increase.
When the signal has reached the
required volume, release the
Select button.
Hold down the Select button after
10 seconds the display indicates
"Signal: max".
To deactivate the signal, when the
display indicates "Signal: max",
hold down the Select button, after
10 seconds the display indicates
"Signal: off".
[_The selected setting is retained
after the washing cycle.
You can select other settings by
pressing the Menu button and change
them by pressing the Select button.
Press the Start/Pause button.
The program starts.
The indicator light is lit.
[_The individual program steps are
indicated in the display field.
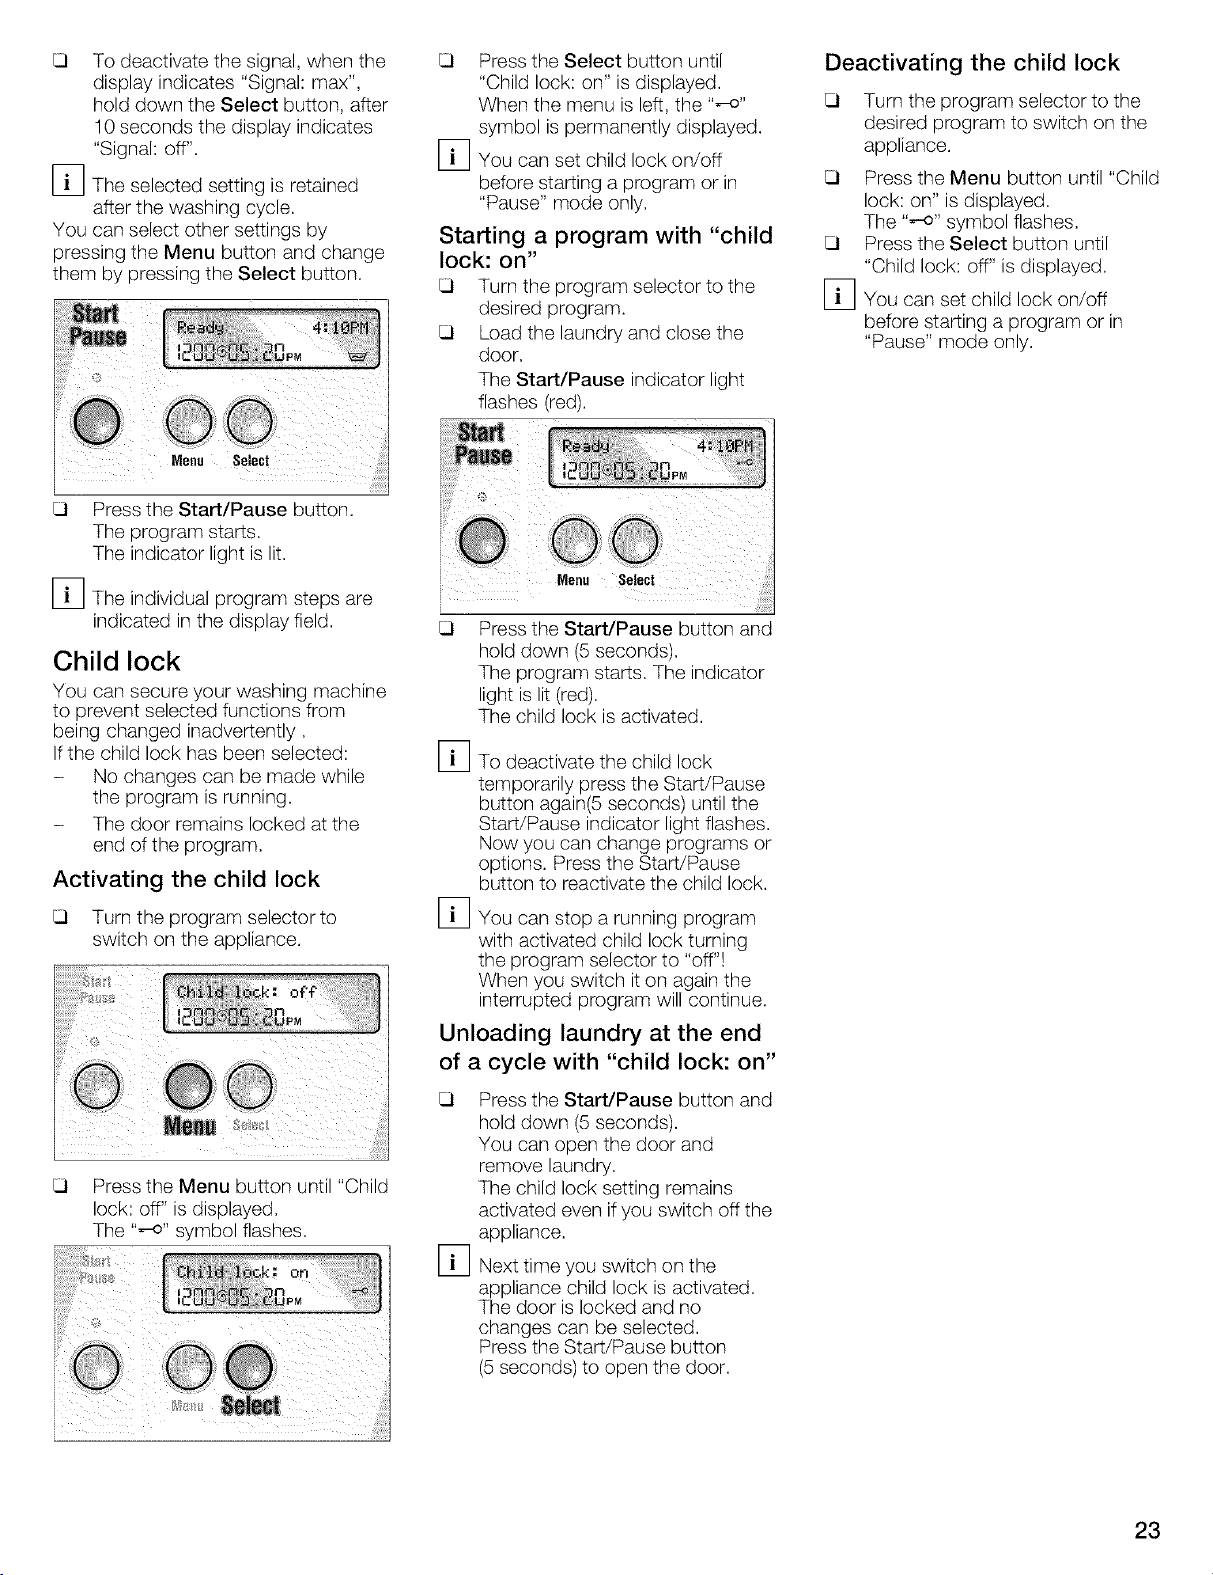
Child lock
You can secure your washing machine
to prevent selected functions from
being changed inadvertently.
Ifthe child lock has been selected:
- No changes can be made while
the program is running.
- The door remains locked at the
end of the program.
Activating the child lock
Turn the program selector to
switch on the appliance.
.......... _l_k
ii !!{_ _ • _ _ !!!_*..,!_,,_,,_•v.,._.._!_l_ _
...................._'_ ': _n
Press the Select button until
"Child lock: on" is displayed.
When the menu is left, the ,,,-o"
symbol is permanently displayed.
[_You can set child lock on/off
before starting a program or in
"Pause" mode only.
Starting a program with "child
lock: on"
Turn the program selector to the
desired program.
Load the laundry and close the
door.
The Start/Pause indicator light
flashes (red).
°o00/
_ Pressthe Start/Pause button and
hold down (5 seconds).
The program starts. The indicator
light is lit (red).
The child lock is activated.
Fq
To deactivate the child lock
temporarily press the Start/Pause
button again(5 seconds) until the
Start/Pause indicator light flashes.
Now you can change programs or
options. Press the Start/Pause
button to reactivate the child lock.
Fq
You can stop a running program
with activated child lock turning
the program selector to "off'!!
When you switch it on again the
interrupted program will continue.
Unloading laundry at the end
of a cycle with "child lock: on"
Deactivating the child lock
Turn the program selector to the
desired program to switch on the
appliance.
Press the Menu button until "Child
lock: on" is displayed.
The ,,,-o" symbol flashes.
Press the Select button until
"Child lock: off" is displayed.
[_You can set child lock on/oft
before starting a program or in
"Pause" mode only.
Press the Menu button until "Child
lock: off" is displayed.
The ,,,-o" symbol flashes.
Press the Start/Pause button and
hold down (5 seconds).
You can open the door and
remove laundry.
The child lock setting remains
activated even if you switch off the
appliance.
Vq
Next time you switch on the
appliance child lock is activated.
The door is locked and no
changes can be selected.
Press the Start/Pause button
(5 seconds) to open the door.
23
During Washing
[_Due to the highly engineered
suspension of this appliance, it
may experience a shudder or
shake when progressing from
lower to higher spin speeds.
This behavior is normal due to
shifting of the drum system and
should not cause concern.
Re-selecting a program
If the child lock is active, tempo
rarily deactivate it.
See page 23.
Turn the program selector to Off.
Turn the program selector to a
newly selected program.
The Start/Pause indicator light
flashes.
If the child lock is active,
deactivate again temporarily.
If required, change the settings.
See Page 23.
Press the Start/Pause button.
The program starts.
The indicator light is lit.
Add a garment /
Interrupting the program
You can put laundry in the drum after
washing begins, take laundry out of the
drum early or interrupt the program at
any time.
[_lt is not recommended to add
laundry after the washing phase is
complete.
Without child lock
[_You can add or reduce laundry as
long as the Start/Pause indicator
light flashes (red).
Press the Start/Pause button.
The following displays are
indicated in succession:
"Pause",
"Door can be opened".
Open the door.
Add/remove the laundry.
Close the door.
Press the Start/Pause button.
The program continues.
The indicator light is lit (red).
When the Start/Pause indicator
light is lit (red),the program can be
interrupted, however the door
cannot be opened for safety
reasons (water level, temperature
or drum speed too high).
The following displays are
indicated in succession:
"Pause",
"Door cannot be opened".
If the speed istoo high, the
Start/Pause indicator light is lit
(red). Laundry can be added in
"Pause" mode when the drum is at
a standstill.
Child lock activated
Press the Start/Pause button and
hold down (5 seconds), child lock
is deactivated and program will be
interrupted.
If the Start/Pause indicator light is
lit (red), the door cannot be
opened for safety reasons (water
level, temperature or drum speed
too high).
The following displays are
indicated in succession:
"Pause",
"Door cannot be opened".
If the Start/Pause indicator light
flashes (red),the laundry can be
added or removed.
The following displays are
indicated in succession:
"Pause",
"Door can be opened".
Open the door.
Add/remove the laundry.
Close the door.
Press the Start/Pause button.
Program continues.
Child lock is reactivated.
The indicator light is lit (red).
Canceling the active
program
If you would like to terminate a program
and remove the laundry:
Press the Start/Pause button and
hold down (5 seconds) if child lock
is active.
Turn the program selector to Drain
or Spin.
If a program is interrupted at a high
temperature, allow the laundry to
cool down until doorglass is not
too hot to touch.
Press the Start/Pause button.
Wait until the program ends.
Press the Start/Pause button and
hold down (5 seconds) if child lock
is active.
Open the door.
Unload the laundry.
If a program is interrupted at a high
temperature, the door may remain
locked until the appliance has
cooled down.
Ifthe program is terminated by
switching off the appliance, the
door may remain locked.
24

After Washing
The Start/Pause indicator light goes
out,
Display field: "Remove laundry",
Open the door.
"Child lock: on" preselected
The Start/Pause indicator light is lit
(red).
Display field: "Remove laundry".
Press and hold down the
Start/Pause button (5 seconds)
until "Pause" is displayed. The
Start/Pause indicator light flashes
(red).
Open the door.
Turn the program selector to Off,
Permanent press
Turn the program selector to Off.
or
C01d
"No final spin" preselected
The Start/Pause indicator light flashes.
Display field:"Start or Drain"
If required, change the spin speed;
see from Page 21.
Press the Start/Pause button.
The program starts. The program
progress is indicated in the display
field.
The indicator light is lit.
or
Turn the program selector to
Drain. The Start/Pause indicator
light flashes.
Press the Start/Pause button.
The indicator light is lit.
Display field: "Draining water".
When the additional program has
ended, open the door.
Turn the program selector to Off.
Close the taps.
Remove the laundry.
FF1 The child lock is reactivated as
soon as the appliance is switched
on again.
Occasionally check for any foreign
objects (e.g. coins, paper clips)
between the drum and rubber seal
- To avoid risk of rust!
[_ After washing, leave the loading
door ajar to allow the inside of
the washing machine to dry.
25
User Maintenance Instructions
Cleaning and Care
TO AVOID
RISK OF ELECTRIC SHOCK!
Always disconnect the appliance
from the power outlet before
cleaning.
Never clean the washing
machine with a pressure washer.
TO AVOID
RISK OF EXPLOSION!
Never use flammable solvents to
clean the appliance.
Cleaning the appliance
housing and control panel
As required:
Use hot soapy water or a mild,
non-abrasive cleaning agent.
Rub dry with a soft towel.
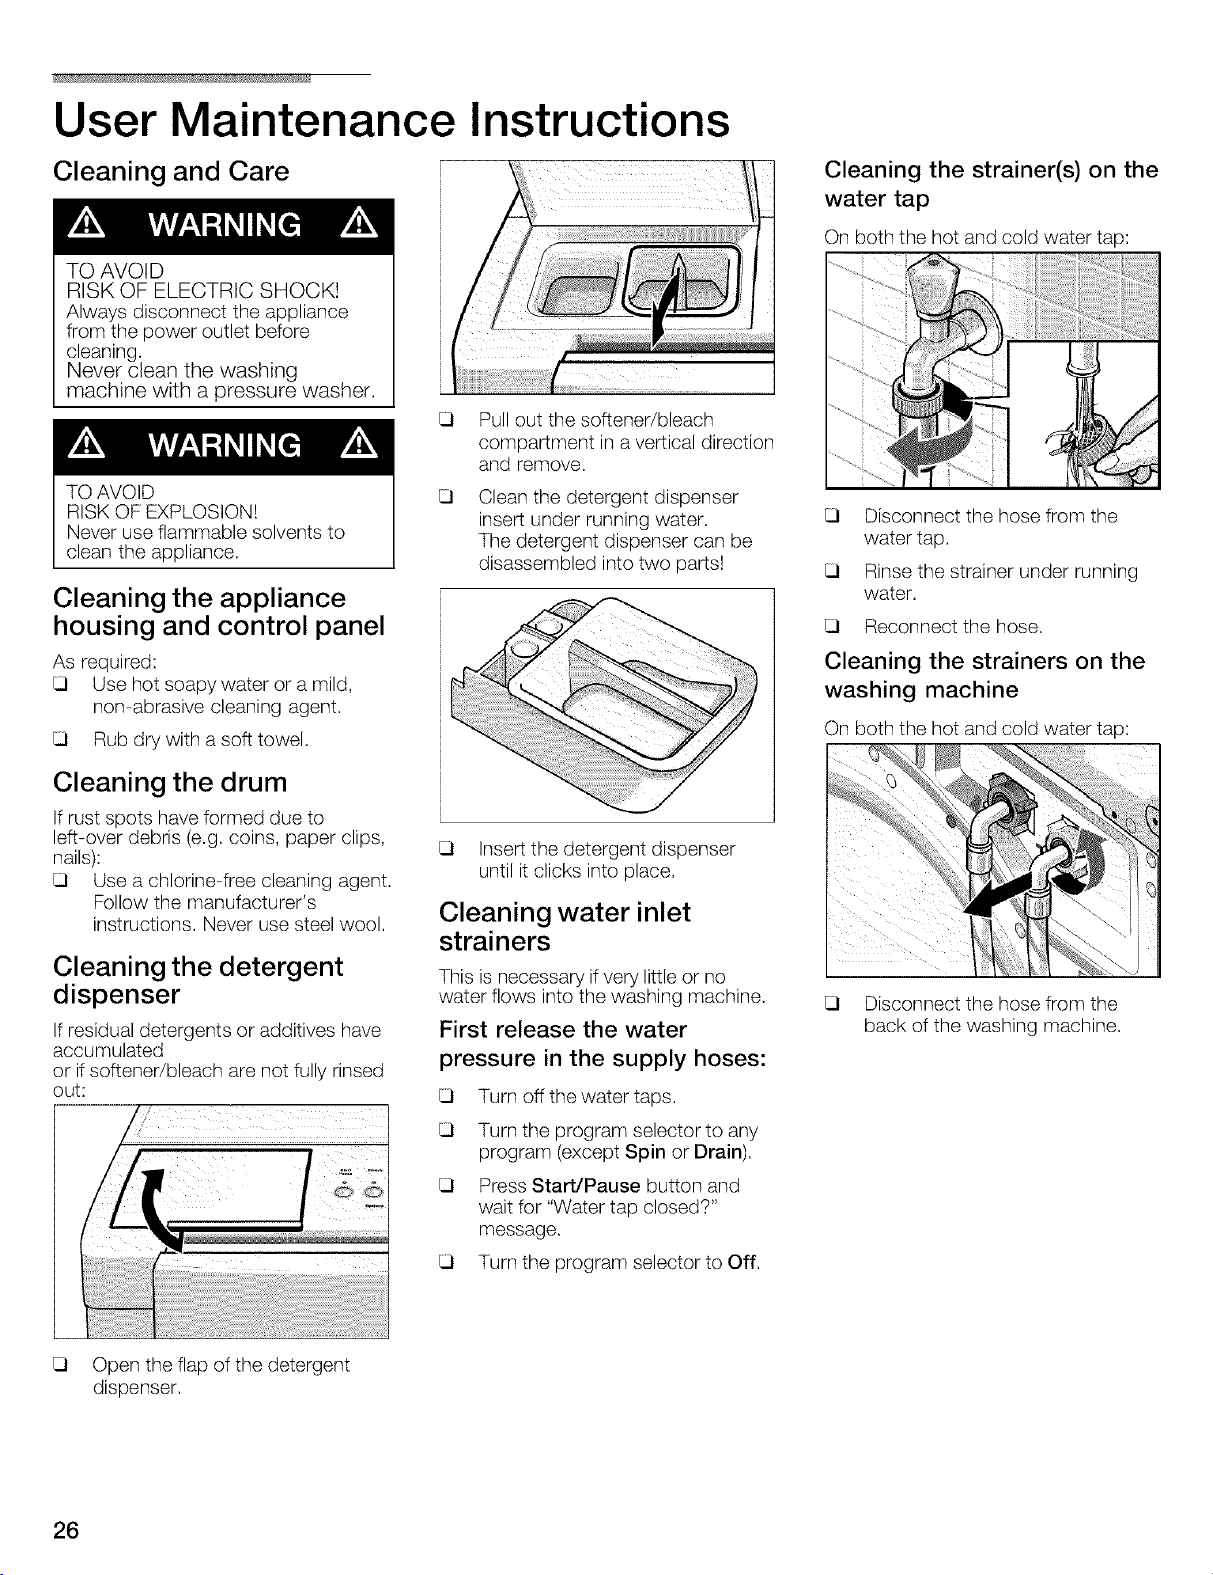
Pull out the softener/bleach
compartment in a vertical direction
and remove.
Clean the detergent dispenser
insert under running water.
The detergent dispenser can be
disassembled into two parts!
Cleaning the strainer(s) on the
water tap
On both the hot and cold water tap:
Disconnect the hose from the
water tap.
Rinse the strainer under running
water.
Reconnect the hose.
Cleaning the strainers on the
washing machine
On both the hot and cold water tap:
Cleaning the drum
If rust spots have formed due to
left-over debris (e.g. coins, paper clips,
nails):
Use a chlorine-free cleaning agent.
Follow the manufacturer's
instructions. Never use steel wool.
Cleaning the detergent
dispenser
If residual detergents or additives have
accumulated
or ifsoftener/bleach are not fully rinsed
out:
Open the flap of the detergent
dispenser.
Insert the detergent dispenser
until it clicks into place.
Cleaning water inlet
strainers
This is necessary if very little or no
water flows into the washing machine.
First release the water
pressure in the supply hoses:
Turn off the water taps.
Turn the program selector to any
program (except Spin or Drain).
Press Start/Pause button and
wait for "Water tap closed?"
message.
Turn the program selector to Off.
Disconnect the hose from the
back of the washing machine.
26
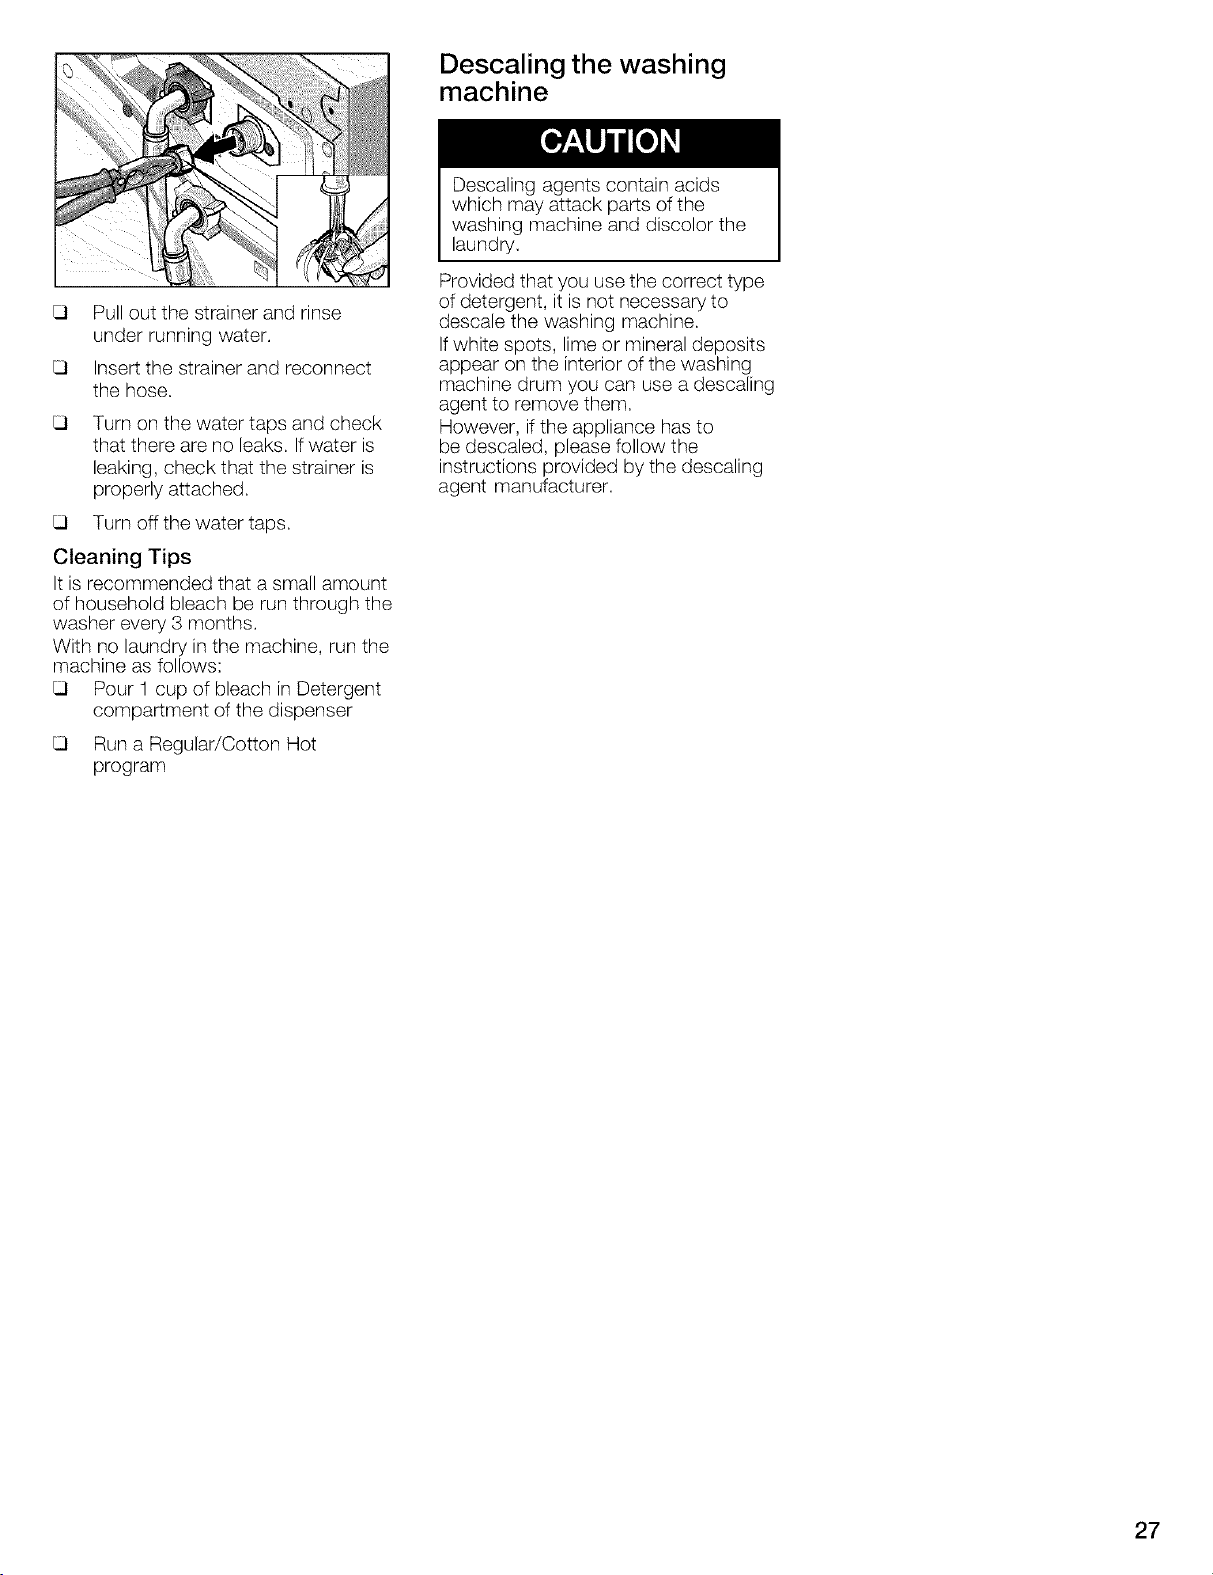
Pull out the strainer and rinse
under running water.
Insert the strainer and reconnect
the hose.
Turn on the water taps and check
that there are no leaks. If water is
leaking, check that the strainer is
properly attached.
Turn off the water taps.
Cleaning Tips
It is recommended that a small amount
of household bleach be run through the
washer every 3 months.
With no laundry in the machine, run the
machine as follows:
Pour 1 cup of bleach in Detergent
compartment of the dispenser
Run a Regular/Cotton Hot
program
Descaling the washing
machine
Descaling agents contain acids
which may attack parts of the
washing machine and discolor the
laundry.
Provided that you use the correct type
of detergent, it is not necessary to
descale the washing machine.
Ifwhite spots, lime or mineral deposits
appear on the interior of the washing
machine drum you can use a descaling
agent to remove them.
However, if the appliance has to
be descaled, please follow the
instructions provided by the descaling
agent manufacturer.
27
Troubleshooting of Minor Faults
Ifrepairs are necessary, and you
cannot eliminate the fault yourself with
the aid of the following table:
TO AVOID
RISK OF ELECTRIC SHOCK!
Repairs should only be carried out
by an authorized technician.
Turn the program selector to Off.
Disconnect the washing machine
from the power outlet.
Turn off the water taps.
Call Customer Service
(referto Page 31).
Fault
Thedoorcannotbe
opened.
Doorcannotbeopened,
eventhoughtheappliance
hasbeenswitchedoff and
on again.
Doorcannotbeopened,
eventhoughtheappliance
hasbeenswitchedoff and
on again.
Programcontinuesrunning,
eventhoughtheappliance
hasbeenswitchedoff and
on again.
Appliancecannotbe
operated."Childlock
activated"as indicatedin
thedisplayfield.
Controllightsdonotlight
up.
Programdoesnotstart.
Start/Pauseindicatorlight
flashes.
Programdoesnotstart.
"CheckDoor!" indicatedin
thedisplayfield.
"Pressstart"isindicatedin
thedisplayfield.
Possible cause
"Nofinalspin"selected.
Childlockactivated.
Powelfailule.
Programisrunningand/orthedooris lockedfor safety
reasons.
Plugislooseor notinselted.
Programselectorturnedto Off beforeendof program.
Childlockactivated.
Forsafetyreasonsthedoorhasbeenlockedbecausethe See"Addingto the laundry/Interruptingthe program",
waterlevel,temperatureor drumspeedistoo high. Page24.
Childlockactivated.
Childlockactivated.
A fusehasblown.
Powerfailure.
Applianceis in energy-savingmode.
Thisis notafault.
Start/Pausebuttonnotpressed.
Doornotclosedproperly.
Endtime selectedbutstill notactivatedby pressingthe
Start/Pause"button.
Action
SelectDrain orSpin.
Deactivatechildlock;seePage23
An interruptedprogramwiil beresumedwhenpoweris
restored,If the laundryisto be removedduringa power
failure,call CustomerService
(mfertoPage31).
Waituntilthe programends;see Page24.
Eliminatethe cause.
Selecta program.
Deactivatechildlock,seePage23.
Deactivatechildlock;seePage23.
Deactivatechildlock;seePage23.
Resetcircuitbreaker,
CallCustomerServiceif thisfaultrecurs.
An interruptedprogramwiil beresumedwhenpoweris
restored.If the laundryisto beremovedduringapower
failure,call CustomerService
(mfertoPage31).
PresstheSelect button;energy-savingmodeis
terminated.
PresstheStart/Pausebutton.
Checkwhetherlaundryistrappedindoor.
Closethedoor(adick shouldbeheard).
Programcontinues.
PresstheStart/Pausebutton,
28
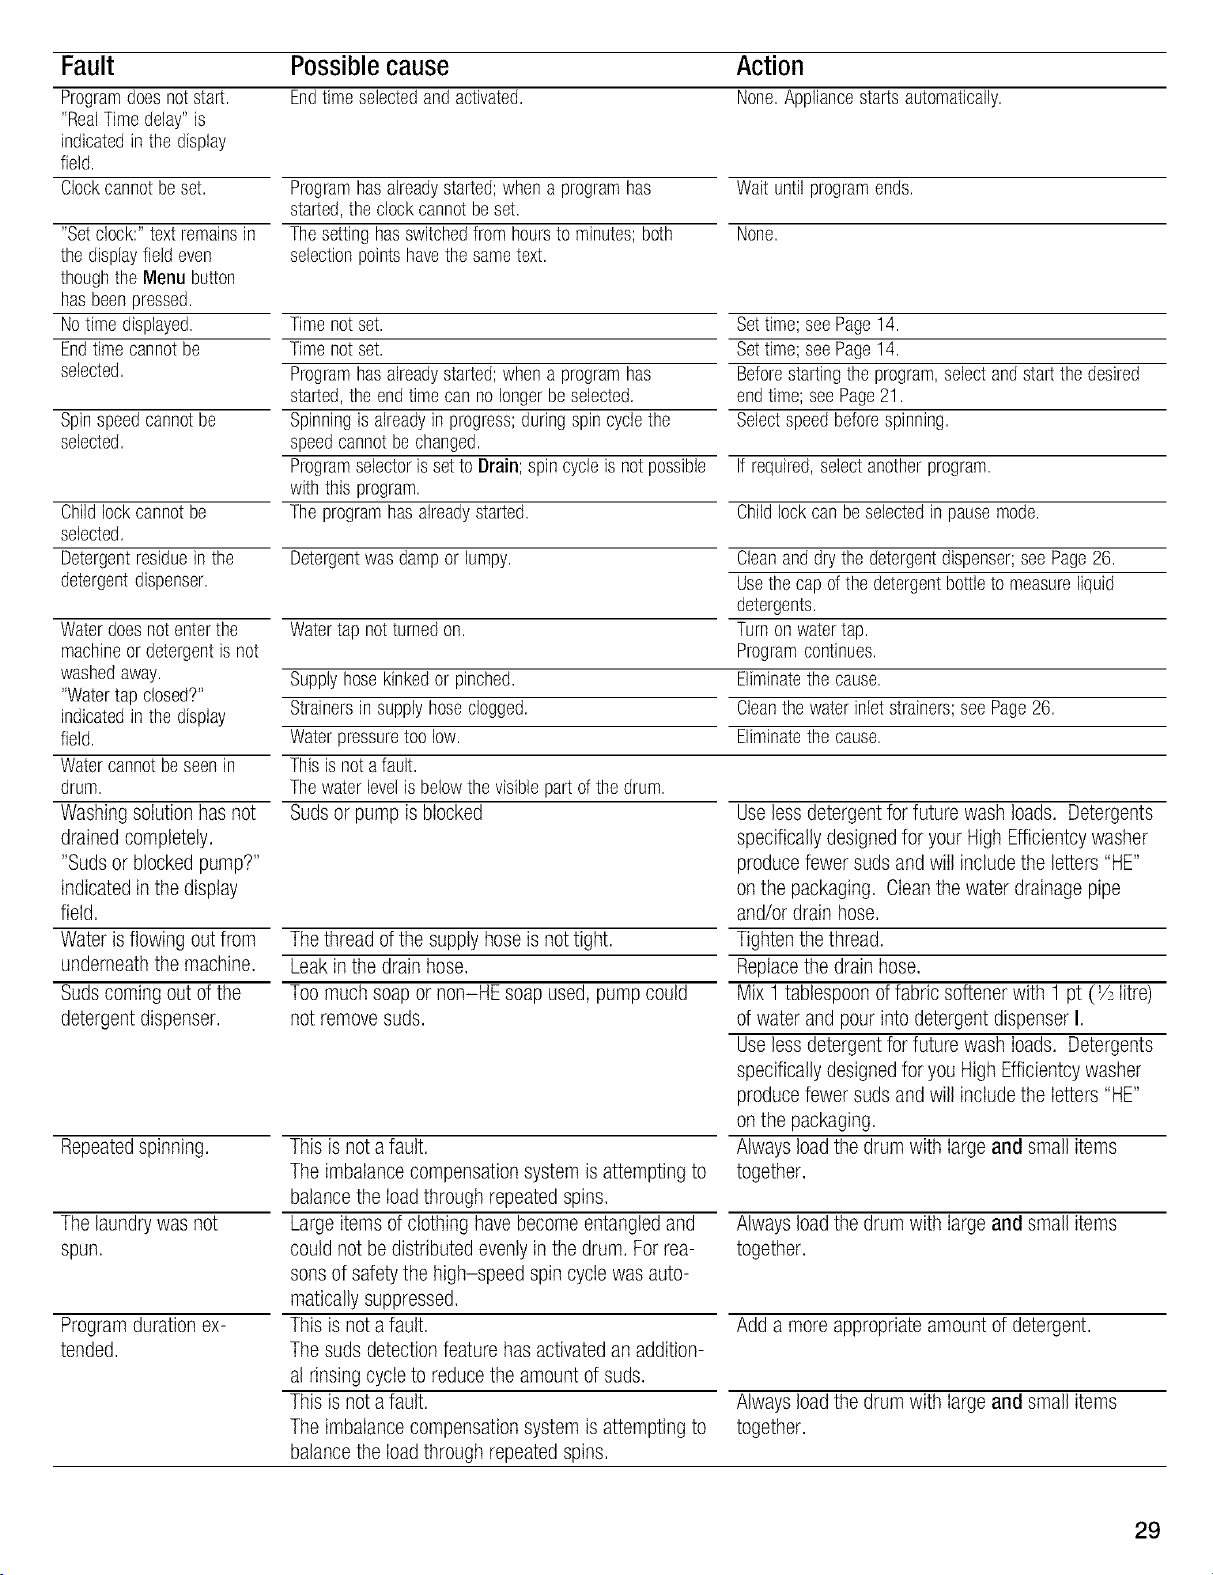
Fault
Programdoesnotstart.
"RealTimedelay"is
indicatedin thedisplay
field.
Clockcannotbeset.
"Setclock:"textremainsin
thedisplayfieldeven
thoughtheMenubutton
hasbeenpressed.
Notime displayed.
Endtimecannotbe
selected,
Spinspeedcannotbe
selected,
Childlockcannotbe
selected,
Detergentresidueinthe
detergentdispenser.
Waterdoesnotenterthe
machineor detergentisnot
washedaway.
"Watertapclosed?"
indicatedin thedisplay
field.
Watercannotbeseenin
drum.
Washingsoiution has not
drained completely.
"Sudsor blockedpump?"
indicated in the display
field.
Water isflowing out from
underneaththe machine.
Sudscoming out of the
detergent dispenser.
Repeatedspinning.
Thelaundry was not
spun.
Programduration ex-
tended.
Possible cause Action
Endtime selectedandactivated. None.Appliancestartsautomatically.
Programhasalreadystarted;whena programhas
started,the clockcannotbeset.
Thesettinghasswitchedfromhoursto minutes;both
selectionpointshavethesametext,
Timenotset.
Timenotset.
Programhasalreadystarted;whena programhas
started,the endtimecan nolongerbeselected,
Spinningis alreadyinprogress;duringspincyclethe
speedcannotbechanged,
Programselectorissetto Drain;spincycleisnot possible
withthis program.
Theprogramhasalreadystarted.
Detergentwasdampor lumpy.
Watertapnotturnedon.
Supplyhosekinkedor pinched.
Strainersin supplyhoseclogged,
Waterpressuretoo low.
Thisisnot afault.
Thewaterlevelisbelowthevisiblepartofthe drum.
Sudsor pump is blocked
Thethread of the supply hose is nottight.
Leakin the drain hose.
Too muchsoapor non-HE soap used, pumpcould
not removesuds.
This is nota fault.
The imbaiancecompensationsystemis attempting to
balancethe loadthrough repeatedspins.
Large itemsof clothing have become entangledand
could not bedistributed evenlyin the drum. For rea-
sonsof safetythe high-speed spin cycle was auto-
matically suppressed.
This is nota fault.
The sudsdetectionfeature has activatedan addition-
al rinsing cycleto reducethe amount of suds.
This is nota fault.
The imbaiancecompensationsystemis attempting to
balancethe loadthrough repeatedspins.
Waituntilprogramends.
None.
Settime;seePage14.
Settime;seePage14.
Beforestartingthe program,selectandstartthedesired
endtime;seePage21.
Selectspeedbeforespinning,
If required,selectanotherprogram.
Childlockcan beselectedinpausemode.
Cleananddrythedetergentdispenser;seePage26.
Usethe capofthe detergentbottletomeasureliquid
detergents.
Turnonwatertap,
Programcontinues.
Eliminatethe cause.
Cleanthewaterinletstrainers;seePage26.
Eliminatethe cause.
Useless detergent for future washloads. Detergents
specificallydesignedfor yourHighEfficientcywasher
producefewer sudsand will includethe letters "HE"
on the packaging. Cleanthe water drainagepipe
and/or drain hose.
Tightenthe thread.
Replacethe drainhose.
Mix 1 tablespoonof fabric softenerwith 1 pt (_/2Iitre)
of waterand pour into detergentdispenserI.
Useless detergent for future washioads. Detergents
specificallydesignedfor you HighEfficientcywasher
producefewer sudsand will includethe letters "HE"
on the packaging.
Alwaysloadthe drum with largeand small items
together.
Alwaysloadthe drum with largeand small items
together.
Add a moreappropriateamount of detergent.
Alwaysloadthe drum with largeand small items
together.
29

Fault
Unsatisfactorywashing
result.
Detergentresidue on the
laundry.
Grayresidue on the
laundry.
Systemshakesorshudders
whenpassingfrom lowerto
higherspeedspinning.
Possible cause
The degreeof soiling was higher than estimated.
Not enoughdetergent.
Somephosphate-free detergentscontain water-insol-
uble residuesthat mayappearas light spots on the
laundry.
Dirt accumulationfrom ointments, fats or oils.
Drumsystemsuspensioncanshiftduringspeedup,this
isnot afailure.
Action
Selectsuitable program
or
Power wash as an additionaloption.
Add detergent accordingto the manufacturer's
specifications.
Brushoff spotswhen laundryis dry.
Add the maximum amount of detergentand select
the highestpermissibletemperature.
Mixsmalland largelaundrypiecesin loadtominimize
thiseffect.
Fault displays
Text in display Possible cause Action
field
"Watertap closed?" Watertapsnotturnedon.
Supplyhosekinkedor trapped.
Strainerin supplyhoseclogged.
Waterpressuretoo low.
"Sudsor blocked
pump?"
"CheckDoor!"
Sudsorpumpisblocked.
Doornotclosedproperly.
Turnonwatertap. Programcontinues.
Eliminatethe cause.
Cleanthewaterinletstrainers;seePage26.
Eliminatethe cause.
Uselessdetergentfor futurewashloads, Detergents
specificallydesignedfor yourHighEfficientcywasher
producefewersudsandwill includetheletters"HE"onthe
packaging,Cleanthe waterdrainagepipeand/ordrainhose.
Checkwhetherlaundryistrappedindoor.
Closethedoor,
Ifthe fault cannot be eliminated with the aid of the above table, switch the appliance off, wait 5 seconds, switch the appliance on
again, select and start the program.
Ifthe fault continues, call customer service; see Page 31,
3O
 Loading...