

Page 1
Gas hob
Placa de cocción a gas
Table de cuisson gaz
[en] Instruction manual .....................................3
[es] Instrucciones de uso ..................................8
[fr] Mode d’emploi ........................................13
Page 2

1 Pan supports
36%
1
2
36$
1
2
2 Control knobs
3 Semi-rapid burner (up to 1.75 kW)
4 Rapid burner (up to 3 kW)
5 Triple-flame wok burner (up to 4 kW)
1 Parrillas
2 Mandos
3 Quemador semi-rápido de hasta 1,75 kW
1 Grilles
2 Boutons de commande
3 Brûleur semi-rapide de 1,75 kW maximum
4 Quemador rápido de hasta 3 kW
5 Quemador wok de triple llama de hasta 4 kW
4 Brûleur rapide de 3 kW maximum
5 Brûleur wok triple flamme de 4 kW maximum
2
Page 3

Ú Table of contents
[en]Instruction manual
Safety precautions .....................................................................3
Your new appliance .................................................................... 4
Accessories .........................................................................................4
Gas burners ................................................................................4
Switching on manually.......................................................................5
Switching on automatically................................................................ 5
Safety system ...................................................................................... 5
Switching off a burner........................................................................5
Power levels.........................................................................................5
Warnings...............................................................................................5
Cooking guidelines.............................................................................5
Cooking pans.............................................................................. 5
Suitable pans .......................................................................................5
Precautions for use ............................................................................6
ã=Safety precautions
Read these instructions carefully. Reading these instructions
will enable you to use your appliance safely and effectively.
Keep the operation and installation instructions and provide
them along with the appliance if it is passed on to another user.
The manufacturer is exempt from all responsibility if the
requirements of this manual are not complied with.
The graphics in this instruction manual are given as a guide
only.
Do not remove the appliance from its protective packaging until
it is installed in the unit.
Do not switch on the appliance if it is damaged in any way.
Contact our Technical Assistance Service.
This appliance is class 3 type, according to the EN 30-1-1
regulation for gas appliances: built-in appliance.
This appliance can only be installed in a well-ventilated place in
accordance with existing regulations and ventilation
specifications. The appliance must not be connected to a
combustion product removal device.
The place in which the appliance is installed must have fullyfunctioning ventilation, in accordance with the regulations.
Before installing your new hob, ensure that it is being installed
according to the assembly instructions.
This appliance leaves the factory set to the type of gas that is
indicated on the specifications plate. If this needs to be
changed, please consult the assembly instructions.
All operations relating to installation, regulation and conversion
to other types of gas must be carried out by an authorised
installation engineer, respecting the applicable regulations,
standards and the specifications of the local gas and electricity
providers. You are recommended to contact the Technical
Assistance Service to convert to another type of gas.
This appliance has been designed for home use only, not for
commercial or professional use. This appliance cannot be
installed on yachts or in caravans. The warranty will only be
valid if the appliance is used for the purpose for which it was
designed.
This appliance is only intended for cooking purposes, not as a
heating system.
This appliance is not intended for operation with an external
clock timer or a remote control.
Never leave the appliance unattended during operation.
Cleaning and maintenance........................................................ 6
Cleaning ...............................................................................................6
Maintenance ........................................................................................ 6
Trouble shooting ........................................................................6
Technical Assistance Service................................................... 7
Warranty conditions............................................................................7
Used appliances and packaging...............................................7
Environmentally-friendly waste management ................................7
Produktinfo
Additional information on products, accessories, replacement
parts and services can be found at www.bosch-home.com and
in the online shop www.bosch-eshop.com
This appliance may be used by children 8 years old and older
and by persons with reduced physical, sensory or mental
capacity or a lack of experience or knowledge if they are
supervised or they have been instructed about the safe use of
the appliance and have understood the associated dangers.
Never let children play with the appliance. Cleaning and user
maintenance must not be carried out by unsupervised children.
The hotplates and surrounding area become very hot. Never
touch the hot surfaces. Children under 8 years old must be
kept at a safe distance from the appliance.
The hotplates become very hot. Never place combustible items
on the hob. Never place objects on the hob.
Do not store or use corrosive chemicals, steamers,
inflammable materials or non-food products below or near this
domestic appliance.
Fat or oil which is overheated can catch fire easily. Do not leave
oil or fats to heat up unattended. If oil or fats do catch fire,
never use water to put the fire out. Risk of burns! Put the fire out
by covering the pan with a lid and switch off the hotplate.
Pans which are damaged, are not the right size, hang over the
edge of the hob or are not positioned correctly can cause
serious injuries. Follow the advice and warnings provided
relating to the cooking pans.
Do not subject the appliance to draughts. These might blow out
the burners.
Do not clean the hob using a steam cleaner. Risk of
electrocution!
In the event of a malfunction, turn off the appliance’s gas and
electricity supply. For repairs, call our Technical Assistance
Service.
Do not tamper with the appliance's interior. If necessary, call
our Technical Assistance Service.
If one of the control knobs will not turn, do not force it. Call the
Technical Assistance Service immediately, so that they can
repair or replace it.
Cracks or fractures in the glass ceramic may cause electric
shocks. Switch off the circuit breaker in the fuse box. Contact
the after-sales service.
3
Page 4
Your new appliance
Page 2 shows an overall view of your new appliance as well as the burner power.
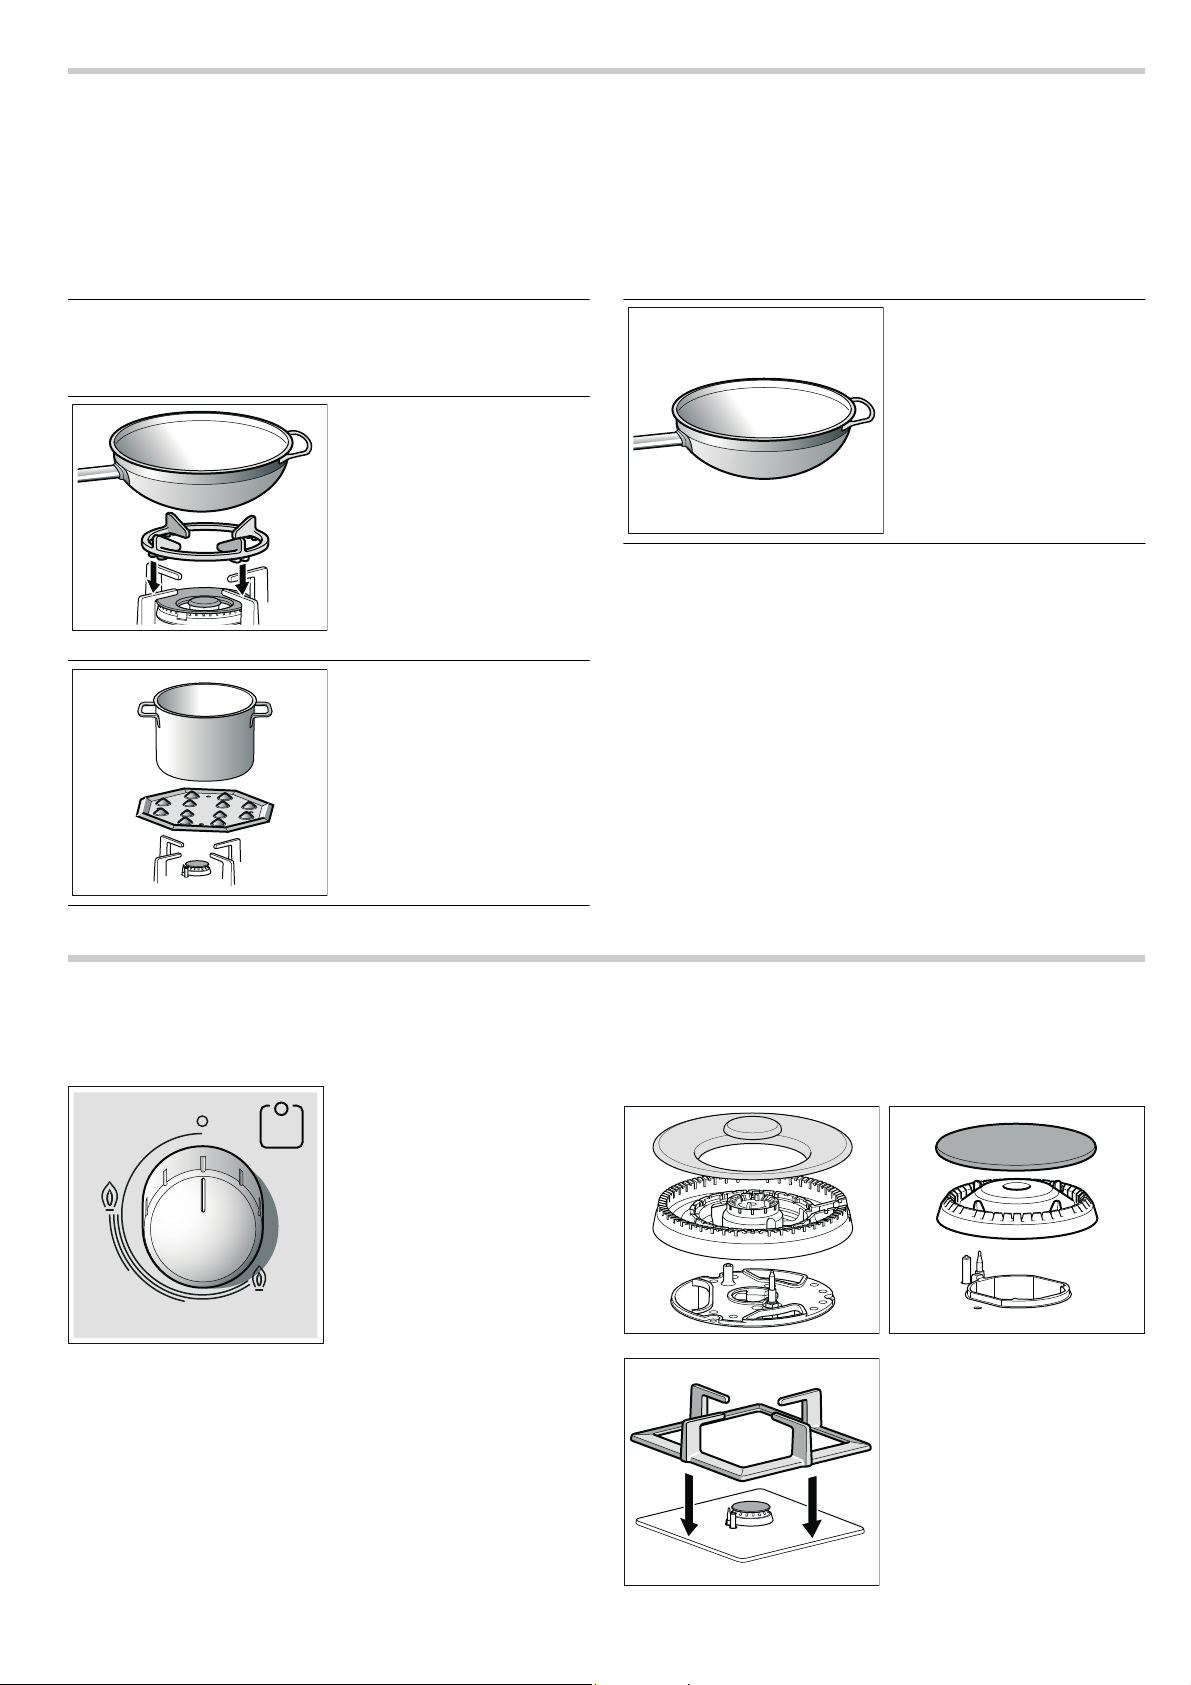
Accessories
The following accessories can be purchased from the
Technical Assistance Service:
Coupling profile
To combine appliances
together and/or conventional
hobs of the same brand.
Additional wok pan support
Only for use on double and
triple-flame wok burners with
pans which are more than
26 cm in diameter, grill pans,
earthenware casserole
dishes, large pans with a
round base, etc.
The additional wok pan support should be used to prolong the appliance's useful
life.
Simmer Plate
This accessory has been
designed to reduce the level
of heat at the lowest power
setting.
Place the accessory directly
on the pan support with the
cones facing upwards, never
directly over the burner. Centre the pan over the accessory.
Wok pan
The wok pan diffuses intense
heat uniformly, so that the
food is cooked in less time
and using less oil.
Always follow the manufacturer's instructions when
cooking with a wok pan.
--------
Code
HEZ394301 Coupling profile
HEZ298127 Additional wok pan support
HEZ298105 Simmer Plate
HEZ298103 Wok pan
The manufacturer accepts no liability if these accessories are not used or are used incorrectly.
Gas burners
There are indications to show which burner each control knob
operates.
It is essential to ensure that all the burner parts and pan
supports are correctly installed for the appliance to work
correctly.
4
Page 5
Switching on manually
1. Press the chosen burner control knob and turn it
anticlockwise to the required setting.
2. Use any type of lighter or flame (cigarette lighter, matches,
etc.) and bring it close to the burner.
Switching on automatically
If your hob can be switched on automatically (ignition
sparkers):
1. Press the chosen burner control knob and turn it
anticlockwise to the maximum power setting.
While the control knob is still pressed down, sparks are
produced on all burners. The flame ignites.
2. Release the control knob.
3. Turn the control knob to the required setting.
If it does not come on, turn the control knob to the off setting
and repeat the steps above. This time, press and hold the
control knob for longer (up to 10 seconds).
ã=Risk of deflagration!
If after 15 seconds the flame does not ignite, switch off the
burner and open a nearby window or door. Wait at least one
minute before trying to switch the burner back on.
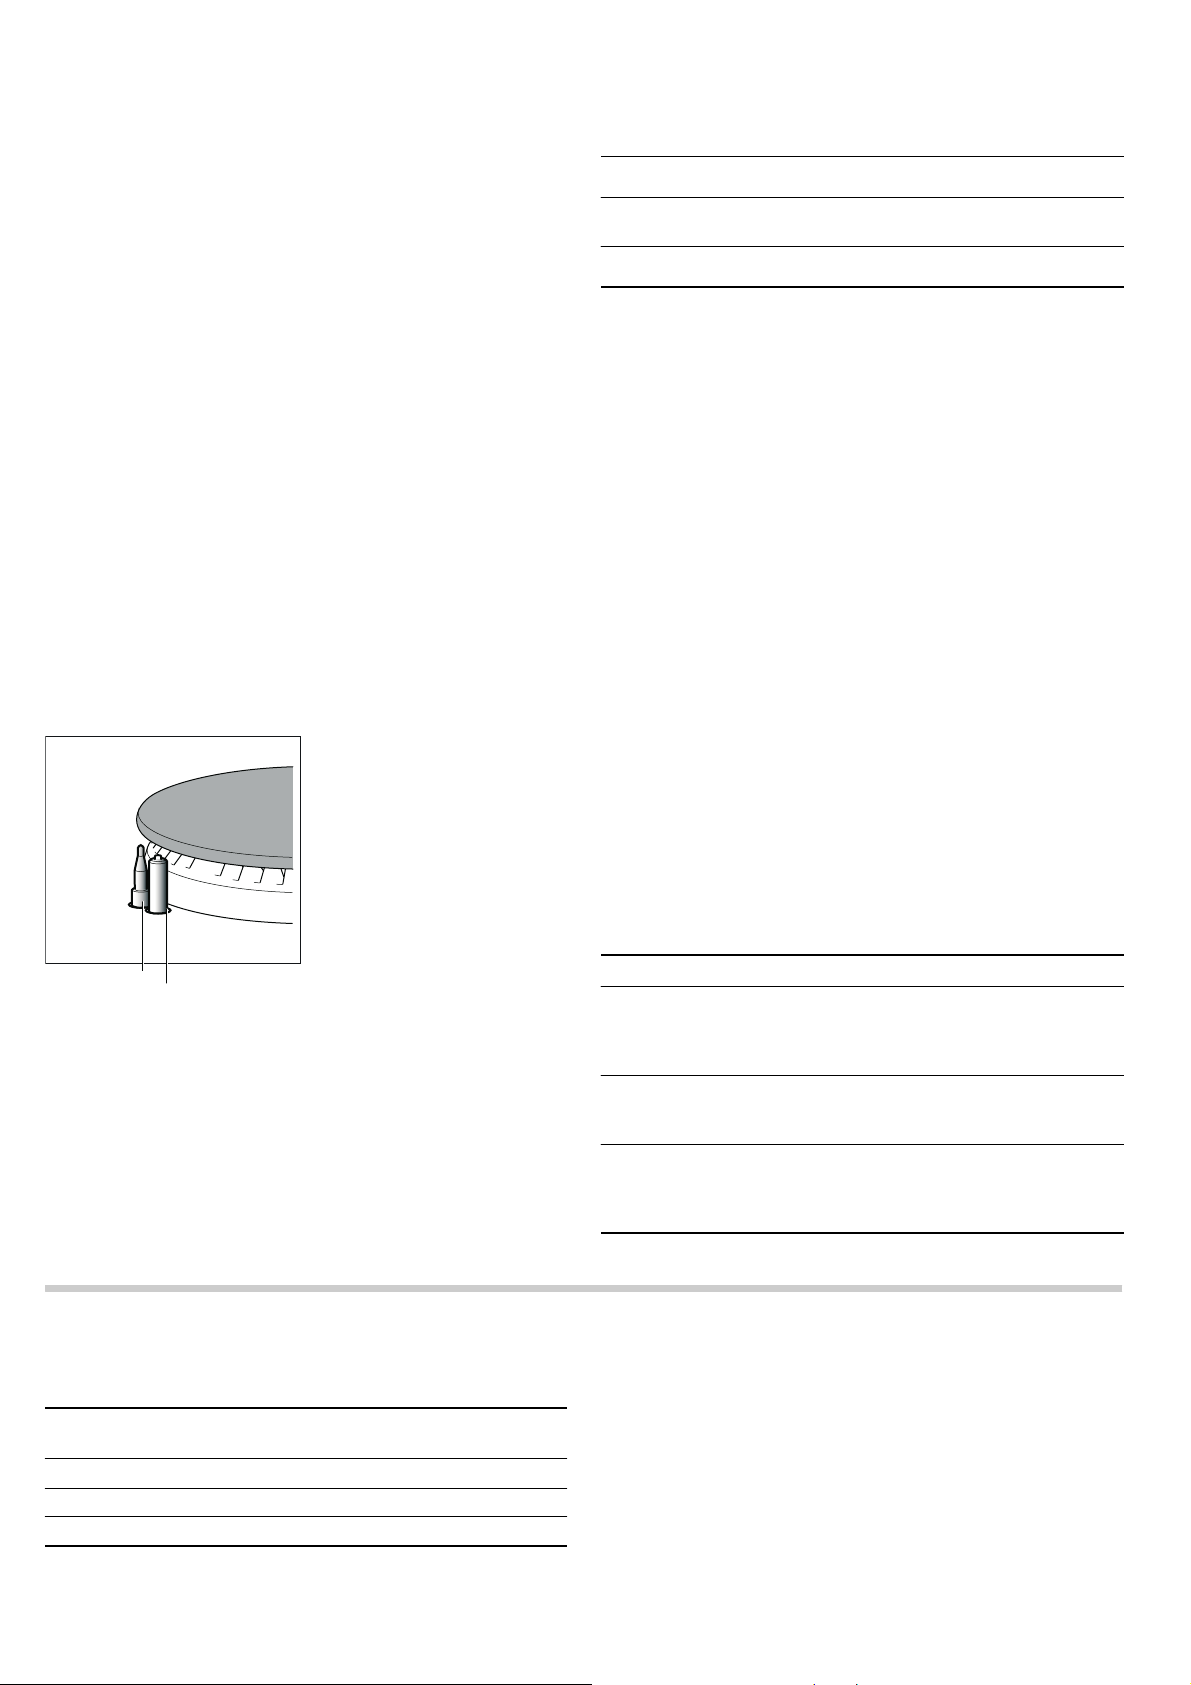
Safety system
Depending on the model, your hob may have a safety system
(thermocouple) that prevents the flow of gas if the burners
accidentally switch off.
Power levels
The progressive control knobs can be used to control the
power needed, from minimum to maximum power.
Setting
High flame
Low flame
Control knob off
Û
Maximum capacity or aperture and elec-
—
tricity on
Minimum capacity or aperture
˜
Warnings
It is normal to hear a soft whistling noise while the burner is
operating.
When it is first used, it is normal for the burner to give off
odours. This does not pose any risk and does not indicate a
malfunction. They will disappear in time.
An orange-coloured flame is normal. This is caused by the
presence of dust in the atmosphere, spilt liquids, etc.
The kitchen will become hot and humid when this gas
appliance is used. You must therefore ensure that the kitchen is
well ventilated: Either keep the natural ventilation apertures
open, or install a ventilation system (extractor hood).
Intense and prolonged use of the appliance may mean
additional ventilation is required (for example, opening a
window) or more effective ventilation (for example, increasing
the hob's ventilation, if possible).
If the burner flames are accidentally blown out, switch off the
burner operating control knob and do not try to relight it for at
least one minute.
A few seconds after the burner is switched off, a sound (thud)
will be produced. This is not a fault - this means that the safety
device is no longer operating.
Keep the burner as clean as possible. If the ignition sparkers
are dirty they will not light properly. Clean them periodically
using a small non-wire brush. Bear in mind that the ignition
sparkers must not suffer any serious impacts.
WKHUPRFRXSOH
To ensure that this device is active:
1. Switch on the burner as usual.
2. Without releasing the control knob, press and hold it down
firmly for 4 seconds after lighting the flame.
LJQLWLRQVSDUNHU
Switching off a burner
Turn the corresponding control knob clockwise to the 0 setting.
Cooking pans
Suitable pans
Burner Minimum pan
diameter
Wok burner 22 cm
Rapid burner 22 cm 26 cm
Semi-rapid burner 14 cm 20 cm
Maximum pan
diameter
Cooking guidelines
Burner Very high - High Medium Low
Wok
burner
Rapid
burner
Semi-rapid
burner
Boiling, steaming,
griddling, toasting,
paellas, Asian food
(wok).
Escalopes, steaks,
omelettes, frying
Steamed potatoes, fresh vegetables, vegetable
stews, pasta
Reheating and keeping things
hot: cooked and pre-cooked
dishes
Rice, white
sauce, ragout
Reheating, keeping things hot
and making tasty casseroles
Steaming:
fish, vegetables
5
Page 6

Precautions for use
The following advice is intended to help you save energy and prevent pan damage:
Use pans which are the right
size for each burner.
Do not use small pans on
large burners. The flame must
not touch the sides of the pan.
Do not use damaged pans,
which do not sit evenly on the
hob. Pans may tip over.
Only use pans with a thick, flat
base.
Do not cook without using a lid
and make sure the lid is
properly fitted. This wastes
energy.
Cleaning and maintenance
Always centre the pan over the
burner, not to one side.
Otherwise it could tip over.
Do not place large pans on the
burners near the control
knobs. These may be
damaged by the very high
temperatures.
Place the pans on the pan
supports, never directly on the
burner.
Make sure that the pan
supports and burner caps are
correctly positioned before
using the appliance.
Pans should be placed on the
hob carefully.
Do not strike the hob and do
not place excessive weight on
it.
Cleaning
Once the appliance is cool, use a sponge to clean it with soap
and water.
After each use, clean the surface of the respective burner parts
once they have cooled down. If any residue is left (baked-on
food, drops of grease etc.), however little, it will become stuck
to the surface and more difficult to remove later. The holes and
grooves must be clean for the flame to ignite properly.
The movement of some pans may leave metal residue on the
pan supports.
Clean the burners and pan supports using soapy water and
scrub with a non-wire brush.
Always dry the burners and pan supports completely. Water
droplets or damp patches on the hob at the start of cooking
may damage the enamel.
After cleaning and drying the burners, make sure the burner
caps are correctly positioned on the diffuser.
Trouble shooting
Caution!
■ Do not use steam cleaners. This could damage the hob.
■ Never use abrasive products, steel scourers, sharp
implements, knives, etc. to remove bits of hardened food
from the hob.
■ Do not use knives, scrapers or similar implements to clean
the point where the glass meets the burner trims, the metal
frames or the glass/aluminium panels, if fitted.
Maintenance
Always clean off any liquid as soon as it is spilt. This will prevent food remains from sticking to the hob surface and you will save yourself any unnecessary effort.
Never slide pans across the glass surface, as you may scratch it. In addition, try not to drop heavy or sharp objects on the glass. Never strike any part of the hob.
Grains of sand that may come from cleaning fruits and vegetables will scratch the glass surface.
Melted sugar, or foods which contain a lot of sugar which may have spilt, should be cleaned off the hotplate immediately, using the glass scraper.
Sometimes certain faults detected can be easily resolved.
Before calling the Technical Assistance Service, bear in mind
the following advice:
Fault Possible cause Solution
The general electrical system is malfunctioning.
6
Defective fuse. Check the fuse in the main fuse box and change it
if it is damaged.
The automatic safety switch or circuit breaker has
tripped.
Check the main control panel to see if the automatic safety switch or circuit breaker has tripped.
Page 7

Fault Possible cause Solution
The automatic on function
does not work.
The burner flame is not uniform.
The gas flow is not normal
or there is no gas.
The kitchen smells of gas. A gas tap has been left on. Turn off the taps.
The safety valves on one of
the burners are not working.
There may be food or cleaning products stuck
between the ignition sparkers and the burners.
The burners are wet. Dry the burner caps carefully.
The burner caps are not correctly positioned. Check that the burner caps are correctly posi-
The appliance is not earthed, is poorly connected
or the earthing is faulty.
The burner components are not correctly positioned.
The grooves on the burner are dirty. Clean the grooves on the burner.
The gas supply is blocked via gas taps. Open all gas taps.
If the gas is supplied from a gas cylinder, check
that this is not empty.
There may be a leak in the gas cylinder coupling. Check that the coupling is sound.
The control knob was not held down for long
enough.
The grooves on the burner are dirty. Clean the grooves on the burner.
The space between the ignition sparker and the
burner must be clean.
tioned.
Contact the electrician.
Ensure the components are correctly positioned.
Change the gas cylinder.
Once the burner is on, hold the control knob down
a few seconds longer.
Technical Assistance Service
When contacting our Technical Assistance Service, please
provide the product number (E-Nr.) and production number
(FD) of the appliance. This information is given on the
specifications plate located on the lower section of the hob and
on the label in the user manual.
Please find the contact data of all countries in the enclosed
customer service list.
To book an engineer visit and product advice
GB 0844 8928979
Calls from a BT landline will be charged at up to 3
pence per minute. A call set-up fee of up to 6 pence may
apply.
IE 01450 2655
Trust the expertise of the manufacturer, and rest assured that
the repair will be carried out by trained service technicians
using original spare parts for your domestic appliance.
Used appliances and packaging
If the ) symbol is shown on the specifications plate, bear in mind the following instructions:
Environmentally-friendly waste management
Unpack the appliance and dispose of the packaging by environmentally-friendly means.
The packaging of your appliance has been manufactured using
only the materials which are strictly necessary to guarantee
efficient protection during transport. These materials are 100%
recyclable, thus reducing the environmental impact. You can
also contribute to caring for the environment by following the
advice below:
■ Dispose of the packaging in the appropriate recycling bin.
■ Before you get rid of an old appliance, make sure you disable
it. Contact your local authority to find out the address of your
nearest recycling centre to dispose of your appliance.
■ Do not pour used oil down the sink. Collect it in a sealed
container and take it to an appropriate collection point or,
Warranty conditions
In the unlikely event that the appliance is damaged or does not meet your expectations in terms of quality, please inform us as soon as possible. For the warranty to be valid, the appliance must not have been tampered with, or used inappropriately.
The applicable warranty conditions are those set out by the
company's representative office in the country of purchase.
Detailed information is available from retail outlets. Proof of
purchase must be presented to obtain the benefits of the
warranty.
We reserve the right to introduce changes.
failing that, place it in the rubbish bin (it will end up in a
controlled dump; this is probably not the best option, but it
will avoid contaminating ground water)
This appliance complies with European directive 2002/96/EC on electrical and electronic equipment identified as WEEE (waste electrical and electronic equipment).
7
Page 8

Û Índice
[es]Instrucciones de uso
Indicaciones de seguridad........................................................ 8
Su nuevo aparato....................................................................... 9
Accesorios ...........................................................................................9
Quemadores de gas .................................................................. 9
Encendido manual........................................................................... 10
Encendido automático.................................................................... 10
Sistema de seguridad..................................................................... 10
Apagar un quemador...................................................................... 10
Niveles de potencia......................................................................... 10
Advertencias..................................................................................... 10
Consejos de cocinado.................................................................... 10
Recipientes de cocinado......................................................... 10
Recipientes apropiados.................................................................. 10
Advertencias de uso ....................................................................... 11
ã=Indicaciones de seguridad
Lea atentamente estas instrucciones. Solo entonces podrá
manejar su aparato de manera efectiva y segura.
Conserve las instrucciones de uso e instalación y entréguelas
con el aparato si este cambia de dueño.
El fabricante queda exento de toda responsabilidad si no se
cumplen las disposiciones de este manual.
Los gráficos representados en este manual de instrucciones
son orientativos.
No saque el aparato del embalaje protector hasta el momento
del encastre.
Si observa algún daño en el aparato, no lo conecte. Póngase
en contacto con nuestro Servicio Técnico.
Este aparato corresponde a la clase 3, según la norma EN 301-1 para aparatos a gas: aparato encastrado en un mueble.
Este aparato solo puede ser instalado en un lugar bien ventilado,
respetando los reglamentos en vigor y las disposiciones
relativas a la ventilación. No debe conectarse el aparato a un
dispositivo de evacuación de los productos de combustión.
El lugar en el que se instale el aparato debe disponer de la
ventilación reglamentaria en perfecto estado.
Antes de instalar su nueva placa de cocción asegúrese de que
la instalación se realiza siguiendo las instrucciones de montaje.
Este aparato sale de fábrica adaptado al tipo de gas que indica
la placa de características. Si fuera necesario cambiarlo,
consulte las instrucciones de montaje.
Todos los trabajos de instalación, regulación y adaptación a
otro tipo de gas deben ser realizados por un técnico
autorizado, respetando la normativa y legislación aplicable, y
las prescripciones de las compañías locales eléctricas y de
gas. Se recomienda llamar al Servicio Técnico para la
adaptación a otro tipo de gas.
Este aparato ha sido diseñado solo para uso doméstico, no
estando permitido su uso comercial o profesional. Este aparato
no puede ser instalado en yates o caravanas. La garantía
únicamente tendrá validez en caso de que se respete el uso
para el que fue diseñado.
Utilice el aparato únicamente para cocinar, nunca como
calefacción.
Este aparato no está previsto para el funcionamiento con un
reloj temporizador externo o un mando a distancia.
Durante el funcionamiento, el aparato no debe dejarse sin
vigilancia.
Limpieza y mantenimiento.......................................................11
Limpieza ............................................................................................ 11
Mantenimiento.................................................................................. 11
Solucionar anomalías...............................................................11
Servicio de asistencia técnica.................................................12
Condiciones de garantía ................................................................ 12
Embalaje y aparatos usados ...................................................12
Eliminación de residuos respetuosa con el medio ambiente. 12
Produktinfo
Encontrará más información sobre productos, accesorios,
piezas de repuesto y servicios en internet:
www.bosch-home.com y también en la tienda online:
www.bosch-eshop.com
Este aparato puede ser utilizado por niños a partir de 8 años y
personas que presenten limitaciones en sus facultades físicas,
sensoriales o psíquicas o que carezcan de experiencia y
conocimientos si son supervisados o han sido instruidos
respecto al uso seguro del aparato y son conscientes de los
peligros que conlleva su uso.
No dejar que los niños jueguen con el aparato. La limpieza y el
mantenimiento rutinario no debe encomendarse a los niños a
menos que estén supervisados.
Las zonas de cocción y adyacentes se calientan mucho. No
tocar nunca las superficies calientes. Mantener alejados a los
niños menores de 8 años.
Las zonas de cocción se calientan mucho. No colocar objetos
inflamables sobre la placa de cocción. No almacenar objetos
sobre la placa de cocción.
No almacene ni utilice productos químicos corrosivos, vapores,
materiales inflamables ni productos no alimenticios debajo de
este electrodoméstico ni cerca de él.
Las grasas o aceites sobrecalentados se inflaman fácilmente.
No se ausente mientras caliente grasa o aceite. Si se inflaman,
no apague el fuego con agua. ¡Peligro de quemaduras! Cubra
el recipiente con una tapa para sofocar el fuego y desconecte
la zona de cocción.
Los recipientes que presenten daños, tengan un tamaño
inadecuado, rebasen los bordes de la placa de cocción o
estén mal situados pueden provocar lesiones graves. Observe
los consejos y advertencias relativos a los recipientes de
cocinado.
No someta el aparato a corrientes de aire. Los quemadores
podrían apagarse.
No utilice máquinas de limpieza a vapor para limpiar el
aparato. ¡Peligro de electrocución!
En caso de avería, corte la alimentación eléctrica y de gas del
aparato. Para la reparación, llame a nuestro Servicio Técnico.
No manipule el interior del aparato. Si fuera necesario, llame a
nuestro Servicio Técnico.
Si alguno de los mandos no se puede girar, no lo fuerce. Llame
inmediatamente al Servicio Técnico, para que proceda a su
reparación o sustitución.
Las fisuras o roturas en la vitrocerámica conllevan riesgo de
electrocución. Desconectar el fusible de la caja de fusibles.
Avisar al Servicio de Asistencia Técnica.
8
Page 9

Su nuevo aparato
En la página 2 encontrará una vista general de su aparato así como la potencia de los quemadores.
Accesorios
Los siguientes accesorios se pueden adquirir en el Servicio
Técnico:
Perfil de unión
Para combinar los aparatos
entre sí y/o con placas de
cocción convencionales de la
misma marca.
Parrilla supletoria wok
Para utilizar exclusivamente
en quemadores wok de doble
y triple llama con recipientes
de diámetro mayor de 26 cm,
planchas de asado, cazuelas
de barro, paelleras, recipientes de base cóncava, etc.
Se recomienda utilizar la
parrilla supletoria wok para
prolongar la vida útil del aparato.
Simmer Plate
Este accesorio ha sido diseñado para reducir el nivel de
calor en la potencia mínima.
Colocar el accesorio directamente sobre la parrilla con
los volcanes hacia arriba,
nunca directamente sobre el
quemador. Colocar el recipiente centrado sobre el
accesorio.
Recipiente wok
El recipiente wok distribuye el
calor intenso de manera uniforme, permitiendo que los
alimentos se cocinen en
menos tiempo y con menos
aceite.
Cuando utilice un recipiente
wok siga las instrucciones del
fabricante.
--------
Código
HEZ394301 Perfil de unión
HEZ298127 Parrilla supletoria wok
HEZ298105 Simmer Plate
HEZ298103 Recipiente wok
El fabricante no asume responsabilidad si no se utilizan o se utilizan incorrectamente estos accesorios.
Quemadores de gas
Cada mando de accionamiento tiene señalado el quemador
que controla.
Para un correcto funcionamiento del aparato es imprescindible
asegurarse de que las parrillas y todas las piezas de los
quemadores estén bien colocadas.
9
Page 10

Encendido manual
WHUPRSDU EXMtD
1.Presione el mando del quemador elegido y gírelo hacia la
izquierda hasta la posición deseada.
2.Acerque algún tipo de encendedor o llama (mecheros,
cerillas, etc.) al quemador.
Encendido automático
Si su placa de cocción dispone de encendido automático
(bujías):
1.Presione el mando del quemador elegido y gírelo hacia la
izquierda hasta la posición de máxima potencia.
Mientras el mando está presionado se producen chispas en
todos los quemadores. La llama se enciende.
2.Deje de presionar el mando.
3.Gire el mando a la posición deseada.
Si no se produce el encendido, gire el mando a la posición de
apagado y repita los pasos. Esta vez mantenga el mando
presionado durante más tiempo (hasta 10 segundos).
ã=¡Peligro de deflagración!
Si transcurridos 15 segundos la llama no se enciende, apague
el quemador y abra la puerta o ventana del recinto. Espere al
menos un minuto antes de intentar encender el quemador.
Sistema de seguridad
Según modelo, su placa de cocción puede disponer de un
sistema de seguridad (termopar), que impide el paso de gas si
los quemadores se apagan accidentalmente.
Niveles de potencia
Los mandos progresivos le permiten regular la potencia que
necesite entre los niveles máximo y mínimo.
Posición
Llama grande
Llama pequeña
Mando cerrado
Û
Apertura o capacidad máximas y encen-
—
dido eléctrico
Apertura o capacidad mínima
˜
Advertencias
Durante el funcionamiento del quemador es normal que se
escuche un leve silbido.
En los primeros usos es normal que se desprendan olores.
Esto no supone ningún riesgo ni mal funcionamiento. Irán
desapareciendo.
Una llama de color naranja es normal. Se debe a la presencia
de polvo en el ambiente, líquidos derramados, etc.
El uso de un aparato de cocción a gas produce calor y
humedad en el local donde está instalado. Debe asegurarse
una buena ventilación de la cocina: mantenga abiertos los
orificios de ventilación natural o instale un dispositivo de
ventilación mecánica (campana extractora).
La utilización intensa y prolongada del aparato puede necesitar
una ventilación complementaria (por ejemplo abriendo una
ventana) o una ventilación más eficaz (por ejemplo
aumentando la potencia de la ventilación mecánica, si existe).
En el caso de una extinción accidental de las llamas del
quemador, cierre el mando de accionamiento del quemador y
no intente reencenderlo durante por lo menos 1 minuto.
Unos segundos después del apagado del quemador se
producirá un sonido (golpe seco). No es ninguna anomalía,
eso significa que la seguridad se ha desactivado.
Mantenga la máxima limpieza. Si las bujías están sucias el
encendido será defectuoso. Límpielas periódicamente con un
cepillo no metálico pequeño. Tenga en cuenta que las bujías
no deben sufrir impactos violentos.
Para garantizar que este dispositivo esté activo:
1.Encienda el quemador con normalidad.
2.Sin soltar el mando, manténgalo presionado firmemente
durante 4 segundos tras haberse encendido la llama.
Apagar un quemador
Gire el mando correspondiente hacia la derecha hasta la
posición 0.
Recipientes de cocinado
Recipientes apropiados
Quemador Diámetro mínimo
del recipiente
Quemador wok 22 cm
Quemador rápido 22 cm 26 cm
Quemador semi-rápido 14 cm 20 cm
Diámetro máximo
del recipiente
Consejos de cocinado
Quemador Muy fuerte -
Quemador
wok
Quemador
rápido
Quemador
semi-rápido
Fuerte
Hervir, cocer,
asar, dorar,
paellas, comida
asiática (wok)
Escalope, bistec, tortilla, frituras
Patatas al
vapor, verduras frescas,
potajes, pastas
Medio Lento
Recalentar y mantener calientes:
platos preparados, platos cocinados
Arroz, bechamel, ragout
Recalentar y mantener calientes
platos cocinados y hacer guisos
delicados
Cocción al
vapor: pescado, verduras
10
Page 11

Advertencias de uso
Los siguientes consejos le ayudarán a ahorrar energía y a evitar daños en los recipientes:
Utilice recipientes de tamaño
apropiado a cada quemador.
No utilice recipientes
pequeños en quemadores
grandes. La llama no debe
tocar los laterales del
recipiente.
No utilice recipientes
deformados que se muestren
inestables sobre la placa de
cocción. Los recipientes
podrían volcar.
Utilice solo recipientes de
base plana y gruesa.
No cocine sin tapa o con esta
desplazada. Se desperdicia
parte de la energía.
Coloque el recipiente bien
centrado sobre el quemador.
En caso contrario podría
volcar.
No coloque los recipientes
grandes en los quemadores
cercanos a los mandos. Estos
pueden resultar dañados
debido al exceso de
temperatura.
Coloque los recipientes sobre
las parrillas, nunca
directamente sobre el
quemador.
Asegúrese de que las parrillas
y tapas de los quemadores
estén bien colocadas antes de
su uso.
Maneje los recipientes con
cuidado sobre la placa de
cocción.
No golpee la placa de cocción
ni coloque sobre ella pesos
excesivos.
Limpieza y mantenimiento
Limpieza
Una vez frío el aparato, límpielo con una esponja, agua y jabón.
Después de cada uso, limpie la superficie de los respectivos
elementos del quemador una vez que se haya enfriado. Si se
dejan restos (alimentos recocidos, gotas de grasa, etc.), por
poco que sea, se incrustarán en la superficie y serán luego
más difíciles de eliminar. Es necesario que los agujeros y
ranuras estén limpios para que la llama sea correcta.
El movimiento de algunos recipientes puede dejar restos
metálicos sobre las parrillas.
Limpie los quemadores y las parrillas con agua jabonosa y
frótelos con un cepillo no metálico.
Seque completamente los quemadores y las parrillas siempre.
La presencia de gotas de agua o zonas húmedas al comienzo
de la cocción puede deteriorar el esmalte.
Después de la limpieza y secado de los quemadores,
asegúrese de que las tapas estén bien colocadas sobre el
difusor.
¡Atención!
■ No utilice máquinas de limpieza a vapor. Podría dañar la
placa de cocción.
■ No utilice nunca productos abrasivos, estropajos de acero,
objetos cortantes, cuchillos, etc. para quitar restos de comida
endurecidos de la placa de cocción.
■ No utilice cuchillos, rasquetas o similar para limpiar la unión
del cristal con los embellecedores de los quemadores,
perfiles metálicos ni en los paneles de cristal o aluminio si
hubiere.
Mantenimiento
Limpie al instante los líquidos que se derramen. Así evitará que los restos de comida se peguen y se ahorrará esfuerzos innecesarios.
No deslice sobre el vidrio los recipientes, ya que puede rayarlo. Asimismo evite caídas de objetos duros o puntiagudos sobre el cristal. No golpee la placa de cocción por ninguno de sus cantos.
Los granos de arena (procedentes, por ejemplo, de la limpieza de verduras y hortalizas) rayan la superficie del cristal.
El azúcar fundido o los alimentos con elevado contenido de azúcar que se hubieran derramado deberán eliminarse inmediatamente de la zona de cocción con ayuda de la rasqueta para vidrio.
Solucionar anomalías
En ocasiones, las anomalías detectadas se pueden solucionar
fácilmente. Antes de llamar al Servicio Técnico tenga en cuenta
los siguientes consejos:
Anomalía Posible causa Solución
El funcionamiento eléctrico general está averiado.
Fusible defectuoso. Comprobar en la caja general de fusibles si el
fusible está averiado y cambiarlo.
El automático o un diferencial ha saltado. Comprobar en el cuadro general de mando si ha
saltado el automático o un diferencial.
11
Page 12

Anomalía Posible causa Solución
El encendido automático
no funciona.
La llama del quemador no
es uniforme.
El flujo de gas no parece
normal o no sale gas.
Hay olor a gas en la
cocina.
Las válvulas de seguridad
de algún quemador no funcionan.
Pueden existir residuos de alimentos o de limpieza entre las bujías y los quemadores.
Los quemadores están mojados. Secar cuidadosamente las tapas del quemador.
Las tapas del quemador están mal colocadas. Comprobar que las tapas están bien colocadas.
El aparato no está conectado a tierra, está mal
conectado o la toma de tierra es defectuosa.
Las piezas del quemador están mal colocadas. Colocar correctamente las piezas.
Las ranuras del quemador están sucias. Limpiar las ranuras del quemador.
El paso de gas está cerrado por llaves interme-
dias.
Si el gas proviene de una bombona, comprobar
que no está vacía.
Algún grifo está abierto. Cerrar los grifos.
Posible fuga en el acoplamiento de la bombona. Comprobar que el acoplamiento es perfecto.
No ha mantenido el mando presionado el tiempo
suficiente.
Las ranuras del quemador están sucias. Limpiar las ranuras del quemador.
El espacio entre la bujía y el quemador debe estar
limpio.
Póngase en contacto con el instalador eléctrico.
Abrir las posibles llaves intermedias.
Cambiar la bombona.
Una vez encendido el quemador, mantener el
mando presionado unos segundos más.
Servicio de asistencia técnica
Si se solicita nuestro Servicio Técnico, se debe facilitar el
número de producto (E-Nr.) y el número de fabricación (FD) del
aparato. Esta información figura en la placa de características,
situada en la parte inferior de la placa de cocción, y en la
etiqueta del manual de uso.
Las señas de las delegaciones internacionales figuran en la
lista adjunta de centros y delegaciones del Servicio de
Asistencia Técnica Oficial.
Solicitud de reparación y asesoramiento en caso de averías
E 902 351 352
Confíe en la competencia del fabricante. De esa forma se asegura de que la reparación se lleva a cabo por personal técnico debidamente instruido, equipado con las piezas originales y de repuesto necesarias para su aparato.
Embalaje y aparatos usados
Si en la placa de características del aparato aparece el símbolo
), tenga en cuenta las siguientes indicaciones:
Eliminación de residuos respetuosa con el medio ambiente
Desenvuelva el aparato y deshágase del embalaje de manera respetuosa con el medio ambiente.
El embalaje de su aparato se ha fabricado con los materiales
estrictamente necesarios para garantizar una protección eficaz
durante el transporte. Estos materiales son totalmente
reciclables, reduciendo así el impacto medioambiental. Le
invitamos a contribuir también en la conservación del medio
ambiente, siguiendo los siguientes consejos:
■ deposite el embalaje en el contenedor de reciclaje
adecuado,
■ antes de deshacerse de un aparato desechado, inutilícelo.
Consulte en su administración local la dirección del centro
recolector de materiales reciclables más próximo y entregue
allí su aparato,
■ no tire el aceite usado por el fregadero. Guárdelo en un
recipiente cerrado y entréguelo en un punto de recogida o,
Condiciones de garantía
Si, contrariamente a nuestras expectativas, el aparato
presentara algún daño o no cumpliera con sus exigencias de
calidad previstas, le rogamos nos lo haga saber lo antes
posible. Para que la garantía tenga validez, el aparato no
deberá haber sido manipulado, ni sometido a un mal uso.
Las condiciones de garantía aplicables son las establecidas
por la representación de nuestra empresa en el país donde se
haya efectuado la compra. Puede solicitarse información
detallada en los puntos de venta. Es necesario presentar el
justificante de compra para hacer uso de la garantía.
Reservado el derecho de modificaciones.
en su defecto, en un contenedor de basura (acabará en un
vertedero controlado; probablemente no es la mejor
solución, pero evitamos la contaminación del agua).
Este aparato cumple con la directiva europea 2002/96/CE sobre aparatos eléctricos y electrónicos identificada como WEEE (waste electrical and electronic equipment).
12
Page 13

Þ Table des matières
[fr]Mode d’emploi
Consignes de sécurité.............................................................13
Votre nouvel appareil...............................................................14
Accessoires ...................................................................................... 14
Brûleurs à gaz...........................................................................14
Allumage manuel ............................................................................. 15
Allumage automatique.................................................................... 15
Système de sécurité........................................................................ 15
Éteindre un brûleur .......................................................................... 15
Niveaux de chauffe.......................................................................... 15
Avertissements ................................................................................. 15
Conseils pour cuisiner .................................................................... 15
Récipients de préparation .......................................................15
Récipients appropriés..................................................................... 15
Conseils d'utilisation........................................................................ 16
ã=Consignes de sécurité
Lisez attentivement ces instructions. Ce n'est qu'à cette
condition que vous pourrez utiliser votre appareil efficacement
et en toute sécurité.
Conservez la notice d'utilisation et d'installation, et remettez-la
avec l'appareil si celui-ci change de propriétaire.
Le fabricant est exempt de toute responsabilité si les
instructions de cette notice ne sont pas respectées.
Les images de cette notice sont proposées à titre indicatif.
Ne retirez l'appareil de son emballage protecteur qu'au
moment de son encastrement.
Si vous observez que l'appareil est endommagé, ne le
branchez pas. Contactez notre Service Technique.
Cet appareil correspond à la classe 3, selon la norme EN 30-1-
1 pour les appareils à gaz : appareil encastré dans un meuble.
Cet appareil ne peut être installé que dans un endroit bien
ventilé, dans le respect de la réglementation en vigueur et des
dispositions relatives à la ventilation. L'appareil ne doit pas être
connecté à un dispositif d'évacuation des produits de
combustion.
Le lieu où est installé l'appareil doit disposer d'une ventilation
conforme à la réglementation, en parfait état de marche.
Assurez-vous que l'installation de votre plaque de cuisson est
réalisée dans le respect de la notice de montage.
En sortie d'usine, cet appareil est adapté au type de gaz
indiqué sur la plaque signalétique. S'il était nécessaire de le
changer, veuillez consulter la notice de montage.
Tous les travaux d'installation, de réglage et d'adaptation à un
autre type de gaz doivent être réalisés par un technicien
habilité qui doit respecter les normes et la législation
applicable, ainsi que les prescriptions des fournisseurs locaux
d'électricité et de gaz. Il est recommandé d'appeler le Service
Technique pour l'adaptation à un autre type de gaz.
Cet appareil n'a été conçu que pour un usage domestique ;
son usage commercial ou professionnel n'est en aucun cas
permis. Cet appareil ne peut pas être installé dans des yachts
ou des caravanes. La garantie ne sera valable que si l'usage
pour lequel il a été conçu a été respecté.
N'utilisez l'appareil que pour cuisiner, jamais comme chauffage.
Cet appareil n'est pas conçu pour un fonctionnement avec une
minuterie externe ou une commande à distance.
Ne laissez pas l'appareil sans surveillance pendant son
fonctionnement.
Nettoyage et entretien.............................................................. 16
Nettoyage.......................................................................................... 16
Maintenance ..................................................................................... 16
Résoudre des anomalies.........................................................16
Service Technique.................................................................... 17
Conditions de garantie ................................................................... 17
Emballage et appareils usagés ............................................... 17
Élimination des résidus de manière écologique ....................... 17
Produktinfo
Vous trouverez des informations supplementaires concernant
les produits, accessoires, pièces de rechange et services sur
Internet sous : www.bosch-home.com et la boutique en ligne :
www.bosch-eshop.com
Cet appareil peut être utilisée par des enfants âgés de plus de
8 ans et par des personnes ayant des capacités physiques,
sensorielles ou mentales restreintes ou ayant un manque
d'expérience ou de connaissances, s'ils sont surveillés ou si
une personne les a instruits de la manipulation de l'appareil en
toute sécurité et s'ils ont compris les dangers qui en résultent.
Les enfants ne doivent pas jouer avec l'appareil. Le nettoyage
et l'entretien incombant à l'utilisateur ne doivent pas être
effectués par des enfants sans surveillance.
Les foyers et leurs alentours deviennent chauds. Ne pas
toucher les surfaces chaudes. Eloigner les enfants âgés de
moins de 8 ans.
Les foyers deviennent très chauds. Ne jamais poser des objets
inflammables sur la table de cuisson. Ne pas conserver des
objets sur la table de cuisson.
Ne stockez pas et n'utilisez pas de produits chimiques
corrosifs, de vapeurs, de matériels inflammables, ni de produits
non alimentaires sous cet appareil, ni à proximité.
Les graisses et les huiles surchauffées s'enflamment facilement.
Restez toujours à proximité si vous chauffez des graisses ou des
huiles. Si elles s'enflamment, n'éteignez pas le feu avec de l'eau.
Risque de brûlures ! Couvrez le récipient avec un couvercle
hermétique pour étouffer le feu puis éteignez la zone de cuisson.
Les récipients qui seraient abîmés, dont la taille ne serait pas
adaptée, qui dépasseraient de la plaque de cuisson ou qui
seraient mal placés, pourraient occasionner des lésions
graves. Respectez les conseils et les avertissements
concernant les récipients de cuisson.
Ne placez pas l'appareil dans des courants d'air. Les brûleurs
pourraient s'éteindre.
N'utilisez pas de machines de nettoyage à vapeur sur la plaque
de cuisson. Risque d'électrocution !
En cas d'incident, débranchez l'alimentation d'électricité et de
gaz de l'appareil. Pour la réparation, contactez notre Service
Technique.
Ne manipulez pas l'intérieur de l'appareil. Si nécessaire,
contactez notre Service Technique.
Si l'un des boutons de commande est bloqué, ne forcez pas.
Contactez immédiatement le Service Technique pour qu’il
procède à sa réparation ou à son remplacement.
Les fêlures et cassures dans la vitrocéramique peuvent
occasionner des chocs électriques. Couper le fusible dans la
boîte à fusibles. Appeler le service aprèsvente.
13
Page 14

Votre nouvel appareil
À la page 2 se trouve une vue générale de l'appareil, ainsi que la puissance des brûleurs.
Accessoires
Vous pourrez obtenir les accessoires suivants auprès de notre
Service Technique :
Profilé de jonction
Pour assembler des appareils
entre eux et/ou avec des
plaques de cuisson traditionnelles de la même marque.
Grille supplémentaire wok
À utiliser exclusivement sur des
brûleurs wok double et triple
flamme avec des récipients
ayant un diamètre supérieur à
26 cm, grils, casseroles en
terre, poêles à paella, récipients à base concave, etc.
Il est recommandé d'utiliser la
grille supplémentaire wok
pour prolonger la vie utile de
l'appareil.
Simmer Plate
Cet accessoire est prévu pour
réduire le niveau de chaleur à
la puissance minimum.
Placer l'accessoire directement sur la grille avec les
rebords orientés vers le haut,
jamais en contact direct avec
le brûleur. Placer le récipient
au centre sur l'accessoire.
Récipient wok
Le récipient wok distribue la
chaleur intense de manière
uniforme pour vous permettre de cuire les aliments
plus rapidement et avec
moins d'huile.
Quand vous utilisez un récipient wok, suivez les instructions du fabricant.
--------
Code
HEZ394301 Profilé de jonction
HEZ298127 Grille supplémentaire wok
HEZ298105 Simmer Plate
HEZ298103 Récipient wok
Le fabricant décline toute responsabilité si ces accessoires ne sont pas utilisés ou sont employés de manière incorrecte.
Brûleurs à gaz
Chaque bouton de commande de mise en marche indique le
brûleur qu'il contrôle.
Pour un fonctionnement correct de l'appareil, il est
indispensable de s'assurer que les grilles et toutes les pièces
des brûleurs sont correctement mises en place.
14
Page 15

Allumage manuel
1. Appuyez sur le bouton de commande du brûleur choisi et
tournez-le vers la gauche jusqu'à la position souhaitée.
2. Approchez un allume-gaz ou une flamme (briquets,
allumettes, etc.) du brûleur.
Allumage automatique
Si votre plaque de cuisson dispose d'un allumage automatique
(bougies):
1. Appuyez sur le bouton de commande du brûleur choisi puis
tournez-le vers la gauche jusqu'à la position de puissance
maximum.
Quand le bouton de commande est enfoncé, des étincelles
se produisent sur tous les brûleurs. La flamme s'allume.
2. Relâchez le bouton de commande.
3. Tournez le bouton de commande sur la position souhaitée.
Si l'allumage ne se produit pas, tournez le bouton de
commande sur la position de déconnexion puis répétez les
étapes. Cette fois, maintenez le bouton de commande enfoncé
plus longtemps (pendant 10 secondes maximum).
ã=Risque de déflagration !
Si au bout de 15 secondes la flamme ne s'est pas allumée,
éteignez le brûleur et aérez la pièce. Attendez au moins une
minute avant d'essayer de rallumer le brûleur.
Système de sécurité
Selon le modèle, votre plaque de cuisson peut disposer d'un
système de sécurité (thermocouple) qui bloque l'arrivée du gaz
si les brûleurs s'éteignent accidentellement.
Niveaux de chauffe
Les variateurs vous permettent de régler la puissance dont
vous avez besoin entre les niveaux maximum et minimum.
Position
Flamme grande
Flamme petite
Bouton de commande éteint
Û
Ouverture ou capacité maximums et
—
connexion électrique
Ouverture ou capacité minimums
˜
Avertissements
Pendant le fonctionnement du brûleur, il est normal d'entendre
un léger sifflement.
Lors des premières utilisations, il est normal que des odeurs se
dégagent. Mais cela ne suppose aucune dysfonctionnement.
Ces odeurs disparaîtront petit à petit.
Une flamme de couleur orange est normale. Ceci est dû à la
présence de poussière dans l'atmosphère, de liquides
déversés, etc.
L'utilisation d'un appareil de cuisson à gaz produit de la chaleur
et de l'humidité dans la pièce où il est installé. Assurez une
bonne ventilation dans la cuisine : laissez les orifices de
ventilation naturelle ouverts ou installez un dispositif de
ventilation mécanique (hotte aspirante)
L'utilisation intense et prolongée de l'appareil peut requérir une
ventilation complémentaire, par exemple, en ouvrant une
fenêtre, ou une ventilation plus efficace comme par exemple en
augmentant la puissance de la ventilation mécanique existante.
S'il se produit une extinction accidentelle des flammes du
brûleur, éteignez le bouton de commande du brûleur et
attendez au moins 1 minute avant de le rallumer.
Quelques secondes après avoir éteint le brûleur, un son est
émis (coup sec). Il ne s'agit pas d'une anomalie, ceci signifie
que la sécurité a été désactivée.
Conservez le brûleur le plus propre possible. Si les bougies
sont sales, l'allumage sera défectueux. Nettoyez-les
régulièrement avec une petite brosse non métallique. Attention,
à ne pas cogner violemment les bougies.
WKHUPRFRXSOH
Pour que cet dispositif soit actif :
1. Allumez le brûleur normalement.
2. Maintenez le bouton de commande enfoncé sans le lâcher
pendant 4 secondes après l'allumage de la flamme.
ERXJLH
Éteindre un brûleur
Tournez le bouton de commande correspondant vers la droite
jusqu'à la position 0.
Récipients de préparation
Récipients appropriés
Brûleur Diamètre minimum
du récipient
Brûleur wok 22 cm
Brûleur rapide 22 cm 26 cm
Brûleur semi-rapide 14cm 20cm
Diamètre maximum
du récipient
Conseils pour cuisiner
Brûleur Très fort - Fort Moyen Lent
Brûleur wok Bouillir, cuire,
Brûleur
rapide
Brûleur
semi-rapide
rôtir, dorer, paellas, cuisine asiatique (Wok)
Escalope, steak,
omelette, fritures
Pommes de terre
vapeur, légumes
frais, potages,
pâtes
Réchauffer et garder au
chaud : plats préparés, plats
cuisinés
Riz, béchamel, ragoût
Réchauffer/garder au chaud
des plats cuisinés et préparer
des ragoûts délicats
Cuisson à la
vapeur : poisson, légumes
15
Page 16

Conseils d'utilisation
Les conseils suivants vous aideront à économiser de l'énergie et à éviter d'endommager les récipients :
Utilisez des récipients de la
taille appropriée à chaque
brûleur.
N’utilisez pas de petits
récipients sur les grands
brûleurs. La flamme ne doit
pas toucher les côtés du
récipient.
N'utilisez pas de récipients
déformés, ayant tendance à
être instables sur la plaque de
cuisson. Les récipients
pourraient se renverser.
N'utilisez que des récipients à
base plane et épaisse.
Ne cuisinez pas sans
couvercle ni avec celui-ci mal
mis. Vous risqueriez ainsi de
perdre une partie de l'énergie.
Placez le récipient bien au
centre du brûleur. Dans le cas
contraire, il risque de se
renverser.
Ne placez pas les récipients
de grande taille sur les
brûleurs situés près du
boutons de commandes. Ils
risqueraient d'être
endommagés en raison de
l'excès de chaleur.
Placez les récipients sur les
grilles, jamais directement sur
le brûleur.
Vérifiez que les grilles et les
couvercles des brûleurs sont
bien placés avant de les
utiliser.
Manipulez soigneusement les
récipients sur la plaque de
cuisson.
Ne cognez pas la plaque de
cuisson et n'y posez pas
d'objets lourds.
Nettoyage et entretien
Nettoyage
Quand l’appareil a refroidi, nettoyez-le avec une éponge, de
l’eau et du savon.
Après chaque utilisation, nettoyez la surface des différents
éléments du brûleur quand il a refroidi. Si des restes sont
laissés (aliments recuits, gouttes de graisse, etc.), même
infimes, ils s'incrusteront dans la surface et seront plus difficiles
à éliminer par la suite. Les trous et les rainures doivent être
propres afin que la flamme soit optimale.
Le frottement de certains récipients peut laisser des traces
métalliques sur les grilles.
Lavez les brûleurs et les grilles à l'eau savonneuse et frottez-les
à l'aide d'une brosse non métallique.
Séchez toujours complètement les brûleurs et les grilles. La
présence de gouttes d'eau ou de zones humides au début de
la cuisson peut détériorer l'émail.
Après le nettoyage et le séchage des brûleurs, assurez-vous
que les couvercles sont bien placés sur le diffuseur.
Attention !
■ N'utilisez pas de machines de nettoyage à vapeur. Cela
pourrait endommager la plaque de cuisson.
■ N'utilisez jamais de produits abrasifs, lavettes en acier, objets
tranchants, couteaux, etc., pour retirer les restes d'aliments
ayant durci sur la plaque de cuisson.
■ N'utilisez pas de couteaux, de racleurs ou d'objets similaires
pour nettoyer l'union entre le verre et les caches des
brûleurs, les profilés métalliques ni sur les panneaux en verre
ou aluminium, le cas échéant.
Maintenance
Nettoyez immédiatement tous les liquides qui coulent. Vous éviterez ainsi que les restes d'aliment ne collent et économiserez des efforts inutiles.
Ne faites pas glisser les récipients sur le verre car ils pourraient le rayer. De plus, évitez les chutes d'objets durs ou pointus sur la plaque en verre. Ne frappez la plaque de cuisson sur aucun de ses angles.
Les grains de sable (provenant par exemple du nettoyage des légumes) rayent la surface du verre.
Le sucre fondu ou des aliments à teneur élevée en sucre ayant débordés doivent être immédiatement retirés de la zone de cuisson à l'aide d'un racleur en verre.
Résoudre des anomalies
Parfois, les anomalies détectées peuvent être facilement
résolues. Avant de contacter le Service Technique, prenez en
considération les conseils suivants :
Anomalie Cause probable Solution
Le fonctionnement électrique
général est en panne.
16
Fusible défectueux. Vérifiez dans le boîtier général des fusibles si un
L'interrupteur magnétothermique ou un interrupteur différentiel s'est déclenché.
fusible n'est pas grillé et remplacez-le.
Vérifiez dans le tableau de distribution électrique
si l'interrupteur magnétothermique ou un interrupteur différentiel s'est déclenché.
Page 17

Anomalie Cause probable Solution
L'allumage automatique ne
fonctionne pas.
La flamme du brûleur n'est
pas uniforme.
Le flux de gaz ne paraît pas
normal ou aucun gaz ne sort.
Il y a une odeur de gaz dans
la cuisine.
Les soupapes de sécurité de
l'un des brûleurs ne fonctionnent pas.
Il peut y avoir des résidus d’aliments ou de nettoyant entre les bougies et les brûleurs.
Les brûleurs sont mouillés. Séchez soigneusement les couvercles du brû-
Les couvercles du brûleur sont mal placés. Vérifiez que les couvercles sont bien placés.
L'appareil n'est pas raccordé à la terre, est mal
raccordé à la terre, ou la prise de terre est défectueuse.
Les pièces du brûleur sont mal placées. Placez correctement les pièces.
Les rainures du brûleur sont sales. Nettoyez les rainures du brûleur.
L'arrivée de gaz est fermée par des robinets
intermédiaires.
Si le gaz provient d'une bouteille, vérifiez qu'elle
n'est pas vide.
Un robinet de gaz est ouvert. Fermez les robinets de gaz.
Possible fuite au raccord de la bouteille. Vérifiez que le raccord est hermétique.
Le bouton de commande n'a pas été enfoncé
assez longtemps.
Les rainures du brûleur sont sales. Nettoyez les rainures du brûleur.
L'espace entre la bougie et le brûleur doit être
propre.
leur.
Contactez votre électricien.
Ouvrez les éventuels robinets intermédiaires.
Changez la bouteille.
Une fois le brûleur allumé, maintenez le bouton
de commande enfoncé pendant quelques
secondes supplémentaires.
Service Technique
Si vous faites appel à notre Service Technique, vous devez
communiquer le numéro de produit (E-Nr.) ainsi que le numéro
de fabrication (FD) de l'appareil. Cette information figure sur la
plaque signalétique située sur la partie inférieure de la plaque
de cuisson, et sur l'étiquette de la notice d'utilisation.
Vous trouverez les données de contact pour tous les pays dans
l'annuaire ci-joint du service après-vente.
Commande de réparation et conseils en cas de dérangements
B 070 222 141
FR 01 40 10 11 00
CH 0848 840 040
Faites confiance à la compétence du fabricant. Vous
garantissez ainsi que la réparation sera effectuée par des
Emballage et appareils usagés
Si la plaque signalétique de l'appareil contient le symbole ), tenez compte des instructions suivantes.
Élimination des résidus de manière écologique
Déballez l'appareil et débarrassez-vous de l'emballage de manière écologique.
L'emballage de votre appareil a été fabriqué avec les matériaux
indispensables pour garantir une protection efficace pendant le
transport. Ces matériaux sont entièrement recyclables, ce qui
réduit l'impact sur l'environnement. Nous vous encourageons à
contribuer également à la préservation de l'environnement, en
suivant les conseils ci-dessous :
■ déposez l'emballage dans une benne de recyclage adaptée,
■ avant de vous défaire d'un appareil, mettez-le hors d'état.
Consultez votre administration locale pour connaître l'adresse
du centre de collecte de matériels recyc lables le plus près de
chez vous, et apportez-le à ce site,
techniciens formés qui possèdent les pièces de rechange
d’origine pour votre appareil.
Conditions de garantie
Si, contrairement à nos attentes, l'appareil présente un
dommage ou ne respecte pas les exigences de qualité
prévues, veuillez nous l'indiquer dans les plus brefs délais.
Pour que la garantie soit valide, l'appareil ne devra pas avoir
été manipulé, ni soumis à une mauvaise utilisation.
Les conditions de garantie applicables sont celles établies par
la représentation de notre entreprise dans le pays où l'achat a
été effectué. Il est possible d'obtenir des informations détaillées
dans les points de vente. Il est nécessaire de présenter le bon
d'achat pour bénéficier de la garantie.
Tout droit de modification réservé.
■ ne jetez pas l'huile usagée dans l'évier Conservez-la dans un
récipient fermé et remettez-le à un point de collecte ou, le cas
échéant, dans un bac approprié (qui sera remis à un
déversoir contrôlé ; ce n'est probablement pas la meilleur
solution, mais nous évitons ainsi de polluer l'eau).
Cet appareil est conforme à la Directive Européenne 2002/96/ CE concernant les équipements électriques et électroniques, identifiée sous le nom de WEEE (waste electrical and electronic equipment).
17
Page 18

Robert Bosch Hausgeräte GmbH
Carl-Wery-Straße 34
81739 München
Germany
www.bosch-home.com
*9000568390*
9000568390
D
 Loading...