

Page 1
PR111B and PR112B
External LAN Reader Modules
Security Systems
EN
Installer Reference Guide
Security System
Page 2
PR111B-PR112B
i
Note
Installer Reference Guide
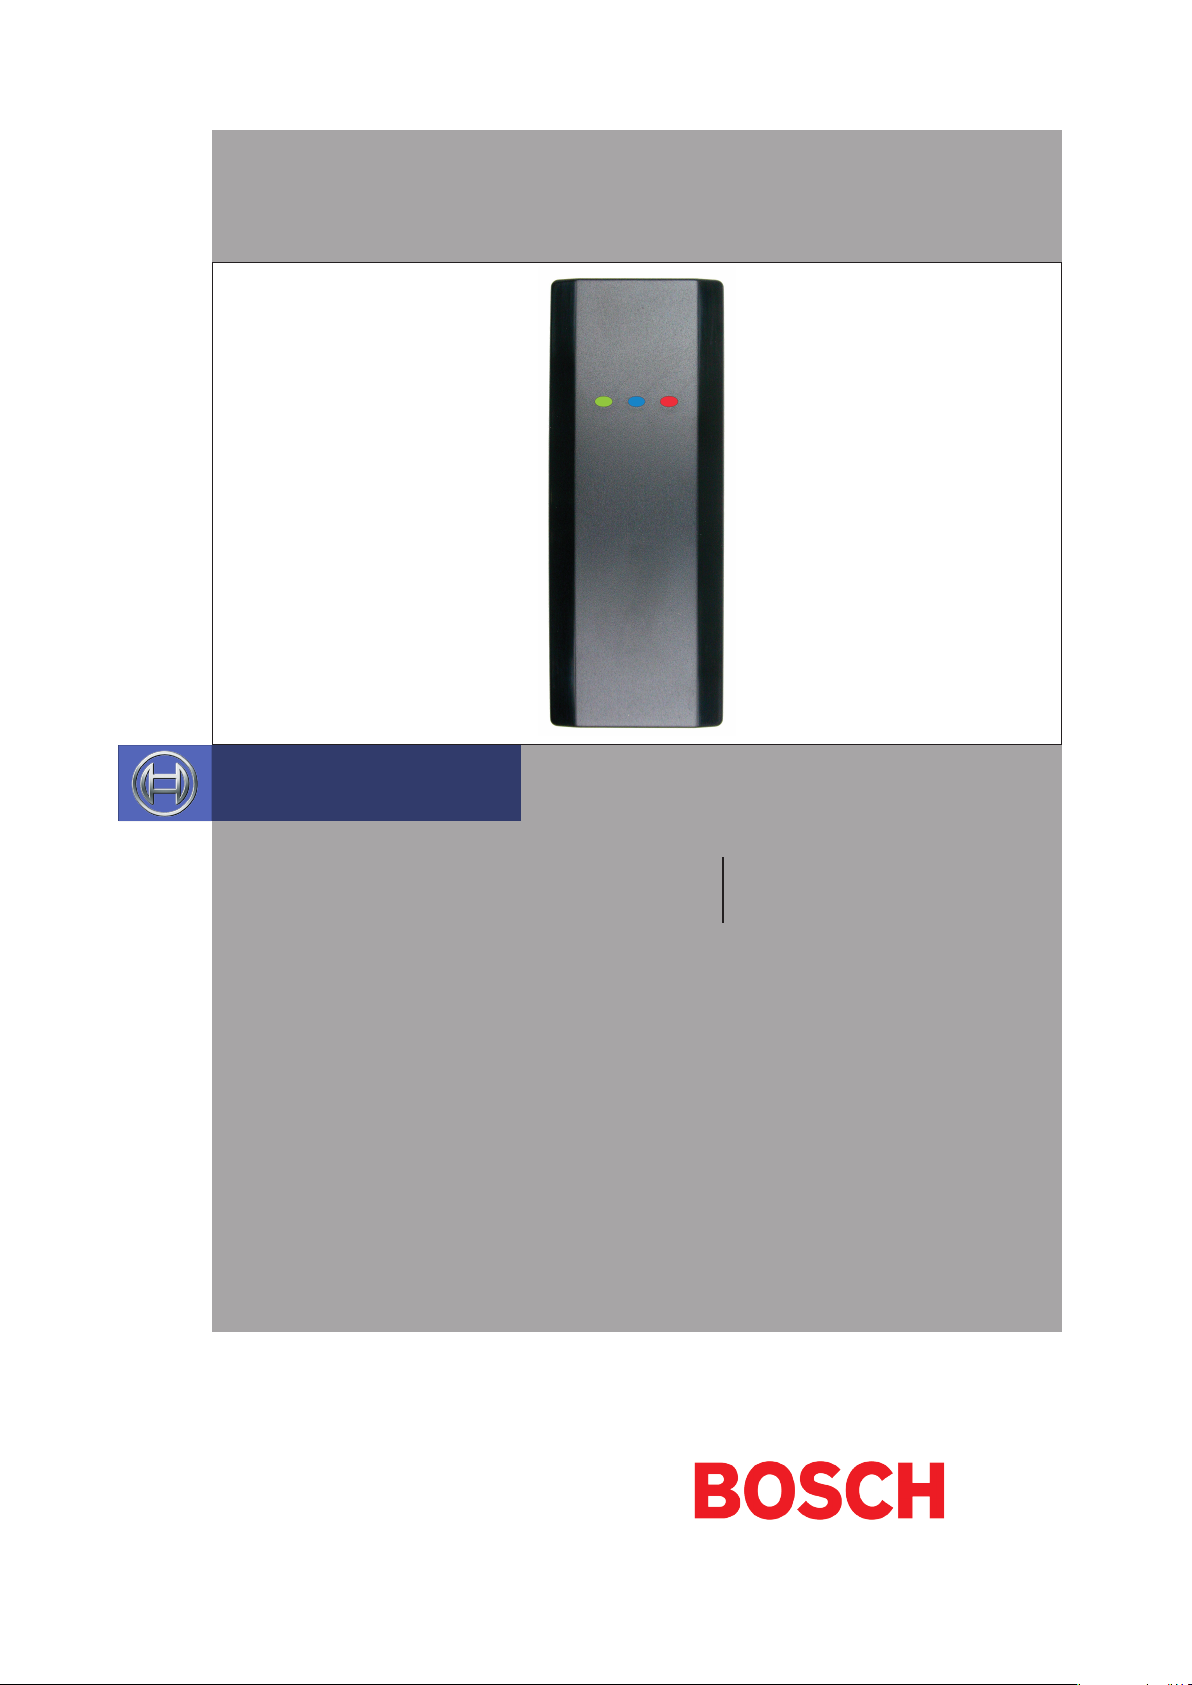
Weatherproof external LAN Readers
PR111B - Black and PR112B - White
The PR111B and PR112B external LAN readers feature our proprietary 40 bit transmission format and can be used
to provide alarm and or access control functionality when used on selected Solution
security control panels.
Constructed from UV stabilised ASA plastic, the external readers provide a high level
of vandal resistance and are weather resistant to IP66 making them ideal for outdoor
installations.
Reader Compatibility
Panels Supported Version Keypads Supported
Solution 16i 2.19 Up to 8
Solution 16X 2.00 Up to 8
Solution 144 2.00 Up to 16
Solution E 2.00 Up to 16
Table 1: LAN Reader Compatibility
The PR111B and PR112B readers include red, green and blue indicators which are
used to show area and or door lock status at all times.
The reader connects to the control panel via the RS485 encrypted LAN and occupies
a standard keypad position in the panel conguration. Various options can be congured via the Devices - Keypad & Readers menu in panel programming. User access
events are stored in the panel log and can also be reported if required.
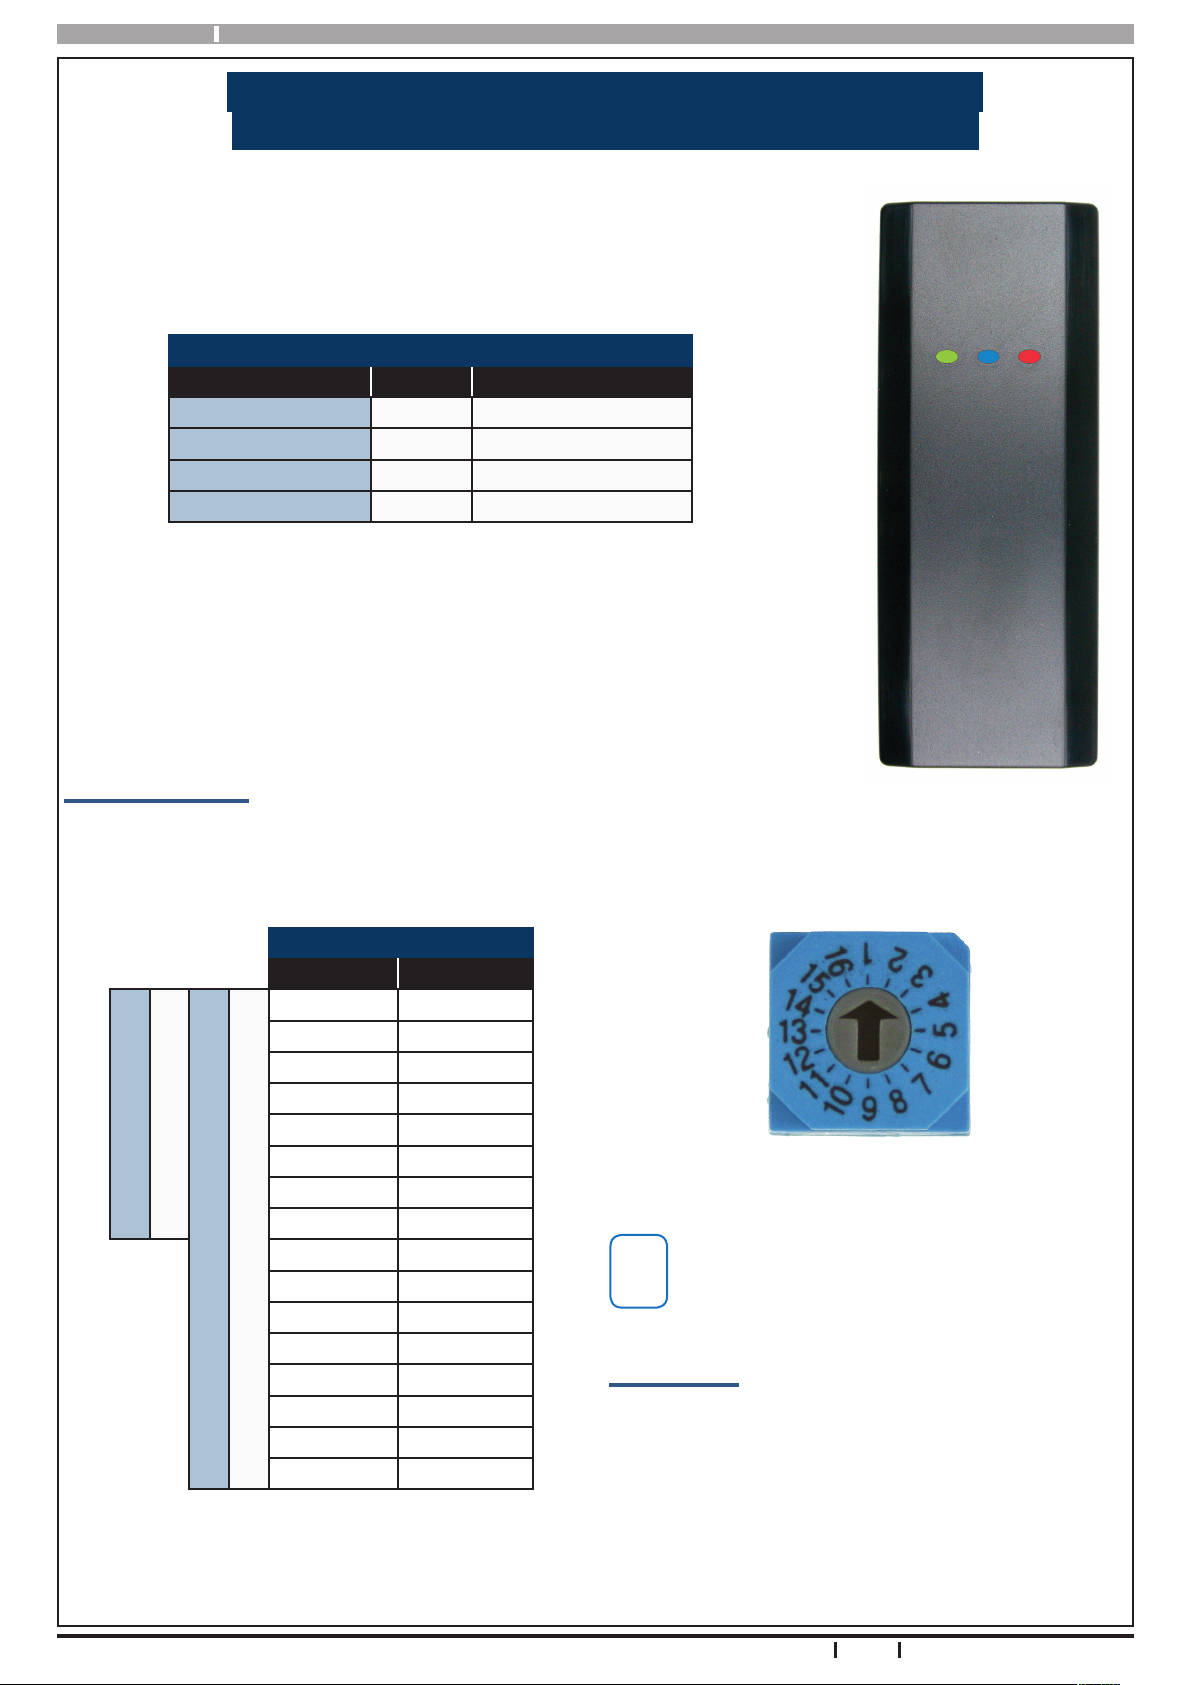
Reader Addressing
Each reader tted to the system must be assigned a unique address on the LAN.
The PR111B and PR112B readers include a rotary address switch for quick selection. The following table shows the
address setting for each reader as well as the number of keypad, reader devices each panel can support.
Reader Address Setting
Address No Keypad No
1 1
2 2
3 3
4 4
5 5
6 6
Solution 16i Panel
Solution 16X Panel
Solution E Panel
Solution 144 Panel
Table 2: Address Table
7 7
8 8
9 9
10 10
11 11
12 12
13 13
14 14
15 15
16 16
Only 1 reader can be assigned to each address. All
readers are supplied from the factory set to address
1. You must power cycle the panel or perform a
LAN scan whenever you change the reader address.
Box Contents
The PR111B and PR112B contains the following parts.
Reader Base Unit
Reader Cover
Mounting Template
Instruction Sheet
1 x (M3 x 6mm) Hex Screw
1 x 2mm Hex Key
Figure 2: Address Switch
Figure 1: PR111B Reader
2
Bosch Security Systems 09/11 PR111B-PR112BIRG FTR1.1
Page 3
PR111B-PR112B Installer Reference Guide
i
Note
i
Note
Installation
The reader should be installed onto a solid surface using
suitable mounting xtures. Wiring should only be
performed while the control panel is powered o.
Step 1) Using the 1:1 mounting template supplied, mark
out the location of the 2 mounting holes and
the cable exit hole before drilling out all points
as necessary.
PR111B & PR112B Mounting Template
Scale 1:1
4.0mm hole
8.0mm hole
Cable Exit
85mm
Reader Operation
LAN Readers can be congured to provide system area
control, door access control or both depending on the
installation requirements.
As there is no LCD display on the readers, feedback is
provided via the red, green and blue indicators and the
reader sounder.
The readers also include an egress input and lock output
which can be used to control door access if required.
Using the on board lock output is not recommend-
ed when the reader is being used on an external
wall of the building. In this case it is recommended
that you run the lock control wires directly to an
output located on the main panel or output expander module located inside the building.
LED Indicators
The Red and Green indicators on the reader show area
status while the Blue indicator shows door status. The
addition of the Blue indicator allows the system to
display both area and door status at the same time if
required.
4.0mm hole
24mm
Figure 3: Mounting Template (Not to Scale)
Step 2) If the reader is to occupy an address on the
LAN other than address 1, you will need set the
required address before mounting. Note each
reader on the system must have a unique
address. See Table 2: for more information.
Step 3) Once the address has been set, terminate the
required wires referring to the Connection Diagram on page 6. Unused wires should be insulated to prevent short circuits.
LED Operation For Area Control
Led Condition Meaning
On Area All On
Red
Flashing Area Alarm
On Area is OFF
Green
Red &
Green
Red &
Green
Red &
Green
Red &
Green
Flashing
Both On
Red On
and Green
Flashing
Alternate
Flashing
Both O
Area not ready to turn on zone(s) unsealed
Area armed in Part mode
and all zones sealed.
Area armed in Part mode
with zones unsealed.
Keypad initialising during
power up or LAN scan.
Home Area and Access
Group not programmed or
keypad not powered.
Step 4) If using the on board lock output to open the
door, you must make sure to use a relay and
protection diode as shown.
Step 5) Once the wiring is complete, mount the reader
to the wall and t the cover plate using the M3 x
6mm hex screw.
Bosch Security Systems 09/11 PR111B-PR112BIRG FTR1.1
Table 3: Reader LED’s - Area Control
The LED indicators will only display the status of
the programmed home area. You cannot move
between areas from this reader. If you require multiple area status visibility you should use a display
keypad like the CP700B.
3
Page 4

PR111B-PR112B
i
Note
i
Note
i
Note
i
Note
Installer Reference Guide
To have the reader control an area on the alarm system
you must assign the reader to a home area. See the
Devices-Keypads & Readers-Home Area menu option
in panel programming. If alarm system control is not
required then you should set the home area option to
No Area.
When the reader has been congured to do alarm
area control only, the blue indicator will remain o
at all times.
To have the reader control an output (door) on the
system you must assign the reader to an access group.
See the Devices-Keypads & Readers-Access Group menu
option in panel programming.
Once assigned, the on-board Lock output and Egress input are automatically assigned to the same access group
as the reader.
LED Operation For Door Control
Led Condition Meaning
Blue On Door Locked
Blue Fast Flash Door Unlocked
Blue
Blue 2 Flashes
Red &
Green
Blue O
Table 4: Reader LED‘s - Access Group Door Control
If both alarm area and door control is required, you must
assign a home area and an access group to the reader.
When the reader has been congured to do door
control only, the green and red indicators will remain o at all times.
Continuous
Fast Flash
Alternate
Flashing
Door manually unlocked
or overridden.
Door automatically
unlocked by schedule or
time zone.
Reader initialising during
power up or LAN scan.
Access Group not programmed or reader not
powered.
Setting the reader volume to o will stop all audible
warning signals at the reader.
Reader Alert Tones
Event Alert Tone Emitted
If the system registers a re alarm, the
Fire
Alarm
Burglary
Alarm
Trouble
Exit
Delay
Entry
Delay
Error
Chime
Alert
reader will sound 3 short beeps followed by a 1.5 second pause. This will
repeat until reset by the user or until
the siren run time expires.
If the system registers a burglary
alarm, the reader will sound a continuous siren tone until reset by a user or
until the siren run time expires.
If a system trouble condition occurs,
the reader will sound 4 x fast short
beeps followed by a 5 second pause
and will repeat this tone until the user
acknowledges the trouble
condition from a display keypad
The exit delay warning will sound 1
short beep every second when the
area the reader has been assigned to
is armed. During the last 10
seconds of exit time the warning tone
will speed up indicating that the time
has nearly expired.
The hi/lo entry delay warning tone will
sound once every second when an
entry delay zone in the area the reader
has been assigned to is triggered. If
the system is not disarmed before the
entry time expires then an alarm will
occur.
If an invalid token is presented to the
reader the keypad will sound a 2 second warning tone indicating that the
token was rejected for some reason.
See the panel log for more details.
If chime mode is active then the reader will sound fast short beeps to alert
the user when a zone programmed for
chime is opened. Chime mode is only
applicable when the area is disarmed.
Table 5: Reader Tones
Alert Tones
The reader emits several distinct tones to alert you to
particular system events. The volume level cannot be
adjusted on the external LAN readers however it can be
turned o via panel programming by setting the reader
volume to the lowest level. See the Devices-Keypads &
Readers-Commands menu in panel programming.
4
When readers are installed outside the premises,
you may prefer that the alert tones are disabled.
See the Devices-Keypads & Readers-Indicator Options menu in panel programming to disable these
features.
Bosch Security Systems 09/11 PR111B-PR112BIRG FTR1.1
Page 5

PR111B-PR112B Installer Reference Guide
i
Note
i
Note
Egress and Lock Control
The LAN reader includes an egress input and a lock output which can be used to simplify the wiring when the
LAN reader is being used for door or access control.
The lock output consists of a protected open collector
transistor that can be used to operate a relay to control
the door lock. The output will go from open to low for
xed 5 seconds whenever the associated access group
or door assignment is triggered.
The on board lock output will operate for a xed
time period of 5 seconds when triggered. If a different time is required then you should use another
output on the system to operate the door lock.
The lock output, and LAN+ power supply are not designed to operate and power the door lock directly. You
should always t a relay and protection diode to the lock
output in combination with a separate power supply.
The optional CM444B Relay Module has been designed
to suit this task. If you require the door to operate when
the mains power has failed then you will also need to t
a battery backup to the external power supply. See the
wiring diagram in Figure 4: for more details.
The Egress input on the LAN reader allows you to simplify the wiring required to implement an egress button
on the inside of the door. The egress input triggers the
lock output on the LAN reader by operating or ring the
associated Access Group or Door Assignment.
The egress input should be connected via a momentary
or push button switch to reader ground. When the button is pressed the lock output on the reader will trigger
for a xed 5 second period.
Conguration Examples
Alarm control function only.
1) Install the reader as per instructions.
2) Set the home area for the reader (keypad).
3) Set reader (keypad) options as required.
4) Assign users to the area.
Access control function only.
1) Install the reader (keypad) as per instructions.
2) Set the access group for the reader (keypad).
3) Set reader (keypad) options as required.
If using the on board lock output, jump to step 6 or.
4) Set output to access group to operate door.
5) Set output event assignment.
6) Assign users to the access group.
Both Alarm and Access control functions.
1) Install the reader (keypad) as per instructions.
2) Set the home area for the reader (keypad).
3) Set the access group for the reader (keypad).
4) Set reader (keypad) options as required
If using the on board lock output, jump to step 7 or.
5) Set output event type to access group.
6) Set the output event assignment.
7) Assign users to the area.
8) Assign users to the access group.
The above examples show how to congure the PR111B
and PR112B readers to control an area and or a door on
a Solution 16i panel. Consult the installation manual for
programming information if you are using a dierent
panel.
For greater security, if the egress input is not being
used it should be disabled via panel programming. See
Devices-Keypads & Readers-General Options in panel
programming.
Bosch Security Systems 09/11 PR111B-PR112BIRG FTR1.1
Any zone on the system can be congured to trigger
an access group and can therefore also be used to
operate the lock output on the LAN reader.
5
Page 6

PR111B-PR112B
i
Note
Installer Reference Guide
Connection Diagram
CM720B or CM723B
Power Supply
(Battery backed up)
+
PROTECTION
DIODE
Wiring Legend
RED
BLACK
WHITE
BLUE
YELLOW
GREEN
The optional CM444B relay module provides
an easy way to interface the readers lock
output to the door lock.
Because of its small physical size
(12.5 x 46 x 12mm) it can be easily located
in the wall cavity if required.
+ -
CM444B RELAY CARD
+
N/O
COM
DOOR
LOCK
= LAN +
= LAN = LAN A
= LAN B
= LOCK
= EGRESS
DOOR
TO
LOCK
N/C
CONTROL PANEL
CM444 Relay Card
DF70
BL
WH
A B
BK
-
RD
MODULE LAN
+
EGRESS
INPUT
Address Select Switch. Keypads and LAN
Readers must be set to a unique address as
per “Table 2: Address Table” on page 2
All LAN Readers are supplied from
the factory set to Address 1.
-
+
+12V
RD
N/O
YL
Lock
Output
GN
Egress
Input
r
t
n
o
C
o
T
.
l
e
n
a
P
l
o
PR111 LAN Reader
P/N:
PR111B
MFG:
30-Jul-2011
S/N:
00542754
N12138
The egress input
You must power cycle the panel or perform
a LAN scan after connecting the PR111B or
PR112B for the system to initialise the reader.
is low (0V) to trigger.
Disable via panel
programming if not
being used.
Make sure that the
keypad buzzer opening
is not blocked
during installation
or the volume will be
greatly reduced.
Figure 4: PR111B and PR112B Connection Diagram
6
Bosch Security Systems 09/11 PR111B-PR112BIRG FTR1.1
Page 7

PR111B-PR112B Installer Reference Guide
Compatible Cards and Tokens
The following user credentials are compatible with the PR111B and PR112B readers.
P/N - PR250B
ISO Prox Card
DF-77SGW
P/N - PR260B
Clam Shell Prox Card
P/N - PR200B
Prox Token
DF-77SGW
P/N - PR201B
Prox Token with Keyring
Figure 5: Compatible Cards and Tokens
PR111B - PR112B Specications
Part Number:
Format: 40bit Proprietary, 125Khz
Operating Voltage: 10.0V D.C - 14.5V D.C. @ 100mA Max.
Module Connection:
(RS485 LAN)
Lock Output: Protected open collector transistor output 500mA.
Egress Input: Low to trigger. Can be disabled via software control.
Dimensions: 44mm(W), 21mm(D), 114mm(H). CM444B = 46mm(W), 12.5mm(D), 12mm H)
Environment: -30˚ to 55˚C RH 5 to 85% at 30˚C non-condensing.
Fixing Method:
Warranty: 3 years from date of manufacture (return to base).
N12138N12138
Bosch Security Systems 09/11 PR111B-PR112BIRG FTR1.1
PR111B - Black - Vandal and Weather Resistant Reader (IP66).
PR112B - White - Vandal and Weather Resistant Reader (IP66).
Max total LAN length using multi strand security cable = 500m ,
Max total LAN length using 2 pair twisted shielded data cable (Belden 8723) = 1200m.
See full control panel manual for complete wiring instructions.
The PR111B and PR112B should be mounted on a sturdy vertical wall using xtures appropriate
for the wall construction type.
RoHS
In the interest of ongoing product development this
document is subject to change without notice.
7
Page 8

Bosch Security Systems
25 Huntingwood Drive
Huntingwood, NSW 2148
Australia
Phone: +612 9672 1777
Facsimile: +612 9672 1717
© 2011 Bosch Security Systems
PR111B-PR112BIRG
Issue FTR1.1
 Loading...