

BOSCH PCD345CEU User Manual
Robert Bosch Hausgeräte GmbH
Carl-Wery-Straße 34
81739 München
Cod. 9000011594 C
en
Operating instructions
Mode d'emploi
fr
it Avvertenze per l'uso
Manual de utilização
pt
Gebruiksaanwijzing
nl
www.bosch-home.com

Dear Customer,
We thank you and congratulate you on your choice.
This practical appliance, which is modern and functional, has been
manufactured from top-quality materials which have been subjected
to a strict quality control during the entire manufacturing process, and
have been carefully tested so that they will meet all your cooking needs.
In addition, we are pleased to supply you with this instruction book
which is divided into two sections: one on how to use the appliance,
and the other on its installation.
We strongly advise to read through these simple instructions, so as to
ensure that you get perfect results from the moment you first use this
appliance. This book contains important information, not only on how
to use the appliance, but also on maintenance and safety. When our
products are being transported, they must be provided with suitable
protective packaging. However, we have reduced our packaging to the
bare essentials, and it is all completely recyclable. You too can contribute
to the conservation of the environment by depositing the packaging in
the nearest recycling container to your home. Used oil should not be
poured down the sink, as this causes serious damage to the environment.
Pour it into a closed receptacle and take it to a recycling point, or simply
put in your rubbish bin. It will then finish up in a controlled dump, which
though it is not the best solution, it does prevent water pollution. Your
children and you yourself will be grateful for it. Before you get rid of an
old appliance, make sure you render it useless, and then take it to a
collecting centre for recyclable materials. Ask your local authorities for
details on the nearest centre to your home.
IMPORTANT:
In the unlikely event that the appliance should arrive damaged or
not meet your expectations in terms of quality, please inform us as
soon as possible. For the warranty to be valid, the appliance must
not have been tampered with, or used inappropriately.
If the sym bol appears on the specifications plate, follow these instructions:
/1"$, 5)& "11-*"/$& "/% %*4104& 0' 5)& 1"$,"(*/(
*/ "/ &/7*30/.&/5"--:H3&410/4*#-& ."//&3
)*4 "11-*"/$& *4 -"#&--&% */ "$$03%"/$& 8*5) 5)&
6301&"/ *3&$5*7& $0/$&3/*/( 64&%
&-&$53*$"- "/% &-&$530/*$ "11-*"/$&4 8"45& &-&$53*$""/% &-&$530/*$ &26*1.&/5 !
)& (6*%&-*/& %&5&3.*/&4 5)& '3".&803, '03 5)& 3&563/
"/% 3&$:$-*/( 0' 64&% "11-*"/$&4 "4 "11-*$"#-&
1

CONTENTS
Safety warnings 3
Get to know your cooking hob 5
Gas burners 6
Diameters of receptacles 7
Cooking suggestions 8
Electrical plates 8
Electrical plates with 7- and 10-setting adjuster 9
Suggestions and electrical plates with 10-setting adjuster 10
Hob grill 11
Griddle cooking table 11
Tips on how to cook with this appliance 12
Rules for use for steel: cleaning and care 13
Rules for use for glass: cleaning and care 14
Rules for use for glass ceramic surfaces: cleaning and care 15
Home troubleshooting
Guarantee conditions 17
16
2
Safety warnings
Read this user’s manual carefully, to ensure that you
use this appliance as effectively and safely as possible.
All installation, regulation and adaptation to other types
of gas must be carried out by an authorised installation
technician, respecting all applicable regulations,
standards and the country's electrical and gas supply
companies' specifications.
It is recommended that you call our Technical
Assistance Service for adaptation to other types of gas.
Before installing your new cooking hob, check that the
measurements are correct.
This appliance should not be connected to an evacuation
device for combustion products.
This appliance has been designed for home use only,
not for commercial or professional use. This appliance
cannot be installed on yachts or in caravans. The
warranty will only be valid if the appliance is used for
the purpose for which it was designed.
The following instructions are only valid in countries
whose symbol appears on the appliance. To adapt the
appliance to conditions of use in your country, always
follow the technical instructions.
It is of the utmost importance that the place in which the
appliance is to be installed should have suitable, fullyfunctioning ventilation (Basic Rules for Gas Installations
in Inhabited Buildings. BOE nº 281, 24/11/93).
Make sure that the appliance is not subjected to strong
draughts, as they might blow out the burners.
This appliance left the factory adjusted for use with the
type of gas that is indicated on the specifications plate.
If any change needs to be made, call our technical
assistance service.
Do not make any adjustments to the interior of the
appliance. If this should be necessary, call our technical
assistance service.
Make sure you keep these instructions for use and
assembly, so that you can hand them on with the
appliance if it ever changes owner.
Never use a malfunctioning appliance.
3
As the appliance’s heating and cooking surfaces get
very hot during operation, always use with care.
Always keep children away from the appliance.
Only use this appliance for cooking, and never as a form
of heating.
Very hot fat or oil can easily catch fire, and so if you are
cooking with fat or oil (for example, frying chips), keep
an eye on the pan.
If a pan containing fat or oil catches fire, do not pour
water onto it, as this may cause BURNS. Cover the pan
with a damp cloth to extinguish the fire, and disconnect
the cooking appliance.
In the event of a malfunction, turn off the appliance’s
gas and electricity supply, before calling our technical
assistance service.
Never place unstable pans or containers on the cooking
hob or the burners, as they may accidentally tip over.
If a gas tap gets stuck, do not force it. Call our official
technical service, and a technician will come to repair
or replace it.
While using your gas hob, prevent any draughts and do
not spill any cold liquids on it, as this may cause the
glass to break.
Do not use steam clearing machines to clean the
hotplate, as there is risk of electrocution.
This appliance is not intended for use by persons
(including children) with reduced physical, sensory or
mental capabilities, or lack of experience and
knowledge, unless they have been given supervision or
instruction concerning use of the appliance by a person
responsible for their safety.
Never leave the appliance unattended during operation.
The diagrams contained in this instruction book are for
orientation purposes only.
IF THESE INSTRUCTIONS ARE NOT
FOLLOWED, THE MANUFACTURER
ACCEPTS NO RESPONSIBILITY.
4
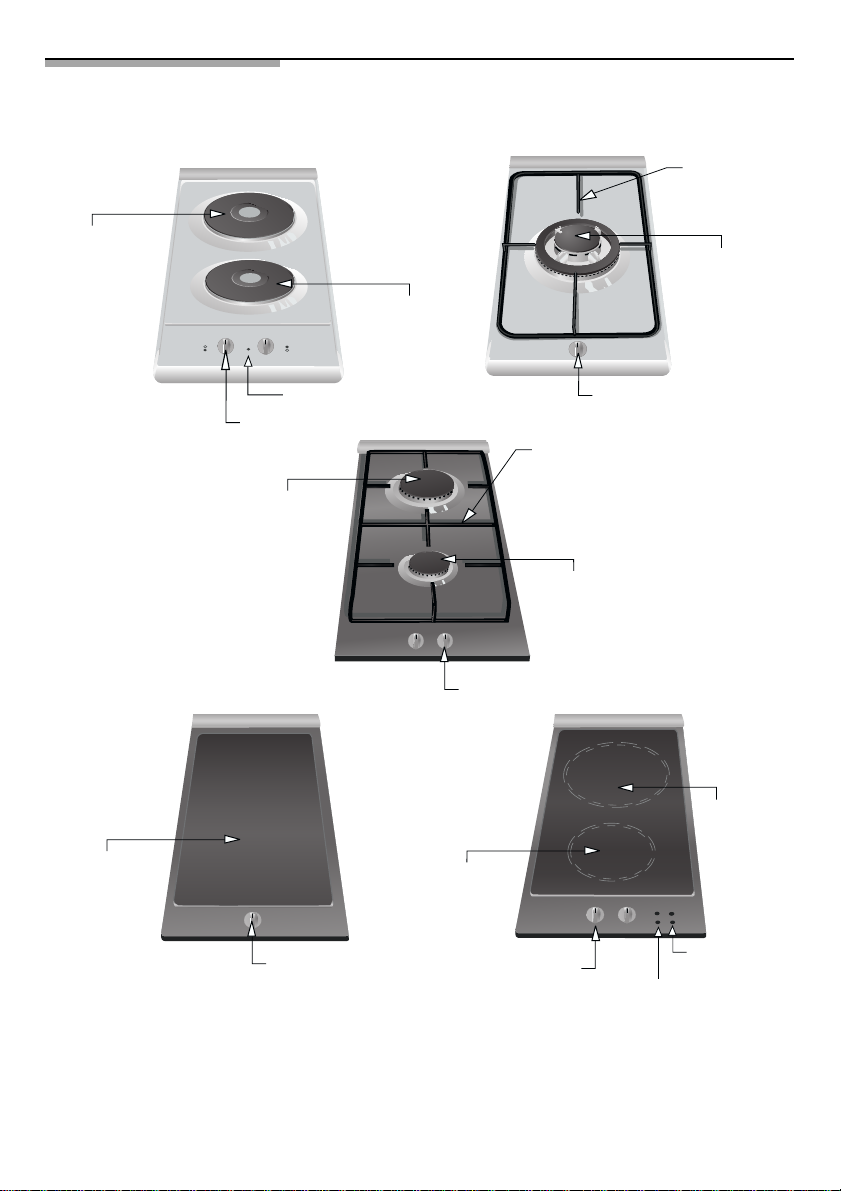
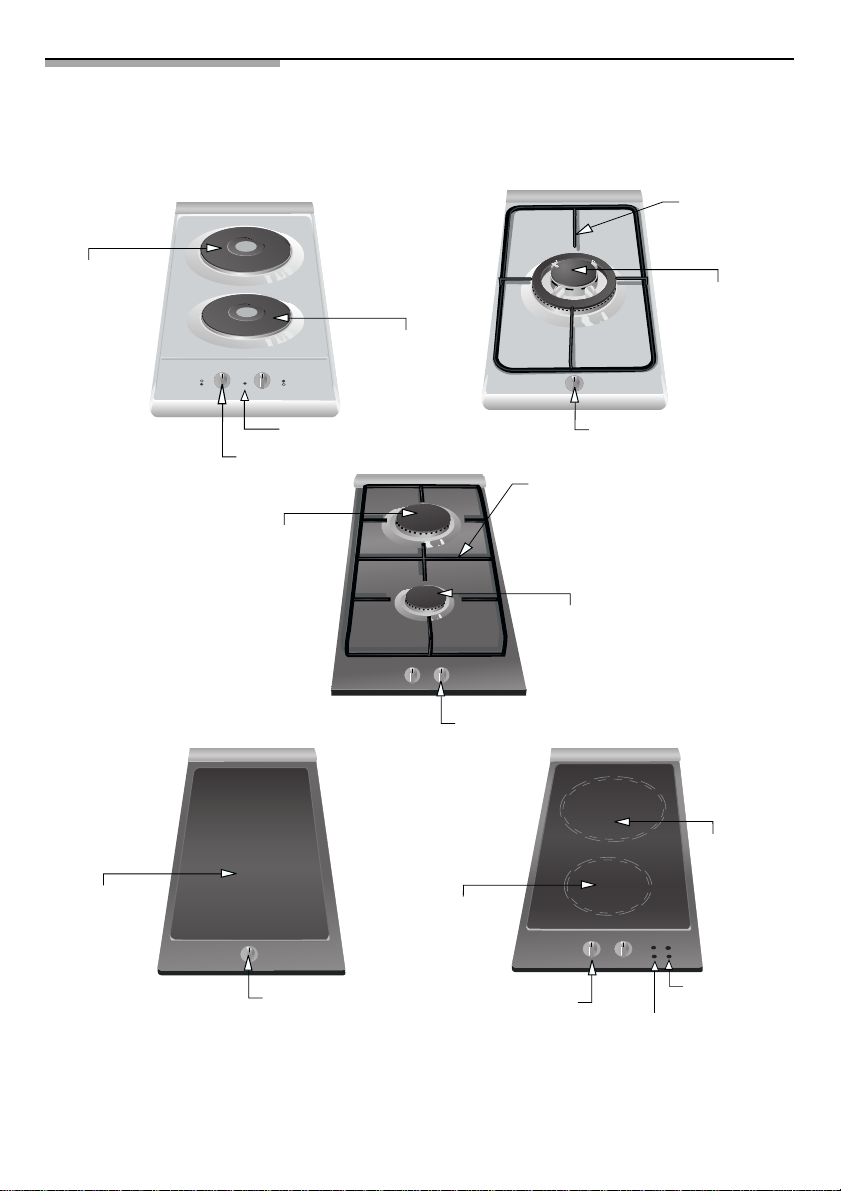
Get to know your cooking hob:
Electric
hotplate
2000 W
Electric
hotplate
1500 W
P^ an support
T riple flamme
burner up to
3, 6 kW
Heating
element
2500 W
C ontrol indicator light
C ontrol knob
Burner up
to 3 kW
C ontrol knob
C ontrol knobs
Heating
element
1200 W
C ontrol knobs
C ontrol knob
P an support
Burner up
to 1 kW
Heating
element
1700 W
Hot surface
warning light
C ontrol indicator light
These appliances may be used together and/or with conventional ceramic
hobs of the same make. See the catalogue for details.
5

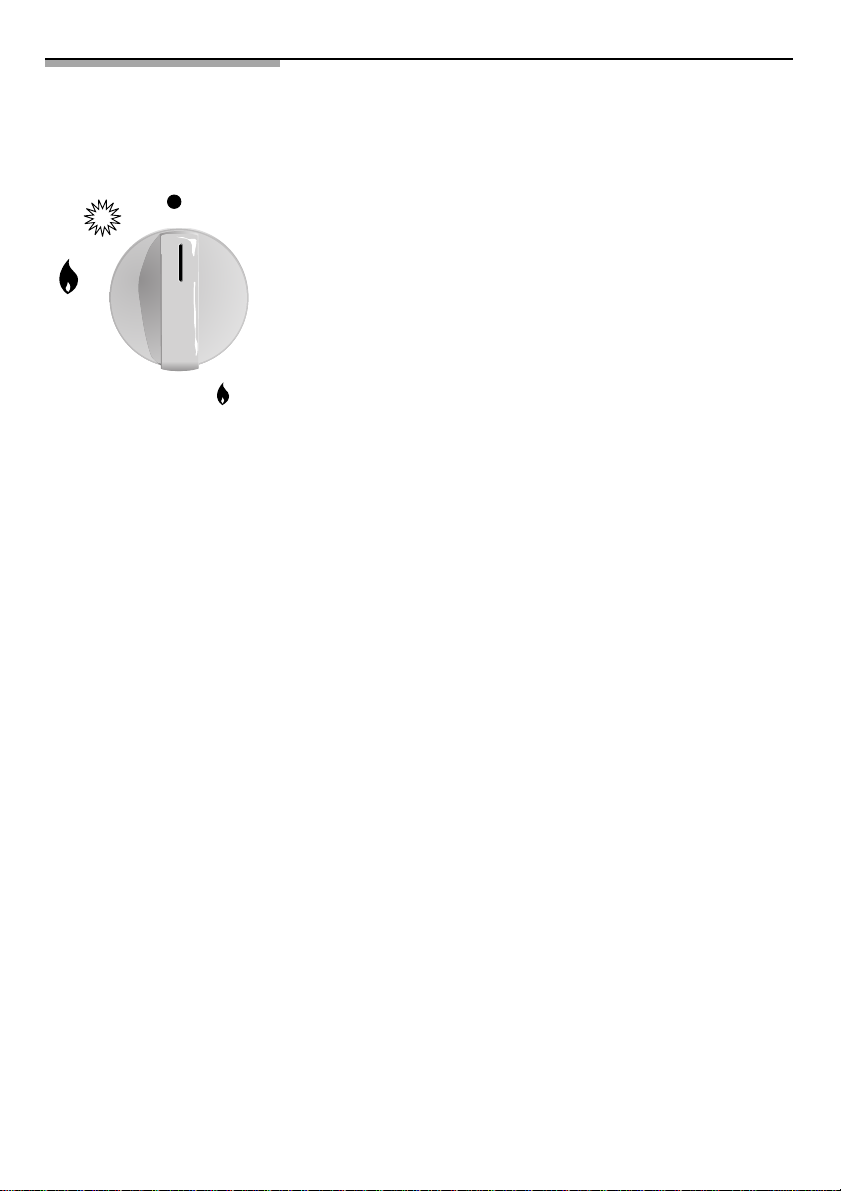
The gas burners
Figure. 1
Each control knob on the oven and on the control panel
is clearly marked to show which burner it controls.
Figure 1.
To light one of the burners, press in the control knob of
the respective burner and turn it to the left, as far as the
ignition symbol, and hold it there for a couple of seconds
until the burner lights. Now release the knob and turn it
to the desired heating setting. If the burner does not
light, repeat the process.
If your cooking hob is not fitted with this automatic lighting
feature, use a lighter or a match to light the burner. If
the ignition sparkers are dirty, this makes the burner
harder to light, so you should keep them as clean as
possible. Clean them using a small brush, and remember
that the ignition sparkers must be treated very gently.
If the burners on your cooking hob are fitted with safety
valves (which stop the flow of gas if one of the burners
accidentally goes out), light the burners in the same way,
though you should continue to hold in the control knob
for a few seconds after the flame lights. If the burner
does not light, repeat the process, this time keeping the
control knob pressed in for 10 seconds.
To turn off the burner, turn the control knob to the right,
to setting 0.
Depending on which model of modern, functional cooking
hob you have purchased, you can have progressive taps
fitted which allow you to adjust the flame to the desired
heat.
Depending on the model, your cooking hob may have
a triple-flame burner, which is very practical if you wish
to cook with receptacles such as paella pans or Chinese
woks (to create all kinds of Asian dishes). When you are
using this gas appliance, it will make the kitchen hot and
humid, and therefore you must ensure that the kitchen
is well ventilated. Either keep the natural ventilation
apertures open, or install an extractor hood.
If you use your appliance for a long period of time, you
may need extra ventilation - either open a window (though
watch out for draughts) or turn up the power on the
extractor hood, if possible.
An orange-coloured flame is normal and it is
produced in the presence of dust in the atmosphere,
spillages, etc.
6
Diameter of receptacles (in cm)
Depending on the model:
BURNER MINIMUM Ø OF RECEPTACLE MAXIMUM Ø OF RECEPTACLE
Triple-flame: 22 cm
Rapid burner:
Auxiliary burner: 12 cm 14 cm
Electrical hot plates: 14 cm 18 cm
Additional pan
supports:
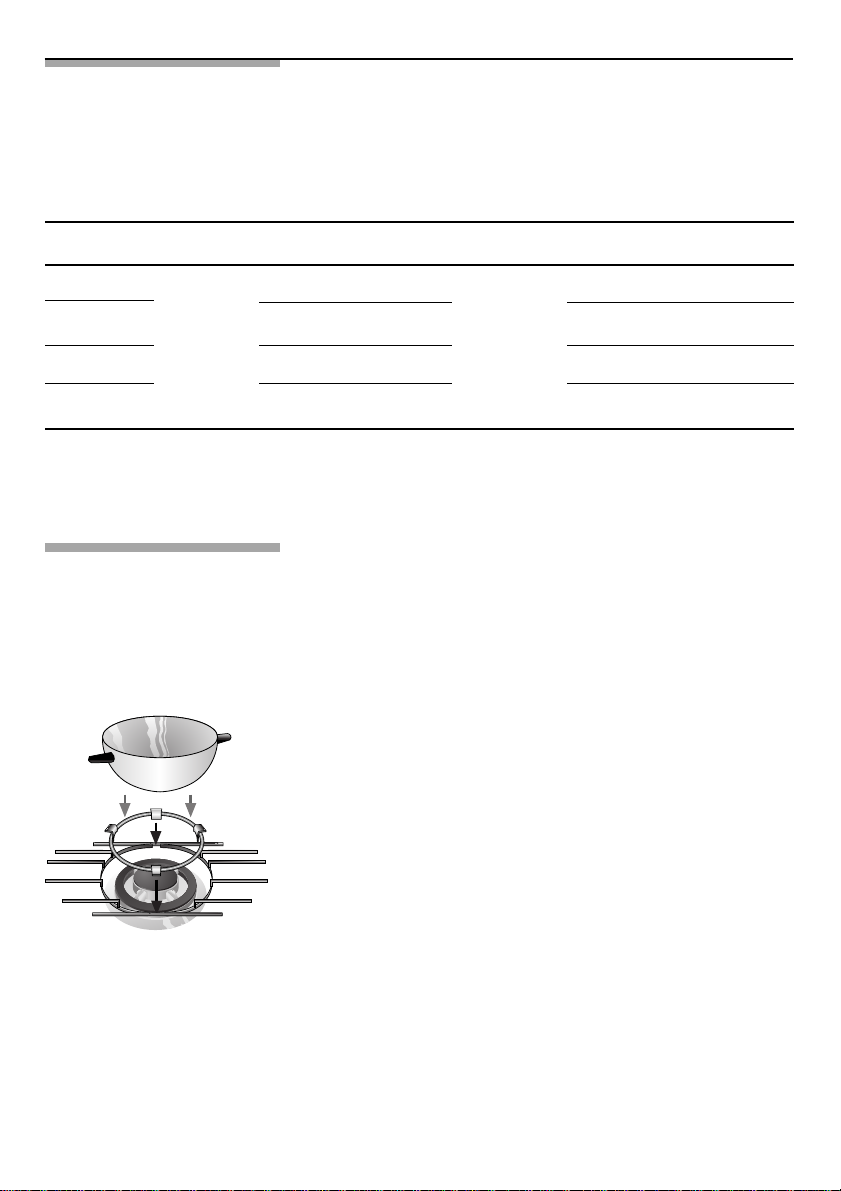
Figure. 2
22 cm 26 cm
Depending on which model you have purchased, your
cooking hob may include a very useful extra cradle
support for use on the triple-flame burner for receptacles
with diameters of over 26 cm, barbecue griddles,
earthenware cooking pots and all kinds of concave
receptacles (such as Chinese woks). Figure 2.
If you do not have this additional cradle support, the
technical service for the make can supply you with one
(code no. 363300).
Pan support for coffee pot: depending on the model,
your cooking hob may include an additional coffee pot
support, which is exclusively for use on the auxiliary
burner with receptacles of a diameter smaller than 10
cm. If you do not have this additional pot support, the
technical service for the make can supply you with one
(code no. 184200).
The manufacturer declines all responsibility if these
additional pan supports are not used or are used
incorrectly.
7

Cooking
guidelines:
Here are some cooking guidelines, for orientation
purposes
Very high High Medium Low
Triple-flame
Rapid
Auxiliary
Boiling, grilling, browning,
paellas and Asian food (woks).
Scallops, steaks, omelettes,
frying, fresh vegetable
stews and pasta.
Cooking: casseroles, rice
pudding and caramels.
Electric hot plates
Before you use your hot plate for the first time, turn it on
at full heat for five minutes, with no receptacle on it.
During this time the hot plate will give off a certain amount
of smoke and smell, which will disappear as you use it.
Except for this first time that you switch them on, never
use the hot plates without receptacles on them.
When you begin cooking, we recommend turning the
control up to the maximum setting and then, depending
on the quantity and quality of the foods being cooked,
turn down the heat to medium setting.
As the hotplate takes a while to cool down, you can turn
it off a little before the food is cooked, so as to save
energy, and carry on cooking using the residual heat in
the hot plate.
Always use receptacles which have perfectly flat, thick
bottoms, and which have a diameter similar to that of
the heating element - and never use receptacles smaller
than the element.
Re-heating and keeping things
hot: cooked and pre-cooked
dishes.
Rice, white
sauce and
ragout.
Re-heating, keeping things hot
and making tasty casseroles.
Defrosting and
slow cooking:
legumes, fruits
and frozen
products.
Steaming: fish
and vegetables.
Melting: butter,
chocolate
and jelly.
Try not to spill liquids on the hotplate surface, or to place
wet receptacles on top of it.
8

Electrical hot plates with 7-setting
knob
Figure. 3
1
6
This hotplate is controlled by a knob with seven settings
(figure 3), which should be used as follows:
2
3
5
4
Setting 1 and 2: heating.
Setting 3 and 4: quick heating and cooking.
Setting 5 and 6: frying.
Electrical hot plates with 10-setting
knob
These hot plates are controlled by an energy control
knob with which you can choose the heat that is suitable
Figure. 4
1
2
3
9
8
7
for the food you are cooking (figure 4).
By consulting the following table of cooking methods
and considering the amount of food being cooked, turn
the control knob to the correct setting for the dish you
want to cook. The “on” control indicator light will come
on. To switch off the hotplate, turn the control knob to
the setting 0. The control light will now go off.
4
6
5
9
Suggestions
Melting: chocolate, butter, jelly 1-2
Cooking: rice, white sauce, ragout 2-3
Cooking: potatoes, pasta, vegetables 4-5
Light frying: stews, barbecued roulées 4-5
Steaming: fish 5
Heating: keeping pre-cooked dishes hot 2-3-4-5
Griddle: scallops, steaks, omelettes 6-7-8
Cooking and browning 9
SETTING
You will need to
cook on a
higher setting in
the following
Cooking with large amounts of liquid.
Cooking large dishes.
Cooking receptacles without lids on.
cases:
Electrical hot plates with heating
element and 10-setting control
These hot plates are controlled by an energy control
knob with which you can choose the heat that is
suitable for the food you are cooking. Figure 5.
By consulting the following table of cooking methods
Figure. 5
1
2
3
4
9
8
7
6
5
and considering the amount of food being cooked,
turn the control knob to the correct setting for the dish
you want to cook. The “on” control indicator light will
come on. To switch off the hotplate, turn the control
knob to the setting 0. The control light will now go off.
The hot surface warning light will come on, warning
that the cooking area is still hot. The hot surface
warning light will stay on as long as the cooking area
(which has been switched off) is still hot, and can be
used to save energy.
When the cooking area has cooled down, the hot
surface warning light will go off.
10
Hob grill
Figure. 6
These hot plates are controlled by an energy control
knob with which you can choose the heat that is suitable
for the food you are cooking. They can be used both
with a griddle and for cooking with receptacles.
Figure 6.
1
2
3
4
9
8
7
6
5
1 = minimum heat.
9 = maximum heat.
By consulting the following table of cooking methods
and considering the amount of food being cooked, turn
the control knob to the correct setting for the dish you
want to cook. The “on” control indicator light will come
on.
To switch off the hotplate, turn the knob to the setting 0,
and the control light will go off.
The hot surface warning light will come on, warning that
the cooking area is still hot.
Griddle cooking table
SETTING
Heating: 1-2
Sausages-fish: 3-5
Marinated foods: 6
Fillets-chops-King prawns: 7-9
Do not use a metal spatula for turning over the food.
These appliances can also be used as conventional electric heating plates.
11
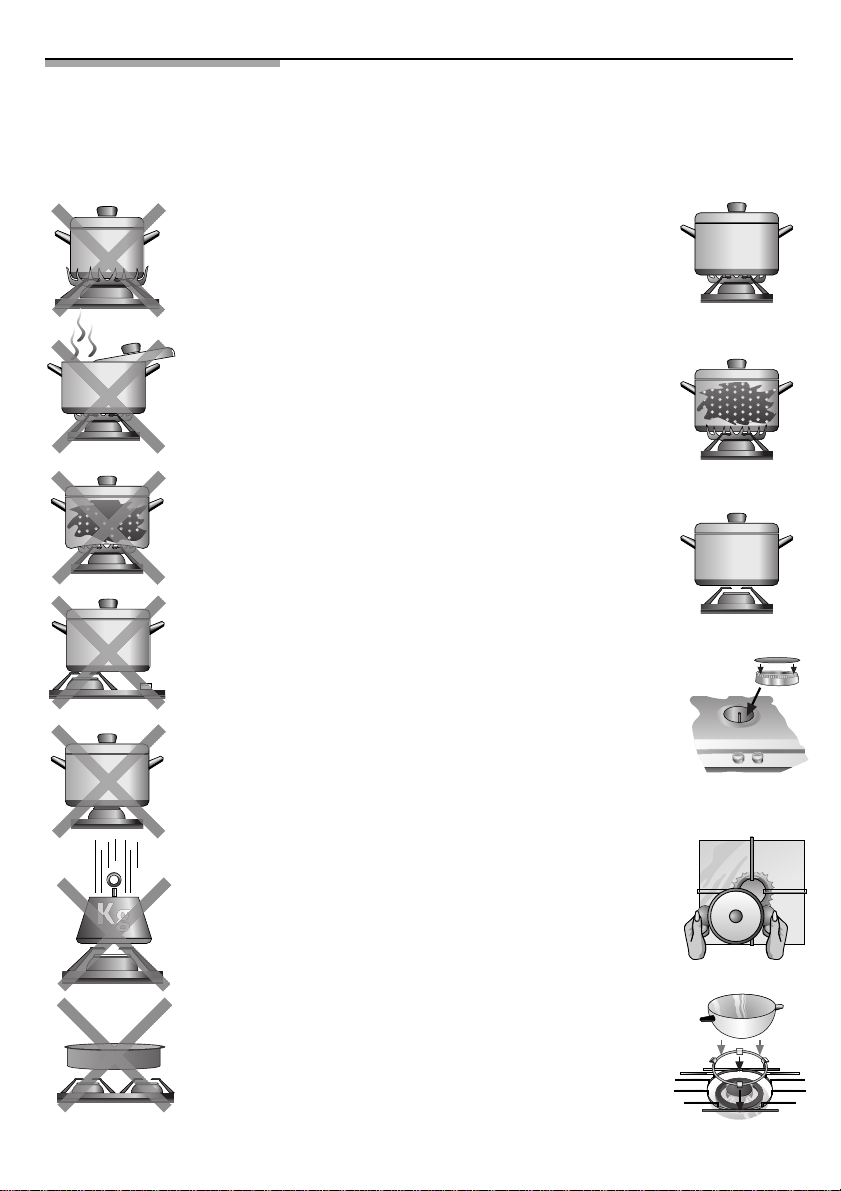
Warnings and suggestions
for cooking
DON’T DO
Don't use small
receptacles on large
burners.
The flame should never
come up the sides of the
receptacle.
Never cook without a lid or
with the lid half off - you are
wasting energy.
Always use receptacles that
are suitable for each burner,
so as to avoid wasting gas
and discolouring the
receptacles.
Always place the lid on the
receptacles.
Do not use receptacles with
uneven bottoms, as they
make the food take longer
to cook and waste energy.
Never try to heat food by
placing aluminium tins or plastic
receptacles onto your cooking
hob, as the containers will melt.
Do not place a receptacle on
one side of a burner, as it could
tip over.
Do not use large-diameter
receptacles on the burners
nearest to the control knobs,
as the flames might reach
them, making them so hot
that they could cause injury.
Never place receptacles
directly on top of the burners.
Do not use excessive weight,
or strike the cooking hob with
heavy objects.
Never use two burners or heat
sources to heat one single
receptacle.
Avoid using griddles and
earthenware pots etc. at
maximum heat for a long time.
Only use pots, saucepans
and frying pans with thick,
flat bottoms.
Always place the receptacle
right over the burner, not
to one side.
Place the receptacle on
top of the pan support.
Make sure that the pan
supports and burner
covers are in their correct
positions before using the
appliance.
Handle receptacles with
care when they are on
the cooking hob.
Only use one receptacle per
burner. Use the additional
cradle support on the tripleflame burner.
12
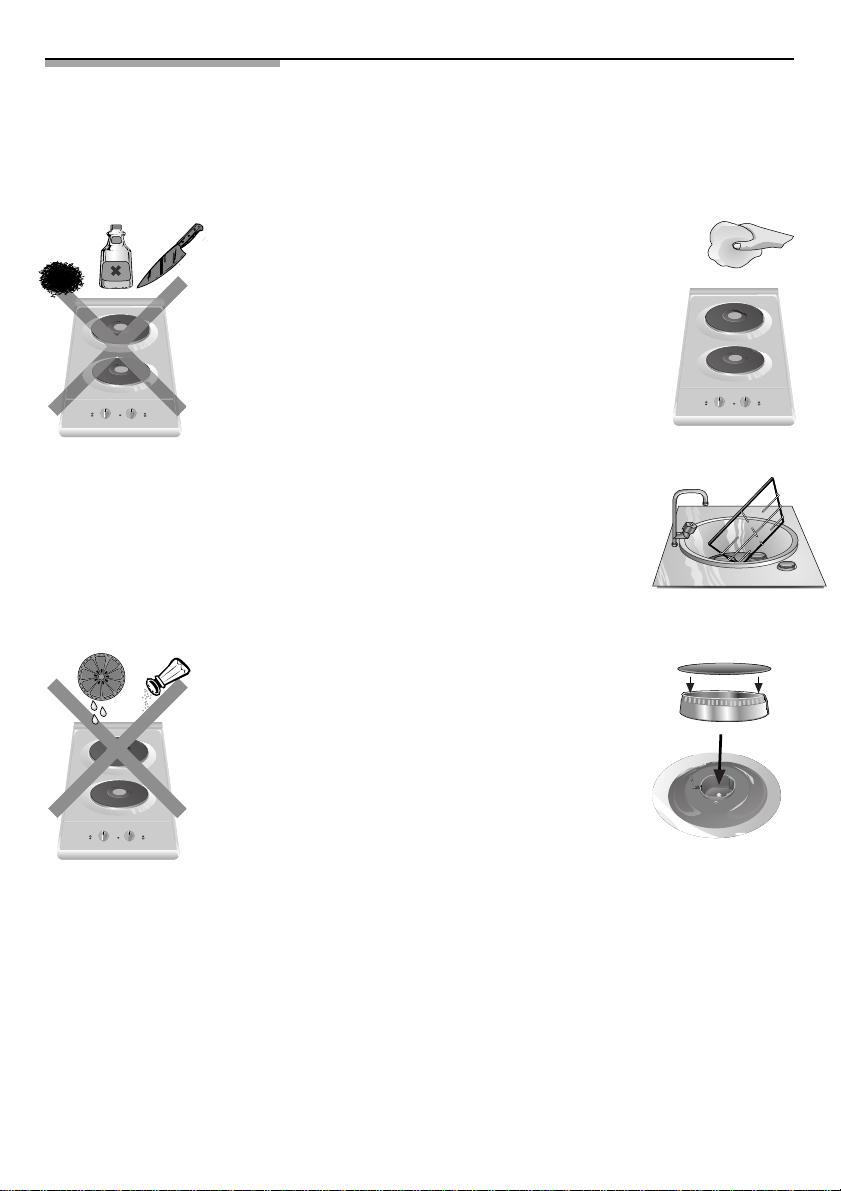
Warnings and suggestions for using
steel: Cleaning and care
DON’T DO
Never use abrasive
products, sharp objects,
steel scourers or knives,
etc. for removing the
remains of hardened food
from the cooking hob, pan
supports, burners or
electric hot plates. If your
cooking hob is fitted with
a glass or aluminium
panel, never use a knife,
scraper or similar to clean
the point where it joins the
metal.
Never use steamcleaning machines
on your cooking hob,
as it could damage it.
Avoid spilling acidic
liquids (such as lemon
juice or vinegar) on your
cooking hob.
Try not to spill salt on
the surface of the
electrical hotplate.
Once the appliance has
cooled down, clean it with a
sponge, soap and water.
Remove any spilled liquid as
soon as possible, as this will
save you time and effort later.
To keep the burners and pan
supports clean, you should
clean them periodically by
placing them in soapy water
and brushing them with a
non-metallic brush to ensure
that the holes and grooves
are perfectly clean, to
provide a perfect flame.
Always dry the burner
covers and the pan supports
if they have become wet.
After cleaning and drying
the burners, make sure
the burner covers are
correctly placed on the
burner’s flame diffuser.
If prolonged use has worn away the surface of the electrical hot plates, sprinkle them with a few
drops of oil or other maintenance products that are commonly available on the market.
Owing to the high temperatures that the triple-flame burner ring cover has to withstand (as well
as the stainless steel areas such as the plate rings, grease traps and the area around the
burners, etc.), they will EVENTUALLY become discoloured with time. Clean them each time
you use them, with a product that is suitable for stainless steel.
After washing the pan supports, dry them completely before cooking with them again. Drops
of water or damp patches on the surfaces when you begin cooking may cause deterioration of
the enamel.
If the pan supports on your cooking hob are fitted with rubber rests, take care when you clean
them, as they might come off, leaving your pan support without protection, and it may scratch
the cooking hob. Stainless steel cleaners should not be used in the area around the controls,
as the setting indications might become erased.
13
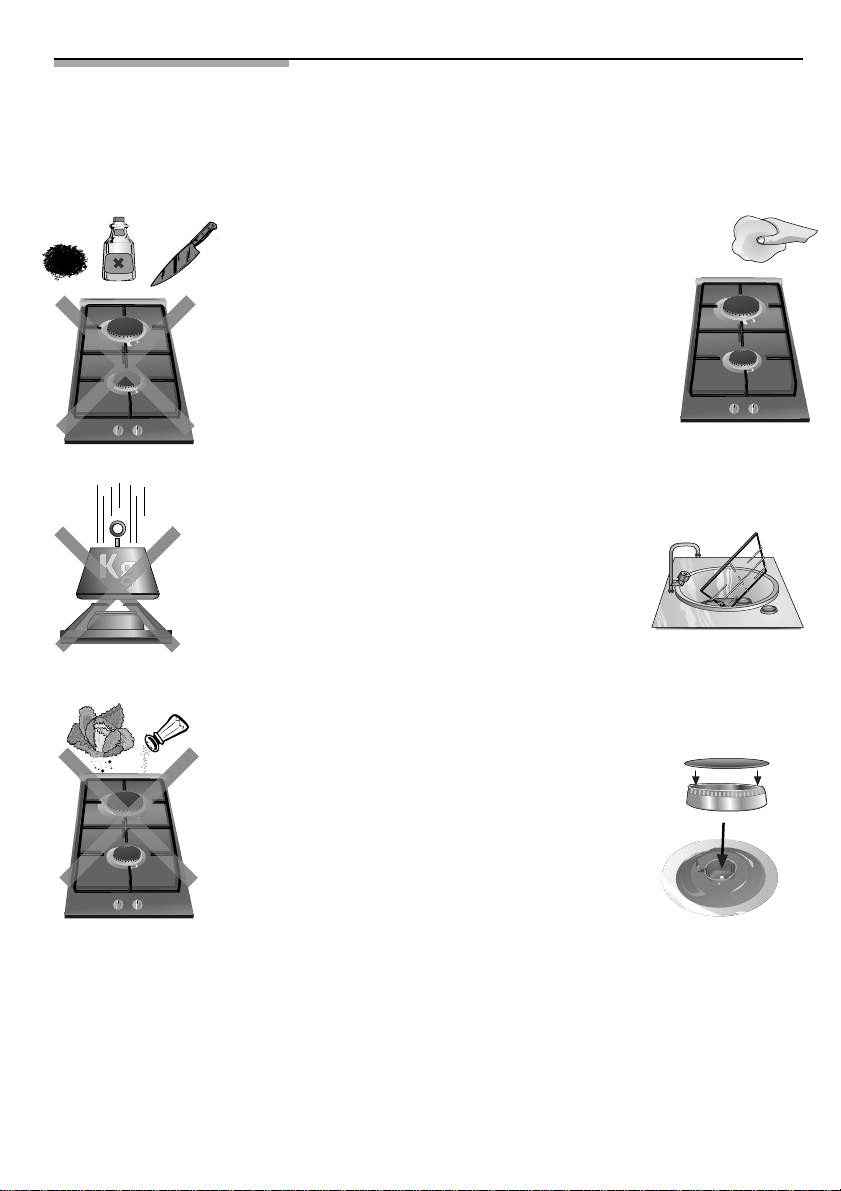
Warnings and suggestions for using
glass: Cleaning and care
DON’T DO
Never use detergent
powder, oven-cleaning
sprays or abrasive sponges,
as they may scratch the
glass.
Never use sharp objects
such as metal scourers
or knives to remove the
hardened remains of
food from the surface.
Never use a knife,
scraper or similar to
clean the area where the
glass meets the trim of
the burners or the metal
trim edging.
Never slide receptacles
across the glass surface,
as you may scratch it. In
addition, try not to drop
heavy or sharp objects
on the glass.
Never strike any part of
the cooking hob.
Grains of sand that may
come from cleaning
fruits and vegetables
will scratch the glass
surface.
To prolong the life of the
glass, always clean with a
soapy sponge, but only
when the appliance has
cooled down.
Clean the surface of the
heating element once it has
cooled down, and every
time you use it.
Even small patches of food
or dirt will burn when you
switch the plate on again.
To keep the burners
and pan supports clean,
you must clean them
periodically by placing
them in soapy weather
and brushing and with
a non-metallic brush to
ensure that the holes
and grooves are
perfectly clean, and can
provide a perfect flame.
Always dry the burner
covers and the pan
supports if they have
become wet.
After cleaning and
drying the burners,
make sure the burner
covers are correctly
placed on the burner’s
flame diffuser.
Owing to the high temperatures that the triple-flame burner ring cover has to withstand (as well
as the stainless steel areas such as the plate rings, grease traps and the area around the
burners, etc.), they will eventually become discoloured with time. Clean them each time you use
them, with a product that is suitable for stainless steel.
When you are cleaning the pan supports, take care with the rubber rests, as they could come
off and the pan support could scratch the glass next time you use it.
After washing the pan supports, dry them completely before cooking with them again. Drops
of water or damp patches on the surfaces when you begin cooking may cause deterioration of
the enamel.
14
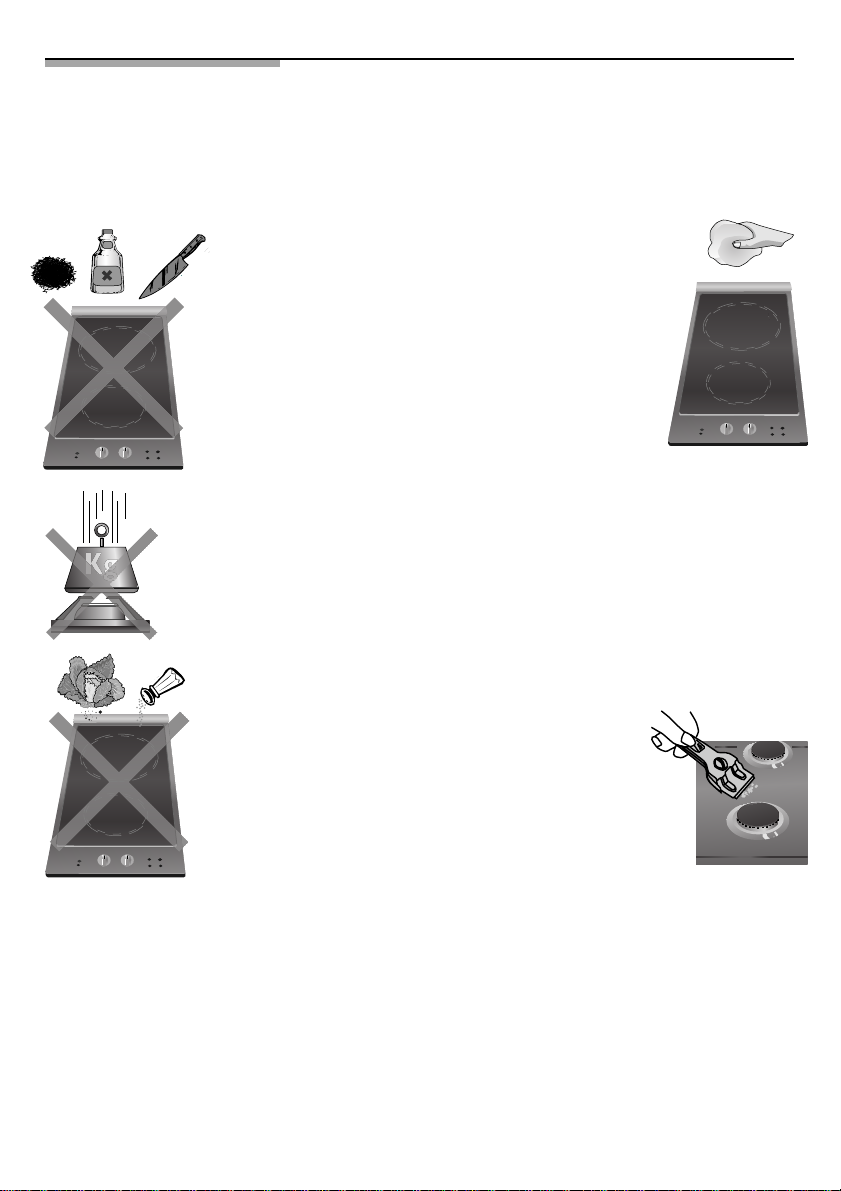
Warnings and suggestions for using
glass ceramic surfaces: cleaning and
care
DON’T DO
Never use detergent powder,
oven cleaning sprays or
abrasive sponges, as they
may scratch the glass
ceramic surface.
Never use sharp objects such
as metal scourers or knives
to remove the hardened
remains of food from the
surface.
Never slide receptacles
across the glass surface,
as you may scratch it. In
addition, try not to drop
heavy or sharp objects
on the glass.
Never strike any part of
the cooking hob.
Grains of sand that may
come from cleaning fruits
and vegetables will scratch
the glass surface.
Melted sugar or foods with
a high sugar content which
has spilled onto the surface
should be cleaned off
immediately.
To prolong the life of the
glass, always clean with
a soapy sponge, but only
when the appliance has
cooled down.
Clean the surface of the
heating element once it
has cooled down, and
every time you use it.
Even small patches of
food or dirt will burn when
you switch the plate on
again.
Always use a special
flat scraper for glass,
taking special care not
to scrape near the trim
of the gas burners.
We recommend taking
regular care of this
appliance.
Owing to the high temperatures that the triple-flame burner ring cover has to withstand (as well
as the stainless steel areas such as the plate rings, grease traps and the area around the
burners, etc.), they will eventually become discoloured with time. Clean them each time you use
them, with a product that is suitable for stainless steel.
When you are cleaning the pan supports, take care with the rubber rests, as they could come
off and the pan support could scratch the glass next time you use it.
ATTENTION: CLEANING FOR VITRO-GRILL APPLIANCES
If you work with or cook food directly on the countertop DO NOT CLEAN the counter with any
toxic components, or use aluminium scouring pads.
We recommend that you use a detergent with a non-solid base, that does not contain “powders”
or have a sandy texture, and use a scraper to assist you in the cleaning.
15
Home troubleshooting
You don’t always need to call the technical assistance service.
Very often, you can solve the problem on your own. The
following table contains a few pieces of advice.
Important note:
Only personnel authorised by our Technical Service should
carry out work on the functional gas and electrical system.
What’s gone wrong........?
... if the general electrical
system is malfunctioning?
... if the electrical sparker
doesn’t work?
... if the flames on the burners
are not uniform?
... if the gas flow does not seem
normal, or no gas comes out?
Probable cause Solution
-Defective fuse. -Check the fuse in the main
-The automatic fuse may have
fused or the trip switch has
tripped.
-There may be food or cleaning
residue between the sparker
and the burners.
-The burners are wet.
-The burner covers are not
located correctly.
-The different parts of the
burner have been located
incorrectly.
-The grooves on the burners’
gas outlets are dirty.
-The gas stop cock is turned
off.
-If the gas is coming from a
gas bottle, it may be empty.
fuse box and change it if
necessary.
-Check the main fuse
box to see whether the
automatic trip switch
or a differential switch has
tripped.
-Dry the burner covers and
sparkers carefully.
-Make sure that the burner
covers are correctly located.
-Carefully clean the spaces
between the sparker and
the burners.
-Place the different pieces
correctly.
-Clean the grooves of the
gas outlets of the burners.
-Turn on all stop cocks.
-Replace the gas bottle with
a full one.
... if there is a smell of gas in
the kitchen area?
... if the safety valves on the
different burners don’t work?
16
-A gas tap has been left on.
-There may be a leak at the
connection between the pipe
and the gas bottle.
-The control knob has not been
pressed in for long enough.
-The grooves on the burners’
gas outlets are dirty.
-Check to see if any gas taps
are on.
-Make sure that the
connection is airtight.
-Light the burner, and then
keep the control knob
pressed in a few seconds
longer.
-Clean the grooves on the
burners’ gas outlets.

In the event that you do call our technical service, please supply the following code:
E - NR FD
This code can be found on the specifications plate of your appliance, located on the
underside of your cooking hob.
Conditions of guarantee
The conditions of guarantee which apply to this appliance
are those that have been established by the suppliers
representing our company in the country where the
appliance was purchased. If necessary, the salesperson
who sold you the appliance will be happy to provide
details on same. However, the guarantee is only valid if
it is submitted together with the purchase document.
We reserve the right to make any changes.
17

Cher/chère Client/e :
Nous vous remercions et félicitons de votre choix.
Cet appareil pratique, moderne et fonctionnel, est fabriqué avec des
matériaux de grande qualité qui ont été soumis à un Contrôle de Qualité
très strict, pendant tout le processus de fabrication et méticuleusement
testés afin qu’ils satisfassent toutes vos exigences d’une parfaite
cuisson. Pour votre commodité, cette notice d’instructions est divisée
en deux volets, un d’Utilisation et un autre d’Installation.
Nous vous prions donc de lire et de respecter ces instructions très
simples pour pouvoir garantir des résultats sans égal dès sa première
utilisation. Il contient des informations importantes, non seulement
destinées à l’utilisateur, mais aussi à la sécurité et à l’entretien.
Pendant leur transport, nos produits ont besoin d’un emballage protecteur
efficace. En ce qui concerne cet emballage, nous nous limitions à ce
qui est absolument indispensable, tout l’emballage étant recyclable.
Autant vous que nous, pouvons contribuer à la conservation de
l’environnement ; déposez-le dans le conteneur le plus proche de votre
domicile disposé à cet effet. L’huile rejetée ne doit pas être jetée dans
l’évier vu qu’elle génère un grand impact environnemental. Déposezla dans un récipient fermé et remettez-la à un point de ramassage ou,
sinon, déposez-la dans une poubelle (elle sera amenée à un déversoir
contrôlé, ceci n’étant pas la meilleure solution mais ainsi nous évitons
la contamination des eaux). Vos enfants et vous-mêmes en serez
reconnaissants. Avant de vous défaire d’un appareil usagé, mettez-le
hors d’état. Remettez-le ensuite à un centre de ramassage de matériaux
recyclables. Les données de ce centre le plus proche vous seront
indiquées par votre Administration Locale.
IMPORTANT :
Si, contrairement à nos attentes, l’appareil présente un dommage
ou ne respecte pas les exigences de qualité prévues, veuillez nous
l'indiquer dans les plus brefs délais. Pour que la garantie soit valide,
l'appareil ne devra pas avoir été manipulé, ni soumis à une
mauvaise utilisation.
Si le symbole
instructions suivantes:
18
figure sur la plaque signalétique de votre appareil, suivez les
B#"--&; -"11"3&*- &5 B-*.*/&; -&.#"--"(& &/
3&41&$5"/5 -&/7*30//&.&/5
&5 "11"3&*- &45 ."326B 4&-0/ -" %*3&$5*7& &6301B&//&
3&-"5*7& "69 "11"3&*-4 B-&$53*26&4 &5
B-&$530/*26&4 64"(B4 8"45& &-&$53*$"- "/% &-&$530/*$
&26*1.&/5 H !
" %*3&$5*7& %B'*/*5 -& $"%3& 1063 6/& 3&13*4& &5 6/&
3B$61B3"5*0/ %&4 "11"3&*-4 64"(B4 "11-*$"#-&4 %"/4
-&4 1":4 %& -"

CONTENU
Avertissements de Sécurité 20
Ainsi se présente votre table de cuisson 22
Brûleurs à gaz 23
Diamètre récipients 24
Conseils de préparation 25
Plaques électriques 25
Plaques électriques avec régulateur de 7 et 10 positions 26
Suggestions et Plaques électriques avec régulateur
à 10 positions 27
Vitro-Grill 28
Tableau de Rôtissage au grill 28
Avertissements d’Utilisation en ce qui concerne
la préparation 29
Normes d’utilisation pour Acier : Nettoyage et Conservation 30
Normes d’utilisation pour la plaque en verre :
Nettoyage et Conservation 31
Normes d’utilisation pour Verre Céramique :
Nettoyage et Conservation 32
Situations anormales
Conditions de garantie 34
33
19
Avertissements de Sécurité
Lisez attentivement ce Manuel d’utilisation pour cuisiner
avec cet appareil d’une manière efficace et sûre.
Tous les travaux d'installation, de réglage et d'adaptation
à un autre type de gaz doivent être réalisés
technicien habilité qui doit respecter les normes et la
législation applicables, ainsi que les
sociétés locales fournisseuses d'électricité et de gaz.
Il est recommandé d'appeler le Service Technique pour
l'adaptation à
Avant d’installer votre nouvelle table de cuisson, vérifiez
que les mesures sont correctes.
Cet appareil ne doit être connecté qu’à un dispositif
d’évacuation des produits de combustion.
Cet appareil n'a été conçu que pour un
domestique; son usage
n'est en aucun cas permis. Cet appareil ne peut pas
être installé dans des yachts ou des caravanes.
La garantie ne sera valable que si l'usage pour lequel
il a été conçu a été respecté.
Les instructions suivantes ne sont valides que pour
les pays dont le symbole apparaît sur l’appareil, il est
nécessaire d’avoir recours aux instructions techniques
pour l’adaptation de l’appareil aux conditions d’utilisation
du pays.
un autre type de gaz.
commercial ou professionnel
par un
prescriptions des
usage
20
Il est indispensable que l’endroit où sera installé l’appareil
dispose de la ventilation réglementaire en parfaites
conditions d’utilisation. (Normes de Base d’Installation
de Gaz dans des Edifices Autorisés, JO Espagnol
nº 281,24-11-93).
Ne permettez pas que l’appareil soit exposé à de forts
courants d’air, vu que les brûleurs pourraient s’éteindre.
Cet appareil sort d’usine réglé sur le gaz indiqué sur la
plaque signalétique. Si un changement est nécessaire,
appelez notre service après-vente.
Ne manipulez pas l’intérieur de l’appareil. Si cela est
nécessaire, appelez notre service d’assistance technique.
Conservez bien les instructions d’utilisation et de montage,
pour pouvoir les remettre avec l’appareil s’il y a un
changement de propriétaire.
Ne faites pas fonctionner un appareil endommagé.

Les surfaces des appareils de chauffage et de cuisson
chauffent, faites très attention pendant le fonctionnement.
Maintenez toujours les enfants éloignés.
N’utilisez l’appareil que pour la préparation de repas,
jamais comme chauffage.
Les graisses ou les huiles chauffées en excès peuvent
s’enflammer facilement. C’est pourquoi il faut bien
surveiller la préparation de plats contenant des graisses
et des huiles, par exemple des frites.
Ne pas jeter d’eau si la graisse ou l’huile brûle, DANGER
de brûlures, couvrez le récipient pour étouffer le feu
puis débranchez la zone de cuisson.
En cas de panne, coupez l’alimentation de gaz et
d’électricité de l’appareil. Pour le réparer, appelez notre
service après-vente.
Ne placez pas de récipients déformés, qui sont instables,
sur les plaques et les brûleurs pour éviter des
renversements accidentels.
Si un robinet se bloque, ne le forcez pas. Appelez
immédiatement notre service après-vente officiel,
afin de le réparer ou de le remplacer.
Pendant l’utilisation de votre table de cuisson à gaz,
évitez les courants d’air et les déversements de liquides
froids. Cela peut provoquer la rupture de la plaque en
verre.
N’utilisez pas de nettoyeur vapeur pour réaliser le
nettoyage de la table de cuisson vu
risque d’électrocution.
Cet appareil n'est pas destiné aux personnes (enfants
y compris) dont les capacités physiques, sensorielles ou
mentales sont réduites, aux personnes manquant
d'expérience ou de connaissances, sauf s'ils ont bénéficié
de la supervision ou des instructions relatives à
l'utilisation de l'appareil de la part d'une personne
chargée de leur sécurité.
Ne laissez pas l'appareil sans surveillance pendant son
fonctionnement.
Les graphiques représentés dans ce manuel dinstructions
sont à titre dorientation.
qu’il existe un
!
LE FABRICANT DÉCLINE TOUTE RESPONSABILITÉ
SI VOUS NE RESPECTEZ PAS LES DISPOSITIONS
À CE SUJET.
21
Ainsi se présente votre table
de cuisson :
P laq ue
électrique
2000 W
Plaque
électrique
1500 W
Grille
Brûleur à
triple flamme
jusqu'à 3,6 kW
Brûleur
jusqu'à
1 kW
Bouton
Elément
chaufant
2500 W
Témoin de contrôle
Bouton
Brûleur
jusqu'à
3 kW
Bouton
Grille
Commandes
Elément
chaufant
1200 W
Commandes
Ces appareils peuvent être combinés entre eux, et/ou avec tables de
cuisson vitrocéramiques conventionnelles de la même marque. Consultez
le catalogue.
Elément
chaufant
1700 W
Témoin de
chaleur résiduelle
Témoin de contrôle
22
Brûleurs à gaz
fig. 1
Toutes les manettes de commande situées sur la
cuisinière ou la boîte de commande indiquent le brûleur
qu’elles contrôlent. fig. 1.
Pour allumer un brûleur, pressez sur le bouton du brûleur
choisi puis tournez-le vers la gauche jusqu’à la position
d’allumage, en le maintenant sur la position maximum
pendant quelques secondes jusqu’à ce que le brûleur
s’allume puis relâchez-le et réglez-le sur la position
souhaitée. Si l’allumage ne se produit pas, répétez
l’opération.
Si votre plaque de cuisson ne possède aucun type
d’allumage automatique, approchez un type de flamme
(briquet, allumettes, etc.) du brûleur. Si les bougies sont
sales, l’allumage sera défectueux, maintenez votre plaque
de cuisson toujours très propre. Réalisez l’entretien avec
une petite brosse, en n’oubliant pas que la bougie ne
doit pas souffrir de coups violents.
Si votre plaque de cuisson a des brûleurs disposant de
soupapes de sécurité qui empêchent la sortie de gaz si
les brûleurs s’éteignent accidentellement, procédez à
l’allumage de la même manière mais en maintenant le
bouton enfoncé jusqu’à ce que se produise l’allumage
puis continuez à presser pendant quelques secondes
avec la flamme déjà allumée. Si l’allumage ne se produit
pas, répétez l’opération, cette fois-ci en appuyant environ
10 secondes.
Pour éteindre, tournez le bouton vers la droite jusqu’à
la position 0.
Selon le modèle de votre moderne et fonctionnelle table
de cuisson, il est possible de disposer de robinets
progressifs vous permettant de trouver le réglage
nécessaire entre la flamme maximum et la minimum.
Selon le modèle, votre table de cuisson peut disposer
d’un brûleur à triple flamme, très pratique et commode
pour cuisiner avec des poêles à paella, Wok chinois
(toute sorte de plats asiatiques) etc.
L’utilisation de l’appareil à gaz produit de la chaleur et
de l’humidité dans la pièce où il est installé. Vous devez
assurer une bonne ventilation de la cuisine : maintenez
ouverts les orifices de ventilation naturelle, ou installer
un dispositif de ventilation mécanique (hotte).
L’utilisation continue de votre appareil peut exiger une
ventilation supplémentaire, par exemple ouvrir une fenêtre
(sans provoquer de courants) ou augmenter la puissance
de la ventilation mécanique s’il en existe une.
Une flamme orangée est normale et se produit quand
il y a de la poussière dans latmosphère, quand un liquide
a versé, etc.
23

Diamètre récipients (cm)
Selon le modèle :
BRULEUR MINIMUM Ø RECIPIENT MAXIMUM Ø RECIPIENT
Triple flamme : 22 cm
Rapide : 22 cm 26 cm
Auxiliaire : 12 cm 14 cm
Plaques électriques : 14 cm 18 cm
Grilles
supplémentaires :
fig. 2
24
Selon le modèle, votre table de cuisson peut comprendre
une grille supplémentaire indispensable sur le brûleur
à tripe flamme pour récipients d’un diamètre supérieur
à 26 cm, grills, casseroles en terre et tout autre type de
récipients concaves ( Wok chinois, etc.) fig. 2. Le cas
échéant, le service après-vente de la marque dispose
de cette grille supplémentaire sous le code 363300.
Grille cafetière : Selon le modèle, votre table de cuisson
peut comprendre un supplément de grille cafetière,
exclusivement pour le brûleur auxiliaire avec des
récipients de diamètre inférieur à 10 cm. Si ce n’est pas
le cas, le service technique de la marque dispose de
ces grilles cafetières sous le code 184200.
Le fabricant décline toute responsabilité si vous n’utilisez
pas ou si vous utilisez de manière incorrecte ces grilles
supplémentaires.
Conseils de
préparation :
Très fort Fort Moyen Lent
Ces conseils ne sont donnés qu’à titre indicatif
Triple
flamme
Rapide
Auxiliaire
Bouillir, cuire, rôtir, dorer,
paellas, repas asiatique (Wok).
Escalope, bifteck, omelette,
fritures, légumes frais potages,
pâtes.
Cuire : Ragoûts, riz au lait,
caramel.
Plaques électriques
Avant d’utiliser la plaque pour la première fois, faites-la
chauffer pendant 5 minutes sans poser aucun récipient
et avec le régulateur situé sur la puissance maximum.
Pendant cette période, il est normal qu’il se dégage de
la fumée et des odeurs, celles-ci disparaîtront au fur et
à mesure.
A part ce premier chauffage, n’utilisez pas les plaques
sans récipients.
Il est recommandé, au début de la cuisson, de placer la
commande sur la position maximum et selon la quantité
et la qualité des aliments, passer ensuite sur une position
intermédiaire de maintien.
Il est possible d’éteindre la plaque un peu avant la
fin de la cuisson et profiter de l’inertie thermique de la
plaque ; ceci permettra de faire des économies d’énergie
vu que la cuisson continuera grâce à la chaleur accumulée
dans la plaque.
Utilisez des récipients à fond parfaitement plat, épais et
d’une taille similaire à celle du chauffage, jamais d’une
taille inférieure.
Réchauffer et maintenir chauds :
plats précuisinés, plats cuisinés.
Riz,
béchamel,
ragoût.
Réchauffer et maintenir des plats
cuisinés et faire des ragoûts
délicats.
Décongeler et
faire cuire
lentement :
Légumes, fruits,
produits congelés.
Cuisson
vapeur :
Poisson, légumes.
Faire/fondre :
Beurre,
chocolat,
gélatine.
Evitez les débordements de liquide sur la surface de la
plaque, ainsi que de travailler avec des récipients mouillés.
25
 Loading...