

BOSCH NGM5455UC User Manual
Gas Cooktops
Use and Care Manual
NGM Gas Cooktops
NGM5455UC


Table of Contents
Questions?
1-800-944-2904
www.bosch-home.com/us
We look forward to hearing from you!
This Bosch Appliance is made by
BSH Home Appliances Corporation
1901 Main Street, Suite 600
Irvine, CA 92614
Safety Definitions . . . . . . . . . . . . . . . 1
Gas Appliance Safety . . . . . . . . . . . . 1
Safety . . . . . . . . . . . . . . . . . . . . . . . . . 2
About This Manual . . . . . . . . . . . . . . 5
How This Manual Is Organized . . . . . . . . . . 5
Getting Started . . . . . . . . . . . . . . . . . 5
Before Using the Appliance for the
First Time . . . . . . . . . . . . . . . . . . . . . . . . . . . 5
Parts and Accessories Included . . . . . . . . 6
Sealed Burners . . . . . . . . . . . . . . . . . . . . . . . 6
Burner Caps . . . . . . . . . . . . . . . . . . . . . . . . . . 6
.Burner Grates . . . . . . . . . . . . . . . . . . . . . . . . 8
Control Knobs . . . . . . . . . . . . . . . . . . . . . . . 9
Burner Control Knob Removal . . . . . . . . . . . . 9
Operation . . . . . . . . . . . . . . . . . . . . . 10
About the Appliance . . . . . . . . . . . . . . . . . 10
Normal Operation (Electronic Ignition/
Reignition) . . . . . . . . . . . . . . . . . . . . . . . . . . 10
Typical Flame Characteristics . . . . . . . . . . . 10
Getting the Most Out Of Your Appliance . 10
Cooking Suggestions (For Best Results) . . . 10
.Proper Cookware . . . . . . . . . . . . . . . . . . . . 11
.Maintenance . . . . . . . . . . . . . . . . . . . . . . . 14
Service . . . . . . . . . . . . . . . . . . . . . . . 15
Before Calling for Service . . . . . . . . . . . . . 15
Troubleshooting Chart . . . . . . . . . . . . . . . . . 15
Data Plate . . . . . . . . . . . . . . . . . . . . . . . . . . 15
How to Obtain Service or Parts . . . . . . . . . . 15
STATEMENT OF LIMITED PRODUCT
WARRANTY . . . . . . . . . . . . . . . . . . . 16
.Cleaning and Maintenance . . . . . . 12
Daily Cleaning . . . . . . . . . . . . . . . . . . . . . . . 12
Cleaning Guidelines . . . . . . . . . . . . . . . . . . . 12


9 IMPORTANT SAFETY INSTRUCTIONS
WARNING:
If the information in this manual is not followed exactly, a
fire or explosion may result causing property dama ge ,
personal injury or death.
-- Do not store or use combustible materials,
gasoline or other flammable vapors and liquids
in the vicinity of this or any other appliance.
-- WHAT TO DO IF YOU SMELL GAS
• Do not try to light any appliance.
• Do not touch any electrical switch.
• Do not use any phone in your building.
• Immediately call your gas supplier from a
neighbor’s phone. Follow the gas supplier’s
instructions.
• If you cannot reach your gas supplier, call
the fire department.
-- Installation and service must be perf ormed by a
qualified installer, authorized service agency or
the gas supplier.
READ AND SAVE THESE INSTRUCTIONS
Safety Definitions
9 WARNING
This indicates that death or serious injuries may
occur as a result of non-observance of this warning.
9 CAUTION
This indicates that minor or moderate injuries may
occur as a result of non-observance of this warning.
NOTICE: This indicates that damage to the appliance or property may occur as a result of non-compliance with this
advisory.
Note: This alerts you to important information and/or tips.
Gas Appliance Safety
9001070911 Rev A English 1

9 IMPORTANT SAFETY INSTRUCTIONS
READ AND SAVE THESE INSTRUCTIONS
Safety
Important Safety Instructions
IMPORTANT: THE APPLIANCE HAS TO BE INSTALLED
BY A QUALIFIED INSTALLER.
INSTALLER: LEAVE THESE INSTRUCTIONS WITH THE
APPLIANCE AFTER INSTALLATION IS COMPLETE.
IMPORTANT: SAVE FOR THE LOCAL INSPECTOR’S
USE AND FOR FUTURE REFERENCE.
9 WARNING
When properly cared for, your new appliance has
been designed to be safe and reliable. Read all
instructions carefully before use. These precautions
will reduce the risk of burns, electric shock, fire and
injury to persons. When using kitchen appliances,
basic safety precautions must be followed, including
those in the following pages.
• Have the installer show you where the gas shut-off
valve is located.
• If a burner goes out and gas esca pe s, op e n w ind o ws
and doors. Wait until gas dissipates before using the
appliance.
• If you smell gas, your installer has not done a proper
job of checking for leaks. If the connections are not
perfectly tight, you can have a leak and, therefore, a
faint smell. Finding a gas leak is not a "do-it-yourself"
procedure. Some leaks can only be found with the
burner control in the ON position and this must be done
by a qualified service technician. See “WHA T TO DO IF
YOU SMELL GAS” on page 1.
• During a power failure, only the cooktop burners can
be lit manually.
• To prevent carbon monoxide build-up, do not block
appliance air vents.
• For proper lighting and performance of burners, keep
igniters clean and dry.
9 WARNING
State of California Proposition 65 Warnings:
This product contains chemicals known to the State
of California to cause cancer, birth defects or other
reproductive harm.
•
IMPORTANT SAFETY NOTICE: The California
Safe Drinking Water and Toxic Enforcement Act
requires the Governor of California to publish a list of
substances known to the state to cause cancer, birth
defects or other reproductive harm, and requires
businesses to warn customers of potential exposure to
such substances.
• The burning of gas cooking fuel can generate som e byproducts which are on the list. To minimize exposure to
these substances, always operate this unit according to
the instructions contained in this booklet and provide
good ventilation.
• Birds have very sensitive respiratory systems. Keep
pet birds out of the kitchen or other rooms where
kitchen fumes could reach them. Kitchen fumes such
as overheating margarines and cooking oils may be
harmful.
Fire Safety
• Do not use aluminum foil to line any part of the
cooktop.
• Set the burner control so that the flame does not
extend beyond the bottom of the pan.
• Use this appliance only for its intended use as
described in this manual. For example, never use the
appliance for warming or heating the room. Never use
the appliance for storage.
• Do not allow aluminum foil, plastic, paper or cloth to
come in contact with a hot burner or grate. Do not allow
pans to boil dry.
• If the cooktop is near a window, forced air vent, or fan,
be certain that flammable materials such as window
coverings do not blow over or near the burners or
elements. They could catch on fire.
• Always have a working smoke detector near the
kitchen.
• Never leave the cooktop unattended when in use.
Boilovers cause smoking and greasy spillovers may
ignite.
•
WARNING—TO REDUCE THE RISK OF A RANGE
TOP GREASE FIRE:
English 2 9001070911 Rev A

9 IMPORTANT SAFETY INSTRUCTIONS
READ AND SAVE THESE INSTRUCTIONS
a) Never leave surface units unattended at high
settings. Boilovers cause smoking and greasy
spillovers that may ignite. Heat oils slowly on low or
medium settings.
b) Always turn hood ON when cooking at high heat or
when flambéing food (i.e. Crepes Suzette, Cherries
Jubilee, Peppercorn Beef Flambe').
c) Clean ventilating fans frequently. Grease should
not be allowed to accumulate on fan or filter.
d) Use proper pan size. Always use cookware
appropriate for the size of the surface element.
• In the event that personal clothing or hair catches fire,
drop and roll immediately to extinguish flames.
• Smother flames from food fires other than grease fires
with baking soda. Never use water on cooking fires.
• Take care that drafts like those from fans or forced air
vents do not push the flames so that they extend
beyond the edges of the pan.
WARNING:
TO REDUCE THE RISK OF INJURY TO PERSONS IN
THE EVENT OF A GREASE FIRE, OBSERVE THE
FOLLOWING:
a) SMOTHER FLAMES with a close-fitting lid, cookie
sheet, or metal tray, then turn off the burner. BE
CAREFUL TO PREVENT BURNS. If the flames do
not go out immediately, EVACUATE AND CALL
THE FIRE DEPARTMENT.
b) NEVER PICK UP A FLAMING PAN - You may be
burned.
c) DO NOT USE WATER, including wet dishcloths or
towels - a violent steam explosion will result.
d) Use an extinguisher ONLY if:
1) You know you have a Class ABC extinguisher,
and you already know how to operate it.
2) The fire is small and contained in the area
where it started.
3) The fire department is being called.
4) You can fight the fire with your back to an exit.
5) Have an appropriate fire extinguisher
available, nearby, highly visible and easily
accessible near the oven.
• Whenever possible, do not operate the ventilation
system during a cooktop fire. However, do not reach
through fire to turn it off.
Burn Prevention
• DO NOT TOUCH SURFACE UNITS OR AREAS NEAR
UNITS - Surface units may be hot even though they
are dark in color . Areas near surface unit s may become
hot enough to cause burns. During and after use, do
not touch, or let clothing, potholders, or other
flammable materials contact surface units or areas
near units until they have had sufficient time to cool.
Among these areas are the cooktop and area s f ac ing
the cooktop.
• Do not heat or warm unopened food containers. Buildup of pressure may cause the container to burst and
cause injury.
• Use high heat settings on the cooktop only when
necessary. To avoid bubbling and splattering, heat oil
slowly on no more than a low-medium setting. Hot oil is
capable of causing extreme burns and injury.
• Never move a pan of hot oil, especially a deep fat fryer.
Wait until it is cool.
CAUTION:
All igniters spark when any single burner is turned on. Do
not touch any of the burners when the cooktop is in use.
Child Safety
• When children become old enough to use the
appliance, it is the responsibility of the parents or legal
guardians to ensure that they are instructed in safe
practices by qualified persons.
• Do not allow anyone to climb, stand, lean, sit, or hang
on any part of an appliance. This can damage the
appliance and potentially cause severe injury.
• Do not allow children to use this appliance unless
closely supervised by an adult. Children and pets
should not be left alone or unattended in the area
where the appliance is in use. They should never be
allowed to play in its vicinity, whether or not the
appliance is in use.
CAUTION:
Items of interest to children should not be stored in an
appliance, in cabinets above an appliance or on the
backsplash. Children climbing on an appliance to reach
items could be seriously injured.
Cleaning Safety
• Do not clean the appliance while it is still hot. Some
cleaners produce noxious fumes when applied to a ho t
surface. Wet clothes or sponges can cause burns from
steam.
• After a spill or boilover, turn off the burner and allow the
cooktop to cool. Clean around the burner and burner
ports. After cleaning, check for proper operation.
9001070911 Rev A English 3

9 IMPORTANT SAFETY INSTRUCTIONS
READ AND SAVE THESE INSTRUCTIONS
Cookware Safety
• Hold the handle of the pan when stirring or turning
food. This helps prevent spills and movement of the
pan.
• Use Proper Pan Size. The use of undersized cookware
will expose a portion of the heating element or burner
to direct contact and may result in ignition of clothing.
Select cookware that has a flat bottom large eno ugh to
cover the surface heating unit. This appliance is
equipped with one or more surface units of different
size. Proper relationship of cookware to heating
element or burner will also improve efficiency.
• Always position handles of utensils inward so they do
not extend over adjacent work areas, burners, or the
edge of the cooktop. This reduces the risk of fires,
spills and burns.
• Adjust burner flame size so that it does not extend
beyond the edge of the cookware. Proper relationship
of cookware to burner flame reduces safety risks.
• Use only certain types of glass, heatproof glass,
ceramic, earthenware, or other glazed utensils that are
suitable for cooktop use.
Proper Installation and Maintenance
• Have the installer show you the location of the circuit
breaker or fuse. Mark it for easy reference.
• This appliance must be properly installed and
grounded by a qualified technician. Connect only to
properly grounded outlet. Refer to Installation
Instructions for details.
• This appliance is intended for normal family household
use only. It is not approved for outdoor use. See
“STATEMENT OF LIMITED PRODUCT WARRANTY”
on page 16. If you have any questions, contact the
manufacturer.
• Do not store or use corrosive chemicals, vapors,
flammables or nonfood products in or near this
appliance. It is specifically designed for use when
heating or cooking food. The use of corrosive
chemicals in heating or cleaning will damage the
appliance and could result in injury.
• Do not operate this appliance if it is not working
properly, or if it has been damaged. Contact an
authorized service provider.
• Do not repair or replace any part of the appliance
unless specifically recommended in this manual. Refer
all servicing to a factory authorized service center.
WARNING:
To avoid electrical shock hazard, before servicing the
cooktop, switch power off at the service panel and lock the
panel to prevent the power from being switched on
accidentally.
English 4 9001070911 Rev A

About This Manual
Getting Started
How This Manual Is Organized
This manual contains several sections:
•The Safety section describes important procedures
that can ensure your safety while using the appliance.
•The Getting Started section describes th e features and
functionality of the appliance, including a description of
how to set it up and operate it.
•The Operation section describes how to operate and
get the best performance out of each com p on e nt .
•The Cleaning and Maintenance section describes how
to clean and maintain the appliance.
•The Service section includes troubleshooting tips and
your warranty.
Before using your appliance, be sure to read this manual.
Pay special attention to the Important Safety Instructions
located at the beginning of the manual.
Before Using the Appliance
for the First Time
• Remove all packing materials and literature from the
cooktop surface.
• While cool, wipe with a clean, damp sponge and dry.
• There may be a slight odor during the first several
uses; this is normal and will disappear.
• Optimum cooking results depend on the proper
cookware being selected and used. (See “Choosing
Cookware - Cookware Recommendations” on
page 11.)
• Read all safety precautions and Use and Care Manual
information prior to operating.
9001070911 Rev A English 5
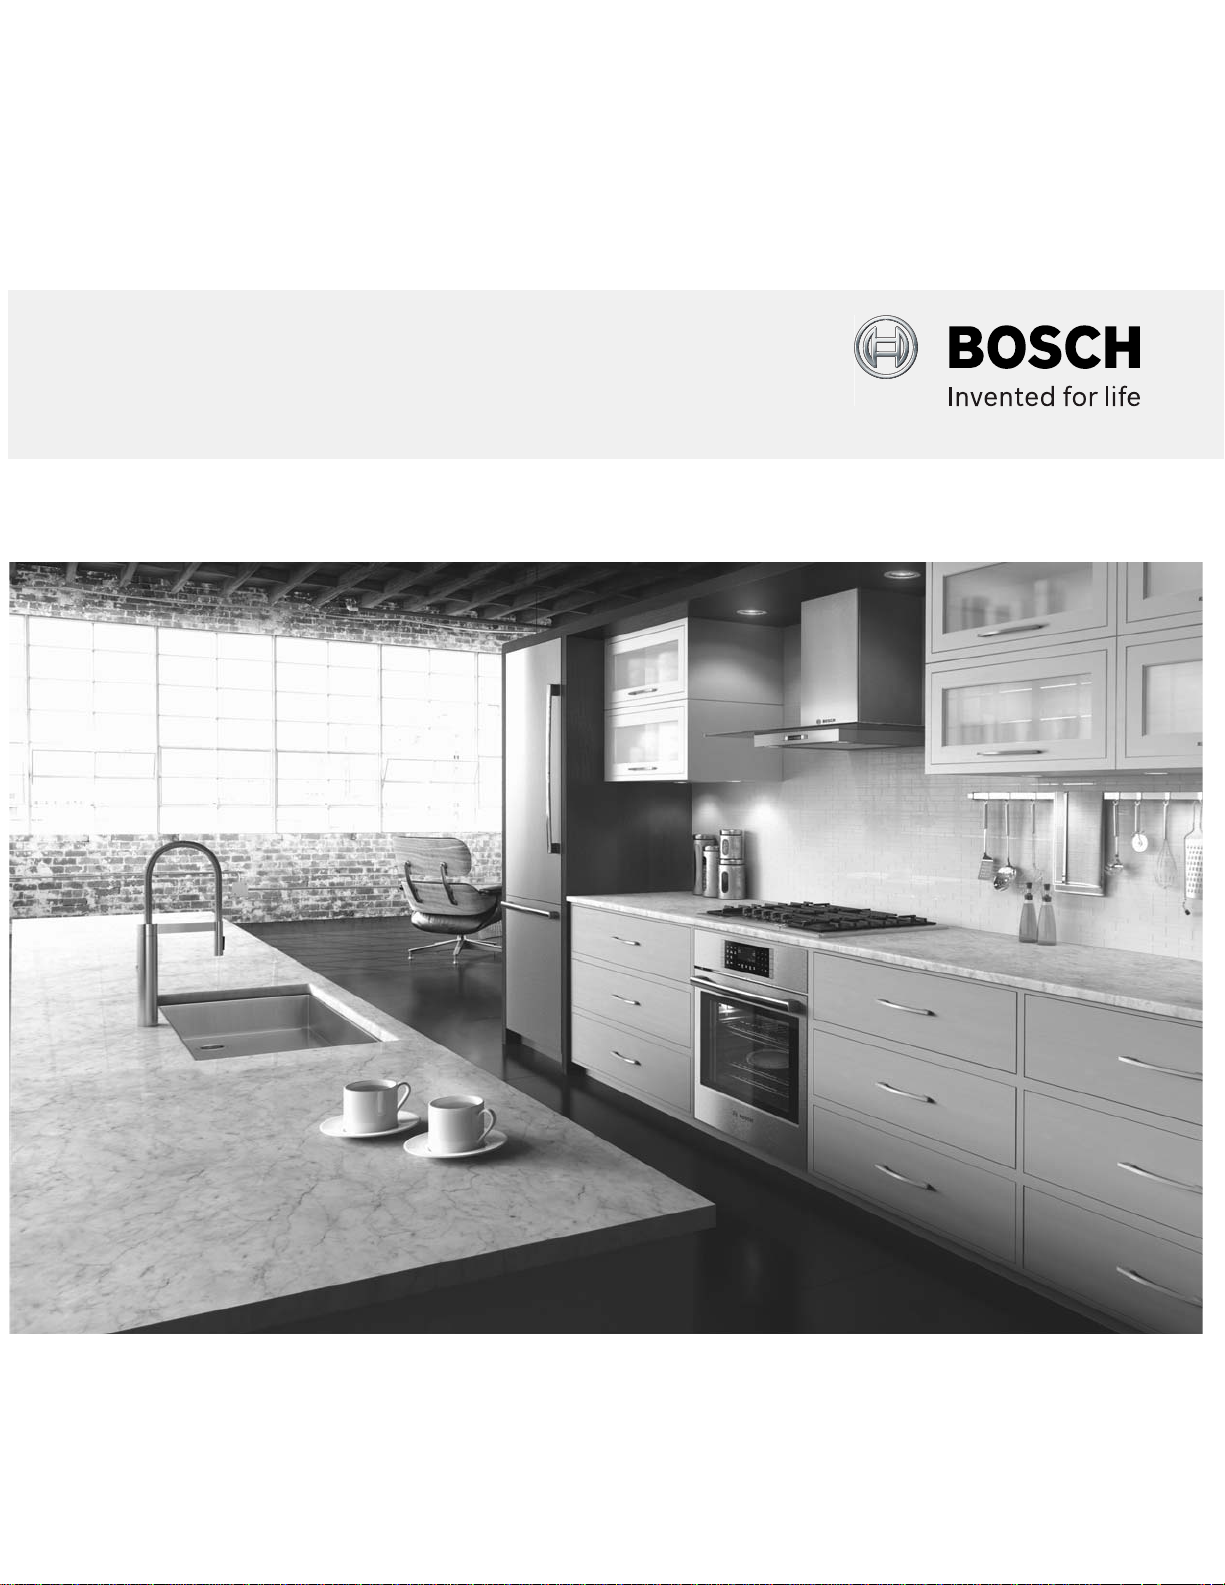
Parts and Accessories Included
1 4 5
3
2
.
1. Le ft front sur fa ce bu r ne r (5,0 00 BTUs )
2. Left rear surface burner (9,100 BTUs)
3. Right rear surface burner (11,500 BTUs)
4. Right front surface burner (5,000 BTUs)
5. Serial Number/Data Plate location (right front
underneath)
Sealed Burners
Your new cooktop has sealed gas burners. There are no
burner parts under the cooktop to clean, disassemble or
adjust. Y our cooktop has three different burner sizes; small,
medium, and large. Match the corresponding letters on the
burner cap and burner base. See “Burners Caps” on
page 7.
Burner Caps
The burner cap is porcelain enameled steel. The burner
caps must be properly placed for the cooktop to function
Figure 1: Models NGM5455UC
properly. If the burner cap is not properly placed, one or
more of the following problems may occur:
• Burner flames are too high.
• Flames shoot out of burners.
• Burners do not ignite.
• Burner flames light unevenly.
• Burner emits gas odor.
9 WARNING
To prevent flare-ups and avoid creation of harmful
by-products, do not use the cooktop without all
burner caps and all burner grates properly
positioned.
9 WARNING
To prevent burns, do not touch burner caps or
grates while hot. Turn the cooktop off and allow the
burners to cool.
English 6 9001070911 Rev A
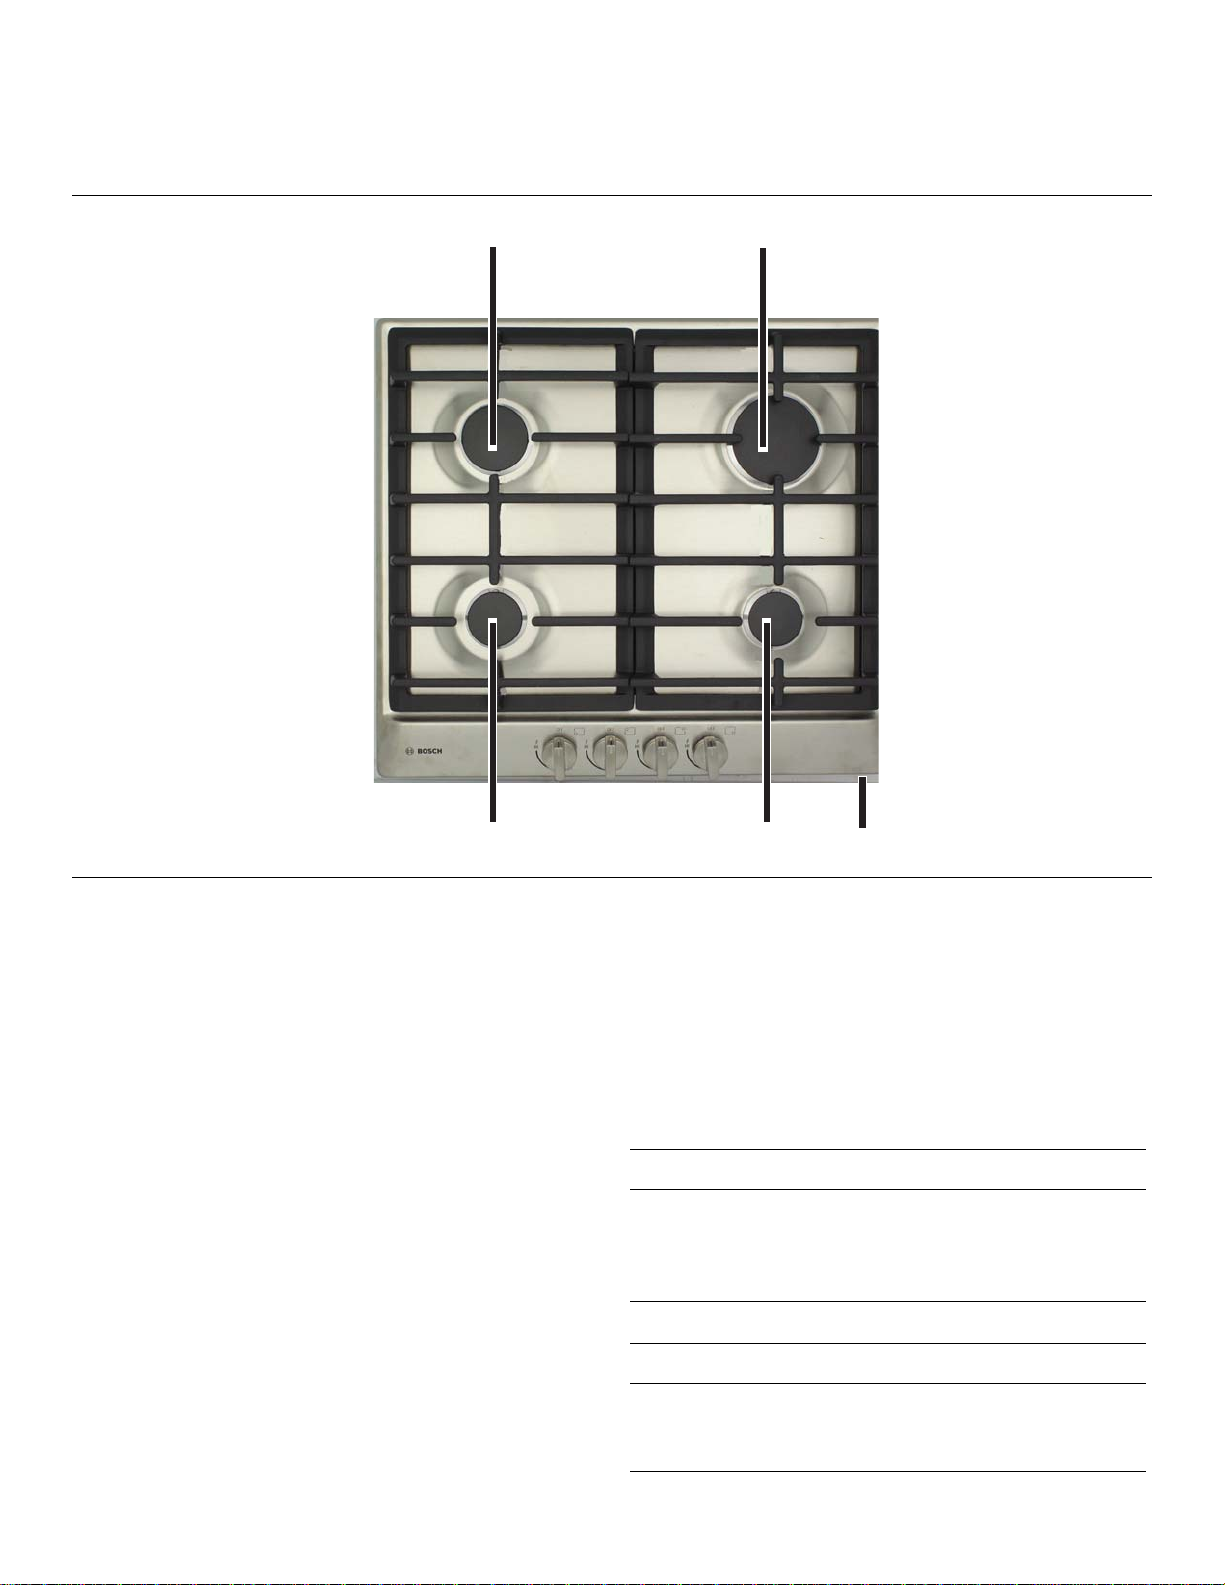
Placing Burner Caps
Burner Base
Burner Cap
Matching letter
designation.
Each cap has a letter (A, C, D, or F) cast in the underside
of the cap that corresponds to a letter (A, C, D, or F) cast in
the burner base that is attached to the appliance.
• Place each burner cap on its correct burner base per
its corresponding letter designation. See Figure 2
“Burners Caps” on page 7.
• Place burner cap gently on top of base so that the
prongs of the burner base fit snugly into the groove of
the burner cap.
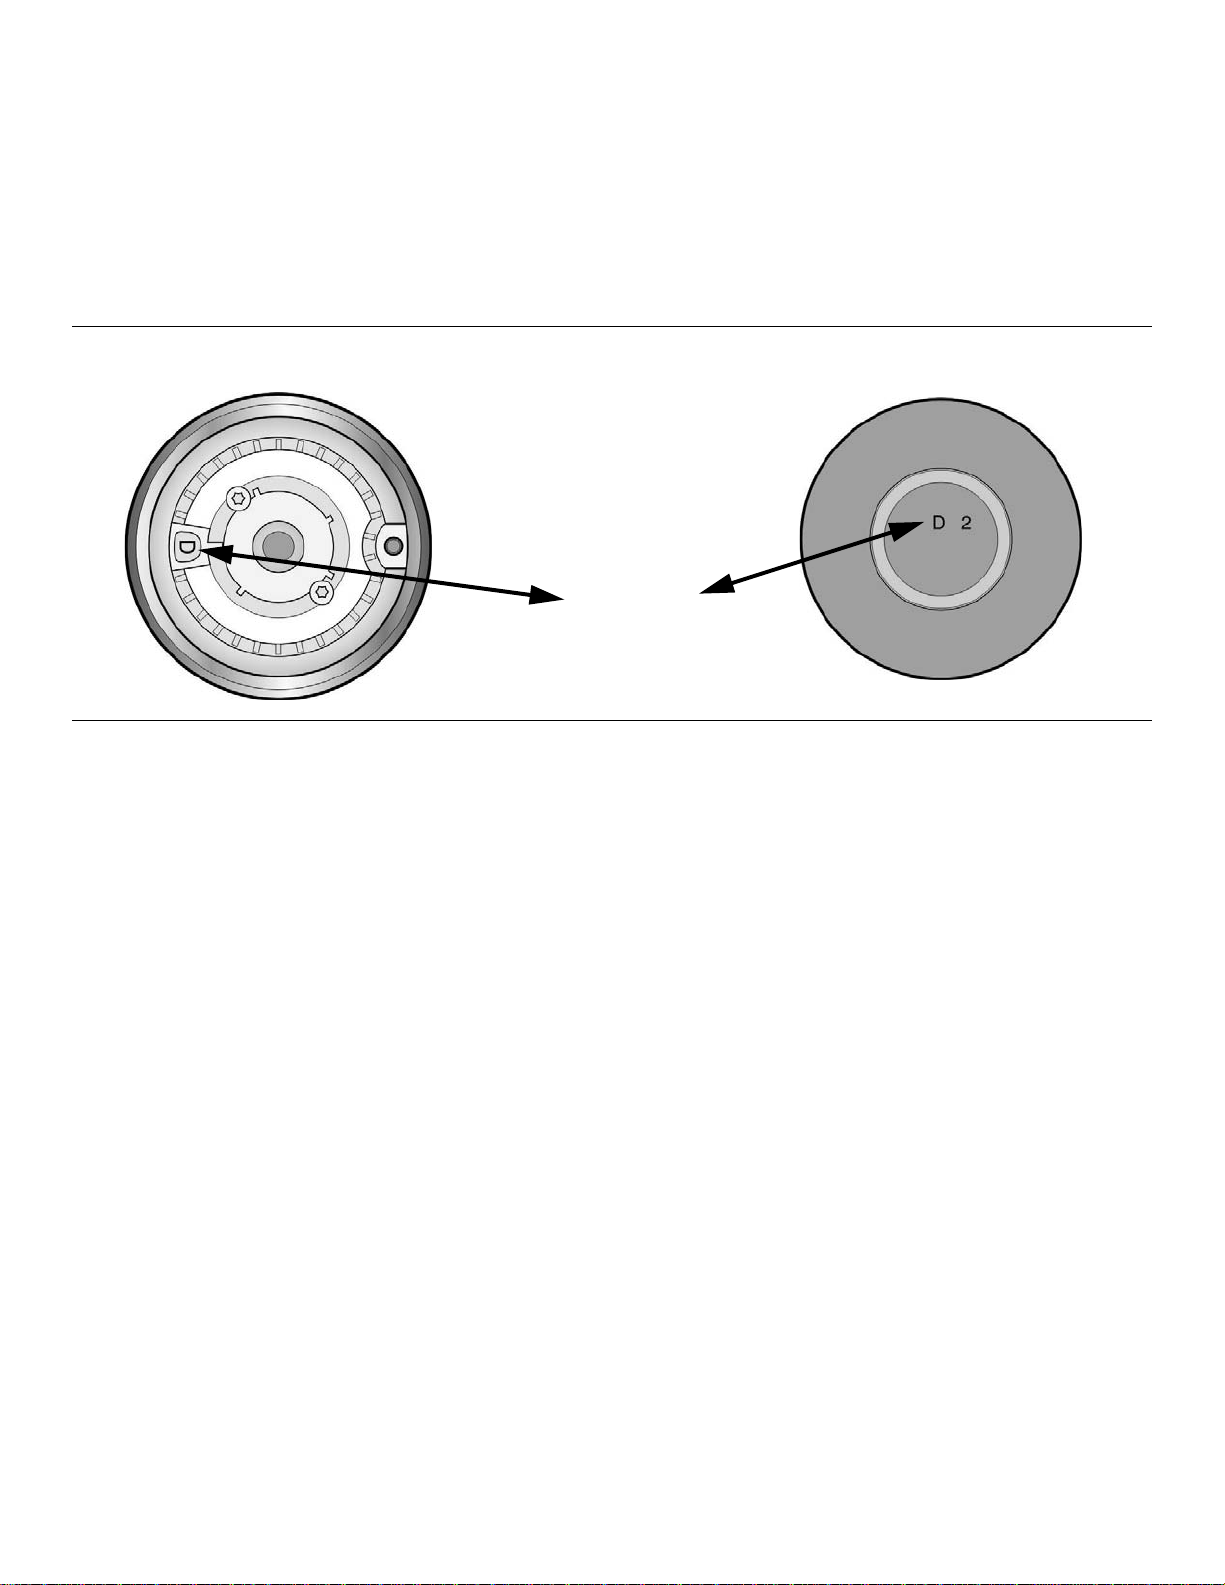
Checking Burner Cap Placement
• Check to make sure there is not a gap between the
burner cap and burner base. See Figure 3 “Bur ner Cap
Placement” on page 8 to see the correct and incorrect
placements of the burner cap.
Figure 2: Burners Caps
• Y ou may gently try to move the burner cap from side to
side to check if it is properly placed. If properly placed,
the cap will click from side to side as the prongs hit the
groove ridge.
9001070911 Rev A English 7
.
Correct Burner Cap Placement
Incorrect Burner Cap Placement
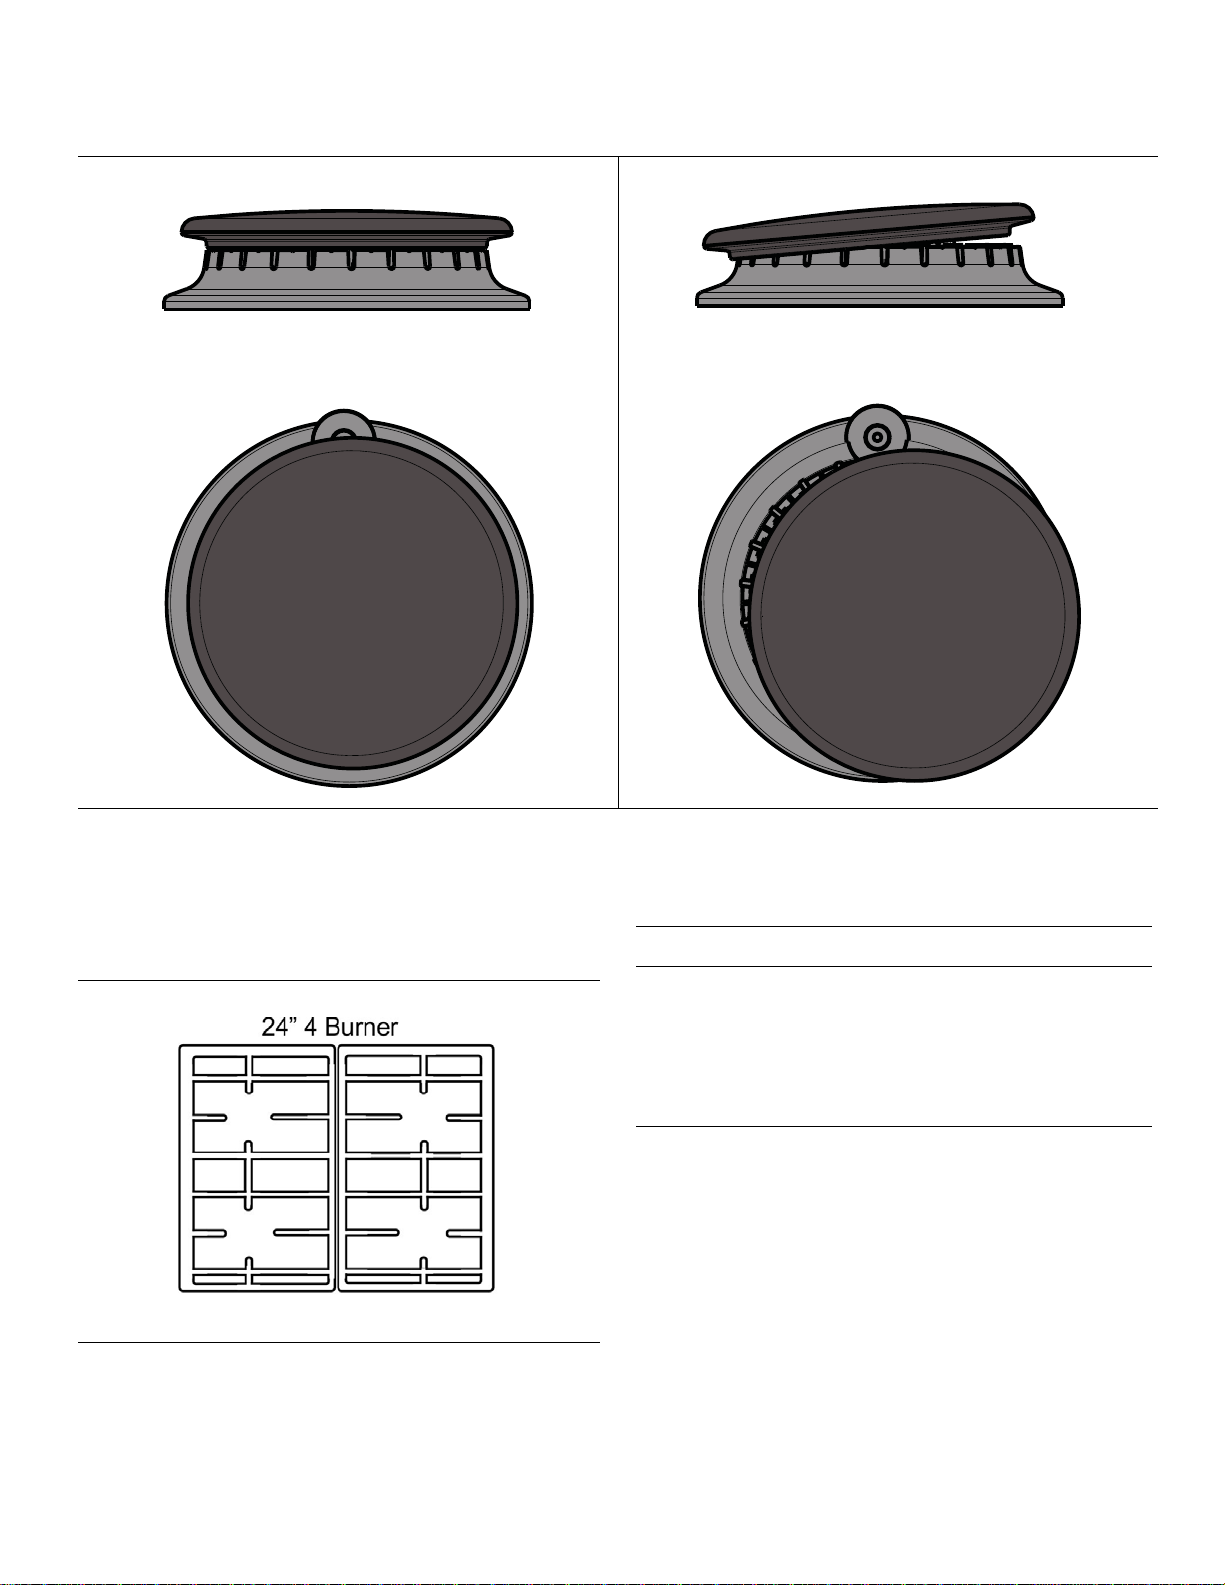
Burner Grates
Grates must be properly positioned before cooking.
Figure 4: Burner Grates
Figure 3: Burner Cap Placement
9 WARNING
To prevent flare-ups, properly support pots, and
avoid spills, all grates must be properly positioned
on the cooktop whenever the cooktop is in use.
Each of the four feet must be placed into the
corresponding dimples in the cooktop. Do not use a
grate if the rubber feet are missing or damaged.
For replacement rubber feet: contact your dealer or call
the service number listed inside the cover.
English 8 9001070911 Rev A
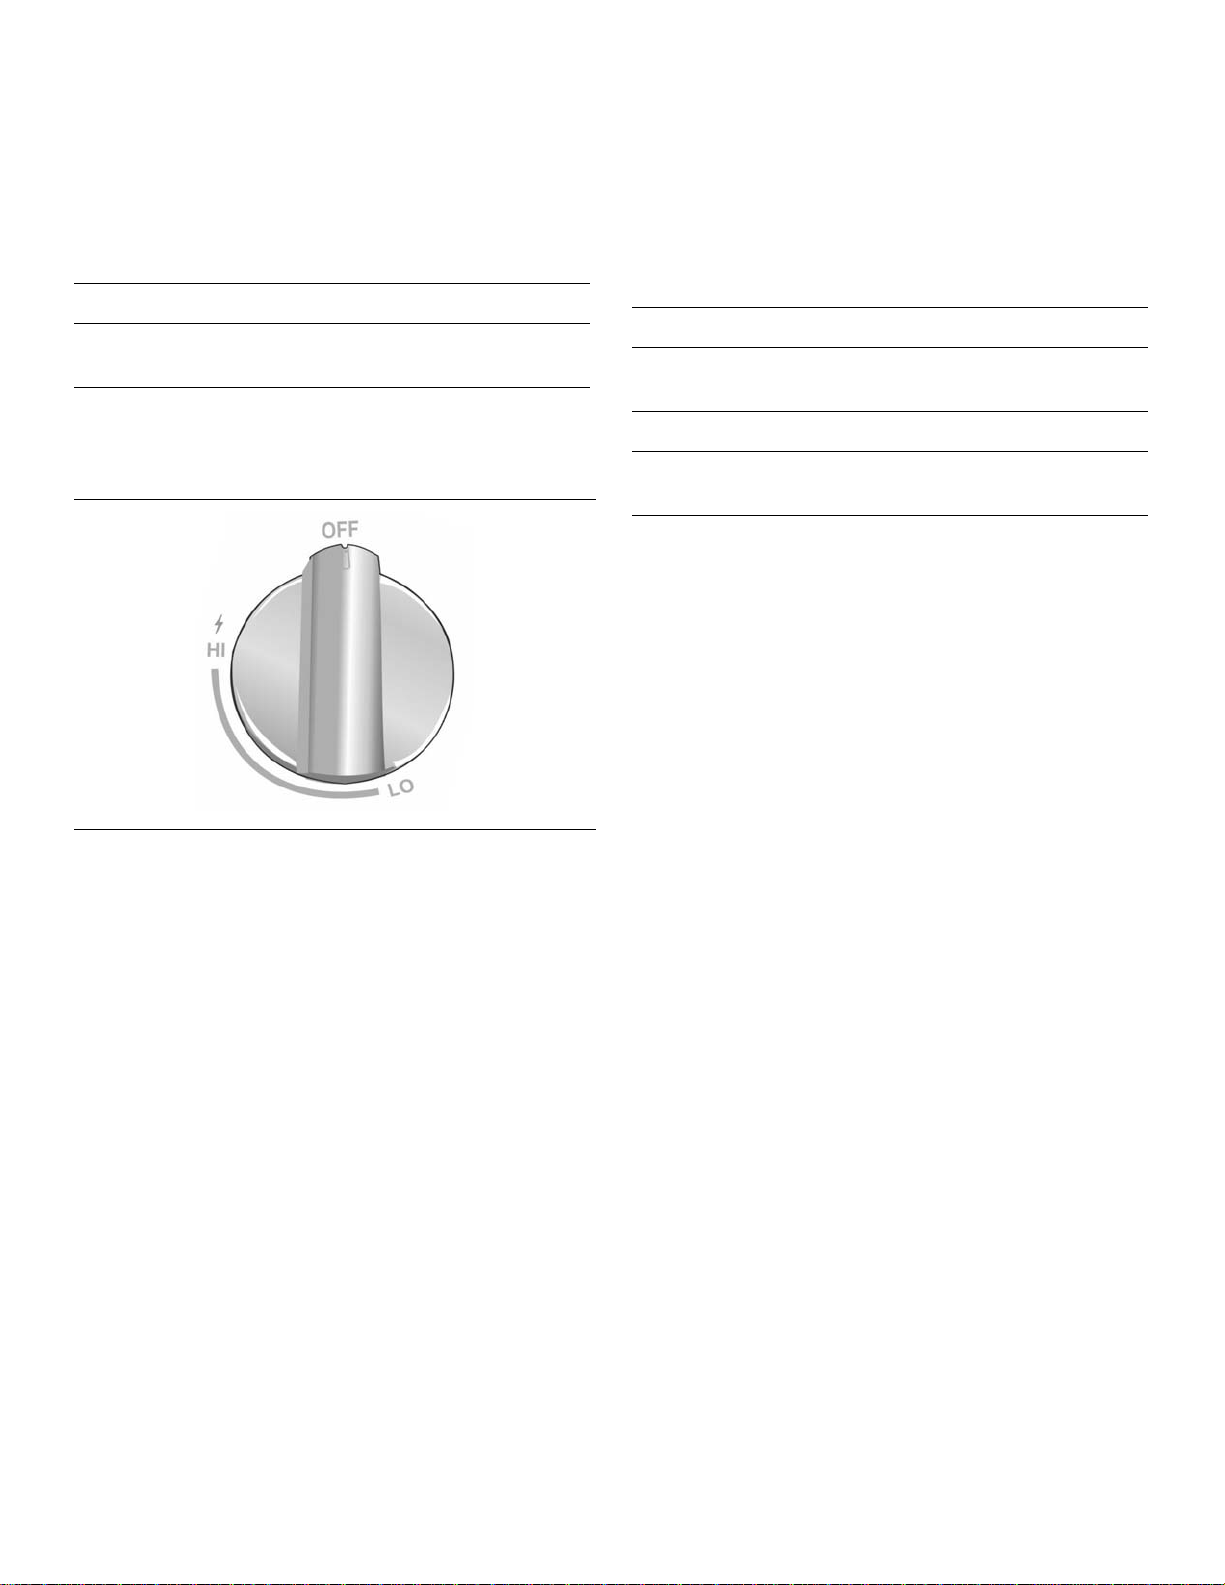
Control Knobs
Burner Control Knob Removal
The cooktop has one control knob for each burner. Push
down and turn to the left to light and set the desired heat
setting.
9 CAUTION
Failure to operate knobs properly may result in
personal injury and damage to the appliance.
The cooktop has standard burner controls and rubber
grommets.
To remove knob and grommet: With burner in the OFF
position, gently lift knob up and off. Gently p ull the grommet
from the sides and lift out.
9 WARNING
To avoid possible electric shock, do not reach
through control opening into rough-in box.
9 WARNING
Do not use the product without the knobs and
grommets in place.
To replace grommet and knob: Carefully insert the
grommet into the opening, ensuring that the maintop is
seated in the track around the entire perimeter of the
grommet. Replace control knob by placing indicator line at
the 12 o’clock position. Press down firmly.
Figure 5: Standard Burner Control Knob
The standard burner controls have an infinite number of
heat settings.
To operate: Select the appropr iate control knob, push down
and turn counterclockwise to the desired flame size. Turn
off by turning the control knob clockwise to OFF.
9001070911 Rev A English 9
Operation
Yellow Flames:
Further adjustment is required.
Yellow Tips on Outer Cones:
Normal for LP Gas.
Soft Blue Flames:
Normal for Natural Gas.
If the flame is completely or
mostly yellow, verify that the
regulator is set for the correct fuel. After adjustment,
retest.
Some yellow streaking is normal during the initial startup. Allow unit to operate 4-5 minutes and re-evaluate
before making adjustments.
About the Appliance
Use the cooktop for surface cooking applications such as
boiling, frying, simmering, steaming and sautéing.
9 WARNING
The burning of gas cooking fuel can create small
amounts of Carbon Monoxide, Benzene,
Formaldehyde and Soot. To minimize exposure to
these substances, the burners should be adjusted
by a certified installer or agency to ensure proper
combustion. Ensure proper ventilation with an open
window or use a ventilation fan or hood when
cooking with Gas. Always operate the unit according
to the instructions in this manual.
The cooktop has one control knob for each burner. Push
down and turn to the desired heat setting.
Normal Operation (Electronic Ignition/
Reignition)
The cooktop uses electronic igniters to light the burners.
There is no pilot light. Each burner has its own igniter. If a
burner flame blows out during use, the burner will
automatically reignite.
9 CAUTION
Figure 6: Checking Flame Characteristics
Foreign particles in the gas line may cause an orange
flame during initial use. This should disappear with use.
Check burner to make sure port holes are not obstructed. If
the ports are clogged, see “Before Calling for Service” on
page 15.
NOTE:
An audible “pop” may be heard when the burner is turned
off manually . The “popping” may be louder with LP gas than
with natural gas. This is normal.
To avoid possible injury or damage to the
appliance, ensure grates are installed exactly per
installation instructions and not backwards or
upside down.
Typical Flame Characteristics
The burner flame should be blue in color and sta ble with no
yellow tips, excessive noise or fluttering. It should burn
completely around the burner cap.
English 10 9001070911 Rev A
Getting the Most Out Of Your
Appliance
Cooking Suggestions (For Best Results)
• Bring food to a boil. Stir well to be sure all the food is
boiling, then cover and reduce the flame to the desired
setting.
• Use a lid to keep a more constant cooking temperature.
• Check the food occasionally to see if the control knob
should be turned to a lower or higher setting.
• It is normal to stir food occasionally.
• There should be steam and slight quivering of the
liquid’s surface while simmering.
• Use proper cookware. (See “Choosing Cookware -
Cookware Recommendations” on page 11 .)
• Center the pan over the burner before turning the
burner on.
• Refer to the “Surface Burner Cooking
Recommendations” chart on page 11 for suggested
settings.
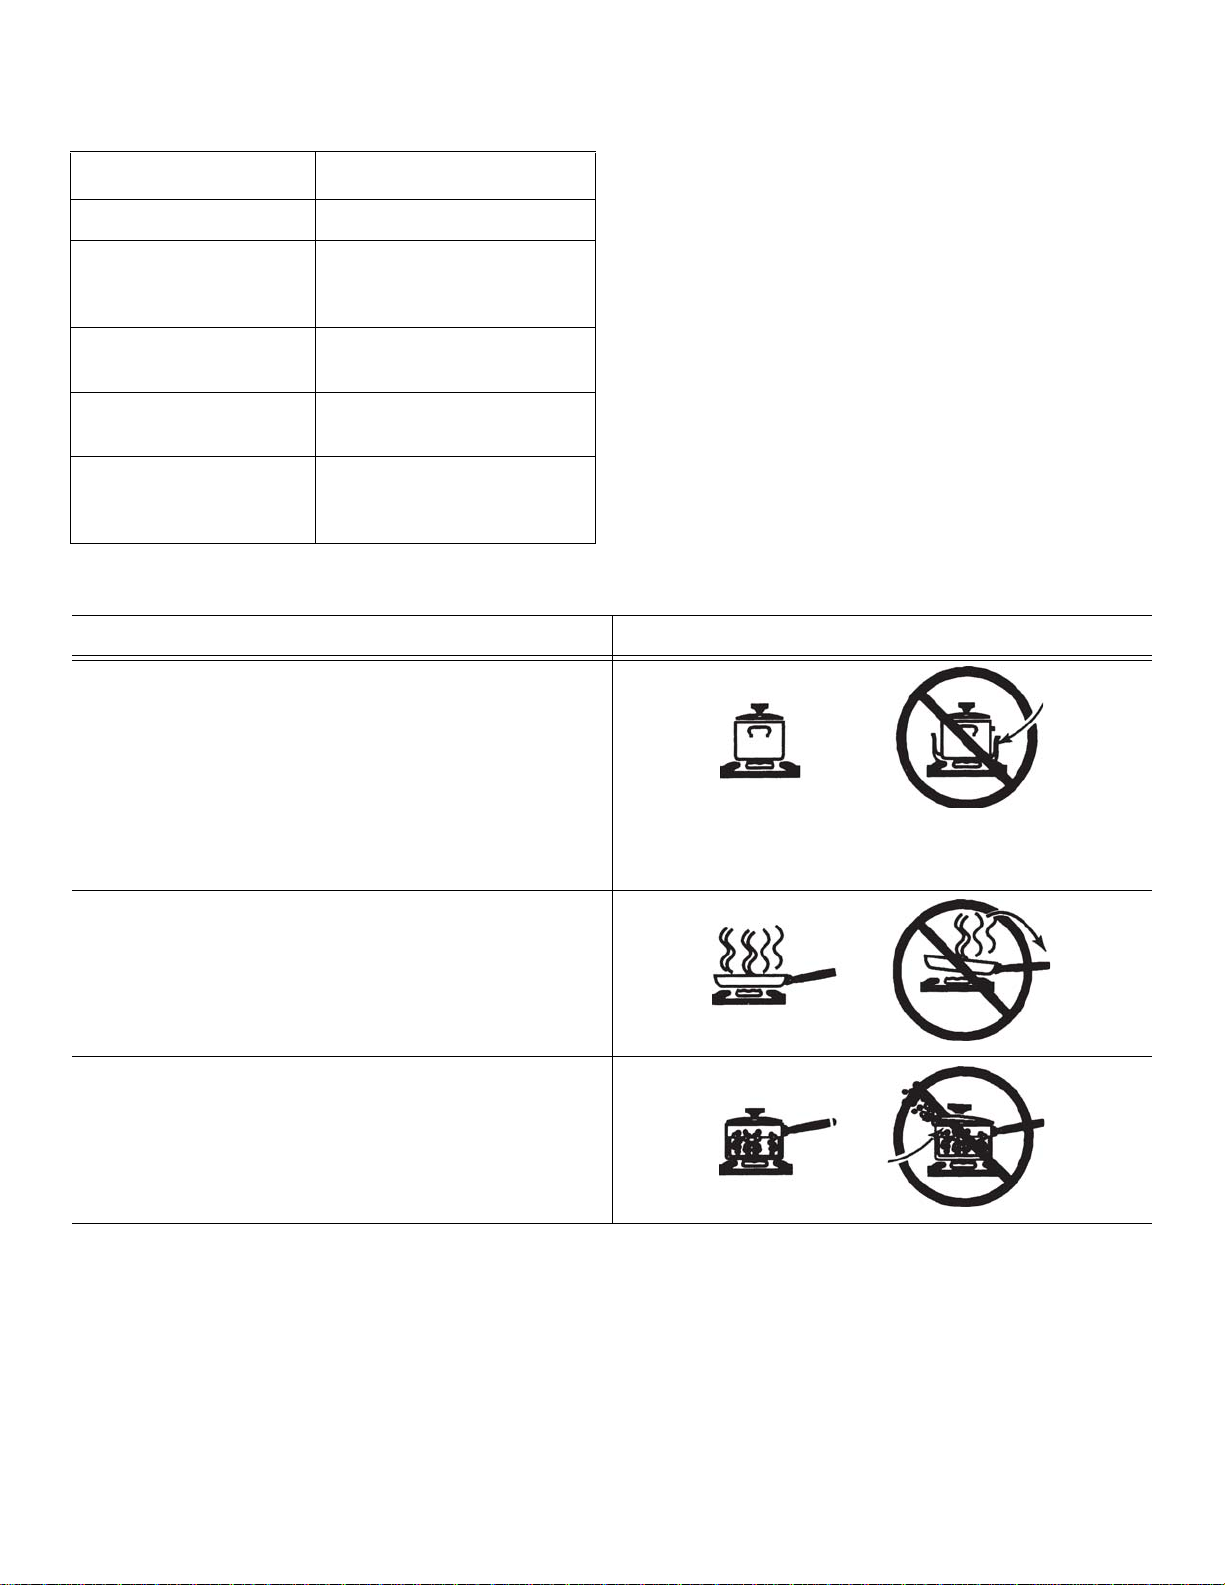
Surface Burner Cooking Recommendations
Proper Cookware
Uses Heat Setting
Bringing water to a boil High
Pan frying, sautéing,
browning meat, deep fat
frying
Most frying, eggs,
pancakes, slow boil
Finish cooking covered
foods, steaming
Melting chocolate and
butter, simmering tomato
sauces, soups, stews
Choosing Cookware - Cookware Recommendations
Pan Bottom Diameter
• The flame should be the same size as the
bottom of the pan or smaller. Do not use small
pans with high flame settings as the flames
can lick up the sides of the pan.
• Oversize pans that span two burners are
placed front to back, not side to side.
• For best cooking results, large pans should
not extend over the sides of the grates.
Medium High
Medium
Medium Low
Low
Practice
Cookware Characteristics
• Aluminum or copper bottomed pans conduct heat
evenly.
• Steel pans, if not combined with other metals, may
cook unevenly.
• Cast-iron cookware absorbs heat slowly and cooks
more evenly at low-to-medium settings.
• Flat heavy bottom pans provide even heat and stability.
• DO NOT USE pans that are thin, warped, dented or
ridged as they heat unevenly.
Use Balanced Pans
• Balance is important for stability and even
cooking.
• Pans must sit level on the cooktop grate
without rocking or wobbling.
• Center pan over burner.
Use a Lid That Fits Properly
• A well-fitting lid helps shorten the cooking
time.
Specialty Cookware
Pans that span 2 burners, i.e. griddles, roasters and fish
poachers, may be used when placed front to back. Adjust
flame equally to cook evenly.
Use a Wok with a flat bottom.
Canners and pressure cookers must meet the same
requirements as described above. After bringing contents
to a boil, use lowest heat setting possible to maintain a boil
or pressure (for pressure canners/cookers).
900107091 1 Rev A English 11
 Loading...