

Page 1

1
2
Inhaltsverzaichnis
DE
Sicherheitshinweise und Bestimmungen 3
Gerät kennenlernen 4
Gerät aufstellen 4
Einschalten und Temperaturwahl 5
Gerät ausschalten und stillegen 5
Lebensmittel einordnen 6
Lebensmittel eingefrieren, lagern
und Eis bereiten 7-8
Abtauen 9
Reinigen 10
Energiespartips 10
Kleine Störungen 11-12
Entsorgung des Altgerätes 12
Kundendienst 13
Index
EN
Safety Instructions and Regulations 14
Getting to know the appliance 15
Setting-up the Appliance 15
Switching on and Selecting
the Temperature 16
Switching off and disconecting
the appliance 17
Food Arrangement 17-18
Freezing food/Food storage
and Making ice 18-20
Defrosting 20-21
Cleaning 21
Energy-saving Tips 22
Minor faults - and how to
fix them yourself 23-24
Disposal of old appliances 24
After-Sales Service 25
Tables de matières
FR
Conseils sur la sécurité et I’utilisation 26
Apprendre à connaître I’appareil 27
Mise en place de I’appareil 27
Mise en marche et sélection
de la température 28
Arrêt de l’appareil et mise hors service 29
Rangement des denrées 29-30
Congélation d’aliments,
stockage et préparation de glaçons 30-32
Dégivrage 32-33
Nettoyage 33
Conseils pour l’économie d’énergie 34
Comment réparer soi-même
les petites pannes 35-36
Avant de vous débarrasser
de votre ancien appareil 36
Service après-vente 37
Indice
IT
Norme di sicurezza e destinazioni 38
Conoscere l’apparecchio 39
Installazione apparecchio 39
Inserzione e regolazione temperatura 40
Disinserire, mettere fuori
funzione l’apparecchiatura 41
Sistemazione delle derrate alimentari 41-42
Congelare, conservare prodotti
alimentari e preparare
cubetti di ghiaccio 42-44
Sbrinare 44-45
Puliza 45
Consigli per risparmiare energia 46
Eliminare da sè piccole anomalie 47-48
Residui di vecchi apparecchi 48
Servizio d’assistenza al cliente 49
BOSCH
3
4
2
5
1
cooler
10
16
18
3
9
4
A
5
6
7
8
11
12
d
f
13
15
B
14
17
A
a
g
A/B
g
/C
s
h
j
Page 2
B
220-240V max. 15W, E14
5 6
17
1
1
2
2
k
P
l
{
22
23
w
e
3
4
2
5
cooler
1
DE
Gebrauchsanweisung
EN
Operating instructions
FR
Mode d’emploi
Istruzioni sull’uso
IT
BOSCH
Änderungen vorbehalten
Subjetct to modification
Tous droits de modification réservés
Salvo variazioni
}
q
ROBERT BOSCH HAUSGERÄTE GMBH Nº Código 5410000130 (8206)
Page 3
Sicherheitshinweise und Bestimmungen
Entsorgung der
Neugeräte-Verpackung
Alle verwendeten Verpackungsmaterialien
Ihres neuen Gerätes können gefahrlos
entsorgt werden.
Der Karton kann zerkleinert der Altpapiersammlung beigefügt werden.
Die Folien sind aus Polyethylen (PE) und die
Polsterteile aus FCKW-freiem Polystyrol
(PS). Diese wertvollen Stoffe können, wenn
Sie sie bei einem Wertstoffcenter abgeben,
nach Aufbereitung wieder verwendet werden
(Recycling).
Die Anschrift des nächstgelegenen
Wertstoffcenters für die Entsorgung der
Verpakkung und von Altgeräten erfragen Sie
bitte bei Ihrer Gemeindeverwaltung.
Bestimmungen
Das Gerät eignet sich zum Kühlen und Gefrieren
von. Lebensmitteln und zur Eisbereitung.
Das Gerät eignet sich für einen Umge
bungstemperaturbereich von +10ºC bis
+32ºC (ST-Ausführung +18ºC bis +38ºC,
siehe Typenschild).
Es ist für die Verwendung im Haushalt bestimmt.
Bei einem Einsatz im gewerblichen Bereich
sind die für das Gewerbe gültigen
Bestimmungen zu beachten.
Es entspricht der Unfallverhütungsvorschrift
für Kälteanlagen, Wärmepumpen und
Kühleinrichtungen (VBG 20).
Der Kältekreislauf ist auf Dichtheit geprüft.
Dieses Erzeugnis entspricht den einschlägigen
Sicherheitsbestimmungen für Elektrogeräte.
Reparaturen an Elektrogeräten sind nur von
Fachkräften durchzuführen.
Durch unsachgemäße Reparaturen können
erhebliche Gefahren für den Benutzer entstehen.
Im Fehlerfall, bei Wartung und bei der
Reinigung Gerät vom Netz trennen.
Netzstecker ziehen oder Sicherung
ausschalten. Am Netzstecker ziehen, nicht
Anschlußkabel.
Ein Beitrag zum Umweltschutz wir verwenden Recyclingpapier.
Sicherheitshinweis
Dieses Gerät enthält in geringer Menge das
Kältemittel Isobutan (R 600a), ein Naturgas
mit hoher Umweltverträglichkeit aber
brennbar. Beim Transportieren und
Aufstellen des Gerätes darauf achten, daß
keine Teile des Kältemittelkreislaufes
beschädigt werden. Bei Beschädigungen
offenes Feuer oder Zündquellen vermeiden
und den Raum, in dem das Gerät steht, für
einige Minuten durchlüften.
Damit im Fall eines KältemittelkreislaufLeck's kein zündfähiges Gas-Luftgemisch
entstehen kann, ist die Raumgröße in dem
das Gerät aufgestellt wird abhängig von der
Kältemittelmengen im Gerät.
Pro 25 g Kältemittel R 600a muß der
Aufstellraum mindestens 1 m³ groß sein.
Die Kältemittelmenge Ihres Gerätes finden
Sie auf dem Typschild im Geräteinnern. Die
größte Menge Kältemittel unserer Geräte
beträgt z. Zt. 100 g; demnach droht keine
Gefahr für alle Kühl- und Gefriergeräte wenn
der Aufstellraum mindestens 4 m3groß ist.
Entsorgung des Altgerätes
Ausgediente Geräte sofort unbrauchbar
machen. Netzstecker ziehen und Anschlußkabel durchtrennen. Schnapp-oder Riegelschlösser entfernen oder zerstören - Sie
verhindern damit, daß spielende Kinder sich
selbst einsperren und in Lebensgefahr
kommen.
Kühl- und Gefriergeräte enthalten
Isolationsgase und Kältemittel die eine
fachgerechte Entsorgung erfordern.
Außerdem enthalten sie wertvolle Stoffe die
einer Wiederverwertung zugeführt werden
sollen. Nehmen Sie deshalb zum Entsorgen
ihre zuständige kommunale
Entsorgungsstelle in Anspruch.
Bei Fragen wenden Sie sich bitte an Ihre
Gemeindeverwaltung oder Ihren Händler.
Achten Sie bitte darauf, daß die Rohrleitungen
Ihres Kältegerätes bis zum Abtransport zu
einer sachgerechten, umweltfreundlichen
Entsorgung nicht beschädigt werden.
3
DE
DE.qxd 3/10/02 12:02 Página 3
Page 4
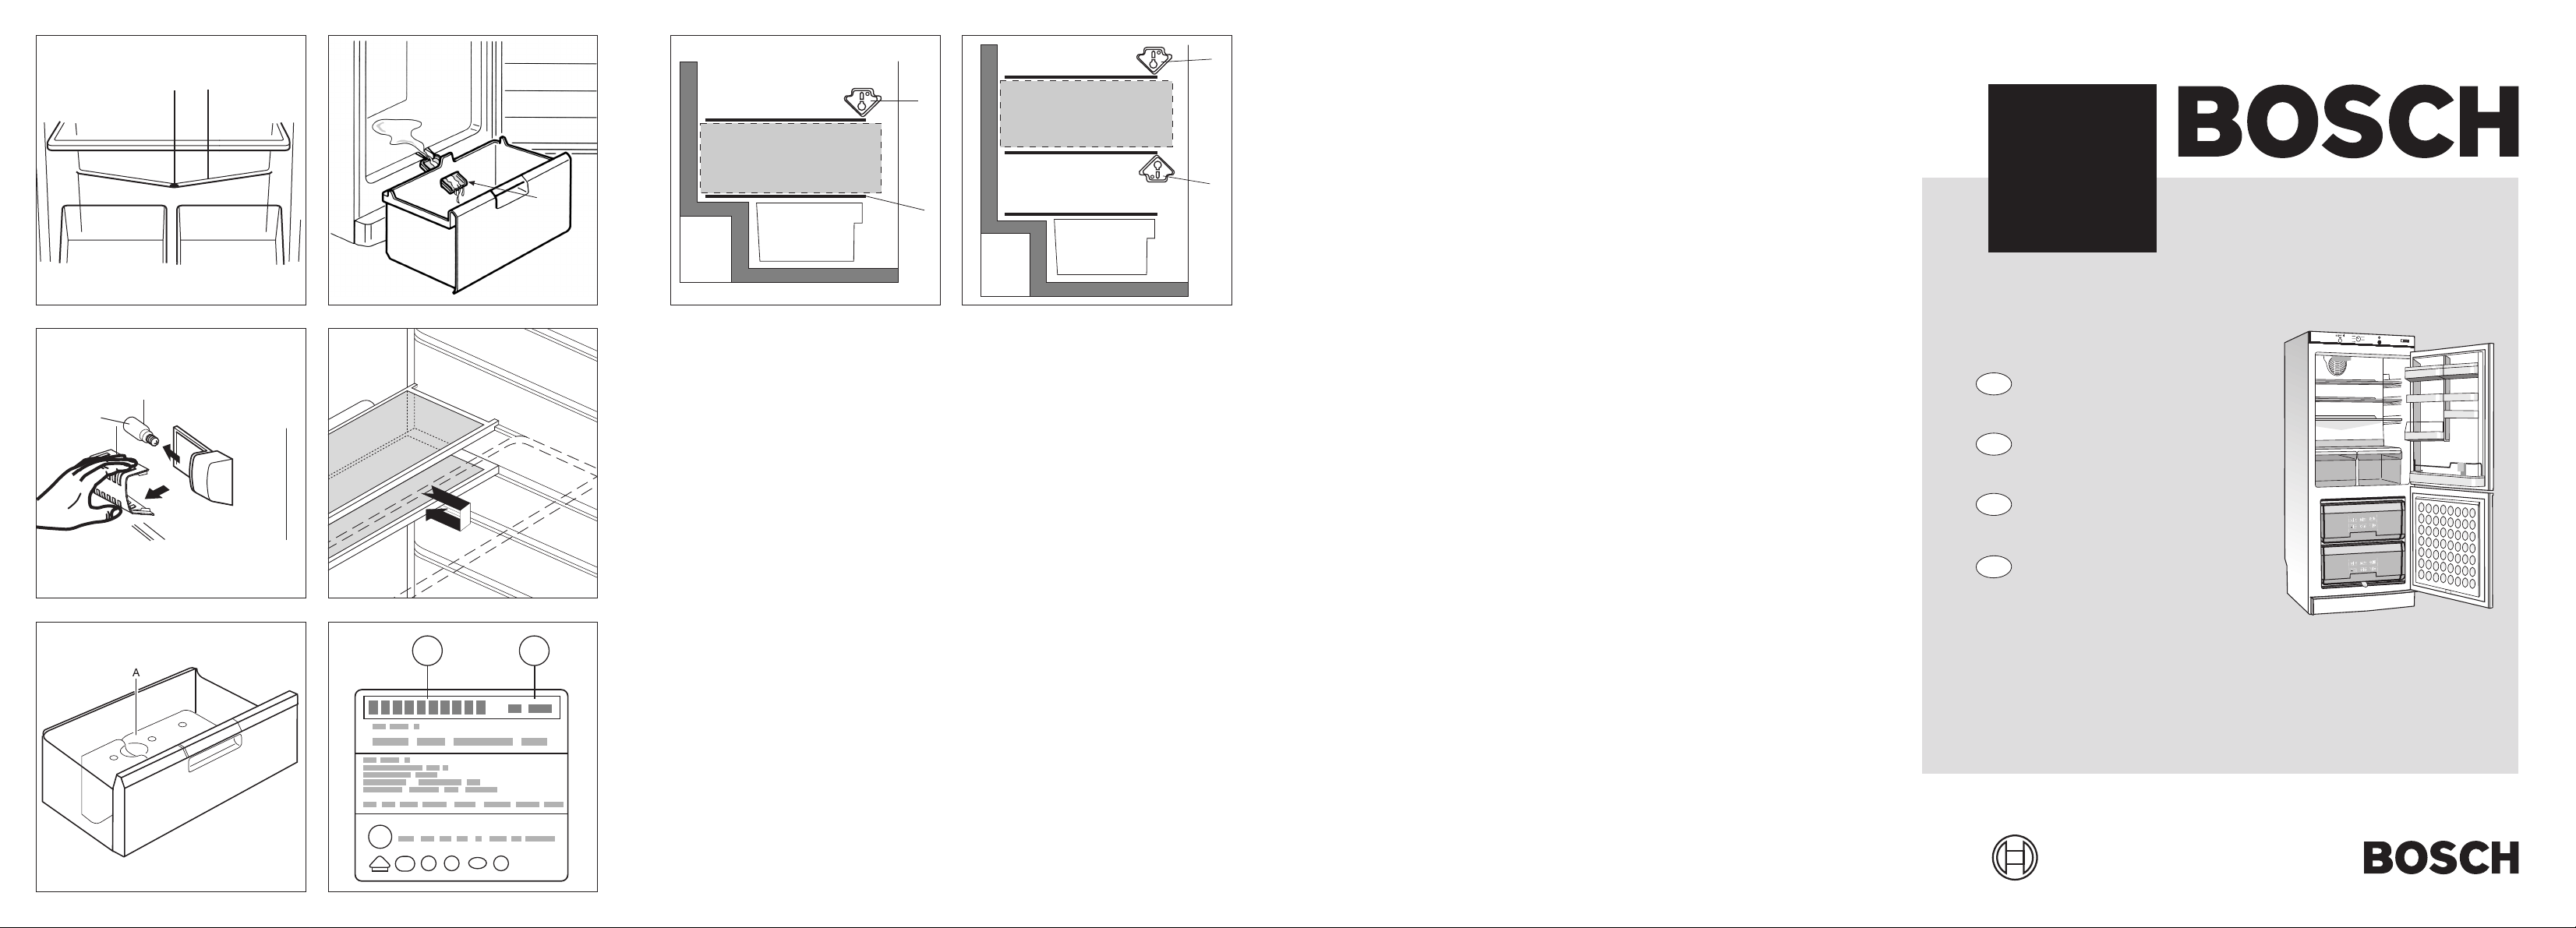
Gerät aufstellen
Bitte klappen Sie vor dem Lesen die letzten
Seiten mit den Abbildungen aus.
Die Gebrauchsanweisung gilt für mehrere
Medelle, Detailabweichungen bei den
Abbildungen sind möglich.
Gesamtansicht
Bild
a
1 Lüftungsgitter
2 Bedienblende
3 Traggitter
4
Rückwand des Gerätes (Kälteerzeuger)
5 Ablaufrinne
6 Ablauföffnung
7 Glasschale
8 Gemüseschalen
9 Käse und Butterschalen
10 Eierschale
11 Ablage
12 Flaschenständer
13 Flaschenhalter
14 Gefriergutkörbe
15 Gefrierkalender
16 Innenbeleuchtung
17 Auffangschale für das Abtauwasser
18 Ventilator
A Kühlschrank
B Gefrierschrank
Bedienblende
Bild
s
21 Hauptschalter
22 Supergefrierschalter
23 Temperaturwäler
Aufstellort
Als Aufstellort eignet sich ein trockener,
belüftbarer Raum. Der Aufstellplatz sollte
nicht direkter Sonnenbestrahlung ausgesetzt
und nicht in der Nähe einer Wärmequelle
wie Herd, Heizkörper etc. sein. Wenn das
Aufstellen neben einer Wärmequelle
unvermeidbar ist, verwenden Sie eine
geeignete Isolierplatte oder halten Sie
folgende Mindestabstände zur Wärmequelle
ein.
Zu Elektroherden 3 cm.
Zu Öl- oder Kohleanstellherden 30 cm.
Beim Aufstellen neben einem anderen Kühloder Gefriergerät ist ein seitlicher
Mindestabstand von 2 cm erforderlich, um
Schwitzwasserbildung zu vermeiden.
Aufstellen und
Wechsel des Türanschlages
Siehe beiliegende Aufstell- und
Umbauanweisung.
Elektrischer Anschluß
Das Gerät an 220-240 V/50 Hz
Wechselstrom nur über eine
vorschriftsmäßig installierte Steckdose
anschließen.
Die Steckdose muß mit einer 10 A
Sicherung, oder höher abgesichert sein.
Belüftung
Die an der Rückwand des Gerätes
erwärmte Luft muß ungehindert abziehen
können.
Die kühlmaschine muß sonst mehr leisten,
und das erhöht den Stromverbrauch.
Deshalb auf keine Fall die Be- und
Entlüftungsöffnungen abdecken.
Gerät kennenlernen
4
DE
DE.qxd 3/10/02 12:02 Página 4
Page 5

Einschalten und
Temperaturwahl
Vor der ersten Inbetriebnahme den
Innenraum reinigen (siehe Reinigen).
Gerät einschalten
Hauptschalter Bild s/21 drücken, grüne
Kontrolleuchte leuchtet auf.
Das Gerät beginnt zu kühlen.
Hinweise
Während die Kühlmaschine läuft, bilden sich
Wasserperlen oder Reif an der Rückwand
des Kühlraumes, dieses ist
funktionsbedingt. Ein Abschaben der
Reifschicht oder Abwischen der
Wasserperlen ist nicht notwendig. Die
Rückwand taut automatisch ab. Das
Tauwasser wird in der Ablaufrinne (Bildk/5)
aufgefangen, zur Kühlmaschine geleitet und
dort verdunstet.
Sollte sich nach dem Schließen des
Gefrierraumes die Tür nicht sofort wieder
öffnen lassen, warten Sie bitte zwei bis drei
Minuten, bis sich der entstandene
Unterdruck ausgeglichen hat.
Bedingt durch das Kältesystem können die
Gefrierplatten an manchen Stellen schnell
bereifen. Dies hat keinen Einfluß auf
Funktion oder Stromverbrauch. Abtauen
wird erst erforderlich, wenn sich auf der
gesamten Oberfläche der Gefrierplatten Reif
oder Eis in einer Stärke von mehr als mm
gebildet hat.
Temperatur einstellen
Die temperaturen in den beiden Räumen
können Sie zentral über den Temperaturwähler (Bild s/23) einstellen. Höhere Ziffern
ergeben in beiden Räumen tiefere
Temperaturen.
Wir empfehlen eine mittlere Einstellung
(ca. “2-3”).
Geräte mit ventilator
Bei Geräten, die mit einem Ventilator
ausgestattet sind, schaltet sich dieser bei
Raumtemperaturen über 26ºC automatisch
ein.
Garäte ohne ventilator
Sollte die Temperatur am Aufstellungsort
des Gerätes auf Werte von weniger als
+18ºC absinken, so bleibt die Beleuchtung
automatisch bei verminderter Leistung
eingeschaltet, trotz geschlossener Kühlfach
Tür. Auf diese Art und Weise wird die zur
langfristigen Aufbewahrung der Lebensmittel
erforderliche Temperatur im Gefrierfach
gewährleistet.
Diese Funktion schaltet automatisch ab,
sobald die Umgebungstemperatur wieder
auf Werte von mehr als +20ºC ansteigt.
Gerät ausschalten
Hauptschalter Bild s/21 drücken. grüne
Kontrolleuchte erlischt, damit ist die Kühlung
und Beleuchtung ausgeschaltet.
Gerät stillegen
Wenn das Gerät längere Zeit nicht benutzt
wird, Netzstecker ziehen, Gerät abtauen
und reinegen. Türen offen lassen.
Gerät ausschalten und
stillegen
5
DE
DE.qxd 3/10/02 12:02 Página 5
Page 6

Lebensmittel einordnen
Veränderungsmöglichkeiten
der Inneneinrichtung Gerät
mit Traggittern
Die Traggitter im Kühlraum lassen sich bei
Bedarf umsetzen. Zum Umsetzen, Traggitter
nach vorme ziehen, absenken,
herausnehmen und an gewünschter Stelle
neu einsetzen.
(Bildd).
Die Eiereinsätze in den Behältern können
hochgeklappt werden, da durch können
Tuben, kleine Dosen usw, gelagert werden.
(Bild f).
Je nach Durchmesser der zu lagernden
Flaschen kann der Drahtbügel von den
Abstellern etwas versetzt werden.
(Bild g/A/B).
Damit die Flaschen beim Öffnen und
Schießen der Tür nicht umfallen können,
kann man sie mit dem Flaschenhalter
sichern. (Bild g/A/B).
Die Absteller können zum Reinigen
herausgenommen werden. (Bild g/C).
Zum Stellen von hohem kühlgut kann die
kleinere Ablagenhälfte aus dem Gerät
harausgenommen (Bild {) werden.
Keine Lebensmittel vor den Ventilator
Stellen (Bild a/18), damit eine Behinderung
des Luftstrahls vermieden wird.
Beim Einordnen beachten
y
Warme Speisen und Getränke außerhalb
des Gerätes abkühlen lassen .
y
Lebensmittel möglichst verpackt oder gut
abgedeckt einordnen. Dadurch bleiben
Aroma, Farbe, Feuchtigkeit und Frische
erhalten, außerdem werden
Geschmacksübertragungen vermieden.
Unverpackt sollte nur Gemüse, Obst und
Salat in den Gemüsebehältern gelagert
werden.
y
Öl und Fett nicht mit den kunststoffeilen
und der Türdichtung in Berührung bringen
(diese könnte sonst porös werden).
y
Im Gerät keine explosiblen Stoffe
aufbewahren.
Hochprozentigen Alkohol nur
verschlossen, stehend lagern.
y
Im Kühlraum befinden sich die kältesten
Bereiche an der Rückwand und über der
Glasplatte. Verwenden Sie diese Bereiche
für empfindliche Lebensmittel.
y
Flaschen mit Flüssigkeiten die gafrieren
können nicht im Gefrierraum lagern. Beim
Gefrieren platzen die Flaschen.
Einordnungsbeispiel
Bild
a
Kühlraum A
Auf den Ablagen (3), von oben nach
unten Backwaren, fertige Speisen,
Molkereiprodukte.
Auf der Glasplatte (7), Fleisch und Wurst.
In der Gemüsebehältern (8), Gemüse,
Obst, Salat.
In der Tür im Fach (9), Butter und Käse.
In den Eierbehältern (10), Eier.
Im Absteller (11), kleine Flaschen, Tuben,
Dosen.
Im Flaschenbehälter (12), große
Flaschen.
Gefrierraum B
In der oberen und mittleren
Gefriergutschale (14), Lebensmittel
eingefrieren, lagern und Eis bereiten.
In der unteren Gefriergutschale
Gefriergut lagern.
6
DE
DE.qxd 3/10/02 12:02 Página 6
Page 7
Lebensmittel eingefrieren, lagern und Eis bereiten
Kältezonen im Kühlraum
beachten!
Durch die Luftzirkulation im Kühlraum
entstehen Zonen unterschiedlicher Kälte.
Die Zone für empfindliche Lebensmittel ist je
nach Modell, ganz unten zwischen dem
seitlichen eingeprägten Pfeil und der
darunter liegenden Glasablage
(Bild w/1 und 2) oder zwischen den beiden
Pfeilen (Bild e/1 und 2)
Ideal zum Lagern von Fleisch, Fisch, Wurst,
Salatmischungen usw.
Beim Einkauf von
Tiefkühlkost beachten
y
Achten Sie auf die Verpackung, sie sollte
nicht beschädigt sein.
y
Das Haltbarkeitsdatum darf nicht
überschritten sein.
y
Die Temperaturanzeige von der
Verkaufstruhe sollte - 18º C oder kälter
anzeigen.
y
Tiefkühlkost ganz zum Schluß einkaufen
und gut eingepackt in Zeitungspapier oder
in einer Kühltasche schnell nach Hause
transportieren und in das Gefrierabteil
legen.
Lebensmittel verpacken
Werden Lebensmittel selbst eingefroren, nur
frische einwandfreie Lebensmittel
verwenden. Die Lebensmittel luftdicht
verpacken, damit sie nicht ihren Geschmack
verlieren oder austrocknen.
Zum Verpacken geeignet sind:
Kunststoff-Folien, Schlauchfolien aus
Polyäthylen, Alu-Folien und Gefrierdosen.
Diese Produkte finden Sie im Fachhandel.
Ungeeignet sind:
Packpapier, Pergamentpapier, Cellophan,
Müllbeutel und gebrauchte Einkaufstüten.
Die Lebensmittel in die Verpackung
einlegen, Luft völling herausdrücken und
Packung dicht verschließen.
Zum Verschließen eignen sich:
Gummiringe, Kunststoffklipse, Bindfäden,
kältebeständige Klebebänder oder
ähnliches. Beutel und Schlauchfolien aus
Polyäthylen können mit einem
Folienschweißgerät verschweißt werden.
Vor dem Einlegen in das Gefrierabteil, den
lnhalt der Gefrierpakete kennzeichnen und
mit dem Einlegedatum versehen.
Gefriervermögen
Je nach Gerätetyp können Sie folgende
Mengen Lebensmittel auf einmal
eingefrieren.
SF-26/KGVA/... 4kg./24h.
SF-31/KGVA/... 5kg./24h.
SF-36/KGVA/... 5kg./24h.
Temperaturwähler zum
Gefrieren einstellen
Beim Einlegen frisher Ware den
Temperaturwähler auf eine mittlere
Einstellung (ca. “4”) drehen.
Beim Einlegen von
Gefriergut beachten
Bereits gefrorene Lebensmittel dürfen nich
mit den frisch einzufrierenden Lebensmitteln
in Berührung kommen.
7
DE
DE.qxd 3/10/02 12:02 Página 7
Page 8
Lebensmittel eingefrieren, lagern und Eis bereiten
Lebensmittel gefrieren
Sind sehr viele Lebensmittel unterzubringen,
kann man alle Gefriergutschalen bis auf die
unterste aus dem Gerät herausnehmed und
die Lebensmittel direkt auf den Gefrierrosten
stapeln. Zum Herausnehmen,
Gefriergutschalen bis zum Anschlang
herausziehen nach oben kippen und
herausnehmen.
Eis bereiten
Bild
j
Stellen Sie die zu 3/4 mit Wasser gefüllte
Eisschale auf den Gefrierrost oder auf den
Boden der oberen Gefriergutschale.
Die gefrorenen Eiswürfel lassen sich durch
Verwinden der Eisschale leicht lösen.
Kälteakkus
Bild }
Dieses Zubehör ist nur bei einigen Modellen
eingeschlossen. Beachten Sie folglich
diesen Absatz nur, wenn Sie über dieses
Zubehör verfügen.
Die kälteakkus verzögern bei Stromausfall
oder einer Störung die Erwärmung des
eingelagerten Gefriergutes.
Die effektivste Verzögerung wird erreicht,
wenn die Akkus in das oberste Fach direkt
auf die Lebensmittel gelegt werden.
Die Kälteakkus können auch zum
vorübergehenden Kühlhalten von
Lebensmittel z.B. in einer Kühltasche
herausgenommen werden.
Gefrierkalender
Bild h/15
Um Qualitätsminderungen des Gefriergutes
zu vermeiden ist es wichtig, daß die
zulässige Lagerdauer nich überschritten
wird. Die Lagerdauer hängt von der Art des
Gefriergutes ab.
Die Zahlen bei den Symbolen geben die
zulässige Lagerdauer in Monaten für das
Gefriergut an. Bei fertiger Tiefkühlkost, die
im Handel erhältlich ist, ist das
Herstellungsdatum oder Haltbarkeitsdatum
zu beachten.
Auftauen von Gefriergut
Je nach Art und Verwendungszweck kann
zwischen folgenden Möglichkeiten gewählt
werden:
Bei Raumtemperatur,
im Kühlschrank,
im elektrischen Backofen,
mit/ohne Heißluftventilator,
im Mikrowellengerät.
An- und aufgetautes Gefriergut kann erneut
eingefroren werden, wenn Fleisch und Fisch
nicht länger als einen Tag, anderes
Gefriergut nicht länger als drei Tage über 3º C
angestiegen ist.
Andernfalls, wenn Geschmack, Geruch und
Aussehen unverändert sind, durch Kochen,
Braten oder zu einem Fertiggericht
weiterverarbeiten und erneut eingefrieren.
Die max. Lagerdauer nicht mehr voll nutzen.
8
DE
DE.qxd 3/10/02 12:02 Página 8
Page 9

Abtauen
Kühlraum
Der Kühlraum taut vollautomatisch ab. Das
Tauwasser wird in der Tauwasserablaufrinne
(Bild k/5) aufgefangen, zur Kühlmaschine
geleitet und dort verdunstet. Ablaufrinne und
Ablaufloch (Bild k/6) stets sauber halten
damit das Tauwasser ungehindert abfließen
kann.
Gefrierfach
Das Gefrierabteil Bild a/B taut nicht
automatisch ab, da die gefrorenen
Lebensmittel nicht antauen dürfen.
Größere Reif oder Eisanhäufungen auf den
Gefrierrosten beeinträchtigen die Leistung
des Geräts und lassen den Stromverbrauch
ansteigen.
Ist die Reifschicht ca. 1/2 cm dick, muß
abgetaut werden. Mindestens jedoch einbis
zweimal im Jahr. Am zweckmäßigsten dann,
wenn wenig oder kein Gefriergut im Gerät
lagert.
Wenn noch Gefriergut im Gerät lagert, ist
ca. 4 Stunden vor dem Abtauen der
Supergefrierschalten Bild s/22
einzuschalten, damit die Lebensmittel eine
sehr tiefe Temperatur erreichen, Danach die
Gefriergutschalten mit den Lebensmitteln
herausnehmen.
Die Schalen in mehrere Lagen
Zeitungspapier oder eine Decke einwickeln
und an einem Kühlem Ort aufbewahren.
Gerätetür offen lassen und den Netzstecker
ziehen. Zum Auffangen des Abtauwassers,
die leere unterste Gefriergutschale darunter
stellen. Bild l/17.
Das Abtauen rasch durchführen. (Die
Haltbarkeit des Gefriergutes wird verkürzt je
länger das Gefriergut bei Raumtemperatur
lagert).
Nach dem Abtauen den Innenraum reinigen.
Abtauhilfen
Zum Beschleunigen des Abtauvorganges
am besten einen Topf mit heißem Wasser
auf eine Gefrierplatte stellen.
Vorsicht bei Verwendung von Abtausprays,
diese können explosible Gase bilden,
kunststoffschädigende Lösungs- oder
Treibmittel enthalten oder
gesundheitsschädlich sein.
Reif oder Eis nach Möglichkeit nich
abkratzen, die Gefrierplatten können
beschädigt werden.
Besser ist es das Gerät abzutauen.
9
DE
DE.qxd 3/10/02 12:02 Página 9
Page 10

Reinigen
DE
Vor dem Reinigen grundsätzlich
Netzstecker ziehen bzw. Sicherung
abschalten oder herausschrauben.
Den kühlraum monatlich einmal reinigen.
Das Reinigen des Gefrierraumes sollte
zweckmäßigerweise nach jedem Abtauen
erfolgen.
Reinigungswasser darf nicht in die
Kontrollarmatur und Beleuchtung gelangen.
Zur Reinigung des gesamten Gerätes außer
der Türdichtung eignet sich lauwarmes
Wasser mit einem leicht desinfizierendem
Reinigungsmittel. Ungeeignet sind sand
oder säurehaltige Putzmittel bzw. chem.
Lösungsmittel.
Die Türdichtung nur mit klarem Wasser
abwischen und danach gründlich
trockenreiben.
Sammelrinne (Bild k/5) und Ablaufloch
(Bild k/6) im Kühlteil häufiger reinigen,
damit das Tauwasser ungehindert ablaufen
kann. Ablauföffnung mit Stäbchen o.ä.
durchstoßen. Darauf achten, daß möglichst
kein Reinigungswasser durch die
Ablauföffnung in die Verdunstungsschale
läuft.
Halten Sie die Schlitze des
Ventilatorkastens sauber. (Bild a/18).
Die Außenwände können zusätzlich mit
einem Lackpflegemittel behandelt werden.
Die Tür dabei geschlossen lassen, damit
das Lackpflegemittel nicht an die inneren
Kunststoffteile gelangen kann.
Nach dem Reinigen das Gerät wieder
anschließen und einschalten.
y
Gerät in einem kühlen gut belüftbaren
Raum aufstellen, vor direkter
Sonnenbestrahlung schützen und nicht
im Bereich einer Wärmequelle
(Heizkörper etc.) anordnen.
y
Warme Speisen erst nach dem
Abkühlen in den Gefrierraum geben.
y
Zum Auftauen Gefrierwaren in den
Kühlraum legen. Sie nutzen damit die
Kälte die in der Gefrierware steckt zur
Kühlung der Lebensmittel im
Kühlschrank.
y
Gefrierraum bei starker Eisbildung
abtauen. Eine dicke Eisschicht
verschlechtert die Kälteabgabe an das
Gefriergut und läßt den Stromverbrauch
ansteigen.
y
Zum Be- oder Entladen, Gerätetür so
kurz wie möglich öffnen.
Je kürzer die Gerätetür offen steht,
umso geringer ist die Eissbildung an
den Gefrierplatten.
Energiespartips
10
DE.qxd 3/10/02 12:02 Página 10
Page 11
Kleine Störungen selbst beheben
Bevor Sie den Kundendienst rufen, prüfen Sie bitte, ob Sie aufgrund der nachfolgenden
Aufstellung die Störung selbst beheben können.
Bei Beratungsfällen müssen Sie, auch während der Garantiezeit, die vollen Kosten für
den Monteureinsatz übernehmen.
DE
11
Störungen
Bei ungewöhnlichen Geräuschen:
Wenn die Kühlraum-Beleuchtung
nicht funktioniert:
Zu niedrige Temperaturen im Kühlfach:
Kühlleistung lä
ß
t nach:
Keine Kühlleistung:
Im Kühlraum zu kalt:
Mögliche Ursachen
- Entweder steht das Gerät nicht fest bzw. eben
oder ein Fremdkörper ist im Bereich der
Kühlmaschine eingeklemmt.
- Ein Teil an der Rückwand kann nicht frei
schwingen und berührt das Gerät oder die
Wand, biegen Sie dieses Teil vorsichtig weg.
- Der Lichtschalter klemmt (Bild s/16). Prüfen Sie
ob er sich bewegen läßt. Wenn nicht, rufen Sie
bitte den Kundendienst.
- Zum Austauschen, Gehäuse von hinten nach
unten drücken (Bild P) und die Leuchte durch
eine neue: 220-240V, max. 15W, Sockel E 14,
ersetzen
- Der Temperaturregler steht auf einer zu
niedringen Stellung.
- Tür wurde häufig geöffnet.
- Es wurden gro
ße Mengen Lebensmittel im
Kühlraum frisch eingelagert.
- Zu starke Reifschicht im Gefrierabteil.
- Die Be- und Entlüftung ist abgedeckt.
- Ein Fremdkörper ist zwischen Kühlmaschine
und der Wand eingeklemmt.
- Stecker ist lose in der Steckdose.
- Sicherung hat ausgelöst.
- Hauptschalter Bild
s/21 steht auf "y"
-Temperaturwäler ist zu tief eingestellt
DE.qxd 3/10/02 12:02 Página 11
Page 12
Kleine Störungen
selbst beheben
Entsorgung des Altgerätes
Kann die Störung anhand der zuvor
genannten Hinweise nicht beseitigt werden,
rufen Sie bitte den Kundendienst.
Führen Sie in diesem Fall keine weiteren
Arbeiten, vor allem an den elektrischen
Teilen des Gerätes, selbst aus.
Öffnen Sie die Tür nicht unnötig oft, damit
Kälteverlust vermieden wird.
Hinweis
An- und aufgetautes Gefriergut kann erneut
eingefroren werden, wenn Fleisch und Fisch
nicht länger als einen Tag, anderes Gefriergut
nicht länger als drei Tage über 3º C
angestiegen ist.
Andernfalls, wenn Geschmack, Geruch und
Aussehen unverändert sind, durch Kochen,
Braten oder zu einem Fertiggericht
weiterverarbeiten und erneut eingefrieren.
Die max. Lagerdauer nicht mehr voll nutzen.
Sicherheitshinweise
Ausgediente Geräte sofort unbrauchbar
machen:
Netzstecker ziehen und Anschlußkabel
durchtrennen.
Schnapp- oder Riegelschlösser entfernen
oder zerstören.
Sie verhindern damit, daß spielende kinder
sich selbst einsperren und in Lebensgefahr
kommen.
DE
12
DE.qxd 3/10/02 12:02 Página 12
Page 13

Typenschild
Bild q
Bitte geben Sie schon bei der Anforderung
des Kundendientes die Gerätenummer (22)
und die Fertigungsnummer (23) an
Beide Ziffern finden Sie im
schwarz-umrandeten Feld des
Typenschildes unten links im Kühlraum,
neben der Gemüseschale.
Die Anschrift und die Telefonnummer des
Kundendienstes finden Sie im
Kundendienststellen-Verzeichnis oder im
amtlichen Fernsprechbuch.
Kundendienst
DE
13
DE.qxd 3/10/02 12:02 Página 13
Page 14
EN
14
Safety Instructions and Regulations
The cardboard box may be broken or cut into
smaller pieces and given to a waste paper
disposal service. The wrapping foil is made of
polyethylene and the polysterene pads and
stuffing contain no fluorochloric
hydrocarbons.
All these valuable materials may be taken to
a waste materials collecting center and used
again after adequate rework. (Recycling).
Consult your local authorities for the name
and address of the waste materials collecting
centers and waste paper disposal services
nearest to your home.
Regulations
This appliance serves for the refrigeration
and freezing of food and for making ice.
The unit is perfectly suitable for expose to
+10ºC to 32ºC ambient temperature (STmodels: +18ºC to 38ºC, see identification
plaque).
The appliance is intended for household use
only.
If the appliance is used for commercial
purposes, the appropriate regulations must
be abserved.
It complies with the current German
regulations for the prevention of accidents
through refrigeration equipment (VBG 20)
and has been tested for leaks.
It complies also with the current German
safety regulations for electrical appliances.
This product complies with the regulations
specified for the safety electrical appliances.
All necessary repairs are to be carried out by
qualified persons.
Repairs carried out by persons lacking the
necessary competence may result in major
damages and could be extremely dangerous
for the user of the appliance.
Disconnect appliance from mains when
servicing or cleaning and always in the event
of a failure. Remove plug and/or disengage
household fuse. To unplug, pull at the plug
itself and not at the wire.
Safety instructions
This unit contains the
coolant isobutane (R 600a),
a natural gas which is very
environmentally friendly but also
combustible. When transporting and
installing the unit care must be taken to
ensure that none of the refrigeration
circuit components become damaged. In
the event of damage avoid naked flames or
ignition sources and ventilate the room in
which the unit is placed for a few minutes.
How to dispose of the old unit
Before disposing of an old, scrap unit no
longer in use, it is imperative to render it
safe and inoperative at once. Disconnect
power supply plug and cut off connection
lead. Remove or destroy all spring, latch
or bolt-locks, ensuring that these have
been made totally unserviceable. This will
prevent the danger of children locking
themselves in inadvertently.
Please observe refrigeration and freezer
units contain insulating gases and
coolants which require specialised waste
disposal. They also contain valuable
materials which can be recycled. Entrust
the disposal of a scrap unit categorically
to the competence of your local waste
disposal service and contact your local
authority or your dealer if you have any
questions. Please ensure that the
pipework of your refrigerating unit does
not get damaged prior to being picked-up
by the relevant waste disposal service,
and contribute to environmental
awareness by insisting on an appropriate,
anti-pollution method of disposal.
Disposing of the packaging of
your new appliance
All the packaging materials employed in the packing of your new appliance may be disposed of
without any danger to the environment.
Our contribution towards a cleaner
environment- we use recycled paper.
EN.qxd 3/10/02 12:02 Página 14
Page 15
EN
Before reading on please unfold the pages
at the back with the illustrations.
This manual of operating instructions
applies to various models.
Some of the illustrated details may deviate
from those present in your model.
General View
Fig
a
1 Ventilation grid compartment
2 Control panel
3 Bearing trays
4
Rear wall of the refrigerator
compartment refrigerating unit)
5 Defrosting-water conductor
6 Defrosting wateroutlet
7 Glass plate
8 Vegetable baskets
9 Butter and cheese storage
10 Egg rack
11 Door shelf12 Bottle shelf
13 Bottle holder
14 Frozen food bins
15 Freezer calendar
16 Interior light
17 Defrosting drain
18 Ventilator
A Refrigerator compartment
B Freezer compartment
Control panel
Figure
s
21 Main switch
22 Super-freezer switch.
23 Temperature selector
Where to set-up
Set-up appliance in a dry, well ventilated
room. Do not expose appliance to direct
sunlight or place near a source of heat such
as: cooker, radiator etc. If placement of the
appliance near a source of heat can not be
avoided, use an adequate insulation plate or
observe the following safety distances
between appliance and source of heat:
3 cm distance from cooker
30 cm distance to oil or gasboiler.
If the appliance is placed next to another
refrigerator or freezer, keep a side clearance
of 2 cm between them to prevent
condensation.
Setting-up and changing the
door hinging side
See enclosed manual for installation and
modifications.
Electrical Connection
Connect appliance to a 220-240 V/50 Hz
supply only. Protect with a 13 ampere fuse.
The connection must be made via a
properly installed socket with a non-fused
earthing.
Ventilation
The air heated at the back of the appliance
must be able to escape unhindered.
Otherwise, the refrigerating machine must
work harder and use-up more electricity.
Consequently, the ventilation inlet grill must
never be covered.
Getting to know the
appliance
Setting-up the Appliance
15
EN.qxd 3/10/02 12:02 Página 15
Page 16

Clean inside of the appliance before
switching on for the first time (see cleaning).
Switching on the appliance
Press main switch, Figure s/21, the
green pilot light goes on.
The appliance begins to cool.
It’s possible that a certain amount of ice or
condensation builds-up on the rear wall of
the refrigerator; this is normal, it’s not
necessary to wipe-up the condensation or
eliminate the ice buil-up. The rear wall
defrosts again automatically. The defrostingwater is caught in the defrosting-water
conductor (Fig. k/5), led to the compressor
and condensed there.
If you have closed the door of the
refrigerator compartment and then cannot
open it again immediately, please allow two
or three minutes for the partial vacuum
arisen inside to level-out.
Setting the temperature
The temperature setting dial (Fig. s/23)
servers to set the temperature in both
compartments. High figures account for
lower temperatures in both compartments
We suggest a middle temperature setting
(ca. “2-3”).
Appliances proveded with
ventilator
If your appliance has got a fan, you should
know that it automatically starts when room
temperature is over 26º Celsius.
Appliances not provided with
ventilator
If the temperature in the place where the
appliance is located falls below +18ºC, the
interior light will automatically remain on at
low power when the refrigerator
compartment door is closed. In this way, the
correct temperature for the longterm
conservation of food will be maintained in
the freezer compartment.
This function disconnects when the
temperature rises above +20ºC.
Switching on and Selecting the Temperature
EN
16
EN.qxd 3/10/02 12:02 Página 16
Page 17

Switching off
Press main switch, Figure s/21, the green
pilot light goes out, the cooling stops and the
interior light goes off.
Disconecting the appliance
It the appliance is not to be used for a long
period of time, swicht off, pull plug, defrost
and clean. Leave the doors of the appliance
open.
Re-arrangement possibilities
The bearing trays in the refrigerator may be
changed around and re-arranged.
To change, pull trays forward, push
downwards and remove from appliance.
Replace in the desired position. (Fig. d).
The insert in the egg rack may be flapped
open so that container may be used to store
other items such as: tubes, small tins or
similar objects. (Fig. f).
The wire frame on the bottle shelf
(Fig. g/A/B) may be rearnanged to
accommodate different size (diameter) bottles.
Use bottle holder (Fig. g/A/B) to hold bottles
securely in place and stop them from fallin off
shelf when opening or closing the door of the
appliance.
The containers on the inside of door may be
taken out for cleaning (Fig. g/C).
To facilitate storage of tall items you may
remove the smaller section of the rack from
the appliance. (Fig. {).
Do not place foodstuffs in front of the
ventilator (Fig. a/18) to permit the circulation
of air.
Observe the following when
arranging food
y
Allow food to cool before placing in the
appliance.
y
Food should be sealed or well covered
before placing in the appliance . This will
prevent food from drying out, loss of in
freshness colour and flavours. It will also
prevent food from tasting or smelling of
other products.
Vegetables, greens and fruit may be stored
in the vegetable baskets and need not be
wrapped.
Switching off and
disconecting the appliance
Food Arrangement
EN
17
EN.qxd 3/10/02 12:02 Página 17
Page 18

y
Oil and fats should not touch the plastic
parts of the appliance or fall on the
sealing strip of the door (These parts
could easily become porous).
y
Do not store explosive substances in the
appliance.
y
Store high-proof alcoholic beverages in
tightly sealed containers and place
containers always in an upright position.
y
The coldest areas in the refrigerator are
the rear wall and the glass plate. Store
delicate food products in these areas.
y
Glass bottles containing liquids that can
freeze must never be stored in the
freezer. Bottles burst when the contents
freeze.
Example of food
arrangement.
Fig.
a
Refrigerator compartment A
On the bearing trays (3) - top to bottom:
bakery products, prepared dishes, dairy
products.
On the glass plate (7): meat and cold cuts.
In the vegetable baskets (8): vegetables,
greens and fruit.
In the door compartment (9): butter and
cheese.
Eggs in the egg container (10).
On the door shelf (11): small bottles, tubes,
cans.
In the bottle shelf (12): larger bottles.
Freezer compartment B
On the upper freezing tray (14): freezing
of fresh food, storage of frozen goods and
preparation of ice.
One the lower freezing tray: storage of
frozen goods.
Note refrigeration zones in
the refrigerator
compartment!
The air circulation in the refrigerator
compartment means that there are zones at
different temperatures.
Depending on the model, the zone for
sensitive foods is right at the bottom
between the arrow on the side and the glass
surface below (fig. w/1 and 2) or between
the two arrows (fig. e/1 and 2). Ideal for
storing meat, fish, sausage and salad
mixtures, etc.
Please observe the following
when buying ready-frozen
food:
y
Package must be intact.
y
Do not exceede expiry date.
y
The thermometer of the freezer
compartment where the food is bought
must indicate a temperature of -18º C or
colder.
y
When shopping, leave the frozen products
right till the last moment. Bring home as
quickly as possible and place at once in
the freezer compartment.
Packing Food
If freezing food yourself, use only fresh
products in perfect condition. Pack food in
airtight containers so that it does not lose its
taste, or dehydrate.
Suitable materials for wrapping are:
Plastic sheets, polyethylene bags,
aluminium foil and freezing containers.
Not suitable are:
Wrapping paper, vellum paper, cellophane,
rubbish bags and used shopping carrierbags.
Place food in container, press out excess air
and seal tightly.
Food Arrangement
Freezing food/Food storage
and Making ice
EN
18
EN.qxd 3/10/02 12:02 Página 18
Page 19

Freezing food/Food storage and Making ice
To seal use either of the following:
Rubber bands, plastic clips, string, coldresistant adhesive tape or similar. Plastic
sheets and polyethylene bags can be
sealed together with a welding machine for
plastic materials.
Before placing the wrapped food in the
freezer, mark each package to show its
contents and include the date of freezing.
Freezing capacity
Depending on the type of freezer, you can
freeze the following amounts of food at one
time:
SF-26/KGVA/... 4kg./24h.
SF-31/KGVA/... 5kg./24h.
SF-36/KGVA/... 5kg./24h.
Set temperature selector to
freezing
If you are freezing fresh food, set the
temperature selector to a moderate degree
(approximately 4).
When loading the freezer
please observe
That frozen products stored in the freezer
should not be mixed with fresh food.
Freezing the food
If you need to freeze very large quantities of
food, you may find it convenient to remove
the frozen food bins (botton bin may not be
removed) from the unit and to stack your
products directly on the freezing grids. To
remove bins, pull forwards until they catch,
tilt upwards and remove.
Making ice
Fig.
j
Ice trays are obtainable at stores which
specialize in this line of business. Fill the
ice-tray three quartes full of water and place
on the freezing tray or in the upper food bin.
The ice-cubes can be easily removed from
the ice-tray by slightly twisting it.
Use the ice container to store ice-cubes so
that you always have an extra supply ready
at hand.
Artificial ice blocks
(Fig. }).
This accessory is only included with certain
models, so if yours does not contain one,
disregard this section.
The artificial ice blocks prevent food from
warming-up too quickly in the event of a
power cut or failure.
They are most effective if they are placed in
the upper drawer directly on top of the
products.
The artificial ice blocks may be taken out of
the appliance and used as a practical
means to keep food temporarily cool, e.g. in
an insulated cooling bag.
Freezer Calendar
Fig. h/15
So as to avoid quality deterioration of the
products it’s important to observe the expiry
date and to consume the products before
this date expires.
The admissible length of storage depends
on the individual type of products.
The figures next to the symbols show the
number of months for which the particular
kind of food may be stored.
In the case of purchased pre-frozen food,
note the date of manufacture or the expiry
date.
EN
19
EN.qxd 3/10/02 12:02 Página 19
Page 20

Defrosting Food
Depending on the particular kind of food and
the use you intend to make of it, you may
choose among the defrosting methods given
here:
at room temperature,
in the refrigerator,
in an electric oven,
with or without fan heater,
in a microwave oven.
Use-up food that has thawed out or partially
begun to defrost as soon as possible.
Do not refreeze. If the food is cooked first, it
may be refrozen as a prepared dish.
Refrigerator compartment
The refrigerator compartment will defrost
automatically. The melting water is caught in
the collecting channel (defrosting-water
conductor) (Fig. k/5) it’s then led to the
compressor where it evaporates. Please
keep the water conductor and defrosting
outlet (Fig. k/6) absolutely clean so that the
water can drain away freely.
Freezer compartment
For safety reasons, the freezer
compartment (Figure a/B) does not
defrost automatically since teh products
stored in this area should not accidentally
defrost.
Intensive frost and ice builds-ups adversely
influence the transmission of cold to the
frozen products and cause the rate of
energy consumption to augment.
When a coat of ice of approximately 1/2 cm
thickness has built up inside the freezer, it
should be alowed to defrost. The most
convenient time to defrost is, of course,
when the freezer is totally or nearly empty.
If there are still frozen products in the
freezer you should switch on the superfreeze, Figure s/22, approximately 4 hours
prior to defrosting so as to extra deepfreeze. You may then remove the bins with
contents from the appliance.
Wrap-up bins in several layers of newsprint
paper or in a blanket and store in a cool
place. Leave the door of the freezer open
and unplug.
Figure l/17, empty lowest frizen food bin
and place underneath runoff to collect thaw
water.
Try to defrost as quickly as possible. (The
longer the food is kept at ambient
temperature the shorter its shelf-life will be).
Clean interior of appliance thoroughly after
defrosting.
EN
20
Freezing food/Food storage
and Making ice
Defrosting
EN.qxd 3/10/02 12:02 Página 20
Page 21

Defrosting Aids
To speed up defrosting it’s best to put a
saucepan with hot water on one of the
freezing grids.
Caution when using defrosting sprays!
These can form explosive mixtures, contain
solvents or propellents which can affect
plastics, or even damage your health.
If possible, do not scratch off frost or ice,
since this can damage the freezer grids.
Local build-ups of frost or ice in some areas
of the appliance can be reduced with a
plastic scraper.
Never scrape the frost away, right down to
the grid.
It’s always preferable to let the appliance
defrost by itself.
Before starting to clean always unplug
from the power supply, switch off the
household fuse or take it out.
Clean the refrigerator at least once a month.
It is practical to clean the freezer each time
it is defrosted.
Do not allow cleaning water to get into the
control panel or inside light. Lukewarm
water with a little washing-up liquid or mild
disinfectant is suitable for cleaning the
whole of the appliance, except the door’s
insulating strip. Cleaning agents containing
abrasives or acids are not suitable, and
neither are chemical solvents.
Clean the door seal with clear water only,
and then rub thoroughly dry.
The defrosting-water conductor (Fig. k/5)
and defrosting-water outlet (Fig. k/6)
should be cleaned more frequently so that
the defrosting-water can drain away freely.
To clean the holes, pierce with a toothpick
or similar object. Do not allow cleaning
water to filter through the outlet and reach
the defrosting drain.
Keep the grooves of the ventilator case
clean (Fig. a/18).
The outside panels of the appliance can be
treated with a normal enamel-cleaning
agent. During cleaning keep the doors of the
appliance closed to prevent the agent from
reaching the plastic parts inside.
After cleaning remember to reconnect the
appliance and switch it on.
EN
21
Defrosting Cleaning
EN.qxd 3/10/02 12:02 Página 21
Page 22

EN
Energy-saving Tips
y
Install your appliance in a cool, wellventilated room.
Protect it from direct sunlight and do not
place near a source of heat (radiator etc.).
y
Allow warm food to cool down before
putting it into the appliance.
y
Put frozen food into your refrigerator to
thaw out. In that way you use up the low
temperature of the frozen food to assist
cooling off the food in the refrigerator.
y
Defrost when thick layers of frost or ice
have built-up. A thick coat of frost or ice
impairs cold transfer to the frozen food,
and increases electrical consumption.
y
Keep the door open for as briefly as
possible when putting in or taking out
food. The shorter the time the door is kept
open, the less ice and frost build-up on
the inside walls.
22
EN.qxd 3/10/02 12:02 Página 22
Page 23

Minor faults - and how to fix them yourself
Faults
Unusual noises:
Interior light does not go on:
The temperature in the refrigerating
compartment is too cold:
The cooling performance
deteriorates:
Total lack of cooling
performance:
Temperature inside
the refrigerator excessively cold:
EN
23
Possible causes
- Either the appliance is not standing firmly, or
something is trapped near the refrigerating
machine.
- A part on the rear side of the appliance cannot
vibrate freely and touches the appliance itself or
against the wall. In this case, carefully bend this
part clear.
- The light switch sticks (Fig. s/16). Try to make
it move; if it won’t budge call the After-Sales
Service.
Fused or faulty bulbs:
- To change, remove the case by pressing the
back part downwards (figure P), and replace
the BULB with a new one: 220-240 V, max. 15
W, base E 14.
- Temperature setting dial is set at a too low
position.
- The door is opend too often.
- A large quantity of food has been placed in the
refrigerator.
- Large frost or ice build-up in the freezer
compartment.
- The ventilation inlet or outlet grills are covered.
- Something is jammed between the refrigerating
machine and the wall.
- Plug may not fit properly into power outlet.
- The fuse has been burnt out.
- The switch, Figure s/21, is at setting “y”.
Temperature selector set too low.
Before you call in the After-Sales Service, please see if you can solve the problem on
your own with the aid of the following tips.
If the After-Sales Service is called in to rectify such simple faults, a full labor-charge
must be made even during the guarantee period.
EN.qxd 3/10/02 12:02 Página 23
Page 24

If the fault cannot be rectified with the help
of the above given tips, please call the
After-Sales Service.
In this case, do not attempt to do any further
work yourself, particularly not on the
electrical components of the appliance.
To keep the temperature inside the
appliance from rising, do not open the door
any more often than absolutely necessary.
Important Note!
If a defect in the mechanism or a power cut
causes the temperature inside the appliance
to rise, check whether the food has started
to thaw out.
Do not refreeze food that has thawed out
completely or partially defrosted. Cook first
(boil or roast) and refreeze afterwards as
indicated for prepared dishes.
Safety indications
Old, scrap appliances should be at once
rendered safe and inoperative as follows:
Disconnect power-supply plug and cut
connection lead.
Remove or destroy all spring latch or boltlocks.
In doing so, the danger of children locking
themselves in is avoided.
EN
24
Minor faults - and how to fix
them yourself
Disposal of old appliances
EN.qxd 3/10/02 12:02 Página 24
Page 25

EN
After-Sales Service
Identification plaque
Fig. q
When requesting the assitance of the After-
Sales Services, please quote the number of
the appliance (22) and the serial number (23).
You will find this information in the panel
outlined in black on the identification plaque.
This plaque is fitted at the bottom left hand
side of the appliance, next to the vegetable
basket.
The address and telephone number of the
nearest After-Sales Service can be found
either in the list of After-Sales Service
offices, or in your local telephone directory.
25
EN.qxd 3/10/02 12:02 Página 25
Page 26

Consignes de sécurité
Dans son circuit frigorifique, cet appareil
contient de l’isobutane (R 600a), un gaz
naturel qui ne présente pas de risques
pour l’environnement mais qui est
inflammable. Veillez à ce qu’aucune partie
du circuit frigorifique ne soit
endommagée lors du transport et de
l’installation. Si l’appareil est endommagé,
évitez les flammes et les sources
d’embrasement. Aérez pendant quelques
minutes la pièce dans laquelle se trouve
l’appareil.
Mise au rebut de votre ancien
appareil
Rendez votre ancien appareil inutilisable
avant de vous en débarrasser. Tirez la
fiche et sectionnez le câble de
branchement. Détruisez la serrure -vous
éviterez ainsi que des enfants s’y
enferment accidentellement.
Les réfrigérateurs et congélateurs
contiennent des gaz isolants et des
produits réfrigérants qui doivent être jetés
avec toutes les précautions nécessaires.
Par ailleurs, ils contiennent des matières
précieuses qui doivent être récupérées.
Prenez contact avec votre mairie ou avec
un organisme compétent en la matière
lorsque vous vous débarrassez d’un
appareil. Si vous avez des questions
tournez-vous vers votre revendeur ou
bien vers la mairie. Jusqu'à l’enlèvement,
vérifiez bien que le circuit frigorifique de
votre réfrigérateur n'est pas endommagé.
Nous contribuons à la protection de
l’environnement en utilisant du papier
de recyclage.
FR
26
Conseils sur la sécurité et I’utilisation
Mise au rebut de l’emballage
des nouveaux appareils
Vous pouvez jeter sans danger les
emballages usités des nouveaux appareils.
Le carton peut servir au recyclage des vieux
papiers.
Les feuilles sont en polyéthylène (PE) et les
parties rembourrées en polystyrène libre
(PS).
Ces matières peuvent être recyclées afin
d’être réutilisées, pour cela, déposez-les
dans un centre prévu à cet effet.
Spécifications
Cet appareil se prête à la réfrigération et la
congélation de produits alimentaires et à la
préparation de glaçons.
Important: Pour éviter un fonctionnement
anormal de votre appareil, nous vous
conseillons de ne pas I’installer dans un
cellier, balcon, maison secondaire non
chauffée I’hiver, ou tout autre endroit où la
température ambiante peut être inférieure à +
10º C et supérieur à + 32º C.
(Appareils classe ST, température ambiante
comprise entre + 18º C et + 38º C, voir
étiquette signalétique).
Il est conçu pour l’utilisation ménagère.
En cas d’utilisation à des fins professionnelles
tenir compte des spécifications propres au
domaine professionnel en question.
Il est aussi conforme au règlement de
prévoyance contre les accidents pour
installations frigorifiques (VBG 20).
L’étanchéité du cycle frigorifique a été vérifiée.
Cet appareil est conforme aux prescriptions
de sécurité valables pour les appareils
électriques. Les réparations des appareils
électriques doivent être effectuées
uniquement par une main d’œuvre qualifiée.
Les réparations inappropriées peuvent
causer des risques considérables pour
I’utilisateur.
Avant de procéder au nettoyage, ayez soin de
débrancher votre appareil. Pour cela, retirez
la fiche mains ne tirez pas sur le câble.
FR.qxd 3/10/02 12:02 Página 26
Page 27

Avant de commencer à lire veuillez déplier
les dernières pages comportant les
illustrations.
Le mode d’emploi est valable pour plusieurs
modèles, des différences de détails sont
possibles.
Vue générale
Fig. a
1 Grille de ventilation
2 Bandeau de commande
3 Grilles
4 Paroi arrière du compartiment
réfrigérateur (élément frigorifique)
5 Gouttière pour l’eau de dégivrage
6 Trou d’écoulement pour l’eau de
dégivrage
7 Plaque de verre
8 Bac à légumes
9 Compartiment à beurre et à fromage
10 Compartiment à œufs
11 Casier de rangement
12 Porte-bouteilles
13 Balconnet
14 Bac pour surgelés
15 Calendrier de congélation
16 Eclairage intérieur
17 Ecoulement de l’eau de dégivrage
18 Ventilateur
A Compartiment réfrigérateur
B Compartiment congélateur
Bandeau de commande
Figure
s
21 Interrupteur principal
22 Interrupteur de «supercongélation»
23 Termostat
Lieu d’installation
Une pièce sèche et aérée convient à
l’installation. L’emplacement ne doit ni être
exposé directement aux rayons solaires, ni
se trouver près d’une source de chaleur
telle que cuisinière, radiateur, etc. Si
l’installation près d’une source de chaleur
est inévitable, utiliser une plaque isolante
appropriée ou respecter les distances
minimales suivantes par rapport à la source
de chaleur.
Cuisinière électrique: 3 cm.
Cuisinière au mazout ou au charbon: 30 cm.
En cas d’installation à côté d’un autre
réfrigérateur, observer absolument distance
minimale de 2 cm pour éviter la formation
de condensation.
Mise en place et changement
de la butée de la porte
Voir la notice de mise en place et de
modification ci-jointe.
Raccordement électrique
L’appareil doit uniquement être branché sur
du courant alternatif 220-240 V/50 Hz, sur
une prise de courant installée conformément
aux prescriptions en vigueur. La prise de
courant doit être protégée par un fusible de
10 A.
Ventilation
L’air chaud se dégageant à l’arrière de
l’appareil doit pouvoir s’évacuer librement,
sinon, la machine frigorifique se trouve
sollicitée plus fortement, ce qui augmente la
consommation de courant. C’est pourquoi il
ne faut en aucun cas obstruer les grilles
d’aération et de ventilation.
FR
27
Apprendre à connaître
l’appareil
Mise en place de l’appareil
FR.qxd 3/10/02 12:02 Página 27
Page 28

FR
Mise en marche et sélection de la température
Avànt la première mise en marche, nettoyer
l’intérieur de l’appareil (voir rubrique
“Nettoyage”).
Mise en service
Tournez l’interrupteur principal (Figure
s
/21) qui est positionné sur “0”. Le
témoin lumineux s’éclaire (couleur verte).
L’appareil se met en marche.
Remarque
Pendant la marche de la machine
frigorifique des gouttes d’eau ou du givre
apparaissent sur la paroi arrière du
réfrigérateur, ce qui est normal. Il n’est pas
nécessaire d’enlever la couche de givre ou
d’essuyer les gouttes d’eau. La paroi arrière
est dégivrée automatiquement. L’eau de
dégivrage est recueillie dans la gouttière
(Fig. k/5), transportée jusqu’à la machine
frigorifique et évaporée.
Si après la fermeture du congélateur la
porte ne se laisse pas aussitôt ouvrir,
attendre deux ou trois minutes jusqu’à ce
que la pression se soit normalisée.
Sélection de la température
Tournez l’interrupteur principal (Figure
s
/23) qui est positionné sur “0”. Le
témoin lumineux s’éclaire (couleur verte).
L’appareil se met en marche.
Nous conseillons une température
moyenne (environ “2-3”).
Appareils disposant d’un
ventilateur
Si votre appareil est équipé d’un ventilateur,
sachez qu’il se mettra en marche
automatiquement quand la température
ambiante sera supérieure à 26º C.
Appareils ne disposant pas
de ventilateur
Si la température de l’endroit où se trouve
l’appareil descend en dessous de + 18ºC, la
lumière intérieure reste automatiquement
allumée à basse intensité lorsque la porte
du compartiment réfrigérateur est fermée.
De cette manière, la température nécessaire
à la conservation à long terme des aliments
est maintenue dans le compartiment
congélateur.
Cette fonction disparaît lorsque la
température ambiante monte en dessus de
+20ºC.
28
FR.qxd 3/10/02 12:02 Página 28
Page 29

Arrêt de l’appareil
Enclenchez L’interrupteur principal (figure
s
/21), le témoin lumineux devient vert:
L’appareil et l’eclairage intérieue sont hors
circuit.
Mise hors service
En cas d’arrêt prolongé, débrancher
l’appareil, le dégivrer et le nettoyer. Laisser
les portes ouvertes.
Possibilités de transformation
de l’aménagement intérieur
Au besoin, les clayettes du réfrigérateur
peuvent être changées de place: les tirer
vers l’avant, les abaisser et les retirer, puis
les remettre en place à l’endroit désiré.
(Fig. d).
On peut soulever le port-œufs, afin d’y
placer des tubes, de petites boîtes, etc.
(Fig. f).
Selon le calibre des bouteilles à entreposer,
on peut légèrement déplacer la tige des
portebouteilles (Fig. g/A/B).
Pour que les bouteilles soient stables à
l’ouverture et à la fermeture de la porte, on
peut les maintenir avec la tige (Fig. g/A/B).
Les casiers de rangement peuvent être
retirés pour faciliter le nettoyage. (Fig. g/C).
Il est recommandé de placer la clayette
comportant une partie amovible dans le
haut de l’appareil. Vous pouvez ainsi retirer
la plus petite partie de cette grille si vous
désirez ranger dans l’appareil des denrées
plus hautes (Fig. {).
A noter lors du rangement
y
Laisser refroidir les boissons et les
aliments chauds hors de l’appareil.
y
Si possible stocker les denrées emballées
ou bien recouvertes. De cette manière,
leur arôme, couleur, humidité et fraïcheur
sont conservés. Cela évite aussi une
altération de leur saveur. Seuls les
légumes, les fruits et salade se
conservent sans emballage dans les bacs
à légumes.
FR
29
Arrêt de l’appareil et mise
hors service
Rangement des denrées
FR.qxd 3/10/02 12:02 Página 29
Page 30

y
Ne mettre ni parties en plastique ni le joint
d’étanchéité de la porte en contact avec
de l’huile ou des matières grasses (sinon,
ces parties pourraient devenir poreuses).
y
Ne pas entreposer de matières explosives
dans l’appareil.
y
Placer les boissons fortement alcoolisées
debout et hermétiquement fermées.
y
Les zones les plus froides du réfrigérateur
sont la paroi arrière et le dessus de la
plaque de verre. Utiliser ces parties pour
les aliments délicats.
y
Ne pas placer de bouteilles de verre
remplies de liquides pouvant congeler
dans le congélateur. Les bouteilles
risquent d’éclater.
Exemple de rangement
Fig.
a
Compartiment réfrigérateur (A)
Sur les grilles (3), de haut en bas:
pâtisseries, plats cuisinés, produits laitiers.
Sur la plaque de verre (7), viande et
charcuterie.
Dans les bacs à légumes (8), légumes,
fruits, salade.
Dans le compartiment de la porte (9),
beurre et fromage.
Dans les compartiments à œufs (10),
œufs.
Dans le casier de rangement (11), petites
bouteilles, tubes, boîtes.
Dans le porte-bouteilles (12), grandes
bouteilles.
Compartiment congélateur (B)
Dans le casier de congélation supérieur
(14), congélation des aliments, stockage,
préparation de glaçons.
Dans le casier inférieur, stockage de
produits congelés.
Contrôlez les zones de froid
dans l’appareil
Vu que l’air circule dans le compartiment
réfrigérateur, certaines zones sont plus
froides que d’autres.
Selon le modèle, la zone adaptée aux
produits délicats se trouve complètement en
bas, entre la flèche imprimée latéralement
et la clayette en verre située en-dessous
(fig. w/1 et 2), ou entre les deux flèches
(fig. e/1 et 2).
Cette zone convient idéalement pour ranger
la viande, le poisson, la charcuterie, les
salades mixtes, etc.
Achat de produits surgelés
y
S’assurer que l’emballage est en parfait
état, il ne doit jamais être abîmé.
y
La durée de conservation ne doit pas être
périmée.
y
La température du congélateur
commercial doit être inférieure à -18º C.
y
Acheter les surgelés à la fin des courses,
les envelopper dans du papier journal ou
utiliser un sac isotherme pour le transport.
Stocker les surgelés dans le congélateur
dès le retour.
Emballage des denrées
Si vous congelez vous-même vos aliments,
n’utilisez que des aliments frais
irréprochables. Emballer hermétiquement
les aliments pour éviter qu’ils ne perdent
leur saveur ou se dessèchent.
Se prêtent à l’emballage:
Feuilles en plastique, feuilles en gaine,
feuilles d’aluminium et boîtes hermétiques.
Ces articles sont en vente dans les
commerces spécialisés.
Ne doivent pas être utilisés:
Le papier d’emballage, le papier sulfurisé, la
cellophane, les sacs-poubelle et les sacs en
plastique.
FR
30
Rangement des denrées
Congélation d’aliments, stockage
et préparation de glaçons
FR.qxd 3/10/02 12:02 Página 30
Page 31

FR
Congélation d’aliments, stockage et préparation de glaçons
Placer les aliments dans l’emballage, en
faire entièrement sortir l’air et fermer
l’emballage hermétiquement.
Pour fermer les emballages on peut
utiliser:
Des élastiques, des clips en plastique, des
ficelles, des bandes auto-collantes
résistantes au froid, etc. Les sacs et les
feuilles en polyéthylène peuvent être soudés
au moyen d’une thermosoudeuse.
Avant d’entreposer les aliments dans le
congélateur, marquer le contenu des
emballages et les dater.
Pouvoir de congélation
Les quantités de produits frais que vous
pouvez congeler en l’espace de 24 h varient
selon les modèles de congélateurs:
SF-26/KGVA/... 4kg./24h.
SF-31/KGVA/... 5kg./24h.
SF-36/KGVA/... 5kg./24h.
Stockage des aliments
Si vous devez poser beaucoup d’aliments,
sortez tous les bacs de l’appareil et
entreposez les aliments directement sur les
grilles de congélation. Pour retirer les bacs,
tirez-les, jusqu’à la butée, levez-lest et
sortez-les.
Réglage de la température
pour la congélation et le
stockage
Pour la congélation et pour le stockage de
longue durée, placer le sélecteur de
température sur (4 environ).
Attention lors de la cogélation
Veillez à ce que les produits dejà congelés
n’entrent pas en contact avec les denrées
fraîches.
Préparation des glaçons
Fig.
j
Un ou plusieurs bacs à glaçons en matière
plastique sont joints aux appareils.
Remplissez les bacs à glaçons au 3/4 d’eau
et placez-les dans le compartiment basse
température. Les glaçons se démoulent
facilement par simple torsion du bac.
Si l’appareil est livré avec une boite réserve
de glace, le couvercle alvéolé sert
également de bac à glaçons.
L’utilisation de bacs en aluminium (en vente
dans le commerce) permet une production
accélérée de glaçons, conformément à la
norme en vigeur.
Accumulateurs de froid
Fig. }
Cet accessoire n’est inclus que dans
certains modèles. Si le vôtre n’en est pas
pourvu, veuillez ne pas tenir compte de ce
paragraphe. Les accumulateurs de froid
retardent le réchauffement des denrées
stockées lors d’une coupure d’électricité ou
d’une panne. Pour retarder efficacement la
remontée de température placez les
accumulateurs directement sur les aliments
dans le tiroir supérieur.
Pour garder provisoirement au frais des
aliments, vous pouvez placer les accumulateurs
avec les denrées dans un sac isothermique.
Calendrier de congélation
Fig. h/15
Pour assurer la qualité des aliments congelés
il est important de ne pas excéder la durée
de conservation. Celle-ci dépend du genre
d’aliments. Les chiffres à côté des symboles
indiquent la durée de conservation en mois
des produits congelés. Pour les produits
surgelés achetés dans le commerce, se
reporter à la date de fabrication ou la date
limite de conservation.
31
FR.qxd 3/10/02 12:02 Página 31
Page 32

Dégel des produits congelés
Selon le type d’aliments et le but poursuivi il
existe plusieurs possibilités:
à température ambiante,
dans le réfrigérateur,
dans le four électrique,
avec ou sans ventilateur à air chaud,
dans le four à hyperfréquence.
Consommer rapidement les aliments
décongelés, même partiellement; si possible
ne pas les recongeler. Mais après leur
préparation en plats cuisinés on peut les
recongeler.
Réfrigérateur
Le dégivrage du réfrigérateur est
automatique. L’eau de dégivrage est
recueillie par la gouttière (Fig. k/5),
transportée dans un réservoir situé à
l’arrière de l’appareil, où elle s’évapore.
Veiller à ce que la gouttière et le trou
d’écoulement (Fig. k/6) soit toujours
propres pour permettre à l’eau du dégivrage
de s’écouler librement.
Compartiment congélateur
Dans le compartiment congélateur,
figure a/B, le dégivrage n’est pas
automatique puisque les produits stockés ne
doivent en aucune cas être soumis à un
début de décongélation.
La cauche de givre augmente la
consommation de courant et peut nuire au
rendement frigorifique.
Si la couche de givre atteint 1/2 cm, il est
nécessaire de dégivrer l’appareil. Dégivrezle
au moins une à deux fois par an lorsqu’il n’y
a pas de denrées dans le compartiment
congélateur.
Toutefois s’il reste des denrées, enclenchez
la «supercongélation» 4 heures avant de
procéder au dégivrage, figure s/22. Retirez
les bacs de congélation avec les aliments et
enveloppez ces derniers dans plusieurs
épaisseurs de papier journal puis
déposezles dans un endroit frais. Laissez la
porte ouverte, débranchez l’appareil.
Pour récupérer l’eau de dégivrage,
(figure l/17), placez un bac vide dessous.
FR
32
Congélation d’aliments, stockage
et préparation de glaçons
Dégivrage
FR.qxd 3/10/02 12:02 Página 32
Page 33

Le dégivrage doit être effectué rapidement
(plus les aliments congelés sont gardés à
température ambiante, plus leur durée de
conservation diminue).
Après le dégivrage nettoyer l’intérieur de
l’appareil.
Accélération du dégivrage
La durée du dégivrage est réduite en
plaçant un récipient d’eau chaude sur une
des plaques de congélation.
Une grande prudence est recommandée si
on utilise des bombes aérosols dégivrantes,
qui peuvent causer la formation de gaz
explosifs ou contenir des solvants ou des
gaz susceptibles de détériorer le plastique
ou de nuire à la santé.
De préférence, ne pas racler les plaques de
congélation pour enlever le givre ou la
glace. Les plaques risquent de s’abîmer.
(Si le givre ne recouvre les plaques que par
endroits, les enlever à l’aide d’une raclette
en plastique en vente dans le commerce.
Ne jamais enlever le givre júsqu’à la surface
de la plaque).
Il est préférable de dégivrer l’appareil.
Avant le nettoyage retirer toujours la
fiche de la prise de courant ou enlever le
fusible.
Nettoyer le compartiment réfrigérateur une
fois par mois. Il est conseillé de nettoyer le
compartiment congélateur après chaque
dégivrage.
Veiller à ce que l’eau de nettoyage ne
pénètre pas dans le tableau de commande
et l’éclairage. Pour le nettoyage de l’appareil
entier hormis le joint de la porte, il est
recommandé d’utiliser de l’eau tiède avec
un produit de nettoyage doux et légèrement
désinfectant. N’utilisez pas de poudres
abrasives, produits détergents ou solvants
chimiques.
Nettoyer le joint de la porte seulement avec
de l’eau claire, puis l’essuyer
soigneusement.
Nettoyer plus souvent la gouttière (Fig. k/5)
et le trou d’écoulement (Fig. k/6) du
compartiment réfrigérateur, afin que l’eau de
dégivrage puisse s’écouler librement.
Nettoyer l’ouverture avec un bâtonnet ou un
objet semblable. Veiller autant que possible
que l’eau de nettoyage ne pénètre pas dans
le bac à évaporation par le trou
d’écoulement.
Les parois extérieures de l’appareil peuvent
être entretenues au moyen de produits pour
vernis en vente dans le commerce. Garder
la porte fermée pour éviter que le produit
n’entre en contact avec les pièces en
plastique de l’intérieur.
Après le nettoyage rebrancher l’appareil et
le remettre en marche.
FR
33
Dégivrage Nettoyage
FR.qxd 3/10/02 12:02 Página 33
Page 34

FR
Conseils pour l’économie d’énergie
y
Installer l’appareil dans une pièce fraîche
et bien aéree et le protéger des rayons
directs du soleil. Ne pas l’installer près
d’une source de chaleur (radiateur, etc.).
y
Ne placer les aliments chauds dans
l’appareil qu’après refroidissement.
y
Placer les produits à décongeler dans le
réfrigérateur. Ainsi, vous utilisez le froid
du produit congelé pour réfrigérer les
aliments dans le réfrigérateur.
y
Dégivrer le congélateur s’il y a formation
de glace. Une couche de glace épaisse
nuit au rendement frigorifique et
augmente la consommation de courant.
y
Ouvrir et fermer la porte de l’appareil
aussi rapidement que possible. Moins la
porte du congélateur restera ouverte, plus
la formation de glace sera réduite.
34
FR.qxd 3/10/02 12:02 Página 34
Page 35

Comment réparer soi-même les petites pannes
Probleme
Bruits anormaux:
L’éclairage du compartiment
réfrigérateur ne fonctionne pas:
Le rendement frigorifique diminue:
Rendement frigorifique nul:
Si la température à l’interieur
de l’appareil est top basse
FR
35
Causes possibles
- Soit l’appareil n’est pas d’aplomb, soit un corps
étranger s’est coincé dans la zone de la
machine frigorifique. Une pièce à l’arrière de
l’appareil ne peut pas vibrer librement et vient
buter sur l’appareil ou le mur: repliez avec
précaution la partie en cause.
- L’interrupteur est coincé (Fig. s/16). Vérifier s’il
est possible de le bouger. Dans le cas
contraire, appelez le service après-vente.
Lampe grillee ou defecteuse:
- Pour la changer, enlevez le boîtier en appuyant
sur la partie postérieure (figure P), et
remplacez la LAMPE par une neuve:
220-240 V, max. 15’W, base: E 14.
- La porte a été fréquemment ouverte.
- Une grande quantité d’aliments vient d’être
placée dans le réfrigérateur.
- Couche de givre trop épaisse dans le
congélateur.
- Les grilles d’aération sont bouchées.
- Un corps étranger est coincé entre la machine
frigorifique et le mur.
- L’appareil esy mal branché.
- Un fusible a sauté.
- Le interrupteur principal (figure s/21), est sur “y”.
- Réglage trop élevé du thermostat.
Avant d’appeler le service après-vente, nous suggérons donc de contrôler si les
conseils suivants ne permettent pas de résoudre le problème.
En cas de consultation, même pendant la période de garantie, le montant des frais
occasionnés par la mise à disposition d’un technicien sera facturé intégralement.
FR.qxd 3/10/02 12:02 Página 35
Page 36

Remarque
Si la panne ne peut être supprimée à l’aide
des conseils ci-dessus, appeler le service
après-vente.
N’essayez pas de réparer l’appareil par vos
propres moyens et n’intervenez surtout pas
dans la partie électrique.
N’ouvrez pas les portes inutilement, afin
d’éviter toute déperdition de froid.
Mesure de sécurité, rendez-le
inutilisable:
- Sortir la fiche de la prise de courant et
couper le cable
- Détruire ou démonter les serrures pour
éviter que des enfants ne s’y enferment.
FR
36
Comment réparer soi-même
les petites pannes
Avant de vous débarrasser
de votre ancien appareil
FR.qxd 3/10/02 12:02 Página 36
Page 37

FR
Service après-vente
Plaque d’identification
Fig. q
Si vous appelez le service après-vente,
donnez tout de suite le numéro de l’appareil
(22) et le numéro de fabrication (23).
Ceux-ci sont inscrits sur la case encadrée
de noir de la plaque d’identification en bas à
gauche dans le réfrigérateur, à côté du bac
à légumes.
Vous trouverez l’adresse et le numéro de
téléphone du service après-vente dans la
liste des points de service ou dans
l’annuaire de téléphone.
37
FR.qxd 3/10/02 12:02 Página 37
Page 38

IT
38
Norme di sicurezza e destinazioni
Smaltimento del materiale
d’imballaggio
dell’apparecchio nuovo
Tutti i materiali d’imballaggio impiegati del
nuovo apparecchio possono essere
smaltiti senza alcun pericolo.
Il cartone può essere frantuamato e
destinato ai rifiuti per carta straccia.
Le lamine sono in polietilene e le parti
d’imbottitura in polistirolo libero di
idrocarburi fluorocloridrici. Queste
sostanze pregevoli possono essere
riciclate, se consegnate in un relativo
centro di raccolta. L’amministrazione
comunale fornisce solitamente l’indirizzo
di un tal centro di raccolta.
Destinazioni
L’apparecchiatura è adatta a tenere al fresco
ed a congelare derràte alimentari ed a
preparare cubetti di ghiaccio.
L’apparecchiatura è adtta per una
temperatura ambiente da +10ºC a +32ºC
(modello ST +18ºC a +38ºC, vedi targhetta).
E’destinata all’uso domestico.
Se dovesse essere impiegata nel settore
industriale, bisogna osservare la normativa
relativa.
E’ in corrispondenza alla normativa
infortunistica per impianti frigoriferi (VBG 20).
E’ stata controllata l’ermeticità della
circolazione del freddo.
Questo prodotto corrisponde alle relative
norme di sicurezza per apparecchi alettrici.
Riparazioni di apparecchi elettrici devono
essere eseguite solo da persone
specializzate.
A seguito di riparazioni non a regola d’arte
potrebbero sorgere gravi pericoli per l’utente.
In caso di difetto, durante la manutenzione e
la pulizia scollegare l’apparecchio dalla rete.
Sfilare la spina della rete o disinserire il
fusibile. Tirare la spina della rete e non il
cavo d’attacco.
Istruzioni di sicurezza
Questo apparecchio contiene il
refrigerante sobutano (R 600a), un gas
naturale altamente biodegradabile, ma
combustibile. Durante il trasporto e
l’installazione dell’apparecchio prestare
attenzione cheunon vengano danneggiate
parti del circuito di refrigerazione. In caso
di danni, evitare fiamme o il contatto per
alcuni minuti il locale in cui si trova
l’apparecchio.
Smaltimento dell’
apparecchio vecchio
Rendere gli apparecchi vecchi
immediatamente inservibili. Togliere la
spina si rete e tagliare il cavo di
collegamento, togliere o disgruggere
serrature - eviterete cosi che i bambini,
giocando, possano restare imprigionati
nell’interno. I frigoriferi e congelatori
contengono gas isolanti e sostanze
refrigeranti che richiedono uno
smaltimento appropriato. Contengono
inoltre materiali pregiati che devono
essere destinati al riciclaggio. Perquesto
motivo, fare uso del competente luogo di
smaltimento rifiuti comunale per
l’eliminazione dell’apparecchio vecchio.
Per eventuali problemi Vi preghiamo di
rivolger Vi alla Amministrazione
Comunale oppure al Vostro negoziante.
Fare attenzione che fino al trasporto allo
smaltimento idoneo e non inquinante le
tubature del vostro frigorifero non
vengano danneggiate.
Il nostro contributo per la difesa
dell'ambiente- noi usiamo carta reciclata.
IT.qxd 3/10/02 12:02 Página 38
Page 39

Prima di cominciare a leggere per cortesia
le ultime pagine fornite di illustrazioni.
Le istruzioni per l’uso valgono per diversi
modelli, per cui sono possibili divergenze di
particolari in qualche figura.
Vista totale
Fig.
a
1 Griglia di ventilazione
2 Panello comandi
3 Griglie
4 Parete posteriore del frigorifero
(generatore di freddo)
5 Convogliatore brina sciolta
6 Foro di scarico brina sciolta
7 Piato di vetro
8 Cassetto verdure
9 Scomparto burro e formaggi
10 Mensola uova
11 Mensola
12 Comparto bottiglie
13 Porta bottigli
14 Piano congelati
15 Calendario congelazione
16 Iluminazione interna
17 Scarico brina sciolta
18 Ventilatore
A Frigorifero
B Congelatore
Panello comandi
Figura
s
21 Interuttore principale
22 Interuttore supercongelamento
23 Regolazione del termostato
Luogo d’installazione
S’adatta all’installazione un ambiente
asciutto e ventilato. Il posto deve essere
esposto alla luce diretta del sole e non deve
essere vicino ad una fonte di calore come la
cucina, il termosifone, ecc. Se l’installazione
accanto ad una fonte di calore è inevitabile,
usare un adatto isolante oppure osservare
le seguenti distanze minime dalla fonte di
calore.
Dalle cucine elettriche 3 cm.
Dalle cucine a carbone o al cherosene 30 cm.
E’necessaria una distanza laterale minima
di 2 cm per l’installazione accanto ad un
altro frigorifero o congelatore, onde evitare
la formazione di acqua condensata.
Installazione e reversibilità
della porta
Vedere allegate istruzioni.
Collegamento elettrico
Collegare l’apparecchio alla corrente
alternata da 220-240 V/50 Hz solo da una
presa installata come da norma.
La presa deve essere assicurata con un
fusibile di 10 A
Ventilazione
L’aria riscaldata al retro dell’apparecchio
deve potersi liberamente disperdere.
Altrimenti la macchina frigorifera deve
produrre più potenza, il che aumenta il
consumo di corrente. Non coprire perciò
assolutamente le aperture d’aerazione e
disaerazione.
IT
39
Conoscere l’apparecchio Installazione apparecchio
IT.qxd 3/10/02 12:02 Página 39
Page 40

IT
Inserzione e regolazione temperatura
Pulire l’interno prima della prima messa in
funzione (vedi pulizia).
Inserire l’apparecchiatura
Premere l’interruttore principale, figura
s
/21, la spia verde si accende.
L’apparecchio comincia a rafreddare.
Avvertimenti
Durante il funzionamento della macchina
frigorifera si formano delle goccioline
d’acqua o della brina sulla parete posteriore
del frigorifero. E’ normale. Non occorre
raschiare lo strato di brina o asciugare
l’acqua. La parete stessa si sbrina
automaticamente. La brina sciolta viene
raccolta nel convogliatore (Fig. k/5), diretta
alla macchina frigorifera dove evapora.
Se dopo la chiusura del congelatore la porta
non si riapre subito, aspettare due o tre
minuti finchè si è compensata la
sottopressione subentrata.
In funzione del tipo di circuito refrigerante, le
griglie possono formare più facilmente brina
in alcuni punti.
Questo non ha alcun valore ai fini della
funzionalità e consumo di energia elettrica.
Sbrinare quando tutta la superficie
presenterà uno strato di brina superiore ai 5
mm.
Consigliamo di norma un valore di
temperatura medio.
Regolazione della
temperatura
La temperature nei due interni possono
essere regolate centralmente con il
regolatore della temperatura, (Fig. s/23).
Le cifre alte esprimono le temperature
basse.
Noi raccomandiamo una regolazione
media (circa “2-3”).
Apparecchi ventilati
Se il uso apparecchio porta un ventilatore,
Lei dovete sapere che questo si metterà in
movimento automaticamente quando la
temperatura circondante sia più di 26º C.
Apparechi non ventilati
Se la temperatura del luogo dove si trova il
frigorifero scende al di sotto dei +18ºC, la
luce interna rimarrà accesa
automaticamente e funzionerà a potenza
ridotta quando la porta del frigorifero è
chiusa. In questo modo si manterrà la
temperatura necessaria per la
conservazione di alimenti per lunghi periodi
dentro al congelatore. Questa funzione si
disattiva quando la temperatura ambiente
sale al di sopra dei +20ºC.
40
IT.qxd 3/10/02 12:02 Página 40
Page 41

Disinserzione
Premere l’interruttore principale, figura
s
/21, la spia verde si spegne.
L’apparecchio e l’iluminazione sono
disinserite.
Apparecchiatura ferma a
lungo
Se l’apparecchiatura non verrà usata per
molto tempo, tirare la spina, sbrinare
l’apparecchiatura e pulire, lasciando le porte
aperte.
Possibilità di cambiamenti
all’interno
Le griglie del frigorifero sono asportabili in
caso di necessità. In tal caso tirarle in
avanti, abbassarle, estrarle per sistemarle al
posto voluto. (Fig. d).
I portauova possono essere sollevati, per
cui si possono conservare anche tubetti,
piccolo sacatolame, ecc. (Fig. f).
A seconda del diametro delle bottiglie da
conservare, la staffa di sicurezza dei ripiani
d’appoggio può essere spostata un pò.
(Fig. g/A/B).
Affinchè le bottiglie non cadano nell’aprire e
nel chiudere la porta dell’apparecchio,
potranno essere assicurate con il
portabottiglie. (Fig. g/A/B).
I porta-bottiglie dello sportello interno
possono essere tolti per compiere la pulizia.
(Fig. g/C).
Per mettere prodotti alti si potrà estrarre
dall’apparecchio la metà più piccola del
ripiano. (Fig. {).
Non posare cibi dinanzi il ventilatore
(Fig. a/18) per evitare che si impedisca la
circolazione d’aria
Da osservare stivando
y
Far raffreddare vivande e bevande fuori
dell’apparecchio.
y
Stivare gli alimenti, se possible, imballati
o ben coperti. Mantengono così aroma,
colore, umidità e freschezza, s’evitano
inoltre trasmissioni di sapore.
Solo le vedure, la frutta e l’insalata
dovrebbero essere conservate senza
confezione.
y
L’olio ed il grasso non devono venire a
contatto con le parti in plastica e la
guarnizione della porta (potrebbero
altrimenti diventare porose).
IT
41
Disinserire, mettere fuori
funzione l’apparecchiatura
Sistemazione delle derrate
alimentari
IT.qxd 3/10/02 12:02 Página 41
Page 42

y
Non conservare materie esplosive
nell’apparecchio.
y
Stivare gli alcool ad alta gradazione solo
chiusi, in posizione verticale.
y
I settori più freddi del frigorifero si trovano
alla parete posteriore e sul piatto di vetro.
Usarli per gli alimenti delicati.
y
Non si possono stivare nel congelatore le
bottiglie con liquidi, che possano
congelare.Si rompono congelando.
Esempi di sistemazione
Fig.
a
Frigorifero A
Nei compartimenti (3): dall’alto in basso
paste e pasticini, pietanze pronte, latticini.
Sul piatto di vetro (7): carne ed insaccati.
Nei cassetti verdure (8): verdura, frutta,
insalata.
Nella mensola della controporta (9): burro
e formaggio.
Nei portauova (10): uova
Nel comparto (11): bottigliette, tubetti,
scatolame.
Nella mensola (12): bottiglie alte
conservare congelati e preparare il ghiaccio.
Congelatore B
Sul piatto alto di congelazione (14):
congelare le derràte alimentari, conservarle
e preparare i cubetti di ghiaccio.
Sul piatto inferiore stivaggio di prodotti
congelati.
Tenere presenti le zone
fredde nel vano frigorifero
A causa della circolazione dell’aria, nel vano
frigorifero si formato zone più o meno
fredde.
La zona per gli alimenti delicati è, secondo il
modello, completamente in basso tra freccia
stampata laterale ed il sottostante ripiano di
vetro (figura w/1 e 2), oppure tra le due
frecce (figura e/1 e 2).
Ideale per conservare carne, pesce,
salsiccia, insalate miste ecc.
Da osservare acquistando
surgelati
y
Fare attenzione alla confezione, non
dovrebbe essere danneggiata.
y
La data di consumazione non deve
essere scaduta.
y
Il termostato del congelatore del negozio
dovrebbe avere meno di -18º C.
y
Comprare i surgelati per ultimo e portarli
subito a casa bene avvolti in giornali o
con una borsa termica e stivarli nel
congelatore.
Imballaggio di derrate
alimentari
Usare solo prodotti freschi e perfetti se si
congela da soli. Imballarli ermeticamente
perchè non perdano il loro sapore o non
essicchino.
I materiali adatti all’imballagio sono:
Fogli di plastica, fogli di polietilene, fogli
d’alluminio e scatole. Tali materiali si
trovano in commercio.
Non sono adatti:
Carta da imballaggio, la carta pergamena, il
cellofan, i sacchetti per le immondizie e gli
scartocci usati.
Avvolgere i prodotti alimentari nell’ imballaggio
,
premendo per far uscire completamente
l’aria e chiudere ermeticamente.
IT
42
Sistemazione delle derrate
alimentari
Congelare, conservare prodotti
alimentari e preparare cubetti di ghiaccio
IT.qxd 3/10/02 12:02 Página 42
Page 43

IT
Congelare e conservare derrate alimentari
e preparare cubetti di ghiaccio
Usare per chiudere:
Elastici, mollette di plastica, spago, nastri
adesivi resistenti al freddo o simili.
I sacchetti e fogli tubolari di polietilene
possono essere saldati con un’apposita
saldatrice.
Etichettare il contenuto dei pacchetti
annotando la data di congelazione prima di
congelare.
Capacità di congelamento
A secondo del tipo di apparecchio potrete
congelare in una volta le seguenti quantità
di cibi.
SF-26/KGVA/... 4kg./24h.
SF-31/KGVA/... 5kg./24h.
SF-36/KGVA/... 5kg./24h.
Impostare il selettore della
temperatura per la
congelazione
Stivando derrate alimentari fresche girare il
selettore di temperatura ad una posizione
media (circa “4”).
Da osservare stivando
derrate alimentari da
congelare
Aver curache il generi alimentari già
congelati non vengamo a contatto con quelli
freschi da congelare.
Congelare i cibi
Se si devono sistemare numerosi alimenti,
si possono strarre dall’apparecchiatura tutti
i contenitori di congelamento eccetto quello
inferiore ed accatastare gli alimenti
direttamente sulle griglie di congelamento.
Per l’estrazione, tirare i contenitori di
congelamento fino a battuta, sollevere ed
estrarre.
Preparazione cubetti di
ghiaccio
Fig. j.
Disporre la vaschetta piena a 3/4 d’acqua
sulla griglia di congelazione o sul fondo
dello scomparto superiore del congelatore.
I cubetti di chiaccio si possono togliere
facilmente torcendo la vaschetta.
Accumulatori di freddo
Fig. }
Questo accesorio viene aggiunto soltanto in
alguni modelli ragione per cui se il suo non
ce I’ha, faccia caso ommesso di questo
epigrafe.
Gli accumulatori di freddo ritardano il
riscaldamento degli alimentari congelati
conservati, in caso di mancanza di corrente
o di guasto.
Il ritardo maggiore s’ottiene deponendo gli
accumulatori nel compartimento superiore
derettamente sulle derràte alimentari.
Gli accumulatori possono essere anche
adoperati per tenere temporaneamente al
freddo generi alimentari, ad. es. in una
borsa termica.
Calendario di congelazione
Fig. h/15.
Per evitare riduzioni di qualità dei congelati
è importante non superare la durata di
conservazione ammissible. La durata stessa
dipende dal prodotto congelato.
I numeri accanto ai simboli precisando la
durata di conservazione ammissibile in
mesi. Nel caso di piatti surgelati pronti,
come si trovano in commercio, bisogna
osservare la data di produzione o di
consumabilità.
43
IT.qxd 3/10/02 12:02 Página 43
Page 44

Scongelazione di cibi
congelati
Si può scegliere tra le seguenti possibilità a
seconda dello scopo d’impiego:
a temperatura ambiente,
nel frigorifero,
nel forno elettrico,
con/senza ventilatore d’aria calda,
nel forno a microonde.
Consumare rapidamente quanto è stato
scongelato o sta scongelando: non
dovrebbe essere ricongelato ancora una
volta. Lo si può congelare ancora una volta
dopo averlo apparecchiato in pietanze
pronte.
Frigorifero
Il frigorifero si sbrina tutto automaticamente.
La brina sciolta viene raccolta nel
convogliatore (Fig. k/5), diretta alla
macchina frigorifera, dove evapora. Tenere
sempre puliti convogliatore e foro di scarico
(Fig. k/6) affinchè la brina sciolta possa
liberamente defluire.
Congelatore
Per motivi di sicurezza il congelatore
(Figura a/B) non sbrina automaticamente,
dato che il cibi che si trovano dentro
devonorimanere congelati.
Grandi formazioni di brina o di ghiaccio
penalizzano l’efficienza dell’apparecchio e
fanno aumentare il consumo di corrente.
Se lo strato di brina ha lo spessore di 1/2 cm
circa, bisogna sbrinare. Ad ogni modo
almeno una o due volte all’anno. Il modo
migliori quindi, quando nell’apparecchio vi
siano pochi o non vi siano affato prodotti
congelati.
Se ci sono ancora cibi ancora cibi congelati
nell’apparecchio, inserire la
supercongelazione, Figura a/22, circa 4 ore
prima di sbrinare, affinchè i cibi stessi
raggiungano una temperatura bassissima.
Estrarre poi i contenitori con quanto
congelato. Avvolgerli in parecchi fogli di
giornali o in una coperta e conservarli e
conservarli in un luogo fresco. Lasciare la
porte del congelatore aperta e togliere la
spina. Per raccogliere la sbrina sciolta,
svitare il gocciolatoio, Figura l/17, degla
griglia de ventilazione e mettere sotto il
cassetto più baso vuoto.
Effetuare rapidamente lo sbrinamento. (La
durata dei prodotti congelati s’accorda in
proporzione alla durata della loro
conservazione a temperatura ambiente).
A sbrinamento avvenuto, pulire I’interno
dell’apparecchio.
IT
44
Congelare e conservare derrate
alimentari e preparare cubetti di ghiaccio
Sbrinare
IT.qxd 3/10/02 12:02 Página 44
Page 45

Mezzi ausiliari di
sbrinamento
Per accelerare il processo di sbrinamento
posare una pentola d’acqua bollente su
una griglia di congelazione.
Attenzione usando spray sbrinanti perchè
possono formare dei gas esplosivi,
contenere sostanze solventi o propellenti,
che danneggiano la plastica o sono nocive
alla salute.
Se possibile, non togliere la brina o il
ghiaccio raschiando per non danneggiare le
griglie.
Si possono rimpiccolire i grandi strati di
brina con l’apposito raschietto in plastica.
Non raschiare assolutamente fino alla
superficie della griglia.
E’ meglio lasciar sbrinare l’apparecchio da
solo.
Prima di pulire staccare, in linea di
massima, la spina dalla presa oppure
disinserire o svitare il fusible.
Pulire il frigorifero una volta al mese.
Conviene pulire il congelatore dopo ogni
sbrinamento.
L’acqua per pulire non dovrebbe andare a
finire nel quadro controlli ed illuminazione.
Basta dell’acqua tiepida con un detersivo
leggermente disinfettante per pulire tutta
l’apparecchiatura ad eccezione della
guarnizione della porta. Non sono adatti
detersivi contenenti abrasivi o acidi nonchè
solventi chimici.
Lavare solo con acqua pura la guarnizione
della porta asciugangola poi accuratamente
con uno strofinaccio.
Pulire molto spesso il convogliatore (Fig. k/5)
ed il foro di scarico (Fig. k/6) nel frigorifero,
affinchè la brina sciolta possa liberamente
defluire. Infilare un bastoncino o simili nel
foro di scarico. Bisogna fare attenzione che
l’acqua con il detersivo non vada a finire
nella vaschetta d’evaporazione dal foro di
scarico.
Mantenere sempre pulite le ranure della
cassa del ventilatore (Fig. a/18).
Le pareti esterne possono essere trattate
ancora con un lucido tenendo però la porta
chiusa per non farlo andare a finire sulle
parti interne in plastica.
Richiudere l’apparecchiatura dopo la pulizia
ed inserire.
IT
45
Sbrinare Pulizia
IT.qxd 3/10/02 12:02 Página 45
Page 46

IT
Consigli per risparmiare energia
y
Installare l’apparecchio in un ambiente
fresco, ben aerato, proteggerlo dai raggi
diretti del sole e non disporlo nei pressi di
una fonte di calore (radiatori, ecc.).
y
Riporre nell’apparecchiatura i cibi caldi
soltanto quando si sono raffreddati.
y
Sistemare i prodotti congelati da
scongelare nel frigorifero. Si sfrutta così il
gelo dei surgelati per tenere al fresco nel
frigorifero le derràte alimentari.
y
Sbrinare il congelatore quando si è
formato molto ghiaccio. Uno spesso strato
di ghiaccio peggiora la conduzione del
freddo nei prodotti congelati e fa
aumentare il consumo della corrente.
y
Per caricare e scaricare aprire il più
brevemente possibile le porte
dell’apparecchio. Quanto meno aperta sta
la porta tanto meno ghiaccio si forma
sulle griglie di congelazione.
46
IT.qxd 3/10/02 12:02 Página 46
Page 47

Eliminare da sè piccole anomalie
Anomalia
In caso di rumori insoliti:
Se l’illuminazione del frigorifero
non funziona:
La potenza di raffreddamento diminuisce:
La potenza di raffreddamento manca:
Troppo fredo nel frigorifero:
IT
47
Cause posibili
- O l’apparecchio non è fermo o in piano oppure
un corpo estraneo è incastrato nell’ambito della
macchina frigorifera.
- Una parte sul retro non può vibrare liberamente
e tocca l’apparecchio o la parete. Posizionarlo
cautamente.
- L’interruttore della luce è inceppato (Fig. s/16).
Contollare se è possibile muoverlo. Se no,
chiamare il servizio d’assitenza.
Lampadina bruciata o diffettuosa:
- Per cambiarla ritirare la carcàssa pressionando
la parte posteriore verso giú. (Figura P) e
sostituirla per una nuova lampadina:
220-240V, mass. 15W, base E 14.
- La porta è stata aperta di frequente.
- Si sono messe a conservare nel frigorifero
grandi quantità di derràte alimentari.
- Uno strato troppo spesso di brina nel
congelatore.
- La ventilazione è coperta
- Un corpo estraneo è incastrato tra macchina
frigorifera e parete.
- Spina non ha contatto nella presa.
- Fusibile disinserito.
- L’Interruttore principale, Figura s/21, sta su “y”.
E’stata regolata una temperatura troppo bassa.
Prima di chiamare il servizio d’assistenza controllare se si può eliminare da soli il
disturbo in base ai seguenti controlli. I casi di assistenza sono a suo carico anche
durante il periodo di che dura la garanzia
IT.qxd 3/10/02 12:02 Página 47
Page 48

Se non si può eliminare il guasto in base
agli avvertimenti già dati bisogna allora
chiamare il servizio d’assistenza.
Non eseguire assolutamente da soli ulteriori
lavori soprattutto agli elementi elettrici
dell’apparecchio.
Non aprire spesso la porta senza motivo per
evitare perdite di freddo.
Avvertimento
Se la temperatura all’interno
dell’apparecchiatura sale per un guasto o
per mancanza di corrente, controllare se i
prodotti non stiano scongelando.
Non ricongelare quanto si è scongelato o
sta per scongelare! Ammannirlo in pietanze
(cucinate o arrostite) per poterlo ricongelare
ancora.
Indicazioni de sicurézza
Gli apparecchi vecchi di ferraglia devono
farsi subito inoperanti per una maggior
sicurezza, in questo modo: disinserire la
presa di corrente e tagliare il cavo di
connessione.
Togliere o distruggere tutte le serrature a
molla o catenaccio. Così si evita il pericolo
per i bambini di chiudersi dentro.
IT
48
Eliminare da sè piccole
anomalie
Residui di vecchi apparecchi
IT.qxd 3/10/02 12:02 Página 48
Page 49

IT
Servizio d’assistenza al cliente
Fig. q.
Precisare il numero dell’apparecchio (22) ed
il numero di produzione (23) quando si
chiama il servizio d’assistenza.
I due numeri si trovano incorniciati di nero
sulla targhetta matricola nel frigorifero
accanto al cassetto verdure sotto a sinistra.
L’indirizzo ed il numero di telefono del
servizio d’assistenza si trova nella lista dei
servizi d’assistenza o nell’elenco telefonico.
49
IT.qxd 3/10/02 12:02 Página 49
 Loading...