

Page 1

KFN91..
en Operating and installation instructions
Page 2

en Table of Contents
Safety and warning information 3. . . . . . . . . . . . . . . . . . . . . . . . . . . . . . . . . . . . . . . . . . . . . . . . . . . . . . . . . . .
Directions for disposal 4. . . . . . . . . . . . . . . . . . . . . . . . . . . . . . . . . . . . . . . . . . . . . . . . . . . . . . . . . . . . . . . . . . .
Scope of delivery 4. . . . . . . . . . . . . . . . . . . . . . . . . . . . . . . . . . . . . . . . . . . . . . . . . . . . . . . . . . . . . . . . . . . . . . .
Installation notes 4. . . . . . . . . . . . . . . . . . . . . . . . . . . . . . . . . . . . . . . . . . . . . . . . . . . . . . . . . . . . . . . . . . . . . . . .
Note the ambient temperature and ventilation 5. . . . . . . . . . . . . . . . . . . . . . . . . . . . . . . . . . . . . . . . . . . . . . .
Installing and connecting up the appliance 5. . . . . . . . . . . . . . . . . . . . . . . . . . . . . . . . . . . . . . . . . . . . . . . . . .
Appliance and installation dimensions 9. . . . . . . . . . . . . . . . . . . . . . . . . . . . . . . . . . . . . . . . . . . . . . . . . . . . . .
Getting to know the appliance 10. . . . . . . . . . . . . . . . . . . . . . . . . . . . . . . . . . . . . . . . . . . . . . . . . . . . . . . . . . . .
Control elements 11. . . . . . . . . . . . . . . . . . . . . . . . . . . . . . . . . . . . . . . . . . . . . . . . . . . . . . . . . . . . . . . . . . . . . . .
Notes on using the appliance 12. . . . . . . . . . . . . . . . . . . . . . . . . . . . . . . . . . . . . . . . . . . . . . . . . . . . . . . . . . . . .
Switching on the appliance 12. . . . . . . . . . . . . . . . . . . . . . . . . . . . . . . . . . . . . . . . . . . . . . . . . . . . . . . . . . . . . . .
Setting the temperatures 12. . . . . . . . . . . . . . . . . . . . . . . . . . . . . . . . . . . . . . . . . . . . . . . . . . . . . . . . . . . . . . . . .
Alarm function 12. . . . . . . . . . . . . . . . . . . . . . . . . . . . . . . . . . . . . . . . . . . . . . . . . . . . . . . . . . . . . . . . . . . . . . . . . .
Childproof lock 13. . . . . . . . . . . . . . . . . . . . . . . . . . . . . . . . . . . . . . . . . . . . . . . . . . . . . . . . . . . . . . . . . . . . . . . . .
Supercool function 13. . . . . . . . . . . . . . . . . . . . . . . . . . . . . . . . . . . . . . . . . . . . . . . . . . . . . . . . . . . . . . . . . . . . . .
Superfreeze function 13. . . . . . . . . . . . . . . . . . . . . . . . . . . . . . . . . . . . . . . . . . . . . . . . . . . . . . . . . . . . . . . . . . . .
quick ice 13. . . . . . . . . . . . . . . . . . . . . . . . . . . . . . . . . . . . . . . . . . . . . . . . . . . . . . . . . . . . . . . . . . . . . . . . . . . . . .
Water filter symbol 13. . . . . . . . . . . . . . . . . . . . . . . . . . . . . . . . . . . . . . . . . . . . . . . . . . . . . . . . . . . . . . . . . . . . . .
Unit of temperature 14. . . . . . . . . . . . . . . . . . . . . . . . . . . . . . . . . . . . . . . . . . . . . . . . . . . . . . . . . . . . . . . . . . . . .
Fridge compartment 14. . . . . . . . . . . . . . . . . . . . . . . . . . . . . . . . . . . . . . . . . . . . . . . . . . . . . . . . . . . . . . . . . . . .
HydroFresh drawers 14. . . . . . . . . . . . . . . . . . . . . . . . . . . . . . . . . . . . . . . . . . . . . . . . . . . . . . . . . . . . . . . . . . . . .
Delicatessen drawer 14. . . . . . . . . . . . . . . . . . . . . . . . . . . . . . . . . . . . . . . . . . . . . . . . . . . . . . . . . . . . . . . . . . . . .
Variable layout of inside 15. . . . . . . . . . . . . . . . . . . . . . . . . . . . . . . . . . . . . . . . . . . . . . . . . . . . . . . . . . . . . . . . . .
Freezer compartment 16. . . . . . . . . . . . . . . . . . . . . . . . . . . . . . . . . . . . . . . . . . . . . . . . . . . . . . . . . . . . . . . . . . . .
Freezing foods 16. . . . . . . . . . . . . . . . . . . . . . . . . . . . . . . . . . . . . . . . . . . . . . . . . . . . . . . . . . . . . . . . . . . . . . . . .
Buying and storing deep−frozen foods 16. . . . . . . . . . . . . . . . . . . . . . . . . . . . . . . . . . . . . . . . . . . . . . . . . . . . . .
Thawing out frozen food 16. . . . . . . . . . . . . . . . . . . . . . . . . . . . . . . . . . . . . . . . . . . . . . . . . . . . . . . . . . . . . . . . .
Features of the freezer compartment 17. . . . . . . . . . . . . . . . . . . . . . . . . . . . . . . . . . . . . . . . . . . . . . . . . . . . . . .
Ice and water dispenser 17. . . . . . . . . . . . . . . . . . . . . . . . . . . . . . . . . . . . . . . . . . . . . . . . . . . . . . . . . . . . . . . . .
Water filter 19. . . . . . . . . . . . . . . . . . . . . . . . . . . . . . . . . . . . . . . . . . . . . . . . . . . . . . . . . . . . . . . . . . . . . . . . . . . . .
Specification and performance data sheet 20. . . . . . . . . . . . . . . . . . . . . . . . . . . . . . . . . . . . . . . . . . . . . . . . . .
Saving energy 21. . . . . . . . . . . . . . . . . . . . . . . . . . . . . . . . . . . . . . . . . . . . . . . . . . . . . . . . . . . . . . . . . . . . . . . . . .
Operating noises 21. . . . . . . . . . . . . . . . . . . . . . . . . . . . . . . . . . . . . . . . . . . . . . . . . . . . . . . . . . . . . . . . . . . . . . .
Defrosting 21. . . . . . . . . . . . . . . . . . . . . . . . . . . . . . . . . . . . . . . . . . . . . . . . . . . . . . . . . . . . . . . . . . . . . . . . . . . . .
Switching the appliance off and placing it out of operation 21. . . . . . . . . . . . . . . . . . . . . . . . . . . . . . . . . . . .
Cleaning 21. . . . . . . . . . . . . . . . . . . . . . . . . . . . . . . . . . . . . . . . . . . . . . . . . . . . . . . . . . . . . . . . . . . . . . . . . . . . . .
Lighting (LED) 22. . . . . . . . . . . . . . . . . . . . . . . . . . . . . . . . . . . . . . . . . . . . . . . . . . . . . . . . . . . . . . . . . . . . . . . . . .
Repairing minor malfunctions yourself 23. . . . . . . . . . . . . . . . . . . . . . . . . . . . . . . . . . . . . . . . . . . . . . . . . . . . . .
Customer services 25. . . . . . . . . . . . . . . . . . . . . . . . . . . . . . . . . . . . . . . . . . . . . . . . . . . . . . . . . . . . . . . . . . . . . .
2
Page 3

deen
Safety and warning information
Before operating the
appliance
Read the instruction and installation
manual carefully.
They contain important information on
setting up, using, and maintaining the
appliance.
Retain all documents for later use or
for subsequent owners.
Safety
If the appliance’s mains cable is
damaged, it must be replaced by the
manufacturer, customer services, or a
similarly qualified person. Improper
installation and repair jobs can place
the user in considerable danger.
Repairs may only be carried out by the
manufacturer, customer services, or a
similarly qualified person.
Only original parts of the manufacturer
may be used. The manufacturer only
guarantees that the safety
requirements are met if these parts are
used.
A mains cable extension lead may only
be procured via customer services.
During operation
n Never use electrical appliances
inside the appliance (e.g.heaters,
electric ice makers).
Risk of explosion!
n Never defrost or clean the
appliance with a steam cleaner.
Steam can come into contact with
electrical parts and cause a short
circuit or an electric shock.
Risk of electric shock!
n Do not use pointed or sharp
objects to remove layers of ice and
frost! Doing so can damage the
refrigerant pipes. If refrigerant
sprays out, it can ignite or cause
eye injuries.
n Do not store products with
flammable propellant gases
(e.g.spray cans) or explosive
substances inside the appliance.
Risk of explosion!
n Do not use base, drawers, doors,
etc. as steps or supports.
n When defrosting and cleaning the
appliance, disconnect the mains
plug or switch off the circuit
breaker. Tug on the mains plug, not
on the cable.
n Store high percentage alcohol only
in tightly closed containers and
upright.
n Do not soil plastic parts and the
door seal with oil or grease. If you
do so, the plastic parts and door
seal will become porous.
n Never cover or block ventilation
openings on the appliance.
n Children and people with impaired
physical, sensory, or mental abilities
or who lack knowledge of the
appliance must only use it if they
are supervised by a person who will
take responsibility for their safety or
who have learned how to use the
appliance by reading this manual.
n Do not store liquids in bottles or
cans in the freezer compartment (in
particular carbonated beverages).
Bottles and cans may burst.
n Never eat frozen foods immediately
after they have been taken out of
the freezer compartment.
Risk of freezer bur n!
n Avoid prolonged contact of your
hands with frozen foods, ice, and
the evaporator tubes etc.
Risk of freezer bur n!
Children in the household
n Do not give packaging or
packaging parts to children.
Danger of suffocation from
cardboard boxes and films!
n This appliance is not a toy!
n For appliances with a door lock:
Keep the key out of the reach of
children!
General requirements
The appliance is suitable for the
following tasks:
n Chilling and freezing food,
n Making ice cubes,
n Dispensing drinking water.
This appliance is intended for domestic
use in private households and for a
domestic environment.
The appliance is fitted with interference
suppression in accordance with
EUDirective 2004/108/EC.
The refrigerant circuit has been tested
for leaks.
This appliance corresponds to the
relevant safety requirements for
electrical appliances (EN60335/2/24).
3
Page 4
deen
Directions for disposal
x Disposal of packaging
The packaging protects your appliance
against damage during transport. All
materials used are environmentally
compatible and reusable. Please help:
dispose of the packaging in an
environmentally friendly manner.
For current methods of disposal,
please contact your dealer or the local
authorities.
x Disposal of old
appliances
Old appliances are not valueless
waste.
Valuable raw materials can be
recovered through environmentally
responsible disposal.
This appliance is in accordance
with European Directive
2002/96/EC on old electrical and
electronic appliances (Waste
Electrical and Electronic
Equipment − WEEE). The
guideline provides a valid
framework for recovering and
utilising old appliances
throughout the EU.
! War n ing!
Handle worn out appliances as
follows:
1. Unplug the mains plug.
2. Cut the power cord and remove
along with the mains plug.
3. Do not remove the shelves and
containers. Leaving them intact
makes it more difficult for children
to climb in!
4. Never let children play with a worn
out appliance.
Risk of asphyxiation!
Refrigerators contain refrigerants and
the insulation contains gases.
Refrigerants and gases must be
disposed of properly. Do not damage
refrigerant tubing until such time when
it can be disposed of properly.
Scope of delivery
After unpacking the appliance, check
all parts for transport damage.
If you wish to make a complaint,
please contact the dealer from whom
you purchased the appliance or
customer services.
The scope of delivery includes the
following parts:
n Refrigerator and freezer unit,
n Features (vary depending on the
model),
n Water connection hose,
n Usage and assembly instructions,
n Guarantee slip,
n Information on energy consumption
and noises,
n Bag of assembly materials.
Installation notes
Transport and installation
This appliance is heavy and must be
secured during transport and fitting.
! War n ing!
This appliance is very heavy. If the
appliance falls over during transport
and installation work, it can cause
serious injuries. At least two people are
required to install the appliance safely.
Keep the doors of the appliance shut
until the appliance is positioned and
level at its installation location.
Installation location
The appliance should be placed in a
dry room that can be ventilated. The
installation location should not be
directly exposed to the sun and should
not be near a heat source such as a
stove or radiator. If installation next to a
heat source is unavoidable, use a
suitable insulating plate or maintain the
following minimum distances from the
heat source:
n 3cm from an electric or gas
cooker,
n 30cm from oil or solid fuel cookers.
If the appliance is being installed next
to another refrigerator or freezer,
maintain a minimum distance between
the sides of the two appliances of
25mm. This prevents the formation of
condensation.
If there is a cover or cupboard above
the appliance, there must be a gap of
10mm to enable the appliance to be
pulled out if necessary.
The heated air must be able to escape
unimpeded from the rear of the
appliance.
If the appliance is being installed in the
corner of a room or in a niche, the
minimum required gaps (see section
"Device and installation dimensions")
at the sides of the appliance must be
observed so that the doors can be
opened all the way.
If adjacent kitchen units are deeper
than 75 cm, the minimum required
gaps at the side must be observed in
order to enable the entire door opening
angle to be used (see section "Door
opening angle").
Floor surface
Information!
The appliance is very heavy.
The floor at the installation location
must not sag. If necessary, reinforce it.
Empty weight:
Basic model 147kg
4
Page 5
Note the ambient temperature and ventilation
The climate class is stated on the
nameplate. It specifies the room
temperatures suitable for using the
appliance. The nameplate is on the
right of the appliance.
Climate class
SN +10 °C to 32 °C
N +16 °C to 32 °C
ST +16 °C to 38 °C
T +16 °C to 43 °C
Ventilation
The air from the base panel at the front
and cover plate at the rear heats up.
The heated air must be able to escape
unimpeded. Otherwise, the
refrigerating unit has to work harder,
which increases the appliance’s power
consumption. You must therefore
never cover or block the ventilation
openings.
Permissible ambient
temperature
Installing and connecting up the appliance
n The appliance must be installed
and connected up by a specialist in
accordance with these assembly
instructions.
n Once the appliance has been
positioned, wait at least 8hours
before plugging in the mains cable.
The oil in the compressor can shift
to the refrigeration system during
transport.
n Before starting the appliance up for
the first time, clean its interior (see
section Cleaning the appliance").
n The water line must be connected
up before the electrical
connections.
n In addition to the statutory national
regulations, the connection
requirements of the local electricity
and water supply companies are to
be observed.
n Only remove the transport locks on
the trays and racks once the
appliance has been installed.
n If the appliance doors need to be
removed in order for the appliance
to fit through the doors of the
house or flat, the doors must be
removed by customer services only.
deen
If the water pressure is more than
8.2bar, a pressure reducing valve
must be integrated. If the water
pressure is less than 1.0 bar, the ice
maker will not work.
The 3/4" tap for connecting the
enclosed connection line must be
easily accessible.
The connection line has a
3/4"connector.
The taste and smell of the water can
be improved by installing the enclosed
filter cartridge. If the filter cartridge is
used, pay attention to the different
connection conditions (see section
"Water filter").
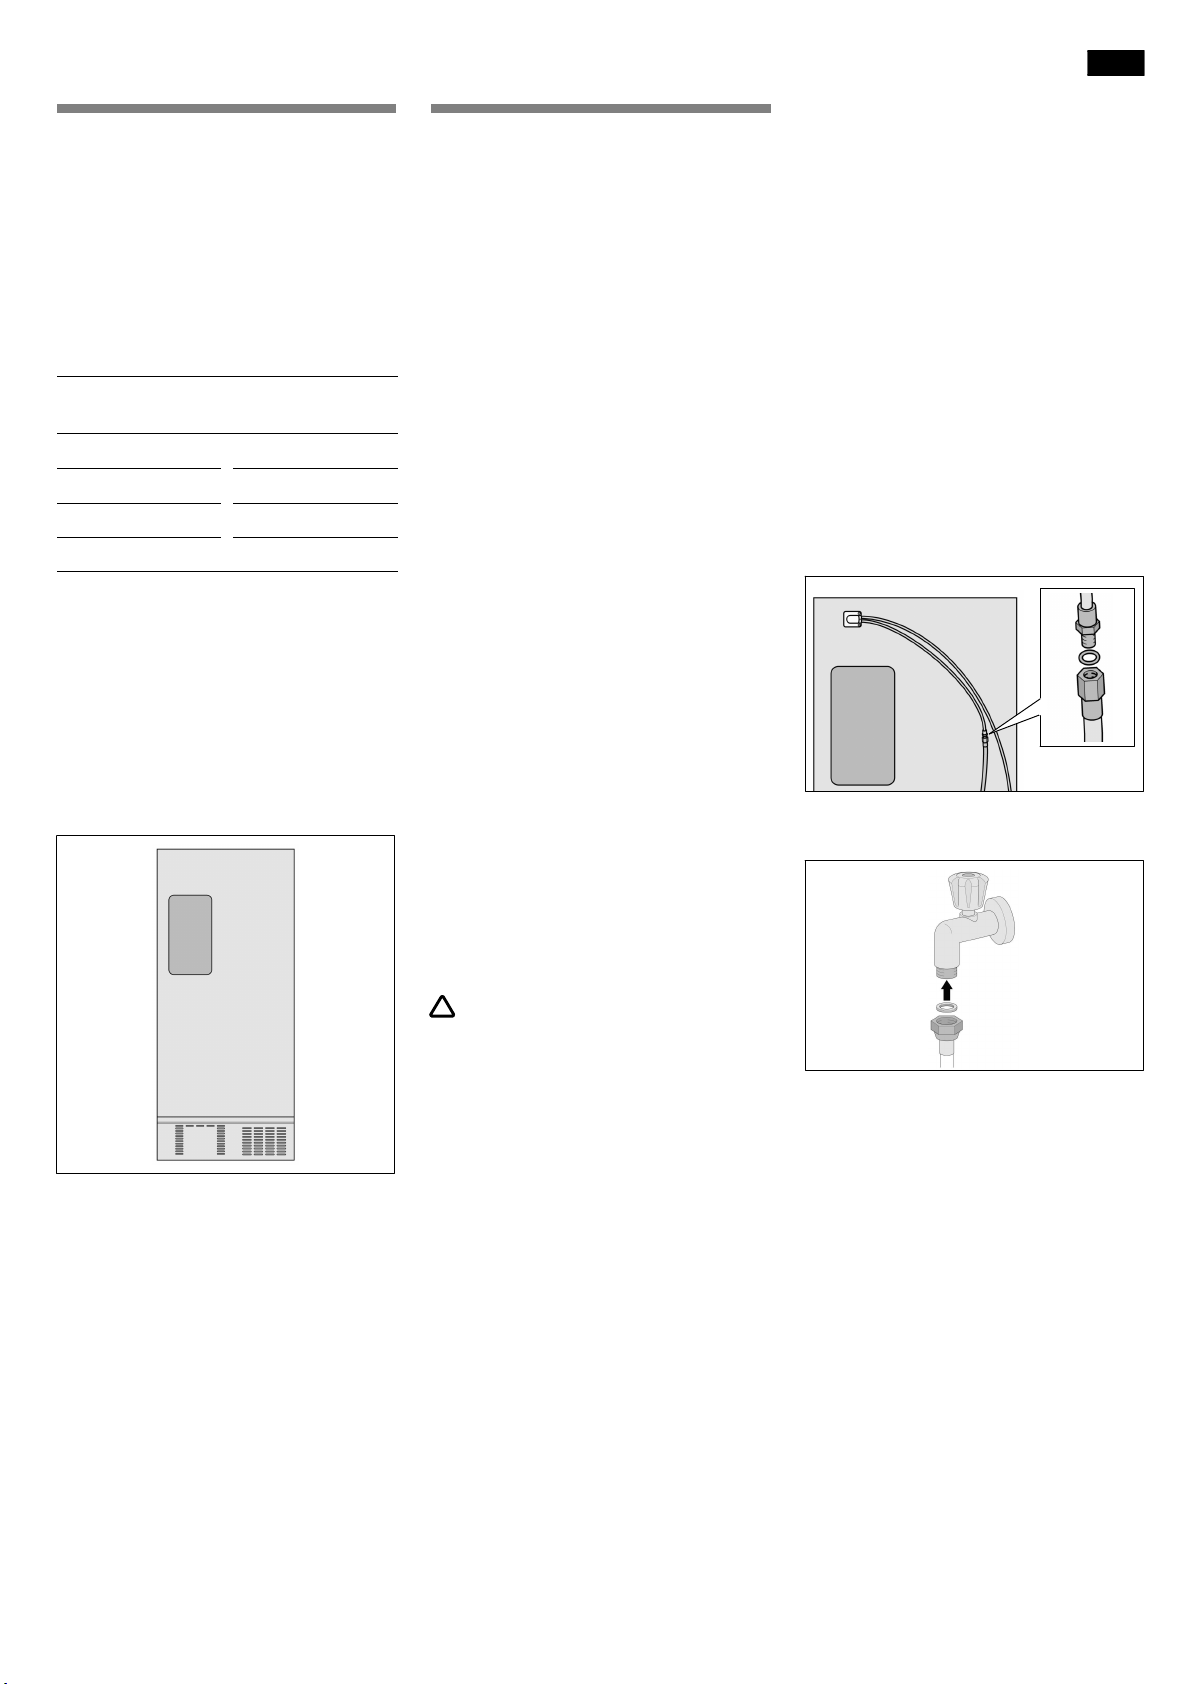
Connecting up the appliance
1. Connect the connection line to the
appliance.
2. Connect the connection line to the
water tap.
Water connection
! War n ing!
Risk of electric shock and of damage
to property!
Disconnect the appliance from the
electricity mains before carrying out
any work on the water connection.
The water connection must only be
installed by a qualified plumber in
accordance with the regulations
governing the plumbing trade and the
local waterworks.
Connect the appliance to a drinking
water pipeline.
n Minimum pressure: 1.0bar
n Maximum pressure: 8.2bar
3. Loop or wind the connection line so
that the appliance can be moved
away from the wall.
5
Page 6
deen
Electrical connection
Following the installation of the
appliance, wait at least 8 hours before
starting it up. The oil in the compressor
can shift to the refrigeration system
during transport.
Clean the inside of the appliance
before it is first used (see section
"Cleaning").
The socket must be near to the
appliance and easily accessible, even
after the appliance has been moved
into place.
Connect the appliance to a
220−240V/50 Hz alternating current
via a properly installed socket with an
earth wire. The socket must have a
10A − 16 A fuse.
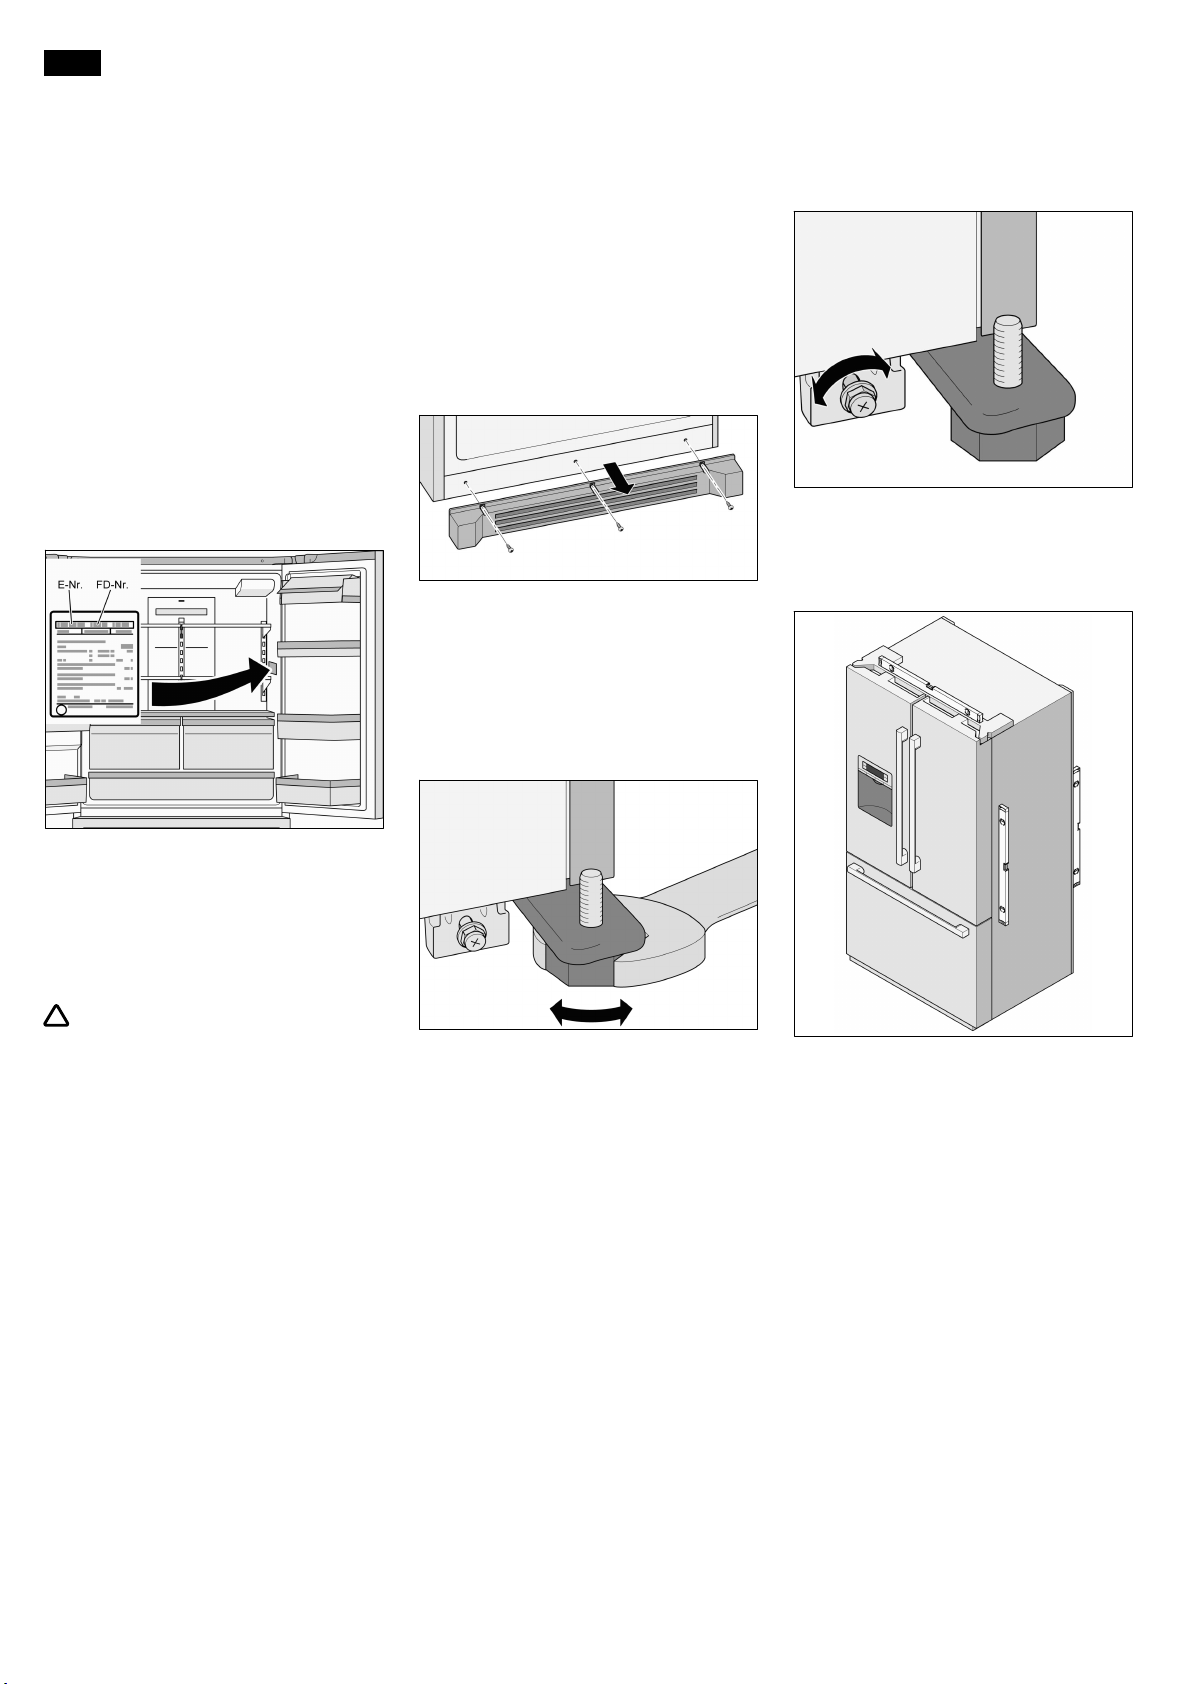
Aligning the appliance
Information!
So that it functions properly, the
appliance must be set level using a
spirit level.
An improperly aligned appliance can
result in water running out of the ice
maker, ice cubes of different sizes
being made, or the doors not closing
properly.
1. Place appliance at the intended
location.
2. Unscrew the three screws on the
base panel.
3. Remove the base panel.
4. Use an Allen key to screw the two
front feet out until they stand firmly
on the ground and align the
appliance at the front.
5. Use an Allen key to turn the screws
and align the appliance at the rear.
Raise the appliance at the rear:
Turn the screw clockwise.
Lower the appliance at the rear:
Turn the screw anticlockwise.
6. Check for horizontal alignment of
the appliance using a spirit level.
In the case of appliances operated
outside Europe, check whether the
voltage and type of current specified
on the nameplate conform to the
values of your electricity grid. This
information is located on the
nameplate.
! War n ing!
In no circumstances may the
appliance be connected up to an
electronic energy saving socket.
Sine− and line−commutated inverters
can be used with our appliances. In
the case of isolated installations in
holiday homes or on boats, for
example, you must use a
sine−commutated inverter.
Information!
The front feet must stand firmly on the
ground so that the appliance does not
roll away.
7. If the fridge compartment doors or
freezer drawer have an uneven
height or are on a slant once the
appliance has been aligned, align
them as described below.
6
Page 7
deen
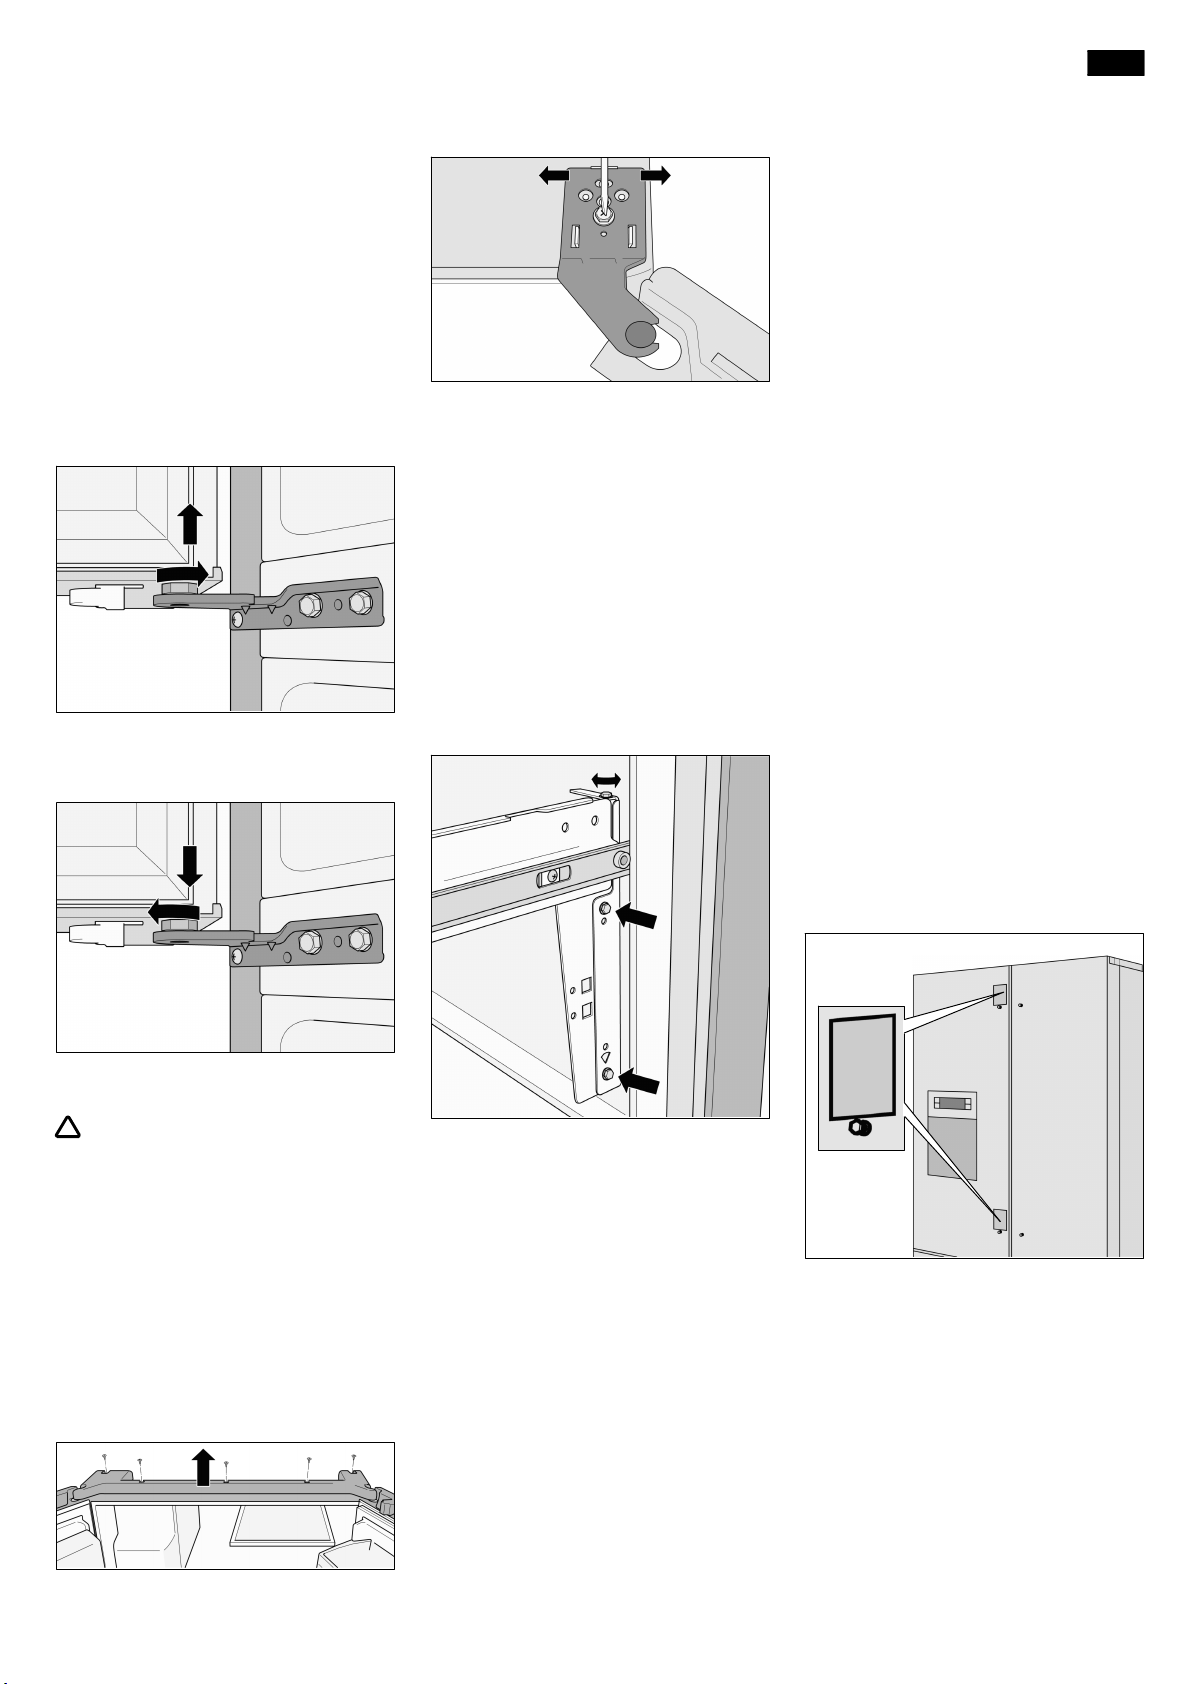
Aligning the fridge
compartment door
If the top and bottom edges of the
two fridge compartment doors are
not at the same level, proceed as
follows:
1. Determine which fridge
compartment door needs to be
raised.
2. Use the nut on the lower mount to
align the fridge compartment door.
To raise the fridge compartment
door:
Turn the screw anticlockwise.
To lower the fridge compartment
door:
Turn the screw clockwise.
4. Loosen the screws.
Do not take the screws out!
5. Align the fridge compartment door
by moving the mount to the side.
6. Tighten the screw.
7. Position the panel.
8. Position and tighten the five
screws.
Aligning the freezer
drawer
1. Determine which side needs to be
adjusted.
2. Loosen the two screws.
Do not take the screws out!
Attaching the handles
Only attach the handles once the
appliance has been positioned in its
installation location and has been
aligned so that it is level.
All of the handles are the same.
There are two protective sheets
enclosed with the appliance for
attaching and removing the handles.
These sheets can be reused.
The protective sheets protect the
surfaces during the attachment and
removal of the handles.
Information!
If the handles are incorrectly
positioned, they cannot be pushed in
the specified direction.
Position the handles properly as
follows:
It must be possible to push the
handles for the fridge compartment
doors downwards.
It must be possible to push the handle
for the freezer compartment drawer to
the right.
If the handles are hard to push,
carefully tap them with a rubber
hammer.
1. Remove the protective sheets from
the fridge compartment doors and
the freezer compartment drawer.
2. Attach the protective sheets.
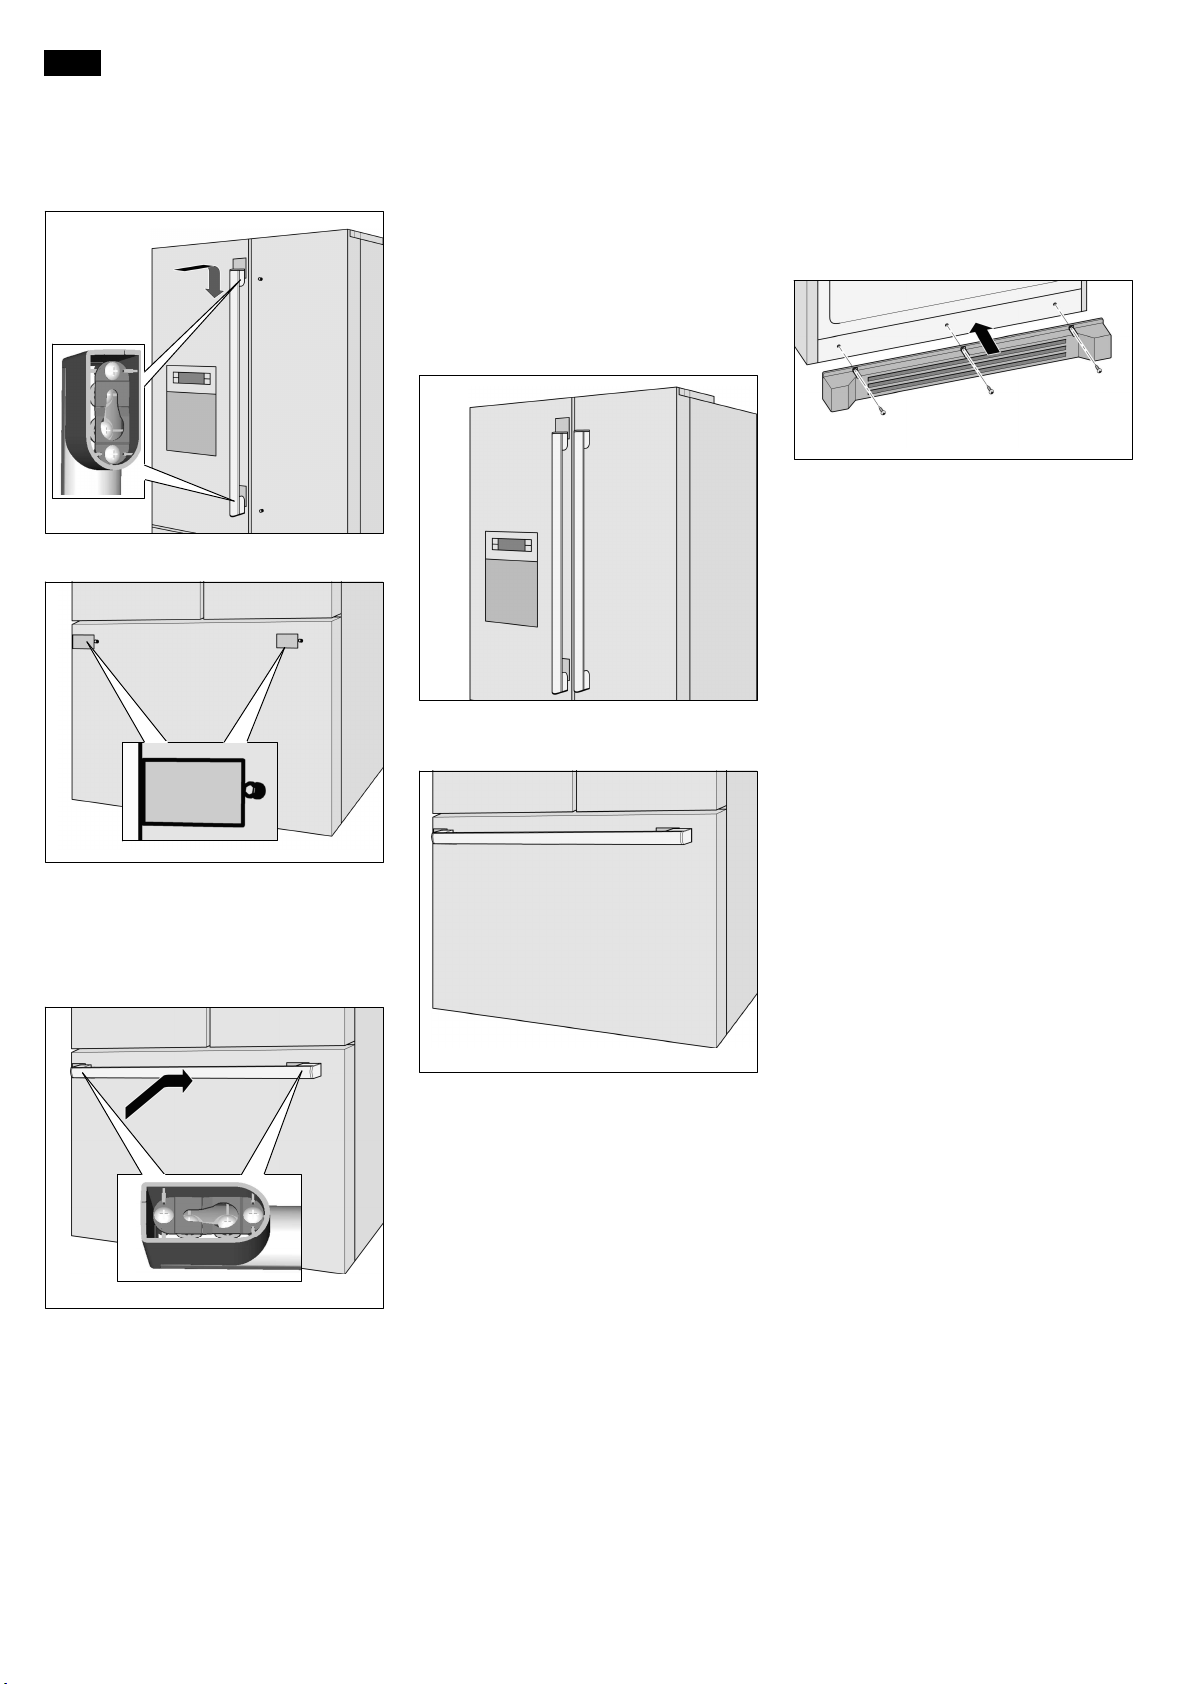
If the fridge compartment doors are
on a slant, proceed as follows:
! War n ing!
Risk of electric shock!
Before removing the top panel:
interrupt the supply of water to the
appliance. Pull out the mains plug or
disable the fuse.
1. Determine which fridge
compartment door needs to be
adjusted.
2. Unscrew the five screws on the top
panel.
3. Raise the panel.
3. Align the freezer drawer using the
top screw.
4. Tighten the two screws.
7
Page 8
deen
3. Position the handles for the fridge
compartment doors on the guides.
4. Slide the handles downwards until
they snap into place.
5. Attach the protective sheets.
Removing the handles
Information!
To avoid scratching the surface, attach
the protective sheet a little below the
handle so that it is not pushed to the
side by the handle.
1. Attach the protective sheets as
follows:
n To the fridge compartment doors
above the guides.
Fitting the base panel
1. Unscrew the three screws on the
device.
2. Position the base panel.
3. Position and tighten the three
screws.
6. Place the handle for the freezer
compartment drawer onto the
guides.
7. Slide the handle to the right until it
snaps into place.
n To the freezer compartment
drawer to the left of the guides.
2. Push the handles for the fridge
compartment doors upwards and
remove them.
3. Push the handle for the freezer
compartment drawer to the left and
remove it.
4. Remove the protective sheets and
keep them for reuse.
8. Remove the protective sheets and
keep them for reuse.
8
Page 9

Appliance and installation dimensions
deen
1772
453 453
1772
849
905
915
min. 1753
1742
772
740
67 − 83
1223
381
140°
55
740
28
90°
905
34
10
740
825
880
28
381
90°
140°
1223
9
Page 10

deen
Getting to know the appliance
This instruction and installation manual applies to several models. Your model may be different to the model shown in the
illustrations.
19 16
20
1
18
17
2
3
4
6
7
5
8
9
12
10
11
15
14
A
13
B
A Fridge compartment
can be adjusted between
+2 ° C and +8 °C
B Freezer compartment
can be adjusted between
−15 °C and −22 °C
10
1 Butter and cheese compartment
2 Can holder
3 Control elements
4 Ice and water dispenser
5 Ice tray
6 Door rack
7 HydroFresh drawers with
lighting(LED)
8 Removable door rack
9 Top frozen food drawer
10 Bottom frozen food drawer
11 Freezer compartment light switch
12 Freezer compartment divider
13 Delicatessen drawer with
lighting(LED)
14 Door rack
15 Egg tray
16 Water filter
17 Adjustable glass shelf
18 Small glass shelf
19 Ice maker/ice cube container
20 Fridge compartment light switch
Page 11

Control elements
The control and display panel on the left−hand fridge compartment door is a touch panel.
You touch a key to trigger the corresponding function.
The control and display panel light goes out after around 1 minute if you do not touch a key.
10
11 9
deen
1
2 7
1 "freezer/super" key
n For adjusting the temperature of
the freezer compartment.
n For switching the "superfreeze"
function on and off.
2 "quick ice" key
For switching the quick ice cube
production function on and off.
3 Water dispenser key
4 Crushed ice dispenser key
5 Ice cube dispenser key
6 alarm/lock" key
n For switching off the warning
tone.
n For switching the child lock on
and off.
3 4 5 6
7 "light/filter" key
n For switching the light for the ice
11 Symbols on the display panel
and water dispenser on and off.
n For resetting the filter display.
8 "fridge/super" key
n For adjusting the temperature in
the fridge compartment.
n For switching the "supercool"
function on and off.
9 Fridge compartment
temperature indicator
Displays the set temperature for
the fridge compartment.
10 Freezer compartment
temperature indicator
Displays the set temperature for
the freezer compartment.
8
"quick ice"
Quick ice function switched
on.
"lighting"
Ice and water dispenser light
switched on.
"Water filter"
State of filter cartridge.
"Childproof lock"
Childproof lock switched on.
11
Page 12
deen
Notes on using the appliance
Opening and closing the
fridge compartment doors
The fridge compartment doors can be
opened and closed independently of
one another.
There is a hinged door strut on the
left−hand door of the fridge
compartment.
Information!
The door strut can be damaged if you
try to close the left−hand fridge
compartment door when the door strut
is folded out.
Before closing the fridge compartment
doors, ensure that the door strut is
folded in at a right angle to the door.
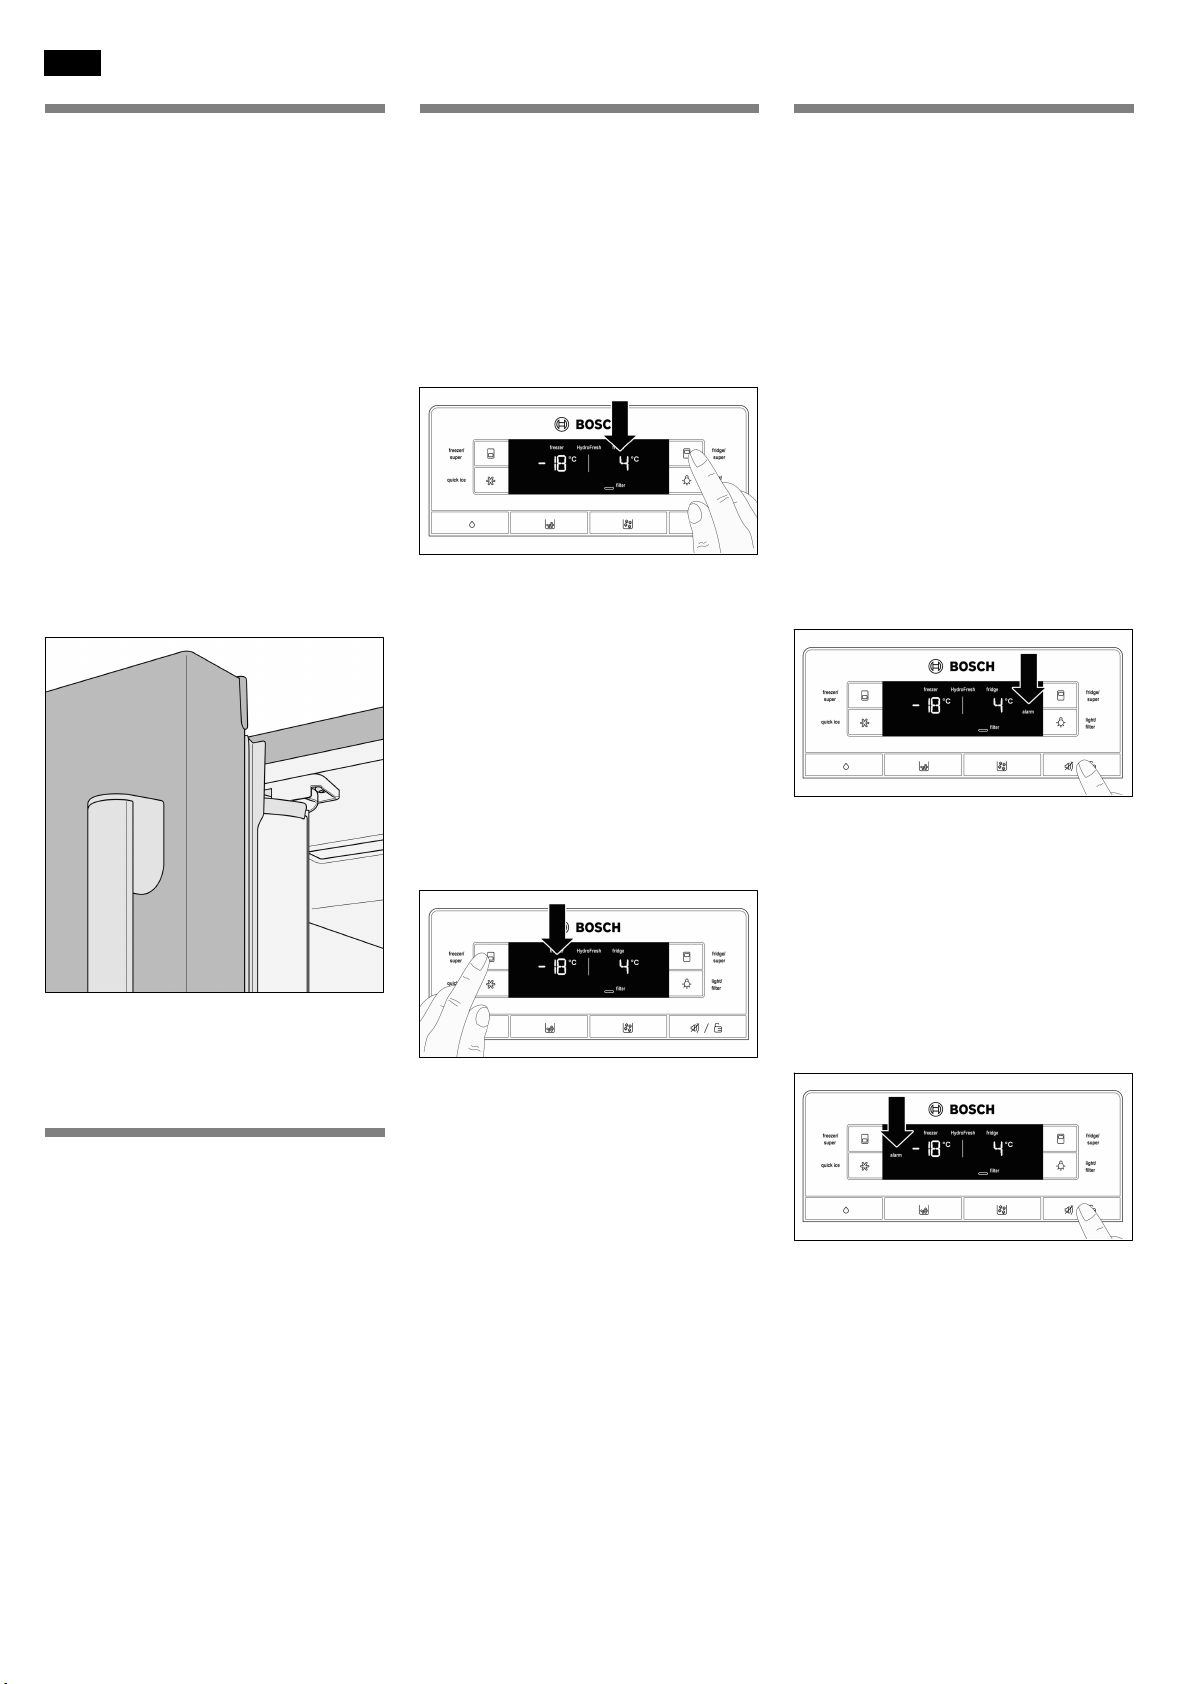
Setting the temperatures
Fridge compartment
(can be adjusted between +2 °C and
+8 ° C)
Press the "fridge/super" key repeatedly
until the required fridge compartment
temperature is set.
The last set value is saved.
We recommend that you set it to
+4°C.
Perishable foods should not be stored
at temperatures of more than +4° C.
Alarm function
The warning tone sounds if the
appliance is too warm or if the
appliance doors are left open for more
than three minutes.
The warning tone sounds three times
for one minute each time. There is a
one minute pause between each
warning tone.
Fridge compartment
The display panel indicates "alarm" on
the right−hand side.
To switch off the warning tone:
Press the "alarm/lock" key or close the
fridge compartment doors.
The "alarm" indicator on the display
panel flashes until the temperature
approaches the set temperature.
When you close the left−hand fridge
compartment door, the door strut folds
behind the right−hand fridge door and
forms the seal between the doors.
Switching on the appliance
Information!
Following the installation of the
appliance, wait at least 8 hours before
starting it up. The oil in the compressor
can shift to the refrigeration system
during transport.
Plug the mains plug into the socket.
After connecting to the mains, the
appliance begins to cool. The interior
lights are on when the doors are open.
The preset temperatures are reached
after several hours. Do not place food
into the appliance before then.
Freezer compartment
(can be adjusted between −15 °C and
−22 °C)
Press the "freezer/super" key until the
required freezer compartment
temperature is set.
The last set value is saved.
We recommend that you set it to
−18°C.
Freezer compartment
The display panel indicates "alarm" on
the left−hand side.
To switch off the warning tone:
Press the "alarm/lock" key or close the
freezer compartment drawer.
The "alarm" indicator on the display
panel flashes until the temperature
approaches the set temperature.
12
Page 13

deen
Childproof lock
If the childproof lock function is on, all
keys on the control and display panel
are locked.
However, even if the childproof lock is
on, you can turn off the war ning signal
if it sounds using the "alarm/lock" key.
To switch the childproof lock on or
off:
Press the "alarm/lock" key for
2seconds.
If the childproof lock function is on, the
"childproof lock" symbol appears.
Supercool function
Superfreeze function
Food should be frozen right through as
quickly as possible in order to preserve
its vitamins, nutritional values,
appearance, and taste.
To prevent undesired temperature
increases when fresh food is placed
into the appliance, switch on the
superfreeze function a few hours
before inserting the food.
In general, 4 to 6 hours are sufficient.
To use the maximum freezing power,
switch this function on 24 hours
beforehand.
You can freeze smaller quantities of
food without using the superfreeze
function.
To switch the superfreeze function
on:
Press the "freeze/super" key until the
display panel indicates "super" on the
left−hand side.
quick ice
You can use this function to produce
ice cubes quickly.
To switch on the quick ice function:
Press the "quick ice" key.
The display panel shows the "quick
ice" symbol.
If the ice cube container is full, the
quick ice function switches off
automatically after a few hours.
Information!
When the quick ice function is
switched on, the power of your
appliance is increased for a while. As a
result, the appliance’s energy
consumption also increases.
The supercool function chills the fridge
compartment as much as possible for
approx. 6 hours. It then automatically
sets the temperature to +4°C.
The supercool function is
recommended in the following cases:
n Before placing large quantities of
food into the fridge.
n For quickly cooling drinks.
To switch on the supercool function:
Press the "fridge/super" key until the
display panel indicates "super" on the
right−hand side.
To switch off the supercool function:
Press the "fridge/super" key.
The "super" indicator disappears from
the display panel. The temperature is
automatically set to +4°C.
To switch off the superfreeze
function:
Press the "freeze/super" key.
The "super" indicator disappears from
the display panel. The temperature is
automatically set to −18°C.
Information!
The superfreeze function automatically
switches off after 2 days.
Water filter symbol
The symbol indicates the duration of
the usage of the filter.
Up to two months.
Up to four months.
Up to six months.
After six months:
The symbol flashes.
Replace the filter cartridge.
When you switch off the appliance, the
water filter symbol is reset.
After changing the filter cartridge,
reset the water filter symbol:
Hold down the "light/filter" key for
3seconds.
The symbol stops flashing.
13
Page 14

deen
Unit of temperature
The temperature can be displayed in
degrees Celsius (°C) or in degrees
Fahrenheit (°F).
When the device is switched on, the
appliance initially displays the
temperature in degrees Celsius(°C).
To set the unit of temperature:
Press the "alarm/lock" key for
2seconds.
The "childproof lock" symbol appears.
Hold down the "quick ice" key for
15seconds until the unit of
temperature changes.
Fridge compartment
The temperature of the fridge
compartment can be adjusted
between +2 °C and +8 °C.
We recommend that you set it to
+4°C.
Perishable foods should not be stored
at temperatures of more than +4° C.
Use of fridge
Use the fridge to store prepared
dishes, bakery products, canned
goods, condensed milk, cheese,
spreads, sauces, dips, and eggs.
When arranging the food,
bear in mind the following:
n Allow warm food and beverages to
cool down outside of the appliance.
n Pack food so that it is airtight to
prevent it from losing its flavour or
drying out.
n Do not block air outlets with food.
Doing so impedes the air
circulation.
n Do not allow oil or fat to come into
contact with plastic parts or with
the door seals.
HydroFresh drawer s
The temperature in the HydroFresh
drawers is kept at around 0°C. This
low temperature provides optimum
storage conditions for perishable
goods.
Foods can be kept in the HydroFresh
drawers for a much longer period of
time before spoiling than they can if
stored in the normal fridge
compartment.
The HydroFresh drawers are covered
by a special moisture filter. This special
filter optimises the air humidity in the
HydroFresh drawers. As a result, the
air humidity in the HydroFresh drawers
is up to 90% relative humidity
depending on how full they are. This
storage atmosphere provides optimum
conditions for fresh produce such as
vegetables, salad, herbs, and fruit.
Suitable for fresh cooling:
As a general rule, all fresh food that
needs to stay fresh as long as possible
is suitable. This includes meats and
sausages, fresh fish, seafood, milk,
butter, soft cheese, crème fraîche,
vegetables, and fruit.
Not suitable for fresh
cooling:
Fruit and vegetables that are sensitive
to the cold, such as tropical fruits,
avocado, papaya, passion fruit,
aubergine, cucumber, and peppers.
Also, fruit that needs to ripen, green
tomatoes, and potatoes should not be
kept here.
When purchasing food,
bear in mind the following:
The freshness of food at the time of
purchase is important when
determining how long it may be kept.
In principle, the following applies: The
fresher the produce when it is placed
into the HydroFresh drawers, the
longer it will keep. When purchasing
food, always pay attention to how
fresh it is.
Removing the HydroFresh
drawers
1. Pull the HydroFresh drawer out as
far as possible.
2. Lift the front of the HydroFresh
drawer and remove it.
3. Insertion: Insert the HydroFresh
drawer into the drawer slide and
push it backwards.
Delicatessen drawer
The temperature of the delicatessen
drawer is just below freezing. It is
suitable for storing meat and
sausages, fish, seafood, milk products,
and hard or soft cheese.
Information!
Do not store foods that are sensitive to
the cold in the delicatessen drawer.
14
Page 15

deen
Removing the
delicatessen drawer
1. Pull the delicatessen drawer out as
far as possible.
2. Lift the front of the delica tessen
drawer and remove it.
3. Insertion: Insert the delicatessen
drawer into the drawer slide and
push it backwards.
Variable layout of inside
Glass shelves
The adjustable glass shelves can be
removed.
Small top glass shelf
You can remove the glass shelf and
place it in the holder beneath the ice
maker. This allows tall bottles to be
stored next to the ice maker, for
example.
Door racks
To remove a door rack:
Lift the door rack and remove it from
the door.
Butter and cheese
compartment
To open the butter and cheese
compartment, lift its lid upwards.
To remove the butter and cheese
compartment:
Lift up the butter and cheese
compartment and remove it.
To insert the butter and cheese
compartment:
Position the rack over the holder at the
required height and push downwards.
Egg tray
The adjustable glass shelves can be
taken out or moved to different
heights.
Removing a glass shelf:
Lift the front of the glass shelf and
remove it.
Inserting a glass shelf:
Lift the front of the glass shelf and
place the hooks into the openings at
the required height. Lower the front of
the glass shelf.
Inserting a door rack:
Position the rack over the holder at the
required height and push downwards.
15
Page 16

deen
Freezer compartment
The temperature of the freezer
compartment can be adjusted
between −15°C and −22 °C.
We recommend that you set it to
−18°C.
Notes on the freezer
compartment
n Make sure that the freezer
compartment drawer is always
closed. If the drawer is open, the
frozen food thaws out. The freezer
ices up heavily. In addition, energy
is wasted due to the high power
consumption of the appliance.
n When you close the freezer
compartment drawer, there is
negative pressure in the freezer
compartment.
n If the freezer compartment drawer
cannot be opened again soon after
being closed, please wait for the
negative pressure to disperse.
Use the freezer
compartment for the
following:
n Storing deep frozen food.
n Freezing food.
n Storing ice cubes.
Freezing foods
Only freeze fresh food in good condition.
Do not allow food to be frozen right next
to food that has already been frozen.
Make sure that foods are packed in
airtight packaging so that they do not
lose their taste or dry out.
To pack the food
correctly:
1. Put the food into the packaging.
2. Squeeze out air completely.
3. Close packaging tightly.
4. Label packaging with its content
and date of freezing.
The following are unsuitable
for use as packaging:
Wrapping paper, parchment paper,
cellophane, refuse bags and used
shopping bags.
The following are suitable as
packaging:
Plastic films, tubular polyethylene films,
aluminium foil, and freezer bags.
You can buy these products from your
specialist dealer.
For sealing, the following are
suitable:
Rubber bands, plastic clips, string,
cold−resistant adhesive tape or similar.
You can use a heat sealer to seal bags
and tubular polyethylene films.
Storage life of frozen food
The storage life of food depends on
the foot type. The following guidelines
apply to a temperature of −18°C:
n Fish, sausage, prepared dishes,
bakery products:
Up to 6 months
n Cheese, poultry, meat:
Up to 8 months
n Vegetables, fruit:
Up to 12 months.
Buying and storing
deep−fro zen foods
Pay attention when purchasing deep
frozen food:
n Make sure that the packaging is not
damaged.
n Check the best before date.
n The temperature of the
supermarket freezer must be below
−18°C. Otherwise, the storage life
of deep−frozen foods is reduced.
n Buy deep frozen foods last.
Transport frozen food home in a
cold bag or wrapped in newspaper.
n At home put deep frozen food into
the freezer compartment
immediately. Use up deep frozen
food before the best before date.
Thawing out fro zen food
Depending upon type of food and the
intended use, a choice can be made
between the following:
n at ambient temperature,
n in the fridge,
n in an electric oven, with/without hot
air convection,
n in the microwave.
Caution!
Do not refreeze slightly or fully thawed
frozen food. Such food can only be
frozen again after being prepared
(boiled or roasted).
Do not fully utilise the maximum
storage period for the frozen food.
16
Page 17

Features of the freezer compartment
Top frozen food drawer
The frozen food drawer can be
removed.
Removing the top frozen food
drawer:
1. Pull out the top frozen food drawer
as far as possible.
2. Carefully pull out the brackets on
both sides and lift the front of the
frozen food drawer.
3. Pull the frozen food drawer towards
you.
Bottom frozen food
drawer
The frozen food drawer can be
removed.
Removing the bottom frozen food
drawer:
Lift the freezer drawer upwards.
Ice and water dispenser
The following can be dispensed as
required:
n Chilled water,
n Crushed ice,
n Ice cubes.
! War n ing!
Risk of injuries due to rotating crusher
blades!
Do not reach into the ice cube
dispenser opening.
Note the following when
placing the appliance into
operation
The ice and water dispenser only
works if the appliance is connected to
the water supply.
After placing the appliance into
operation, you must wait around
24hours before the first lot of ice
cubes is ready.
After the connections are made, air
bubbles are still in the lines.
Draw and discard drinking water until
the water can be drawn without
bubbles. Throw away the first five
glasses of water.
When using the ice maker for the first
time, throw away the first 30 to 40 ice
cubes for hygiene reasons.
Notes on using the
appliance
When the freezer compartment has
reached its freezing temperature, water
flows into the ice maker and freezes to
form ice cubes. The finished ice cubes
are automatically discharged into the
ice cube container.
Occasionally, the ice cubes stick
together. During transport to the
opening where they are discharged,
they usually separate automatically.
Once the ice cube container is full, the
ice maker switches off automatically.
deen
The ice maker can produce up to
100ice cubes in 24 hours assuming
that ice cubes are removed several
times a day. The quantity produced
depends on the room temperature and
the appliance’s temperature setting.
When ice is being produced, you can
hear the water valve, the sound of the
water flowing into the ice bowl, and
the sound of the ice cubes falling
down once they have been produced.
Information!
Do not put bottles or food for fast
cooling into the ice cube container.
The ice maker can become blocked
and damaged.
Pay attention to the
quality of the drinking
water
Caution!
The supplied water filter only filters out
particles from the supplied water, and
does not filter out bacteria or
microbes.
All materials used in the water
dispenser are odourless and tasteless.
If the water has an aftertaste, it may be
for the following reasons:
n Mineral and chlorine content of the
drinking water,
n Material of household piping or
connection line,
n Freshness of drinking water. If no
water is drawn for a long time, the
water can taste somewhat stale. If
this happens, draw and discard
around 15 glasses of water.
The taste and smell of the water can
be improved by the installation of the
supplied water filter in the water inlet.
17
Page 18

deen
To dispense water
1. Hold a suitable container under the
ice and water dispenser.
2. Press the water dispenser button
until the required quantity of water
is in the container.
Tip:
The water from the water dispenser is
cooled to the proper temperature for
drinking. If colder water is desired,
place ice cubes in your glass before
drawing the water.
Dispensing ice
Information!
Only press the button for dispensing
ice cubes or crushed ice long enough
to fill half the container with ice.
Otherwise, the ice in the ice cube
dispenser opening can cause the
container to overflow or can block the
ice cube dispenser opening.
If crushed ice is dispensed prior to
dispensing ice cubes, there may still
be some crushed ice in the ice cube
dispenser opening. This is dispensed
along with the first lot of ice cubes.
1. Hold a suitable container under the
ice and water dispenser.
2. Press the ice cube or crushed ice
dispenser button until the required
quantity of ice is in the container.
Ice tray
The ice tray is for storing ice cubes
that are not required straight away in
the freezer compartment. Thanks to its
shape, the ice tray fits neatly into the
ice and water dispenser.
Shutting down the ice
maker
Information!
You must interrupt the water supply to
the appliance several hours before
shutting down the ice maker.
If you do not intend to use any ice
cubes for longer than one week (e.g.
because you are going on holiday), the
ice maker should be shut down for
that period in order to prevent the ice
cubes from freezing together.
1. Press the release button and
remove the ice cube container.
2. Switch off the on/off switch behind
the ice cube container (0). The ice
maker is now turned off.
3. Empty and clean the ice cube
container.
4. Push the ice cube container right
back on the supports until it snaps
into place.
To place the appliance back into
operation:
n Switch on the on/off button behind
the ice cube tray (1). The ice maker
is turned on again.
18
Page 19

deen
Water filter
You can procure a filter cartridge for
the water filter from customer services.
Change the filter cartridge at least
every 6 months.
After 6 months, the flashing water filter
symbol prompts you to replace the
filter cartridge (see section "Water filter
symbol").
Caution!
Do not use the appliance in places
where the quality of the water is
questionable or not sufficiently known
without properly disinfecting before
and after filtering.
Deviating connection
conditions
Filter cartridges cannot be integrated if
the water pressure is above 8.2 bar.
A pressure reducing valve must be
fitted if the water pressure is above
5.5bar.
Inserting/replacing a filter
cartridge
1. Pull the cover forwards and fold
down.
Information!
Be careful when removing the filter
cartridge.
The water system is under slight
pressure after use.
2. Carefully turn the old filter cartridge
or bypass cap 90° anticlockwise.
8. Pour out the water from the used
filter cartridge. The filter cartridge
can be disposed of as household
refuse.
9. Hold down the light/filter button
for 3 seconds. The water filter
symbol is reset. The symbol stops
flashing. The new filter cartridge is
activated.
Important information
n If the appliance has not been used
for an extended period of time or if
the water has an unpleasant taste
or smell, flush out the water
system. In addition, run the water
dispenser for several minutes. If the
unpleasant taste or smell persists,
replace the filter cartridge.
n The ice maker and water dispenser
can be used without the filter
cartridge. In this case, install the
bypass cap.
3. Remove the new filter cartridge
packaging.
4. Insert the new filter cartridge and
carefully turn it 90° clockwise until it
snaps into place.
5. Fold the cover upwards and snap
into place.
6. Establish the water supply to the
appliance.
7. Dispense several litres of water
from the water dispenser. This
removes air from the water system.
19
Page 20

deen
Specification and performance data sheet
For filter models 9000 077 095 and 9000 077 096
Using replacement cartridge 9000 077 104
This model was tested by NSF
International as per ANSI/NSF
Standards 42 & 53 and was certified
for the reduction of the substances
listed below.
Models 9000 077 095 and 9000 077 096 were tested by NSF International in accordance with ANSI/NSF
Standard 53 and certified for cyst and cloudiness reduction. In addition, they were tested as per
ANSI/NSF Standard 42 and certified for the reduction of chlorine taste and smell.
Rated particle class: I
Rated service life: 2800 litres
The concentration of the specified
dissolved substances in the water that
reach the system was reduced to a
value equal to or below the permitted
limit value as stipulated by NSF/ANSI
42 and 53 for water drawn from the
appliance.
Information!
Although these tests were carried out
in standard laboratory conditions, the
actual performance of the appliance
might deviate from the values stated
here.
Substance Average load in supply water Permitted concentration as per
NSF
Cysts * 122,500 cysts/l Min. 50,000cysts/l 99.99 < 1 cyst/l
Turbidity 10.8 NTU 11 ± 1 NTU 98.8 < 0.16 NTU
Rated value for
particle class I
w 0.5 to < 1 µm
Chlorine taste and
smell
Substance Max. permitted concentration in wastewater Required reduction as per NSF NSF test report
Cysts * N/A w 99.95 % J−00056513
Turbidity 0.5 NTU 95.5 % J−00058972
Rated value for
particle class I
w 0.5 to < 1 µm
Chlorine taste and
smell
* Based on the use of Cr yptosporium parvum oocytes.
Guidelines for use/water supply
parameters:
Water pressure 207 827 kPa
Water temperature 0.6 °C 38 °C
Flow velocity 0.75 gpm
n The system must be installed and
operated in accordance with the
13,666,666 pts/ml Min. 10,000particles/ml 99.00 143,333 pts/ml
2.0 mg/l 2.0 mg/l ±10% 97.5 < 0.05 mg/l
N/A w 85 % J−00056506
N/A w 50 % J−00056501
Without adequate disinfection
before or after connection to the
system, this product should NOT be
used if the water has harmful
microbiologic qualities or if its
quality is unknown. A system
(2.83lpm)
certified for cyst reduction may be
used for disinfected water that
contains cysts that can be filtered
out, among other things.
manufacturer’s guidelines.
n The filter must be replaced every
6months.
n Flush new filters for 5 minutes.
n For more details, see the guarantee
Average reduction in % Average concentration in water
The entire system (apart from the
cartridge) is subject to a one−year
warranty. In the case of the cartridges,
the warranty only covers
material/processing defects. The
service life of the cartridges depends
on the local water properties, so no
guarantee of service life is given.
For more information on the price of
spare parts, contact your local
appliance dealer or parts agent.
Manufactured by:
Cuno Engineered Products
1000 Apollo Road
Eagan, MN 55121−2240 U.S.A
card.
20
Page 21

deen
Saving energy
n Install the appliance in a dry room
that can be ventilated; not in direct
sunlight or in the proximity of a heat
source (e.g. radiator, cooker). If
necessary, use an insulating plate.
n Allow warm food and beverages to
cool before putting them into the
appliance.
n Put frozen foods that are to be
thawed out into the fridge. This
means that you will then use the
coldness of the frozen foods to chill
the other food in the fridge
compartment.
n Open the appliance doors for as
short a period as possible.
Operating noises
Completely normal noises
Humming − cooling unit is running, air
circulation fan is running.
Bubbling, whirring, or gurgling
noises − refrigerant is flowing through
the pipes, water is flowing into the ice
maker.
Clicking − motor is switching on or off,
solenoid valve on water connection is
opening or closing.
Rumbling − finished ice cubes from
the ice maker are falling into the ice
cube container.
Preventing noises
If the appliance is positioned
unevenly
Use a spirit level to align the appliance
so that it is level. This can be achieved
by using the threaded feet or by
placing something beneath it.
If the appliance is touching adjacent
units or appliances
Move the appliance away from
adjoining furniture or appliances.
If drawers, baskets or storage
surfaces are loose or sticking
Check the parts that can be removed
and reposition them if necessary.
If containers are touching
Move the bottles or containers apart
slightly.
Defrosting
Freezer compartment
Thanks to the fully automatic no−frost
system, the freezer compartment
remains ice−free. There is no need to
defrost it.
Fridge compartment
The defrosting is performed
automatically.
The condensation flows through the
drainage hole to an evaporation tray on
the rear of the appliance.
Switching the appliance off and placing it out of operation
Switching off the
appliance
Pull out mains plug or switch off circuit
breaker.
Disconnecting the
appliance
If you do not use the appliance for long
periods:
1. You must interrupt the water supply
to the appliance several hours
before switching it off.
2. Remove all food from the
appliance.
3. Pull out the mains plug.
4. Remove the filter cartridge and
throw it away.
5. Empty and clean the ice cube
container.
6. Clean the inside of the appliance
(see section "Cleaning the
appliance).
To prevent smells, leave the appliance
doors open.
Cleaning
! War n ing!
Risk of electric shock!
Prior to cleaning, unplug the appliance
or disconnect the fuse.
Caution!
Risk of damage to property and risk of
minor injuries.
n Never clean the appliance with a
steam cleaning device!
n Do not use sandy or acidic cleaning
agents or solvents.
n Wipe down the lights and
control/display panel with a damp
cloth. No rinse water may enter the
lights or the control/display panel.
n No rinse water may enter the
drainage hole in the evaporation
area.
n Never clean the shelves or
containers in the dishwasher. Doing
so can cause the parts to deform.
Cleaning the appliance
The HydroFresh drawers and the
delicatessen drawer can be removed
for cleaning.
1. Pull out mains plug or switch off
circuit breaker.
2. Remove all food from the appliance
and store in a cool place.
3. Clean the appliance with a soft
cloth, lukewarm water, and a little
pH−neutral detergent.
4. Dry the appliance with a cloth.
5. Wipe down the door seal with clean
water only and thoroughly rub dry
afterwards.
6. After cleaning, switch the appliance
on.
21
Page 22

deen
Cleaning the water
collection tray
Spilled water collects in the collection
tray.
Remove the sieve to empty and clean
it. Wipe out the water collection tray
with a sponge or absorbent cloth.
Cleaning the ice cube
container
If no ice cubes have been removed for
an extended period of time, the ice
cubes that have already been made
shrink, taste stale and stick together.
Caution!
Risk of injury.
A full ice cube container is heavy.
Remove the ice cube container very
carefully.
1. Press the release button and
remove the ice cube container.
2. Empty the ice cube container and
clean with lukewarm water.
3. Rub the ice cube container and
feed screw until they are completely
dry, so that the new ice cubes do
not freeze to them.
Inserting the ice cube container
4. Push the ice cube container right
back on the supports until it snaps
into place.
Information!
If you cannot push the container right
the way back, turn the feed screw a
little in the container or remove any
frozen−on ice cubes from the loading
area.
Removing the special
moisture filter
1. Pull the HydroFresh drawers about
10 cm out.
2. Flip up the glass plate above the
HydroFresh drawers and remove it.
3. Reach between the cover
openings, carefully unhook the front
4 catches, and remove the cover.
4. Remove the special moisture filter.
5. Clean the special moisture filter in
lukewarm water and allow to dry.
6. Insert the special moisture filter.
7. Hook in the cover at the rear, fold
down, and snap into place at the
front.
8. Insert the glass plate and close the
HydroFresh drawers.
Lighting (LED)
Your device is equipped with a
maintenance−free LED light.
Caution!
Risk of eye injuries due to Class 1M
laser radiation (IEC 60825)!
Do not look straight at the light using
optical instruments.
Any repair work on the lighting may
only be carried out by customer
services or authorised experts.
22
Page 23

Repairing minor malfunctions yourself
Before you call customer service:
Check whether you can solve the problem yourself on the basis of the following information.
You must bear the costs for consultation with customer services yourself − even during the warranty period.
Fridge and freezer compartment
deen
Malfunction
No display on display
panel, inside light does not
work, appliance is not
working.
The inside light is not
working.
The food is too cold. The temperature is set too low. Turn the temperature up.
Food is too warm. The door won’t close properly.
Possible cause Remedial action
The mains plug is not plugged in. Plug the power cord into the mains.
The domestic connection fuse has tripped. Replace or switch on the fuse.
Check whether there is power.
Power failure. Wait until the power is again restored. If
necessary, inform installer or the electrical
supply company.
The light switch for the fridge or freezer
compartment is jammed.
The LED lighting is faulty. See section "Lighting (LED)".
The temperature is set too high. Lower the temperature.
The ventilation opening is blocked. Move food away from the ventilation opening.
See whether you can move the light switch.
Align the appliance using a spirit level. See
section "Aligning the appliance".
Check the position of the drawers and correct
their position if necessary.
Check the door seals and door strut; if
necessary, clean them or correct their
position.
The appliance has an
unpleasant smell.
Water drops form outside
on the appliance.
Water drops form in the
appliance.
Drawers can be closed
only with difficulty.
The doors were opened several times or were
left open for a relatively long time.
Large quantities of fresh food were added to
the appliance.
Food that has a strong odour was placed into
it.
The inside of the appliance is dirty. Clean the inside of the appliance.
The door won’t close properly.
The air humidity is too high. In certain cases, this can be normal.
The air humidity is too high or the doors were
opened too frequently.
The door seals are not leak−tight. Check the door seals and door strut; if
The drawer is inserted incorrectly. Insert the drawer correctly.
The drawer rails are dirty. Clean the drawer rails.
Wait until the temperature inside the appliance
has dropped.
Fresh food must first reach the proper storage
temperature.
Wrap the food in question or place into
odour−tight containers.
Align the appliance using a spirit level. See
section "Aligning the appliance".
Check the position of the drawers and correct
their position if necessary.
Check the door seals and door strut; if
necessary, clean them or correct their
position.
Do not open the doors as often and do not
leave them open for relatively long periods.
necessary, clean them or correct their
position.
23
Page 24

deen
Ice and water dispenser
Malfunction
The water filter symbol is
flashing.
The ice maker is not
producing enough ice
cubes or the ice cubes are
a strange shape.
The ice maker is not
producing enough ice
cubes or isn’t producing
any at all.
The ice cube container
contains ice cubes but they
are not being dispensed.
Possible cause Remedial action
The filter cartridge is worn out. Replace the filter cartridge.
Following the replacement of the filter
cartridge, the water filter symbol was not
reset.
The appliance or ice maker was only switched
on a short time ago.
A large amount of ice was removed. It takes approx. 24 hours, until the ice cube
Water pressure too low. Check the water pressure.
The filter cartridge is blocked or worn out. Replace the filter cartridge.
An ice cube has become stuck in the arm
used to measure the fill level of the ice cube
container.
When switching from ice cubes to crushed
ice, an ice cube might get stuck in the
dispenser opening. The ice cube drips into the
ice and water dispenser.
There is a layer of ice on the feed screw. Pull out the ice cube container and clean it.
The ice cubes have frozen together. Pull out the ice cube container and clean it.
Reset the water filter symbol.
It takes approx. 24 hours before ice
production begins.
container is again filled.
Pull out the ice cube container and remove
the stuck ice using a blunt plastic implement.
Do not use pointed or sharp objects, as this
could damage the appliance.
Remove the stuck ice from the dispenser
opening using a blunt plastic implement. Do
not use pointed or sharp objects, as this could
damage the appliance.
The ice maker is not
producing ice cubes.
The ice maker is switched off. Switch the ice maker on.
The appliance is not being supplied with
water.
There are kinks in the water connection line. Turn off the water supply. Smooth out the
Water pressure too low. Check the water pressure.
The ice cube container is not inserted
properly.
The water connection is improperly installed. An improper water connection can cause low
Have a skilled plumber check the water
connection line.
kinks. Have the damaged water connection
line replaced by an original spare part from the
manufacturer.
Insert the ice cube container properly.
water pressure and damage to the appliance.
24
Page 25

deen
Malfunction
No water or only a small
amount of water is
dispensed by the water
dispenser.
The dispensed water is not
cold.
The water is cloudy. Air or bubbles in the water. Normal during first use of the water dispenser.
There are suspended
particles in the water or in
the ice cubes.
The filter cartridge is blocked or worn out. Replace the filter cartridge.
Water pressure too low. Check the water pressure.
The stop valve is not completely open. Open the stop valve and make sure that it
There are kinks in the water connection line. Turn off the water supply. Smooth out the
The appliance was only recently set up. The water requires approx. 12 hours to be
Water has stood for an extended period of
time in the lines and has adjusted to the
ambient temperature.
The water that first flows through the filter
cartridge can dislodge carbon dust from the
filter cartridge.
If water freezes and thaws out again,
suspended particles are formed through
mineral deposits.
Remedial actionPossible cause
remains open.
kinks. Have the damaged water connection
line replaced by an original spare part from the
manufacturer.
chilled down.
Fill and discard 15 glasses of water.
Disappears after a short period of time.
Suspended particles are not harmful! After a
short time, these suspended particles will
disappear.
Suspended particles are not harmful! They are
a natural feature of the water supply.
Customer services
You can find a nearby customer
services branch in the telephone
directory or in the customer services
listing. Please inform customer
services of the product number (E no.)
and manufacturing number (FD no.) of
the appliance.
You will find this information on the
nameplate.
Please help in avoiding unnecessary
service calls by providing the product
and manufacturing number. You will
save the extra associated costs.
25
Page 26

ROBERT BOSCH HAUSGERÄTE GMBH
CarlWeryStraße 34
81739 München
www.boschhausgeraete.de
9000 577 733
en (9010)
 Loading...