

Bosch Integral TH13 Operating Instructions Manual

Integral TH13 ISDN Telephone
connected
to
Integral 33 systems
Operating Instructions

2
Familiarize yourself with your phone
This
introduction is designed to help you learn the basics of your telephone quickly
and easily
. Y
ou should read this section to learn about the special features of your
new telephone, even if you are already familiar with deluxe phones.
What you should definitely read
Basic operating principles → starting on p. 14.
Y
ou should read this section to learn about the special features of your new tele
-
phone, even if you are already familiar with deluxe phones.
This manual uses a number of practical scenarios to provide you with a better un
-
derstanding of the functions your phone has to of
fer.
Making calls
This section describes the various options you can use to make calls.
Receiving calls
There are also a number of functions that make phoning even easier
. These are
explained in this section.
During a call
Useful functions help you keep track of several calls at once.
Using the phone in a partner group
Some things are easier for partners. These functions are contained in a separate
section, as they are only valid within a partner group.
Setting the telephone for your own specific needs
Y
ou won’t need to do it every time you use the phone. But your phone (TH 13) pro
vides you with the ability to set up various functions according to your own personal
needs.
T
eam functions
This section describes functions used to communicate with certain subscribers
within your telephone system, such as sending messages and making announce
-
ments.
If in doubt, look it up
If you are looking for something specific, you can look it up in this section. Y
ou will
also find an alphabetic overview of all menu items in this section.

3
Table
of Contents
Familiarize yourself with your phone
Familiarize yourself with your phone
2
TH 13 – Overview 6
Which keys for which functions? 7
Special features of your telephone
8
How to use this manual
11
Basic operating rules
14
Putting the telephone into operation
24
Making a standard call
25
Making calls
Dialing a call number from the telephone book
27
Dialing a call number from the call list
28
Sending messages (Minimail)
30
Recording call charges for projects
33
Receiving calls
Answering calls 34
Requesting info message
35
Picking up messages 36
Store all callers (T
alk list) 37
Receiving minimail (Mailbox)
38
During a call
Monitoring 39
Handsfree 40
Deactivating the call number and charge display
44
Temporary switchover to DTMF 45
Additional call during an existing call
46
Several calls simultaneously
47

4
T
able of Contents
"
Using the phone in a partner group
Overview of partner functions
52
Using the phone in a partner group
54
Setting up partner groups
55
Connection for partner
57
Setting up the telephone for your own specific needs
Call numbers in the telephone book – overview
58
Storing call numbers in the telephone book
59
Diverting calls 68
Answer calls at another telephone (Follow me)
69
Double Call
70
Setting up function keys
71
Setting up macro functions
72
Setting the telephone
75
T
urning of
f autom. postdialing (DTMF)
76
Switching on key beep
77
Handsfree equipment
78
Handsfree talking with auxiliary loudspeaker
80
Displaying call charges 82
Setting acoustics and contrast
83
Do not disturb
86
Setting the language
87
Entering appointments
88
Alternate time zone
90
Private User Mobility (Mobile direct dialing number)
91
Saving personal data centrally
92
VIP functions
Setting up VIP functions
93

5
T
able of Contents
A
If in doubt, look it up
T
elephone functions overview
101
Display messages 106
Display messages during emergency operation
112
Menu items on the display
113
Setting tones and distinctive rings on your phone
132
If something goes wrong
133
Protecting the phone from unauthorized users
135
T
esting the telephone
137
Registering for automatic call distribution
138
Additional information and functions
139
Index 141

Familiarize yourself with your phone
6
TH
13 – Overview
The
functions of a number of keys may dif
fer depending on how your telephone is
set up and how it is connected to the telephone system.
Display
The display assists you
with operation.
Softkeys
for various functions
The current function is shown
on the display
.
LED display
flashes for call
Programmable
function keys F1–F4
for standard assignment
see page 7
Digit keys with
additional
alphabetic
labelling
for dialing and
entering codes
Fixed function keys
to select functions
quickly
Handsfree
AEI interface
to connect
accessories
(underside of unit)
microphone
2
ABC
#
*
R
Menu
+
–
Enter
Familiarize yourself with your phone
7
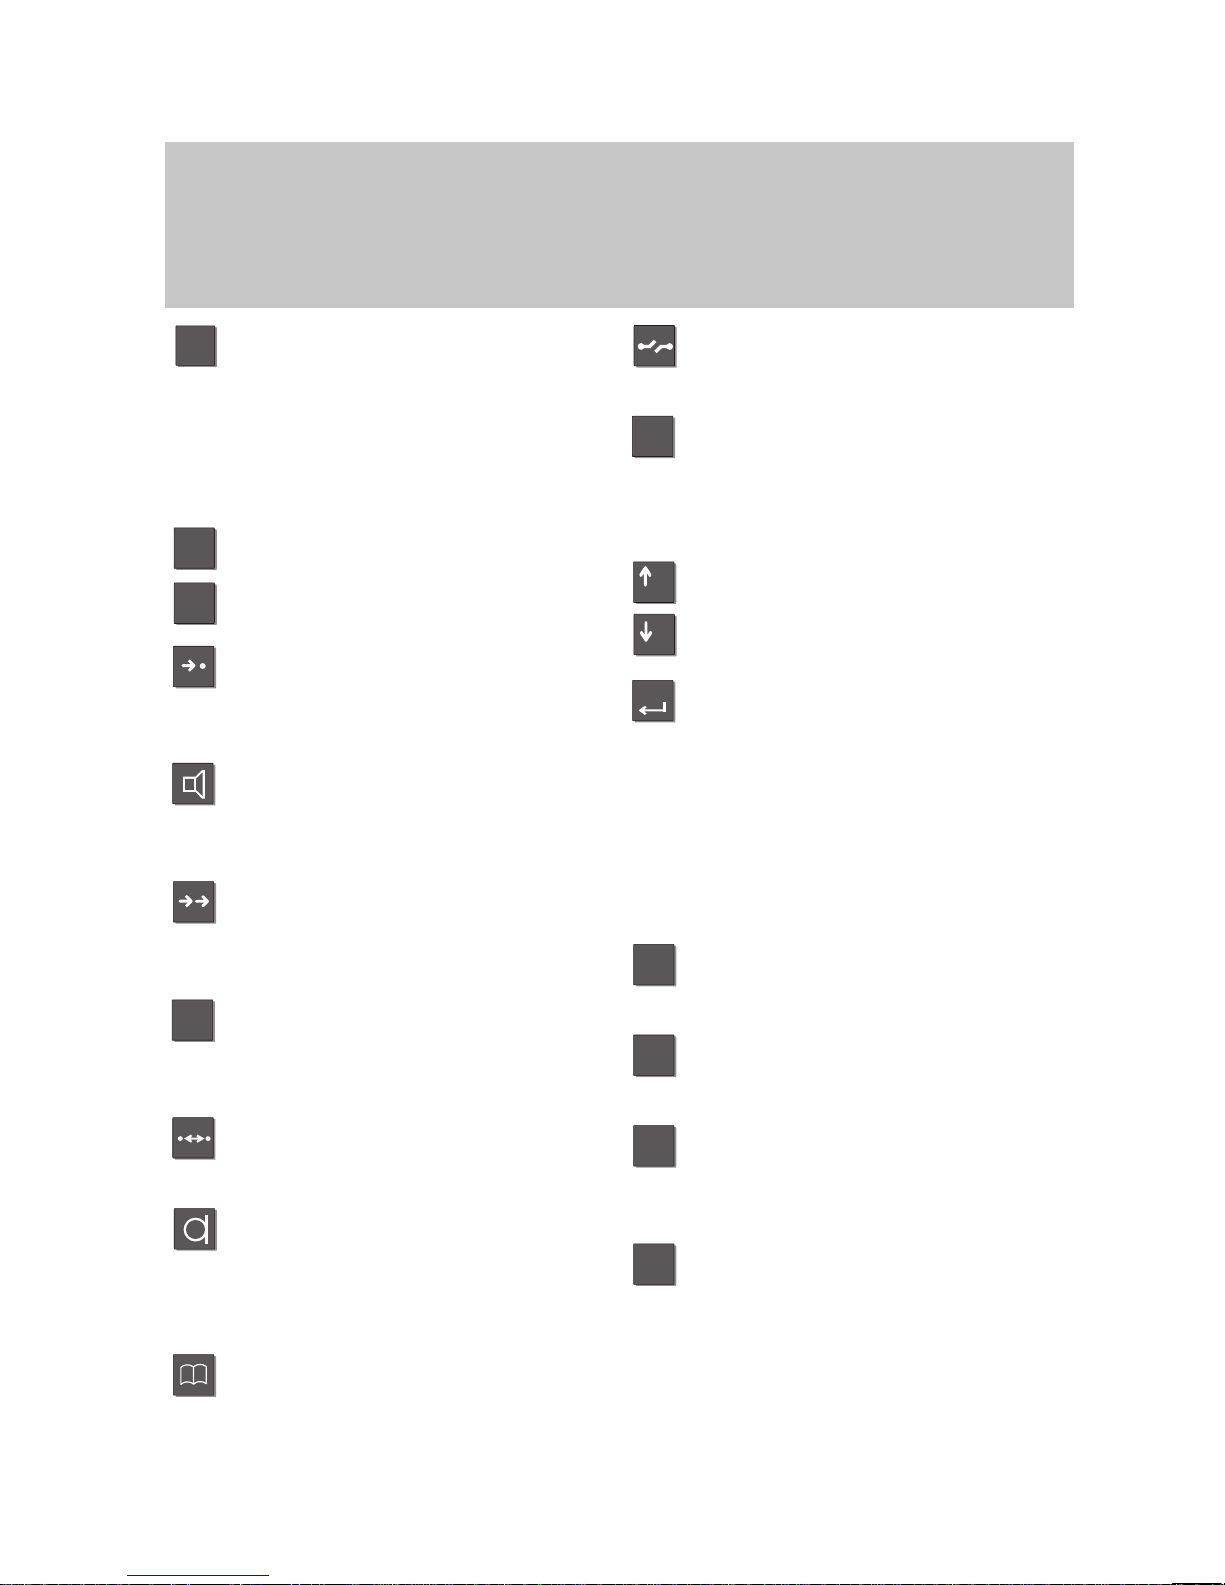
Which keys for which functions?
This
section gives you a brief overview of the keys on your phone and their respec
tive functions.
The use of the individual keys is explained in detail under the corresponding func
-
tion on the following pages.
Digit keys with alphabetic la
-
belling
for dialing call numbers and en
tering codes.
The alphabetic labelling allows
you to dial by means of letters
(vanity numbers).
Star and hash
for special functions.
Destinations
displays the various softkey
assignments one after the other
on the screen.
Monitor
switches the loudspeaker on/of
f
and facilitates dialing with the
handset on-hook.
Redial
redials a number
.
Y
ou can choose between the last
5 numbers.
Refer-back
initiates consultation within your
system and allows you to return
to your original call.
Callback on busy
Y
our telephone rings when the
dialed number is free again.
Handsfree mode
activates the loudspeaker and
the microphone so you can use
the phone with the handset onhook.
T
elephone book
electronic telephone directory
.
Y
ou can use it to store, find and
dial numbers.
Release
clears down the current connec
-
tion or aborts initiated operations.
Menu
activates the main menu, where
you can select and initiate many
of your phone’
s functions.
Arrow up /down
moves the tag highlight
up or down on the screen.
Enter
used to select a highlighted
menu item and to confirm an en
-
try
.
Programmable function keys
(standard programming):
F1: Interchange
to toggle between two calls
F2: Call diversion
to another telephone
F3: Call list
containing parties who could not
reach you
F4: Conference
with two other parties

Familiarize yourself with your phone
8
Special
features of your telephone
You
can of course use your phone to make calls as you would with any ordinary
phone.
This telephone also of
fers a variety of functions that make phoning even easier
.
This chapter contains a brief overview of some of these special features.
The display assists you
The display provides you with important information, e.g. on the current call.
In addition, display messages guide you through operation step by step.
The functions of some keys may change temporarily
. The display shows you which
functions are currently assigned to these “softkeys” (→
p. 15).
The call number of every ISDN caller is shown on the display to let you know who is
calling before the call is actually set up. The name is also displayed, if possible.
Y
ou can decide how your display is to guide you through operation. Y
ou can choose
between three display modes: a detailed display, a somewhat abbreviated one for
advanced users and an extremely abbreviated one for pros.
Customizing the functions of your phone
Y
ou can select and activate most functions quickly and easily from the screen.
A number of functions can also be performed quickly using the function keys. Some
of these function keys are programmable and can be assigned the functions that
you use most often. Some of the keys have already been assigned functions before
delivery.
Y
ou can also change numerous standard settings and adapt the phone to your own
personal needs.
Storing personal data centrally
Y
ou can store your personal telephone settings centrally in your telephone system
for security
. Y
our data is protected with a password there.
If your telephone is replaced with a new one or if you “move house” within your tele
phone system, you can simply “bring along” your telephone settings to your new
telephone without having to enter them again.
Storing call numbers
Y
ou can store call numbers very easily
. The numbers are entered in a so-called tele
phone book. This telephone book represents the call number memory of your
phone. Y
ou can locate, modify
, or delete the entries in your telephone book quickly
and easily at any time.

Familiarize yourself with your phone
9
Special features of your telephone
"
Handsfree answer back
Y
ou can adjust the settings on your phone so that calls are accepted automatically
.
This allows you to speak to a calling party without lifting the handset.
Protection against unauthorized use
The integrated “lock” allows you to protect your telephone against unauthorized use.
Using the phone in a partner group
Y
our BOSCH TELECOM service representative can connect your phone to other
phones within your system to form a partner group. A number of functions are par
ticularly easy to use within this partner group. In addition, the display provides you
with additional information about your partners.
Number of possible connections
Y
ou can establish up to 4 calls simultaneously
. Y
ou can toggle between these calls
as you wish.
Up to 3 simultaneous calls are shown on the display
.
T
eam functions
Y
ou can group any number of telephones in your system together to form a team.
T
eam functions include, for example, making an announcement for another phone
in the team, requesting callback if a team phone is busy
, or simply signaling your
call by means of a special tone.
Y
ou can also set up your team phone in such a way that “handsfree mode” is auto
matically activated for an incoming call. This allows you to speak to the calling party
without lifting the handset (handsfree answer back).
Windows
If you are connected to several parties at the same time, each call will be displayed
in a separate section of the screen. These sections are called “windows”. Each win
-
dow also displays the call mode of the respective party, e.g. “call” or “conference”.
Storing all callers (T
alk list)
Y
ou can store the call numbers of all callers you have talked to. Later on you can
retrieve the corresponding numbers specifically and dial them if required. It is also
possible to reallocate call numbers from the talk list to your telephone book. The
default setting for the talk list is ”on”.

Familiarize yourself with your phone
10
Special features of your telephone
A
Sending messages (Minimail)
Y
ou can send short messages to one or several destinations. There are 10 texts
you can choose from:
– 7 predefined texts which you can modify or complete
– 3 texts which you can enter yourself
Receiving messages (Mailbox)
The mailbox is a call list for texts. Here, callers can leave up to 10 shorts minimails.
The display of your telephone shows you when you have received a new message.
Programming function keys (Macros)
Y
ou can program the function keys of your telephone with macro functions of vari
-
ous steps. This allows you, for example, to activate and deactivate a fixed call diver
-
sion by a single keystroke.
Operating a door device
If you have a door device connected to your telephone system you can assign its
operation to a function key
.
PTM – Personal T
elephone Manager (option)
PTM is a Windows program that allows you to perform some of the functions of your
phone on your PC. These functions include:
–
setting up your phone
–
editing telephone book entries
–
writing texts, e.g. for notes or telephone book entries
–
saving data on your PC
Connecting additional ringing tones (second alarm)
Y
ou can equip your telephone with an additional ringing tone. Y
ou can then, for ex
ample, receive a signal in the neighbouring room when your telephone rings.
The second alarm is connected to the telephone’
s AEI interface via a switch con-
tact. Please contact BOSCH T
elecom as required.

Menu
Silence
the telephone
Menu
. . .
Silence the telephone
–
Enter
Return
Familiarize yourself with your phone
11
How to use this manual
A
number of abbreviations and symbols are used in this manual to give you a better
overview
. This section contains a brief description of each of these symbols.
The screens used in the manual contain only the texts or symbols that are signifi
-
cant for the respective function.
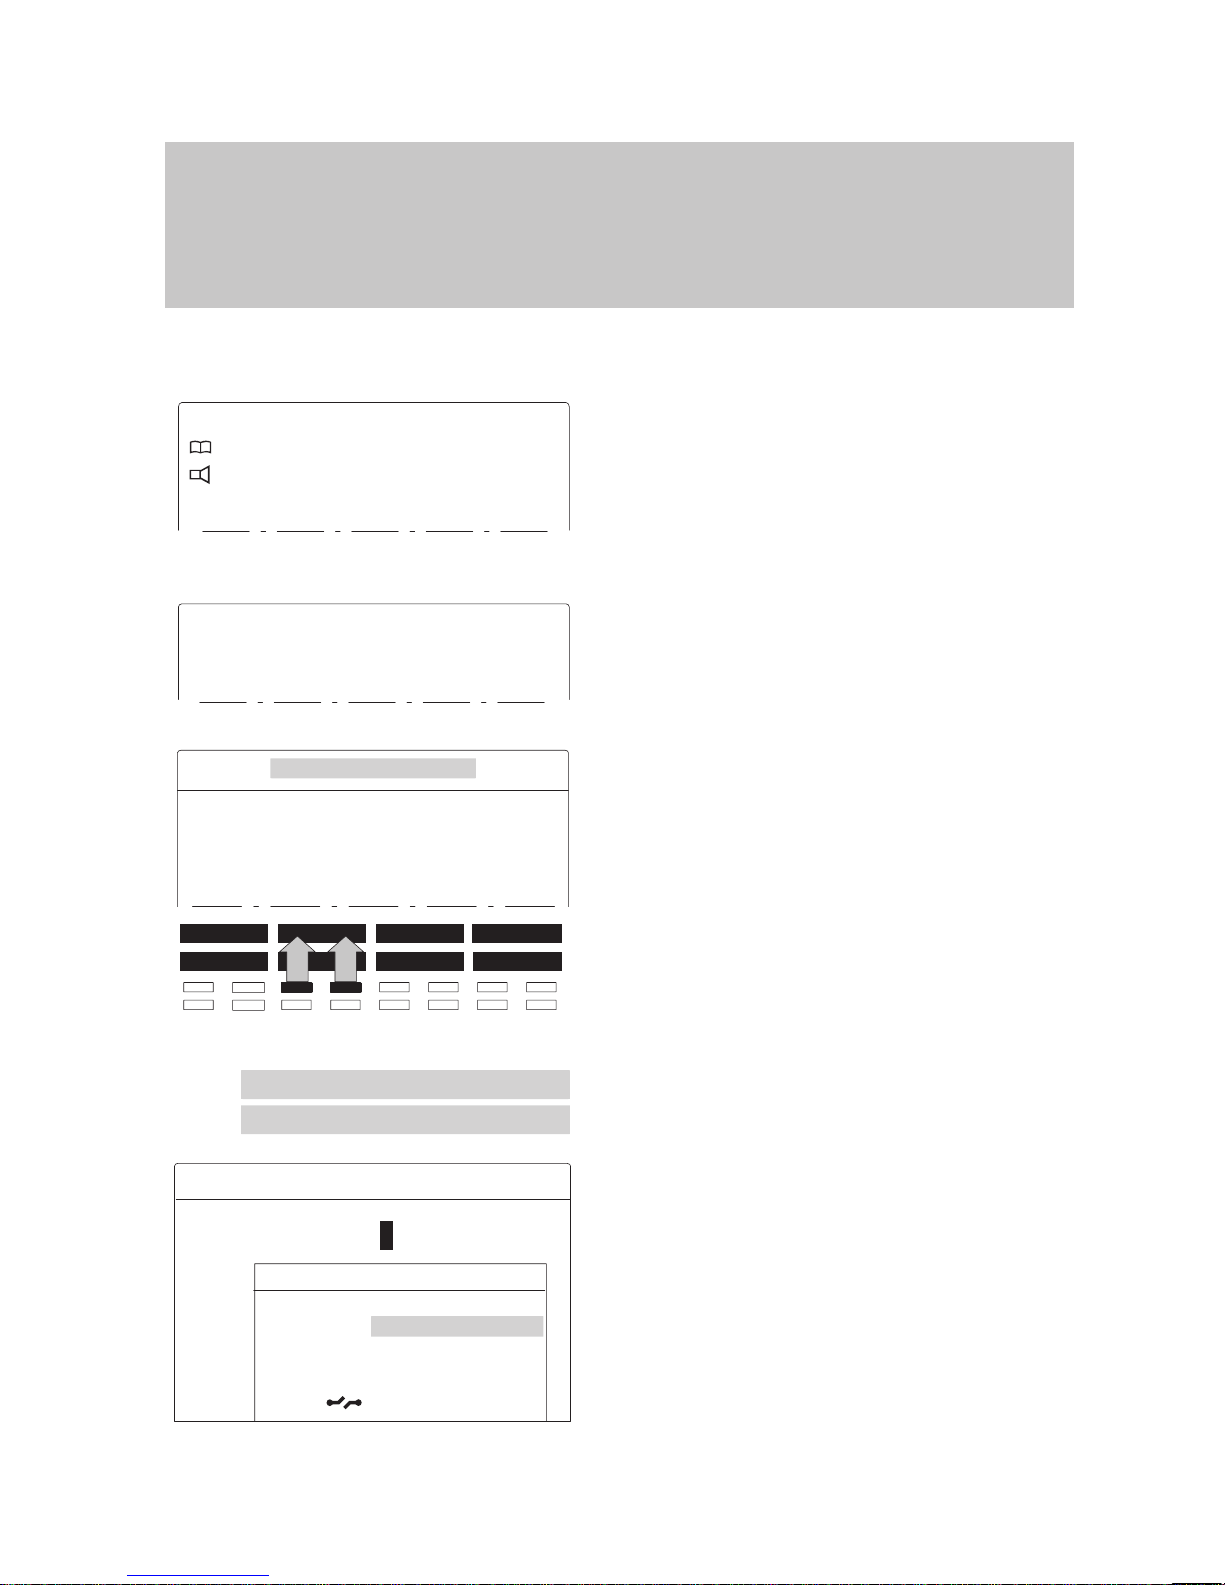
Selecting a function using a function key
Some functions can be selected using a
fixed function key. These keys are depicted
as shown here.
Selecting functions using menu items
Y
ou may need to press the “Menu” key to
activate the main menu.
T
o select the menu item shown on the left,
move the cursor on the display up or down
using the arrow keys until the menu item is
highlighted (grey background).
Example
:
Y
ou want to activate the function “Silence
the telephone”.
Press the “Menu” key.
T
ag the menu item “Silence the telephone”
using the arrow keys.
Activate the tagged function.
Note:
This manual explains all of the menu items
that you may come across when using the
standard configuration of your phone.
Functions assigned to function keys do not
appear in the menu.
Note:
Y
ou can always move from a submenu to
the previous level with the “Return” menu
item.

N
Local
phone book
Search: N
J
A
BCDE F G↑
HIJK L M N ↓
OPQR S T U
V
W
Cont List Edit Brk Corr
Familiarize yourself with your phone
12
How to use this manual
"
Enter a call number
The keys to the left are shown when you
are required to enter a number
.
Y
ou can type the numbers manually or en
-
ter a stored call number
.
Dialing
Y
ou can initiate the dialing procedure in two
different ways: Y
ou can press the “Monitor”
or “Handsfree” key or lift the handset
(→ p.
39).
The symbol to the left tells you to select
one of these options.
Set up a call
Dial
. The symbol to the left tells you to set
up a call. Y
ou can either enter the call num
ber first and then lift the handset or vice
versa.
Details → p. 25.
Enter a text
Y
ou can enter text in the telephone book
using the softkeys.
The left-hand column displays a key with a
letter.
The corresponding key on your phone is
located below the letter
. Y
ou may need to
move the cursor on the screen using the
softkeys „
↑“ and „↓“
until the desired let
-
ter appears.
Details → p. 22.

Silence
the telephone
Enter
Silence the telephone
. . .
Signal tone
On
Off
Return
Enter
-
Familiarize yourself with your phone
13
How to use this manual
A
Switching the menu item
The manual also uses a short form for this
operation:
“Switch the menu item to...”
Example:
Y
ou want to deactivate the acoustic signal
for appointments.
The default setting of this function is “on”.
Select the menu item “Silence the telepho
ne”, for example,
and press the “Enter” key
.
An additional window appears.
The current setting “On” is tagged.
T
ag the setting “Of
f”.
Note:
If you select the menu item “Return”, the
previous function setting will remain active.
Press the “Enter” key to confirm your
selection.
The signal tone for appointments is deacti
vated.
Optional functions
The symbol to the left indicates that the de
scribed function is not a standard feature of
your telephone.
Other functions may also be disabled. Con
sult your BOSCH TELECOM service representative if you wish to use these func
-
tions.

2135
Miller 12.04.94 16:50
Telephone status
Appointment activated
12.04.94 16:50
free 2135 Miller
. . .
Call number display On/Off
. . .
Familiarize yourself with your phone
14
Basic operating rules
The
following pages contain a few basic rules concerning the function of your
phone.
The display assists you
The figure at the left depicts the display as
it could look when the telephone is idle.
Y
our name and call number are displayed.
Y
ou can also see the current date and
time.
Depending on which functions you are cur
rently using, various items are displayed
for your information, as well as menu items
for selecting the next operating step.
The display generally only displays func
-
tions that are available on your phone.
Example: Y
ou make a call.
Lift the handset.
The display contains menu items from
which you can now choose the desired
function. The chosen function is highlighted
in grey
.
Y
ou can now
, for example, switch of
f the
2135 Miller display by pressing the „Enter“
key.
Note:
The display returns to idle mode if you do
not press a key within 60 seconds. If you
wish to switch back to the idle display
manually,
press the “Release” key.

Appointment
activated
Enter
Appointments +=On
Specify app..
+13.06.96 15:00 Mr.Fuller
...
Further pages with key →•
Laws Mill Jone
Math Breh Tayl Full
1
Familiarize yourself with your phone
15
Basic operating rules
"
If you see a message in the idle display you can directly activate the corresponding
menu item in an easy way
.
The display shows you the current level of softkeys.
The idle display additionally shows you in
formation on the state of your telephone.
For example, a corresponding message
appears if an appointment has been en
tered.
Y
ou can open the corresponding menu
item directly from the idle display
.
For this purpose select the message in the
idle display
.
Press the ”Enter” key.
Y
ou can now process the settings, for
example change an appointment or enter a
new one.
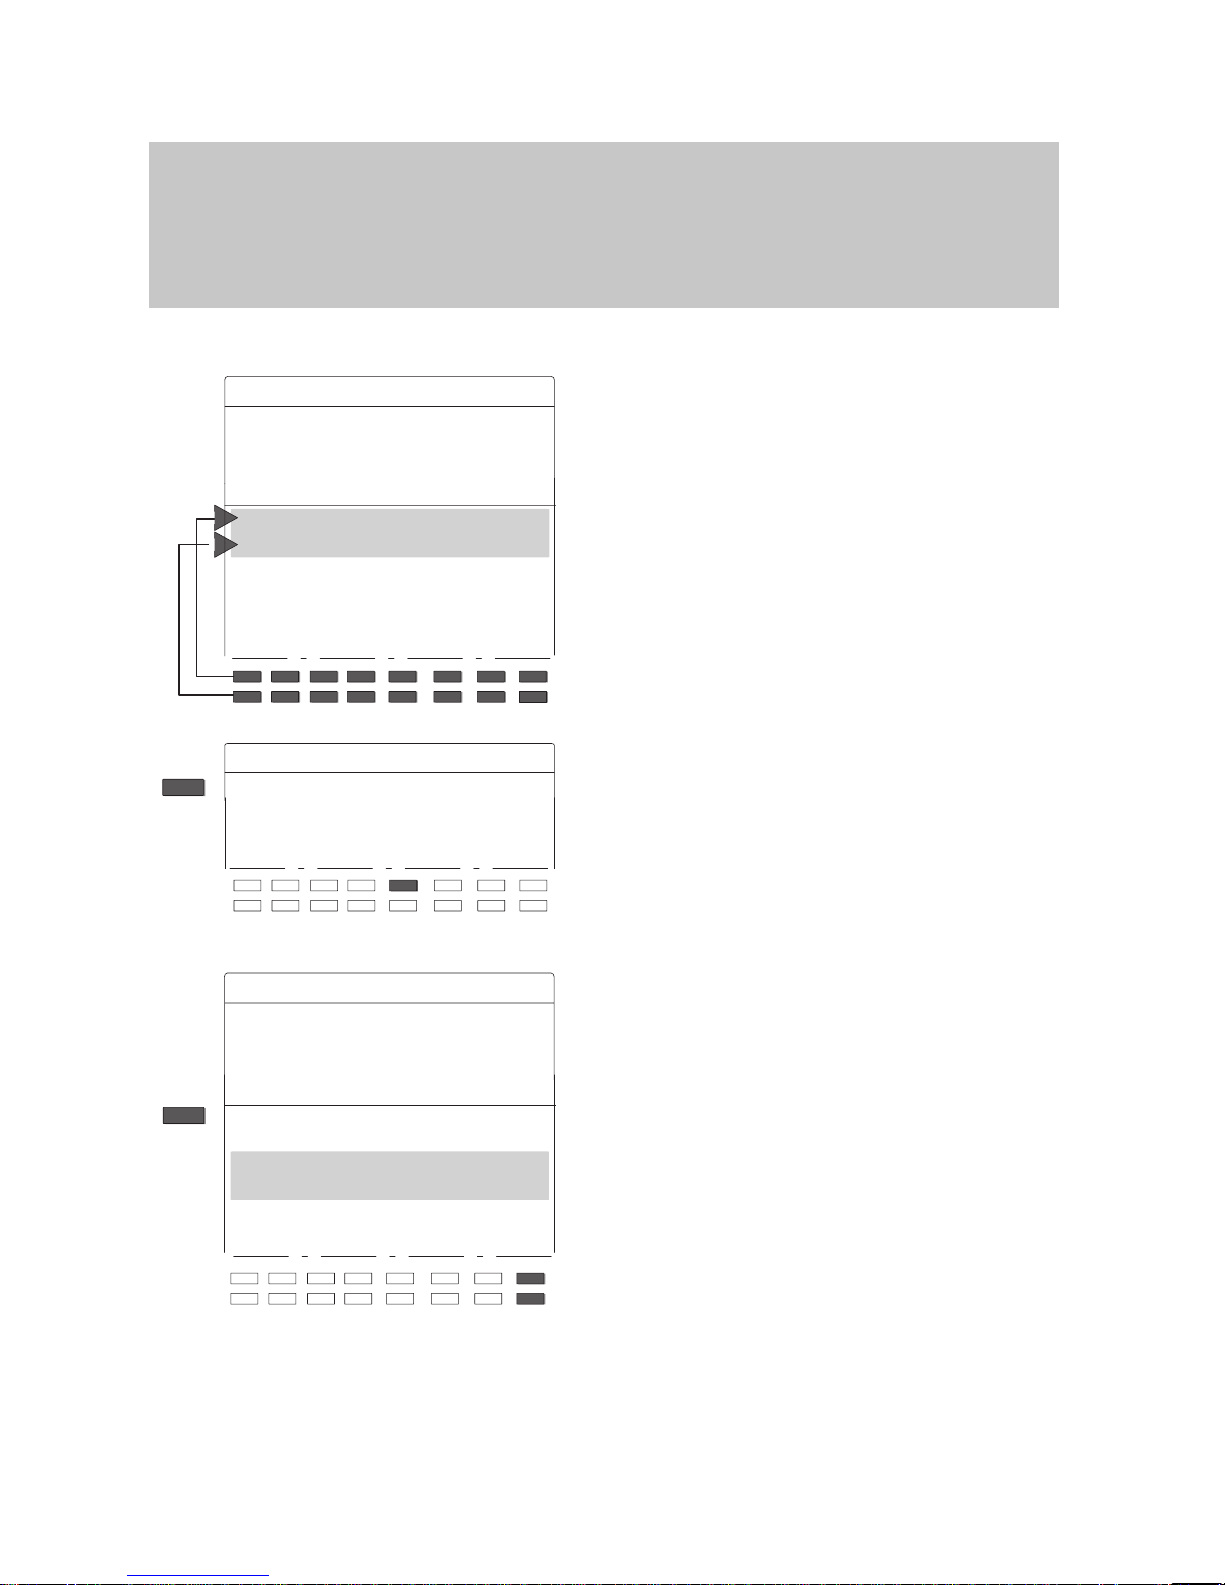
Softkeys
The function of the two upper rows of keys
changes according to the operating mode.
The current function of these keys is
shown in the display
.
These keys are known as “softkeys”. The
key in the example on the left serves as
the destination key with which you can call
“Mill”.
Y
ou can also program these keys as addi
-
tional function keys.
Softkeys on five pages:
Sixteen key assignments are shown on the
display simultaneously
. However
, one key
can be assigned several functions.
On the first page (1) you see partners,
functions or destinations 1–16, on the se
cond page (2) additional functions, on the
third, fourth and fifth page (3,4,5) addi
-
tional destinations.

Connection
5394 Judy
Call 071234567 Smith
Connection 5594 Judy
Familiarize yourself with your phone
16
Basic
operating rules
"
The display shows up to three simultaneous connections if you are connected to
various subscribers at the same time.
Press the “Destination” key to display other
assigned functions.
Y
ou can scroll through the existing pages
using this key.
Note:
The second page of softkeys is reserved
for functions. Y
ou cannot store call num
bers here.
Therefore, on storing call numbers the se
cond page is automatically omitted.
On programming function keys only pages
1 and 2 will be displayed.
Displaying calls
When you are connected to another party
,
this is displayed in a so-called “window”.
Y
ou receive another call while you are talk
ing. This additional call is displayed in a
second window located behind the first
one.
The currently active connection is dis
-
played in the front window
.

Menu
.
. .
Time Zone
Other functions
. . .
–
+
Enter
Setting the telephone
Receive VIP funct.
Off
Transmit VIP functions
Off
. . .
Familiarize yourself with your phone
17
Basic operating rules
"
Several functions can be activated in a number of dif
ferent ways.
– The simplest way: select it from a menu,
– The quickest way: using a function key
.
Activating functions
Selecting functions from the menu
Y
ou can select and activate all the func
-
tions of your phone from the display
. Y
ou
do not need to remember any key symbols
or combinations for menu selection.
Press the “Menu” key
. This calls up the
main menu, where you can select the de
-
sired function.
In order to select a function, use the arrow
keys to move the highlight onto the desired
function. This function is then highlighted in
grey
, in this example “Other functions”.
Press the “Enter” key. This key confirms
your selection—the chosen function is cal
led up. In this particular case, a further
menu will be called up, from which you can
select the “Setting the telephone” menu
item, for example.
The display changes. Only associated in
formation is displayed on the screen.
This example shows you the functions that
you can set on your phone.
Note:
When you purchase your phone, it is pro
grammed in such a way that the functions
assigned to fixed function keys are not dis
played.
Y
ou can change this setting if you wish
(see
Setting the telephone, p. 75
).

Local
phone book
Search: N
J
A
BCDE F G↑
HIJK L M N ↓
OPQR S T U
V
W
Cont List Edit Brk Corr
Familiarize yourself with your phone
18
Basic operating rules
"
Y
ou can abort all operating procedures at any time. Y
ou can disconnect the current
connection in the same way
.
Activating functions with function keys
Several functions can also be activated us
-
ing a function key
, e.g. the electronic phone
book.
The display on the screen is the same as
the display that appears after menu selec
-
tion.
In addition to the fixed function keys, you
can program a number of keys with the
functions that you use most frequently
.
Canceling an operation
Press the “Release” key.
Y
ou can cancel an operation at any time if
you change your mind or inadvertently acti
-
vate the wrong function.
The phone returns to the status it had be
-
fore the function was selected.
Moving to the previous level
If you want to move from a submenu to the
previous level, select the “Return” menu
function.
...
Telephone book
Monitor
Conference
...
.
. .
Conference
. . .
DisplayCode dialVolumeEmergency
With list
Dialing J
.
. .
Further functions:
Setting the telephone
Setting the telephone
...
Mode of operation
Simple
...
Mode of operation
Simple
Standard
Softkey
Return
Cancel
Familiarize yourself with your phone
19
Basic
operating rules
"
Display menus – three display modes
Simple mode:
If you are still unfamiliar with the functions,
you can have them all displayed on the
screen. This display mode is the default
setting of your telephone.
Standard mode:
In this display mode, functions assigned to
fixed or programmable function keys are
not displayed.
Softkey mode:
Switch to softkey mode if you are an expe
-
rienced user
.
When you use your phone, all functions
you can perform are displayed as softkeys
rather than menu items.
If, for example, you wish to adjust the vol
-
ume of the receiver
, you must press one of
the two corresponding softkeys.
The menu is displayed as usual when the
phone is idle.
Changing the display mode:
Select the “Further functions:” menu item.
Select the “Setting the telephone” menu
item.
Highlight the desired menu item and press
“Enter”.
The setting options are displayed.
Highlight the desired display mode and
press “Enter”.

Judy
012345678
Judy
. . .
Dial
Familiarize yourself with your phone
20
Basic operating rules
"
Setting up a call
T
o set up a call you have to perform the
two steps described below:
–
prepare for dialing,
–
activate dialing.
The call number is dialed.
It does not matter which of the steps is car
-
ried out first. However
, we recommend to
follow the described order because it al
lows you to correct the number before it is
dialed.
Dial:
The symbol to the left is always used
in this manual to indicate that you should
set up a call in this way
.
Preparing to dial
Y
ou have two dif
ferent possibilities. Leave
the handset on-hook.
Enter the call number manually:
T
ype the desired number using the digit
keys.
or
Enter a stored call number:
Enter a stored number
, e.g. by pressing a
destination key
.
Note:
Y
ou must dial an external line code before
you can enter an external call number
.
1233
Nail 01.04.94 11:55
or
1233
Nail 01.04.94 11:55
or
Familiarize yourself with your phone
21
Basic operating rules
"
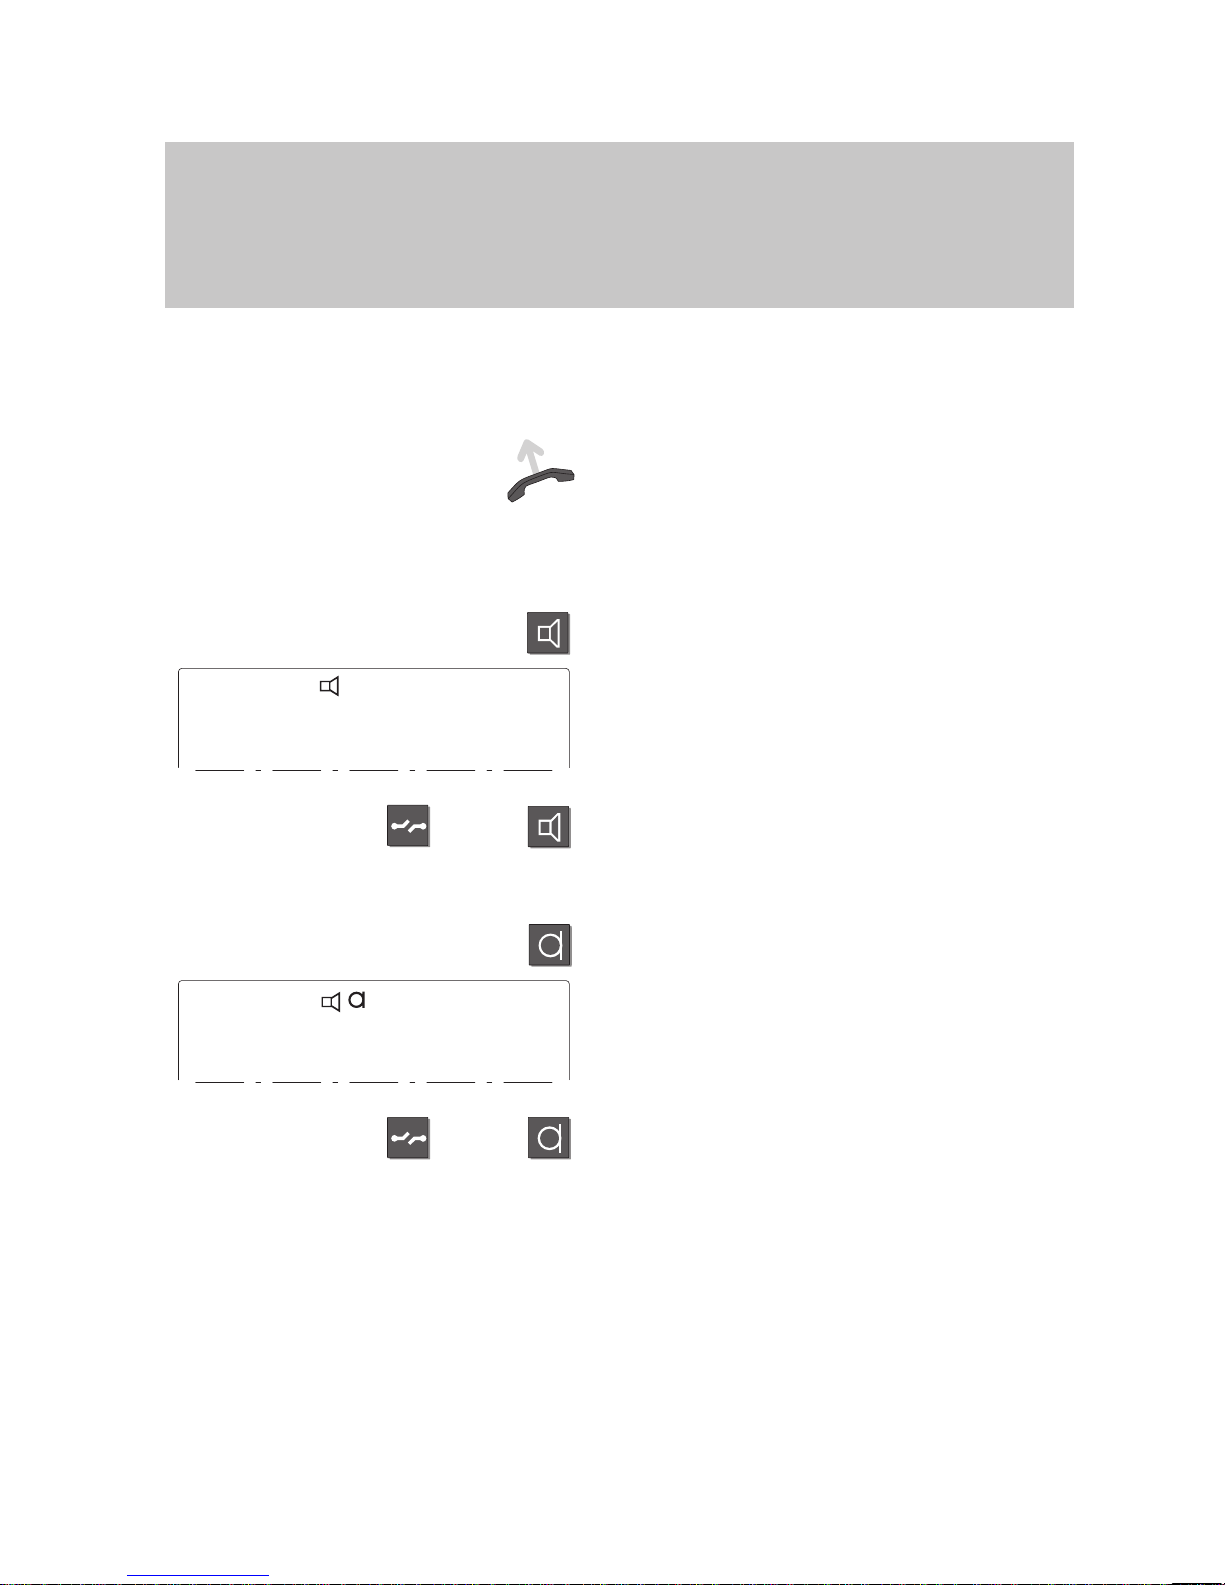
Activate dialing
Enter a call number
.
Y
ou have three options.
Lift the handset. The specified call number
is dialed. Y
ou can use your phone as usual
when the other party answers.
or
Press the “Monitor” key.
The specified call number is dialed.
The symbol to the left appears on the dis
play.
When the other party answers, lift the
handset to talk to this party
.
Cancel:
Press the “Release” key or “Monitor” key
or
Press the “Handsfree” key.
The specified call number is dialed.
The symbol to the left appears on the dis
play.
When the other party answers, you can
talk to this party without lifting the handset.
Cancel:
Press the “Release” key or “Handsfree”
key.
Specify
an appointment
. . .
Text :
J
ABCDE F G ↑
HIJKL M ↓a-z ↓
NOPQR S T
UVWXY
Z ↓a-z
ÄÖÜ ( ) /
_ ←→
Ins Del End
↓a-z
Specify
an appointment
. . .
Text : E
J
E
↓
Specify
an appointment
. . .
Text : E
J
ABCDEFG
HIJKL
M
↓a-z
NOPQR S T↑
UVWXY
Z
↓a-z↓
ÄÖÜ ()/
_ ←→
Ins Del End
↓a-z
Familiarize yourself with your phone
22
Basic
operating rules
"
Y
ou can enter texts in the telephone book using the softkeys. Y
ou can then search
for the name of a subscriber and the respective call number in the telephone book.
Entering text (Example: text for appointment)
Enter a short note after “T
ext”. This note
will be displayed when the appointment is
signaled.
Y
ou can only type in the letters with a grey
background using the corresponding soft
keys.
Move the grey bar up or down to change
the allocation of the softkeys.
T
o do this, use the softkeys “
↑” or “↓”.
E.g. to enter the word “EVEN”:
Press the corresponding softkey to enter
the letter “E”, shown here as key “E”.
Move the grey bar up or down to change
the allocation of the softkeys. T
o do this,
use the softkeys “↑
” or “
↓ ”.
Enter
the remaining letters.

Specify
an appointment
. . .
Text : EVEN
J
↓
Specify
an appointment
. . .
Text : EVEN
J
ABCD EF G
HIJK L
M
↓a-z
NOPQ RS T↑
UVWX Y
Z
↓a-z↓
ÄÖÜ () /
_ ←→
Ins Del End
↓a-z
↓a-z
↓
←
Specify
an appointment
. . .
Text : EVE
J
ABCD EF G
HIJK L
M
↓a-z
NOPQ RS T↑
UVWX Y
Z
↓a-z↓
ÄÖÜ () /
_ ←→
Ins Del End
↓a-z
Ins
Del
Familiarize yourself with your phone
23
Basic
operating rules
A
The text is shown on the display
.
Note:
Additional rows of letters appear when you
move the grey bar up or down using the „
↑“
or „
↓“ softkeys.
Press the softkey „↓
a-z“ to switch from up
-
per to lower case and vice versa.
If you make a mistake:
Use the softkeys „←
“ and „→“ to move the
cursor to the letter you wish to change. En
-
ter the correct letter
. The incorrect letter is
overwritten.
Inserting letters:
Move the cursor to the letter in front of
which you wish to insert an additional letter
and press the “Ins” softkey.
Y
ou can now insert letters.
Deleting letters:
Move the cursor to the letter you wish to
delete and press the “Del” softkey
.
The letter is then deleted.

...
Deutsch/English/Français/Italiano
Deutsch/English/Français/Italiano
Sprache
einstellen
Deutsch
English
Français
Italiano
. . .
English
Enter
Select language for mail texts
Own texts will be deleted
Deutsch
English
Fran
çais
Italiano
. . .
English
Enter
Familiarize yourself with your phone
24
Putting the telephone into operation
Select
language:
Before being able to use your telephone you must first define the
language for the display texts and minimail messages.
Select language for display and minimail
In the idle display you will see the following
message.
Highlight the line and press the ”Enter” key
.
The display shows you the languages
which are available.
Select the language for the display texts.
Confirm your selection. The display texts
will appear in the selected language.
The display now shows the languages
available for minimail texts.
Select the desired language for minimail.
Confirm your selection. The minimail texts
will appear in the selected language.
Note:
Y
ou can change the language later on at
any time. For more information please refer
to chapter ”Specifying audio, contrast and
language”.

Judy
Dialing
2134
J
Free 2134
J
Redial
123456
. . .
Next entry
Familiarize yourself with your phone
25
Making a standard call
You
can of course use your phone to make standard calls as you would with any
other telephone.
Internal: Dial the desired number directly
.
External: Dial the external line code of your system (e.g. “0”) first.
Making calls
Dial call number – by either entering each
digit separately
or
pressing a destination key
.
The number is shown on the display
.
Y
ou can enter and correct digits if neces
-
sary.
Dialing
. The call number is dialed.
The display indicates whether the other
party is free. If the called party answers,
you can carry on a conversation as usual.
Redialing a call number
Press the “Redial” key
. Y
ou can redial the
last five numbers you dialed very easily
.
The last number dialed is displayed on the
screen. T
o display another previously
dialed number
, select the menu item “Next
entry” or press the “Redial” key once
more.If you have assigned a line, all entries
with digit, destination and partner keys will
be entered in the redial memory
.
Dialing.
The displayed number is dialed.

Delayed
redial
Call 5594 Miller
or
Familiarize yourself with your phone
26
Making a standard call
A
If busy:
Select menu item “Delayed redial”. The
number is redialed up to nine times at
30-second intervals.
Cancel:
Press the “Release” key
. This terminates
automatic redial.
Receiving calls
Y
our telephone rings as usual when some
-
one calls you, and the LED beside the key
-
pad flashes.
The call number and the name of the call
ing party (if applicable) are displayed on
the screen if the call is internal or set up via
ISDN.
Lift the handset and make your call as
usual.
Letting someone in the room listen in
Press the „Monitor“ key
. This turns on the
loudspeaker.
Inform the other party that someone else is
listening. In addition, the other party will
hear two short beeps.
Deactivating monitoring:
Press the “Monitor” key once more.
Note:
You can also press the “Handsfree” key
.
If you choose to do so, the microphone is
also activated and you can use the phone
with the handset on–hook.

Local phone book
Search:
J
N
e.g.
Local phone book
Search: N
J
Nail
1234
Newman
4321
Nobody
5678
*
↓
if req.
Making calls
27
Dialing a call number from the telephone book
You
can store up to 300 numbers in the electronic telephone book of your tele
phone. If you wish to make a call, you can have the name or number displayed on
the screen or search through the entire telephone book.
Dialing a number stored in the telephone book
Press the “T
elephone book” key
. This calls
up the electronic telephone book.
The input mask is displayed. Y
ou can now
search for the desired entry (to save en
tries, see the chapter “Storing call numbers
in the telephone book”, → Page 59).
Main telephone book (
-):
If you would like to use the “Continue” dis
play key with the main telephone book
(METB), you can have this feature set up
by your Bosch Service.
Enter the search string, e.g. the first letter
of the name.
The display contains all entries that begin
with this letter
.
Note:
If a large number of entries begin with the
letter “N”, you can limit the search: Enter a
string of consecutive letters for the desired
name.
If you enter a star at the beginning of the
string, you can also enter a part of the code
or call number
.
Select the desired subscriber
.
Dial.
The selected call number is dialed.
If the called party answers, you can have a
conversation as usual.
Note:
T
o select an entry from a specific list in
your private telephone book, press the
“List” softkey instead of the first letter of the
name. Y
ou can now select the desired list.

Telephone
status
New entry in call list
New entry in call list
Call list 8 Entries
Smith Robert
11.11 13:05
+3>
00691234567 10.11 12:05
1>
Mayer 11:55 10.11
1
No call number
09.11 08:25
1
...
Smith
Robert 11.11 13:05 +3>
Entry of: 13:05 11.11.94
No.: 3751
Name : Smith Robert Amount: 3
Diverted from: 3710
Connection
3751 Smith Robert
Call list: 11.07.96 13:05
...
Making calls
28
Dialing a call number from the call list
If
you do not to answer a call—because you are not there or currently busy—the
date and time are saved in the call list.
Y
ou can display this list at any time and return calls to the subscribers entered in it.
The list shows the 10 most recent entries.
Dialing a number from the call list
The idle display contains the message
“New entry in call list”.
Highlight the line and press the ”Enter” key
.
The current entries are displayed.
If the name of the caller is known, the sys
tem enters it in the call list; otherwise, the
call number
.
Select the caller
, e.g. Mr
. Smith, if you want
to know more about the entry
.
Additional information about this entry is
displayed on the screen.
Someone called three times in vain. The
call came from extension 3710.
Call back subscriber:
Dialing.
The call number of the selected
subscriber is dialed automatically
. If the
party answers, you can make your call as
usual.
While you are calling back the subscriber
the date and time of his last call are shown
on the display
.
Note:
The call list entry is automatically deleted
as soon as you have called back.
The message ”New entry in call list” conti
nues to be displayed in the idle display until
you have scrolled through all new entries.

S S S
Reallocate to telephone book
Making calls
29
Dialing
a call number from the call list
A
While calling somebody the date and time of the last call received by this person are
shown on the display
.
The message ”New entry in call list” continues to be displayed until you have paged
through all new entries.
Store call number in the telephone book
Select the desired entry from the call list as
described before.
Select the option ”Reallocate to telephone
book” to store the entry in the telephone
book.
The call number is thus stored in the tele
-
phone book.
Note:
If you wish, you can complete or modify the
entry in the telephone book later on. For
more information please refer to the chap
ter ”Store call numbers in the telephone
book”.
Symbols in the call list
Call without call number
Call was not yet viewed
Number of calls by the subscriber
Diverted call
Call with message (VIP number)
No
call number
+
n
>
*

Send
Minimail
Choose with enter
Tel.conf. 00:00 00.00
Meeting 00:00 00.00
Meeting rescheduled
Dictation please
!
Call a taxi please
!
0 cup(s) of tea!
0 cup(s) of coffee
!
+
–
or
Enter
Send
Minimail
Subscriber1+ 1234
Subscriber2 3456
Subscriber3
Subscriber4
Subscriber5
Enter
if req.
–
Making calls
30
Sending messages (Minimail)
You
can send short texts to one or several destinations. There are 10 texts you can
choose from:
– 7 predefined texts which you can modify or complete,
– 3 texts which you can enter yourself.
Send minimail
Select the “Messages:” menu item and
then “Send Minimail”.
A list of predefined texts appears on the
display.
Enter the required digits in the text you
wish to send as a minimail (e.g. time, date
or room number).
Correct:
Move the selector bar to the next line and
back again. Y
ou can now overwrite the en
-
try.
Press the ”Enter” key to select the text you
wish to send.
The display shows a list of the subscribers
you can select as destinations.
Select one or several subscribers. ”+“ indi
-
cates that the subscriber has been selec
-
ted.
Enter new subscribers if required.
Page down through all subscribers.
 Loading...