

Page 1
Robert Bosch Power Tools GmbH
1 609 92A 4BV
70538 Stuttgart
GERMANY
www.bosch-pt.com
GST Professional
1 609 92A 4BV (2018.06) T / 19
65 | 65 E | 65 B | 65 BE
en Original instructions
ko 사용 설명서 원본
Page 2

2 |
English . . . .
. . . . . . . . . . . . . . . . . . . . . . . . . . . . . . . . . . . . . . . . . . . . . . . Page 5
한국어 . .. .. .. .. .. . .. .. .. .. .. . .. .. .. .. .. . .. .. .. .. .. . .. 페이지 12
1 609 92A 4BV | (18.06.2018) Bosch Power Tools
Page 3
GST 65 BE
A
(1)
(2)
(3)
(4)
(5)
(6)
(7)
(8)
(9)
(10)
(10)
(6)
(10)
(6)
(9)
(10)
| 3
Bosch Power Tools 1 609 92A 4BV | (18.06.2018)
Page 4
E
BCDEF
G
(11)
(4)
(4)
(12)
(13)
(6)
(4) (12)
(14) (15)
(16) (17) (18)
(17)(16)
(19)
4 |
1 609 92A 4BV | (18.06.2018) Bosch Power Tools
Page 5

English
Safety instructions
General Power Tool Safety Warnings
WARNING
tions provided with this power tool. Failure to follow all in-
structions listed below may result in electric shock, fire and/
or serious injury.
Save all warnings and instructions for future reference.
The term "power tool" in the warnings refers to your mainsoperated (corded) power tool or battery-operated (cordless) power tool.
Work area safety
u Keep work area clean and well lit. Cluttered or dark
areas invite accidents.
u Do not operate power tools in explosive atmospheres,
such as in the presence of flammable liquids, gases or
dust. Power tools create sparks which may ignite the dust
or fumes.
u Keep children and bystanders away while operating a
power tool. Distractions can cause you to lose control.
Electrical safety
u Power tool plugs must match the outlet. Never modify
the plug in any way. Do not use any adapter plugs with
earthed (grounded) power tools. Unmodified plugs and
matching outlets will reduce risk of electric shock.
u Avoid body contact with earthed or grounded sur-
faces, such as pipes, radiators, ranges and refrigerators. There is an increased risk of electric shock if your
body is earthed or grounded.
u Do not expose power tools to rain or wet conditions.
Water entering a power tool will increase the risk of electric shock.
u Do not abuse the cord. Never use the cord for carry-
ing, pulling or unplugging the power tool. Keep cord
away from heat, oil, sharp edges or moving parts.
Damaged or entangled cords increase the risk of electric
shock.
u When operating a power tool outdoors, use an exten-
sion cord suitable for outdoor use. Use of a cord suitable for outdoor use reduces the risk of electric shock.
u If operating a power tool in a damp location is un-
avoidable, use a residual current device (RCD) protected supply. Use of an RCD reduces the risk of electric
shock.
Personal safety
u Stay alert, watch what you are doing and use common
sense when operating a power tool. Do not use a
power tool while you are tired or under the influence
of drugs, alcohol or medication. A moment of inatten-
Read all safety warnings, instructions, illustrations and specifica-
English | 5
tion while operating power tools may result in serious personal injury.
u Use personal protective equipment. Always wear eye
protection. Protective equipment such as a dust mask,
non-skid safety shoes, hard hat or hearing protection
used for appropriate conditions will reduce personal injuries.
u Prevent unintentional starting. Ensure the switch is in
the off-position before connecting to power source
and/or battery pack, picking up or carrying the tool.
Carrying power tools with your finger on the switch or energising power tools that have the switch on invites accidents.
u Remove any adjusting key or wrench before turning
the power tool on. A wrench or a key left attached to a
rotating part of the power tool may result in personal injury.
u Do not overreach. Keep proper footing and balance at
all times. This enables better control of the power tool in
unexpected situations.
u Dress properly. Do not wear loose clothing or jew-
ellery. Keep your hair and clothing away from moving
parts. Loose clothes, jewellery or long hair can be caught
in moving parts.
u If devices are provided for the connection of dust ex-
traction and collection facilities, ensure these are connected and properly used. Use of dust collection can re-
duce dust-related hazards.
u Do not let familiarity gained from frequent use of tools
allow you to become complacent and ignore tool
safety principles. A careless action can cause severe in-
jury within a fraction of a second.
Power tool use and care
u Do not force the power tool. Use the correct power
tool for your application. The correct power tool will do
the job better and safer at the rate for which it was designed.
u Do not use the power tool if the switch does not turn it
on and off. Any power tool that cannot be controlled
with the switch is dangerous and must be repaired.
u Disconnect the plug from the power source and/or re-
move the battery pack, if detachable, from the power
tool before making any adjustments, changing accessories, or storing power tools. Such preventive
safety measures reduce the risk of starting the power tool
accidentally.
u Store idle power tools out of the reach of children and
do not allow persons unfamiliar with the power tool or
these instructions to operate the power tool. Power
tools are dangerous in the hands of untrained users.
u Maintain power tools and accessories. Check for mis-
alignment or binding of moving parts, breakage of
parts and any other condition that may affect the
power tool’s operation. If damaged, have the power
tool repaired before use. Many accidents are caused by
poorly maintained power tools.
Bosch Power Tools 1 609 92A 4BV | (18.06.2018)
Page 6

6 | English
u Keep cutting tools sharp and clean. Properly main-
tained cutting tools with sharp cutting edges are less
likely to bind and are easier to control.
u Use the power tool, accessories and tool bits etc. in
accordance with these instructions, taking into account the working conditions and the work to be performed. Use of the power tool for operations different
from those intended could result in a hazardous situation.
u Keep handles and grasping surfaces dry, clean and
free from oil and grease. Slippery handles and grasping
surfaces do not allow for safe handling and control of the
tool in unexpected situations.
Service
u Have your power tool serviced by a qualified repair
person using only identical replacement parts. This
will ensure that the safety of the power tool is maintained.
Safety information for jigsaws
u Hold the power tool by insulated gripping surfaces,
when performing an operation where the cutting accessory may contact hidden wiring or its own cord.
Cutting accessory contacting a "live" wire may make exposed metal parts of the power tool "live" and could give
the operator an electric shock.
u Use clamps or another practical way to secure and
support the workpiece to a stable platform. Holding
the workpiece by hand or against your body leaves it unstable and may lead to loss of control.
u Keep hands away from the sawing area. Do not reach
under the workpiece. Contact with the saw blade can
lead to injuries.
u Only bring the power tool into contact with the work-
piece when switched on. Otherwise there is danger of
kickback if the cutting tool jams in the workpiece.
u Ensure that the footplate always rests securely while
sawing. A jammed saw blade can break or lead to kickback.
u When the cut is completed, switch off the power tool
and then pull the saw blade out of the cut only after it
has come to a standstill. In this manner you can avoid
kickback and can place down the power tool securely.
u Always wait until the power tool has come to a com-
plete stop before placing it down. The application tool
can jam and cause you to lose control of the power tool.
u Use only undamaged saw blades that are in perfect
condition. Bent or dull saw blades can break, negatively
influence the cut, or lead to kickback.
u Do not brake the saw blade to a stop by applying side
pressure after switching off. The saw blade can be damaged, break or cause kickback.
u Use suitable detectors to determine if utility lines are
hidden in the work area or call the local utility company for assistance. Contact with electric lines can lead
to fire and electric shock. Damaging a gas line can lead to
explosion. Penetrating a water line causes property damage or may cause an electric shock.
Products sold in GB only:
Your product is fitted with an BS 1363/A approved electric
plug with internal fuse (ASTA approved to BS 1362).
If the plug is not suitable for your socket outlets, it should be
cut off and an appropriate plug fitted in its place by an authorised customer service agent. The replacement plug
should have the same fuse rating as the original plug.
The severed plug must be disposed of to avoid a possible
shock hazard and should never be inserted into a mains
socket elsewhere.
Product Description and Specifications
Read all the safety and general instructions.
Failure to observe the safety and general instructions may result in electric shock, fire
and/or serious injury.
Please observe the illustrations at the beginning of this operating manual.
Intended use
The power tool is intended for making separating cuts and
cut-outs in wood, plastic, metal, ceramic plates and rubber
while resting firmly on the workpiece. It is suitable for
straight and curved cuts with mitre/bevel angles of up to
45°. Note the saw blade recommendations.
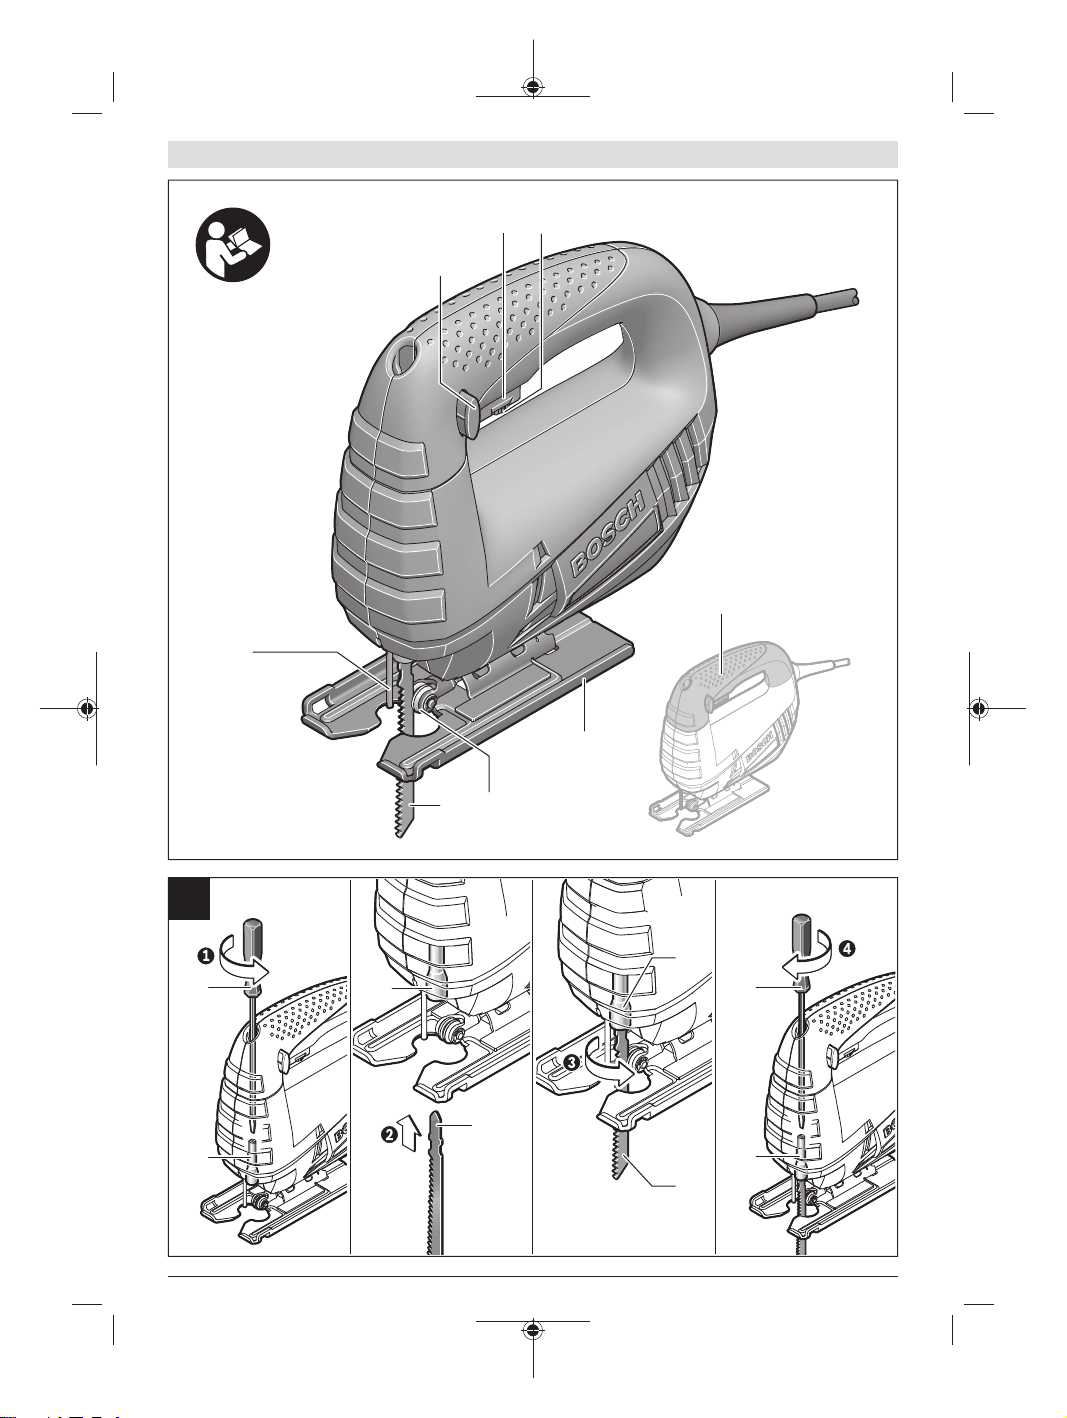
Product features
The numbering of the product features refers to the diagram
of the power tool on the graphics page.
On/off switch locking mechanism
(1)
On/off switch
(2)
Stroke rate preselection thumbwheel (GST65E/
(3)
GST65BE)
Base plate
(4)
Guide roller
(5)
(6)
(7)
(8)
(9)
(10)
(11)
(12)
(13)
(14)
(15)
(16)
(17)
(18)
(19)
A)
Saw blade
Shock protection guard
Handle (insulated gripping surface)
Screwdriver
Lifting rod
Anti-splinter guard
A)
Base plate screw (2x)
Scale for mitre/bevel angles
Threaded hole for base plate
Positioning cam/mark
Guide for parallel guide
Locking screw for parallel guide
Parallel guide with circle cutter
Circle cutter centring tip
A)
A)
A)
1 609 92A 4BV | (18.06.2018) Bosch Power Tools
Page 7

English | 7
Accessories shown or described are not included with the
A)
product as standard. You can find the complete selection of
accessories in our accessories range.
Technical data
Jigsaw GST 65
GST 65 B
Article number
3 601 E09 1.. 3 601 E09 2..
Stroke rate control – ●
Rated power input W 400 400
Power output W 230 230
No-load stroke rate n
0
rpm 3100 500–3100
Stroke mm 18 18
Max. cutting depth
– In wood mm 65 65
– In aluminium mm 12 12
– In steel (unalloyed) mm 3 3
Max. cutting angle (left/right) ° 45 45
Weight according to EPTA-Procedure 01:2014 kg 1.7 1.7
Protection class / II / II
The specifications apply to a rated voltage [U] of 230 V. These specifications may vary at different voltages and in countryspecific models.
➍
Fitting
u Pull the plug out of the socket before carrying out any
work on the power tool.
Inserting/changing the saw blade
u When fitting or changing the saw blade, wear protect-
ive gloves. Blades are sharp and can become hot when
used for prolonged periods of time.
Apply the screwdriver(9) to the lifting rod(10) from
above and turn it clockwise until the saw blade(6) is
fixed in place.
Push the mounting plate with the guide roller (5) forwards
against the back of the saw blade and retighten the
screws(12).
u Check that the saw blade is seated securely. A loose
saw blade can fall out and lead to injuries.
To remove the saw blade, follow the steps above in reverse.
Selecting the saw blade
You will find an overview of recommended saw blades at the
end of these operating instructions. Only use saw blades
with single lug shank (T shank). The saw blade should not be
longer than required for the intended cut.
Use a narrow saw blade when sawing tight curves.
Inserting/removing the saw blade (seefigureA)
Loosen the screws(12) until the mounting plate with the
guide roller (5) can be moved backwards.
➊
Apply the screwdriver(9) to the lifting rod(10) from
above and turn it by approx. 3–4turns anti-clockwise.
➋
Insert the saw blade(6) into the lifting rod(10) perpendicular to the cutting direction.
➌
Turn the saw blade(6) so that the teeth point in the
cutting direction. Pull the saw blade(6) downwards
slightly until it engages.
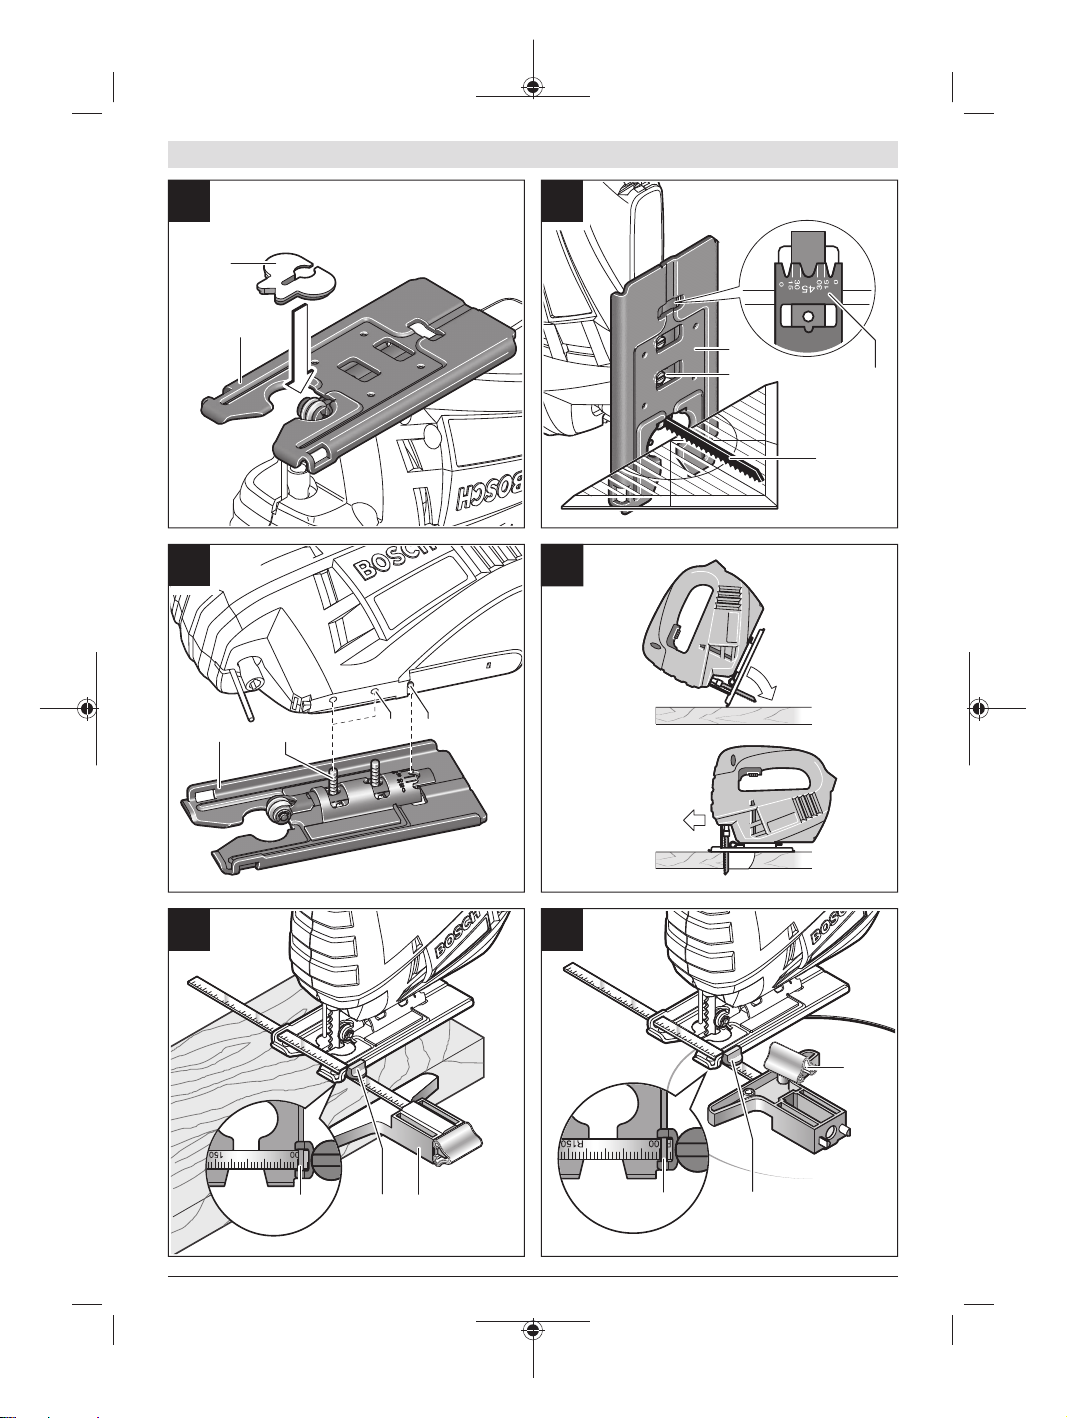
Anti-splinter guard (see figureB)
The anti-splinter guard (11) (accessory) can prevent splintering of the surface while sawing wood. The anti-splinter
guard can only be used with certain saw blade types and only
at a cutting angle of 0°. When sawing with the anti-splinter
guard, the base plate (4) must not be moved to the rear for
sawing close to edges.
Push the anti-splinter guard (11) into the base plate (4)
from below.
Dust/Chip Extraction
Dust from materials such as lead-containing coatings, some
wood types, minerals and metal can be harmful to one’s
health. Touching or breathing-in the dust can cause allergic
reactions and/or lead to respiratory infections of the user or
bystanders.
Certain dust, such as oak or beech dust, is considered carcinogenic, especially in connection with wood-treatment ad-
GST 65 E
GST 65 BE
Bosch Power Tools 1 609 92A 4BV | (18.06.2018)
Page 8

8 | English
ditives (chromate, wood preservative). Materials containing
asbestos may only be worked by specialists.
– Provide for good ventilation of the working place.
– It is recommended to wear a P2 filter-class respirator.
Observe the relevant regulations in your country for the ma-
terials to be worked.
u Avoid dust accumulation at the workplace. Dust can
easily ignite.
Operation
Operating modes
u Pull the plug out of the socket before carrying out any
work on the power tool.
Adjusting the mitre/bevel angle (see figureC)
The base plate (4) can be swivelled to the right or left to
make mitre cuts up to 45°.
The anti-splinter guard (11) cannot be used while mitre cuts
are being made.
– Insert a saw blade (6).
– Remove the anti-splinter guard (11).
– Loosen the screws (12) and push the base plate (4)
slightly towards the saw blade (6).
– The base plate has lock-in points at 0° and 45° on the left
and right so that precise mitre/bevel angles can be set.
Swivel the base plate (4) to the desired position according to the scale (13). Other mitre/bevel angles can be adjusted using a protractor.
– Then slide the base plate(4) all the way towards the
mains cable.
– Push the mounting plate with the guide roller(5) for-
wards against the back of the saw blade and retighten the
screws(12).
Moving the base plate (see figureD)
You can move the base plate (4) back for sawing close to
edges.
Insert a saw blade (6).
Unscrew the screws (12) completely.
Lift up the base plate (4) and reposition it such that the front
screw (12) can be screwed into the rear threaded hole (14).
The second screw(12) is no longer required here.
Push the base plate(4) towards the positioning cam(15)
until it engages and push the mounting plate with the guide
roller (5) forwards against the back of the saw blade.
Retighten the screw (12).
Sawing with an offset base plate (4) is only possible with a
mitre/bevel angle of 0°. In addition, the parallel guide with
circle cutter(18) (accessory) as well as the anti-splinter
guard(11) must not be used.
Start-up
u Pay attention to the mains voltage. The voltage of the
power source must match the voltage specified on the
rating plate of the power tool. Power tools marked
with 230V can also be operated with 220V.
u Products that are only sold in AUS and NZ: Use a resid-
ual current device (RCD) with a nominal residual current
of 30 mA or less.
Switching on/off
To switch on the power tool, press the on/off switch (2).
To lock the on/off switch (2), keep it pressed down and
push the locking mechanism (1) to the right or left.
To switch off the power tool, release the on/off switch (2).
If the on/off switch (2) is locked, press the switch first and
then release it.
Controlling/preselecting the stroke rate (GST65E/
GST65BE)
You can variably adjust the stroke rate of the power tool
when it is on by pressing in the on/off switch (2) to varying
extents.
Applying light pressure to the on/off switch (2) results in a
low stroke rate. Applying increasing pressure to the switch
increases the stroke rate.
It is not possible to reduce the stroke rate while the on/off
switch (2) is locked.
You can also preselect the stroke rate and change it during
operation using the stroke rate preselection thumbwheel
(3).
The required stroke rate is dependent on the material and
the work conditions and can be determined using practical
tests.
It is recommended that you reduce the stroke rate when placing the saw blade on the workpiece and when sawing
plastic and aluminium.
During prolonged periods of use at a low stroke rate, the
power tool may heat up significantly. Remove the saw blade
and let the power tool run at the maximum stroke rate for
around three minutes to cool down.
Practical advice
u Pull the plug out of the socket before carrying out any
work on the power tool.
u Switch the power tool off immediately if the saw blade
becomes blocked.
u When machining small or thin workpieces, always use
a stable base or saw table (accessory).
Before sawing into wood, chipboard, building materials,
etc., check for and remove any foreign objects such as nails,
screws, etc.
Plunge cutting (see figureE)
u Plunge cuts may only be applied to soft materials,
such as wood, gypsum board, etc.
For plunge cutting, use only short saw blades. Plunge cutting
is possible only with a mitre angle of 0°.
Place the power tool so that the front edge of the base plate
(4) rests on the workpiece, without the saw blade (6) touching the workpiece, and switch it on. On power tools with
1 609 92A 4BV | (18.06.2018) Bosch Power Tools
Page 9

English | 9
stroke rate control, select the maximum stroke rate. Press
the power tool firmly against the workpiece and allow the
saw blade to plunge slowly into the workpiece.
As soon as the base plate (4) rests fully on the workpiece,
continue sawing along the required cutting line.
Parallel guide with circle cutter (accessory)
When working with the parallel guide with circle cutter (18)
(accessory), the workpiece must be no more than 30mm
thick.
Parallel cuts (see figureF): Loosen the locking screw (17)
and slide the scale on the parallel guide through the guide
(16) in the base plate. Adjust the desired cutting width as a
scale value on the inside edge of the base plate. Retighten
the locking screw (17).
Circular cuts (see figureG): Drill a hole large enough to push
the saw blade through on the cutting line within the circle to
be cut. Machine the drill hole with a router or file so that the
saw blade can lie flush with the cutting line.
Position the locking screw (17) on the other side of the parallel guide. Slide the scale on the parallel guide through the
guide (16) into the base plate. Drill a hole in the workpiece
in the middle of the section to be cut out. Insert the centring
tip (19) through the inner opening of the parallel guide and
into the drilled hole. Adjust the radius as a scale value on the
inside edge of the base plate. Retighten the locking screw
(17).
Coolant/lubricant
As the material heats up along the cutting line when cutting
metal, you should apply coolant or lubricant.
Maintenance and Servicing
Maintenance and cleaning
u Pull the plug out of the socket before carrying out any
work on the power tool.
u To ensure safe and efficient operation, always keep
the power tool and the ventilation slots clean.
If the dust outlet becomes blocked, switch off the power
tool, disconnect the dust extraction system and remove the
dust and chips.
Clean the saw blade receptacle regularly. For this, remove
the saw blade from the power tool and lightly tap out the
power tool on a level surface.
If the power tool becomes very dirty, this can lead to serious
faults. For this reason, do not cut materials which generate
large quantities of dust from below or overhead.
u In extreme conditions, always use a dust extractor if
possible. Blow out ventilation slots frequently and install a residual current device (RCD) upstream. When
machining metals, conductive dust can settle inside the
power tool, which can affect its protective insulation.
Apply a drop of oil to the guide roller (5) from time to time.
Check the guide roller (5) regularly. If worn, it must be re-
placed by an authorised Bosch after-sales service agent.
In order to avoid safety hazards, if the power supply cord
needs to be replaced, this must be done by Bosch or by a
customer service centre that is authorised to repair Bosch
power tools.
After-sales Service and Advice on Using Products
Our after-sales service can answer questions concerning
product maintenance and repair, as well as spare parts. You
can find exploded drawings and information on spare parts
at: www.bosch-pt.com
The Bosch product use advice team will be happy to help you
with any questions about our products and their accessories.
www.powertool-portal.de, the internet portal for tradespeople and DIY enthusiasts.
In all correspondence and spare parts orders, please always
include the 10‑digit article number given on the type plate of
the product.
Cambodia
Robert Bosch (Cambodia) Co., Ltd
Unit 8BC, GT Tower, 08th Floor, Street 169,
Czechoslovakia Blvd, Sangkat Veal Vong
Khan 7 Makara, Phnom Penh
VAT TIN: 100 169 511
Tel.: +855 23 900 685
Tel.: +855 23 900 660
www.bosch.com.kh
People’s Republic of China
China Mainland
Bosch Power Tool (China) Co. Ltd.
Bosch Service Center
567, Bin Kang Road
Bin Kang District
Hangzhou, Zhejiang Province
China 310052
Tel.: (0571) 8887 5566 / 5588
Fax: (0571) 8887 6688 x 5566# / 5588#
E-mail: bsc.hz@cn.bosch.com
www.bosch-pt.com.cn
HK and Macau Special Administrative Regions
Robert Bosch Co. Ltd.
21st Floor, 625 King’s Road
North Point, Hong Kong
Customer Service Hotline: +852 2101 0235
Fax: +852 2590 9762
E-mail: info@hk.bosch.com
www.bosch-pt.com.hk
India
Bosch Service Center
69, Habibullah Road, (next to PSBB School), T. Nagar
Chennai–600077
Phone: (044) 64561816
Bosch Service Center Rishyamook
85A, Panchkuin Road
New Delhi–110001
Phone: (011) 43166190
Bosch Power Tools 1 609 92A 4BV | (18.06.2018)
Page 10

10 | English
Bosch Service Center 79,
Crystal Bldg., Dr. Annie Besant Road, Worli
Mumbai–400018
Phone: (022) 39569936 / (022 )39569959 /
(022) 39569967 / (022) 24952071
Indonesia
PT Robert Bosch
Palma Tower 10th Floor
Jalan RA Kartini II-S Kaveling 6
Pondok Pinang, Kebayoran Lama
Jakarta Selatan 12310
Tel.: (21) 3005-5800
www.bosch-pt.co.id
Malaysia
Robert Bosch Sdn. Bhd.(220975-V) PT/SMY
No. 8A, Jalan 13/6
46200 Petaling Jaya
Selangor
Tel.: (03) 79663194
Toll-Free: 1800 880188
Fax: (03) 79583838
E-mail: kiathoe.chong@my.bosch.com
www.bosch-pt.com.my
Pakistan
Robert Bosch Middle East FZE – Pakistan Liaison Office
2nd Floor Plaza # 10, CCA Block, DHA Phase 5
Lahore, 54810
Phone: +92(303)4444311
E-mail: Faisal.Khan@bosch.com
Philippines
Robert Bosch, Inc.
28th Floor Fort Legend Towers,
3rd Avenue corner 31st Street,
Fort Bonifacio, Global City,
1634 Taguig City
Tel.: (632) 8703871
Fax: (632) 8703870
www.bosch-pt.com.ph
Singapore
Powerwell Service Centre Ptd Ltd
Bosch Authorised Service Centre (Power Tools)
4012 Ang Mo Kio Ave 10, #01-02 TECHplace
Singapore 569628
Tel.: 6452 1770
Fax: 6452 1760
E-mail: ask@powerwellsc.com
www.powerwellsc.com
www.bosch-pt.com.sg
Thailand
Robert Bosch Ltd.
Liberty Square Building
No. 287, 11 Floor
Silom Road, Bangrak
Bangkok 10500
Tel.: 02 6393111
Fax: 02 2384783
Robert Bosch Ltd., P. O. Box 2054
Bangkok 10501
www.bosch.co.th
Bosch Service – Training Centre
La Salle Tower Ground Floor Unit No.2
10/11 La Salle Moo 16
Srinakharin Road
Bangkaew, Bang Plee
Samutprakarn 10540
Tel.: 02 7587555
Fax: 02 7587525
Vietnam
Branch of Bosch Vietnam Co., Ltd in HCMC
14th floor, Deutsches Haus, 33 Le Duan
Ben Nghe Ward, District 1, Ho Chi Minh City
Tel.: (028) 6258 3690
Fax: (028) 6258 3692 - 6258 3694
Hotline: (028) 6250 8555
E-mail: tuvankhachhang-pt@vn.bosch.com
www.bosch-pt.com.vn
Armenia, Azerbaijan, Georgia, Kyrgyzstan, Mongolia,
Tajikistan, Turkmenistan, Uzbekistan
TOO "Robert Bosch" Power Tools, After Sales Service
Rayimbek Ave., 169/1
050050, Almaty, Kazakhstan
Service e-mail: service.pt.ka@bosch.com
Official website: www.bosch.com, www.bosch-pt.com
Bahrain
Hatem Al Juffali Technical Equipment Establishment.
Kingdom of Bahrain, Setra Highway, Al Aker Area
Phone: +966126971777-311
Fax: +97317704257
E-mail: h.berjas@eajb.com.sa
Egypt
Unimar
20 Markaz kadmat
El tagmoa EL Aoul – New Cairo
Phone: +20 2224 76091-95
Phone: +20 2224 78072-73
Fax: +20222478075
E-mail: adelzaki@unimaregypt.com
Iran
Robert Bosch Iran
3rd Floor, No 3, Maadiran Building
Aftab St., Khodami St., Vanak Sq.
Tehran 1994834571
Phone: +9821 86092057
Iraq
Sahba Technology Group
Al Muthana airport road
Baghdad
Phone: +9647901906953
Phone Dubai: +97143973851
E-mail: bosch@sahbatechnology.com
Jordan
Roots Arabia – Jordan
Nasser Bin Jameel street, Building 37 Al Rabiah
11194 Amman
1 609 92A 4BV | (18.06.2018) Bosch Power Tools
Page 11

English | 11
Phone: +962 6 5545778
E-mail: bosch@rootsjordan.com
Kuwait
Al Qurain Automotive Trading Company
Shuwaikh Industrial Area, Block 1, Plot 16, Street 3rd
P.O. Box 164 – Safat 13002
Phone: 24810844
Fax: 24810879
E-mail: josephkr@aaalmutawa.com
Lebanon
Tehini Hana & Co. S.A.R.L.
P.O. Box 90-449
Jdeideh
Dora-Beirut
Phone: +9611255211
E-mail: service-pt@tehini-hana.com
Libya
El Naser for Workshop Tools
Swanee Road, Alfalah Area
Tripoli
Phone: +218 21 4811184
Oman
Malatan Trading & Contracting LLC
P.O. Box 131
Ruwi, 112 Sultanate of Oman
Phone: +968 99886794
E-mail: malatanpowertools@malatan.net
Qatar
International Construction Solutions W L L
P. O. Box 51,
Doha Phone: +974 40065458
Fax: +974 4453 8585
E-mail: csd@icsdoha.com
Saudi Arabia
Juffali Technical Equipment Co. (JTECO)
Kilo 14, Madinah Road, Al Bawadi District
Jeddah 21431
Phone: +966 2 6672222 Ext. 1528
Fax: +966 2 6676308
E-mail: roland@eajb.com.sa
Syria
Dallal Establishment for Power Tools
P.O. Box 1030
Aleppo
Phone: +963212116083
E-mail: rita.dallal@hotmail.com
United Arab Emirates
Central Motors & Equipment LLC, P.O. Box 1984
Al-Wahda Street – Old Sana Building
Sharjah
Phone: +971 6 593 2777
Fax: +971 6 533 2269
E-mail: powertools@centralmotors.ae
Yemen
Abualrejal Trading Corporation
Sana’a Zubiery St. Front to new Parliament Building
Phone: +967-1-202010
Fax: +967-1-279029
E-mail: tech-tools@abualrejal.com
Ethiopia
Forever plc
Kebele 2,754, BP 4806,
Addis Ababa
Phone: +251 111 560 600
E-mail: foreverplc@ethionet.et
Ghana
C.WOERMANN LTD.
Nsawam Road/Avenor Junction, P.O. Box 1779
Accra Phone: +233 302 225 141
Kenya
Robert Bosch East Africa Ltd
Mpaka Road P.O. Box 856
00606 Nairobi
Nigeria
Robert Bosch Nigeria Ltd.
52–54 Isaac John Street P.O. Box
GRA Ikeja – Lagos
Republic of South Africa
Customer service
Hotline: (011) 6519600
Gauteng – BSC Service Centre
35 Roper Street, New Centre
Johannesburg
Tel.: (011) 4939375
Fax: (011) 4930126
E-mail: bsctools@icon.co.za
KZN – BSC Service Centre
Unit E, Almar Centre
143 Crompton Street
Pinetown
Tel.: (031) 7012120
Fax: (031) 7012446
E-mail: bsc.dur@za.bosch.com
Western Cape – BSC Service Centre
Democracy Way, Prosperity Park
Milnerton
Tel.: (021) 5512577
Fax: (021) 5513223
E-mail: bsc@zsd.co.za
Bosch Headquarters
Midrand, Gauteng
Tel.: (011) 6519600
Fax: (011) 6519880
E-mail: rbsa-hq.pts@za.bosch.com
Tanzania
Diesel & Autoelectric Service Ltd.
117 Nyerere Rd., P.O. Box 70839
Vingunguti 12109, Dar Es Salaam
Phone: +255 222 861 793/794
Bosch Power Tools 1 609 92A 4BV | (18.06.2018)
Page 12

12 | 한국어
Australia, New Zealand and Pacific Islands
Robert Bosch Australia Pty. Ltd.
Power Tools
Locked Bag 66
Clayton South VIC 3169
Customer Contact Center
Inside Australia:
Phone: (01300) 307044
Fax: (01300) 307045
Inside New Zealand:
Phone: (0800) 543353
Fax: (0800) 428570
Outside AU and NZ:
Phone: +61 3 95415555
www.bosch-pt.com.au
www.bosch-pt.co.nz
Disposal
The power tool, accessories and packaging should be recycled in an environmentally friendly manner.
Do not dispose of power tools along with
household waste.
한국어
안전 수칙
전동공구 일반 안전 수칙
경고
양을 숙지하십시오. 다음의 지시 사항을 준수하지 않
으면 감전, 화재, 또는 심각한 부상을 초래할 수 있습
니다.
앞으로 참고할 수 있도록 이 안전수칙과 사용 설명서
를 잘 보관하십시오.
다음에서 사용되는 "전동공구"라는 개념은 전원에 연
결하여 사용하는 (전선이 있는) 전동 기기나 배터리를
사용하는 (전선이 없는) 전동 기기를 의미합니다.
작업장 안전
작업장을 항상 깨끗이 하고 조명을 밝게 하십시오
u
작업장 환경이 어수선하거나 어두우면 사고를 초
래할 수 있습니다.
가연성 유체, 가스 또는 분진이 있어 폭발 위험이 있
u
는 환경에서 전동공구를 사용하지 마십시오
공구는 분진이나 증기에 점화하는 스파크를 일으
킬 수 있습니다.
전동공구를 사용할 때 구경꾼이나 어린이 혹은 다
u
른 사람이 작업장에 접근하지 못하게 하십시오
른 사람이 주의를 산만하게 하면 기기에 대한 통제
력을 잃기 쉽습니다.
본 전동공구와 함께 제공된 모든
안전경고, 지시사항, 그림 및 사
. 전동
. 다
전기에 관한 안전
전동공구의 전원 플러그가 전원 콘센트에 잘 맞아
u
야 합니다
다
를 사용하지 마십시오
플러그를 절대 변경시켜서는 안 됩니
.
접지된) 전동공구를 사용할 때 어댑터 플러그
. (
. 변형되지 않은 플러그와 잘
맞는 콘센트를 사용하면 감전의 위험을 줄일 수 있
습니다.
파이프 관, 라디에이터, 레인지, 냉장고와 같은 접
u
지 표면에 몸이 닿지 않도록 하십시오
경우 감전될 위험이 높습니다.
전동공구를 비에 맞지 않게 하고 습기 있는 곳에 두
u
지 마십시오
. 전동공구에 물이 들어가면 감전될 위
험이 높습니다.
전원 코드를 잘못 사용하는 일이 없도록 하십시오
u
전원 코드를 잡고 전동공구를 운반해서는 안 되며
콘센트에서 전원 플러그를 뽑을 때 전원 코드를 잡
아 당겨서는 절대로 안 됩니다
. 전원
오일에 접촉하는 것을 피하고, 날카로운 모서리나
기기의 가동 부위에 닿지 않도록 주의하십시오
상되거나 엉킨 전원 코드는 감전을 유발할 수 있습
니다.
실외에서 전동공구로 작업할 때는 실외용으로 적
u
당한 연장 전원 코드만을 사용하십시오
장 전원 코드를 사용하면 감전의 위험을 줄일 수 있
습니다.
전동공구를 습기 찬 곳에서 사용해야 할 경우에는
u
누전 차단기를 사용하십시오
. 누전 차단기를 사용
하면 감전 위험을 줄일 수 있습니다.
사용자 안전
신중하게 작업하며, 전동공구를 사용할 때 경솔하
u
게 행동하지 마십시오
피로한 상태이거나 약물 복
.
용 및 음주한 후에는 전동공구를 사용하지 마십시
오
. 전동공구를 사용할 때 잠시라도 주의가 산만해
지면 중상을 입을 수 있습니다.
작업자 안전을 위한 장치를 사용하십시오
u
안경을 착용하십시오
. 전동공구의 종류와 사용에
따라 먼지 보호 마스크, 미끄러지지 않는 안전화,
안전모 또는 귀마개 등의 안전한 복장을 하면 상해
의 위험을 줄일 수 있습니다.
실수로 기기가 작동되지 않도록 주의하십시오
u
동공구를 전원에 연결하거나 배터리를 끼우기 전
에, 혹은 기기를 들거나 운반하기 전에, 전원 스위
치가 꺼져 있는지 다시 확인하십시오
운반할 때 전원 스위치에 손가락을 대거나 전원 스
위치가 켜진 상태에서 전원을 연결하면 사고 위험
.
이 높습니다.
전동공구를 사용하기 전에 조절하는 툴이나 키 등
u
을 빼 놓으십시오
. 회전하는 부위에 있는 툴이나 키
로 인해 상처를 입을 수 있습니다.
자신을 과신하지 마십시오
u
불안정한 자세를 피하
.
고 항상 평형을 이룬 상태로 작업하십시오
자세와 평형한 상태로 작업해야만이 의외의 상황
에서도 전동공구를 안전하게 사용할 수 있습니다.
알맞은 작업복을 입으십시오
u
나 장신구를 착용하지 마십시오
헐렁한 복장을 하거
.
.
하는 기기 부위에 가까이 닿지 않도록 주의하십시
. 몸에 닿을
코드가 열과
. 손
. 실외용 연
. 항상
전
.
. 전동공구를
. 안정된
머리나 옷이 가동
.
,
보
1 609 92A 4BV | (18.06.2018) Bosch Power Tools
Page 13

오
. 헐렁한 복장, 장신구 혹은 긴 머리는 가동 부위
에 말려 사고를 초래할 수 있습니다.
분진 추출장치나 수거장치의 조립이 가능한 경우
u
이 장치가 연결되어 있는지, 제대로 작동이 되는지
확인하십시오
. 이러한 분진 추출장치를 사용하면
분진으로 인한 사고 위험을 줄일 수 있습니다.
툴을 자주 사용한다고 해서 안주하는 일이 없게 하
u
고 공구의 안전 수칙을 무시하지 않도록 하십시오
부주의하게 취급하여 순간적으로 심각한 부상을
입을 수 있습니다.
전동공구의 올바른 사용과 취급
기기를 과부하 상태에서 사용하지 마십시오
u
할 때 이에 적당한 전동공구를 사용하십시오
은 전동공구를 사용하면 지정된 성능 한도 내에서
더 효율적으로 안전하게 작업할 수 있습니다.
전원 스위치가 고장 난 전동공구를 사용하지 마십
u
시오
. 전원 스위치가 작동되지 않는 전동공구는 위
험하므로, 반드시 수리를 해야 합니다.
전동공구를 조정하거나 액세서리 부품 교환 혹은
u
공구를 보관할 때, 항상 전원 콘센트에서 플러그를
미리 빼어 놓거나 배터리를 분리하십시오
. 이러한
조치는 실수로 전동공구가 작동하게 되는 것을 예
방합니다.
사용하지 않는 전동공구는 어린이 손이 닿지 않는
u
곳에 보관하고, 전동공구 사용에 익숙지 않거나 이
사용 설명서를 읽지 않은 사람은 기기를 사용해서
는 안됩니다
. 경험이 없는 사람이 전동공구를 사용
하면 위험합니다.
전동공구 및 액세서리를 조심스럽게 관리하십시
u
오
부위가 하자 없이 정상적인 기능을 하는
. 가동
지, 걸리는 부위가 있는지, 혹은 전동공구의 기능에
중요한 부품이 손상되지 않았는지 확인하십시오
손상된 기기의 부품은 전동공구를 다시 사용하기
전에 반드시 수리를 맡기십시오
. 제대로 관리하지
않은 전동공구의 경우 많은 사고를 유발합니다.
절단 공구를 날카롭고 깨끗하게 관리하십시오
u
카로운 절단면이 있고 잘 관리된 절단공구는 걸리
는 경우가 드물고 조절하기도 쉽습니다.
전동공구, 액세서리, 장착하는 공구 등을 사용할
u
때, 이 지시 사항과 특별히 기종 별로 나와있는 사용
방법을 준수하십시오. 이때 작업 조건과 실시하려
는 작업 내용을 고려하십시오
. 원래 사용 분야가 아
닌 다른 작업에 전동공구를 사용할 경우 위험한 상
황을 초래할 수 있습니다.
손잡이 및 잡는 면을 건조하게 유지하고, 오일 및 그
u
리스가 묻어 있지 않도록 깨끗하게 하십시오
이 또는 잡는 면이 미끄러우면 예상치 못한 상황에
서 안전한 취급 및 제어가 어려워집니다.
서비스
전동공구 수리는 반드시 전문 인력에게 맡기고
u
리 정비 시 보쉬 순정 부품만을 사용하십시오
게 함으로써 기기의 안전성을 오래 유지할 수 있습
니다.
작업
.
. 알맞
. 날
. 손잡
,
. 그렇
직쏘 관련 안전 수칙
절단용 액세서리가 숨겨진 배선 또는 코드를 접촉
u
,
할 가능성이 있는 작업을 수행할 경우, 전동공구의
절연된 손잡이 면만 잡으십시오
. 절단용 액세서리
가 "전류가 흐르는" 전선에 접촉되면, 전동공구의
노출된 금속 부품에 "전류가 흐르는" 상태로 만들어
작업자가 감전될 수 있습니다.
.
클램프 등을 사용하여 가공물을 작업대에 안전하
u
게 고정하고 받쳐주십시오
. 가공물을 손으로 잡거
나 몸쪽을 향하도록 잡으면 불안정한 상태가 되어
통제력을 잃을 수도 있습니다.
톱 쪽으로 손을 가까이 대지 마십시오. 작업물의 아
u
래쪽을 잡지 마십시오
. 톱날과 접하게 되면 부상을
입을 수 있습니다.
전동공구를 켠 상태에서만 작업물에 서서히 접근
u
하십시오
. 그렇지 않으면 톱날이 작업물에 걸리면
서 반동이 생길 위험이 있습니다.
톱 작업 시 밑판이 안전하게 밀착되어 있는지 확인
u
하십시오
. 톱날이 걸려 있으면 부러지거나 반동이
생길 수 있습니다.
작업을 마치고 나서 전동공구의 전원을 끄고 기기
u
가 완전히 정지된 후에 절단면에서 톱날을 빼내십
시오
. 이렇게 하면 반동이 생기는 것을 방지할 수 있
으며 전동공구를 안전하게 내려 놓을 수 있습니다.
전동공구를 내려놓기 전에 기기가 완전히 멈추었
u
는지 확인하십시오
. 삽입공구가 걸리거나 전동공
구에 대한 통제가 어려워질 수 있습니다.
반드시 손상되지 않고 결함이 없는 톱날만 사용하
u
십시오
. 휘거나 날카롭지 않은 톱날이 부러져 절단
작업을 방해하거나 반동을 유발할 수 있습니다.
전원을 끈 후 옆에서 톱날을 눌러 정지해서는 안 됩
u
.
니다
. 이로 인해 톱날이 손상되거나 부러질 수 있으
며 혹은 반동을 유발할 수 있습니다.
보이지 않는 부위에 에너지 배선 및 배관 여부를 확
u
인하려면 적당한 탐지기를 사용하거나 담당 전력
공급회사에 문의하십시오
. 전선에 접하게 되면 화
재나 전기 충격을 야기할 수 있습니다. 가스관을 손
상시키면 폭발 위험이 있습니다. 수도관을 파손하
게 되면 재산 피해를 유발하거나 전기 충격을 야기
할 수 있습니다.
제품 및 성능 설명
모든 안전 수칙과 지침을 숙지하십시오.
다음의 안전 수칙과 지침을 준수하지 않
으면 화재 위험이 있으며 감전 혹은 중상
을 입을 수 있습니다.
사용 설명서 앞 부분에 제시된 그림을 확인하십시오.
규정에 따른 사용
수
본 전동공구는 목재, 플라스틱, 금속, 세라믹판 그리
고 고무 자재를 단단한 작업대 위에 고정시킨 상태에
서 절단선을 긋는 작업이나 절단 작업을 하는 데 사용
해야 합니다. 마이터 각 45° 이하의 직선 및 곡선 방향
절단에 적합합니다. 톱날 선택에 대한 권장 자료를 참
고하십시오.
한국어 | 13
Bosch Power Tools 1 609 92A 4BV | (18.06.2018)
Page 14

14 | 한국어
스트로크 로드
제품의 주요 명칭
제품의 주요 명칭에 표기되어 있는 번호는 기기 그림
이 나와있는 면을 참고하십시오.
전원 스위치 잠금 버튼
(1)
전원 스위치
(2)
스트로크 수 설정용 조정 휠(GST65E/
(3)
GST65BE)
밑판
(4)
가이드 롤러
(5)
A)
톱날
(6)
안전핀
(7)
손잡이(절연된 손잡이 부위)
(8)
드라이버
(9)
(10)
작업 표면 보호대
(11)
밑판 나사(2개)
(12)
마이터 각도용 눈금
(13)
밑판용 나사홀
(14)
위치 고정 핀
(15)
평행 가이드용 리드
(16)
평행 가이드 잠금 나사
(17)
원형 절단기가 있는 평행 가이드
(18)
원형 절단기의 중심 표시기
(19)
도면이나 설명서에 나와있는 액세서리는 표준 공급부품
A)
에 속하지 않습니다. 전체 액세서리는 저희 액세서리 프
로그램을 참고하십시오
A)
A)
A)
A)
.
제품 사양
직쏘 GST 65
GST 65 B
제품 번호
3 601 E09 1.. 3 601 E09 2..
스트로크 수 제어 – ●
소비 전력 W 400 400
출력 W 230 230
공회전 스트로크 수 n
0
rpm 3100 500–3100
스트로크 mm 18 18
최대 절단 깊이
– 목재 mm 65 65
– 알루미늄 mm 12 12
– 강(비합금) mm 3 3
절단 각도(좌/우) 최대 ° 45 45
EPTA-Procedure 01:2014 에 따른 중량 kg 1.7 1.7
보호 등급 /II /II
GST 65 E
GST 65 BE
자료는 정격 전압 [U] 230V를 기준으로 한 것입니다. 전압이 다른 경우 및 국가별 사양에 따라 변동이 있을 수 있
습니다.
조립
전동공구를 보수 정비하기 전에 반드시 콘센트에
u
서 전원 플러그를 빼십시오
톱날 끼우기/교환하기
톱날을 조립 또는 교체할 경우 보호 장갑을 착용하
u
십시오
. 톱날은 날카로우며, 장시간 사용하면 뜨거
워질 수 있습니다.
톱날 선택하기
추천하는 톱날 목록은 본 설명서의 마지막 부분에 나
와 있습니다. 옆 돌출걸이가 1개인 톱날(T자형)만 사
용하십시오. 톱날은 절단하려는 깊이보다 길어서는
안 됩니다.
좁은 모서리 절단 시 가는 톱날을 사용하십시오.
1 609 92A 4BV | (18.06.2018) Bosch Power Tools
.
톱날 끼우기/분리하기(그림A 참조)
조립판이 가이드 롤러 (5) 와 함께 뒤쪽으로 이동할 수
있을 때까지 나사(12) 를 푸십시오.
➊
드라이버(9) 를 위쪽에서 스트로크 로드(10)
에 끼운 후 시계 반대 방향으로 3–4바퀴 돌리십
시오.
➋
톱날(6) 을 절단 방향의 가로 방향으로 스트로
크 로드(10) 에 끼우십시오.
➌
톱날(6) 을 돌려 톱니가 절단 방향을 향하게 하
십시오. 톱날이 맞물려 고정될 때까지 톱날(6)
을 약간 아래쪽으로 당기십시오.
➍
톱날(6) 이 고정될 때까지 스크류 드라이버(9)
를 위쪽에서 스트로크 로드(10) 에 끼운 후 시계
반대 방향으로 돌리십시오.
Page 15

한국어 | 15
가이드 롤러 (5) 를 포함한 조립판을 앞쪽, 톱날쪽으로
누른 후 나사(12) 를 다시 조이십시오.
톱날이 제대로 끼워졌는지 확인해 보십시오
u
하게 걸린 톱날은 빠질 수 있으며 이로 인해 작업자
가 상해를 입을 수 있습니다.
톱날을 분리하려면 반대 순서로 하면 됩니다.
. 느슨
작업 표면 보호대(그림B 참조)
작업 표면 보호대 (11) (액세서리)는 목재를 톱질할 때
표면이 손상되는 것을 방지해줍니다. 작업 표면 보호
대는 특정 유형의 톱날과 절단 각도가 0°일 때만 사용
할 수 있습니다. 밑판 (4) 은 작업 표면 보호대를 이용
하여 작업할 때 가장자리 절단 작업을 위해 뒤쪽으로
이동시켜서는 안 됩니다.
작업 표면 보호대 (11) 를 아래쪽에서 밑판 (4) 에 눌러
끼우십시오.
분진 및 톱밥 추출장치
납 성분을 포함한 페인트나 몇몇 나무 종류, 또는 광물
성분 그리고 철과 같은 재료의 분진은 건강을 해칠 수
있습니다. 이 분진을 만지거나 호흡할 경우, 사용자나
주변 사람들은 알레르기 반응이나 호흡기 장애를 일
으킬 수 있습니다.
떡갈나무나 너도밤나무와 같은 특정한 분진은 암을
유발시키며, 특히 목재 처리용으로 사용되는 부가 원
료(크로마트, 목재 보호제)와 혼합되면 암을 유발시
키게 됩니다. 석면 성분을 포함한 재료는 오직 전문가
가 작업을 해야 합니다.
– 작업장의 통풍이 잘 되도록 하십시오.
– 필터등급 P2에 해당되는 호흡 마스크를 사용하십
시오.
작업용 재료에 관해 국가가 지정한 규정을 고려하십
시오.
작업장에 분진이 쌓이지 않도록 하십시오
u
쉽게 발화할 수 있습니다.
. 분진이
작동
작동 모드
전동공구를 보수 정비하기 전에 반드시 콘센트에
u
서 전원 플러그를 빼십시오
마이터 각도 설정하기(그림 C 참조)
밑판 (4) 은 45° 이하의 마이터 절단 작업을 위해 좌측
또는 우측으로 방향을 전환할 수 있습니다.
마이터 절단 작업 시 작업 표면 보호대 (11) 는 사용할
수 없습니다.
– 톱날 (6) 을 끼우십시오.
– 작업 표면 보호대 (11) 를 분리하십시오.
– 나사 (12) 를 푼 후 밑판 (4) 을 톱날 (6) 쪽으로 약간
미십시오.
– 마이터 각도를 정확하게 설정할 수 있도록 밑판에
좌측 및 우측으로 0° 및 45° 지점에 고정점이 있습니
다. 눈금 (13) 에 맞춰 밑판 (4) 을 원하는 위치로 젖
히십시오. 다른 마이터 각도는 각도 측정기를 이용
하여 설정할 수 있습니다.
.
– 이어서 밑판 (4) 을 전원 케이블쪽으로 끝까지 밀어
줍니다.
– 가이드 롤러 (5) 를 포함한 조립판을 앞쪽, 톱날쪽
으로 누른 후 나사(12) 를 다시 조이십시오.
밑판 위치 변경하기(그림D 참조)
가장자리 절단 작업을 위해 밑판 (4) 을 뒤쪽으로 이동
시킵니다.
톱날 (6) 을 끼우십시오.
볼트 (12) 를 돌려 완전히 푸십시오.
밑판(4) 을 들어올린 후 앞쪽 나사(12) 가 뒤쪽 나사
홀(14) 에 들어갈 수 있게 위치를 옮기십시오. 이때 두
번째 나사(12) 는 필요하지 않습니다.
밑판(4) 이 맞물려 고정될 때까지 위치 고정 핀(15)
방향으로 누른 후 가이드 롤러 (5) 를 포함한 조립판을
앞쪽, 톱날 등쪽으로 미십시오. 나사 (12) 를 다시 조입
니다.
밑판(4) 의 위치를 변경한 절단 작업은 마이터 각도가
0°일 때만 가능합니다. 그 외에도 원형 절단기가 있는
평행 가이드 (18) (액세서리) 및 작업 표면 보호대 (11)
를 사용할 수 없습니다.
기계 시동
전원의 전압에 유의하십시오! 공급되는 전원의 전
u
압은 전동공구의 명판에 표기된 전압과 동일해야
합니다
동이 가능합니다
전원 스위치 작동
전동공구의 전원을 켜려면 전원 스위치 (2) 를 누르십
시오.
전원 스위치 (2) 를 고정시키려면 전원 스위치를 누른
상태에서 잠금 버튼 (1) 을 좌측 또는 우측으로 미십시
오.
전동공구의 전원을 끄려면 전원 스위치 (2) 에서 손을
떼십시오. 전원 스위치 (2) 가 고정된 상태에서 먼저
전원 스위치를 눌렀다가 전원 스위치에서 손을 떼십
시오.
스트로크 수 제어/사전 설정(GST65E/GST65BE)
전원 스위치 (2) 를 밀어 이동시키는 만큼 전원이 켜진
전동공구의 스트로크 수를 조절할 수 있습니다.
전원 스위치 (2) 를 약간만 밀면 스트로크 수가 낮아집
니다. 세게 누르면 스트로크 수가 높아집니다.
전원 스위치 (2) 가 잠긴 상태에서는 스트로크 수를 줄
일 수 없습니다.
스트로크 수 설정용 조정 휠 (3) 을 이용해 스트로크
수를 사전 설정하고 작동하면서 변경할 수 있습니다.
작업 소재와 작업 조건에 따라 필요로 하는 스트로크
수가 달라지므로 실제 시험을 통해 결정할 수 있습니
다.
톱날을 작업물에 대거나 플라스틱과 알루미늄에 톱
작업을 할 때 스트로크 수를 줄이는 것이 좋습니다.
낮은 속도로 장시간 작업할 경우 전동공구가 과열될
수 있습니다. 이 경우 톱날을 빼고 전동공구를 식히기
위해 최대 속도로 약 3분간 작동시켜 주십시오.
표시된 전동공구는
. 230 로
에서도 작
.
220 V
Bosch Power Tools 1 609 92A 4BV | (18.06.2018)
Page 16

16 | 한국어
사용 방법
전동공구를 보수 정비하기 전에 반드시 콘센트에
u
서 전원 플러그를 빼십시오
톱날이 물리면 즉시 전동공구 스위치를 끄십시오
u
작거나 얇은 작업물에 작업할 경우 반드시 안전한
u
받침대나 톱 테이블(액세서리)을 사용하십시오
목재, 칩보드, 건축용 자재 등에서 톱 작업하기 전에
해당 소재에 못, 나사 등과 같은 이물질이 없는지 점검
하고, 필요에 따라 이를 제거하십시오.
플런지 쏘(그림E 참조)
목재, 석고보드와 같은 연질 소재의 경우에만 플런
u
지 절단 방식으로 가공할 수 있습니다
플런지 절단 작업 시에는 짧은 톱날만을 사용하십시
오. 플런지 절단 작업은 마이터 각도가 0°일 때만 가능
합니다.
전동공구를 밑판 (4) 의 앞쪽 가장자리와 함께 가공물
에 설치하십시오. 이때 톱날 (6) 이 가공물을 건드리지
않게 유의하고, 전동공구의 전원을 켜십시오. 스트로
크 수 제어장치가 있는 전동공구의 경우 최대 값으로
선택하십시오. 전동공구를 작업물에 대고 누르고 톱
날을 천천히 작업물 안으로 들어가게 합니다.
밑판 (4) 이 가공물의 전체 표면에 닿으면, 원하는 절
단선을 따라 절단 작업을 진행합니다.
원형 절단기가 있는 평행 가이드(액세서리)
원형 절단기가 있는 평행 가이드 (18) (액세서리)를 이
용해 작업하는 경우 작업물의 두께는 최대 30mm를
초과할 수 없습니다.
평행 절단(그림F 참조): 잠금 나사 (17) 를 풀고 밑판
에서 평행 가이드의 눈금을 리드 (16) 를 통해 미십시
오. 원하는 절단 너비가 밑판의 안쪽 모서리 눈금자에
나타나도록 설정하십시오. 잠금 나사 (17) 를 돌려 조
이십시오.
원형 절단(그림G 참조): 톱 작업해야 할 원 안에 절단
선을 따라 구멍을 뚫어 톱날이 들어갈 수 있게 하십시
오. 홀 작업 시 루터 또는 줄을 이용하여 톱날이 절단
선에 밀착되게 하십시오.
잠금 나사 (17) 를 평행 가이드의 다른 측면에 설치하
십시오. 밑판에서 평행 가이드의 눈금을 리드 (16) 를
관통하여 미십시오. 작업물에 톱질하여 오려 내려는
부위 중심에 구멍을 냅니다. 중심 표시기 (19) 를 평행
가이드 안쪽 구멍 및 뚫은 구멍에 끼우십시오. 반경이
밑판의 안쪽 모서리 눈금자에 나타나도록 설정하십
시오. 잠금 나사 (17) 를 돌려 조이십시오.
냉각제/윤활제
금속에 톱질 작업을 할 때 작업물이 과열되기 때문에
절단선을 따라 냉각제나 윤활제를 발라 주어야 합니
다.
.
.
!
안전하고 올바른 작동을 위하여 전동공구와 전동
u
공구의 통풍구를 항상 깨끗이 하십시오
분진 배출구가 막힌 경우, 전동공구의 전원을 끄고, 분
진 추출 장치를 분리한 후 분진 및 톱밥을 제거합니다.
.
톱날 홀더를 정기적으로 닦아 주십시오. 이 경우 톱날
을 전동공구에서 빼내고 전동공구를 평면에 가볍게
두드려 털어 주십시오.
전동공구가 지나치게 오염되어 있으면 기능 장애가
생길 수 있습니다. 따라서 분진이 많이 배출되는 소재
는 아래쪽 또는 머리 위쪽에서 작업하지 마십시오.
작동 조건이 열악한 경우에는 가능한 항상 집진 장
u
치를 사용하십시오. 통풍구를 자주 청소하고 누전
차단기
(PRCD)에
연결하십시오
. 금속 소재에서 작
업할 경우 전도성 분진이 전동공구 안에 쌓일 수 있
습니다. 이로 인해 전동공구의 보호 절연장치 기능
에 장애가 생길 수 있습니다.
가이드 롤러(5) 에 가끔 오일 한 방울을 발라 주십시
오
가이드 롤러(5) 를 정기적으로 점검하십시오. 마모된
경우, 보쉬 지정 서비스 센터에 맡겨 교환해 주어야 합
니다.
연결 코드를 교환해야 할 경우 안전을 기하기 위해 보
쉬사나 보쉬 지정 전동공구 서비스 센터에 맡겨야 합
니다.
AS 센터 및 사용 문의
AS 센터에서는 귀하 제품의 수리 및 보수정비, 그리고
부품에 관한 문의를 받고 있습니다. 대체 부품에 관한
분해 조립도 및 정보는 인터넷에서도 찾아 볼 수 있습
니다 - www.bosch-pt.com
보쉬 사용 문의 팀에서는 보쉬의 제품 및 해당 액세서
리에 관한 질문에 기꺼이 답변 드릴 것입니다.
전문 작업자 및 개인 작업자를 위한 인터넷 포털
www.powertool-portal.de도 참조할 수 있습니다.
문의나 대체 부품 주문 시에는 반드시 제품 네임 플레
이트에 있는 10자리의 부품번호를 알려 주십시오.
콜센터
080-955-0909
처리
기기와 액세서리 및 포장 등은 환경 친화적인 방법으
로 재생할 수 있도록 분류하십시오.
전동공구를 가정용 쓰레기로 처리하지 마
십시오!
.
보수 정비 및 서비스
보수 정비 및 유지
전동공구를 보수 정비하기 전에 반드시 콘센트에
u
서 전원 플러그를 빼십시오
1 609 92A 4BV | (18.06.2018) Bosch Power Tools
.
Page 17

한국어 | 17
Bosch Power Tools 1 609 92A 4BV | (18.06.2018)
Page 18

18 |
T 144 D
T 244 D
T 144 DP
T 101 B
T 308 B
T 308 BF
T 101 BIF
T 118 B
T 123 X
T 127 D
T 345 XF
T 121 AF
1 609 92A 4BV | (18.06.2018) Bosch Power Tools
Page 19

2 608 040 289
2 605 438 212
2 607 010 079 (5x)
| 19
Bosch Power Tools 1 609 92A 4BV | (18.06.2018)
 Loading...